Transcripts
1. Intro: Hi everyone, welcome
to the course. My name's Andrew and I'm the
founder of Scattered Kind. Today I'm going to be your
instructor as I walk you through the entire process of tufting your very first rug. Before tufting, I actually started my career in
the corporate world. I was desperately
looking for some sort of creative outlet so I could express myself outside of work. And that's where I discovered tufting and immediately
I was hooked. I just kept making these
rugs over and over again. And as I made each rug, I started to realize
more and more that this is my purpose and
this is where I belong. So at a certain point I ended up making the jump and
following my heart. And I quit my job and started scattered kind at the studio. We host workshops, We
introduce tufting to our students and
guide them through the entire process of creating
their very first rug. Now my goal is to
share my knowledge and expertise with as many
people as possible. So that's why I'm creating
this video course. In today's course, I'm going to be guiding you
through everything. The materials, the set up, tufting, straight
lines, curved lines. And finally, I'm going to walk through the
finishing process. So you can end up with a rug just like this.
So let's dive in.
2. Materials Overview: Before we actually get into it, I'm just going to go over
a bunch of materials that you guys would need in order to create your very first rug. So for all of these materials, the links would be down
below in the description. The first thing
we're going to be starting with is
the tufting gun. There are two types of
tufting guns out there. One is called the
cut pile gun and the other is called
the loop pile gun. So for the purposes
of this course, we're going to be focusing
on the cut pile gun. It's definitely the gun that I recommend and the
gun that I prefer. Just because the
cut pile gun has a pair of scissors already
attached to the gun, it creates a shaggier feeling, softer texture, and it's just overall a lot
easier to use. Next thing we'll want to
focus on is the yarn itself. This is very, very important that we choose the right yarn that fits the requirements of our project as well
as our budget. So our studio definitely prefers using red hard
super saver yarn. It's a really, really
common acrylic yarn that you can find at most
arts and craft stores. And again, it just
has a wide variety of colors that we
can choose from. If you did have a little
bit of a higher budget, I definitely recommend
looking into wool yarn. So wool yarn is definitely higher quality
than acrylic yarn, and it's definitely better
for the environment as well. The only downside here
is that the colors for wool yarn are not as
vibrant as acrylic y. When it comes to the
form of this yarn, we definitely prefer using cones over skins or yarn balls. This is just the
easiest way to have the yarn feed nice and
easy into the gun. And it just makes the
easiest experience possible. If you don't have
a yarn cone winder or if you were having
trouble finding yarn cones, you can still use the yarn
straight out of the skin. Or you can buy a
yarn ball winder which is a lot more accessible. Some last couple
items we'll need is a projector to
trace our designs. Some clamps to clamp
our frame to the table. Some fabric scissors, some
wire just to thread our gun. Some tweezers for
gun maintenance. We'll want some
sewing machine oil just to make sure the gun
is nice and lubricated. Finally, we'll want a electric air duster
just to make sure all the little bits of dust
that collects throughout our project is nice and cleaned off once you guys
finish tufting. Another important component
to consider is the glue. Traditionally, people have been using this glue right here. This is ruggedhesive
that you can find at most home
improvement stores. But for the purposes
of this course, we'll be using this liquid
latex from tufting nation. We definitely prefer using
this liquid latex just because it's a lot easier to use than this rugged
adhesive right here. And it does create a much, much cleaner finished
product versus this glue. With our liquid latex, we'll be using two
different types. One right here is the 100 and the other right
here is the 200. We'll go a little bit
more in depth into the differences of
these glues later. But just to summarize,
the 100 glue is a lot more liquidy and the
200 glue is a lot more pasty. Just note that for our project
we'll be using both glues. The final thing we'll
need for our gluing is our backing for liquid latex. We'll be using a mesh backing. You can find this ad pretty much any textile store,
any fabric store. The only important thing
to note here is that if you will be using the
traditional glue, you'll need a fabric
backing instead of mesh. So for gluing and finishing, some materials we'll
need are a paint roller, a pair of electric scissors, a rug carver, a guard
for the rug carver, an animal hair comb, and finally, an
animal hair vacuum. I definitely recommend using
an animal hair vacuum over a regular vacuum just
because it's really effective at getting all of
that dust out of your rug. Okay, next we have
our tufting frame. So this will essentially be the canvas that you'll
all be working on, and this is what we're
going to be tufting on, as well as gluing
our rugs down on. So to build a frame,
essentially all we'll need are a couple
of planks of wood, some 2.5 inch screws, some eye hooks, and finally we'll just
need some carpet taps. So these carpet tax strips
are pretty easy to find, you can find them at any sort
of home improvement store. And lastly, what we'll need
is our tufting fabric. So this will be
the fabric that's stretched across our frame, and this is what we'll
actually be tufting on. You can find this fabric at a bunch of different
tufting websites, but you can also
find this on Amazon.
3. Preparing Your Frame: Now that we've covered
all of our materials, we can start to actually
prepare our frame. The first things we're
going to do is just stretch our tupping
fabric over the frame. It's very important that we do stretch this fabric
as tight as we can, because a loose piece of
fabric on the frame is going to cause a ton of
holes and a ton of ribs. So we're just going
to unfold our fabric. First thing we're
going to do is just drape it over the entire
frame, just like that. The first thing we're
going to do is we're just going to start to latch on the two sides of the fabric. Just start pulling on both sides and get them nice and locked
onto those tax strips. Next we're just going to start locking on the bottom
of the fabric. Again, keep pulling so that they can attach to
the tax strips. Something to keep
in mind here is to keep using those lines on your fabric to
make sure that you're stretching everything as nice and as straight as possible. Next, we're just
going to flip it over and move it over and start stretching the
top of the frame. Now what we're going to do,
we're just going to really, really tighten all four sides. Now our fabric is stretched, the lines are nice and straight. And one left thing we're
going to do just to make sure that the tension
is strong enough, we're going to do something
called the phone test. We're just going to take our
phone and all we're going to do is just drop it on
top of the fabric. If the phone bounces, then we have our
fabric tight enough. Bounce, we know we're good.
4. Design Tips: There's a couple of
guidelines we want to follow, especially when creating our very first
tufted rug design. So first and foremost, we want to make sure that this design is as
simple as possible. I always like to tell my
students who enter our studio, less is definitely more. So we want to make
sure our designs have nice, big, easy shapes. We want to reduce
as many intricate, small designs as possible. And we want to try to keep the number of colors
to a minimum, so about 56 colors. This is all to
ensure that we can tuft the cleanest rug possible, and also make sure
that any sorts of mistakes would be avoided. Next, we want to avoid having any gradients in our design. Gradients are near
impossible to tuft, so we want to make sure that our entire design is
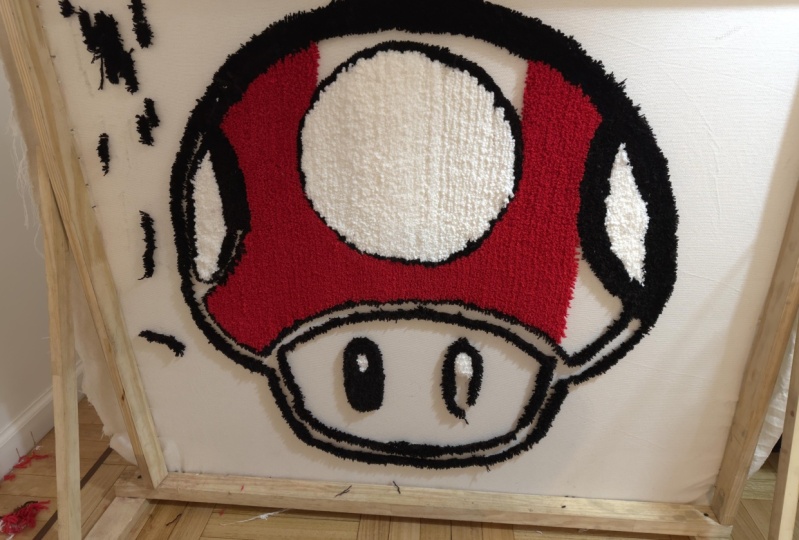
nice and color blocked, and we have nice, clean lines. So this is a good example
of a first rug design. As you can see here,
the design is not overly intricate and the
colors are at a minimum. Another good first rug design. As you can see, it does have
a bit of a black outline. But if you look at the
different sections, you can still see that they're nice and big, and easy to tuft. Finally, for the
purposes of this course, we'll be making the
scattered logo. As you can see, it has big thick outlines and
big sections to color in.
5. Tracing Your Design: Now we'll trace our design
onto the actual fabric. There's two things to
keep in mind here. For one, we just want to
make sure we're mirroring our design because this is the back of the rug we're
going to be working on. The actual rug is going
to come out on this side. We also just want to make
sure that we're leaving about four fingers of space between the design and
the edge of the frame. Our designs trace. So we're just going to color
code everything.
6. Tufting Gun Setup: We're traced, we're color coded, and we're ready
to start tufting. So first we're just going to prepare this frame over here. If you look on the
top of the frame, we have two hooks right here. So we're just going to
take our two strands of yarn and put them right
through the two hooks. Next we'll be threading
the actual gun, so there's two holes we'll be
threading the yarn through. First there's this bigger
top hoop right here. And then if you look at
the top of the needle, there's a small little hole right on the top of the needle. So these are going to be the
two holes we're going to thread both of our
yarn strands through. So we're going to take
our two strands of yarn and just put it through
that bigger top hoop. Next for that smaller hole, you're going to want
to use your wire. This is very similar
to threading a needle, but essentially we're going to go upwards through the
bottom of that hole. And we're just going to take
our two strands of yarn, put it through the wire, and
pull the wire back down. Now you can see
there's this little tail kind of hanging
off the needle. So we just want to pull up until there's just about 2 " of tail. Some little safety things
we want to keep in mind. If you have longer hair, just make sure you tie it up. We just want to avoid anything getting caught inside this gun, around the edges
of the frame here. We want to be careful
not to kick ourselves in the hands on any
of those tax strips. And finally, if you
see right here, we have a little on off
switch for the gun. And there's a little light right here telling you if
the gun is on or off. The biggest thing
here is just to make sure the gun is always off
when you're not tufting.
7. Tufting Gun Operation: The best way to
imagine this gun is to view this similar
to a sewing machine. Similar to how a sewing machine moves the fabric and
feeds the fabric. And the person being the guide the gun works just like that. So if I'm holding the gun like this and I start
pulling the trigger, the gun itself is going
to start moving up. And our job is more so
to just guide the gun. So that's kind of
the first lesson to remember out of all of this, which is when we're tufting, we do not want to force that movement and
push the gun upwards. We just want to let the gun at its own speed
and its own pace. And we're just kind of
following along with our arms. The two body parts
we want to keep in mind are our shoulders
and our arms. So starting with our shoulders, we just want to make sure we're nice and square with the frame. So what I see a lot is people start eventually
standing like this. And I totally get it
because you can get a good view of the
gun from this angle. But if you're standing sideways, you just don't have the
same level of control or the same range of motion as standing straight
on like this. So just make sure you're
nice in front of this frame. And then in terms of our arms, we just want to make sure we're
extending them out enough where our front arm is
almost fully extended. Because if we have both of our arms really close
to our body like this, we don't give the gun
a lot of room to move, so we kind of restrict
the movement of the gun. So just make sure you
extend your arms out so you have a nice
full range of motion. So another important point we'll want to remember
is to make sure that this gun is always perpendicular to this fabric
whenever we're tufting. So what I mean by that is, let's say I'm doing another
line going upwards. What we need to avoid having the gun do is
something like that, where it's like you
only let the front of the gun move up
and you're leaving this back part anchor down. So see how it's starting to
angle a bit like this, right? If the gun does angle too much, you can see that the needle is popping out of that fabric. And you're going to have
all the same issues with not applying
enough pressure. So it's really going to start
destroying your fabric. So you need to make sure
as you guys are tufting, instead of seeing the
gun move like that, you want to let the gun move as one complete unit,
just like this. This next part is going to be the most important thing to remember out of everything
I'm going to tell you here. So when you stab
into the fabric, you really need to
make sure you're applying a good amount of
pressure into the fabric. So pressure is the
number one thing that creates those
holes in rips. It really slows people down. It creates a lot of just
really ugly looking lines. So you really need
to make sure you're applying a good amount
of pressure here. So what you want is these
two metal feet right here. These should be completely
pressed up against the fabric. So a common mistake people
make is they'll only put about half of that needle in and then
start pulling the trigger. But you want the
entire needle to be in until you can't
press in anymore. And then you should also see a little bit of an
indent on the fabric. So to make this as easy
as possible for you, if this is your body position
while you guys are tufting, just make sure you're
leaning inwards just a little bit just so you can rely more so on your body weight versus
your arm strength. It would look essentially
something like this. To reiterate, we want our shoulders nice and
square with the frame. We want to make sure our
arms are nice and extended. We want to be applying
pressure onto the fabric. We want to make sure the
gun is perpendicular. The very last thing
we want to keep in mind is when we're tufting, we want to be tapping the trigger versus
holding the trigger down. It just gives you a
lot more control over the gun and make sure your lines come out a lot more accurate. You got a nice little line just like that. So I'm
going to do it again. I'm going to stab the needle in right next to
that previous line, and I'm going to start
tapping the trigger. As you can see, we have
two lines right here. They're going to be nice
and flat on this back side, but all the fluffiness is going
to come out on this side. Now that we tufted our
first set of lines, there's just a couple
little best practices that I want to cover with you. So first, every single time
before you start tufting, just pull on this little
string right here. We just don't want any
slack going down here. Because if they're slack here, this is what's getting caught,
wrapped around the gun, getting caught up in your hands, getting caught up in
the gear right here, and you're just going
to have a big issue. So just make sure you talk on those two little strings
next in terms of pressure. So a very common habit that I see when it comes to pressure is that people will always start with the perfect
amount of pressure. But then as the
gun starts moving, people start kind of easing up. But obviously you don't
want to be doing that, because that would make the
first half of your line nice. But then the second half of
your line is going to get all messy and it's going to
start destroying your rug. So we just want to make
sure that as we're tufting, we keep our arms nice and
locked out and we have consistent pressure all the way through up until we completely
let go of the trigger. The gun completely stops
and then let's pull out. So never ease up
on your pressure otherwise or else again, you're going to start
destroying your rug. You're gonna start creating
a bunch of little holes in order to have the most
control over this gun. You always want to make sure you're tufting shoulder level. Shoulder level will always be a lot more comfortable
and a lot more controlled versus
holding the gun down here or holding the gun up
here as you're working. I definitely recommend
if you do have an adjustable table
to raise and lower the frame as you desire or to actually use a seat if
you're working on lower parts. So when it comes to
the lines themselves, there's a couple things you
want to be looking out for. So one is the actual
spacing between the lines, and then two is the actual
texture of the lines. So first with the spacing, we don't want all of our lines
to be touching each other. It does create a lot of
tension on the fabric, so at a certain point, the
yarn might break through. So we do want to
have a millimeter or two of space in between
each of these lines. So you should be able
to see a little bit of tufting fabric in between
each of these lines. So as you're tufting, just stab the needle right next to that previous line
you just tufted. Just make sure
you're not stabbing directly into that
previous line. And as long as you follow along, you can see that there's a little space in
between the lines. But that'll be okay because on this side
it would be covered up since the yarn flays out and fluffs out
on the front side. When it comes to the
texture of our lines, what we're looking for is a
nice corn on the cob texture. As you can see,
there's a bunch of bubbles going
throughout these lines. So that's what we want
to be looking for. If you do hold back the gun, or if you restrict that
movement on the gun, you'll see your lines
starting to look like this. So as you can see, these
bubbles are nonexistent. Or they're extremely,
extremely skinny. If you see lines that don't have that corn on
the cop texture, generally that would mean that you're holding
back the gun. What you want to be doing
is loosening up so that you can let the gun
move more freely. If you see your lines start to come out
looking like this. So you might notice that it does have that corn on
the cob texture. But if we were to compare these bubbles to these
ones right here, you can see that these
bubbles here are a lot wider. So essentially what I did for this line was I
forced that movement, I kind of pushed
the gun upwards. So this line on the other side is going to
be really, really sparse. So if you ended up filling the entire rug with these types of lines
on this back side, it might look good,
it might look like you completed everything. But over here, your rug is
going to be very sparse, very bald, and very incomplete. So essentially what
we're trying to do with these two lines is find
that nice balance in between the two of not pushing the gun up too much and
not holding the gun back. It's just a matter of practice. It's just a matter
of learning curve. Everyone will get to this
corn on the com point. If you did not apply enough pressure or if you
did angle the gun too much, then basically the
lines will start to come out looking like this. See how this line is not nice
and flat like these ones? See how it's all messy. It's all coming out
towards our side. If you ever see
anything like this, this is a sign that
you're probably not applying enough pressure or you're angling the gun too much. I'd say just pull
all of these out. You can go right back
in to redo that line. But let's say for example, we did do a good line, but let's say we just kind of went off into
the wrong section. We could still easily just pull any of this yarn out
and redo those lines. So no pressure, none
of this is permanent. A lot of this can be
edited and undone. We just want to try to minimize the amount that we pull
out from the fabric, because the more we do, the
more damage the fabric gets. So we just run a
little bit more risk of creating holes a.
8. Advanced Tufting Tips: Now that you're comfortable
with your vertical lines, we'll want to start focusing
on some turns and curves. The way that turns and curves
work is that the gun will always be moving
in the direction that these two feet
right here are pointing. That's why holding the
gun normally like this, these two feet are
pointing upwards. The gun moves up. But let's say for example, we wanted to move to the right. The really important thing
you need to make sure you're not doing is
something like that, where you're dragging
the gun across that way. If you drag the gun like that, you're essentially going
to slice the fabric. If you slice the fabric, you're going to lose the
tension on the fabric. If you lose the
tension on the fabric, you can't even tuft
on it anymore. So it does render
the rug useless. So it's very important that we do not drag the
gun like that. Instead of dragging
it, we're going to use this back handle and we're
just going to rotate it. Now you can see these two feet
are pointed to the right, so the guns going to
move to the right. So it's very
important as you guys are tufting to make sure that the gun only moves in the direction of these
two feet right here. Because what I see often is people would turn
the gun like this. So ideally the gun should
be going diagonal, but some people
will try to force it to go completely
horizontally. And again that just destroys the entire rug and just makes it unusable and
untufftablef example I'm going to stab in right here. And now let's say I want
to move to the right, so all I'm going to do is just turn my back handle
just like this, so this front handle is
more so for comfort. This won't control anything
with the steering, it's all done from
this back handle. And then very important when you're doing your
turns and curves to still keep in mind all the
points we went over before. What often happens is people
will be very focused on these turns and curves that they forget about everything
else we went over. So still make sure you're
applying good pressure. Still make sure everything's
nice and perpendicular. And again, continue
to tap the trigger, so you got a nice little
right angle just like that. But obviously as you guys
are working on your designs, they're not just going
to be easy right angles, they're going to be a
little bit more curvy, a little bit more smooth. So this is especially where working in bursts
matters the most. So when I say work in
bursts, I mean quick, tiny little taps, almost as if you're going
bubble by bubble. Because every single time you
do these tiny little taps, you can slightly
adjust the gun as you go to get a really smooth,
clean, accurate line. For example, let's say
instead of this right angle, I wanted to do a right curve. It would look
something like this. So as you can see, this came out more curvy, a lot more smooth. So this is especially the point where you
want to be working a little bit slower because when you're working
on your details, you obviously have
to be a lot more accurate versus working
on a big chunk of color. And finally, when it comes
to these turns and curves, the last thing we
want to keep in mind is just our body position. So if you're a leftie like me, you'll always have an easier
time moving to the right. And if you're a
righty, you'll have an easier time
moving to the left. And that's just
because of the nature of how our body works. Because you are
most likely holding the gun with your dominant
hand as the back handle. And it's always going to
be easier for you to do this with your arm versus
this with your arm. It's just a very weird,
awkward position. So I say that because as
you guys are tufting, feel free to start and stop wherever makes you
feel the most comfortable. Always go in the direction that gives you the most comfort.
9. Tufting Your Rug: What we want to
start focusing on first is all of these outlines, we want to get all those
little details out of the way before filling
in the rest of the rug. So what I'm going
to start doing now, I'm going to start tracing all of these different outlines. I'm just going to
stab right into the marker and I'm just
going to start tracing. Now we've finished
our first rug, so all we're going
to do is flip this over and work on some
finishing touches before we start gluing. The very last thing we'll
want to do is to tweeze out any of the little
overlapping lines we created. So as you can see here
in this brown section, we have a little bit of
messiness with the blue because we accidentally
overlap just a little bit. So this is what we'll want
to start tweezing out. So I'm just going to go in and I'm just going to go
thread by thread, being careful to only pull out those little
blue pieces of yarn. And as you can see, the section is starting to be cleaned up. Now that we finish tweezing, we can get to gluing
down our rug.
10. Gluing Your Rug: To glue down our rugs, we'll be using two different
types of liquid latex, 100.200, The 100 is a lot
more liquid of a consistency, so we'll be using this paint
roller here to apply it. As for the 200, it's
a little bit thicker, so we just need to be using
some sort of scraper tool. This right here
is a cake cutter, but you could also use
a putty knife finally, just because the
glue can get messy and it could mess
up your clothes. Just make sure you're using
an apron as you're gluing. Let's get started with the 100. So I'm just going to dip my paint roller
into the 100 glue. And now I'm just going to spread it onto the
surface of the rug. And we just want
to make sure that every single part of the rug is nice and saturated
with the glue. Don't be afraid to dip
the roller back into the glue so you can get
full coverage on the rug. We fully covered the
rug with the 100, so let's move on to the 200. Before we apply the 200 glue, we'll just want to add this mesh backing on top of the rug. So I'm just going to drape this over the entirety of the rug. And now I'm just going to
take some scissors and cut out any parts of
the mesh that's making contact with the tacks on the frame we have the mesh on. So now we're going to start
applying this 200 glue. The goal of this is to get a nice thin layer
across the entire rug. We don't want to
have any of this 200 caked on because it gets
super, super thick. We're going to
start gluing along the same direction as the lines that we made
when we were tufting. So as you can see, most of our lines are going
down this way. So this is the direction that we're going to start scraping. I'm just going to
use one hand to hold down the mesh
and we're just going to start scraping again. We're getting a nice
thin layer across the entire surface of the rug. Any of this excess,
you can just put it back into the bucket. I like to go in with my hands at the very end just to
make sure that there's complete contact
with all the mesh throughout the entire rug. So we're all done with gluing. So we're just going
to let this out to dry for about a day.
11. Trimming Your Rug: We're gonna cut this
rug out from the frame. As we're cutting, we're
going to want to leave a couple of inches of excess
fabric around the rug. Let's start taking off
this excess fabric. I personally like to use a
pair of electric scissors, but if you want, you can always use any pair of fabric scissors. Finally, we're just
going to do one more once around
just to make sure that all of that excess fabric is cut off right along
the edge of the rug. We want as little excess
fabric as possible. I'm going to start shaping
down the surface of this rug to make
everything nice and flat. And even throughout. For this, I'm going to be
using my rug carver as well as the guard
for the rug carver. So I have my carver
on the rug and what I'm going to do
after I turn it on is put my two hands on the
two sides of the guard and start letting it glide across the surface with a
nice even pressure. Don't apply too much
pressure onto the guard or else you're going
to start digging too deep into your rug. The surface is nice and flat. I can already see these
details coming out a lot. So to finish it off,
I took the guard off the buzzer and
we're just going to start cleaning up
all of these edges. We're just about done. The very last thing
we want to do is use this animal hair comb to get out the last little
bits of dust. And then we're just going to use this vacuum to vacuum it all up. Now I want you guys to remember, no one's first painting
is ever amazing. Tufting is a learned skill, just like any other art form. So if in the beginning you're getting a little discouraged because the first rug is not turning out as
great as you want. The more you practice, the more you get your
hands on that gun, the more you'll be able to
reach that creative vision. Thanks so much for coming
with me on this journey. Wishing you the best of luck, and I hope tufting brings you as much joy as it's brought me. Oh.
 Andrew Kim, Founder, Scattered Kind Tufting Studio