Transcripts
1. Introduction: Hi, I'm Stephanie
with Crosscut Sewing. Another one of our really
popular easy sewing projects is the messenger bag. I think that almost all of my students have
made at least one. These are reversible and the
strap is adjustable as well. If you don't have
this bag hardware, I will show you how
to make it without, but your strap won't
be adjustable. To make the bag, you will need the pattern which is linked to in the description. One and 3/4 yards of webbing. I'm actually going to show you
how to make a strap out of fabric for this if you
don't have webbing. It doesn't really
matter if your webbing is anywhere from 1 inch-1.5. The only thing that
you would need to adjust is your hardware. I think this is about
1 and 1/4 inches and I have the right hardware. This strap, even though it's the same color,
is a little thinner. I would just need
to make sure that I had one-inch hardware. It doesn't really matter too much what kind of
webbing you're using. If you're using a cotton
webbing, which this is, you can finish your
edges so they don't fray with some seam sealant
like some fray check or you can buy these little strap ends like this as well or if you have
nylon webbing, you can heat seal it
with a lighter and just melt the end so
that they don't fray. But for today I am going to show you how to do
the fabric strap. You will need to have one
sliding buckle like this. and two square rings. I also have 1/3 of a
yard of exterior fabric, 1/3 of a yard of
interior fabric, and 1/3 of a yard
of fusible fleece. Because I am making my strap, I have an additional 1/3 of
a yard for the strap fabric. I also have my basic sewing
supplies. Let's get started.
2. Cut the Fabric: I printed and
assembled my pattern. I just cut it out and taped the pattern pieces
together at the notches. I have my bag piece and
my flat piece here. I'm going to cut
my fabric first. I'm going to place
this pattern piece. I have both of my fabrics layered here because I'm going to
cut them both at once, but you can cut them
separately if you would like. I'm going to place this here. I'm just going to
trace around this. I want to make
sure that I placed this as close to this edge as possible because I need this piece here to be able
to cut my flap out of. These are my bag pieces. I'm just going to set
those aside for a moment. Then I'm going to open these up because I have two pieces of each
fabric for my exterior, but I only need one piece
of each for the flap. I should have enough to be
able to open these out. I'm lining them up
right sides together. Then I'm going to cut
my flat fabric out. Just get those line
up on the top there. Now I have my two flat pieces. Then I'm going to cut my
feasible fleece in the same way. I'll have my bag pieces
and then I'll open it up and cut out one flat piece.
3. Sew the Straps: I am going to show
you how if you want to make a fabric
strap, you can do that. This is handy for a few reasons. Maybe you don't have webbing on hand and you still
want to make it. Another reason, especially
if you're sewing with kids, is the webbing on
the sides can be really thick to sew through
two layers of that. If you're nervous
about doing that or nervous that you're machine won't do a great job on that, you can go ahead and make the tabs and the
strap out of fabric. What you would need to do is with your third
of a yard of fabric, you would need to cut that
in half so that you have two strips that are six inches
by the width of fabric. Since our strap is 54 inches, we'll have to sew those
two strips together. The way to do that is to
have your two strips. I'm going to place
these right sides together and overlap
them like this. Then I can take a ruler, and I'm going to sew from
corner to corner to join these. The reason I'm doing this, you'll see in a second, is so that there's
less bulk in the seam. I would just take that
and sew those together. Then just trim this off. I would iron that seam
open. Just like that. What that does is it joins your two pieces
with the diagonal seam. If you try to just join
these with a straight line, then you'll see when
we fold it next, you would be folding all
that bulk in on itself. This distributes that seam
when we go to make our strap. Once you've sewn your two with
a fabric strips together, you can cut 154 inch piece. Then from what's left, you can cut to
three-inch pieces. These are my tab pieces. I'm just going to show you. What I did was I
folded this in half, this the long way. Then I brought both edges towards the middle
and press them, and folded this backup
and pressed it again. I did that on both tab pieces. I did that for the whole
54-inch piece from my strap. To finish the end and have a nice finished
end on your strap. Because the way we do this, this will show even though
it's folded like this, I'm going to take this fold
it back on itself like this. You can see there
how I've done that. I'm going to sew right
across that edge. I'm just going to
use about a quarter of an inch seam allowance. Once I do that, I'm just going to trim those
corners just a little bit. When I flip this around, then I have a nice
finished edge. Now for all three of these, I'm going to sew along the open edge first
close to the edge, and then it's not functional, but I think it looks nice to stitch the other side as well. I'm going to go ahead and
do that on my machine. I sewed around this whole piece, all four sides and I sew down the sides of each of my tabs.
4. Add the Strap Hardware: If you are using webbing from here on, it
would be the same. You would do things
the exact same way as we're going to do
with our fabric strap. The first thing that
I am going to do is I'm going to take
my rectangle rings, and I'm going to just fold this tab right around that so those edges meet,
so it's right in half. I'm just going to stitch
as close as I can get, it doesn't have to
be really close, right along this side here, and then I'm going to do the
same thing on this piece. I have those guys done, I'm going to set those
aside for a second. I'm going to go ahead
and put my buckle on. This can get a little tricky, so I'm going to show
you how to do this. I'm going to take my
slider and have it in the middle and I'm going
to take one end of my strap and I'm
just going to go around that middle
piece just like that. Then I'm going to fold this
back by about two inches. Doesn't have to be two exact, and I'm going to sew this. I want to make sure that
this is nice and secure. So I'm actually going to
sew two lines of stitches. I'm going to so one
right on top of where I already sewed here and then
I'm going to sew another one. I'm going to take my rectangle
ring and thread it through this end and then I'm
going to take this end, this is the loose part here and I'm going
to take this end, I'm making sure I'm not twisted, and I'm going to go up
and over like this. So I have this, so this
is my adjustable strap. Then just going to take my second rectangle ring and thread it through like this, and I'm going to bring this
back by about two inches too. Then I'm going to stitch
this just like I did before, so I'm going to do two
lines of stitching there. That is my adjustable strap. This size I find works
for both kids and adults, it seems to be long
enough for most adults. We're going to set that
aside for a second and we're going to
work on the bag.
5. Add the Interfacing: I'm going to take
my exterior pieces, which in this case
are the black fabric, and I'm going to fuse
my fusible fleece. With this fabric,
it doesn't really matter the right side
and the wrong side. But if I had a fabric like
this, a printed fabric, I'd want to make sure
that I was fusing my interfacing to the
wrong side of the fabric. The bumpy side is the glue side, and that glue will
melt with the iron and stick to the fabric. I like to iron feasible
fleece from the fabric side. I find that my iron
likes it better. I'm going to get
these all lined up, and the flat piece too. I'm going to go
ahead and fuse this. It takes a few seconds, depending on the
temperature of your iron to melt that glue and make sure that it's stuck
down on the fabric. I'm going to go ahead and do
that on all three pieces.
6. Sew the Bag Body: I'm going to put
my flap aside and take my two bag pieces. Line these up right
sides together. Put some flips on. This is the top of my bag, so I don't want to sew there. But I'm going to sew this side, the bottom and this side. I'm going to use a 3/8 of
an inch seam allowance. That looks like that. I'm going to do the
exact same thing. This is the same
way with my lining. Only difference is
that I am going to leave an opening
in the bottom of the bag so that I can turn this right side
out when I'm done. This bag gets pretty bulky, so I would leave at least about six inches
on the bottom there. Now I'm going to go ahead
and sew that the same way. Now I have these two
pieces sewed like this, and I'm going to go ahead
and box these corners. In order to do that, I'm going to take
the bottom seam and bring it to the side
seam and match those up. It's easy to do this if you
open the bag up a little bit. If you can see, I'm opening up these corners, bringing these two
seams together. I'm actually going to
go ahead and open them up so that they're
nice and flat. I'm going to just check. It's a little tough to
tell on this fabric, but to make sure that
those are lined up. Then I'm going to just clip
that and I'm going to go ahead and sew right
across this edge, right from here to here. I'm going to use my 3/8
inch seam allowance and back stitch at the
beginning and the end. Then I'm going to repeat that on this corner and
these two corners. Now that I stitched each corner, I'm going to put these aside and work on the
flat for a minute.
7. Sew the Flap: I'm going to take
my two flat pieces and place them right sides
together and line them all up and I don't have to
sow this part here. I'm just going to
stretch all along here. If you haven't sown
a curve before, you just want to take
it slow and if you need to adjust more than
you can steer it, then you can just stop
with your needle down, lift up your presser
foot and adjust a little bit and just do
a little bit at a time. Now, on these curve parts, I'm going to use
my pinking shears, just to go right on those parts there and if you
don't have pinking shears, you can clip some notches
into your fabric. Just be careful not
to cut your stitches. If you do snip some
of your stitches, just go back in with your machine and stitch
a little closer in. Now that we've done
that, I'm going to turn this right side out. I'm going to go
ahead and give this a good press with the iron. Now that that's all
pressed on the outside, I'm going to tap stitch. I'm going to do is just stitch right along the edge
of the fabric here. Just right around. I don't
have to stitch this. Now my flap is done.
8. Finish the Bag: Now I'm ready to put all
of my pieces together. I am going to go ahead and
grab my outside piece, and I'm going to turn
it right side out. [NOISE] This is where if you're not using hardware, and you're just going to cut a strap to a specific length, you can measure this on yourself and measure your strap and see how long
you would want it. I'm going to attach my tab
here right on the seam, and I want to open this up flat. But if you just had a strap, you would just take
one of the strap ends. I'm just going [NOISE]
to put this in place and I'm going to baste it. I'm going to sew a
little closer to the edge than my
three-eighths so that this won't show
in the final bag. [NOISE] I think for this part, I'm going to go ahead
and take this off. [NOISE] You see how I have it here. I have the raw edges together, so I'm going to bring the strap around the
bottom of the bag. [NOISE] I'm going to make sure that it's not twisted, and line the other tab up. I'm just centering it on
the seam just like that. I'm going to sew that in place. [NOISE] Actually, if you are
worried about sewing through the webbing here where you have the two
layers and the bag, you could still use
webbing for this part, and you could make a
tab out of the fabric. Then you wouldn't have to
worry about that as much. Now you have to make a decision. I know that I want my bag to look like
this when I'm done. But if you want it to be all the same fabric on the inside and all
the same on the out, then you want to
flip this around. Since I know I want
mine like this, I'm going to bring this
around to the back, and I'm going to stitch it on like this so that when it to closes it looks like that. Again, I'm just eyeballing this I'm not really measuring, but I'm just trying to have
about the same distance here. [NOISE] I'm just going to go
ahead and stitch this on. [NOISE] We're getting there. Now I'm going to attach
the bag and the lining. I have my lining, and
this is still inside out. So I'm going to
take my bag and I'm going to put it in my
lining here like this. I'm going to match
up the side seams so I can see the side
seam for my bag. Even though my tab is
sandwiched in there, I'm going to match up
the lining and the bag. [NOISE] I clip that in place. I'm going to go over here and do the same thing
on the other side. [NOISE] I'm just going to adjust this a little bit and see how it fits all around. I'm just going to bring
the outside and the inside together and line those up and clip all the
way around my bag. [NOISE] Now we're going to sew around this whole thing. You can be a little bit more generous with your
seam allowance. I'm still going to use
three-eighths of an inch, but I might go a hair over
just to make sure that I catch the tabs and the flap, and that the stitches
that are used to baste those, they don't show. [NOISE] Just when you get to your tab, just maybe slow
down a little bit. You just want to make sure that [NOISE] your machine
goes over everything. [NOISE] Now, we're going to turn this through the opening
that we left here. [NOISE] Before I tuck this in, I'm just going to
press this opening, I'm just going to
tuck that in along the fold and press that. [NOISE] Then I'm going
to stitch this closed. If I wanted my bag
to be reversible, I would probably hand-sew this so that the stitches don't show. [NOISE] We're almost there. I'm going to tuck this inside, and then I'm going to roll this down and get those
edges all rolled out. Then I'm going to press
all around there. [NOISE] It's a little tricky
to do this flat, so if you have an
ironing board you can just put the bag around
the end of the ironing board. [NOISE] That might make
it a little easier. [NOISE] I'm just
rolling all that down. [NOISE] My last step is
I'm just going to sew all around this part here. I'm going to top-stitch this just to hold
everything together, and I'm going to just stitch
as close to this edge as I can and go around the bag.
It can get a little tricky. You just want to
make sure to keep your strap and your flap out of the way when
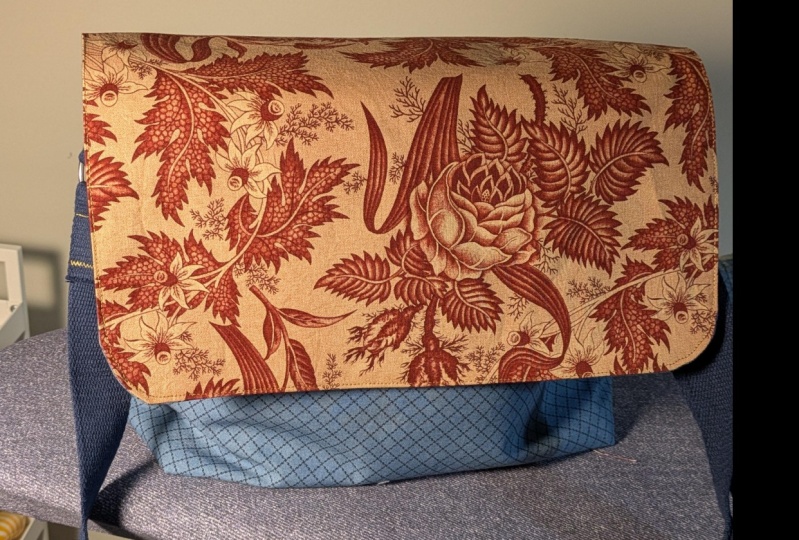
you're doing this. [NOISE] Our bag is finished. I love this bag because you can make it in a fun novelty
print like this, or you can make it a little
bit more grown-up if you want to use canvas or
even waxed canvas. I would love to see your bag, so please share it. [MUSIC] Thank you
for sewing with me.
 Stephanie Theisen, Sewing Instructor