Transcripts
1. Welcome to the class: Glistening in the sunlight. The slick and crystal
clear glass surface inspire the artist to capture captivating
color through their art. Ever dreamed of capturing the mesmerizing realism of
glass in your paintings? Let's delve into the art of replicating
delicate transparency using watercolors. Unlock
the secrets of magically creating lifelike glass with its intricate reflections
and refractions in this immersive class. Hello, my name is Evgenia. And today we'll be exploring the enchanting world of
painting glass in watercolor. Throughout this class,
we'll delve into the intricacies of
painting glass objects. Starting with foundational
exercises designed to hone our skills in
softening edges and strokes. We'll uncover the nuances
of brush control, a crucial aspect when capturing the delicate
essence of glass. Along the way, we'll explore
fascinating methods such as employing sandpaper and
watercolor pencils to add unique texture and
depth to your artwork. Finally, we'll bring together all that we've learned to craft a monochrome
masterpiece featuring a transparent glass bottle. Additionally, at the
end of the class, you'll discover a helpful
guide with step by step strategies for painting
glass with these techniques. Even the most
challenging glass object will no longer pose an issue. I've been professional
artists for many years, focusing exclusively
on watercolors. I've always been captivated
by the magic of this medium. I started to paint when I
was a child, but as I grew, I had no idea how to improve or how to create
effect that I wanted. I didn't know any of the
techniques or how to use them. Now I've taken part in exhibitions and been
fortunate enough to win rewards from such highly
regarded organizations as International
Watercolor Society, HelvetArt, Light Space Time Art Show International
and Royal Talens. Watercolor can
be challenging to manage for those who
start to use this medium. Which is why it's my intention
to help you to enjoy water colors and to learn
it in an easy and fun way. In the step by step lessons, you can see the hand
and brush movements clearly from different
points of view. We will explore versatile and fundamental watercolor techniques that you can use in all your
paintings and sketches. Also, we will discuss the
materials that will enhance your watercolor experience and will help you to enjoy
the process greatly. If you find this class too
easy or too difficult, you can choose from
my different classes available for learning
varied watercolor skills. The approach of my
classes is to start with an easy wash. As we proceed with the
painting step by step, we will add more details
completing the artwork. If you have any struggles or
difficulties along the way, you can start a discussion and I will read and respond
to all your questions. Remember to hit
the follow button next to the class title, just below the video. By doing so, you'll stay updated and be
among the first to receive updates on my upcoming classes and
exclusive giveaways. Also, you can see my latest
free watercolor tips and tutorials by following me
on Instagram and YouTube. Grab your paints and brushes and join me in this
artistic adventure. Let's unlock the secrets of
painting transparent glass together and bring our
creations to life on paper. I can't wait to begin.
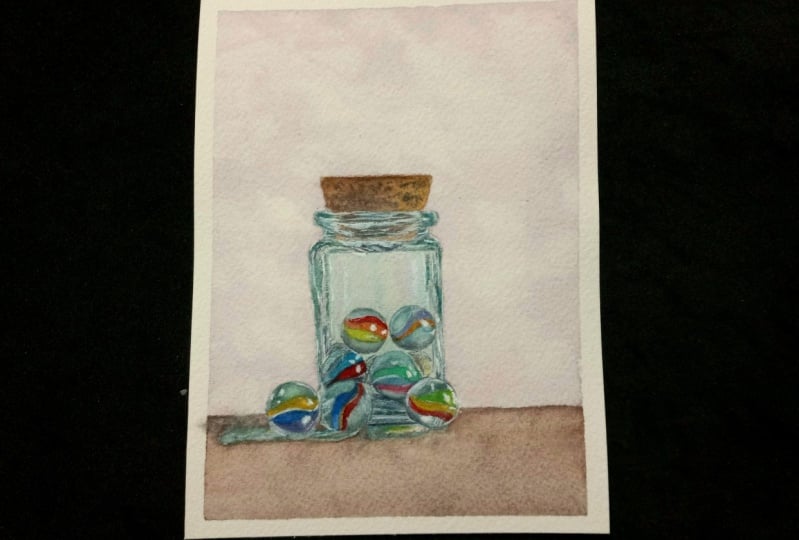
2. Your project: Before we begin with the class, I want to thank you
for joining me today. Let's discuss our project. In the resources section you'll discover my
completed painting as a helpful reference, along with pencil drawing
that you can trace. You have the freedom to
select your own object to paint or to closely follow
my painting as a guide. Additionally, you'll find a reference photo
and a selection of other images that can serve as inspiration for your
very own artwork. It's a great pleasure for me to give my students feedback. After you put so much effort in your artwork,
why not share it? You can do it by taking a photo of your painting
and share it in the Student Project Gallery under the Project
and Resources tab. I'd love to hear all about
your painting process. If you had any
difficulties or what was the most enjoyable part
of the painting process, Upload your artwork by clicking Submit Project on the
Project and Resources tab. Upload a cover image. It can be your artwork's photo, but it will be cropped. No worries. You can upload
a full photo further. Share your thoughts about the class and your
painting process. Under the field where you write, you can find three small icons. Click on the first one 'image'
and upload your artwork. You can see your photo
appearing under your text, Scroll the top and click on the button 'publish'
to share your project. If you have any struggles or
questions during the class, please start a discussion and I will be sure to
answer your questions. I highly encourage
you to explore the work of your fellow students
in the student project gallery. Viewing other
creations can be truly inspiring and also to receive support can be
incredibly reassuring. Therefore, please
consider engaging by liking and leaving comments
on each other's projects. Join me in the next
lesson to explore watercolor materials.
3. Materials to enhance your painting experience: Let's discuss general
watercolor materials and how they can enhance your
watercolor painting experience. We'll begin with the drawing. I recommend using a
soft pencil as it allows for easy erasure of pencil lines later
in the process. Having both a regular eraser and a kneading
eraser is valuable. The kneading eraser in particular plays a crucial role in softening the lines before
you start painting. This preparation
makes it simpler to erase the lines once your
painting is complete. For watercolor paper,
I recommend opting for thick paper with
a weight of 300 GSM. While the best paper is
typically 100% cotton. It's worth noting that
there are variations, even within this category, based on different brands. The ideal approach is
to experiment with various paper types and select the one that
suits your preferences. It's important to know
that you don't always need to use 100% cotton paper. Occasionally, it's enjoyable
to experiment and learn on acid free paper made from cellulose or a blend of
cellulose and cotton. This choice can be budget
friendly while still providing you with
the opportunity to explore various techniques. However, even in this case, I recommend choosing thick
paper with a weight of 300 GSM to ensure a sturdy surface for your
water color endeavors. To transfer a line drawing that you find in
the resources tab, you can use an artist's
graphite paper. It's important to use wax free graphite paper
specifically as using carbon transfer paper
is not suitable for transferring a drawing
to watercolor paper. If you are interested
in exploring three alternative methods for transferring a pencil drawing
onto watercolor paper, I invite you to check
out my other class, Dreamy Sunset Landscape in Watercolor, Mastering
Wet Technique For beginners I stretch my paper using Graphics
stretching watercolor paper artboard. To secure the paper, I use artist's tape. For more details on the
various tape types for stretching the paper you can refer to my other class, Clear, transparent water
with shells and starfish. Mastering drawing
with water technique. Let's move to the
watercolor supplies starting with brushes. I personally prefer using synthetic brushes
because they are vegan. I appreciate the idea of not
harming animals. Generally, it's often believed that the highest quality
watercolor brushes are made from squirrel
and sable hair. They are resilient and hold water and paint
exceptionally well. However, modern high
quality synthetic brushes have nearly identical
capabilities to natural hair brushes. For example, Escoda
offers a series of synthetic brushes
called versatile, that possess the same qualities as natural Kolinsky
sable brushes. Davinci brushes have
the Colineo series. And Isabey offers the beautiful Isaqua series. In the exercise lesson, you'll learn more about specific brushes I
use in this class. Ideally, you should
have two water jars, one for washing your brush, and the other for
obtaining clean water, for wetting your brushes, paper or watercolors. However, I must confess that I sometimes use just one jar. For convenience, I can
concentrate on the process without worrying about which
jar my brush goes into. Nevertheless, I always
make it a point to change my water regularly to prevent
mudding my color mixes. You can use either
watercolor cakes or tubes for your painting. There are various watercolor
brands available, and they offer
both student grade and professional
grade watercolors. Your choice between the two depends on your specific
needs and budget. If you're just starting with watercolors or working
on practice pieces, student grade paints can be a cost effective option. For the colors used
in this class, you can refer to the
color palette lesson. To paint water colors with ease it's a good idea to keep several paper tissues or a
cotton cloth within reach. They're very useful for
dabbing your brush or paper as needed and for thoroughly
drying your brushes. If you want to truly enjoy watercolor painting experience, I recommend using a
ceramic mixing palette. It can also be ceramic plate, plastic or metal palettes tend to disrupt the smooth laying
of watercolor strokes, causing the paint to form
separate drops and pulls. A ceramic surface is ideal
for watercolor painting. Using a ceramic mixing palette will enhance your
painting experience. The mixing process feels exceptionally smooth
and creamy on ceramic. A natural or synthetic sponge, is essential for
making adjustments to correct small mistakes
in your painting. Additionally, for some
artworks you may require a masking fluid, a white gel pen, or a fine acrylic
marker or white gouache to add small details that can significantly
enhance your piece. A spray bottle is also
useful for evenly wetting your paint without
creating water pools on it. Now that you've gained insights into general
watercolor materials, let's move on to
the next lesson. In the upcoming lesson, you'll engage in a couple of watercolor exercises to help you feel more at ease and boost
your confidence.
4. Exercises part 1: fluidity of watercolor, softening the edges of the strokes and washes: We'll start with the
fluidity exercise. For this, you'll
only need one color, which you can freely
select from your palette. Begin by moistening
your watercolor slightly with a
tiny drop of water. When you're ready, make a
stroke with your brush. And observe how the
color lays on the surface appearing opaque,
similar to gouache. Repeat this process to experience and observe
the opacity of watercolor. Next use the same color by
directly from the tube, squeeze out a small amount of color and apply
it with your brush. The water color will lay
on the paper like a paste. Hold your brush horizontally and stroke it on
the paper surface, creating a rough texture known as the dry
brush technique. This effect can be achieved using water color
from tubes or cakes. Now add more water to your
water color on the palette. Notice how the color becomes lighter with
increased water. Add a few drops of water, ensuring the color remains creamy on the palette
without flowing when you turn it.
Make another stroke loading your brush with more
color to cover the surface evenly. Increase the amount
of water in your mix, resulting in a
much lighter tint, Create a new stroke
to observe and feel the difference in texture with
a more fluid water color. In the next experiment, we'll explore how water
affects water color. Begin by painting a
rectangular shape with an opaque color. Then rinse your brush and
saturate it with water, applying it directly
beneath the rectangle. Touch the edge of the
rectangle with your wet brush and blend the color directly
on the paper with water. Continue adding more water and applying it under your wash, observing how the color reacts
and mixes with the water. Next rinse your brush
and gently squeeze the bristles to diffuse the edge of the
color on the paper. Stroke the lower
part of the edge to blend it seamlessly
into the paper, eliminating any visible edges. Finally, turn your paper and allow the color
to flow downward noting how the water
color behaves. Experiment with mixing
the flowing streams. And use your brush to
diffuse the color edges further into the
paper. Well done! Let's move on to the
second exercise and learn how to soften the
edges of shapes and strokes on a fresh
piece of paper. Begin by creating a circular
shape using just one color. The shape has initially
defined edges. What if we want to soften a portion of the
edge into the paper? Make sure, you have a paper tissue
or a dry cloth nearby. Rinse your brush
and gently squeeze the bristles on the
edge of the water jar. Stroke the edge gently
and observe how the wet brush softens
the color's edge. Let's repeat this process
with a rectangle. Wash the brush and
start by stroking the wet bristles on the dry
paper next to the edge. Then touch the
edge of the color, noticing how it flows
into the wet area. You may notice a
slightly colored area which could result in an
outline edge as it dries. To prevent this,
dab the area with the paper tissue to blend the edges seamlessly
into the paper. Next, we'll repeat
the process with a stroke just as before. Wash the brush and
squeeze the bristles. Slightly stroke the wet brush along the edge to blur it. Dub the paper lightly with the tissue to ensure a
seamless transition. Let's paint a circular
shape but leave the middle unpainted as before. Squeeze the brush on the edge
of the water jar and stroke the wet brush along the inward
circle edge to soften it. If your brush feels too wet, dab it on the paper tissue. Stroke delicately
along the edges, letting the hue seamlessly
blend with the damp surface. These exercises
require patients, make time for them periodically, to build confidence. Wet the inner circle with water for a smooth color transition. As we focused on the inner
circle, our shape dried. Let's see if we can soften a dry watercolor wash.
Stroke along the edge and some color may get wet, but the edge remains, the color from the dried area cannot flow freely
to the wet area. You can add some color to the
now wet paper on the edge, but it won't create a
similar color transition. Finally, let's make
the last stroke and soften it
directly with water. Noting how we can create an uneven, artistic
color transition. Extend the pigment
into the wet area, allowing it to
mingle on the paper. Finally, gently dab the
nearly transparent edges with the tissue for a
flawless transition. Fantastic work! Let's move on and create our
first glass painting.
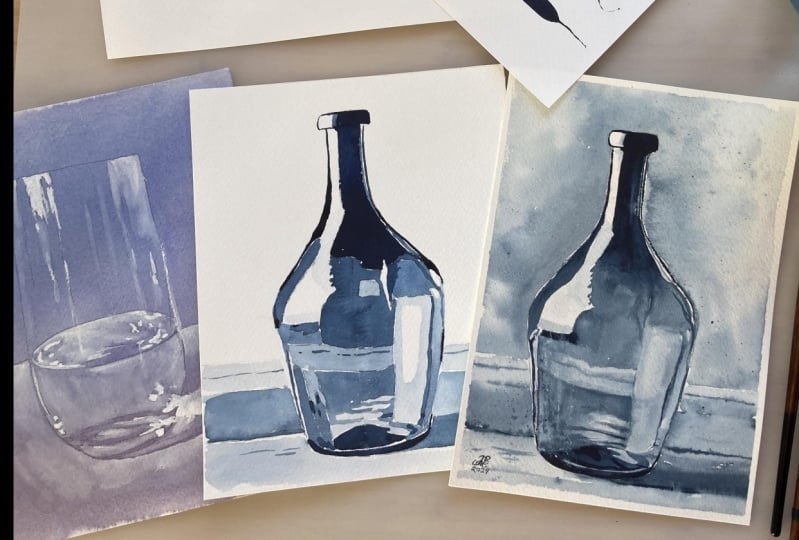
5. An easy glass painting - What makes glass look like glass ?: What gives glass its
distinctive appearance? In this exploration, we unravel
the secrets behind glass's transparent allure. The
unique properties and characteristics that
unmistakably define glass lie in its reflections. To paint glass,
you have to study its lightest parts and observe
the refractions in water. Studying the surface of
glass is easier with a photo, simply print it out or use your phone or a tablet
next to your painting. In the Resources tab, you'll find both the
pencil drawing and the reference photo
for this painting. I prepared a piece of
colored paper beforehand. You can create it by wetting your paper and applying
two darker tints, like Payne's gray and Blue, allowing the colors
to mingle loosely. Then let your paper
dry naturally, or use a hair dryer to
speed up the process. Once your paper is
completely dry, you can draw the
glass directly on it. Alternatively, as we learned
in the materials lesson, you can use one of the
transferring methods to transfer the pencil drawing available in the resource
sections of the class. We will use only one color- white for this study. It can be white,
watercolor, white gouache, or even white
pencil or pastel. Our objective is to
examine the reflections, observing the subtle
variations in tint. Some areas are light
but not entirely white. We'll start in the areas that appear lighter
than the background, but aren't bright white. When painting, use
just a small amount of water to moisten
the white color. On some papers, the underlying
color may lift slightly, resulting in a blend with
your background color. This is okay for our
monochrome study. Begin with gentle strokes. Identify the areas that are relatively light but
not entirely white. Color them accordingly. If you're using white color, run your brush bristles
on the palette to ensure the white is slightly
diluted with water. A well executed drawing is crucial for a successful
glass painting. Take your time to study
the intricate reflections and create a detailed drawing
before you start painting. If you prefer not
to print a photo, you can use an image from your phone or tablet
for reference. With practice, you'll become
adept at studying the glass object visually
without needing a photo. The water surface is much
lighter than the background. Let's supply a
light color to it. Remember, watercolor tends
to light up when it dries. You may need to
add more white to the light areas to achieve
the desired balance of tints. Begin by outlining
the shape that will later be painted
with a bright white hue, leaving the shadow
areas untouched. Focus on lightening
the water surface which is lighter
than the background. Use broad strokes
to spread the white across the entire water
area within the glass. Sketching some lines to suggest reflections at the
bottom of the glass. Gradually add more white to enhance the contrast
between the reflection shapes. Maintain a relaxed grip on your brush and
apply more white to the upper reflections with
gentle horizontal strokes. Next, touch some white
around the glass. Paint the table top
surface slightly, leaving the paper unpainted
in the shadow areas. Similar to the exercise soften the edge of the applied
white with a wet brush, create a small area
of light between the shadow in the
brightest reflection. Next, cover the table surface with a mixture of white paint diluted slightly with water to add a touch of transparency. If you watercolor appear
lighter than intended add more white. Switch
to a fine brush and use an opaque white color to paint the brightest parts
of the reflections. To create an opaque
transparent color, use just a drop of water to wet the color or use color
directly from a tube. Our first glass painting is
beginning to take shape. Soften the edge of
strokes as we did in the exercises to ensure a smooth transition. Paint small, intricate
white reflections, and the brightest and
largest one on the table, apply thick, opaque white for
the brightest reflections. Add a couple of
bold white strokes where the reflections
are brightest. Then with a damp brush, gently soften the edges of the white wash to achieve
a smoother transition. Adjust the tinted balance and add more
transparent white to gray areas to ensure the dark background remains
sufficiently darker in the shadows where
it's left unpainted. Apply another layer
of transparent white onto dry paper to brighten
the water in the glass. Add a few additional
small white reflections along the water edge
and on the glass surface. Complete the glass
painting by ensuring the brightest parts
white and opaque enough. Congratulations with your
first glass painting!
6. Exercises part 2: brush control, making a tint color palette: We'll start with a brush control exercise to
loosen your hand. Take all around brush
with a fine point, wet it thoroughly, and gently squeeze the bristles on
the edge of the jar. Roll the bristles of
your brush gently to pick up the color.
Add a drop of water again. With your brush,
almost horizontally, saturate the bristles with color by turning
the brush around. Now let's talk about
how to hold the brush. If you grip it firmly close
to the bristles like a pen, you won't have full
control over your strokes. Instead, align your brush with your stretched fingers so that it rests between your
thumb and index finger, supported by your middle finger. Loosen your grip so you can turn the brush in
all directions, even holding it horizontally to the paper surface if needed, and switch quickly
between positions. Next, hold the brush
perpendicular to the paper, touching it just with the tip, and make a hair thin line
without applying any pressure. Slowly start to push
your brush onto the paper so that all
the bristles lie flat. Make a stroke, and then
slowly lift the brush again without pressure to
create another hair thin line. Repeat this process until you complete your first
brush control line. Add just a drop of water
to moisten the watercolor. In preparation for
the next stroke, hold the brush almost
perpendicular, not entirely, without applying any pressure on the bristles, paint a wavy line just with
the tip of your brush. Then hold the brush
perpendicular again and with pressure push the bristles to
lie fully on the paper. Move the brush in this
position to create a wavy line
without lifting it. You'll notice when the brush has very little moisture
on the bristles, it results in an
interesting pattern known as dry brush on
dry paper technique. Try this exercise with your
other brushes to get a feel for the different
strokes you can create and to loosen your hand, understanding the effects of
pressure, or lack thereof, on the paper. Just as before, gently roll the bristles to
saturate them with color. Holding the brush at an angle, hold the brush almost
perpendicular, not entirely, without applying any pressure on the bristles. Paint a wavy line just with
the tip of your brush. Then hold the brush
perpendicular again and with pressure, push the bristles to
lie fully on the paper. So this fine brush
dries very quickly. I'm not able to complete my line without
lifting the brush, but this will give you
an idea of what you can create or not with
different brushes. Next, hold the brush
perpendicular to the paper touching it
just with the tip and make a hair thin line
without applying any pressure. Slowly start to push your
brush onto the paper so that all the bristles lie
flat. Make a stroke. And then slowly lift
the brush again without pressure to create
another hair thin line. As preparation for the
next painting will create a tint palette using only
one water color and water. In this demonstration,
I'll use Indigo. Thoroughly saturate the bristles to create a thick, opaque color. Then put the color
on your pallet, starting with the opaque color, and gradually adding water to create a gradient
from dark to light. Now take the darkest color. Then after washing your brush, take a slightly lighter color. And continue this
process to create tint swatches The lightest tint will have a lot of water in it and
just a tiny drop of color. Now let's arrange the
tints next to each other. We'll start with the
darkest tint and then take a slightly lighter color from the palette touching the edge
of the previous stroke. And continue until the
tint line is complete. Let's move on to the next lesson and create a mosaic painting.
7. Mosaic Painting - Study the glass: Glass with all its reflections and refractions
resembles a mosaic. To grasp the essence of
every glass painting, let's create a mosaic
of this glass bottle. To begin, study the
reflections and draw them as shapes for
your convenience. For this painting study, I have provided a pencil
drawing that you can trace and follow along
with this brief lesson. We'll start by taking a
creamy dark tint with a fine brush and carefully painting the
edges of the bottle. This serves as an excellent
brush control exercise, allowing us to color the shapes and create
long, thin lines. Take your time to carefully
paint the opaque shapes, moving your hand
slowly but decisively. For thin lines, apply
almost no pressure. Try to relax your grip
and enjoy the process. Take more paint and after completing the line switch
to a larger round brush. Apply pressure to the
bristles to color the area. Paint the bottom edge of the bottle and a
small area on the right. Mix some color with
water on your palette, as we did in the exercise part. And apply the color to the
shape in a light tint. Hold your brush
not overly firmly, and keep it far from the bristles to achieve
better brush control. At this stage, it's important
to let the painting dry. This is necessary
as we are going to paint other shapes next
to the painted ones. We don't want any color bleeding between the two
different shapes. Continue by coloring
in the shapes, noting the different tints, and trying to replicate them. By adjusting the
amount of water or color to darker
or lighter tints. When painting a line, use the techniques learned
from the previous lessons. And draw a line with the tip of the brush without applying any pressure to prevent color
mingling between shapes. Avoid painting a new shape next to the freshly painted one. Instead, dry the area first. Before painting a new shape, we will touch the table
surface with a touch of color to study how it
refracts in the bottle. Take a moment to notice
how you hold the brush. Try aligning it with
your stretched fingers and place it between your
thumb and index finger. Relax your grip, hold the brush horizontally
to the surface slightly, and color the table shapes. And congratulations on your
second completed painting.
8. Exercises part 3: bleeding technique, sandpaper and watercolor pencils: For this series of
small exercises, we will need two or
three different colors. You are completely free to
choose your favorite colors. Begin by moistening the first
color and painting a shape, dry it thoroughly, and then wet the second color. Apply it by touching the edge
of the previous shape. Since the previous shape is dry, there will be no color bleeding. As the second shape dries, paint one more shape under it. This resemble the painting mosaic from the previous lesson. The aim of this lesson is
to learn how to create artistic effects using the
color bleeding technique instead of drying
the third shape. Begin by painting a new
one in a different color, touching the edges of the second and third shapes where the previous
shape was wet, the red color flows into it, mingling with the green
in an unexpected pattern. This creates an artistic and
visually appealing effect, which can be used when
painting backgrounds or when aiming to create an
artistic touch in your artworks. Let's try this
technique once more. Paint a shape that
is saturated with color but not overly watery. Then take another color, and holding the
bristles horizontally, touch the edge of the previous shape with
just the tip of the brush. Move your brush downward
without touching the shape. Then move it back up and
tight the edge again. Afterward, continue
coloring the shape without touching
the bleeding color, allowing it to create its own magical, unexpected pattern. Now, we will test
the same technique, but with overly wet
water color stains. Create a shape and add
more water to it, so that it becomes very watery. Then take another
color, and as before touch the edge, then not,
then touch again. Move your brush to
the right to color the surface without touching
the bleeding color. Allow it to spread freely. Notice how quickly
the watery paint flows into the new one, creating small streams of color. Now that the exercises
are completely dry, we can experiment with
another handy technique- lifting on dry paper. On student grade
cellulose paper it's easier than
on cotton paper. You can use different
brushes to lift, wet the brush, dab it
on the tissue, and rub it on the
colored surface. Try using another brush. If you notice your
lifted shape is too wet, dab directly with the tissue. Make different shapes
and lines to experiment. Lifting with flat brushes can
lift very fine, thin lines. Using sand paper on
watercolor paper can create interesting effects by altering the texture of the
paper surface. Experiment with different
grades of sand paper to achieve varying levels
of texture and effects. You can fold the sand
paper and create light lines in your painting
by rubbing the surface. This creates a texture that is difficult to replicate
with just a brush. Always test the sand paper on a small inconspicuous area of your painting before
applying it more broadly to ensure
the desired result. Additionally, you
can rub the paper flatly with sand paper
leaving light marks. This technique works well
for creating high lights on rough surfaces or adding
he textures to objects. The next technique that truly
picks interest is using watercolor pencils to create
artistic splatters. Let's give it a try. Begin by wetting
a round brush, then take a watercolor pencil
and dip it briefly in water. Dampen the tip by stroking
the wet brush over it. Lightly dab the pencil on
a tissue to activate it, and gently squeeze the bristles of the brush on the
edge of the water jar. Tap the brush a few times on the graphite to
create splatters. Experiment with
different effects by varying the distance between
the pencil and the paper. Try holding the pencil
close to the paper for fine splatters or higher above the paper for
larger splatters. Now let's try using another color without dipping
the graphite in water. You'll find that
it works just as effectively when you simply
moisten it with your brush. For a further variation, try using a brush with more water to see how it
affects the splatters.
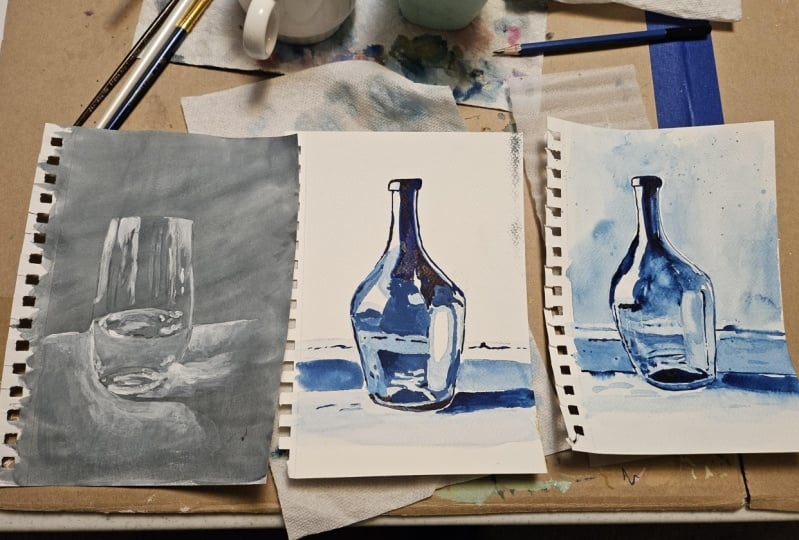
9. Painting a realistic glass bottle: As always, let's
begin by softening the dark pencil lines
with a kneading eraser. This step will make
it easier to erase the pencil lines once the
painting is finished. If you've drawn very
delicate light lines, you can skip this step. For this particular painting, you will need basic
watercolor brushes, some round brushes
with fine tips, and some fine brushes similar to the
previous Mosaic Study. We will use only one color. In my case, I'll
be using indigo. Start by color in the top
of the bottle with a dark, opaque, and creamy color. Remember to use
light pressure for thin lines and enough pressure
for painting large areas. You can switch to a round brush to cover large
areas more quickly. Then with the rigger brush, paint an unbroken line, add some creamy dark
color farther down, wet your brush and soften
the edge somewhat. As we did in the
exercise to achieve a lighter tint without allowing the previous wash
to dry completely. Add another light wash
touching the previous one, add some drops of darker tints
for a seamless transition, Wash the brush a little
and stretch the color. With a wet brush move the
bristles in a colored, still somewhat wet area to create a lightly tinted area within it. Color the reflection light and define the edge
of the bottle. You may choose to touch or not, to touch the previous
area to create some color bleeding as we
did in the previous lesson. First, apply pressure on your round brush to
color light area. Then switch the brush position to draw a thin line
without pressure. Using the tip of the brush, create some dark areas. Paint the belly of the bottle touching the previous areas for some color bleeding paint around the reflections. Wet the brush and soften
the edge to make it blurry and diffused
on the white paper. Rub gently with the wet brush to further soften the edges. You can also touch the edge with a wet brush and let the
water color work its magic. Use pressure on the bristles to draw a dark edge
of the bottle, paint the bottom of the bottle, leaving a thin white
reflection close to the edge. And add some droplets of darker tints in the still
wet area to create texture. Add some darker
strokes to still damp paper around the
reflections to accentuate them. Let's enhance the
reflections by drawing some darker lines using just the tip of your brush and touching the paper very lightly. With a fine brush and a
bit of middle tint, paint some darker areas
in the reflections. It's a good idea to study the
reflection before you start painting and hold your
reference photo by hand. Now let's paint the
refraction of the table in the bottle with a
very light tint. Add some touches in the
largest reflection. Soften the edges
with a wet brush and dab the edge of the
area with a tissue. To ensure a seamless transition, draw a line in a still
damp refraction. When the area is dry, rub it with a damp brush
on the edge to soften it. Note that the process may be different on
different papers, I use Arches cotton paper, which makes it more
difficult to do. On cellulose paper,
the paint would lift more easily after
gently rubbing. Dab the area with the tissue. Let's move on to
the next lesson.
10. Painting the background: The background will enhance
the appearance of the bottle. Let's paint some loose areas. Hold the brush far from
the tip. Relax your grip. Begin by defining the edge. Wash your brush. And
soften the edges of the previous strokes by
mingling them with water. Move your brush quickly to cover a large area
with moisture. Define the upper edge. Cover the large area
with a watery mix. Then add some darker
tint and with only the tip of the brush
paint around the bottleneck. As you move lower, cover the area with
quick wet strokes, all the way to the table. Add some loose strokes
in the wet area, mingle them in it, and
paint around the bottle. Add some color stains
on the wet paper. Take the same color of water color pencil as
your monochrome painting. And some artistic splatters. Holding the brush
horizontally cover the table surface. Add a darker tint directly touching
the previous wash. Take your time to paint around the bottle with
precise brush strokes, do the same on the other side. Take a lighter tint and complete the table surface. Stroke the bristles horizontally
on the surface, as the brush gets dry, it will leave unpainted area
that look interesting and uneven. With the tip
of the brush paint dark lines in the table texture, some of them will get blurry and some not due to paper wetness. Create a dark
shadow that is just a bit lighter than the
edge of the bottle. With a damp brush stroke
under the shadow, touching it in some places for a nice bleeding effect. Stretch the color and
adjust the details. Add some lines in
the table texture, add some fine splatters
to enhance the texture. We will paint the
finishing touches on dry paper for
the fine details. Some lines to define the edge. A darker area in the bottom of the bottle. Rub with a damp brush on the surface to lift some color on dry paper. Then dab it with a tissue to prevent water from
spreading further. I like to use an
old Filbert brush. It's a good idea to have one dedicated for this kind of work. Add some darker tint to make more difference
between this area and the one inside of it. As the inner one
is not 100% white, color it with water
and a drop of color. I add a darker tint to accent the inner
area of reflection. Color the bottom reflection
and a light tint as well. Create a darker area
on the left to give an illusion of disappearing
refraction of the table. Paint the area darker to
visually divide the areas. When your artwork
is absolutely dry, we can use sandpaper. This area of the bottle has a very uneven mosaic
of reflections. We will add a few
sandpaper effects on it. Congratulations on completing
your glass artwork.
11. Strategies guide step-by-step for painting glass: In this lesson, you'll receive a helpful guide for painting
glass objects successfully. Even the most complex ones
will no longer pose an issue when you follow
these handy steps. Print out a photo of the glass
object you wish to paint. Study the reflections closely. Observing the intricate mosaic
of different shapes and refraction that give the glass its distinctive appearance. After completing your
drawing use kneading eraser to gently soften any pencil
line that appear too dark. Mask all small
intricate reflections with a masking fluid to
preserve their brightness while you paint over them later. Thoroughly wet the
surface of the glass. Apply water color stains
loosely and allow them to blend together to create a base color for
your glass object. Add darker shades
where necessary avoiding intricate
details at this stage. Allow the painting
to dry thoroughly or use a hair drier to speed
up the drying process. Paint the mosaic of reflections. Paying attention to small
variations in tints and shades and accentuating
the darkest areas. Take your time and keep the reference image
close at hand. Paint the background
with shadows and light reflections cast by
the glass onto the surface. Optionally, consider
enhancing the painting with artistic touches such as adding color splatters to create
additional texture. Remove the masking
fluid to reveal the intricate bright
white reflections. Paint some fine details
with a very fine brush. If you observe the your
background is too light, paint a darker shadow to
achieve the desired contrast. Dry the painting thoroughly. Consider enhancing the
painting by adding fine white details using a
white pen or white gouache. Optionally use sand paper to
create a glass like texture.
12. Concluding the class - What we have learned in a nutshell: In conclusion, our journey
through the world of watercolor glass
painting has been a delightful exploration of
both technique and artistry. We began by understanding the diverse nature
of watercolor, from its ability to create opaque thick textures to
its transparent fluidity. Through exercises focused on softening edges and
mastering brush control, we gained insights into the nuances of painting
glass objects. Our first painting, using only white water
color on toned paper, challenge us to discern
the intricate play of reflection that give glass
its unique appearance. As we progressed, we honed our skills through exercises in brush control
and color palette creation. Culminating in the
mesmerizing mosaic technique, which allowed us to capture
the intricate patterns of light and shadow dancing
across glass surfaces. Through experimentation
with bleeding technique and unconventional tools like sand paper and
watercolor pencils, we discovered new avenues
for artistic expression. Finally, we brought
together all that we had learned to create a
stunning monochrome artwork featuring a transparent
glass bottle where every stroke and wash came together to evoke the
delicate beauty of glass. I hope the short but
enriching journey has not only sparked
your creativity, but also equipped you
with valuable strategies. If you enjoyed the class, I would be really grateful for
getting your review on it. Remember, the journey of
artistic discovery is endless, and I encourage you to continue exploring and
refining your skills. I hope to see your artwork after you put so much
hard work in it. And I love to hear all about
your painting process. If you had any
difficulties or what was the most enjoyable part
of the painting process. Share your artwork in the Student Project
gallery by clicking on Submit Project under the
Project and Resources Tab. Every piece of art, no matter
the level represents time, effort, and personal expression. But most importantly, it's a part of your
artistic journey. It's a visual record of
your growth as an artist. If you have any questions, I'm happy to respond and to help. Just post your thoughts
in a discussion thread. If you prefer to share your artwork on
Instagram, please tag me @magical.watercolor. I would love to see your
painting. Skillshare would also love to see the
artworks of my students. Please tag them as well @skillshare. Remember to hit
the follow button next to the class title, just below the video. By doing so, you'll stay
updated and be the first to know when I introduce a new
class or announce a giveaway. Thank you for joining me on this artistic adventure and
I look forward to seeing the beautiful creation
that emerge from your new found expertise
in painting glass.
 Evgenia Cordie, Professional Watercolor Artist, Belgium