Transcripts
1. Introduction: Hello, My name is Sam and welcome to my own corner studio here in central Virginia. Today we are going to be learning about tables, how to prep, how to make, and then trim them. I loved team and then one of my favorite things to make there, one of my favorite things to use, and one of my favorite things to look at. There's such a neat little compact form that we're not really familiar with here in the West, but only with today's video on Spire, you to try and make them for yourself and learn more about this fun little farm. I fell into ceramics by chance years ago after I got out in the Navy, go back to school that further my education using my GI Bill benefits. I had no intention of taking anything aren't related that I needed in our credit and my advisor who worked with other veterans recommended that I take it as other vets really liked it. So as you might have guessed, I took it and really, really enjoyed it. I was lucky to have a really great teacher, really great ceramics programmed. And that just really, really set me up in a good way. And then my first teacher introduced me to my mentor who I later started apprenticing for. And then started teaching. I started teaching clay around such Virginia and I've done that. I really, really enjoyed, really, really love helping people work through their issues with gla. Coming up against hurdles are things they just don't understand. And giving that little extra bump, that little extra tip or that little adjustment and how they're doing something that really changes the way that they work with the clay and ideally expands, expands their curiosity and not, not just their skill base, but their desire to learn more and keep pushing it. So when it comes to making our TBL, there's a few things we're going to have to do to get from a ball of clay through this first thing. Obviously, we're going to go through all the tools that we need from our wheel, water and all of the hand tools that we're going to need to make this TiVo. We're also going to go through clay wedged, getting that ready to go so that we have a nice even piece of clay to work with. Now my knee go over how to center the clay, throwing the clay, altering the teapot once we haven't thrown, and then trimming seeds. Once we have that all ready to go, I'm really excited to share this one with you today. And she, like I said, it's one of my favorite that is to do one of my favorite things to make. And I hope that I can maybe pass some of that enthusiasm along to you in your own quest and learning and development team. Let's get started.
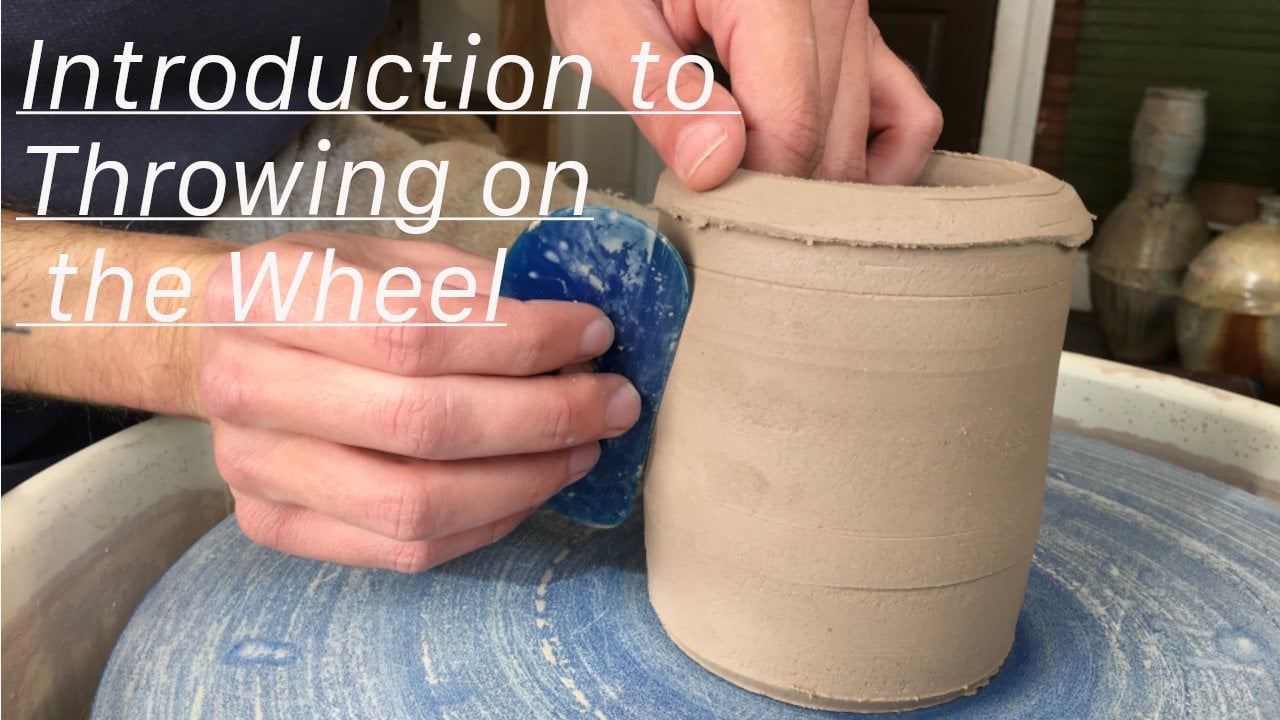
2. Preparation: All right, Now we're ready to get our clay and tools ready and get thrilling. So the first thing we're gonna do is get our layout. We're going to measure out one pound of clay. And then I'm going to get that on the wedging table and start wedging that. Now I'm going to use the spiral wedging technique, where I'm rocking the clave forward, twisting it at a slight angle, and then rocking it back at another slight angle. And I like to go counterclockwise. So as I'm wedging each time, I'm just adding a slow rotation to that and it kinda starts looking like a snail shell, which is why it's called the spiral lettering technique. And I'm gonna do this about 40 times and maybe a little bit more. I usually go by the pound. This is only one pound, but I still like to do at least 30 or 40 iterations when I'm, when I'm when I'm judging the clay. So once we have that wedged, I'll get that patent into a nice round ball. So be ready to slap it on, slap it onto our wheel head without having any creases or any folds that could cause any cracking and the base of our pot. After we have our clarity, we're gonna go through getting our tools ready. So the first thing we're going to need, obviously as our wheel, very important part of the process. Next, next important tool in, probably the most important tool in working with clay is our water. And when I have an ice bucket of water ready to go next to us, then as far as our hand tools go, I have my sponge, needle tool and wire or kind of just our administrative tools. And then as far as the hand tools I'm going to be using the most. That is this one, blue, red. This is really what I'm going to use more than anything. And then at the end when we get into trimming, I'll add my trimming tool, my throwing knife that we'll use for that. But like I said, for the most part, it's a sponge and the rib and then just my hands. It's so small form it's relatively easy to push around so you don't need a whole lot of equipment. But if you want to do any fun alterations or carvings, you can go crazy from there and get into all sorts of stuff. So now that we have our clay wedged, are tools all ready to go? Let's get this clay on the wheel and get it centered.
3. Centering: Okay, Now that we have our clay wedged and ready to go or tools ready to go. Let's get this clay down on the wheel and get it centered, right? So first thing I'm gonna do is go slightly wet sponge, get this wheel turning and just get a little layer of water here on my bat. And that's just going to help the clay stick to the bat a little better than it would on the dry plastic. So I'm gonna write this down. That's a pretty good shot not to get some water on here. And then the center, I'm going to brace the base of my hand here against the side of the clay and you can see it hit my hand tap, tap, tap, tap. So I'm going to do is braced my left elbow in my hip or against my leg, just somewhere against my body. And I can start to slowly lean in. And you can see that it's starting to press the syndrome more center shape. But then my right hand needs to come in and apply that downward pressure. And that also keeps my left-hand from just pushing it off the bat. You don't want it to just slide away on you. So you want to have that side pressure and this pressure coming down from the top. And so you can see I'm really just pressing with this bass part of my left hand right here. And then kinda the same part of my right hand. And really just try and use the base of my hands. I don't want to be centered with my fingers. I want to be using is close to my risks as possible. That really just makes my hands not have to work very hard. So I feel like the best tricks for centering are keeping the clay is close to the base of your hands as possible while you're centering and making sure that your elbows are in secure positions, that they're not going to be floating around. So you're not having to fight the clay with your shoulders. Instead, you want to just let your body weight lean over that clay. And you just create this nice little contained space for that clay. Clay is sit and we'll give this a quick cone up. Gently press it back down. Since we're going to be making a relatively narrow table, I'm going to keep my clay relatively collected here and press it down just a little bit. For the sake of centering when I'm thinking ahead for what I'm going to be making in this case at the table, it's going to be about this wide. So I think it's wise to when you're centering things, having the base of the clay around the same shape made probably a little bigger than at least the base of the pot you're going to be making. That's just something to keep in mind while centering.
4. Throwing: Okay, Now that we have our clay centered, Let's start to get it thrown. A little water on here. And then kind of in the same hand position is when I was centering and have my left hand here. But then I'm just going to guide my under the curve of my right from here and just press a little dimple. And in the center is the center of the clay there. And that's going to be my guide. As I press down with my left thumb, guided by my right hand, and start to establish the depth that I want. And since I'm going to be carving a foot on this, I want to leave a good little bit of clay in order to do that. Perfect. So that's that's about what I want. Usually it's about a finger's width is that I'm looking for with tables. And that's yeah, that's pretty good. The limb or water in there. And then as I throw in, as I compress, I'm going to work out that little hole that I just poked in the base of the pot so it doesn't make it so that you can't drink benefit. And that's going to slightly start slowly slide my thumb back. Kind of at an upward angle as I'm going. I don't wanna go flat because this one, it's a table, not a it's not a flat bottom thing like a vase might be. You want that nice, nice curve. Use my sponge and just really kind of do my first round of compression here. Compress, compress, compress. It's still keeping that rounded shape and the bottom. Now you can see how this is kinda flared out over where I send it the claim, but that's okay because this is the part right here that I'm going to start lifting up and start getting into this cone shape right now it looks like a little bowl, but now we're gonna take this clay out at some of this out of the bottom and all this clay that I have right here. And we're going to lift it this way to create that cup shape that we're looking for. So in order to do that, I'm going to rest my hand here kinda like when I was making the bowl in an earlier video. And I'm going to start to press them with this right hand here with my sponge and then start to apply pressure as I slide out. And then I kind of start to catch this clay here. And then I'll kinda roll it over my left hand here and just start to get him moving in that upward, conical direction. And then you can start to see the cup shape starting to, starting to happen here. I also want to stay mindful to not compromise my curve. Oftentimes, when you go to therapies walls, you'll end up pressing down a little bit and not just OUT. Say that nice bowl-shaped kinda gets this kind of drop off towards the end. So I got to make sure that I'm always and I'm applying pressure, kind of lifting that up and kinda keeping that curve in mind as I move the row of that table out and then transition to lifting that wall up. And once I get to the top, I'm stopping right about here. I don't want to throw this rim thin. I want to keep this. I'm going to keep a nice little band declare because I'm going to mess with this rim later on. Pulls water out. Now in this last poll, what I'm gonna do is I'm going to guide this base out a little bit more. I'm going to apply pressure here on this slide out this clay a little bit more. I'm just going to hedge that out just a little bit. I just want to get a little bit more with a little bit more, little bit more within this base. And then I'm going to lean my right and my sorry, my left thumb over a little bit. While pressing out a little bit, I'm gonna kinda get this like kinda slight volcano shape. I'm going to say I still want a little bit of flair to that room. For the most part. Yeah. Just the slight taper and just having a straight cylinder is fine, but it's just not quite as intriguing. I don't think visually. So I like to have that nice little taper end just to kinda keep some tension. And this little guy here, somebody who's my ribbon, just apply a little bit of pressure inside. And now just to compress this well, a little bit, scrape off that slip and then press that. When I went a little bit more. Just get a little bit extra flair and not too much. Okay, so now we have our T ball thrown. But now next we're going to get into altering the table and making it just a little bit more interesting. So let's get ready to do that.
5. Altering: Okay, Now it's time for my favorite, my favorite moment with tables and that's altering them. And there's a couple of things that I really like to do that I learned from my mentor that are just really, really fun things to do with the TBL after you've thrown its basic shape. So we have this nice form, it's nice and clean. So now let's move it around a little bit and make it a little more exciting. And the first thing I'm gonna do is take this nice band of clay that I have up here and undulated a bit. So I'm gonna go ahead and establish the general shape of the room that I want. I like this shape. This is really comfortable shape for drinking out. There's this little bump right here. And then this nice angle that kind of smooths over and it's not too sharp, not too clunky, just a really nice place to drink from. So I want to maintain that. And then I'm gonna get my fingers wet. And I'm going to start slowly kinda pinching and pulling up, pinching and pulling up. Now I'm not going to run all the way up to my band and click is I want to maintain this nice lift and I just established. But I'm going to be muslim declared just below that room. And just slowly, slowly, slowly, little by little, lifting that room up a little bit right there. And then I'm just going to smooth this out just a little bit. It doesn't have to be perfect. We'll clean it up later. Rotated a little bit. I like to do three sides. Some people do for some people do a lot, some people just do one whenever you want to do I like to do three. There we go. You want to be mindful not to thin this out too much. You don't want any really terribly weak spots in your table. But a lot of that will be aided by maintaining a nice strong room that, that will be kind of your best, your best protection when it comes to longevity for functional pods that you're using on a daily basis, Eden and drinking from, thrown in the dishwasher, thrown in the sink, stuff like that. Having a strong rim will really be the saving grace for pots that have, you know, daily lives. All right, so given this nice third part pulled up here, taking a nice and easy, smooth that out a little bit. Turn laying around. So you can see it's got this funky shape, but I'm not really interested in keeping in this triangular shape. I'm interested in this undulating rim. That's all I was trying to get there. And we can keep a little bit of movement side to side in there. But I'll kinda go back and redefine this nice little drinking lip. And then we'll be ready for the next part. So the next part of this alteration, I'm going to take this nice clean wall and move it all over the place. Because why not? I think it wants to be moving all over the place and I don't like sitting still that much. So what I'm going to do is kind of like when I'm lifting the clay. Common to have, instead of having my hand over here, I'm gonna have this ribs at this nice sharp edge. I'm going to push the cloud over that Ruben lift up. But instead of lifting slowly so that I actually pull clamp, I'm going to move quickly so I don't push any clay up or anywhere. I just I'm just distorting it a little bit. So I don't do this kinda quick some of the press out there going with that rib and just do one lift up. Pretty simple. And then I'm going to put my fingertip back in here and go down and create a line and then one more quick line up. And then I'm left with this really neat. All of a sudden there's all this movement going on. There's all these new places to put your hand when you're holding it. And that's where it becomes really fun to use tables like this because you find that you're always kinda playing with it. And then you end up finding relatively quickly, you end up defining your favorite part to drink from your favorite way to hold it like a time when you don't have your BUN. I'm going to need you to leave with cap came down to sing to me. All right. But after you do these alterations, you end up, you find when you use it all of these different, all these different ways that you like to drink from a different ways you like to hold it, where you like to put your lips when you drink from it. It just makes it a lot more, lot more fun. So the final piece we're gonna do here before we get it ready to trim is I'm just going to cut out some of this clay at the base. Oh, actually, before we get there, I'm going to take this rib again. And I'm going to apply just a little spiral texture on the inside. There we go. Quick little swirl. That's alright. Now I'm gonna come in with this throwing knife here. And I'm just gonna put a 45 degree angle. I don't have to get crazy with it because I'm going to trim it later. I'm just going to try to make it a little more easy to pick up off the wheel hub and dry a little bit, little more quickly, a little more evenly. So there we go. I'll take my wire. Usually wrap it around one hand, press down with my thumbs, press it down a little bit of time, right under there. And then we're ready to set it aside, let it dry. And then we'll be ready to trim.
6. Trimming: Okay, Now there are tables sufficiently drug, we can start to trim it. Now there's a couple of things we have to consider when trimming a table like this. The first thing is how we're going to trim it with this rim moving as much as it is is dry enough now to where I can set it down on that rim and it won't be squished. However, if I were to start trimming and applying that downward pressure, it would start to alter this rim and also it's not even I don't know where the I don't I did this by hands. So these aren't going to be perfectly even. So we have a couple options here when it comes to how we want to trim this table. The first thing you can do is just by hand, use a use your regular trimming tool. We're using a throwing knife, whatever you want to use, you can trim afoot, and that's pretty cool and really fun. And you can do all sorts of interesting things with that. But I still want to trim this, turning it on the wheel. So I need to put something else down here to help support this rim so I don't ruin it. And that's where our Chuck comes in. So let's pull this over. And a chuck is essentially just a tower of clay that I threw two Rest things on this good for trimming tea bowls, bowls, anything where you want to be cautious of compromising the rim. So this really comes in handy to help with that. So I need to get this centered. So like anything else, somebody used the same technique of just holding my finger to just stop the edge and you can see a tap, tap tap someone to stop right there. Push it over a little bit. Tap, tap. More. Some people can do this really quick. And they can, some people can do what's called like slap, slap centering or what is tap Centering. I don't know where they can just you can keep it spinning and tablet. That's really cool. I don't know how to do that. I gotta do it slowly. That's okay. That looks good right there. So we have this in place, but we also want to lock it in place so we make sure it doesn't go sliding around while we're trimming. So I've got these four little lumps of clay here. So I'm going to use these and use two at a time. I'm going to press down on two sides, two opposing sides at the same time so that I don't scoot it one way or the other while I'm doing this, turn it around a little bit, get these other two plugs pushed on there. And there we go. Got a nice secured Chuck, ready, determine TBL on. So let's bring this back and we can sit down and you can see how this works now. Now my room is floating and I have any pressure sitting on that rim. It's all sitting inside of this table. Inside of my nice spiral texture in there, which I also don't want to compromise. So I want to make sure this is dry enough to, to support this pressure. But that's where this is nice because it's all this space right here that's sitting, instead of just this really narrow remedy would only be these three points or these three points it would be setting on. So for all that pressure, the resting on this nice broad surface really helps not distort anything along the way. So let's get that put on and now got to center the table on here so you can see it's got a lot of play in it. So let's keep that around a little bit. And I usually start which is this top edge right here. And that's why after I'm done throwing it, I like to carve that nice 45 clean angle because I can't depend on this to help me center that because it's moving all over the place. So I like to have a clean spot here, here and here where the, where this edge is going to be leading up to the foot. So that this gets pushed around just a little bit more. There we go. That'll do it. Let me give you just a little press this little press on there. Not too much. I don't wanna, I don't want to squish that texture in there. I don't want to slide around. So the next thing I'm gonna do is establish the width of the foot that I want. I'm not going to leave all this clay layer. So for a table like this, I like to use about three knuckles across and you're going to find your own measure. My guess, I don't know what that is. Maybe 2.552 inches or so. But I'll lay my hand down, place my needle tool. And the side of my hand is, and you can see where I've already put a little circle in there to begin with. But then I have a general a rough placement of where my foot's going to be so I can start peeling away this clay in big chunks and not worry about compromising the foot. And then I can finish all of that after I get all this clay away. So I'm going to use my very simple trimming tool that you can find them most clay kits. It's pretty straightforward tool. It works for most things. It's not fancy, but my kinda his fancy, It's a neat tool. But I'm going to rest my left hand here. Just apply a little security blanket there to help us stay in place. I'm going to start cutting this clay away little by little. And I'll usually cut over to where my line is. Usually get to there. And then I'll use the point of this tool and start to go down. And then we can start to see. We'll talk a little bit. And that's okay. It's not ideal. But then all you gotta do is just put it back up there. And Chuck's can be tricky. They did, they do take some practice and you really got to make sure that you're you're drying game is on point. And that also means maintaining this. I'll keep this in a plastic bag so it doesn't get bone dry. But I also don't want to let it stay wet because either too dry or too wet and the clay will slide around on it. And the same goes for this. I don't want to I just wanted to be right for trimming, but that also makes it just tacky enough where it should hold on. Should still can slide around them sometimes. And that's okay. So bring that point. And again, I'm just going to roll this over a little bit. Chemo was clearly on. I want to create a nice little edge over here. A nice transition point from this really wild and movement up here. And then I want to get a nice sharp turn. I don't want it to be flat. I wanted to have a nice curve to a leading up to my foot here. This is where some patients comes in. I'm sure there's all sorts of other fancy tools that people can use to do this. But I like this technique. I don't know that it really, it really asks you to pay a lot of attention to what you're doing. And I don't know if you're like me and your mind wanders easily. It doesn't while you're doing this, you're really focused on what you're doing and really watching your pressure so that something like that happens. You're not all over the place. This is sliding around a good bit. That's okay. We'll make it We'll make it there. We're almost there. Bring that foot down a little bit more. Okay. Now I had this, this about where I want to nominate terminus, but real quick, so I'm going to cut one little bevel in. I'm going to cut a bevel out in. I don't know, to bevels right there. But I want this nice little cut in. And then coming back out and going back in. Now like that for a couple of reasons. One, it's nice to look at. So that's really important, but also it's really easy to grab and hold onto. And that's something I like about a good T-bills from any direction. It's just easy to hold. It can look a little weird, especially without a handle, which is what we're used to in the West. But you had these little, little, little accents like this. And he kinda create this much more subtle and nuanced form that you interact with a little bit more and find different comfortable ways to hold. So now I'm gonna do just a little bit of messing around with this. Some do low quick tap, tap, tap. Just break up that line a little bit. I'm going to do it down here to Little tap, tap, tap and just get that a little more rough look in, a little more like rough-hewn look in and also make it a little more interesting to hold and do stuff with. So now that we have the outside of our foot done, Let's get this inside cleaned out. So usually we have about a centimeter or so of space right there. So I'm going to start pretty much where that foot is going to be. My cut down a little bit and I just slide into the center. Do that again. Come over to where this is going to be. Put down a little bit. Slide. Alright, and something I'm thinking about volunteering inside this foot is I want to go down and then I'm going to slide and towards a sack, leave it a little spiral in there. But what I'm trying to do is essentially get the inside of this foot to match the height and the relative curve of the outside of the foot on to create this nice kind of even lines. So when you're looking at the cup, when you're using the table, you kinda get that sense of continuity. And that's really nice to have. Just adds, adds a nice layer to it. All right, so I'm just gonna clean this up a little bit. Scraped somebody's, it'll give results. Smooth out some of these edges. Sign it with my chomp. Spin out, and then we have a nice table here. So let's see if we got what we're looking for here. So what I wanted was a form that was relatively taller than it was wide, has more of a cylindrical shape. I want this nice taper and I want that foot to be high enough to give it some nice lift to just lifted up off the table a little bit. And also there's a nice sign, a nice size to it. You can always roll it around. So it's kinda and it becomes knock over prove within reason. But this looks really nice. We've got that nice spiral on the inside. We are able to keep that. Had the spiral on the bottom of the foot. And then there's all these nice, all this nice movement coming up and then moving up in this undulating RAM. But that maintains this nice even lip all the way around so you can drink from any part and not be worried that there's going to be thin or thick spots because we made sure to lift from the walls and not from the room. Yeah. T will love it.
7. Final thoughts: Thanks so much for spending some time with me today. I hope you enjoyed that video and I hope you are able to learn something about tables. And that encouraged you to, to try to learn a little bit more about it. I encourage you to get on social media, the Internet, or I mean that a hippie heaven, if you're a library person, there are plenty of ceramic bugs. Were just incredible examples of tables and their history. I could do a whole video just on the history and the context of tables. And even then some of the I would only be scratching the surface. There's so many excellent resources out there to learn about this really, really cool form. And I think it's fun to mix it in. I grew up, I'm pretty generic mug, mug household. So having something that I can make that is just more fun to use, more fun to drink from, fun to hold, and fun to make that. That's really my big thing with TBL. I think they're just so much fun to make. They're just like little as my boss, as my mentor would say, they're like little high cuz it's the small contained forms. You don't have a lot of freedom to do a lot of crazy stuff. But in this little package within these certain literal parameters, you can do so many interesting things and make something that you'll just want to use all the time and look at all the time. And hopefully other people will want to as well. But anyway, until next time. Once again, thanks so much for spending some time with me today and I hope to see you in the next video. Thinker.
 Samuel Deering, Lets make some pots!