Transcripts
1. Intro: Screens. They're all around us. They're in our phones, computers in your living room, kitchen outside, on billboards. You're currently
watching me on a screen. They're so universal
in our lives. But when it comes
to filming them, the situation can
get complicated. The content of our screens often ends up washed out
and blown out. And I'm here to help
you change that. Hi, my name is, and I'm a videographer
and music producer from Belgrade, Serbia. For the past four years, I've been making Skillshare
classes with my sister Die, who is a top teacher
here at Skillshare. My sister does mostly ipad
tutorials on procreate. Figuring out how
to properly record her ipad screen was
the top priority. It took us many iterations
to get that perfect look. In this class, I'll
guide you through my typical set up of recording
a top down ipad shot. We'll talk about lighting your scene and how to
avoid reflections. You learn how to use the
manual exposure mode in your camera to properly match your screen to
the senior filming. The techniques I'll show you can be used to record
any other screen, such as a laptop phone or a TV. This is an intermediate class, so you do need some knowledge
of how cameras work. But I made sure that even
beginners can follow it by including a simple
guide to manual exposure. When you're done with the class, you'll know how to film
any scene involving a screen effortlessly
and confidently. I'm really excited to
teach you all this, so let's get started.
2. Project: For this class project, we are going to be recording a simple shot that
has a screen in it. I will be demonstrating this
on a top down ipad shot. But you can use anything
that has a screen, like a laptop or a phone. The only requirement is that the screen has
adjustable brightness. As far as recording
equipment goes, a camera that has a spot exposure metering
mode is preferred. Almost all mirrorless
and DSLR cameras have these functions as well as
some point and shoot cameras. If you use a phone or your camera does not have
a spot exposure meter, you can still follow the class, but you'll need to do a bit
more trial and error in matching the brightness of
your screen to your scene. I'll also be using a gray card for measuring
the exposure of my scene. This can be also
found cheaply online. I have this set of gray, black and white cards that I got for just a
couple of dollar. Not essential, but it helps
out a lot if you have one. When you're done, put your finished shot in
the class project. When you're ready, just click on the Create Project button and
share with us your results. I can't wait to see
what you come up with.
3. Lighting Your Scene: When it comes to lighting scenes that have screens in them, we are presented with
two distinct problems, brightness of the
screen and reflections. Screens emit brightness. And even though we can dim them, we can only dim them
a certain amount. You need to have enough light in your scene to be able
to get natural results. You can use external lights or use a location with a
lot of natural light. I'll be filming this top down
shot in my sister's studio, which has big windows that are diffused with some curtains. But since the table we are
using is a bit further away, I'll be using my Go
doc SL 60 lights to help out the natural
light in this scene. These are relatively
inexpensive, but very powerful lights. In this lesson, I'll be using terms such as
quality of light, color, temperature, and
hard and soft lighting. If you want in depth
explanations of these, you can check out my class
Pro Lighting on a Budget, How to light a
Talking Head Shot, which covers these topics. The color temperature
of your lighting is very important to consider
when recording screens. The standard color
temperature for modern screens is 6,500 Kelvin, which is a cool
color temperature. It pairs nicely with daylight
and daylight colored lights which are around 5,600 Kelvin. If you're using warm lights like incandescent or warm LED's, your screen will look
very blue when recorded. To fix that, you can enable the night light
feature on your phone or computer to make the image more warm and match
the ambient lighting. Iphones and ipads also have
a feature called True Tone, which matches the warmth of your ambient lighting to
the warmth of your screen. So make sure you turn that on. Now when we're talking about
which quality of light to choose when lighting a
scene involving screens, I like to go for
soft, indirect light. As you can see in this example, if I use a hard light, just point my Godox light
directly at the table. The screen looks okay
because it's a flat surface. Since I didn't point my
light directly at it, I don't get a nasty hot spot. The problem comes the minute my hands or any other
object enters the scene. As you can see, I get these really ugly long shadows that get easily distracting. The easiest way to get soft
light in any scene is to bounce it off a white ceiling
or a white wall here. I just pointed my
light directly at the ceiling and moved
it a bit to the side. The bright part of the ceiling isn't directly over the ipad. I do this to avoid unnecessary reflections
on the screen now you can see how much softer the
ceiling light is and how much better all of the
shadows look in the scene. This works well for a
quick and easy result, but we can achieve an even
softer and more natural look by making a booklight. A book light is one of the softest lighting
set ups you can make. Light is firstly
bounced and then diffused to achieve an
unbelievably soft look. Note that when you're
making a booklight, there is a lot of light loss from the diffusion
and the bouncing. You need a powerful
light for my set up. I use two of my Godox lights at full blast so that I
could get a nice output. We also did this set
up with just one of these lights for many
of my sister's classes, just try out experiment. You can try bringing the
booklight as close as you can to your scene so you
get the maximum brightness. Okay, let's build our booklight
for bouncing my lights. I'm using a simple white
reflector mounted on a stand. This can easily be a piece
of white poster board or even a white wall if your
reflector has a silver side. You can also try using that. Just make sure to avoid
gold reflectors or colored walls as these will affect the
color of your light. I pointed both of my lights
at an angle at the reflector. Now it's time to diffuse them. I will be using a
cheap Ikea clothes rack to hang my diffusion, which is also a thin
bed sheet from Ikea. You can also use shower curtains or buy specialty
diffusion material. I'll put the rack directly
in front of the reflector. Turn both of my lights on, and let's see the results. As you can see, we get an even lit scene
with minimal shadows. Book lights are a great option when you need soft,
natural lighting. And I like using them
for all kinds of scenes, not just ones involving screens. Now let's look at
another problem we encounter when recording
screens reflections.
4. Avoiding Reflections: Screens are made out of glass, and glass reflects light. You need to be
extra careful when positioning lights and
positioning your device. Note that the reflections
will mostly go away when you turn on your
screen to something bright. But when you're displaying
something dark, the lower contrast on the
screen will become prominent. The first thing you need to control is your light sources. You need to make sure the angle at which
the light is coming at the screen is such that it doesn't show
up in your camera. You can do this by either
moving the light or by angling your screen a
bit to avoid any hot spots. If you can't move a light
source, such as a window, you can black it out by hanging a thick dark blanket in front of it or use a dark
fabric like duvetine. I also had success
with scuba fabric, also known as neoprene, which was inexpensive to get. The next thing you need
to worry about are light colored surfaces that
light can bounce off of. This means light
colored walls and ceilings that don't produce
big bright hot spots. They can wash out the blacks on your screen and impact
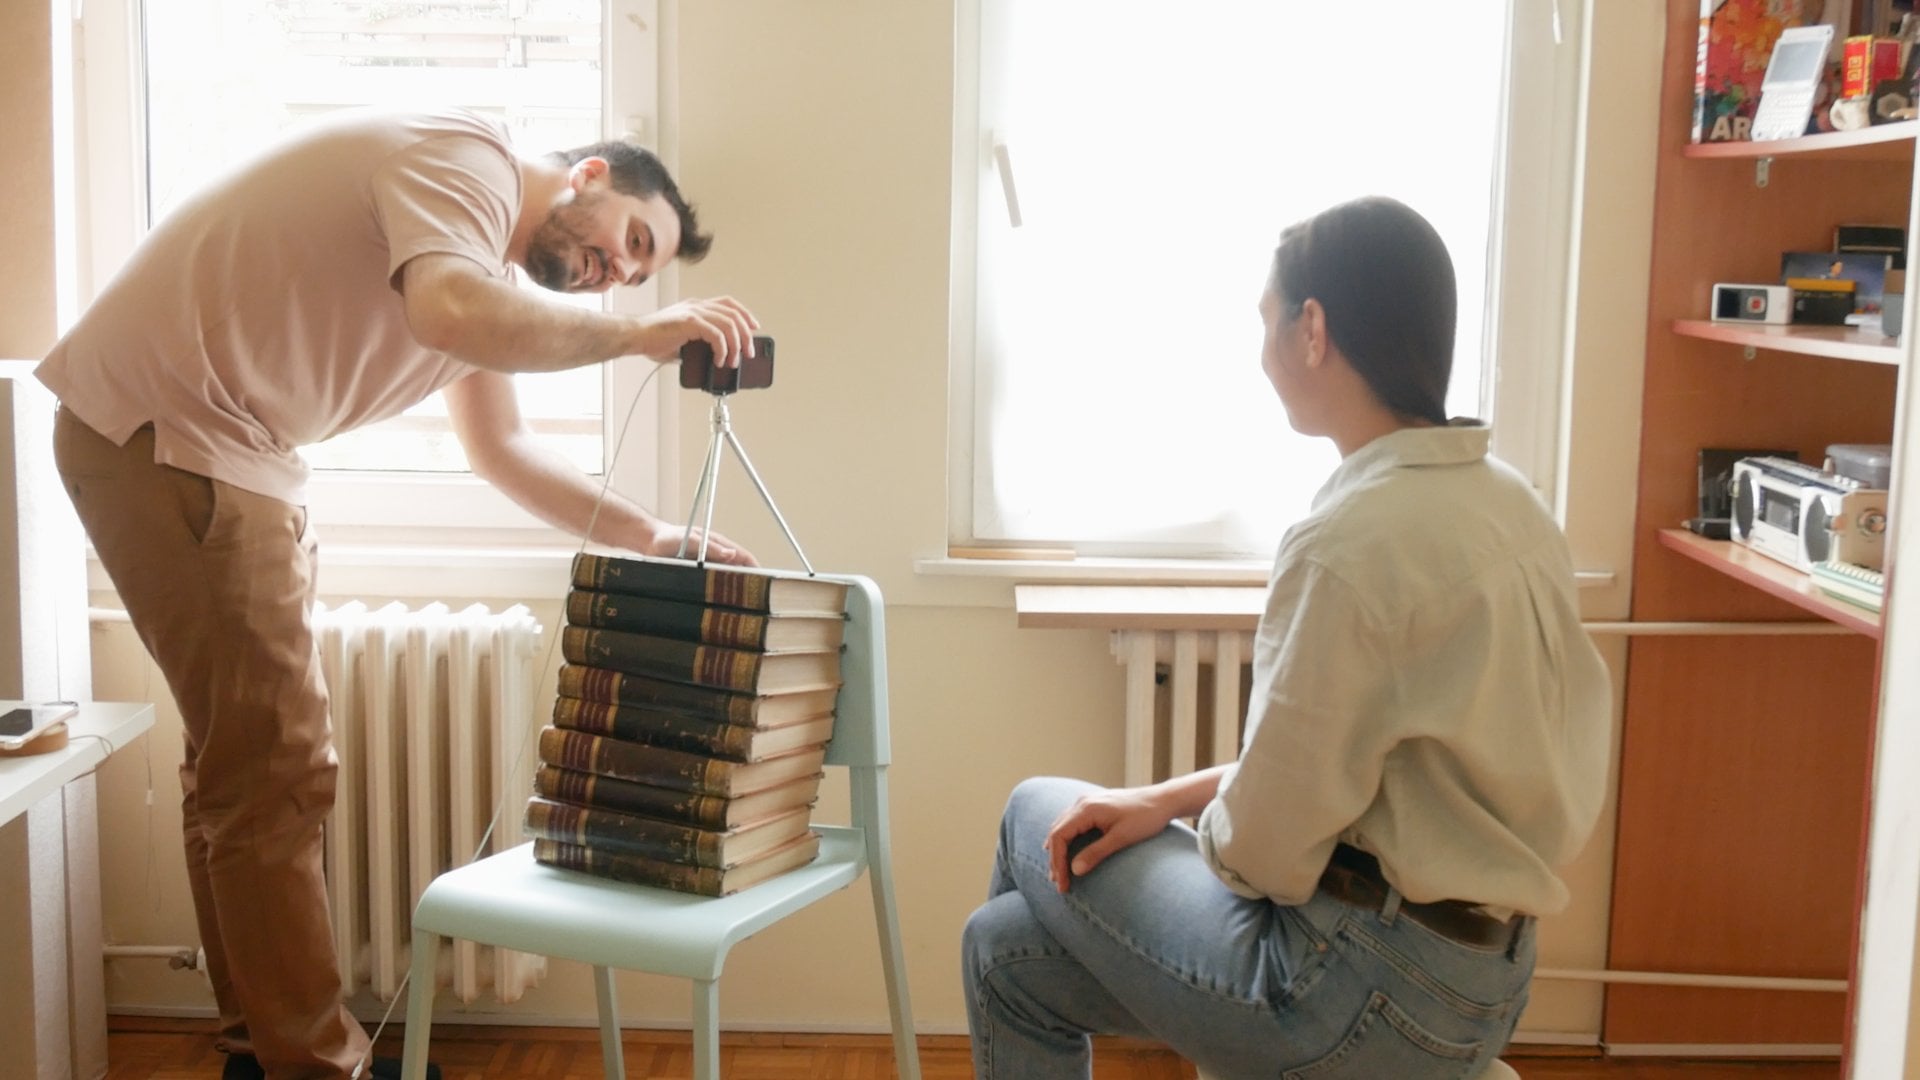
the final result. For my top down shot, I use the piece of cardboard
that we spray painted black. I just balance it on
top of my camera, which is mounted on
a weighted stand. It's stupid. But
when something is stupid and it works,
it's not stupid. You can also use
black posterboard for this if you
want to be fancy. Making a cut out just for your lens is the most
professional way to do it. But putting it over your
camera works just as well. If you need to fix a
reflection on a laptop, dark fabric or black posterboard
is still your friend. You can hang them on stands
or even tape them to a wall. Just experiment with
the positioning and keep checking
your camera screen. It's best to do all this
with the device turned off. The screen is completely black. This way you can see
all the reflections. Last but not least,
don't stress. If you can't remove
all the reflections, The Law of Diminishing Returns is definitely at play here. It doesn't need to be perfect, but if you have the time, it's just another detail that will take your shot
to the next level. Now let's talk about exposure.
5. Manual Exposure Basics: Once you've let your scene and avoided most of
your reflections, it's time to turn your screen on and match the brightness. Since screens change how bright they are depending
on their content. If you record your screen
using automatic exposure, you'll run into an
issue where your camera will brighten or darken
your call recording, depending on how
bright your screen is. To avoid this and achieve
a perfect picture, we need to use manual
exposure settings. This means setting your camera
into manual mode or using something like the
black magic camera app or Filmic Pro on
your smartphone. Now, if you never use the manual mode to
expose your shot, it can seem
intimidating at first. But once you get the
hang of the basics, it becomes a lot clearer. Exposure is the amount of light that reaches
your camera sensor. Three parameters affect this. Your aperture, your shutter
speed, and your ISO. This is what's known as
the exposure triangle. Each of these elements can make your image brighter or darker. The aperture, the property
of the lens you're using. It's defined by a number
we call the F stop. It measures how much light the lens is sending
through to the camera. Because this
property is a ratio, its values are a bit
counterintuitive. The lower the value, the more light the
lens is letting in F two is letting a lot
more light in than eight. The values are also quite
small in increments, but represent a rather
large increase in light. This is known as a
logarithmic scale. Every stop in the F stop scale represents a doubling of light, F 2.8 lets in double
the light of 42. Let's in double the
light of 2.8 and so on. Aperture also affects the
sharpness of the lens. Once you start stopping it down, the image will get sharper and the background will
become less blurry. Note that you can
change the aperture on most modern DSLR and
mirrorless cameras because the lenses have an aperture mechanism which changes the amount of light
coming into the lens. Smartphones, on the other hand, have a fixed aperture
because of their size. To change the exposure
on a smartphone, you need to use
either shutter speed, ISO, or an external filter
that darkens the image, also known as an ND filter. The shutter speed is
the amount of time that each frame is exposed
when shooting video. This number is shown as
a fraction of a second. For example, 1/50 means the camera exposes the
frame 50 times in 1 second. Increasing the shutter speed
will make your shot darker. When you change your shutter
speed from one over 50th to 1/100 your shot will
get darker by one stop. This means you'll
reduce the amount of light hitting
the sensor by half. The shutter speed doesn't
just affect the brightness, it also affects the
motion blur in your shot. For the most natural motion blur that matches what we
see in real life, you want to use a shutter speed that is double your frame rate. If you're shooting at
30 frames per second, the shutter speed should be 1/60 If you're shooting
at 24 frames per second, it should be 1/48 But most cameras don't have
that kind of a control, so we use 1/50 which is
essentially the same. If you're shooting using
slower shutter speeds, you will get more
pronounced smeared frames. If you shoot at higher
shutter speeds, you get choppy movement, unless you want to use
it as a creative effect. Try to keep your
motion blur natural, Match your shutter speed to
double of your frame rate. The last part of our
exposure triangle is ISO. This is also known as the
sensitivity of your sensor. Your sensor is composed
of millions of tiny photosensitive
cells, called pixels. When light hits these pixels, they produce a certain voltage. Your camera then
takes a reading of this voltage and then assigns
a lightness value to it. Sometimes the amount
of light hitting the sensor is not enough
and we need to boost it. Or in other words, increase the sensitivity
the sensor to light. This produces brighter values, but also increases the noise
that we get in the image. The more we boost this voltage, the more noise we get. Iso values usually start at 100 or 50 and then get doubled. If you set your ISO 100-200
you'll get double the light. Now, common advice
to beginners is to always try to keep the ISO
value as low as possible. But modern cameras can handle certain ISO values
virtually Noise free. For any camera, using ISO up to 800 or even 1,600 will
yield good enough results. Going over these ISO values
can become an issue, but it still depends on
the camera you're using. Some cameras like the Sony
seven S three can shoot noise free at insanely high ISO
values like 16,000 or more. Let's recap. The exposure
triangle looks like this. Aperture, shutter
speed, and ISO, we are shooting video, so we're trying to make
the shutter speed fixed. That's the last thing
we want to change. For example, if I have a
scene that is too dark, the first thing I want to do is try to open
up the aperture, so I'll try to lower the F stop. If your scene is still too dark, you want to start increasing your ISO until you get
the desired brightness. If you increase your ISO too much and start getting
a lot of noise, my first advice would
be to add more light in your scene before
lowering your shutter speed. If you don't have
any more lights, your ISO is at its limits and
you need to get the shot. You can lower your shutter speed to be the same as
the frame rate, 1/30 for 30 FPS. This will work for scenes that
have very small movements, but as soon as you make a
larger movement in the frame, this ends up looking bad. Now let's look at what
happens the other way around. If you have a shot
that's too bright, the first thing you should
do is lower the ISO. If you lower the
ISO to its minimum, and your sin is
still too bright, then you need to start
closing down your aperture. If it's still too bright, you need to increase
your shutter speed. Now here we come to an
interesting problem. What do you do if you're using a foam that has a
fixed aperture, or you want to maintain
a specific stop because of a blurred background. If your ISO is at
the lowest setting, your only option is to
increase the shutter speed. This will lead to choppy
motion in your frame. You can fix this by putting an ND filter in
front of your lens, which is sort of like
sunglasses for your camera. Another option is to add the motion blur in post
production using tools like the real smart motion blur or pixel motion blur
in after effects. Note that this route
can lead to artifacts, not to mention you need a pretty beefy computer
to pull it off.
6. Matching the Screen Brightness: Now we know how to
set the exposure, but how do we know how
bright our scene should be? You can usually just look at your monitor and eyeball
the right exposure. But our cameras have a tool that's built in that allows us to measure the exposure value of the whole scene
or a part of it. For all my examples, I'll be sending my camera
to spot metering mode. This is found in the menu in
most cameras under metering. After you set the camera
mode to spot metering, you'll usually see
a circle or across at the point where the camera
is measuring the exposure. This varies between
manufacturers. Some cameras also allow you to move the spot
you're measuring, and some just keep
it in the center. This exposure meter
measures light in stops. If you increase the
light by one stop, you've doubled the amount of light that comes to the sensor. The value that the stops are measured to is the middle gray. Middle gray represents the
middle value of your sensor. If your sensor goes
0-256 in values, the middle gray is 128. This is exactly the
value we need to match between our
screen and our scene. If the middle gray on our
screens, which means RGB, color 128 for RG and B, and the middle gray in our scene have the
exact lightness. This means that our screen
is blacks and whites will match with the blacks
and whites of our scene. We can display the middle gray on any screen pretty easily. Just open up paint or any other graphics
program and just fill it out with the RGB color 128. For all the three
values in hex code. This is color 88, 80. But when it comes to our scene, there aren't a lot of things in life that are
perfectly middle gray. That's where a gray
card comes into play. These are specialty cards that have the correct
middle gray color. What if you are in a pinch and don't have a
gray card handy? You can use your hand. The exposure value
of light skin is around two thirds of a
stop over middle gray. When I point my hand
at the camera's meter, I should get either 0.7 or in the case of
this graphical meter, two lines over middle gray, each line represents a third. If you have lighter skin, the value can be closer to one. Darker skin tones are closer
to zero or middle gray. This method isn't as
accurate as a gray card. But for example,
I did this enough times that I know when I
expose my skin at two, threes over middle gray, it looks good in the end. It's all trial and error. And the more you do this, you get a knack for
how exposure works. Okay, let's set the proper
exposure for my scene. I look where my spot
meter was set and place my gray card
at that exact spot. I'll adjust my ISO and aperture until I get
the value to be zero. I'm doing all this on a
mobile app just to make it easier since the camera
is mounted overhead. I can also check the
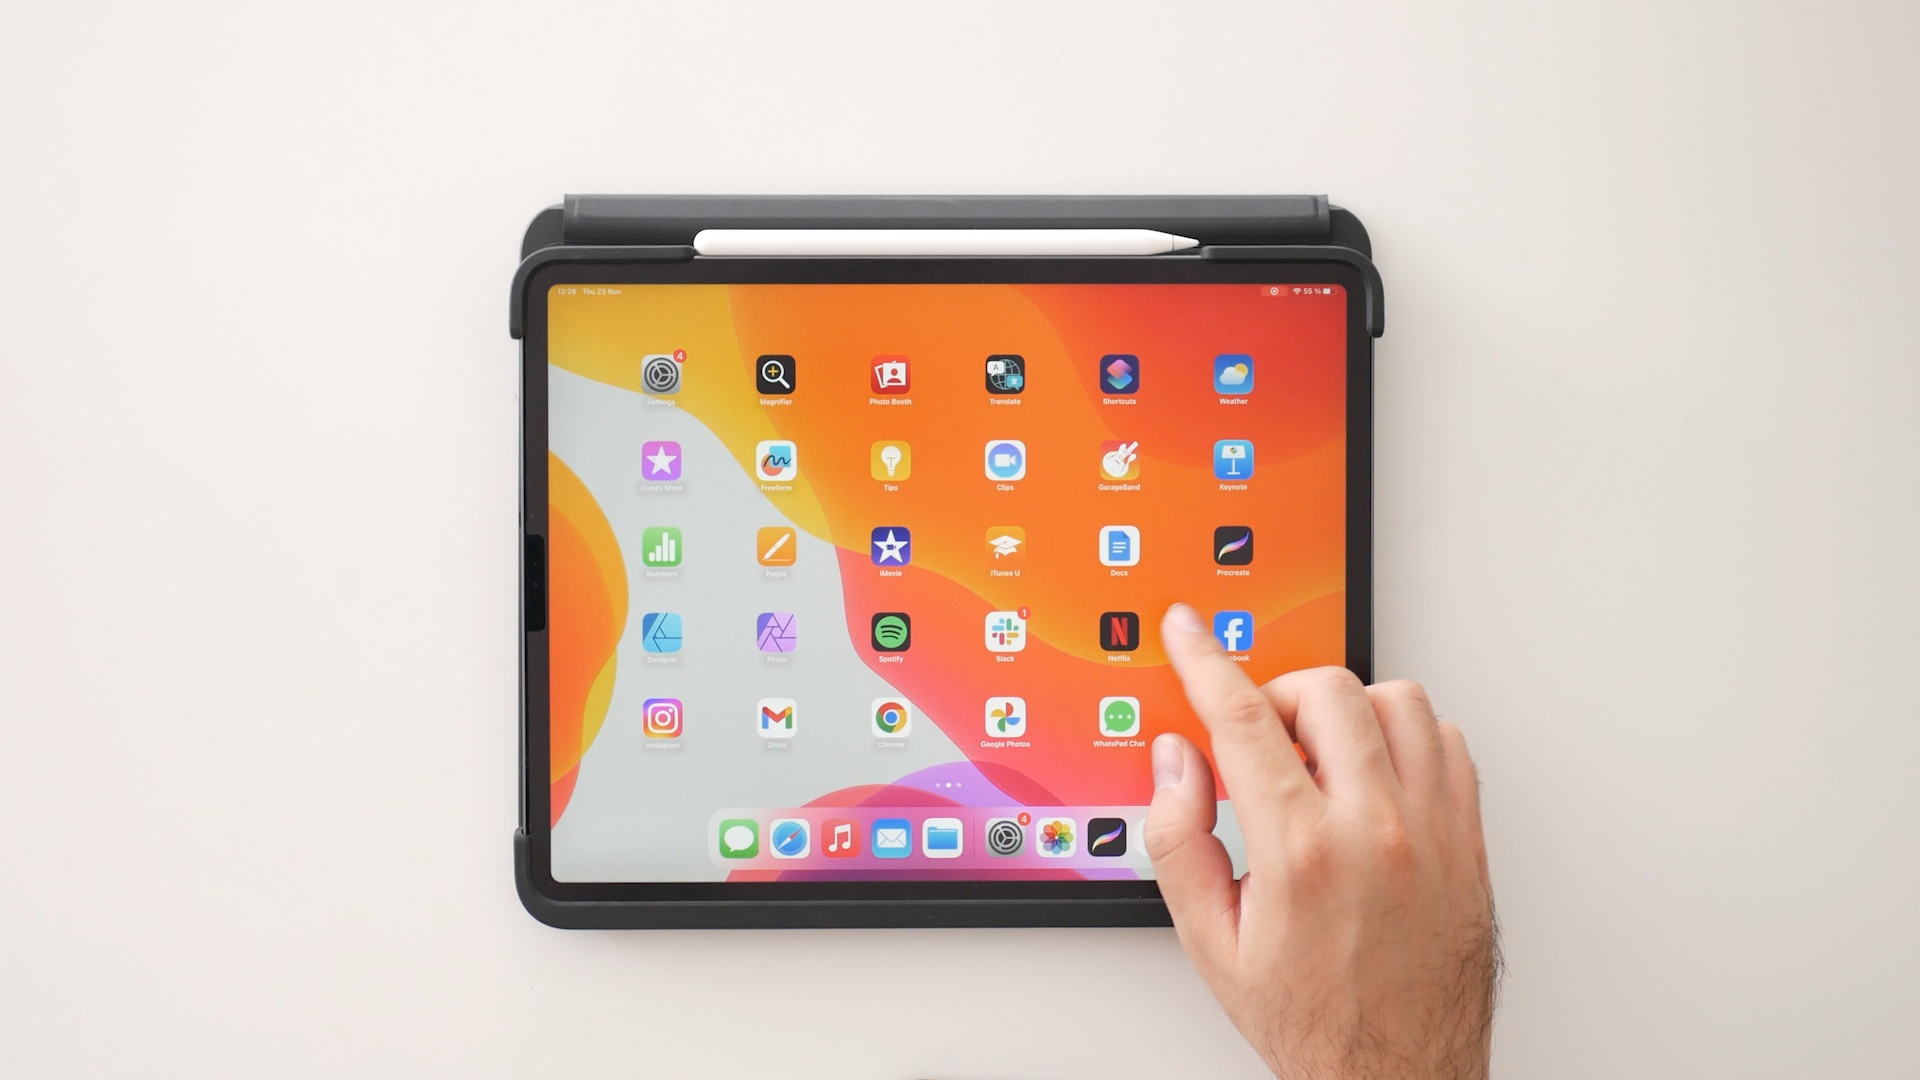
exposure using my hand. It's 23/0 Perfect. Let's turn on my ipad screen. As you can see, it's
way too bright now. Before I start adjusting
the brightness of my ipad, I need to make sure that true tone is on and the
color is better match. And I also need to make sure
that auto brightness is off. I've had this happen
too many times. You do all the work and
you set everything up. And then in the
middle of the shot, the tablet just randomly
changes its brightness. The setting for auto
brightness is hidden away in the accessibility settings under the display and
text size sub menu. Once you turn it off, the brightness that you set will stay the same no
matter what you do. This is great for filming, but for general usage
you may want to turn it back on when you're
finished with recording. Now I'm going to open a
procreate on the ipad. Go to the color tab and enter the color value
for middle gray, 128 for R, G, and B. I'm going to fill my
whole screen with the color. Now on my camera, I'm moving the spot meter to be measuring just the
gray on the screen. I'll go to the brightness
slider and just move it until my camera shows zero for the
measurement. And that's it. You can see that the screen is perfectly matched with
the rest of the scene. This method works for
any type of device. When you're shooting
laptops and TV's, keep in mind that moving the
angle of your screen can dramatically
decrease or increase the brightness that the
screen has in the frame. Here's a simple
scene with a laptop. I'll set up the exposure
of the scene beforehand, And now it's time to adjust
the brightness of my screen. I just Googled full screen
color and then went to the first website
that allowed me to fill the screen with
the middle gray color. I'll set my spot meter to the screen and adjust
until I hit zero. Now watch what happens
if I rotate the laptop. Notice how darker the screen became to get the
proper picture. Now I need to increase
the brightness to make the middle gray appear
as zero on my meter. If you use a phone or your camera doesn't
have an exposure meter, your options here are
a lot more limited. Your best bet is to set the exposure on your phone
according to your scene, lock it, and then
just start adjusting your screens brightness and
look at different images. Try displaying dark
and bright images and matching what you see in real life with what's
on your phone screen. It's a bit more tedious, but if you follow all of
the steps we talked about, you'll end up with a
professional looking shot that's better than letting everything go loose on automatic mode.
7. Thank You: We've made it to the
end of this class. I hope you enjoyed it and that
you feel more confident in your ability to tackle filming any screen
that comes your way. If you like this class, be sure to read and review it. I always like hearing
your feedback and suggestions for
my next classes. If something wasn't clear, you can always start a
discussion on the class page. And I'm here to help
you in any way I can. If you want to get notified
about my next classes, you can follow me
here on Skillshare. And if you want to
keep in touch with me, you can follow me on
Instagram at Umsarre. Thanks for stopping by. Have a lovely day and I'll
see you in the next one.
 Uroš Maravić, Videographer & Music producer