Transcripts
1. Introduction : Hello everyone. My name is Jessica
and welcome back to the studio handbooks
series of classes. This is chapter two. If you have not
seen chapter one, that's full of what even
more information and the concept of what
these classes are. I am sitting around in my studio with you in these
classes and I'm sharing what comes to me pretty
much in order of what subject matter but
not not really organized. It's more of a conversation
and it's, oh, by the way, you know, this and
that, and so on. So every, we don't really
have a topic per chapter, but sometimes it turns out to be about a couple of things. And this is one of those times it's turned out to
be about color, about a huge field of art media that is water-soluble and
thought of as water media. And it really isn't
watercolor at all. It's die and it's
about brilliant, amazing color and it
has its drawbacks. And one of the
tools we really use a lot with it is a water brush. So we want to get to know what a water brush is
and what it can do. We have color
swatching and we have, It's all about color. And then we use
some of these and have a really fun time testing what they can
and they can't do. We do a little bit of, of debunking of
marketing claims and your project for this
series of classes, it's just really one project. And it is to create a
studio Handbook of your own and put this information in there in any kind
of a note-taking, a sketching, a any
kind of method that you have that you'd like
to use to keep information. And so Welcome to Chapter two. And let's just jump
ahead and get going. You're probably tired of
looking at my studio handbook, so let's go get some more
information for yours.
2. All About the Water Brush: I thought I'd spend a couple of minutes talking about one of my top favorite art supplies
in the whole wide world, and that is a water brush. When I found this, I thought, oh boy, I can carry water around
without carrying a big thing of jug of something and
jars and everything. And I was just in heaven. And also the way that
these work is that they require a constant supply
through this business here, engineering, gizmo,
ism, and they wick the water from the barrel into the brush tip at all times. So you can't probably
see that I just wet my finger but this
is a damp brush tip. So let's see what can
I tell you about them? I'm first going to tell you that when everybody
first finds out what a water brush is and there's carries its
own water supply. The idea that you
get right away, of course, is that
you're going to squeeze it to get the water out. This works if you want it, this will squeeze out
a drop at a time. If you want to work on
making a tiny wash. And it's good for
squeezing some water to make a bigger wash
in your palette. It's not good to be squeezing this over the top of
your artwork ever, really, because that is
really a lack of control. What's going to come out. And you're gonna
get a big blob of water somewhere,
you don't want it. So when I squeeze
it, most times, the only time I
squeezed it is to clean it on a paper towel. And there's little
squeeze marks right here, a little fingers squeeze marks
right there on the barrel. And this brand, which
is best by the way, and squeezing a drop
and going like this, you have a clean brush. This makes it an
amazing tool for color swatching and
for color when you're doing a lot of colors switching and you don't want to
pollute one with the other clean so quickly with
a regular brush as you know, it's pretty difficult to get
it back to totally clean. This is a pretty new one and
so the tip is pretty white. They will stain it, but it's not a problem
because they're not depositing any color. So I use these two
absolute death, but I'm just going to show you after you use
them for awhile, the tip looks more like the sable brush and less
like the white one, but still working grade. You can wear them out. I wear them out regularly. You can get like bad hair days because I not only
paint with them, I push with them and I do my if you've taken
some of my other classes, you know, about my
vignetting technique with pencil and everything. And that's all it's up. It's hard on the brush. They're not expensive though
there for eight or $9. And they do last a long time. And once you have really
beat the devil out of them, you can do things like put bleach in them and use
them on black paper. And you can mix different
color washes in your old one and just keep it full
minutes like one of those color brush
pens that you buy. And so anyway, in my opinion, I would say humble opinion, but I don't remember really
too humble about my opinions. But in my opinion, there's only one brand that
is just top of the trick. That brand is called Ni Jie NIJ. And it's made by current talky, which is a company that
I really like anyway, but I have been using their water brushes
for 20 years or more. Not sure if they didn't exist for 20 years and it
hasn't been quite 20 years, but it seems like it. And what's really
good about them? They never do a leak thing anew. And a leak thing coming
out of a water brush can just be a total,
total disaster. So I use almost all the
time, the small tip. And then Nietzsche
brush for sketchbooks, I find it's a perfect amount of moisture without being
too much, too little. But they do come in other sizes. If you'd like a looser style. These two are both smalls. There is a medium tip and
there is a large tip. Both of these are pointed round. Then there is a, I don't use it much, but for certain things, which I will be showing you. One of these days, the flat version that they
make comes in really handy. It's about a half an
inch wide wash brush. I'm not going to say that. I think that with this, you can get a real Even
Wash sale for a long time. I was really an idiot. I'm proud to say that, no, I couldn't figure out
how to fill these. So people would
say that you just dip it in a cup of water I've saved down and squeeze it
and it'll suck up water. Well, it does but
only about that much. And so for I don't
know how many years, a lot of years, more years than a person should
remain this dome. However, I did it, I would just take a
little butter knife and I would pry off this
little black cap. Didn't hurt anything. Sometimes an exact us better, I just lift it and then
I would fill my Biro under running water and put this little plug back in
and screw it back together. So one day I happened upon a YouTube video that is one
of those life-changing. Never forget this YouTube
videos about filling this. I would take you in the camera to the sink to
show this in life, but there is no good angle
or which to do that. So I'm going to
tell you about it. You still unscrew the brush, but you don't pry this thing off and you don't
dip it in a cup. You take it to
running water under your sink and you
hold it upright. And you put your thumb
and index finger on little squeezy flat place
here and you squeeze it. I'm not gonna do that because it really rough. This is full. You squeeze it three
or four times under the running stream of water
and the brushes full. Totally fall is just
a fantastic thing. And maybe everybody in the world knew about that a long
time before I did, but I don't think so. The directions never
came and said that. But anyway, now, you know, if you've been doing
it any other way, It's not as easy as this way. So these days there are
a number of brands and by all different even
current dash pen towel. There are paint kits that come with water
brushes in them. But in my opinion, only the needed
use just the best because it fills so
easily, which I now know. And because it does not leak, it will not blob on your
artwork and it cleans instantly with just
a back and forth. If I can put, I'm going
to show you that. If I can find my
paint palette here, I'll get these guys
out of the way. So wonderful for
watercolor in the field, because you don't have
to pre-web anything. And if you want to, you can drop the drop
right out of the brush. You can also do it in one of your palate places
to make a wash. But anyways, I'm getting
a lot of paint on here. In order to demonstrate. See that's a nice dark
yellow ocher there. I wanted to demonstrate how
easily the brush cleans. So I just I always start
by taking the excess off. I squeeze a drop or two and then I wipe it
back-and-forth. And if you test over here, look not a bit of pain is left. So this makes this
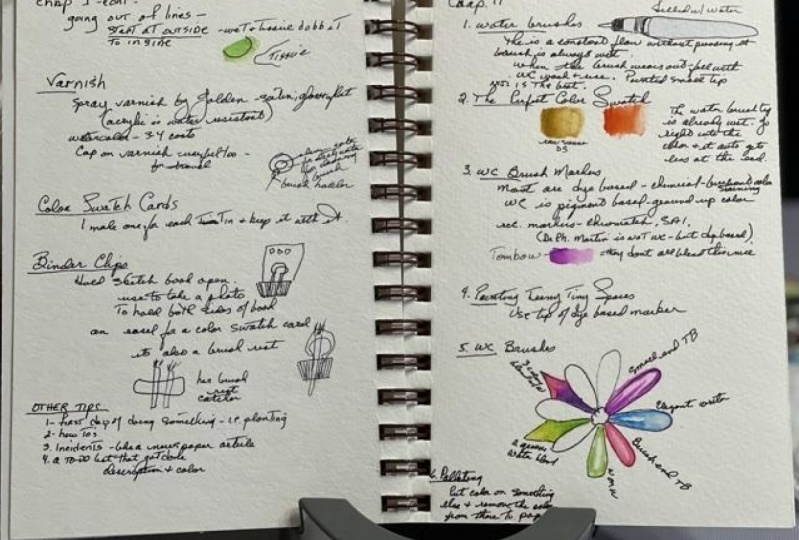
the perfect tool for making color swatches. And we're going to go talk about the perfect color swatch.
3. The Perfect Color Swatch: In Chapter One of
the studio handbook, we talked about color charts and having one for
every paint box. And it's a wonderful idea. And so I'm making a new
color chart for this box. So I thought this is
a perfect place to show you the perfect
way to make a swatch. And then I wouldn't
even be wasting time because I'd be making what? I've already done. My top row and my second row. And I'm starting
on my third row. So this third row right here is earth tones and it's got a couple of
full pans in the front end. And that's because those
are a couple of colors that are really important
to me and I use them a lot. But I've already got my army out of raw sienna
swatch right here. And so I'm going to show
you how I do a swatch by doing the one that's now missing from the market,
the burnt sienna. So I don't pretty wet
the paint at all. I just go in with my brush, which is C Daniel Smith. Paint never sticks
in pants for me. Never, never, never. But anyway, I just went
in with the water brush. There was enough moisture to really get a
nice load of paint. I always really fill my brush. I don't do swatches with washes. I'm going to make a wash. But I don't make a wash to
make the swatch because I want information in my swatches that runs the gamut it
with the color can do. And if if you look right
here, the darkest, like it comes out
of the tube is on the left and it lightens up and it shows me
a range of value. The other thing it shows me is, I don't know what
I can point with, I guess a handle of a brush. It shows me the blend edge and I'm just making
that term up. That's nothing official. But it shows me how smooth the drying edge
would be between values. And to me that's really
important because I don't like hard edges and my
watercolors, some people do. Then you'd know also
what's going to dry with a harder edge like this one over here
that is quin gold. This pretty hard edge where
it meets its darkest right? And overhear hardly any edge. That's a light ocher by snowy, I think is how they say that. I'm not sure, I'm not French. So here's a Naples that
dries really hard. So my information and
I'm gonna get from a single swatch is what does the color look like
coming out of the tube? And what does it lighten up to? And then how hard will the
line be on a wet on wet, where the darker and the
lighter values meet. So that's why I consider
this a really good way to make a make a swatch. So I have my brush full of
pain and I just usually do not a circle but
a little rectangle. Now I want you to
notice right here how already I have values
that light enough. Why did that happen? Right? Because this is feeding water to the tip the whole time I
was going across here, this is why we don't use
these to make an even wash. But what I've got
here is a range of values from darkest to lightest, but two as late as I'm
probably going to go. If I make a swatch and I
want an example of lighter, I may come back and
lift on that edge. So I might sometimes
with some colors, I might even blend away the right-hand
edge so that I have a whole range of
value coming across from the darkest to
the lightest that I'm probably going
to use the color. And when I did this, of course, I added more water
because of this point. And so now I got to watch that blend because that's
not gonna be fair for me to judge the blend when I just fed a blob of
water in there. Okay. So that is how I do what I
call the perfect swatch. And I do it with everything. I do it with watercolor. I do it with a brush markers. I do it with watercolor pencils, especially when I
put the block down dry and I come back with this brush and wet
it and spread it. I'm getting so much information
from that one swatch. Even though sometimes you
have to be small like in this palette with
so many colors in it. And then what I do is
with a little tiny, actually it's a Pitt pen, that's an extra small point. I write the color
abbreviated if I know, I'm still going to
know what that means. And then I always make a
note of the manufacturer. So this says d s because
Daniel Smith up here. This one is mg. If Sam Gram Schmidt,
Anki, Sri Lanka. The LEA, I have to put the
SEN, so I know the difference. Wn is Winsor Newton
and so on mission. You can't see off here, but I have a mission out here. I have a somewhere I have Ohio to this is a
Grumbacher, not Ohio. What is it called? I don't know, Old Holland. Old Holland. I put o h and
therefore I read Ohio. So anyway, that is what I think is a perfect swatch in
order to tell what, not only what color you have, put all the values of
that color at a glance.
4. Color to Dye For: Our in the wild and wide world of water-based media, there is a real abundance of things that are, that there is a misnomer there named watercolor. And there aren't really watercolor, even though they're water-soluble. That's harder to see and understand for people. So marketing people just call them watercolor this and watercolor that. Watercolor brush markers. There are actual watercolor brush markers made by a couple of the companies like Winsor, Newton. But most of them are not watercolor, they are dye based. Why does that matter? There are a lot of reasons that it matters, and I'm going to try to handle a few of them with LB and scientific is, I am not a very scientific person. When it comes to art, I have a basic understanding, but watercolor is made of pigment and pigment is ground up color source like it might be a mineral or it might be. I don't know what a lot of stuff and organic dyes originally were made that way too, like boiling vegetables and so on. And you can still make dies with those. But in our modern times, most dye based things are actually made from chemicals, petrochemicals usually. And they have a brilliance that no pigment based ink ever house. It's like how on your computer or your device, the colors are so absolutely brilliant. And you can't seem to match that when you go to paint something. And those because of the nature of pigment versus light color, the primaries aren't even the same, will die and pigment are sort of like that dye is dissolved. Pigment is a ground up finer and finer and finer. In your transparent watercolors. That's a finest grind. And then in wash, it has more capacity because it's a more coarse grind. Lot of people think that guage is like, yeah, add white paint to water color or you add clay. And that is true. The inexpensive kind. However, the fine art type of wash is made opaque by larger pigment particles. Okay. Pigment is more light fast. There is a variance and what pigment is, how light fast, but pigment is more light fast than die. So as an artist, illustrator, sketch burger, and so on, what do you have to know about the difference between die in pigment and the major thing is light fastness. So diabetes is very bright. It does not granulate. And it will not, it will fade with exposure to light. So traditionally, die media has been used in cases where you're going to create art and digitize it or you're going to create art and then print it. It prints really nicely and scans nicely because there is no granulation. And so, and then once course you scan it and you print it, that's a different animal and you're printing with pigment inks usually. And so they become permanent and they have a lot more, a lot more light, fast ness, if you will. But now a lot of us work in sketchbooks and UF sketchbook is kept closed. And so therefore is a dye based media are coming back in very strong and it's really nice to be able to use them in your sketch book. So I just have a few here. And it's really a lot. And I'm just going to run through them a little bit quickly. And then I have a swatch book that I have made from my different dye media, which we will go through and we will talk about it a little more. Okay, so this right here is a box of something called Peerless watercolor. And again, marketed as watercolors is not watercolor. It is. And see if there's a bigger she didn't hear that. I can show you that it comes in larger sheets. What I have here, kinda leftovers from cut sheets because of how I use it. So this is not a watercolor. What it is is a paper impregnated with dye. And they were originally, it's a very old product. It was originally developed to add color photographs. And then the family that manufactured it, oh, you know, maybe people would like to just use it for paint. And so people do and they call it Peerless water colors. It is not watercolor, it is water-soluble and in its brilliant color, but it is dy and if you handled it, it with a finger that was even slightly moist, you would get it all over your fingers. Now, I'm not going to talk about that more now that I'm going to talk about it in the swatch book or I can show you how it works and how it looks. Aware I have here are just a bunch of what are called watercolor brush pens, markers, brush pounds. Winsor Newton makes a brush pen that is actual watercolor and sort of somebody else right now I can't think of who it is. It might be. No, I'm not going to hazard a guess because I can't remember, but somebody else also does and they are markers, brush tip markers, and they are actually water color. I don't think personally that the watercolor works so well in that format, but that, that's up to everybody as they use them. So these, all of these are not watercolor. All of these are GUI-based ink in one or another form of marker. And there some are called real brush. And this is one. And the reason they call it this is a real brush clean color. I really like this one. But the reason they're called real brush is because they are that is not a fiber tip with a little brush point. That is a bendable painted oil brush. That's the differences, is a fiber brush very similar to the the water brush. But it is soft in it. It, it doesn't beat up paper and it bends from a very thin line to a fatter line. So this is one of those. This is a Chrome attack, I believe it is as well, yes, that's another real brush. And then here I have the very, very popular Tombow. And it's not a real brush. It is a fiber Tip Brush. And it comes to a point, but it does not bend any more than that. Just the tip of it will bend. And what I find, I'm cellulose based paper, not on cotton, cotton, a 100 percent cotton watercolor paper can just bought take anything. I have literally put a piece of 300 pound Arches through washer and dryer cycles. Three, I think I was trying to beat it up. I was trying to get distressed edges for a project I was doing. That stuff is just tough. But anyway, in most sketchbooks you don't have it would be too expensive to how a 100 percent cotton paper in these types of harder tips, um, can start to bring up the fiber on the paper surface. This is from this is a Staedtler, has a thin end and a fat end. But again, fiber tip, not real brush. So that's a big difference here. This is a Japanese brand that I found on Amazon and they're really, really good. S, S, ai. And there's a company name starts with an a that I can't say n, It can't read it because it's so small. This is one of the better. Besides real brush here. This is a really wonderful real brush tip. You see how much flexibility that's got. The reason these have a handmade tip. It's not it's put together just like a inexpensive regular paint brushes. The other nice thing about these is that you put the cap on and you see that it doesn't fit back in the box because they seal, you really push it on and they seal so they do not dry out. All right, so then what I have here are HDR went ink tents, pencils. They are marketed more truly than most things. I mean, most people think of them as a watercolor pencil, but they're not, they're dye based. And they go ahead and they tell you that and they brag about certain aspects of it due to the fact that they're dye based. And one is the brilliance of color and another is if they say if you lay down a layer and wet it after that, it's waterproof. We're going to be testing that because I haven't found that to be very true. Be honest with you. Believe it or not, there's still another very badly misnamed water color that is not watercolor. And they do make watercolor. Okay. But Dr. Ph. Martin's radiant concentrated watercolor is not watercolor. And I think in the name they have a space and the name. And it seems to me that they might have done that just to say, okay, we're not really saying watercolor, but you know, that's everybody's understanding. Watercolor. This is a dye based, highly concentrated liquid paint. I shook this up to show you, but before I did, it does settle out. So it's, it's an odd die, maybe the concentrated part of it, I don't know it's an odd die because it says it has something that settles out, dust or something you can't tell on this because it's dark. But anyway, rural vibrant color but again prone to fading and, and used mostly in, in work that has to be reproduced. But again, in sketchbooks, no problem, sludge not going to lay your sketch books out to sunbathe. So anyway, that's kind of an overview of all of these things that are out there called watercolor pencils and watercolor brushes and watercolor markers and everything. And they're not, they're a dye based by we're going to we're going to take a good look at the reason if you've WHO fits doc a fizzle out light fast, why the heck would I even want to use it anyway? Well, the color is eye popping. And that's why really, that's what they all have going for them as brilliance like ink tents, they market themselves against the rest of the watercolor pencils by that, by vibrance and peerless is thought to be just amazingly vibrant. And all of these, actually, the watercolor brushes don't advertise themselves that way, but they have the, they are brilliant because they are dy. So you're going to be seeing how brilliant everything is in just a minute.
5. A Book of Many Colors: In our chapter one session, we talked about color swatch cards and we talked about them again today when we were making the perfect color swatch. I am going to sit with my hands are. For your sake. It has a Lennon cover and it creates a more a pattern. You can see it. I'll show you just for a minute. It's really awful and distracting and it moves on the video and so on, right? Anyway, so while I talk about why I have this book, I am going to keep my hands over for you. So a card with a lot of swatches isn't really practical and you're talking about, you know, sets of markers and ceramic bowl and all this kinda stuff. And so, and there are so many of them and I don't really use them all the time. So what I decided to do was to put all of those swatches in a book. And I can grab that book at anytime and find whatever brand ideas of brush I'm using and get the swatches for that and choose a color. And so I'm going to open this in order to start telling you about it. And of course, This book is a weird book. I won't close it again. It is likely that it was made by a global arts, which has now been brought by speed ball. But it's an odd, odd landscape shape and I got them. Well at that time I was working with global arts trend to develop the perfect sketch book and and I wasn't working for them. I was working with them and we weren't really getting anywhere with it. And by the time that anything was getting close to the Stillman and burn came along and we'll talk about that at another time. But that just became my favorite most wonderful sketchbook. And so in a way I had these because they were sent to me and I thought, yeah, I'm never going to, I'm not really landscape sketch book or anyway, usually own portrait, so they'll never going to really use this for that. And so sketchbooks that you're never going to really use for something else. There's always something else to use them for. So I don't even know in the joke here is that I colored test for time. I was like I either for drying or for something. I was testing something but I can't even remember what paint that wasn't as to back is kinda pretty. So that is not one of my swatching things, but this is a swatching book. And then for color charts. And then what's funny too, is that the first thing in here is the swatches that it is the peerless watercolor teta. And what I did was like I told you, you, you have to figure out a way that works for you to use these in it. And generally, it's about cutting that larger sheet up into smaller pieces. And I have a like a laminated card elsewhere that I have little pieces on. It's like all in one pallet. But like you say, I don't use it that often. And so I thought we all do is put the actual. Peerless in here and with its color chart under it. And I divided it into different pages. And by color so that it would stay somewhat organized? Yes. You did hear my dog bark because she I don't know. I think she's triggered by the video or something. She's in the house, I'm in the greenhouse. She didn't like that. And I'm going to have to go and talk to her bodice. Okay. So Sky and I have had a little talk and that's a will last us for a few minutes. I think that's probably all. She's a Siberian Husky. And if any of you know, that breed of dog, you know that they are the boss of everything. So anyway, I was going to show you a little piece of watercolor paper here, how this works and where it looks like. So I'm going to get my trusty watercolor or a water brush, which again, is really the best way to work with this because it's carrying the right amount of water, the project to the palette in the page. And because it cleans more easily, so dy is staining. That's the other thing. The difference between the dye and the pigment based paints is that most dyes are going to be staining and you can lift them to a certain degree, but usually not back to white. And you're never going to get granulation out of them. And never say never, but okay, I'm gonna go to blood red here. And all I'm doing is taking the water brush into wet an area and look at that color Berlant's, it's just, it's really amazing how bright it is and it will lift while it's wet. And the problem is though, that where I just read this, Let's say if I can pick up anymore, I'm only picking it up really from the edges of the wet spot. You see you not as much brilliance at all. Because what you do is you're using this pane up as you go. So once you have, you can see little spots here and here. And once you have made these little spots, then there is no more dye to pick up from that paper. And so the second time in the same spot you're here. And then when they didn't see that, I mean, amazing. Look. How well you can't look. Oh, yeah. I'm I'm cleaning the brush. One drop and all that intense color came right off there. So I love water brushes. Anyway, if I go back to that very same spot. One more time. I'm just barely going to have anything. So I mean, I guess that could be useful if you were trying to go over three different values. But you can see that that is very much lightened up. So you can tell when you have used up a whole sheet. But when it's gone, it's gone. And once it's used, that is that ON going to grab an example of a sketch that I did with these. So you can see they're really amazing color. This sketch is not very usual for me. I mean, it looks like me, but it's like when I'm branching out and trying things that are new. So originally this is called Tweet street and Vine as bird houses in case you didn't notice. Anyway, originally I did this in an app called Paper on the iPad and it has a wonderful painting engine. And it gets you a look just kind of like this. So when I took this sketch to a sketchbook, I that what do I use to get the look I had in the paper app and I turned to the Peerless. The ink line here is done with the original orange pen. We'll talk about that when we talked boating pens some time. And it's a real sketchy and scratchy line, but the color from the peerless is fantastic and it won't change much because it is inside of a book. And so they'll look would be the reason why you would reach for those regardless of any of the inconvenience that might be about it. So back to our color book and pass through the all these. I don't know. I'm not sure why I separate pages, but I think that there are a lot more colors to be had. These things are not inexpensive by the way. So I left room for them and I always left the left page blank because you can tell if I close this book after I've used one of these in it, It's not dry it. And it'll be over here. And look at those. Amazing oh yeah, here these really show you all the colors. I've got. Birth towns, burn numbers, and a neutral tent. All right, now we are out of there. And we're moving right along now. Ink tents. We talked about the intense pencils. And this is a color chart for the intense blocks. I only have 24 of them. I have like 72 or however many they make of the intense. But only 24 and here because they make a block and the block is like, let's say a hard pass down with it's made of the, of the inner core of these. So. You can use it. We figured that out a long time ago. They use a mouse palette, but then the manufacturers saw that that was happening. And they now make a mini kind of a half pans situation so that you can carry them around and use them as a palette. And their whole claim to fame in life is brilliance. But as you can see, this brilliance doesn't even hold a candle to the brilliance that we got. I'm going to in fact hole not a candle, but that sketch up again so that you can see the difference and brilliance. And this one is really takes a cake. You know. It might be the most brilliant thing I've ever used. I don't know. But anyway, back to facts, ma'am. So this is the ink tents and you'll see I did colored tore swatches the same way I applied this dry and then took the water brush, wet an area that to see what the range of values here we have coin markers. I didn't have one of those out. There may be Socorro and have one of them in the original bunch here. They look like this. They're not a real color brush. They are fiber. They are nicely soluble and you can tell that. And they are brilliant. Probably a pretty good runner up to the and to the peerless. But you can see here that they blend with water very nicely. They'll blend out and then blend with each other. And I only told you start to get dry later on. You don't go in and mess because nothing happens with those. Anyway, these are also pretty expensive, but I think they're worth it because the more expensive your art product is, the more color it's got in it. And that's the truth. Here's a radiant. These are the concentrated water color from Dr. Ph. Martin. And I don't have a lot of colors. That's pretty darn close to the peerless to, so they got color gonad. Again, another reason to be using these things is a really good reason to be using them is their brilliance. Now this happens to be Dr. Martin hydrous, and I don't know how I got in here because most of the things in here a database, but that at the time was not my intention. My intention was to have one book with color charts from multi sets of art supplies. But the hydrous is not. I think that the radio is right there. I look at that difference in brilliance. So this is a real watercolor with pigment. And this is dye based. Alright. This is a strange animal. It's calls to below 88 and really it's a very fine tip marker in its semi water-soluble. So it is TY based. And so why it's interesting is if you do a real sketchy thing and then you wash over a lot of your line. Remains. And so it can give you a real interesting what do I want to say? Like, you know, crosshatched, kinda shading on the sketch because you do it with this and then you wash over it looks like it's water colored but it's got Cross has had just sketching. So it's kind of interesting. They're not expensive. They don't come in a lot of colors. But this is what I call an effect medium. This is to pull out when you are a certain kind of a look. Okay. Here are Tombow markers. I do not have very many of them. I do not dislike them. I like everything Tombow makes, but like I said, the paper in my sketchbooks does not like those fiber tips once I start blending them. So I just don't use them much and therefore, I don't have very many colors, but their colors are wonderful. And they come at the other end of that Tombow marker is a, is a fine tip. So there are dual tube anthropologists are useful. Okay? Staedtler triplets at they, their claim to fame was that come in. That's not their claim to fame. That they come in a one millimeter and a 0.3. Their claim to fame is a, they have a triangle barrel and they don't roll around. And so, and also you can leave the cap off and they don't dry out. And I think that that is very true advertising thing because this set is, oh my gosh, at least 15 years old and probably older. Rarely used in no, I don't leave the covers off, but every time I open them back up, There's nothing and dry it out. Yeah. So that's pretty good claim. I like when those claims are true, Here's the Chrome attack, the real brush marker. And that is this guy. And it's got again, it's got the bendy tip. And the colors are nice and brilliant, especially through the warm colors there. And the greens, earth tones or a little, well, they're actually, what's interesting is they're sort of granulated and you don't get that in a dye based marker. So when I look in here, then I'm doing something. I use a lot of earth tones because I'm in the Southwest. So if I'm doing something, you don't want some texture. This is that essay. Japanese, a handmade brush tip. Colors are beautiful. They're subtle, they're not as Poppy as if some of that I know I skipped on. Here's the real brush clear color from a SIG. And they, this is all their colors, I think. No, I think they now have 60 excuse me. And this was the 489. Leave out the fluorescent. I never use fluorescence and so nice color range on these. Again, these are expensive. Set of 48 is like a $100. But I have also had these 44 or five years and I do use some, I mean, not my real brush. I do use them a lot and they have stage nice and juicy and, and good. Now I'm going to point out something just because we're here and it's a something. And that is if you paint with these guys, these diabase colors, almost all of them. And you say that you have a wet area and you want to go in and you want to add more color with your brush tip. What's going to happen is the brush tip is going to suck up the water from the art in the brush tip gets all like no bleached, but looks bleached. It gets all colorless, you know, like two-thirds of the way up. And all you can do is go to, you know, go to a here's a fix-it for that. Go to a paper towel and bleed it out a little bit and pull it back, pull the ink back down. But that's not helpful for adding color to an area where you don't have enough. So there's a workaround for it. But it comes along with this idea of palpating, which I'm going to tell you about either this timer, chapter three, that you can, you can use these from a palette and keep picking up more color. Okay? And that could be n, that is yet. So I have given you a nice tour here. And in the next short video, I'm just going to show you a blend factor on these guys. And then we'll move on to something else.
6. Going Round the Blend: Hi, I've mentioned before that what is really, really important to me in any water media is its flexibility. And so I wanted to do a test. This is a Stillman and burn beta sketchbook. I do my sketch booking in the wire bound because I don't want my hand on it, but I use I use these as actual sketchbooks, like testing and preparing and stuff, the old way of using sketchbooks. And then I do the good stuff in the good sketchbooks. So I have all my brands of watercolor brush pens here, which we now know are all die. And I did a test on everything. Okay. And so my test was that I wanted to know when you first put these down, It's a dark mark that you're making and I wanted to know, can I brush that out and blend it and not have blooms and cauliflower ears and wash back and how smoothly is it going to run through its values. And so I tested every one of them on exactly the same paper. And I would just run through my opinions about it. If you want to buy these what I thought were the best and what weren't the best. Okay. The SAI, the Japanese one is the most like a real watercolor brush. And so, and it blends beautifully and the colors are beautiful. It does have that thing where the tip goes white if you try to add in color. But that's this sample here. And the chroma tech, a lot of people really like the Chrome attack and it's not bad here. The markers are not as juicy. And again, the tip does turn white. If you go back into a area of lesser color, then once on the two, it will pick up the lesser color. And so they're not very expensive. So for that reason, there are good bet. Staedtler. I don't think I don't know that I yes, I did talk to you about it. It was yeah, it was this one was not happy with the Staedtler markers. I read a great review about him, so I thought I'll try them. But I had a coupon and I got a really good price on it anyway, I really don't like thumb. You can see why I'm doing exactly the same kind of brush work on every one of these swatches. So compare that blending to this blending and you'll see where my problem is. It's very hard to make the marks disappear. And that's what I meant a minute ago. These markers go down and make a very deep color. And when you are blending out, you want to be able to make that edge disappear where that color was, you know, that color line was. And so that's what I was doing here with a water brush. I was just working it out and getting it to smooth out that one. Not so much. That also is not a real brush tip. While I was at Hobby Lobby with a coupon getting the Staedtler markers. Right next to him was Hobby Lobby was master Touch brand. And they are not real brush either. There are fiber tip. And so they were, I don't know, $11 or something. They were half-price. And I'd like to colors, so I've got a set of those and I found that they were hard to blend the marks out. I had to work very hard at this and you go, Oh, that's nice and smooth. It is with the paper surface isn't anymore because it took too much. That was exciting. The door blew open. Very windy today. Anyway. So these are the coil markers and like I said, they're very, very expensive. They do blend well, but the tip bleeds out and it won't make a dark mark anymore. And if you keep on working with it, you get the paper fiber coming up again. And so here we have the zig real brush. This is a winner. In my book. This blended beautifully, the paper is absolutely unharmed. I probably use these more than I use any. The Tombow blends very well. And I do love that about it yet, but it is not a real brush. It will bring the paper up. And so this one I only use when I want a color that I can't find elsewhere. And just for kicks, I put the Winsor Newton real watercolor marker down here. Now I'm going to confess that I'm that kind of person that when I think a product is exciting and I write out my via wholesaler and I will set it is they're just not being used because I get the least blend ability out of the real watercolor markers. Any of these guys. And I'm not sure if I'm, it's my painting style, you know, is not as brushy and washy. I don't know. But I have taken these out at least 10 times and said, Okay, I'm going to have another go at this and figure it out is not working for me, but that is not a dying anyway. So if you have not been bored death, which I hope that you haven't. You're now have an understanding of all of this. It's out there and there's a lot of it. And it can be exciting and you may as well try it, but without spending everything in the bank like I did. Maybe some of this testing, I'll give you an idea of what, which of these looks like something that's going to work the best for you.
7. Lift & Fix it: One of the things that's common knowledge about dies or is one of the things that you think of when you hear the word di, is this pretty permanent and that you're not going to get it off of stuff you get it on. And we are here right now to test how that applies to watercolor brushes, which are not our color. So we've said before, we can pick up and correct and make disappear some problems by adding water and picking it up, blotting it up. And so we got to see if this is true. Dive brushes. And now I have this is the, what I, what I think is the best the SAI and this is my you wonder why my water brushes get all beat up. So I'm going to see how much removing I can do. And I did use a red which is the worst color to ever get loose from anything. Not bad. Cleaning the brush. Well, good. I love it. I just love it. I would it would take me 10 minutes to get that color out of a regular brush. So very interesting that you can go back in algebra, it's dry and you can lift highlights and do blending. Now, I, what's going on here when I did that, I saw that when you do such a thing, you're going to want to stay there, you know, and kind of re-wet the entire areas so that the part that you did read isn't going to bloom into the, into the rest of it. Just for kicks, I'm going to see how much I can actually get back to white without destroying the paper surface. That's the deal here though are the tradeoff your eyes have is whether you're going to destroy the paper surface. So that's pleasing is not the fact that you could do this because you could bring something way back. Okay, What about getting rid of it? Totally doll like we did with watercolor in Chapter one with my fix it. Which is to go in, let's say this was a mistake over there where we went on a line there. And we'll try our trick that we do with watercolor. I'm barely touching it because I don't want the paper to be disturbed how I'm adding a bunch of clean water right in the first place. And this is not bad, but I don't think it's going to go away entirely like our watercolor or pigment based well and blot. Not bad because I did this one. I'm going to try the same thing. With the real brush, I have never read here too. Or no, That's a Chrome attack. Well, we might as well see how this is a chromatic. Now a lot of times when you're using, amazed at what you just saw happen will happen. It starts on a little dry, but we'd be patient, don't dip it in water because that does bleach the tip backup be patient and the ankle will wick because it's being fed out. Okay, and then that's chromatin. And these are really the three real brushes. And here is our zig real color. Also, purple is a very staining color, so we'll see where we get here. And in the meantime, while we're waiting for those to dry so that it's a fair a fair thing. I am going to try a trick that I don't know what's going to happen here, but about getting rid of the mistake All the baby, all the way back to white. We're going to try a little bit of not here, spray alcohol. This is rubbing alcohol in here that I use for a lot of things. Plant, plant protection from founders and bugs. Islamism. It doesn't seem to hurt the plant, which is so weird. But what we're going to do here, I'm getting my blue bottle caps. And I'm gonna put a little bit of alcohol. And I'm gonna get my brush ready because alcohol evaporates really quickly. So I'm going to spray a little alcohol in that camp. And you know, you can get a sharpie marker off of things with alcohol because it's dye. And so paper though, I just don't know whether that is going to work. We don't know to a stri, but that might just get down the graph in there if we were had to have a fix it. And you know what, almost all the way off of it is a good fix it most things anyway. Now we're still wet. And that's what this darkness is. But I want to see when it dries, whether we have been able to make that paint disappear if we were trying to do or fix it. Just can't leave well enough alone. Kangxi. Just starting a little more alcohol in there. I'm going to blot it one more time. Well, it's not bad. And let's just say you were you were using these to do something new. We're going to scan. You can always clean that up and scanning, but this is better than I expected. So now we're going to see if the other two brands, rural, behave that way. And it lives whether we can go back when they're dry, and whether we can pick the color up top. And three Liquify. To a good extent this one. We are doing it. Is it good Lift? That is a good Lift in How about this is the chromatography. This is the real brush. Let's see if we can get going on here. And this is done, is going to fight a little bit. And the more you do it, the more you're going to take a chance on the paper, but this isn't bad. All three of these will allow for you to go back in. If someone was too dark or just to something and you could go back in and adjust. Now I'm going to try our alcohol fix and see if that works on these two. And evaporated out of here of course, whenever spring another couple of spritz is. And just go at the edge of this. Can I get rid of this? This one doesn't seem to react to the alcohol. We're not getting as much color removal is we did on the red. I don't know about our purple, but we're going to find out. It definitely makes it soluble again. But getting rid of it totally for a fix, I don't know, maybe so with the purple as well. And again, this is the real brush. That's a Chrome attack. So both the SAI and the real brush reacted quite well to a correction technique. I'm going to lift this slowly slide out. And you can take a good look. We're almost dry up on the red with the alcohol. And, you know, it's optical illusion because we're seeing that, that part of the red. But what can I hold over it? If we couldn't if we were just looking at the corrected part. That isn't too terrible as far as Howard downstate wasn't how much we got rid of it. So there's our cleanup fix, it attempted on dye, and that's how much success that we've got. In. The next thing I'm going to do is I'm going to test this thing which I have not been fine. I have not found to be true. About after an intense pencil dries. That is, it's not going to be movable by water anymore. And I I've had this full man a few things and I do apply it pretty heavily. I'm going to put a couple of colors here. I put some yellow in here on top. This is the way I paint with watercolor pencils and I do have a Skillshare class on it goes all into that. So I lay it down dry and I come back with my water brush. And I would be reading and I would be blending pretty green. And I'm going to try to be fair. I'm going to try and make sure that I wet everything here because then I'm going to wash over it out or dries and we're going to see about that marketing claim. Because sometimes I have done that and then when I go right up next to it with the next thing, it just melted against, I'm giving it the best chance. And if it is waterproof now that we have learned a lesson and that is, and we're going to use this stuff. And I'm picking up extra pigment to I'm giving it every chance. So that if it now is waterproof when we go back over it, when it's dry, we're going to know that that's how to make that happen, is to make sure all of it got wet and maybe even pick up any extra pigment. So I'm going to turn the camera off until it dries and then we're going to do that test. Okay. We're totally dry here and we're, so it's time for our acid test of whether we can paint over this. Are you ready? I'm going to, I've got quite a wet brush here. And so oops. As we have in to me, when I trusted them. And I painted up next to this look at that. In no way is that even water resistant. After and you're thinking she knew this was going to happen? I really it didn't happen to me before, but I really didn't know because this time I was really diligent about making sure every bit of the pigment had gotten wet, so therefore, it could dry, water resistant. But if I were you, I would not trust my ink tents, pencils to be water resistant. Just sayin.
8. Painting Teeny Tiny Spaces: So I have introduced you to an awful lot of dye based materials, mostly brush markers and fiber tip markers. And these are the professional ones. Like if you're someone in your family has a children's kind of water soluble marker and there are boxes of like a 100 colors and the line that are for $20 and so on. But anyway, all the way up and down the price spectrum, you'll have a change of the quality of the die and everything, but it's all die based. And so now what do you do about using them? And that is I can just show you all these guys and all their beautiful colors and everything and not some suggestion about how they're used. So number one, when I reach for these, especially the real brush markers, a little, little tiny tips, I am trying to paint a really tiny area. Now this is my grocery shopping excursion for my Skillshare workshop series I was doing about having to stay home and trying to have adventures anyway. And I can't believe that I don't have this done, but every time I open the book, I add more food. Instead of finishing the painting of the food that's already here. And so this was a, this was a great fun lesson where we learn to draw grocery bags and then we filled them and then we unpack them and put them away. And we talked all about how to draw these different containers and shapes and all that kind of stuff. But you see they're very small and so it makes the Pedro and fun. So to get out my my I'm not going to say stable, it's not stable. It's a fix able. But to get out my real thin watercolor brushes and to go into 92 pins of paint with little drops of water and pick up pigment, which is thicker, and go back into tiny little places like this. Can it be done? Absolutely. It can be done. Is it easier and faster to do it with a tiny tip of a, I'm reaching for one of these guys with this tiny tip of a dye based marker, water-soluble marker that is already full of color. Yeah. So this is what she wanted to do. This is how I paint my little packages. And I do come with my water brush and I do pick the color back up. So that's why this isn't solid color and the wine is little blended. I'll show you that in a minute. Little blended blue into the, the old green or whatever in the world I was using there. Also some of these sets like there's that Artesia brand. And they have a set with, I think a 120 colors of these. Like I said, you can find sets with that many colors on Amazon to so when you need the color of raw turkey breast ground up, It's not something I'm going to just find sit in there in a watercolor pan, but you will find it in the number of colors available on these markers. And I very recently did oh, recipe page of a for a tada that I make and I had slices of raw onion. Well, the color of the Bedelia onion is like what? So I found in the RTs marker brush markers set something called camel meal tea. Guess why? Perfect onion color and I don't know what set, but it was a set like that. Then I found the perfect color for raw ground turkey breasts. So there you go. This is a really will be finding one for the color of garlic breed as well. And so this is my major reason that I may turn to die color. And another one is the ability that you'll see in a few minutes to do really wonderful pastel work with it without hardly any trouble at all.
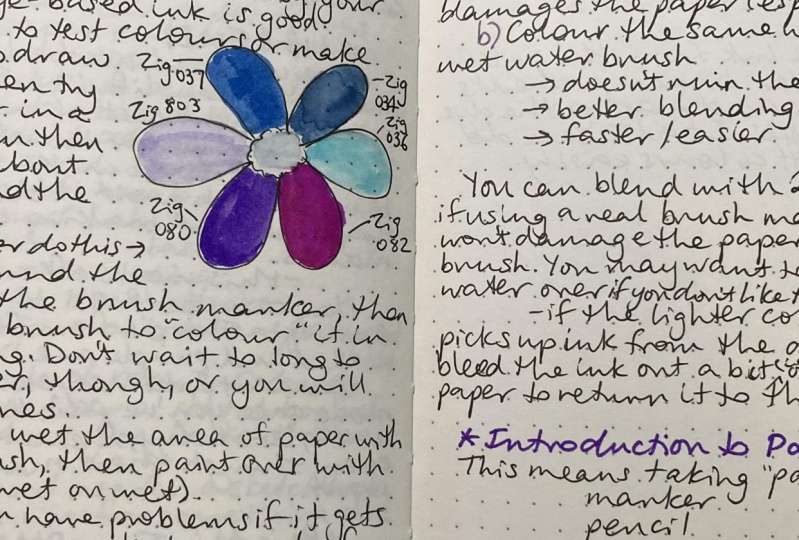
9. Techniques for "Watercolor" Brushes & Markers: I have my trusty sketchbook. Sketchbook. In other words, a traditional warmer. I test things out because we're going to need to draw doodle here that we can use to experiment with a number of dye colors. And before I do that, I'm just going to point out a little throwback thing to the water brush. And I remember when I said that the water brush that you could mix a color, watery color and fill a water brush that's an older one or whatever, and have your own color of paint brush, marker, saga thing. The really good idea for that is to use a concentrated dye color rather than try to make a watercolor wash. And the reason is really that the pigment is in particles in watercolor. And this Dr. Ph. Martin has some separation as well, but it's not It's more of a I don't know, like a dust thing. It's not going to clog your water brush. So what you would do is you would use a little bit of this. It's a concentrate and you'd mix yourself a little, you know, little vial of color like maybe and something like that. And then fill your water brush with it. But use a dye based ink color. Just like magic, a great big flower has, a doodle has appeared on this page. And you'll notice that I use pencil and eraser and I inked it. And I didn't rush the race or off yet for a reason. I want to introduce you to some of the I Love. I found out about this on the Facebook group that I run for Sketchers and somebody just mentioned it in passing and I Oh my God, I've got to have that. So T, who's a spread? The O and it's on Amazon and it's vacuum cleaner. It's not a Roomba. You don't let it go all day long. I need a Roomba for how much eraser Chrome I come up with. But this will make noise, but so is the wind making noise. So just swatch, this is so cool. So the brushes on the bottom too. Okay. Ready? Going to hear some machine noise. Okay, come back here. I know you're all running to Amazon or anything. This is the coolest thing. I mean, I work in a greenhouse, writes on all truly worry a lot about eraser crumbs on the flagstone floor because there's potting soil and little seeds and dropped leaves in all kinds of stuff that have to be pretty much vacuum is swept all the time. But to not have to do that and to just have it be gone. And then you twist this off and empty it. And I think it was like $15 or something or I mean, it's like an amazing I went and bought two more, right? For both other studios because the little bits of glass I get. If I put my hand down and cut bleed and it's not pretty paint. And the other one the other one is in Hawaii in my office studio where all of the computer and all that is in mostly that when picks up corn chip cookie crumbs sometimes. But anyway, we won't go there. Very fun. Okay, when I'm testing different things, I always draw flowers or flower pots depending on where the colors are like that I'm testing and I do it because that's my favorite doodle, not this big usually. But what I loved to do and a flower is try different things on the different petals and the flower does not end up having much gestalt at all. But all of my samples are on it and I can like do a little writing about what was what. And so you might want to do this in your in your handbook and you can go and get if you don't have any diabase water-soluble markers in your world, then, okay. No NADH to do that, but you still have this method to use on anything else that you want to test. And if you do even kid ones, then get them out and give this a try. And hopefully you have a water brush. If you don't have a water brush. After seeing this whole class, you're probably going to run out and get one someday, soon. But meanwhile, use a regular brush and a little pot of water. So I'm going to start with something that is really kind of Calvin and I need to grab a color that would make sense for this. I'm grabbing like purpley color. Okay, So real common use of a diabase marker is to add the color along the edge. Now you see what you're getting, what I was talking about before you see you've got that hard edge of color. This is a sig, real brush. That's a text, which we don't care about. And the rest of the noise is the rent. So you want to get in there pretty darn soon because otherwise you will have a hard line on the were the application was no. See, I just went way out of the line and we know our cleanup is not wonderful. But I'm going to move with it. That's just a test. So what this does, it's intense as all get out. But what this does is give you some automatic shading here and some automatic variant of color. As opposed to when you would fill, fill in with the brush as it goes. Now I want to experiment with the zig rule of law for a real, real blush, clean color. To see if I take this tip. Let's say I wanted to do some all stripes and the mental ECO happened there. So you started out dark. And aligned up and now it's light. And so this demonstrates when I was trying to tell you which and this one doesn't do it badly. But it picks up lighter color, which dissipates the color and the brush. Okay, so this is zig and that's not so bad, but I'm going to try it. Just show you in a minute what happens with the brand and the Chrome attack, which does it really kind of badly. So and this is, you can go back again and you can blend that so the harsh lines of the petal aren't showing and the colors brilliant. And that's kind of a thing of beauty to use that approach. So that approach is the outline and then the water to spread it. I've got a couple of the Chrome attack, also a real brush of those. And I wanted to look at what another approach, another approach might be that you would use with watercolors. So you would move to this and think, well, do it here. That's not underwhelming. I want to use my or worn brush. So in watercolor, I might pre-web in area. Okay, And then with watercolor, I would pick up paint and I would feed it into the area. So I want to show you the difference, at least was some brands of marker. And you can't see that very well. But the point is bleaching out here. So, but I am, I'm bending the brush down in, I'm coaxing the colored is still come through. And this is a joint housebound way this time because I think I've got a really good flow coming. But it can happen that you might not be able to get your intensity because of the tip. Picking up clear water. Instead. Here I'm trying to show you that needs to color that don't come back and the US. Okay. So wet on, wet on wet technique. Now this one over here demonstrates something that can happen with the dye. Okay, if you remember this, we put the line of color around the side. We blended in. We even came back, we put some lines there and we blended them in. And what happened is we reach a critical mass of water to die without a lot of water here. And therefore, what color can get very washed or washed back. And it can go into the deeper color was and leave these. Little do dads. So the lesson being that less water is better. And what I'm gonna do here to try to fix things is I'm going to go another layer that's pretty dry and add back a little Silva, fix it for that as is. Okay. But I mean, the markers not going down as smoothly as it did, I'm gonna win on to plain paper. But I'm going to try to cut back on my amount of blending here so that doesn't wash back again. Did not think or I keep some drama going on. All right. The next one, I'm going to grab a couple of Tombow markers. And I'm going to show you a blending thing. That kind of they make a blending pen. And all of the markers don't, but the blending pen will work with some of them. So we're going to rewind to put a couple of leaves here. Now we're going to blend in two ways using a couple of Tombow markers. So the first way is going to be the, I'm going, I'm using three greens here. And I'm going to put them in in both cases here. I'm going to put them in where they go and kind of a like I don't want to say herd as just not where it is but divided areas you now, so that one would go there, that midtone would go next, like so. And the dark would go into the darkest area. Okay. So the next Tombow marker that I'm grabbing is called a blunder. And there is no color as gotta blending fluid and, and I have no idea what the blending fluid is. I should probably look that up. But supposedly, when you come back with your blender, it's going to blend the color into the other color. Now I'm going to be honest with you, I don't like this method because it takes some effort. Even when your blend is a brand new blending. It takes some effort. It's not that smooth and I can already feel that my paper does not like the flavor tip. And so I can feel that there is a fragility, a kind of sensitivity, if you will, in the paper surface right now ended, I better not go very much further with this. All right, so that's the blending 10 and a lot of people swear by them. And maybe I just don't know how I should use it, but I've looked at all the videos and I think that's how you're supposed to use it. But this time I'm going to apply the color the same way. So there's our light value and our medium value. And our dark value. This is on a cellulose paper, sketchbook. Stolen and burn Beta. And this time I'm taken water, I'm gonna make sure I have just extrudes of drops over here on my tall so I know I have a nice wet brush and I'm going to go in with my nice wet water brush to do the blending. You see how much nicer that is. I don't want to use the word nice this much, but this is much my preferred way of wanting Tombow markers. And so I mean, you can make your choice to, but you might not have to have the expense of having a marker Blender. If you have a water brush. Do okay, all by themselves. So this was less work, lighter touch papers in better shape and the blend is more pleasing, I think over here. Could I get to this kind of blend? I could even take water back now and do it, but I'm going to beat that paper up. And I don't wanna do that once you start disturbing the fiber on the surface of your paper, on a cellulose paper, you're in some trouble because you're going to have tilling in the spelling, sort of like eraser chromosome, but you can't vacuum of up to pilling gives you, you know, dots of darkness in your color. And so it can make a big problem for you. Okay, now, blending one marker into another, doing this is going to pick up the one color onto your other color marker. That's you know, that's okay. That's not a terrible thing. But you just know what's going to happen in in the fix it is to bleed it off into. Now I'm going with this side of this brush. If I go to tip, the flow is much darker. But on these, if you go with the side, get kind of a Variance. So bring a red n. And I'm going to blend this. I'm going to add my second color, which is an orangey car. And I'm going to blend it using only the other paint marker. So let's see where we get here. Again from the side, we don't have a lot of moisture. And I'm doing this to show you. I would, if I was doing a piece of art that I was concerned about, I would have already got in here with more water because what I feel is there's just not enough moisture going on. But that is a blended and it's a blended some people would like because they would, they like a lot of brushstrokes. And so I know if I keep this up, I'm going to get more and more blend. And because this is a real brush, I'm not disturbing the paper that much. Okay. And now I do have the all some darker color on my orange. And if you can see that, see where the red is here. So the fix for that is just two. Get the flow of the markers real color going on. And until it washes, if you will, washes out the rosy color that I had picked up there. So that's three approaches and blending color. This is kinda the hottest because there's no water involved. And you might like that the best. And I think the last thing that I'm going to do and it really how this many techniques to go over is something that's called piloting.
10. Intro to Paletting: This class is already pretty long and so I, pelleting is a very big subject and applies to more media than this. But it does lend a whole other level to the use of the range of value and so on. I've using mace. And so we are going to do that for show here. And piloting means that you take not paint from the tube of paint, but you take paint from a marker, a pencil, cran and whatever. And you put it on a pallet. And then with a water brush, you come back and you pick that up and paint with it. And you can get like really beautiful blends and so on. Always in a lighter key though, because gonna give you a lighter values, obviously, this was something, it's really funny how you get an idea and you start doing something. And I was doing this. We'll talk about it next class. I was doing this really long time ago. And, and it kind of grew and I put it a lot of blog posts and then workshops and all of them were, I'm talking 20 years ago now. And it grew in popularity and it grew and grew and grew. And now there's young people who have YouTube videos and they do palpating on a baggie that's sitting there. And it's done a lot of different ways. But eventually the art supply market gets a hold of these trends. And current dash did do that. They make a lot of colored pencil, watercolor pencils and watercolor crayons and Neil color all that stuff. And so they got a hold of the concept and they actually make, and this is about $11. This is a plastic palette and it's rough on this side. And that's because they wanted to hold the lead of a pencil that I got here. I've just got a gray, I guess. It will just deposit the lead of a pencil or the color of a CRAN, blah, blah, blah. So the problem is with with these is that they stain really badly and I haven't even been able to get this off with alcohol. And this is a little cutting more and they come in sets at the dollar store elsewhere. And that surface is very much the same. And these do clean better for the most part. So I'm going to see how much of this can I get off of here? I've got a little red stain over there. But this is just a damp paper towel would do it, Windex would do it. And sometimes there's some stubborn alcohol may do it. Like this didn't come right off. I'm going to try the alcohol spirits. Okay. Anyway, they stain. And that is one of the thing is, as you know, is I want to quickly show you this and then there's gonna be a lot more about palates next time because there's just a lot, lot of good stuff. So in this case, I am going to take these two markers that are used on the real intense guy here. And I'm pelleting it. That's what that's called. Now, putting it in a baggie or saw mug, you know, it's going to be it all up. And the reason that you like this surface is that it's not going to be, it'll up and it's going to be there for the taking, sort of like a peerless paper. You'd get a water brush or a wet paint brush. But truthfully the water brushes just the best over for this. And you pick up the paint from here. And you'll notice that it's a lot hierarchy, in other words, are a lot lighter value. Then what you get when you go down with the marker itself, and is what you can add coerce, you can't add color from the marker because of that problem with the leaching. But you can keep picking color up from that palette and adding it back. And then when you come in with another color, the blending is a thing relating to behold. Look at that beautiful peach. Okay, I could blend that or I could let it settle out the way that the watercolor does. I'm watching my, my, my monitor to see where this is in the camera. But one reminder I want to tell you is that Skillshare puts a black bar up at the bottom. Unless you move your mouse way away from the video. And you'd like that last bit there that was all on the camera, but it could have been blocked that much by the by the volume, the stuff that comes up, the buttons on it. Okay. So this is lot of ways to use diabetes markers and water brushes. And now you're going to go around and you're going to look differently at your your child or your grandchild rule set of markers. I'm going to suggest that you use a design like this, this time in your Chapter 2 of your book, and that the things you learned do them in the different petals. And I mean, even if they turn out badly does okay. Because then take a little fine liner and make your marks. What happened there? What did you do? I did wet on wet. I blended with water, I blended with a blending pen, whatever you did there, and maybe the brand of the marker. And out of this all I think that sketch brokers and illustrators are going to find these to be really valuable tool is not for every day now, for every minute, but the really good alternative for certain situations. So that is it for this time, I could talk forever, but they really can't. And so this is an ongoing class and we'll be back with a whole bunch of new information next time to keep adding to your studio handbook. And meanwhile, I hope you'll upload your pages of notes or your way of recording this information because it will help all of us. And the other thing that I forgot to mention last time is that I am happy to answer questions when you leave something in the discussion area, when you upload a project, when you ask a question, Skillshare sends me an email with that question. And I check my email a couple of times a day and I'll be happy to answer any questions you have because I'm throwing a whole lot of information at you. And and I might not be thinking about everything that I should be covering about it. And so if you're intrigued by something and you want to know what if this or that, go ahead and leave that question in the discussion and I will be absolutely willing to answer it. And then all other students can see that question and that answer in the discussion as well. And everybody just keeps on learning. So till next time, have fun and have a lot of bringing a lot of color into your life.
 Jessica Wesolek, Artist/Teacher