Transcripts
1. Introduction: Have you ever heard of
an application software called Clip Studio Paint, CSP? This is the best and most
popular application used by many professional
manga artists in Japan. This is very useful. But on the other hand, because of its many
useful functions, it is also a bit difficult to use, especially for beginners. In this lesson, I'm
going to show you how to use the CSP in the
most basic way. Hi, I'm Naomasa Matsuda a Manga artist based
in Kyoto, Japan. I've been teaching manga at the university in
Kyoto for eight years. I have also been a member
of the selection committee of the Japan Media Arts
Festival for three years. Since 2020, I'm teaching at
a Manga school in France. To take this class. You don't need to have any previous knowledge
or experience. You will start from
the very basics in the same way that
I teach students with no previous CSP experience at University in Kyoto. You can use CSP on a
Windows PC, Mac, or iPad. At the end of this course, you will know the
basic settings and operation of the CSP. And will be able to
draft and ink freely. Are you ready? Okay, let's get started.
2. What you will need: The first thing you
will need is a computer with CSP installed and a tablet. The best way to start is with an iPad and an Apple pencil. This is the easiest
way to get started. If you have a computer. The cheapest way to get started
is to buy a pen tablet. However, it will take some
training to get used to it. Because you will be drawing on this tablet while
looking at the screen. Like this. I'm
already used to it. So it's no probrem for me. But if you are new to
this, it's not easy. It's better to try it out
in a shop, if you can. I don't recommend
anything other than Wacom products, as they often
have performance probrem. Then there's a tablet PC and stylus pen
that comes with it. This seems to be very
similar to using an iPad. But if you use a less
powerful computer, you may not able to
draw an accurate line. Again, it's best to try this
out in a shop, if possible. Then there are the
Wacom pen computers. In fact, they are the best. I wouldn't recommend
anything but Wacom for performance either. However, the Wacom ones
are quite expensive. So I will only recommend
them if you can afford them. And pen displays. Again, Wacom Is a way to go. This is cheaper than buying a new iPad if you
already have a computer. But it's not as easy to use as an iPad in that
you need a cable. Now, in many cases, these computers do not have
CSP installed on them. If this is a case, you can download it from the CELSYS website
and install it. Did you do it? Then I'm going to
explain how to use the CSP.
3. Settings for iPad: Hi guys. In this video, I will show you how to use the CSP on iPad with
an Apple pencil. First of all, start
the clip Studio. When you see a red mark here. It means that there's a
newer version of this. In that case, click here and follow the
instructions to update. When the update is complete
or it is the latest version, you will not see
a red mark here. Click here to start the Clip Studio Paint, CSP. The next step is to
go to preferences, which controls the
entirety of CSP. Click on interface. Here you can choose between
light or dark colors. So choose the one you like best. Then click on rulers and units. In the unit section, is the length
units here set to pixels? If so, change it to millimeters. For text section,
change it to points. Then click on Canvas
and click on Settings. This is a setting
that lets you know how big your drawing
will be when printed. You will never print them. You don't need to do
anything about this setting. But if you think you might, you should adjust this. What does this mean?
Here's what I mean. Suppose you are trying to draw your character on the CSP Canvas. Can you find the right
size of the drawing? Impossible. This is because everyone's screen
size is different. One centimeter on screen is not one centimeter when print. That's why here
you need to teach your CSP the one
centimeter of the ruler. When you move this slider, do you see how the scale
gets bigger or smaller? Place your ruler here and
move the slider so that the scale on the screen is exactly the same as the
scale on the ruler. When you are satisfied
with the settings, click Okay. You are done. I will explain later how you can check the
size of your print. Okay? The next step is
to set the paper. Click on this icon
or click on File. And then New. This will bring up
a screen like this. The leftmost one is a
paper for illustration. When you set this, you can create a paper
of the size you want. And here. If you want to write
on a non-white paper, you can freely change
the color here. Next, this is a sheet of paper for a Webtoon, a vertical
scrolling comic. So this is a long
verticals sheet of paper. Next, comics. This is probably what
most of you want. When you click on this preset, you will see a
variety of papers. Select this. The other items are not
necessarily right now. So I will not explain here. Click Okay. Then you will see this
sheet, these blue, could be purple, anyway I mean, all
these lines here are the guidelines
for bookbinding. The printing company will print
your drawing on the sheets of paper and then cuts and binds
a book using these lines. In other words, if you don't
plan to bind the book, these lines are unnecessary. And you can draw on
illustration paper. For those of you
who want to bind. Here is a standard
area for drawing. Normally, you would
make some panels in this area to draw the
pictures and speech bubbles. Next is this line. It shows the area of the entire paper
when it is cut and bound. In other words, this area is
what the reader will see. A few decades ago, there were very few manga
artist who draw in this area, but nowadays there
are fewer who do not. You may therefore
draw in this area. But for the purposes of
binding the inside margins, which is this part of
the right-hand page, and this part of the left-hand page should be free of pictures and balloons. Because when your manga is bound, this area is difficult
for readers to see. This line is for a margin
for error when printed. So draw until this outer line. The next step is to
set the pen pressure. Then move your pen
freely on the paper as you usually draw. You will see this graph change. Now, click Okay. If you don't like this setting, you can go back to here and reset as you like. In this figure, the vertical axis shows
thickness of a line. And the horizontal axis shows the magnitude
of the pressure. If you don't want to draw
too much thick lines, do like this, then you will have to apply a lot of pressure
to get a thick line. On the other hand, if you want to draw a thick
line with little pressure, you can do like this. Now, you are ready to draw. Next. Here. It's probably
black on your screen. But if not, click Black. And from the tool on the left, here it is, click the pen. In the sub tools panel here, you will see the G-pen, the mapping pen and
various other pens. You don't really know what a
G-pen or Mapping Pen means. Let's try them out. One more important thing. Tap here, on the arrows. Select the topmost option, then tap this icon again
to activate this function. When the icon is like
gray, it is enabled. Why you need to do this? When it is light gray, you can move the canvas freelly with one finger. But if not, you see? This
is what happens. Okay?
4. Settings for Windows PC: This section describes
how to use the CSP with a Windows PC
and a pen tablet. First of all, start
the clip Studio. When you see a red mark here. It means that there's a
newer version of this. In that case, click here and follow the
instructions to update. When the update is complete
or it is a latest version. You will not see
a red mark here. Click here to start, like Clip Studio Paint, CSP. The next step is to
go to preferences, which controls the
entirety of CSP. Click on fire, and preferences. Click on interface. Here you can choose between
light or dark colors. So choose the one you like best. Next, the touch
control settings. Uncheck this box, then
click on rulers and units. In the unit section is a length
units here set to pixels. If so, change it to millimeters. For text section,
change it to pints. Then click on Canvas
and click on Settings. This is a setting
that lets you know how big your drawing
will be when printed. You will never print them. You don't need to do
anything about this setting. But if you think you might, should adjust this, what does this mean?
Here's what I mean. Suppose you are trying to draw your character on CSP Canvas. Can you find the right size
of the drawing? Impossible? This is because everyone's
screen sizes different. One centimeter on screen is not one centimeter when print. That's why here you
need to teach your CSP. The one centimeter of the rural. When you move this slider, this see how the scale
gets bigger or smaller. Place your ruler here and
move the slider so that the scale on the screen is exactly the same as the
scale on the ruler. When you are satisfied
with the settings, click, Okay, you are done. I will explain later how you can check the
size of your print. Okay? The next step is
to set the paper. Click on this icon
or click on File. And then New. This will bring up
a screen like this. The leftmost one is a
paper for illustration. When you set this, you can create a paper
of the size you want. And here, if you want to
write on unknown white paper, you can freely change
the color here. Next, this is a sheet of paper for web tune of vertical
scrolling comic. So this is a long
verticals sheet of paper. Next, comics. This is probably what
most of you want. When you click on this preset, you will see a
variety of papers. Select this for
commercial issued, the five millimeter monochrome. The other items are not
necessarily right now. So I will not explain here. Click, Okay. Then you will see this sheet, this blue, purple. Anyway. I mean, all these lines here are the guidelines for bookbinding. Printing company will print
your drawing on the sheets of paper and then cuts and binds
a book using these lines. In other words, if you don't
plan to bind the book, these lines are unnecessary. And you can draw on
illustration paper. For those of you
who want to bind, here is a standard
area for drawing. Normally, you would
make some panels in this area to draw the
pictures and speech bubbles. Next is this line. It shows the area of the entire paper they
need is cut and bound. In other words, this area is
what the reader will see. A few decades ago, there were very few manga
artist who draw in this area, but nowadays there
are fewer fruit. Not you may therefore
draw in this area. But for the purposes of
binding the inside margins, which is this part of
the right-hand page, and this part of the left-hand page should be free of pictures and balloons. Because when new manga is bound, this area is difficult
for readers to see. This line is for a margin
for error when printing. So draw until this outer line. The next step is to
set the pen pressure. Click on file in the menu
and go down to the bottom. Click on it. Then move your
pen freely on the paper. As you usually draw. You will see this graph change. Now, click okay. If you don't like this setting, you can go back to here. And we said, as you like, in this figure, the vertical axis shows
thickness of a line. And the horizontal axis shows the magnitude
of the pressure. If you don't want to draw
too much thick lines, do like this, then
you will have to apply a lot of pressure
to get a thick line. On the other hand,
if you want to draw a thick line with
little pressure, you can do like this. Now, you are ready to draw. Next. Here. It's probably
black on your screen. But if not, click Black. And from the two on
the left here it is. The pen. In the pen to span over here. You will see the G pen, the mapping pen, and
various other pens. You don't really know what a
GI panel Mapping Pen means. Let's try them out.
5. Settings for Mac: In this video, I will show
you how to use a CSP. First of all, start
the clip Studio. When you see a red mark here. It means that there's a
newer version of this. In that case, click here and follow the
instructions to update. When the update is complete
or it is a latest version. You will not see
a red mark here. Click here to start the
Clip Studio Paint CSP. The next step is to
go to preferences, which controls the
entirety of CSP. Click on interface. Here you can choose between
light or dark colors. So choose the one you like. Best thing, click on
rulers and units. In the unit section is length
units here set to pixels. If I change it to millimeters. For text section,
change it to pints. Then click on Canvas
and click on Settings. This is a setting
that lets you know how big your drawing
will be when printed. You will never print them. You don't need to do
anything about this setting. But if you think you might, should adjust this,
what does this mean? Here's what I mean.
Suppose you are trying to draw your
character on CSP Canvas. Can you find the right
size of the drawing? Impossible? This is because everyone's
screen sizes different. And one centimeter on screen is not one centimeter when print. That's why here
you need to teach your CSP than one
centimeter of the rural. When you move this slider, this see how the scale
gets bigger or smaller. Place your ruler here and
move the slider so that the scale on the screen is exactly the same as the
scale on the ruler. When you are satisfied
with the settings, click, Okay, you are done. I will explain later how you can check the
size of your print. Okay? The next step is
to set the paper. Click on this icon
or click on File. And then New. This will bring up
a screen like this. The leftmost one is a
paper for illustration. When you set this, you can create a paper
of the size you want. And here, if you want to
write on unknown white paper, you can freely change
the color here. Next, this is a sheet of paper for web to a vertical
scrolling comic. So this is a long
verticals sheet of paper. Next, comics. This is probably what
most of you want. When you click on this preset, you will see a
variety of papers. Select this. The other items are not
necessarily right now. So I will not explain here. Click Okay. Then you will see this
sheet, this blue, purple. Anyway. I mean, all
these lines here are the guidelines for bookbinding
printing company will print your drawing on
the sheets of paper and then cuts and binds a
book using these lines. In other words, if you don't
plan to bind the book, these lines are unnecessary. And you can draw on
illustration paper. For those of you
who want to bind. Here is standard
area for drawing. Normally, you would
make some panels in this area to draw the
pictures and speech bubbles. Next is this line shows the area of the entire paper
when it is cut and bound. In other words, this area is
what the reader will see. A few decades ago, there were very few manga
artist draw in this area, but nowadays there
are fewer fruit nut. You may therefore
draw in this area. But for the purposes of
binding the inside margins, which is this part of
the right-hand page, and this part of the left-hand page should be free of pictures and balloons. Because when new manga is bound, this area is difficult
for readers to see. This line is for a margin
for error when printing. So draw until this outer line. The next step is to set the pen, pressure your pen
freely on the paper. As you usually draw. You will see this graph change. Now, click okay. If you don't like this setting, you can go back to here. And we said, as you like, in this figure, the vertical
axis shows, solves a line. And the horizontal axis shows
magnitude of the pressure. You don't want to draw too much thick
lines, do like this. Then you will have
to apply a lot of pressure to get a thick line. On the other hand, if you want to draw a thick
line with little pressure, you can do like this. Now, you are ready to draw. Next. Here. It's probably black
on your screen. If not, click Black. And from the two on
the left, here it is. Click the pen. In the
sub tools panel here, you will see the G pen, the mapping pen, and
various other pens. You don't really know what
G pen or mapping pen means. Let's try them out.
6. Preparing to start Inking: Before I explain, in Qing, let me show you a real deep pen. Professional Japanese manga use several different types of depends when inking being
the traditional way. In my case, I mainly use
these three types of depends. First of all, this is a mapping. And this is also a mapping pen, but you can draw a
softer line with it. These are mainly
used for drawing backgrounds and effect lines. And this is a G pen, which is used for most of the characters in,
shown in manga. Okay, now back to the CSP. First, click on the
real G pen, okay? If you can't find it, click on G pen at the top. That's okay. You're paying is now our dip pen called real G pen,
or maybe Japan. Now look at the two
properties here. Here you can see the
brush size 30 to about 1. For now. What this means is
that you can draw thick or thin lines 3D with it. But the maximum thickness
is one millimeter. You have changed
the numerical unit two millimeters in
the preferences. If you change it to pixels, the thickness will be different. The paper is too small
to see clearly. Is. So let's zoom in a little. The zooming here or here. If you want to zoom out. Here. Okay, click twice. This should be about right. Let's draw some lines. Try drawing slowly
with less force than, more false, then less force
than more force and so on. Yeah. Did you find it different
from pencil or marker? This is G pair, you feed it. Now, let's try using
a G pen for inking. First, download the
sample drawings to photo of your choice. Then open the sample
drawing you want to ink. There are three ways to open it. The first way is to click
on file in the menu above. Then click open,
Open the folder, saving the sample
bias you downloaded. And click on this sample
picture and open it. If you are a beginner, this is the easiest
way to understand. Second, click on this icon, then click on a sample
picture and open it up in the folder where the downloaded
sample files are saved. Then drag and drop it. A sample is now open. Let's start inking. But before that, I said
computer screens Barry in size. And you can take from screen how big it will be
when it's printed. So you need to teach the CSP how big the rural actually is. The remember that? Then? How do you know
the size when it's printed from the screen? I'll show you that using
this picture, okay. Click on View here, then click on print size. You will see that the size of the picture on the
screen has changed. This is the actual size of the
picture when it's printed. Is it true? Okay,
let's find out. Here is a real print
of this picture. Compared with the
picture on the screen. What they see. They
are the same size. Since you gave the
CSP and actual ruler, you can click on the
print size and it will tell you how big it
will be when printed, regardless of the size
of your computer screen. The G pen is a handy pen. The thickness of
which can be friendly adjusted depending
on the pressure. This is why it is used by most professional
manga artist in Japan. On the other hand, the G pen can be a
bit tricky to use for beginners who don't have the freedom to
control the pressure. You can find it difficult
to draw with a G pen. You should use a marker, marker in the sub two and
select marker on top. The brush size to
1.2 millimeter. Set the opacity to 100, makes sure the ink is black. Next, create a new
layer for inking. Click on this icon. A new layer has been created. You see how this layer is
little different in color. Layer below. And you can
see the Pen icon here. This means that this is the layer that is
currently selected. You can only manipulate and draw on the layer
with this pen icon. If you click on the layer below, it will change color and you
will see a pen icon here. This means that
the layer below is now selected and
you can draw on it. Click on the top layer
again to select it. Now start inking. Markers are easier to
use down G pen for beginners because they
don't support pressure. You are used to using a G pen, then you can use it. It doesn't matter which
one you start with. Just follow this blue
line as you're inking. If you are right-handed, this curve will be
harder to draw. If you are left-handed, you will find this
curve harder to draw. That because we
need draw a curve. Europan moves in a circle
around your wrist. Renew a drawing in
the traditional way. You probably rotating
the paper so that it was at a comfortable
angle for you to draw. It's the same with digital. You don't have to
draw the curve. Difficult angle. You can just rotate the paper. There are several
ways to do this, but the first thing
you need to remember is this icon. Click on it. It will rotate slightly, change the angle
to the one you are comfortable with and inking. If you click on the next icon, it will rotate in the
opposite direction. If you are right handed, you should find it easier
to draw out this angle. If you're left handed. This should be about right. Okay. Now let's start inking.
7. Inking a Boy: Okay, Now let's start
inking with me. First. Click on the button
here to enlarge. Click two or three times. On the iPad. Check the color first. Then peach out. Oh, pinching. This is about right. Then select the hand two
in the top left and move the canvas down a
little to make it easier to draw on the iPad. Just drag. Next. Switch to the pen tool. First. Take the brush size by
doing some trial drawing. It looks a bit thing, so change it to a thicker
click the button a few times to erase the lines you have just drawn on the iPad. Tap with two fingers for undo, tap with three fingers for redo. Now, select the pen tool again and make the brush
size a little thicker. Make it two millimeters, and do another test drywall. It looks about the
right thickness. Press the button
again and erase them. You start inking. Now, however, you will be drawing on
this sample layer itself. This means that you
can't modify it later. You need to make a new layer
for inking. Here's how. Click on this icon in the
layers palette on the right, you go a new layer, draw on this layer. As I'm right handed, I find it difficult
to draw this curve. I click on this
rotate button several times and make it to a
comfortable position to draw. On the iPad. Use two fingers. Then start inking. Left curve is now drawn. The right one is still
difficult to draw. So I click the rotate
button again and change the angle to a more
comfortable position. Then draw it. Return the canvas to
the original position. Then proceed with the inking. Use the hand to adjust the position of the
canvas if necessary. This is the end of the inking. The next step is to
fill his hair black. But if you feel it as it is, it won't fit correctly because all the blue lines on
the sample layer below. To avoid this, you need
to hide this layer. Click on the icon. It is now hidden and you will see a gray checkered pattern. This means that this
layer is transparent. Now, select this layer and choose the bucket tool
from the left to palette. Make sure that the ink is black. Okay, Click on the canvas. Now he's layer is painted black. You could have finished this, but you can see some blue
lines on the sample layer. Just a little. Hide that layer and
put a white layer underneath it to make
the background white. Click the icon to
hide both layers. They are now hidden. Then click this button again. You now have a new layer. Move this layer below
the two layers. To do this, just
drag on the iPad. Drug is three lines. Icon. Then select the
bucket tool again. This time. Click on the icon at the bottom right of
this black icon. This is a background color
which should now be white. If it's not white, change it to white by
clicking on the white part of the square in the bottom
and click on the layer. The whole layer will
now be favored. White. Then showed
this layer again. You don't need the sample layer. So you leave it hidden, but don't delete it because
you might need it. Okay.
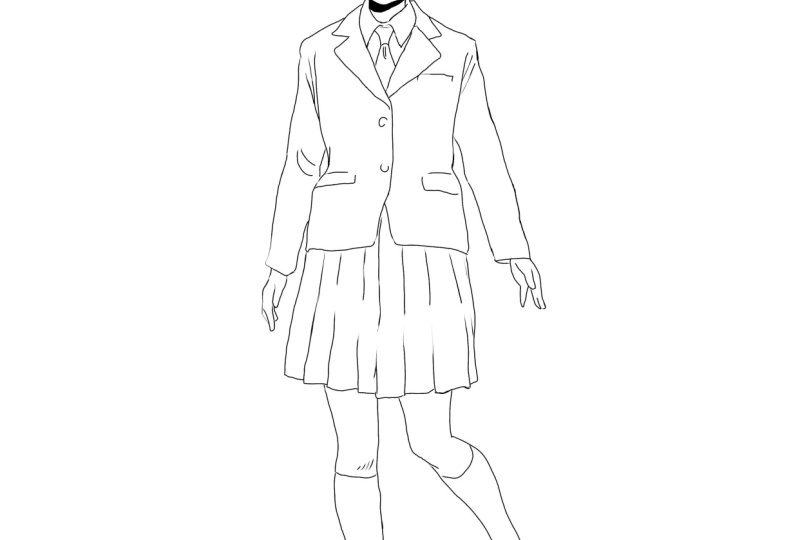
8. Inking a Girl Using Keyboard Shortcuts: Now let's start
inking of the girl. Remember to first of all, open the folder where
you have saved samples, then drag and drop
it onto the Canvas. Select the pen from the
tool palette on the left. Change the brush size of it from two millimeters
to one millimeter. And here, click on
black to activate. If it's not black, change it to black. Next, create a new layer for inking by clicking
on this icon again, The image is too
small to inking. So enlarge it. A little. Click on the zooming
buttons several times to change the size of it. In the upper right corner, you will find a palette
called the navigator. When you move this red frame, you can move the canvas
to any position you want. In other words, it has the same function
as the hand tool. There's also a keyboard
shortcut for that. There are so many keyboard
shortcuts that it is impossible to learn
them all at once. However, they are
very useful and you should learn them little by
little as you need them. Let's take a look
at some of them. First of all, a keyboard
shortcut that has the same function as the
hand to the space bar. When you press it. The cursor will change to hand icon that
shows the hand too. If you press and
release the spacebar, it will change to the hand tool. But if you keep pressing it, you will get the hand tool for as long as you hold it down. And when you release it, it will change back
to the original tool. So when you want to
move the canvas a little while you are
drawing or inking, press and hold the space bar to move it and then release it to put it back to the pen
tool, the undo button. It's abutment. You will use a lot so you don't want to waste your
time moving the cursor to the button every time the
keyboard shortcut for this undo button is the
control key plus Z key. Each time you press these keys, the line you have drone
will disappear one-by-one. Then the blue button. These are replaced by the
control key plus spacebar. If you hold down them
and click on the screen, you can zoom in a
little each time. But there's a more
convenient way. Hold down the Control
key plus spacebar and moves the cursor
left or right. When you press these two keys, the cursor will change
to this plus sign. Hold them down and
drag to the right to enlarge your drawing or
to the left to shrink it. Press space bar to move
the canvas with Hand Tool. Control key plus D key to undo. And Control key plus space by n, drag to the right or
left to zoom in or out. These three things will
save you a lot of time. So keep them in mind. Next, you may want to see the whole canvas as you
add zooming in or out. To do this, press the
Control key plus a key. This will instantly show
you the whole canvas. If you want to erase
everything on a layer at once, press the Delete. Then there's the
rotate button and the keyboard shortcut
for it is this. When you press the archae, the cursor change
into a Rotation icon. Then hold down the Shift key and drag to rotate the canvas. Then you release it. It changed back to the
pen tool you are drawing. This is very useful. You should draw
with the pen tool. Press R to rotate to
the angle you want. Then release it to go back to the pen tool and
continue drawing. Finally, I'll tell you
one more useful thing. You can return a rotated
Canvas to its original state. In an instant. Just hold down the Alt key and double-click on the screen. This is also very useful
and worth remembering. Okay, Let's start inking. It does matter where you start. You can start with hair, the nose, or any other line
you feel comfortable drawing. I will tell you one
tip on how to ink. Draw the inner lines
thinner than the outlines. Now you have finished inking. As I said at the beginning, there are so many
useful features in CSP, but I can't introduce
them all at once. So in this video, I have shown you how to
move the canvas, enlarge it or
shrink it, rotated, inking and fitting
with the bucket tool.
9. Final Thoughts: Thank you so much! : Hey, how was it? I hope you enjoyed my video
and understand it easily. The next video, I will show you more complex functions
such as red, yellow lines and screen. If you are not
familiar with drawing, try inking the rest
of the samples. Okay. Now, see in the next
video, Bye-bye.
 Nao Matsuda, Manga Artist, Lecturer