Transcripts
1. Complete Revit Guide Introduction: Managing your projects
and read that can really help your workflow
for large or small projects, especially when it comes to
elements like schedules and details for complex systems
like those windows. Hi, I'm Brian in
your instructor for this complete rabbit
guide to schedule a shop drawings and cost
estimation in revenue. In this course, you
will learn how to take a two-story Revit
project and add your schedules,
window schedules, window the curtain
wall elevation, as well as the
accompanying details to help project and doors and windows get built to
your drawings will also want to have a
cost estimate project. This course begins looking at
how to set up the schedule accurately and the foundation helps everything goes smoothly. Then work with tagging that detail elements
and the connections. Next we do the same
for Windows and for your door and windows of
your project to be complete. Finally, the course
finishes with a cost estimation
section where you learn how to estimate and find out the prices
for your project. This course is for those
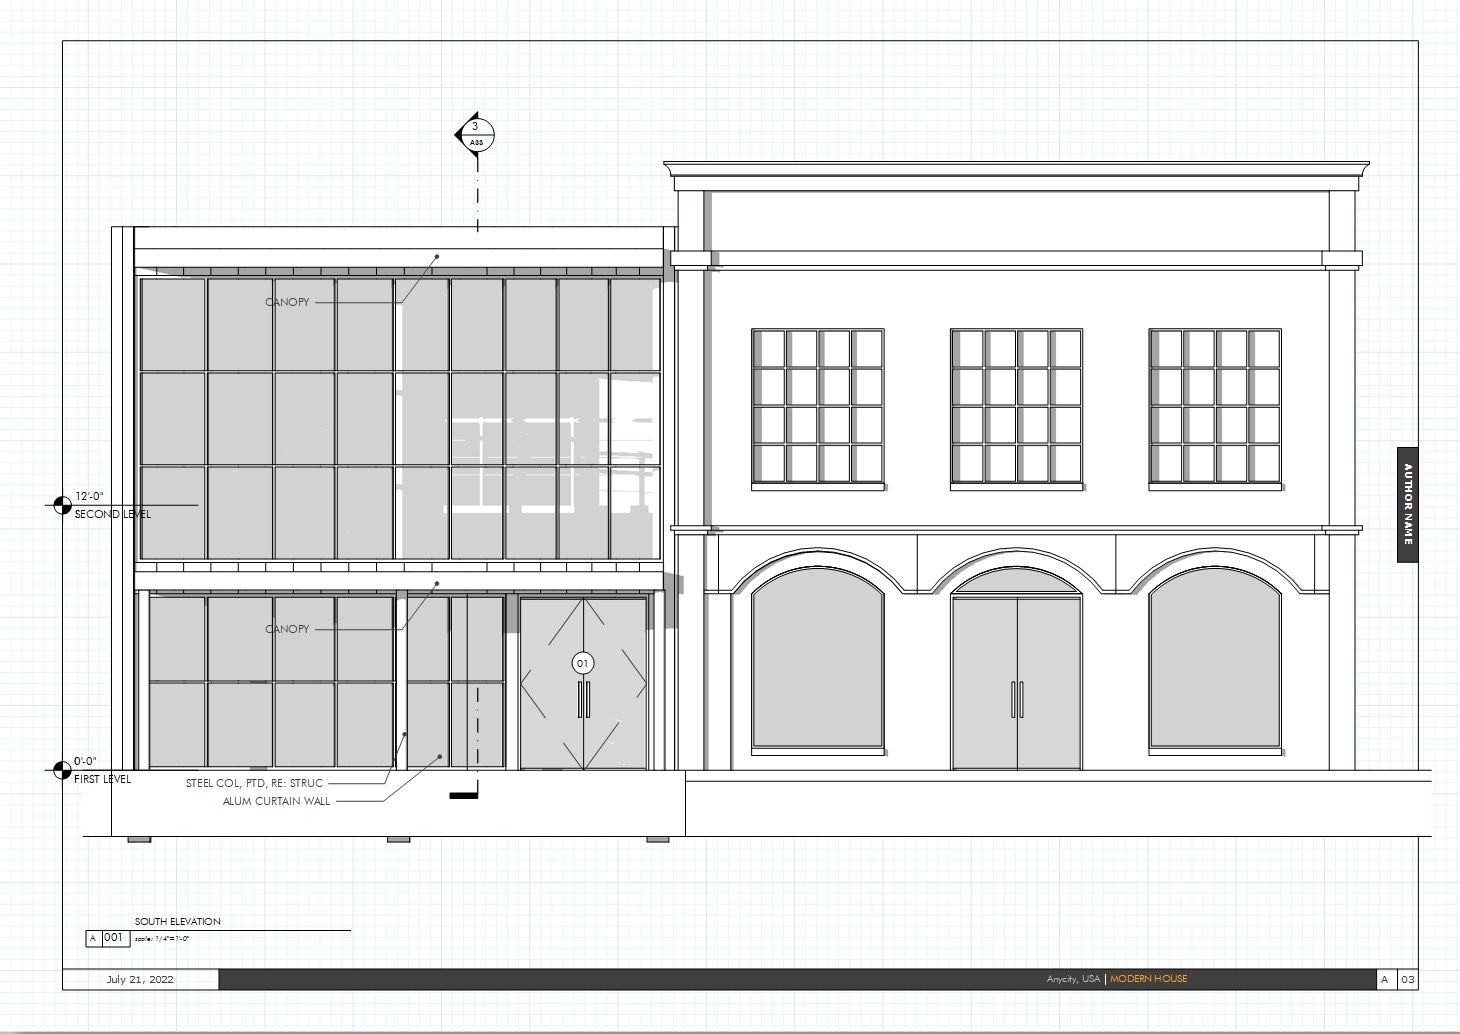
with beta skills and Revit, architecture and construction ready to advance their learning. If you're new to
rabbit, you can see my complete Revit guy cores
on my Instructor page. I'm a licensed
architect with over a decade of experience
using Rabbet, I bring industry insights and techniques to help you better understand rather
projects collaborate better and your teams
in this class project, you will develop the doors
and windows schedules and complete a small cost estimation for project using
Revit schedules. You ready to start
advancing your skills in Revit project management. Then let's go.
3. Schedules Concepts: Reverend has a lot of tools
for project management outside of modeling with
elements like details, schedules, and estimate,
it's important to have an accurate know-how
of these systems for them to help you project. Your five key principles to help you and your Revit
project management. Number one, keep it simple. When you're using
family the details of rabbit, just keep it simple. Try to use a small set
of rabbit families. Avoid unnecessary customization
is in the world wall. There's only cause issues. You call us assess the needs
of the project and then adjust the families so
you can get the job done. Number two, you want to follow standard practices on details when you're putting
together your model, there are clear
indicators such as when the direction or
uses of interior, exterior doors and specific
applications, simply, you keep the situation
for details, the easier it is to do. Number three, find the
appropriate manufacturer details. Some manufacturers
give a wide variety of revit elements and some just give simple
cat or PDF files. Whatever is available to you, the better you match your
model to the final product, the more clear your
drawing will be. Number four, you want to
build a system first, it's important when researching
to develop products after initial Molly that you
have the complete system. You can often get a manufacturer's
spec and recommended hardware specs from
manufacturers and spec writers. This will help you ensure
the product works. To spec. That's going to help
you save lots of time versus having to
create it yourself. The next thing you wanna
do is estimation, simple. Estimation for projects
takes a lot of factors. Remedy organization of files, keeps a comprehensive set of
information about the model, but that's still would
just be a guess. You can ensure the
best estimate by starting generally and
getting more precise with the contractor input and also engineer input
as the project grows.
4. 42 0 Introduction To Door Schedules: Our project has several
doors and windows. And each of these are a
unique part of detailing that could really add to
the projects clarity for building and also
communicating with the client. Just seeing how it's going to be made so you can have
a good end result. And the Revit model
has a lot of power. And turning information
from just visuals, two, numbers, facts, figures, so that you can understand
what's going to be built. You can adjust accordingly. So now we're going
to add our doors schedule with some gory
details and a window schedule.
5. Adding Door Tags: We're going to first start by
looking at our floor plan. And I like to just go to my
plan to look at the spaces. And I just go straight to the sheet less as easy
way of organizing it. And I have lots of openings. Went away from having tours in certain areas where we could
do now is come back and start to tag these
doors that I do have and start to get the
details ready for them. To tag details for
to tag these spaces. You can press T G. You also can tag by going to
the annotate category. And I just like to burst Tg. And you can choose when you're tacking to choose a leader, which would lead to your detail, have some space around it. But I actually am fine with it to tagged as
being close to the door. And currently none of
my doors have tags. I'm actually going to start
adding the tags as I do this. And be careful when you're
tagging curtain wall. Sometimes it tags the wall
instead of this the door. I'm going to name this 01. Tag. This door. I'm going to take this door. Three here. I'm just going to
make sure we're not turn on construction lines off. Before. I want to come
on at insight doors. For right now, we don't
actually want to have our square footage
on our tags here. So we're actually going to
select all these one view and we're going to
turn off the area. Yes. We have 1234 for
the exterior doors. Will come inside and
we'll start doing 30567. And then we'll go to
our second floor. We're actually going
to numbering in this.
6. Adding A Door schedule: We're going to bake
and new schedule. That's going to help us organize which doors on the project. So let's go down to doors. And we'll just call
this reward schedule. Press. Okay. I will just say schedule. And this one we want to apply some of the same
things that we're looking at for family family type material. We want to put our
width and our height. Then we're actually going to add some different categories. Because we want to, of course, let people know if
there's going to be glass for the type of glass
that will be in here. I'll go ahead and
add these glazing. And this is this going to
be a text information. You want to edit that glazing
as far as their doors. And we'll just keep
it simple for it now. Now we'll see our
doors schedule. So I guess we'll just keep it simple with
the family to type. So we're going to put
the number of the door. We'll go back and add that. We can remove our
family and tight. We're just going to
make sure that we put the number or the market, the door. At the top. We have a one to nine and we want to make
sure that we're sorting and grouping the
mark. Press. Okay. Now we have Arctic schedule, so we're going to add
that first to our sheet. Just put that at the
top space for that.
7. Adding Door Type Legend: What we can do now is
make our door types. And so that can be
done in the legend. And this legend is going to
be at a quarter-inch scale. We can have our baseline, which is our ground line here. We're going to make each door. And so the way to add doors to view and a schedule
or your details page, you can actually put
a door into a legend. So it's not gonna be, of course openable, but it will show the details of the door. This works with certain
sounds and not with others. And so I'm going to use
that for the regular doors, but the curtain doors, we're going to actually draw
them. But it's very easy. So just watch and see
how it can be done. So we want to start with
a legend component. I'm going to start our
Single Flush door. And it doesn't exactly matter
which different sizes. I'm not going to be putting
the sizes in the model. We're going to add one
for the single flush. Then we're going to draw in
the other types that we have. So we're just going
to align these each the current panels. We're going to go into our
elevation to see how they are. And that will form Howard
drawing these doors. And I'll show you what it
would look like because there's this
possibility will work. But typically it I've had
issues with it. Door types. We just go to Annotate. Then the legend component. And it's a door or
curtain panel door. And see if it comes out right. And they typically don't. It's, it's very strange. That's why I like to
just draw that one and make sure that it's going to be similar. So we actually just going to do a little bit of measurement. We're also going
to make sure that we don't include the frame. Two and a quarter inch frame. Really don't have to be super
specific about the sides. We're actually going
to make sure that actually is the same sizes. These were shopping and go
to the top of the door. Do with lines instead
of components. Three feet, make sure they're aligned. Later on. We made sure that our dimension
size one-quarter inch. This doors, yes,
you're going to be medium command here. Actually we're just
gonna do it on one side and then we're
going to mirror it. The easiest way to do
these sort of things. We'll make our interior
line a thin line. So we currently see that
we're showing the door here, but here we have the frame. We're not trying to show
the frame in this model. So I'm going to come in here, each one of these doors and
mask out around the door. All of these are going
to be the median lines. This is going to
be a solid white. And the exterior
line is going to be in sure door types legend. And just make that
simple information. And this one is the door.
8. Annotating A Door Legend: I want you to do for this now. Makes sure that it's clear that the schedule include the
information about the door. Make add it to
that witness line. That's more dimension. For each of these,
we're just going to double-click and place with the words C schedule,
copied and pasted. Actually for these,
I'm just going to put equal, equal for this. We're going to place
this schedule. So we don't duplicate the
information all over the model. Will have information
in one place versus having it all
over your drawings. Beginning. Chances for error. Sometimes people will include the door hinge in the model. We're not going
there for this one. But that's definitely something
you can start to add. You can start to build
these information. The information
that you have here. And I'm just going to
type the types type a one that we're just going to cut this
under each door type. We're going to see we're also going to
label the type of glass. This is going to be these
are exterior doors. And we're going to make
sure that text is 1 sixth. Same thing for the
curtain wall doors. Alright, so now we can add
this to your schedule. You can see this, this dry
for about 36 is pretty big, so you can probably bring that information down a little
bit close to each other.
9. Adding Door Types To Schedule: And so we have our
door types and we know we want to put
that into the schedule. We're just going to change this number to come into fields. We're going to add
the door type. Actually have marked and
we also have put here. We're going to go ahead and edit type mark. Type mark. It's different for the ones. Now, we know that we want
our double storefront. If we go back to our door
types, Coffee, Type C, we're going to make it so
we further in our model and our all of our Single Flush
door's gonna be type B. Even as I'm going
to change this. I'm going to move it. Door type. Git calls type mark. Be right next to the family. And my storefront. Be hollow metal. I'm just actually going to
put them at all. I shall do hallmark
of all my doors. I actually sometimes you do
aluminum for the storefront. I'm actually matter for that. She would do for them. That's very variation. We put all our door
here and for lasing, put that for our course
with glass door types. And all this information
on our sheet.
10. Organizing The Door Schedule Sheet: Has some valuable information
and we see we have lots of space to then add information
about our windows. But we also want to
put our door details. Currently, we don't want
to have a time on this. So we're gonna put no title because it's self-explanatory. We will make a label
inside four types. And we'll make that two
quarter-inch be too big. That will do.
12. Introduction To Door Details: Prevalence, some awesome
tools to help you detail some of the
items like doors and windows and hasn't
built in families that help you graphically draw it so you don't have to
draw every single line. Let's look at some of
the drawings that we can put in from the rabbit
families and what we can add.
13. Adding A Door Jamb Detail: Currently made a detail from a plan and the rabbit model where I'm showing the
door and open the door. So right now I want to add detail components to show some of the things
that are happening. So what I'm going to do is actually I see component
is grayed out, but it actually is the legend component
that's grayed out. You actually can use the
other types of components. Let me click detail component, storefront and selected rush. You're going to
load the family of a double rabbit door frame. And you can just come in here
and rotate that 90 degrees. And will probably hide the
model when we're finished. But this is going to probably come over a piece of blocking. It's gonna go here.
We're going to come and add a two-by-two piece. It's going to be a 3.5 inch. Doors are two by two by four. Currently we see that we're a couple of inches are a couple of parts of an inch smaller
than we want to be. We actually can either see
if it's editable here. You can edit it. So currently has width orders. We have a form, four quarters. So we're going to do a 5.5 inch hollow metal that much older
studies, but five degrees. I'm going to pull it back. Always. It's useful to find some reference as you putting
things like this together. The paint to go and find
a little reference. For this particular case. We can find out some useful gems that we could just incorporate. This is something
that comes in here. And we'll get to that.
That'll be fine for us. So yeah, this is pretty much fine for
what we're trying to do. And start wall, wall. What would be a double here? We'll have this meeting
both sides of our door. And we're actually
going to use it to make it filled region for the gypsum. That will be both sides. Actually going to use a line for the inside. All the lines. Exterior line made
that a one line. It's on. We're going to
mirror this gypsum. Because we want this
a little bit thicker. We're going to go and override
and review this element. We're going to make
this objection line to be a thicker weight. We don't need the model
really in this view, we're going to come back. Spend model. I should say, do not display. This is just our first
door information here. We're actually wanting
our interior line now, the immediate mine, this one as well. So we have our typical jam here and they just
come close to him. This is called Go Jan. And sometimes if people
don't want to put it in your model, you can always, these are, these are
items that can just be copied into a drafting view. Some people will put
in drafting view. Now one thing about difference with the traffic
view, the drafter, you will go to the
extents. So it doesn't. So some people make
details in that way. Don't forget when you're copying things,
everything's reset. We overriding this view
and I'm going to make the objection line
with the five prime. We could call this jam.
14. Adding A Door Head Detail: And now we can just continue on this same fashion
for making our head. So we're just going to go
to View and drafting view. We create a draft view, a variation called his head
detail, door head detail. And we're really using
the same type of wall which is located in
a different orientation. That same frame has been used. Yes, you can just paste it. Rotate it, override the graph by element. For interior doors. We get this added. We'll go back to
our door schedule, will add both of these
details. Go ahead. Detail. We know where it probably want to have
this three inches now. Jan detail now, head detail, at least three inches. And sometimes people also
make a another region. For a cut line. It's very simple. You just
do a thing like this. You can encode this
wide. Make all of this. Make sure you're dealing
with solid white. Bus. Comes out and make sure that this is
going to be medium line. Same thing for Go ahead. Reason the same extruded
hollow metal frame around would typically
be very similar. We're just going to leave
this as this right now. And our interior
doors will not need a sale unless we wanted
to have a bit of a sill on those doors are
closed or something like that.
15. Adding A Curtain Wall Jamb Detail: And we'll actually
go back to our model to check out the situation that we're going
to reference too. So that's a useful purpose for making movies call-outs jam. They should double-click
on the circle. We're going to turn
this into a DAW, and we're going to turn into the actual modest, fine detail. This is going to be where a
curtain wall meets the door. Because we're trying to make
sure exactly where it is. This is that the door opens up. Revit has some great families for curtain walls
and storefronts. So we're going to use
that for this data. And what we need to do is for my annotate, we'll
add a component. And this actually is a
door or a curtain wall. Back up a little bit. In this, our store front door jam, double glaze because
it's definitely get that good information. So we currently have our door closing into this wherever there's glass on the other side. So it's going to be a jam. Satellite condition. You can see that our doors
opening out that way. And this really would
suffice for our section. So we can simply use this detail or we get go
and make a drafting view. And the only thing we
want to come back in here is to make sure that we're
not just commit a type. We see, we don't see the option for the type of
family that we have. Because in this family,
you look back here, we've made a curtain
wall that is actually 1.5 by
2.5 is very thin. Two by six, we can do is
actually go into this family. We're going to save
a copy to our model. We actually can save
it to the file. We're just going to call
this satellite section one by 5152. So what that means is that whereas this you
currently see is six, there's actually more than six. We only want that to be five. We're going to put that
all in detail lines. And now we want to make sure
that this dimension is 1.5. And easy way to do this, and I see all these up. Make sure we have
near this element. This part of the model might need to come
in a little bit. We'll have to move the
items separate from this, which is our boundary. Behind. This is a masking
reason. Pull that back here. Now we get our sleek
little detail. One by fives will go back into here and
there's the verify. So we did a this type
of curtain wall. We look at our type one but 2.5, so it's actually
pretty, pretty sleek. We might come back because we've obviously
made this smaller. We left this at 5.5. I think we might
compromise it three inches or at least something like four inches. It's pretty different. So that's something that
you would figure out when you're developing your model. That's a great reason to
how the SketchUp model, or excuse me, rabbit model,
figure these things out. Load this into the project. This can be our our file. I don't know you want to use. And it's going to be That's very close to
what we have in the model. So we're going to make this
as a drafting the ear. And you're going to
go into our views. Strapping few Kurt
mall door jamb. Make sure that it's at three. And we will change it just
in here though in the model, you would probably
change that as well. 1.5 by four inches. Really good. Our door schedule. We're going to place that
in Britain. All door Jim.
16. Adding A Curtain Wall Sill Detail: Here we're going to add
the same thing using the curtain wall. Wall, sill. Curtain wall is going to
be a little bit different. Make sure it got to annotate. Component will load the family. This is gonna be our
double glazed door. We're just going to be sure that your n is going to be this cell. We have different
types of cells here. So it's a matter of make sure you're looking
at the correct one. I think it's it's pretty
obvious that it's letting you choose the type of finish. So it shows the
button, the door. And we can add our own cell. It's probably from your family? Usually the types
probably provided in the doors and be saved. So the metal frame
is just the cell. Here. This threshold. And this here will show
our finished floor. We're just kinda use detail
regions for these items. You're doing a
three-quarter inch floor. Want to make sure
this is set to wood. So the way it would work is
that our surface outside, we're going to have it
as a type of board. Make sure it's going to
come down a little bit. We're going to have this saddle inch under our current Mordor. Now we're going to add a additional line for where that comes
down to the ground. Make this to be. In life. We're not really going
to show too much of the structure for this model. We are going to go inside of here and make sure that we have a top line as B. A wide lines. For this would be our curtain wall door. We can do is because this
is a pretty tall one. You'd gone here again. We want to make a
lot thinner door. It is double-click in here. And we'll make sure that we are. There's an options
for different sizes. We don't see one. So we're
going to choose can make one that's six inches. Storefront rail section. Six inches. Six. Its current one. That's a little bit I'm
going to start at Guam. We're going to come
out six inches. Pull everything down. This we're going to
move the lines first. They will move
that outer region, the project and close
their product modern, Let's say this wall. So just make this to
be that new type. So we're going to put
this on our schedule.
17. 43 5 Adding A Glass Door Head DetailCC: So now we're going to add
this new drafting view. And we'll just show
the curtain Wyatt. Say curtain wall. Your head. Will go back into my annotate. Load. The curtain wall, storefront, double glaze head. And it says we're closer. Let's review real quick. Okay. Fine. We'll do that same thing where we
want this to be four inches. We want this to be the
same as we had headed for, say the other 11 by five by four actually already added into this. It was scheduled. Here. We just want to
make sure that it's going to have that same 1.5 inch by going to that. Emily, double-click to edit it. Save this one to this lesson by four. Going in. To make sure we put here. We're trying to make
this to be our 1.5 inch. Want to believe this? We're going to go about it a little bit. To this. We're going to adjust our little blocking
like we did last time. Workable units. That should be fine now, our masking here, you probably close to your head. Keep them in the
same place it was this one. We're back. And we're going to make
sure that we measure sure that the proper dimension. This is already on a
schedule and now we have that right affirmation.
18. Door Details Conclusion: This is now our completed
set for our doors. Doors on the interior
frontier jam, anterior head, and our
exterior curtain wall. We also have a exterior
condition for our type. A door is a glass door. We would add that one as well. When you add that and any
other unique details, you will have
completed your page, what your details
and your schedules. But it's that easy because it's all made to order in revenue. As you start your projects.
20. Introduction to Window Schedules: This Revit project
that we've been working on this
class actually uses curtain walls as opposed to
using typical glass windows. However, when you
make a schedule, you're going to be using some same information and
some different information. So I'm going to show how to make a curtain wall glass schedule, but also, I'll go back to the basics of what a window
schedule normally would do.
21. Standard Window Schedules: As you can see in this small
little building I've made. For a sample, it
has four windows. And when we go into
our schedules section, to make a schedule, we're going to write click and make sure we're on
new scheduled quantities. Will click to add
a window schedule. Click, Okay. This will just get all the windows that
are in the project. We're going to make sure
that we record the family. And also the height
and the width. And also the mark number. Scroll up so we get
that information. That mark number
probably go first. And we're just going to
put that information in. We're going to sort and
group it by the mark number. And we'll just leave. It does start to see what
information we're going to get. Now you see that we
only have four windows, 1234, it doesn't have any of the curtain walls and
curtains schedules. Pretty much are going to work a little
differently anyway. We'll close this. And now we're gonna be
looking at how are we going to assess the curtain walls?
22. Notes On Curtain Wall Schedules: Curtain walls are
very different. The purpose of this
window schedule is to give to a contract, to a fabricator who can look at the sizes and
tell you how much the prices would be then in the future when
you agree on that, they're going to get the class
materials and make that. And so they have to be able to build from your information. So let's work on what is used for making
curtain wall sections.
23. Adding Curtain Wall Elevations: So the first thing we're
going to do is now that we know that we're gonna be working with a different system, is we're going to go
to the floor plan. The floor plan, we're going to make what's called
the window elevation. You might have made it
something like that before. But it's gonna be
a little different because it's going to encapsulate each
curtain wall sets. So currently in this
model we have 12345. And it started in the same way that you
make a typical elevation. Okay, so now we have our plan. We have our 12345 types. What we're going to
start with is by using a view in elevation view. And we're actually going
to change this type. We're going to use
interior elevation. I'm going to duplicate that and call that window elevation. We're going to click on the interior elevation and
we're going to duplicate it. And this is going
to be very similar, but it's only going to
be for our windows. We click, Okay. And we're going to click on this elevation to be in
front of our major systems. And actually this
one is continuous. This one is not continuous. The Soviet two separate items. We're going to do one here. Finally, we're going to
do one of this wall. So let's start looking at what these window elevations
are going to cover. This one is going over
a little bit too large. And we're going to organize it. We already know about the crop
region and we're going to prepare for the crop region
before we even start. We always want to
extend it a little further into the crop region. And we want to make sure that
it's not going out too far. And we're just making work
simpler for us in the future. Finally, this wall,
these are going to be each crop we're going to
need to work on that crop. So we're going to come here and I'll do the example
of what this is going to do and you see what the
end result will look like. So this is our curtain wall. Well, our storefront wall. We're using this
instead of a window, but we have to price it and find out information
about it all the same. So that information is going
to come from a legend. And it's also going to come
from this elevation drawing. And since each of the
windows is different, we're going to make
one for each window. And so this right
here is our outline, which will make our space
around our window clean. We're going to make
sure that it's a wide line or at least a
medium line around the window. And now we're gonna make sure this line
shows that ground floor. And what we're gonna do
for the curtain window. Make sure we get aligned
to each of the Mayans. Did mention line. Do an overall dimension. They were going to now
do the vertical lines. We might need to move our object if it's getting in the way of
seeing the whole window. If the window is
overstepping curtain wall, we probably need to
just pull that window and that'll help us out here. And of course, as usual
in Revit, I use tab. Just let them that grid line. So you can always correct
anything as you're modeling. Alright, and now I'm going
to go back to that edge, edge. And If having too many issues, I'm going to turn
off line weights. So I know what I'm looking at. Here. We're just getting
outside and we'll go back to the first
floor and we'll see something is not hitting and
we see that it's missing. The target, will
come back to it. We could fix that all while
we're doing this model. And we're not going to work out the perfecting
of dimensions right now. But what we've done now is now we've dimension all the glass that's going
to be in this piece. And next thing we have to do is we're going to put the type. And all of these are going to
be tempered. At the bottom. Makes sure that that tag is going to be at
a proper scale. See thirty-seconds. 1 16th for d5 for me. That again, that's
temperature at the ground. And that's because if it breaks, it won't hurt someone. It's close to the ground. That's a Residential Code. Typical building code
item. In the copied up. And a higher glass is going to be regular glass. And depending on your code, you might need to make
this temperate as well. It is three feet above. So always check with your particular region if you're dealing with these
sort of things. Okay, so now I have all the
windows n and I'm going to go to my window elevation page
or my window schedule page. What's going to happen is I'm going to go to
this window elevation. And I'm going to make
sure to put that one too, I just made in here. Now also will make
a legend where I start to define the
different types. And I could just really
start to do that here. Wouldn't find g1
is tempered glass. Eg, two is glazing. We'll just call it plays
temperate glazing. Storefront glazing will just be that simple. But we want to make
sure that we're actually going to label
the type of window. And this is going
to call this a. And we'll just call
this master bathroom. And we'll call this a here. But be careful or
if you're using the same destination
for doors and windows, some people might just put W1. Now that we go back
into our floor plan, will see this labeled as a type and you'll see
the sheet that it's on. So we just do the same item. Who did this window? We could of course always
put finished floor. Make sure that that is
going to be 1 16th. And we just go and do that same thing for
each of these drawings. We're going to be pulling
it down and make sure we only capture that area. Because this is our
window elevation. The only thing that
we're concerned with. And Oliver window
elevations are here. Only thing we're
concerned with here is documenting that
window elevation. But we're gonna do this
big one and then I'll let to do the other one as you're going through
your exercises and we'll just finish our sheet. You would go to get our
duty for medium lines. From the edge of our
word wall, edge to edge. We might need to adjust
to get the wall. Go back into that
first floor and fix where the style might
be intersecting with it. And then we'll come back
and to elevation and we'll call this our
front warm front wall. Look for the title of the join. Sure that nothing is selected. We just call this front wall. Make sure our keyboards
working properly. And all we're going to do now is dimension our entire
wall top to bottom. They will just dimension
each of our segments. And the grid line is good
enough for the manufacturer. And you remember we've made a door schedule where there's also
extra information. Make sure that we're
connecting to that line. And if it's going out too much, we might need to make sure
that it's capturing the wall. And we might just turn
off line weights. We might just say disallow join. It won't give us any issues. Do the same thing
for here because it's a pretty complex
material join. So alright, so now this can actually make sure that
it's on the curtain wall. That will move a little
bit for n. So make sure it's going to the
right location. Both sides. Then as we go to
the outside edge, we're going to come to
the each individual one from edge to edge to edge. If it stops, you're
trying to keep this continuous comeback
and click on it. And just be patient. So there you have it. And all you need to do is that same element where
you can tag your doors. And you could also just
put your texts want 16 on each of the
appropriate windows, making sure that it's the
proper type. For each one. We've finished this off
to my weights back on. We're going to make sure to put a white line at the ground
for our floor level. And we go back to
our window schedule. And we'll put our front wall probably at the lower
part of the schedule. And we'll call this B or C. Let's just change that
detail number here. And on our first floor, you see now we've
labeled that and you continue the same
for all of your windows. So the next thing we do, besides having this 330 seconds, we'll just label that. No legend.
24. Adding Window Details: The next thing we do, of course, on the sheets like this
besides our Windows, we will also add no details. And so you do that
the same way you do a door detail which
come into view. And this is the best way
of making traffic view. And this is, of course, it's Kirkman window sill, which is going to
make our cell line. And we're going to now use DC. We're going to check to see
if we have this storefront. And we probably don't
have the storefront. We'll just look at this. This is our storefront glazing. In the storefront glaze seal. It finished. Actually that
that is probably our system. And well, you could just
place it on the ground, would probably going to
put our typical assembly. We're going to make
sure that it's come up 1 eighth of an inch plus one. So it's one quarter
of that shadow. We're just going to for now make our little backer unit part of our
installation technique. This is, we just kinda do
it in drawing currently. We're going to make this
when these are solid color to duplicate this as a gray. And we're gonna make file with the line being
a little bit thick. We're just going
to make a bunch of little curves to show
some of that sealant. Can do that with
the medium line. This copy that again. When I come back as well. And here we can add a little box to be the nail or that will nail
them to the finished system. This is going to be just
for materials sake. I'm going to make sure
that we put the lines, this as a phantom line. Because we want
to make sure that our system is going
to be a proper width. We'll see if we can
change it in family, but we'll have to
actually go inside. We're going to double-click
editing the family. We're going to make sure
that this is going to be our Save As family. This is going to
be the same as r, one by five by four. That means that this
dimension here, it's going to be two
inches on each side. Who are just simple, little by little,
little detail families. And we've got to make sure that this
dimension right here, I'm going to be 1.5 inch and very simple process and will just align this AL. We're going to load this
into the project and close. Go back into our curtain
window sill detail. Make sure this is the
one that's going to be here. Just match. This would just move that by hand. We'll just mirror this
on the other side. And we might just that to roll back the way people were detail, this is definitely
different situations. Some people would of course, make sure to have that
appropriate installation here. So it depends on your detail, how you're organizing it. But then also if you're going
to use single or double. And this right
here is looking at single storefront glass. We're going to do
to close this off, is really going to get
a cut line. Going. Turn off our sound. Don't get too many errors. Extend. Should I
studied that part? And we actually
also going to make sure that we delineate where the four-line is because our exterior wall is going to be prior exterior ground is going
to be lower than a fillet. This we're just going to
match the properties. Let people see where
the the outside is and where the inside is. Just going to label it now. Storefront and I call
curtain walls of time. But this is a storefront
just like it's listed here. There's a little bit
of a difference. I'm going to of course, measure the distance as well. So that will be aligned
with our entire project. And we'll copy this level to labor the Bakker and seal it. And it's very likely for this, I'm going to put this
make sure it's listed as storefront window sill. We could just find
that in our details. And make sure we're in
our window, schedule. Copy this over. So now we have some
of our details for our storefronts
and space between.
25. Adding Window Detail Tags: From what I hear, when
someone could do as easily, say that this is the detail. We could also just, if we wanted to make it pretty clear that that's going
to happen right here. We could come here and
actually add a section. But via reference section,
just scroll down. It says storefront window sill. We could just make
sure it's it's known. Now for this type, I've made it where you
don't show the sections. I can override that. So you can see the section
in the annotation category. So I only want to show
that section on the watch. I'll need the other
sections. We can hide those. But in terms of
showing this section, I thought that
would definitely be an important value to finding out what's happening
in that situation.
26. Adding Window Tags to Elevations: Now that we have the elevations
created for the project, now go ahead and use a view
reference that you find in your project for the views that are irrelevant
for this project. So you know, we have a
different window for each or different window unit. And so we're just
going to be placing what's called a view reference. And this reference went
to this elevation. We're actually going to place it for the particular window. So I'll go through
that workflow. Start by going to the
View tab, view reference. And make sure that we're
gonna be putting in the file a window
view reference label. This is something
that's custom-made. And you'll have to sort of know a little bit about
rabbit details, but Szilard project, and
you're welcome to copy it out. Essentially, you're
going to make sure that it's going to be in the window category
because it's type of view. And you'll be looking at the
appropriate window for this. So we're going to definitely check to see that the window is in the project. We go to our project browser
and will collapse all. And we're starting by looking at our all right window elevations. And we have them labeled
as front wall living room. And so one way to organize this even better so they
can be located. We can always just say
front wall, storefront. And the same thing here. We just make sure the storefront is clearly labeled for
each of these areas. Master bathroom, storefront
as two bedrooms, storefront, then the
study storefront. Now when we go to click
on the view reference, we'll see like we're located. So this is in the rear.
It's for that living room. So we know we're looking for
the living room storefront. And I can just locate
that anywhere in here. And I could go back to
the view reference. Make sure I'm saying the
master bedroom storefront. And notice that I'm putting it over the storefront,
not over the door. The door will be tagged
separately as well, of course, because it's
a different system. And when I double-click
on that elevation, it goes immediately
to my work elevation. So I have Windows both in
the North and in the South. So I'm going to my
south elevation. From the south elevation, we're doing again the same item. We're going to start with
the bathroom storefront. And then we're going to
continue press Enter. And we want to make sure to
get the correct elevation. So now we're going to the study elevation
of study storefront. And if it doesn't have a label, we'll go ahead and
label it later. Then. We'll add
the view reference for the dining room storefront. And we just call it front wall. That's fine. We have always can just
make sure to align these. If there's an element that
can align to two, now, we can always just located they're gonna be
properly aligned. So now what we'll do is we'll
go into our elevation page. We'll be looking at
both our elevations for our building C, which we see those tags. And we'll also tag our door. Just knew that they will down the same issues here which will have that tagged in elevation just
like it wasn't planned. There's a duplicate one.
We'll just take off the one. Then we'll add another is located down to
where we want it to go. Extra tag speculatively that okay. So you live with that door? We all look at our are pretty much our Windows
schedule where we always put our
Windows elevation. We'll just check what
our labeling system was. So I think we want to
stick with the letters, come back out and
label this as B. If it's already taken,
we'll change it. A, B, C, last one, D will come into this drawing and move our
section tag up a little bit. And also, it could
be very useful. This would come out,
leave this region. This lower our view. And just lower that little bar. So it's not going
to be in the way. So now we have our tags for
our windows in our elevation. And we get this, of course,
hide some of these things.
27. Window Schedules Conclusion: So we are starting to
show how you would see and get information about
building these sorts of things. You will populate this page with all the windows and
all the silk connections. And when you get all that done, you'll have a complete set. And you could go back and
forth and review what you have to see if it's fitting to the ideas that
you're putting together.
29. Introduction to Rooms: The room family in Revit is an incredible tool to give you
information about a space. You can also turn around, use that information to get
quantifiable information, dictate how many people
can fit in the space, how much it will cost because you have
the square footage. Or you can even use it
just the color code and understand what's
going on in space. This is something you
can use your plans and other parts of your model. And we're gonna get into
how you can use that.
30. Adding Simple Rooms: Adding rooms in Revit is
not a difficult task. Here is a basic plan without
any of the room tags, but I've actually
created some rooms already in this drawing. But if you want to
start adding rooms, all you have to do is go
to the Architecture tab and click on row. No-show spaces where
there might be a row or what were
their R groups. So since I've actually had
gone to my model Nate rooms, that actually can see the
space where there isn't one. And I can click on Rome. As you can see, the room is for this area
between these walls. And I could simply give
a title like closet and also have a rumen any tag or any any room that's made
in any of the views. I can always come back
and click on tag room. And any view I can
come and put a tag on. So you can customize your room tag to have some
information as above. And it's also a family that
you can also come into. Double-click and
choose different types of information that's shown.
31. Room Attributes and Schedules: One incredible feature in Revit is the ability to
make room schedules. Room schedules, and
information pertaining to individual spaces are something that Revit gives you lots
of control and power over. It's again, another part of the building information
modelling that revit provides. We'll look at how to get
that from your plan. How to make a
schedule like this, which can be used for various means of
assessing your building, adding particular information,
maybe even making a price per square
foot to your building. Let's get started.
32. Custom Room Boundaries: Now that we have
all of our rooms, one thing about this is you can see these few lines that
are in the project. You click on it. It
says rooms separation. That's one way that I've divided spaces that didn't
have normal walls. If you click on any wall, you'll see there's a check mark down under constraints
that says room bounding. If we take it off, that would, for instance, if we take up this room
bound, give us an error. The error would mean from this, it says that multiple rooms are enclosed in the same region. That's because rooms
close off the boundaries of or the walls cutoff
boundaries of the rooms. We're going to click Cancel. Another way to divide the room also is two from the
Architecture tab, click on room separator. This ladder allows
us to make lines. And now when we press
control over the room tag, we'll see that
there's a division. We can simply say that this is a water closet for a toilet. So that's how you would divide a space that might
have an open wall. Or if you have a very big space like this where I
have big openings, that's how you would divide
that space from this space. So I've divided the
model interior. These are all interior
into these spaces. Now I'll show you
what happened if you had tried to
make a room outside. Now, since the outside of the spaces and bounded by walls, you can put a tag out there, but you'll get an error message. And it will say it's
not an enclosed region. Though if we add come out
and made a room separator, we could make walls
around the area. But a problem might be that there is no ground, but since we've
placed the ground, we don't have an issue. But we're going to
take that off because we're fine with just
doing the interior. We will look on the second
floor and make sure that those bases are also labeled. As you can see, we've
labeled the loft. And also I have made a room separator line
around the entire balcony. Some people calculate
stairs separately. Since I've included that
on the ground floor, that will be the basis
for measuring that.
33. Introduction to Schedules 3: Now let's add our room schedule. To add a room schedule. You're going to come
down to schedules. In the browser. We're going to collapse all. You can right-click new
schedule or quantities. You can also make this going to View and
clicking on schedules. Those are two different
ways that you can make a new schedule. We're going to scroll down
to Rome in the category. Then we'll click Okay. And now we're choosing the items that we want in our schedule. We're going to start off with the room name, then
the room number. And we're also going to put occupancy and we'll
show you why. And then we are going to leave off some of the
Finnish information. Like I said, before, you can put this information in your room schedule
so you can start to quantize all the
information for that rule. And now we're going to go into some of the
other properties. We would like to
group this by number. And we'd like a
header and a footer, but not with the number, more based on the occupancy. And so we're going to
use the occupancy. Not exactly by code.
For this project. We'll just use it by a
particular differentiation between a main living space
or an accessory space. And we want a header and
footer to these sections. Then we're going to
click on formatting. And because we
haven't placed area, we're going to come back
here and include area. And when we click on area, we're going to add the
base of the formatting. Click Calculate totals. I think that's enough to get
our room scheduled started. Now, currently, you can see
that all the organization, there's a little bit
all over the place. I'm gonna go back in here with
our sorting and grouping. We're actually going to organize
by our occupancy first. And we'll put a header and
footer for the occupancy and they will put numbers second, that clear this up. And as you see, I've gone in
here for each of the rooms, spaces and detailed what is is if it's accessory or
if it's circulation. You could change it very simply. For instance, for balcony here, I can just click on circulation and you see
that updated immediately. And we also see that some things that are here that I've deleted
from the project. Don't worry, what
you need to do to remove rooms that
aren't. Be included. If you just click area and you can say that
it is greater than 0. So that's one way to make sure you only showed worms
and the project. And the toilet is
something I would make as the accessories slowly
makes sure that auto tax gets it and the loss is going to be
part of the living spaces. So you can see from this very simple going from
the rabbit schedule, innate by the floor plan
of labeling the rooms. That all this information is in the project already know all we have to do is
make a schedule.
34. Updating Room Info 4: So one thing that people
might be interested is in changing the numbers. You actually can
change the numbers. Make sure if you're going
to switch a number, you get an error message. You want to come back and
change the other ones so rooms can have the same number
and then you can fix it.
35. Room Area Grand Total 5: And currently you see there's a total for each
of the occupancy, classifications, accessories, circulation, but we don't
have a total total. So we actually will go back
in the field and then go to sorting and grouping
and make sure that we include grand totals at the end. We see for our house that
our square footage for our interior condition
space is 1923. We could use this both for estimation of the
cost of the project. Also using to analyze
things about the space. Maybe we want to have less living space
because it costs more. Or maybe we can reduce the circulation because
it's not that critical. These are all things that
can be done innately from Revit using the
information of schedules.
37. Introduction to Material Takeoffs and Estimates: Whether your project
is bigger, small, being able to estimate
the cost of it, and what actually is going
to go into making it built is pretty important
even from the beginning. So whether you're an architect or you're designing
your own home, rather, it gives you
some awesome tools to help this go forward. In this part of the course, I'm going to go through
using the tools that are built-in and
rabbit to look at the items and inflammation in
your model and start to get totals and sums about each of the individual
materials and assemblies. We'll also go
through how you can code this up and put this into either a rabbit form
or get it ready for exporting into whatever program
you use for estimating.
38. Estimation Concepts in Revit: As this project is a very
real set of information. And rather it has incredible BIM or building
information modeling tools. The question is, how can we get this project built using
the most of these tools? And one of the answers
is that we can estimate the cost at every
stage of construction. So this model is still basically an SD or a
schematic design model. Yet, because we have
all these systems and all of these are
quantified in Revit. That means that we can go
ahead and put them into a schedule within
the program and start to see how much
this project will cost.
39. Estimation Resources: Before continuing with
looking at this pricing, I do want to show you a good
resource outside of Google. Google actually has
some great tools for estimating your project. You can do a simple
Google search. And I'll show you, I'll show you very quickly where if you ever want
to find out materials, for instance, you want to find the brick cost per square foot. Google has several different
sites that can help you price that unique
material itself. It calculates all of
these things with inside. A good resource that gives
you accurate is RS Means. And it's accurate information
about your cost estimating that could be very
valuable if you are starting to say that this
project is worth it. And over time you'll
figure out how to estimate by simpler methods. But if you really wanted
to quick estimate of how somebody
is going to cost. Other than a Google search, you can start building
your calculation. This is something
that's very valuable.
40. Estimation Tools in Revit: Let's get into how revit has
tools for cost estimating. We'll look at a
cost estimate that I just put together
for the Stonewall. Our project has for stone
particular divisions. And we'll look at those. 1234. And I've detailed these walls out with
various systems. But if I wanted to just see
how much the stone was, I could make a takeoff for that. I've also made an entire takeoff for every single wall that
has all of the assemblies. So let's go through and make a stone wall takeoff
from the beginning. So the first thing
we're going to do is from our schedules, go to new schedule, and we're going to choose
the new material takeoff. So click on that. And as you can see from
this new dialogue, we have several different
things that we could be pricing or making a
material takeoff, which is a shorthand for
saying it's for pricing. So we're going to
go down to all. And what we're
going to do is use a unit cost for
each of the walls. And I'll show you
how we'll get that. But if you look up here, you can also see things like furniture and different
types of k square, which are things that
you could do one by one. For instance, if you
had two cabinets, they might cost the same. For the wall. We're going to
have to use square footage. So that'll be a very good
thing for you to see. And you'll see how to use
this when you're thinking about other items because
it goes by the same logic. Okay, So we're gonna leave the name and we're
going to leave the new construction
and we'll click Okay. Okay, for a material takeoff, we want to have some very
specific information and it's going to be all
around the material. We're going to scroll down first selecting family and
the family and type. Then down to the material area. The material cost. Material description
for right now, that material name right
above the description. So we'll put that higher. This information will help
us deliver the takeoff. But we also want to make
sure we get a total, which is multiplying our
area times the cost. And I'll show you how to put in the cost for each material. So to create a total, we're going to click effects. In here. We'll just call this total is gonna
be a formula. And it's going to equal the area times using this
asterisk, the costs. And it's going to be divided
by one foot squared. This is so it will be
in the proper units. And we can click Okay. And next we're going to go into how it's
going to be sorted. We're going to
click family first. And then we'll click
family and type. And at the bottom we're
going to click grand totals. That will give a grand total at the end of how many
units are there. They will scroll up to
see the formatting. We're going to click on total and we're fine with
the other formatting. But we want to make sure in this drop-down that instead
of a no calculation, we're going to add
a calculate totals. And we're not really changing
things in appearance, so we'll click Okay. Alright, so now you see all of the walls in the project
and their assemblies. For instance, our basic wall
A1 has concrete masonry, metal furring, rigid insulation, and a stone veneer. And so you'll see that it's on both sides and this
is one wall assembly. So it'll be double. And you see this for all
the walls and the project. And you also see a price
at the end of all these.
41. Setting Material Costs: Let's go into how we can get
the prices for one system. We're first going to
go through a 3D model. So we can actually
work out the prices for the stone veneer walls. The stone veneer wall, which we've detailed
a little bit more. We click it and we go to
edit type and structure. We'll see the assembly
of this wall, which starts and ends
with a stone veneer. And in the middle it
has the metal furring, has a vapor retard or it has concrete masonry units on the
inside, rigid insulation. One thing to make
this appropriate, I have to put metal
furring on the inside. Though. Metaphor ring can go
in-between the insulation. So we'll give it a quarter-inch depth so we
can have that included. But it's going to give us the information we need
so we can price it. So to get the price
to a material, we have to go to the Material. Dialog. With each material, you'll
have your settings. If you go to the Identity tab, you will see that
there is a place for a cost of the material. So if the cost from your
research shows 750, you could change that here. Rev, it doesn't
automatically put prices in these drawings, so you'll have to go and
find that for yourself. But when you put it in there, you can always make a chart of the different prices that you
can place into your model. So let's look at
the metal furring. We click into metal furring. And from my research I
found a price of about $1. Now, be mindful that if you want to include the
construction costs and the material cost and
the contingency that you will have to make a note of what you're putting into that price. So I will estimate that this
is for my material only. The construction costs will
have to be calculated later. I'll click Okay. Vapor with tartar. This is another system
that would require a little more complication. So it's always good to research how you a
price each element. For concrete masonry units. It's very easy to
find that system. I found the price of $5 average. And then for rigid insulation,
it's very expensive. So this is also a chance
for you to research. If you find something
too expensive, maybe it's something
needs to be changed. I know I'm installation
costs a lot of money. So it's good to research. It will just go with
this Google answer. And you can do research to find out what's
best for your project. You can also decide to
change the installation for the assembly method based
on the price you see here, makes sure that your
entire assembly is going to achieve what's
needed for your project, including an exterior wall
that keeps out the weather, also the water, and also it maintains the
look that you need. Having metal furring and a stone veneer as a
very good assembly. With rigid insulation. We'll make sure people
inside the building are well and that the material
will be taken care of. Mainly that all the material fluid that gets inside it will be able
to be pushed out. And that's also going to
be an issue considering the vapor retard or
being on this side. This is something for you
to research in your region, what's best and
most appropriate. We set these material, we set the prices. So let's go back to
a material takeoff so we can calculate.
42. Estimating Material Cost by Square Foot: Now that we've assigned a wall material to each of
our parts of the Stonewall. We're going to make a new
Stonewall material takeoff from where we started. What we're going to
do with this is make sure that we're only going
to see the stone veneer. Go the song veneer has
many different elements. We're going to first see what's
happening with the stone. Then we'll look for all the
other elements that are in the project for this takeoff. Right? So what are we going
to do to remove items? We're going to make sure that we're going to first include
what we're looking for. So we put stone veneer. So this takeoff just from
what we've placed in here, tells us that we
already have a estimate that it's going to be $45
thousand for our stone. That's a lot of money. So being able to estimate
quickly and seeing, hey, maybe this is too
much for my project. Maybe we want to come back
and shorten the wall. Or maybe you want the
interior materials to be a little bit different. Some sort of way to
balance the project. And maybe if this cost
a certain amount, maybe we will save one finishes or system in
another part of the project. By putting this together, we've made it easy to use the power of
building information modeling to inform our design. So when you go and you've talked with either if you're to client or if it's
your own house, you will be able to
come back or talk to contractors before a
project gets developed. So you can really start
getting a price that you want. And a design that matches
in an intelligent way. Takeoff for other
materials can be done in the same way that we've done for the stone
material takeoff. I want to show you just in
case we want to duplicate and do the same thing
for the Tsugi bomb wall. We can just come back here. And now our filter can be Tsugi. And we'll just make
sure from looking at a larger, a larger takeoff. And we will see that
the sugar bond, we scroll down, it's
called bit Tula. Will go in here and change it. So that should change
our shaggy wall takeoff. So we now see the
price that would be for all the sugar bond.
43. Estimating Material Cost by Unit Cost: In case we wanted to make a estimate for our other
systems more like a unit. We can also make unit
by unit takeoffs. And of course, the benefit here is that
you could just get it from your model though you can
also just count them in your Excel sheet will make
it from the rabbit system. This also could use be done
on elements like Windows, fixtures, or unit costs
that are not by area. We'd start by saying new
schedule in quantities. And this would be for our doors were
starting from scratch. And we would do similar
family, family and type. But we also scroll down here and choose things like the cost. And we would put count. We come here for our total. We just put cost times one. This is something
where we could add like a fee or some sort of thing that would
affect the price. For instance, is hardware
costs a certain amount, we could just add that in. Then we go to sorting
and grouping, which is family,
family and type. In formatting. You'll know that in cost, it does give us the ability
of calculating the total. We can also use this
total that will include some of our
other factored in price. And we click Okay. So that already gives us
our count and our total. But we want to make sure
that we come back to our formatting and our grouping. Make sure there's a grand
totals in our format. When we clicked on costs and calculate totals, click Okay. And you'll see that there's no cost because
we didn't set it. And we also want to put a
total under our account. We have a little bit of
numbering as well there. Okay, so what we
can now do is we can look at our
model for a moment, but then we'll come back
here and say the pricing. This is something
you can also look on a catalog like Marvin
doors and windows. So I'll hide some
of these items. And you could use
something like Marvin. And as you can see, the pricing is both for
doors in the curtain wall and in regular systems
in the project. And if you make a custom door, you'll find it listed
custom in your takeoff. So this is listed
as a door schedule. So that's another funny
way of doing a takeoff. Whereas the take-off could get
a little more information. You could just do
this as a schedule. And we're going to come
here and we'll say that our research that we can quickly find for
a curtain wall door. So it talks about the
cost of installing it. We'll go ahead and take a unit. If we said it's it's two hundred and six hundred
per linear foot and we're typically doing
three-foot doors. We'll go ahead and
say it's about 600. For each of these. You click okay. Then for the, the double door,
will click 1200. And we'll come back. And we'll also say wood door
costs, three-foot door cost. And we'll look at a something about 400 is something that we'll
just use for this model. So we do actually 350 because
these are not entry doors. And that'll change it
for all the types. We know that this smaller door, this actually this actually
is the biggest door. So we'll put this one at 400. And so now we've seen the pricing for our doors
done with a schedule, but it can also be
done on the take-off. As you can see, this takeoff, which is a little bit different because you'd have to
go into the material. But the schedule
is the natural way for pricing unique
unit elements. Now we have our pricing system. We can use on any system. You can price walls,
we can price fixtures, lighting, everything can
be done within Revit. It's a great system and it's a great use of building
information modeling.
44. Course Conclusion: Congrats on finishing this
complete rabbit guide to them, scheduled shop drawings and cost estimation you
required to finish. And if you've completed
the exercise, you even further head
and your Revit skills. If you have any
questions, please don't hesitate to comment in the class or ask a question
because I'm happy to answer. If you enjoyed this course,
please leave it to the view. This has been branded and I've enjoyed being your instructor. See you in the next course.
 Brandon A Gibbs, Architect & Innovator