Transcripts
1. Intro to Prepare Procreate Ephemera Brushes for Mixed Media: Hi guys and welcome. My name is seller's past, current and I'm coming to you from sunny, Manitoba, Canada, all the leaves have fallen and I think winter is probably just around the corner. I'm trying to enjoy this good weather as much as I can before that happens. So the last few classes I've done with you have been with mixed media. And we've done that in Procreate. When I was working on those, I thought to myself, I've got to have more of these brushes handy to do this ephemera that I want to add to my compositions. In the last few days, I've been creating a bunch of these ephemera brushes. And I want to show you the process because it really isn't that hard. And it's quite easy to find materials. Once you know where to look. I've got quite a few different ideas to explore in this class. So I hope you're ready. Thanks so much for all of you who have been choosing to start following me. I'm really hoping I'm getting some different artists here now that are interested in mixed media as much as the other stuff that I've been teaching. And I know you probably think she's always doing brushes. But believe me, the more I use them, the more powerful I realized they are. And I think, Oh my gosh, I need more brushes. So that's why I'm creating them all the time. Some of these I'm adding to my website, so make sure you check out my artists resources there. That's at shop dot Dolores art dossier. And don't forget to join that mailing list. Also make sure you hit that follow button up there. That way you'll be informed of anything that I put out. As I put it out. Mixed media is such an incredible medium to explore. And I think that the more I get into it here, the more I see that I can include this as part of my art daily practice. Instead of doing it like I always used to in my art journals. I started to work here in Procreate. So these brushes that I'm creating are just going to expand my horizons. So I'm really hoping that you're going to feel that way too. And I hope that you enjoy this class. Let's get into it.
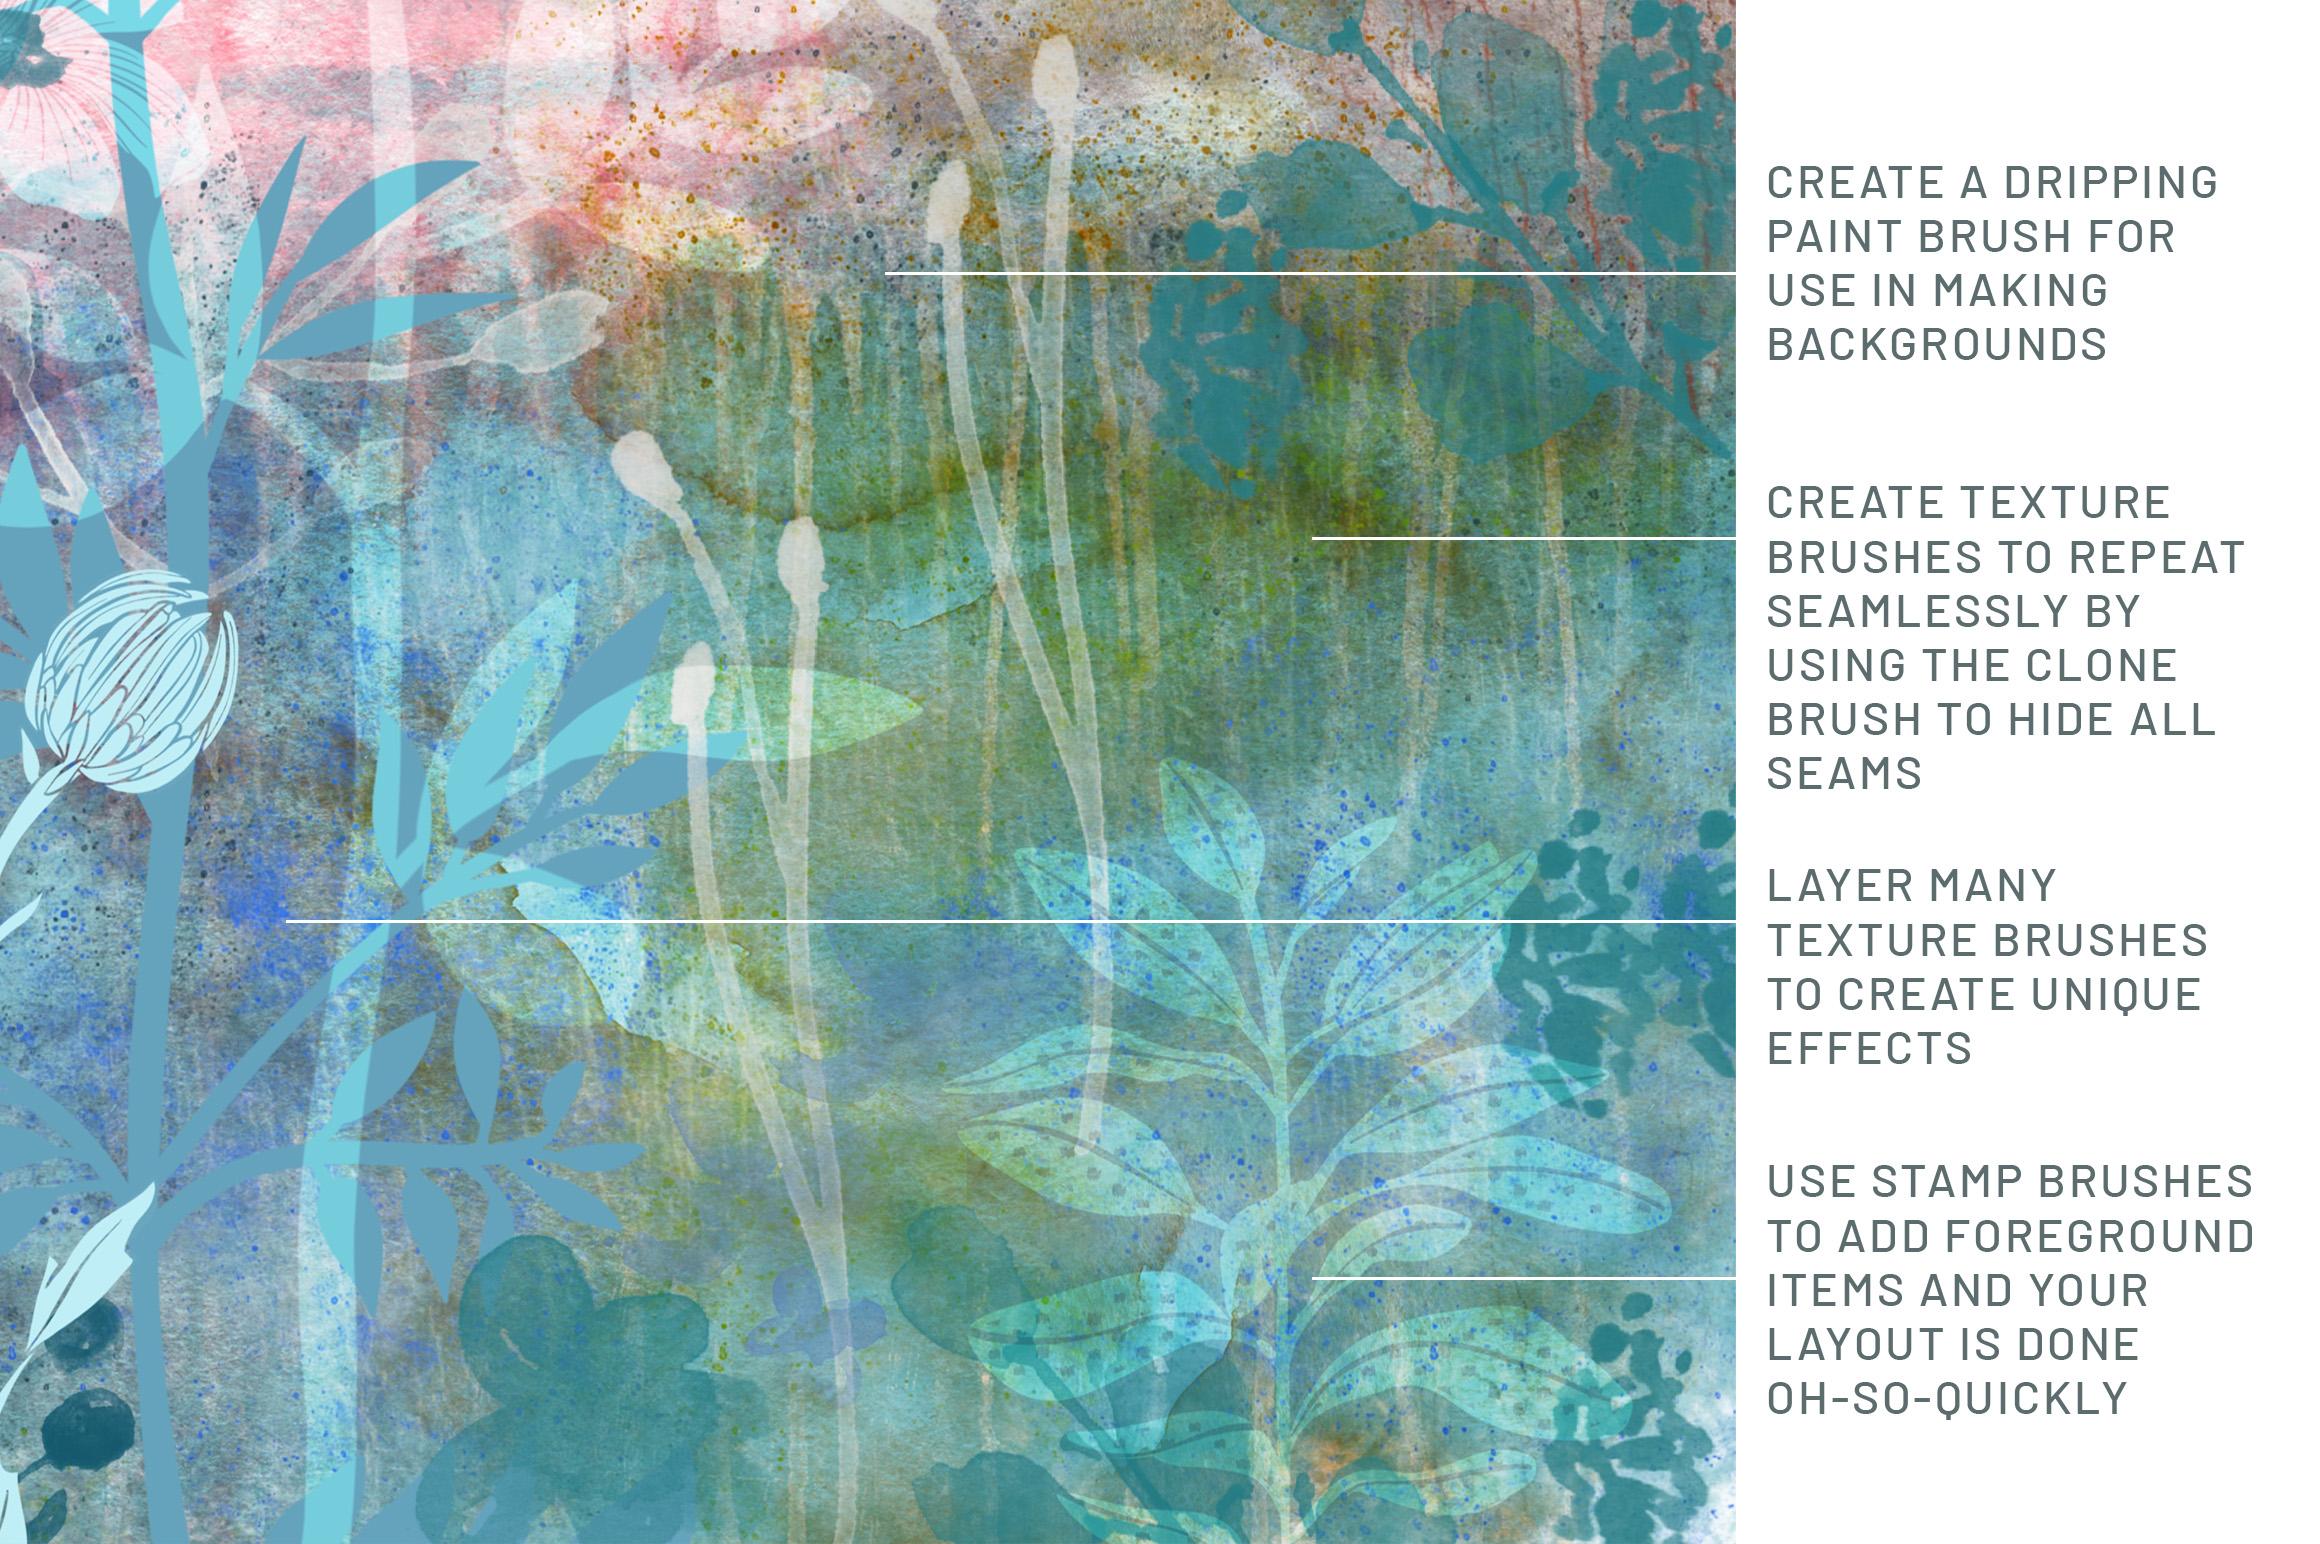
2. Overview and Ideas to Spark Creativity: Hi guys and welcome to. This first lesson is a little bit about inspiration, and it's also about sourcing the files that you're to be using for creating these different swatches. Let's get started. I want to reiterate when you aren't creating seamless repeat patterns or anything for that matter, that uses sort of a photographic source. If you haven't created it yourself, you have to make sure that it is a photo of that is not copyright protected. Now, I apologize if there's any noise in the background here. We're just about to get some kind of a thunderstorm. And the thunder is fairly loud here. So if you hear anything, That's probably what it is. So when I'm sourcing out an image, one of the things that I always do is I go to, of course, images here, went through in the Images tab, go to Tools and you can go to change things like the size and what not. But here if you go to usage rights, you can change it to Creative Commons licenses. Those are licenses that allow for you to duplicate the images without violating somebody's copyright. Now there are a lot of different sites that you can go to. Some of them, you may still have to attribute the artist, or you can pay a small fee to license it or to use it for free. You don't have to necessarily buy the license. It'll be just a $1 single use kind of a fee. And so I often tried to look for things, let's say from Pixabay or from Unsplash. Those are sites that I've used before that are quite easy to work with. So let's say this is the image that we wanted to use. Now the fact that I know that this is a royalty-free image, I'm going to just make the unilateral decisions here to download directly from this image here it's big enough for what I'm going to be needing it. I'm good enough quality and I'm going to be changing it so much that you'll never know that this was the original image that I was using, so I won't be violating the copyright. It'll be extremely different. So what I'm gonna do is I'm going to Control, click on the image, go down to Save Image As, and in my case, I want to save it to my iCloud Drive so it'll be available on my iPad easily. And this is the folder that I've been saving the backgrounds in that I'm going to use for today's class. So I'm going to hit Save here. And now I'm going to switch to my iPad. So here on my iPad, this is the stack that I've made with a few files that I plan to work with in this class to get that file that I just imported or saved onto my, to my iCloud Drive Uranus right here. That's what I like about iCloud. Is that easy? It is to actually get that file between my desktop and my laptop. So the other files that I've collected here, I've got just kind of this is the one I really liked as far as swatches and stuff goal. So I'm not sure exactly how I'm going to use it. I love this one because it's got a combination of water drops and some nice texture to watercolor blooms and things like that that I can incorporate into a repeat tile. I've also got a couple of other examples of files that could be used for that. Again, there's accommodation, there are some spatter in here, and some just really nice areas of watercolor. I'm not sure which part. I'll use an on some of these I could probably use more than one part. A faster way to scroll through would be to open them like this so that I could come through more quickly from your gallery. Just do a pinch to enlarge and you can scroll through them much more quickly. You can't do anything with them here, but you can definitely look at them here. I love this area, so I might try and incorporate that. And really this whole sample here has great paper texture showing through. This one just has fantastic blooms everywhere, all kinds of really neat edges that I could use. And so I've got more than enough here to create a couple of really good seamless repeats. I'm not sure that I will be able to use because it's got such a distinct striping on it. I added it to this set here, and I'm probably going to add a few more things as we go through the class. So in the next lesson, what I'll do with you is start with one of these and break down the whole process for you. How I actually use these to create that seamless repeat. The purpose for the seamless repeat a course is that I can pick it into another program like Photoshop and use it to fill up complete background. I'll show you that at some point in Photoshop as well. And here in procreate, I use my repeats, repeats to create pattern brushes. You'll see in a ton of those in my other classes. I use that process to create all of these, as well as many of these other ones here. So as we go through the process, you'll get all of my advice about the usefulness and really for me, how absolutely indispensable creating a seamless repeat tile is. And of course, the main thing that I wanted to show you in this class was the use of the clone tool. So that's something that will be really useful for us. And you'll see why in the next lesson.
3. Sourcing Files: Hi guys, welcome to Lesson 2. In Lesson 2 here I want to show you how to source files that you can use that are royalty free. Let's get started. I'll tell you you don't have to look very far to find mixed media ephemera. I just did a quick search and this is all the stuff that has come up. What I did personally is I bought a couple of packs from a couple of different suppliers on Etsy and some of them are really inexpensive, like a $1.2 dollars each. So I had a bunch of stuff that I could work with for that. And then of course, I have also gone through some of my own journals for things that I could use to create mixed media backgrounds. So it just kind of in the same way as I would if I was starting a project like this and I needed to fill up glucose and stopped down in the background. I've got two or three boxes of stuff in my old studio. And I went over to my other house, my parents old house, which is now my daughter's house. And I took some pictures of a few things and I brought a few things over. So I'm going to show you those in a few minutes. But there is some beauty to grabbing some items that are digital to start out with. So what I did is downloaded them and put them into my iCloud Drive. So all of this stuff now at the ready for creating anything that I want really with the digital files. I can go in and grab sections of them or take a part of one to use as a background. I've got a few of these just basic patterns that I can use to make things like washi tape. And I actually downloaded a couple of pieces of tape that I could use to make brushes with. I also went into my own archive of backgrounds that I have. This is one that's on my website and I sell on Creative Market as well called volume seven, collage, ephemeral, or a camera or what I call it, I think I called it syringe, grunge collage backgrounds. So I'm going to show you the use of these as well. And I betcha, you've got a ton of this stuff that you could just photograph and add. So I want to review all of those different things with you. So I think I'm going to switch to the iPad now and we'll get started taking a look at that. So here's a bunch of the files that I had been creating. So I want to flip through those so that I can show you a few things and you'll probably recognize some of this stuff from that long brush class. And I've kept that in the same stack here because there's a lot of stuff that I can use between those two classes. So it's probably a buildup from the clone brush class. Now did this ephemera class. And then next is going to be the use of what we've created to create these kind of layouts. Okay, So this is the one that I've used for my titles. And you can see here a ton of different digits of ephemera. The background is a crazy busy background that I'll show you in a second. And I've used it in two or three different colors and abuse it as a background for two or three different pieces of art that you're going to see here. So here's one with that same background just treated completely differently. This is the beginning of another one. Here it is with really sort of painterly background of fact. So you'll see a bunch of these different things in use. This is one of those backgrounds. This, I've just started this one and this is one of those backgrounds of mine that I brought in. And yeah, here's a really quick one with two of my grandkids, again using one of those backgrounds, but also superimposing a bunch of the ephemera that I've created, including some of that masking tape. So as far as sourcing the stuff, I'm trying to do a bunch of my own original stuff. So I've got art journals. This one's kind of a piece of an art journal. But here's an example of one of those backgrounds that I would have ready for viewing whatever sort of mixed media piece I wanted on top. So it could be a painting, it could be lettering. I would generally scan something like this and then get rid of this. Seem like it's already got some content, which is the stuff that I'm trying to develop now as brushes. Here's another example, so I've got just a bunch of ephemera along the edges here. It was ready to go. That's when I kinda started in a little bit here. And basically I have a bunch of books setup like this. So because this one fell apart. But I've bought a much better paper. This is a mixed media sketchbook. So this one is, I don't know which is more appropriate for the painting in and having it survive and not fall apart. Like some of my old books are just in such rough shape like this is another one that I have. And you can see that it gets all broken and pulled apart because of the tension that the paints and blue will put on it. So these are, again, just exactly the same things I just showed you there. Just the beginnings. In some cases is just the paint that's been slapped on. What I do a lot of times in these journals is I use a credit card and old gift card or whatever to spread the paint because I find that it ends up drawing a lot faster. And the other thing is, if I apply adjust, so, so this conditions the page for me to then be able to work on top of and delicious little bits in here. Like you take a look at this and how nice is that? I don't know which is natural, but it's really pretty. So some of them don't look like much, honestly. But I started with this kind of thing in the past before and ended up with a really gorgeous piece, sold a little old sketchbook here. I just came across a couple of sort of that say peekaboo technique. This is super old, I bet you, this is a 15 year-old artwork, maybe even older. And you can see here that I did have an artwork in the back, some mixed media stuff. There was probably something that really terrible. So that I decided to use it as a background instead. And I've built up, this is basically that peekaboo technique. I've got a ton of little bits of collage around the edges and stuff, stuff I've glued on and some of it may have been underneath and I've painted around it and let it be exposed or I could have added it to the top. I just don't remember anymore. So there's one example and here's another. So justice I'm doing here in my journals. This is what I want to create here in Procreate. So that's basically the idea behind these pieces here. So it's natural media and that's digital. Can you tell the difference? I mean, if you saw them side-by-side, would you be able to tell? I certainly wouldn't. So looking at something like this a little bit closer, you'll see that I've got, let me get my stylus here. I've got that layer. And here actually is that look at what comprise that layer. You'll see, let me just turn this off and it looks absolutely crazy. I know, but it does come together in the end. So I had done a basic painted background. You can see I've added a bunch of brush strokes already, and that's a lot of my pattern brushes and stuff that you see me create in the past. Then some additional layers here. And you can see as I go through this, all of the different kind of layers that I've added. And what's great about something like this is you could turn off two or three of the layers and have something that looks completely different. That could be completely different. And you can see here that I also added a button. I've duplicated that group and flattened it and then did some work with hue and saturation and Allen's and brightness and curves and who knows what all, and came up with that design. Then I did a very, very quick painting, very, very rough. And then added that nice release of fat ice cream colored paints. And I'm using gouache paints here. I'll show you the set that I ended up buying. I didn't have time to make a bunch of brushes for this, so I did buy a set and then I've added some additional details here, and these are either brushes I already had existing. You may recognize this little kinda liner brush and not when I've used before that you can see here a bunch of new brushes that I've created. So that's one of them. And there's this little border brush that I've created. And these are all things I'm going to be showing you how to do in class. And then this is just kind of what I call a scatter brush. It's not called that here. Procreate can't remember what it's called, but I've created those brushes as well and I'm gonna be showing you that. So that handwriting came from this pamphlet that I got. This is a paper company that put out these sample papers. So Frazier papers. This is a company that when I was working and specifying printing, I would be able to choose the paper. And this was one of the fliers that the paper company sent out to promote their papers. It's gorgeous. It's got all of this really cool stuff that I could use for ephemera. So I've been taking a couple of things that are here. I'm definitely not copying the whole artwork. I'm just taking little sections. I don't think I'm violating any copyright laws. And this book is so cool because these are like little postcards. You can literally rip them off and actually use them. I've got a ton of these old paper catalogs. I kind of miss this when I was working more imprint that we would go to these. They would have kind of an open house at the paper companies. And they'd have all of these books that they would be giving away with all these samples. So I have saved a ton of them and I do use them. And I've taught some, even hanging on my wall, especially in my other studio. That's where I have that work by Joel Nakamura that I was talking about. But this really reminds me of the books Griffin and Sabine. The author is Nick band talk. And as a series of books they're fascinating love story between two people who are writing to each other. The whole book is made up of all these kind of little bits of ephemera and postcards. All kinds of really neat things are set up exactly like this. If I had it here, I would flip through it to show you, but I have that in the other house. So that's a really great inspiration. If you wanted to look out, it would be the Griffin and soybean books. This also reminds me that I have at my other hosts are my old house, a bunch of old photographs and old postcards that I bought at a secondhand store in Albuquerque, New Mexico. And we loved the store so much that will go out of our way to go there. And just and they probably stay overnight, they're in the area so that we can go specifically to the store. I love the ephemera. There's a huge section there of just old books. You can buy an piles and piles of old photos. They're real, they're old photos, family albums that who knows what. But you can go through there and find some from a 100 years ago easily. And there's also a ton old postcards and old greeting cards that you can buy. And I've bought many in the past that I've used for projects like this. So there's that. Then I also had a whole bunch of these which were painted patterns and things that I had created. I think I may have shown you this in another class before, but I ended up using a bunch of these yesterday or whatever when I was working on this project to create some great brushes that we'll use in our backgrounds. So there was that but I filled out. And then the other thing is I have a bunch of old things like this. This is an old piano book. This was one of the piano books that I studied from one, taking piano lessons as a teenager. And I loved this one because of the border and then also because of this little name plate here. So I've actually taken this and isolated it, and I've got this ready to use in some of my designs as well. There's so many places that you can source files from. Another place would be old bookstores where you can buy magazines, even National Geographic, I've sourced a ton of great ephemera from National Geographic books. I'm one of those people that saves bits of wrapping paper or even the postcards like this that come with my uppercase magazine. Every time I get a delivery in the magazine, There's always one of these and I, and I saved them because these are little bits that you can cut up to make really cute orders or whatever. So those are really gorgeous. Those are a ton of the different sources that I have that I can think of off the top of my head and I'm sure I'll think of more as we're going through class. But in the next class I really want to get started just working on a couple of these ephemera brushes. All right. So I will see you there.
4. Preparing Swatches for Brushwork: Hi guys, welcome to lesson 3. In this lesson, I want to show you how to create the swatches that we're going to use for making the brushes. Let's get started. Hey, so this is the brush document that I've created. I also still have that one from the clone brush class. So these are items that I could also easily use in creating ephemera backgrounds, whatever for this class or for, for any of the backgrounds that I'm doing for my mixed media piece. So if you were in that class, you have already received the information on how to create something like this or something like this. What's the brush that we ended up being able to use in this way. So that would make a great background. So I'm probably going to not go into too much detail about how to create those, since you can go back to the clone brush class to figure that one out, I'm going to review a few of them though, just because I think that there'll be useful for you. And the one I want to start with is this one here. So what this was, let me just shut off my guides here. This was a page that I had created in an art journal with a bunch of obviously little strips of cutouts from magazines and whatnot. Some hand painted details and some of these lines like these yellow lines here were done with paint markers. And I did kind of put an overall sort of Glaser, just saw over top. And I use the same method that I always do for creating the repeat. And I did also use the clone tool to get rid of some of the obvious lines. So here and here, so you can see that line is still pretty prominent. In a way it doesn't show too much because of the nature of that original piece. It would show up if it was painted line, for example. So I'll just quickly show you if you worked in that other class, what I did was use the clone tool. You can set the source so where you want to copy from, and then you can draw the line over top. Now, I've caught, believe it or not, that brush selected at the moment for the same brush was being used. And I don't want to do that. What I want is to go to my airbrush. I'm happy and finding the soft brush is working the best. And then I just went through and made some corrections there. You can also change where you're sourcing it from there. Let's save this because that looks pretty similar there. How easy it is to get rid of that seam. And same thing with vertically here, I might want to just add a little bit to stagger that ALL so that it doesn't look like really straight lines. Now, what I did here was to duplicate that layer. So I'll do that here now. And I'm going to show you how I have been creating the black and white that I need for the stamp. And that did go over in the other class, but we can do it real quick right now. And that's to use the Gradient Map. And I like to create a quite contrasty, so I drag that black over this way a bit. I definitely bring the white up and then kinda mess around with this to figure out how the midtones look. So I like to look for that. As, you know, copying that going into my brushes here, I'm going to go into my mixed media sets, and I'm just going to duplicate a brush that I've already got set up because that'll make it faster. I can click into here, go into green, go to Edit, Import and paste, and it's already in the reverse here. If it wasn't, then all I'd have to do is a two-finger tap. And let's try it this way because the other one is the opposite. So this one might be a kind of a nice alternative. So that one, I would move to be near this one. So I've got the negative one and the positive one here. So let's just do a quick test of this, will hide these, add a layer. You can do it in any color. Let's pick maybe a deep green and test those out so you can imagine how useful that could be. I think that that is a great way to build up and see the edges or something. And let's try the other one. And this is one that I've set up as a color changing one. And you can see here that you get a lot of variation in the colors. So that's pretty neat. And this one isn't the one that's in reverse, so it's a negative form. So that one, maybe you'd want to choose a lighter color to start out with. And you can see that as I continue working at, I get those changes in color. So that's something you can do to make that brush more interesting. So I'll delete that one and the other one I wanted to show you here real quick. The use of a pattern, a repeating pattern that you make the brush out of the original was just a bunch of circles drawn. I didn't have the entire canvas filled. And what I did is that four corners technique where we have the guides on, the drawing guide is on quadrant. And I've set it to the biggest size so that it basically just has the four quadrants. And then what I did was to have the snapping and magnetics on and duplicate it four times and then move these into the four corners. And what I had done is I had left all the edges blank. And once I had them in position like this. I had to draw some of these to fill in. And I did the process twice, I think, before I filled up the entire square. And then once I was done, I made sure they were all pinch together. I added a white background. You can see there, if you don't have a white background on it, you've just drawn the pen lines. You would add a layer, grab your white, pour that in there, and then just pinch the two together and again, Copy, go into your brushes. And I'm going to duplicate this one so that we can make the reverse image of this. So we'll go into green again, Edit, Import, Paste. And in this case I wanted to do the reverse image. So I two-finger tap on it, hit Done, and now I've got two versions of that brush. So what it would look like, put it on another layer path, what it looks like in negative form. And then this is where it looks like in positive form. So those are really great little fillers that we could use. So delete that and delete that. What I want to do is have that brushes a color changing one as well. So I'm going to duplicate this one that has the color dynamics set here. So I'm going to duplicate it. Let me just delete this one and delete this one and duplicate this one. Going to the grain, Edit, Import, Paste, hit Done, and you have to hit done twice there. And you'll see that I've got really crazy color dynamics set here. So I've gone through and change the amount. You feel it's too much you can go in and change it. So I'm going to change it, let's say to 10 instead and maybe 8, 13 here. You really have to experiment, but let's hit Done here, and let's give this one a try. This is when I wanted to delete and let's start with an orangey color. You can see here that I can get it to change very easily. And that's a really neat effects. So this one I can duplicate now and go into the grain, edit, two-finger tap, hit Done. And now I have that in positive form. Now if ever I wanted to make it smaller when I'm using it. I can go into here to the grain and just reduce the scale. And you find that you'll have to do that quite a lot. When you're working on a project like what I'm going to be doing. So that's just something to keep in mind. The only other one that I did that use that same process was this one here. And I showed you a few of those backgrounds that I had from my journals. And I did the same process where I move them into the four corners. And then I use the clone tool to make sure that the seams were hidden. Then I duplicated the layer, applied that gradient map and then did the three-finger swipe. So let's do that here. Hit Copy. We'll duplicate that brush again because I like that color changing. We're gonna go into Grain, Edit, Import, Paste. And this one I think I'll invert. And I'm going to make that green a little bit smaller. And it's really obvious when you see it here, but when you do use it, you're going to find that because you're covering it with so much other stuff, it works fine. I'm going to make it a little bit bigger here, back to normal. And you can see how interesting that background could be. So you could start with something like that in your background before you glue down or technically paint down your ephemera, you can go in and make the brush a lot bigger here. That's the green, but you can also go into the properties here and increase your minimum size. And you can also go into your shape and make changes, and go into your jitter and make changes. So then when you paint, you could put down a background so easily and so quickly. And especially if you decide to work in layers to build everything up and use the blending modes. So that's just a part of it. That's just your basic background. Then you'd start putting on all of your smaller detail brushes. So in the next lesson, what I'm gonna do is show you the creation of some really neat brushes that I have here that I think you're gonna really like. This is a nice little border that I've created and it's easy to stretch and have your little motif repeating will be shut off my guides there. And you'll see that I've created a whole bunch of different ones to really help me when I'm filling out my backgrounds. Okay, So these are what we're gonna do in the next lesson. So I will meet you there.
5. Perfecting a Challenging Pattern: Hi guys, welcome to lesson 4. So unless it for here we're going to be working with a much more challenging swatch. So the coning is going to be a lot trickier, trickier but not impossible. Let's get started. For this next one. I'm thinking I'm maybe going to try doing something with this pattern here. Again, what I tried to do is find a spot within this that has some interesting stuff that I want to try to incorporate. Maybe you'll try something like this instead. A kind of like this area in here. So I'm going to make a selection here, rectangular copy. And since I've got that document already set up, I'm going to use it again. It's already ten by ten and it's got everything that I need. I've already got the guide setup correctly. So here I would just paste to free form enlargement. It's really important that I haven't right to the edges. Let me just turn off the magnetics and snapping for now. So I'm actually going to go a teeny little bit over and make sure that there's no gaps or anything. And I should turn off all of that. Actually, I can get rid of this. And this is going to be what I'm going to use for my pattern. So I need to have my guides back on. And this is the beauty of doing a bunch of brushes on the same day or a bunch of seamless repeats on the same day. You've got the document is everything set up and you've got your head in the game. Before I do anything here, I think what I'm gonna do is get rid of that little dot there. So I'm going to use the cone to do the repair. And actually that spot was pretty good. And my class brush my spatter and that's not what I want to use. Let me try. Let's try and just a watercolor brush, a resident brush here in Procreate. I'll try that watercolor brush and see how that looks quite a bit smaller. Probably not a good choice because it's not opaque enough. So let's go to the painting. I wasn't the painting, so let's try something a little bit more opaque. Maybe this Tamar, and yeah, that works a little bit better, not the best match. So maybe I'll move back over to here, and there we go. That's pretty good. So just like the last one, same process, duplicate, duplicate, duplicate. Make sure you're snapping and magnetics are on. And then to start moving these top left, top right, bottom left, bottom right. Now remember last time what I did after pinch these together as I went through and I took all of the color completely out of my repeat. And in this case I'm not gonna do that in Procreate here, I will eventually need just the one color, the black and white image to use to make my brushes. But because they could also use this as a pattern swatch for creating an overall repeat pattern in Photoshop. I'm thinking I'm going to keep the color in it for now because I think I could probably use it with color in that case. So I'm going to do the same process. And this is the paper you're wondering if you could do this in Photoshop. That's where 90% of the time you do it. And the reason I did it there was because the rubber stamp tool and that's what helped to get rid of these seams. But now that I can do it here in procreate, well, procreates kinda take it over as my weapon of choice. Let's start getting rid of some of these obvious seams in an area like this. See how nice the colors match I can actually use and paint in this area? No, I think I'm going to use an airbrush. And the reason I want to do that is because I can get a nice, soft edged one, which will do a better job of blending. And let's turn off those guides so you can see what's happening. So already look how great that little area looked in that was just cause that side match so well. So it's going to get a little trickier as I work my way down into something like this. But for now I'm just going to use that same one over here and the soft edge airbrushed is working out great. And pecan need to get rid of that hard little thing there too, because that's something that would be really obvious in a repeat. And softly brush that out. And then maybe it would be a good idea for me to kind of use this on the way down. Now I know that we're going to need that second set of repeats to get these corners better. On the other one was really easy to hide that, but I think it's going to be pretty obvious on this one. So let me just continue on with what I'm doing here and then we'll move on to doing that. So in a case like this, I might want to bring this over here to a spot that has an OH, like a differentiation between the two colors just to give some kind of ending location. And I'm seeing here that pesky little, I don't know, blemish is obviously the same, so I'm going to go up here and grab a little bit and get rid of that. I liked this hard edge, but it needs to blend, so I'm going to take that color from that and then just kind of soften this end bit so that it will blend in a bit better. And we'll carry that red cross here, I think. Now this part's going to be tricky because I don't have any blue over here on this side. I do have some down here, so maybe I'll grab from here. I need more of that light greeny color. So maybe I'll grab from here for that just to make it a bit different. Now you see if I kept going here, I would end up repeating that there and I don't want that exactly the same, so I won't do it from there. There are maybe some of this green might work nicely. And I am getting a little bit of a repeat there of this, but I think that might be okay. Another thing that I've done in the past is to take a selection of an area. So let's select this area. Let's do freehand here. So select something like that, feathering. So I'm going to close that selection first and then feather it. And you can see that It's making it bigger and that area is what's going to be feathered. So I'm going to three finger swipe down and copy three-finger swipe down and paste. Now I've got this, but I can have it in a different direction than what it is here, which will help to kind of disguise it. I can also make it a little bit smaller. So when we pull that into maybe this area in here, just to be different, we have to collapse that together, so we'll pinch those two together. And then we still need to finish this little bit here. So let's go back to cloning. And because we need to do up here too. So up here we need blue again. So I'm going to grab that. And I think that'll be good. We're going to end up having to blend it over here. And we'll do that when we do the repeat. And I need green. So let's move that here to do here, and we'll use it for here as well. So I think overall I've got everything I need to do here, maybe that little white spot. And just to make this look a little bit different than that, let's also try to copy over that little bit there just to have something different happening there. But this here, so that makes this one look a little bit different than that one. And I think we're ready to go for the next step. So let's do the duplication. And I'm sure you're sensing a pattern here. I do it the same every time. And this is just going to help us to get those blends between the scenes working properly. When you are moving things like this. It's really important that you don't hit your screen anywhere because that will move it over and it'll be just by a pixel, you'll hardly see it happening. But if it does happen, you're gonna get some lines within your repeat so you don't want that. I'm going to hit that again before I do anything else so I can ensure that I don't cause myself problems with any little strips or lines showing up on the edge. And you can see that. And if I hide my guides, that I've done a really okay job of most of the joins, except for this one here, that one's really obvious. So we need to fix that went up. And I think once we do, we're going to have a pretty decent repeat. I'm going to use my Clone again and let's clone from over here. Oops, rookie mistake. No matter how experienced you get, still can make mistakes like that. Let's get that out again. I really like that. I think that that's worked great. Amongst other things that I've done in the past, would be to take something like this, which we know is also a perfect repeat and use it minutes to make another version. For now, I'm just going to turn this off. We've got what we need here to make our brush. I usually duplicated at this stage to make it black and white for Procreate's use. So let's go to our adjustments. You're going to go and be saturate completely, usually brighten a tiny bit in here. Then I go into the curves and make some adjustments here. And it's usually seems to be that I move this over by one to call one column or so. And then I move this over a little bit to get it later. And then I use this for the mid-tones. Now it's up to you. I'm gonna make it pretty contrast to here and click off of the adjustments and three-finger swipe down and copy. Let's go back to our texture sampler. I'm going to duplicate this top one. Go in here, go to Grain, Edit, Import, Paste. Now we know that this is the positive version of it. So two-finger tab will give me the negative version of it, done twice. And let's just do a test of that on a blank layer. So here, of course, with Procreate, you're only going to get the one color. But look how gorgeous for a brush like. That is amazing. I love it. I really love it. And there are a million different things you can do to change your colors. You can just go in now and do some additional colors on there. And you can make a color changing brush, but look how quick that one brush is going to create backgrounds for me on other projects. And the beauty of it is I've got this tile that I can use in Photoshop to make a full repeating pattern in color. So maybe let's hop into Photoshop for a quick lesson and I'll show you how to import that and use it there. In order to make it available to me, I'm going to do a quick export of justice title here. So I'll just go to Share JPEG. I'm going to share it to my desktop. And so in the next lesson, it'll be available for me there. I could also have saved it, and I often do save it to Files. I can go back into those textures and backgrounds, rename this single blue green watercolor pattern, swatch and hit Done, and it's there for me. And in the next lesson we'll meet in Photoshop there. I'm going to demonstrate the use of that to create a seamless repeat pattern. All right, so I'll see you there.
6. Creating a Frame from Found Ephemera: Hi guys, welcome to lesson 5. And this last one I want to show you how to create some really great borders that'll help you to incorporate photos into your designs. Let's get started. So for this lesson, I want to show you how I isolated and perfected that little book plate from the music book that I had. And just show you how I can clean it up and get it ready for doing my final frame. I imported it. I had it there as a photo, so I just went to add insert a photo. Then I located it and brought it in. And you a ton of stuff that I need to get rid of here. I just roughly centered it didn't really matter. It gets at that point. But I'm going to show you how I just went through and cleaned it up. First of all, I went to the herbs to just see if I can brighten it up a little bit. So I pulled that to the left and hold this a little bit to the right because I wanted to really dark in that blue and then did a little bit of adjusting here with the midtones. But you can see here I had this really big dark area here. So after the first goal, then I went to my freehand selection and I kind of roughly selected this area. I went to feather and I feather and you can see that the selection is this kind of growing. So that's how much it would be feathered at the edge. And then I went in there and did that same thing again. So I went back to curves. And now the only part that's being affected is going to be this corner here. So lighten that a little bit more. I didn't feel like I needed to darken it, but I've got it quite lightened, I think. And looking at it now, I think that that's going to be fine for the next step that I'm doing. Before we start, I'm even going to take a bunch of that stuff from the outside out of there just to make it less distracting. So let's just select and a little bit bigger than the actual book plate, select inverse. And we're going to hit caught here, three-finger swipe down. You could use the selection tools to select large chunks and remove them as well. So here, cut that off. Same thing with this side. I'm getting pretty close to the edge here and I can see them a little bit off square. So we'll have to do an adjustment there. And you can use the free hand selection tool to get rid of a bunch of the extra stuff here, three-finger swipe cut. And we're getting very close to what we need here. Let me just try that rectangular selection up at the top here. And I can see, and I know because I've already done it once and I'm going to need to draw that blue line at the top. So I'm going to cut and you can see now how off square it is. One of the things you can do is to put your guides on. You can change the grid size so that you do have quite a few lines there to work with and hit Done. And then you can make the adjustments carefully. And sometimes it helps to reduce your transparency, but I think I've got it pretty close. They're going to go back to my rectangular selection. And now I'm going to try to get rid of all of that. So I have gotten rid of it. And it looks like I'm probably in good position here for drawing that line. Now, let's get rid of this stuff in here. Before I get rid of it though, what I wanna do is think about, I would like to actually have that OK round still be in this frame just in case I want to use it with that background. So I'm going to hit the clone tool instead and get a nice big brush. Let's go back to that goulash, I guess. And I'm going to use this area is vertical area here to clone and fill in. Now that quash brushes a bit transparent, so I'm not sure that's going to work. So let's go into the painting here. I'll grab just a flat brush and see how that is. That seems to be working pretty good. So I'm going to go through and clone until I get rid of that. So I'm going to time-lapse this a bit so that you don't have to watch this whole thing. Now you can see I'm having a bit of a problem because of the change in the tone there. So I think what I'm going to do is like half of it here and then I'll just duplicate. I'm going to use the rectangular selection tool here. I'm going to copy paste and I'm going to flip that horizontally and use that for this half. It isn't perfect, but this is mixed media after all. So I'm going to pinch those two together. I can still do a bit of cloning here and fix that central area a little bit. And what I wanna do is actually separate this anyways, this first bit here, I'll show you that later on, but that's one of the ways that I'm going to be able to put a picture in here very easily. But now I want to get rid of all of this extra junk on the outside. So I'm going to use the automatic selection. You can pull, see how I'm dragging and changing the selection threshold. So it's looking pretty good. Let's, I don't want to go too much. That's probably as far as I can go. And let's just try this and cut. And actually that's done a beautiful job. A couple of little remnants here and there, but that can be erased off. At the top here. I need to add that line in there so I'm going to double-check my angle. Had to turn that one off in the background and it was kinda throwing me off. It looks pretty darn good. I don't know if I have to do any straightening there. You look at the distance here and the distance here, maybe just teeny tiny bad. So I think that's good. And I'm going to get this little bit of the line offer here. And then I'm just going to use a brush to create that line across there, her. So I'll erase this little bit here. And trusty old posca pen, let's sample this color here. See thickness of my marker. So I'm going to have to go quite fan, went full but to pin. And then what I'll do is just quickly draw across this way. You need to be a little bit bigger. And I'm using the top of the grid here as a guide. Then I can just kind of rough in that ended bit. But I want to fill it with this fill. So I'm just going to grab a section of it with a rectangle tool. Rectangle selection tool can be very slim, copy paste, and we'll move that in, enlarge it to fit. You may have to enlarge to get that perfect. I'm going free form so that I can get it exactly right. That looks pretty good on this end. And I think that will be fine. Looks pretty good. I probably could put a little bit in there. And again, I can do that with the clone tool if I need to go real small and just clone that in. And you could fuss with this for awhile. It's up to you. I'm going to just make my posca do a bit of the work for me here. So I'm going to cross to do this line again, just picking that up a bit and I think I'm going to thicken up this top line as well. So you can see that you can scribble it pretty roughly and then just hold your pen or finger down, whichever you're using to draw a perfectly straight line. Now this section in here, you can see that I did have a bit of change in tone there. So that's something I would take some time to fix. The finished one that I did. You I will show you here, looks quite a bit different because my settings were a little bit different as far as the curves and that the insight section is big. I enlarge and I didn't like that. So that's why when I did this one with you, I did it this way with the clone tool. So what I need for using this as a brush, shut this one off is to have this on the white background like we did with the other one. So I'm going to go back to my drawing guide here and go back to that big grid size. I'm going to put the snapping back on again because I want to center this perfectly. So I'm centering it side to side. You see that line turns yellow and then I also want to do it vertically, so both sides are symmetrical. Here. I'm going to add another layer, make it white, pinch the two together. And then of course to make it into a brush, I just saw something there. I haven't collapsed with the little fill that I had there. So I'm going to do that part again and this part again. And now I'll collapse with the white layer, but I need to make this to a black and white. Now, I would keep this a colored version of this that I can use and which has become something that I put into my ephemera gallery. But as a brush, what I need to do is duplicate it first, then go into my gradient map and turn it black and white like this. So three fingers swipe down copy. And in this case I just want a single frame. What I did is copied one of my leaves from another set there, but I'm going to go into Shape, Edit, Import, Paste. And it's better than the other ones versus the one I'm going to keep and hit Done. And now I have this as a brush that I can use just like that. So I'm going to show you in the next lesson how I end up making a frame to use or the pictures out of this. And I have another idea as well, so I'll share both of those with you in the next lesson. See you there.
7. More Ideas and Using the Brushes: Hi guys, welcome to lesson 6. So this last one is going to be just a bunch of other little things that I wanted to tell you and I just didn't throw into the previous lessons. Let's get started. Okay, so what I wanted to do in this lesson was to show you a couple of techniques that I used here to construct this page. And I'm going to show you the use of that frame that we just completed. But I want to make it easier by showing it to you in way. So it looks like an old Polaroid, I guess. This is the way it breaks down. I've got them each in their own folder. I started, let me shut everything off here. I started with a white square. That white square is going to be what ends up being the white frame. Then I duplicated it. So let me just delete this one. I'll duplicate this one. And what I did here was to take and fill that one with with black, then I reduce the size of that one so that I could get the order like the width of the border there. I think if I do put the snapping on, there we go. It guys actually use the other one as a guide for centering it and so on. You can also move just a little bit at a time by tapping. It'll go up a pixel at a time. If you want to make some really fine adjustments, then I duplicated that white again and place it underneath. Well, let's just use that one. I'll delete this, since this is what I'm making right now. I filled it with black. And then what I did to get that drop shadow fact was to go into the Gaussian blur here. And as I slide, you'll see that the shadow will start to appear. You see it there. I wanted to fairly good and very soft shadow, so I pulled it 14 to 16 percent pretty good. And I wanted to kinda just be in the corners there. So I decided to erase some of it there. You can use a softer eraser so you could go into something like a brush that, you know, it's fairly soft. Airbrush would work really well. And you see, I'm kinda just taking a little bit out of the center here. I just kind of like that effect. It's completely up to you. You can have it so that the shadow is everywhere. That's your call. Now the cool thing about this is with this interior square. We can use it for the photograph. So as long as you create a clipping mask with your photograph, it's going to perfectly line up to that square that you have there. So it's a clipping mask, but I can still that are grab the right one. I can still move it around. I'll turn off my snapping. You can see here that I can move it around. You can see the size of the photograph. It's nice and big, but I can get it positioned exactly the way I want. So that's how I do it, super simple. And that's the basic idea behind the other frame that we're going to use. Now, I also had created a tape brush, so that will be in the set that I'm giving you. It's in here somewhere Here it is masking tape and I just did that on a separate layer. Hide this one. I'm going to add a layer. I kind of took a beige and no masking tape, kind of a color and just stamped that tape. Depend on how hard you press. You're going to get different sizes. Of course, you can still adjust it there as well. And it was on its own layer. So I was just able to rotate it and do whatever. It's got a bit of transparency to it. If you don't like that, you can duplicate it and then pinch the two together. It's completely up to you, so I don't know what I'm getting there. Oh, I can. So I've hit my 15 layers. Yes, I've hit my maximum layers here. So it's not allowing me to do that. I like my layouts to be big just in case I'm going to use them for something else. Okay, so that's how you do it for this sort of old Polaroid look. Now, let's also experiment with the other frame that I created. So I'm going to go and create a new document here completely. So we don't run into this problem with the number of layers. So I'm going to add, and let me just do an 8.5 by 11 in this case. And why don't we hear just do a little run-through of all of the brushes that we looked at today are that we created today. So let's start with AC ground. It's always good to choose a palette to use so that you're going to have a cohesive kind of a look afterwards. Let's grab this, one of my favorite ones that, and go back to a lot of clear that. And let me just start with a bit of a teal color and lay down some of this background. And this is that really neat color changing one. So for laying down some kinda background that we'll use, maybe part of it will show through 0. We'd not that much of it will show through, but see you can go through and do all kinds of different layers there. I think I'm going to limit it to these colors for now. And maybe I'll even go lighter here. And I want to add a bit of ephemera, so I'm going to add a new layer and ephemera I'm going to do you may be in a darker brown. So I'm just adding almost looks like paper that I cut out and glued here. It doesn't have a white background like the original did buy it when it's on its own layer like this, you can use your automatic selection and select as much or as little as you want over the background. So I'm going fairly low in my threshold there. I'm going to select the Inverse and then I'm going to make a layer in between those two and fill it with white. Probe, the easiest way to do it. So I do have a little bit of white there, not a lot, but what I can do is also brush in some. So I'll go into that Guassian sac. And trying to figure out who I bought that from so I can let you know and I can go in and just brush a little bit in here. And you remember with that collage stuff that there were a bunch of little bits of paint and color in there. And some of that I want to add in with some of those really fun brushes that I made. So let's grab, let's start with some of these. So I'm going to try to start introducing a lipid of other colors in here. So maybe that a little bit of rusty. So as if I have hand painted these, I'm going to make them actually quite a bit bigger. So I'm going into the scale to change the size of the circle. That's sort of one of your main things that you'll go in and want to change. It also depends on how big your document is sized, you know, so you may need to experiment. They're a bit. Now that's got a lot of color changing going on, which is, okay, I'm gonna work with it. I think I can handle it. And you see how it's changing color quite a bit as I'm going through here, I'm building it operates, so I'm not sure how this is going to go at all. I'm just like going for it and building it out. So that's also start putting in some of these little borders and things. Now with these, this can be used as a border, but it can also just be used as a stamp brush. So you can go through and stamp a bunch of little motifs here in there. Like you could decide on, look that you want and go and create. It may be different colors to start building up your colors there. So you can do it that way. Or like I said, you can use it as a border so you could pull your line across, hold it, and then you can space it the way you want. So that's an idea. Now, if you're not sure of how you're going to arrange everything, do it on a new layer. That way, you'll have the flexibility to move it around later. So let's do that. And what I wanna do is lay down something like this. This is one that I created the same way as I did those circles. And it works in the same way where you pull and then line out from edge to edge to get a new kind of look with it. Or like I said, you can go in and just stamp it square what I want, but I'm showing you all the different things you could do. So that's a possibility. Then you can take something like this one to build it up. So let's go in with a deeper green and I'm going to go a bit smaller. And this is one of those that you can pull and you can really space it or you can put it closer and that combination of colors doesn't work. But I'm going to try putting this on a new layer. And that went, I'll do is go back to this layer or goal and per layer in-between and add some color with the goulash brush that I was using. That works quite nicely as well. Now this may be is the wrong color completely. So I would go in here and elected, and I could select, I could do alpha lock here and choose a different color and just brush it on with a gloss. So I'm brushing those lines only. That's not quite what I'm looking for. So maybe go a bit brighter. And when it's locked like this as an alpha lock, you can also do things like change only part of it. So you could go in and put sort of light, medium and dark if you wanted to, but that's a possibility. And of course, the other thing would be that you could use your automatic selection and select the whole background. Select invert, which now means Alliance are inverted. Choose a color. Let's go with a brighter teal kind of a color and to fill the layer. So that's another possibility. Once you have a color baby, It's not quite right. It's not, it's too dark or too light or too bright. You go into hue and saturation and you can make changes there to drag it along, to change the color. You can be saturated. You can brighten it. Just do whatever you have to do to make it look good and you can reposition it. And you've got another idea here for your border to add some interests. So I thinking, I don't like that that much, but I do kinda lightened I have so I'm going to keep it and maybe what I'll do is just select these both dragging to the right or sliding to the right and just move them down a little bit. So let's look at some of the other things that we've got here. This is when I really liked that I created with, remember those watercolors with the, with the patterns that I had painted. This is one that I created with that. So you can see the green here. And this is a good one to add texture into the background, for example. So I'm going to go to that background. Maybe I'll do it on a new layer and I'll select that color so I know exactly what I'm doing. And then go a little bit darker and I can go in and just add a little bit of texture like that. I can also go into course, and this would be one where I will adjust the green so that I could get bigger, sort of a bigger pattern. And you see how we're slowly building up a very interesting background that we can use, just like in the journal page. You can go ahead now and do some artwork on here. You could use some of your other brushes or you can do that photograph idea. So let's try that other photo frame. This lesson is trying to get long, so I'm going to go up to that frame that we created. We'll add a new layer. Let's go to the top here, and I'll do it in this dark brown and not grabbing. See how big that is. It could go bigger. And in a case like this, we could turn on the snapping to centric. And I want to create a block just like I did last time with the photograph, but I also want to color the frames. So let's go into the automatic selection and we're going to select the area all around. And then we're going to select Inverse, make a new layer underneath the frame. And let's put in a really nice color. I'll do for now. We can always make adjustments. I think these two kinda need to be moved up a bit, so I'm going to swipe to the right. Let's move it up a little ways and in turn Snapping off. Then I'm going to go back to my frame here. Again, use the automatic selection, and this time I'm selecting that inside bit there. Here, I'm going to make a new layer on top this time. If you fill it with any color, honestly, I'm going to fill it with black just so it's easier for you to see. And then let's just import a picture. And I have so many gorgeous, gorgeous grandchildren that it's not hard for me to find a beautiful picture to stick in there because this little cutie will put him in there. So you can roughly size the picture to what you need it. But as soon as you make the clipping mask, you'll see that she's clipped perfectly to wherever you want Him and you can still enlarge and reduce and move them around. So that's our little feel. That's just how easy and quick it is to use any sort of frame that you find or create. Because of course you can make these yourself. You could definitely still go in and on something like this. You could add a new layer, make it a clipping mask, and you could select the color and maybe go a little tiny bit brighter and use one of your brushes that you like. And you can go in and put some additional color into the frame is only going to show up where it's clipped to. So it's clipped to that. And that's why it's showing up. You can still use blending modes. You can reduce your opacity. You know, it just makes it that much more interesting. And then don't forget that. You can also select the whole thing in behind, add a new layer beneath everything else, fill it with black or any dark color. So let's look at the layers here. You can see it's block. Now we can go into Gaussian Blur layer and then just start pulling until we have a drop shadow around to what we need. And don't forget that with that drop shadow, you can still blend it. I would put it on multiply or something like that. And you can reduce the opacity if you wanted to softened up just a little bit. And the same effect for the same method we used for putting a square in here, we could easily do the same thing with this top part. So I would take the automatic selection and I would pull, let's see how far we can go and see how much it feels. So we can call both that far. I'm going to make a new layer. I'm going to fill it with black. I'm going to hide this temporarily. And we can see here what we have to fill. So what I would do is the rectangular marquee and just cover that whole area there and fill. And if there's anything that you missed, you can also just brush it in. Once you've got that, you can slide that underneath and you can fill it with whatever color you wanted. So let's say we fill it with light yellow or something, turn that frame back on again. We can get rid of what's in there. We can either erase it or select it. What has used the rectangle selection tool, and we'll do touch the recent sneaky little bit. That's fair. If ever you're having a problem with that. I've got about eraser chosen. I can go back to our new eraser based on a brush I know will work like my tapered brush. And now I've got this area that I can use as little frame. We can insert some text. One, choose a nice fonts. Let's go in and choose something fun. And we'll choose one of the colors that we've been using. And this little guy just turned for my two youngest grandsons, reported within a month of each other. We've got a pretty cute little arch journal is happening here. So something like this where it but a bunch of different parts. I would group them and then that way I can easily enlarge everything at once. So this probably 900 other things I could show you here. But you've got the basic idea for my magnetics and stuff on so that I can get it perfectly centered. What I'll do is go back and add some other details here. Of course, you can definitely paint things by hand. You can definitely go ahead and do that. I like this little flower border. Maybe I'll use it and try that one in white just to see how that looks. Let's just add another layer. I'll do that again. And remember, it's automatic selection is your friend when you're doing these kind of projects. Because we can invert, add a layer underneath, pick a color, and then go back and use the fill layer to fill it so beautifully. And let's go in and grab a couple of other little things. I'll do a few things off camera and then I'll show you my finished page in the next lesson. See you there.
8. Finishing the Composition: Hi guys, welcome to lesson 7 and 7. Here we're going to finish up our composition. Let's get started. You can see here that I've added a lot of other details. It's a little not sped. I find that a lot of art journal pages, especially at this kind of scrap bookkeeping, they're often like this. You do a lot of stamping. You add a lot of little mark Hurd in bits, which of course we're doing with brushes, add borders. They're really built up. I've had a lot of texture and you can see I've used all of those brushes that I showed you, the handwriting brush, that texture brush that I created with my watercolor. I've gone back and added a few more of these little circles, actually duplicated the brush. This was the really color change in one and I have duplicated it with a smaller texture that I can use that stays kind of the same color with a lot easier. And you could continue to keep building up stuck in the background until you are happy with your layout. But the one thing I did not touch on was the addition of those bits that I bought from Etsy. I would go to Insert a file to do that. And here's all the different files that I did by I guess I randomly just opened one. I wouldn't want that one because that one's already made into something. Try that again. Actually have looked at this one and I thought that was really pretty. So this is one that you could just use sections of to put in. I mean, that's even pretty just like that if you had that on one side and then on that side that with acrylic, or you could use this in behind what you've done. You could also do blending modes to see if adding this could really enhance Galileo that you've created. So we could go in here and just kinda scroll through the blending modes. Like Isn't that gorgeous right there? I mean, just so quickly, a completely different look. We could lighten or reduce the opacity so that we could see a little bit more of what we had done ourselves in the background. And you scrolling through these blending modes to see if there's something that appeals to you. So that's one possibility. Let's check out another one here. Some of these newspaper advertisements are great because they've got some really neat topographies. So sometimes what I do is just take a section of one thing and let's see what we can find here are that I like a lot of these little things are super usable, so you can just grab one part of it. I should have put this on the top so you can see happening. But let's just grab this little thing here. So we'll use the rectangle selected, cut and paste, and then we'll get rid of that original. And this one could be just used in much the same way where you figure out a good blending modes. Let's just stick that up here in the corner and move it down below him again. Oops, I just created a clipping mask with that. So I'll move it a little bit further down. And you could do a blending mode like That's neat, where all the color and texture and stuff shows through on the black or even something like that soft light where you can apply that full texture, just as kind of an overlay. That one's really poor resolution because I just grabbed a very small section of it and of course then and small and I enlarged it. So that's a no-no. You don't want to do that, but it's just to give you ideas. So let's undo, keep it at that size. I'm actually don't even mind that. I think that is kind of a neat addition and you can go through and do that and have a couple of things like that peeking through. Now the other thing I often recommend that you do too is to go back into your gallery here, select that file and duplicate it, and then go back into it and do some different things to the second one. So remember we talked about that collage that I had done, that crazy collage. Let's check this out. This is the flattened one. Flatten it, copy it, and then undo squared still in layers. This one pays off. Got that now in the background, Let's just rotate. It doesn't really matter in this case. And now you could try a million other things just with this background so you can take it and just do some crazy blending mode tricks you could have had in the background. And then add a layer and do some negative painting. So you're going to paint something in the background. See what I can do real quickly here. I'm just going to use my tapered pen pressure brush. And let's just say we're going to just do a cute little frame. Something like this will fill it. And I'm going to use my automatic selection, select the inverse and turn off that layer, add a new layer, and then we'll fill the layer. And of course here we could reduce the opacity a little bit, but we do see a little bit peeking through. And just by the spot that I put it in here. And we've got some of our little motifs actually over top here. You could make it smaller or bigger, whatever you want to do, you can still fill in the background if you make it smaller. And then of course, he can go in and use hue and saturation to change the color of it, make it work. So that would be, That's pretty nice right there. And so let's grab this one and this one and just move them down so that we get all those other things over top of it. And a couple of things here we can turn off. And maybe now I will actually increase that, turn that one off. And you can see how cute this one could look to obviously would take a lot of work. I'm just trying to give you some ideas. You can do this any way you like. In a way, what we end up here with here is two frames. So that might not be ideal, but let's do something like that. I'm going to bring this backup to 100 percent so that I can feel that outside area again and then I'll reduce it again. And I would probably add a whole bunch more little details in there. Like I could go in with a bunch of these little flowers, maybe in a lighter blue or in white. Sample that color, go a little bit darker. And the other thing I didn't show you about these brushes, That's kinda fun, is that you can take the brush, see the sizes. And we're going to have way too many borders and stuff happening here. So I'm going to turn that one off and let's actually get rid of these. We've got looks nice now, doesn't it? But with this little brush. So I've got it about that size. Maybe I'll go a tiny bit smaller. You can draw a border and you can continue to pull. It's called smaller. We'll go within this area here and you can continue to pull it to space it out a little bit more. So it takes a little bit of practice. You might have to do it two or three times to get the setting that you want. And if you go only partway around, you can do half circles. So that's another way that you can create a frame. And you can still go in here and change your spacing so that you could a little bit more control. So that's something that you could do. It starting to look a little bit. But I just have so many ideas that I want to give you just so that when you are playing with this and I'm gonna give you this brush set. I might add some more or it might have a couple laughs. I'm going to go through and make sure that they're all working okay. And you can go through and do some of this experimentation. And I really hope that you'll enjoy playing as much as I have with this is as if I've got my paint markers and everything out and I'm just going for it with some of my layouts in the ends. I end up with some of these sort of looks that I used to do a 100 percent in markers or cut out paper or collage, watercolor, you name it like it's all in here. And these books, that's why they end up this thick. It is because of all that experimentation. And I'm just thrilled that I can do this now digitally because these files I'm a lot more likely to use again, then digging out with something like this to take a picture of two, then use that digital image and combine it with other things. Much more freeing and it's super fun. So I hope that you'll enjoy it and I hope you end up with allele that looks a lot better than mine. I would love to see you post some of this stuff, so make sure you think about that as you're producing something and yeah, just add it to the project so that we can share and take a look at what we all are so much enjoying. So some of these little guys, I had done that reverse selection like the area and then inverted it to fill it, and then I flattened it together. So this is something that I could easily now select. Make sure I'm on the right layer. Copy paste. And then I've got that one that I could move around, but somewhere else on the page, I like to work in odd numbers. So that's something to keep in mind. Try not to be too symmetrical because it ends up looking kind of weird and experiment. I'm going to give you some backgrounds. And I guess I never did or did I show you importing a background because I've got some that I'll give you as well. So you could completely ignore these backgrounds and go to Insert a file here. This is the grunge volume. I'll give you a couple of these. I'm not going to give them all to you because it is a brush step that I sell, but you can import a pre-made journal page and drop that in behind everything else. And then experiment with things like the color. That's already partly done for you. So that's always kind of fun to work with as well. So yeah, I better stop talking. I could go on forever. You've got the idea. And what I've done is I've created all these brushes to go back and do that other course which will be the follow-up for this, where we do all of these amazing peekaboo paintings, my batteries even dying, that shows you how much time here. So without further ado, I guess I'm going to end the class. I'll see you in that wrap-up in the next lesson. And yeah, I'm going to take a little break right now. Buh-bye.
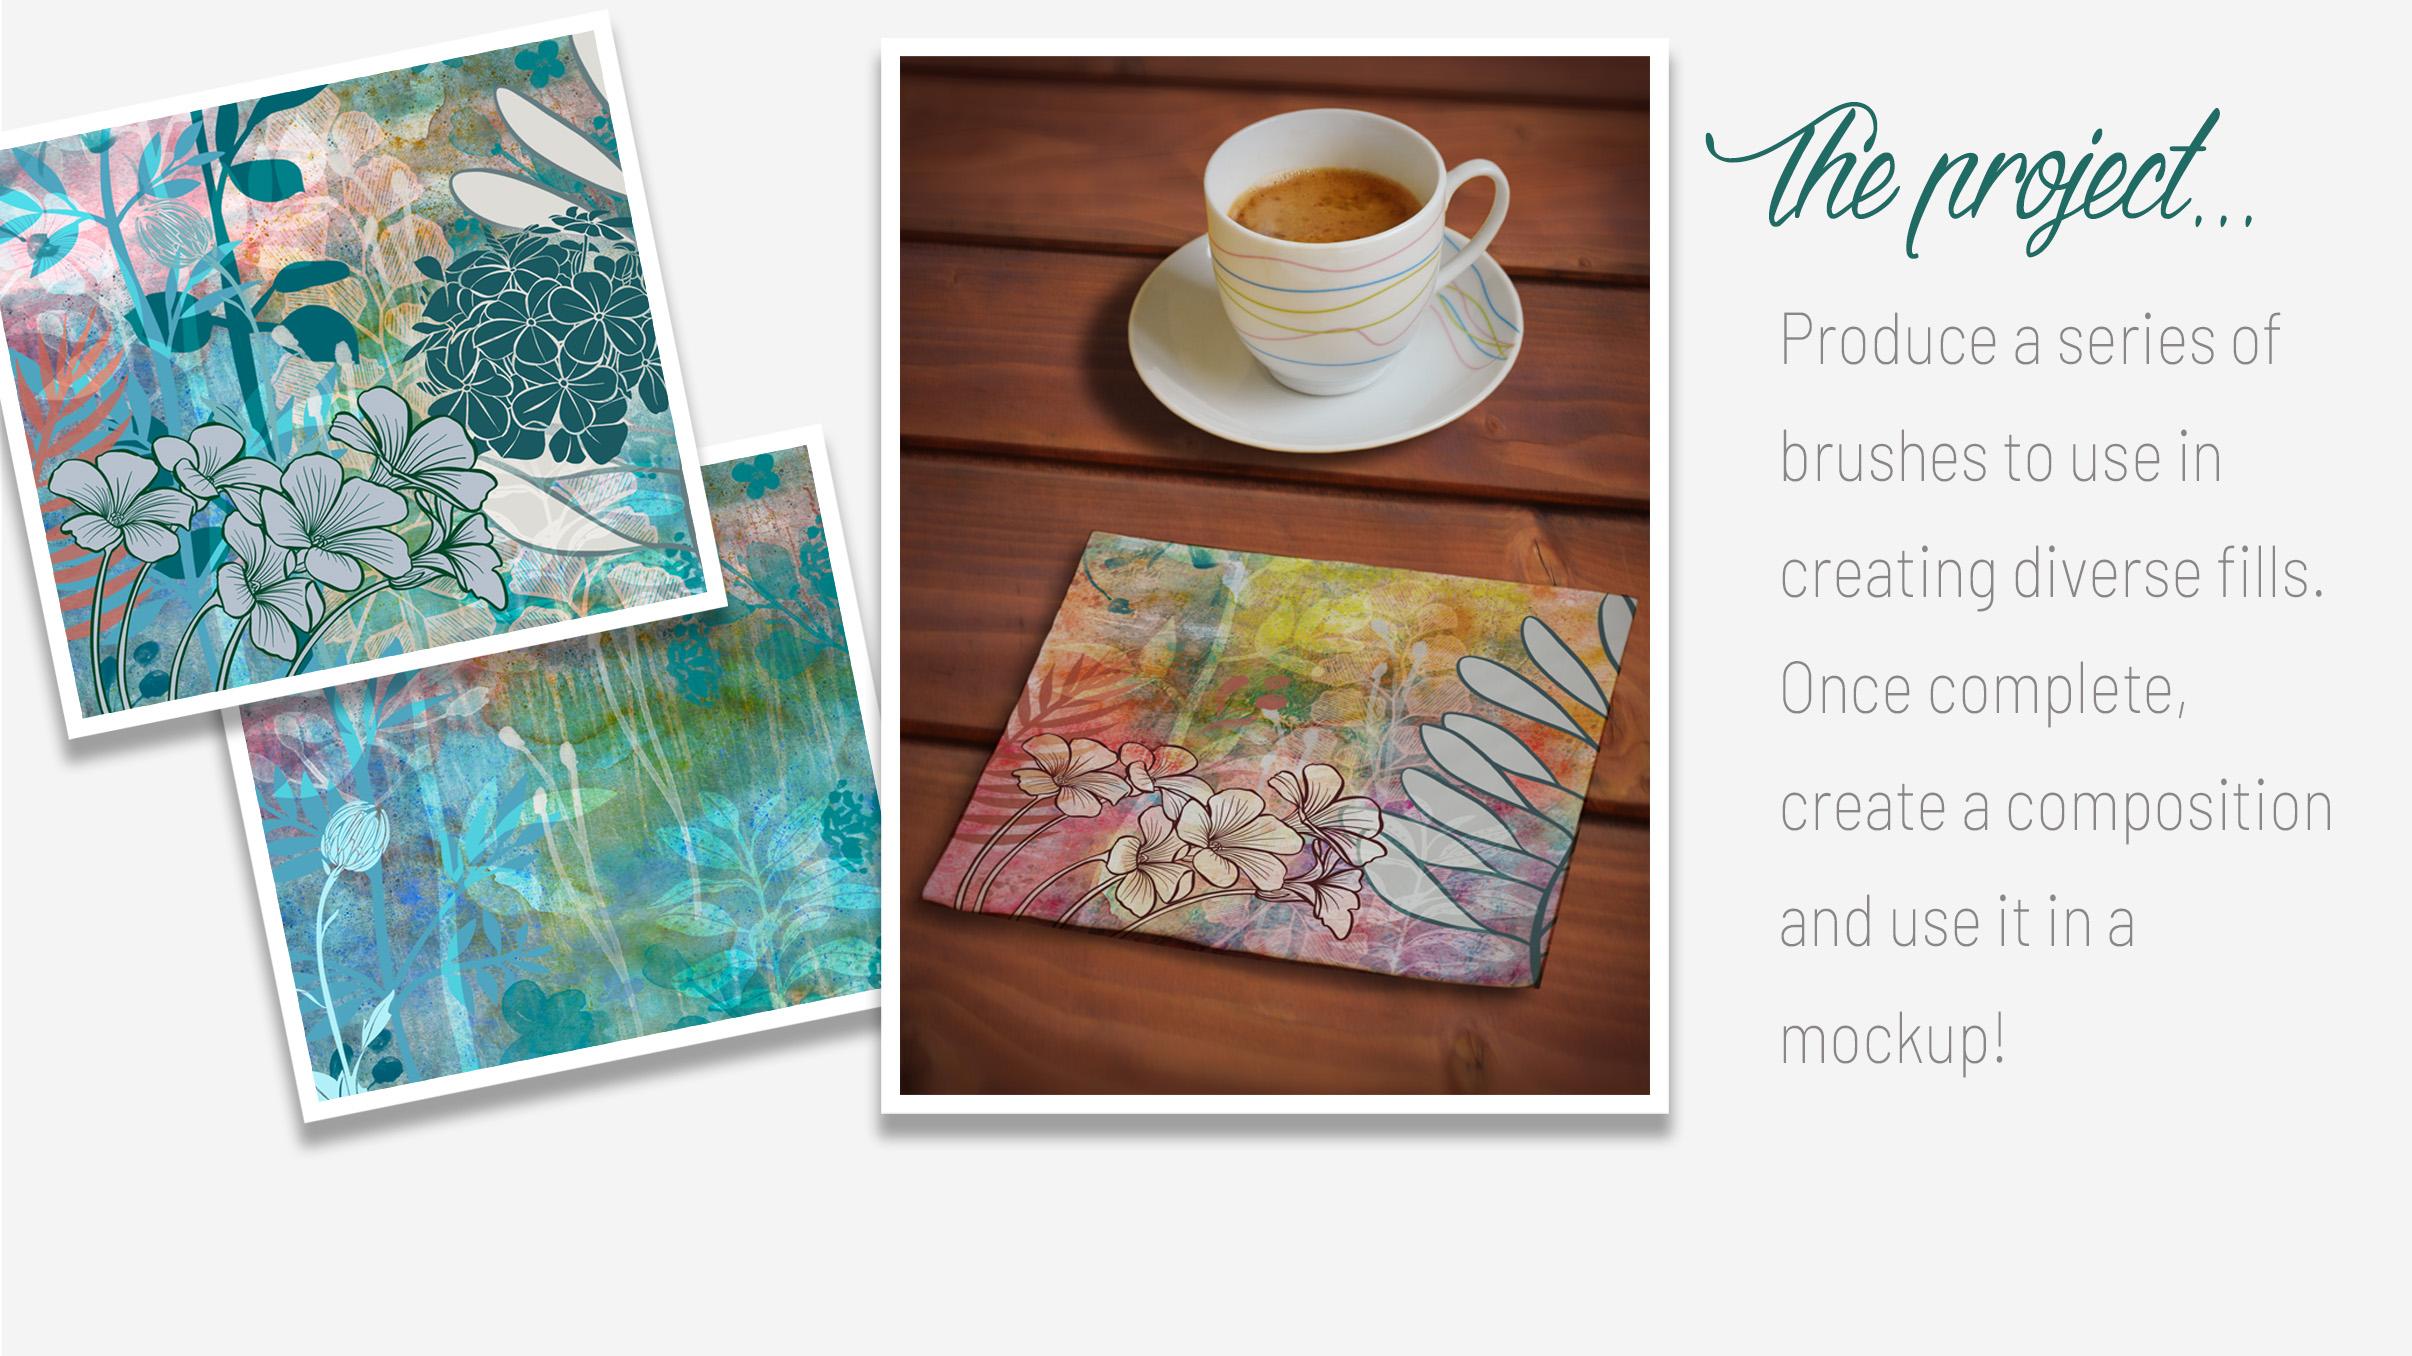
9. Outro and Wrap Up: Hey guys, welcome to lesson 8. So less than eight here, I just want to show you this little composition on a mock-up. I think that this process has created these great layouts that we can use. And you would swear that they're the real national media ones. You may have been producing in your art journals. I have a bunch of this stuff in my art journals. And the problem with it is I never use it again. So having it visually here, I think is going to be a real addition to the kind of work that I can do for our licensing. Thanks again for attending my classes. I really appreciate that you're here and thanks so much for your lovely comments to my posts and the reviews that you've been giving me. I really so much Appreciate it. I think that that's helping me to build up my following. So just a little reminder if you haven't done so already hit that follow button up there. And that way you'll be one of my followers and you'll get all of my information as I put it out there. Make sure you check how those art inspiration boards that I pointed out on Pinterest. And if you want to check out my store is I've got one at 1000.com. When an art of where you Canada and amp Society 6. And as societies six, I'm under my own name, but I'm also under the umbrella up out of the blue. So you'll see different work in both of those. So check those out. It's really great as artists that we can support each other. And as we get into the holiday season here, Let's just make a point of each of us ordering at least one thing from another artist. I'm sure that'll make a lot of difference. And I really enjoyed the Christmas season because I do make a lot of sales, especially in my Sawzall stores. So that's just a little bit of a pointer for you. And I guess that's it. I will see you next time and hopefully there isn't snow on the ground. Bye for now.
 DeloresArt, I love Skillshare!