Transcripts
1. Introduction: What You're Going To Learn: Hey, there, my name
is Adan Brotherhood, and I'm the owner of the digital marketing agency ambo Media. And one of the services we
offer is PPC advertising, which means we know an awful
lot about Facebook ads. In this class, I'm going to be showing you exactly
how to set up Facebook business manager and all the most important
parts of that platform. Then I'm going to show
you exactly how to create your first campaign
on Facebook just following the steps I
outline in this class. And then at the end, I
have five bonus tips for you that I highly
recommend you take into consideration when you begin implementing the strategies that I talk about in this class. So that means if you're
a small business owner, an entrepreneur or a Marco
just getting started. This course is going
to provide you with everything you need
to know to make sure you get off to a good start with your Facebook
advertising campaigns. And lastly, before
we get started, I would highly encourage you to share with
me the work you've done after watching this class via the project section
below this video. Whether that's
pictures of your ads, your ad copy or the way you've
structured your campaign, please feel free to
share it with me, and I'd be happy to have
a look at it for you. Below this video, I've also
left a link to a bunch of resources that you can use to further improve your
advertising skills. I also have something special to share with you when we get
to the end of this class. So please stick around to the end in order to
find out what that is. So with that being said, I'm super excited to get
into this with you, so let's get started.
2. What To Expect From Advertising on Facebook: All right. Before we get
into any of the good stuff, I just want to take 5 minutes to set some expectations and talk about some of the things
that you'll likely want to know before you launch
your first campaign. Because the truth
is there's a lot of misinformation out there
surrounding Facebook ads. The last thing I want is
come into this class with any false expectations
and be let down. The first thing I have
here is that it takes time This might seem pretty obvious, but just like any other
skill or anything else that you're trying to learn or implement for your company. It takes time for it to work and it can take time
to get it right. There's a lot of people out
there that would have you believe that Facebook ads
work instantaneously. While they are published almost instantly and that they
go live almost instantly, that doesn't necessarily mean
that they're going to be successful and
profitable instantly. It might take two, three, four, five attempts before
you actually get it right and before you start seeing the results
that you want. It's really, really important to make that clear from the get. Second thing you're going
to want to be aware of is that there is
no magic secret. There is a massive industry behind Facebook advertising
that would have you believe there is
some magic codes in order to make Facebook
advertising work. When in reality, it's just a
case of putting on the work, putting in the effort
and doing what you can to make your
advertisements work. Really, there is
no magic to this. It is a case of just putting in the work and putting in
the hours and making sure you're doing everything
you can to provide your audience with
something that will catch their attention. That's number two.
Number three is you have to be willing
to test things known that they might
not work the first time. It really is just a case
of trial and error. A lot of the work you do, a lot of the stuff you
do might not work, but that's why we test things.
That's why we try things. That's why we come up
with a bunch of ideas and let the data tell us
what's working and what's not. I'll talk about that
a little bit later, but you really have to know you really have to
understand that when you launch this
first campaign, you're testing, you're dipping
your toe in the water and you're trying to figure out
what works and what doesn't. That is the thing you
should be thinking about when you do this
for the first time. You shouldn't necessarily
be going into it with the expectation that this is going to make me loads of money, it's going to generate
loads of sales and loads of ads because yes, that is the long term goal. That is the overarching thing that we're trying
to achieve here. But more importantly, initially, we're just getting our feet wet, we're just testing and you
have to know that it might not necessarily work the way you've envisioned
it in your head. That's number
three. Number four, don't be misled by fake results. Like I touched on a
little bit earlier, are a lot of people in this industry that
will present you with fake results that
really don't mean anything that are
totally unrealistic. They might do this for
a bunch of reasons. They might do this because they're trying to
sell you a course. They might do this because
they're trying to sell you on Facebook
advertising services. Regardless of the reasons, really try and pay attention
to what these people are saying and really try and think about if it's realistic or not. Because you'll very quickly
become accustomed to the type of data that is
generated by Facebook ads, you'll quickly learn what are reasonable results and what
are unreasonable results, you'll learn what
are bad results and what are good
results because you'll often find that a lot of the people that you'll
find on YouTube, for instance, talking about Facebook advertising
will present you with results that are
designed purely to bit you in and they aren't real. And it's really
important you know that. All the work we're going
to be doing here in this class is real,
it's focused, it's foundational, and I'm not going to mislead
you on anything. I have absolutely no
reason to do that. That's number four. Number five is stay consistent and
focus on the long term. Again, this might not
work the first time. You might launch your
first campaign and it might not turn out as
great as you want it to. There's also the
chance it will and I really hope for you
that that is the case. But regardless of whether it's a massive success when you initially launch it
or whether it's not, it's really important
that you stay consistent that you keep
testing that you keep trying and you focus
on the long term because maybe it
won't work today. But there's a high
chance that in the coming weeks or in the
coming months that you'll find your sweet spot and
you'll be running campaigns that are
profitable and successful. Please keep that in
mind. That is it. Those are the five key
things I really want you to keep in mind as
we get into this class. With that being said,
let's jump into and start learning more
about this platform.
3. How To Set up Facebook Business Manager: Okay. The first thing that we're going to want to do here is obviously access Facebook's
advertising platform. To do this, the
first thing that I want you to do is type into the search bar business do facebook.com that
you can see there. Then what I want you to do is login with your
Facebook account. Now, if you've never seen any of this before and
you don't know what Facebook
business manager is, you don't know what
it looks like. Please don't worry. It'll
make sense really soon. The first thing you want to
do after that is click login, and then you're
going to want to use your Facebook account to do so. I'm just going to log in
here using these details. When we are logged in here, you'll be taken to a page that
looks something like this. This is a page you'll be
brought to every time you log into business
manager on Facebook, and this is also where you're going to manage your ads from. Now, there's a lot of different components
to business manager, and I'm going to
touch on all of them. But there's a couple of really basic things that you
need to know just as an overview of the important
parts of this platform. The first one is
that you'll be given an overview of your
ads performance here. I'll show you ad
account performance. Now, if you don't know
what an ad account is, I'm going to get
onto that in one of the next lessons,
please don't worry. But all your performance
and all your spend and all the stuff that
you really need to know will show up here. Every time you log
into business manager. Down here, your
Facebook pages or any Instagram accounts
will also show up here and it will just give
you an overview of the different pages that you're managing if you
have more than one. Then up here, this is
where it gets interesting. If we go to this
hamburger up at the top, we can click to see all tools. Now, the most
important ones that I'm going to be focusing on in this class is ads manager,
business settings, events manager, com manager, and I'm going to be touching on creative hub in some places. That is obviously a
lot of other stuff here that you'll
be able to look at as you get more familiar
with the platform. But in terms of
what's important, the sections that I just
mentioned are all you need to worry about for the purposes
of what we're doing here. With that being said,
let's move on to connecting your Facebook
page to business manager.
4. Linking Your Facebook Page With Business Manager: Okay, now that we know what
Facebook business manager is. The next thing that we're
going to want to do is connect your Facebook
page to business manager. To do that, all you
have to do is follow the steps that I'm
going to show you here. The first thing you're
going to want to do is go to business settings. As you can see just by
clicking that button. Then when you get in
here, you'll be taken to the page section under
accounts in business settings, and from there, you just want to click this blue Add button. Now, there are three different
things you can do here when it comes to adding
a Facebook page, you can add a page, which is just a page that you already on and you already
have access to. You can request access
to another page. This is most commonly used if you're an agency
owner like me, wanting access to another
businesses Facebook page. Then thirdly, you can create a new Facebook page if you
don't have one already. Now those last two options, you can use if you want, if that's the situation
that you're in. But for the most part,
you're just going to want to add a page. We're
going to click that. Now, the ambiomedia accounts are already added to a
different business manager, so I won't actually
be able to do this to the fullest extent, but you'll see how you just
by following these steps. I'm going to click ambo Media. I'm going to click Add page. You can see here that Facebook's identified these counts
as being connected. We're just going to
add all for them. Now, what you see here is how it will look after
you've added the page. You'll see the page appear
in this left hand column, and you'll see all the people that have access to your page. When you've done that,
that is your page added. If we go back to business home, this is what you would see. You would see your pages added to this section
on the bottom, which were previously empty. That explains to you
exactly how to add your Facebook and Instagram account to Facebook
business manager.
5. How To Create A Facebook Ad Account: Now that you've hopefully added your Facebook page
to business manager. The next thing that
we're going to want to do is create your ad account. Now, you're going to
use an ad account for a bunch of different things. It's going to manage
your billing. It's going to manage
your campaigns, it's going to manage
your Facebook pixel. It is really everything that exists above your advertisement. It's also important to
note that you can have multiple ad accounts so if you have different segments
of your business, especially if you're an
agency or a marketer, if you're working with clients, you will use different ad accounts for
different companies, and that's a really important
point to note here. If we want to go ahead
and create an ad account, what we're going to do here on the business manager home
is click Go to settings. Then after we've done that,
it's going to open up in a separate tab and it's going to take us back into
business settings, like where we were when we were creating and adding
our Facebook pages. Now what we're going
to do is created. Now, much like when we're
adding the Facebook page, you have two options
down the bottom here, you can add an ad account if it's one that already exists. You can request access to another ad account from another company if that's what you need. Lastly, you can
create a new adcant what we're going to
do here is create a new adcunt that's also what you're going to do if
you're new to this. Click, create a new adcant. Then you just want to name it. I'm going to name this
one test ad account, and I'm going to change
it to the British pound. There we go. That's fine. And then we click next. When you hit this
section, your adcant will be used for your business. Let's hit Create. Perfect.
When you've done that, what you're going to
want to do is if you have multiple employees or
maybe if it's just you, you want to make
sure that you've got access to this ad account. You want to click
yourself and then you want to click all these on so that the
person has access. Then lastly, you're going to
want to add payment info. I'm not going to do this
because there's no point, let's just cross
that out. That's it. Really that you got
your ad account set up and this will come
into play much more later when we start
discussing the structure of ads and how actually
everything all ties together. There's a couple of last things that you need to know
about add accounts. A accounts can be
banned by Facebook. For instance, if Facebook
doesn't deem you as following their
advertising policies, it's likely that you will get banned or your account
will be restricted. Now the way that you're
going to want to check your ad account is meeting Facebook's criteria for
a good ad account and following the policies is
clicking the hamburger up here, and then going to
account quality. Obviously, there's nothing
that I've really done with this account and
it's just going to show the account that
we just created. Then this would be
for offline tracking, but we're not going to
get into that right now. However, if there
was anything wrong, it would show up in
your account issues. Now obviously, I've
not used this before, but if there was anything
outstanding or there was anything going wrong in your account, it
would show up here. Okay. So now you know how to connect your Facebook page,
which you've hopefully done. Now you know how to set
up a Facebook ad account. Now the next thing that
we're going to look at before we actually start
creating campaigns is optimizing your
business settings just to make sure Facebook deems your business manager as a legitimate
business and so that nothing goes wrong when
you actually start creating campaigns
and spending money. Let's move on to that now.
6. How To Optmise Your Business Manager For Success: Okay. So now that you've added your Facebook page and
created your ad account, I just want to talk
about a couple of things you can do to increase the legitimacy of your
business in Facebook's eyes. Like I said previously, it's not uncommon for ad
accounts to get banned. It can actually be
pretty annoying, especially if
you've got a lot of campaigns running and you really begin to depend on Facebook
for revenue and sales. The couple of things
that I'm going to recommend you do here will simply reduce the chances
of that happening. So if we're on the home page
of your business manager, we're going to go to the
hamburger up the top left, then we're going to go
to business settings. Now, there are two things
that we're going to do here. The first thing that we're
going to do is verify your domain with Facebook and the second thing
that we're going to do, just add more information
about your business, so Facebook can see that
it's actually real. When it comes to your
website and your domain, What we're really
getting at here is that we want Facebook
to know that the place you're
sending people to with your advertisements
as your website, it's a representation
of your company and it's a legitimate source
of information for them, because what can often happen is that people can
pay ads for anything. You could run an ad and
you could send it to a malicious site
that does not have the user's best
interests at heart, obviously, Facebook would
not want that to happen. What we're doing
here is basically just telling Facebook that yes, this is my domain,
this is my business, and this is a legitimate place where I'm sending traffic to. If we go down to brand safety
and we collect domains, Now, this is how
it would look if you did not have a domain adds. In this particular instance, the ambo media domain is on
another business manager, so we will not let
me do this here. What I'm going to do
here instead is use adm brotherhood.com to try and illustrate this process to you. If I type in aden.com
and click Add. You can see that it has added the domain to my domains
list under brand safety. Now obviously, it says here
that it isn't verified. The reason it's not verified is because I haven't
taken any action that will allow Facebook to verify
the domains legitimacy. There's a couple of different
ways you can do this. If I click this drop down here, you can see that you can add a meta tag to your
HTML source code. I don't recommend
you doing that. You can also upload a HTML
file to your directory. I don't recommend
you doing that. You can update your
DNS TXT record with your domain register. I do recommend you doing that. This one here is the easiest one to do out of all three
that they've mentioned there. Now, even though this is the easiest way to verify
your domain with Facebook, there are different ways
that you'll do this depending on where you
purchased your domain from. What I would highly recommend
you do is just go to Google and type in how to add TXT record to your DNS on and then type in where you
borrow the domain from, and it should give you
tutorial showing you exactly how to add a TXT
record to your DNS. That is the first thing
that we want to do. Why I've done that then
what I want you to do is go down to the bottom here
and go to business info. Okay. Now, people often get
confused when we talk about verification because
there's two types of verification on Facebook
business settings. There's verifying your domain, which is what we've
just discussed, but there's also verifying your business status,
which you can see here. Now obviously, this business manager has not been verified. Now you only really
want to do this if you're selling
products on Facebook. It's not really an
important thing overall. And when I'm talking about verifying your domain or
any kind of verification. I'm not referring to this, and if I am is
likely I'm talking specifically about
commercial products. But while we're in this section, one thing that you want to do is fill in your business details. This is just a way
for Facebook to go, hey, they provided us
with this information. Does the information
they've provided us with match company information from other sources on the Internet. And most of the time this
information will match, it will be correct
and it will just add another layer to
your verification and your legitimacy when you're using Facebook's
advertising platform. Lastly, if we look
down here at my info, I highly recommend just checking that and making sure it's okay. Ensuring that they've got
the right e mail address, that your e mail address
is verified with them. I also recommend that you have two factor authentication
turned on. Just add an extra
layer of security, and again, protecting and legitimizing your
business manager. Now you know a couple of tips
that you can use to improve the legitimacy of your
business in Facebook's eyes. If you've been following
along with me so far, we've basically completed the setup phase of
business manager. There's still a couple
of things we need to do, but we'll get to that
when we come to them. Now what we want to
do is actually visit Ads Manager and have a
look at how we actually build campaigns and the way Facebook structures
campaigns on its platform.
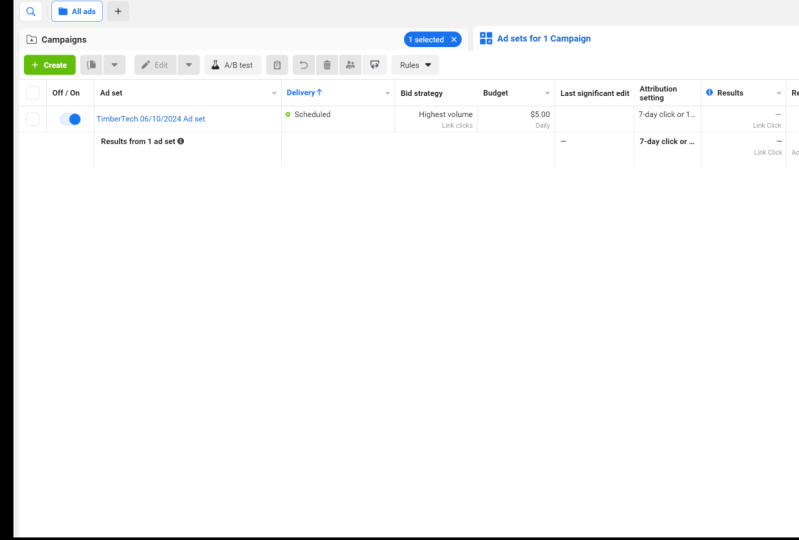
7. An Overview of Ads Manager: Now that your business
manager is set up, it's time to talk
about ads manager. Adds manager is a
place where you're probably going to be
spending most of your time. It's definitely more the
core of business manager. This is where you're going to
be creating your campaigns. It's where you're going
to be managing them. It's where you're going to be
analyzing your performance. It really is where
the magic happens. There isn't a great deal
that you actually need to understand about ads manager. When it comes to the actual
creation of the campaigns, that's where things
get more complex. Just in terms of how it works, it's relatively straightforward. Each campaign will really
have its own hierarchy, and you get three
different sections for any campaign
that you create, and that's what we're
going to talk about here. Firstly, you have
the campaign level, then you have the ad sets level, then you have the ads level. The campaign level
is where you're going to set your objective, and that is what underpins the structure and the type of campaign that you're
going to be creating. Secondly, we have adsets. This is where you're going to be deciding on your audience, and it's also where
you're going to be deciding on your placement. Your placement is where your ads are going to show
up on Facebook. For instance, are they
going to show up in the news feed or
are they going to show up on the audience network? That is what you're going
to decide in your ad set. Then lastly, we have the ads, and the ads are what
people are going to see when they see your ad appearing on their
newsfeed or anywhere else you might be
advertising on Facebook. So when we actually look at
this as a hierarchy because it isn't totally clear when you look at
it on Ads Manager. You can have
multiple ad sets and multiple ads inside
the campaign. Adds manager itself
does a good job of making you think that
it's all one dimensional. When in reality, you can
get quite granular here and you can do a lot of really cool stuff with your campaigns. Like I said previously, the
campaign is the objective, the ad sets are your
audience and placements, and your ads are the creative. Now the thing that you
can do here as I said, you can have
multiple ad sets and multiple ads inside
the campaign. You may be wondering, what is the reason why I'd
want to do this? You might want to have
multiple asets and say they can paint if you're targeting
two different audiences. If you've got audience A and audience B for products
A and products B, you're going to have
a different set of targeting metrics for
each of those audiences. Inside each of those
asets you might have different ads that are talking
about different things and and are intended to influence your audience
in different ways. If we just refer to
this one over here as audience A inside that ad set, you might want to
test your copy, you might want to
test your images, you might want to test the call to action
that you're using. There are multiple things
that you might want to test when you actually
launch your campaign. This is the benefit of having an advertising platform that can do an awful lot of
different things for you. Now, there isn't
really a limit on how many adsets and how many ads you can have inside each ad set. However, my personal
recommendation would be in our time running Facebook advertising campaigns
for businesses, would be that you don't
want any more than three ad sets inside the campaign, and inside each ad set, you don't want any
more than five ads. We found the sweet spot
for ads to be 3-5. A more than that
you run the risk of over saturating your budget. An less than that and
you're probably not testing enough variables and gathering enough data for the money
that you're spending. That is really the key
things that you need to understand about ads manager. Now that we understand
add manager, we understand that structure. Of course, we're
going to get onto the more complicated
stuff and how to actually create a
campaign later. But next, we're
going to talk about ads manager and the Facebook
pixel. Let's jump into that.
8. Events Manager and Installing The Facebook Pixel on Your Website: All right. The next
thing that you want to do here is look at
Events Manager. Events Manager is
where you're going to be managing your
Facebook pixels. If you don't know what
a Facebook pixel is, it's essentially a piece of
tracking code that you'll install on your website
to track user activity. In this particular lesson, I'm going to be showing you
step by step how to create a Facebook pixel and then how to install it
onto your website. Then lastly, check
if it's actually firing and active
on your website. The first thing you're going
to want to do here if you haven't already is go
to events Manager. If you open up the
left hand panel, you'll see events manager
there, just click that. Now, this can seem more
complicated than it actually is. Essentially, events manager
is like an analytics tool. For instance, when you
actually have an active pixel, it'll show up here telling
you how many events have been uploaded and how
many have been matched. Then you'll be able to see the different conversions
that you've got being tracked and how many of those conversions
are being fired off. When you're looking
at this page, what you're going to
want to do is go to the green create
button up the top. So the first thing
you're going to want to do when you hit this page is click this green
connect data sources button on the left hand side. When we do that,
you're going to see four data sources
that you can connect. You're going to see web,
app, offline, and CRM. These are the four different data sources that
you can connect to. Thankfully, we
don't need to worry about app offline or CRM. The one that we're
focused on here is web. What to do is click Web,
then click Connect. Then you're going to want
to click Facebook Pixel. We don't want to worry
about conversion Z API for the purposes of
what we're doing here. Click Facebook Pixel. Then we're going to enter name. I'm just going to put in test. Okay. And from here, I'm just going to pinch the
domain from my settings. Okay. And then we're going to go back here
and I'm just going to pop that in. Great. Then we want to click Continue. Now when you click Continue, it's going to offer a couple of different things
that you can do. If you're using
WordPress and actually, I'll just show you this because this is probably useful for you. As you can see here,
you can connect your pixel to any
of these partners. Now what I'm doing here,
I'm using Webflow, but I'm not actually
going to use this way of installing the Facebook pixel for
what we're doing here, mainly because you can
run into issues when you use a partner
to edge your pixel, but for the most part,
it will be fine. Instead, I'm going to close
that and I'm going to go to manually add pixel
code to website. Reason why I'm showing you how to do it like this is because if you get stuck using
any of the partners, this is going to be the second thing that
you're going to try. It's important that I show you how to do this even if it is a last resort when you're
connecting your Facebook pixel. What we want to do here is we
want to copy the base code, and we want to take
that code and paste it into the header
of our website. You can see that I've pasted
the Facebook pixel in, you can see where it
starts and you can see where it ends and I'm
going to save changes. Now that I've saved
the changes, I'm going to publish the site. Now that the site is published, what I'm going to
do is just click continue over on Facebook's end. When we get in here,
I'm going to recommend that you turn on advanced
matching, for the most part, this is okay to do, and it will improve the capabilities
of the Facebook pixel, which is useful regardless
of what you're doing. Do that. Hit continue. Then what we're
going to do, we're going to come back
here in a second, and we're going to
add some events. But firstly, what we're going to do is we're going
to make sure that the Facebook pixel is
firing on our website. I'm going to go here and I'm going to check
out the website. Now that we're in
here, I actually have a chrome extension that will tell me if the pixel
is firing or not. Now, events manager
will actually tell you if the pixel
is firing as well, but it's good to
have another way to test this for cross
referencing purposes. If we go up here and click on
the Facebook pixel helper, we can see that the test
pixel that I created is firing for page
views and micro data. And that's exactly what we want. So now that I know that pixel
is firing on that site, I know that it's tracking activity and
I know it's working. Now we can go back
to events manager, and now we can go to the
open events setup too. Now this is where
you're actually going to create conversion events. Now, a conversion event is something that Facebook
will individually track. Since IOS 14.5,
you can only have eight conversion events
per Facebook pixel. That's a new thing that
didn't used to be the case, but now before we actually
go back into event setup, another way that you
can test to make sure the Facebook pixel is
working is like I said, on Facebook business
manager itself. When you're in the
Facebook Pixel tab, where you want to go is go
from overview to test events. Take the link to your website, pop in and open website. From there, if we go back, you'll be able to see
that a page view has been processed as a
conversion event. Now, if we go back to overview and click
Continue Pixel setup, click Facebook Pixel,
click Connect, and we're just going to go back through these steps
really quickly. Continue. Type in the
URL, open website. We will now see the event set up tool on the
left hand side. There are a bunch
of things you can do with the event set up tool. You can track buttons,
you can track URLs. You can track different
things going on in the site. What we want to do
here is just track the URL because that's the
most simplest thing we can do. We're going to take this URL. We're going to
select the type of event that we want to track. In this instance, if you're
just tracking a page view, if it's just someone
visiting the page, you're going to want to mark
this as a view content. Okay. Now, you don't really need to worry about
the value here. That's not really important for the purposes of
what we're doing. You can just leave that as is, or you can click
don't include value. Click confirm.
Great. Now we have a new conversion event added
to our Facebook pixel. We can finish
setup. That's done, finish. Yes, it's fine. Great, done. Now we are
back in advance manager. If I just refresh the page here, we can see Before
Apple's IOS 14.5, this would be enough and the tutorial would
basically end here. Since IOS 14.5, Facebook has had to introduce something called aggregated
event management. And like I said previously, what this actually means
is that you can only track eight conversion
events now as opposed to previously where you could
track as many as you want. So now we want to do is
click Configure Web events. When we get into here,
a couple of things that are going to happen
and I need to talk about. Now, there are some
restrictions to what I can show here because this is a
new business manager. Basically, what will
happen is you have to add the eight conversion
events that you want Facebook to prioritize. Now, it's really important
that you follow the steps previously when I
was talking about business settings and
verifying your domain. Because if you haven't
verified your domain, then you will not
be able to do this. This is Facebook's way of ensuring that you are
a legitimate business. It's really important
you do this. What you would have
to do is follow the steps that I said
in the previous Video, verify your domain on
business settings. Make sure it's verified, then if we go back to events manager, I'm actually going to
show you what this would look like when it's
being completely done. This is the pixel
for ambiomia here. This is the active
one that we use. We're going to go from pixels to aggravated event management, and we're going to go to
configure web events. You can see the ambiomdia domain here and you can see
we've got eight events. If we click on that, you can see the eight conversion events
that I've added to track. If I click Manage events, I can click Edit
and I can change the different conversion
events that I want to add. Now, for the most part,
if you've been setting up your events
with the setup to, then you're not
going to be seeing anything called
custom conversion. You're going to be seeing
the name of your pixel. Please don't worry
about custom conversion for the purposes of
what we're doing here. It's a more advanced
feature and it's something that I'll get
onto it a little bit later. When you've done that, you
would click submit, save it, let it do its thing
and you've added your A and you've prioritized
your conversion events, which is exactly what
Facebook wants you to do. At this point, if you've done all of this and you're
basically going by the book to really low the chances of your
account getting banned or your ad account getting
restricted. That really is it. Hopefully, that's showing you
everything you need to know about events manager in the Facebook pixel
and how to set it up. If you have any questions about this subject or any
of the other lessons, I'd really encourage you just to leave a comment and leave a note in the discussions
panel and talk to you about what issues
you might be experiencing. Now that we've done all
that, that's great. Let's move on to the next step.
9. How To Set up Commerce Manager For Your E commerce Brand: Okay. The last thing that I want to talk about
here before we move on to actually creating a
campaign is Commerce Manager. Commerce Manager is where
you're going to create a Facebook shop if you're an E commerce brander or if
you sell physical products, so you can find the
commerce manager if you go to the hamburger on
the top left hand side, and you go to Commerce
Manager as you can see there. When you're there, what
you're going to want to do, it's click this blue
add shop button. If you click that,
we're going to be taken to a page or a walk through
rather that looks like this. Now, you can create a shop
on Instagram and Facebook, it depends what one you want to. The reason I just
want to touch on this briefly is because if
you are an commercial brand, then it's really really
important that you know how to do this
because it does give you another opportunity
to get your products in front of customers on social, which saves them having
to actually go to your website to learn more
about what you're selling. If we choose Facebook in this
instance and click next, and then we want to choose
our checkout method. When it comes to the
checkout methods, there are a couple of
things you're going to want to keep in mind here. If you're in the UK like
me, as you can see here, you cannot check out with
Facebook or Instagram that is only available
to US customers. You can check out
with messaging, however, and you can check
out on your website. For instance, you can have
product information on Instagram or on Facebook
and then you can just direct them to your website, check out if they're
ready to purchase. You may be thinking, well,
that's not too different from just sending them to
my site in the first place. You're right. It's
not too different. We're still going to
have to go through a similar amount of steps. The only difference
here is that they can look at your product on Facebook or Instagram and they don't have to go
elsewhere to do so. That might be something that
you might want to consider because that might be the
natural flow of your customers. I'm going to go with that
and we're going to go with checkout on another website.
We're going to hit next. And then we're going to choose the pages that
I want to sell from. For what I'm doing, I am going to click
Aden Brotherhood, and we can just use my personal Facebook
page as an example. When we've done that,
we're going to mark the delivery of destinations
that we're shipping to. For what we're doing here, I'm just going to put the
United Kingdom. Okay. And we're going to
just leave that as is. And we've done that really is. So we've specified where we
want people to check out. We've added the page, we want
the shop to connect to it and we've added the destination that we intend to deliver in. So all we have to
do is click that you comply with Facebook
seller agreement, finish setup, and then
that we'll go into review. And Facebook will
let you know if your shop has been successful in the application
process or not. And after that you'll
be redirected a page, it looks just like this where
you can manage your shop, add catalogs and
items and you can see insights about how
your shop is performing. But really, that is the basics
of commerce manager done. Now we're going to
go on to learning about how to actually
create a campaign. And this is some of the
more exciting stuff that we're going to move on to
now. So I will see you there.
10. How To Create Your First Facebook Ads (Part 1 The Camapign level): Now that we have done all that, we should now be ready to
create our first Facebook ad. The first thing that
we're going to do here is talk about the campaign level, the different objectives
that are there and the one that I recommend you using if you're
just starting out. If we go to this green create
button at the top left, click create and you'll be taking a pop up
that looks like this. This is all the
different objectives that you can use for your ad. It's broken down into
three different sections. You have the awareness section, you have the
consideration section, and you have the
conversion section. To quickly break that down. You're very rarely going to use the awareness
section, really, you're only really
going to see big brands use that that have a lot
of brand awareness where a lot of people know the
name and they're just trying to get their ads out to as many people as possible. The place where you're going to spend a lot of your time is in the consideration and
conversion section. The conversion section
has anything to do with the Facebook Pixel like we spoke about in one of
the previous videos. Depending on your target,
most of the time, you'll end up using the
conversion objective. And lastly, you can use the objectives in the
consideration section, regardless of
whether you have the Facebook pixel set up or not, but I would always
recommend that you have the Facebook pixel
set up anyway. Let's just quickly break
each of these down. Traffic refers to
if you're sending traffic from Facebook
to your site. Engagement refers
to if you're trying to get engagement on
a particular post. This is things like
lights, shares, comments. App installs a self explanatory. This is if you're
sending traffic from Facebook to the app
store or Google Play. Video views is again,
self explanatory. If you're looking
for more video views on a particular video
you've created, then you can use this to
drive more video views. Next, we've got a
lead generation. This is one of the really
good ones that I'm not actually going to
be demonstrating here, but I will talk about it and
touch on it a little bit. The lead generation objective
basically allows you to collect people's information
on Facebook itself. This means that you
don't have to send users to a landing
page with a form. It means that the form
is on Facebook itself. It means it's
native to Facebook. Now, this is a really, really
useful objective to use, if you're trying to generate
leads and if you're trying to drill down the number of steps that a person has to go through before they can take
advantage of your offer. I would highly
recommend doing this. It's something I've spoke
a lot of bit previously. If you want me to
elaborate more on this, simply just add a question to the discussion and I can
definitely elaborate on this. And then the last objective
we have here is messages. If you want people to
message your brand, if you have a chat box set
up or anything like that, then you're going to want to
use the messages objective, and this will send people
from Facebook into messenger. Now that we know all the
different objectives, the one that we're going to pick here for the type
of campaign that we're going to create is going to be the
traffic objective. The traffic objective
refers to when we send someone from
Facebook to our website. I would say that is the standard campaign
that you will be creating when using Facebook
ads. Let's click traffic. When we go down here,
we're just going to want to name the campaign. Now, I would always recommend that you name your campaign properly when
you're doing this, it sounds like a really
small insignificant thing, but I guarantee you
when you get deep into this and you've got 40, 50, or you end up with hundreds of campaigns and
your ads manager, you're going to want a quick
way to be able to find them. There is a search bar on the Facebook advertising
platform that you can see behind this pop up here. Use keywords that
are relevant to what the goal of
your campaign is. For instance, on
the campaign level, I would highly recommend
naming it based on the objective and then the date. I'm going to put objective. Then I'm going to put date. And for your ad
set, I'd recommend naming that based on the
audience and placement. You would put in the
name of your audience. However, you've named that,
you put that in here, and then you would
put in the placement. This is where are you actually
showing the advertisement. Then lastly, for the ad, I would recommend just
putting in a keyword that you think is relevant to the type
of ad that you've created. Again, if you've got multiple
ads inside an ad set, you're going to
want to name them based on the different
types of ads that they are. I'm just going to put
in here creative. When you've done
that, let's continue. After we've hit the
continued button, we'll be taken to the ad setup. This level here you can
see is the campaign level. Now we've already
named the campaign, but there's a couple of other
things that we have to do before we move on to the
ad set and the creative. The first thing we have to
do is we have to decide if we're going to do
an AB test or not. Now AB testing is a totally separate subject that I'm not going
to get into here. I just want you to completely disregard that for the moment. Down below and onto a
more important point, we can see campaign
budget optimization. I would actually recommend using campaign budget optimization because it will
allow you to better control your budget and
ensure you don't overspend and ensure your budget is being distributed in the right places. Because if you have multiple
asets for instance, because what campaign budget optimization is
going to do here, if you have multiple
asets is take your budget and place that budget into the asets that are
performing best, which is a really,
really useful thing, and we'll ensure you're getting the most for what
you're spending. So we're going to turn it on. And when we get down
here, there are two ways that you can
manage your budget. You can manage your
budget on a daily basis or you can manage it
on a lifetime basis. I totally depends on
what you want to do. Obviously, if you manage
it on a daily budget, there's a higher chance
that you're going to forget about it and overspend. If you keep it on
a lifetime budget, it means the budget
will be evenly distributed from the start
date to the end date. If you're trying to make sure that you don't
overspend and stuff, that's the one that I
would probably recommend. But I'm going to leave
this as a daily budget for now because that is what
I would personally use. Just as a market in someone
who does this all the time, that is what I'm used to. And in terms of how much would I recommend you spend per day. This varies depending
on what you're doing. Standard in the industry is
always ten pounds per day. That is the place
where people tend to start. I'm not sure. But you can go to
five pounds or $5, for instance, if you think that's more
appropriate, however, I wouldn't recommend going lower than or you run the
risk of your ads underperforming and not doing
as well because they don't actually have enough budget behind them for them
to do anything. That's just something you
might want to keep in mind. But let's just go
with ten pounds a day and move on from here. That actually brings
us to the end of the campaign section. Now we're going to
look at the ad set.
11. How To Create Your First Facebook Ad (Part 2 - The Ad Set): So from the campaign level, what you want to do is just hit the blue next button
down the bottom, and then you're going to
be taken to your ad set. Like I said previously,
what we're trying to do here is send traffic from
Facebook to our website. We've already named it just
like the campaign level. On the traffic section, we're going to leave
this as website. We're going to leave dynamic
rates of turned off. We're going to leave
our offer turned off. Those are two things
that you don't have to worry about right now. And for our schedule, we're just going to
leave that as is. I'm not too fussed
about how long this runs for it and you
can and probably should add an end
date if you want to Now we are down to
the audience section. Now there's a bunch
of different things that you can do in
the audience section, and there's a lot of
different targeting metrics that you can take advantage of. What I'm going to
do here is show you everything that you need to know in terms of the different metrics that you can target. In terms of locations, this is self explanatory, but you can target
an entire country, you can target a town. I am actually on the
West Coast of Scotland, so I'm just going to type in Glasgow because that is
the nearest city to me. Uh, but I can type
in Glasgow Scotland, United Kingdom,
that will come up. You can see here that it will appear as a circle
around Glasgow, and you can make this location bigger or smaller depending on what you want to do so we can increase that or we
can decrease it. It's entirely up to you. When we picked a location, what we want to do
is move down to age. Age, again, it's a demographic, it's something that will be
specific to your business. Hopefully, you know, what age
your customers are roughly, you've got the best idea
of who you can target. Because if it's a product that's targeted at younger people, obviously, you don't
want to be targeting people that are 65 and above. Just keep that in mind.
Then in terms of gender is your ad intended for men
or is it intended for women. I would say that
again, much like age is a very self
explanatory thing. When we get down to
the bottom here, we have detailed targeting, and this is where
the magic really begins to happen because there's a lot of different
targeting metrics that you can take
advantage of here. Can target demographics, which are things
like age and gender, which are more
tangible and fixed? You can target interests and
you can target behaviors. Behaviors are things
like purchase behavior? What are people
actually doing on Facebook's platform that
they can see and understand. What I'm going to do here
is add one demographic, one interest, and one behavior. If we go to demographics and we can just add
anyone we like here, let's just say it's
education level, for instance, and we can say, is the person at university for what I'm intending to sell. Then we can go to interests. I can say, Well, is this person also interested in advertising? Then I can go back
to Bros again. I can go to behaviors
and I can go, well, what do they do online that
I want to tap into I can go, I want to target early adopters. Now I have a fair audience here. Because if I'm targeting
someone that's a university, I'd want to take this
away from 65 plus and maybe just that down to say 24. Let's go with that. If
we go to 24, Great. Now we have a more
defined audience. Then down here below, we have detailed
targeting expansion. This will allow you to
reach more people beyond the targeting metrics that you've laid out
in your audience. I'd recommend you turn
this on if you're new to advertising and you've
not done it before because you might not get your audience perfectly
the first time. And if Facebook manages to
identify a set of people that it thinks might be more engaged or might
visit your website, based on the data
you have input or based on how people are
engaging with your ad, then you want the
algorithm to be able to do its job and match your ad with the people that are most
likely to click it. Let's leave that on. Then when
it comes to the liages you don't actually have
to add much Facebook will know what it's doing, but what I can do is
add in English here. Let's just go English.
Once we've done that, that really is our
audience created. Let's save this audience. When we're naming our audiences, let's just go with
a couple of things. Let's go with the keywords that you want to associate
with the audience. Then let's go with
age, and gender. Great. Now we've created
an audience and saved it. Then below that, we'll
look at placements. You have two options
here. You have automatic placements and
you have manual placements. Placements refer
to the place where your ad is going to
show up on Facebook. So is it going to show
up in the news feed, is it going to show
up in messenger or is it going to show up on Instagram Facebook
recommends that you keep this on recommended. This allows it to test and do some different
stuff to determine where it's best to show your ad. But if you want to
be more specific, you can go to manual
placements and you can get rid of some of these placements
that Facebook offers. So you can see here
there's quite a few. But at the top here, I can
decide if I want to only show my ad on desktop or mobile. Now you can run your
advertisement on both. I would just be conscious
of the fact that most traffic these days
generally comes from mobile. That's like a known fact. You might want to take that into consideration when you're
deciding on your placements. Now, if we go down, we can get rid of the
audience network, we can get rid of
Instagram or messenger. You can really do
what you want here. And you might be
wondering, well, what are the best
placements to target? And the truth is it completely depends on what
you're trying to do. When you're just starting out, I would recommend leaving
automatic placements on and just let Facebook
do what it does, especially if you're a beginner, you don't want to play about
with things too much because if you start turning off
some of these placements, you'd run the risk of missing out on some of the placements that might actually be useful for what you're
trying to achieve. So keep that on automatic.
So let's leave that there. And for optimization
and delivery, there's a couple of
things we can do. We can optimize this campaign
for line of page views. And we can optimize
it for link clicks, daily unique reach
and impressions. I don't recommend
you optimize it for daily Unique reach
and impressions because that is not
the overall goal here. You want to optimize
your campaign for either landing page
views or link clicks. For what we're
doing here, I would recommend picking
landing page views. That will tell you
how many people are actually hitting your
website because the truth is someone clicking the
link to your ad doesn't necessarily mean
they're going to hit your page and look at it, but if Facebook is tracking
landing page views, that means you're going to
accurately see How many people are clicking a link and visiting your website as a result. That's something just
to keep in mind. When we've done
that, we're ready to move on to creating the ads. Just hit that blue
next button down the bottom right hand corner
and we can move on to
12. How To Create Your First Facebook Campaign (Part 3 - The Creative): Great. The last thing that
we have to do here is create the advertisement
that the people you're targeting
are going to see. Like before and
hopefully, like yourself, you've already named
the advertisement. Then down at identity,
we want to select the Facebook and Instagram account
we're going to be using. You're going to
want to go for me, would be ambioMdia and then the Instagram
account is obviously ambioMdia then when it
comes to add setup, you have a few
different options. You can use a single
image or video, and we're going to be using a
single image for what we're doing here or you can use a
carousel or a collection. Because you're creating
your first campaign, I would highly
recommend just using a single image or a video. If you have a video that you
can use in your campaign, I would recommend using
that because generally, it's more engaging
and you'll get a better feel for how people
are responding to your ad. But when you've decided on that, let's move down to
the ad creative. What we're actually going
to do is add a couple of different images and you'll
see why in a second. If we go here, The first one we're going to
add is just a basic one to one ratio image that you can see here. Let's
just open that up. Let's select that and hit next. We've added that image and now we're just
going to hit next. Now you can see here
that this image doesn't actually fit some of the
placements that we've selected. What we want to do is replace
the story apps and sets and the right hand column
images with one that actually fits the dimensions
that it's looking for. For instance, we're
looking for a ratio of nine to 16 for
stories as and set, and we're looking for a ratio of 1.911 for right column
and search results. For the stories and apps, let's just replace this image we've got here with another one. Let's uploads. Go back to downloads and then we have
this image here ready for us. Okay. And let's select that one. Let's hit next, and we can see that we've updated that image. Then over on the
right column section, we're going to
replace that again. We're going to upload an image. This one here, click anyone, and there we go. Great. Now we've updated
the images to match the sizes that we're
looking for. Let's next. What we can see here is that Facebook is
asking us if we will allow them to enhance
the images that we've got if we think it
will improve performance. Of course, we want
to make that yes, when we've done that,
let's click done. Now we have the
images set and we have relevant images
for each placement. Now when we get down to primary text headline and descriptions, a couple of things that we're
going to want to do here. I already have some copy pre created for the purposes of
illustrating it to you here. In terms of writing copy itself, that's definitely a
separate subject that I'm not going to get into too
much detail about here. But you'll be able to see from the copy that I'm going to
add what this advertisement is about and the words that I've used and the
things that I'm trying to do with the copy to motivate
people to take an action. If we go over to this tab, I already have some
copies prepared. The primary text is
just a short form one. This ad that I'm creating
was for website design. This was a campaign that we run that did pretty well in terms of conversion rates and some of the soft numbers
that we're looking for. That's the primary text. Then if we go back and
we go for the headline, turn your website into
a selling machine. Let's input that headline. Then for the description, Your description
won't always show up, but I would always recommend
adding one anyway. You can add more sales copy specific to what you're
trying to achieve, or you can add information about your business if that's
what you want to do. Then when we get into
destination, obviously, here we're looking to send this traffic to our website URL, and I have my website
design sales page that I'm going to add in here. Just copy and paste that in. Obviously, the pixel
that we were creating earlier is not installed on
the main ambiomdia site, so we're just going
to cross that off. When it comes to display link, if you have quite a long ur, I would recommend just shorting
it to something that is more understandable to anyone that isn't familiar
with your brand. I'm just going to make
it my root domain, and you can see it
showing up there. Then for the cost
action, depending on what you want to achieve
with this campaign, the highest converting button
is usually learned more. I'd probably stick with that
if I were you unless you've got something more
specific in mind. Then with ages, we don't really need to worry
about lineages. Tracking we have
our pixel set up. And then when we've done that, we're basically good to go. From there, we would
want to publish. You can see that I haven't
fully published this campaign. I've left it as a draft. But what you can expect after
you publish your campaign, your ad can be in review
from anywhere 1-24 hours, sometimes longer depending on how Facebook is keeping
up with things. You just want to keep that
in mind that your ad might be in review for quite some
time, but that's okay. When it is Facebook
will either approve it, and it will start
running or they'll kick you back with
some kind of error and say that it doesn't
meet some kind of policy, which is what
they usually do. That happens to you,
you're more than welcome to leave a comment
in the discussion. I'd be happy to talk
to you about what you can do to get your ad live. That is step by step how
you create your campaign. Like I said at the very
beginning of this class, I'd highly encourage you if you've been following
along with these steps to leave an image or
a video or give me some information on how
you got on with this class. If you've created
your first campaign, what does the add look like? What a copy did you use? Do you need help with please feel free to leave a question in a discussion panel
and I'd be happy to answer it. And we're
not quite done yet. I actually have five bonus tips for you I highly
recommend you take into consideration as you get more experience with your
Facebook advertising. Thank you and I will see you
in those top five bonuses.
13. Bonus # 1 - Don't Throw Mud At The Wall: Okay. The first bonus tip I
have here is don't throw mud. Now, you might be wondering what the heck do I mean by that. Well, what I actually
mean is don't go into your Facebook advertising
hoping for the best. The reason why this
is the first tip is because it is one of
the more important ones. You want to be split testing, and this is what a
diagram is here. If you don't know
what a split test is, don't worry because I'm going to explain exactly what it is here. A split test refers to
when you could add A and add B and you want to find out which one is the most effective. What you can see here, we're
following the same structure as what you see in
Facebook advertising, we have an ad set, we have ADA and add B, and we can see that a B
had a 3% conversion rate, which means add A is the winner. Now, how on earth
would we have known which ad was going
to be the winner without testing them
against one another. This is something
that you'll, very frequently run into where
you have multiple ideas, you have multiple ways
that you can do things, but you don't know what
is the best way to do it. Instead of just
using your gut and your intuition to
try and determine what is the best way to take your campaign, let
the data tell you. Actually go into ads manager, create a couple of different
ad sets with a couple of different audiences and create a couple of different
ads for each. When you do this, what I
recommend you do it is test the variables that
I'm going to list here. The first variable
that you might want to test could be copy. You might want to test
short form copy over mid form copy and
over long form copy. Do short ads result in more clexan a longer ad.
That's the first thing. The second thing you're
going to want to consider is that images are videos. So If you have an image, but you also have a video
and you want to see what one performs best and results in the most clicks, then test them
against each other. Another thing that you
can test is placements. Do you want to see how effective your ad is on Facebook
versus Instagram? If you want to find out,
then why not test it. Then the last thing that I could say that you could
test is your audience. That's probably one of the
most significant things here. If you have multiple
audiences or you have multiple different
metrics you can target, then why not create a couple
of ad sets and test them. Yeah, that is my advice here. Do what you can to test
things to split test, and do not throw at the wall. Let's get
onto the next one.
14. Bonus #2 - Ad Fatigue is Real: The second bonus tip I
have for you here is don't let advocy
ruin your campaign. Advocy is basically where an audience or a group
of people that you're targeting get fed up seeing your ad because I've
seen it too many times, they've been over exposed to it and it's no longer effective. There's a couple
of things that you really want to keep in mind and pay attention to to
avoid that happening. The first thing you're
going to want to do is keep an eye on your
click through rate. Your clickthrough rate is
basically going to tell you if people are interested
in your ads or not. For instance, if you have 1,000 people that
see your ad and only 0.5% of them click
through to your landing page, then that is an indication that your ad is not performing
as well as it could be. Now, click through rate can be affected for a
number of reasons, but you definitely
want to consider ad fotque as a factor in this. You should be aiming for a click through rate
of three to 5%. That is standard, anything lower than that and there's
likely something going on, and advirtie may be
what's causing it. And the second thing you're
going to want to do is have multiple ads and be
ready to rotate them. One way to get past
advotgue immediately is just rotate your campaigns and your images and your
copy frequently. For instance, you might want to change your ad every
couple of months. You don't want to do it so
often that you run the risk of hurting the performance of
your campaigns even more. You just want to do this when you feel like it's
inappropriate. If you feel that advotgue is
causing problems for you, then changing your ads is a
good way to get around that. The third type I have here
is to consider frequency. Frequency simply refers to how often people have seen
your ad on average. For instance, if
you have a campaign running that has a
frequency above five, you're really going to
want to consider if the people seeing your
ad are fatigued by it, if it's making them uninterested,
if they're sick of it, if they're annoyed of it, if it's going to hurt
your campaign. Yeah, advote is a really
important thing that you're going to want to think of when running Facebook ads. Let's move on to bonus
tip number three.
15. Bonus #3 - Don't Overlook Your Offer: Okay, bonus tip
number three is that your offer matters and that you shouldn't
forget about it. This one might seem obvious, but when we're creating
campaigns and we're doing a lot, it's easy to overlook
the creative of your ad mainly because it's one of the last things that
you're going to be doing. Here's a couple of things
to keep in mind when it gets to the creative
of your campaigns. The first question
to ask yourself is, is what you're offering clear? To the person seeing
your ad can quickly identify what you're selling
and what you're offering. You don't feel as
though it is clear, then you're really going
to want to consider how you can make that
more compelling. The second thing that you're going to want to
do is think about the features and benefits
of your product or service. What are the key
things that make your product or
service stand out from your competitors and
make sure they are included in your ad in
one way or another. The third thing that you're
going to want to do is consider the messaging
of your competitors. If you can, there is no harm in analyzing your
competitors to see what offers they use and also what kind of messaging
they use to entice people. If you overlook your offering
and you don't consider it enough and you don't give it the attention it deserves, it's likely going to hurt the performance
of your campaign. I can't stress the
importance of how important the creative
of your ad actually is. It is the most important
part above all else. Yes, it might be the
last thing that you do, but by no means is it last
when it comes to importance. That is tip number three.
16. Bonus #4 - Focus on The Metrics That Matter: Okay. So tip number four is focused on metrics that matter. When you're getting started
with Facebook ads and you're trying to benchmark your
performance, it's very, very easy to fall
into the trap of benchmarking your performance
based on vanity metrics, such as comments, likes, shares. These things don't matter, and they do not
contribute as much as you might think to the
performance of your campaign. Which is why I'm
sharing with you now three soft stat metrics that I highly advise you pay
attention to on your campaign. I'm also going to
show you where you can find them on Ads Manager. So the first one we
have here is CPM, which is cost per
1,000 impressions. Your CPM will fluctuate depending on what
you're targeting, but this basically dictates the cost of your
entire campaign. If your CPM is too high, I, if you're paying ten pounds or $10 just to reach 100 people, then there's something
wrong there. A good CPM, in my opinion, is anything below ten pounds. This will vary a
lot depending on the location you're
in and depending on what industry you're in, and the CPM is often influenced heavily
by competitiveness. So please bear that in mind when you're
analyzing your CPM. Second thing we have
here is cost per click. How much does it cost
for you to get a click? Much like CPM, your
CPC will vary a lot depending on what industry you're in and who
you're targeting. But here's a couple
of things to keep in mind when it comes to
analyzing your CPC. If you're advertising for B
to B business to business, it's likely that
your cost per click is going to be higher
because there's less of the people on Facebook that will actually be
interested in your offer. You'd b2c if your
business to consumer, then there's
obviously going to be much more consumers than
there are businesses, and it's much more likely your cost per click
will be lower. Please keep that in mind. The third thing
that we have you is your click through rate. If your ad reaches 1,000 people, how many people actually click through to
your landing page, regardless of what industry
you're in or where you are, you should be aiming for
a click through rate anywhere 3-5% or higher. The higher the
clickthrough rate, the better it's going to be. For instance, if your ad
reaches 1,000 people and only 0.5% of the people who saw it clicks through it to
your landing page, and that's not very good. If your ad reaches
1,000 people and 5% of them click through
to your Landon page, that is quite a
significant difference. That's something
to keep in mind. The fourth metric I've got here that I think
is probably the most important out of everything I've just mentioned is sales, is it translating into more
business for your company. That is the most
important metric of all. If it's not generating sales and it's not
generating business, then it doesn't matter how good you click rate or cost per click are because
it's not moving the needle in the way
that you want to, and there could be a number of reasons why that is the case. Now, if you want to see the CPM collect the rate and cost per click on ads manager, what you have to do
As go to ads manager, go to columns up
the top right here, click on it, and then go down
to performance and clicks. This will open up a
bunch of new columns for you to analyze the
performance of your campaign. For instance, we can see now
we can see cost per result. But if we scroll
along a little bit, we can see CPM here, then we can see cosper click and then we can see
click through rate. You won't see them
if you just have a standard performance
view as your default, so you have to click to
performance and click. That's why I would
advise. That is tip number four. Let's
move on to the next one.
17. Bonus #5 - Follow Your Creativity: Okay. The last tip
I have for you here is to follow
your creativity. You might be thinking,
well, that's not very useful or that's not as in depth as what some of the other tips or
lessons have been. The truth is it's
not meant to be. One of the problems
that a lot of people face when
they're advertising on platforms like Facebook is that they can seem highly technical, for the most part,
they are, they require a lot of technical
knowledge to use, and it requires a lot of
knowledge to get right. If you're watching
this as a person who doesn't consider themselves
to be tech savvy, it might seem
slightly overwhelming and you might get so hung up on this technical stuff that
you forget about being creative and creating something
that is genuinely unique. When Facebook's advertising
platform launched It allowed anyone with money, basically to run ads on
Facebook if they wanted to. Before the likes of Facebook
and Google advertising, someone had to go directly
through an agency to have ads published in
big media publications. The likes of Facebook
and Google changed that. It made it easier for anyone to create ads and publish
them if they wanted. The problem with
that is it's driven the quality of ads down
overall in the industry. You're likely to see ads are much more annoying than before. Likely to see ads
that aren't really useful and aren't
really creative at all. The last thing I
want you to think when leaving this class
is that it doesn't require effort and that it doesn't require
thinking differently and being creative because
if you can be creative. If you can create a campaign
that is genuinely unique, that is genuinely
useful and actually means something to the people
that it's intended for, then that is going to put you at a massive advantage
over your competitors. That is really what I want
to leave this course on. Because ultimately what
we're trying to do as business owners as
entrepreneurs as marketers. What we're really
trying to do if we do it properly is
make a difference. We're trying to
attract customers in a genuine way that isn't overly salesy,
that isn't malicious, that isn't deceptive, we're
trying to do honestly, and we're trying to do
it with a creative flair that is different
from our competitors. That is one of the things
I think is most important to take away from this
course than anything else, follow your creativity
and don't be scared of trying out new
things and experimenting. Thank you. That wraps
up this course. Let's move on to the
conclusion because I have something special to
share with you there.
18. Conclusion: What's Next?: Okay, so that brings
us to the end of this beginners class to
Facebook advertising. I really, really hope
you found it helpful, and I hope you can
now go out and create effective and compelling
Facebook ads for your business. And like I said at the
beginning of this class, I've left a resource below with links to relevant resources so you can stay up to date with what's happening in the
Facebook advertising. W because the truth is this
stuff changes all the time, and you're going to want to
do everything you can to stay on top of it and stay up to date with what's happening
in the industry. And if you remember at the
beginning of this class, I said I had something special to share with you
at the end. Well, iras. Outside of the courses we create and publish
on Skillshare. We also have ambo Academy, which is our online platform where you can learn
digital marketing, improve your skills,
and connect with like minded individuals
who are also in a similar situation to yourself. You'll get access to
hundreds of hours of trainings and be part
of a community of business owners just
like yourself who are facing similar problems
on a day to day basis. There are also multiple
live calls per week from myself and the
people who work in ambo media. So you're constantly
getting up to date information on a broad
range of topics, including website design, SEO, PPC advertising, social
media marketing, e mail marketing chat
box and much more. So I'd highly encourage you
to check out the link of left below and get started
with Ambu Academy today. And if you want to
check out any of the other classes we
have on Skillshare, I'd encourage you just to
hit the follow button above this video and check out
a profile to learn more. But it's been a pleasure
teaching this class, and I look really forward to
seeing you in the next one. So thank you and I will talk
to you soon. Thank you.
 Aidan Brotherhood, Building things