Transcripts
1. Course Introduction: Hi, and welcome in. This
course is an introduction to the solid fundamental
concepts of how to lay out and design
the residential garden. We always start with
a conceptual plan, and I'm going to
walk you through the steps to how to achieve this where your plans
and your ideas are going to be more imaginative
and more creative. We're going to be talking about three dimensional space and the different design principles that help to bring all of
these elements together. Now, this is a course on garden
design and not gardening. So I'm not going
to be going into great depth on actual
planting design. I have students from all over the world with
different environments, different climates, and that
just wouldn't be practical. But I am going to discuss plant design theory and how plants reinforce your
design solutions. So this course is going to
give you the knowledge to be more imaginative and more
creative in your designs, to create functional space where all of the
elements are going to be flowing together and working together to
the greater good. So with all of that said, I will look forward to seeing
you in lecture number one, and let's just jump
straight on him.
2. Course overview and Class Project: In this lesson, we're
going to start talking about our design objectives. Whenever you start a project, you should have some direction
that you're going in to be able to achieve and meet your client's
expectations. And we call these
design objectives, and there's primarily
three of them. And the first one is we want
to be able to integrate the architecture of the home with the garden or the garden with the
architecture of the home. So for example, if I'm designing a garden for an arts
and crafts style home, one that would have been built
in the early 20th century, the siding may be cedar
or redwood shingles, the porch may be of brick, you know, different
building materials. And I'm going to want
to pay attention to the architecture and
the style of the home. And for a home of this era, I would be looking at reference books to see what kind of plant
material might have been popular at that time and how they may have
used natural elements, boulders or such to complement the architecture of the
original architect. So I'm integrating the
landscape design with the architecture of the home and trying to make that flow
together seamlessly. If on the other hand, I was looking at a very
crisp and modern home from here in the
early 21st century, then I might be looking at
different materials, maybe, um, concrete that is of a very almost white
color to it, you know, deep blue tiles for
the pool, you know, different elements that
bring modernism into my design to complement what is going to be part of the
architecture of that home. So the integration of the
home, the architecture, and the garden together, so they work together
in a synergistic way. The second design objective is going to create
functional space. If I want to have a
recreational area, well, I'll be in consultation
with the homeowner. What kind of sports or activities
are you interested in? And if it's simply
a Batch ball court, well, I'm going to look up the dimensions of
Bach ball Court, and I'm going to incorporate
that to where the space for that Bach ball court is going to be functional
and large enough, not just for the court itself. But for pedestrian
traffic around it, where people can sit and
relax or enjoy the game. On the other hand, if they like to play badminton or croquet, then we're looking at
a much larger area. And typically recreational
areas are going to be large rectangles longer
than they are wide. If I'm looking at patio space, entertaining areas, then
it's the same idea. I still want it
to be functional. I want to have enough room
for table and chairs, and yet have enough room where pedestrians can
circulate all the way around. I may want to have an area for a barbecue or cooking area. Well, this would
become ultimately a subspace of the patio, the main entertainment area, but I still want to have
enough room and create circulation patterns
through the use of vertical planes that are going to help to
define the space. Finally, you want to meet or exceed the expectations
of your client. And I think Fletcher Steel, a landscape architect from
the early 20th century, said it very well when he said that you don't want to just listen to what the client is asking for but what
they dream of having. Then we as designers need to be able to interpret what they are asking of us and take
advantage of that and come up with something
beyond their expectations. So the three design
objectives to incorporate and integrate the home and the
garden together, create that functional
space for whatever purpose that we're designing for and
consult with the homeowner, and then finally meet or
exceed the expectations of what they are asking of us as landscape designers,
landscape architects. Okay, so in the next lesson, we're going to
start taking apart these three planes of
enclosure and talking about how they affect our perception and our movement
through a garden. Okay, thanks for watching. And let's take a short break, and I'll see you back
here in a moment.
3. What is Garden Design: In this lesson, we're
going to start talking about our design objectives. Whenever you start a project, you should have some direction
that you're going in to be able to achieve and meet your client's
expectations. And we call these
design objectives, and there's primarily
three of them. And the first one is we want
to be able to integrate the architecture of the home with the garden or the garden with the
architecture of the home. So for example, if I'm designing a garden for an arts
and crafts style home, one that would have been built
in the early 20th century, the siding may be cedar
or redwood shingles, the porch may be of brick, you know, different
building materials. And I'm going to want
to pay attention to the architecture and
the style of the home. And for a home of this era, I would be looking at reference books to see what kind of plant
material might have been popular at that time and how they may have
used natural elements, boulders or such to complement the architecture of the
original architect. So I'm integrating the
landscape design with the architecture of the home and trying to make that flow
together seamlessly. If on the other hand, I was looking at a very
crisp and modern home from here in the
early 21st century, then I might be looking at
different materials, maybe, um, concrete that is of a very almost white
color to it, you know, deep blue tiles for
the pool, you know, different elements that
bring modernism into my design to complement what is going to be part of the
architecture of that home. So the integration of the
home, the architecture, and the garden together, so they work together
in a synergistic way. The second design objective is going to create
functional space. If I want to have a
recreational area, well, I'll be in consultation
with the homeowner. What kind of sports or activities
are you interested in? And if it's simply
a Batch ball court, well, I'm going to look up the dimensions of
Bach ball Court, and I'm going to incorporate
that to where the space for that Bach ball court is going to be functional
and large enough, not just for the court itself. But for pedestrian
traffic around it, where people can sit and
relax or enjoy the game. On the other hand, if they like to play badminton or croquet, then we're looking at
a much larger area. And typically recreational
areas are going to be large rectangles longer
than they are wide. If I'm looking at patio space, entertaining areas, then
it's the same idea. I still want it
to be functional. I want to have enough room
for table and chairs, and yet have enough room where pedestrians can
circulate all the way around. I may want to have an area for a barbecue or cooking area. Well, this would
become ultimately a subspace of the patio, the main entertainment area, but I still want to have
enough room and create circulation patterns
through the use of vertical planes that are going to help to
define the space. Finally, you want to meet or exceed the expectations
of your client. And I think Fletcher Steel, a landscape architect from
the early 20th century, said it very well when he said that you don't want to just listen to what the client is asking for but what
they dream of having. Then we as designers need to be able to interpret what they are asking of us and take
advantage of that and come up with something
beyond their expectations. So the three design
objectives to incorporate and integrate the home and the
garden together, create that functional
space for whatever purpose that we're designing for and
consult with the homeowner, and then finally meet or
exceed the expectations of what they are asking of us as landscape designers,
landscape architects. Okay, so in the next lesson, we're going to
start taking apart these three planes of
enclosure and talking about how they affect our perception and our movement
through a garden. Okay, thanks for watching. And let's take a short break, and I'll see you back
here in a moment.
4. Design Objectives: In this lesson, we're
going to start talking about our design objectives. Whenever you start a project, you should have some direction
that you're going in to be able to achieve and meet your client's
expectations. And we call these
design objectives, and there's primarily
three of them. And the first one is we want
to be able to integrate the architecture of the home with the garden or the garden with the
architecture of the home. So for example, if I'm designing a garden for an arts
and crafts style home, one that would have been built
in the early 20th century, the siding may be cedar
or redwood shingles, the porch may be of brick, you know, different
building materials. And I'm going to want
to pay attention to the architecture and
the style of the home. And for a home of this era, I would be looking at reference books to see what kind of plant
material might have been popular at that time and how they may have
used natural elements, boulders or such to complement the architecture of the
original architect. So I'm integrating the
landscape design with the architecture of the home and trying to make that flow
together seamlessly. If on the other hand, I was looking at a very
crisp and modern home from here in the
early 21st century, then I might be looking at
different materials, maybe, um, concrete that is of a very almost white
color to it, you know, deep blue tiles for
the pool, you know, different elements that
bring modernism into my design to complement what is going to be part of the
architecture of that home. So the integration of the
home, the architecture, and the garden together, so they work together
in a synergistic way. The second design objective is going to create
functional space. If I want to have a
recreational area, well, I'll be in consultation
with the homeowner. What kind of sports or activities
are you interested in? And if it's simply
a Batch ball court, well, I'm going to look up the dimensions of
Bach ball Court, and I'm going to incorporate
that to where the space for that Bach ball court is going to be functional
and large enough, not just for the court itself. But for pedestrian
traffic around it, where people can sit and
relax or enjoy the game. On the other hand, if they like to play badminton or croquet, then we're looking at
a much larger area. And typically recreational
areas are going to be large rectangles longer
than they are wide. If I'm looking at patio space, entertaining areas, then
it's the same idea. I still want it
to be functional. I want to have enough room
for table and chairs, and yet have enough room where pedestrians can
circulate all the way around. I may want to have an area for a barbecue or cooking area. Well, this would
become ultimately a subspace of the patio, the main entertainment area, but I still want to have
enough room and create circulation patterns
through the use of vertical planes that are going to help to
define the space. Finally, you want to meet or exceed the expectations
of your client. And I think Fletcher Steel, a landscape architect from
the early 20th century, said it very well when he said that you don't want to just listen to what the client is asking for but what
they dream of having. Then we as designers need to be able to interpret what they are asking of us and take
advantage of that and come up with something
beyond their expectations. So the three design
objectives to incorporate and integrate the home and the
garden together, create that functional
space for whatever purpose that we're designing for and
consult with the homeowner, and then finally meet or
exceed the expectations of what they are asking of us as landscape designers,
landscape architects. Okay, so in the next lesson, we're going to
start taking apart these three planes of
enclosure and talking about how they affect our perception and our movement
through a garden. Okay, thanks for watching. And let's take a short break, and I'll see you back
here in a moment.
5. Three Planes of Enclosure: So let's talk about these
three planes of enclosure. And I am in my office, and in the office, I have a very well
defined sense of space. I have the floor
or the base plane, and the furniture, everything sits on this floor
or base plane. I have the vertical plane, which are the walls
of my office, and I have the overhead plane, which is, in this
case, the ceiling. So when we're designing, we're really
starting our designs by looking at the base plane. So remember, we are designing
on a sheet of paper, and we're going to start drawing patterns and working
out shapes and defining them out to
be functional and purposeful to what
our design intent is. So everything starts
being designed on the floor plane,
on the base plane, and we interrelate
and interconnect shapes within this concept, this two dimensional view before we start
working our way up. Once we have a
base plane that we are happy with or at least
we're experimenting with, then we can come in
and in this instance, using the walls of my
office as an example, I have my vertical
plane coming up, but I'm also creating views
outside of the office space. I'm creating views with
the window behind me. I'm creating views with windows at each end of the office. So those are portals into this space that
I am within now. My ceiling is a traditional
eight foot ceiling, so it's high enough to
where I don't feel cramped. It's not so high that I feel
like it's soaring away. But think about how you
would feel if you walk into a cathedral here in the States or in Europe,
and you've come in, and now you have these
massive buttress ceilings going way up into the air, you have this huge sense
of just spaciousness. On the other hand, if I walk into a space where the ceiling, maybe it's lower than eight
foot for whatever reason. Then it's going to have
a very direct impact on how I perceive the space
that I have just walked into. So these three planes of enclosure are what
define our spaces. And interior space is very
well defined with our floor, our walls, our floor coverings. The ceiling, however, we embellish our doorways
and our frames. Out of doors, it's
going to be more fluid. So out of doors, base plane could
be concrete patio, brick patio, it could
be gravel walkway. If it's a recreational area, it would probably be turf or maybe it's asphalt if
you've got a sports court, and vertical elements can be an 18 inch high seating
wall around the patio. Now you have definition
to the patio. You can control how people move in and out
and use the space, but you're also creating an additional seating area when there's extra
people or children, and they just want to sit
on the edge of the wall. So we've got that element. We also have the idea of
having rock walls and hedges, giving us vertical elements and separation from one part
of the garden to another. And even something
like a bamboo hedge, which gives us a sense of privacy and yet still
allows air movement and to a degree a
certain amount of visual movement
through that hedge, can give another
perception to the space. The three planes
of enclosure are how we are going to
manipulate the space that we design our gardens in
and how we are going to use these planes to help move people from one
area to another. The patterns we
might use for, say, brick paving are going to help either be dynamic
and move people, or it's going to be static and keep people kind
of in one place. Kinds of vertical
planes we're going to use are going to help
to define the space, give extra functionality
to that space, and move people along. And then finally, the
overhead plane, well, on a patio, it might be an
arbor or a solid soffit. It could be the
canopies of the trees. It could be an arbor with
vines growing on it. It can actually even
be just the open sky. All of these are going to have a direct implication on how
we perceive this space. So there's our three
planes of enclosure, and that's what we're going
to be using to achieve our design objectives of integrating the home and
the garden together, creating functional
space, and meeting or exceeding the
desires of our clients. So now, how can we
put all of this together and do it in
an orderly fashion? And that's what we're
gonna be talking about in upcoming lectures. Okay, thanks for watching. And let's take a short break,
and I'll see you in a bit.
6. Form Composition: Okay, now that we have looked at the three planes of enclosure, where we have our base plane, our vertical planes,
and our overhead plane, when we're starting a design, we're always designing
on the base plane, on that floor plane and
interconnecting shapes and defining our functionality of the garden of the design intent that we are
coming up with. And we're starting that on that floor plane,
that base plane. Well, when we start
combining shapes together, then we want to do it in a
logical and cohesive manner, and that is referred to as form composition or
geometry of shape. And it holds, whether you're
doing landscape design, landscape architecture
or architectural drawings for buildings or homes. So let's just jump
onto the board, and we're going to look at these two basic geometrical shapes the circle and the square, their component parts, and
how they relate to each other and how we use
these in garden design. And in this lesson,
we're going to be taking a closer look at the two primary shapes that
we use in landscape design. And these two shapes are
right here in front of us, the circle and the square, and each of these shapes have
component parts to them, and we're going to
take a closer look at all of this and see how these component parts not only define the
individual shape, but how you can use these
component parts to combine these two shapes to make very strong form composition and strong garden plans when
you're working on a project. So we're going to
start by looking at the circle and with the circle, the center is arguably
the most important point. If you think of a circle in
the terms of a dartboard, everything is focused in towards the center
of that dartboard. So everything radiates out from the center of the circle and the circumference
is defined by it, the radius is defined. All of these components relate directly
back to the center. And the circumference
simply refers to a continual arc all the
way around the circle and the circle can be
dissected in half by the diameter and the
diameter also has the ability to go
beyond the circle or the circumference of the circle and become an extended diameter. A component part
that is extending out into space, so to speak. Of course, we have the radius and just like the
extended diameter, we have an extended radius. There's one more
straight line that we work with quite a bit on the circle and that straight line is referred
to as the tangent, see if I can grab this
and the tangent is simply a straight line that flows effortlessly off of
the arc of the circle, off of the arc of
the circumference. Here are our component parts of a circle as you look at this and now we're going
to look at the square, you can see how parts these component parts of the shape can relate
to each other. So let's look at
the square and see what component parts
it is made up of. Well, as everyone knows, a square is basically a
box with four equal sides. But a square now
can be dissected. On its axis, and now we have four squares proportional
to our original. The square is unique in that it can be
divided on the diagonal. We have a 45 degree angle between this axis line
and this diagonal. And just like the circle
that had extended diameter, extended radius, the
square has extended sides. It has extended diagonals
and it has an extended axis. All of these lines
continue out into space. The extended axis could be coming off of the
center axis right here, extended diagonal could be
continuing in this way. But the square is unique
also in that each of these individual
quarters can now be subdivided into four
smaller squares of proportional value to not only the original quarter square but the whole
square itself. And we can take these and multiply them out to
start forming rectangles. So these are the
component parts of the square and how
they can be used in landscape design to relate to the circle and start building very strong
form composition. So let's take a look at this, and this is just
something really simple I put together just
as a demonstration. But say you have, I'm
calling this the patio area. You can take this side, extend that line geometrically
straight on out. It flows effortlessly into
the tangent of a circle, swings around on the arc
of the circumference. If this line along here and this top line
along here were extended, they would meet right here in
the center of this circle, that would be possibly
a fountain head. We have an extended radius. We have an extended radius, even though you don't
physically see the line connecting visually it ties
directly into this center. Now we've got the extended
radius or it could be an extended axis
coming on across. We've taken this patio area, doubled it in size to
create a rectangular area, seating walls to give
interest, a fire pit, perhaps some kind of
gravel or decomposed granite in here, a lawn area. Now I've got this area in blue
that hasn't been defined, but I could take this
to my client and just draw in some mass plantings. And at this point in
the conceptual design, I don't necessarily need to know what kind of material
the patio is made of. I don't need to know
exactly what type of water feature
this is going to be. And I don't need to know
what kind of plants are necessarily going to be
in this particular area, but it's a way of getting
a conversation started. So this is how in a
very simple diagram, how the component
parts of shapes relate to each other
within garden design. Now, we're going
to take a look at some actual designs and see how that idea is played out in something that's a little more realistic. So
let's take a look.
7. Examples of Form Composition: Well, we've looked
at some kind of theoretical ideas with the
idea of combining shapes, form composition, combining
the circle and the square, using their component parts. But let's take a look at some actual garden designs
that have utilized this. One from one of my
students in the past, one that I did when I
was studying in England, and then one from a
landscape architect and acquaintance of mine
from England, as well. So let's just take a look at some practical applications
of form composition. Okay, so let's take a look
at a couple of examples of form composition and
how design approach these two ideas work together. So in this instance, we have the residence
of the house, and we've got this
kickout coming out, and then a 45 degree
area out here, an alcove in the home. So we've reinforced
the architecture of the home by coming
out with 45 degree, a rectangle 45 degree pattern. And we're coming out and
stepping down into the garden. And at this point,
we're coming across, and all of these pathways are on a rectangular 45 degree
pattern, 45 degrees. We come up, that's
45 to this angle, come back over into this area. Some hedging proposed hedging, and then you have
your turf area, stepping stones coming
across just to give some interest to
the composition. Everything holds together. And as far as form
composition is concerned, all of the component parts of these shapes relate
to one another. So the axis of a square, the axis of a rectangle
all comes out to form these shapes all the way around
within the garden itself. So design approach gives us an idea of how we want
to lay out the garden. Form composition helps us to keep all of the component
parts of our shapes together. So let's just take
a quick look at one that I did in England
a number of years ago. This is one I did a few years
back when I was in England, and in this one, we
had one existing tree, and as a result, I use that tree as the hub of a concentric
or radial design. If you look at this closely, then if I use this as my
center point, my lines, extended radius lines
all come out from this point right
here, into the yard. The center of the circle becomes a very strong focal point
even for these arbors, at this point right here, if you were to extend them, they're all just segments of an extended radius coming from this location
right here and even the arc that I'm using for the hedging is
built off of this center. That's what I was meaning by the center of the
circle can become a very powerful
focal point within a composition for awkward
shaped properties, a radio, concentric
circle design can be a very powerful solution to getting people out and
moving through the garden. Okay, so one last example of form composition
and design approach. Again, when we talk about reinforcing the
architecture of the home, we can talk about something
called the rule of thirds. And the rule of thirds in
garden design simply says that the closer you are to the
architecture, to the home, the dominant building
on the site, you want to reinforce that architecture with a
slightly more formal approach. In this case, a rectangular design approach coming right
off of the house. In this one that we
looked at earlier, we were using a
rectangular 45 degree to reflect the
architecture of the house. As you segue further
from the home, you can start to drop into a more naturalistic or
softer design approach. So as we come out along here, we're actually dropping into
a little bit of an arc and tangent because we've got
our tangent line and arc. But then we drop back into a rectangular 45 at this location, reinforcing the shape and
placement of the swimming pool. But now we can come off of and because the
property is deep enough, we can drop into a
curvilinear design. So we have a pool house, we can use the back of the
pool house as a tangent line. We can come directly off
of that into a nice arc, and it just swings
all the way around, it comes around and feeds itself right back up into the tangent off of this paving
and planting beds. So it works its way smoothly
throughout the composition. Each of these arcs is
built off of a circle. I could put a center point, draw a radius line out and have this circle defined exactly the way I want it
in construction, the same with this arc, this arc, even this arc here. These trellises reinforce
the 45 degree angle. So form composition holds
all of this together. Design approach gives us
that direction to keep our garden cohesive
and flowing nicely, and then plantings smooth
and blur these lines. So we've got a rectangular
design approach, an arc and tangent
design approach, a rectangular 45, and a curvilinear all
within one property. But they all flow together due to paying attention to form composition and the
overall component parts of our different shapes. So that's what we want
to accomplish when we're doing good
solid garden design.
8. Form Composition Wrap up: Okay, to summarize
form composition, our geometry of shape,
what we've talked about, if you can master these ideas of combining
circles and squares, expanding squares
into rectangles, working off of
tangents of circles to flow into other compositions, you're going to really be
able to start combining and making good solid
landscape design, landscape architecture. Once you have it developed
on that base plane, then we can start looking
at the vertical plane. Okay? I've got a patio. Maybe I want to define how
people are going to use that. So now I can come in and maybe I've got a large
square or rectangle. Now I can come in and build seating walls around
the perimeter. I can start working in
those directions to create vertical elements
that will define space and frame views and
control traffic patterns. Then I can come into
the overhead plane. And depending on whether it's an open arbor with
plants growing on it or a solid roof or soft
to protect from the rain and wind and
sun, it doesn't matter, but you start building
these three planes of enclosure off of your base
plane using form composition, combining these shapes together, and now you've got a
good solid start on doing excellent garden design
landscape architecture. So from this point, we're going to start talking
about design approach. Now that we understand
three planes of enclosure, we understand form composition. Now let's look at an approach that is
going to give us kind of a blueprint or a recipe for what might work in
any particular setting. And that's where we're
going to go next. Okay. I'll see you in Avent.
9. Introduction to Design Approach: So a quick recap. We've gone over the
planes of enclosure, and we've gone over
form composition. Now we want to take
these and come up with a recipe to where we can
approach any property, front yard or backyard and
develop a design that's going to be fluid and move
our clients or ourselves, our guests through the
spaces that we're designing. And this is referred to
as our design approach. And there's five basic design approach concepts
that we work with. One is arc and tangent, one is rectangular,
one is rectangular 45. One is radial, and the
last one is curvilinear. And because these
concepts can seem a bit restrictive at the beginning when you're first starting out, I'm going to take these
and break them down to five separate short lessons to kind of demonstrate
how these flow and how they work to a
greater degree. And then I can take and say, I'm going to have one design
approach in the front yard, say, a rectangular approach. But I can segue into
a rectangular 45, an arc and tangent or a radio, whatever in the backyard. But how I combine these forms, how I move these people down pathways and do my
form composition, and then segue into an individual design
approach is going to be key to how successful your garden
is going to be overall. So let's go ahead and we're just going to take these
one at a time and see what they have to say for themselves and
walk our way through it. So let's jump into
design approach, and I'll see you in
just a few moments. Let's take a short break.
10. Rectangular Design: Alright. In this lesson, we're going to take a look at rectangular design approach, and we're going to look at
three different designs. One is a conceptual plan that one of my students
did a number of years ago. Another one is a conceptual plan that I did and that was
subsequently built out. So we'll see the plan and then the actual
constructed garden. And then we're going
to take a look at an architectural plan that
is rectangular as well. So we'll walk our way
through all three of these, and let's just take
a look and see what rectangular design
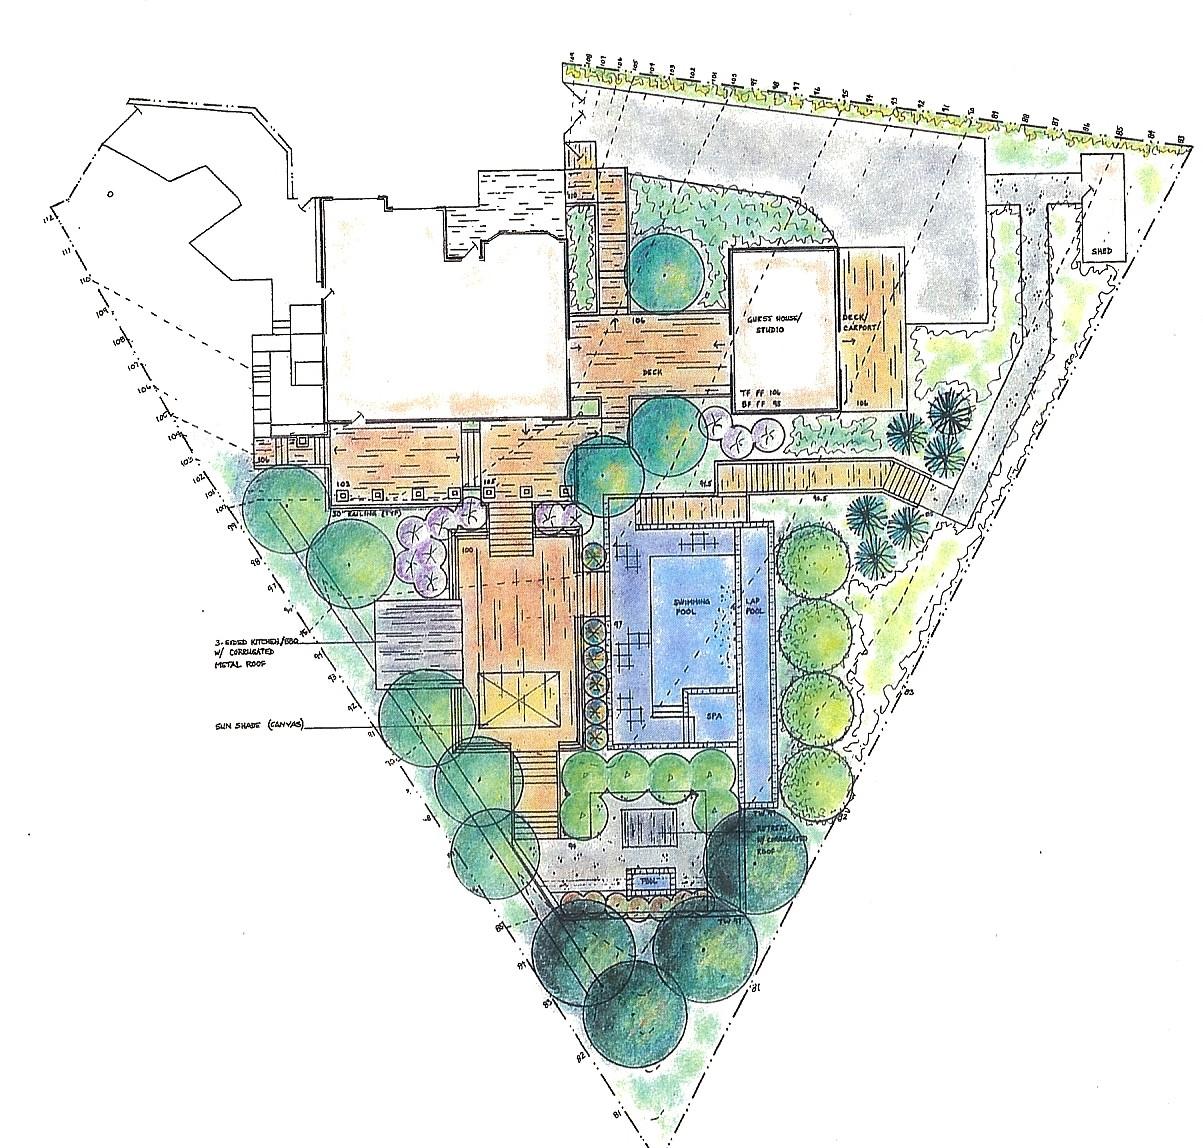
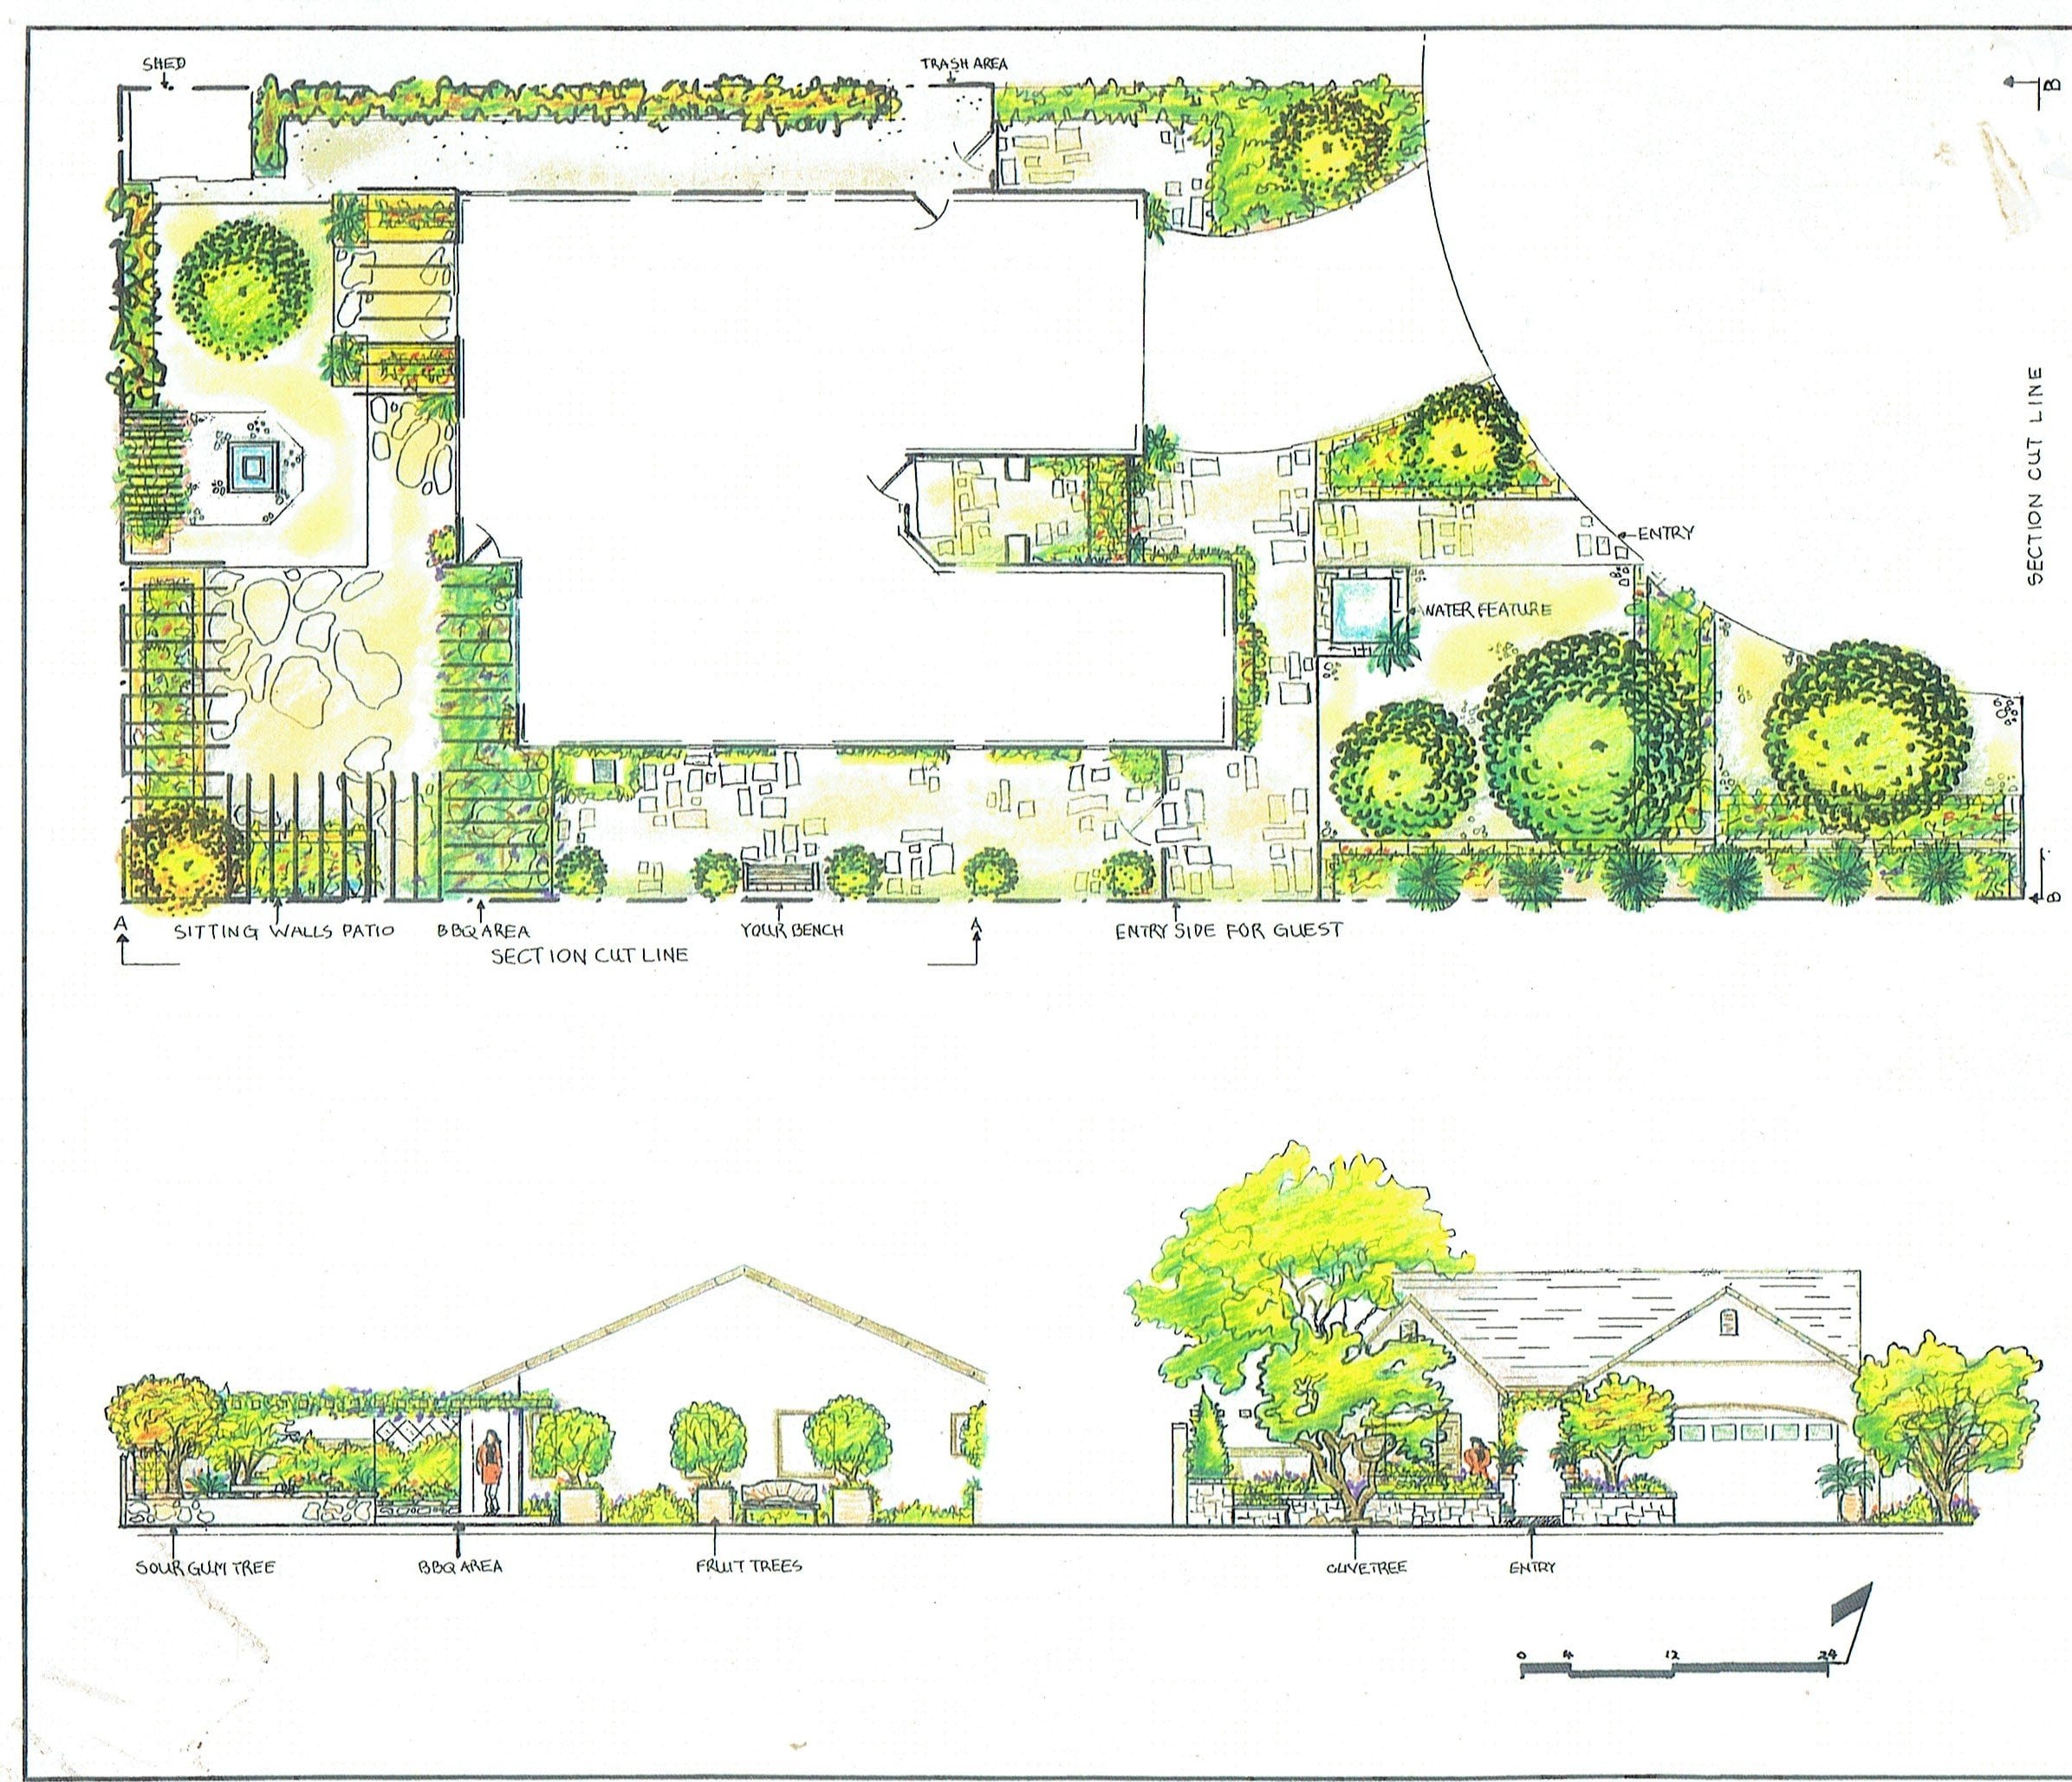
has to say for itself. So here is one more example of a rectangular design and a very odd shaped, pie
shaped property. And yet, when Kathy
did her design, we came out the back
door and everything is just basically squares
and rectangles. But all of the component parts, all of the form composition
flows together. You ignore the property lines when you're doing your design. You're radiating
from the house out. And where the
property lines don't necessarily match up with whatever design approach
you're working with, that's where
plantings come in to soften and blur those lines out. But you came down stairs
depicted, stairs depicted, swimming pool, lap pool, spa, eating area, another
little water feature. Conceptual plantings
just to give the client an idea of
what it could look like. At this point, none of these plants have
actually been selected, but the purpose of their being there screening, some screening, some shade factor,
some interest, all of this ties together. And again, this is
another design that was done by hand
and hand colored, and I think she did a
beautiful job with this. But a simple rectangular design where the plants blur
these straight lines. And yet you've got a lot of very usable space within
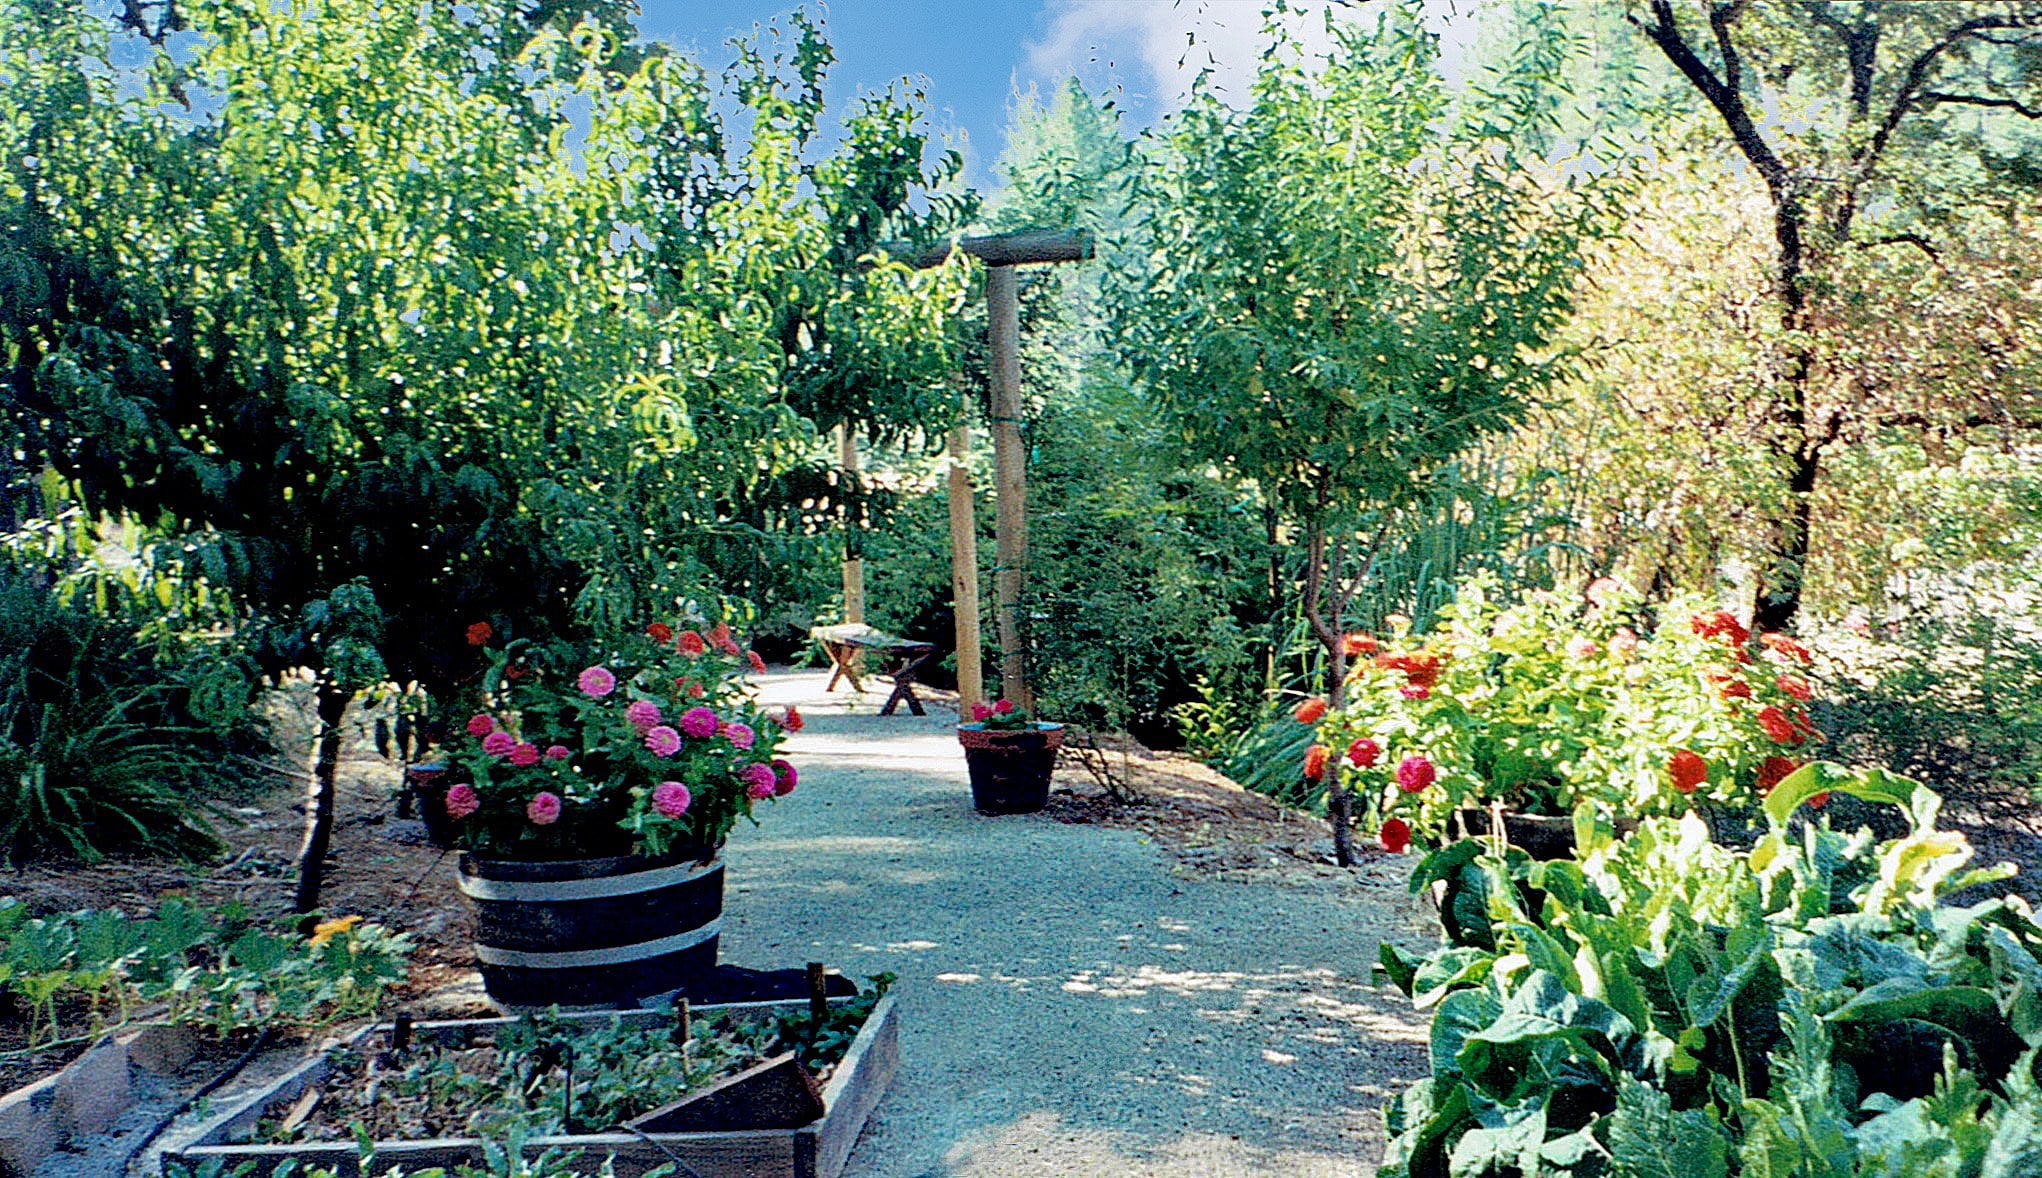
a project like this. Okay, so here is a
conceptual plan. I did a number of years
ago for some clients. This was on the east
side of the house, so it was protected from
the western summer sun. And originally, it was
just a Bermuda grass lawn, and they decided that
they wanted to have more functional area an area
where they could entertain, where they could sit outside in the afternoon and have some
protection from that hot sun. So I brought them in
from the driveway, and we had to step up at that point where
the entry arbor is. And as we came along with
this rectangular design, we stepped up one more time
because there was a number of steps coming into the
actual entry to the house, and I wanted to
soften that down. By the time I had
made two steps up, 26 inch steps, well, we had gained 12 " in elevation. So I was able to turn
them and drop them back down 12 " to the
sunken patio area, and we were really back
on original grade. So I set a fountain
at one end corner of the patio in order to give them a focal point as they
came into the property, and also added a patio
arbor to give them a little bit of shade and
just some vertical element and overhead element to it. And then we went
ahead and created some subspaces where
we stepped back up out of the sunken patio and came over to
a barbecue area. And then, again,
because we had already stepped up two steps, we were able to soften
the number of steps going into the entry
to the house itself. And this is what that simple rectangular design
ended up looking like. So a very nice, casual entry. We use natural stone
for the paving, and it picked up the colors
of the roof very nicely. And then as you go up that
first step that you can see, we were able to turn and drop back down into
the lower patio. And now those walls, because they come up 6
" above the walkway, and yet are 12 "
above the lower, we've got 18 inch high, you know, casual seating wall. So this one turned
out very nicely. Now, this is an
architectural design, another rectangular design. And this was done by
Frank Lloyd Wright. This is falling water in
Western Pennsylvania. And again, rectangular designs
do not have to be boring. And falling water is certainly anything
but a boring design. And when you see
it in plan view, it's like, Oh, okay, it's rectangular,
but when you see the actual built construction, then we've got something that is really quite spectacular
and how the house just kind of
cantilevers out over the creek and then
natural stone reinforcing the rural area that it is in and it's even
carried into the house as well with natural stone that flows right out onto
the outside balcony. So all of these are ways of working with rectangular design. And I just think
that whether it's in the garden or in
the architecture, rectangular design can
really be quite stunning. So to summarize
rectangular design, what we're doing is we're
creating spaces that either are perpendicular
or parallel to the house. Rectangular design does tend to reinforce the architecture
of the home overall. And as in any design, you want to create
dominant space. In the backyard, that could
be a recreation area. It could be the patio area, but you want to have
a dominant space within your composition. Then you can come in with the
vertical planes and start to create seating walls or other elements that are going
to be vertical in nature, that are going to help to create subspaces within
your composition, and you're going to
be able to help to create movement within
the design as well. So now we can have
dining over here, and entry over to
the recreation area or another part of
the yard over there, and you're moving
people and they don't really know they're being
moved in this sense, but they are and now you're going to come in with
the overhead plane and create shadow or transition between spaces and the
sense of an arbor, and all of this can
follow very, very well. But we've looked at
three different designs, and if it's done properly
and with some creativity, then rectangular
design, I think, is anything but boring. And I typically tend
to start all of my designs in rectangular
design approach initially. That kind of gets me
flowing with ideas, and then I can
manipulate or shift to a different design approach
if I feel it's warranted. So we're going to go ahead and take a look at another
design approach in the next lesson and work our way through
all five of these. Okay. I'll see you in a bit.
11. Rectangular 45 Design Approach: Okay, in the last lesson, we looked at rectangular design
and how it can apply to, you know, properties
that are odd shaped, properties that are
long and linear and basically mimic the
footprint of the house, and how it is used in
architectural design as well. So in this lesson, take a look at rectangular 45, where we're going to take
that same basic shape, the rectangular shape but
now we're going to turn it at a 45 degree angle
from the house and how that can
give the property or the design solution a little bit more
dynamics and interest. So let's take a look at
one of these designs. This is an example of a
rectangular 45 degree design. And in this one, I know we've looked at this before,
but my student, she brought us in on
the side of the house on just a straight
linear rectangular walk. But at the back of the house, she turned this to a 45 degree. So instead of just
coming straight in 90 degrees into
a square patio. She gave it a lot more
interest by coming in and turning it and coming
down this walkway here. Splitting this distance here
to create a wooden deck. So she's changed material. She's put an arbor
over the top of it to give more of a intimate
subspace to this. You turn and come back
into the patio area. She's got an arbor
across here where she actually has a
gate coming across. So she's made this little area a private patio off of
the master bedroom, and now she's got the main
courtyard area in tile, another arbor coming down. This is a 45 degree. So it's just taking this linear rectangular design
and tilting it 45 degrees, and it gives some more
dynamics and more interest, a bark floor, woodland
seating area, water, fire pit, barbecue area, and then of course, the graphics just showing some
conceptual plans. Again, this design is
all hand drawn and hand colored and
just the concepts of creating some privacy and
subspace and then back into a rectangular design
to come down this area, past the air conditioning and out into the
front yard again. So that's an example of
a rectangular 45 degree. So that's Rectangular 45. Again, it's a recipe. It gives you an idea of how you might want to move
people through a garden give it a little more interest potentially than
rectangular design, not always, but potentially, it helps to direct
focus or attention to one corner of the property or another in a
more dynamic way. And it's just another way
of being able to work with form composition to where we're keeping all
of the elements, all of our shapes
working together to be a cohesive whole and not
just kind of a mishmash of, Oh, I'm going to do this,
I'm going to do that. And then nothing
really ties together. And again, just like
in rectangular design, we come back with our
vertical elements, our overhead planes
to add more interest, create subspaces and get people interested
in going out and exploring the garden and using plant material to
soften the edges, to soften the straight
lines that are directing and moving
people through the garden. Okay, so that's Rectangular 45, and let's move on and take
a look at another one.
12. Arc and Tangent in Garden Design: Alright. In this lesson, we're going to look at what we call arc and tangent design. And just like in
rectangular design, and we went from rectangular, where it's parallel and perpendicular to the
home to the structure. And then we went with
a rectangular 45, which gives us the opportunity
to direct views to different portions
of the garden simply by turning that 45 degree angle, with arc and tangent, if you remember back
to form composition, one of the component parts of the circle is the tangent line, that straight line that comes effortlessly off of the arc, the circumference of our circle. So with arc and tangent, we're basically working
with a rectangular design. But instead of having a hard 90 degree turn
or a 45 degree angle, we're going to go
into the tangent of that circle and have a nice soft rounded turn to
what we're working with. So we're going to
look at a design, one that I did a
number of years ago when I was studying in England, and it's actually
a combination of our rectangular 45
and our con tangent. And I think this
will be a good one. It's simple, but it's going to illustrate how you can combine two different design
approach in the backyard in property and still have
all of your form composition, all of this work together appropriately and
flow very nicely. So let's just take a look and
I'll walk us through this. So here's a design
I did a few years. And this really combines a couple of different
design approach. We've got a rectangular 45
and an arc and tangent. So let's take this apart. Here's our 45 degree, and that's coming directly
off of the house. So there's your rectangular 45, the low wall giving it some definition from
the patio to the turf, the lawn area, and
this planting area. Then we're coming down
along this linear pathway, which is at a 45 degree
exit from the patio. It comes down, and the arc and tangent
gets picked up where the straight line of the pathway is the tangent that
swings into the arc, swings all the way around terminates in a water
fountain in a pool of water, and then you have bench seating
and some timber decking, which is a step up
from the patio, which again is laid
on a 45 degree angle. So you're picking up
this same pattern over at this end of the yard, and then the 45 degrees
is reinforced with this trellising and
even the shape of the planters as it intrudes into the turf area to help break up your view
a little bit there. So even though that was a fairly simple example of arc contangent and
rectangular 45, the key to it is when
you're working with a rectangular design and even
a rectangular 45 design, if you don't want
those harder angles of a 90 or 45 degree, then as long as you set
your compass and work with the actual tangent
lines off of circles, you can soften those turns down. You can soften the
composition in that way. And that can add some nicer, softer lines to it, which a lot of
clients like to have. And you can still blur your lines with your
plant material. When you have grasses
or other shrubbery, whatever cascading
along the pathway or along the edge of a patio, then those straight lines or even those curved lines
can become blurred, and it kind of gives a little extra movement to
visually that material, that paving material
that you're looking at. And it can create
visual movement, depending on how wide that path and how much the plant
material may encroach on one side as opposed
to the other to create this flowing movement
looking down a path. So even though you do still have strong structure and form
composition to your design, what you've done is
you've softened it down and created even
more visual interest. And remember, the
plant material, even though it may be low, it's still a vertical
element in the garden. So okay, so that gets us through our third design approach. So let's go ahead and
we're going to take a look at radial design approach
in the next lesson. Okay. I'll see you in a bit.
13. Radial Design: Okay, in this lesson, we're going to take a look at radial design approach or also known as concentric
circle design approach. And this is a method or an approach where if you have an irregular
shaped property, it's actually a really good
way to focus or manipulate the vision and focus of your clients or visitors
out into the garden. And we've looked at
a couple of these, but we're going to
take a closer look at them now and kind
of walk our way through it and just reinforce what radial
design approach is. And I particularly
really like this. But one aspect of
it is you've got to have a fair amount of room
for it to really take effect. So a fairly long yard and wide, even if it's an odd
shaped property line, you want to have enough
room to where the arcs and the enjoined circles and expansion of this
particular design approach can really come
into full fruition. Okay, let's take a
look at radial design. This is an example of a radial or concentric
circle design. One of my students
did a few years back for a project that we
were doing in class. And what she did was we've got the house depicted right here, and she established a
fire pit right here in the center and used that where the point of
her compass would be plopped into
her concept plan, and all of these different arcs that you're seeing
in this design, even the garden beds that are laid out over at this area here, all of these relate right back to the center
of this radial design. All of the walls, stairs, arbors, all of the elements, if the lines were extended, they would come right
back into the center, even along the garden edge here, right back to that
particular location. And that's the strength
of a radial design. It really helps to open things up because as
you look at this, the pathways get
broader as you go out. Here's a pathway
that swings around conceptual plan with trees
showing some ideas for shade. Arbor, another arbor
and sitting area. And even though the property itself is kind of an odd angle, the composition
holds together very, very well. It brings you out. You swing around on this arc, you radiate it out again. This would come right
back into the center right in here to this
dining area that she has. It comes around up an
arbor that's underneath this conceptual tree right
here in this corner. And the way she
layered her colors, this was all hand drawn. Then the arbor becomes
subservient to the tree, which is going over
the top of it, radiates back in and around. And at this point, she actually dropped more into a rectangular design just
because we were isolated now. But everything flows from the center out and
from the extremities, the areas back in. So this is an
excellent example of a radial or concentric
circle design. One more example of a
concentric circle design. This is what I did in
England about 30 years ago. And when I was
studying, and again, the existing birch tree became the focal point or the
center of my design. And all of these elements, the extended radius,
the arch circumference, the arbors going over a
pathway, seating areas, hedges, and all of these extended
radius would come right back to the center
of this circle right there at that birch tree,
and it radiates out. And by simply altering
where the hedges come in, you give interest and
movement to the garden. You come through, it
opens up comes across, I stopped at this point. Again, all hand drawn, but just a simple example of
a concentric circle design. And I've mentioned you
can have design approach. You can have two different
approach on the same property. And down in the front area, I actually used a rectangular
design because of the architecture of the home and the space, it
made more sense. So I did a rectangular design in the front swung around and came right into a concentric or radial design
in the backyard. So a very powerful
design approach, but it keeps my
form composition. It keeps all the elements of my design flowing and
working together. So we've had the opportunity to look at a couple of
different radial designs, one that I did in England
when I was studying, and one that one of my students did a few years ago, as well. And they both have
strong points. The student she did a
beautiful job on hers, and it really pulls you
out into the garden. And yet, because of
the form composition, it can still tie everything
together very, very strongly. So if you have the opportunity, if you have a large
enough property or you just want to give
it a shot, you know, whether you have a
central fountain in a courtyard or some kind of a piece of art that
you could use as a focal point at that very center of
this design approach, give it a try and see
what you come up with. It can be a lot of fun, and it can create
a lot of interest, particularly when you use
those planes of enclosure, and once you've established
that base plane, that circular concentric
circle design, then you can come back in with your vertical and
overhead planes to give more interest to your
design composition overall. Okay, that's number four, and we're going to go on
into curvilinear design, and we'll wrap up our five main design approaches
that we work with. Okay. I'll see you in a bit.
14. Curvilinear Design Approach: Okay, we're coming into our fifth and final
design approach that we typically use
in garden design. And this is curve linear or be considered
naturalistic design. And this is what most people enjoy trying
to draw and working with. And curvlinear design is a very natural
approach to landscape. You've got these sweeping
arcs and curves, moving people down pathways that are curving, and
all that is great. And doing the landscape in curve llinear is great, as well. But to be really effective, you've got to have
a fair amount of room to have these arcs
being really effective. So typically, I will start with a rectangular or
rectangular 45 design. I might do a radial design. I will do curve linear. But we're going to talk about something called
the rule of thirds, and we'll see an
example of that here in just a moment where
we're going to be working with different design
approach in the backyard. If we've got enough
room to do curvlinear, then we want to reinforce
the architecture of the home and then transition our way out
into the landscape. So with all that said, let's take a look at a couple of different designs that are
curvilinear in nature, but combine design approach, as far as rectangular
closer to the house to reinforce that layout
and that structure. So let's take a
quick look at this. So we looked at
this design earlier and we talked about how we had a rectangular
design approach, arc and tangent, rectangular 45, and then curve linear. Well, let's take a look
at another application of working curve linear
into a garden design. So in this one, again, we are reinforcing
the architecture of the house by having rectangular design approach
around the building itself. And then at this upper stone
terrace, we're coming out, and we're actually dropping into a radial design approach where we would have a center point
roughly right about here. And now we've got an
arc or a radius coming out the sides of the fountain and the stairway and even the stone landing
down here at the bottom, all of these lines would project directly back
to that center point. So that's where it's
concentric circle or radial design approach. So the curves start to soften the composition out.
We've got our landing. And now, this edge
of the landing becomes a tangent line
into this arc right here. And because the property is
deep enough and wide enough, we can come in and do a nice smooth arc to form a
curvlinear design approach. Component parts still
fitting together. We're still coming down, and the landing in front of the summer house
becomes a tangent. Now we can come across. We can come up on this tangent into the ark under
these proposed trees, and it swings around. And as we come off of
this arc right here, we're coming back
into a tangent line coming straight into this arc, which if this circle was
completed all the way around, the center point would be
somewhere right around in here, and now we've got a
tangent line that we could physically project
straight into this. So again, radius,
extended radius, arc tangent into
the component parts of all of the different
shapes we're working with. Again, we've got rectangular, radial and curvilinear
design approach within one property
because the property is large enough to segue from
the formality of the home to a softer approach to a very
soft naturalistic approach, we ignore the property
lines themselves, plantings, massed plantings, trees are going to
blur all of this. What we want to do is form a good solid design composition right here in the middle
of the property to where we have a good
solid garden design that we can plant out and have those plantings reinforce what our overall
design approach is. Okay, so that's pretty
much curvilinear right there. Well,
there we have it. That's the end of curvilinear, and we've looked at five different design
approach and how you can combine a different design approach
on the same property, even in the same backyard, as long as you pay attention to that form composition and how the component parts
of shapes relate to one another to
where you have a nice, flowing, cohesive
design solution. And once you get this
under your belt, then you're going to
be able to really move ahead with doing good
solid garden design. Now, there's some other
aspects of design that we're going to be touching on as we go on through the course. But for now, that
was design approach. And so thank you for watching, and we'll see you in a bit. Let's take a short break, and then we're going to move on.
15. Introduction to Design Principles: Well, we've covered
a lot of ground, and we've gone through
the component parts of our shapes that
we use in design. We've talked about
form composition, and we've gone through
the design approach that we typically get started with and how we can use
those in our garden designs. So now what we want
to do is come in with something that's
going to help to bind all of this together. And that's what we refer to
as our design principles. Our design principles
are defined by unity, order, and rhythm, and we're going to take a look at
each of these in turn. So that said, let's just go ahead and just
jump straight into it. And once we get this, then we're going to be
able to actually get started with how to
develop a conceptual plan. Okay, let's take
a look at unity.
16. Unity in Garden Design: Okay, we're going to start
talking design principles. And as I mentioned before, we have three basic
design principles that we're going
to be looking at, and those consist of unity, order, and rhythm, and how
they pertain to garden design. Now, in this lesson,
we're going to take a look at unity and to create unity and undivided
holistic effect to our garden, we're going to use
four subcategories to the unification process. And those four subcategories
consist of dominance. We want to create
a dominant area, a dominant theme in our garden. If we don't have dominance, the eye tends to wonder. And if you think
about going into an office space where everybody has a ten foot cubicle that they walk or that they work in
there is no dominance, and your eye just kind of tends to wonder as a result of that. So we want to create dominance within our composition
when we're first drawing out
our conceptual plan and working with our ideas. We also want to use repetition because as you repeat
elements in your design, then it tends to unify
visually your garden together. And we're going to be looking at some examples of this as well. Interconnection means,
rather than just having an element and an
element side by side, then we're going to
interconnect them. So kind of like interweaving
my fingers together, I'm going to take
the composition, and I'm going to blend
it together and overlap different portions of
my design composition together to create an
interconnected whole. And I would do the same in planting design where I'm
going to have plants that interconnect and flow
around each other to create a visually
pleasing composition. So dominance, repetition,
interconnection, and then we're going to
talk about the unity of three and how that pertains
to garden design as well. So for right now, let's
go ahead and take a look at some photographs to illustrate
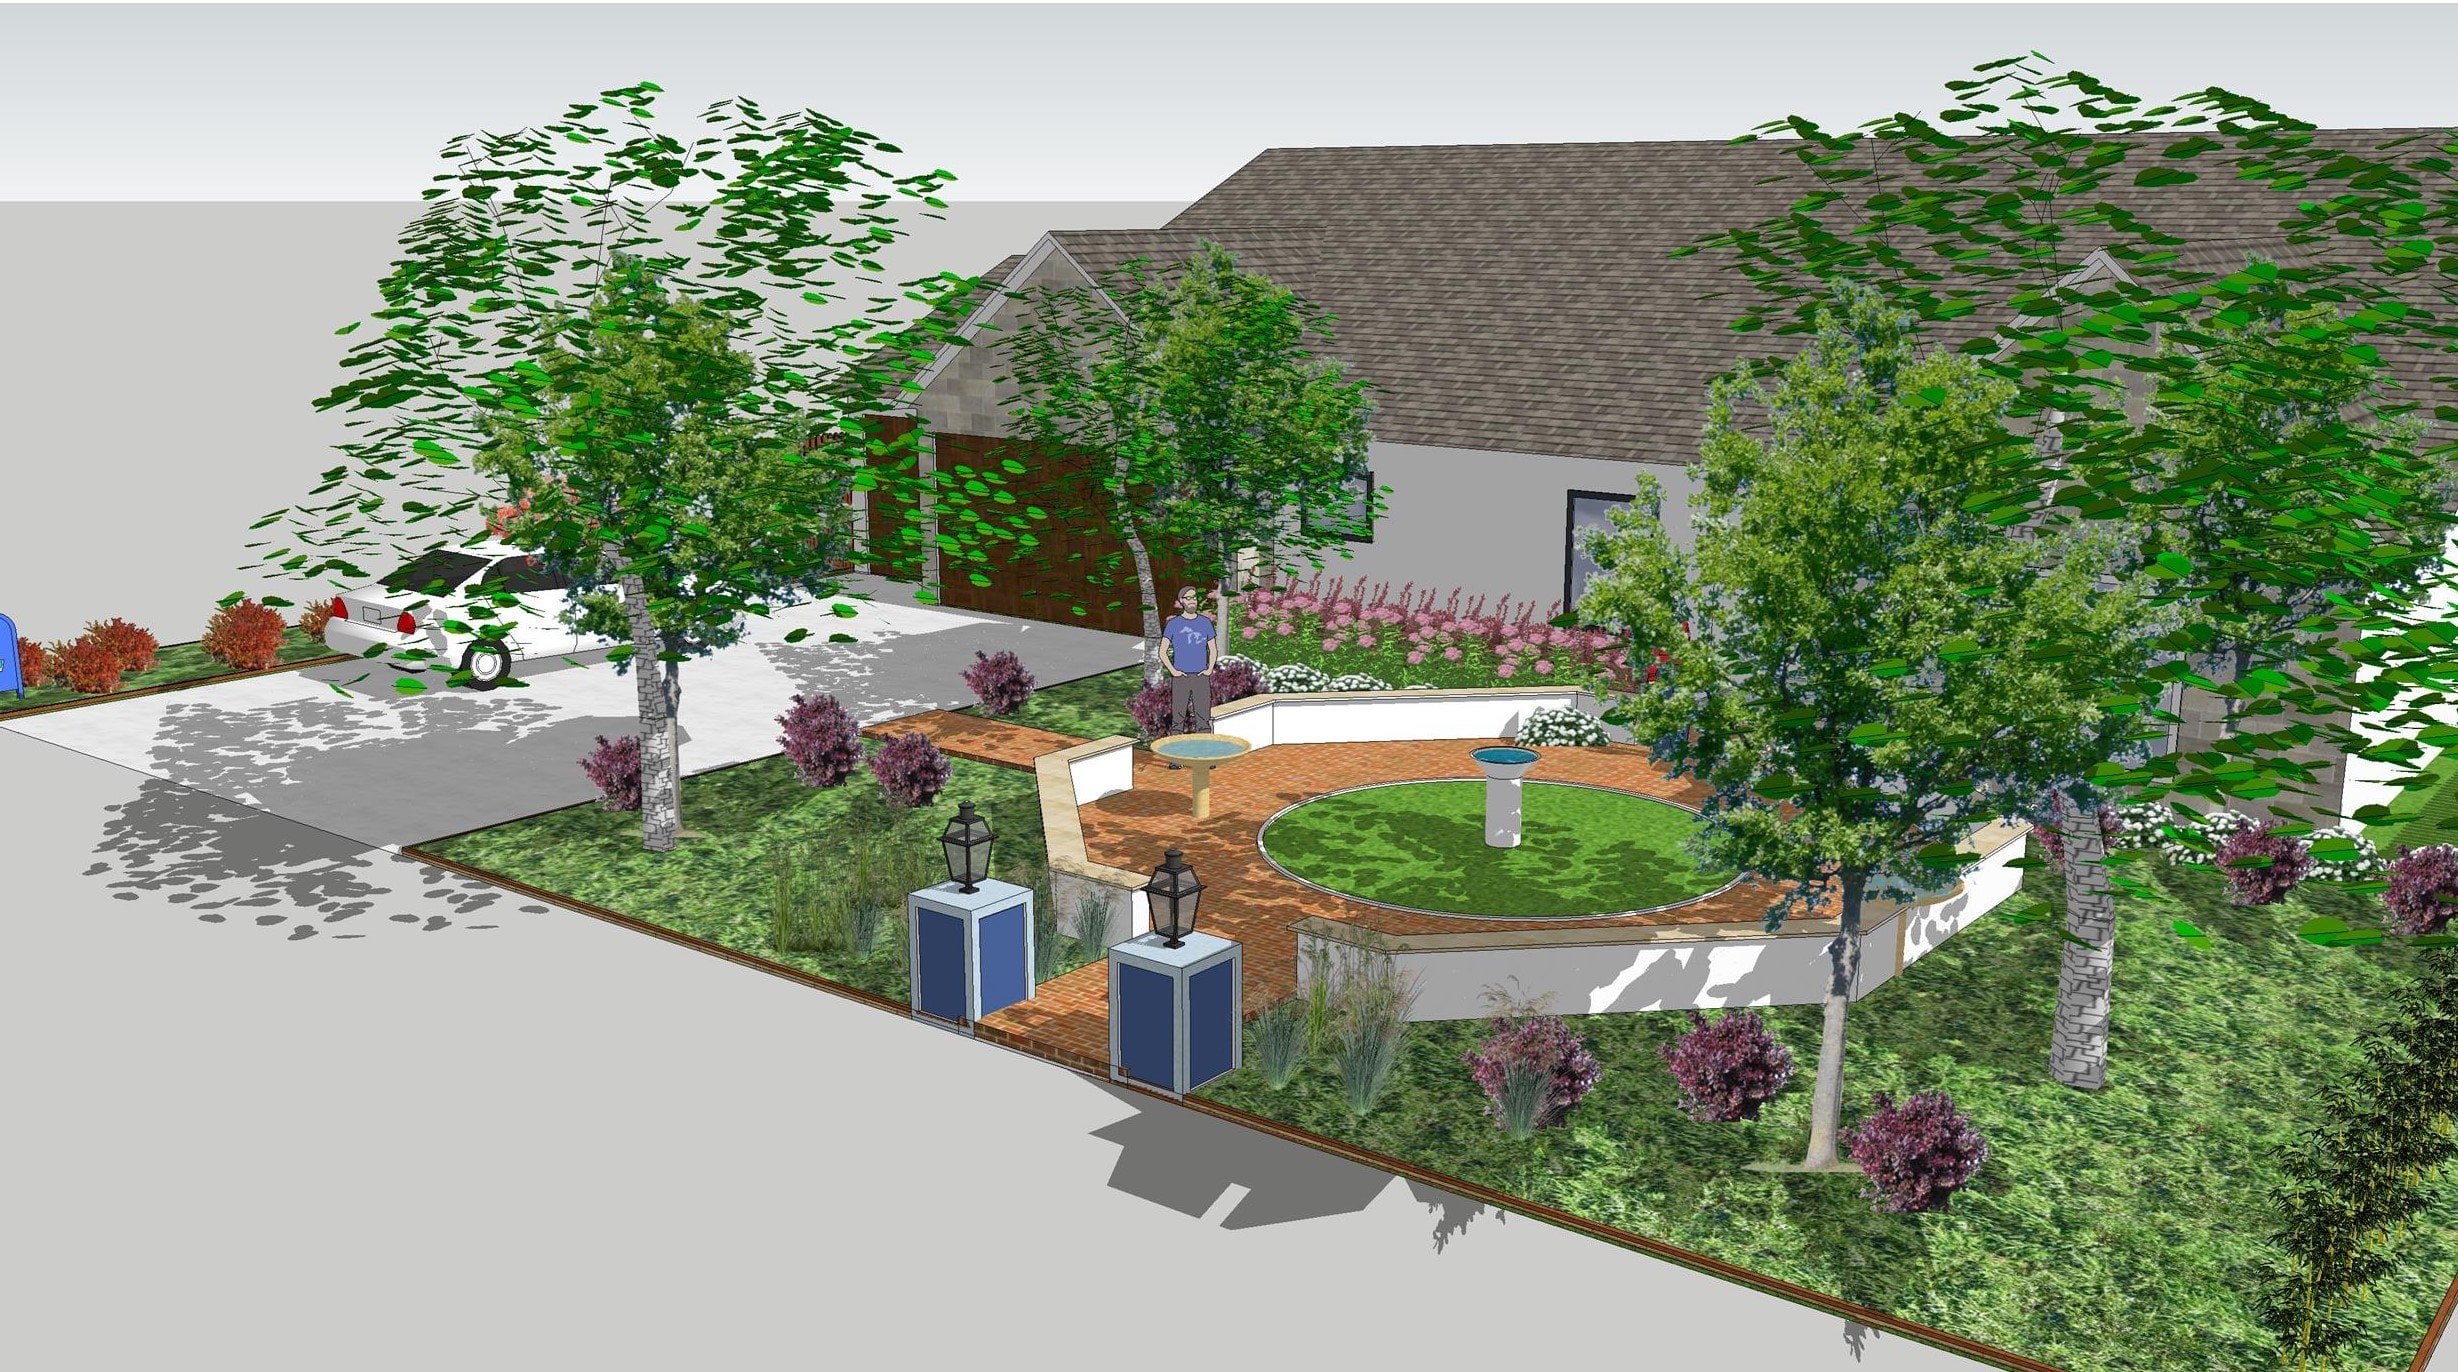
what I'm talking about. Okay, let's talk about
dominance in garden design. And in this instance, we want to establish a dominant space so the
eye doesn't wonder. We've come through an arbor
into the private garden. We've got the same stone
unifying the garden together. But the main pedestrian walkway brings you to the front door. And because we were
able to come up a step at the entry
and a step right here, we were able to drop
back down 12 " to create a sunken resting and seating area here in
this front garden. Plenty of room for a small
table and chairs for relaxing. So we have a dominant
space in this area here, but we also have a
dominant element in that we have a water feature, which when you come in off of the driveway becomes a
visual draw pulling you in. The colors of the walls pick
up the colors of the stone, as well as the colors
up into the roof tiles. So everything works
together to pull you in, keep the pedestrian
area away from the conversational and
relaxing area here. But we can do dominance
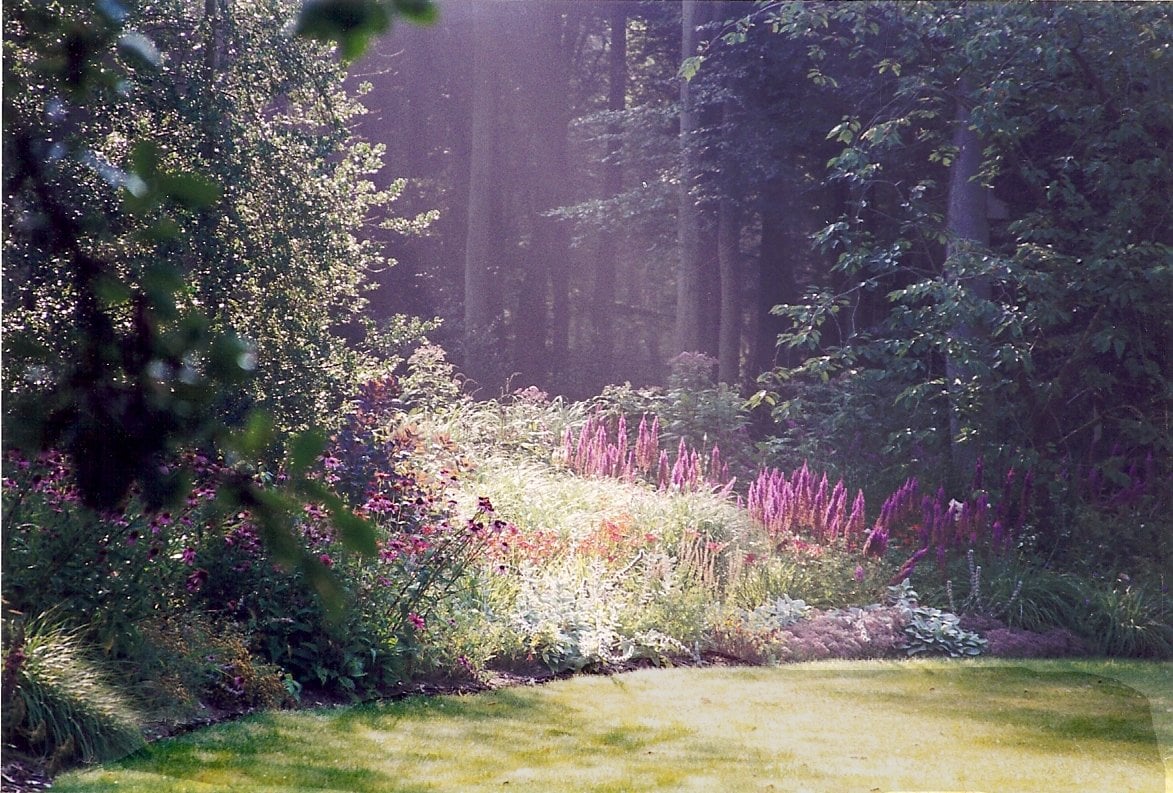
in other ways, and we can accomplish that
by having a large turf area, a large lawn area, which wrapping around with a
very naturalistic planting, we've got this
planted on a perm, so you've got a vertical
element happening, and the way the
lawn wraps around, it pulls you down
through this pathway, and it makes you want to go and explore and see
where it takes you. So let's take a quick
look at repetition. Repetition is simply repeating the same element or similar
elements in the garden. In this instance, it's lavender going down on each
side of the grass path. We have a symmetrical
design in that we have two Italian cypress at this location and then
trimmed boxwood on each side. And then the large hedge is a backdrop with an arch
pruned or carved out of it. And then as you
look down through, you've got pale yellow flowers
in this foliage down here, which are a nice complement to the purples of the lavender. So we've got repetition here, and we can achieve
repetition with urns and hardscape elements. So here we have urn and urn. We have urns on each side. We've got a water
rill running down, which leads to a pool down
here at the very bottom. And then the paving
material changes from a gravel or sand to stone to gravel and back to stone leading
to the entry to the home. Stone columns are
another great way of having not just repetition
and a structural element, but it also gives you a good strong vertical element and then a support for
the overhead plane, in this case, a rose arbor. One more look at
this composition, and we have repetition in the plant material where
we have Lamb's ear, the Stikes repeated
at this location, the day lies repeated
at this location. So visually, it draws
your eye all the way down right here to
where you want to exit. Interconnection and
interconnection is just taking our form composition and wrapping our shapes
around each other. So in this instance, the concrete stepping
stones come in, the deck wraps around them, and the boards are
laid at a 45 to give a more dramatic
and dynamic feel to it. So if we look at this
quick composition, this quick diagram on the left, the lawn area is not defined. The patio or the hardscape
areas are just floating. Nothing is interconnected. Nothing is tied together. But if we take those
same elements and simply put a border around
the turf area, then that starts to tie that
and give it definition. Now we can bring the
paved areas and connect them to the turf
area. This area. Now we can add a backdrop of some kind of a
screen or trellis, and then the plantings
are all interconnected. So you have a much
stronger composition than what we see on the left. So when we're talking
about the unity of three in garden design, what we're looking at is kind
of a practical application. So let's look at hardscape
materials. For an example. In my garden, I'm using no more than three different
hardscape materials. So in landscape
design composition, I'm not going to use more than three different
hardscape materials. Even if they're not side
by side or interconnected, if I have a large
enough property, I may go ahead and use
brick near the house. And then if I have
another location where I want a more permanent
setup and a solid floor, I could use brick again. I'm repeating that material
out into the garden, even if they're not visually
within sight of each other. I'm going to use
timber as an example. So brick and timber and maybe concrete or decomposed
granite or gravel. These would be the elements
that I would work with, but I don't want to keep adding more and disparate materials into my composition because I want to have that
sense of unification, that sense of unity, and I can achieve that by
limiting the amount of hardscape materials
and then create repetition by reusing them throughout the garden
as I deem necessary. Now, in some cases, if the garden is large enough, you could go to a
fourth material, but that fourth
material, in my mind, would be just natural surfacing, a dirt path, pine needles, maybe some brick or bark
chips that would be out. So that would
constitute potentially a fourth hard scape or
fourth flooring element. But each of these elements
is also going to give you an indication of the
space that you're within. Brick slightly more formal, maybe close to the house
or a more permanent area, say, a gazebo idea somewhere
out in the garden, timber a little less
formal but durable, and then bark chips or soil or pine needles or even
lawn is going to give a different feel to where
you're at within the garden. The same is going to be true
overall of planting design. And I don't mean
that we would limit our plants to just
three species, but I would group them
in odd numbers three, five, seven, that idea, because it becomes
more dynamic than just having an equal number of
plants, say on each side. The exception being,
if you want to reinforce movement
walking down a pathway, as we've seen with some of the hedges in the
earlier examples, the photos that we
were just looking at. And we're going to talk about
planting design principles in another lecture
later on in the course. So anyway, that's our first
design principle of unity, and now we're going
to go ahead and we'll take a break and then
we'll take a look at how we can achieve order
in our design composition. And that'll be our
second design principle. Okay. I'll see you in a bit.
17. Order in Garden Design: Okay, let's take a look at
our second design principle, which is order in garden design. And what we want to
do is order can be conceived as the underlying
framework of our design, and we want to create
visual order for ourselves, for whoever we're
designing the garden for. And we're going to
start, as always, designing on the base plane, and we're going to experiment with form composition
and design approach. As long as we hold to
these two principles, then it's going to create visual order on this base plane. We still want to have a
harmonious unification overall, so we're going to pay
attention to what we discussed under unity
as far as dominance, repetition, interconnection,
and that unity of three. To create order in our design, now we want to start looking at three other subcategories, and that's going to be
asymmetrical design, symmetrical design, and then mass collection or
mass plantings. And a lot of this symmetrical, asymmetrical and
mass collection. Will relate to planting
design, which, again, we're going to have a lesson on that further on in the course. But we're going to take
a look at a couple of different designs
and then a couple of photographs and just get a feel for how form composition and
design approach can work together and then
layer this up with mass collection and our symmetrical or
asymmetrical design solutions. Because these design principles are aesthetic guidelines
to make our gardens more approachable and of greater interest to ourselves and to whoever we're
designing the garden for. So let's go ahead and just
take a look at a couple of different designs that I think
will help to clarify this. Okay, let's take a look at a rectangular 45
design approach, and we've got a strong
architectural element here on the house itself with windows looking out
viewing into the garden. So the timber, brick and
stone terrace have all been designed to reflect the
architecture of the house. And as you come off of this formal brick
and stone terracing, you're coming down the steps and you're coming into
gravel pathways. And that's going to
have a direct influence on how you perceive that space. Gravel is going to
be much more casual, much more naturalistic, and
you can bring this around. And it doesn't
have to be gravel. It could be bare earth, it could be bark chips, it could be decomposed granite. But you've got a strong
form composition and a strong design approach that holds this
together visually. You have good, strong visual order by taking this approach. Now you're coming in with
conceptual plantings that will blur these straight lines and make it more
interesting overall. It brings you deeper
into the garden. You have an exit out of the
property to a utility area. You have hedging that helps
to screen some of this. But you turn the corner
and you come back underneath a graveled
area and where you can exit back into the lawn or turf area and you can exit and get back onto
the gravel area in here, where plantings are helping
to define the walking area. This is also an asymmetrical
planting design in that you've got
a large mass tree, a very large tree on this side, which visually is balanced by the plantings on this side of the composition and the
fact that we have a timber, arbor, or pergola over reaching
the pathway along here. Same idea. We've got
mass plantings here, and then another tree on this side with a seat underneath
it, and then plantings. So visually, it's in balance. The weight on this
side is balanced with the mass of
plantings on this side. So this is a good,
strong example of a rectangular 45
degree design approach with good visual order. In this example, we're taking
a look at a radial design, so it doesn't have any relation to the architecture of the home, but it does focus
your eye out into the lawn and you've got a
stepped lawn with brick. So you're coming out.
You've got brick edging. You've got some plantings
to help frame it. Everything in this composition radiates right
from the center of this circle out to
create the pergola, the arbors that are coming out over the top of
the timber decking. The timber decking comes
up, swings over radius, swings up extended radius, and then the circumference
coming around. So there's strong interconnection
between all of this. And even where you have a
summer house or pergola, the circumference
of this composition would go right through the center of this summer house to where these component parts
are all sticking together. And again, we have
asymmetrical planting design in this composition as well. So now let's take a look at a photograph of a
rectangular design approach. And in this one, we've got a very strong visual
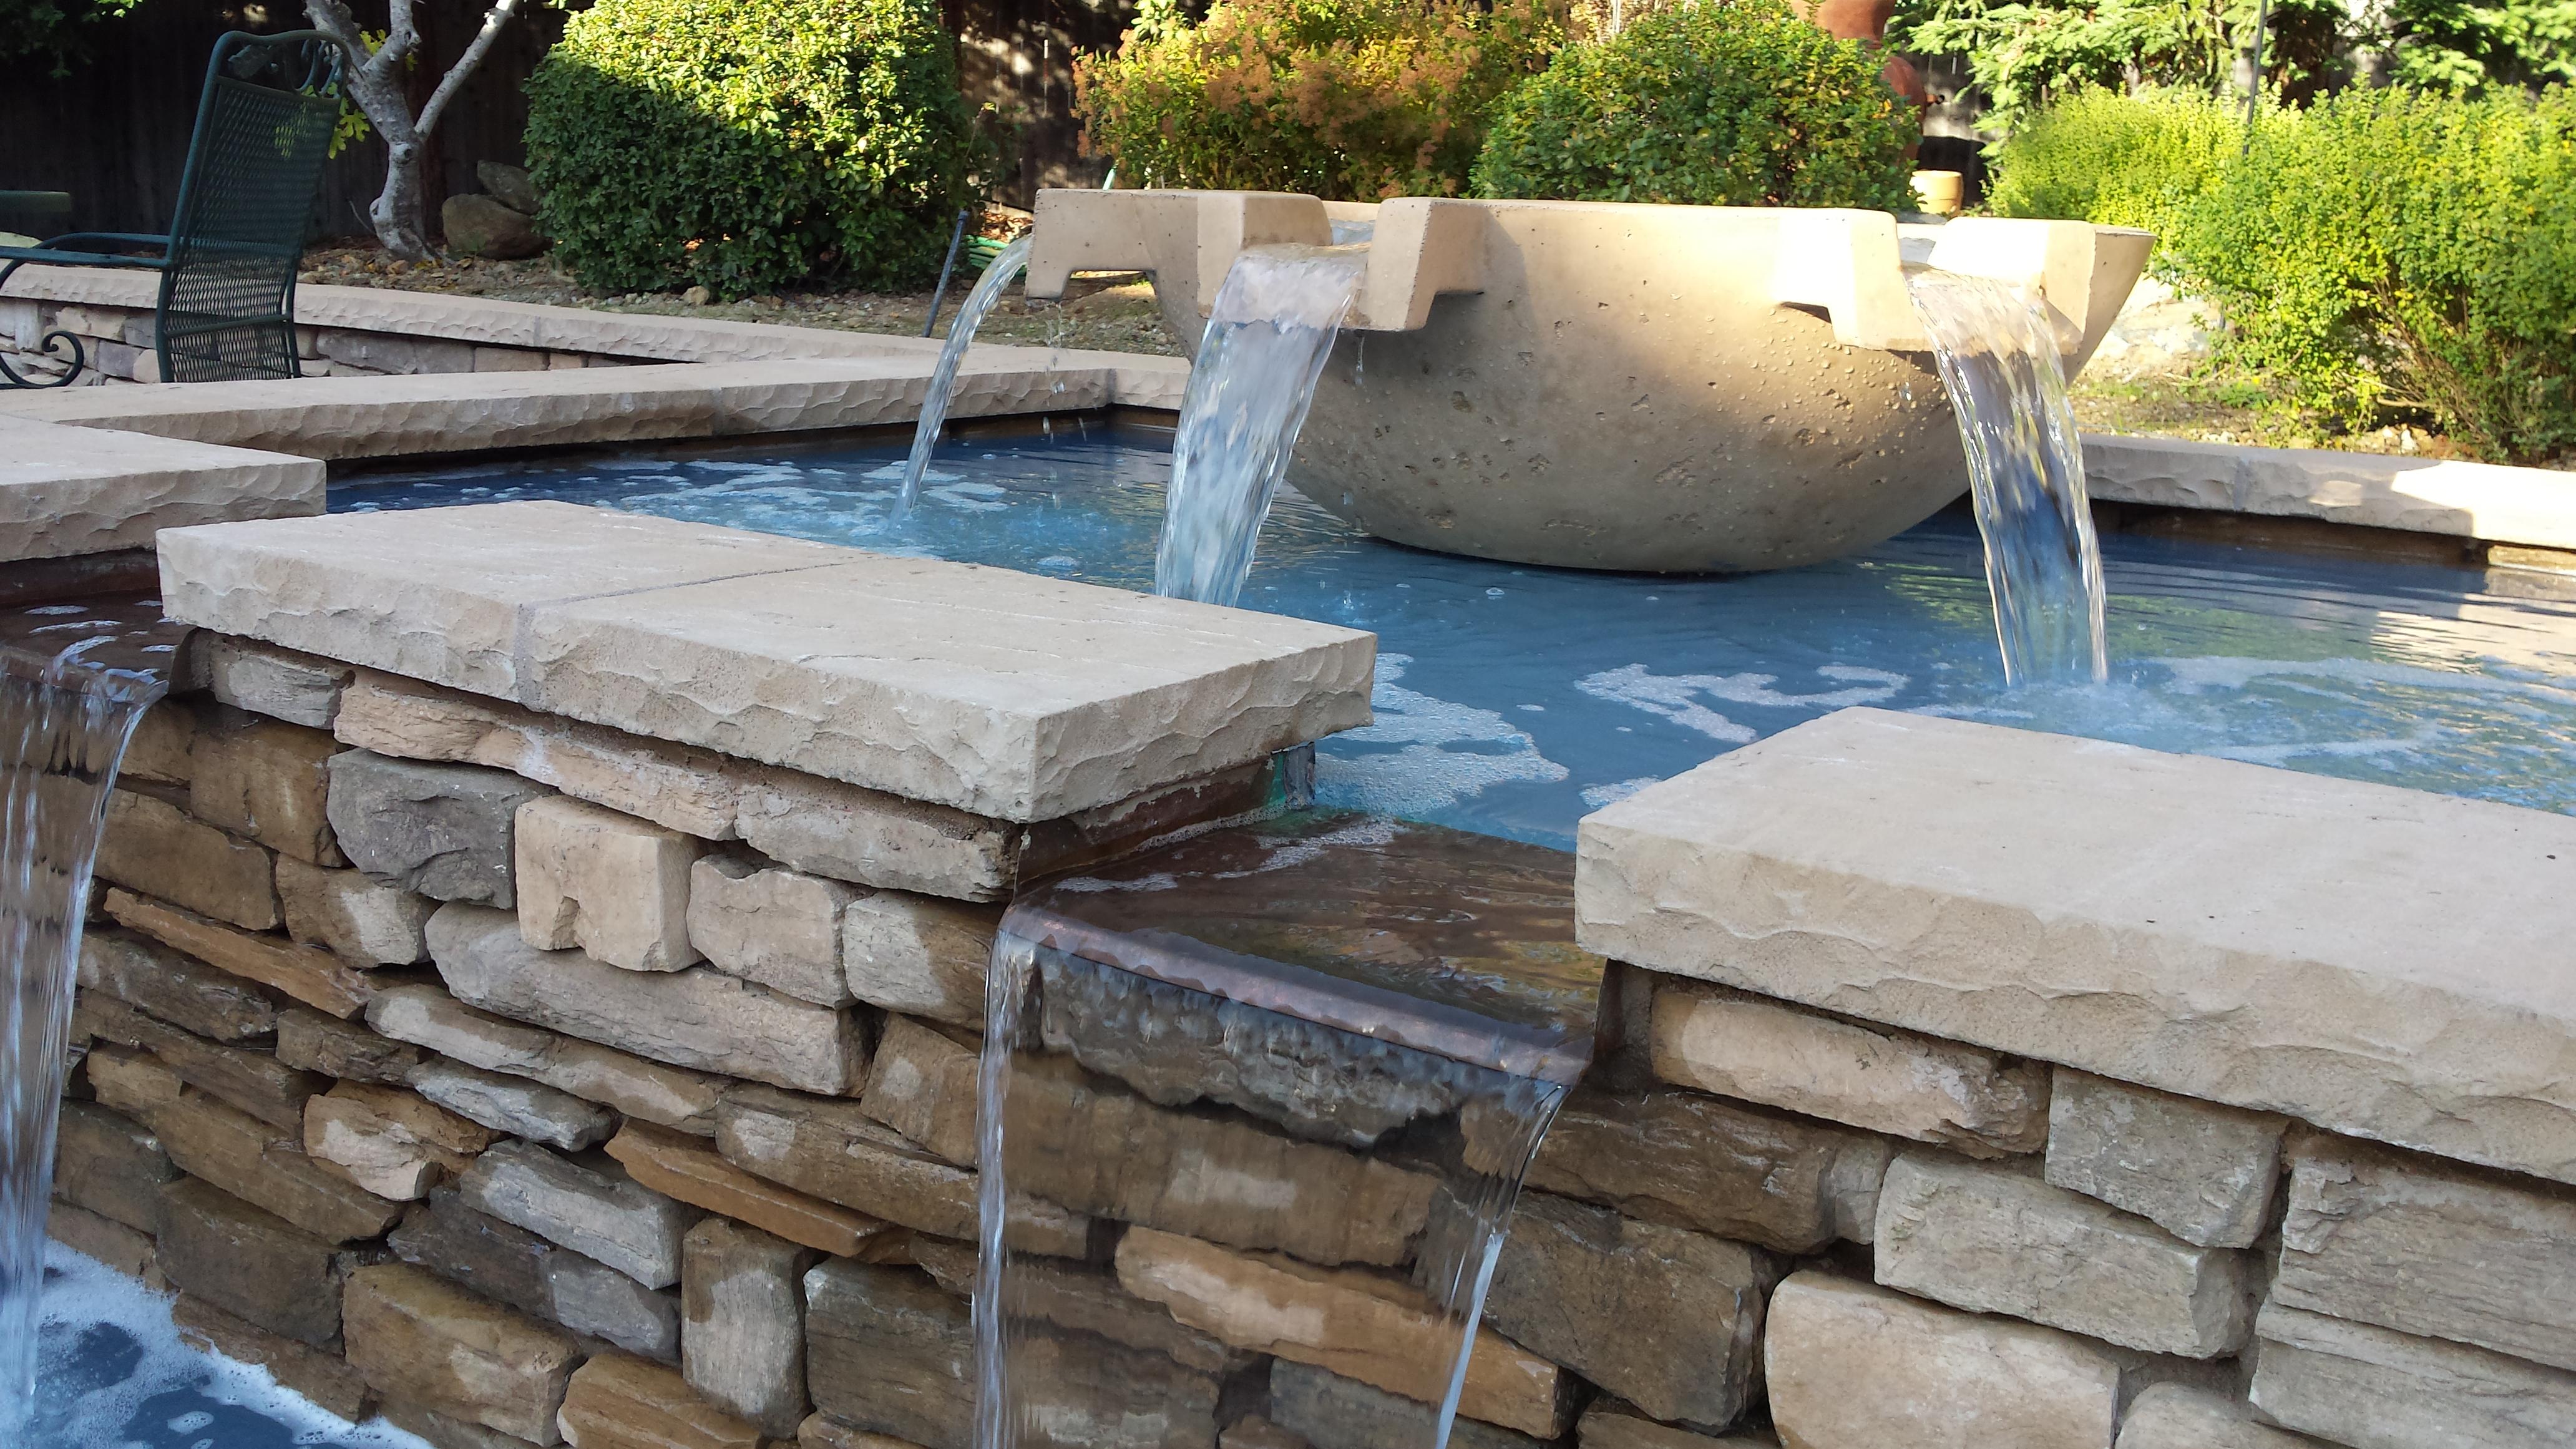
composition in visual order. Everything's tied together. Everything is interconnected.
Wrapping around. The bluestone flags are
laid at a 45 degree angle, but where the border is
and where the steps start, they go to a rectangular design. And visually, this
tells you there's something different
happening at this location. You've got the border
for the natural pool. You've got the border for the lap pool, the swimming pool. But you also have
change in elevation. So having a change of
pattern is going to be a visual clue that something is changing
as you drop down, then you go back
into the 45 degree. So you've got repetition from here to this surface, down here. You have mass plantings
of grasses on this side, where the color of the
grass is reflected by the color of the flowers at this location and then down
at this location as well. So you have repetition
in the plantings. And you have more mass
plantings along the edge of the pool reinforcing that linear lap pool effect
going all the way down, more yellow balancing out and giving balance to these
elements in the garden. So again, using a minimum
number of plants and repeating them helps to create visual order
in our garden. But what about a symmetrical
design solution? Well, in this one, we've got a perfect balance in what we have privet
hedge on this side, a privet hedge on this side. The stone or the brick
walkways are identical. They're mirrored on each side. The water real goes up through the middle and to
the fountain head, which where the water would
emanate from right here. And then we have Italian Cypress mirroring on each side
and framing the view, framing the view looking
up to the house, but also framing the
view from the house out, and the architecture
of the home is also in perfect symmetry. You've got dormers on this side, dormers on this side.
You've got a fireplace. There's another fireplace hidden by the cypress over here, and then the door, the entry
is right here in the middle. So everything is
right on this axis. So just some quick looks at different design approach,
different mass plantings, form composition, component parts all working
together to create order, visual order and asymmetrical
and symmetrical planting. Okay, so just some
quick examples of how you can
create visual order, keeping order in our
garden design compositions and how form composition and design approach really go
a long ways in creating that base plane visual order to our composition to
our design solution. Now we bring plants
in and use them to create more visual balance,
more visual order, as far as asymmetrical or
symmetrical garden design, you know, plantings, using mass plantings
to reinforce the linear aspects of the lap pool and minimizing
the number of plants. We're creating a garden and
not a botanical garden. So we want this to be as aesthetically
pleasing as possible. And again, repetition
will help to unify our composition,
creating dominance, whether it be in the lawn area and that rectangular
45 design that we saw the lap pool and the
photograph that we were looking at we're going to create dominance
within the garden. Then we're going to
create repetition to kind of keep all of our
elements fitting together, and then interconnection where everything wraps
around each other. And then finally in asymmetrical
design in particular, looking at that unity of odd numbers and
balancing it visually with the weight of the plants
and the different colors of plants are going to have
a visual weight to them. So a deep dark conifer or shrub is going to visually have more weight than of
lighter colored shrub. So we want to play
with these aspects. We'll discuss this more in the planting design
lesson coming up. So that's order
in garden design, and next we're going
to take a look at rhythm and how
that plays into this. So I'll see you in a bit.
18. Rhythm in Garden Design: So unity and order refer to the composition
of our design. Rhythm, on the other hand, is referring to time and
movement within the garden. When we enter a landscape, we're seeing it over a period of time and
at different views. These views are
seen in sequence, and mentally, we start
to form patterns. So as designers, we want to create patterns in
our gardens and our landscapes because then this is going to create rhythm. And we're going to do this using four different but related
visual pattern approaches. And those are repetition, alternation, inversion,
and gradation. So we've talked
about repetition a little bit in the
last two lectures. So repetition, again, is just taking an element
or a grouping of elements and repeating them in an obvious sequence that creates rhythm and continuity
within the garden. It can be done with
paving materials, say patterns in a brick walkway, and it's most commonly done
in planting design as well. So let's just take a look
at a couple of examples of what repetition can
achieve in garden design. So let's look at repetition
in planting design. And in this design, we've got stacks, the amsir
right here in the foreground, and we've repeated this on
down the line where you can see the gray plantings about two thirds the
way along this border. And this creates a visual unity. You see the repetition of the plant material
of the color, and you've got a
visual continuity and a visual unity
within this border. And it can also be used
in paving materials. And here's a combination of planting design and
paving selection. And in this one, of course,
the white flowering azaleas are receding into the distance as they get further from us, they tend to close in a little
bit more onto the pathway. This creates a bit of
tension and perspective, and then the running bond
pattern of the brick, that's a dynamic pattern, and it's repeated
all the way along, so now it becomes a visual stimulation and tends to move you down
through the garden as well. Whether it be paving
materials or plant materials, repetition can do
a wonderful job in creating movement
in the garden. So repetition is pretty
easy to envision and pretty easy to implement
into your garden design. So let's look at alternation because this is going to make
it a little more dynamic. And alternation is simply
taking that repeating pattern, but now we're going to
alternate patterns or sequences within that to
give it more interest. And it's going to be
a lot easier to show this to you than to try
to walk you through it. So let's look at some
examples that I've drawn up. This example, I've taken alternation and I've drawn three different diagrams
to explain this. In the top diagram, we have a rock wall, but I have alternated
rather than making it just a solid rock wall
with a brick cap, what I've suggested is a rock wall with iron
fence panels in between. We're alternating
these elements. It's still a repetitive pattern, but they're alternating between the rock and the iron panels. In the middle example, it's an example of alternation
with plant form. So whereas I might have a
pyramidal tree, say, a spruce, and then I'm going
to alternate and bring in some kind of
hedging material in between. So this could be on
a formal pathway or some other application. But I'm taking these
elements and I'm alternating between the
pyramidal of the tree form and the softer or maybe the clipped boxwood hedging and creating a
sequential pattern, a repetitive pattern,
and alternating. And finally, you can do the
same thing with colors. And if you're designing
a perennial border, then it's nice to be able to bring in a repetitive
fashion to it. And you can do this
with a triad of colors. And in this instance, I'm
using a triad of yellow, red and blue, and
then repeating it, yellow, red and blue. Species don't necessarily
have to be the same, but the colors create
that sequential pattern. The colors create the rhythm
that tends to make your eye or help your eye just skip
down along a perennial border. And then of course, in a
real perennial border, you would have different
plants in the background, maybe some deep greens
to set this off. But these colors are
going to be what move the eye down
along that border. And that's what I mean by using alternation to
create more interest in your garden design. So now let's take a look at
what inversion would entail. So now let's look at our
third way of creating rhythm, and that's using inversion. And inversion is
simply it's going to primarily be used in
hard scape materials, paving, such like that. But what we're doing is we're
starting with a pattern, and then say we have concrete
with a brick border to it, and then add an
obvious sequence, we're going to
invert that pattern. And instead of having
a brick border and a concrete interior, we might switch it and invert it to where it's a
brick interior and a concrete border around or any other combination
of materials. So I've drawn up a
quick example that we can take a look at
just to kind of give you an idea of
what inversion can do in your garden
design solution. So in this example of inversion, we have a stone walkway
coming into a house, and this stone walkway has a brick pattern around the edge or a brick
border on the edge of it, and then it's flanked with some boxwood hedging or some
kind of hedging material. So that's the walkway coming in. As you get to the
landing, the front porch, what inversion is stating
is that now instead of the stone being the main pathway and the brick being the edging, now the brick is the
main surface and the stone is now the edging or the border
all the way around. So I have taken these elements
and I have inverted them. I changed them out and
said, as you're coming in, you're on a stone
path and you step up onto the patio and
now on the patio, you are on a brick patio and there is a stone
border around it. So that's just a
simple explanation of what inversion is,
but it can be very, very effective if you're
bringing people down a walkway and then
you want them to get to a landing point, a standing point where they're
going to rest and wait to be accepted into the
house or a sitting area, something that tells them
that this space is different. So that's inversion. Let's look at gradation. So here are two
different examples of what I mean by gradation. One is using plant material and the other is architectural. And so in the upper drawing, I have a typical
planting scheme, and this is something
that you would be doing in your own
gardens or for a client, where you have the lower plant material in the foreground, and as you reced from the viewer towards the property line
or towards the fence line, then the plant material is going to get taller and taller to create this gradual climb
or gradation of height. This can be
accomplished as well by having earthen berms
that the plant material is planted on where
it would climb and then drop down on the
far side of the berm. In the lower drawing,
I have fence panels and the fence panels are
gradually getting higher from about a four foot
fence panel at the far left to approximately a
six or eight foot fence panel on the far right. I've also put a
little alternation into the fence panels in that they go from a horizontal to a 45 degree pattern
for the slats. Gradation in a profile view. In this example,
this is a design I did for some clients
a number of years ago, and this is a conceptual plan. But I had a rectangular
design approach right around the house there
at the bottom of the screen. And as you start to work
your way out and you can see this snake pattern pathway leading away from the house towards the top of the picture, and so it's dropped into
a curvilinear design. But as you follow this path out, it gets narrower and
narrower until you finally have that circular area with a fire pit at the very top. What I'm doing in this particular instance is from the scale of the drawing, the pathway is wide
enough as you leave the house for two people
to walk side by side. But as you get closer to the
circular area at the top, I narrowed it down and I did
this deliberately because I wanted the people to physically have to fall back
behind each other, they end up going in
single file and enter that rounded sitting
area individually. And I did that on
purpose because I wanted them to come
in and experience that particular
portion of the garden individually and then they can turn and talk to
each other about it. So there's four
different ways to create visual rhythm within
your garden design. Repetition, alternation, inversion, and
gradation and how you combine and interconnect
these principles to create this visual
rhythm or what going to give your garden design much more interest and much
more dynamic presentation. So create rhythm,
create movement, encourage people to go out into the garden
and explore it. Where does this path lead to? Gradation can hide
how a path swirls around to the backside of a perm or a different
part of the garden. Encourage people to move
out through there by using alternating
paving patterns, and then invert
that where you have a dynamic pattern going
down along a pathway. And when you get to a seating
area or a spot to rest, change it to a more
static pattern, invert that and
slow people down. Practice with this,
see what you can do in your own yard or on designs that you may
already be working with. But using these principles
are what going to make your designs or any designs
much more interesting, much more dynamic, and pull
people into the garden, which is what we want to do. So that pretty well wraps
up design principles. And so let's take a break, and I'll see you in
the next lecture.
19. Drawing to Scale Imperial: Okay, so let's talk about how to use and read the scale rule. And the scale rule
is just simply a way of taking real
world proportions of your property that
you're working on and shrinking it down proportionately to
where it will fit onto the size paper that
you're drawing your design on. Now, here in the States, we
use imperial measurements, meaning feet and inches. If you're using metric, then you're going to be
converting centimeters to meters. But the procedures
going to be the same. Now, if you're using
metric measurements, you may want to skip
this particular lesson altogether and just jump to the next one where
I talk about using the scale rule in metric values. So what we're going to do in this lesson is we're
going to talk about how to determine which scale value you're going to want to
use on your drawing. Now, here in the States, the most common is eighth
inch or quarter inch scale. Eighth inch scale simply means
that an eighth of an inch equals 1 ft or 1 "
equals eight feet. Quarter inch scale
is twice as big. So it just simply means a
quarter of an inch equals a foot or there are
four feet in an inch. So in this example, I'm going to be using
11 by 17 inch paper. But whether you're
using 11 by 17, 18 by 24 or 24 by 36, the procedure is going
to be the same to determine which scale
value you can use on the sheet of paper
based on the dimensions of the property and based on the size of the paper
that you're working with. Now, this assumes
that you've done a site survey or you
have been provided a plot site plan of
the property that may be dimensioned but
not drawn to scale. If you're not familiar with
how to do site surveys, then I'll have another class stand alone on how to
do the site surveys. So you may want to take a look at that when it comes available. So anyway, let's go ahead
and jump over to the board, and we'll take a look
at how to determine the scale value for your
project that you're going to need is to have your
site survey with all of your dimensions listed on it from when you're
out in the field. And so you're going to have
that as your reference point. Now, let's look at the paper. This is an 11 by 17, and 11 by 17 is the full dimension of the
paper from edge to edge, side to side and top to bottom. But if you look at this, I've got room in here
for a title block where I can fill in information on
my name for the designer, who designed it, or, um, who the client is, the date, and then a space for
the scale itself. And so because I've
got this title block, and I also have a
drawing border that goes all the way around
the edge of the paper, that means my actual drawing
area is not 11 by 17. It's going to be a
little bit smaller. And that's going to be true of your other paper sizes as well, 18 by 24 and 24 by 36. So if I want to know what my actual dimensions that
I can work within are, First off, I'm going to measure the inside of my drawing
area, border to border. And I've got an area
that's about 15.5 " side to side that
I can draw within. And from bottom to top, it's measuring 10.5 ". So if I take my
calculator and I just say 15.5 " times eight
feet to the inch gives me an area of 124 linear feet side to side that I could work with as far as a
property is concerned. And I'm just going
to write that down. And then top to bottom, it measured 10.5 ", and I'll take that
times eight because I'm speculating that
I'll be working at eighth inch scale
on this size paper. And that gives me a
value of 84 feet. So I could have at the
eighth inch scale, a property that measures 124 by 84 feet side to
side, top to bottom. But that would also take me directly to the edges
of my drawing border. And you never want to draw
directly to the edge. It doesn't look professional. You want to stay in at least about half an inch
all the way around. Well, on the eighth inch scale, half an inch is four feet because there's four
feet to the inch. So I'm actually going
to be down a little bit from that 124 by 84. And if I wanted to try to
use quarter inch scale, well, that's four
feet to the inch, so it's twice as big. And I'd simply take this 124
by 84 and divide it in half, and that would give me my value. And again, you do this with
all of your paper sizes. Now, if we come back
to our site survey, I can start adding up my linear measurements
all the way across, including this bit of decking
coming out here at the back and my measurements from the front of the house to
the back of the house. And once I know what my dimensions are for
the house property, and I already know I can have a property that can go up to about 116 feet because I'm going to stay in
from my drawing borders, then that'll tell me what size
scale is going to be most appropriate for this
particular drawing. And I'll use the calculator
again to add this up. But before we get
too far into that, I've got a 16 foot piece
of decking right here. And then from the deck over to the corner of the
stairs is 13 feet 10 ". The width of the stairs
is four feet 6 ". The width of this little bit of bay window is four feet 2 ". And rather than trying to add up all the feet
and then add up all the inches and
dividing by 12 to get the foot equivalent and coming
back and doing the math, I'm going to do a
simple conversion and convert these inch values, 10 ", 6 ", and so on, to a decimal value. So I've developed a
little chart here or put together a little chart that simply converts the inch value, 1 ", two inch, three inch, and so on into an
equivalent of feet. In short, I'm saying that
1 " is equal to 0.08 feet. 2 " is equal to 0.17 feet. And I've done this by
simply taking the part 1 " divided by the
whole 12 " in a foot, and that gives me a
decimal equivalent. So where I was mentioning that this bit of the bay
window was four feet 2 ", that would be the
same as 4.17 feet. 13 feet 10 " would
be 13.83 feet. And now I can do my
math really easily. And I'll just keeping that chart handy right there and
using my calculator. I've got 16 feet
for the decking. I've got 13 feet 10 ", so I've got 13.83 feet. Then I've got four feet 6 ". Well, that would be 4.5 feet. And then I've got
a 12 foot total. And you'll notice I'm not
stopping and picking up these different
running measurements of where the window
starts and stops. I just want to know what
my total dimensions are from the left side to the right hand side
of this property. Now I've got this bay
window coming out. And because these are on a 45, they're not going to give
me the full four feet 2 ", but they're going to
be about probably taking up about three feet of horizontal or linear
dimension right across here. But I know I have four feet 2 " at the front of the bay
window at this location, and 2 " is 0.17 feet. So I'll go ahead
and go 4.17 plus. And I'm just going to guestimate these are about three feet each. So three plus three plus now we're turning
and coming straight back. I'll ignore that. And
I'm coming out this way. I've got 1 ft 2 " or actually, I've got four feet 2 " all the way from the house
wall to the end here. So that's another 4.17 feet. And that gives me
a total dimension across the property of 60.67 feet or real close to 60 feet 8 " because 8 " is 0.66 feet. So I'm going to call it
60 1 ft side to side. And front to back, I can come back and do the
exact same thing again. I've got eight feet of a
dimension for this stairwell. And that stairwell is even with this corner.
And also here. So I've got 34 feet, 4 ", 4 " is 0.33 feet. So I'm going to go plus 34.33, and then my house kicks out three feet
right here at the back. So I'll add three feet in there, and that kicks out four feet, so that's three feet. That's four feet,
so I'm just going to add 1 ft onto that. And then these stairs right here are two feet, so two plus. So my total dimensions front to back of
the house come out to be 48.33 feet or 48 feet 4 ". So you see how
simple it is to be able to go back and forth with this conversion and switching your inches to a decimal factor. So those are the dimensions
that I have to work with. And I know that
quarter inch scale, I only have 84 feet on the eight inch scales
top to bottom. At quarter inch scale, that'd be 42 feet
border to border. So I'm going to have to use eighth inch scale for
this particular drawing. So that's how we've
determined how to choose the scale value, eighth inch or quarter inch
for the size of the property or the size and the size of the paper that
you're working on. So now that we can
determine that and know that our drawing is going to fit on
our sheet of paper, then we'll take a
look at actually plotting up a survey to walk us through that procedure in a couple of lessons from now, we're going to take
a look at the metric scale in the next one. Okay, thanks for watching, and let's take a break,
and I'll see you in a bit.
20. Drawing to Scale Metric: The metric rule is what probably most of the
world is using out there, and the most common scales on the metric rule
that we're going to be using in residential
garden design are the one to 50 or the one to 100. So what does that
mean? Well, when you're looking at your paper and you're looking at the rule, this is a ratio one
to 50 or one to 100. 1 centimeter on your paper, measuring the
length of a line on your paper is going to equal 50 centimeters or half a meter on the real world,
in the real world. So at the one to 50 scale, 1 centimeter on the paper equals 50 centimeters or half a meter
of real world measurement. So it would take 2
centimeters to equal 1 meter 2 centimeters
on your paper to equal 1 meter of real
world measurement. With the one to 100, it's twice as small. It's half the size, so it is going to be 1 centimeter on your
paper is going to be equal to 100 centimeters
or 1 meter on the ground. Now, typically, a property
of about 1,000 square meters or less is going to be a good size to use
a one to 50 ratio, a one to 50 scale. And I'm always drawing on a
24 by 36 inch sheet of paper, and that's going to be pretty
close to the equivalent of an A one sheet of paper
in metric sizing. So I can take 1,000
square meter property, and at a one to 50 scale, I can fit that onto my A one sheet and
have plenty of room to have any kind of
notes or plant legends or any other information I
may need to have on this. Now, a one to 100 is going to be more suitable at
the same sheet size, A one for larger properties, say about a quarter of
an acre to five acres, which would be the equivalent of about a tenth of
a hectar to what? Two hectars. And there's even
a one to 500 scale where 1 centimeter on the paper
is the equivalent of 500 centimeters on the
ground or 5 meters. So if you had a
very large property anywhere from two hectars
up to 40 hectars, then you're going to
want to use that, and that would be
more applicable for doing an overall site plan. And then for detailed drawing, you would take separate
sheets of paper and different views of your
property of your plan view, and you would use a one
to 50 or a one to 100 and blow that up to where you could get
more detail into it. So I have a drawing here on the board that I did a
few years ago in England, and it is in metric. And so let's take
a look at this. So here's this radial design that I did a number
of years ago, and this is an A
one sheet of paper. And in the real world, this property measures
side to side, about 39 meters by
about 39 meters. So I am using a
one to 100 scale. So at that, so I've
got one to 100. And if I tried to
use back up here, one to 100 on the scale, I can go up to 30
meters on this run. So I can measure up to
30 meters at one to 100. At one to 50, it's
twice as large. I can only measure 15 meters. If I tried to draw this
property at one to 50, it's too big a property. It wouldn't fit on
this sheet of paper. So one to 100 makes
that just right. Now, if I want to
know the length of this piece of brick along
this stretch of the driveway, I can take my one to 100 I'm going to set it
right there like that. And I'm going to measure 1
meter, two, three, four, five, and now I'm going to have increments of the meter
or the centimeters. So it's going to be
5.5, six, seven. It looks like about 5.8
meters for this stretch. So when I'm measuring the house, I'm using a metric rule, a metric tape measure. And I'm going to
measure the property just like I would in any
other normal situation. I'm going to write
those values down. The length of this
wall is 5 meters. The length of this next wall is 3.5 meters, whatever
it might be. And I'll make those
measurements. I'll record all of
that information. I'll come back in, like I said, I always work on an A
one equivalent sheet. So I'm going to determine based on the overall
dimensions of my property, what's going to fit easier, the one by 100 or the one to 50. And then I'm going
to select that, and I'm simply going to
do a direct read and use my triangle and my
parallel edge to create this house and then
triangulation using the same processes
we've been talking about to get this
information onto my paper.
21. Plotting Your Survey: Okay, so we have
looked at how to use the scale rule using imperial
values, feet and inches. We've looked at how to use the scale rule,
the metric scale, and we've seen how to determine what scale
you should use based on the size of your project
and the size of the paper that you're going
to be designing on that you'll be drawing on. So now in this short lesson, we're going to take a look
at how it'd get started on actually plotting
up a site survey. And we're going to use the
same survey that I used a couple of lessons
back and just walk our way through how to take a look at your actual
notes that you would have taken in the field and then
drawing it up on our paper. So anyway, that's where we're going
to go with this lesson, and it's going to
be pretty quick. It's just an example of
how I'd get started using my drafting equipment
and starting to draw up this design. So
let's take a quick look. So just a quick refresher. Remember that on
eighth inch scale, we're going to be
using this upper line, the smaller line of numbers. And we're always starting from the zero mark and reading
from left to right. So four feet, five, six, seven, eight feet or 1 ", and then so on up 12 feet, 16 feet and on. These larger numbers below, reading from right to left
in increasing value, 40, 42, and so on, those relate to
the quarter inch scale, which starts at the other
end of the scale rule. I just move this down. So the quarter inch scale. Here we're working from right to left with zero, two, four, six. And what you're going
to want to be aware of and careful of is when you are using
either of these scales, make sure that when
you read a value, you are indeed reading
either the eighth inch value all the way across or the quarter inch
all the way across. It's very easy to think you're reading 36 feet on the eighth inch scale because you've just made
a slight mistake. So just be aware of that. And now we're going to take
a look at actually starting to plot this survey
onto our paper. So here's my paper,
and I'm just going to bring my parallel edge up and I'm going to start my
line coming across. Then I'm going to take
my drafting triangle, and I'm going to do the
same thing again and draw a vertical line going up. These are my two lines
that are technically wild. Using my eighth inch scale and constantly referring
back to my site survey, I know that from the corner of my deck to the house is 16 feet. Well, the corner of
my deck is going to be right here
for my purposes, and I will measure 16 feet
on the eighth inch scale. And that puts me right here. And I can draw in another line to
represent the house wall. This is my deck area. This is the house here. Then I know that from the
corner of the house and where the deck meets
to the corner of my stairs is 13 feet 10 ". So remember, on the
eighth inch scale, each of these little individual
marks represents 2 " so that there's six marks
and there's 12 " and a foot. So I'm going to simply set this. I'm going to hold 13 foot
on this vertical line here. And I'm going to come
over to where my zero is, and then I'm going to go
in five little tick marks, and that's going to put me at
what would be 13 feet 10 ". That's where my stairs
are coming down. So I'll draw a wild
line coming down. And I just keep referring
back and forth. So my stairs are
four feet 6 " wide, and then I've got 12 feet to where the
bay window comes out. So I'm just going to
go ahead and measure four feet 6 " across the face. I'm not going to worry
about the length right now. It's 12 feet to where
the bay windows are. And then at that point, I've got this bay window coming out at a 45 degree
and wrapping around. So I'm just going to set
my triangle to where the 45 degree angle is
right at that little mark, and I'm going to
draw my line wild. That particular stretch of the bay window is four feet 2 ". So I'll go to four feet 2 ". Then I'll come back,
draw my horizontal. That also was four feet 2 ". I go to there, and then turning my triangle and keeping it
snug to my parallel edge, I'll roll this over. Bring it back. And
at that point, my house wall is going
back 34 feet 4 ". Well, I'll just come over, set this and run a
wild line going up. So that's just kind of a
quick overview on plotting up a typical site survey and
getting started with that. So anyway, that's it for this. And now I think
we're ready to go on to actually working
with a conceptual plan. Okay, thanks for watching. Let's take a break, and I'll
see you back here in a bit.
22. The Conceptual Plan Part One: Well, we've covered a lot
of ground up to this point, but we're finally to the
point where we're going to start looking at developing
the conceptual plan. So just a quick overview. The conceptual plan
is your ideas for how to develop the design solution
for any piece of property, whether it's your own place or that of a client or a friend. The idea of this is
to get ideas on paper that you can take to whoever you're presenting
this to and say, Here's my design solution. Here's the direction I'd
like to go with this. And at this point in time, we're putting plant
graphics into it, but we don't need
to know exactly which plant species
it's going to be. We want the client or our
friends or family to be able to buy into the overall
layout of the garden. And once that's established, then since we have done some
generic plant graphics, we know, Oh, I want to
have a tree over here, I want to have a mass
of shrubs over there. Okay, now we can
start thinking about what tree or shrub that is going to be once
this has been approved. But if you come in
and do a plan and take all the time to select all the different plants
right off the bat, and then show it to your
client or your family, whoever you're presenting to, and they say, Well, that's okay, but we
don't like the layout. We'd like to have
the patio over here, we'd like to have this expanded. Then all that work
that you put into selecting plants initially is going to be to a degree lost. It's better to do
it conceptually and present your ideas
and just run with it, and then we get more
specific as we go. So I'm just going
to show developing a conceptual plan very quickly, and because when I'm doing it, I'm just letting
my thoughts run, keeping form composition and design approach in mind
throughout the process. So let's just take
a quick look at how I would develop
a conceptual plan. So here's my site survey, and I got this by getting a floor plan from the
client and here's the main level floor plan that
was done by the architect. And even though it's not to
scale, it is dimensioned. I know that's probably
really difficult to see in this view, but it is dimensioned, so I could take those dimensions and then just transfer them to scale onto my drawing even though I was given
a dimensioned plan, I want to make sure that
that dimension plan was actually built
per the design. So when I'm out in the field
just doing a site survey, just kind of taking it in and assessing what the actual
site conditions are, then I'm going to
have an opportunity to pull a tape measure
and make sure that everything lines up and is indeed accurate
because you don't want to take a dimensioned plan and find out that
for whatever reason, the builder, whoever
did something and they expanded one wall
a little bit, who knows? It's just a good idea always confirm that what you
are given is correct. So anyway, that's what I did
with this particular design, with this particular property. So I want to do a
quick walk through. Course, here's the residence, and the thick black lines
are the house walls. I do this with a 1.4
millimeter technical pin. You could have used
or I could have used a fine point sharpie
that would've been fine. Of course, these little
blanks are my windows and the areas where you see the
Xs across are covered areas. This is the car port
and the driveway coming in or garage and
driveway coming in. This is a patio off
the side of the house, which in this instance
is the south side of the house and then the
front porch entry. I've got my doors
indicated on this plan. You can see there's a little
dashed line right here. Well, if this door could
rotate 360 degrees, then in essence, the door itself would
represent the radius of a circle and the hinges would be the center
of that circle. I want to get the
proper arc from my circle template and be able to use that to
develop this arc right here. If this is the radius of a circle and this is
eighth inch scale, and this doorway measures
three feet wide, the radius would be three
eighths of an inch, three feet eighth of
an inch to the foot. The diameter would
be six eighths, and that's what I
want to work with. Six eighths is three quarters. If I set this right here, you can see that if the door
could indeed go 360 degrees, that's what gives
me this proper arc right at this location. It was the same over here, and it was a smaller arc because this was a narrower
doorway right here. It was a little wood storage. So I just used a smaller
diameter arc to create those. But that's a nice reference
because it tells me which side the door is
hinged on, where the arc is. So if I was designing a patio or some kind of entry at
that door location, that wasn't there originally, then I would want
to know which side the door is hinged
on because that could have a play as far as the ergonomics of how I
bring people into the house. So that's why I always make note of where
the doors hinge and then show that little arc to where I can see the
swing of the door. So that's what we've
got going here. I do have a sliding glass
door at this location. I've got a little
double arrow right here to indicate the side
that you would walk in and out of and then
some rock walls that were existing stone
stairs coming down, more rock walls
that are existing. So that's the site plan
that I have to work with. These trees over at this
side were existing. So we've got all
of this in place. And now let's take a look
at some photographs of the property just
to kind of give you a visual of what I
was working with. And then I'm going to
take some trace paper. I'm going to throw it on
top of a site survey, and I'm going to start
working up some ideas. So here is the house itself, and it's definitely got
an architecture to it, kind of a rustic
ranch house style. They live on 40 acres
out in the country. They raise horses. So there's the front porch with that
side porch off to the left. And this is the
view looking from the front porch straight
out to the east. That green area is
part of their pasture, and that's their driveway
swinging around. So what we want to do is
frame this view and take advantage of that borrowed
scenery off in the distance. Here's the side of the house, and this is the wood box where I had those double
doors on the site plan, and it leads around
to the garage. Finally, here we have the
stone stairs going down, and these are all natural
stone from the property, dry stacked into place. So this is going to
play off of what we're going to want to do to
keep the flavor going. Just one more view of
some of the stone, and it's terraced, and we can
see that on the site plan. And finally, a little
bit of detail of the kind of elements that these
folks really want to see. So there we have the project. We've got a cabin architecture that evokes the Old
West, the clients. They have a 40 acre parcel. They have a vineyard.
They raise horses, and they just want to be able to frame that view out
to the east from the front of the house
where they can sit on that front porch
and enjoy the view. They want to have a lawn area, but they want to stay
with the colors and the natural surroundings
that they have bought into. So the goal is to come up with a conceptual plan and probably go through
a couple of them, but come up with a
plan that then can be evolved and finalized into an actual ink drawing
for the clients that I would take to them and
show them, Here's my ideas. Here's what I came up with.
What do you think of it? And now, at that point, it's a topic of discussion
and changes and modifications can be done with a minimum of input
from me initially. I haven't gone to the
planting plan stage. I just want to get the layout and walk them through
what my ideas are. Okay, thanks. And let's
have another break, and I'll see you in a bit.
23. Developing the Conceptual Plan Part Two: So we've had a chance to take a look at some
photographs of the site. So now I'm going to start
developing the conceptual plan. And when I'm doing this, I typically for my purposes, I'll start with a
rectangular design approach. I'm comfortable
working with that, and I can expand
off of that as I develop subsequent
plan solutions. And so that's how I
would get started. One thing I can suggest is
once you start drawing, I have trace paper
over my site plan. Once I start drawing, I'm going to be trying to keep that grease stick on my trace
paper as much as possible. I don't want to draw a
little bit, pick it up, stare at it, start drawing again, pick it
up and stare at it. I don't want to go into
that kind of an analysis. I want to work more on a I
guess I'll say a gut feel. And the more I can
keep that pencil on the trace paper
and just draw shapes, I will naturally tend to flow into good solid
form composition. And then once I finish that, I can throw in some
rough plant graphics. I want some shrubs
here, some trees there. Great. I'm done with that. I can look at it, rip that
piece of traced paper off, put a fresh sheet on, and then develop a second
conceptual plan and maybe refine what I've done or go in a slightly
different direction. I won't know until I get there. So that's how I
work on developing a conceptual plan for any kind of a project
that I'm working on. So let's just take a look at
how I would work this up. And right over in here is where that power box was that we could see in one of
the photographs. I know I need to
have access into the porch from the
driveway area, so I'm just going to
start drawing up. I want to have some access areas and then I'm going to come down and put down just shapes. I don't know where I'm going with this at this
particular moment, but I'm going to just
throw down some shapes. I know they want to have
some access coming into the wood box off of the driveway and I've
got access there. I want to frame
this view out here. Well, I think since
there's land falling out, I'm going to start
thinking about maybe a retaining wall.
I'm going to do that. I'm going to come in
and I am going to throw a couple of trees to where I can see between
them out to that view, but I'm going to build
this up maybe because I'm always a fan of arbors, I could do an arbor idea to
where I've got that access. Now maybe this becomes a
set of stairs coming down. That leaves that open, but I could do some
plantings in here. I think that bringing this up, getting these arbors going, I think I can skip
that power box is more over to this side
if I remember right. This is going to
be lawn in here. I'm going to have
some focal points. I'm going to just do
some shrubs coming out, some shrubs coming over. I think I'll bring the lawn
all the way over into here, here's that side porch. I'm going to make
this an herb bed. Now we've got some
plantings in here, maybe some trees to shade the entry coming in and just frame this and soften
this side down. I'm not going to
worry about that. I am going to expand
and put an arbor. This is the kitchen
window right here. So I'm going to put an
arbor coming out that could have some vines on it
to help just soften this, and that can just be graveled or decomposed, granted
underneath there, just so that they've
got some access around to the garage. Okay, so there's concept
plan number one. Is it any good? It's okay. But, you know, that's the whole idea is you're not going to know until
you get started, and you're probably not
going to come up with the solution that you're
going to be really happy with on the
very first try, especially when you're
first starting out doing landscape
design, garden design. So now I'm going to go ahead
and in the next lesson, we're going to rip this
sheet of paper off, and I'm going to start another
concept plan and just kind of refine and work up ideas based on the one
that I've just done. So let's take a short break, and I'll see you in a bit. I
24. Developing the Conceptual Plan Part Three: Okay, so we've done
concept plan number one, but I want to refine this. So I'm going to move ahead, and we're going to take
this sheet off the paper, this trace paper off. And let's work up another idea, but kind of expand on the general concept
of where I started. So I'm just going to
take this one off. There's some ideas to it, and I'll set it off to the side. Pull another sheet
of trace paper, set it down here. And I'm going to adjust my camera again
just a little bit. So now I know I like
this rectangular idea, but I'm going to keep my
walkway coming in off of this. I'm also going to keep a walkway coming in to the wood box. But I think I want to make sure that you can go either
direction if necessary. I'm going to put some
plantings, there. I like my tree idea there with
some shrubs underneath it. Now I'm just going to go
ahead and push this out. Since this curves
around a little bit, I'm going to throw
some 45 into this. And bring this back up. I want to have access across here because I realized
that there isn't any, so I'm just going to throw
an idea like that in. That gives me a place
for a plant in there. I still like the idea of having some kind of a retaining wall swinging around at some point, framing this with a couple of large trees and I'm
going to go ahead. With this idea with the arbor, where I can get some
plants growing on that, now I think that in hindsight, because they may not
have enough stone, and I don't think they do. So I'm just going to throw a split rail fence down to where this little bit of
stone wall can be. That will give that
sense of enclosure, and then the split rail
fence is going to fit in with that kind of rustic
Old West style of the home. And this can still be
lawn and this can be flowers and shrubs and
the same thing over here. And I think I'm going to do and I'm going to
put stairway coming down here and
stairway coming down here from under the arbor so that I can leave this
a little bit taller. And have some plantings in here. Here's those existing plants. This is still good. I still like the idea of the
arbor over here. I still like the idea of the
herb beds right in here. So I'm going to stick with that. So I'm refining my
idea a little bit. And now I'm going
to throw that away, spit this down and
I'm going to again, I know I want to keep
this access here, and I know I want to keep
access to the wood box so they can pull up with a tractor
or whatever and load that and then have
access back and forth. This area, I'm set with that, I'm happy with that idea on this I like that idea of the
45 degree coming around, and then I think I'm just
going to stick with this, but I'm going to
throw a 45 in here. Keep some plantings,
keep this as lawn. I did like the idea of the arbor but I think I'm
going to expand this idea over and pick up the flavor of the front porch and
put some stone out here where you
could actually have a bench seat
underneath the arbor, in case you wanted to be
out at this location, you could even have the
bench seats turned to where you could look out
in this location. I'm going to think about
where I have stairs. I don't think I'd want
to come all the way out to walk down to
get to the barns. I'm going to come over,
and I'm going to create an access point coming down with stone steps at this
location to get down the hill and then a
path that'll lead on down to the barn. At that point, I'm going
to go ahead and stick below stone wall swing around. And then the split rail fence
idea coming along here, shrubs and flowers around here, maybe something a little taller to help
punctuate and keep this view open and then go ahead and stick with
my idea of the trees, and I'll center all of this a little bit better off
of the front where they can look out this window or this window and see what
they're looking at. Okay, so that's it. That was my second concept plan, and I'm happy with this. I think I've got some good, strong bones to this
design solution. So this is the one I'm going
to go ahead and finalize. And that's where
I can take this. And the next lesson, we're going to go ahead and get a polished, more finalized design solution
concept plan inked up, and it would be something that I would be able to
show to a client. And it's literally
moving that fast. I'm just getting these shapes
down and working them up, and it becomes an intuitive
feel if it's going to work for you or not and
for your client, as well. But this is how I
think is a good, strong way to get going on this. So let's go ahead and finalize this concept plan and make it actually
look like something.
25. The Final Concept Plan: So in the last lesson, I came up with what I'm going to develop into my
final concept plan. So at this point, I have taken the
free hand drawing, and I've gone ahead and
used my parallel edge, by drafting triangle,
all of this, to be able to actually
draft up and develop a plan that is to scale for
the client's presentation. I've put together
plant graphics. I'm going to have all of that. So now I'm going to ink the
plan because by inking it, it's going to give it a
much bolder appearance, and it's going to preserve it. It's going to be permanent. So let's walk our
way through this and we'll just get this final
concept plan drafted up. M So there's my final
conceptual plan. But the whole thing is, this is a discussion document. I can now take something that
I feel comfortable with, take it to my client, my friends, whoever
I'm presenting to. And I can say, Here's
what I've come up with. Here's why I have
trees located at these locations to
help frame the view. This is why I have plantings
of various heights at these different locations
to help control traffic, to frame views again, to add interest, color, fragrance, whatever it might be. Have arbors down here to
create shade and once again, reinforce how I want
people to view the garden. This is a discussion document. If they come back
and say, It's great. We like all of this, but what trees have you
picked out? I don't know. I just know I have
a rough idea of the size and mass of the tree. Now when I go to select
the actual species, I have narrowed this down a long ways instead of a giant plant palate
to choose from. I know I want to have a
tree that's this diameter, this tall, these ideas. I've refined this down
without being specific. Same idea with any kind of perennials or
herbaceous borders, the same idea with
any taller shrubs, even what kind of vines I may have on arbors if I go that way. It's a conceptual document, a conceptual plan that you can take and say,
Here's where I want to go. Now you get feedback. Now you can make changes with a minimum of effort to get honed in and polished and then come back and do an actual
planting plan. Now, we're not doing
that in this course, but we are going to go through the basics of
planting design and how plants reinforce what our
design solutions should be. So, Okay, that's it for now. And so one more break here, and I'll see you in a bit.
26. Coloring the Concept Plan: Okay, we've inked in
our final concept plan, and we're ready to
show it to the client, right? Well, not really. Because to make this really pop and get your
clients involved, the best thing you can do
is color in your plan. Now, I've drawn this on a
24 36 inch sheet of paper. That's a pretty big
sheet of paper. You don't want to color in a sheet that size.
It takes too long. You're going to use a lot
of material to do that. What you want to do is
you're going to take this 24 by 36 inch
sheet of paper. You're going to go to your local copy shop or print center, and you're going to have it
reduced down to an 11 by 17, which, in metric would be what? The equivalent of an
A four or A three. So but you want to
reduce it down, now you've got something
that's a lot faster to color. And if you're going
to do trade shows, any kind of marketing, you've got something
that you can put up on a display board to show people what you're
capable of doing. So right now, here is one of my students hand drawings
of one of her designs, and it was done on copy
paper at 11 by 17, which is just plain bond paper. But then once that's colored, you can take it down and have the copy shop do it
on glossy card stock. So if you look at this, you'll probably see there's
a little bit of sheen to it. That sheen that
glossiness helps to pop these colors off of the
paper much more effectively. So we're going to work
in that direction. And when I'm working, I'm just using I'm
using prisma color, and this is a 60 pencil set. I don't use quarter of those, so you don't need
a set this large, and really any colored
pencil will do just fine. And then I also use
soft chalk pastels, and I use those for
the larger areas, and I'll demonstrate
that here in a moment. So again, I'm just using
a small selection of the colors out of
my colored pencils and of the colored pastels, the chalk pastels, as well. So I'm not using
a huge selection. I'm narrowing this down, and I'm layering colors together to get
different effects. So out of the prismic colors, the ones that I use the
most often are going to be a various
assortment of greens, and that just kind of it's whatever I see fit to,
greens are important, and then I'm going to be
using poppy red, an orange, a purple, a true blue, and finally a canary yellow, a nice clean, bright yellow. Now, when I'm coloring,
I don't want to have a real sharp point on my pencil. That's going to
leave too much of a real strong line to it. I want it to be softer. So what I want to
do is I want to chisel the point
down to where I have a broader flat surface when I'm actually doing
my color rendering. When I want to color, I want to have, again, kind of a chisel point. So I'm going to take my pencil and I'm literally just going to fairly hard color that until I get a blunt broad point to this. Then when I start to color, all of my coloring is done as a downward stroke of my pencil. I'm not taking it
and keeping the lead on and just going
back and forth. I'm literally stroke, lift, stroke, lift, and
I do that quickly. That gives me a nice
soft look to this. I'll also use pastels
and my pastels, soft chalk pastels, I'll use cotton and tips to
help blending it together. Then I can take this. Using my eraser shield, I can just come in and literally over an area that
I may want to use this, scrape a little off, and then I can come in
and use a cotton swab and get a nice soft
blended color out of this. So that's the technique I use when I start
to render a plan. So we're going to take a look at this final concept plan
that I put together, and we're going to
render this out, and I'll show you how
this all works and how you can get some depth into your drawing into your
rendering just by the colors that you're using and the way we blend these together. So let's just take
a look at that. So I can look at this
plan right here, and let's start with
these two trees. I know these trees
are going to be dominant over this
lawn or turf area. And I could use my
colored pencils and say, a green to color this in. But I can also come
in with my pastel, my soft chalk pastel, and this is why I like
using these because I can scrape a little bit of
green onto the paper. And then using my cotton ball, I can just throw
that little bit of color on there very
quickly and easily. I can come in and
use a little bit of red because a little bit
of red just helps give it a little more depth
and I can use my tip, and then I can
come in with, say, a yellow and I'll use yellow as a backdrop
color very often, even in areas where I know
I'm going to be having green. I've got my lawn area down here, and I'm just going to throw
some color onto that, and now I can come
back with, say, maybe a slightly darker green, and you just want to get your
idea across to your client. And you'll always
have a little bit of color residual on your cotton. So even if you
haven't scraped any, you can get a real
quick effect with that. Then I can come in and I'm going to start looking at some
of my different plantings, and I've already chiseled the
point on my canary yellow. I'm just going to
come in and throw some color onto these small
trees, shrubs right there. Now I'm going to come
in and I'm going to layer a little bit
of blue to that. Then I can come in and even layer a little more
green into it. And finally, I can come in with a little bit of red
to give a little bit of what we would call
a glow to the drawing. And that all helps
to start giving it just a little bit more interest to what this is going to be. And since I am using pastel, pastel can potentially get
on the heel of your hand. So if you just take a
clean sheet of copy paper, you can lay that over and then you're protecting
your drawing from your hand and
potentially smearing. I'm always going to try to
concentrate a little bit of the darker colors on what I would consider to be the shady side of the drawing. I just continue in this
mode until I'm done. So really, that's how quickly
you can get color down onto an 11 by 17 plan reduction
and get some layering to it, get some interest to
it, take it down, get it put onto the glossy card stock if your printer will
do that for you and help pop those colors. And now you've got
something that you can take to your client
and you can really kind of walk them
through much more effectively by putting
this color to your plan. Okay, that's coloring. And so in the next lesson, we're going to take a look at some basics of planting design, and we're gonna be close
to wrapping this up. Okay, let's take a break, and I'll see you in a bit.
27. The Principles of Planting Design: And So what's the process for developing a
planting design? Well, it still comes back
to our conceptual plan, that initial plan that we
want to take to the client. And just like in this example here that
I've shown before, and I've got a couple of
others we're going to look at, what we're doing is we're
not just putting plants, masses, trees on the
paper, willy nilly. That is not the point of this. The point of it is to use plants to reinforce
our design solution. So for example, if
I have a walkway or a stairway and I want to reinforce movement
along that walkway, then I may go ahead and put
some hedging on each side. The hedges kind of box that
walkway or stairway in. It reinforces movement. If I have brick paving, then I'm going to put
that brick paving pattern down as a running bond or maybe as a herring
bone pattern. These are dynamic patterns
that tend to pull you along. So it reinforces the fact
that we have hedging. Now, at this stage, I may have an idea of what the landscape is on
each side of the hedge, and I want to determine that
this hedge is going to be, I'm just going to say
two to three feet high and about two feet wide. Now I take my plan to
the client and I'm showing them the overall
concept plan again, and they love
everything about it. It's a slam dunk. Great. I
come back to the office. And now, when I go to look
at that hedging material, because I've determined and
explained it to the client or whoever I'm presenting
to that it's going to be two to three feet high and about two feet wide. Well, that throws
out a whole bunch of different plants that
wouldn't fit that criteria. I've narrowed the field down to where I can
start looking at, whether it be boxwood or wanimus or if they don't want
something very formal, I could go with azaleas, something that might be a
little looser in free form. But I'm looking at
plants that are going to fit that growth criteria. Now, I could reinforce that
same movement by having, say, birch trees on the
outside of the hedge, but a repetition of birch going down that pathway
or going up the stairway. So now you don't only
have the movement of the hedge to help move
you along that walkway. Now you've got the repetition and the vertical
element of the trees, the tree trunks going along. So everything that I'm doing, what I'm creating a
conceptual planting plan is in the back of my mind, why is this plant here? Why do I have a grass, an ornamental grass
at this location? Well, maybe it's to catch the
view and pull people down, punctuate a certain
location within the garden. So that's how I
start to develop. And then when it comes to actually doing a
working drawing, an actual planting plan, I can go back to my notes or
whatever I remember and say, This is what I wanted to
have at this location. I wanted to be this size, I wanted this flower color. I wanted this idea. I wanted an evergreen tree. I wanted a deciduous tree. I wanted them at this
diameter or this height. And without being specific
at the conceptual stage, I am being somewhat specific in the purpose of the planting
and the size of the planting. So let's just take a quick
look at one of these concept plans that I've put together and kind of walk
our way through that. So here's a conceptual
planting plan, and I've just got
some trees up here, and I've got a couple
of smaller trees or tall bushes at the entry
where the walkway comes in. I've got a tree here
at this corner. I've got some little spiky
guys because I wanted to do something that would
punctuate the location. So you see, even in this plan, I'm not being specific, but I do have a
purpose for why I have the plant masses or the
trees at these locations. The purpose of this would be for screening in this
particular situation. The purpose of these is for some shade and a little
bit of parcel screening. It's not as important
as this location. I wanted to have some perennial
color coming around here. I wanted to do something to
accent the entry coming in. Same idea here at the entry to the home
and such like that. So it's all conceptual. It's all just an idea. And if the client or whoever
I'm presenting to says, Well, gosh, what
are these trees? I'm going to say, I don't know. I don't know what they are yet. I just want to know if
you like the layout. And it's okay if you don't know. And it's okay if you do. It's like, I want these
to be Japanese maples. I want these to be
whatever. That's fine. You don't need to know
exactly what each species or each plant is going to be
at the conceptual stage. Here's a conceptual
planting plan. I know we've looked at
this particular plan before in other lectures, but look what a
difference throwing some color onto this makes. Even this little plan here throwing a little
bit of color onto it helps it to pop
off the paper. So you see the color really does help bring it
up off the paper, and it helps to reinforce
your design solution, and it helps to convey that
solution to the person, whoever you're
presenting this to. I keep saying client that's kind of in
the back of my mind. So how do I generate? How do I actually do a lot
of these plant graphics? That's what we're
going to take a look at next so that you can get an idea of how I
actually produce these.
28. Planting Graphics: So if I look at this blank sheet of paper that I've got right here and a quick look at this, I've got my different trees. I've got some
screening shrubs with a bold line indicating that it's coming up off the paper
to a greater degree. I've got some smaller plantings in here to punctuate the entry. I've got some specimen plants
in these corners here. So how do you generate
this kind of graphic? Well, for trees, you're
going to be working with their general diameter at the scale you're
working with. So our goal with
planting graphics is to try to turn a two
dimensional sheet of paper, just a flat sheet of
paper with drawing on it into more of a three
dimensional effect. And we do that with line weight. The thicker the line weight, the more it's going to come up off the paper closer
to the viewer. The finer the line weight,
the thinner the line, the more it's going to
recede away from and we reinforce that with color
because the darker the color, the more it's going to
pop up off the page, and the lighter the color, the more it's going
to recede away. So if we look at this
little design here, the darker colors
represent the trees, and these trees come up off
the page to a greater degree. And the lighter colors, the paving and such,
recede away from you. So we're going to use a
series of plant graphics and how you can draw
to get this effect. And then when you come back in and do your color rendering, then it just reinforces that whole procedure
that we're trying to do. Remember, trying to get
a three D effect off of a two D two dimensional
sheet of paper. So let's just take a
look and see how I do these simple plant
graphics to get this effect. So I'm going to take a circle
template that's appropriate for the size of the plant
that I want to draw in. And in the case of
these trees right here, to create this graphic, I'm simply taking my
sharpie fine point pen, and I'm going to create a series of dots
around the outside, and I'm just bouncing
straight up and down. And then I'm going to pick
one side or the other, top or bottom, but I'm going to create a shadowing effect. So at the conceptual stage, you still want to
keep the ergonomics of your planting ideas in mind. You don't want to have this
massive tree that you know is going to be way too
big in a small area. So you're going to be
looking at the diameter of circle templates of
your drawing and you're going to keep this ergonomically
correct to where you can explain it and justify your design solution
to a greater degree. Then I can put that and maybe
a couple on the interior. Now I've got a nice
shadowing effect to what my plan looks like, and I can double
this up and have them overlapping each
other if I choose to. Now if I want to have some
plantings underneath that, I can come in, and in this case, I'm using 0.35 micron. And because I don't really know what these individual
plants may be, I'm just going to do kind of
what I call a cloud drawing, kind of like when
you drew clouds. I'm just going to
put that in because I can just label that planting. At this point, it
doesn't really matter. I just know I have a purpose
for it and I want to have some plants at this
location in the plan. Then if I want to
have some hedging, I'm going to bring
in triangle or use my straight edge just to give
myself some dimensions of the thickness or the width and length of my
proposed hedgerow. And then using a 0.5
millimeter micron, I'm just going to follow this edging all the way around and put just some
irregular lines to it, and then I can come in with a finer point and create a little bit of
texture within this. And then if I want to
have a specimen plant, say ornamental grass or a
series of them, I can come in. And again, probably using a
0.2, maybe 0.35 millimeter. I'm just going to pick a circle template,
a circle diameter. And I'm going to
literally just bouncing back and forth on the
inside of this diameter. I would just go back
and forth a few times. And now I've created
some specimen plants, some iris or ornamental
grasses in front of a hedgerow underneath a tree
with some other shrubs, and I can put a third tree
at the end of my hedgerow, again, selecting a diameter,
throwing that out. Now I'm going to come
in and use my sharpie, and rather than using
this dot effect, I'm going to And I try to keep the sharpie as vertical
as possible because it helps to keep me from
smearing too much. And I establish an
initial boundary or border or
circumference to it, and then I can just come back. And throw some extra
continual lines through this. Now I've got that
effect happening. And then finally, let's
say I wanted to have a conifer of some kind
backing up this hedgerow, then I'm going to come
in and I'm using my 0.5 micron or technical
pen if you're using those. And again, just like in
the earlier graphics, I'm simply bouncing
back and forth. But now I'm going to
come in and use the 0.5 and then the 0.35, and that gives me that nice
little graphic right there. So in a nutshell, I can come in and
I can even throw a little bit of what could
potentially be ground covers. There in front of
these plantings. So doing your conceptual
planting plan can actually go
pretty darn quick. And remember, you're keeping in mind the purpose of the plant and the overall size of the plant because even
though it's conceptual, you still want to have the
ergonomics working properly. And remember that the
heavier the line, the thicker the line,
the darker the line, the more it's going to
pop up off the paper, and the thinner the
line or finer the line, the more it's going to recede
visually away from you. And then when you come back in, you put bolder colors, darker greens on those trees, the ones with the darker lines, that's going to pull it
off the paper even more, and then lighter colors
down below that. So it's all just a matter of
layering your plan together, layering your graphics, and
then reinforcing it with the coloring techniques
that we were looking at in the
previous lecture. So that's planting graphics and planting design
elements of it, the principles of planting
design kind of in a nutshell. So okay, that's it for here. Let's take a break, and I'll
see you in the next one.
29. Course Wrap up: Okay, so that pretty
well wraps up our course on the fundamentals
of garden design. And everything that we've
covered is going to give you a good solid foundation
if you choose to do landscape design for
yourself or anyone else. And if you want to have
some more information or reference, then
I have my book, the fundamentals
of Garden Design, and this is what I actually wrote in order to
develop this course. So I want to thank you
and I encourage you to leave a review and
certainly do a design, do a project, and
upload it where we can all have an opportunity
to view your work. Okay, so keep an eye open for more gardening
courses coming along, and thanks again, and I'll
see you on down the line.
 Robert Littlepage, Landscape Architect - Teacher, Author