Transcripts
1. What to Expect: Hi there, and
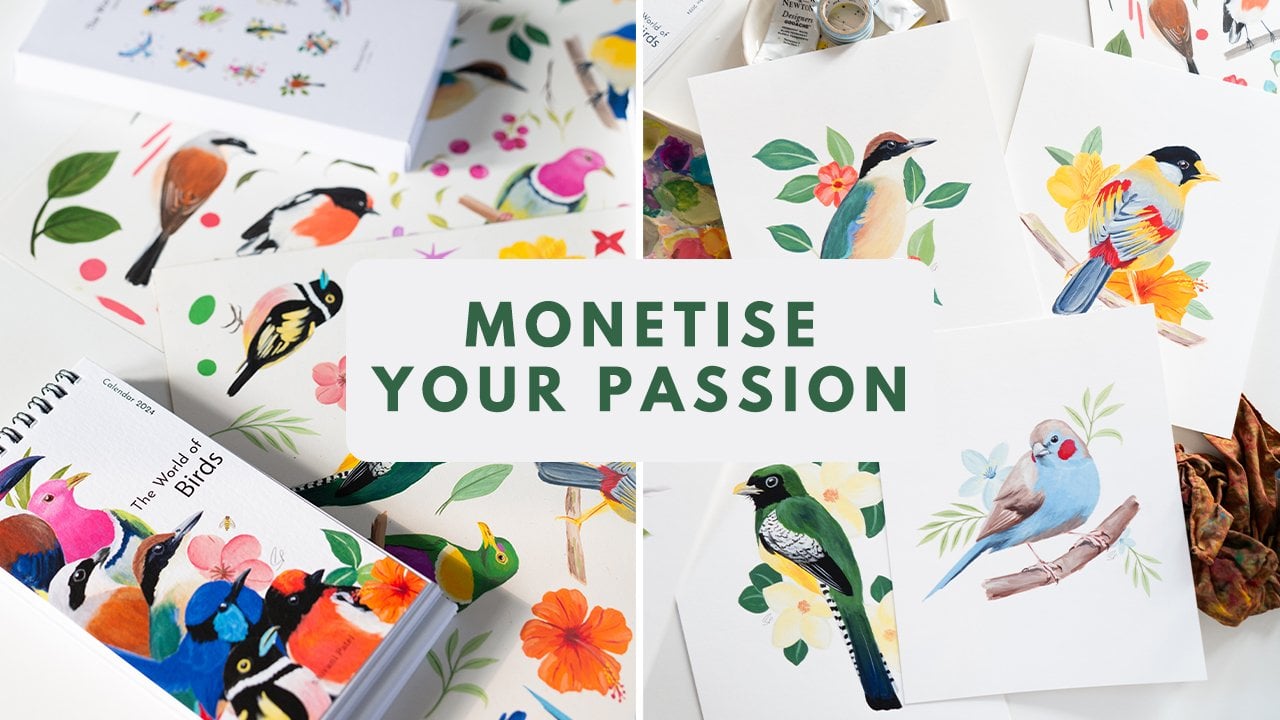
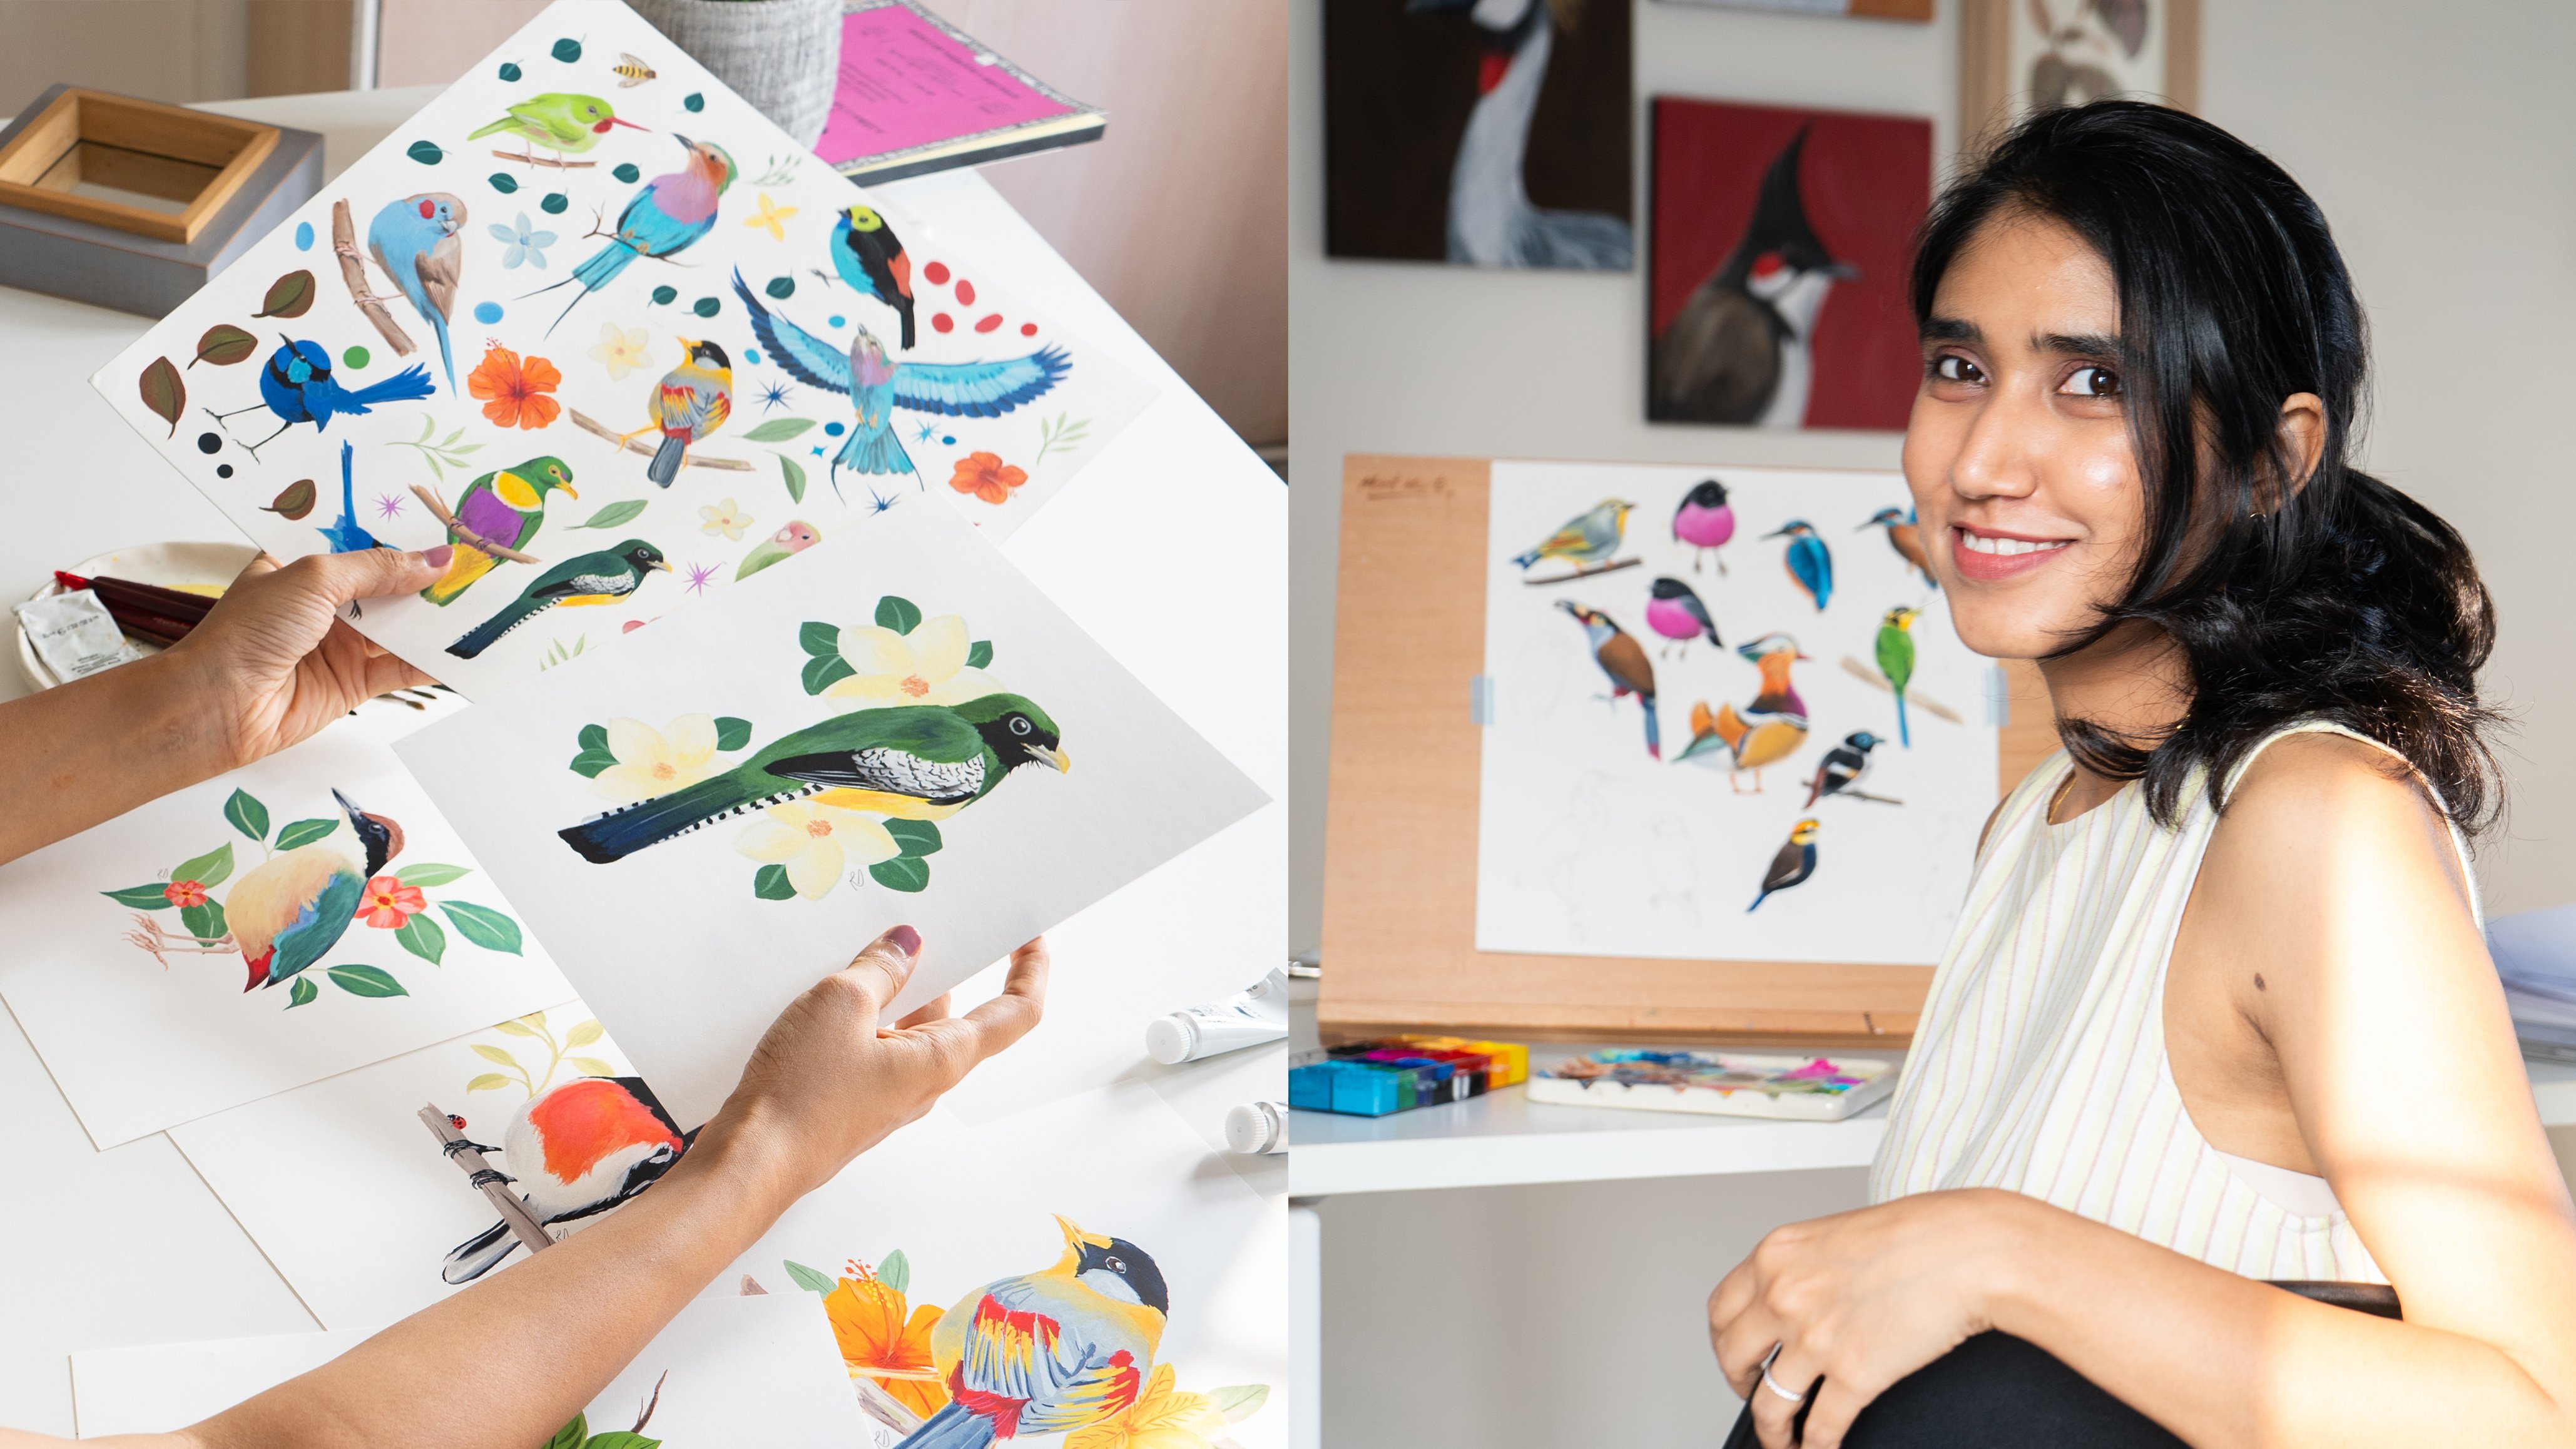
welcome into this class. My name is Shivani, and I'm a gouache artist and
surface pattern designer based in the Sunny city of
Chennai in the South of India. I've been running
my art business for more than three years now, and through all of this, I have found it
very important to plan towards my goals
and stay organized. As artists, this can be a
little challenging at times. We always tend to have a lot of different aspects of our art and our business
that we're juggling. And when it comes to planning, we can be faced with
a lack of clarity. Sometimes we could also face struggles with follow through. Actually working
towards those big goals that we set for ourselves. So in this class, I'm going to help you out with all of that, and we're going to be using
a tool called Notion. As an artist, I found
that notion gave me all the flexibility that I needed to plan towards my goals. In this class,
I'll be taking you through exactly how to build a dashboard for yourself so that you can track your
goals and your progress. Even if you're not
comfortable using notion, don't worry because I'll take
you through all the basics. And if you prefer you could
just do the same activity on a piece of paper or on any other software
of your choice. Whether you're just starting your art business or
you've been doing it for a few years and whether this is the start of a new year or you're in the middle of a year, it really doesn't matter. You could do this activity at any point of time and
we're just going to work towards a plan for the next 12 months of
your art business. I'll see you in the next lesson where we're going to
talk a little bit more about exactly what we'll
be covering in this class.
2. The Class Project: In this class, your
project is to create a personalized dashboard for yourself for your
yearly planning. Additionally, you're
also going to craft a plan for
the next 12 months. As I mentioned before, you don't have to do this only at the start of a new year. No matter where you
are in the year, you can start this activity and plan for the next 12 months. In the dashboard, we're
going to include sections for your annual goals, and we're going to be breaking those down into quarterly goals, and we'll also have a section where you can track
some key metrics. Before we dive into any of this, don't worry if you're
not familiar with notion already because I'm going to break it down for
you completely. I will help you out with
all of the basics that you need to get started
working on notion. Also, notion is completely
free for you to use. So if you don't already
have an account, I'm leaving a link for it
in the description below, so you can just click
that link and sign up. As you go through the class, try to follow along with me as I show you how I build
out my dashboard, and you can follow
the exact same steps. You can also start
customizing it to the way you want it
to look and function. Anytime you have
questions for me, please feel free to post them in the
discussion tab below, and I'll be sure to
get back to you. In the next lesson, let's talk a little bit more about notion.
3. Why Notion?: Before we start going over some of the basics of notion in the next lesson, I just wanted to talk to you
a little bit about why I personally prefer notion for all of my planning
and organization. Notion is an amazing
productivity software which allows you a lot of
freedom and flexibility. And I think that's one
of the things that really drew me to
notion as a tool. Whether you want to just
jot down quick notes, you want to create to do lists or you want to
write out articles, you want to write out
scripts for videos, or you want to make an entire
complex planning dashboard. Notion can do all
of that and more. And one of the best
parts is that it can be completely custom tailored to your artistic needs
and preferences, whether it's just
about the look and feel or the way of operating it. You can make it be whatever
you want it to be. Understanding the
basics of how notion can operate is going to make it even more
powerful for you. There are a lot of people
who start using notion but choose to use already
available templates. Sometimes that can
be a bit limiting. But by understanding exactly how you can customize notion, you're going to be able to make any template into
exactly what you need. Even if something doesn't
perfectly fit your needs, you're going to be able to
adjust it for your workflow. When it comes to the yearly plan, I find that notion helps me create a clean and
organized structure. What I'm going to teach
you in this class is not going to be a very
complicated dashboard, and it's very easy for
beginners to follow along. But I am going to help you
understand all of the tools and techniques that will help
you take this even further. I'm keeping things simple for this class
because I have made the mistake in the past of overcomplicating my
notion dashboard. At the end of the day when
you overcomplicate it, there ends up being a
little too much friction to the process and you
end up not using it, and that's not what we want. We want something simple, clean, and organized that you're going to be able to
follow through with. Simple is good and
you can always add more later based on
your unique needs. Now that we've understood what the tool could potentially be, let's start understanding
the basic tools of notion.
4. Notion Basics Part 1: So in this lesson, we're
going to start using Notion. I'm going to teach you all about the basic building blocks of notion and exactly
how you can use it. The first thing you're
going to want to do is head over to the link in the description and sign up
for a free Notion account. Once you sign up, you should see a page that looks
something like this, and you can choose the options
that are relevant to you. This is then going to create a workspace for you that's going to look
something like this. It might give you
some instructions on how you could get started, but you don't have
to worry about that. Right now, we're going
to go over all of it. You can start by
creating a new page. You can either use
the shortcut command+N or you can click
this icon up here. You can give your page a name. And let's start by trying
out a few basic shortcuts. Notion works in the
form of blocks. You can create different blocks which have different functions. To see all of the blocks
that are available, just use the forward
slash on your keyboard. And now you can see this entire list that you can choose from. I'm also going to show you
a few shortcuts for these. The first one says
text, of course. Here you can embed a
page within this page, which I'll show you
what that means. Then you can create a to
do list with checkboxes. You can create headings. You can create a table
or a bulleted list, a numbered list, or toggle list, which can be very useful. You can even use a quote, a divider, and there
are many other things. But for now, let's just
try some of the basics. Text can, of course, just
directly be typed in. And every time you hit Enter, you could potentially
add in a new block or you could just continue
typing more text. To create a todo
list for a shortcut, you could just use box
brackets and give it a space, and that creates a Tdlist. Now, every time you type
something and hit Enter, it's going to continue the list. If you want to stop the list, just hit delete or backspace. The next thing you could
do is a toggle list. To create a toggle list, you could just use
this symbol and again, hit space, and this
creates a toggle. And every time you
hit Enter now, it's going to be text that
appears within the toggle, which basically means that it can be hidden when
you hit this arrow. The next thing you could do is create headings
based on hierarchy. So say you're
writing an article, you might want a heading one and then some text and then
heading two or heading three. So to do this,
you're going to hit the hash symbol once for
heading one and then hit space, and this becomes heading one. So this is a big heading. And then you could do it
as two hashes and again, space, and this gives
you heading two. And when you do it with three, it becomes heading three. The same thing can be done
within a toggle list too. So say you want to create a toggle list with
this symbol space, but you want it to be
within a heading one. So here you can do
the hash again, and it becomes a toggle
with heading one. And similarly, you
could do the same with Heading two
or heading three. To create a numbered list, you could just use a
number with a full stop, and that becomes
a numbered list. Again, when you hit Enter, it's going to continue
the sequence. And when you're
done with the list, just hit delete or backspace. And then similarly, you could do a bulleted list by
hitting the hyphen. Now, like I said, all of these are blocks, which means that
all of these can be separately handled
and moved around. So now let's say I
want to move the heading right to the
top of the page, I can just drag this
here by hitting this icon with the six dots and drag it to where I want it. I would like to leave this
here and maybe I want this toggle to come after
the medium heading, and maybe I want these
number list to come here. In this case, keep in mind that each item is a separate block. So if you want all of it, click drag, select all of them, and move them together. Now, a way to kind of format your page is maybe you want some things
to go on the side, so you want columns
in your page. When you want that,
you could just select all the items you want
to move to one side of your page and just drag it. So now it's all come to the
side of the big heading. But if you want all
of this to come under big heading and be on this column rather than being
across the entire page, then select this
and drag it here. If you hit three hyphens, you get a divider. So this is another
thing that can be really helpful in
formatting your page. So I just created a
divider, like I said, with three hyphens and darg
it to where I wanted it. I'm just going to add in
some dummy text here, and now we'll see how
we could format text. So this is a basic text block. Now, let's say I want certain
parts of this to be bold. I'm going to select the
part that I want bold. And of course, you can always use these buttons
that are right here, but I'm just teaching you
some basic shortcuts. You can use Command
B to make it bold. You can use Command I to
make something Italics. You could do Command U
to add an underline. And of course, if you're
using a Windows laptop, every time I say command, please use Control instead. These are the basic things
that you can do when it comes to just
formatting your text, and this is largely what we're going to use to create
the dashboard as well. If there are any
further shortcuts that you may need as we
go along the class, I will mention them then. I'm also going to be providing a downloadable PDF with all
of these shortcuts mentioned, so don't worry if you didn't
follow along with all of it. You can check the resources
section and download the PDF.
5. Notion Basics Part 2: There are two more
things that you're going to need to understand
about notion. The first is how pages work, and the next is how
databases work. Now, keep in mind that the
pages and dashboards are both foundational elements of notion that make notion such
a powerful tool. So it's really useful
for you to have that knowledge so that as you continue working
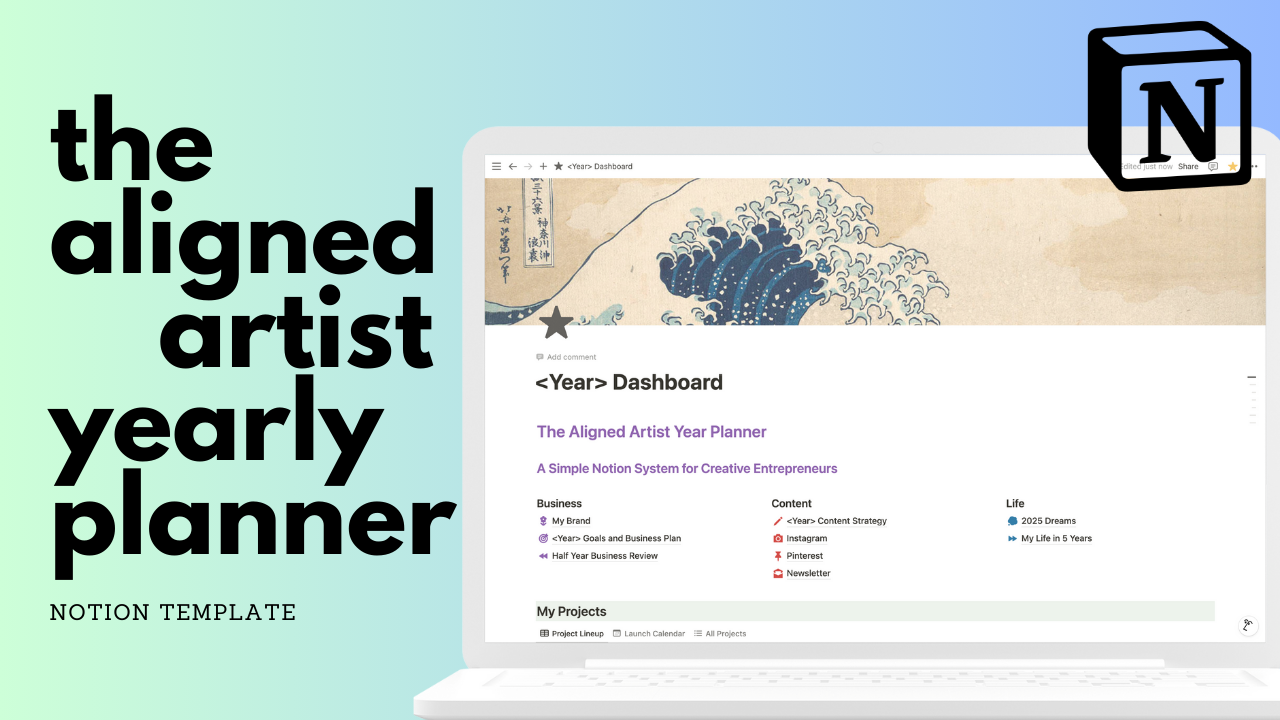
with notion, you can take advantage of them. Pages are pretty simple. What you see here is my
yearly planner dashboard. This is a lot more detailed than the dashboard we'll be
creating within this class. What we're going to
create in this class is going to be just our
goals and business plan. We're not going to
overcomplicate things. But later in the class, I will tell you a
little bit more about the larger dashboard that
this is a part of for me. For now, let's look at
my yearly dashboard just to understand what
pages and databases are. What you see here with these underlines under
them are all pages. The beauty of notion
is that you can embed multiple pages
within a single page. So this here is a single page, and I have all of
these sub pages embedded within this page. Each of these sub pages
serves a different purpose, and I can link to these pages from anywhere in my
notion workspace. When you create a new page, it would usually show up here
in this private section. If you want it to be
more easily accessible, what you could do is you
could add to favorites, and you'll see that it shows up in this section right here, which makes it a lot more
easy for you to access. This becomes really
useful when you have a lot of pages
within your notion. For now, I'm going
to delete this page, which I will do by clicking these three dots and
saying move to trash. So as you can see,
my year dashboard, when I created it, it was in this private section and I've
added it to my favorites. And this is how it would
usually look like, but I can use this arrow
on the left here to toggle and look at all the sub pages that are
contained within this page. That way I can easily navigate to any of
these pages as well. So every time you want to add any additional information
into a page on notion, you can choose whether to
directly type it here. Or to create a sub page. Generally, if it requires a lot more information
of its own, then it's better to create it as a sub page as I've done here. So here I have sub
pages that talk about my brand and the tone
and voice of my brand. I have a sub page for me
to do my business review. I have a sub page for my
goals and business plan, which is what we'll go over. I have a sub page for
my content strategy, and I've also created these columns like
we discussed before. When you create columns, you can also choose how small or large you would like
to make them. For this, I wanted them to be fairly
equal to have these divisions. So those are pages. Now you have another
thing called databases. Databases can be slightly
complicated to explain, but once you start using them, they're fairly easy
to understand. I'll also leave links to
some YouTube videos which might be helpful in case you want to dive a little
deeper into this. For now, here's what you need to understand about databases. You can again use the
forward slash command to create a database. You can either create an inline database or a database that opens
up in a full page. So this would again work
like a link to a new page, but it would be a database. You can also create a
linked view of a database, which means you might already have a database
that you've created, and you can create a view of that database within any
page that you would like to. So in this case, I'm going to say linked view of a database, and I'm going to use
my projects database. So this is a database that
I have already created. The reason I'm using this to demonstrate to you is because I already have some information
populated within it. When we create our goals and
business plan dashboard, I will show you how to create a simple database to use there. As we do that, you'll get a better understanding
of how databases work. So try not to get too
confused right now. For a general overview, what you need to understand
is a database is sort of like a table but
a lot more powerful. A database can be
created to manage your projects or manage all of your different designs
that are part of your portfolio or
anything of that sort. This here is an example of how a database could look
and in a database, you can create all of these
different potential views. You could have it
in a table view that looks something like this, or you could have
it in a list view that has something like this, or you could even have it
in a calendar view like this where based on the
date assigned to it, it might show up
in the calendar. In a database,
every single entry is treated as a separate page, which means it can have
its own information. Each of these
entries here can be opened up as a separate page, and you can type in whatever information you want to give to that particular page. So in this case, in
this example database, it is a project. So I could potentially add some details about the project
into the section here. And here you can use all the blocks that you
typically use on Notion. So you could possibly
have lists in here. You could have a to do list pertaining to this
particular project. You could even add images. For example, if this is an
art freelancing project, you could have a mood board, or you could show
some color swatches which you might be
using for this project. These are just examples
of how you could use it, but the possibilities
really are endless. Another important
aspect of databases is that any database can be
assigned certain properties. So every entry into that database would have
all of these properties. And this is completely
customizable. You can choose the plus
icon here and you can decide what properties you
want to give to that database. Let's say you are using this to manage a list of
potential clients. In that case, you could add in their email IDs,
their phone numbers, the URL of their website, and maybe you could
add a checkbox where if you've contacted
them, you could check it off. So this is completely
customizable to exactly what your needs are and what the purpose of a
particular database is. Just to show you this as
an example right here, my database has these
three properties. So every entry here is
assigned a category, and this for me is
a drop down list where I can select what
kind of a project it is. Then I've assigned a due date. So this is a date property, and I can assign a date to this based on when I need
to complete it. Then I can assign a status. So this is another type
of property which can tell you when a particular
project is due. I also have an additional
property here, which is an archive property. So once I complete a project, I can archive it by
checking it here, and it will disappear from
this particular view. That's because I've added
a filter that says I want it to show me only the
projects that are unchecked. If all of this is a little confusing, don't worry about it. I'll take you through
exactly how to create a dashboard for yourself
with one of these databases. I've also added some links
in the description below, which you can check out in
case you'd like to watch some YouTube videos to better understand
how databases work. Now let's keep things
simple and let's dive into the next lesson
where we're actually going to start building
out our dashboard.
6. Building the Dashboard: So now that we've gone over
the basics of how notion works and some of the important shortcuts
that you could use, we're going to go into notion and start working on
the class project. We're basically going to
build out a dashboard for your goals and business
plan for the next one year. I'm going to show you exactly
how to do everything. So even if you've not
memorized the stuff that we went over in the previous
lesson, don't worry about it. As you actually start working within notion and
building out all of this, you'll get a lot more
familiar with how notion works and how you
can best use it. So let's jump into building
out our dashboard. You see right here is an example of the dashboard that we're going to
be building out. This is an empty
templatized version. Towards the end of this class, I'll also tell you
how you could get your hands on my
entire dashboard, which includes a lot more than just the goals and
business plan dashboard. So if you prefer not to build this out from
scratch yourself, you can just go ahead and
get that for yourself. But either way, I would suggest following
along and trying to build it out so that you can get a hang of how notion works. So like I said, this is sort of what we're going
to build out, and let's start doing that. What I'm going to
first do is create a new page here with this icon, or you could use Command N or Control N on your
keyboard to do this. I'll now give it a title, and I'm going to say 2025
goals and Business Plan. I'm shooting this
at the end of 2024, which is why I
mentioned 2025 here, so I could plan for
Jan to December 2025. But let's say you're in the
middle of 2025 already, you could just mention
the months over here. That way, this isn't just
limited to a calendar year. You can get started no
matter where you are. We're going to use these three
dots here and I'm going to make it a full width page
because I prefer that. You also have more
customization options here, you can choose what you like. You could go with
smaller text overall. You could choose a Serif font, they also have this mono font, but I'm going to go with the default and I'm
going to keep it to full width so that I can maximize what I'm
putting into this space. The next thing I'll do is
add a little icon here. You can choose whatever
icon you feel like. You can make it personal to how you feel about the year
or whatever it is. I'm going to choose a
target icon over here. Next thing I'm going
to do is plan out the different sections that
I want in this dashboard. Right now, all we're going to do is create a blank dashboard. And as we go deeper
into this class, I'm going to tell you more about how you could think
about filling these out for yourself and for your unique
business goals. I want to use the
Heading two over here to have a
slightly bigger text. I don't want the
normal body text size, and I'm going to plan
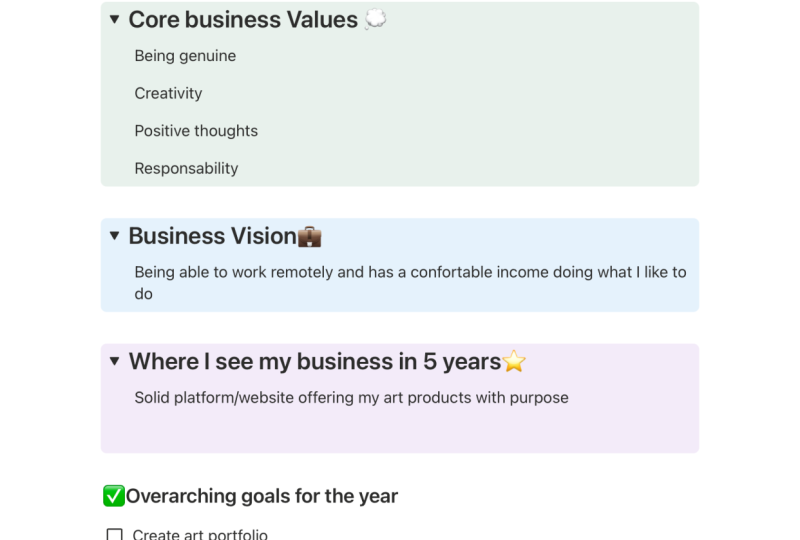
out four sections. The first is the
artistic vision, and then another again in heading two would be
the business vision. And then I want the
core business values. And finally, I
want a section for where I see my business
in five years. Now, I've also decided that
I want all of these to actually be toggles so that I can hide them when
they're not in use. To do that, I'm going to
use this greater than symbol or this angled
bracket as a shortcut. And the moment I press space, it becomes a toggle. You could even just select all of these by clicking
and dragging. You could click
this menu here and say turn into
toggle heading two, so that way we can do it
for all of them in one go. The next thing I want to do is sort of put these into columns, and I'm going to drag
one of them to the side. So I drag the business vision to the right of artistic vision, and I'll also move
these two under them. So I don't want it to be
under the overall line. I want it to be under this line. So the line which is
on just the left side, and I'll move this under the line which is just
on the right side. So these two are in the left, and these two are in the right. And another thing
I'll do to format this is I will add
a background color. Again, choose whatever you want. They can all be the same
color or they can be different colors whatever
your mood is like. Great. So that's one
major section done, and the next thing we're
going to do is add a section for the overarching
business goals of the year. Again, I'm going to
make this heading two, because I want it to be large. I'm also going to add
an Emoji here just because I feel like I
want to add a star. Under this, what we're going to have is a sort of todo list, which we can strike off as
we go through the year. To do that, I'm going
to use the box bracket. So first an open bracket and then a closed bracket
and then hit space. So this is the shortcut
for the to do list. And for the time being, I'm just going to say goal one, goal two and goal three. I'll explain the purpose of each of these sections in
the next lessons, so don't worry about
that right now. The next thing we're going to
do is another heading two, and we'll say Goals For. And again, here you can
insert the year that you are currently in or the months like we discussed for the title. For me, I'm going
to make that 2025. And I want this to be
divided into four columns, which are for the four
quarters of the year. Again, based on where
you are in the year, you can plan this as the next three months slots
for the upcoming 12 months. I'm going to make
this heading three so that it's larger
than my body text, but at the same time, it's smaller than the heading
of this section. I'll just put that down as
Q1, and for me, it's going to be
Jan to March 2025. And I'll create
these four headings and then we'll take
it from there. Another thing you can
do if you want to copy formatting of text is you can just copy this entire block
and you can duplicate it. So to do that, I'm
going to click down these six dots here and I'm
going to say Command D, that duplicates it and places another same block
right under this, and then I can make my edits. So now, like I said,
I want to make this into four equal columns. So I'm going to do something similar to what we
did in the beginning. I'm just going to drag
this to the side here. So when you get this
blue line here, that's when you can drop it. And again, I'll drag this one and I'll drag this one here. So now when I want something
to come under this column, I'm just going to bring my
pointer here and then hit Enter and then it comes
into this section. And again, here, I'm just
going to make box brackets for a to do list
and say goal one, goal two, and goal three. And now I'll select
these and I'm going to copy them into the
other sections as well. To do that, I'm going to
drag and select all of them. I'm going to hold down the
option key on my keyboard to duplicate and click these
six dots here and drag. This copies it for
me very easily. And I'll repeat that
for all of the columns. Again, here I would like to just add emoji to make it a
little bit more fun. Great. And finally, down here, we're almost at the
end of the template. Finally, down here, I'm
going to use the shortcut of three hyphens to
create a divider, so I can divide
this bottom section into a different area. You can do this anywhere
that you want to. If you feel you would prefer
to have a divider here, you can add it here as well. But I don't want that,
so I'm deleting it. So now the final section
that I'm going to create is for key metrics, and here we're going to create
a small database as well. Again, heading two, and
we'll say key metrics and add an emoji here just to differentiate
this section again. And now we are going
to create a database. So to do that, I'm hitting
the forward slash, and I get all of these options of potential blocks
I could create, and I'm going to say database. I would like this to
be an inline database which is embedded
within this page. And I'll call it
key metrics 2025. And create that as a new table. When you create a database, you're going to want to decide
what properties you want for each of the pages that you create within the database. So in my case, I'm going to use this database to track
some key metrics across platforms where I either share my art or potentially where
I sell digital products. So you could use this to track
either revenue metrics or number of sales or maybe your subscribers on
platforms like Instagram, email marketing however
you want to use this, that's completely
flexible and up to you. I'm going to give
you a format which can completely adapt
to whatever you need. The first thing we need
is the platform name. Then we're going to
create a new property, and we want this to
be a number property. This is going to be to track our current metric
on that platform. And then we'll create
another number property, which is our target. So your target is
usually going to be different from your
current number. For example, on Instagram, maybe I currently
have 2000 followers, but I want to grow it
to 5,000 followers. So 2000 is my current metric and 5,000 is my target metric. Now, I'm also going to
have a selection property, which is the metric type. In this metric type, I'm going to add a few options. One is going to be sales. So this is for platforms
like Etsy where I might want to track
the number of sales I've made
on that platform. You could have one called revenue and I'm also going to have one
called subscribers, which could either
be subscribers or followers depending on
whatever that platform is. Finally, I'm going
to have one property which is a formula, and this is going
to be very simple. This is going to be just to
track the difference between our current metric and our target metric so that
we know where we're at. And here we'll hit Edit formula, and what we're going to type is current divided by target. And we'll save that. And we can choose how we
want to show this. I prefer to show it in
the ring chart format. And as we go into
the next lessons, you're going to see
how this works. So again, don't be
worried right now. We'll just adjust
the size of these so that they all fit into the
page neatly and that's it. We're actually good to go. This is how simple it is to
create your own dashboard, which is ready for
tracking all of your goals and targets
for the year ahead. In the next lesson, let's
start talking about all of these different sections and how you're going to fill them
out. I'll see you there.
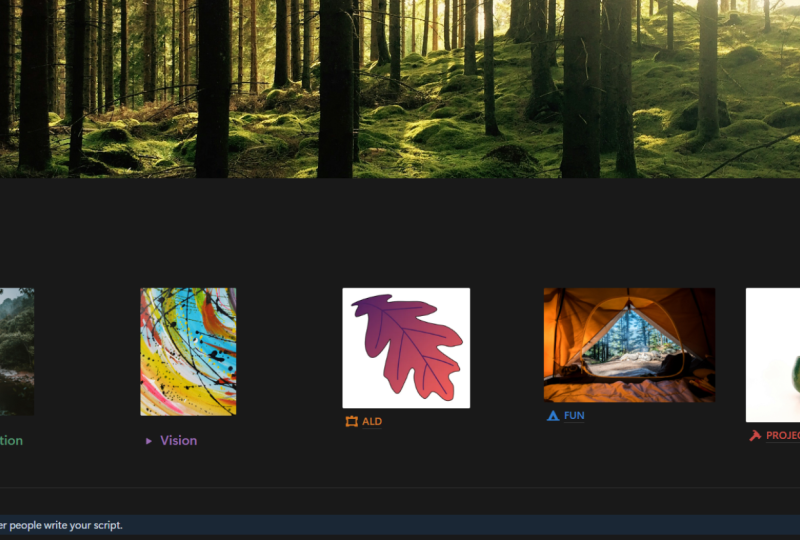
7. Defining your Business Foundations: So now that you've built
out your dashboard, it's time to start filling
out the different sections. The first thing we
want to do is fill out the four sections on top,
the artistic vision, the business vision, the
core business values, and where you see
yourself in five years. Each of these have a
very specific purpose. The artistic vision
is where you want to go with your art and
your creative practice. I've separated this from
the business vision because I often think about those
as two different things. My artistic vision is very much about what drives
me as an artist, what I want my art to convey
to people who see it, and what kind of
improvements I want to make that fuel my
own creative energy. On the other hand,
the business vision might have more to do with
the kind of customers that I want to
serve and what kind of value I want my business
to bring to this world. Just as an example for you, I'm going to fill out
these two sections with my own personal artistic
vision and business vision. Think of the business values as somewhat like non negotiables
for your business. This could be the
authenticity that you bring to everything that you do and every piece of
content you create. If you're somebody who teaches, it could be about
being nurturing or generous with the
knowledge that you share. So based on what matters to you and what is
important to you, personally, you could choose
to fill out this section. I'm going to fill out my
core business values, and I would recommend
keeping this to a maximum of three core values. Finally, we have this
section about where you see your business or
your art in five years. I'll leave this
completely to you. I don't want to fill something
out and influence what it is that you put into this section because
it's very personal. This could be either
very specific. For example, you could
specifically state that you want a certain
level of revenue. You want to be a six
figure business, or you could include
some specific goals or big dreams that you
want to work towards. For example, maybe
you want to write a book. Try to spend some
time visualizing what the next five years
could look like for you and what those big dreams are that you want to accomplish. You could put them all down
in here in bullet points. Don't feel like you need to censor yourself or
leave something out. Just put in whatever you
are feeling in this moment. These four sections
on the top of your dashboard are going to serve as a North Star
for your business. The reason I put them into toggles is so that
they're not distracting. You can always close
them when you're just focusing on
working on your goals, and you just want to see
all of these sections. But when you do want to view these or if you're ever
feeling lost during the year, and you just need that
North star to bring some direction to the goals
you're setting for yourself, you can always open these
up and make sure that you're staying true to the
big visions that you have. So in the next lesson, we'll
talk about the next section, which is the overarching
codes for the year.
8. Defining your Goals for the year: So your overarching
goals for the year need not be very specific
goals, but they can be. Try to create some balance between the different types of goals that you're putting in. One would be your
business goals, and the other would be
your artistic goals. Business goals are all of those that give you direct
opportunity for income. So this could be maybe the number of art collections you want to release in the year. Maybe you want to launch
your print store, maybe you want to put
out a new online course. All of those are very
specific business goals that you could set for yourself. The artistic goals,
on the other hand, are essential for you to
build your creative skills. This could be taking
a course from another artist to improve
your technical skills. It could be exploring
a new medium or pushing the boundaries
of the art that you create. Having these goals ensures
that you don't just get lost in the business
side of things all the time, but also make time for play and for improving your
creative practice. Before you fill out this
section in your dashboard, you could start by brainstorming
in a notebook just to do a bit of a mind dump and get everything
down in the page. Once you're done
with that, you could pick out the ones
that really stand out to you and the ones
that you'd like to focus on for the
next 12 months, and you could fill those
out in the dashboard. So these overarching
goals for the year need not be something very
specific, for example, wanting to publish one or
two new online courses, but they can be something a
bit more abstract as well. For myself, in the
previous year, just to give you an example, I set a goal of
saying no more often. I found myself in a
position where I was saying yes to each and every
opportunity that came my way. And at the end of the day, I was getting stuck with
projects that didn't necessarily fuel me or projects
that I wasn't excited by. This was taking time away from the projects that
I actually wanted to work on or projects that could have helped me
improve as an artist. So that's an example
of a goal which is a bit more abstract and
not exactly quantifiable. But it's just a mindset shift that I wanted to
bring in for myself. So your goals could also be
related to your mindset. They could be very
specific income goals. They could be creative goals or whatever else
you'd like to put in. Just to give you some examples, I'm going to fill out a
few goals in this section. One goal that I know I want
to set for myself is to publish one new
Skillshare course per quarter for the
next 12 months. But I'm going to set that as create four skill share
classes for the year. Just in case I'm not able to
create one in each quarter, I can still make up for lost time and create
four over the year. Another thing I would really
like to do is to start reaching out to brands
for art licensing. Another thing is to
work on my print store. I already do have an
active print store, but it's not something I put
a lot of active energy into. So I'm going to say
that I want to revive my print store or I want to develop my
print store further. For now, I'm going to limit
that to three examples, but I usually have about
five or six different things that I put into this section. You can put in as many
as you'd like to, but try not to set too many goals for
the year and end up overwhelming yourself. Next, let's discuss how we can set quarterly manageable
goals for ourselves.
9. Quarterly Breakdown: So in this lesson,
we're going to go over how to break your
goals down by quarter. And we'll also set some key metrics to
track for the year. Once you're done with
these two things, your dashboard is
completely functional and ready for you to start working
towards your big dreams. When it comes to the
different quarters, it's important for you to
have some level of balance. You don't want to have too
many very large goals in each quarter and end up not being able to
focus on any of them. Try to focus on just one
major goal per quarter. This could be something large like setting
up an online store, launching a signature online course or something
of that sort. As you do this, try
to also think about launch schedules and keep festive schedules at the
back of your mind, too. Sometimes you might
want to launch a collection specifically
for the festive season, and sometimes you might want to lay low during the
festive season. Maybe you have plans with your family or you're
going to travel, factor that in when you're
setting your goals. A mistake that we tend
to make when we're looking at big picture
goals for a year ahead is that we could potentially
set a goal that isn't really realistic for
us to be able to accomplish. Maybe we set a big
goal for December, but by the time
December rolls around, we realize that we
have a trip planned. We have a lot of family
visiting from out of town, and it's just not
possible to get all of this done and make time for
our personal lives as well. So keeping those
things at the back of your mind as you
plan this out really helps when it comes
to actually being able to execute and
get these goals done. And as you do this, also remember that none of
this is set in stone. Quite literally, if you want
to move your goals around, you can just click on them and drag them to another quarter. If I fail to accomplish
something in the first quarter, there's no reason why
I can't move it to the second or third quarter when it's more realistic
for me to accomplish. In fact, there are going
to be goals that you don't end up accomplishing
through the entire year, and you might have to move
that into the next year, and that is fine, too. This is just to
provide a roadmap so that we know exactly
what we're working on. We have clarity,
we have direction, and we know what
our big vision is. We know why we're doing the
things that we're doing. None of this is meant to
put pressure on ourselves or make ourselves feel bad about not being
able to do something. We'll discuss that more
in the next lesson when we talk about doing
reviews for ourselves. But for now, let's just
start setting these goals. So I'm just going to use
these three examples that I set over here and start
by breaking those down. I know I want to create four skill share
classes for the year. So the first thing
I'll do is put that down as one skill share
class per quarter. If in any quarter, I'm not
able to create a class or if any other project takes
up more time than expected, then I can always move
it to another quarter. Now, again, with the second
big goal that I have, I wanted to reach out to
100 potential brands. To simplify this for myself and to make sure that I'm slowly
chipping away at it, I'm going to reach out to
25 brands per quarter. I don't want to reach the end of the year and realize that I have to reach out to 100
brands all in one go. So it's easier to
break that down. Now, in these two examples here, I have given you goals that get repeated across
every quarter, but this is not going to be the case with every single goal. For the print
store, I'm going to decide to do it in
one specific quarter. For myself, I think
I'm going to do it towards the end of
the year because I think Black Friday might be a great time for me to
be able to promote it. But even if I want to launch the online store towards
the end of the year, maybe in October or November, that would mean that I need to have it ready in quarter 3. I'm thinking about
all those things as I set these goals so that I can see what I need to do each quarter in order to be
able to make that happen. I'll start by putting it down here as wanting
to launch it. And if you have a specific month when you would ideally like
to be able to do something, you can put it in brackets. Now, to be able to do that, I'm realizing that maybe
by July or August, I should have the structure
of my online store ready and start photographing the prints that I want to put
onto the store. So I've decided that
I would want to have all my prints shot and have
the images ready by August. And then by September, I can create the
online store and I can actually put up all
my product listings. Now, again, to be
able to do that, maybe I want to create a
good bank of prints in advance or a good bank of paintings that I want
to create prints out of. So maybe in quarter one and two, I'm going to focus a lot
on creating that artwork. And in my overarching goals, I've also said that
I want to start launching new prints each month, but that's something that's
going to happen only after I launched
the print store. So maybe in December, I'm going to launch a few new
designs for my art store. And I can continue doing
that in the following year, which would be
2026 in this case. Now, everything that
I'm filling out here are just to
give you examples. You can take this further. You can think about exactly what you want to accomplish
for yourself. Let's say you want to try out a new medium and create
some art with that medium, or you want to do
an online course where you learn some
new art techniques. You could potentially
set that as a goal, say in Q2,
that you want to take up this particular
online course. Sometimes you could even have goals that
require investment. So for me personally, sometimes I set a goal of buying some new equipment
which would help me in recording my
skill share classes or my YouTube videos. This could be a goal
also that I set for myself because I
would like to build up the revenue to be able to afford that new gear
for my business. Customize this to exactly
what it is that you need and what your business
requires to be able to grow. But at the same time, try not to overcomplicate it,
keep it simple, limit it to lesser goals
so that you're able to focus and actually
get these things done. A good rule of thumb is
that if you feel you are accomplishing your goals
way ahead of schedule, it could mean that you're
not setting enough goals for yourself or you're not being ambitious enough with the
goals that you're setting. However, if you constantly
feel like you're chasing, if you constantly feel like, no matter what goals
you set for yourself, you're just unable to
accomplish any of them. Then it could be
that you're being a little bit too lofty
with your ambitions. Maybe you also have a day job and you're running
your art business part time. In that case, specifically, it becomes really important
for you to be realistic with what it is that you can accomplish with the time
that you have available. Now let's look at the
key metrics section. I'm going to hide
this database title here because we already
have it up here as a title. Now, to give you a few examples, I'm going to set three or four different platforms
that we could track. Let's start with Instagram, and then let's put in Pinterest as another
content platform. Then let's look at
email marketing. So you could call that
email newsletter. And I'm going to put in Etsy as a sales metric
that we could track. I'll change the name of this
from formula to progress. Now I'm going to give you
examples for each of these. For Instagram, let's assume you have 2000
followers currently, and your target is to
grow that to 5,000. So I can see that
something's wrong here because I want this to
show as a percentage. So I'm going to edit this by
clicking on Edit property, and the number format is
going to be a percent. Also, I don't want it
to show the number. I'm happy if it just
shows me that ring graph, and we can just close that in. Now, the type of
metric that this would be is subscribers. Similarly, on Pinterest, you
could set it as the number of subscribers or it could
be a view count. For me, I track my views on Pinterest. So on Pinterest,
let's say you're currently at 10,000
views per month, and you want to grow that as a first step to 35,000
views per month. So you can very clearly
see how far you are at the moment and
how far you need to go. With your email newsletters, let's say you currently
have 100 subscribers, and you want to grow that
to 1,000 as a first step, and Etsy let's say I have 50 sales so far and I
want to grow that to 200. So this gives me a visual idea of where I'm at
with each of these, and this could also help inform the goals
that you're setting. If you feel that your
Instagram needs a lot of work, maybe working on your Instagram
profile could be a goal. Maybe setting a regular
schedule for yourself for new content creation could also be a goal that
you set for yourself. Or maybe you want to
improve with Pinterest. Maybe you want to
take an online course or spend some time studying some YouTube videos
that are going to help you improve
on that platform. It's important to set
all of these as goals. What often happens
is that we look at goals only as things
that can be quantified. We don't look at study or spending time actually
improving things as a goal. But the moment you actually
start factoring that in, you can be a lot
more realistic about the time commitments
that you need to put towards each
of these things. If you know that
you need to spend one quarter improving
your skills with a particular platform, be that Pinterest or email
marketing or anything else, you'll know that you have
less time to dedicate to maybe creating art
or any new project. So you can be very strategic about how you're
spending your time. And again, I'd like to remind you about how databases work because each of these can be opened up as a separate page. So if you want to put
in some notes here, maybe about your plan about
how you want to improve on that platform or something
about your content strategy, you could do all of that
within this page here. So now your dashboard
is completely set up and you can start
working towards your goals. In the next lesson,
let's quickly discuss how you can review
and adapt as you go.
10. Reviewing & Adapting as you go : So now you've got all of your goals planned
out and ready, and all of these are to work towards your big vision
and your big dreams. Once you've done this and you actually start
working on things, it's important to conduct monthly and quarterly reviews for yourself to see
how things are going. When you do this, you can
check off whatever is done, and you can move things around to different quarters
if required. Remember that things
may change as you go. Keep things flexible and agile because that's what best
serves you and your business. As you go through the year,
you might find that your own personal
priorities shift, or you might find that some
of the goals you set for yourself no longer serve the evolving needs
of your business. In that case, feel free to delete certain goals
without any guilt. Remember that this entire
dashboard is yours. Nobody sees this but you. There's nothing wrong with not accomplishing all of the
things that you set out to do. Certain goals may take longer to accomplish than you
initially anticipated. Sometimes life and circumstances
may get in the way, and it's important for us to stay agile and keep
shifting things as we go. However, if you find yourself repeatedly struggling
with any of this, or if you have struggles with setting your goals and
staying accountable, then I'd recommend booking a
one on one session with me. The one on one sessions are available right
here on Skillshare, and I can completely guide you through how to set
goals for yourself, how monitor your own progress, and how to stay on track. You can click the link
in the description to book a one on one session, and if you're
interested in them, I'd recommend
booking them quickly because I have very
limited slots available. In the next lesson,
let's talk about how we can go one step
further with Notion, and I'll also tell
you how you can get your hands on my template.
11. Going further with Notion: I use notion for not just this. I use it for so much more. It's great for task
management, scripting, and also keeping track of various aspects of
your personal life. It can be customized,
like I said, to absolutely anything
that you want it to be. I mainly use this
full dashboard of which the goals and business
plan is just a small part. The dashboard is
what I use to keep track of everything to
do with my business. This is what you see here
is a template version, which you can also
get for yourself. I have a page for writing down aspects of your brand that you would like
to keep track of. This is a great page
to refer back to anytime you need to build
new assets for your brand, for example, a logo or a
website or anything else. Then we have the goals
and business plan, which is what we just went over. I also have a page for a
half year business review. This is really important to do, and this gives you all the different prompts that
you would need for you to be able to do a review for yourself and take decisions for your business accordingly. All of those fall under
the business section. Then we have the
content section. Here I have a page where you can write out your content
strategy for the year. Again, I've provided all of
the different prompts that you would need for you to
plan out your content. I've specifically added in pages for Instagram, Pinterest, and for an email newsletter, and I've also given you
a video that you could watch to get some guidance
on each of these topics. All of these different pages
have been built out in such a way that you can easily understand and
get started with them. We have a section called life. This is where you could fill out your dreams for the year ahead. These could be your personal
dreams like wanting to get fit or wanting to
learn a new language. And for each of them, you could think about all these different prompts
that I have provided. Then there's a page for visualizing your
life in five years. This is an activity
I find very useful, and it helps inform choices in my personal and my
professional life. Then I have a projects
dashboard down here, and this can be used to track all of the different
projects that you're working. Finally, I have a
content calendar down here where you can
create entries for all the different content
that you're going to create and you can even visualize
it in a calendar form. This entire dashboard
is available to purchase right
here on Skill Share. For all of the students who
have gone through this class, I have a special discount code mentioned in the description. The description has
the link for you to be able to purchase this as
well as the discount code. When you purchase this, you will also be receiving a video that's going to take you through exactly how to use
the entire template. Like I mentioned before, the entire template is very beginner friendly and
easy for you to use. In the next lesson, let's recap everything that we
learned in this class.
12. Conclusion: Congratulations on making it
to the end of this class. In this class, you learned all of the basics of how to use notion to build out a yearly planning
dashboard for yourself. We also went over how to fill out the different sections
in the dashboard, including how to set a vision for your art
and your business, how to set overarching
goals for the year, how to break your
goals down by quarter, and how to set some
key metrics to track. We also spoke about
how you can conduct quarterly or monthly reviews in order to keep
yourself on track. Once you've created this
dashboard for yourself, I would love to see it
and provide my feedback. Head to the projects
tab below and upload a screenshot of
your own Notion dashboard. If you've used some other tool, I'd love to see that as well. My complete Notion dashboard is available for you to purchase
right here on Skill Share, and I've left a discount code in the description for students who have completed this class. To make sure you never miss out on any of my future classes, make sure that you follow
me here on Skill Share. I also regularly host giveaways for all of the
people who follow me. You can also check out
my profile on Instagram or view all of my free
content available on YouTube. As a next step, I would
highly recommend checking out my two Skillshare classes on business fundamentals,
specifically for creatives. The first one specifically talks about business
plans for artists, and the other talks about all the different income streams that you could
potentially explore. I'm sure you'll find a lot
of value in those classes, so I hope to see you
inside one of them. Congratulations once again, and I will see you
in the next one.
 Shivani Patel, Gouache Artist | Creative Entrepreneur