Transcripts
1. Introduction: [NOISE] Hello and
welcome to my studio. My name is [inaudible] and
I live in British Columbia. I'm a graphic designer
[NOISE] and an artist. This is where I come
to walk every day, take my daily walks and I pick up like a whole bunch of rocks. I come back privily from my walks about five
times every day. Then when I left.
I also come here to release my stone
[NOISE] and leave them on the beach for
other people to find. I call it my touch and
release program but it's also as [NOISE] form or
part of abandonment. A stone is really
like a mini Canvas. It's really small, it's not very intimidating, but you can also create
beautiful archive. In this class, I want
to show you how to make beautiful art on stones and I'm going to show you
everything you need to now to get started [NOISE]. First I'm going to
walk you through my favorite material to paint on stones and then where
to look for inspiration, and also showing
you a way to create your own beeswax salve that
you can rub on your stones. Now we'll start painting. We'll start with
lines and grids. I will go into all
over patterns. Then I'll show you how to paint some leaves and other
botanical elements. Mandela types of design and then maybe even
your own alphabet. Then how to seal your stones and maybe a few other ways
that you can use them. [MUSIC] Please join me in this wonderful world
of painting stones. I'll meet you in my inside studio because
[inaudible] [NOISE]. See you in class.
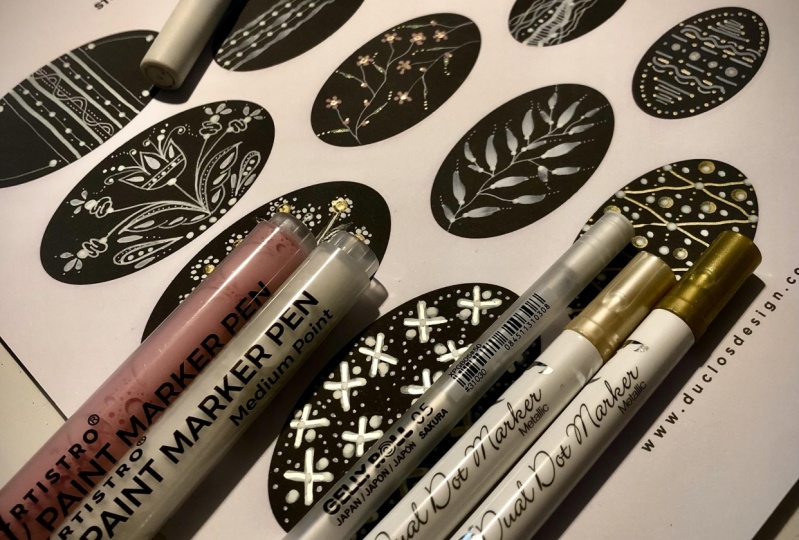
2. Materials: [NOISE] The first thing you're going to need is
some stones to paint on. I like a variety of size
and colors and textures. I'm pretty lucky
that I live right by a beach that has
the best stones. Actually, it's too
many to choose from. [MUSIC] But if don't
have access to that, you can find them online. I know that Artistro sells a pack of 10 rocks or 30 or 60, and you can have
those shipped to you and use to paint on. This is your little canvas. [NOISE] The next thing you'll
need is your paint pen. I use the Artistro
paint markers. For this lesson, they do a whole bunch of
different kinds, but what I'm going to use
is the extra-fine point. I'm going to use the
medium, this one here, the medium point and
also the fine point. I'm going to basically
use those three. Mostly in white, I'm going to use a
little bit of color. I would say if you're only
going to buy one size, buy the extra-fine
point because this is really the one that I
use for everything. Then I would buy a pack of five because you're
going to use them. You can use them with
abandon which is great. You can also buy the
whole set of 12, and then you'll have
all these great colors that you can experiment with. These are really great. You can have fun with
it and you can paint on a lot more than just stones. You can paint on glass, on ceramic, on
porcelain, on wood, on rubber, on metal, on paper, on fabric. Anyway, you can just experiment
and have fun with them. I also use the medium
tip and the fine tip. These also come as a set. I think you can buy them
separately just of white. But this is the set
of medium-fine tips. Again, you have all
these great colors to have fun with, and this is the
set of medium tip. These also come in a set. This is a 30 set. But you can get a
smaller set if you want. But look at all
these great colors. Is that awesome? So yeah, you'll definitely want to play around with these. I would recommend buying
a nice set of colors. I'm not really going to use
in this class that much, but you're going to want to
use them for other things. I do have a coupon, a discount code for Artistro paint pen or
anything on their website. You can order these
through Amazon or through the Artistro website, and you can use the
discount code LUCIE10 on artistro.com to
get 10 percent off. I'm going to show you
now how to prime these. I'll show you may
be using a color. Let's use maybe this color here. I'll show you what you
do when you get started, to get started with these. First, you take your
marker and then you shake it just to want to make sure that all the
paint is mixed up. You have to hear
that little ball inside telling you that it's actually mixing
up the color. Then you do that with a cap
on and then after that, you start to prime your tip. You just push until you
see the paint coming out. Don't despair. See, you can see it's coming now. [NOISE] Slowly coming down. Now I have enough. I have the ink and
I'm ready to go. [NOISE] It works
great on paper too. In addition to the stone
and the Artistro paint pen, you're going to need a
pencil and an eraser. You'll need a paper
towel or a soft cloth. This is optional, but if you
want to protect your stone, you can use matte
medium and a brush. I like the Liquitex fluid. If you want to make a beeswax salve and I have the recipe here and I have a video explaining
how to make it. Instead of the matte medium, you can use that, and you'll need some beeswax
and some coconut oil. Then I also have something
you can download, I call it my stone
practice sheet. This is a sheet
where you can make your design before you
put it on the stone, and you can just
print a whole bunch of these and then
just play around. This is a page that
you can just use to practice your design and doodle. Before you put it on your stone, you can actually just do it on this practice sheet and then you transfer
it to your stone, and then you can also
use a practice stone. I do that if I have like a
stone that is not perfect or I'll just sacrifice one
to just practice things. I might turn out to be a masterpiece and it's not
a practice stone anymore. [LAUGHTER] You never know. [LAUGHTER] You can
download these. The last thing you
can download is the alphabet sheet with
all the letters and we're going to have a whole
lesson on how to write letters on your stones. So I think that's about
it, that covers it, and we're ready to get going.
3. Inspiration: Where to get inspiration
for your little stone? I would say, first thing
you should do is go out and bring a sketchbook and
draw as much as you can. Anything that you see on
your walks or anything, just sketch some things and fill pages and pages
of your sketchbook. Then when you come, it's time to paint your rock, then you have ideas. There's so many ways that
you can stylize a leaf or there's just a lot of ways that you can
experiment with shapes. Another good place to get
inspiration for texture is to look into stitching books. This is Sashiko embroidery
techniques and this is great. These are nice repeating
patterns that would all look really great on a stone
if you reproduce them. Then, the other great
source is embroidery books. Embroidery books are great
because they're all line art. These would be really
great to translate into a pattern onto your stones. There's one I really like here, I'm going to show
you, this one here. I love all the little
details, the little texture. Just ideas for textures and
line work and everything, these are great source for that. Also, influence from
different countries. There's so many
resources out there, it's really hard
to narrow it down, but I would say just
explore, go to the library, get some books for inspiration. Always bring your sketchbook
with you and then just draw and see what you're attracted to and just draw as
many shapes as you can, and then you'll
have a book full of great ideas to do
some fabulous stones.
4. Preparing your Stones: The other thing I'm
going to show you how to make is how to make your own beeswax salve to
put on top of your stone. You can also use, instead of that, you
can use matte medium. A lot of people ask me
if what I put to protect my stone because you
want to leave it outside and in the rain
and you want it to last. I'm going to show
you how you can make your own beeswax salve with
beeswax and coconut oil. If my stone is rough, enough to texture is
a little rougher, I'm going to apply the little salve before I
even start painting on it. Most of the time, I don't put anything
before I paint on it. But I'm going to show
you at the difference. I'm just going to apply this and I'm going to
wipe off the excess. It's really fun, though, because it's like
a little massage , [LAUGHTER] stone massage. You can also wish for something
while you rub your stone, you wish for anything you want
really. Sky is the limit. What I do is I usually
always wipe off the excess and then I will leave it, I will let it dry. I would let it sit for a while before I start painting over it. But I'll do a demo with this
one that I did a while ago. Because if you
paint straight on, let's say unfinished stone, this one, I don't think
I did anything to it. You're not going to see
a difference honestly. This one doesn't have
any finish on it. It's straight rock. This one here as I put the
beeswax salve over it. It only makes a big
difference if your stone has a rough surface and it
makes it easier to glide. You see what I mean? It's
a little bit easier. I didn't let this dry long enough so the paint
might peel off. I would wait. But this could be
helpful for that. But most of the
time, I actually do not put anything on my rocks. I just go straight on it and
I add the salve afterward. I'm going to show
you at the end. If you're going to use matte
medium, that's really easy. You just take your
matte medium and you paint over it and
you let it dry. This one, I did it on top because I want to
show you how you can put, you can finish off and seal it, but you can still
add something to it. Like this one, I've decided that I want to add something. I felt like I needed more. I don't know if it does. It's nice because
you can add to it, not put another coat of
matte medium on top. If you already have a layer of matte medium and you
make a mistake here, you can pretty much wipe it off. As if you don't have any coating and you're
painting on your rock, you won't be able to do that. It might be a way to just, at first when you
start doing it, you have a second
chance to maybe change your mind and wipe it
off or you let it dry. But if you're going to use
matte medium underneath, you make sure to put matte
medium on top because, otherwise, it's not
going to last as long. That's for the coating. In this video, I'm
going to show you how I make my special beeswax salve. For that, I use coconut oil. This one does not have a scent, doesn't matter, if you'd
like to smell a coconut, you can use the scented one. The proportion are
one portion of beeswax to three
portion of coconut oil. I am going to do roughly about a teaspoon of beeswax,
put it in there. It's not super accurate, but I think it really
needs to be really. I'm going to do about
three teaspoon of coconut oil, about. [NOISE] This is the
mix that I'm doing. [NOISE] You can melt
it two different ways. I have this little Mr. Coffee
mug warmer that I use, and what I do is I just put it on and I wait until it's melted. It's going to take a while. But if you're not in a hurry, that's a really
easy way to do it. The other way you can
do is just put it in the microwave and I'm going to go do that right
now and be right back. For this quantity, I put it in the microwave for
about two minutes, and then it's completely melted. What I'm going to do in
there, you don't have to, but if you want to add
some essential oil, I'm going to add some
lavender essential oil in there because I
like the smell of it. Just a few drops. I'm going to shake
it and stir it. [LAUGHTER] Stir it
and not shaking. Now what I'm going to do is
I'm going to pour it and this is what I use because I think it works really well to use. It's an old tealight container
and when I'm done with it, I recycle it and I use
that too as a container. This is a little hot. I'm just going to
pour it in here, all the way to the top, and then you're going
to let this sit for, I would let it cure overnight, but you probably use it right away as soon as it solidifies. it's going to look like that. It's going to be ready to use. The other thing you can
do is use a little. If you have an empty
container for a lip balm, this one, it was empty
and I just filled it up. Like I have a little
bit leftover in here. I could probably just
fill up another one and use it as lip balm. It's great. You can also use it that on your stone because
it's a good way to just rub it on and then
it's very portable. [LAUGHTER] You can take it to the beach and rub your stones. It's great on your lips also. It's also great on your
hands and it's wonderful. It feels really great. Because sometimes you find
some really nice stones, you don't want to
really paint on them. You find them, they're wet, and
they're beautiful, and then you get them home, the next day and they
don't look that great because you can't see the
color as well when they dry. I have a lot of stones
that I'd just like to keep around my house. All I do is I apply
the salve on it. I just rub it on and it's so pretty and it's so fun to do. Then I wipe it off
with a paper towel. You can also use a soft cloth if that you
want, something absorbent. But you could see how pretty
the color is on this one. Let's try another one here. I use my fingernails
because I think I can just scrape a little
bit of it like that. Let's try this one here. I just love it. This one
looks almost like a muscle. It gets to the point
where you have enough on your fingers and you can just grab a stone and
just like do that. See how pretty this is. [MUSIC] You can use that on a wood also. It really works well to rub over any wooden bowl or anything that needs
a little refreshing. Look at that. How pretty
it is. Look at that. Very simple and it nourishes the wood and makes it
look like new again. [NOISE] I'm going to put
my little stones in there. Oh my God. So pretty,
like little jewels.
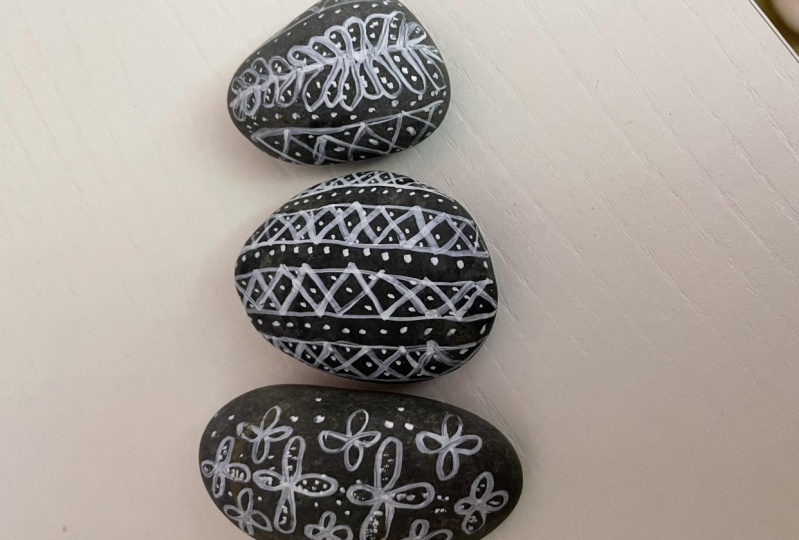
5. Lines and Grids: [NOISE] Okay. We're going to start with
just lines and grids because they are the
easiest ones to do, and they still look really
great if we put them together. If you look at it, all these
designs are super simple. But at the same time, if you put a bunch of them together,
they look great. We're going to start with
very basic lines. Let's see. Maybe I can show you like if you just
do little dotted line, like little stitch lines, if they do them on
different types of rocks, they're going to look different. These are all kind of
the same patterns. If you look at them, they all look different. You can also do the just simple
straight lines like that. If you just don't do it
over the whole rock, it looks like something's wrapped around it,
so it's really cool. Let's just start with that. Move that away, and I want to have
some rocks here. I'm just going to do a
little wrap around like that and some little
stitch lines on these. For this, I'm going to
use the extra fine point. If you want to practice, I have this practice
sheet that you can use. If you're not sure,
you could just practice on this sheet and
see what it would look like. If you have an
idea for a design, maybe you could just do
it before you do it on the rock because then it might be easier if
you start on something, just do a little sketch on this. If you want to, you could
fill this whole sheet for ideas and then transfer
them to your stone. I usually just go in and
do whatever I feel like doing because for me it's
more of a meditative process. I'll just take a stone and
just decide what I want to do. This one, I think I'm going to go tall on this one instead of going
like a little belt. [LAUGHTER] Instead of belt-like, it's going to be freeway-like. I don't know. I'm just
coming up with words here. I'm just going to leave
this one like that. Then I'm going to do
another one where it's just going to be lines. Maybe I'm going to do some straight lines and then I'm going to
make them cross. They don't have to
be straight at all, and then I could just leave
it like this or I can add some little dots, like I can use maybe
the medium point. A lot of time, I just test it here
first to make sure that it's loaded properly. Then I'm just going to
add some little dots. Most of the time I really don't know what I'm going to do. I just start doodling. I just doodle on rocks. You know what? If you don't
like it, it's just a rock. Just take another
rock and start again, and then go and put it out
there on the beach for somebody to find with a nice
little message on the back. [LAUGHTER] So have this one. We just did those two, see how quick it was. Then I'm going to
do another one. Maybe just like some dotted line or you can do a squiggly line. I like to do this little
grid kind of thing. So maybe I'll do this
one with a little grid. Actually, when I do my lines, I prefer to use the
extra fine point. So that's what we're
going to do here. Let me take this
little guy here. Sometimes, too, when you
start to paint a stone, you have an idea
in mind and then, for some reason, it doesn't work out the way that you think
was going to work out, but it turns into something
else and that might be even more interesting. So don't be too set
in a special design. This one I'm just going to
add my little line across, create a little grid like that, and this is a great one. I want to show you what we did. We have these three stones, and then we're going
to do one more. I think I like to do, I like this little grid here. So I'm going to do
it on this one. This is very easy. You
just put lines across. [MUSIC] Now we have these four. Let's do another one. Let's do a bigger one here. I think this one I'm
just going to do lines with the medium. I'm just going to do
some lines like this. I'm just going to go across
and keep it really simple. Usually, I start
right in the middle and then I usually
prime it first, then I'm just going to go
and do my little line. You can draw it first if
you want with a pencil, but I usually just go
straight on the rocks here. If it doesn't look like
I wanted to look again, I'm going to turn it
into something else. We have this one and this
nice little group already. I really like to do a series
of little lines, too. So let's do one more like that. I'm going to do this one. I also look at the
shape of the stone and it tells me what
it wants to be. Let's do some little dots. You see, we just created this little group here
and they look great. I would encourage you
to explore and try to do maybe some zigzag
lines like that, or use some lines and
add some circles, or just do a crisscross and add some little dots and lines. You can also do
more of an X shape. Anyway, sky is the limit. So go ahead and experiment
a little bit with these, and then we'll go to
the next pattern.
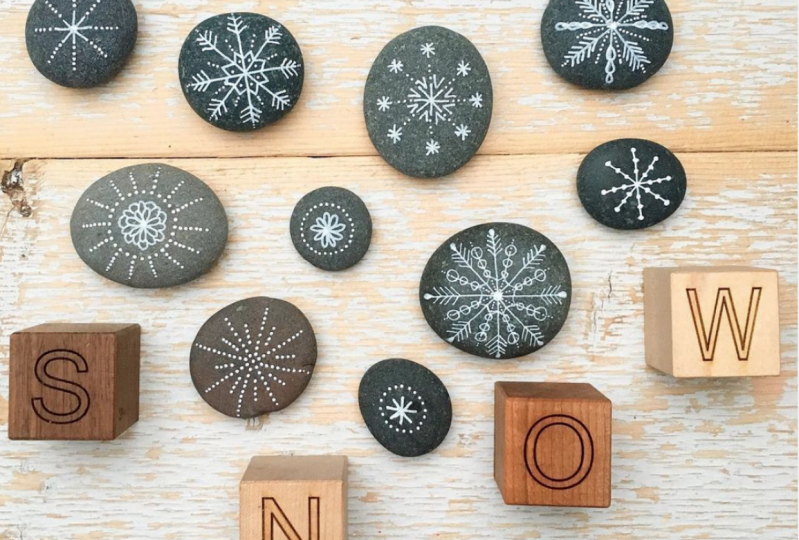
6. Allover Patterns: [NOISE] Okay. Now we're going to work
on all-over patterns. An all-over pattern
is a repeated pattern that you have that
covers your whole rock. Here you have a little bit of a flower pattern and these
little dark patterns. Anyway, I'm going to show you
how to make some of these. Let's go and create
a flower, a star, maybe something
with dots and then something that's a mix of line and all over pattern here. Let's move these here. Let's start with the
really easy one. This one here, the little
star pattern. Very easy. You start and you
just create the star. Easy. Then at the end I
just put a little dot because it makes it
look a little bit retro and it adds
a little interest. Then I'll just repeat
this all over my rock. [NOISE] I have this little star pattern
and an all-over pattern. It's very simple,
but it looks great. I think it looks great. Then let's try to do a
little flower pattern. I'm going to use this stone
and the same principle. You just create a little flower, whichever type of flower
that you like to do. You can do something that's more with little lines like
this one, for example. You could create a flower like that [NOISE] or
you could just do little circles and then you can fill those
with something. There's a lot of
ways that you can do an all-over pattern. But what I would do is just pick a type of flower that you like to draw and just
repeat it over and over. See, very simple and awesome. Now we're going to do
something more like a pattern. I'm going to take an element, let's say a shape, and then I'm going to
repeat that shape but I'm going to make it overlap each other. Now you have this cool stone and what you can do is you can
add some elements like that. Maybe I want to add
some little lines here. Maybe I'm going to add
some little dot here. You can just play
around with it. You can put the little star
if you want, mix it up. That's another all-over pattern. This one is very easy. What you do is I'm going
to use for this one the medium point and you're
basically doing a flower, but just with dots. See. I'm going to repeat
that over and over. I'm putting a dot and
then just putting stuff, dot around the dots. See, you have this
all-over pattern. Oops, see that wasn't dry here. If you feel like you
want to add to it, you can just do that. You can turn it into
something else if you want or just do a few
of them like that. You can play around with it. Now I'm going to show
you how I'm going to do this pattern here, which is a line
pattern and grids, but at the same time it's
more of an all-over pattern. I divided my stone in squares and now I'm going
to do my lines across. [MUSIC] It's all different, but I can see how you can create this really cool little
all-over pattern with a design like that, starting with a grid. We have our little
collection here. Again, very simple, but they look really
good together.
7. Botanical Elements: [NOISE] Another one of my favorite thing to do is to paint botanical
elements on the rocks. I love painting leaves
or little trees, and usually imaginary
leaves, stylized. Usually, I like to use more the oblong type of
shape in my rocks, but you can use any
shape that you want, any shape that you have on hand. I'm going to start with
just making something, maybe like this one here. Let's just do a
simple little branch. See the branch? Yeah, I guess so, although branch with leaves. I'm just going to
draw some lines. I'm going to keep
it really simple. [MUSIC] Then maybe when I'm
done with that, I'm just going to add
some little details. I'm going to add maybe
some little dots just at the end of my leaves just to add
a little interest. Very simple, but very
elegant and pretty. Let's do just a simple
little leaf like this. If you do one leaf, I usually start with
just my line here. Then there's my shape. You can do that
whichever way you want. I will add some
little dots here. There's my leaf, and then I'm going to do
more like a tree like this. Then I'm going to come in
with this and add some dots. [MUSIC] Now we have a little tree, and then let's do a leaf like that. [MUSIC] One more. Let's do some funky little
branch like this. [MUSIC] That gives me a nice, little assortment of
botanical elements to mix up with my other stones. [MUSIC] [NOISE]
8. Mandala Style Designs: [MUSIC] Now I'm going to show you how to
make a Mandala type of design or just a
circular design. For this I'm going to
probably use another color, but just one more color
to the idol dimension. I don't make a multicolored like a lot
of people do Mandalas, but you can definitely do that and go that route if
you want to but I'm going to show you
just a simple way to do this type of design. Let's start with the one that
looks like a sea urchin; one of those two here, and then I'm going
to grab my stone. Because you're going to work
in a circular way for this, I like to tape it on
a piece of cardboard. I'm going to use
some tape [NOISE]. I can use any kind of
masking tape and then I'm just going to
stick it on here, and then I'm going
to do my lines. I'm going to just
draw my lines and do some star here in
half and then in half, and then you have
a place to start. What I'm going to do now
is start in the middle. Let's see I'm going
to start here, and maybe I'll start with
[NOISE] the find point. Again, you frame it. I'm going to do it here [MUSIC], and then I'm going to go around maybe with
the other color. Let's do that, I'm
going to start with this one and then
I'm going to go. I'll have that. Now I'm going to do some
lines all the way to the end. I'm going to use my fine point and I'm going to
add some circles. Ready. Now I'm going to do one that's
more like this one, like a Mandala type. This cube is just over here. [MUSIC] Let me show you how to make these little snowflakes [MUSIC].
9. Create an Alphabet: [NOISE] In this lesson I'm going to show
you how to create your own little alphabet. I created this sheet
for you that you can use just for
inspiration and for size, but you can also
create your own, find one online and print it, and just make it your own. But this is a good
place to start. I have all the letters here. Of course when you want
to write something, you're going to have to
create more letters. I always have some
extra that I create. Then I'm going to show
you my process on how I transfer the letters. I wanted to be about the
same size, all of them. These are about an inch tall. I leave it lose because I mean, so rock, you don't
want it to be perfect. You want it to look
a little funky, but at the same
time you want it to be easy to read when you're
trying to spell some words. I'm going to use
this stone here. [NOISE]. Let's see. I want to do maybe a D. I'm
going to do a D for dewclaw. [LAUGHTER]. First thing I'm going
to do is these are about an inch tall,
these letters. For a reference, with a pencil, I'm going to mark the inch mark here and try to center
it on my stone here. Then I'll just draw.
I'll going to start with [NOISE] the flat part here. [NOISE] Let's see. Then you can erase those lines afterwards so don't
worry too much. Don't worry too much if
it's not centered or if it looks a little bit funky, that's the whole idea. If you want to perfect alphabet, you would just print something. The whole idea of
doing it on the rocks and it has to look
home made and fine. I have my basic letter here. I have this page here as a PDF to
download for you to use. I'm just going to go
ahead and just draw my lines right over
my pencil lines. Then I'm going to
do this curve here. The curves are little
bit harder to do. It's hard to do because
the stone is also curved. Even if you're trying
to make it perfect, it's not going to be perfect, so you just have
to let go of that. Now I have my shape
and what I like to do to personalize these, I'm going to add some
little lines in here. For the final touch, I'm just going to put a
roll of little dots here. You can put them inside
here, or outside. I think I'm just going
to put outside here. Do whatever you want. You
can put any flourish. There you go. You have the letter
D as in dewclaw. [LAUGHTER] Do that 26 times
and you have your alphabet. [LAUGHTER] That easy. Then when this is dry,
wait until it dry, but then you can just use an
eraser and erase your lines. I can go on and show you, like this one here. I think I erased the
line on this one here. [MUSIC] Sometimes you'll
get a little bit of the pen marks on there that
was going to go overlay your white so you
can always go in and redraw your lines if
you want to or not, because it's really
pretty either way. [MUSIC].
10. Bonus Video: Cherry Blossoms: In this bonus video, I'm going to show
you how to paint a little cherry blossoms and
also a little bird here. This is very simple, you just need your stones again. I'm going to pick three stones, like one more elongated shape. I'll do this one here
for the little bird one. This one is going
to go horizontally. For this one here, what I did is I used a stone that already
had a line in it, and I work with that detail. I think I'm going
to do that again. I'm going to use the stone here. Already has some lines in it. I'm going to work my branches with the design
that's already there. Let's start with this one here. For this one I'm going to use the medium point and I also will use my extra fine
point in white. What I'm going to
start with is I'm just going start with
my branches first. Let's shake it up a little bit. I'm going to start here at the bottom and just
draw some branches. Sometimes it's easier to do
it upside down like that. You can go and if you want
to go and have them cross, you could do that too. These are my stems here, I'm going to add
some little branches because I'm going to put my little flowers
at the top here. Another one here. I think we'll start with that. Now we're going to
go in with my pink. Then I'm going to
add my flowers. To do these flowers
is very easy, I just do five little dots 1, 2, 3, 4, 5. Then I'm going to
do the same thing. At the end of each
little stem here, I'm going to do a flower. I tried to keep them
really close together and then I look here and
I feel like I need to have one a little
bit lower here. I'm going to draw one more stem just right here to overlap there and add a flower in here. The next thing I'm going
to add is little buds. I'm going to add just a
little bit here and there. Because these are little
flower buds, not too many. While the other one dries, I'm going to work
on my blue one. This one I want to work
with what's already there on the stone. I'm going start with my
white extra fine again. I'm going to draw
a line over this. That will be one of my stem is going to make them work with the design that's already there. Then what I'll do is
do the same thing, and I use my light
blue medium point and just draw my
little flowers again. Five dots. Sometimes, like for this one, I think
instead of doing a flower, I'm going do 1, 2, 3 dots like that, just to finish off like that. Then add some flowers. You could do a mix of both. I'm going to let this dry
and then I'm going to work on my third stone, which is going to be
the horizontal branches with the little bird. I'm going to start
with this one. I'm going to just draw, let's say this is going to be my branch where my little
bird is going to be. Then maybe I'll
draw my bird first. What I'm going do is just
draw a little bird shape. Very simple, a little beak, and then three feathers. Then I'm going to just
do my branch like I did for the other ones. Put the legs here,
another one here. Then the difference
between this one is they're not all going
to come from here. It's like the bird is in a tree, so I'm just going to
have some branches that come from the
other side here. Then I'm going to have
another one coming from here. Then I'm going to add
my little flowers. 2, 3, 4, 5. The last thing I'm
going to add is some color inside my
little bird here. I'm just going to fill in
my little bird with blue. We're going to let
everything dry, and then we're going
to come in and add some more
details with white. Now that everything
is pretty dry, I'm going to add
some little detail with my extra fine point. Let's start with the
first one that we did and add little dots
in the middle, 1, 2, 3. I'm going to do that everywhere. The other thing I like to
do is add a little bit of shadow or highlight
on my little buds here. I mean you can read that
as a little shadow, a little highlight, or even it looks like
a little bit of snow. You can decide to put it
below if you want at the top, I like to put it
at the top here, almost like the sun
is hitting on it. Then the last thing
that I like to do is add some little dots. They can be like
a little branch. They could be following
the branch here, I can put it right next to it, add a little detail. It just adds a little
je ne sais quoi. [LAUGHTER] You'll see. Until you feel like you have it exact like the way
that you want it. I think I'm going to
stop right there and move on to the next one, which is our little
designer we did with the line in the rock. The last one that I'm
doing is my little bird. For the detail on the bird, I'm just going to do this
little line. It's not dry. [LAUGHTER] It's not super
dry yet. Let's see. I'm just going to add
these little line that's going to look like
little feathers. You can add some
here if you want. I'm just going to do
little dots here. [MUSIC] For the eye, I'll probably just
use my black marker, and just do like one little
dot, just like that. See, we have a nice little bird. It's so easy. Then I'm
going to do the same thing. I'm going to add my little
dots and highlights, and voila you have three nice little cherry blossom stones and
the little bird.
11. Finishing Touches: Now we have all my stones that I made in the
different categories. Then I'm going to decide
if I'm going to leave them natural or if I'm going to add some South to the beeswax soft
to protect them. Or if I'm going to seal
them with matte medium. Depending on what
you're doing with it, let's say you're
going to have it outside a lot and you
really want to protect it, maybe you want to use the
matte medium and I'm going to show you how to do that. Let's say this one here
I'm going to do the South. You have to let it dry, make sure that the ink
is completely dry. The paint pen is
completely dry before you can actually apply
the South on it. It'll give you a little
bit of a darker look. This one is sealed. This one I can decide that
I don't want to seal it, because I want to keep it. All my other stone
with alphabet on it don't have any sealant. I'm leaving it natural
because I know I'm not going to use it outside. I'm going to use
it in my studio. So it doesn't really matter. I'm just going to erase
the lines and I'm done. For this one here, let's say this one here I
want to put in my garden. I'm going to seal that
one with matte medium. I'm going to show
you it looks like. I'm going to erase
some of the lines, but I'm not going to
worry too much about it. I'm just going to
use a cheap brush and some matte medium. Then easily I'll just
put it right on it. [LAUGHTER] Because I'm lazy. I'm going to put a
piece of paper here. I've put a little too much. What I'm going to do, I'm
going to wipe it off. Then I'm going to
leave that this dry. You can do the back or not. If there's nothing
on the surface, you don't need to do it. This is just to
protect your linework, and this will take a
little while to dry. I'm going to leave it here. Then I have these two
here that I'm probably just going to add a
little bit of South. The nice thing about the matte medium is
that once this is dry, you can go back on top
and add some lines too. This one I have
enough on my finger. There you have it.
This is without. These are your options.
12. More ideas!: [NOISE] What else can you do
with these beautiful stones? Well, you could turn them
into garden stones and write the name of all your herbs and plants that you have
in your garden, and then decorate them with a little border and place
them in your garden. The other thing you can do
is use them as place cards for your dinner parties or
weddings or special occasions. I had even turned my stones into business cards with my
website on the back, and they make great people with. You can also make yourself
a little tic-tac-toe with an old plank and I use a
wood-burning tool for the lines. You can paint them
like Easter eggs. I like to use them as props in my collage picks tools
that I post on Instagram, and sometimes they even
come part of the artwork. But most of all, I like to paint a bunch
of them and release them on my beach for
other people to find, and I call that my catch
and release program. It's a form of art abandonment. But whatever you decide to do, just get out there, get creative, experiment, and enjoy the process.
13. Au Revoir!: Thank you so much
for taking my class. I hope you were
inspired to create lots of mini art on pebbles, and on stones, and on rocks, and that you can share
your art with the world. Even if it's just to take pictures and put
on social media, or release them in the wild, or if you just want to give
them to friends and family, you're going to make
somebody happy, for sure. I hope to see you in
another one of my class. In the mean time, [FOREIGN] [MUSIC].
 Lucie Duclos, Design + Mixed Media