Transcripts
1. Introduction: Hello. My name is low and I am a designer and a mixing Artists from Victoria I teach makes me their classes here on skill share, but I also love designing patterns and creating my own fabric own spoon flour. Since I've had a lot of requests for a pattern design class, I decided to create a new pattern. Design Siris for skill share. So this first class will focus on creating a basic, seamless repeat by hand using the paper cutting technique. I will also go through the different types of repeat. Then I'll show you how to create your own repeat tile that you can use to make beautiful wrapping paper. And then you can use my Hank Tack template to create really cool gift bag. What your leftover paper. So you don't need a computer or any computer skills to learn this technique. But as a bonus lesson, I'll show you how to clean up your repeating photo shop and how to upload it to spoof our to create fabric or wallpaper or home decor items like Do they cover or tablecloth. So I hope you'll join me on this pattern design adventure and that you'll be inspired to create beautiful and fun, and you help these matters. So he's
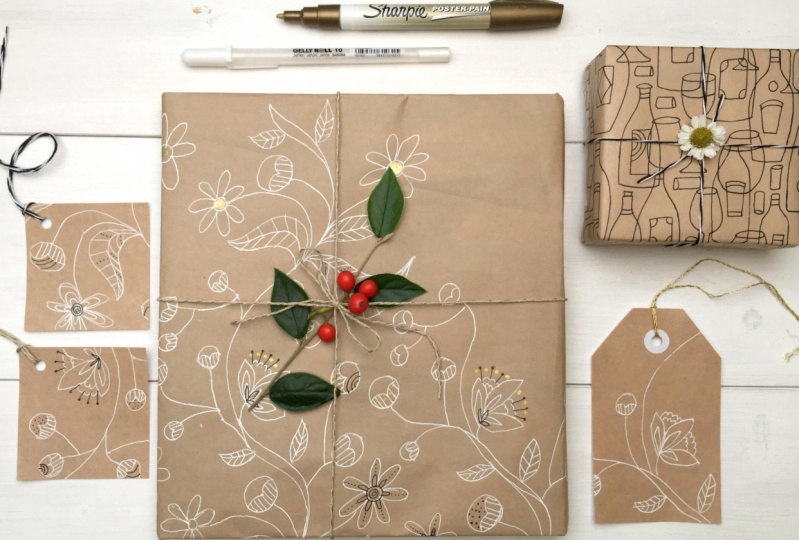
2. Materials: Okay, let's go through the supplies you need for this class, so you'll need some scissors. You'll need a pencil and racer, and you'll need Ah, marker. This one is the favorite Castell, that co pigment in 0.6 point five with fine. Any other brand would work to on and, uh, Sharpie poster paint in gold. And you can use also if you have, uh, Posca brand that works, too, and jelly roll for this application. I like to use this one instead of the postcard because it stays on top of the craft paper a little bit better. So jelly roll from secura and white and you'll need some, um, tape, though masking tape. I used Washington because it's not too sticky, and I kind of like to reposition my piece of paper. So but you can use any kind off masking tape as long as it's not the super sticky kind. And you'll need some card stuck not too thick, just kind of, You know, I mean, you can use paper to That's gonna be much easier to work with card stock, and I use a five by seven pieces, but you can use any size you want and you'll need some kind of ruler and and then you'll need some tracing paper. Um, this is a nine by 12. Yes, a piece of paper tracing paper about nine by 12. A rule of Kraft paper. This one is about two feet wide. It's not, too. And that's kind of the kind that we want. And as faras reference books, you Can you. This is a really great reference book of a barn fabric design and creating repeats, and they talk about everything in there. It's really good one, and I'll put the reference in the reference section in the description of the class. And then another great book is the spoon flour handle. There's also a lot of information on creating a repeat and how to work on spoon flour with color palettes and everything. So if you want to go dig a little further, you can get this book. It's really good and, uh, yeah, let's get started
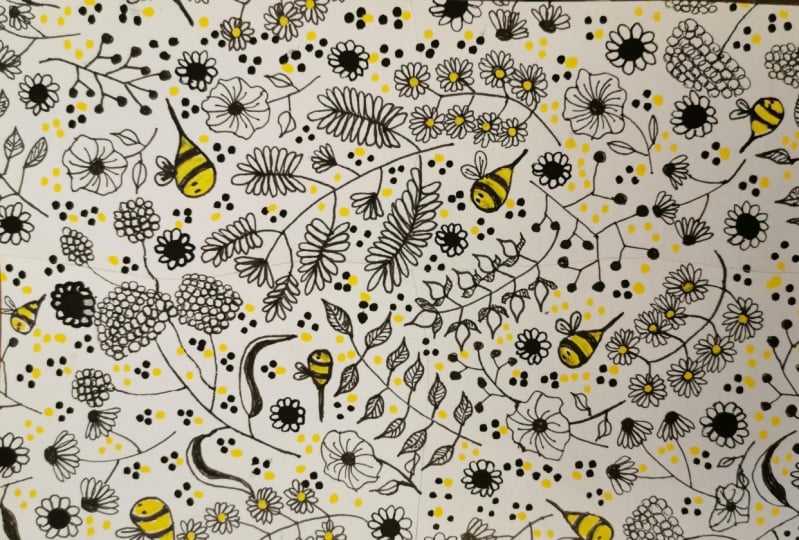
3. Pattern Inspiration: so pattern is everywhere you look. If you look around your house, you'll find some patterns. You'll you'll, um, fabric on the wall on on products and on this is a file folder as recall pattern on it. So it's really all around you. And when I started wanting to design fabric, I just was mystified about how you would end up having a seamless power like that because he can kind of see where it repeats and stuff. But I just like, How do you put something together that was fascinated by by, you know, the technique known learning A. Taking a How to Do that? Uh, this is actually a book on wrapping paper, which is really has really great ideas in there, some very intricate. And I would call them a novelty novelty fabrics because it's always telling a little a little story. You know when you look at it, so it's kind of it goes into that categories. I think there's three big categories in fabric design and didn't surface. Pardon design would be florals and novelties and geometrics. So another one that's really it, was a great book on mid century modern living. Uh, if you look at this beautiful pattern here. I mean, we're gonna work on in black and white today, but still he can You can still translate something like that in black and white. But again, these are seamless patterns. Another good one that I love Is this pattern from I don't know who did this one, but it's beautiful. And there's a lot of great patterns in this book. This one is the fabulous fabrics of the fifties. Another thing that I've found fascinating was like Paisley is like, how do people create paisley on again with the technique I want to show you today, You gonna You gonna find out how you can actually do something like that? I wouldn't I wouldn't recommend to do something like that at the very beginning foot. Maybe when you get a little better, you can do something like that s Oh, this is another great book. 19 sixties fashions. Uh, what's great? Because today we're gonna work in black and white line artwork on Lee because I think I don't want to bring in color because it's already so many things to to learn. So it's easier to take color out of it. And I will make a class later and just work with color palettes and different thing. But at this point, we're just trying to learn this technique. So I think four ideas for shapes and florals and things. Uh, embroidery books are great because they have a lot of line drawings in them, so he can get a lot of great ideas and put them together. Also, a lot of the books from thes are do overs. Probably Indian design, anything that Nick would have a lot of cool. Interesting repeat. Ah, and borders and stuff on. And this is another one. Chinese design patterns again beautiful. Repeat our work. Look, that you can gonna show you how you create something like that. And, um and also, I love this book here. This is a great embroidery book. Uh, has got a lot of elements that you can combine together, and it's full of great ideas. And, um, I think also, you can go out and collect some wrapping paper and some fabric, so I want to show you I'm gonna tell you a little bit more about the different kinds of repeat in the next videos.
4. Types of Repeats: Okay, so let's talk about repeats. You can do a lot of difference styles of repeat, but what you need to do is create a tile first. So this is a tile or a block, and, um, to create our basic repeat, you just repeat this tile like a tile floor. So to create that, you just basically repeat this shape over and over on the side. So this is a basic repeat. If you wanted to turn the same tile here, but do 1/2 drop. Repeat. What you would do is you would take your tile and move it down half of the other tile, and it gives a completely different effect. You'll see. So this would be, ah, halftime 1/2 drop. Repeat if you want to do the half break. Repeat. You would go back to your original here, and what would happen is that you would move it half a block, but like when you're laying bricks so it would go on either on the right hand side or like moving to the left. But he we're gonna just move it here halfway. And this is 1/2 brick. Repeat, if you wanted to do There's another option that you can do in spoon flour is that you can do a mirror. Repeat. So for a mirror, repeat what it would do. Is it? Would it would do a mirror image of this. So the mirror image would be that one. And then it would also do a mirror image of this which would end up being this tile and same here. That would be a mirror image of that would be, um, this tile and it would be the same thing here. So, you see, like the difference it creates here. And then here it would be this disc, Um uh, this one, the bigger the fatter piece here that would repeat so they would repeat. It would actually mirror this. Like, if you put a mirror in between here, That's what it would you want and you're going to see. And same here. You're gonna do no like this. It's confusing. And then you would repeat the same time. So this would be your mirror image. Cool down this right? No, this one, actually, no, it would be like this. Remember, here and mirror of this would be this one. So this would be a mirror image of the same design. So this is what you can do with this one tile. He can do basic half drop, have brick mirror. Uh, and and then on the next video, I'm going to show you how to create seamless repeat.
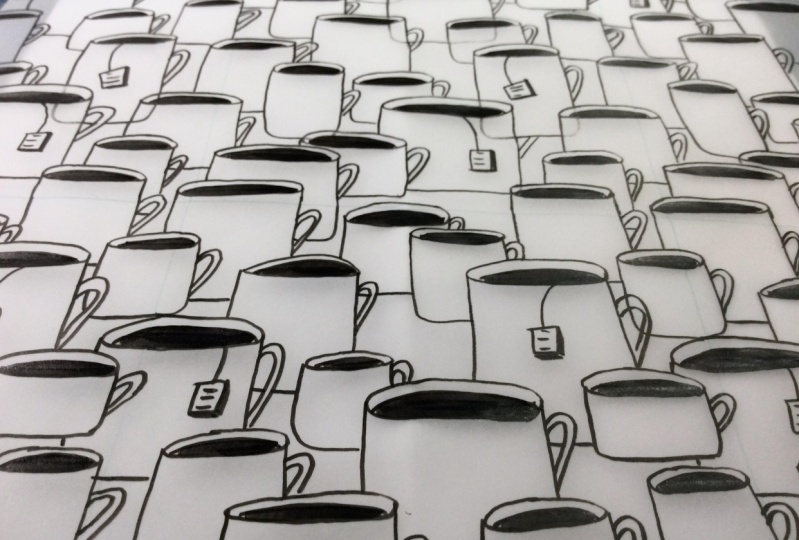
5. Seamless Repeat: So now I'm going to show you how to create your seamless repeat. And for that you we will need to create a tile repeat tile. And I'm gonna use a piece of paper that's five by seven for this. But you can use any size you want. It could be square. It doesn't really matter. And then you'll need a pencil and some scissors and any kind of tape masking tape, but not something that is to, um, permanent, because you don't have to move things around and then on Eraser. So I'm gonna start I drawing my on illustration and hear something that I want to turn into a repeat. You can get some really good ideas in the embroidery books because we're gonna work in black and white for this exercise. And, um, I would keep something, Keep it really simple, because we're going to repeat this a bunch of times and draw it so someone that kind of based my design on something similar to that because I kind of like the shape and I want to know. I want to show you how you can take just about anything and just turned out into a beautiful. Repeat like this one, for example, that I did with the one illustration and for my coloring book, I decided to turn it into repeat to do it on fabric. And so you really don't see where it repeats exactly? Just kind of flows into each other. And that's kind of what we're trying to get with this with this technique. So another example here is this that I think it's really beautiful. Yeah. Again, it's the repeat title, but you really don't see. I mean, if you look closely, you'll see, like you can see that this one repeats here. But, you know, when you look at it from a distance, you really can't tell No, let's get started. So I'm gonna just draw something. Um, Let's see. I'm gonna just Do I really like diesel? Uh, he's okay. And you want to do it in pencil because we're going to rework our design. We're gonna fix it and alter it and kind of like these little things here. They're really cute on this one. So I'm just gonna do You don't want to copy everything. You just want to be inspired and in a kind of nice to have something, sometimes just to get you started. And then you want it bar. You want to kind of add your own touching there, do this And what's really important at this point, it's like you not you can do you do it. You're drawing in on this on this surface, But you do not want to touch any of the edges. That's a very important. So I'm gonna do another one here, and then I'm going to do, um I don't know, other little element here. Maybe like flower looking simple just to make it mine, you know? So I think I'm gonna stop there for this stage, and then I'm gonna show you how you put this away. So I wanted to have this design. I want to create a repeat out of this, and I want to show you the first step. So first you need to make sure that all the edges match and flow into each other. So we're gonna cut our piece of paper. We're gonna cut it in half. I was going to do it one side of the time, so we cut it in half, and you kind of want to give it a little bit of a curve because you'll see when you put it back later, it's gonna make your life much easier. So I have these two pieces and then what you want to do is switch him around and line up. They the flat edges together, and then you're gonna want to tape it on tobacco. I want ta pissed. So you turn around, mixture, everything lines up perfectly, and then just put some teeth. This is not perfect enough. Yeah, that's kind of important. If you want you repeat to repeat the right way. So now I'm ready to make this kind of work and flow into this part. So what I'm doing here is I'm trying to link this with this one with this side. So then they flow into each other, and I really wanted to put element that go across this line here, but I'm not allowed to touch this edge or this edge. Are those two edges. You just work in the middle. You can always work in the middle. You just can't touch the edges. Okay? And then I'm gonna do I don't know. Um maybe another flower here whips. I'll make it go from here. Okay, so now I have stuff going on in the middle. I'm gonna do the other side, and I'm just gonna do the same thing. I wanted to give it a slight curve, Not don't go crazy just a little bit, because, um, it'll help you put it together. And also, it helps you. Helps. You kind of know where you get. Have a flat it That's where you want to switch it. So here you have to flat edge. Serious sweet. You You swing him around, lose like this, and and then you want to make sure that here So you don't want that Lined it up up here. You want a lineup? You want to see that little X here? That's where it needs to, um, to hit, like, right there. So again, um, turn it around and make sure you have this little X here and put a good piece of tape there for this. Okay, well, now it's time you put it anywhere you want, because usually we're gonna do kind of a toss. Repeat anyway. So, uh, now I want to kind of link these pieces together so you can see here. My flowers is starting here. So maybe I wanted to go linked to this here. And then maybe I'm gonna add another one of these guys and maybe another one here. This is what you're handy Dandy Eraser comes to play, and then again, you can always work in them in anywhere, as long as you don't touch any of the edges and you can work in the middle here and here. I think I think that's pretty good. I want em. Maybe I want this. I want another one here because I wanted to link over here. Okay, so I think I'm going to stop here, and I'm gonna What I'm gonna do is I'm gonna put it back together, and I want to see if I like it if I need to adjust because you can always adjust even after you've done this. So you take everything apart and you'll see why it's important to have, um, this little curve here because you can put it back together. If it was all the same, you wouldn't know how it would be kind of hard to put together. But now that it's like a little puzzle pieces um, you know, Then I'm gonna Can you see where it matches? Let's see. Like this. Ah, no, no, no, no. That's not that easy. Um, they're safe. And here and here. So now I have all my pieces back together, and I'm going to just glue them back and because you kind of have to do it on the back. That's also very helpful. Toe have these little puzzle piece because you're not seeing like what you're doing. Okay, so now again, make sure everything is super straight. Then tape it back together. So, um, I should probably do visible better because you don't want any gap anywhere. Just makes your life more difficult. Okay, so now I have my tile, and you can look at it and see if it if you see any, like holes or anything in there that bother you, then you can know at this point you can go and add some details. Someone had some lines here again. You cannot touch any of the edges, but you can add some details. Can I have some lions in here? I think maybe I want to add something here like a little flower. Um, I think it's pretty good for for this design. So in the next video, I'm going to show you how I'm going to test its repeat to see if I like it. If it flows property and then I can always adjust my tile. So to recap, you draw your image in the middle off the paper. Then you cut it in half and then you make sure to line up the edges, the flat sides together. Then you feel in the middle. Then you cut again and make sure you line up the four corners and then you feelin again Ah , in the middle. And then you put it back together and tape it on the back. And you have your repeat tile that you can now repeat to infinity. So I'll see you in the next video.
6. Testing your Repeat: So now we're gonna be You were going to test our repeat. The way that I do it in my class is I actually used some tracing paper and I make my students repeat their tile by hand because I think when you do it by hand, once you you really understand the whole principle off doing a repeat, and you could do that on the computer after that if you want. But, you know, I think it's always nice to to learn it, how to do it by hand. I think your brain kind of kind of registers like the principle of the whole concept. So here, I'm gonna kind of center this in the middle of my page. Um, maybe I start started the bottom if you this is a nine by 12 piece of tracing paper. So I'm gonna do 2.5 inch at the bottom and then lying up maybe like, two inches here, and then put your time in the middle and then trace other here. Here. Okay. Okay. So this is where we're gonna repeat our tile to see if it if we did it right. So what I do is I put my tile in the middle and tape it if you want. I usually don't tape it on, but I'm just going to trace my design. So there you go. Oops. Okay. Well, this is No, I didn't do a really good job here, so I'm actually gonna do this and I'll change my tile after to match that. I don't want every do it. Okay, so and I'll show you how we do that. Okay? So, again, this is just Teoh. Yeah, I kind of like this. Maybe I want to bring some of that someone else. Do you look so that? Okay. So as you can't see, it doesn't have to be, like, perfect anything that's in the middle. You can really kind of do whatever you want. Still on. Don't have to follow exactly where your lines are. But anything that touches the edge are it's pretty important to be accurate, because that's when you want to see if this tile is going to repeat property. So what I'm gonna do now that I'm done tracing my tile, I'm gonna slide it, slighted to the left, on the lines that we drew here, and then I'm going to finish the lines so I can see that everything matches. So I did. This side is totally fine. It's pretty good. So now what I'm gonna do and check the other side Someone slighted Tiu the right side right here. And, um and yes, it it matches here too. So I'm doing great, but I'm gonna trace everything because I want to see how it looks when everything's together and how it repeats. And if I like to repeat because then I could change my if I don't like the repeat. Oh, I see holes in it or a stuff that looks to predictable I'm gonna change my tile to I'm gonna just my tile to work the way that I want No. So my size air repeating really well, So I'm happy with that. So now I'm gonna I'm gonna check the top and bottom to see how much repeats. So again, I would take my tiles and slide it down to the bottom and lining up with my lines here. And if you line it properly, you can tell that it's working when I want to drive. But you can see how it's starting to come together. as a design. And when you repeat something, even if it's really simple, it becomes, um, kind of intricate than interesting. It's like magic. Yes. And then when you print the whole thing on fabrics, it's even more magic and addictive to Okay, okay, we're doing great. I'm already seeing that. This is a bit of a hole in here, and I don't know that I care, because I don't think it's a bad thing. Toe have a whole, you know, that's a little space. So But this is where I could decide to, you know, maybe at something in here. Maybe I'll do it for you guys just to show you just to show you how you can change something like that. Okay, so now I'm gonna do sinking at the top, slide it up to you yet Here. Okay, so now I can see that, You know, everything repeats properly. It's all flowing. So what I'm gonna do is I'm just going to finish the corners, just a have a full page of my repeat night. I can scan it and just kind of look at it for any kind of holes or stuff that I I want to change. Okay, so now I have for white. So I haven't pretty cool tile, so I like it. I really like the flu. I don't see any big problems with that. I do like having a little space in here. I don't think it's Ah, it's an issue. But, um, I if I wanted Teoh change something that say, Like, I want to add something in this space here. And what I would do is you know, one had something here like that, Okay, Because I feel like there's a whole and I want to add that. So I'm gonna do I'm gonna added here, and so that means that I have to add it to my tile. So at this to my I would change my tile here to have something here, and then I would have to kind of undo everything, so I would just put it back in here, do that because I want to add this one to fit perfectly. So it would just add this. But then you just put it back together, and then you can tested so you would draw it, You know, kind of here Here, you know, you would draw this. Try it, line it up again, draw it and then you would do that around. But I don't think it makes any difference here because it's behind behind where we did so. So that would be a way to alter your original tile. Teoh adjusted to have something that you want so so you can do something like that. Very simple like that. I could go a little bit more intricate if you want. Like, yesterday I tried one with a pistol. This little design here and I, um I just I reworked it a lot, you know, And then a breathing kind of like the way that the last tile the tile worked. So that's really pretty. And again, it's just so you know, interesting and all the movement that's going on there and that kind of stuff from this little tile and that kind of work, like back and forth for this. If you want something to metric, that kind of like is intertwined and works together, not something that's just a set, repeat, but something that has a little more movement than you could do the same thing with very simple shape. And then I repeated just started with just I think I have, like, three or four shapes and then I repeat out of that, even though it's very simple, it's very effective and very interesting. But I would suggest that you pick something simple to start and just to understand how this whole technique works and then we're going to move on to our class project.
7. Your Class Project: So here comes the fun part. Now we're going to trace our seamless on a piece of Kraft paper to create a sheet of wrapping paper. So I have a role here, Kraft paper and I'm gonna measure about 20 inches wide. Uh, because it's going to be about the size of a sheet of wrapping paper when you buy it in the store in defense, fancy feet, a wrapping paper. Perfect, because we're gonna use it to wrap things. So this is where we don't need to be perfect anymore now that we have a good and good repeat. So I'm gonna start kind of tracing in kind of in the middle of my sheet of paper, and I'm gonna trace it on. I'm gonna work towards the edge. So I'm going for this. I'm gonna use the jelly roll from Sakura, and I like it because it kind of stays on top of the craft paper as opposed to some of the paint marker kind of get absorbed by the Kraft paper. I'm going to draw my shapes, and this is doesn't need to be perfect at all. It could just be just fall away in your design and it's more for the flow. So you can see that, um, the jelly roll sometimes gets stuff and you kind of have to clean. So a good idea is to work. Not like I'm doing right now but the other way around. So if you're if you you want to start here and then draw this way as I'm kind of all over the place here, I'm going to smear my think so don't do like what I dio. And this could be the time to add some details that you didn't have that you don't have on your original because you might feel like, you know, you can use a little more definition, so you do whatever you want. You can leave it as is and you can add and we're gonna add some metallic also, so you'll see. So basically, once you're done, you know all of your I wouldn't say like, don't draw like, half a shape like this. Just wait until it repeats here. But what I would do is do like all the shapes that are all pretty much whole. And then move your piece of paper. I'm gonna show you. So here and see this one here. I'm gonna move my piece of paper to right here. You know what? It matches up here, and I'm not going to keep doing my design here and that you're gonna do exactly what you did before on the piece of tracing paper. Except that this time you would you would you want to finish your shapes and that draw half shape, You know, you want it to be more continuous. So I'm gonna do this, and I'm gonna paint my whole page, and then I'm going to get back and at some metallic color. So if you having a hard time seeing through your paper here to trace your drawing, um and or if you're using a view victor paper, that's really hard to see through. I'm gonna give you a little trick, Teoh. Create your own homemade makeshift lightbox. I actually bought a little cheap white light box, and it is already broken, so I can't recommend anything that's inexpensive. So that's why I want to show you how to do it like thistle techniques. So I'm just gonna use, uh, plastic container. You can use any size you want depending. What kind of surface you need for drawing, and you're gonna just use your You could use a flashlight, I guess. But something flat is better. So I'm just gonna use gonna use a flashlight and here, and I'm gonna put it in my box inside here, and I am going to hang on, center it a little better. And the tracing paper will help diffuse the light a little bit. And it should meet a lot easier to see your drawing through the paper and then to line up your repeats, right Like this. And then you could just go ahead, me tracing and with their own. And there you go. So I finished, uh, repeating my pattern all over my piece of Kraft paper. I, um, smeared a little bit. If you look carefully. If that happens to you, you might want to just want when you draw, and then you move your hand because if you look at my hand, I kind of smear over the place so you might want to draw. And then as you move down, you just put your poem on a piece of cardboard or anything and move it around like that. That might help a little bit for the smearing, But personally, I don't really care that much because, you know, the beauty is that it looks homemade and it's in perfect. And that's just the way this and it makes its part of the beautiful the beauty of this, uh, this craft paper. So I'm gonna add some detail here with a Sharpie, uh, gold Sharpie. You can also use a post CO brand if you want. This is silver, but a reading of the gold metallic on the craft paper loved the contrast that you get with the craft and shiny Matt and shiny. So I am going to start adding some details. I mean, you could totally you just leave it like this is that it's gorgeous, just as is, but you can add anything to it like I'm gonna add. I just love adding a little bit of gold, and, uh, it could be super simple. You can just have a few, You know, a few here and there you go crazy. If you want. You could just do whatever you want. I kind of like Teoh. Try different things and you don't have to repeat the same thing every day. The idea is to add some some sparkle. So I'm going to do that. You saying I hear you want You might want to use this two nut smear. I want to try different things because I'm not true with gonna work, So that's kind of cool. Um, I like this here. I'm not wanted. That's in the middle. You do whatever you want here. Maybe like that. It's really up to you. Once you wrap something in it, it's just gonna look beautiful. So you can also add, uh, any other color that you want. You can trace your lines in black if you would prefer. And so I mean, I would say just come and experiment with it and just have fun. And once you repeat this whole page, you're really gonna understand how they repeat works. And I think that's the whole exercises. Like, how do I create a repeat and how does it work? And your brain is really gonna register after repeating that over and over. Do you? You would be a master after you're done with this, you can do anything. So enjoy. Have fun and post something in the project section and show me what you did and rapper present with it and show me how it looks. Okay, Have fun
8. Wrap it Up!: So congratulations. You made beautiful wrapping paper, and I can start wrapping your presence and, uh, you can add some little flowers and stuff. And this I had this threat is kind of works pretty well with the Kraft paper because it's him. Thread. If I could find, um, it's hemp thread and this guy low golden that that's really pretty. And then, for this packet here I got actually took, scanned my design and I put a piece of I cut a piece of graph paper that was 8.5 11 and I just put that in my printer and then a printed beautifully, so that works really well, too. You can try that on a Z, concede he here. It's one of the paper that I didn't finish. And you can also do that so you can like leave area. They're not. You don't have to draw everywhere on it because it looks really pretty like that, too. So there's a lot of different options, and, uh, and then once you wrap your presents, you're gonna have these leftover pieces. And of course, you don't want to throw them away because you work hard and the gorgeous So I actually got I have a handout and a little tempted for your Hancocks that you can create and show you how I did these Hank factory quickly. No. So you have you have these a leftover pieces from wrapping your presents. So what you do is you kind of just you could treat them. Actually, I'm gonna do this. You can just place them. You can see through a little bit you can look through, like, put it on the window if you want to see through. But he can actually place a design on this. Yes. So you see, I think I wanna move it down a little bit. So then it's super easy. All you need to dio is put some glue stick or any kind of blew that you prefer. The glue stick is pretty easy. And then you place your design, and then you look, you just cut it up and you could see the line through it. You want to do that? Because if you don't use it is gonna be too thin and you can print a bunch of these pages to so you can have them ready. I used card stock for the backing and I So there's other hang tag, and then this one here would be my little square hand. Okay, you can make you can do that with a ruler, but I don't know. And what I do here is, um I let tiu these ill um I don't know where you call them. The page reinforce er kind of thing. There's a name fourth, and when you know what they are not a lot of people use them anymore, but you can buy them just about anywhere, Any stationery store. And I just put it here and I take my, um, hole punch and I just punch right in the middle. Oops. Well up a little bit off and for these and for the little one. But it still looks pretty. And then for these little ones, I'll just do it in the in the corner, and then I'll just use my little, um, little ham cord. God, I mean, you can even just do like a little pack off hang tags and give them away as present, Gaza is so pretty like that and same with the you can use any kind of threat really can use gold. You can use your in can use ribbon
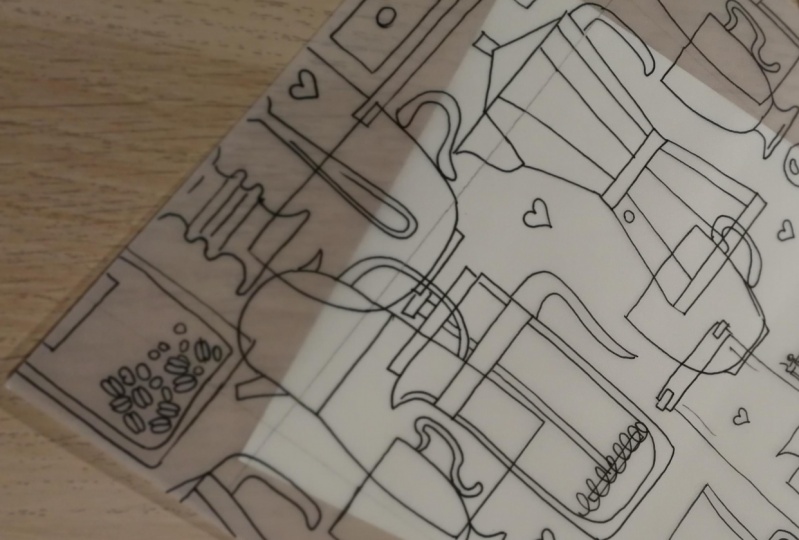
9. Bonus Lesson: About Spoonflower: So for those of you know, Photoshopped a little bit, I'm gonna show you how you can test your repeat and clean it up to be able to upload into foot into, ah, spoon flour. So as can my my piece of tracing paper. And then I'm gonna make sure that the lines that is square and lined up by dragging my rulers there, okay? And then I want to crop it because this is our tile that we did. If you remember, the middle is our original tile. So I'm gonna crop that. And then I am going to Ah, look at my canvas size and change this into pixels because there's gonna be easier to work with. And you could see that you So you want to write down these numbers? So write down these numbers half of those numbers, and then go under filter on their other offset. So now we're going to start with the horizontal, which is the wit, and we're gonna put half of our number that we have for the with. So this one is 7 45 Make sure this one is at zero and click OK, And then if you see it's It's basically taking those two edges and putting them together just the way we did when we cut the paper. But it's doing it on the computer. So I'm gonna use the pencil. Actually, I'm gonna fix the contrast a little bit. I'm gonna go under levels, and I am going to play with it until I'm happy with it. Okay? Right now, that's pretty good, because I want with the high contrast. Okay, so now I'm gonna grab my pencil, and I'm just going to fix where I see that there's breaks and stuff. So and then between the eraser and the pencil, I'm in pretty good shape and that anything else you want to fix while you're at it, go for it. So here, I'm gonna It raised that a little bit, and I'm going fix this. I'm not doing like, a perfect job. I'm just trying to show you the whole idea of of how you can do something like that in photo shop. Okay. Okay. So and then I can you know, you can fix little things like that. You can redraw some of your lines if you want. Um, it's here. So I was going to be a little funky, but that's OK. So in here its pretty good if you see, um, I'm still gonna gonna clean it up a little bit, but it's it's pretty good. And if you see stuff like that to you can go ahead and clean it. Okay, so let's go back and see what it looked like, so it looks pretty good. You know, um, that perfect. But you can you can work on it and make it smooth and everything, but, you know, this is where it's gonna repeat, and it looks it looks good enough for this demonstration. So let's do the other one. So we go back to filter other and we go offset. And now we this time we're gonna put zero here, and we're going to do the vertical one, which was half of that number. If you remember, it was 10. 56 and here you go again. That that is exactly that line when we cut the paper and I don't know what happened, but it didn't do really good job. But my repeat, because it does line up at all. So it happens. So right here, I'm just gonna okay, I'm just gonna fix it. And here I'm gonna who that's really off. Okay, let's see. So I think that's pretty good. And, um, I'm gonna save it. I'm going to go here and save it as, uh, my seamless repeat, tired save. And I want to save it. And I'm going to go and show you how you take this style and upload to spoon flour. So now your own spoon flour dot com And this is my shop on spoon flour, and you could see all my designed here that are for sale. Um, we can I can show you an example of, Let's say, uh, here I want to look at things design to buy. And so people who were looking at my at my shop they can see what it would look like on a pillow on. That's a yard. What it would look like if, as a duvet cover. And then you can also look at wallpaper how it would look on the wall. Ah, home decor. Now you can do that with spoons. Howard is kind of knew used to have to go to rue story, but now you can do it straight from spoon flour. So it looks pretty cool here with I love the cocktail napkins, and all of these are already made so we can order just fabric. Or you can actually order, um, curtains or anything that, um you want. But first, what you need to do is you need to go and upload your design. So you go here under, upload your design, and then you go choose your file, and then we're gonna go. We called it good, right? This one. Yeah. So I am going Teoh. So like that. And then here, I'm going to say I own the right. Yes, because I did it, and I'm gonna upload. So if you have a really large file, it will take a while. Not this one shouldn't take too long. Okay, so now I have my file. This is just where I didn't really clean up very well, but, um, my repeat is pretty good. And, uh, so if you look at this now, you can see this is what I was explaining to you that when you you could upload your repeat in here and do have dropped or have break or center of mirror. Um you couldn't do, have we did a basic repeat for that. So that's the only thing that you could do with this design. Because if you do 1/2 drop, it's not gonna work and have break either Sent center doesn't make any sense for that. And mirror. You could actually do a mirror image if you wanted to thank you can put anything into a mirror image probably gonna work, but it's a little weird, but it works, but we'll go back, Teoh our basic repeat, and then you can play with the size. Here. You can make it smaller or bigger. You can see what it would look on wallpaper and as a room with wallpaper, and then you can you can, um, you can go here and see Okay, a test watch would be this Ah, fat quarter or a yard, and then you can pick any of these fabrics here when you order it. So to be able to put your fabric for sale, you would have to order at least a swatch for I think it's $5. Yes, and and once you get us, watch back then you can put your fabric for sale and then you can fill up all of this. Here. You can You can change it. Teoh. Botanical, Botanical. Seamless. Okay, so you call it that you can do a description, and here, um, and then you can put some tags in there, and then this one is just black and white. So I'm just gonna take these out and update here, and I can Also, even if it's not for sale, you can put it in your public gallery so other people can see it. And, uh and Yeah. So I changed the name here, so I would, um, just refresh here, and then it will show up with the name here, and then if you want to enter a design challenge, you would do it here. And these are They have one, like, every week to have a challenge. So that's basically how you do that. And, uh, I hope that, uh, you're gonna give spoon flour, um, a shot, because it's really fun.
10. Thank You: Thank you so much for taking my class and for experimenting and tweeting. Beautiful sickness repeats. So it don't forget Teoh, download the class material and the hang tag template in the section in the project and a resource section below. And also, if you want to show your project, you can do that also in the project section. And if you want to share on Instagram, you can use hashtag Lucy loves pattern and tag me at least see Declude also, if you don't already follow me on skill share, you want to click that little button up there And you, uh, you'll be the 1st 1 to know when I published new plus or any other exciting news, so I hope to see you soon.
 Lucie Duclos, Design + Mixed Media