Transcripts
1. Hello: You will notice bad composition.
But why is that, and how is it influencing the way we feel about a piece of art, how we interpret it, and
how we interact with it? In this class,
we'll explore just that. You will learn how
to use the principles that govern composition to tell your story and to influence
emotion and perception. We'll look at things
like framing, grids, leading lines, use of
contrast, depth, scale, focal point, how to
show importance, how to set the hierarchy, how to achieve harmony and more. We'll do a fun exercise
where we'll rearrange and re-frame the same four elements
and see how the story, emotion, and overall
vibe changes as we do that. The topic of composition is
very versatile. Its principles apply to all visual mediums
like illustration, graphic design,
photography, film. If you're just starting
your creative journey, I highly recommend
investing time in learning these principles, as they will help you
master composition and create polished,
impactful pieces. If you're struggling
to plan your layout, you will benefit from refining your understanding
of composition, enabling you to produce
engaging and effective pieces. Join me as we discover the
tools and techniques used to create good composition and how to avoid some
common mistakes. I'll be working in
Affinity Designer, but I've got you covered. If your software of choice
is different. Let's learn.
2. Class Project: Hi, I'm glad you joined me today. Our class project will be very
easy to do. To get started, download the class assets
from the download section, open in any graphic software, and create as many
different scenes with it, following the composition
guidelines in this class. After that, post your favorite scenes and
share in a comment what is your personal
interpretation of the compositions you
chose? If you want to. If this class ends
up giving you value, please consider leaving a review and sharing your
experience with it. And don't forget, the
discussion section is open to any
questions or comments, so don't hesitate to reach out if you have any. Let's dive in.
3. Why Is It Important: Why is it so important? A good composition will engage with your
audience, guide them, and help them interpret
and experience your art in a straightforward
and meaningful way. When done right, it will not
be seen, only experienced. It's one of the main building
blocks of visual mediums, such as art design
or photography. I'll argue it's more important than style, or choice of colors, which are the more obvious
aspects of the visual arts. But why do I say that? Think of art as a house. The foundation is formed by our mastery of shapes and forms, establishing the bound
for everything else. Just like a well planned
layout in a house ensures clarity
and easy navigation, the composition
principles guide how viewers interact
with our artworks. It's all about crafting a
space where viewers can easily find what they're looking for and feel a certain way. While the decorative elements, like art style, color, contrast, brushwork, textures,
add visual appeal, they can't compensate for
poor layout and organization. Just as beautiful
furniture can't make up for confusing or
overwhelming house layout. There's no denying that
these elements contribute to the overall beauty and
richness of an artwork. However, they are secondary to the underlying
structure and composition. Join me in the
next chapter where we'll start exploring
framing and grids.
4. Elements of Composition: Composition is the
purposeful arrangement of elements, aimed at communicating a message visually in a clear and focused way. Its task is to communicate, but how do we actually do it? Now if you're familiar
with graphic design, you most likely already know
some or all of these terms. That's how versatile
composition is. Regardless of the end
result, the structure of visual communication, and the way we perceive it, are the same. In this class, I'll
talk about composition in terms of designing
art and illustration. Let's start with
what I believe is the first and foremost - focus. Focus, or focal point
is the primary item in your painting or design that you want your
viewers to see first. This is the primary carrier of information and the rest of the image is there
to reinforce it. In other words, the focal
point is the main storyteller. There are a few elements that support designing
the focal point, and the first one is hierarchy. Hierarchy is the way
we arrange elements on our canvas to indicate
their importance. We can make something bold
and bright to signal that's the focal point and make the secondary elements
smaller and weaker. "If every part is
equally important, then every part is equally unimportant"
said and Nathan Fowkes. So, you don't want
everything screaming for attention all at the same time. Scale is often used to draw attention to or away
from an element, thus informing their
hierarchy to the viewer. Scale can also inform of depth. If you thought of contrast, you are absolutely right, as scale naturally
creates contrast. When I say contrast, I'm not only referring to
the color or value contrast, but really any characteristics that differ from one another. This can be, as we said, value; hue/saturation; shape, like big and small, thick
and thin or round and sharp. This can be texture
and no texture; or edge - like a sharp
edge versus a lost edge. As well as proximity - dense and sparse Negative space helps
reinforce grouping. It either isolates or brings
elements closer together. It gives space to breathe and is often very underrated
and very underused. Groups that are not related
to each other should be separated, to further signify
that lack of relationship. Negative space can
create a sense of depth and direction and
reinforce our focal point. When combining different
contrasting elements, we must always
strive for harmony. While this may be a matter
of personal interpretation, the main thing is to
contain all elements within the same universe with
similar aesthetics and style, and a common denominator. We need to be very purposeful about each and every
choice we make. It needs to serve
a specific goal. This is what harmony means, that the elements are different enough but still work
effectively together. This brings me to rhythm. It may help to think
of rhythm in music for this one. We have repetition, we have different
tempos, different shapes, size, contrast, and how
they all play together. This will determine how easy it is for the
eye to move through the illustration and interpret the aesthetics and
emotion of the piece. Balance is another thing
that we need to consider. It can be two types: symmetrical or asymmetrical. Symmetrical is just what it sounds like - mirror repetition in two planes, left and right, or
top and bottom. Asymmetrical balance is more common in real life and in art, and can introduce dynamics and a sense of movement and energy. A well balanced asymmetrical
design will have a sense of harmony and purpose and will
draw the viewer closer. An unbalanced composition,
on the other hand, may bring a sense of anxiety or dread to the viewer and
may push them away. How to ensure we do it right? Well, we think of each element in terms
of its visual weight. And strive to counterbalance
every heavier element with multiple smaller,
lighter elements on the opposite direction. What gives more weight to
an element well, in short, everything that is high in
contrast, and not just color. Those would be the dimensions, how much space it
takes on the canvas, the bright colors, saturation, the rich texture, et cetera. Let's see how these
elements play together in a single
picture plane.
5. Framing, Grids (Guides) and Leading lines: Framing deals with the
arrangement of elements within the picture plane.
When deciding what will be our frame size
and in what aspect ratio, step one is to consider where it will be used and what do
we need to fit into it. For example, I've created
my assets for this class in 16 x 9 ratio, because this is equal to
the video frame size ratio. If you are creating
art for your walls, the frame size or canvas
size will dictate the size. If you are designing
for a client, they will provide
the dimensions. If you want to post
on social media, you may opt for a square
or 4 x 5 ratio. Now that we have the canvas
size, it's time to fill it. We call this staging. Staging is more than
mere arrangement. It's about carefully
choosing subjects, props and environmental
elements, and orchestrating
their interactions and relationships to evoke a particular response
from the viewer. Starting with the horizon line. If we're looking from
above the horizon, we create a sense
of superiority. It can also be menacing
and overpowering. Everything directly on the horizon line is more subdued and tranquil and looking upwards gives us a sense of being small, defeated, or dominated
over. Mastering this requires knowledge and
practice in perspective, which is really
fun, in my opinion, but it's a topic that
needs its own class. So we'll be diving in
simple on the horizon, on eye level composition
with this one. A protip here would be to avoid putting your horizon line
in the middle of the page, unless you are designed
for a symmetrical piece. Opt for slightly
above or below to get a more dynamic and
engaging composition. The human mind is great
at connecting things that don't necessarily
go together. We are going to derive linear movement from the way things are arranged on the page. This is where leading lines come into the scene. Pun intended. We use them to guide the viewer's eye to
the point of interest and make it less confusing as to what they should be
paying attention to. They are also great in creating depth and reinforcing
the main object. Leading lines can
work in tandem, starting from multiple points of origin and converging
in one single point, which is our focal point. The rule of thirds can be
applied to pretty much any subject to improve
the composition and balance. It's one of the most useful
composition techniques, acting as a guideline
that helps us determine where to place
an object on the page. And I know it's titled a rule, but it's actually
just a guideline helping you to better
plan your composition. Imagine if everything
in the world was always placed in the same spot on
the canvas. Boring, right? When it comes to the rule
of thirds, in general, the first point, which
is the top left, takes the most attention. The bottom left is the next one, then the top right, and the
last one is the last one. Golden Ratio, also known
as the Divine Proportion, is a mathematical relationship
that yields the number 1.618. It's often found in nature and commonly used in art, design and
architecture, creating harmonious and naturally
looking compositions. It's also just a
guideline, not a rule. You can use this ratio of 1.6 to create naturally looking and highly appealing
proportions. You may also find this
proportion in golden rectangles, circles, triangles,
golden mean, and more. You'll also find
some other grids like radial, resembling
the letter V, S, C ... Pretty much anything
dynamic that makes the eyes move across the
canvas, can be a guideline. Let's look at some examples, as I'd like to demonstrate
how powerful and how direct or
indirect this may be.
6. Paintings studies: The first thing that catches
my eye is the woman, and let's see why.
She's leaning against a terrace that has
similar tones and values. The terrace has these two
columns to the left and right. There's also a carpet
leading to where she stands. So this out right
curves space for her. The straight lines
are contrasted by the curved bay where the woman's
gaze is leading us. And we're left to
wonder whether she's waiting for someone or she's
just enjoying the view. To her right, there's a tall
tree that further separates the canvas and pretty
much everything to the right of the painting
is of no interest. The exception here
is the small table with the flowers on top, which balances the
overall composition. The composition uses
the rule of thirds, and if we switch the
view to grayscale, we can very easily see how the contrast separates the
image between home and nature, but also how it makes
the woman stand out. Our second example
is of this bay. We have leading lines that make our gaze move from
right to left. The interesting part is that
we have the houses on top of the hill that make
our eyes stop and rest. Then we have movement again, followed by rest, etc. When we reach the
end of the rocks, we have these bright spots of blue pointing downwards and the masts of the ships
pointing upwards. And as we're looking
at the ships, something dark brings our gaze back right where we start again. If we switch to gray scale, we'll see that the sky is
pretty much non-eventful and it's there to reinforce our time spent looking at the
hills and the ships. And I'd say this painting is
based on the Golden ratio. With our final
example for today, my eyes are immediately
drawn towards the center of the
painting because there's a face looking at us. But when we look closer, we see his gaze is actually to the right, towards his wife. The wife's gaze is at the child,
who is facing her father. A little black dot is grabbing my attention to
the left and hey, a sheep is also looking at us. If we continue to the left, we'll be seeing the dog's head, which is actually turned
up, towards its human, and the old shepherd is bringing us back to
the young family. The trees are creating a frame, separating light and shadow. The old shepherds' colors
and values are closer to the tree and the family with their bright colors have
the greatest contrast. Oh, and by the way, I bet you didn't even pay
attention to these guys. Why? Well, because we have
a loop of leading lines, which holds us in the left to the mid part of the painting. And while they all appear to
be there for the sheep, the sheep are merely a
part of the setting, not our focal point. If we look at grouping
and negative space, we have the old man and his dog, the sheep, and the young family
in three separate groups. When you group
elements like that, you create secondary stories with pockets of new
meaning within them. No wonder a picture
is worth a 1,000 words. This painting is also
using the rule of thirds. But because of clever use of
contrast and leading lines, the young family becomes our main focal point
and storyteller. It's fascinating to
see how this example breaks the rules and
builds upon them. But if you're trying to do that, remember to always reinforce with leading lines and contrast, otherwise, it may not be
as impactful as it can be.
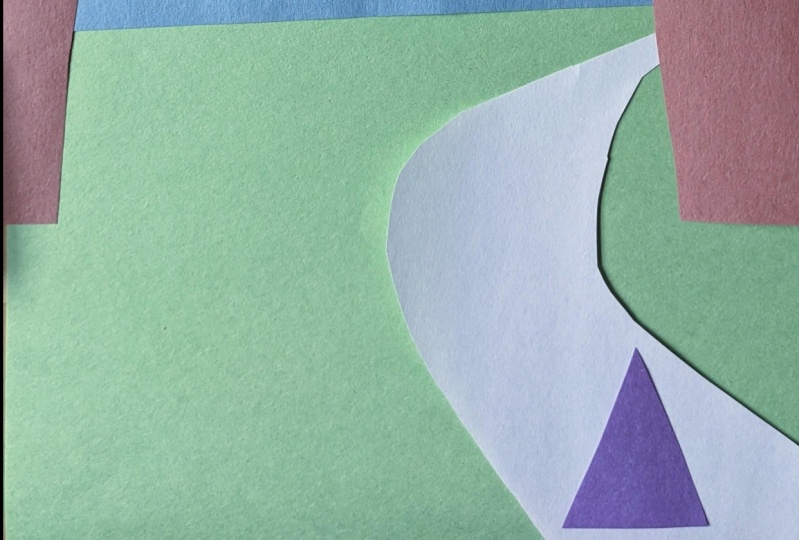
7. Composition exercise: Now in affinity designer
and I'll create a quick mask by drawing a
rectangle over my image. Drag the image in in
the layers panel. This will mask everything
to the rectangle. I've already created
a quick composition of our hero walking
down the road, nearing a crumbling rock arch. But let's see what other
scenes we can create. Press control or command
and drag to duplicate, then backslash on the keyboard if you have clip
to Canvas enabled. My hero is the focal point, and I want to play
around with scale, make it feel like he's so
much smaller than the rocks. I want to hide the vanishing
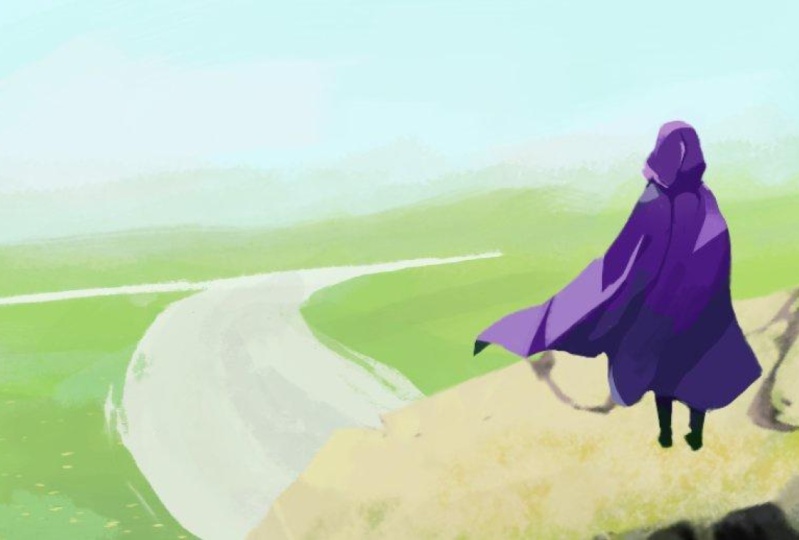
point on the road, and now we know he's walking, but we don't know where to. This gives me a new idea. I want to play around with
the horizon line next. So control command, click
and track to duplicate. Select the ground layer, and let's pull that up. I'll match the road to it. And I like how it feels we've switched the point of
view, looking from above. So I'll make this the
hero's point of view, like he climbed on top of a mountain and is
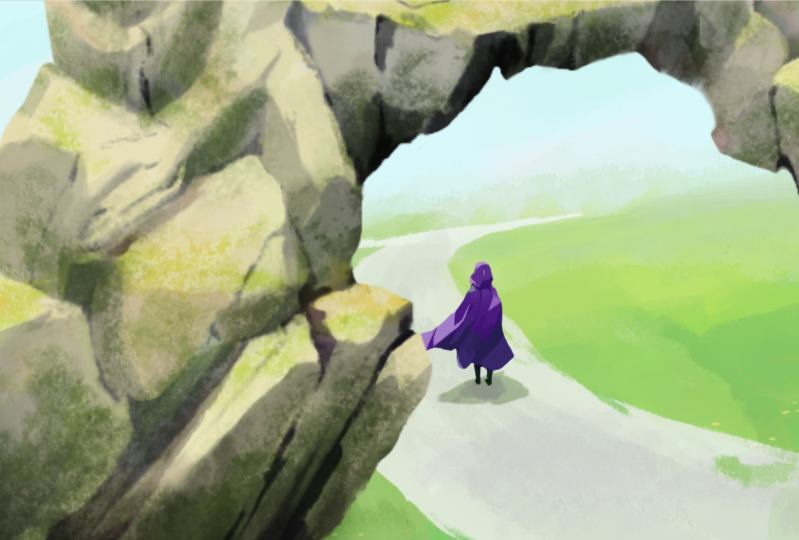
gazing in the distance. Let's see what else we can do. I'll keep the rock close to us. Maybe flip it to add a bit more weight to the
left side of the canvas. If I move the hero slightly
behind the rock like so, we'll know he's already
walked past it. If I make the rock even bigger, the arch is framing
the hero and we naturally follow the road
because of the leading line. I'm zooming out to
see what I've done, and this gives me another idea. Click and drag to duplicate, and let's make the
rock a mountain. But it's not contributing
to the story. Maybe I can make it super small and put it in the
vanishing point, this is the hero's destination. I'll flip it horizontally again. And let's play
with the symmetry. Move some weight to the left. To be fair, the rocks need a bit less detail if they're
going to be that far away. And that's why this
composition looks a bit off. I can continue playing around
with placement and scale, but I'm curious to see
how the same ideas would look if they are
in a nine by 16 frame. I'm enabling lock children, so I only rotates
the rectangle mask, hold shift, and
rotated 90 degrees. I'm resizing the layers to
fill the empty top and bottom. In this specific ratio, we have a lot of
state in the height, not so much in width, which makes the
focus very narrow. And you know what? I'll
actually grab a copy of all four scenes real quick so I have them ready just to
speed things up a bit. The lock children feature
in affinity is global. So when I enable it, I can only manipulate the masks. The layers that are clipped
to them will stay unaffected. I'm stretching the sky and ground layers to
fill the canvas, and I'll try to use the
rock arch as a frame again. The sky and the ground
are pretty forgiving to re sizing without observing
the aspect ratio. The rock is not so much, but let's pretend
they're perfect. This next one needs to be of our hero standing
on top of the rock, looking at the roadhad
this looks all right. But let's see what else can do. I'll try switching things up. I'm struggling a bit, and I believe it's important to show this is a searching moment. We don't always know
everything ahead of time. So I'm just playing around and
exploring how the elements interact with each other until I feel like I can get
a good composition. Now, this one should
be easy, I suppose. It does look like the
first one that I've made with slight
difference in proportions. And the last one looks easy too. I hope you've had a
few ideas of your own. This presentation is by no means exhaustive of all the
possible scenarios. Download and drop the PDF in your graphic software and
have some fun with it. If you have questions, I'll
be in the discussions.
8. Thank you: I hope you liked this class and learned something new today. If you've enjoyed it, rate and review it and click Follow, so you don't miss any
future classes on the topic of drawing
and graphic design. I'm looking forward to seeing your compositions, so go play around with the four elements and share your top picks in the
projects below. If you have any questions, the discussion
section is opened. You can ask me
absolutely anything and I'll be sure to
answer as soon as I can. Thank you for spending
your time with me today. See soon in the next class.
 Plami Taneva, Lover of Illustration and Graphic design