Transcripts
1. The Art of Branding: Create Authentic Brands Using Adobe Express: Art and Branding are
not that different. Hi. My name is Pamela Cleo, and I'm a communication artist
and visual storyteller. I run my art and design studio with a poetic and
conceptual approach that allows me to give
visual form to ideas to simplify projects that
think outside the box. Some of my clients
include doctors without borders Germany
and ID Barcelon. Just as a painter
meticulously applies its brushstro Branding entails a thoughtful
selection of colors, fonts, imagery, and messaging to convey brand's
essence and values. Branding is about narrating a tale that resonates
with viewers. Much like a sculptor
refining their masterpiece, branding involves honing and
shaping a brand's logo and assets to craft impactful and
memorable visual stories. In this class, you will learn how to create
authentic brands that tell a brand story with
impact using Adobe Express, all in one app for fast
and easy content creation. This class will prepare you
with the right tools and insights to evoke emotions,
forge connections, and leave a lasting
in even if you're a season designer seeking to delve deeper into
conceptual branding, this class offers
invaluable insights. After taking this class, you'll be able to create
branding projects that transform brands into authentic
memorable experiences. We will go over the
essential aspects of branding and brand
identity creation. Begin with a thorough
understanding of the differences
between branding, visual identity, brand identity, brand assets, and a logo. Moving forward, we'll delve into the intricacies of shaping the shape and the
personality of a brand, as well as making a value
proposition Vn diagram and a brand archetype wheel. Additionally, you'll learn to give visual form to
your vision through drafting while
simultaneously mastering the fundamental tools
of Adobe Express. I'll write a bonus section on vectorizing images using Figma, enhancing your design
on Adobe Express. By the end of this class, you will be familiar
with Adobe Express, and you will master
the art of designing unique brands through a
comprehensive replicable process. Are you ready to embark on the journey of authentic design? Join me in the art of branding. Can't wait to see you in class.
2. Class Orientation: Today's main class
project is to get you familiar with the forms available
in the class resources. We will briefly go
over the intake form, the value proposition
VN diagram, the brand archetype wheel, and the Illustrated
guide to follow along the class's main
topics and process. Remember, our class project is the creation of a brand
idensity from scratch. My goal is to make you
feel empowered and confident to build a brand
of your choosing from zero. Now is a great time
to start thinking about the kind of brand
you want to create. Can be your personal brand, a rebranding proposal for a
brand of someone you know, or a fictional brand
that excites you. For example, a subscription box of art supplies
and healthy snacks. I'd love to see
that in the world. What's great about
the class project is that you will
learn about creating authentic brands with
a brand identity that highlights their
uniqueness as we go along, and together we will develop the conceptual voice of
the brand you're crafting. I will guide you through
a process that will allow us to shape a brand
identity with a logo, wordmark typography
and color palette after an in depth process. I will guide you
every step of the way through the difference between
branding brand identity, visual identity, brand
assets, and a logo. A branding intake form, how to shape the voice and personality of the brand you're creating by summing up your
brand in one sentence. Creating a brand
archetype wheel, how to create a concept board, how to develop a mood
board from a concept, developing a first draft, how to start giving
form to a vision. Learning the basics
of Adobe Express, shaping your vision
on Adobe Express. Bonus vectorizing images on Figma to import
to Adobe Express, creating a basic brand
book on Adobe Express. With in depth process
we will cover, you will be able to create
brands that forge connections, evoke emotions, and
leave a lasting imprint. You will be able to shape brands with Adobe Express and Figma, if you so wish to shape brands into authentic,
memorable experiences. Make sure you have
pen and paper, and I'll see you in
the next lesson.
3. Class Resources: Remember, in the class project, we will create a brand
identity that includes a logo, a color palette,
and a typography. Before going to the software, we will develop an in depth conceptual process to
shape the voice of your brand and later apply it to the visual system that
is a brand identity. It is important to go to the design software last
because the way you make a brand authentic is by tuning in to what
it does uniquely. Don't worry. There's a
process for doing this. First, we will fill out an intake form I use
with my clients. Note that you can
fill out the form as the real or fictional client or develop a brand for someone else and have them fill it out. The answers on this
form will give us great insights and possible
concepts to develop further. Once we have the
form filled out, we will use the
information in it to complete our event diagram
value proposition. With this completed, we will sum up your brand
in one sentence. After this initial steps, we will create a concept
board to go deeper into what the brand is
and what it can become. After researching the words and choosing one or
two main concepts, we will create a
mood board to set the R direction of
the brand identity. Then we will go over powerful branding
shapes and begin sketching the initial
draft of our logo. After that, will dive into Adobe Express
to get familiar with this software and start
designing the logo of our brand with a typography and color palette selection. In the bonus section, we will quickly go over how to vectorize custom shapes and Figma and
import them to Adobe Express. Once we have completed
these steps, we will create a basic brand
book in Adobe Express. With branding, there
are no absolute rules. As you practice, you
might realize that this ideation process might
change a bit in order. What matters is that you build a solid foundation to shape the story of
your brand visually. This is how we guarantee our authentic voice
will come through. If at any point you feel
inspired or get an idea inside, write it down in your
sketchbook or hand notepad. I don't go anywhere without a sketchbook, and
that's where I reason. Before going on to
the next lesson, make sure you have
downloaded the class resources guide and have the links to Adobe Express and Sigma read. See you
in the next lesson.
4. The Difference Between Branding, Visual Identity, Brand identity, Brand Assets, and a Logo : In this lesson, we'll go over the different elements that
make up a brand identity. We'll go over the differences
between branding, brand identity, visual identity, brand assets, and a logo, and we'll look at the roles and significance within the
branding landscape. We'll navigate through
brand semantics, empowering you to
discern and articulate the core essence of any brand
with clarity and precision. Branding versus visual identity. Branding encompasses
the holistic, strategy, and perception associated with a company, product or service. It englops everything
from the brand's values, mission and personality to its messaging and
positioning in the market. Visual identity,
on the other hand, refers specifically to
the visual elements that represent a brand, such as its logo, color palette,
typography, and imagery. While branding focuses on
the overall impression on emotional connection a brand cultivates with its audience, visual identity is a
tangible manifestation of this intangible concept. It serves as the visual
framework through which the brand communicates
its identity and values to the world, playing a crucial
role in shaping how the brand is
perceived and remembered. Visual identity is the
same as brand identity. I personally prefer the
term brand identity, as brand is a word
most people are familiar with versus
visual identity, which can be more familiar to
people in the design world. Brand assets versus logo. Brand assets is a wide range of visual elements and collateral
used to represent a brand, including but not
limited to logo, typography, color palette,
imagery, and graphics. These assets work together to create a cohesive
visual identity that communicates the
brand's personality and values across different
touchpoints and channels. The logo, specifically,
is a central component of the branding identity
and serves as a recognizable symbol or mark
that represents the brand. It is often the first point of contact between a brand
and its audience, playing a crucial role in
establishing brand recognition. While other brand assets support and reinforce the
brand's identity, the logo stands out as a distinct and
memorable emblem that encapsulates the
essence of the brand in a simple and
recognizable form. It's important to remember that a logo is part of
a brand identity, but it's not its totality. Now, you're ready to get started on crafting the
voice of your brand. Now is a great time
to start thinking about what kind of brand
you want to create. It can be your personal brand, a real brand you've
been meaning to create a rebranding proposal for a brand of someone you know or a fictional brand
that excites you. For example, a subscription box of art supplies
and healthy snacks. I will guide you every
step of the way, and I'll be working on a brand I've been meaning to
create for a while, which will serve as the
class's case study. Make sure you have
the class resources ready and I'll see you
in the next lesson.
5. Art of Branding Intake Form & First Steps of the Branding Project: In this lesson, we will go over the branding intake form available in the
class resources. The reason why you want to start with writing when
designing a brand is because navigating
with your eyes closed can be quite a challenge, and designing without all
the necessary information presents a similar struggle. The responses on this form will bring to light
the unique story, requirements and vision of
the brand you'll be creating. If you're creating the brand for a project you've had in
mind for a while now, you will be filling out the
form as a client, as well. The form works either way. You can also give
it to the owner or person in charge of the
brand to be created. This form helps us develop a holistic view of the
brand's vision and mission. You can print it or fill it out on your preferred software. I use this form all the time
when working with clients. It's my first step
to getting inside their head and trying to
understand what they mean. What I actually do is have them fill out the
form on their own, and then we have a video call
to go over their answers, where I ask them what they
mean by fresh, for example, because words are
perspectives and we all have very different
definitions for a same word. You can skip the call step if you're the client for the
project you're creating. Just bear this in mind for future cases where you might
be working for someone else. Also, try to read as detailed as possible when
filling out this form. This is the form you'll find
in the class resources. Feel free to print it or
have it read it digitally. If someone will be
filling it out for you, you can create your
own version of it on Google Forms and
get a live document you both have access to. Before we go into
the form itself, let me contextualize you about the brand I'm going to create as the class case study
for the purpose of applying what we learned
throughout the class. My brand's name is
Lena residencia, which translates to
the good residence. It's an art residence
I am creating with my mom in the mountains of
Colombia outside of Cali. You might not always know where the naming of a
Branding comes from, but if possible, it's
very helpful to know this bit of information as it will provide
valuable insights. For the case of Lena residencia, the name comes from the house
complex where it's located. The name of it is Yarbaena, which means
peppermint in Spanish and also would
translate as good herb. Buena is part of the word, and that's where the name
of the residence stems from Yirauena Buena residencia. I haven't developed the
branding of Yerbauena yet, but it will have a lot of
common with LaenaRsidencia, the brand identity I will be developing in the
classes case study. I filled this form out as
the client a bit before. Feel free to pause the video
whenever you need to read or reread something and take your time when
filling out the form. You can see I was very
detailed with the responses. The form is a place
where more is more, as we'll expand now to later on synthesize in our brand
identity process. After filling out the form, re read and highlight the terms that draw your
attention either because they suggest images or start showing up as
possible concepts. A concept is a general idea about a thing or
group of things. Don't worry about this too much, as the purpose of
this form is to understand the project's
needs and vision. Can see that I've
highlighted silence, sanctuary, creation, intentional, introspective,
blooming, fertile, slow. Before moving on to
the next lesson, make sure your intake
form is completed, that you've dedicated
a bit of time to re read over it and have
highlighted important keywords. Make sure you have the Venn
diagram value proposition from the class resources ready. In the next lesson, we
will be filling this out.
6. Value Proposition Venn Diagram: In this lesson, we will go over the Venn diagram
value proposition available in the
class resources. This chart will help us create a synthesis of the intake form
we previously filled out. And it's also a great
tool to have at hand for your communication
systems and pillars. It's very valuable to remember your brand's Ys so that
you can create from here. Creating from your Y will give you lots of
ideas because you will be responding to the reason your brand and business exists. Let's have a look together at Laon Residencs Vn diagram.
I just filled out. You can see in the why I wrote, because slow life has a
positive impact on creativity. Destinated time and space for
creating is very desirable. This project aims to support
the living expenses of the adopted cats and dogs with the fees paid
by the residents. Bringing people to
Lauena Residencia will show them a
slow way of living. Residents will
create art aligned with the values of
Lauena residencia. LaenaRsidencia will be part of an art ecosystem
honoring the beauty and quiet of its remote location in the What section
nrtisticRsidence, to art studios, a
small community, a project with social
artistic impact. Is it for artists and creators, people that want to dedicate time to develop a product
they are working on. In the middle of the Venn
diagram of the what, the why, the for
who is your vision. What makes your brand unique? Drawing from this, we're going
to go ahead and fill out the bottom part of the form to sum up your brand
in one sentence. La Gena residencia is an
art residence who helps artists connect with nature to connect with their
creative power. What's your brand sentence? I'd love to see the
process development of your brand's identity alongside the final class project
when we get there. Do you notice how your brand is starting to have a
voice of its own? Make sure you have completed the Venn diagram value
proposition form, and have the brand
archetype wheel ready from the class resources. And I'll see you in
the next lesson.
7. Brand Personality Archetype Wheel : In this lesson, we'll go over the brand personality
archetype will. This tool helps us develop further the personality
and voice of our brand. With it, we can begin crafting compelling
brand personalities. Just as individuals
have distinct traits and characteristics that
shape their identities, brands too can embody unique archetypal qualities that resonate with their audience
on a profound level. So let's do a quick brand
archetype overview. The Rebel. The rebel archetype
embodies nonconformity, freedom, and defiance
against the status quo. Brands associated with this archetype challenge conventions and inspire individuals to break free from societal norms. Examples include
Harley Davidson, Apple in its earlier years, and Virgin. The Jester. The ester archetype symbolizes humor, spontaneity,
and playfulness. Brands embodying this archetype
entertain and delight consumers injecting joy and
laughter into their lives. Examples include Coca Cola, Old Spice, and M&Ms, the lover. The lover archetype embodies
passion and intimacy. Browns aligned with this
archetype evoke emotions of love, Romance
and connections. Examples include
Victoria's Secret, Godiva, and Chanel,
the caregiver. The caregiver
archetype represents compassion, nurturing,
and support. Brown's embodying this
archetype demonstrate empathy and care for their audience, positioning themselves as dependable and
trustworthy allies. Examples include
Johnson and Johnson, UNICEF and Campbell's.
The Everyman. The Everyman
archetype symbolizes relatability, authenticity,
and inclusivity. Brands associated
with this archetype resonate with the
common individual, portraying everyday
experiences and values. Examples include Ikea and Levis. The innocent. The innocent
archetype embodies purity, simplicity, and optimism. Brands embodying this
archetype evoke feelings of nostalgia,
innocence, and hope. Examples include Coca Cola, Dove, and Disney. The leader. The leader archetype represents authority, influence,
and vision. Brands aligned with
this archetype inspire confidence and trust, positioning themselves as
leaders in their industry. Examples include
Rolex, Mercedes Benz, and Microsoft, the Sage. The Sage archetype symbolizes wisdom, knowledge, and insight. Brands embodying
this archetype offer valuable guidance and
expertise to their audience, establishing themselves as
authorities in their field. Examples include
Harvard University, Tet Togs, and National
Geographic, the magician. The magician archetype
embodies transformation, innovation, and enchantment. Brands associated
with this archetype inspire awe and wonder, offering transformative
experiences and solutions. Examples include Disney, Apple, and Test Lound, the hero. The hero archetype represents bravery, courage, and resilence. Brands embodying this
archetype inspire audiences to overcome challenges
and achieve greatness. Examples include Nike,
Superman and BMW. The creator the
creator archetype embodies originality
innovation and expression. Brands aligned with this
archetype inspire creativity and self expression
in their audience. Examples include Lego,
Apple, and Adobe. The explorer. The explorer archetype
symbolizes adventure, curiosity, and discovery. Brands associated with
this archetype encourage their audience to
break free from conventions and
explore new horizons. Examples include the North face, Jeep, and Red Bull. Each archetype offers a
unique perspective and set of characteristics that can inform and enrich your brand identity. Let's go over my example. By going over the answers from the intake form and VN diagram, I have identified that
the archetypes that best align with Lana
Residencias brands values, personality, and target
audience are the caregiver, the creator and the explorer. Take a moment to fill out your brand's archetypes and remember nothing
is set in stone. You can always go back to
it and change it if you realize another archetype is more suitable as you go along. Now that you have completed
your archetype will, you're starting to
see how your brand will present itself
and communicate. You're now ready to start
working on the concept board. Make sure you have
pen and paper ready, and I'll see you in
the next lesson.
8. Creating a Concept Board: In this lesson, we will create the concept board for
your brand identity. You don't need a
specific template for this because this is
just an ideation tool. So pen and paper is fine. What's great about
this is that it allows us to really connect
with the essence of the project and have a
solid concept to create a moodboard with instead of
going to generic mood board, search words, common places, or random shapes that don't necessarily have a connection with the magic of the brand. Meaning it's authenticity,
what makes it unique. Make sure you have
the intake form, the Vn diagram
value proposition, and the archetype will at hand. Take a look at my example
and take a moment after to create your own
on a sheet of paper. I always like to start
on paper, but of course, there are digital
free tools like Miro that make mind
mapping easier to follow. I'll show you my
sketch first and then the clean final
version in Miro for better legibility. But
either one is fine. What's important about
this step is that we get image insights from the process
we have been working on. I like to start my
concept board with the name of my project
or brand in the middle. My brand's name is
LauenaRsidenca, which translates to
the good residence. The name of LauenaRsidencia
comes from Yerbauena, the name of the house
complex where it's located. Erbauena means peppermint in Spanish and also
reads as good herb. Buena is part of the word, which means good, and that's where the name of
the residence comes from. Yerbaenaena residencia. It's very valuable to
look at definitions, synonyms, antonyms,
and etymologies. This is great for ideation, as words are symbols for
concepts and things and knowing what lies behind a word is a very
fruitful process. Now I'm going to go to my
intake form and read over it. Most importantly, I want to read over the
highlighted parts. Which of these are more
potent and appealing? Let's do the same definition, synonym and etymology
process we did before. Synonyms open different pathways if we feel we can dig
from one side further. A concept board is
a powerful tool for dissecting complex ideas. They are great for
conceptualizing as they allow us to open ideas and terms into
more approachable units. This enhances association
and helps us to ground the ideas by approaching the relationships
through analogies. Let's take a look at the
concepts I've chosen. Silence, sanctuary, creation,
intentional, introspective. I looked for the synonyms and etymologies and
from all of these, the ones that
resonated more with the voice of LaenaRsidencia, are sanctuary, creation,
and intentional. Now that we are clear
on the concepts, we are ready to start
working on our mood board. Before going on to
the next lesson, make sure you have
dedicated time and research to completing
your concept board. Make sure you have finished
your concept board, and I'll see you in
the next lesson.
9. Creating a Mood Board: In this lesson, we will
create a mood board from the concept board
for brand inspiration. A mood board serves as a visual collage that
captures the essence, mood, aesthetic and creative direction of a brand or project. It's a powerful tool
used to convey ideas, evoke emotions, and guide the visual direction
of a project. A mood board is a
visual representation of a brand's personality, desired aesthetic, and
as the term says, mood. It typically consists of a curated collection of
images, colors, textures, typography, and other
visual elements that evoke the desired mood and communicate the brand's essence. Moodboard serves as a visual reference
and inspiration guide throughout the branding process, helping to ensure consistency and coherence in
design decisions. We've taken the time to
craft a concept board, so we won't risk using overused images or
being too literal. We want our brand identity
to stand out from other contemporaries and
collaborators in the industry, and we are more
creative than that. In the example for
my case study, some images I directly want
to avoid are scribble, brush, art palette, a house. It's helpful if you take
a couple of minutes to think about the images
that immediately come to your head or your
browser when you think about the business
area or descriptor. We are creating authentic
brands for a reason. And even if you're making, say, a muffin brand,
it'll have a twist, a richer story behind it. So we don't necessarily have to use a muffin and the logo. It can be something a little bit more creative
than genuine to your story. You have two options, saving the images from the
browsers you're consulting and
laying them out on the board later on your
preferred software, or you can do it on Pinterest. Pinterest is a free,
popular platform for creating visual inspiration
and creating mood words. If you don't already
have an account, go ahead and set it
up with your email. To begin, you can create a new board dedicated to
your brand or project. Then start pinning images that resonate with the desired
mood, style, and aesthetic. You can search for images using keywords related to your
brand and just to your theme, and save them to your
board for AC reference. Be sure to mix and
match images that capture different aspects of
your brand's personality, from color palettes and typography to textures
and visual motives. And make sure to type in the keywords from
your conceptbard. This is where it
starts getting juicy. For example, I'll search
for my keyword, sanctuary, as well as sanctuary plus
conceptual illustration. I love this search prompt
because it allows me to start searching for a vibe instead of an image that already exists. You can also look for the
mood you want to create. My mood is playful,
connected, inspired. Once your moodboard is complete, you'll have a comprehensive
visual reference to inform and inspire
your branding decisions. Crafting a personalized
digital moodboard. You can create a personalized digital moodboard by
saving images from various sources and organizing them into a cohesive collase. Begin by collecting images that align with
your brand vision, whether from online sources, stock photo websites or
your own photography. Remember that moodboards are not only a source of inspiration but also a valuable tool for communicating and refining
your brand's visual identity. Whether created
using Pinterest or created from your own
collection of images, Moodboards provide a
visual roadmap that guides the branding process and ensures consistency in design decisions. Before we go on to
the next lesson, make sure you have
your mood board ready. You can print it or have
it ready digitally, and I'll see you in
the next lesson.
10. Intro to Powerful Shapes : In this lesson, we will go over how powerful shapes can
enhance the impact of a logo. Shapes play a pivotal
role in logo design, serving as the
building blocks for crafting memorable and
effective visual identities. From geometric precision
to organic fluidity, each shape possesses
unique attributes that contribute to
the overall weight, flow, legibility of a logo. If you take a look at some of
your favorite brands logos, they most likely have an underlying geometric
shape behind them. This is because shapes are fundamental elements
in logo design, providing structure, balance,
and visual interest. Let's begin by examining some of the most commonly
used shapes and their inherent
qualities. The triangle. Triangles are
dynamic shapes that convey energy, movement,
and progression. In logo design, a
triangular composition can create a sense of
directionality and drive, guiding the viewers eyes towards a focal point or key
message, the circle. Circles are universal symbols of unity, wholeness,
and continuity. In logo design, a
circular shape can evoke a sense of harmony,
inclusivity, and community. Circles are inherently
balanced and symmetrical, creating a feeling
of completeness and cohesion, the square. Squares are stable,
solid shapes that convey strength,
reliability, and order. In logo design, a
square composition can create a sense of
structure and stability, instilling confidence
and trust in the brand. In Western cultures, we
read from left to right, and this directional flow can
be used in logo design to guide the viewers eyes and create a sense of
progression or movement. Take a look at my logo. It uses that direction to use the break to extend
the directional flow. General good practice is
to opt for shapes that strike a balance between
visual interest and clarity. Before we go to the next lesson, make sure you have
analyzed a couple of brands of your liking and looked at their logo to try to understand the underlying
shape underneath it. Make sure you have all the forms from the previous lessons, pen and paper ready because we will begin sketching
in the next lesson.
11. Developing a First Draft: In this lesson, we
will go over how to start giving visual
form to your vision. Maybe you already
have some ideas as to how you want your
brand to look like. Look at your concept board and moodboard. What
patterns do you see? It's okay if you
don't know yet which direction your brand
identity or logo will take. Let's sit with the concepts and the images we have created. Remember that much like a sculptor refining
their masterpiece, branding involves honing and
shaping a brand's logo and assets to craft impactful and
memorable visual stories. It's a process that requires
tweaking and tuning, just like anything, you
get better with practice. Nonetheless, there are
some clients or projects that require more
iterations, and that's okay. I like to think of my
branding service as a bridge between my
client and the vision, and that requires clarity. Before I show you my process for sketching the
classes case study, I want to say that
it is essential to start with pen and paper
in the creative process. Working with pen and
paper encourages free flowing ideation without the constraints of
a digital tool. The tactile experience
of pen and paper fosters a deeper connection between the mind and the
creative process, allowing ideas to evolve
organically and uninhibitedly. Let's have a look at the
process of my sketch. I wanted it to be playful, to reminiscence a triangle, not only for its stable shape, but because a triangle
looks like a house and like a mountain without
being it directly. I'm interested in this metaphor. Also, I wanted to have a
body because residents are a fundamental member of this artistic residence program. The body is shaped like a triangle to hint
at the person being their own home and then being at La one residencia as their home. I included a flower to show the connection with
the land and also to signify nature as shelter to nurture
a creative process. The intentionality part I will use more in
typographic elements, making the word mark
very neat and elaborate. I also like the idea of using
the word mark as a stamp, making the most of the name
being the good residence. Almost like a stamp of approval. The initial analog stage
not only stimulates creativity but also helps clarify ideas and concepts
more efficiently, laying a strong foundation
for the digital design phase. If you have sketched
different options, choose your favorite
one and keep the discarded ones at hand as they might come into
the game later. I love to share and see
creative processes because a finished project is never the same as the original idea. Bear this in mind. It
demystifies creativity. Are you satisfied with
your initial sketch? Take your time polishing it. You can also look
for more references for either form or content. A good practice is
knowing that if you take references from lots of
sources and not just one, it's called inspiration and not copying because we
never want to do that. Always honor and respect
other people's creations and use them as starting points to nourish
your creations. Before going on to
the next lesson, make sure you have your mood board and your sketches ready. Also, grab a camera. Your phone's camera is perfect, and I'll see you in
the next lesson.
12. Getting Familiar with Adobe Express : In this lesson, we will be getting familiar
with Adobe Express, a software where we'll be
creating our brand identity. Go ahead and click on
the Adobe Express link provided in the class resources. Adobe Express is an all in one app for fast and
easy content creation. Its reversion is very robust. You can upgrade if you
want, and it's worth mentioning that if you have an Adobe Creative
Cloud subscription, Adobe Express is included in it, so you already have
access to all the perks. Go ahead and click on
Get Adobe Express free. No credit card
required. We love that. Note that you can use it on a web browser or also
download the app. Continue to set up your
account with your email, and you'll be in your
Adobe Express workspace. The side bar on the left is a direct access to
Import sections. On the plus tab, you can
create new files or formats. The home t takes you to
the main navigation page, the brands tab to
creating a brand. This is where we'll go in a bit. In the Explore tab, you can browse templates
you can customize. The schedule tab lets you plan and schedule on
different platforms. In the learned tab, you
will find handy tutorials. Let's go ahead and click on brands and click on
Create New Brand. I'm typing in the name
of the artist residence I'm creating resident
something worth noting is that you can
also create logos and assets on other software
and import them to Adobe Express
to easily manage your content creation
and make this easier for your
client or yourself. To get started, go ahead
and create a new space. You can do this by
clicking on the plus sign. You can select a template or
create a custom artboard. Let's go ahead and choose Logo. Take a photo with your camera or your phone of the sketch
you have developed, and let's add it
to your workspace. This will help as a guide to
create our brand identity. Drag and drop the photo onto your Adobe Express page and
adjust the size as needed. Play with fonts and shapes. A good practice is
to stick to clean, easy to read fonts
and never use more than a combination
of two typographies. In the elements tab, you can add graphic
elements to your artboard. Adobe Express has lots of simple and complex shapes which you can color
in and group. Yet it's worth noting
that this software does not let you create
new shapes from scratch. To start working, create
your workspace by choosing the size on a homepage or by clicking on the plus
symbol on the left side. You can start on a workspace from zero or from a template. Add text, go to the Tools
menu on the left side. Click on the Text tool and
then on the add text button. Once created, you
can edit it from the same menu that appears
after adding the text. You can add elements
by simply clicking on the elements button and
selecting the desired element. Once added, you can edit
it in the same menu. To create your own libraries, you want to import
your own files and fonts so you can create a
library to store them in. To do this, go to the left panel and click on the
your stuff button. In the brands and
libraries part, click on the plus icon and
select Create New library. Once done, you will be able
to import all the elements you are going to
use and you will be able to work faster
with them later. You can, of course,
add your own graphics. If you are familiar with
other Adobe software that allows you to do this,
go ahead and use that. But if you're looking
for a unique shape, I'll see you in the
next bonus section where we'll see how to create vector shapes in FICMa and import them
to Adobe Express. Make sure you have created a logo as far as you're able to, and I'll see you in
the next lesson.
13. Vectorizing Images on Figma to Import to Adobe Express (bonus section): M in this bonus lesson, we will briefly go over how
to create custom images in vector form IFICMaT later on import them to Adobe Express. There's no need for you to use this software if your brand
identity doesn't require it. But it's something that
I like to teach because it's a free tool that
allows you to create custom shapes you
might not be able to create otherwise.
In Adobe Express. The reason why you want to work with vectors is
because they won't lose any quality when scaling and will look neat and clean, even if exported as
PNG or JPEG files. Zooming, C, no pixelation. You can select the shape
tool from the top tool bar. Select the shape tool
you want to use. Common options
include rectangle, ellipse, line,
polygon, et cetera. Draw the base shape by clicking and dragging
on the canvas to draw the basic shape that resembles the object
you want to vectorize. You can adjust the shape, the size, the position, and other properties
of the shape by using the selection handles and adjustment options
in the right panel. You can refine the
shape if necessary. If the object you're
vectorizing has more complex features such as rounded corners or
additional details, you can use the shape
editing tools to add or adjust nodes and manipulate
the shape as needed. You can create more
complex shapes. If you want to create
more complex shapes, you can use the pen and pencil
tools in the top manibar. Adjust the opacity of the image. In order to work better, you can lower the
opacity of the image you are using as a guide from
the panel on the right. With the image selected, a section called fill will
appear on this panel. By changing the percentage that appears in this section
next to the image, you can adjust its opacity. Once the vector is finished, you can either delete the
image or you can hide it by clicking on the I
icon in the same panel. You can group arrange. When you're satisfied with
the vectorized shape, you can group it with
other related shapes and arrange them in layers as
needed in the Layers panel. Think of vectorizing
your image as tracing it over with a cleaner
connect the dots by clicking and dragging
until the next point and make sure that the shape is close if it's going to
be filled in with color. Export your vectors,
do so by selecting the vector in the tools
panel on the right side. Look for the export option. From there, you can
export it as a PNG, JPEG, SVG or PDF to keep the vector characteristics
exported as SVG. To keep transparency behind
the image exported as PNG. Now, you're able to upload your images onto Adobe Express. Make sure that you have saved
your files in SVG format. This keeps the vector form. Once you have saved
the vectors in FIGMa, you can add them from
the graphics part in your library
to Adobe Express. Walla. That's it. Now, your custom shaves
are part of the library. Now, let's fine tune our logo. Even though your logo
might have color, it's important to start with a black and white version and make sure that there's always a black and white version
of your logo because this is necessary for printing
purposes and formats. Less is more in terms of
logo color combinations. You might want to sit
with it or ask for a second opinion between
multiple versions. I recommend not having
more than three because this might distract you. Now that you're set with a
logo that speaks to you, you might want to
create variations of it with just the word mark, the symbol, the slogan or
a combination of them. Keep this at hand.
Congratulations. You made it. You're done with the creation
of the brand identity. In the next lesson,
we will create a brand book so that you
can manage your brand.
14. Creating Your Brand Guide on Adobe Express : To in this lesson, we'll go over the essential
process of crafting a basic brand guide to lay the foundations for cohesive and consistent brand
communication. We'll explore how to
create brand colors that evoke the desired mood and
resonate with your audience. Select typography
that reinforces your brand's personality
and enhances legibility and develop logo variations
that maintain visual integrity across
different applications and contexts to effectively
communicate your brand identity and values across
various touchpoints. How to create a simple style
guide in Adobe Express. One option to create your
style guide is to use a template already
created in Adobe Express. Choose one that suits your banding or the style
you want to follow. In this template, replace all
the elements with those of your band and make
all the changes you see necessary until you
get the final guide. If you don't find any template that completely fits your idea, you can also look for
inspiration on websites like Pintrest and use an image
from here as a template. To do this, import the
image into Adobe Express. Adjust this to the desired size and lower the opacity to
be able to work on it. Place the elements according to the base and make the
changes you see necessary. First, present your
visual identity in a large format so that
it can be clearly seen. If there are variations of it, add it in a smaller size. Then start distributing
the different elements. Colors. Create as
many squares or circles in another case as corporate colors
your brand has. If your brand has primary
secondary colors, you can differentiate them
using different sizes. Do not forget to name each
of these colors if possible, at least in hexodecimal system, hex to create these squares, select elements from
a menu on the left. In the same section, go to the shapes section and in the rectangles area,
select a square. Once the square appears
in the work area, select it and in
the field section, give it the desired color. You can import your
own color samples or choose from the library
from the custom section. When adding the color code, you can look it up
in Adobe Express. In the custom section. You can see both the
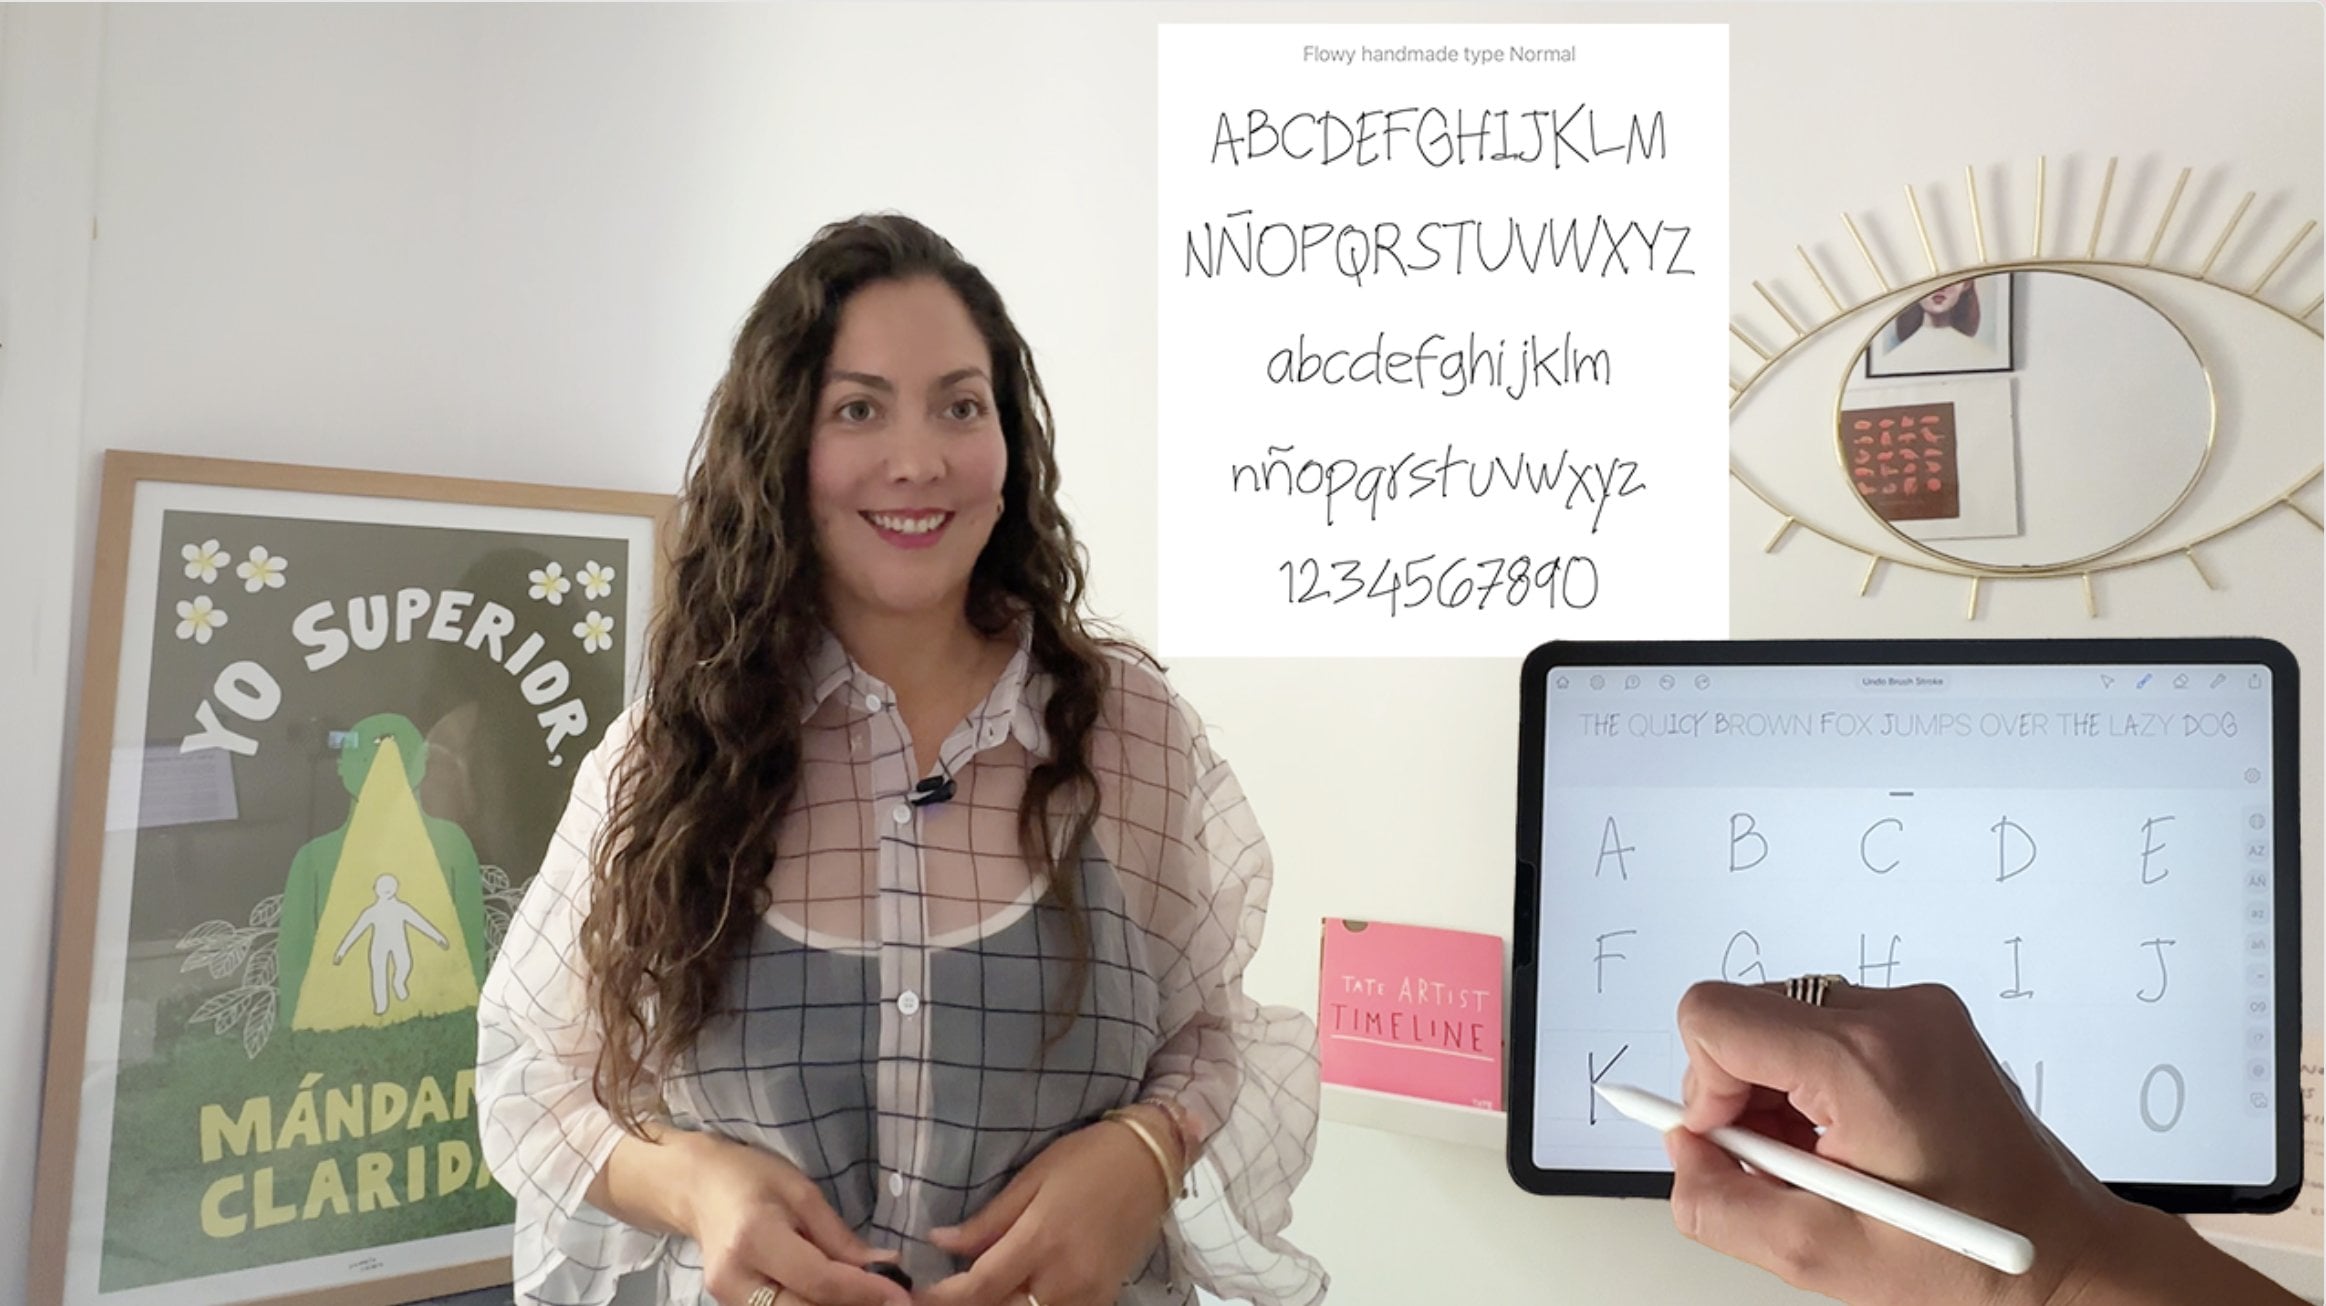
hexadecimal and the RGB system. Typography. To present
your typography, put the letter A in uppercase
and lowercase together. In addition to this, it is recommended to also add
the complete alphabet in a smaller size or a sentence containing all or almost all
the letters of the alphabet. Be sure to mention the
name of the typeface. If your brand has more
than one typeface, it is probably a main typeface and a complementary typography. The main typography is usually one that
makes up your logo. The one that you use to
write your brand's name. The complementary typography is the one that is used for
other types of text, for example, a menu in
the case of a restaurant. It is recommendable to have a complimentary typography that is simpler and more
legible than the main one, since it will be used in
smaller and longer texts. In addition, it offers a greater visual hierarchy.
Graphic resources. If you have different
brand graphic resources, you can implement them either individually or by showing
how each of them is used. When making your style guide, make sure that the
different elements are well differentiated
from each other. You can do this by leaving
enough space between them, or if necessary, by
using separation lines. To export the guide, go to the top right area
and select Download. Here you can choose
three different formats, PNG, recommended for images, JPEG, recommended
for small file sizes or PDF, recommended
for documents. As your brand identity begins
to take shape and grow, keep an eye on its trajectory. Embrace the fluidity of
the creative process while staying anchored to
its foundational elements. Cultivate a flexible mindset, allowing your brand
to adapt and evolve. Remember, the journey of a brand development is
dynamic and ever evolving. Stay connected to your
brand's unique voice and vision and witness as it unfolds and
captivates the world. Now you are ready to launch your brand and share
with the world.
15. Conclusion: Congratulations. You made it. You have completed
the art of branding, and now you know what
goes into the creation of an authentic brand and
how to create your own. We learned how to start shaping the brand and put
ideas in order. We reviewed the difference
between branding, visual identity, brand identity, brand assets, and a local. We completed an intake form, defined its value proposition, created its concept
board and mood board, reviewed powerful shapes,
and drafted a sketch, and learn how to
create the brand in Adobe Express and Figma
in the bonus section. And we created a
brand style diet. Now you know the basics of brand identity design
and how to use the right tools to create authentic brands in a
cohesive and coherent way. Branding design is not about
creating a logo at random, but it is something much
deeper and premeditated. The art of branding in depth process will help
you give visual form to your vision through
drafting while simultaneously mastering the essential tools
of Adobe Express, to create brand identities
over and over again. I trust that this
class has given you greater clarity to structure
your branding ideas, awaken your creativity,
and allow you to understand how to
shape brand identities. May this knowledge propel you towards building solid
and coherent brands? I'd love to see how your brand identity is slowly forming. Feel free to upload
your screenshots, no matter where you
are in the process. We'd love to give you
feedback and see your work. If you like this class, please leave a review and follow me. Tack your creations
with Art of branding. I hope you feel inspired
to continue creating brand identities and powerful designs with
authentic voices. Thanks for joining me.
See you next time. Can't wait to see your
brand in the world.
 Pamela Calero, Creative Director and Visual Artist