Transcripts
1. Introduction: Hello, and welcome to this
intermediate watercolor class. Today, we're going
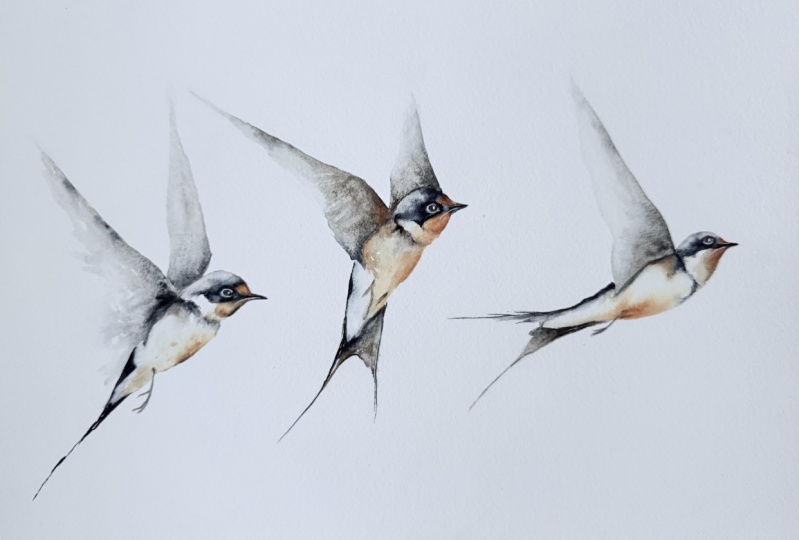
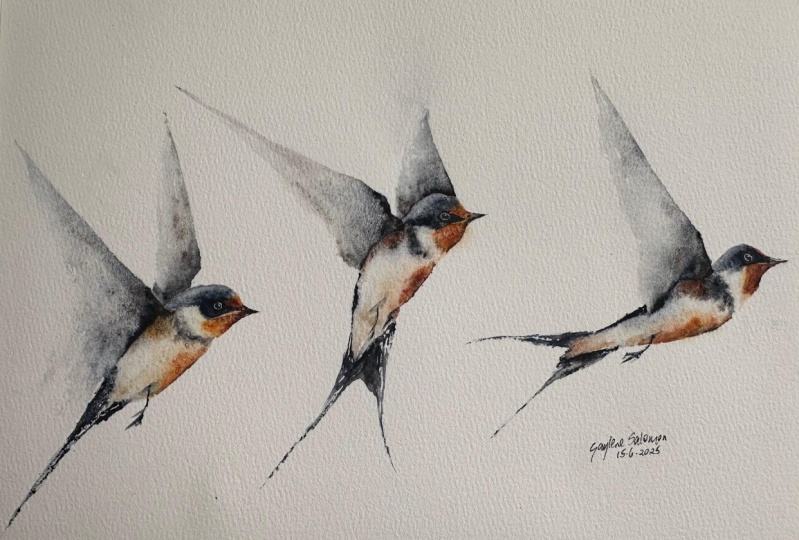
to be painting these fabulous
swallows in flight. I'm not sure what took me so long to choose them
as a class subject, as they're quite
magical to paint and lend themselves beautifully
to my wet and wet style. I'm Jan Davis. I live, paint, teach, and walk my lovely spaniels in the beautiful South Downs
National Park in England. Over the last 20 years, I've taught myself the free flow technique that
you see today. Not having been to art school, finding my own way has been
fun and sometimes daunting, but has allowed me to
develop my own style. This has led me to teach others either on a
one to one basis or as part of a group in a wonderful studio in the
heart of the South Downs. I also run a successful
art business where two days are never the same from the thrill
of exhibiting to painting pet and
wildlife commissions in my own home studio. In all my classes, you will follow
along in real time, where I can guide you
to keeping your work loose and fresh
without overfussing. If you're just starting out, my three beginner classes
will guide you with your first masterpiece
painted in only 15 minutes. Then you'll find dozens
of my master classes available covering a wide
range of beautiful subjects. In each one, I share the techniques I use in
my own professional work. We'll have a lot
of fun together, and you'll gain the
understanding and confidence to
incorporate everything you learn into your own work. You'll be amazed at how
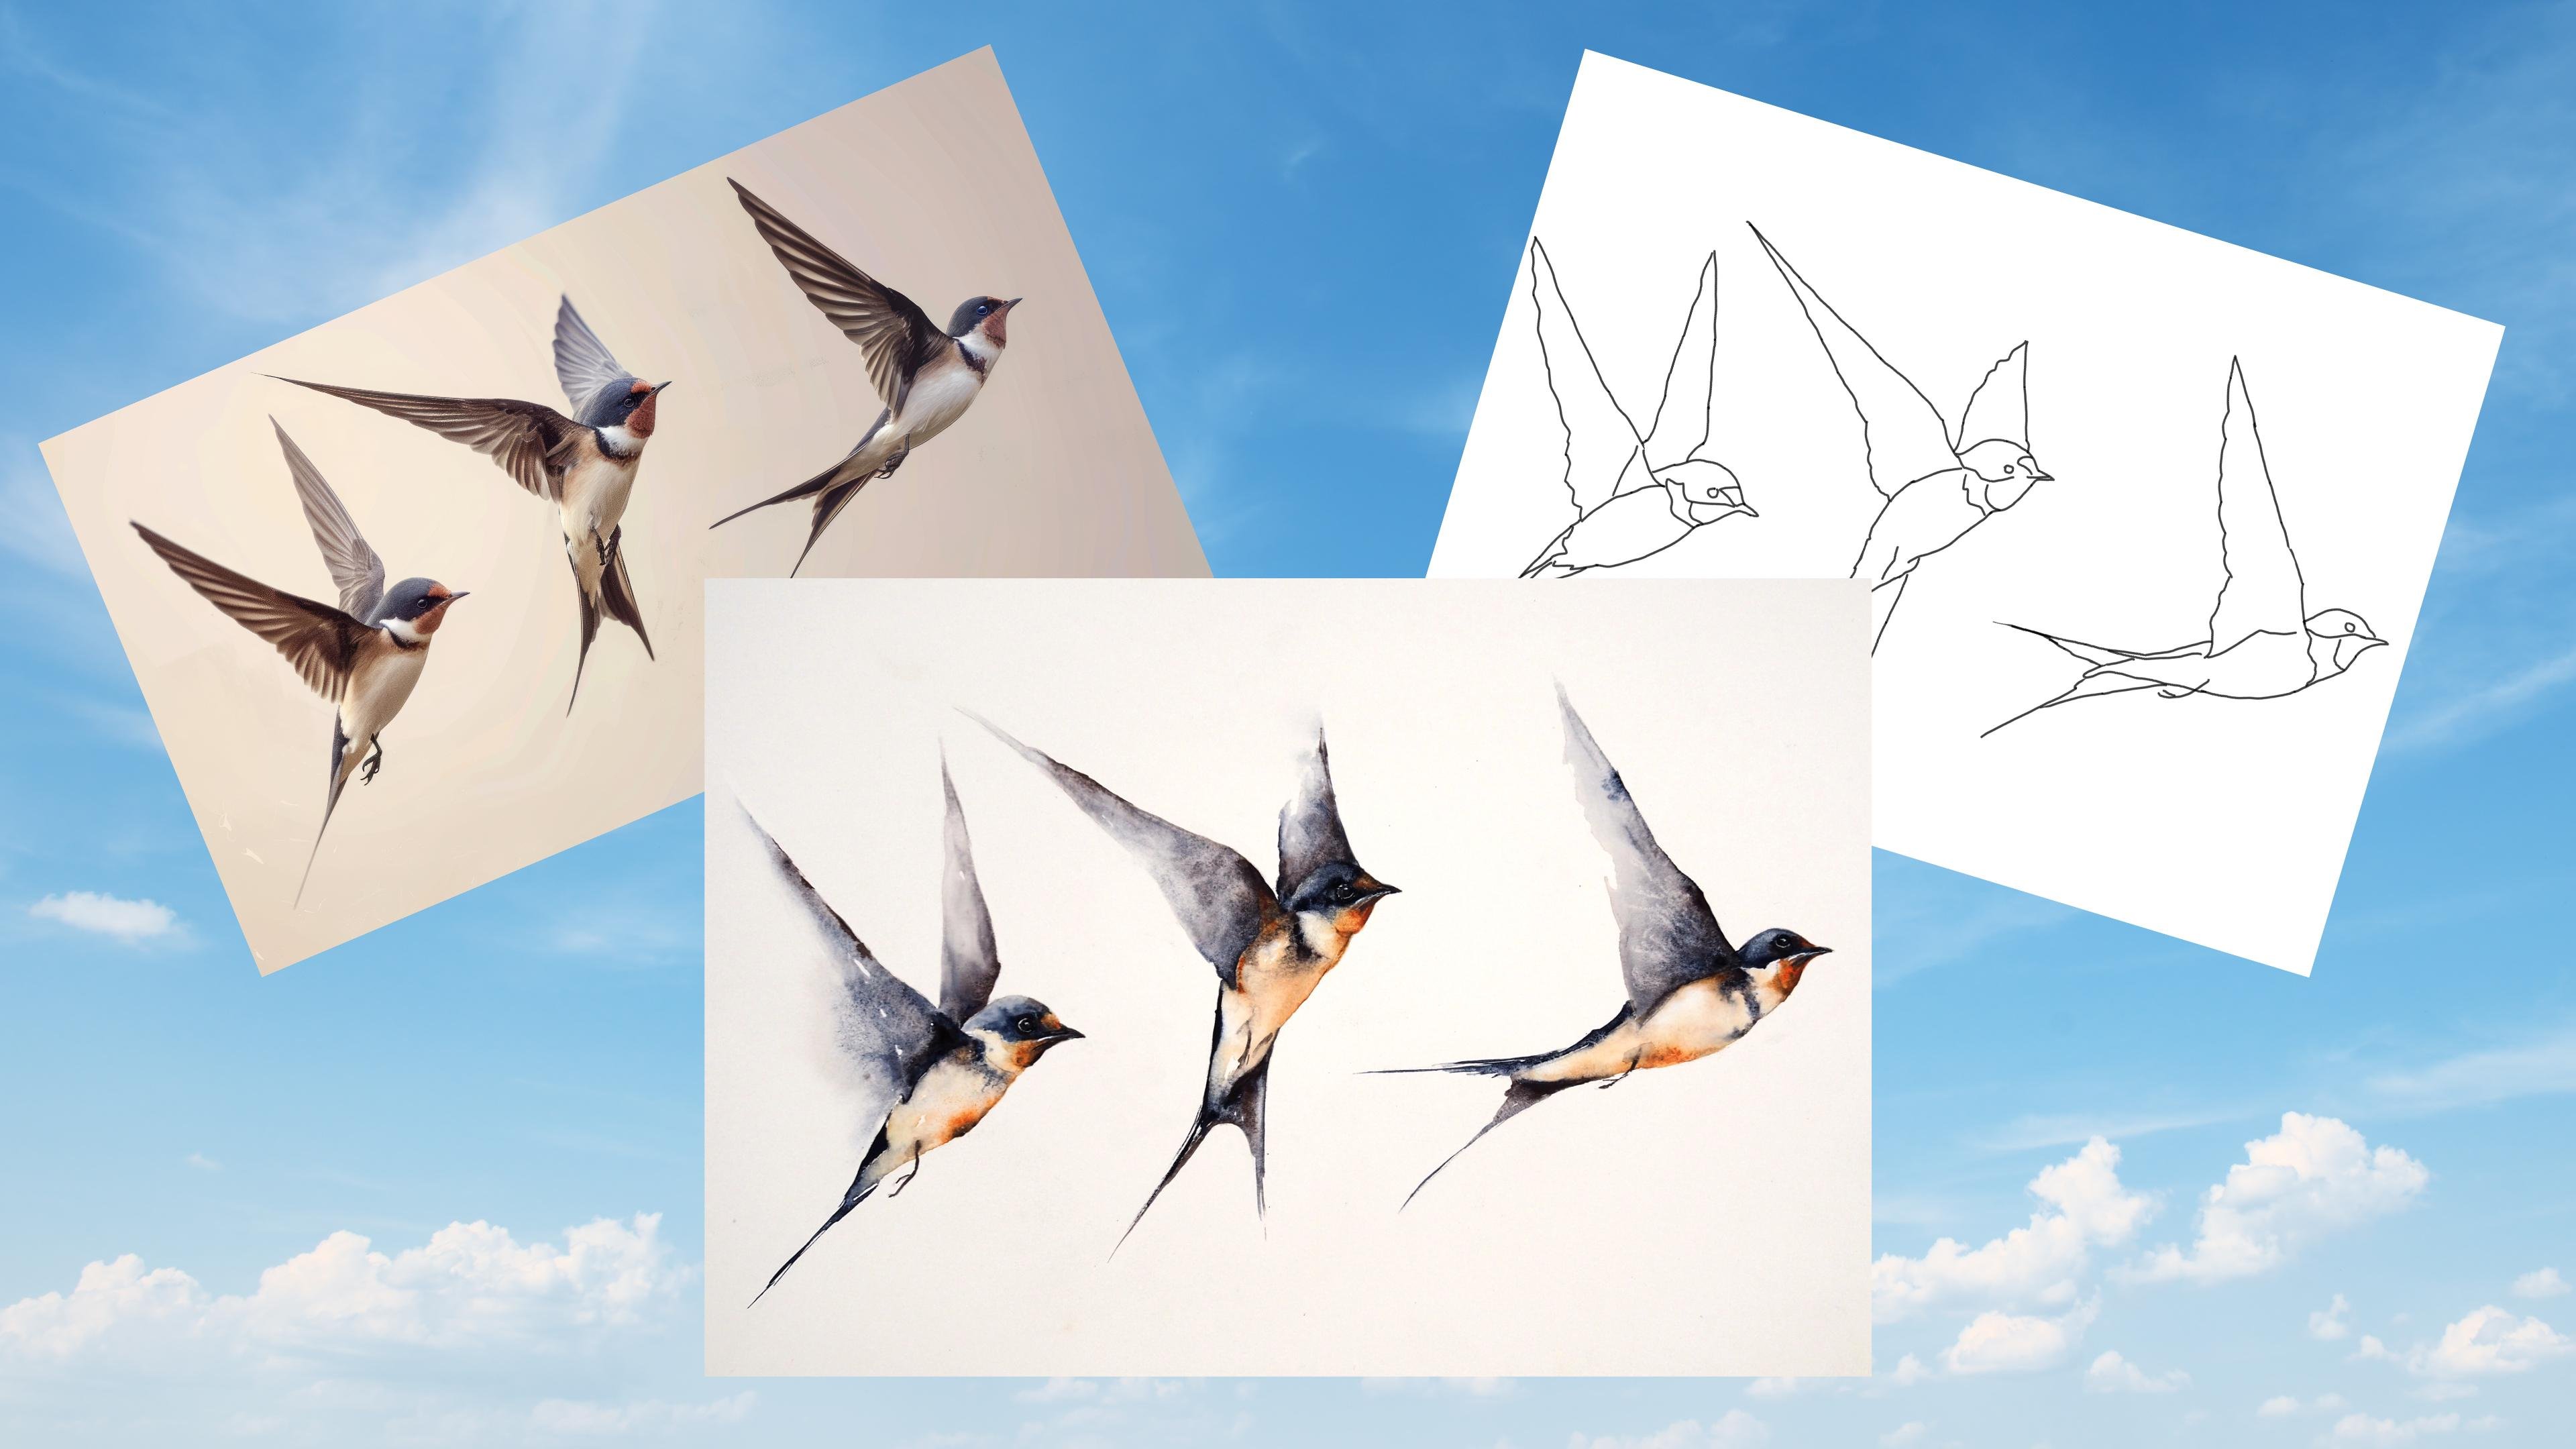
easy watercolor can be. As ever, I provided you with
a wonderful reference photo, along with that downloadable template for you to print out. The template will give you a stress free drawing so you
can just enjoy the painting. I'll be showing you a wonderful, simple way to paint
wings in motion, how to section small areas
off and the hows and whens to join them up to achieve that lovely
sense of flow. I will also show you the importance of fine
detailing at the end. This is the part where
fiddling is allowed. There's a wealth of other
tips and tricks I'll share with you as we work our way through
the glass together. If you'd like to learn
more about me or my work, then please pop over
to my website at Jan Davis walkcolurs.co dot. This can be found
on my profile page, along with the links to my
Instagram and Facebook pages. I'm very active on
my social media, where I love to share my art, especially on stories
with many ideas, works in progress, and
tales of studio life. I really hope you will share all your paintings on the
projects and resources pages. I love seeing your masterpieces. And don't forget
I'm here to help if you get stuck or
have any questions. I want you to experience
that buzz of painting in this liberating wet on wet loose style. So
come and join me.
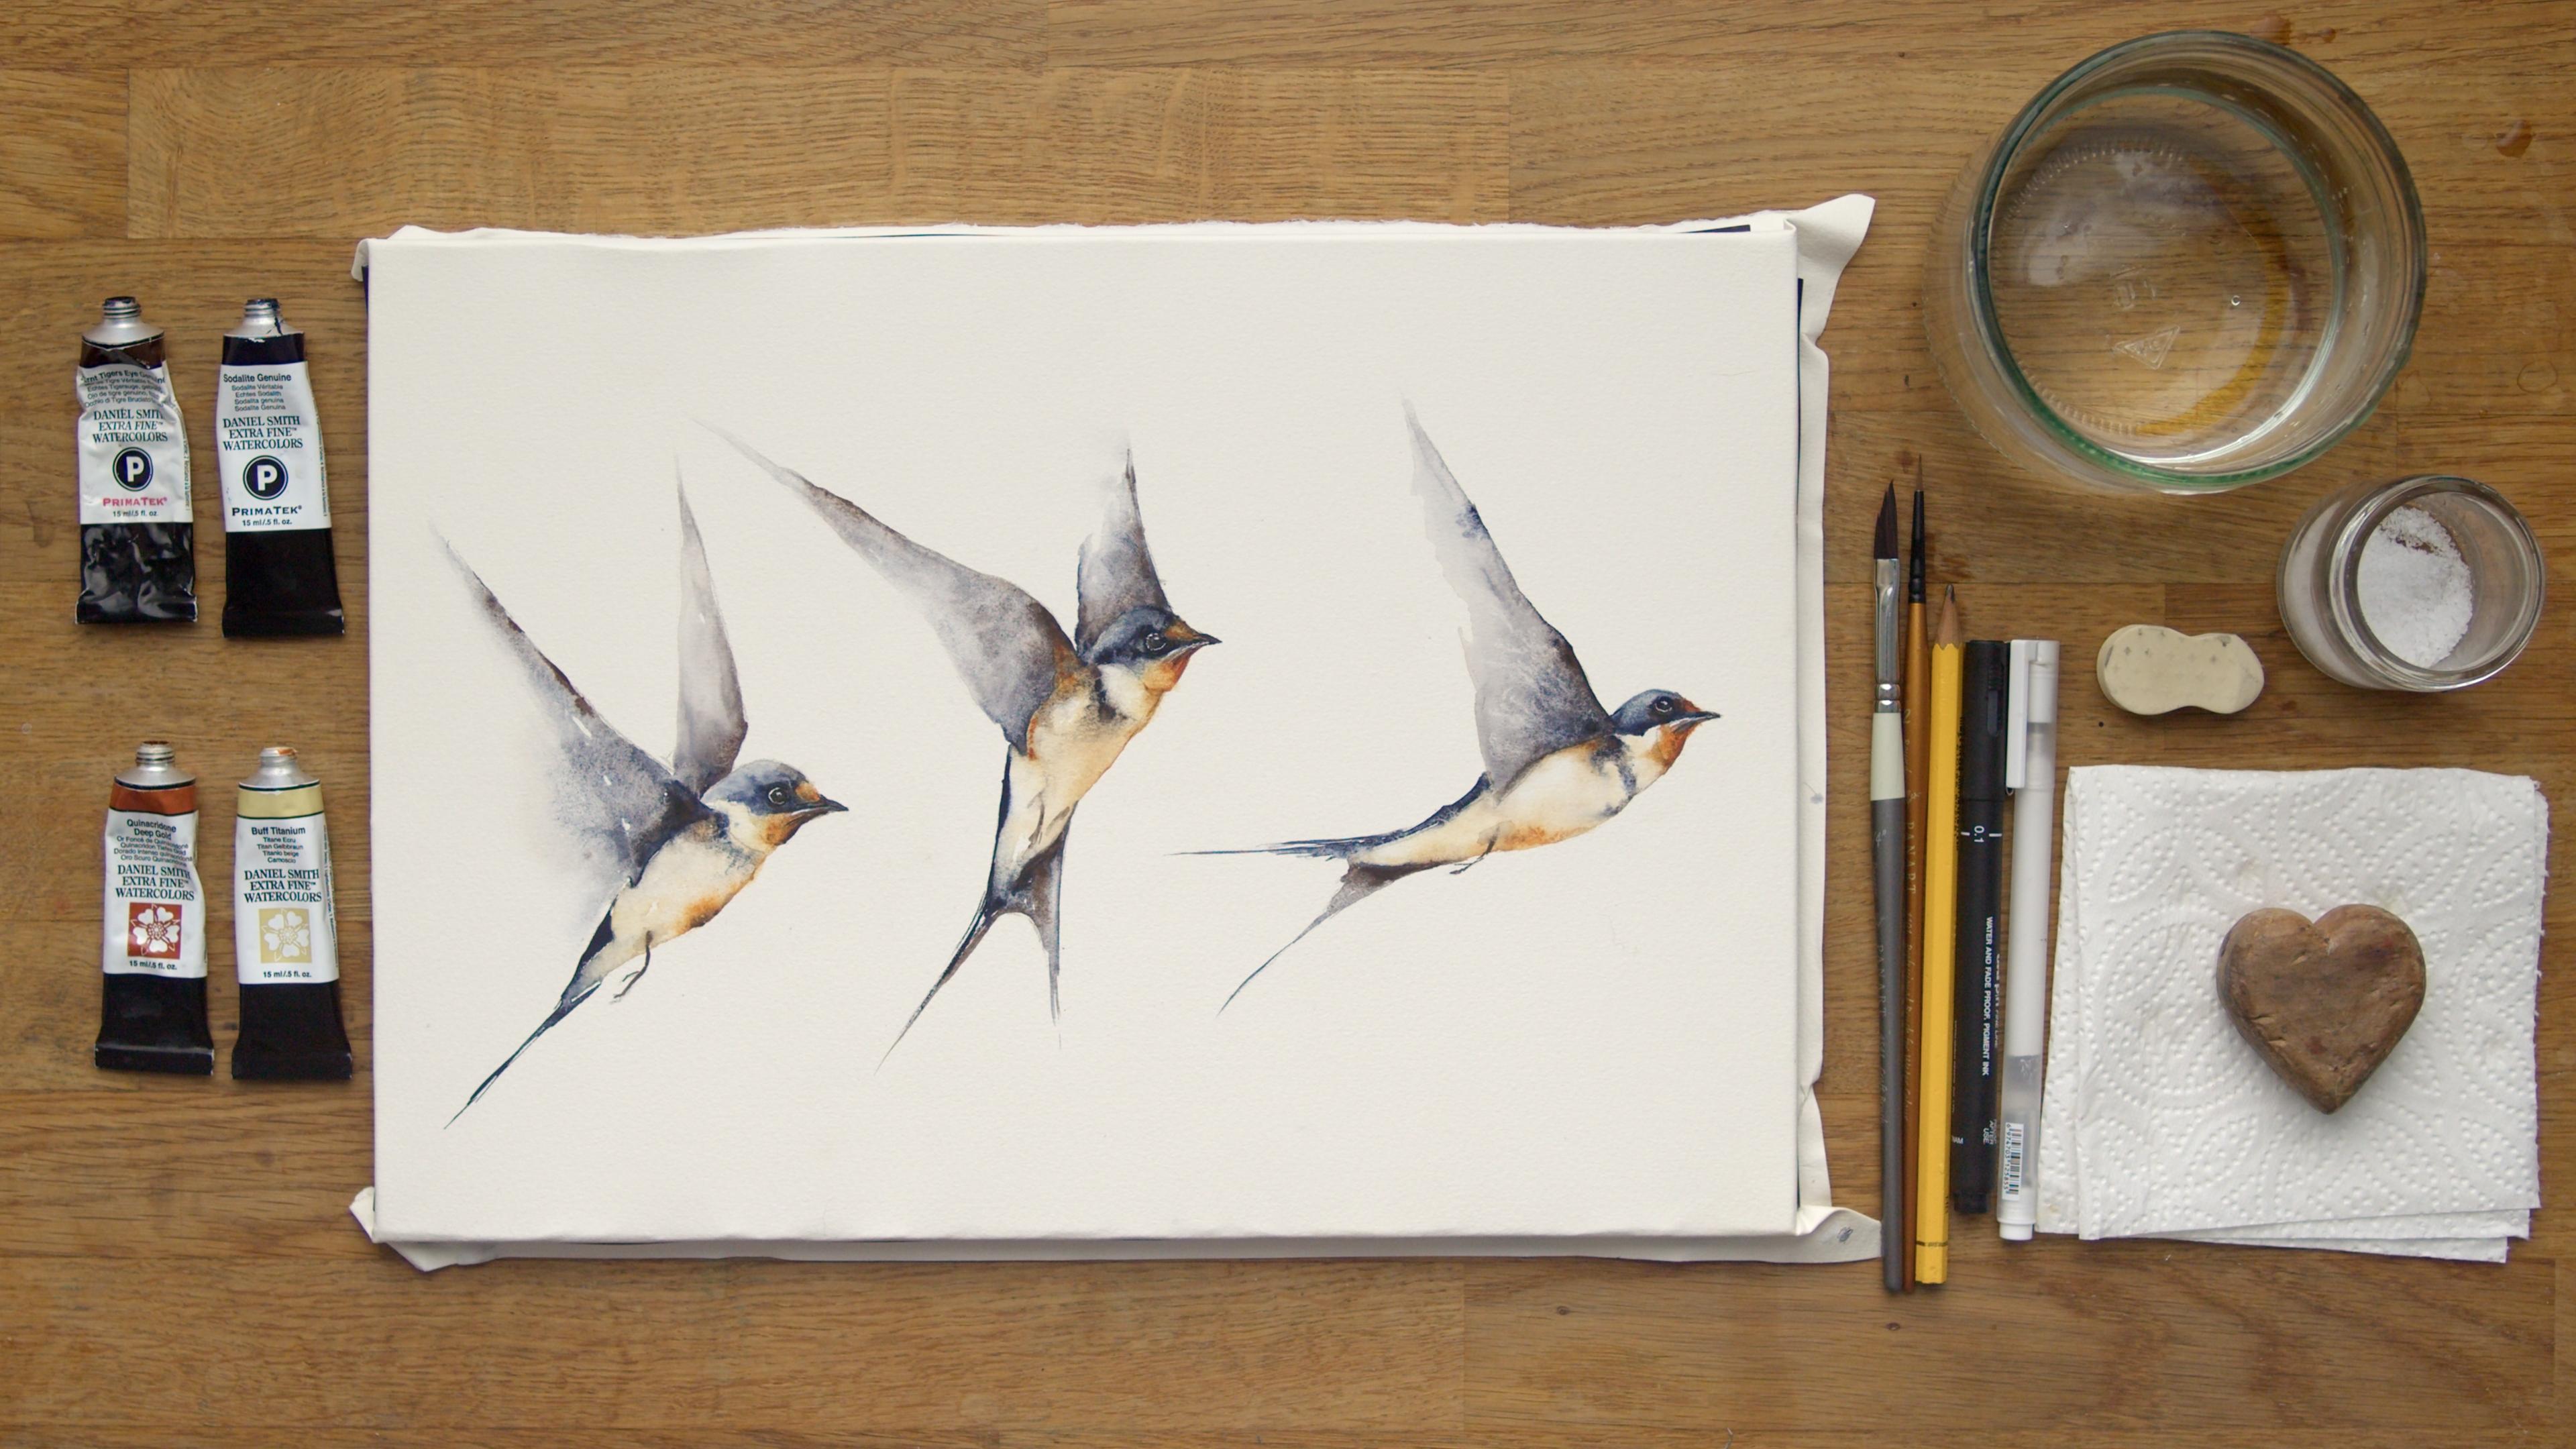
2. Materials: So let me run through all
the materials you're going to need to paint the
beautiful swallows. So starting off with my paint or maybe
starting off on my nails. If you follow me regularly, you know I don't
normally paint my nails, but it is this swallow class is the 50th class now that's
been launched on Skillshare. So I thought I would paint
my nails in celebration. Right, where were we? Materials and paint. So I've only got
four actually today, so nice and easy. I've got so like genuine. And if you follow me regularly, you'll know that
he's a firm favorite along with burnt Tiger's eye. And then we have
quinacridm deep gold, which you can obviously see
is for the orange bits and buff titanium just
helps to sort of spread the orange and is
nice for the chest areas. I have archers, and it's been stretched on a perfect
paper stretcher, which I will pop a link on the projects and
resources pages. And sorry, the
arches is 90 pounds, so it's quite a light paper. I got my pot of water.
There's a little bit of salt. I haven't used it a lot, and you may find
depending on what paints you select and
papers you select, it might have a better
work better for you. So I've just popped a
little bit on the breast, but not necessarily
if you don't want it. Was there a little
rubber, my trusty heart, 'cause I didn't tilt this
actually in during the class, but you may find it's useful
for you for certain reasons. So anything that's about an inch high to give you a
little paper tilt. Kitchen roll or paper towel. I have let me go so in a minute. I have a pencil, and I have two brushes, quite little because they're only we see they're tiny little subjects, so
they're not very big. I quite like this
little chisel brush, or I think they call it a
dagger, actually, not chisel. Dead cheap, nothing fancy, but I quite like it 'cause
I paint out the tubes. It's quite nice. I can
get the paint out, and it gives me a nice fine tip. But I've also got a very small
brush subject number two, just for the smaller details, like the eyes use say, it's a very dddly
subject or subjects. I've also got a fine liner pen, which was to do the
beak cause again, I might repeat this a few
times during the class, but they are small subjects. So to do it with a
brush is quite hard. And also, it's just to help.
With the eyes as well. And the gelpen been a little bit experimenting
with this 'cause obviously, you can just use, which I've
actually got off camera, but you can use a little
bit of white guash. I um or you can use a little white gelpen
which is it's quite good. It does mark quite well, so I've used that as well. So again, not necessary. It's just something I've sort of been playing
with really. Um, what else? Obviously, there's
a reference photo on the projects and
resources page, so it's always nice to have open while you're
painting, if you can. There's obviously a picture
of the finished piece, and I have a hair
dryer off camera, just to finish off drawing bits, just to hurry hurry
things along, but if you haven't got one, it's by no means
necessary or essential, I think is the word
I'm looking for. Uh I think that's it. So let's go and sketch them out.
3. Sketching Out: So to the critical
part of this class, it might not be the most
exciting part of the class, but it is probably the
most critical is to get your sketch right without
the shapes being correct, especially these especially it's always the case that the
sketch needs to be right, 'cause you'll get to the end
of the painting and go, Oh, if only I taken a
little more time with that angle or got that
sort of sweep right, it's just it makes the
world a difference. And I think this style,
because it's very loose, you need that shape to be right. So let me give you
a few little tips. And I would say, obviously, this is quite you can see, it's quite heavily sketched out. It's mainly so you
can kind of see, but I will just gently rub
out some of these edges. So I would say, go lighter
with your pencil marks. Obviously, you want to
be able to see them. But you ideally don't
want to be able to see them in the
finished piece and be able to rub them
out quite cleanly. Especially any areas are particularly light because
these backs of these wings, particularly and very much so on sort of bird number three, there will be no joints. If you have a pencil mark
here, it's going to look. It's not going to give you that lovely lost
and found edges, which is so prized
in watercolor. So go very gently. As I said, use that template that's in the projects
and resources pages. And again, 'cause these
subjects are quite small, it's even more critical
that the shapes are right, especially around beaks
and head shapes because birds they're very character fought in how they're shaped, how their heads are shaped, and how their beaks are shaped. If you have a very long
beak or very short beak, it will almost turn it
into a different species. So take care with
that. And I say, just take your time, and I know I'll probably repeat this. But when I do a
commission piece, I will always sketch it out and just go off for 10 minutes, come back and reassess
my piece and just make sure everything looks
nice and ready to go. So take your time with this bit, and then we can get
on with like I say, the fun bit and
adding some paint.
4. Wings: So just a little thought before we start
applying the paint. This class is very simple. If you just place the paint
and allow things to happen, you'll get a little
unstuck when you try to fiddle and maneuver
it around too much. So it's really going to be
a case of drop and leave. So if you tend to be one of those bolder painters and
you use a lot of color, and you're quite bold. Try to be a little lighter,
especially on the wings, use that lovely
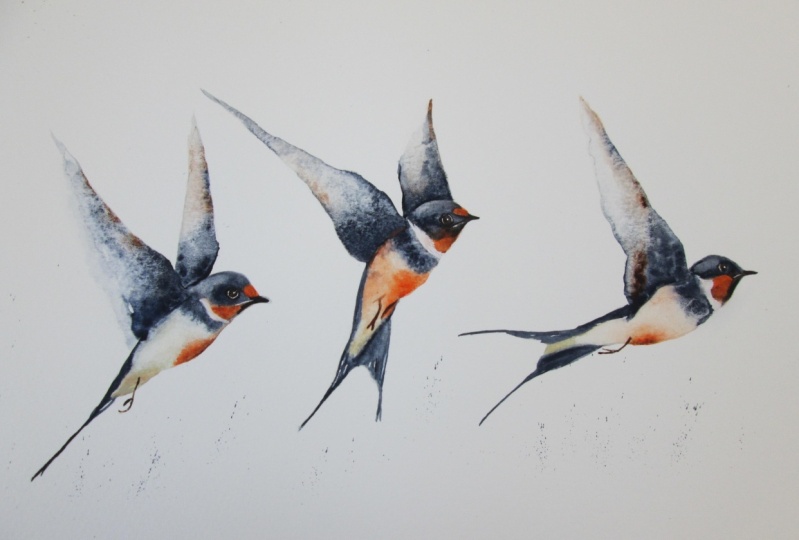
let me bring in my little one of the
finished pieces. The joy and movement comes with sort of
lack of paint almost, especially on these
sort of back wings, where we let this one almost
completely disappear. So go light and gentle. But obviously, if
you're a gentle, delicate painter, you'll
probably be absolutely fine. But if you're a
little bit bolder, then I would go a touch tach a tad gentler on your
paint application. So let me get rid of some
of the bits and pieces. I don't need those on
my desk at the moment, and that to one side. Menu that sort. I don't
need that either. It's a bit better. Okay,
so wet your brush. And pickup we're going to
use just for the wings. I'm just going to use soda like genuine and the burnt tigers eyes give those a bit of
a squidg, get them awake. Okay. And we're going to actually
going to paint these on, but very quickly
wet the area down. So this will encourage, hopefully, some
sense of looseness. So instead of wetting
everything down, we're going to paint
it in and then wet. This will allow allow movement because we're going to
drag it up the wing, so we're going to wet and
drag and it will encourage that paint to follow and give that lovely sort of sense of, hopefully, lightness
and looseness. So hent why, but don't yeah
do this quite quickly. Don't fiddle too much because you can end
up with a sort of a strong line which you
don't want of paint. So for I rattle away
do this quite quickly. So touch that bottom
top edge, so I say. Give it a little
bit of a rustle. Nice, clean water, we're just going to
pull that up the wing. Stay within those lines. You want to get a nice angle? And then back fill that. And really, for the
rest of the wings, it's almost, as I say,
rinse and repeat. If you get little dry patches or something I would leave that. I haven't, but I've got
that little dry patch. I'm gonna leave that. See
that little raggedy edge. Again, it just gives a little
sense of the movement. Give that rustle. If you can
see that strong paint mark, just give that edge
a little rustle. And, of course, if
it's a little light and it's not giving
you enough punch, you can always add more paint. But I would suggest
just on that edge. I might go. A little bit was a little bit
so like genuine. It doesn't matter if
you've got a little blue or had Tiger's eye if
you've gone vice versa, don't worry too much
about the color. We're just trying to it's all trying to get a lovely sense of light and ease, I suppose. I'm gonna leave it
to that. And what will be will be
it obviously move and change as it begins
to dry. And that's that. So don't try not to fiddle. I think you always
have this thing. If it's going to be good, you
need to spend time on it. It's not always the case. Now, I've probably
done this a little caandd And there is a reason. Obviously, we're
working this way, and I'm right handed, so
there's always a risk. So just be careful you don't would have made more
sense to work this way. But because I
wanted this wing at the back to really be lost, do the lobby lost and found, I'm going to leave it to
dry on a slight tilt. So there is methatamize
slight madness. Okay, exactly the same. So if you felt that was a little bit blue or a little bit brown, add a slightly different yeah, be a little bolder
with the color you didn't feel you had
enough of on this one. So, exactly the same. So, again, if you found that
you were a little heavier, add a little less
paint, vice versa, if it was a little light,
and go a little heavier. Trying to get a I
can't move my desk and my, um, paper around. I'm trying to do some
funny angles here to get that lovely angles right. Plenty of water and allow
that color to run in, I say, if you get leftward
little dry patches, I would just go with that
and let him let them be. But make sure that head you get that wing going round
the shape of the head. Just right. Up against
that little edge. Now with this one, again, you can choose two or not
to, but I'm going to do it, so I'm just going to
wet the paper outside and just allow
some of that color to come out, the very tip. So it's just wet to here. I don't want to put
any color there just to show you obviously, it'll be a bit odd, so
just a tiny fraction, make sure your
water's lovely and clean and pull it right out, you won't find a
lot of movement, but they just give
you that lovely soft edge once it dries. So give that little bit a go. Bit tiny thing to be a bit
heavier with the blue here. Tiny bit of tiger's eye there, just to break up the blue at. Yeah. Always take your brush
away. Have a little look. See what you think.
I'll draw it. Funny little dry patch there. I think I want that one there. I want to just give your eye
just a sent to that shape. I thought you gonna come
in a little bit there. I had had a one to one that came in this studio
a little while ago, and they licked their brush or to get the excess water off. I find I keep doing it now. It's awful. I must dip
it on my paper towel. At least you don't have
to see me doing that. Okay, I think that's worked
nice. Please with that. Because this back wing is
touching the front wing, I'm just going to
when I add the paint, I'm just going to make
sure there's a tiny, tiny little white line just
enough to separate it. We'll join it up in a minute. But at the moment, I don't want all this color running
into this wing, but make sure it's
just a slither because if you do forget, then it won't matter too much, but we will try and
remember to join it up. Come right in.
Actually, the wing goes into the body a little bit, so make sure that
comes in there. Put a little bit more
tiger's eye there being a a bit mean, my mother. B. Okay, exactly the same
as we did with that, you know, probably more
with that front one. Go keep adding lots of water. And keep drawing it up. Very gently. If
you add too much, probably better to
add too much water and almost then suck
it up a little bit of kitchen roll than it
is to call drag a lot. Do you want to be just allow everything to
do its own thing. You don't want to interfere
too much with this one? I'm gonna put the tiniest bit. I burnt Tiger's eye just
the Yep, that's enough. I don't want I don't
want too much. It's so easy to do
these too heavily, and you lose that lovely
sort of sense of magic. So go gentle. And if you've done
the dragonfly class, it's not dissimilar, trying to do those lovely
translucent wings, just trying to keep
the wings very light. And if you've got a lot
of water sitting there, you can always just sort of
suck it up a little bit. So you just dry your brush, pop your tip of the
brush in there, and it will just suck
some of that water up. Man just speed things along 'cause if there's a great
big puddle on these wings, it takes a long time to dry, but it wouldn't matter
because it would give a nice sort of shape
and patterning. Okey doke. Let's Let's join that little
lineup, if I forget. Just very gently. Almost add a little bit more paint
if there's not enough. It doesn't matter
if they then run into one another at this
stage. That's fine. I just didn't want
that back wing to run into the front wing
at the earlier stage. And again, just make sure that head and backs got a nice shape. Right. Let's do the
back one on this one. I'm definitely going to
do a little more brown. It's gonna look more tigers eye. Again, making sure you got
that nice shape of the neck. And exactly the same again. Just careful with your hands. Putting them into the wings
of the other ones. Oh. This is a bit tricki not
being able to move my paper, but see how I can do this. Plenty of water. Just, honestly, allow it to allow it to move. Make sure you What's
really nice is to make sure there's a real tip
that almost disappears, rather than anything
blunt at the end, just make sure that's
lovely and neat. If I'm gonna leave
that, that's fine. And the same again, we will leave a tiny, tiny, little white line and go a
little bit bluer on this one. And this one, we're
gonna wash straight off. We're gonna wet outside and then allow that to
really disappear off, so plenty of paint. But what tigers are in there. King you bush. And
again, exactly the same. Get the wing shape in, then we can wet outside
and allow it to run. Tigers are in there. So you want to work
quite quickly, 'cause you really
don't want where you put the V of painting, you don't want to see
that V underneath. Just go to give that a
little minute to dry just a tiny bit 'cause
that's quite wet. If I wet this out here, I think it's gonna there's
too much paint there. I think we're gonna
have too much paint here. So that makes sense. So I'm just gonna allow it
just to dry just for a minute, if that take some
of excess water off I could see if we can take
a little bit of water out. No. I kind of want it to dry
on its own if I'm honest, but I will just join up that
little white line again. Making sure there's
a nice and neat, make sure the back's
nice and neat. If you want a
little extra color. Somewhere long. Let's have a bit of tiger's eye. Be careful not to add too
much water at this stage. Um, you want to paint. Again, take your brush away. Try not to fiddle
with any other wings. I would keep those as light. Don't try to fiddle with them. It would be better if I'm
honest if something's gone a little wrong and
you've gone too heavy handed, almost better to say start painting again. That's
really hard, isn't it? But you want that
lovely looseness, rather than going back
in and doing extra lays, which we have done in past
classes adding sort of depth. Here, you don't really
want that depth. I don't think you just
want that lightness. Okay, let's think it might
be a little bit too soon, still, so judge your own piece. If yours is lovely
and dry or drying, should I say not lovely.
You don't want it dry. Um, you have to be a little bit of a judge of your own
piece and drying times. But yeah, I think that's
not bad, actually. I'm just gonna I've wet that. I've gone right up
against that wing. I'm just gonna allow
that to blend out. So I've wet. All this is wet here. All this area behind
the back of the wing. By pulling like this, it's just encouraging
that paint to come out. Again, try not to go in
there to encourage it too. You want it's just catching it. The timing is critical, really. And that should
dry quite nicely. And what I will do, let's put those down now. We've
done the wings. Be a little judge. If
it's running quite a lot, you don't want to
put it on a tilt. If it is dry, if it
isn't moving very much, we can then allow it to dry
a little bit on a tilt. So I quite like
how that's moving. If I put that on a tilt, I think too much of that
colour is going to run down. I don't want that. So yes, just have a little
look at your piece on. Just I'm gonna pop
a little bit of ti, causes just go I've lost. Oh, I did it there, didn't I? I just put my finger in there. Um, the next trick
is in to move along and squidge the paint onto
your nice clean paper. Just go a bit tiny bit of
tiger's eye. It's just there. Gain, you have to be a
judge of your own piece. I just want to move that. Can I rustle that around a bit, see if I put a little
bit of water in there rather than see, that's the risk of
working this direction, but I think I've
saved it. Right. That really just needs
to be just needs to allow just needs to be
allowed to dry on its own. Again, the same rules apply to the hair dryer if
you watch previous classes. And if you haven't, just make sure when you do give
it a little hair dry, that it's not sitting
in puddles, obviously, if you put a hair dry
over there, you'll encourage it to blend
around and even worse, you can sometimes blow
the paint off your paper. So it's just the
hair dryer is only really needed when
it's almost drying. It just finishes that
last drying stage off. So yes, allow it to dry.
5. Tails Bodies and Beaks: Ty hoof. Just a quick note. I've cleaned my water. I can be a bit of a bit naughty, not cleaning my water
regularly enough, but because these
subjects are so tiny, and we want these to be
lovely and loose and clean, dirty water will mark. So we'll give you
a slight color. So I've just cleaned those. In case you wonder
why that looks. I've got fresh water and
fresh kitchen towel. Right, I'm going to start
with number three bird, and let's work that way
and hopefully avoid me putting my hand in any of it. So we're going to be painting
a little about the wing, actually, and the edges. We're gonna be painting the
tail in, and then wetting. So it'd be easier if I
just start, wouldn't it? So I'm going to just use a
soda light genuine for that. We're going to paint
in the dark areas, so make sure these wings
are definitely dry. We're just gonna paint them in. I know. Painting. Who
knew I could just paint? I mean we're gonna come
down. It's quite nice. Let me show you this quick leap. If you can leave
little white lines, it just gives it another sort
of a little bit more light, little bit just a little
bit of difference, really. So let's try. And there's
the beauty with this brush. It's got a lovely
sort of tip to it. And it is tricky because these little subjects are quite small, so it would be quite
nice if any of you are feeling brave is to
paint these larger. Okay. Clean the bush. Nice, clean water, and
we're going to wet down. We're gonna start at the top, just so I don't want to start
adding water at this stage, because that's still too wet. If I start up here, one, it almost causes a little of a barrier if
the water's here, it's acting as a slight barrier. I wet here and start
wetting all out, it's encouraging it to draw
up just like the wing. So if I start at the top, I hope that kind of makes sense. Makes sense in my head, anyway. So make sure you wet
wet everything down, touch that wing, and we
actually will on this one. We'll go in just
slightly into that wing. If it bleeds, perfect. You can see on that
reference photo that you can see some sort of join of the wing. It's come down. Now, be a little bit of a judge. If it's sitting in a
puddle at the moment, a little bit you've just
painted on hold fire. If not, I just have a little
try. Yeah, that's right. I kind of want a tiny little bit of a bleed, but not a lot. If it come down, let's
see how it feels. It's a little bit. Gain, if it does
run a little bit, you always sort of soak it
in I'm just gonna leave that tiny white line that
I call it join there. Yes, as I was
saying, it would be interesting if somebody was to paint these a little larger. I did when I was trying it out, and you may
have noticed it. See, that's running
quite a lot to Yeah, that was a little bit
too wet this paint here, but that's okay. Push that down. Yes, I was doing two swallows.
I didn't look quite right. The beauty of these
was the three. But it would have given
me the opportunity to paint a little bit larger. So if you've got a
nice larger piece of paper, it's worth a try. Right, a buff titanium and
I've got a cratod deep gold, we're just going to start
adding that little bit of color underneath the breast area. Now, I think the UK swallows
are almost white chested, and I think stateside, you there or depending
on where you are. I think the American
I think what you call barn swallows
have orangy chest, whereas UK ones here don't. They're white
chested. So if you're in the UK and you want
to be very exact, then just add the tiny,
tiny, little bit of colour. See if you're in the
states and you want your swallow to look
like a born swallow, then add a little bit more. Orange. So we're just looking
for just to get that say, a little bit of color,
a little bit of shadowing under the breast. If it's a little bit washed out, you a little bit of tiger's eye. Just a tiny hint. A very tiny, tiny, tiny, tiny
little bits of paint. Bit mainly because they're
tiny little subjects. And to, it's just to keep
everything wonderfully light. A little bit of tiger's eye, a little bit of orange
just underneath that wing. I see, I've got little
dry patch today. You see that's running
around a little dry patch. Put that down. No, I'm gonna pop a little
bit of salt in at this stage, actually, just before
it dries, and I forget. Optional salt, you
don't have to. You can do it on one
bird and not the others. But at least I put one
down before I forget. Right. Put those down.
Gonna pick up the ti. The way, they're
so like genuine, I'm gonna do that collar. Again, just have a little judge. If it looks very wet or
you start putting it down, it's spreading too much, then hold fire, but
that's about right. It's just giving me a
little bit of a soft edge. Okay, don't overfit or
just put that down again, and we're gonna
pick up the orange. Make sure you clean your brush, but make sure you take
the excess moisture off because you don't want to add too much water
at this stage. If we add more water, it's all going to start
swimming again. So we're wanting it
to sort of dry so we get the right movement of paint. I actually gonna pop
it into that beak. Obviously the beak
will be painted again in the black, but dark. We always want to get that little marking in
there of orange. We want to reserve that white so we don't want to put
new color in there, so it's just catching
at the right time. It's about perfect. Make sure you get those
nice sweeps of the body. If it's running a little bit too much between that
gap, you can gain, you can just give you brush, gently sort of suck it
up. Bit salt there. It's not particularly helping. Fabulous. Again, take
your brush away. A little ponder. I might put a tiny bit more
tigers there just to give that sense of darkness underneath shadow. Yeah,
I think that looks right. Right. Try not to
try not to fiddle. And we're gonna do
exactly the same with word number true. Let's pick up so like genuine. Hema bush. And we're gonna do a little bit of
painting. Same again. It's a tiny little bit
of body color there, isn't it? Or blue, should I say? No body color. And
it's nice just to get that little sweeps so you get left with
a little white line. So we'll sweep down
one of those tails, as well, so be bold
with that movement. Coming up. Feels
weird to be painting. That's good a little bit of
tigers eyes wearing this bit. I got a wet down. Wet that down. There's a nice light a nice lump of light there on the side, which I've kind of destroyed, which I can take
out in a minute. But have a look at
that reference photo. Here's a nice light on
that right hand edge, and then a darker area, it just sits in there
and get the sweep right. Come down with that tail. Fab. We see if I can get that out. Well, it's still wet. It's
just wetting my brush, taking the water off, and just sucking the color up
and see how that's lifted. Again, I'm going to
try not to fiddle 'cause all that granulating
paint just moving around will give that
lovely sort of sense. Again, make sure you get
that body shape right. Same again. We shall
wet down the body. And then probably won't I go, yeah, let's go a little
bit into that body. It hasn't really
sort of shown that I've gone in there,
has it on that one. But again, if you've got a very obvious sort
of V there of, you know, we were
wet into there, then don't do it on this
one. I have a little look. You're coming down
wetting the body. I'm going to be a bit
more careful down here. So touching that
seeing how it feels. The risk is if you
don't join her up, you forget, and then you end
up with a little white line, so I'm actually going to touch that tail color now. And
that's worked out fine. It's just give you
see that's just given a little bit
of shadow underneath Make sure it's all wet. And again, if you duck
your head up and down, you'll see if you've
got any dry patches. Ideally, you don't
want any dry patches. And we will go back. They are literally the same
technique on each one. So if I pick up the right
colours, that would help. We want the gold and the buff. And just again
underneath the chest. You can do one
bird a lot lighter than the other, just
to break those up, so that's always an
option for you just to change the character
of each bird. Let's go this one at
a little lighter. A little more European. You can see my colours
run again here. Just a bit too soon.
Easy push it back. Again, just take brush away. It's almost better
to have that bleed. It's keep it lovely
and soft than it is to let it dry and have a
hard line, personally. Alright, to go back. The so like genuine. Gain, be a little bit of judge
if this is very wet. It's a little bit
of tigers eyes well on it. Mix it up a bit. It's just nice to do something
different with each bird, even though they're
the same patterning, the same bird, it's nice
to do something different. See, that's too much
too wet, went too soon. So that you can
easy push it back, but that's what I mean, you just need to look at your
own piece really and see how how wet that is and whether that's the
right time to add the paint. And obviously, they will
have their own character. If I had put probably just,
they both spread these two, actually, but if
I had say sepia, it wouldn't have moved as much. So you get to know
your own character of your own paints as well. But actually, when I take
my brush away, I like that. Sometimes you just have to go
with the flow, as they say. And a little bit of tigers
underneath the wing. Always add a little bit of the orange as well
to break that. I go go pop a little bit of the orange into actually
into that wing, that sort of wing joint. Yeah, just after after being a little different
than one another. I like what that's done.
I don't sure there. It's probably just a bit bit
drier there for some reason. I think I'll wet it all down. But some days, it's just nice
to allow things to happen. Right, I'm going to
leave that body bit. I'm not gonna put any
salt on that, but again, if you haven't salted, you know, your first bird or third bird, actually, you can pop thumb on the second one and
put that down, but I won't do any
salt on that one. Along with your
orange. I'm gonna make this one a little more
orangey, I think. Is gonna go into that beak. Be careful you get that
white shape of the beak. Push some of that
back because it's a white section
here, isn't it? So. Sometimes you have
to sort of stand there and watch how
the paint moves, but that's, I think
that looks pretty. If I look away from
it, that's nice. Just make sure it
doesn't keep spreading. Fab. Right. Exactly, same again. So, genuine. And
we're going to beat. They'd be mindful of
getting the sweep right and the shapes right. Coming down. Try and leave some of that
just a little white lines. Helps break everything
up, I think. We're coming underneath, that's getting a little tis eye there. I clean my brush, take the excess moisture. So to say, they're
tiny little subjects, if that was a bigger
subject, you'd want to have lots of
water on your brush. But there's not a lot of
room for the paint to go in, we don't want to add
too much water, either. So again, put a little bit of like genuine on my brush
and do a nice sweep down. These sweeps are the
scariest, isn't it? Because you've got
one shot at it. But yes, try and keep that
lave you're a little unsure, practice on a little
bit of scrap of paper, it's just a wrist
movement, really. So you just put and sweep down. It helps to put rest your
hand on the piece of paper, sometimes that gives you a
little bit more security. Joy up that handing
floating those in the air. Yeah, it looks alright. Let's just tidy my top edge
up a little bit there. Get to it too liny.
Yeah, that looks great. Okay, I'm not going to go
into the wing on this one. 'Cause I'm just crazy. I'm going to go right
along that joint, but do you want to
touch the wing joints. Just to stop them
looking too section, you should get just a tiny,
little bit of the bleed. Again, just wet that
entire bird down. If it does help to put
a little bit of color, you can't quite see
what you're doing, you can always put a little bit of buff
or something there, just so you can see
make sure you've got the shape of that
body, right, the swing. See how that is. If we touched that yet. It's a bit too soon. I need to allow that
to dry a fraction. How's that going? That's not too bad. It's probably going
to That's right. Okay, again, same thing. I'm going to put a
little bit more color. Just again, it's just
to sort of break up the to stop looking
the same, sort of, um, you be too regimented, so I'm gonna put a
little bit more color down a little bit lower than
I did on the other two. And if I'm still fiddling around putting color down and
you like what you've got, I know I probably say this on a few classes, but just stop. Just 'cause I'm sort
of fiddling away, then yeah, stop if you
like what you've got. Just a tiny bit of colour under that wing. Got tiny cap there. Make sure that goes
up the right butts up against the wing. Yeah, I like how that's moving. I think this is quite wet here, so if I put that soda
genuine there for that sort of collar of
color a bit too soon, I'm just gonna have
to be patient for a minute and allow it to
just go off a little bit. This is the trouble when you're waiting for something to dry, you just want to keep fiddling, and I need to stop Okay,
let's see how we go, right? If I clean my brush
and I make sure my brush is probably drier
than it normally would be, and I get, make sure
that there's not a sort of wet sort
of bobble there, so I'm getting a nice
concentration of paint in there. It's quite sticky. That will help things not move as much. Yeah, that's not bad. Sets
me desperate to get on. Once you get going, you
don't want to stop, do you? That's done alright,
actually. Same thing applies. Just if your brush is quite dry and your painted
quite sort of sticky, then it won't move so much. Your brush is really
wet and you've got a really watery sort of paint and then it
will spread more. Yeah, that's alright, actually. I'm gonna leave it at that. Leave my brush.
Same sort of thing. I don't want to be adding
too much water. Okay. It's good. It's just 'cause it's, we're working very
small. It does. Working small, although
it feels more comfortable and more feels like
it'd be easier. Sometimes it's harder
'cause you've got such a tiny sort of
surface to be working on. I spread too much. I'm
chattering away, concentrating. So, yes, it can all be
harder to paint very small. Especially on your eyes. It's a lot of
squinting, isn't it? Very small, petties. Such a tiger's eye
underneath. It's a tiny bit. And if it does form sort of
a really lovely pattern, but it's outside that penciled mark you
put in, don't worry. As long as it just
gives you something pleasing, it's
better to do that. Then to sort of
keep maneuvering it round to the correct place
that you've penciled in. But say, if it's given
you a nice shape, then it's nicer for the just to keep that lovely
sort of flow of marks. But that's spreading a
little bit too much. Again, it's always
just worth taking your brush away,
having a little look. That's done right, I think. And really at this stage, they just need to dry now. And not fiddle.
Right, I'm gonna put my brush down because
they are drying lovely, and I've done enough. I say, it's really critical not to sort of
fiddle with these. I think it's partly,
like I said, it's the tiny little subjects. You don't have a lot
of room for error, and it's just to keep
because these birds are so light and ethereal, aren't they? They need to be kept
very simple, I think. Right, yes, allow these to dry, and then we can finish
off the finish off, you can do the heads then.
6. Heads: Okey doke. So once they
are fabulously dry, we are going to do their heads. Now, if you've been standing, 'cause I always love to stand, it might be a good time to sit 'cause it's a little fiddly. So take your time, but, and just go gentle. But we are going to paint in, there's lots of painting
today, isn't there? We're gonna paint in those
little orange parts. At the front of the head first. I want to keep
these because it's quite a distinguishing feature
on these little swallows. So I want to make
sure that's in. Again, we can sort
start to work our way into the beak so we can see the beak and get that shape right. We will make it
darker, but there's no reason why they can't
beat orange at this stage. And again, Just
painting that in. There's no point I could wet this little area down
and drop the color, but honestly, it's
just too small to worry about dropping colour. So, just take your time. This little areas
quite critical. Getting that sweep of the
head right into the beak. I just want to work
our way along. Now, this front bird
hasn't got a lot, has it? But there is a tiny,
tiny little bit, so let's just put
a little colour easy 'cause we're going
over with a dark color. It's easy to lose
it if we want to, but very hard to then
put it in if we lost it. Right. Pin you brush. I'm gonna stick with my
tiny little brush, I think. See how I go. Brush I think you get a
sense of how you feel. If they're too big, it's quite cumbersome, especially for
something like this. But if you're working on
bigger pieces, obviously, a little brush is very
small and tweets, your work becomes tweeds. So it's just judging really
the size you're working on. Now, I want to actually
wet this down. I'm going to wet the head
down when I drop the color, it just allows it to move. I don't need movement
in the head. Whereas here, we wet
down and pulled up, and that gave a
scent of movement. Here, I just want stillness. So if I wet, then I will
hopefully get a scent. Again, it's a little area, as well, so it's not
going to be so obvious. But what might be
helpful, ideally, I'm going to try and leave
a little white ring around these eyes because they have
a white ring, don't they? And it's actually easier to
paint it in. So I paint it. It's easier to
leave it. Um, white than it is to try
and paint it in. So try and do that,
and then we're going to wet the rest of it. You want to touch that
yellow, yellow, orange, even. So you get a slight bleed, but be careful it's not too wet. If it's very wet or
it's moving a lot, it's now whizzing
into this area, give it a little a minute, but you want it a little damp. I'd love to see
somebody painting these larger because I
think they'd be fantastic. So if you're feeling if you've been feeling brave
and you've done them larger, when you post them
up, let me know that you've painted them larger
because I think they would, in some respects, be easier. Sounds a little
limited ways with my board size and
how my setup is. Right. So once
that's nice and wet, and we need to work
quite quickly, 'cause we don't want it drying, we're gonna add
color at the bottom. Again, that will allow the
top to then to be nice and light cause it will hopefully just blend up, so
goes the theory. I'm not going to try
and go into the big no. Let's get this done first
before it dries on us. It fiddle with the
beacon in a bit. Okay, keep an eye on
that reference photo. You can see if you
squint your eye, you can see where
there's darker areas. Obviously, that looks
like it's bored on top, so if it's not really
moving that much, you can always add a
little bit more water and just give a little rustle
encourage it up there. You'll know when you suddenly
get sees you can see, I've got a nice sense of
light up the top there. It's moved and it's nice
and dark underneath. Try and keep that good news, this is a test for
your eyes, isn't it? Try and keeping that little
white ring around the eye. Again, take your brush
away, have a little ponder. See what you reckon. And if you're happy with it,
I'm going to run the colour into the start getting that beak. We will
fiddle with her. That's why I've got the
little fine liner pen, so we'll probably finish it
with the fine line of pen, but we can get some of the colour in there
with the Sol genuine. Again, the shape is critical, but I think we'll do that with a fine liner because we can sit and really get
the shape right, so I'm just sort of
almost going inside. It looks a bit like a hummingbird at the
moment, doesn't it? With a big shape? Yeah, once you've got something
you like, leave it. We'll soften that
gap that junction, I'm sort of finishing off bits. But because a lot of the
rest of it is quite soft. I don't mind that hard edge, actually. So I mean, hard edge. Obviously, this is dry, this is wet and you've got
quite a hard edge here, and normally I'd like to soften
things as much as I can. But that actually gives us
a real good distinction and it's quite a distinguishing
feature in these swallows. So we are going to
do exactly the same again with bird Number two. So I'm going to go
around I'm going to pat around the eye first just so I know I've got a
little ring round. And I go all the way round. Even though the
finished piece won't necessarily have a white
ring all the way around, we can always close
and get rid of it, but it's very, very hard
to put a white ring in once you've covered it. So then I'm going to wet down
keep brush nice and clean. Silence of concentration. Make sure it's nice and wet, and then we're going to
say exactly the same game the so like genuine. Just pop it at the bottom. I get make sure that
get a nice sort of shape of where that marking is if it needs to be
altered a little bit. If your pencil, you can come in a little
bit if you want to. Go into the body, make sure you get a nice
sort of shape, really. Again, I worry about
the beak in a minute. Just get the color down
first before it dries. Just a little bit of I'm just sort of giving a
little bit of a rustle, really, and just encouraging that so like genuine
up to the top. I'll see once you've
got a nice sort of lump of light and
dark underneath, we can kind of come into that blue That's into
the orange a little bit. It's a little bit
of a strange shape. Again, as our pieces
all start to evolve, they all have their
own little issues issues little things
you have to work on. So you or I may be doing stuff where you don't need and you've
got a nice shape already, but it's gonna come
in a little bit. Yes, that's just made the shape of the head a little bit better. It's just so
critical, and I say, because these are
small subjects, the tiniest little movement
outside that shape, it will really show. If you're doing a huge piece,
it wouldn't matter so much. A little bit round
that over the neck. Again, lift your brush lift your brush
away. You want that? Because it. Because the wing, you've got the junction
between the wing and the head. You want to be able
to see the difference between the head and
where the wing is. So I'd keep that
light if I were you. She said she put more paint on. Okay. Take my brush away. I like that. I don't think
I want to fiddle too much. You could let's put a
little bit of salt. I think, again, it's
a little small, but it might just do something. Let's see how that goes. Hoke doke and it's
exactly the same, again with number one bird. Go around the eye. And then pane brush, and then we're going
to wet the head. Touching the orange parts. Go and get a nice shape. If your pentil marks aren't
quite the right shape, you can always shape
them a little bit. So just get a nice Look
at that reference photo. It's got a little logged
because we haven't obviously got the eyes in
at the moment, better. Take her saying, give
it a little rustle. It more color. Just touch more. It's getting that junction
between obviously, getting that lovely sort of sense of light on the forehead, but also making sure
they don't look bored. So, I think that
works out right. Sometimes they just work
and other times you need a little bit more time spending, but try I try not
to fiddle too much. It's sort of all fairness, a stage where you could fiddle cause you're it's a little area, and you're just putting
the strength in really. You see, I've just
gone outside a little bit Hope you haven't altered
the shape of the head. I think I go away with that. Come into the beak a little bit. But so we'll get the beak shape down right without the little
fine liner pen. Oki doke. That looks alright. So it's it's on
with a scary feet. I'm never very
confident with feet. And I don't like doing
them if I'm honest, but they do look a lot if
you don't I've got just popped a little bit
of tigers eye on my brush and little
so light genuine. Now we're just gonna very gently put that shape
in just like that. I wouldn't do too
much, and what you can do is just to wet
the top of that, where the leg goes in. You can put a little tiny,
little bit tigers e there, just to get a sort
of shadow where the leg is going into the body.
Just softens it, as well. And these are a little more complicated if
you look at them grip but I'm trying not to add too much
complication in there. Let's just do a little
bit of something. Some of you are brilliant
at painting legs. So if you're
confident with legs, then go for it. Again, I think I
think with a side, it's a bit hard to to
get very detailed. Again, adding a little
bit of water there. Tiny bit of tiger's eye, just to see if I can
get that sent to the shadow where the leg
goes into the chest. That's probably enough.
And the last one. It's even worse it
goes outside the body. Right. And down here,
something like that. Look. A bit tigers eye at
the top. Just wet. So you get a little softness. Yes, that's right. A little stumpy at the end. Okay, I'm not going
to fiddle too much, 'cause I know what I do. I'll ruin it. Um Right. We just need to
allow these to dry, really, and then we'll
put those eyes on. And then they really we
can do the little shaping, there's little final
bits and pieces, but I'll allow those
heads to dry nicely, and then we can almost
finish them off.
7. Finishing Off: Okay, so once your heads
are thoroughly dry, let's let's brush off any
salt we've got on there. So I've got a little
bit of salt down there. It's not worked
particularly well. A little bit on that forehead
on the top of the head. That's give me a
little bit, hasn't it? And then I'm going to rub out any pencil marks that are
remaining, but really, really make sure your
painting is dry, 'cause I have done that
actually quite recently. I realized there was a
little bit I touched up and managed to smudge
it across my paper. Look, it's quite kept
my lines quite light. I have to just rub
any of those out. An sort of tail ones. I won't do too much
because it does wobbly hold camera around. But you get the general gist, so you've lost all
those pencil marks if you had any
sort of remaining. And we're going to paint those little tiny
little lies in. So I'm going to use
a combination of the Tiger's eye and the
slight genuine really, again, they're quite little,
so it doesn't matter too much the colors you could and just the
so light genuine, but I still like
you'll still get a sight sense that there was
some brown in there as well. So go heavy with the brown
probably tiger's eye. And literally just start in the middle and we'll
work our way out. No, you want to try and keep
those white lines somewhere. I'm going to This one's going
to lose them in the front, so there'll just be a little
white line in the back part. I don't really want a
ring all the way around. Looks a little cartoony like. So hopefully that's then we'll just move on
onto the next one. Cup of water that
running down my brush. This I will probably again, I'll probably do
darting in the middle. I'll probably almost
a ring round. I will lose the front section, but I might keep a little bit
on top and see how it looks because it's very easy to
close it down completely, so you'll get it left
with nothing than it is to try and find it again. It's really hard to reclaim that white
once you've lost it. So if you're in doubt, go smaller and have
a little look. Say, keep taking
your brush away, having a little ponder. Does make a difference,
doesn't it? Once you get those eyes in, you can start to see
it coming to life. This one, I'm going to
lose the top portion. Keep the bottom. Now,
I've left too much white. So what I will do, I will
come in to the head and close that down a I obviously
left too much white, so that's worth remembering. Keep taking your brush away. You want just the sliver there. Say if you've been standing up, it's a really good time to
sit and get ever so close. Still standing. I don't want to get my head
underneath the camera, so I'm always a little
careful with that, so I can't quite get that close. Okay. I'm actually going
to. This is just me. It's a little bit pale here. I just want to so I
just head down again. I go to add a little bit more. So light, genuine.
Darken that up. It's a little bit light. It's a bit too light on the back
of the head, as well. It's just a tiny, funny shape. Yeah, that looks better.
Close that white line down a little bit more.
I think it's enough. I'm gonna lose it otherwise.
Pam that looks better. Right. Let's we need
to let that dry. Let's sort of get
these beaks sorted and get these lines
sorted, as well, it's quite a hard line
between the orange tops, particularly with
bird three and two. That one's fine. So that
looks a little odd. There's a little bit of bit of tinkering needs going
on there with this one, so I'm going to wet down the orange touching a
little bit of the blue. And that will just soften.
We'll keep the blue. So we keep the orange and just keep it just lets things soften. So let's wet this little chest little chest a
little throat area. Did you give that a
little bit of rustle. Try and get that to
soften a little bit. I said, I see, I
quite like this one. This one just got a little
looks a little hard, so by softening, hopefully sort of
reclaim himself a little bit of so
like genuine here. Again, yours might be perfect. So just just watch me. If yours is fine, I say, it's gonna be really hard for me to know what everyone's like, so I just have to have a look at my piece and have
a little judge. Get a bit of tiny. I've got a little bit of
untag tiger's eye there. Put a little bit of
colour under there. I think the beat
just need sorting. I think that's why it
looks a little odd. I might have liked this one. I might have a little pale, still a bit washed out on top. It's a little bit more so
I'd like genuine in there. So there's nothing, I probably
said, try not to fiddle. There's times when
you need to fiddle, and these little tiny
little bits of detail at the end when you
need to make sure things are sort of correct. So there is a time for fiddling, so it's not all a
bad thing to fiddle. It's just probably
knowing when to fiddle is the trick, really. That looks better to me. Okay, and you can
wet a little chest but be careful c we want
to keep that white white, but still it's nice
to get a softness. Yeah, that looks
better. I'm going to do the same with
this little one. Gonna whip that orange down and just touch the blue
as well, so it will soften. Don't want to do
too much the blue will quickly run into
the orange and you can get left with the
orange has disappeared. So be careful. I quite like the rest of that. I put a little bit more orange
there. It's a tiny bit. Sort of front end to
allow it to run down. I actually quite like that
hard edge that I've got here. That's nice. Yeah, that looks good. Right, we just need to let
that dry a little bit, we'll put those tiny
little catch lights in those eyes and just
do those beaks. So let me give a little dry. Hokey doke. Right. The
last little bit with the eye I found useful
is with the paint brush, it's quite hard to close
that white sliver down. So you can do it with a
little fine marker pen. So you can either go
inside the eye and close it depending
how big your eye is. If it's too big, then
you come into the body. If it's too small,
you go into the eye. I hope that kind of makes sense. About it doesn't like
it for very long, so you need to give a little
scribble on something else, the wake it up again. But if you just making that getting that white line
as a sliver as you can. Getting with this
one. Take your time. It'll be a tiny little
amount that'll do it. I think I've lost
almost too much there. Having it I can't see if I'm on it's that close because I'm a little way away, but take your time with
it, and let's put in. Now, this can
either be done with a little bit of white
guche like I normally do. I've got a little
bit here. But I've got a white gel pen here, which I found quite useful. Let's make sure this is working. Right. And we just want to do a tiny little white
dot, just like that. No one there. Brings them to life is like magic, isn't it? So that's your eye done, really. Now, if you've lost some
of this little white line, you can pop it in a try
a little fine liner, and we'll you can see
that's gone a bit chunky, but what you can do
allow it to dry, and then we can go back in
with the fine liner and just reshape it again,
if that makes sense. So I'll let that dry. And the last little thing
we need to do is to shape the beaks because
they look a little. All look a little. Really
look at that reference photo. They have a little
sweep at the top, and this is what will make
your swallow a swallow. So take your time, look at that reference photo. Keep If you flick your
eyes back and forth, it almost opimposes itself. And they do come in to the body, so they don't actually
stick outside, if that makes sense, though. This was the one that
looked a little odd to me. I think it's just the beat
needed sorting. Go slowly. It'll be the slightest
of movements. We'll change, so be careful. You don't go too too wild. And these can all be adjusted
when you sort of step away and come back in to
your painting and sit, as I say, with a fresh
pair of eyes, as I say. Quite often, you'll see little
bits aren't quite right. So this If you're unsure and you can't see what N's doing
or whether you know, whether that beaks quite
right, then step away. Go and have a cup of tea, go and have a stroll
around your garden, whatever, and just come back and have a little
look at your piece. I think that's
getting there now. This still looks at
odds if that has dried. I just come back in and
make that eye that white. I just going into that white now and closing that white down. And the very last thing to do. I found back to
the little white. Again, this can be done, say, with a little bit of
white guise and a tiny, tiny tiny eagle brush. But there's a little that little mouth
line that just runs. Curves down. And that's a
nice little thing to get in. Comes off the belt
and runs down. I always give them a
bit of a sad fate, but it's a very
swallow like thing. I can see this little eye needs a little bit of attention. I guess I can't quite get close enough to it
to sort it out. But, um I would highly recommend
probably at this stage, we've been playing now
and painting for an hour. And like I always say, sometimes you sometimes don't almost see what
you're looking at, and you get a little like
I'm not sure what I'm doing, and you get a little muddled, and you just want to finish, so you do stuff that maybe
shouldn't have been done. So yeah, sort of step away
if you're unsure before you finally fit in with
these beaks because the trouble using a fine
line, it's quite permanent. You can't kind of get
that out so easily. So the only other little
things to do we can put some little tiny wing
markings on here. As you can see on
that reference ot, they're quite
obvious, aren't they? But I'm not over keen
on them personally. But you can say, I've got a cleaner brush, got a little bit of
kitchen roll here. You can very gently and make
sure you get the angle. You can see whether that
white line comes in, make sure you get
the angle right. Do you just take a tiny
little bit of paint out? I give you. You see it quite
comes out very well, these last the
paints I've chosen today come out very easily. Even squeege a finger
if it's too obvious. So, you can try and pop a
little few of those in there. I definitely not going to do
on that one because I love that sort of looseness
and that flow off there. But also another little trick
because it's quite nice. You can take some
of these little almost get a sense of this wing, but you're just going to
take some little sort of hard line off the
back end of this. Wing and make sure
when you blot it, you've got a nice clean
piece of kitchen, well, you just soften it. But when you're doing it, you almost don't see you've
made any difference. But actually, when you
step away from it, you can see it just
helped a little bit. And I had that little funny
little box there. Did I ride. Come somehow gone into the white painting,
give it a bit of scrub. Any little tips that gone a little bit of Mine
aren't too bad. But some of my
practice pieces got a little chunky at
the end, again, you can sort of make those a
little cleaner and crisper. I love where that just
how I happened to dry. S happened to dry. How I
happened to wet that wing down. It's left that ragged edge. Very hard to do it.
Consciously. It's one of those things
that just happen, and you have to go with it. Some pieces all have it. So pieces won't Yeah, I
think that looks nice. So that really is it. I did ponder some
flicks like that. Not sure I like the cleanness of this, but you could do some. Where can I I'm just
gonna move this. Just get a tiny just a raw scrap of paper paper. Bear with me. It's just a piece
of normal paper. But, you can do I don't
even want to do these on any practice pieces
because I don't really not overly keen on them. But some people love a flick, so you can do a little bit
of paint on your brush. You just hold the end and
pull back your brush. So you'll get a
little bit of flick. It will give you a sort of
sense of movement and light. I'm not saying I don't want to do it on any of the swallows. I've got a couple of
practice pieces here, but actually, they're
allocated already, so I don't want to
ruin those pieces. But it's a thing you can ponder if you're feeling brave
or you could do a couple. And see what you think. You could do one with
and one without. And like I said, I may have said this, and
if you put any projects up, I may have said
this in a comment, but it's such a useful thing to paint a subject
a couple of times. I think you learn
a lot by doing it, the first go, you're
a little unsure. Maybe you haven't
done this before. Second time, you'll be
a lot more confident you'll either
correct some things you wanted to try like, Oh, I should have done this or Oh, if only I had done
that a little bit, a little bit different, you could then have another
go at doing it. And it just builds on your little confidence
and your knowledge. And then you get
two pieces as well. And you can give pieces away,
which is always lovely. I love gifting pieces of art. Anyway. Before I ramble away 'cause I never want to finish these classes
'cause I love them. But I must stop. So thank you very much for taking
this class with me. It's been a really popular I hope it's
been a popular subject. I got a qui a lot of
love on Instagram, and I popped up some
of my practice pieces. So, yes, I hope you've
enjoyed doing this. And again, like I
always say, please, please pop these on the
projects and resources pages. Any questions? Then ask me. There's a little discussion box where you can ask
me anyth you want. Um and if you got the chance to review this
class, I love a review. It's always lovely,
and as they say, it just helps these classes get more eyes on
them, I suppose. So, so, yes, I hope
you enjoyed it, and thank you for joining me.
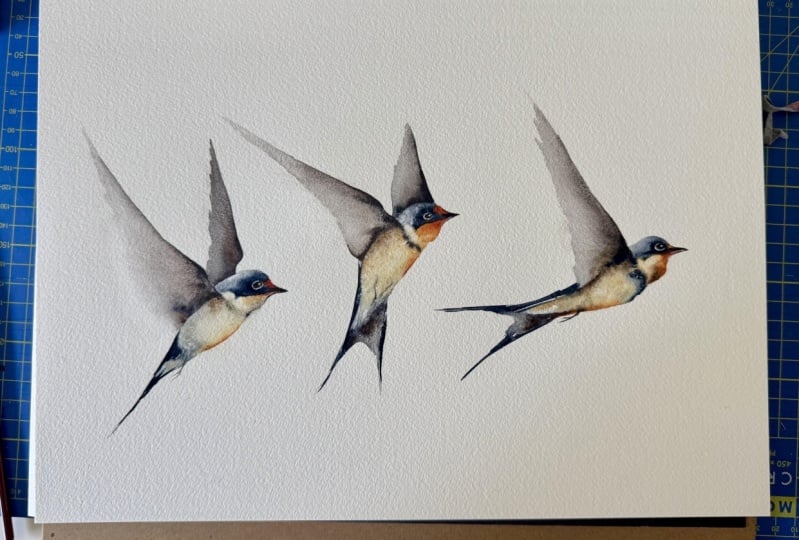
8. Final Thoughts: I hope you enjoyed painting
these beautiful swallows. Weren't they magical to create? Did you enjoy painting those
wonderfully easy wings? The biggest trick
was not to overfill. What about sketching
those areas off? A great way to build up the painting that doesn't
feel too overwhelming. Now, I hope you did spend a little time
fiddling at the end, getting those eyes and beaks
wonderfully crisp and sharp. As I always say, it's worth stepping away and
coming back and looking at your painting
with a fresh pair of eyes and tweak, if necessary. So we look forward to seeing
you in the next class.
 Jane Davies, Professional Artist and Teacher