Transcripts
1. Welcome to Class! : As designers time
to create as one of the most important tools
we have at our disposal, though technology made it
easier to create faster, there are still opportunities
to work more efficiently, giving us more time to create. The process of making patterns and designers already advanced, but there are tools
in the rest of the suite that can
make it even better. By bridging the gap and
working efficiently, we can create our patterns more effectively and have more
time to build our portfolios. If you've been
creating patterns and designer and want to
learn ways to make the process work better
for you, welcome to class. [MUSIC] Hi everyone, I'm Tracey Capone,
I'm an artist, designer and top teacher
here on Skillshare. I spent most of my 20 years
in the corporate world as a project manager where efficiency was
crucial for success. As an artist and designer, I like to figure
out ways to make the apps I use suit my needs. Even if it means
using tools and ways they weren't
originally intended. In this class, I'll
demonstrate several ways to optimize the affinities
way for pattern design, so that you can work more
efficiently and effectively. The Affinity suite is part of my everyday creative process. I've been using it
to design and create patterns for sites
like Spoonflower and Society6 for the
last few years and I've had the privilege of
being spotlighted by Sarah, the makers of Affinity, as a teacher to watch
both here and on YouTube. We'll begin class by taking
a look at linking assets, which will allow you to take
motif to create a designer, even flat vectors and link
them up to the Asset Studio in photo so you can access them seamlessly from both apps. Next, we'll learn how to save pattern templates that
have all of the symbols, art boards and more needed
for pattern preview. This will give us a
new canvas each time we create a pattern
without having to start from scratch
and without bugging down our home screen and
slowing down the app. From there, we'll
move to studio link, which allows you
to seamlessly jump between the apps and
the Affinity suite, avoiding a lot of
time consuming, exporting and importing
when you want to use different tools
in different apps. After that, we'll take
our first look at pattern layers and photo and
I'll show you how you can sketch out a pattern
design while photos seamlessly tiles it
in a standard repeat, allowing you to visualize
your pattern before you begin building it and
saving your time upfront. We'll follow that up with one
of the Affinity of photos best efficiency hacks, macros, which will allow us to
automate some of them are repetitive and manual parts of the seamless pattern process. I'll show you how to plan out
and create macros for both a basic and half-drop
repeat for use on both the desktop and iPad
versions of the app. I'll also show you how to
quickly adjust your macros for various canvas sizes so you don't have to
do a lot of rework. Next up, we'll take our second look at
pattern layers and photo, and I'll show you two
ways to use them to test your basic patterns
whether you're already working in photo
or working designer. From there, we'll head back into designer where I'm
going to show you a quick and easy way to test basic repeats right
inside the app. When you take the class, you'll receive a set of three basic and half-drop
repeat macros that I've created in
three canvas sizes. Macros can only be recorded in a desktop version of photo, but for those of
you don't have it, or those of you who'd
like to follow along with the class and try your hand at making them later,
I've got you covered. As a bonus I'm also providing a set of three macros
which will allow you to test your half drops
in photo with a single click, something that would normally be a manual and very
time-consuming process. Use all of the efficiency tips we'll be discussing in class. You'll need the complete
Affinity suite, either for a desktop or an iPad. If you don't have
the full suite, there are still several
tools you can use. Check out the About page
for more information. This class is for intermediate
students who have experienced creating patterns in either designer or photo. We won't be covering the basics like setting up the canvas, creating motifs or
making perfect patterns, Instead, we'll focus on
technical aspects of creating patterns and explore
tools that will make the process more
efficient and fun. If you're new to designer
and pattern design, I recommend starting
with a beginner class in both before taking this one. Are you ready to level up the pattern-making
process and Affinity and make it work more
efficiently for you?. If so, come join me in class and I'll see
you there. [MUSIC]
2. The Class Project: [MUSIC] The project for class, is to use one or more of the
efficiency tools that we cover in class to improve
the pattern-making process. You could create a set
of assets that you link between designer and photo. You could create a
pattern template and whatever size or sizes
meet your needs. You could use a pattern layer to plan and sketch out
your basic repeat. Perhaps use studio
link to seamlessly jump between apps,
create macros, and use them to create
your own repeat patterns, or use the pattern layer to preview your repeat
pattern and check for issues or scale your
pattern in a variety of sizes. I'd love to see which tools
you found most helpful. Feel free to share
screenshots of your progress here in the
projects and resources section. Just click the green button, add a title, and
load your project. Sharing your project,
not only helps future students see what they learn when they take the class, it can help more
students find my class. Next up, we'll take a look
at the downloads for class. I'll see you there. [MUSIC]
3. Downloads & Resources: [MUSIC] The downloads for
class include a full set of seamless repeat macros for both a basic and
half-drop repeat pattern. I've also included
a bonus set of half-drop pattern
testing macros, which will quickly and easily
take a half-drop pattern swatch and tile it
correctly at various sizes. To download the macros, head to the Projects
and Resources section of the class
on a browser and not the SkillShare app and click the hyperlink under the
downloads for class. You'll need a password
when you get there, which I'll put up on
the screen right now. On the downloads page, you'll find a link at
the bottom where you can access the macros
on Google Drive. Now the basic and
half-drop repeat macros are created for
three canvas sizes. They work in both the desktop and iPad versions
of Affinity Photo, so I recommend saving
them somewhere you can easily access them. I've also included a PDF that breaks down
how to import them, but I'll show you how to do that in an upcoming video as well. Next up, we'll talk about
working with vectors in Affinity Photo and what you
can expect from the class. I'll see you there. [MUSIC]
4. Before We Begin: [MUSIC] You've decided
to take the class, which means you have experienced creating repeat patterns, either in designer or photo. You've already been
through the process of creating your art boards
and adding your symbols, creating your
polling and motifs, and using the transform
studio to move your duplicated motifs to the correct spot on the
edges of the art board. It's a pretty
straightforward process , but let's face it, even with the Transform Studio, it's pretty manual
and inefficient. In this class,
we're going to take that base process
and make it a lot more efficient by using some built-in tools in
both photo and designer. Now you might be
asking yourself, I use flat vectors for the infinite
scalability and we're about to work in a
raster application, is that okay? So do I. But here's the thing, photo can accommodate flat vectors, in fact, there are
tools built into it that allow you
to create them. As long as you don't add
any raster effects to them and you export your
pattern swatch in a vector friendly format, you'll maintain the
infinite scalability and vector flexibility that you would achieve in designer, but get the benefit of
the extra tools in photo. Now one important note, again, this class is not about
motif creation or placement, we're not going to focus
on heroes or blenders, or how to create a cohesive
pattern collection. In fact, to keep it simple, I'm going to be
using basic shapes with very little
thought to placement. In sun, we'll be focusing on the technical side of things. Specifically how to use tools already built into
the affinity sweet, make the pattern creation
process easier and more efficient no matter where
you create your motifs. What does that mean? That
means you can use designer and all of its vector
tools to create 100% flat, flexible vectors, and I'll
show you how to use tools in photo to complete the pattern-making
process in less time. Even if you create
your elements in Procreate or Fresco and
finish them in Designer, you'll still be able to use the process shown
in class as well. Let's head into the next lesson
where we're going to see flat vector assets
and link them to photo so we can
easily access them. I'll see you there. [MUSIC]
5. Asset Linking Between Designer & Photo: [MUSIC] In this lesson,
we're going to cover one of the most powerful time savers in designer and the rest
of the affinity suite, assets, which are stored
design elements that you can access from any document because they're saved
application-wide. Not only that, but the asset studio will
allow you to save your vector motifs and designer and then link them across
the affinity suite. Another huge time saver as it allows you to
avoid exporting from one app and importing into
the other. Let's get started. I'm starting in designer and I'm going to show you how I save four flat vector
motifs that I created and link them so that I can
easily access them in photo. Let's start by taking a look
at the assets panel itself. In the desktop
version of the app, you can pull the Asset Studio in from the window
menu at the top. In the iPad version of the app, you'll see an icon on the
side that looks like this. If you ever can't find an icon, just tap the question mark at the bottom and
labels will pop up. Now there's a
hierarchy built into the Asset Studio that
you need to be aware of in order to successfully
save your assets and that hierarchy
starts with category, that's the parent level. You'll find the category here at the top and to find a
particular category, you can either tap in the
middle and use the flywheel or use the left and right
arrows to scroll through. The next level of
assets is subcategory, and this is where you can
further categorize your assets. This is one of my assets
packs and you can see that I have it broken
down into flower shapes, flower middles, leaf shapes, and vases and reads. To add a new category, go to the burger
menu at the top and just choose add a category. I'm going to name
mine vector flowers. From this same burger menu, you can import a category if
someone shares one with you. You can add your subcategories, which we'll get to in a minute. You can export a category if you create assets that
you want to share, you can rename duplicate, link, which we'll talk
about in a moment, and delete a category. Now, designer is not
going to allow you to add an asset directly
to a category, so whether you want to further
categorize them or not, you need to create at
least one subcategory before you can begin
adding your assets. I'll add two for mine, because I have
flowers and leaves. Once I've added those, I can go into the
burger menu for each of those and rename them. I'll name this one leaves and I'll rename
this one flowers. Now that I have my
subcategories in place, I'm ready to begin
adding my floral shape. I'm going to start with my
leaf shapes because they're single-layer curves
and the easiest to add to the asset studio. With my move tool, I'll select my one leaf shape, go to the burger menu
for that subcategory and choose Add Asset from
selection and I'm all set. I'll tap the other and
do the same thing. Now when adding
multi-layer assets, you may need to take an
additional step before selecting them and adding
them to your assets. I have these flowers here and if you look at my
layers to the other, actually broken down into individual layers
that I have grouped. In order to save these to the assets studio as a
single combined shape, I need to make sure
that I'm selecting the group layer and not
the two individual layers. Even if I have them grouped, if I select those and
save them to my assets, it's going to save it as
two individual layers. I'm going to go
back up and choose my group layer, go into assets, add asset from selection
and you can see that the entire flower is added as an asset as a single object. I'll do the same thing
with my other flower. Just make sure that I
have the group layer selected and I'm done
adding my four assets. Now to use an asset, you can tap and either
insert or delete. On the desktop version, you actually have two
additional options, you can reorder your
assets by holding down the option key and dragging them around in whatever
order you'd like. Otherwise, they're going to be loaded in the order
you save them. Second, in the desktop version, you can right-click and
name your assets as well. Unfortunately, neither
of these options is available in the iPad. Now that the asset category is created and the
assets are loaded, they're ready to either be exported by going to the
burger menu at the top or they can be linked
if you're going to use them in an app
on the same machine. I know that I want to use
these in photo on my iPad, so I'll go up to
the burger menu and I want to choose
a link category. If it's already linked, that will be grayed out and it's not going to be an option. Linking assets between
either your iPad apps or your desktop apps saves
you time because you don't have to export
your assets from one application and
import it into another. When I go into photo, if I go into my assets, it's automatically going to be there. Assets
are pretty cool. Remember, because photo
can handle vectors, you can link your assets between designer and photo with
the reassurance that as long as no raster
effects are added and they're saved in a vector
family format like PDF, you can safely use what you
created in designer in photo. Let's head into the
next lesson where we're going to talk about
another way to work more efficiently between
apps by creating templates that can be used across the entire
affinity suite. I'll see you there. [MUSIC]r
6. Using Pattern Templates: As a digital creative, one of the best ways to
be efficient is to take advantage of tools that help us avoid needless repetition. One way that photo as well as the other two affinity apps
can help us with that, is by using document templates. In a moment, I'll
show you how to create templates, but first, let's take a look at a few ways that templates can help you be more efficient when
creating patterns. Templates allow you to save the Canvas with placeholders and defaults that you create such as grids and guides, art boards, stroke and fill color,
text attributes, symbols and basically anything
you add into your Canvas, so they're always
at your fingertips, ready to use when you need them. Templates are saved with a standard AF template file
extension in all three apps, both iPad and desktop. Which means that what
you create in one can effectively be
used in the other two. When it comes to the
pattern templates, you can use the
same template and photo that you do in designer. Unlike linked assets, these do work between the iPad
and desktop as well. Another benefit of templates is they're saved
outside of the app, rather than housing it in your home screen and
continuously copying it. That means the
gallery can remain organized and free
for active documents, which is going to help your
apps run more smoothly and efficiently and help you
avoid accidental override. I have a 3000 pixel basic
repeat Canvas setup. I want to save this as
a template and pull it in whenever I need to
use this size canvas. If I open up my layers, you'll see that I have
my art board setup with my first one
with the main symbol. The second art board has the duplicated symbols across
the pattern preview so that anything I place on
the main tile will automatically repeat on
the pattern preview. Now, I also set up grids, which I use a lot when I'm
creating geometric patterns. I can easily turn them off
when I don't need them, but I like to set them
up because they're handy just to have
around just in case. Now, I've also set up a third art board
without any layers, which I'm going to
show you how I use at the end of class. Stay tuned. Now I want to save
this as a template, so I don't have to
recreate it each time I want a 3000
pixel basic repeat. I'll head up to
my documents menu and choose Export As template. To make it easier to find especially in a list of
other pattern templates, I always name mine
with something that will indicate the size
and type of documents. In this case, 3000 pixel
basic repeat at 300 DPI. Then I hit "Save"
and choose my file. Now I've already saved this, so I'm not going to repeat that. Remember, you can
use this template in both the iPad and desktop
versions of the app, as well as the other
two affinity apps. Saving this to a Cloud file will allow you to access it on both your iPad and desktop
whenever you need it. Now if I go back
to my home screen, I can tap New from Template, find the template
that I just saved, and it's all set
and ready to use. Making changes to the
template once you pull it in, isn't going to impact the template you've
saved out there. You can pull that template and
as many times as you want. As long as you don't export and override
the existing one, using the save as template function and will
always be a free copy. I do recommend saving the
document once you pull it in. Go back to your home screen
and just rename and save the document so that you have it set up for that
particular pattern. I've created templates
for multiple pixel sizes as well as both basic
and half-drop repeats, so that I have
everything ready to go depending on what I want to create and it doesn't take
up space in my home screen. Next up, we'll take a
look at StudioLink. Which will allow us
to seamlessly jump between apps with
a single click. Saving us from wasting
time exporting and importing Canvas needlessly.
I'll see you there.
7. Using StudioLink to Bridge Apps: [MUSIC] Studio Link
is one of my favorite time-saving tools in Affinity. It's existed in the
desktop version of the app for a while. However, with the implementation
of publisher for iPad, it was just released
for Version 2. In this lesson, we'll
take a closer look at how Studio Link works
in the desktop. In the next lesson,
we'll head into the iPad version of the app and look at how it can help you make your pattern making
process more efficient. Studio Link was created by
[inaudible] as a way of taking their seamless suite
of apps a step beyond having a
singular file format, and allow users to effectively jump seamlessly
between apps with a single click while maintaining all aspects of the
original canvas. How can it help me be more efficient when
creating patterns? Well, Studio Link
automatically shifts your canvas from one
app to the other. Which means you don't have
to export your Canvas from one and import it into the other to continue
working on it. It allows you to seamlessly jump between apps with the
click of a button. Now, there are some
caveats to that, which we'll talk about
in a few minutes. But for the most part, you can continuously
switch between apps without disrupting
your workflow, which means you have
immediate access to the best tools in each of
the apps quickly and easily. So let's head into
the desktop version and see how it works. While you do need to have all three apps registered,
designer, photo, and publisher for
Studio Link to work, in a desktop version, you don't need to
have all three open. When we get to the iPad version of Studio Link in
the next lesson, you'll see that there is a
very distinct difference between how the two work. Let me show you an
example of how to use Studio Link in
everyday creative work. Now, this is just an example, no need to replicate it. I'm here in designer, and I've created
this sign and I've used blend ranges to make my text recede into the texture behind it and
give it a weathered look. The problem is the edges of the texts are a
little too perfect. I want to rough it
up a little bit, taking advantage of a
displacement filter. Now, designer doesn't have
that, but photo does. Instead of exporting this file, importing it into photo, using the filter, and then
coming back to designer, I'm going to use Studio Link
to jump between the two. Before I do that though, I want to make a copy of my original texts so I can always go back to
it if I need it. And I'm going to
save my file so I have it somewhere
safe just in case. Once I've done that, I'll go
up to File, Edit in Photo, and you can see that
it's pulled all of my layers into photo untouched. Now, I want to make
sure that I maintain the flexibility of my vectors. So I've taken that
rasterized version, the copy of my text, and I've put it in its
own group because I want to apply the
displacement filter just to that particular
layer, not the rest. So I'll select that
layer and go to my live filters,
choose Displace. I'll grab the texture
that I want to use. You can see that it's changed
the edges a little bit. I can adjust my levels here. I think that looks
good. I'll close this. And now I'm done here in photo. So I can go back up to File, Edit in Designer, and now all of my layers are there and that displacement
map has been applied. More importantly, if I open
up my vector group here, you can see that I've
maintained the original vectors because I was careful not to add any raster elements to it. You can seamlessly jump between
the two apps and maintain the flexibility of working
with vectors and text, as long as you don't add
any raster effects to them. This is going to allow
you to use the best of both apps without
a lot of work. The other thing you'll note, if I go into this
group at the top, is that even though designer doesn't have a displaced filter, because I use Studio Link
and jump back into designer, it's pulled that
displacement map in, and because I used
a live filter, I can just double-click
this and adjust if I need to without having to
go back to photo. Studio Link is great for
something like using an adjustment filter that
designer doesn't have. How can we use it to make the pattern creation
process more efficient? Let's head into the next lesson where we'll take a look at how Studio Link works on the
iPad version of the app. And more importantly,
how we can apply it to the seamless pattern making
process. I'll see you there.
8. Using StudioLink in Pattern Design: [MUSIC] We've looked
at a typical use case for studio link in
the desktop version, but what about the iPad version? More specifically, how will it help us when creating patterns? Let's head into
the iPad and first take a look at how
Studio Link works, then talk about how to use it to make pattern creation
more efficient. Unlike the desktop version, when using Studio Link
and the iPad version, not only do you need to have
all three apps registered, you need to have all
three running and publisher is going to be
the gateway to using it. What does that mean? I have the 3,000-pixel pattern
template that I saved earlier open
here and publisher and I'm not going to add
anything to it here, but I at least need to pull it in in order to
engage Studio Link. Now with this is open, I can go up and tap and switch between
designer and photo. Now I do want to note when
using Studio Link on the iPad, you'll only have access to the main persona in both
designer and photo. Here in designer,
I'm only going to have access to the vector tools. Additionally, because
the Save As function is now in the home screen in
Version 2 for the iPad, if I back out of this,
I'm in publisher. I'm going to be saving it from publisher not the other two, which is fine, just
be aware that it's going to save it with
an AF pub extension. Now, because of the way the
affinity suite is set up, you'll still be able
to reopen it either in designer and photo and everything
is going to be intact. Because remember the
suite is set up so that all three file extensions are readable within each
of the other apps. From there, you can save your final pattern tile in
either designer or photo, whichever you prefer or
you can simply leave it in Publisher format since it can
be read in all three apps. Now that we have
Studio Link engaged, just like with the
desktop version, we can switch back
and forth between the photo and designer
with publisher in a background acting as
host and we can use each of the app's best features to make our pattern process
run more smoothly. Let's look at an example. In an upcoming lesson, we're going to cover
macros and affinity photo, which will allow you
to record a series of steps and play them back
with a single click. We're not going to go into
it too much in this lesson, but long story short, it's going to make the
process of duplicating and moving the motifs on the outer edge of your
Canvas super-fast. Now designer doesn't
have macros, but it does have the
best and widest range of vector tools
between the two apps. How do we get the best
of both apps when it comes to creating
our patterns while avoiding a lot of
needless exporting and importing of full
Canvases between the two? Well, that's where
Studio Link comes in. I'm hear in designer and I have some of those
motifs I showed you earlier pulled in from my assets and since they're at the outer
edge of the Canvas, I'll need to duplicate
them and move them to the opposite side to
complete my pattern. I could do this
manually, of course, but I want to speed
up the process by using the macros
that I just mentioned. I'm going to use Studio
Link to pop over to photo, just tap and hit Photo and now I have all of the photo
tools available to me, so I can select one
of my assets here. I can go to my
macro menu and I'll find the particular one
that I want and I need to duplicate this and
move this over so I'll tap the correct macro and I'm all set and I can keep doing this until they're all done. Now of course I'm not
done with my pattern. Maybe I want to add more to the outer edges and remember
since I've linked my assets, I can add some more. I can use my macros to
move them around and keep going until I'm done
with the outer edge. But let's just
pretend I'm done with that and I want to add
some filler elements, but I want to use designer's
vector tools to do that. Again, since I'm in Studio Link, I can just click, go back to designer, and now I have all of designer's vector tools available
to complete my pattern. When I'm done, I can
go back out of this, save this here in
publisher and I'm all set. If I want to pull anything
up in designer or photo, I can, and everything that I just created will remain intact. Studio Link is pretty awesome. A seamless way to jump
between all the apps and get the best of all of them while working more efficiently
on your patterns. Now again, just a few
reminders that apply to both iPad and desktop versions. Make sure that before
you use Studio Link, you save your work, save the full file, complete with history in
one of the three apps, just so that you have a backup. Personally, I've never run into a glitch using Studio Link, but it's always better to save than having to start
all over again. That leads us to the next one. When you switch between
apps using Studio Link, the file you are working on is no longer open in
the other apps, so it's really important to save before you back out
of that Canvas. We've covered linking assets, creating templates,
and using Studio Link. Let's head to the next
lesson and take a look at photos pattern layer and
how it can easily map out your pattern even
if you complete it in designer or any other app.
I'll see you there. [MUSIC]
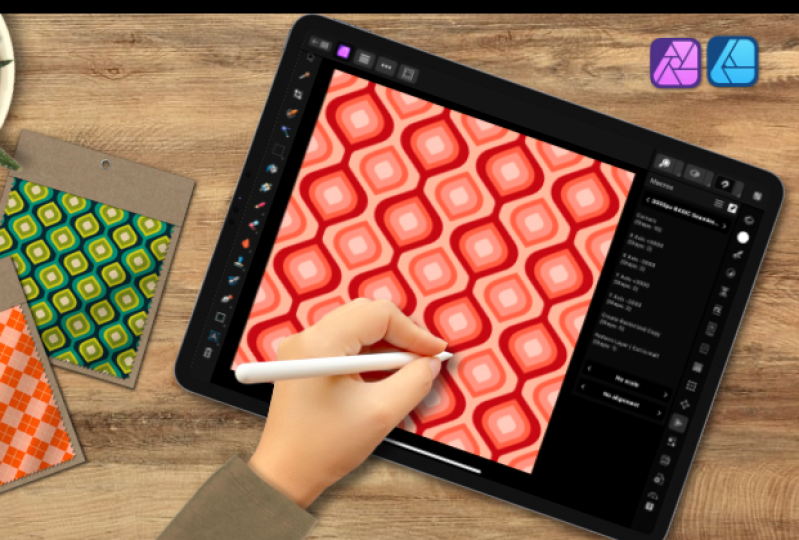
9. Visualize Your Pattern with Pattern Layers: [MUSIC] Affinity photo has
a pattern layer feature that allows you to sketch
out a seamless pattern, starting with a single panel. While providing a
live preview of the repeat, no symbols required. Whether using designer
or another design app like Procreate to create
your final pattern, this feature will allow you to visualize and sketch
it out beforehand, making the design process
run more smoothly. Let's take a look.
This is a pattern that I sketched out
previously and it's all based on a single swatch
in the middle of my Canvas. Anything that I draw both
inside and out of the swatch is going to repeat across the Canvas giving me a
preview of my repeat. In a moment I'm
going to start with a fresh Canvas and create
a new pattern sketch, but first, let's
talk about some of the limitations of
the pattern layer. Now first, this is only
going to allow you to sketch out a basic
repeat, not a half-drop. When I create a shape, I can size this up and down. I can move the pattern layer, but I can't adjust the
position of the repeats outside of the swatch to
offset them for a half-drop. Second, this is
only going to work with rasters not vectors, so you can sketch a pattern, you can create a pattern
from a selection. You can use symmetry
and mirroring. You can even add pixel
adjustments to the pattern layer, but you're not going to be able to pull any vector assets in. Where this pattern
layer does come in handy when it comes
to efficiency is giving you the tools that you need to sketch out
a vision that you have for your pattern and see it before you
begin to build it. I have a 3,000 pixels
single layer Canvas setup. This is only going
to be a sketch, so you don't need to pull in your pattern template for this. I'll head to my layers studio
and choose the plus sign. I want to select Pattern
Layer in this case. Pattern layer from selection is something we will go
over later in class, I'm going to show you a
different way to use that. In a desktop version
of the app just go to Layer menu at the top and
again choose Pattern Layer. A dialog box is going
to open to allow you to select the size
of your pattern swatch. Now by design, the
largest size you can choose is 1,024 pixels. I'm just going to tap
and set mine to 1,000. Now to start, it's going to look like nothing happened
on your Canvas, but if you've looked
at your Layers studio, you'll see that a
pattern layer showed up. If you choose either your
move tool or a brush, you'll see that the pattern
swatches here in the middle. I'm going to go in and
choose one of my pencils. Now, anything that I draw within that box is going to seamlessly tile again
in a basic repeat. But here's the cool
thing, I don't have to stay within the box. In fact, going outside of the box means that
I automatically get a reference for
where my seamless repeats need to happen
on the other side. For example, if I create
a vine shape like this, I can see that I
need to complete this portion here and not here. I'm going to use mine to
sketch out an OG pattern. I've turned on both
symmetry and mirroring, I've changed the lines
to two and I'll just draw out the initial template. I'll change this back to one and I want to shift my symmetry lines
so that it's vertical. I find it easier to do this
with the Shift key on. It's not an easy thing to
do in the first place, but if you have this on, it actually helps snap it
exactly where you want. I'll just lock that
back in place. Turn this off. Now, I can
start drawing out my shape. Now I made a little mark
there so I'm going to grab my eraser and
just get rid of it. With my pencil I can begin
creating my initial shapes. Since I have mirroring on, it makes it a little bit easier. Now you don't have to do
this in mirror or fashion, you can create any pattern
you'd like with this. This is just what I
choose to create. You can see as I'm doing it, it's tiling it across
the rest of the Canvas. Now, for the purposes of keeping this class
under 20 hours, because I am not
a fast sketcher, I'm going to keep this
a rather simple design, but I'm going to speed it up and I'll see you
on the other side. [MUSIC] Again, I'm going to keep it
relatively simple. I could keep going and
fill in the top here, but what this allows
me to do is step back and see if I feel
like there are any holes, anything that needs to
be edited and I can go into the actual
creation process, whether it's with
vectors or rasters in another app with a plan
rather than building as I go. That makes them
much more efficient process and saves me a lot of time in the
creation process. Now, what do I do with this? Well, from here,
I'm going to save my pattern swatch and use it as a sketch layer in whatever
app I want to build it in. I would end up pulling this into Designer and start
building it with vectors. You could just as
easily bring this into Procreate or Fresco, or again, any app that you
use to create your patterns. I'll go ahead and use my
move tool and you can see that it's a
selecting that swatch. I'll go up to my documents
menu and export. Under the area, I want to choose selection only. I can either save it to
my files or in this case, I'm just going to
hit the Share button and save it to my photos. I'm all set. I can import this in to any app that I
want to use it in. [MUSIC] Now towards
the end of class, I'm going to show you how to use pattern layer
from selection. But first, let's head into the next lesson where we're
going to begin talking about my all-time
favorite efficiency hack Macros. I'll see you there.
10. What Are Macros?: [MUSIC] We've
reached my favorite efficiency hack in photo. This is one of those tools where when you know how it's
supposed to work, you can figure out ways to
apply it to things it's not necessarily intended
for. What are macros? Well, if you've come from
Photoshop or Illustrator, you may be familiar
with actions. There are a series of
recorded steps that can be recreated with a single
click of a button. Macros are affinity photos
version of actions. As a photographer, I
typically use them to add multiple layers of go-to
adjustments to my photographs. Those I use regularly
and don't want to have to rebuild each
and every time. Basically the automate manual or complex processes making your
workflow more efficient. How can we apply them to the pattern process?
Think about it. What is the most manual part of creating a pattern
and affinity designer? Duplicating the motifs
on the edges of the canvas and moving those
duplicates to the other side. And that's just a basic pattern. What about half drops where
you have to move them twice. Sure, the Transform
Studio lets you key in a specific number
and that's great. But after a while, all that keying adds up and
it takes time. What if we could reform
that duplication and transformation
in a single click? That's where macros come in. Over the next few videos, I'm going to show
you how to plan out and create macros that can be used in both the iPad and
desktop versions of the app. Now they can only be created
in the desktop version. We'll be heading there
for the next video. If you don't have
the desktop version, don't worry, I've
got you covered. I provided the macros we'll be creating in the class
with the downloads, and I'll show you how to import them in an upcoming video. Let's head into the next
lesson and start mapping out and creating our
macros. I'll see you there.
11. Creating Macros | Basic Repeat: In this lesson, we're
going to plan out the macros needed to
complete a basic repeat, then head into the
desktop version to create our own
seamless repeat macros. It's always a good idea to
plan out the macros you need, because you don't
necessarily need one for every part of
the pattern process. Just the key parts that are more manual and involve a
lot of repetition. If you create too many, it just becomes
confusing and you're more likely to make errors
with your patterns. Let's plan what we'll need
for a 3,000 pixel canvas. For a basic repeat, we need to duplicate
and move each shape on the outer edge once in the opposite direction
of where we added it. This is going to require
at least four macros. For shapes we add to the left
edge on the x-axis we need a macro that says duplicate
this shape and move it plus 3,000 pixels
to the right. For shapes we add to
the right edge on the x-axis we'll
need one that says duplicate this shape and move it minus 3,000 pixels
to the left edge. For shapes added to the top of the pattern square on
the y-axis we'll need a macro that says duplicate
this shape and move it plus 3,000 pixels
to the bottom edge. Finally, for one that we've
added to the bottom edge, we'll need to write a macro that says duplicate
this shape and move it minus 3,000
pixels to the top edge. We'll also create a macro that reduces a pattern layer by half, which we'll use in lessons
at the end of class, as well as one that
duplicates the shape and offsets it to the four
corners of the canvas. Now that's a lot of
info all at once. Let's head into photo and create our macro set step-by-step. Before we begin, you'll
need to make sure that your macro and Library
panels are open as we're going to need
both if yours aren't go up to window and you can open
them here at the bottom. You'll also want
to make sure that your transform and
layer panels are open. I recommend detaching
the macro panel and pulling it out next to your canvas so that you don't have to click back and
forth between the layers, panel and macros
during recording. Let's take a quick look at both the macro and
library panels before we begin recording. On the left side of
the macro panel, you'll see record, stop and play, which is
pretty straightforward. Let's head over to the right. The rounded arrow will let
you reset the macro panel. If you're done creating your macro and you save
it to the library, or you've made a mistake
and want to start again You can hit this icon. The second is going to add your finished macro
to the library. When you click on
it, it's going to give you the option
to either put your macro in a default category or one that you've created. More on that in a bit. The last two icons are
export and import. Now, I prefer to import my macro sets from
within the library, which we'll take a
look at in a moment. But you can do
that here as well. You can create your
own macro categories by heading to the burger menu at the top of the library panel and choosing "Create
new category". This is another area where you
can import macros as well. If I head into one of my existing categories and
go to the burger menu, you can see that I can rename, delete, duplicate a category. I can also move them up
and down within the panel. This is where I can export
my individual categories. We're ready to
create our macros. Let's head back over
to the macro Studio. Now, I'm just using
basic shapes for this and there's no need to use
your pattern template. I have a single 3,000
pixel canvas setup. You can set your Canvas app in whatever size macros
you want to create. Again, I have my macro
panel pulled out. My layers panel is open
and so is transform. I'm going to need all three
during this next process. I want to take this donut
shape and move it from the left side of my
Canvas to the right side. I'm going to select it first, and then I'll go ahead
and click record. You want to make sure
that you select it first. Otherwise you're going to get an error message from
photo. With it selected. I'll type command or
"Control J" to duplicate it. Now I need to move this from
the left to the right side. I'll go up to my transform
studio and in the x-axis, I'll type plus 3,000 and you can see that move the duplicate over
to the other side. Now one final thing that
I want to do before I stop recording is to
click outside my canvas. That's going to
clear my selection which is going to get
recorded and it's going to make it a bit
cleaner when I want to move to my next shape and that's it. That's all we need to
record for that move. I'll hit stop and we're
going to test it out. I'll delete my duplicate. Again, select the
original and I'm just going to click play
here in the macro Studio. You can see that it duplicated it and moved it over
to the right side. I know it's working fine. I'm going to go ahead and
save it to my library panel. I'll click the second
icon and I already have a category setup for the 3,000 pixel basic
seamless repeat, so I'll select that
and you can name yours whatever you need
to remember yours. I have 3,000 pixels
on the x-axis. I think I'll add plus to this and click "Okay" and that's going to take
me to my library panel. If I open up that category,
there's the macro. Let's test it now
that it's here. Again, I'll remove
the duplicate, go to "my Library", click the macro and it
worked just as expected. Now we need to do
the same thing, but for our y-axis. Now technically, we
can just adjust the existing macro and I'm going to show you how to do that
in the next lesson. But just for some more practice
in creating the macros, let's go ahead and repeat the
process that we just did. Again, I'll select the donut
shape before I hit record. I'm going to clear
my macro panel. Start recording and I want
to duplicate my shapes. Command or control J, you can
see that showed up there. I'll go up to my
transform panel and this time I'm going
to type a minus 3,000 in the x-axis and it took that duplicate and offset it to the left
side of the canvas. Again, I'll click
outside and then hit stop and my macro is
recorded. Let's test it. I'm going to remove
the duplicate and select the original, click "Play" and it
worked just as expected. Let's go ahead and save that. I'll tap the second icon. Again, I want to put this in my 3,000 pixel basic
seamless repeat. I'll just change
this to minus 3,000. Okay, and there it is. Let's just test it and
make sure it's working. Again, we want to create
macros now for the y-axis. I'll clear my macro panel and I'm going to select this
first shape at the top. I need to duplicate
it and move it plus 3,000 on the y-axis. With it selected, I'll
tap the record button. I'm going to duplicate it, go to my transform studio
and this time click into the y-axis and type plus 3,000. That's offset it from
the top to the bottom. I can click outside my canvas to stop and I'm all
set to test it. Let's remove the duplicate, grab the original, and
click "Play". I'm all set. I'm going to say
this to my library, again, to my 3,000 basic. This time I want
to change this to y-axis and plus
3,000. There it is. I'll go ahead and test that. Make sure it's working. Let's create our final one. That's going to be
from the bottom to the top, so minus 3,000y. I'll grab this donut shape. I'm going to clear my
macros, hit "Record". I'll duplicate my shape. Go to my y-axis on
the transform studio, and this time type minus
3,000. There we go. I'll click outside, hit stop, and the macros all set. Let's just test it. I'm going to save
this and we're done done the main macros
for this set. Next, let's create a macro
that's going to duplicate this shape and send it to the
four corners of the canvas. This one's handy
once you want to create something like
a polka dot pattern, where you have your main circle here in the middle and then need to repeat it evenly
along the four corners. As you can see here, this macro is a little more
tricky because it involves multiple duplicates
and some select and deselect which photo
has a bit of a process for, but we'll walk
through it slowly. I'm going to clear
my macros here, select my shape in the middle and I'm
going to hit "Record". The first thing I want to
do is duplicate my shapes. I'm doing "Command" or "Control J" and I'm going to
hold "Shift" down and just drag this
with snapping on to the corner until
it pops into place. Next, I want to clear my selection and you can
see that it shows up here. I'm going to select the second shape and
it's going to bring up a dialog box that asks me which layer do I want to select. Now, these are technically
the same thing, so I'm going to keep it at
select layer 1 from the top, because it's layer
1 from the top. I'll hit "Select",
duplicate the shape, go up to my transform
studio and I'm going to type plus 3,000 pixels. That's going to send
it to the right side. Again, it's evenly spaced. I'll de-select and I'm going
to follow the same process. I'll click that last ellipse, choose select layer
1 from the top. Duplicate the shape
and this time I want to go plus 3,000 on the y-axis. Then one final one,
we'll select it, select layer 1 from the top, duplicate our shape and we
want to type in minus 3,000 x. Now we have our circle in the middle and all four corners, and these are evenly spaced. I'll click clear to clear
my selection and stop. Now let's test that out. I'm going to remove
all the duplicates, select the middle
ellipse and click play. What should happen is that
I get four duplicates that automatically go to the
four corners. There we go. I could turn this into a polka dot pattern
if I wanted to. I'm going to save this to my library. Click
the second one. Again, this is a 3,000 pixel canvas and I'm just going
to type four corners. Again you can name
yours whatever you need to so that you
remember which is which. Let's go ahead and remove
our duplicates again. I'm going to remove
the duplicates and then test my final. It's always a good idea to
test the macros in both places here and in your library just to make sure
it's running okay. I'll click four corners
and we're all set. One final macro that
I want to create is cutting my pattern
layer in half. Again, we'll use
this later in class. But since we're here
creating our macros, let's take care of it now. To do this, I'm just going to duplicate the
rectangle that I have in the background
of my canvas and I'll change it to
a different color. I want to select that
rectangle, hit record. I'm going to go right
to my transform studio. In the width and height, I want to make sure
that this is locked so that they maintain
their aspect ratio. On just one or the
other doesn't matter which one I will
just you divide two. That's going to
take that rectangle and it's going to reduce it from 3,000 pixels
to 1,500 pixels. I'll click outside and
clear selection and stop and let's just test that again on.
I'll just back up. Sure that the rectangles 3,000. Hit play and there we go. I'm just going to save
this to my library. This one's going to
make a lot more sense towards the end of class. I'm trying to name this
cut pattern layer in half. Click, "Okay", and I can
test this last one again. Let's just go backwards. Go to library and we're all set. We've created our macros
for the basic repeat. In an upcoming lesson, I'm going to show
you how to create macros for a half-drop repeat. For now though, let's head to the next lesson and I'm going
to show you how to adjust an existing macro for a different Canvas size.
I'll see you there. [MUSIC]
12. Adjusting Macros for Canvas Size: [MUSIC] We've created macros
for a 3000 pixel Canvas. But we all know there are times when we need to
create another size. The good news, you
don't need to re-record all of the macros just to
change the Canvas size. Instead, you're going to
adjust the ones you've already created and save
them as a new set. Now if you're more comfortable recreating the
macros for each size Canvas or you just want to practice creating them,
go ahead and do that. If you'd prefer to edit
the existing ones, let's head back into the
desktop version and do that. I'd like to create a
category of macros for each Canvas size that I use and keep them separate
from one another. There are two main
benefits to doing that. The first is that
I don't have to spend a lot of time searching for an individual macro
within a single category. Second, by breaking my
macros out individually, I don't have to
edit the offset for a particular Canvas size
each time I use that macro, that just takes time. Instead, I'm going to
do that once and create a separate macro and
separate categories for each Canvas size. The very first thing
I'll do is create my category and
my library panel. Now this is a 2000 pixel
Canvas and I already have a setup for a basic repeat. But for the purposes
of the class, I'll just set up another one. I'm going to name this
2000 pixel basic repeat. Now I want to take this diamond shape and I want to move it from the left side of
the Canvas to the right. I don't have to start all over again though and
record the macro. Instead, what I'm going to use is one of my existing ones, in this case, the
existing 3000 pixel set. Because I know that I want to
go plus 3000 on the x-axis, I'll right-click on this
one and choose ''Edit''. If I open up this
cog shape here, you can see that on the
offset x it shows 3000. I'm going to change that
to 2000 and click ''Out''. Now to test it, what should
happen is it'll duplicate it and move it 2000
pixels to the right side. We'll click ''Play'', and
that worked just fine. I want to make sure that I don't overwrite the existing macros. I'm going to go right up
to my add to library, pick the right category, and I'm willing to
change this to plus 2000 pixels on the x-axis
and click ''Okay''. Let's test it one more time. I'll remove the duplicate, go back to My Library, click the Macro,
and we're all set. Let's do one more together. I want to clear my macro panel so that I can bring
in another one. This time I'm going to take
this diamond shape from the bottom and move it minus
2000 pixels to the top. I'll right-click on y-axis minus 3000 to bring it
into the macro panel, go into the COG shape
and change this from 3000 to minus 2000s. Now if I select that
shape and test this, it should bring it to the top. Let's go ahead and save that. Again, to the right category, I want to make sure I rename it. It's minus 2,000 on the y-axis. We're all set. Now I'll continue doing this for
each of the macros, making sure to
test them out both here and in my library panel. Saving them to the new category
with a new name again, so I avoid overwriting the
existing macro so that everything stays
intact. That's it. By editing existing macros, you can save yourself
tons of time by not having to repeat steps
you've already taken. That gives you more time to use those macros to create
beautiful designs. As long as you're careful
and plan out what you want the edited macro to do and then test it to make
sure that it does, you can quickly and easily make macro sets for all of your
favorite Canvas sizes. Now that we have our
macros for a basic repeat, let's head to the next lesson and create some for a half-drop. I'll see you there. [MUSIC]
13. Creating Macros | Half Drop Repeat: The process for
creating macros for a half drop repeat isn't that different from
a basic repeat. In fact, we can borrow two of the macros we've
already created. The only difference is that for those macros created for
shapes placed on the sides, we need to record two offsets, one across and either
one up or down, depending on which quadrant
the shape was placed in. Let's plan our macros
for a half drop repeat. For any shapes placed
on either the top or the bottom of the pattern
tile we'll need a macro that says duplicate and shift
+ or -3,000 on the y-axis. We've already created this
for the basic repeat, so we'll simply borrow those. But for anything
placed on the side, not only do we need to offset or duplicate to the opposite side, we also need to
shift it either up or down to the
opposite quadrant. For example a motif
placed on the top-left will need
to be duplicated and shifted 3,000 pixels
to the right and then down 1,500 pixels on the y-axis, half of the canvas size. The same goes for the
rest of the quadrants. We'll create a macro moving the duplicate from this chart in quadrant to the opposite
quadrant on either side. Lower left to upper right, upper right to lower left, and finally, lower-right
to upper left. We won't be creating
a macro to half our pattern swatch as it won't work properly
for the half-drop. However, at the end of class, I'll share a three
bonus macros that I've created specifically for
your half-drop repeats. I also don't create corner
macros for half drops because motifs placed in the
corners never worked well. But let's go ahead and create
the rest of our macro set. I'm back in photo for desktop. Again, I have my macro
and library panels open, as well as my layers
and transform studio. Again, I'd like to keep my
categories separated by canvas size so that
I don't have to hunt around for a
particular macro, but set yours up, however, works best for you. I've already set
up a category for 3,000 pixel half-drop repeat. Remember we can copy two of them from the other set
that we created for the basic repeat specifically
for those on the y-axis, because anything
placed at the top or the bottom works
exactly the same way. We just need to duplicate it and offset it to
the top or bottom. I have my category
here and I'm going to go up to my basic
seamless repeat for the same canvas
size and I'll start with the y-axis +3,000. I have a clear
macro studio here. I'll go ahead and
right-click and edit, and that's going
to pull this in. Now I don't need to
change anything. What I'm going to
do is immediately go up to add to library, choose the new category and
I'm going to save this as +3,000 y-axis and click "Okay." Let's just test that and
make sure that's working. There we go. I'll just move this guy over here so we
can do the other side. Now I don't need to pull a new macro in for
this next step. I'm just going to go up to
the cog shape and this time I'll just change this to -3,000. I'll test it and then I'll go ahead and save
it to my library. Again, I want to choose
the new category, and I'll change this to
-3,000 on the y-axis. There's no easy way
to duplicate this. The best way is just pull
it into your macro studio, adjust as needed, and then
save it to your new category. Now I have my originals here
and my duplicates here. I'm going to remove those from my macro and I'm just going to delete any
of these duplicates. Let's go ahead and
create the rest of the macros for the sides. We want to think of
our Canvas as being broken out into four quadrants. I've added guides to mind so you can see what
I'm talking about. I mentioned earlier
in the lesson that we'll need to
create our macros so that the duplicates on the side and up going across the canvas. Then either down or up, half the size of the canvas, so in this case 1,500 pixels. Let's start with this rectangle. It's in the upper left quadrant, which means that the first
transform needs to take it to the upper right +3,000 pixels. Then I need to
send it down 1,500 pixels to the lower right
quadrant along the y-axis. I'm going to keep it selected. I'll hit "Record." I want to go back
to my layers panel. I'm going to duplicate this, go up to my X and type +3,000 to send it to the right
and then go to my y-axis and you +1,500. That's going to send it from the upper left quadrant to
the lower right quadrant. Again, I'll go ahead and click
out of the canvas so that I clear my selection
and I'll hit "Stop." When I click play, it should duplicate it send it 3,000 to the right
and 1,500 down. Perfect. Let's go ahead and
save this to our library. Again, I'll choose
the new category. I like to be a little
descriptive in my names for my macros here just so that I can see
upper left to lower right. I find it a lot easier
to see it that way. I'm going to say upper left to lower right and type +3,000
on the X, +1,500 on the Y. You can name yours again,
however, works best. Now from here I can either edit my original
macro and save it, or I can record each
one individually. Let's do one more
together and then we can do the rest by adjusting
the original macro. I'm going to clear
my macro studio. This time I'm going to start at the upper right quadrant so that it has to go
to the lower left. To grab the move tool here, I'm going to delete one of these duplicates to bring
this guy over here. Again, I need it to go across -3,000 and then down +1,500. I'll hit record. I'm going to duplicate my shape, go to my x-axis and type -3,000, and then in the y-axis +1,500. I'll click outside to clear
the selection and hit "Stop." Let's just test that. It should run from the
upper right quadrant to the lower left, and there we go. Let's save this to the library. Again, I'm just going
to change this from upper right to lower left. I'll do -3,000+1,500, I'll click "Okay", let's get rid of one
of these duplicates and just test that final macro. There we go and that works. Now from here, I can just
adjust the existing macro and keep saving it so that I don't overwrite
the existing ones. I'm going to do that
off camera since you've already seen me do that. But again, you also have that in the macro sets that I
provided with the class. With my macros complete, I'm ready to export these
so that I can use them both here and the iPad
version of the app. I'll go to the burger menu, choose Export macros, find the file that I
wanted to place the name. It's automatically going
to get it whatever you named your category if you wanted to change it,
you can do that. I'll just click "Save"
and I'm all set. Now that we have our full
and half-drop repeats for a 3,000 pixel canvas, we're ready to begin using them. Now they're all loaded here
in the desktop version but now we need to bring
them into the iPad version. In the next lesson,
I'll show you how to import the
macros that you created here on desktop into the iPad version.
I'll see you there.
14. Importing Macros on the iPad: [MUSIC] Now, while you
may not be able to create macros and the iPad
version of photo, you can import and use any macros and they'll work exactly the same way that they
do in the desktop version. Let's take a look at how to
import them into the iPad. Importing macros works just like any other import in Affinity. In order to import them, you need to be in the
macro studio and have the macro file saved somewhere that you can access them
from within the app. I'll head to the burger
menu at the top, tap ''Import Macros'', select the file, and it's automatically
going to pull it in. Now, I can locate it by tapping in the middle
and using the flywheel, or again, I can use the
left and right arrow keys. I can go back up
to the burger menu and rename the category, duplicate it, delete it, or import more macros. The only thing that you're
not going to be able to do in the iPad version
is to edit them. If you've created
your own macros and you need to make an
adjustment to them, you'll need to head back to the desktop version
of the app to make the changes
and re-export them. Now that our macros
have been loaded, let's head into the next lesson and take a quick look
at them in action. I'll see you there. [MUSIC]
15. Efficiency Hacks in Action: [MUSIC] Let's recap.
We've saved and linked vector assets between
designer and photo, so we can easily access
them without having to export from one and
import to the other. We've created a
pattern template which provides us with a clean canvas, complete with all
of the symbols and artboards and
everything we need to complete our patterns without having to recreate
them each time. We've explored StudioLink, which on both desktop and iPad will allow us
to seamlessly jump between photo and designer so that we can take advantage of the tools in both without
having to leave either app. We've covered pattern layers, which can help us visualize our basic repeats by tiling
them as we sketch them out. Finally, we planned out
and created Macros, which will allow us to
automate the more manual and repetitive steps in the
pattern-making process, saving us tons of time. Now what? I'm going to jump into the iPad and show
you how I would put several of those into action on a half drop repeat,
starting with StudioLink. I'm in the iPad version of publisher and I'm
starting out here so that I can make use of StudioLink
between photo and designer. Because remember on
the iPad version, all three apps need to be open and publisher access your
gateway to the other two. I've pulled in a pattern
template for a half-drop repeat, and it has all of my
artboards and symbols, so I'm ready to
head right out of publisher and begin
building my pattern. Now, I'm going to
start in photo so that I can pull in my
motifs on the edge and then immediately
use my macros to help duplicate and move them. Since I've linked up my assets between
designer and photo, I can easily access them. Since Photo can handle
the vectors and maintain their independent
scalability while I add them to the canvas, I can do that without worrying about them becoming rasterized. Now since the class isn't about the pattern process itself, I'm not going to
spend too much time thinking about where
I'm placing my motifs, or even complete a full pattern. But I am willing to place a
few of these along the edge. [MUSIC] Now that I have a few of the motifs along the
edge of my canvas, I'm going to use the
half-drop repeat macros to duplicate and move them. I'll head to my macros
and find the set for the 3,000 pixel half-drop
seamless repeat. I'm going to start with
the two easier ones. For this one it needs to go top to bottom so
I'll choose +3,000Y. The other leaf goes
bottom to top, so I'll choose -3,000. Now on these two, the daisy flower here is going to go from
the upper left to the lower right so I'll
find the matching macro so upper left to lower right
and now it's completed it. Then this final one is going to go from the upper right
to the lower left. Upper right, lower left. Now of course I could move these around and I would
normally keep going, but in the interest of time, let's just say that I'm happy
with the outer edges of my pattern and I want to add a little bit
more into the middle. Now, I could stay here in photo, but I prefer to use
some of designers vector tools that
photo doesn't have. Instead of exporting this from publisher and then
pulling it into designer, instead, I'm going
to use StudioLink to head back over there and
complete the pattern. Before I do that, I
just want to make sure that I save a copy
at the point where I'm at just in case because
Affinity auto saves your files and places it in the sandbox or your home screen, but I want to be sure that I've captured everything
that I've done up to this point and I have
a backup file available. Now remember, we did
start in publisher, so I'm going to end up
saving it from here. However, because the Affinity
suite is set up so that all three apps use
the same file format, I'll be able to pull this into either a designer or a
photo without an issue. My main goal here is
just to have a backup. I'll go ahead and tap the
burger menu and just save it. I'll go back in, and now I'm going to use
StudioLink to head to designer to use all of the vector tools that I have available to pull
into the middle. Now I could have easily
just pulled this directly into
designer, but again, just in case I
need to go back to photo to use my macros, I'm going to stay
within StudioLink so that I can jump easily
between the two of them. The pattern's not quite done, but let's just
pretend that it is. I have everything filled in and I want to get
it out into the world. But before I do that, I want to test it because that white line that forms down the middle of the
pattern preview is a bit distracting and I just want to make sure
that everything looks okay before I load it on
Spoonflower or another site. That's where the final
efficiency hacks we'll be covering come in. In the next lesson, we'll head back
into photo and take another look at
pattern layers and how they can help you test your basic repeat patterns.
I'll see you there. [MUSIC]
16. Testing Basic Repeats with Pattern Layers: [MUSIC] We've used the
efficiency hacks we covered so far to create a basic repeat. Now let's put that
final swatch to the test and make sure
everything tiles correctly. Over the next two videos, I'm going to show
you how you can use tools built into photo and designer to quickly and easily test your patterns
of various sizes. In this one, we'll focus in
on photo and head back to pattern layers to take a look at two different approaches
to testing patterns. I'm in photo and I have a
3,000 pixel basic repeat template open and I want to test the pattern to make sure that everything is tiling correctly. Now of course, this
is the full file with all of my
symbols and artboards so I want to be careful
not to rasterize anything that I want
to remain vectors. To do that, I'm going
to select artboard 1, three fingers swipe down and copy and then I'm going
to back out of here, choose new and new
from clipboard. That's going to bring that
copy into its own document. If I open my layers, you can
see it's still an artboard. Now in order to use
pattern layer with this, I need to rasterize it
so in my layers panel, I'll choose the second
option and rasterize. I'll go back to my
layers studio and choose the plus sign and choose
pattern layer from selection. When I do that, you'll see
it creates a second layer. I want to turn this first one
off because I don't want it to create any issues when
I'm sizing the top one down. Now, if I select it, I can scale it by hand
and you can see that it's tiling but instead I'm going to use the macros that we created. I'll go into my macro
studio and I'm going to find the macros
for my 3,000 pixel basic repeats and I'm specifically going to use
the cut in half macro. What this is doing is it's
tiling it down to 1,500, it's cutting it 3,000-1,500 and the pattern layer is then continuing the
pattern past that. I can keep doing that to
check it at different sizes. I can two-finger
tap and bring it back or use the history studio. More importantly, I
can zoom in and scroll around to check the pattern and make sure that
everything looks okay. That was using pattern
layer coming from inside a photo but what if you're in designer and want to do that? I find the quickest
way to do that is to export artboard 1 as a raster layer and use the share function
between the two apps. Again, I'm going to select
artboard 1 and this time I'm going to go up
to documents export. I want to make sure that I'm
only sharing artboard 1. You can see it's 3,000 by 3,000 pixels and I'm
sharing it as a PNG. Again, it needs
to be rasterized. I don't need to change
anything else other than making sure that
my area is set so I'll choose share and I'm going to scroll across
to find photo 2. If you don't find it here, you can check under more
and I'll select that. Again, it's open as its
own layer here in photo. Now this time it's a
rasterized version, I don't need to rasterize it
so I can immediately go to the plus sign and choose
pattern layer from selection and follow
the same process. I can go to my macro, use my 3,000 pixel basic and
check the different sizes. That's two approaches to
checking a pattern in photo. In the next lesson, we're going to use the
pattern layer along with one of our
macros to quickly and easily scale the pattern to various sizes for export so
I'll see you there. [MUSIC]
17. Scaling Patterns Quickly with Pattern Layer: [MUSIC] Not only can
pattern layer help you test your patterns if you use it in conjunction with your macros and
maintain the repeat, you can use it to
scale your pattern to multiple sizes
quickly and easily. Let's take a look. I have my pattern open from
the last lesson. Again, this is the
full pattern template and I only want to
use the pattern tile. Now at this point,
I've already tested the pattern and I know
that it has no issues. Now I just want to scale it
in a few different sizes. I'll select the artboard, choose the move tool, and I'm going to
three-finger swipe down and copy that's the same process
we did with the last lesson. Again, I'll go ahead back out, choose new and new
from clipboard, and now a copy of that artboard
is open its own canvas. Next, I need to
rasterize this because I want to create a pattern
layer out of it, but I want to rasterize it
in such a way that I don't lose any quality and I can
load it onto Spoonflower. I want to maintain my 3,000-pixel canvas
and make sure that photo doesn't either
add or take away any information from
what I've created. I'm going to start by
rasterizing the artboard. Now affinity of photo
defaults to 96 DPI regardless of what the
original document is set up whenever you
rasterize a layer. Now, this isn't an issue
because we can change this. That we want to
set it at 150 DPI because that's Spoonflower's recommendation for their size. I'll go up to documents,
choose resize. You can see the
DPI, there's 150. I'm going to tap
and change that, but before I accept the change, I'm going to scroll over
until I find this lock. Now yours might be showing
automatically I have my icons enlarged so that you
can see them on the video, but you want to make
sure that that is grayed out and not on. The lock is re-sampling
and I need to make sure that it's off before
I accept the DPI change. Otherwise, photo will re-sample my canvas and increase
my pixel sizes. Again, I don't want
that to happen. So once I've made
sure that's off, I've changed my DPI. I can go ahead and
click the check mark and accept the change
and that's it. Now I can use my macro
to adjust the size of my pattern layer and find the various sizes that
I wanted to keep. But first, I'll go ahead
and create a pattern layer. I'll turn off my bottom layer, go to my macros and I can use my cut-in-half macro
to create the various sizes. Now, remember we're not
sizing this by size. This is sizing using precise pixels by using the transform studio and
we're maintaining our repeat. If I like a particular size, I can simply go up to the
documents menu Export, and I can export that
particular size. I'll just change this to, let's see, Ogee medium. I can keep this
as whole document and I can just click
"Share" to share it to my photos or okay to share it to my files and because I
maintain my pattern layer, I can continue using the macro
to size it down and find additional skills that I want to export and save to
load onto Spoonflower. Again, as long as you
rasterize and change the DPI in such a way that you maintain
your original pixel size. You can use pattern
layer and your macros to automatically create multiple pattern sizes
quickly and easily. In the next lesson, we're
going to take a look at a quick way to test
your patterns right inside designer without having to leave the app. I'll
see you there. [MUSIC]
18. Testing Basic Patterns in Designer: [MUSIC] You've seen it. That
annoying white line that forms down the middle of the preview panel when you create your pattern in designer. You can zoom in and it
disappears temporarily, but it always comes back. Don't get me wrong, I
love the ability to see how my overall pattern
looks by using symbols, but the ability to test my final pattern without
worrying whether that line will or
won't be there when I export even better. Now we've taken a
look at how you can use Affinity Photo
to test a pattern. But to do that by using two
simple tools and designer, you can test your pattern right inside the app
quickly and easily. Even better, you can use
the test pattern to make elements for future designs
so let's take a look. This is where the
third art board that I showed you in the
templates lesson comes in. Now, this is going to work in both the iPad and desktop
versions of the app. All you're going to
need is a bitmap or raster version of your pattern
tile and the fill tool. The fill tool, which looks like a gradient with a
line through it has an option called bitmap and that's going to allow
you to fill a shape, or in this case, an art board with a rasterized version
of the pattern tile. But first we need to export
this as a raster image. I'll head up to the documents
menu and choose export. You can select
either PNG or JPEG. I've already got it
named but I'll change the area in this case
to pattern tile, if you haven't renamed yours, it would be artboard one, and I'll click ''Okay''. Now it's important to note that the fill tool will not
pull from your photos, on your iPad you're going to
need to save it to a file. I'll click ''Okay''
again and I have a file setup just
for test patterns. That way if there's anything
wrong with the test swatch, I haven't saved it among my other good files and I
clean this out regularly. I'll just hit ''Move'' to save it and now I'm ready
to use the fill tool. Back at my third art board, my pattern test or
I've also pulled in my command controller
by going to the documents menu and
just toggling it on, I tend to keep it
off until I need it. I'm bringing this
end because when I tab and turn on shift, that's going to help me
create a nice straight fill across and then help me size
my pattern up and down, so I've just tapped
and hit the Shift key. I have my fill tool
selected and I'll just drag left to right with a fill. I want to go up to the
contextual menu at the top. If I tap left, bitmap is the very first option, I'll just pull the pattern in and you can see it's
coming in rather large, but I have these handles
and shift is going to help keep these handles at
the angle that they're at. I'll just drag this down and I can see my pattern
at various sizes. I can just keep dragging
this up and down if I release shift it'll let
me tilt it if I want to, but I actually want
to keep it this way. Now more importantly,
I can zoom in to the pattern and just make sure that there's
no issues with it, without the white line that forms on the pattern
preview window. If there are any issues with it, I can go back and fix
it and test it again. If not, I'm good to go. There's an additional
benefit to using this tool, which is that once you have the bitmap created and in place, you can make it a selection with your move tool like I have done here and you can add it as a bitmap filled
your swatch studio. If you'll notice my swatch up here because I have
this selected, it's showing the pattern
instead of a solid color. I've created an application-wide pattern palette and
with the selected, if I go to the burger menu and choose add current
fill to palette, it's going to add it there. Now because I've set this up as an application-wide palette, if I use this in another canvas, I can turn a selection
like this one which is a solid color into the pattern and I can use the fill tool to
adjust its size. Again, if I use the Shift key, I can drag it down and up and make it whatever size I like. This is great if you plan to create a pattern
within a pattern. Shape has a pattern and
within a larger pattern, this is a really
great way to do that. Pretty simple, and you don't
even have to leave designer. Now unfortunately, just like
pattern layer and photo, this will only work with
a full drop repeat. A half trump isn't going to tile correctly however
in the next video, I'm going to share a set
of bonus macros that I provided with the
downloads that will allow you to quickly tile
your half-drop and tested at multiple
sizes and photo.
19. BONUS MACROS | Half Drop Pattern Testers: [MUSIC] In your
downloads, I shared three bonus macros
that will let you test your half drop
repeat patterns in photo in three canvas sizes. Because the pattern
layer built into photo only accommodates
basic repeats, to test your half drops, you would normally need
to manually duplicate and tile the layers in
a half drop formation. The macros, which
will test a 1,000, 2000 or 3,000 pixel pattern, will automatically
do all of that for you with a single click. I opted not to teach this macro as part of the class
because in truth, due to some of the
odd steps you have to take to record this
macro in photo, it ends up being a rather
convoluted process that would've caused more
confusion than good. Instead, I'm providing
them to you as a bonus and I hope
you find them useful. That said, while we won't be walking through the
creation of the macro, let's head into photo and
take a look at how they work. I have a 3,000 pixel half-drop pattern swatch that I
pulled in and rasterized. I'm starting with a
single pixel layer. It's important that you
work with a single layer to start because anything
with a lot of layers and groups built
into it will bog these macros down and potentially cause
your app to crash. Simply use these as a
test and make sure to keep a full unrasterized
copy somewhere safe. I'm going to head to my macros
and find the bonus set, and because this is a
3,000 pixel canvas, I'll go ahead and
use this first one. What this is doing is taking the pattern swatch and
duplicating it five times. All five copies are halved. In this case, it was sized
down to 1,500 pixels, and it's automatically moving the five layers to the top
and bottom left corners, and the other three
to the middle right, and then halfway up and down the top and bottom to
form the half drop. If I keep tapping that, you can see it'll
continue to do that. I can test the pattern
at smaller sizes. To go backwards, I
can either two-finger tap or use the history studio. I hope you find these
macros helpful in testing your half drop
pattern swatches. [MUSIC] In the next video, we're going to wrap
up the class with some final thoughts. I'll
see you there. [MUSIC]
20. Final Thoughts: We've reached the end of class. As always, I thank you for trusting me with your
time and creativity. I look forward to seeing what you've taken away
from the class. Which efficiency hacks
are your favorite? Will you implement
some of them in your everyday pattern
making process, or maybe make them a part of your overall creative process. Let me know in the discussion. Of course I'd love it if
you would share a project. If you share your
project on Instagram, be sure to tag me at the
handle on the screen. Have you enjoyed the class
and found it helpful? I would be grateful if
you would leave a review. Sharing projects
and leaving reviews not only helps future students
see what they'll learn, it helps more students
find the class. I invite you to join my
free creative community, the creator collage, which is an extension of my classes
here on Skillshare. It's a friendly, non-judgmental community of digital
creatives of all skill levels with experience in a range
of applications. You can ask questions, share your work or
tips and tricks, and participate in
live events that compliment my classes
here on Skillshare. You can find the
link to the creator collage in my profile. I have lots more
classes planned, including several
pattern classes. Be sure to hit "Follow"
on my profile so you always know when a
new class is published. Of course if you have any questions about what
you learned here in class or suggestions for
a class you'd like to see, let me know in the discussion
or send me an email. You can find my contact
details on my profile. Thank you again for joining
me and happy creating.
 Tracey Capone, Illustrator, Photographer & Designer