Transcripts
1. Trailer: This is more than
just another class about how to make
patterns on your iPad. It's about creating a workflow that will make the
most of your time, allowing you to really
enjoy the creative process and then fast forward through some of the
more tedious steps. I'm going to take you through
the whole life cycle of a pattern from the initial
sketching and Procreate right through to putting it
together in Photoshop and then having a completed design
ready to send to clients, share on social media, and then eventually archive and your file system
so that you have all the different files
together in one place. If we haven't already
met, then, hello. I'm Rebecca Flaherty, an artist with a big love
for surface pattern design. I live here in the UK,
where I've been working as a self employed artist and designer for about
seven years now. I've been in love with patterns for almost as long
as I can remember. Some of my earliest
memories are studying my mom's huge hand sewn
floor cushions with their 1980s Laura Ashley
floral fabric and trying to spot the repeating motifs long before I even knew what
a technical repeat was. Now I get to see my own patterns license on lots of different
products like hats, stencils, children's clothes, dog harnesses, and stationery. In this class, I'm going to teach you how to
sketch and illustrate your patterns in Procreate using non destructive methods that
preserve image quality, maintain an editable
layer structure, and therefore make this a viable method for professional
commercial pattern making. We'll look at how to use a diamond shape for
your peat so that you can keep the edges
of your pattern inside the canvas in Procreate. All of our motifs
will be intact, and nothing is going to get cut in half on the edges
of the canvas. You'll learn how to sketch
out your design first so that you know exactly what
motifs you'll need to draw. No more wishing you'd
made a leaf a bit bigger or curve a bit
more to the left. Once we've sketched our design, we'll learn how to illustrate and add texture to the motifs. If like me, you like to use textured brushes to
draw your motifs, but hate how difficult they can be to fill in and procreate. Then you are really going
to love the shortcut that I have for skipping
the boring edge tracing in procreate and instead doing it in Photoshop
with just one click. And talking of shortcuts. I'm also going to teach
you how to record a photoshop action for building out your pattern
using smart objects, which you can run through
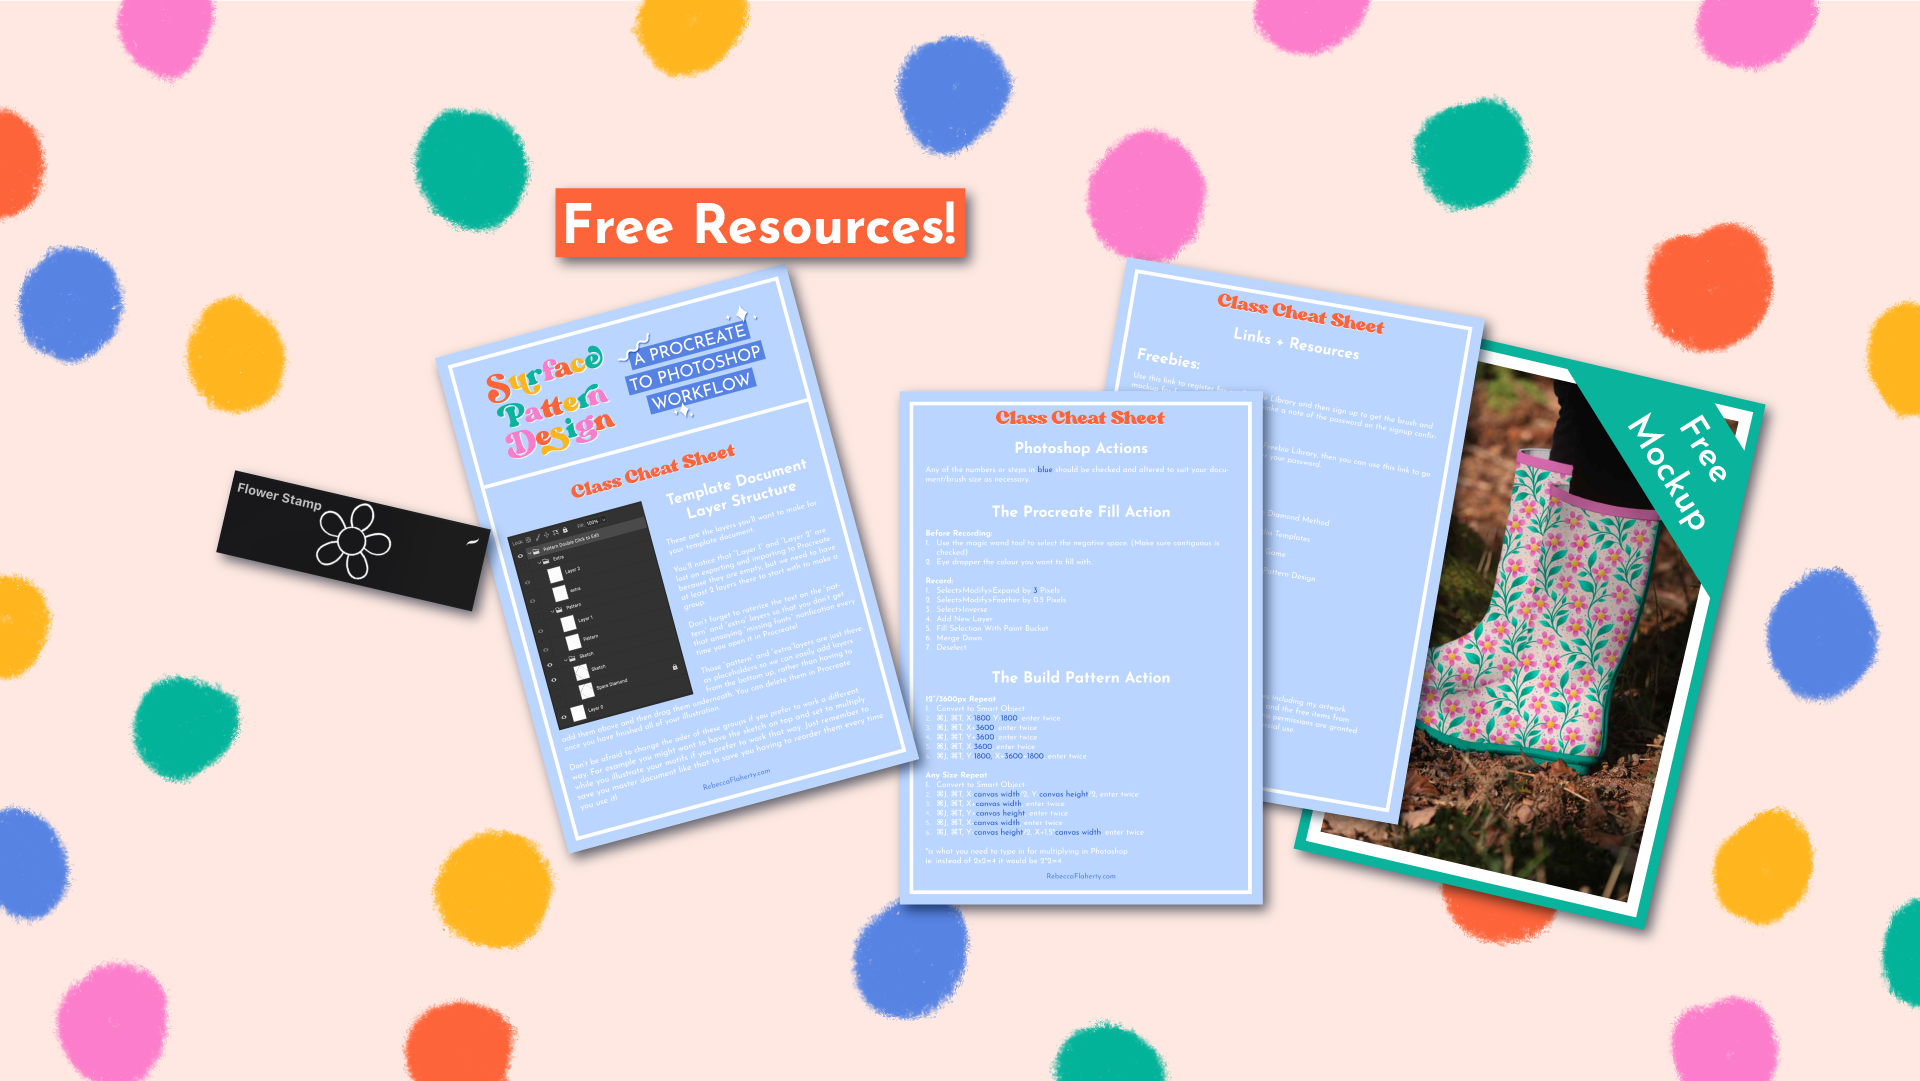
with just one button. It's a real timesaver. I've even created a few goodies for you to use while you're
working through the class, including a flower stamp brush for creating easy
flower shapes to trace over and a beautiful
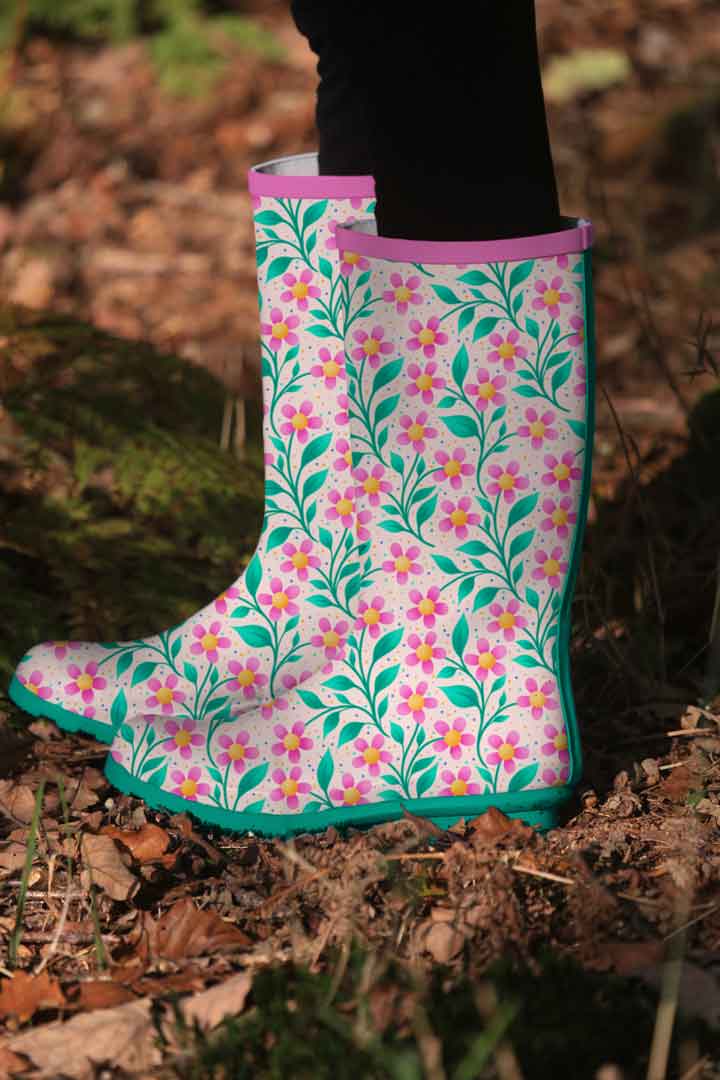
welly boot mockup for you to showcase
your patterns with. I'd say this is probably
somewhere between a beginner and
intermediate level class. If you're familiar
with the basics of Procreate and Photoshop, then this class is
a perfect next step for your pattern design journey. It's also a great class for
advanced students who are looking for some tips to speed up and streamline
their workflows. Ready to get started,
then let's go.
2. High Level Overview and Class Project Flattened: I As always, I want to start
with a very brief explanation of what we're
going to cover because having the end result
in mind will help everything make more sense
as we work our way through. My whole process for making
patterns in Procreate is based around a
diamond shaped repeat instead of a square
or rectangle one, which is what you are
probably used to using. It does sound more
complicated than it is, and you'll still get to turn it into a normal square
repeat at the end, so don't worry about that. We'll start by making the
Canvas template and Photoshop, and then we'll send
it over to Procreate, where we'll go over a
bit of pattern design one oh one before
we get started. This workflow, we're going
to design the pattern first as a sketch and then
illustrate the motifs, which I found to be a much more time efficient and
fun way of working. There's a few shortcuts
we can take in Procreate, which take advantage
of the fact we'll be using Photoshop to put the
pattern together later. Things like tracing in these textured edges can
be skipped in Procreate, and instead, we can just do it with one click in Photoshop. We'll learn how to preview
the pattern in Procreate, to check for any errors
or things we might want to change before we send
it over to Photoshop. Once we open the
pattern in Photoshop, we'll be learning
how to build out our tile using smart objects. I'll be showing
you how to record two really useful
Photoshop actions. One to automate
building at your tile, and one for filling
all those pesky gaps you get when you use the
color drop tool in Procreate. Then we'll be covering how
to test your repeat in Photoshop before we make
any last minute edits, and then we'll export our
pattern ready to send to a client or upload to
somewhere like Spoonflower. This workflow that
I've come up with plays to the strength of
each piece of software, and it really speeds up your
pattern making process. Your class project
is, you guessed it, make your own pattern using the steps I'll be teaching you. You have total
free reign to make any pattern you like in any
colors or theme you choose. My favorite class
projects that I set are ones where I get to see
all your lovely patterns. So please do upload them to the project gallery so that
we can all take a look. Just a quick note on copyright, you're welcome to copy my
pattern for a reference as we go along for the purposes of
learning during this class. However, don't forget
that it is an act of copyright infringement
if you were to then use your copied pattern for any other purposes such as
selling it or uploading it to print on demand
or spoonflower or sharing on social media and implying it was
your own design. If you do want to eventually be able to sell your pattern, you create while
following this class, which is a great idea, then you will need to create work
which is unique to you. Plus, it's much more fun to create your design in
your own style anyway, and I can't wait to see
what you come up with. Even included a link in the resources for a free
mockup you can use to show off your designs in the
class project section. Let's get started.
3. Creating a Canvas in Photoshop: I guess the first
thing we should talk about is canvas size. I get asked about this a lot, and the answer is that there is no right or wrong size or shape for a
pattern repeat to be. It depends entirely on
what you're making it for. If you're creating a design for a client as a custom project, they may tell you
what size they want. Because we're making pixel art, we need to make it
in the actual size we want it to be right from the beginning because we can't scale up like you
can with vector art. If you're making a
standalone motif, there's definitely a case
for going as big as you can, because you can then
use the design on products like big wall
art and tapestries. But when we're making a pattern, you can just repeat it several times to fill a larger area, so there's no need to
go as big as you can. You can stick to a simple size. I see a lot of designers
use anything 8-12 " at 300 DPI for their repeats. You can use a square
or a rectangle. I'll tell you what size I
use and the reasons why, and then you can tweak
those things to figure out what might be the
best size for you to use. So I use a 12 by 12
inch canvas at 300 DPI. This is 3,600 pixels
by 3,600 pixels. To convert inches to pixels, just multiply by your DPI, 300, in this case. Sometimes I do use a 5,000
or a 6,000 pixel repeat, but that's very rare
and only when I want to do a super bold,
large scale design. So here are my
reasons for choosing a 12 inch or 3,600 pixel repeat. It's small enough
not to run out of layers too often in procreate. It just happens to be
the perfect size and ratio square for
wallpaper on Society six. It's also a good size
for spoon flower. Their wallpaper is 24
" wide at 150 DPI. So when my pattern is finished, I can double the width
in Photoshop and still be within the correct
resolution for spoon flower. It's a good size
for the level of detail that I
personally draw in, and it's a good scale for
the markets I design for. A benefit of sticking to the
same size canvas mostly, is that you can set up
processes and actions to repeat certain things that
you do over and over again. So have a think about any of
these factors that might be relevant to you when
trying to decide what canvas is a good
size to work with. I suggest using a 12 inch canvas when following along with
this class, at least. So then all the
dimensions and maths will be the same as what
you see on your screen. I will, of course,
tell you how to make alternate sizes
as we go along. One last piece of
advice is to always use an even number as we will be moving things around
by halves later. Things can sometimes get messy if you're dealing
with half pixels. So always try and pick an even number of pixels for
your canvases if you can. So now we're going to set up our Canvas template that
we'll be working with. I'm using a MacBook and IMAC for the Photoshop
aspects of this course. I'll be telling you keyboard
shortcuts as we go along. So if you're using Windows,
as you probably know, if I say command, then for
you, it will be control. For any other steps or
parts which look different, you could try Googling how to do X in Photoshop for Windows, and please feel
free to share any of these differences
in the discussions for other students and
also so that I can mention any differences in
future courses that I make. I first started out doing
this part in Procreate, and that's how I teach it in my first class on making
patterns in Procreate. However, I recently switched to a template that I
made in Photoshop. And honestly, the
reason for that is one day I was
feeling extra fussy. I'm a bit of a perfectionist and wanted to make a more pixel
perfect version of it. But I actually found out
because it is pixel perfect, it snaps into place
a lot quicker and easier than the one
I made in Procreate. The templates that you make in Procreate do function perfectly, but I just find it satisfying to have it line up perfectly. So now I use this one
that I made in Photoshop. If you want to see how
to do it in Procreate, then have a look
at my other class where those steps are covered. But today, we're
going to look at setting it up in Photoshop. So we're going to
create a new file, and I'm going to come over
here to the width and height, and we're going to
change it to 3,600 pixels and 3,600 pixels
for the height as well. You could also
change it to inches, and then you'll see here
that it's 12 by 12 ". That's only going to be
12 by 12 if you have the resolution here
set to 300 DPI, which is what we want it to be. You can leave the
color mode in RGB unless you have a
specific reason for wanting to use CMYK. It's always best
to start in RGB, and then you can always switch
down to CMYK colors later. You can leave all of these
other settings as they are. And this one here,
the color profile, this one here is a pretty
commonly used color profile, so we'll leave that how it is. And then we can click on Create to start working
on our document. So the first thing I'm going
to do is come over here to our Layers panel and unlock
this background layer. And then over here on the left, I'm going to click on the color and change my foreground
color to black. So as I showed you in
the basic overview, we're going to use a
diamond shaped repeat, which I promise is not
as scary as it sounds. I'll show you exactly how it
works in the next lesson. But first of all,
we just need to go ahead and make a working
document template. So we're going to use
the rectangle tool. And if you don't see your
rectangle tool over here, it's probably hidden
behind this one. So if we right
click on this one, and yours might be hidden
behind any of these. Mine's hidden behind the
line tool at the moment, because that's the last
one of these that I used. So we're going to use
the rectangle tool. Keyboard shortcut for that is U. And we can click
anywhere on the Canvas. And then in these boxes, we're going to type 3,000
603,600 in this one. And make sure all the radii
settings are set to zero, and then we can click Okay. And that's going to
make a square for us. We don't want our square
to have any fill. We want it to be transparent so that we can see through it. So we're going to click up here where it says
fill up on the top, and we're going to set
that into no fill. And then for the stroke, we're going to choose
black for the color. And then for the line, we're going to
choose a solid line, and let's just
slide this around. I normally have mine quite
thin for my working document, maybe about five pixels. But if I make it that
thin for this one, you're not going to be
able to see it very well when we do the
screen recording. So let's try 15,
maybe a bit too thin. Let's try 20. There we go. And then if we hover
here in the corner, and you want to make sure you've got Snap turned on for this, so we'll go to view and
make sure Snap is enabled. And then we're going
to click up here and drag this around whilst holding
shift at the same time. And we can then snap it to
various different angles. And we want to snap
it to 45 degrees. So when you have it
there, you can let go of shift and let
go of the mouse, and we'll leave that
like it is for now, and we'll go back to
using our move tool. And then I'm going
to come up here to these three dots and click on those and choose
a line to Canvas. You want to make sure
you've got that selected. Sometimes it says
Align to selection, and you won't be able
to do this next part, which is to center it on the canvas using
these two like that. The next thing we want
to do is resize it so it exactly fits the
edges of the canvas. And actually, let's set some guidelines up first so we can see where the middle is. So I'm going to drag in
from the rulers here. If you don't have
rulers showing, you can go up to view and make sure you have
rulers checked here. And we're going to
drag it across to the halfway point, 1,800 pixels. And then we'll drag
another one from the top ruler down and snap
that into the middle too. Then we can zoom in here. And if I press Command T, and then up in this box, make sure you have the
image constraint checked, and I'm just going to
type in there 3600 px, and that will change this
width to 3,600 pixels. If you were working with
a different size canvas, obviously, you'd put your
actual Canvas width in there. And if we just zoom in here, you can see this goes
nicely off the edges. If yours was to look
something like, let's just make
this a bit smaller. Something like that with a gap between the
diamond and the edge. This canvas is not going to
work the way we want it to. It's crucially important that your diamond goes all
the way off the edge. So let's change
that back to 3,600. And then I'm just
going to again, double check in all
of these corners. It should do because
we've centered it, but I'm still going
to go around and check that this is touching and going off the edges on all
four corners of this diamond. So once you're happy with
that and you've verified it, you can press Enter twice
to set that transformation. And at this point, we
can right click on the layer and scroll down, and we're going to
rasterize the layer. So this is no longer
an active rectangle. It's just pixels, and this
layer is now flattened. So let's zoom out and
have a look at this. So this is the template to mark out the repeat that
we'll be using in Procreate. We're going to use this
as our repeating tile. Just one last thing which
I want to add on there, which can help a little bit with an extra visual so that you know you've lined
it up properly. This is an additional step to how I used to make
them Improcreate. I'm going to add, like, a little cross line or
cross hair in each corner. So let's come back over
here to our rectangle tool. We'll right click on this and
change it to the line tool. And then anywhere along here, I'm going to click on the
guideline and drag out a horizontal line around
about 2300 pixels. It doesn't have to be exact. And then we're going
to go up here to the fill and stroke boxes like
we did with our rectangle, and we're going to choose
no fill for the line, and we want a black
stroke on it. And then we'll set
the stroke weight the same as we had for our
diamond around the edge. So we'll choose the
thick line for that one, and we'll change this
one to 20 pixels. And then with this
layer here selected, I'm going to align it to
the left of the canvas. You already know it's centered vertically because we
did it on the guideline. And then what I want
to do is repeat that in each of these corners
it's just going to give us an extra
visual to verify that this is all lined up when
we're working in Procreate. So to repeat this in
the other sections, I'm going to press Command J on this layer to duplicate it, and then we can use the align
to right button up here. And then that's going to
pop it over here for us. And then we can
select both of these, press Command J again
to duplicate those two. And I'm going to press Command T. And then if you
come over here, make sure you're not
adjusting the guideline. If you're just above it, you'll see this
little rotate icon. And if you hold
down Shift again, and then you can rotate it 90 degrees and then press Enter. And then you're going to get those lines at the
top and bottom. Just going to get rid
of my guidelines here. You can do that with the keyboard short
command semicolon. So now we can select
all of those layers, all of those small lines there, and we can right
click and we can go down and merge all
of those shapes. And then we can select
rasterized layer, and then we can select those two and merge them all down
into one single layer. So this now is all
the construction that we need to do to
set up our template. The rest is just organizing a few layers to make it
easier to use in Procreate, and then for bringing back
into Photoshop afterwards. And it's just going to help
us keep our file tidy. So I'm going to name
this layer here, sketch, and then I'm going to press
Command J to duplicate it, and then drag this
one underneath. And I'm going to call
this one spare diamond. And then I'm just going
to hide this layer, and I'm also going to lock it. That way, we'll always
have a spare to go back to and procreate
if we need to. So I'm going to group
these layers together, and I'm going to call
this group sketch. And then I'm going to add a
new layer above this one. And I'm going to use the
text tool shortcut is T, and I'm just going to
type anywhere in here. I'm just going to write
pattern in there. And then on this layer
here with that selected, I'm going to press Command
J to duplicate it. And then I'm going
to double click on the text icon there, and I'm going to change the text in this one to say extra. And then I'm going to
right click on each of these layers and
rasterize the text. So right click on this part of the layer and come down
here and rasterize type. The reason I'm rasterizing it rather than
leaving it as text, if you don't have the font you use installed on Procreate, every single time you open
this document in Procreate, you're going to get
a notification like this to say that
it's missing fonts. So as these are
just placeholders, we don't need them
to be active text, we're just going
to rasterize them, and then that won't happen
every time we open it. So the next thing I'm
going to do is to add a layer above each of those. So let's add one above
there and one above extra. And then I'm going to group these two top players together. And I'm going to call
this group extra, and then I'm going to
group these ones together. You can either use
this folder icon or the shortcut Command G, and then I'm going to
call this one pattern. And then all three
of these folders, I'm going to select, and then I'm going to group all
of these together. And then this group, we're going to call Pattern
Double click to edit. You can call this, obviously,
anything you like. But as you'll see
later, when we bring this back into
Photoshop to edit, that's exactly what we're going to be doing
with this layer. And I like to call it that right from the start
because it saves me renaming it later every time if I want to hand
it over to a client. I'm a big believer in only
doing repeated steps once. So yeah, admit these steps all do seem a bit
random and mysterious. But in the next lesson,
I'm going to show you exactly how to use
all of these layers, and it will make
a lot more sense. We can even hide these layers to start with the pattern and the extra because we won't need those for doing
our initial sketches. It's the sketch layer
we'll be working on. And again, saving it
with these hidden saves us having to hide them every time we open them in Procreate. So with that said, the next job is to save it. I'm going to press
Command S to save, and I have a folder on my iCloud called
Procreate Transfers. And that's a dedicated folder
I have for moving stuff to and from my iPad
and my computer. Obviously, you can save yours in wherever you'd normally save
it to do this kind of thing. You can see I have a copy of my now pattern tile that I
use, save there already. So I'm going to call
this one pattern tile, and we'll just put a two after it so it doesn't overwrite that. And then you compress Enter. So that's now saved, and I'll be able to
open that on my iPad. If you don't use iCloud, you could use AirDrop
to airdrop it over to your iPad or you can
use Dropbox or email, whichever Cloud
service or method you use for transferring it,
that will work just fine. I do recommend having it somewhere you can
access from your iPad without having to send
it over each time just so that it's always
there and ready to use. So that's the basic Canvas made. I'm going to add an
optional step here. You'll notice the one that
I showed you there on my iPad in ICloud has the
colors flipped on it, and the background is black. Where is it? And here, this one. If we open up this
file, you'll see that, this has got the colors flipped
and the lines are white. You can see how I use these much thinner lines in the one that I
use in real life. But as I said, that doesn't show up very well
on a screen recording. So yeah, this one, black
background and white lines. The reason for this is
that I like to have my iPad and my procreate
interface set to dark mode. So that means if I draw with black lines on the white canvas, it's harder to see the
layer thumbnails when I'm trying to spot what is
what on each layer. If I draw in white on a
black canvas, though, it's much easier to see, and I also find it easier on my eyes drawing this way
with a mostly black screen. I often do all my
sketching and drawing, first thing in the morning
as soon as I get up. So I don't like staring at the bright white screen
that early in the day. So I have my background in
black and my lines in white. However, if you prefer the
light interface on Procreate, then you'll find the
black linework will show up just fine
in the thumbnails, so you can keep it the way we just created it in Photoshop. If you do want to
flip the colors, just select the layer
that you want to change. And if you press Command
I on that layer, it's going to invert the color, and then you can just do
that for each of the layers. So go on that layer,
press Command I to invert and it'll change
it from black to white. So now I just need to
save this version. I'm going to press
Command Shift S, and that's going to save as. And then we can just add black to the end of
the file name here, and then press Enter to save it. And now we have both
versions of that saved in our iCloud ready
to download from our iPad. So now that's our
template Canvas setup. Then the next lesson,
we'll open it and Procreate and learn
how to use it.
4. Procreate Pattern Basics: So let's go over a bit of
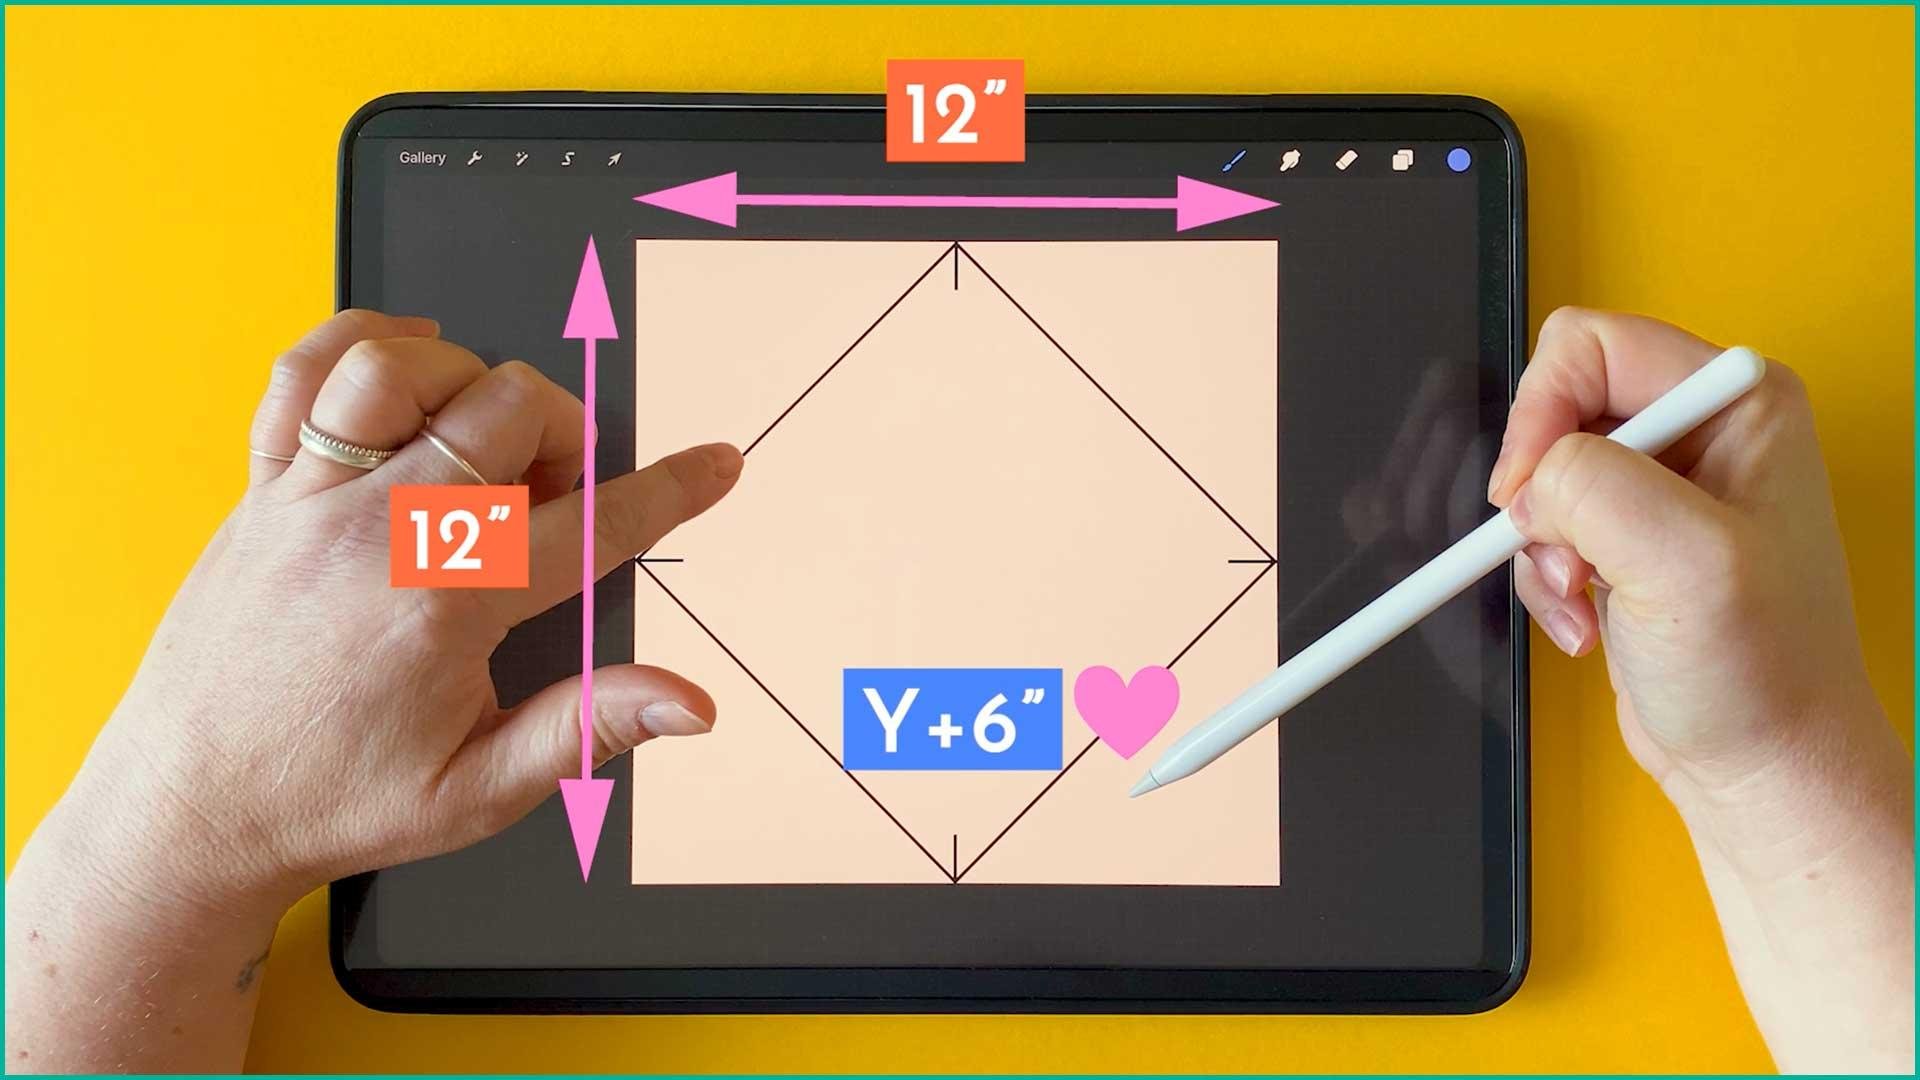
pattern design one oh one. First, the very basics that make a pattern tile repeat
seamlessly are that everything that touches
this left edge needs to be repeated in the
exact same position over on this right edge. And then everything that touches this top edge needs to be repeated down
here on the bottom. That's what makes
the design seamless. If we look at this layer here, you can see this is how
the design repeats. Here's a bit of pattern
design vocabulary for you. When we move something
up and down on a canvas, we are moving it
along the y axis. Down is positive
and up is negative. And when we move
something side to side, we're moving it
along the X axis. Left is negative and
right is positive. If you have trouble remembering
which axis is which, an easy way to remember is to visualize the Y with an
arrow pointing down. My canvas here is 12 by 12 ". So everything up here
needs to be copied and moved 12 " along the Y axis. And all this here on
the left needs to be duplicated and moved
12 " along the X axis. We now have a repeating tile. So as I said earlier, let's just turn this layer
off and turn this one on. You can see how it looks
when it's put into repeat. But here's the thing. When you make a pattern in
Photoshop or Illustrator, you have the option of seeing past the edges of your repeat. You can see how your motifs are interacting with the ones on the other side of the canvas. This just isn't
possible in procreate. Everything is cut off along this edge and you don't get
to see past the canvas edges. You can work around it by
duplicating these layers. And then you can bring these
edges into the middle, which would then
allow you to fill any holes in your pattern
that fell on the edges. But the problem with that
is that when you start duplicating and
transforming in Procreate, you can start to
lose image quality. Some types of transformation
are worse than others. Let's just undo this and
take a look at what I mean. Let's have a look
at this motif here. You can see I've got
this nice textured edge where I've used the dry
ink brush to draw it. If I select a part of this, let's just make sure
I'm on the right layer. There we go. If I select some of this
heart to transform it, and then scaling it
down even a tiny bit, you can see Procreate has had
to recalculate how to move it and put it back together with a smaller number of pixels
than we started with. It's having to remake the
image every time we do this. And so it's now all
blurred and soft, and we lost our
nice textured edge. These nice textured lines
can become fuzzy and blurred after they're
interpolated multiple times. Interpolation is the method
used to adjust the pixels in an image when you scale,
rotate, or transform. Here's a little pro tip from
the Procreate manual itself. Every time you resize an image, the interpolation
process happens again. After a few times, you
might start to see the edges in your image
degrading and looking fuzzy. Think of this like making a photocopy of a
photocopy of a photocopy. You lose a little
more image quality each time you transform. Try to avoid repeatedly transforming the same
part of your image. Thankfully, moving it
about like we are doesn't cause as much of a problem as
rotating or resizing does. But for best practice and
always for commercial work, I try to avoid doing it. The main thing, though,
is that I like to work in a non destructive
manner and have intact motifs that aren't
cut off at an edge. So how do we get around this? Well, we can still use
a square as our tile, but we're going to
have that square rotated 45 degrees so
that it's a diamond. That way, all of the edges
of the repeat are visible there inside the visible canvas that we can see on procreate. We can see how
they'll be positioned with the next tile as
we're drawing them, and they're also not going to get cropped off at the edge. When it comes to making
this repeat work, instead of making
sure the top and bottom and the left
and right match up, we need to have this edge here match up with this edge here, and this one match
up with this one. The maths of that,
and please don't panic here because you won't
actually have to do any, is that everything touching this line needs to
be copied and moved plus half of our
overall document size in inches along the X axis. So this is a 12 inch document, so it needs to
move 6 " this way, and then half of our overall
document size again, 6 " along the Y axis. But as I said, you don't
have to do any maths. Procreate snapping
can do that part for us. Let's have a look here. I'm just going to duplicate this diamond layer and then
hide the one underneath. And I'm just going to
add a blob to this one. And let's do one here, and then one just
roughly in the middle. So on this layer
with the diamond, I'm going to swipe
left to duplicate. Then we can tap on transform. And then down here
where it says snapping, we need to make sure that we have magnetics and snapping on, and these slides here turned
all the way up to the max. You will then be able to drag your canvas exactly
halfway across. You'll see these orange
lines cross over here in the middle when
it's snapped into place, and then you can just release. And then we're also going
to drag it halfway down. And again, you'll
see the orange lines pop up when it snaps into place, then you can just let that go. Easy peasy. Didn't
have to do any maths. Just make sure that you're
definitely snapping into exactly the right spot by checking for those orange lines. Look for those along the edges and crossing
in the middle. You can also use these little cross hair
lines that we put in. This should look exactly
as we created it. If it looks anything like, let me just nudge
this up slightly, and then we'll go
and have a look down at the bottom, and
you'll see what I mean. If you're seeing
things like this, then you'll know that it's not snapped into the right position. If those aren't
lined up properly, you'll know you've
gone wrong somewhere. If you find that yours isn't snapping properly as
you're moving this around, then double check that you
have snapping turned on, first of all, and that both of these sliders
are all the way up. And also, if we go back to
this layer and we can zoom in, as I mentioned when we
were setting it up, make sure that all the edges of your diamond are touching
the edges of the canvas. I know that mine are, so let's just let's
break this one here. Let's crop a little bit out. That. So yeah, if you're
seeing something like this, that would be why yours isn't snapping correctly
into position. When we select the whole layer
to move it halfway across, we need to have the
whole canvas selected. As you can see, when
I've selected this, we don't have the whole canvas, not the full width selected. So when we move it
across by half, we're only going to be moving it across by half of this amount, not the full width
of the canvas. So if you find that you have an error on
your document like that, you can fix it by just adding a little blob and making
sure they go to the edge. However, you'd be
better off going back into your photoshop
document and changing it. There and then re saving it on the cloud because otherwise, you're going to have to
do this every single time you import it
back into Procreate. So let's just undo those steps and get
back to where we were. So let's go back to our
tile with the blobs on it, and we'll show this one that
we already started moving. So to carry on building this tile, this is how
it's going to work. On this original layer that
has the bits we drew on it, I'm going to re show
that one that we moved. So with our original
layer, that we drew on. We're going to duplicate
that again and this time, we'll drag it halfway down
and halfway back this way. So in a negative direction
along the X axis, and again, checking for our
orange lines intersecting. And then again, we'll go back to the one that we drew
on this bottom layer, and we're going to
duplicate that, and we're going to
drag it upwards, making sure we've got our lines crossing and then
over to the left. And then go back down to
this bottom layer again, duplicate it, select it, and we'll drag it up
and over to the right. And now we have built
out our diamond repeat. We have this edge
matching up with this one and this edge matching up with
that one down there. So let's test this
repeat out, shall we? I'm going to swipe down
with three fingers, and I'm going to tap copy all. Then I'm going to go up to
the very highest layer. It doesn't matter if
it's showing or not. So up on your topmost layer, swipe down again
with three fingers, and this time, we're
going to tap paste. And that's just pasted a copy of everything that we could see. So I'm going to tap on
this blue dot down there, and I'm going to drag
this up until it fills. Just this top left
quarter of the document. And you'll see your orange lines for snapping come up
there in the middle, and then you can release. And then we're going
to go to our layers, and we're going to swipe left
to duplicate this layer. Then we're going
to transform it, and then we're going
to drag it over here until it snaps into place. And then we're going to pinch
those two layers together. Duplicate those two,
tap to transform, and then we're going to drag and snap them down into the bottom. And you can now see how our diamond is tiling
and repeating perfectly. So let's hide these two
and go back to our tile. The clever thing
about this is that the whole square can still
be our overall repeat. You'll notice that this edge here matches up
perfectly with this one, and the top also matches
up with the bottom. So this entire canvas will actually be a seamless
tile that we can export. It will still function just like a normal
square grid repeat, and you can use it just like
any other pattern tile. For example, on spoon flour, you can still use
the basic repeat. The best part is that
because we're repeating everything within it in this
built in diamond repeat, we only have to create motifs
to fill this middle part. These three here are the only ones we'd
need to illustrate. We only have to create
finish motifs for these. If we go back to
my flower pattern, let's show this layer, and let's also show the diamond so we can
see where the edges are. If we go back to this pattern, the only part that I had to illustrate were these ones here. Even though the pattern is
made up of all of these, these here are the only
ones I had to illustrate. The rest will be
repeated when we bring this into Photoshop later. I'll show you quickly
how that works. So on this layer, I'm going to have to add a
little mark to the corners because my illustration doesn't go all the
way to the edges. It's going off the edges here, but there's nothing touching
the top and bottom, so I need to just uh, let's just add a little mark going off each of these corners. There we go. So now, if we duplicate this layer, you can see how this section
repeats in a diamond, just like we did with that test one to fill out the
rest of the tile. There we go. Just
do this last one. So those parts in the middle, these ones here are the only
ones that we had to draw. Now, I know what
you're thinking. I said that duplicating
things was bad, and you're absolutely
right. I did. But we're only going to be doing this duplicating for
our sketch layer, and image quality isn't
important for a sketch layer. With this method, we will
sketch all our motifs first. Let me just find the original for this pattern, somewhere hidden down here. Let's turn these layers off, turn this one back on, and
let's find the sketch layer. I don't know if you can see
that because it's in white. Let me just change
the colors on those. There we go. Change
those to blue. So there we go. This is the sketch layer
for this pattern. And yeah, we're only
going to be using this duplicating to work
out the sketch layer. We'll sketch all our motifs first and figure out the
layout for the pattern. Then we will illustrate them
over the top afterwards. The rest will be duplicated in Photoshop using smart objects. Duplicating with
a smart object in Photoshop preserves
image quality. So it's perfect for building out patterns we've made starting
this way in Procreate. We can even automate
parts of the process. I know you must
be excited to get started with some real
pattern building now. But before we move on, I just have one more thing to set your minds at rest and say, in case you are wondering,
this diamond here is only ever part of
the sketch layer. You can see I have it
here on my sketch. It's just to allow us
to see the seams of our repeat and allow us to snap the edges
when we transform. It won't show in
the final pattern. So now you have the basics of how your pattern
is going to repeat. Let's start designing it. And
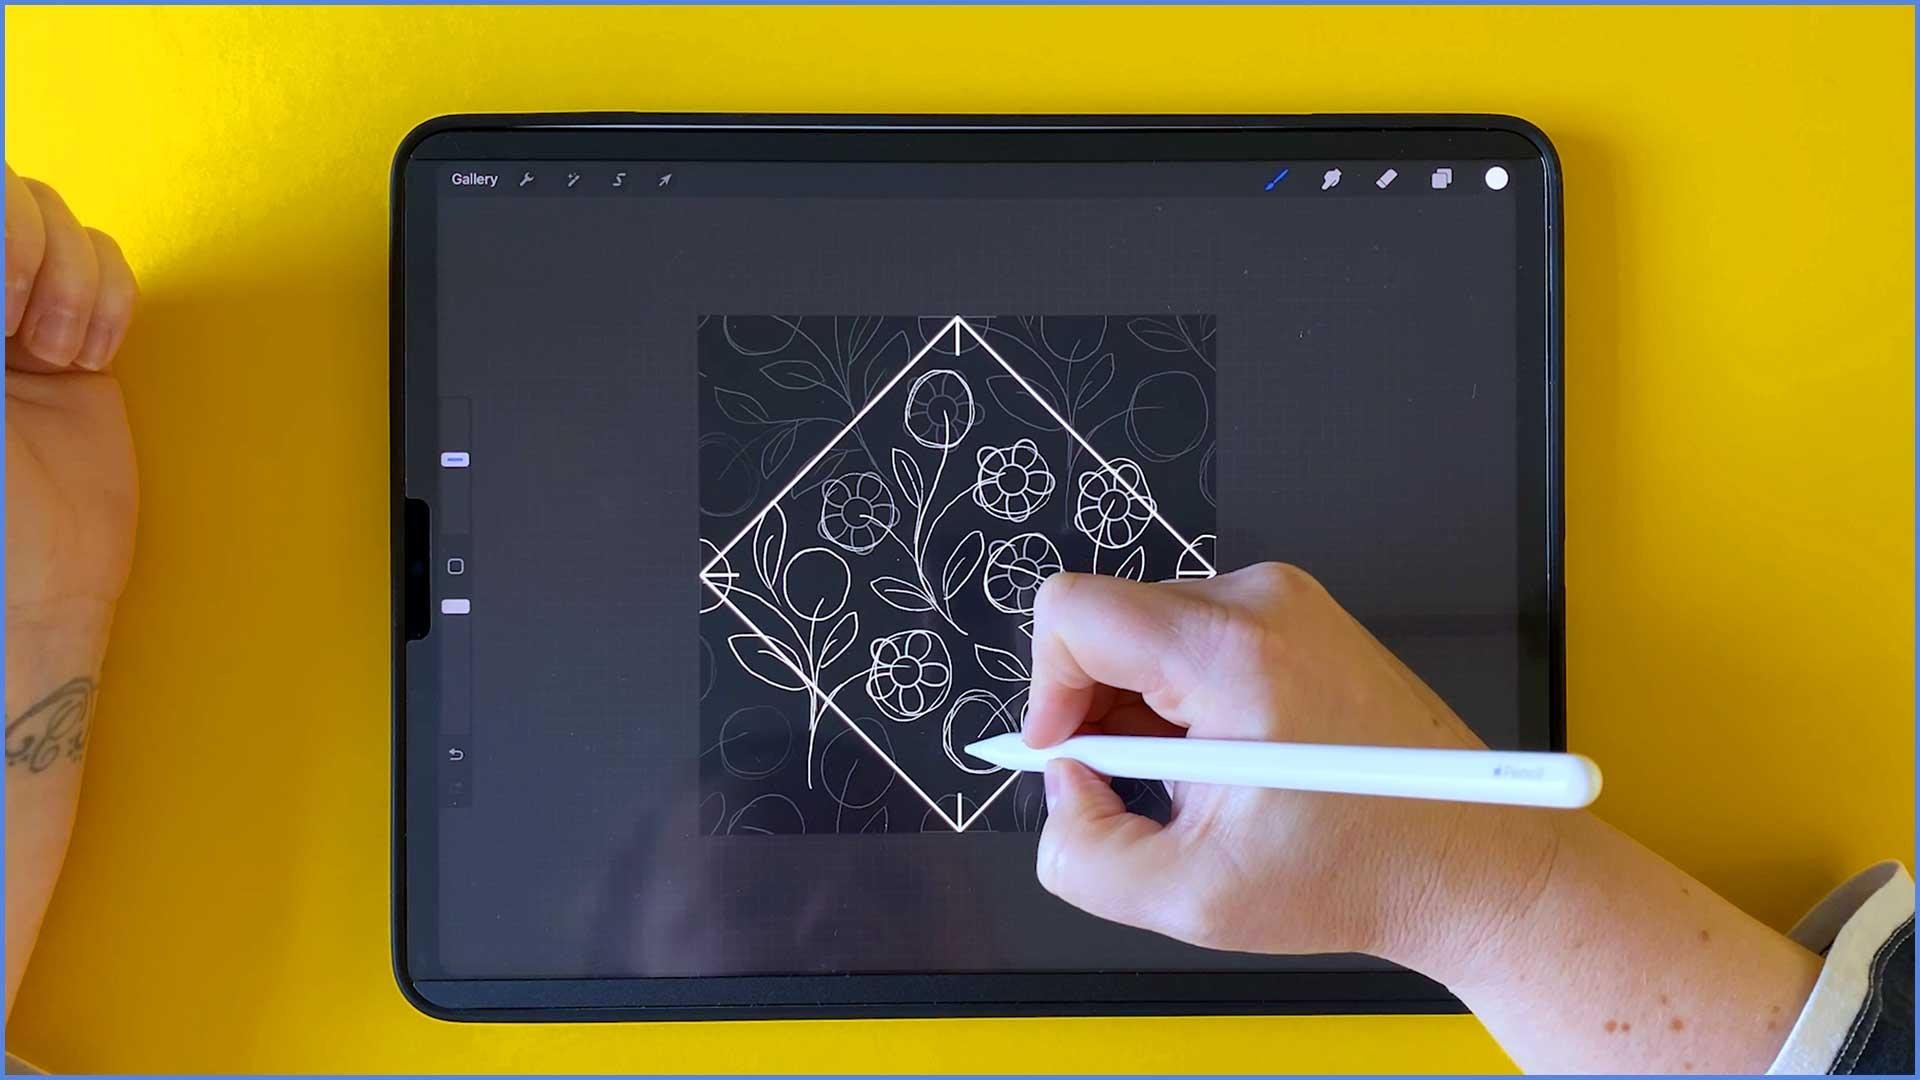
5. Sketching a Design 1: So let's get started
making our pattern. So obviously, the
first thing we need to do is to bring in our Canvas template from wherever it was that
we had it stored. Either airdrop it to your iPad and then
open it and Procreate, or if you've got it
saved in the Cloud somewhere or in your
files on your iPad, you can go to Import, and then you want to navigate to wherever
you have it saved. And I'm going to bring
in this black one here, the black version. So we're going to come
up here to our layers, and I'm just going to this sketch layer here is
the one we'll be using, so I'm just going
to lock the one underneath to keep it as a spare in case we need
to go back to it. So I'm going to swipe to
the left and tap on lock. So we can't draw on that
one by accident and hide. So I'm going to add a layer above this diamond just
to start off drawing, and then I'll merge
it down in a second. It's just nice to be able to get drawing on a blank
layer to start with, and then we can merge it down. So you can use any
brush for this. I'm going to go into the
inking this one's my favorite, and I'm going to use the
dry ink pen. Where is it? There we go. And I think
what we'll try and do is to make a similar version of that flower pattern that we were looking at
in the last lesson. So I'm just going to
test out this brush. That's probably a
little bit thick for sketching and make
that a bit smaller. And I'm actually going
to change something, change the settings on
this dry ink brush. So if we have a
look at this one, you'll see that if we
go to stabilization, it's got some
smoothing on there, and that can make
it difficult to do quick sketches if
it's smoothing it. So I prefer to have
that turned off, but I don't want to
change the settings on the main brush and then
forget what they are. So I'm going to
duplicate this brush by swiping left, tap on duplicate. Then I'm going to tap on this
little squiggle up here, and then we can go in to stabilization and turn all
of those all the way down. And then there's no
smoothing on this one now, so we can do nice quick
sketching with it. So let's get started
doing drawing. I'm just going to start
laying down some shapes here, start with the stalks
for the flowers. Plunk those in
there. And for now, I'm just going to
do a rough circle where I know I want the
flower heads to be. I'll draw the petals and
stuff in properly later. I might also put
some leaves in at this point. There we go. And then once I have this first basic doodle
of my first shape there, I'm going to select it, and then you can move it to
wherever you want it to be, you're going to
turn off snapping there so we can free move it. And then we can just drag this first motif around to place it on the diamond
where we want it. Normally, I place everything
right up here in the middle, almost going up into
the corner there, but I want to show
you a way of being able to draw into
these corners later. So I'm going to place this
deliberately down a bit. And then once that's in place, I'm going to pinch it together to merge it with
my sketch layer. So they're now on
the same layer. So now I'm going to tap on
this transform arrow up here and I'm going to turn my snapping and magnetics back on and make sure those
slides are all the way up. So then I'm going to
duplicate this layer, tap on transform,
and we're going to drag it into the corners
like we did before, dragging up and across
making sure that we can see these snapping lines
showing we've got everything in the
right place and checking for these
little crosses, as well. And I'm going to
do that four times dragging it into each of
the different corners. And then once that's done, you can pinch these four
layers here together. And now we have these
around the outside. We now know how this element is going to interplay with
anything else around it. I'm going to turn
the opacity down on this top one just so
that we can easily see what's on our sketch layer and what's on the outside
duplicated layer. So let's go back to our bottom sketch layer, this one here. As you look at the thumbnails, it's the one with the drawing on the inside of the diamond, as opposed to the one which
has it around the outside. So now we know that we have
this gap here to fill. We can maybe draw something that's going to
connect into here, maybe let's make sure
we're on the right layer. Let's start down here
next to this one, which is, in fact,
this one up here. Let's maybe draw some
lines that curve up there and go around here. And again, just go to draw the
flower heads in as circles for now until I've got all
my positioning worked out. Just put a few leaves in. And then again, we can
duplicate this layer and drag it into its positions in all the
different corners of the canvas. So go back to the
bottom, duplicate, transform, drag it
up until the left, making sure it's snapped. Bottom layer,
duplicate, transform, drag it again, bottom layer,
duplicate, transform. And then because I haven't made any changes to
this top one here, we've just added bits to it. We can just merge all of
these layers into one. Again, you just pinch them
all together to do that. And I'm going to bring down
the opacity on that layer. So now we can see we've got this nice section here
of pattern lining up, and we can see how
these motifs are lining up with each other off
the edges of the canvas. Whereas, if we were doing this using the edges of this canvas, we wouldn't be able
to see off the edges. So the next part that
we need to fill, I think, is maybe do
something in here. Um, it's actually looking
like I don't quite have enough room here to put another motif,
this sort of size. And what I'd like to be
able to do is draw in kind of this area here
and go off the edge. So this is a step I
didn't include in my first class on
making patterns like this IPcreate because it can get a bit messy if
you're not going to be using Photoshop to put it all back together again at the end. The way we get round it is to shift the edges of
the pattern inwards. So I'm going to duplicate
this top layer. And then I'm going to select it. I'm going to drag
it halfway across. And then the one underneath, I'm going to drag halfway
across in the other direction. And then I can pinch to
merge those two together. So if I just hide this, you'll see now instead
of having the diamond, we've got the diamond going in across like that with these cross hairs
now in the middle. And again, this is a
nice way to be able to verify that you've got
it lined up properly. So then this bottom sketch layer, we're going to
do the same to that. I'm going to duplicate it. Select it, and I'm going
to drag it halfway across. And then the bottom
one, I'm going to drag halfway to the other side. And then this now brings the edges of the pattern
into the middle for us so we can then draw off the edges because
they're now in the middle. And like I said, this is
just for a sketch version. We won't be doing this
for the final one. The duplicating, as I said, can sometimes get a bit messy, but this is just the sketch, and we're going to be using Photoshop to do the rest later. So now we've got this
nice big section here, all in one stretch
that we can work on. So I'm going to
maybe start here, making sure that I'm on
this bottom of the two, the one with the higher opacity. So let's start maybe here. I don't know if I'm
going to be able to get three on this one, maybe just and do my tapping with two fingers. I
think I might go. Let's see if I can just
draw these in here. We can make the
line go up there, and then take this
one over here, and then possibly we can
fit that one in there. Then we can take the
leaves round here. And then I think this
part is going to be the part that
then goes up there. So once we've added this motif, to see how that is interacting
with everything else, I'm going to delete
this top layer. And then this one that's left, I'm going to duplicate
it and shift everything back over to the sides so that we
have our diamond again. Let's bring that there
and take that one across, and then I'm going to pinch
to merge those two together. So now we're back
to our diamond, and you can see
how this way we're able to have things
going off the edge. As I said, I don't mind things off the edge when they're
in my sketch layer. When we come to draw
the motifs on later, I'm going to show you
how to get these going off the edges and to
draw them in the middle, and then we can fix it
in Photoshop later. But we'll leave
that for now. So I think that's the whole
thing filled now. So if we do duplicate and
fill the edges, again, just duplicating
that bottom layer, transforming and dragging it
out into all the corners, each time making
sure you can see those orange lines where
it's snapping into place.
6. Refining Your Sketch: So it's looking
like we've just got this area here to fill. Just going to pinch to merge these layers and turn
down the opacity. So we've got this gap here, which is the same gap as we've
got up here and over here. So what I think I would
do is modify this slightly and bring
this flour down there. So let's try erasing that, make sure I'm on
the right layer. Let's go back down to this one. The one that has a
filled in diamond as opposed to the empty
diamond up there. So let's just erase
that part of it. It doesn't matter
if you erase some of the diamond, as well
while we're at it, as long as you keep the bits in contact with the edges intact, it doesn't matter if you mess up these inside edges
while you're sketching. So let's go for having maybe let's have a flower
head down here in that gap, and then we can bring that stark down there
to meet with it. And then I think I'll bring this one a bit
further over as well. So let's just erase that and draw that
a bit further over. And then we can put
a leaf in there to fill that gap and
one down there. And, yeah, this is
the reason that I absolutely love using this
method to make patterns, rather than drawing motifs
and then taking them into Photoshop or Illustrator
to build a pattern. By drawing the layout first, you can really make these
motifs lean into each other and fill every little gap and really make an
interwoven pattern. That's why I absolutely
love this method. I love drawing intricately
interwoven patterns where everything fills
the space really nicely. So I'm just looking
now to see if I want to put in any more
leaves on at this stage. I think I think there's probably
enough in there for now, and I'll leave that until a bit further on before I
put a few extra leaves in. So what I'm going to
do now is to duplicate this bottom layer and then take that up
into the corners again to reflect those
changes that we just made. Just take up this last one. So this top one here, because this is now different, we've modified and move things
around on these layers, I'm going to delete this one and then merge just these
four duplicates just to keep things
nice and tidy. And that space is
now nicely filled. To test the pattern and see
how it's looking in repeat, I'm going to swipe down
with three fingers. I'm going to copy all, and then I'm going to go up
to this layer here, this group, the one that's
called pattern double click. I'm going to swipe down
again with three fingers, and I'm going to paste and
then this blue dot down here, I'm going to drag
up to the center, so we're just snapping this
up into the top left corner. Then I'm going to
duplicate that layer, transform it again, and
snap it across to the side, pinch those together,
duplicate, transform, and snap those down
at the bottom there, and then we can pinch those
last two layers together. And then, although it can be a little distracting with
these thicker diamonds, and as I mentioned, when we were making those, I have deliberately made those a lot thicker so that you can easily see them from
above as I'm filming. You can definitely make those
thinner in photoshops so that they won't show up as much and they won't be as
much of a distraction. But on the whole, I think this pattern, it's
flowing nicely. There's no obvious gaps or bits that stand out
as being too big. I think maybe here, and I see it happening up
here on the same part, I might make this flower sort of twist down a bit more
to fill that space. Or when it comes to this flower, I might move that up a bit or even extend that
leaf up there. We'll have a look when we start drawing the proper motifs on, and that's easy
enough to fix later. So I'm going to hide this layer or you could delete it. You
don't need to keep that. I'm going to go back
to my sketch layer, and I still need to
draw these flowers. Once we've got the bones
of our pattern laid out, you'll want to put a bit
more detail into it. You can either draw
the flowers in by hand like this or what I normally do. I normally make a
shape stamp brush, and I have this one here, which I'm going to include
with the class materials. So you can use this one as
a sketch to trace over it. So let's have a look and
see what size this is. Whoa, way too big. Let's make this bit smaller,
still a bit too big, bit smaller, too
small, bit bigger. There we go. About 30%. So, yeah, you can either
draw your flowers in and details by hand or as
I say, what I normally do. I use this brush stamp so I
have a bit of uniformity but with a little bit of
variation because when I trace over them in
the illustration stage, they're all going to be
slightly different but still based on this shape
being the same size. So I'm just going to lower the opacity on
the layer above again. So you know which one
we're working on. Then I'm going to go on
my proper sketch layer, and then I'm just going to stamp my flower shapes in here
where these circles are. And then to be able to draw these ones that we've got
going off the corners here, I'm going to duplicate this
sketch layer and perform that side to side
offset that we did when we were putting those
in place the first time. So just duplicate it and drag
it over and then drag the other one over and then do the same with your
sketch layer above. Duplicate and drag that over and then drag the
other one underneath. So then we have this X
instead of a diamond. And then we'll go back onto our sketch layer and just
put this flower in there. And looks like I forgot to do this one as well. There we go. So now that we have all
of our flowers added, I'm going to delete this top layer and we will
put this back into a diamond, duplicating and moving over, and then the other
one pinch together, and then we'll
perform our diamond offset into the corners
with this sketch layer, and then all our flowers will be in place
around the outside. And then we should be at
the stage when we're ready to start properly
illustrating motifs. So that's all done now. I'm going to pinch these
four at the top together, reduce the opacity on that one. Do you know, actually, I think I might add a few more
leaves to this one. So let's go back to the
dry ink brush for drawing, go to the M recent, and
it should be there. There we go. Yeah, so I'm just going to put a few more leaves in here to
fill up some of these gaps. These don't have to
be perfectly shaped. We can work out the exact shape and positioning better later. I'd like to have my patterns fairly densed and fill
most of the gaps. So yeah, I think that's
probably enough for now. Again, now I've made a
change to this central bit, I need to apply it to
these outside areas so that when I'm drawing
the final motifs, I'm aware of what's
going on around it. So let's just do
this offset again. Because when we want to
illustrate over the top, we need to know what we're
illustrating next to. So if you make a
change in the middle, always, then apply it to the
areas around the outside. So then let's pinch
those four together. We can delete this
previous one up there. Although we didn't make any
changes, we just added to it. We could merge
them together, but I'm just going to
delete this one. And there we go. That is now our finished
sketch of our basic pattern. When we come to illustrate this, these parts here are the only ones that we're actually going to
need to illustrate. And then these ones
here are the ones we'll put together
later in Photoshop. So in the next video,
we'll look at how to start illustrating
over the top of this.
7. Illustrating Motifs: So now that's our sketch
all laid out nicely. We can start adding some color
and final motifs to this. Just going to start
by turning down the opacity on this
outside layer here. And then the first
thing that I'm going to do is change
the backgron color to something that
I want to use in the final illustration and then work the
colors around that. So I've got this palette here that I'm going to use.
Change the background color. Come up to your layers, tap
on the background color, and then you can choose
a color off your palett. I'm going to go for
this Piccio one here. And then we're going to come
up to our layers menu again. And we're going to be working
in this pattern group here. So I'm going to
turn that one on. We can hide that text layer now. We just needed that layer
in so that we could save out the group with
at least one layer in it. So we can add a layer
above that one. And now, working in
my pattern folder, I'm going to choose the color
that I want for the stalks. That's where I normally start. So I'm going to go
with the green. I'll use this dark green here. And I think the brush I use. I'm going to go back
to the dry ink but use the regular version that does
have some smoothing in it. So now I'm going to start
drawing in the stalks. That's normally where I start if I'm doing a floral
pattern like this. So I will start from the
middle of where the stalk would be attached to the flower just to
get the right angles. And I'm just going to draw some nice flowing
lines for these. So I think I'll use this
thicker brush for the flower stalks these larger leaves. And then I think for
these smaller leaves, I'm going to use a
slightly thinner brush. Don't be afraid. When you're
drawing curves like this. Don't be afraid to move
the canvas around. It's much easier to
draw at this angle than to try and go backwards
and draw the other way. So don't be afraid
to move the canvas around to a position you
find comfortable to draw in. So I'm just going to finish
putting these leaves in here. And then I'm going
to change up to the bigger one for these
flower stalks again. I think I'm going to
turn the opacity up on the outside sketch layer so
I can see it a bit better. It's a little hard to
see at the moment. And while we're here,
I'm going to go back up onto my stem layer
and I'm going to rename this layer to stems. I always like to name
as I go in Procreate. And then when we get
back into Photoshop, it's easy to see what is what. It's much easier to
see the thumbnails and do the renaming
in Procreate. So let's carry on with this and draw these flour
stalks in here using nice curved lines or straight lines, if
that's your style. I'll change to the
smaller brush for these. As you can see, I'm
obviously not sticking religiously to the sketch
lines that I've drawn. I'm going more going with more of a flow of
the curve and using that to be the guide is where I want the stem to be rather than sticking religiously to
what I drew in the sketch. As long as I'm following
and paying attention to what's going on around
where I'm drawing, it doesn't matter if you deviate from the sketch a little bit. I think actually I need
to change the color of this sketch layer on the
outside because it's getting a bit hard to see which I'm supposed to be drawing
and which I'm not. So rather than
changing the opacity, I'm going to alpha
lock the sketch layer. Swipe right. Actually,
maybe I'll do the top one. Swipe right with two
fingers to alpha lock it, and then you can tap on fill layer and it will fill it with the color
that you've got, and then I can turn
the opacity down. And now I can easily see
the difference between the ones I do need to draw and the ones I
don't need to draw. So let's go back to the stems. And I think the only one I
need to draw now is this one, which it goes right
off the edge, but actually it's only
the flower that goes off. So I can still draw this
on this same layer. So let's draw in the stems, and then we'll look at
drawing the flower later. So, as I'm not
going off the edge, I can start here. I'm just looking at this and thinking it looks a
bit too vertical, and I think I want to put a
bit more curve into that, so I'm going to undo
those and try and work a bit more curve
into that line. Yeah, I think that works better. So let's just put these back in. I'm just remembering
from when we looked at this image here on this bit, I was thinking I might
have a look when we come to draw the motifs
to fixing that bit. And that was this section here. And so my options were to maybe extend this
leaf up a little into it or move this flower
down, this one here. So I think I think I'm going to probably extend this leaf up a bit more. So let's get the eraser. I want to erase with the
current brush that I'm using. So I'm going to long
press on the eraser, and you'll see up there it
says erase with current brush. That's gonna give me a much
softer brush to work with. So just go to erase that down. And then let's just
draw actually, I'm going to fix the stem that
I'll be coming into first. Let's just go back over
this. There we go. That's fixed. So I'm
going to come up here and angle it
down into the leaf. The stalks are right, and then we can make
the leaf come up there. I think that should
fill it nicely. I might even take this flower a little bit further down there. So let's just erase that one. And then on my sketch layer, I'm going to use
the select tool, and I want to select freehand. Just go to draw around this
flower. Go to transform. I'm going to turn snapping off, and then I'm just
going to move it down here ever so slightly. And then I can go back
to my stems layer here, start in the middle
of the flower, and then join back
up with that point. And there we go. And
now I'm just going to go back over here and finish working on these last few stems.
8. Filling Motifs (A shortcut!): No. Okay, so I think that's
all of our stems done now. So the next thing
that I'm going to illustrate would be the flowers. So we'll add a layer
above this one. And I'm going to do
the flower centers first, which are
going to be yellow. So let's rename
this layer yellow. You could call it centers, middles, yellow or whatever
color you're doing. So let's go grab
my yellow color. And then we just need to draw and fill in all
these circles to do that. So I'm just going to make
a rough circle shape. And then you want to
hold it in position, and then up here, you'll see
it'll say ellipse or circle. I'm taking too long over
that. I need to go quicker. Let's undo that. So
keep an eye up there. I'm going to draw and hold, and it'll say ellipse created,
or it might say circle. You can tap on that little
triangle right there and then change it to be
either ellipse or a circle. If you want an oval shape, you can tap on ellipse or if you want the perfect
circle, you can tap on circle. I'll just undo that
and show you again. It doesn't give you all
the time in the world. So draw, hold, tap up here, and then you can choose
circle or ellipse. I'm going to keep the
circle for this one. And then I'm just
going to work my way doing this for all
of the others. And that's now all of these done except for this
one here in the corner, which we're going to tackle
after we've done the rest. So now we need to fill these in. You can drag from
your pink color here down into one of these
shapes and let it go. And then up here, you'll see
it says continue filling. You can tap on that
and then just tap on each of those
circles here like this. And then when you're
done, you can just tap on the
little tick there. Now, with Procreate's
color drop, because we're using
a texture brush, it doesn't fill all the way to the edges as easily
as if we were using a flat brush
like this one. I'll just show you if
I drag that in there. Apart from that place
where we started, you can see that this one fills more seamlessly
than the textured one. I mean, even that
one's not perfect. You can get around
it to some degree if you hold and
then drag across, you can change the threshold.
To fill more of the shape. And you can do that
with these as well, but once you get to
a certain point, even if you turn the threshold as high as you can go without
filling the whole page, you're still going to see some
of these gaps creeping in. There are ways around that. If you're using only Procreate, you can obviously go
around each one of the motifs and trace over
the edges like that. And that's a perfectly
acceptable way of doing it. However, let's just get
rid of all of these. If you've got a lot
of shapes to fill in and especially when it comes
to doing these petals later, that actually gets quite
tedious to have to go around and trace around all
of these things one by one. So I wait until I'm in
Photoshop to fill all of these in because then we can use the magic one to do things
like invert selection, feather and fill that way. It's actually a process
we can even automate, so you can do it with
just a couple of clicks. But we'll
get onto that later. The only problem with
not filling these in now is that if we want to
do any shading over these, which we will do in a second. So if we were to just let's
alpha lock this layer, which is how we might
normally do shading, let's go for a darker color
and choose a texturibush. Choose one out of here. So when we put some
shading on these, that's kind of made
that permanent now. And when we come to fill
that in Photoshop, you know, we're left with not being
able to do it properly because we've sketched
over an unfilled shape. So the way we're going to
do this shading later, we're going to add a layer
above our flat shapes, and then we're going
to clip it to them. And then when we add our
shading to that layer, when we come into
Photoshop and we do the equivalent of filling
in these gaps like this, I'm just going to
quickly draw over them. So when we do the equivalent of filling in these
lines like this, we still have that perfectly intact shading layer
over the top of it, which we can then merge down in Photoshop like
that, and we have no gaps. So I'm just going to undo all those steps again
now and get rid of that. So, I just wanted to run over that in case
you were thinking, hang on, are we going to leave the unfilled
shapes like that? The answer is yes, we are. We're just going to use
the quick color drop, fill them, and then
we're going to move on. We're not going to worry about
filling these in because we're playing to
the strengths of the different
programs we're using. Procreate is great for drawing but not so
great for filling. We can leave that and pick
it up in Photoshop later, which is much
better for filling. So now we've done those. We can add a layer underneath
that one for the petals. I'm going to tap on this
layer and rename it petals. And I think let's make
them this pink color. And then we'll make
sure we've got our drawing brush
again, dry ink line. I'm just going to
go round and fill, well, trace all of
these flower lines in. And remember, I said, by using
the flower stamp to make sure they're all
roughly the same size and angle and the
spacing is correct. But then tracing over
each one by hand, you'll get the uniformity, but with a little bit of a hand drawn feel built
into it as well. And that's why I like using motif shape stamps for
drawing motifs like this. And then that's all
our flowers drawn. And yeah, I'm always
thinking when I'm drawing the same motif over
and over again like this, I'm always thankful
that at least I don't have to draw all
these ones as well. So then we can use
the color drop again, drag from the corner, continue filling, and then we can fill in all these flowers. Oops. I might have not
quite closed that shape. We'll just leave that
one until the end. I expect if we hide these, there's probably a gap somewhere
in there so we can drag. And then if we pull to the left to reduce the threshold,
that will fill properly. So there we go. That's
our flowers drawn now. The last thing I'm going
to do is the leaves, and I'm going to draw these
underneath the stems. So I'm going to tap
on pattern layer and I can add a layer above it, and we'll call this one leaves, and I'm going to use a
lighter green for this one. And I'm just going to trace
over these leaf shapes here. Nice and simple. I might actually switch
the shape of these up and change the shape. Even though I've
drawn them, you know, the shape this shape
in the sketch, we're not tied to having
to draw them that shape. So if you change your mind halfway through it
illustrating, that's okay. Um, I think I'll go for
sort of that shape, but with a bit more pizzas
and curve built like. A. One thing which I'm
checking for here, I remember I changed the
shape of this slightly, so I'm just kind of checking where that ends in
relation to the leaf, and I think that's
gonna be okay. Also, I know that I need to be careful because we move
this flower down a bit. But I know to just
go over that line a little bit is still going
to be okay. So that's fine. Ideally, if you change
stuff in your sketch, you should then go and change it all around the edges again. But because these were
only really tiny tweaks, I didn't bother to
do that at the time. But if you make any big changes to your sketch as
you're going along, I'd recommend repeating
the duplicate and taking it off
the corners again. And then that way, you'll have less potential things to
fix in Photoshop later. Right. I think that's
all of our leaves done. Just looking at
this section here, I'm wondering if that's going to feel like a bit of a gap later. So we might add some dots to this pattern later to fill in
some of those smaller gaps. But for now, on
our leaves layer, we're going to use
color drop just like before to continue
filling these shapes in. Oops. Oh, I actually really like
seeing color that background. I really like this
green background, so I might use that to come up with some alternate
colors later. We'll skip that one, which
is obviously not filled in. Try and change the threshold. No, still not going
to get away with it. That might be cause I have the threshold turned
up too much, no. There we go. Let's just
take this all the way down. It doesn't need to
be that high because we're gonna be fixing
things later anyway. Yet, that one clearly doesn't
want to be filled in. So let's hide that. And yeah, I've got a
great big gap there. That's never gonna fill.
So let's fill that in and then drag the color in.
9. The Extra Group: That is most of the
illustrating done. The next thing
that we need to do is this flower
here on the edges. So to work on that, this is going to go in the
extra section. And what I'm going to do is swipe down with three fingers, and I'm going to copy all, and then I'm going to turn
on my extra folder. I'm going to select this
layer with extra on it, and I'm going to
swipe down again with three fingers and paste. And that's now pasted a copy of everything that
we had on screen. I'm going to duplicate this
layer and I'm going to oh, I don't have snapping turned on. Let's turn magnetics
and snapping on. And then I'm going
to drag this layer all the way and snap
it to the edge. And then the one underneath, I'm going to drag back in
the opposite direction. So now we're working on our
X rather than a diamond. Gonna pinch those two together. We can just delete
that placeholder at the bottom that says extra. You can delete the
Pattern one if you want at this point as well, because we don't need to add any more layers in underneath. Those are just placeholders. So now we can work
on this flower here. Now, when we move things
over to the side, we know that because
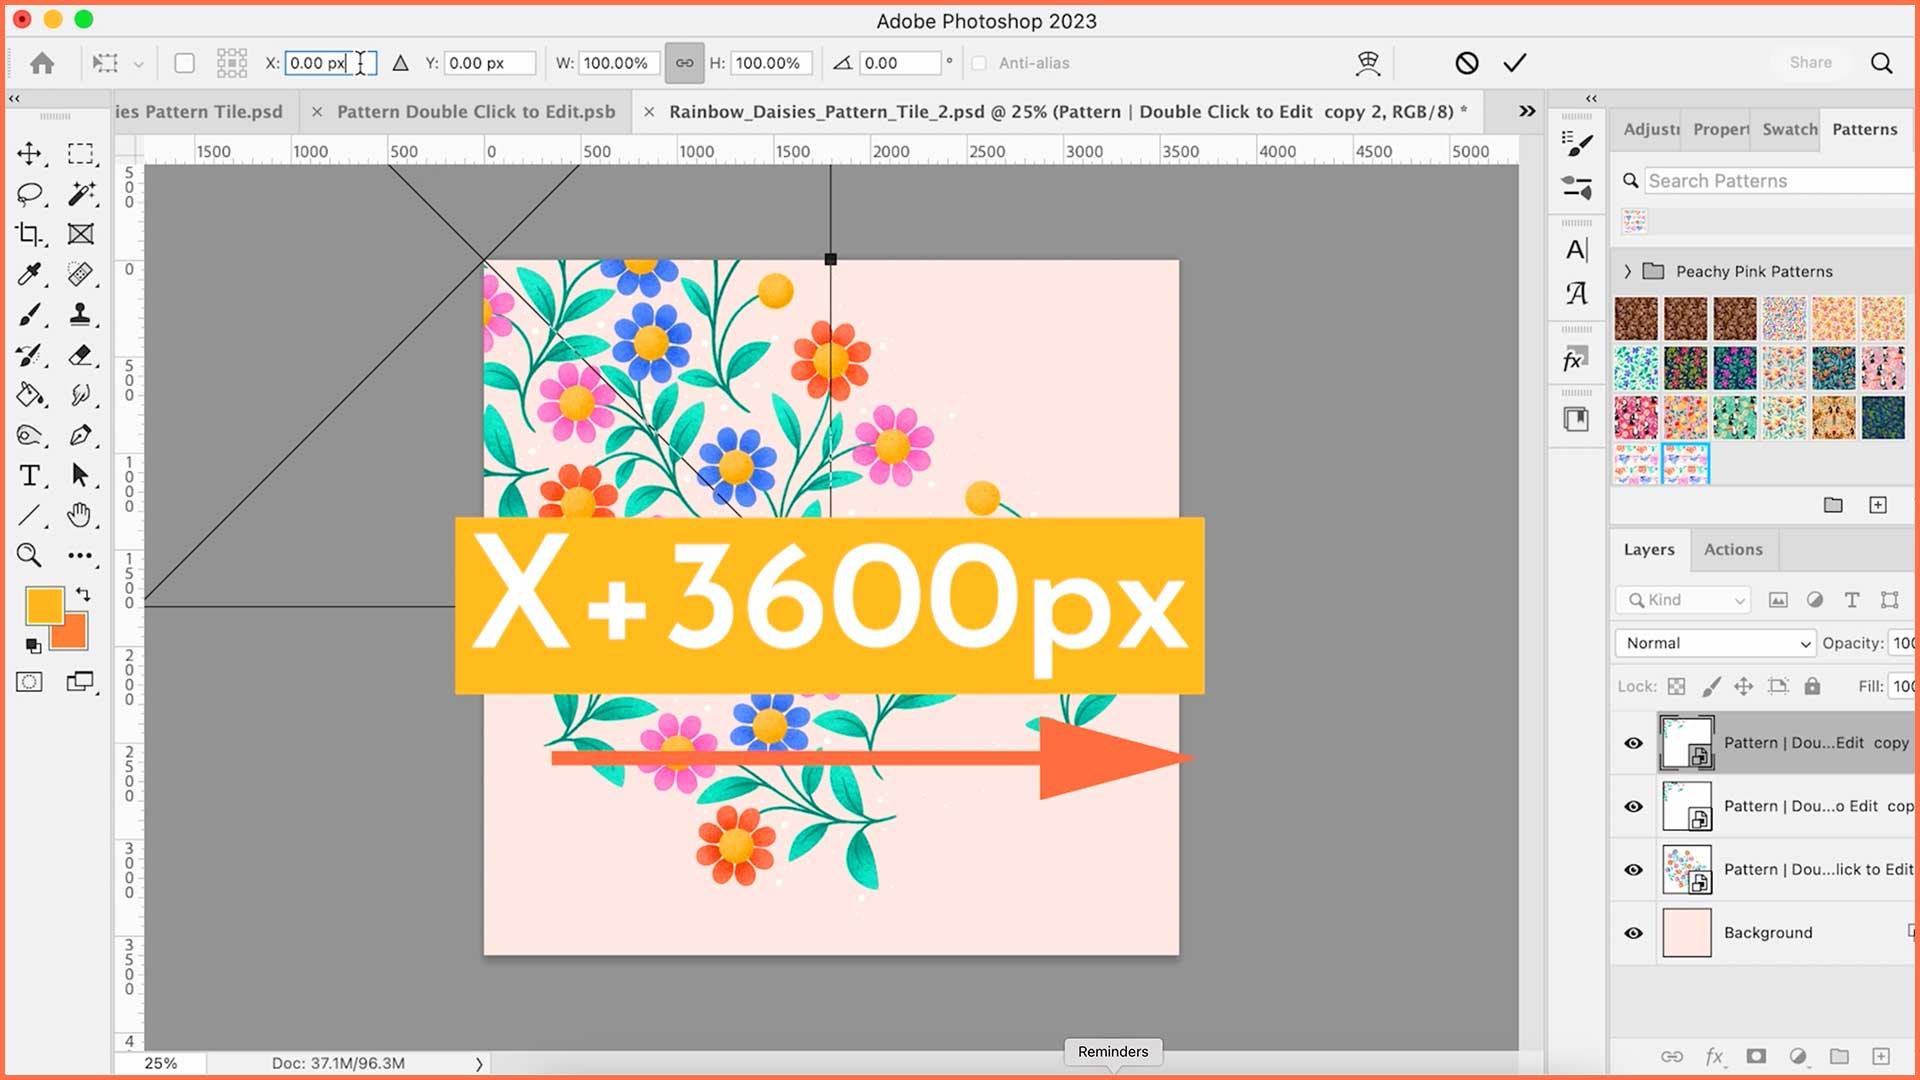
our document is 3,600 pixels or 12 ", we've shifted everything this flower
that was on the edge, we've moved it plus 1,800
pixels or 6 " along the X axis. We've moved it half of the document size
along the X axis. So this spot in the middle, this is a very specific place. We haven't just shifted this to any old
spot on the canvas. So when we come to take
this back into Photoshop, this whole extra folder, we can easily move that back to where it should be in
the pattern just by moving the whole
folder -1,800 pixels along the X axis or 1,800
pixels to the left. So that is how we get around drawing off the
edges and procreate, but without having to
have motifs cut in half. Because when we take this
back into Photoshop, we can just make the canvas
bigger and do it that way. So now we can go ahead and illustrate this flower
here in the middle. So let's add a layer and we
will do the yellow center. We're just going to draw the
circle like we did before, snap it by holding, and we'll change
that to a circle. And then you can tap
anywhere to come off that, and then we can color
drop into that. Just go to rename this
one extra yellow. And then I'm going to
add a layer underneath. And then we can use the pink. And again, just tracing
over our petal shapes. And then use color
drop to fill that in. And that is now that
extra folder done, and we've laid down the
basics for all of our motifs. If you just work in flat shapes with no
shading in procreate, you're actually
done at this point, and you could then
save and send this over to Photoshop and skip ahead and start the next
section working in Photoshop. But if you like to add
texturing to your work, then keep watching for the next video because we
will look at doing that next.
10. Adding Texture: So now let's have a
look at how to add some texture to these
motifs in a way that makes use of not having
to stop and start in procreate to fill in all those
little lines and instead, making use of how easy it is
to do it in Photoshop later. So as I said, if we were to alpha lock these layers and then add texture
onto this layer, we would have to fill in these spaces around the edges first. But if we add a layer above
and we use a clipping mask, it's still going to
have the same effect as if we'd alpha
locked the layer, but it's still going to fill
over the top of these gaps. It just won't show
them at the moment, and they will show up when we
come into Photoshop later. So on this layer, let's just rename this one
to Petals Extra, I forgot about that earlier. Don't worry about renaming the clipping masks because
when they get merged down, they will take the name
of whatever layer is below them when we do
that in Photoshop later. So on this clipping mask layer, and let's have a look at
what texture brushes are available. Let's try this one. So I'm going to use this medium nozzle spray paint
that comes with procreate, and I'm just going to
use this to add a bit of this darker color to the center
of the petals like that. And then I'm going to choose
a lighter pink and just add a touch of lighter color
to the edges like that. And as you can see, if
I just unclip this, all of that is still intact and will cover
those areas perfectly. But because it's clipped
to this layer underneath, it's still going to
show those gaps, even though they're
not really there. So that's all there is to do on this layer because this
is in our extra group. So I'm just going
to do the same with the yellow, add a
layer above it, clip it to the layer below, and let's go for a slightly darker orange color
on the bottom here. And then a lighter color
up there on the top. That might be a bit too similar to see. Let's go a bit lighter. There we go. And while I've got these colors saved
here in my color history, I'm going to go and add
these to the other layers. I recommend if you don't have
color history on your iPad, I think not all models have it, my son's iPad doesn't have this in his
version of Procreate. If you use a color in illustration that's not
saved in your palette, what I would do is create a
new palette to put it in, and then you can just add any extra colors that
you use as you go along because sometimes
it's hard to find the exact right color by pulling it from the
illustration like that. Another thing that I know some
illustrators do is to add a layer in their illustration
which they'll just drop down colors onto so they can easily
pull them that way. Just use a hard brush. And like I said, on a new layer, you can just add dots of the color which you've got then saved there to go back to, like having a note of them
in your illustration. Just going to hide
those for now. We can also hide this
whole extra folder now because we've finished
doing that flower. So when we hide that, it's going to jump back to the normal illustration
underneath. So let's start with doing the yellow flowers first as we have those colors
in our recent history. Let's add, not a layer mask, tap on it and add a
clipping mask. There we go. So yeah, let's use these colors, and I'm going to go back
to my recent brushes at the top to find the
one I was just using. So now we're just going
to go round and add that little bit of shading to all of these flower centers. And then we'll get
the lighter color just to add a bit of
light to the top. We're imagining the
light is coming from the top left
in this drawing. That's that layer done. We
can now go to the petals, add a layer above, tap it, and then choose clipping mask. And then I need to
scroll all the way back down here to this palette, and I can get the darker pink. And I'm just going to put a
touch of this coming out from behind the yellow circle there just to add a
little bit of depth. Do that one down there, and
then I'm going to choose the lighter pink and just touch that onto the
edges of the petals. And then with the stems, I think I'm probably just going to leave those as they are. I'm not going to put
any shading on those. If you wanted to do any
shading on the stems, because we didn't use color fill on this,
we just did drawing. You can just alpha lock it and do shading over the top on
this one if you wanted to. That way, there's no
gaps on this layer, so we don't use to use the mask. Um, I don't want to do
any shading on this one, so I'm just going to
leave that one as it is. For the leaves, I'm going
to add a layer above, tap it and clip it to the layer. And then I'm going to
use a darker green to add some shading to the leaf. I'm just going to
which one do we have? It's a darker one. So yeah, I'm just
going to add a bit of darker color just where the
leaves come out of the stem. And then this lighter green, I'm just going to add a
touch of that on top. And then that is all of
our leaves now shaded in. So if we collapse
all these layers, I'm going to get rid of
this when I put up there. I'm going to get rid
of that preview. We've got everything now
contained in our pattern group. We've got our sketch. We've got our pattern,
and we've got our extra. We're almost ready to export to Photoshop, but before we do, I'm going to show you
how to put this into a quick preview for one last checko things
before we leave Procre and switch software
into Photoshop. I
11. Testing the Pattern in Procreate: And and If you wanted to put all of this
together to preview on your iPad and to see how the
pattern is going to look, what I would do is to
duplicate this whole folder. If you have enough layers, you may find that you don't have enough free layers to
be able to do that. In which case, I would
go out into the gallery, duplicate the whole document, swipe left and tap on duplicate, and then you can have your working version and one
that we're going to flatten. So let's go into this one. So I'm going to hide this one. Actually, so I'm going to lock that so that we can't do anything destructive
with that one. I'm going to delete
the extra sketch. I have locked stuff there. I just need to unlock that spare diamond and then
we can delete it. And then for the pattern, I'm just going to tap on that one and we can tap on flatten. And then for the extra, we can turn those layers on. We just need to delete
that pasted image, and then we can tap
on the whole group. We've just got this
one flare there. We can then flatten that too. So to almost replicate what we're going to
do in Photoshop, which is to be able
to move this over, we need to do the opposite of the offset to get it into the
middle in the first place. So if we just select this, we are only going
to grab the flour, and there's no way of moving
this exactly 1,800 pixels. We need to be able to
select the whole canvas to do that to move it over by half. So if we just take
a regular pen, it doesn't matter what it is, this one will do,
and we just draw a little mark going corner to
corner off the edges there. And then off the edges of
the corner in that one, then we can duplicate
this layer. And remember, this is just
to give us a little preview. This isn't us putting
the pattern together. This is just a
preview and a check. We're going to duplicate this. We can drag it over to
the left and snap it into place and drag this one over to the right and
snap it into place, and then we can pinch
those together. And then I'm going to erase this line which is
now in the middle. Et's use a different
eraser. There we go. And then we can show
our main layer, and then we can pinch
these together. And then this is
the bit which we can offset and fill
the edges with. Now, because we've not got anything we've got something going off the edges
left and right, but we don't have
anything touching the edges top and bottom. We need to put those with a pen. We need to put those marks
back in again to the corners, and then we can duplicate
this layer and do our out into the corners offset the same as we were doing with the
sketch layers earlier. Again, remember this
is just to give us a little preview and
a check on our iPad. We're not merging
any final artwork. Everything is still going
to be fully editable later. So let's just pinch those
last four together. We'll erase those little
marks in the middle and go to the layer underneath and erase the marks
in the corners, and then we can pinch
those two together. And then this is now a copy of exactly what our patentile
is going to look like. I like to do this because it's a last opportunity
to check if there's anything that I
could quickly fix here before we take
it into Photoshop. And I'm glad I did because I can see in this section here, I've got my stem going
down a little bit too far, and it's overlapping
with the leaf like that. It's not the end
of the world, but because that's not how the
rest of the design is working, that's not got
elements touching, I'm going to change it now while I've still got
it in prorocreate. Another thing I can see, which
I spotted as I was going along is that I have the petal overlapping the leaf there. And again, it's not
the end of the world, but my pattern style is generally not to have
things overlapping. But with this one,
what I'm going to do is to rotate that
later in Photoshop. So I'm not going to
change that now, but I think I will go and
edit this stork so we can hide this flattened layer, and we'll go back to
our pattern folder. I'm going to unlock it now. And so it's this one here that
needs editing just a bit. I'm going to turn
this layer back on, but bring the opacity down. And so I need to go back
into my stems layer. Let's get the right brush, and then I'm going
to long press on the eraser to erase
with this softer brush. So I'm just going
to erase this up here and then go back and get the color
that I use for the stems. Oh, and get the brush a bit thicker and then just
fix that stem there. Except now, I think that looks a bit too
short and stubby. So I think I'm
going to undo this. I'm going to leave
that as it was, and I'm actually going
to fix the leaf instead. And it's this one
up here. So let's go to our leaves layer. I can probably leave this
clipping mask as it is, because this will
rather handily apply to whatever I do underneath
it as well on this layer. So I'm going to use a
solid erase at this time. So let's erase this whole leaf. And then let's get the color we use for that
one, which is this green. So I'm just going to
draw another leaf, avoiding that stem
there, if I can. Get the brush at the
right thickness. And you'll see as I do this, it's going to pick
up the texture from the clipping mask above. Might be easier if I
draw this side first and then match the other
one to it. There we go. I think that's going
to look much better than trying to change the stem. And as you can see, we've kept this nice texture from above. So we don't need to go and
redo this preview layer again. That's just for us to
see how it looked. So I'm going to hide my
pattern layers again, and let's go back up here to this preview one and take
the opacity back up. And although I know I've
changed these parts, another thing I like
to do is to see how this looks
overall in repeat. So I'm going to select
the whole layer. And I'm going to drag it up to just this top left quarter, duplicate it and snap
it over to the right, pinch those two
together, duplicate, and snap those down
to the bottom. And then you get a nice preview before you send it
over to Photoshop. If you spotted anything else at this point that you
wanted to change, this would be the point
to go back and do it. Otherwise, if you're
happy in the next lesson, we will look at some
export best practices for sending it
over to Photoshop.
12. Procreate Exporting Best Practices: So let's have a look at a
few export best practices. I always like to tidy my files up a bit before I send
them over to Procreate. So I'm going to delete this preview layer because
we won't need that. This duplicated pattern layer
I'm also going to delete. I want to have my pattern layer showing but have my
sketch layer turned off. And I'm just going to go
through and make sure that everything that should
have a name has a name, which all of these do, and on the extra section. All of those do,
too. I can delete this pasted layer because
we won't need that. There's not a whole lot of point collapsing folders before
you export into Photoshop, because when you bring
stuff into Photoshop, everything imports
open as default. So once I know that
I don't need to undo anything else in this document
and it's ready to go, I'm going to come back
out into the gallery, and I'm going to
rename this document. So I'm going to tap on the
name and then normally, I don't have black on the
end of my file names. It's just called patentile. So we'll just delete
that for now. The reason I call
it patentile is because when I'm adding
a file name to things, I just need to add
what the file name is, and then this would be
Pink Daisy's patentile that can be its permanent name. It saves me having to add paten tile on the
name every time. So we can then tap Select. We can tap on our file, and then we can tap Share and you want to
share it as a PSD. I'm going to save mine to files. I'm going to save it in iCloud, but you could airdrop it,
you could text it, email it, however it is that you
normally send files from your iPad to your computer. So just as I have a
Procreate transfer folder for sending things to Procreate, I also have a transfer
to MAC folder, which I put things in for
sending back the other way. Got my file name down here
so I can just click on save, and that will now save in ICloud and I will be able to
open that on my computer. Once you have your file saved and sent over to your computer, in the next lesson, we'll look at opening it in Photoshop.
13. Opening in Photoshop: So once you have your
file on your computer, you can double click on it
and open it in Photoshop. If you've never used
Photoshop before, don't be overwhelmed all the different menus
and panels and things. I'll walk you through
everything as we go along, so just stick with me
and it'll be fine. So when you open your
file in Photoshop, you'll notice, as I mentioned, even if you closed all
the groups in Procreate, they'll all be auto expanded when you
open it in Photoshop. It look a bit overwhelming when you're in this
small interface. So if you go to the top one
and Command click on it, it's going to auto close all of those groups for
you, much tidier. So the panels that we're
going to need for working on these files are the
patterns panel here, the Swatches panel, and you're also going to need
layers and actions. If you don't have any of those, you can go up to the Window menu up here and
find them on this list, click on them, and then arrange them as you want them
to be over here. One last thing I
want to do before we start is just to go
over to the crop tool here and make sure you have
delete crop pixels unchecked. This will mean that we can move the edges of the canvas later, and we're not going
to inadvertently delete any parts that
fall outside the canvas. So now that's done,
we have a file open, and we've got the correct
panels over here. And the next lesson,
we're going to learn all about smart objects.
14. Creating a Smart Object: So this part here
is what we want to use to build out
the rest of our tile, similar to how we
did in Procreate. The best way to do that is to convert it to a smart object. If you've never used
smart objects before, a smart object sort of
behaves like a group, but it makes everything in it a whole separate file
that you linked to. When you duplicate a normal
group like this one, let's just duplicate that and just change this
to group select. And let's just move this move
it up to here, for example. If you change something within this group here, for example, if we made a change that leaf
here and say we rotated it, it would only change
that leaf there. This leaf would remain
unchanged because this is a whole separate entity.
It's a duplicate. But when we make something a smart object and then change it, let's just go back, get rid of that one, quickly make this one a smart object, duplicate it, and let's
drag it up there. If I change this leaf here, this one up here would also change in
exactly the same way. When you duplicate
a smart object, you're not saying
make one version of the object here and
another version up here. You're saying show
this object here and show it here at the same
time. It's the same object. So any changes we make
to this little leaf here also apply to this one plus all the other
ones around the edges. So it's a great way to build
patterns for three reasons. One, it's a non destructive way of duplicating and transforming. We're not going to
lose image quality. It saves us time
because we only have to edit one instance
of an object. But the main reason is that
your pattern stays seamless. If you weren't using
smart objects, you'd need to keep
checking that when you change something
here on this side, you'd also have to move and change the duplicated version
of all the other edges. In a Smart Object, you know
that any changes you make on one instance will be mirred
on all the other instances. So let's just delete this one. Actually, note, let's undo, and then we can go back to it
just being a normal group. So let's convert this
to a Smart Object. I use this function so often that I have
a shortcut setup. So I use Command W, but to do it the normal way, right click on the layer and go down here and click on
Convert to Smart Object. You'll notice the little
icon here changes, and we now can't
expand the group like we could by clicking
on the little folder. We now got this thumbnail, and the way we get
to our layers within that group are by double
clicking on this icon here. You'll notice that
the smart object takes the name of
the highest layer. This is why I call all my layers grouped together as pattern, double click to edit. When I hand these files
over to a client, they can easily figure out how to get to the
pattern elements. Just by naming that group
like that from the beginning, I don't always have to rename it at the end when I
get to this stage. So let's double click on this thumbnail and
see what happens. You'll see that it's now opening another document over
here in this new tab. So we have our original
document here. We double click
on that, and it's opened up all those layers as a new file up here called Pattern Double
click to edit PSB. This is the separate document
that I was talking about. We can edit things in here, save it, and then the main
document will update. So let's just add
something here. We're just going
to add a layer in, and let's just go get a big, ugly brush and just draw a
bigblogeon it like this. If I press Command S to save, and then we go back over
to our main document. You'll see that big ugly blob is now in our main document. And if I'd had this duplicated up in the corner
like I did before, there would also be that
black blob up there as well. So let's go back into
our Smart Object and undo that and also
undo the added layer. I'm going to re save
this now so that we get rid of that black blob
in our main document, and then I'm going
to close this for now and then we'll
come back to it later. So now that we've
looked at how to convert this to a smart object, the next step is to
look at how to use that to build out the
other parts of our tile, and we'll look at that
in the next lesson.
15. Building a Repeat: So we're going to use
this smart object to build out the
rest of our tile. Let's start by setting up some guidelines to mark
the edges of the pattern. The design will still work
if you don't do this, but it's useful to
have the seams marked out in case you want to
expand the canvas later. It's also useful to
have it set up so that when you pass a
file over to a client, if they play around with
things and move things about, they can easily find their way back to the edges of the repeat. So we need to have rulers showing around the
edges to do this. If you don't have
these, you can go up to view and make sure you
have rulers checked. This is also a
good point to make sure you've got
snap turned onto. So what we're going to
do, we're going to go up to our rollers and click and drag and snap a guide to the edges of the
canvas like this. That one's not quite
in the right place. Just going to press
Command Ed to undo that. And there we go. That
one's dragged into the right place and the last
one over here on the right. So now I'm going to use
my crop tool over here. I'm going to hold
down option I'm just going to click out here
and then hold down option and then you can
drag out in all directions. If I just drag it without
option held down, it's only going to drag
it out in one direction. So hold down option, and then you get to drag it in all directions
at the same time. Then you can release and press Return to set
that transformation. Now, I don't normally
expand the canvas like this when I'm
working on a pattern and you don't need to either. But it's going to be
helpful for us to see what's going
on and visualize what's happening
if we can see past the edges as we're learning
what's going on here. So the first thing
I'm going to do, the first thing I'm going
to do is plug my Mac in so that it doesn't run
out of battery, and I'll be right back. Okay, we're good. So the second thing I'm going to do is just delete
this background here. And replace this procreate
background layer with a color fill layer that just extends infinitely
across the whole canvas. That way, we're
not going to have any issues with things
potentially becoming misaligned. I prefer to have everything extend over the edges
when I'm making patterns. So I'm going to come down here and I'm going to
click on this little icon, and we're going to add
a solid color fill. And we're going to click
on that, and this is going to set a solid color
fill over the whole document. So let's just leave
that black for now, and then we can hide that layer, and we can use our
eye drop at all. Keyboard shortcut is I. We can select that background
color, hide sorry, show the color fill layer, and then come up to
our swatches and apply that to the
whole document. We can then delete
this background layer. Now, whenever I add one of
these background layers, I always make a note of the X and Y dimensions in the layer name so that
I don't forget what it is. It's a habit I got
into back when I was working with more
random size canvases, before I started
using this method, where nine times out of ten, my canvas is 12 by 12. But I'd write the dimensions
down on a scrap of paper, and I'd be referring back
to that for working out the maths of how much to shift things left and
right, et cetera. But then I realized it
would be more useful to have that info in
the actual document. So then I started writing the X and Y dimensions
here in the layer name. So although it's a thing I
don't need to do anymore, it's a habit I've stuck with. And again, it's a
thing I think is potentially useful info to have contained in the file for when you hand it
over to a client. So I'm going to double
click on this layer name, and we're just going
to write in there x36 hundred and y36 hundred. So yeah, two little
tips there to help you keep track of your
document dimensions. One is to have them written
down there in the layer name, and then a second
is to have them marked out with guidelines
around the edge of the canvas, so you can always find your way back to
wherever the repeat is. So let's start building
our patentile. So the first thing
we're going to do is go to that Smart
Object layer, and we're going to duplicate
it by pressing Command J, or you can right click and
go down to duplicate layer. So the next thing we're going
to do is to transform it in exactly the same positions as we did with our
sketch in Procreate. Except this time,
we'll be doing it with some easy maths
instead of snapping. And again, don't let
the word math scare you because we can get
Photoshop to do that for us. So we're going to press Command and that's the
shortcut for transform. Now, up here in these boxes, these show where this tile
is positioned on the canvas. They show where its X
and Y coordinates are. So whatever this number is, and if you remember when we
were working in Procreate, we knew we needed
to move that by half the amount of the
overall repeat size. So our repeat is 12 ". It's 3,600 pixels. So we need to move it
half of that amount, which is 1,800 pixels this way in a negative direction
along the X axis, and also 1,800 pixels up, and that's a negative
direction along the Y axis. The good news is
that we don't have to do any of that
maths in our head. We can just click
up into this box. If you click once, it's
going to highlight it, and then if you click again,
you'll be able to type. So click between that number
and where it says Px. So we're going to
type in minus 1800. And that is then moved
1,800 pixels this way. But we also want to move
it 1,800 pixels that way, and that's a negative
Y direction. So click into the Y box. Click once to highlight
it and then click to get in there to be able
to type. There we go. And we want to move that
minus 1800 pixels upwards. And once you've done
that, you can press Return twice to set
that transformation. So now that smart
object is being shown in the middle
of the canvas here, and it's also being shown up there in the top
left of the canvas. So the next thing we need to do is same as we did in Procreate, we want to move this
up and to the right. But instead of moving this
one up and to the right, we can move this
one across instead. So we'll click on
the one that's on top and we'll press
Command J to duplicate. And this time, we
want to move this all the way over to the
other side of the Canvas, which is 3,600 pixels. So we're going to press
Command T to transform. And then up here in
our X box up here, we're going to type
in plus 3,600, and that's going to take it all the way over to the other side, and then you can press Enter
to set that transformation. And then the next
thing we need to do is these two smart objects
that we have here, these two because they're
touching this top edge, we need to move these 3,600
pixels down here as well. So we're going to with
these two layers selected, press Command J to duplicate, Command T to transform, and then in the Y box up here, remembering that
down is a positive, we're going to
type in plus 3600. And that's going to move
those 3,600 pixels down, and then you can press Enter twice to set that
transformation. So the main reason that
I wanted to expand the edges of the canvas was to give you a good view
of what we were doing. I didn't want all these parts up here to be hidden
and not on view. So looking at it like this, you get a good understanding
and feel for how the pattern is put together
in its diamond formation, but still repeating
within this square. Remember, I said,
I'd show you how to build a pattern
with just one click? Well, all those steps
we just did are the ones we're going to combine
into a Photoshop action. However, we're not
going to do it just yet because there's an
extra step we'll need to put in that has
something to do with the extra layer group that
we had created in Procreate. So we'll circle
back to that later. First, we need to tidy
up and edit the motifs, which is what we'll look
at in the next video.
16. Editing Motifs: Mm. So let's have a look at editing some of these motifs and fixing
these holes here. To get to our motifs, we need to double click on our smart object again,
just like we did before. So I'm going to make sure
my sketch layer is hidden, and I just want to be
looking at my pattern layer. I'm actually going to
ungroup all of these. So on the top layer here, the pattern, double
click to edit, I'm going to press
Command Shift G, and that will ungroup all those. We don't need those
grouped together anymore. So we have our
sketch layer hidden. I'm not going to
delete it because we might need to come back
to it at some point. This one is one I added in
with some dots after I stopped recording because I wanted
to be able to show you how to move some things
around in Photoshop. So I'll hide that, and we'll come back
to that later. So to find our motifs, I can open up this
patterns folder, and then you can see
all the layers that we made in Procreate
a little earlier. So the first job is
to properly fill all those motifs
because as you can see, they've still got those
little lines on the edges. So let's start
with these leaves, working from the
bottom layer up. I'm going to unclip the
shading on top of that. And to do that, you hold down option hovering between the two, and then just click, and then that becomes unclipped. If you want to clip
it back again, you hold down hover
between and click again. That's how to toggle
that on and off. And then I'm going
to hide that layer. So the way we're going to
fill all of these layers, I'm just going to
zoom out a bit. We've got a good
selection on view here. I'm going to use the
magic wand tool, so press W to get that. And what I want to do is to select everything outside here, all the space where
there's nothing. I'm going to select all
of the negative space. You need to make sure
you have contiguous switched on for this bit. If you have contiguous
switched off, it's going to grab
any negative space no matter where it is
in the whole drawing, even if it's these bits
inside the leaves. We only want to select the
stuff outside the leaves. Contiguous means
only select stuff that is connected to the
pixels that we're clicking on. So if I click here, it's only going to select
the negative space that is the same and
connected to this pixel. Things in here aren't connected because they're separated
by that border there. Hopefully, that makes
sense. Just make sure you have contiguous
selected for this bit. So I'm going to click here, making sure that I'm
on the right layer. Press Command D to deselect
and select the leaves layer. Make sure you're on
the right layer. So let's select that.
And that is going to select all of the area where
we have no fill at all. And what we want to do is to make this selection
a little bit bigger, so it comes into
just in past here. We want to soften the
edges a little bit, and then we can
use the fill tool to fill all the parts
that we want to. So the next step is to
go up to select menu, and we're going to go to modify, and we're going to
expand what we have selected by two pixels. The brush that I
used in Procreate and the size I was using it, two pixels should be just
about enough to take it in so that we still get these nice soft
textured edges here. If you were using
a brush that was a lot more chunkier and had
more texture on the edge, you might want to increase your selection than a bit
more than by two pixels. But what we want to do is to just take it in enough to get a selection to get our selection in and out of the way of the
nice textured edge here. So I'm just going to
leave that with two well, actually, maybe I might
take it and buy three. Let's press Command
Z to undo that. And then go to select, modify, expand, and let's change this to three and
see how that looks. Yeah, I think we're
going to change it. We'll keep it at
three. That looks a good amount to
be taking it in. So the next thing we want to
do is to soften the edge and put a feather on
it so that we have a nice soft edge to eliminate. We don't want to
see any harsh lines if we zoom in, and we
have a look there. There's some parts
where, you know, if we had a really harsh line, that might be a bit obvious. So we're going to put a
feather on this selection, but only want a small one. So we're going to go to
select, modify feather. And I'm just going
to put a feather of half a pixel on that
and click Okay. That won't make
any visible change happen on screen at this point. So at the moment, we have all this negative
space selected, but what we actually
want to have selected is the space
inside these leaves. So what we need to do is invert our selection by
pressing Command Shift, I, and that will
invert the selection. So now what we need to do is to add a layer
above this one. So we're now working on a
layer above the leaves. I'm going to use
the eyedropper tool to select the color
of the leaves. So press I, and I'm
going to click on this leaf to select
the color inside. And this is why we
have the clipping mask turned off because
we need to be able to see and select the same color as you
have for this leaf. So now we're going to select
our bucket fill tool, which is G. And if we
fill the selection, that's going to fill everything on this layer which
we have selected. So if I hide this
layer underneath, you can see if I zoom out, we have these kind
of inner areas filled on top of the
original layer underneath. So now I'm going to turn
this top layer on again. The next thing you need to
do, just zoom out to make sure there's no glaringly
obvious mistakes, but this is looking okay. So once you're happy that everything's
looking as it should, you can with this
layer here selected, I'm going to right
click the layer and scroll down here and I'm
going to choose Merge Down. And as I said, when
you merge down, it takes the name of
the layer underneath, so we don't need to
do any renaming. So the next thing
we can do is to show our clipping
mask, our shading, and then we can clip that to the layer by holding
down option, hovering between the two layers
and clicking to clip it. And as I said, all
of those gaps, because we did the shading on a separate layer that
didn't have the gaps in it, when we then filled the
gaps on the leaves layer, that fills in the gaps that weren't really there on the shading, if
that makes sense. So once you've clipped that, you can go onto
this clipped layer, right click and merge
that down as well. Now we have all of that
on one flat layer. Now, this process that we
just did, all those steps, it's actually
possible to automate all of that into
one single action. So we'll look at how to record that action as we
do these petals. So let's first of all, zoom in so we can see
the petals more clearly. So first of all,
I'm going to unclip the petals, the
shading over them, and then I'm going to hide and then I'm going to
go to the petals layer, and we're going
to select all the negative space with
the Magic One tool. Then as before,
we're going to use the eyedropper to select the color that we
want to fill with. And at this point, we're ready to start
recording our action. So we're going to go over
to our actions panel, which you should hopefully
have up from before. If you don't, you can
go up to Window and get your actions panel
showing from up there. Your actions panel will possibly look a little different to this. If you haven't ever
used it before, there's probably a set of Photoshop default
actions in there. I've deleted that folder from mine because I don't
ever use any of those, and I just have this
one with mine in there. So to set up your own folder
with your own actions, you come down to this
little folder icon here. And let's make a new set. We'll call this Skillshare. So with your folder selected, we're going to click on
this little plus icon, and we're going to
name our action. I'm going to call
mine Procreate fill. That's why I have it called
in my normal folder up here, so I'm going to
make sure I save it into my skill share folder. I'm going to assign
it a function key. I think I have F 11 assigned to this one in my other
folder at the moment. You can pick any key you like. If it's a key that's
already assigned to another function
within Photoshop. For example, I think five is something to do
with either brush or color, so I click Record. Yep, this is brush settings, so Five is already a Photoshop shortcut
for brush settings. It's up to you if you use F five for brush settings
as a regular shortcut, you'll cancel that
and you could do Shift a five or
Command Shift a five. If you don't ever use the F five key for the
brush settings, then you could just click Okay and overwrite that setting. I don't ever use
this shortcut key, so I'm going to go ahead
and use a five for this. If you want to assign
a color to it, these can be useful when we put the actions panel in
Button Mode later. I'll just show you quickly now. If you click on this little
hamburger menu up here, you have the option to
view this in Button Mode, and each of your actions can have a different
color on it. So you could choose that if you want to put a
color on there. It's certainly not
necessary to do that, and I'm not going to
put one on here today. So once you have all of
these settings here, I find it helpful for me to put the name of
the shortcut key I'm using up here in the action name because
when I start a new action, I will always forget what
key I assigned to it. So the first few
times I've used it, it's useful for me to have the name up there as a reminder. So I've put the key that
I'm using up there. If you want to do that. And at this point, we can click Record. And as I said, it will
prompt you if you've chosen a shortcut key that's already assigned
to something else. So you can either cancel
it and choose something else or if you're
happy overriding it, just go ahead and click Okay. It's not going to
cause any problems. You can always delete this action and reassign
the shortcut key later. So you can just click Okay. And from this point, everything that we
do in Photoshop is going to record as a
step in our action. So you have to make
sure that you're only doing things that you're
supposed to be doing. For example, if I go to my list, if I were to add a
new layer in here, you'll see that's recorded
there, make a new layer. So if that happens to you and you record something
at any point in this process that
you don't want in the selection, you
can stop recording. Find the step that
you didn't want in, you can select it, and you can drag it down
here to the bin. And that will remove that step. You can then go back to where
you were supposed to be, go back and press record, and then you can carry on. So let's now continue
from where we were. So I want my move tool selected, and let's go back over
here to our Layers panel. Oh, actually, I need to delete
this layer that we added, first of all, so
let's delete that, and then we'll have to go
back over to our actions. And then we need
to stop recording, drag this step to the bin, and then we can carry on
recording from where we were. So at the moment, we have all of this negative white
space selected already. We have our color already set to the color we want to
fill with in the next step. The first thing we want to
record doing and happen every time because if we were to
select this color every time, that would become a default. We have to do that before
we play this action. So the first thing
we want to repeat every single time
is to go to select, modify, expand, and we want
to expand by three pixels. So we'll click Okay on that. And you should see
on our actions that step saved over there. Next job was to go to select, modify, feather by half a pixel. And then the next step was
to invert the selection, which you can do
with Command Shift I or you can go to select Inverse. So now we have this area
inside selected instead. So we can go back over
here to our actions, and you can see that all of those steps are also recorded. So we now need the
bucket fill tool, which is G, a shortcut. We're going to add a new
layer above this one. And with the bucket fill, we're going to fill
in what we have selected with the color
that we've already chosen, and then we can press Command
D to deselect everything. And then we can right
click on this layer here and choose Merge Down
to merge this layer down. And then at this
point, we can go to our actions panel and we can
stop recording our action. So now that we've recorded that, the first thing we should do
is to test it out or hold off re clipping emerging
down these tops for now, and we'll test our action
on these yellow ones. So let's go over to here. We'll unclip the mask
and we'll hide it, and then make sure we're on this yellow layer that we
want to be working on. We're going to use
our magic one tool, W to select the
negative space and I for our eye drop at tool to select the color from
the middle or here. So now if we press F five, And now that has magically
filled all of that for us, which is very cool, indeed. I'm actually going
to go back and undo some of those steps now to show you several
different ways of playing your action. Let's just undo that
and delete that layer. And then let's get this back
to where we were before with the that's selected, and we've got yellow
as our color. So obviously, you can press the shortcut key Five,
as we did before. And when I said earlier
about butter mode, let's just put this
into butter Mode. You just go to the
Hamburger menu and select Button Mode up there. And this is what
I meant about it putting all of your actions in a bit of an easier to see list. And as we were talking
about color, and I said, If you've chosen a
color for this one, I have purple selected. It can help you find it
a little bit quicker. So if you're in butter Mode, you can find it and
just click on it and it will play your
action for you that way. Let's just undo that again.
Go back to where we were. And then lastly, if you don't
have it in Button Mode, you can find the action, select it, and then you can go down to the bottom
and press Play, and that's going to play
that action through for you. So that's three different
ways of playing an action. You can press the shortcut key. You can select the
action and press Play, or you can put it
into Button Mode. You can use whichever you want. I more often than not
use the shortcut key, but use whichever one fits best into how you use the
mouse and the keyboard. So now let's go
back to our layers, and we can fix this one first. So we're going to show
the shading above it, and we're going to clip it to what's underneath by
holding down option, hovering between and clicking
as we've been doing. And then we are going to right click and we're going to
merge this layer down. So now we can do the same on
this layer below the petals. We're going to show it.
We're going to clip it, and then we're going to
right click and merge down. So now I'm going to zoom back out so we can see
everything we've got here. And now we have all
our shading and motifs fixed for this group. The next thing we're going
to do is to deal with our little extra folder up here. So first of all, I'm going
to turn it on to show it, and then while we're
working on it, I'm going to hide the pattern layer underneath
so it's not distracting us. So we'll hide that one. And what we need to
do now is repeat those steps we did on the pattern layers
to fix these motifs. So we will unclip
the petal shading, hide it and go down
to the layer below, select the negative space,
eye drop of the color, and then we can play our
shortcut with F five. And then we can
show the shading, clip it back to the layer below, right click and merge it down. Then we can hide the
shading here, unclip it. And make sure we have
our extra yellow layer. Use the magic wand tool to
select the negative space. I to eye drop the color in the middle and then
our fill shortcut key. Then we can show the
shading, clip it down, and then I'm going
to use Command E, the shortcut to merge
down this time. So once you have all
of your motifs in your extra folder all
tidied up and sorted out, the textures merged
down and cleaned up, I'm going to close that folder and I'm going to show
the pattern one. And I'm going to zoom
out so that we can see everything going on
in this window here. So the next job to do is to put this little extra section
back into the correct place. So thinking back to procreate, we shifted the edge, the seam of the canvas to the very middle to
draw this part. Our canvas was
3,600 pixels wide. So when we moved
it to the middle, we moved it along the X
axis by half of that, which is 1,800 pixels. So to put this back in its correct place
within the pattern, we need to move it back along
the X axis by 1,800 pixels. This number that you
move it back by will always be half of whatever your canvas size
in Procreate was. Photoshop can do
that mass for us. So let's first of all, make the canvas a little
bigger to start with. We're going to use
our crop tool, which is C, and I'm going
to hold down Alt or option, so it resizes in
both directions, and I'm going to drag
it roughly enough so that new piece
will fit into it. And then I'm going to press
Enter to set that crop size. So with this extra
group selected, we're going to press Command and then Photoshop can
do the maths for us. So we come up here to
our X and Y boxes, and we need to move
it along the X axis, and we're moving
from right to left, so it's going to be in
a negative direction. So we come up here to our Xbox, click in here and we're
going to put minus. And if you can do the
maths in your head, you could put -1,800. But if you've got a really
strange canvas size, like, I don't know, two, four, five, two pixels, you could put minus
2452 divided by, which is the forward
slash key, two, and then that would
figure out for you what you need to move it by. Ours is 3,600 pixels. So if we put -3600/2 pixels px that's
going to move it exactly 1,800 pixels
over to the left for us. So that's two different
ways of doing it. You can either type in the
exact number, say -1,800, or you can type in your
entire Canvas size, 3600, whatever yours is, and then divided by two. You'll then need to press Enter twice to set that
transformation, and that is now over
there in the right place. So if we now press
Command S to save, and then we go back over to our main patentile we click
up here to go into this file. You'll notice that it's
applied this new motif here, here, and here to
these smart objects. Where it's changed this
one on the Canvas seam, we also have this one down here changed because we
repeated it down here. But you can see with
this one, because there wasn't anything going off
the edge at that point, we didn't repeat it
all the way over here. So because we've now
gone past the edges, we've taken this motif and it's touching the seam of our tile. Now we need to
repeat this one over here because it's now
crossing the edge. We need to repeat
this smart object, 3,600 pixels over to the right. So I'm going to select this
layer that has it on there. And this is why we didn't record the action earlier because I knew we were going
to need to put this extra repeat in there. So I'm going to press Command
J to duplicate this layer, and then I'm going to
press Command T and we want to move it 3,600
pixels over to the right. So that's a positive
direction along the X axis. So we come up to our Xbox and into here and we're just
going to type plus 3,600. Press Enter to set that and then this will move
all the way over to there. And now we have a nice,
perfectly repeating tile. So now we have in mind
that anytime we build out this pattern tile
with an extra part in it, we may also have to repeat
this part over to the right. Let's have a look in the
next lesson at how to record the action to build this all
out automatically for us.
17. The Build Pattern Action: And So here we are back in another pattern that I have set up ready
to build out. I'll record the
action as we do it. So make sure you have your actions panel
showing here as before. Again, if you don't have
it, you can go up to your Window menu up here and choose the
actions from there. So let's go to our
Skill Share set. Let's just collapse this one and select our skill share set. I'm going to click
on the plus icon down here to record
a new action, and I'm going to call it
Build 3600 pixel repeat. And then we need to
pick a function key. I'll try F four and see if
that has anything assigned. It's given me shift
as an option there, so that probably does have
something assigned to it. Before we go any further, I just want to say
that this action will only work on a 12 inch,
3,600 pixel canvas. And by that, I just mean this specific action recording now because the measurements
we're going to type in will be relative to
a 12 inch canvas. This is one of the
reasons that I like to work in the same size
most of the time. If you regularly work in
a few different sizes, you could record an
action for each one. So if you regularly use an eight inch canvas quite
a lot, 2,400 pixels, you could build out one
of these actions for 2,400 pixel canvas as well. The principles will be the same. We're just going to stick
to the 12 inch one, 3,600 pixels for
learning how to do it. And then once you
know how to do it, you can then modify
the numbers to fit different sizes of canvas that you might
want to work with. So at this point, we're
going to click on record. Let's hop over to
our Layers panel. The first thing that
we want to do is convert this group
to a smart object. So we're going to
right click on it. And where did
Convert Smart Object go up there? There it is. So step one is now done, and then we want to duplicate
this layer with Command J, and then we're going to
start building it out in the same way as we
did in Procreate. We know that we need
to move it 1,800 pixels or half a canvas
distance to the left, and then up and to the
right and down, et cetera. And then we know that we're
also going to need to eventually put these
extra parts here, so we also know that
we're going to eventually need to repeat this
over here on the right. So let's start to go
through those steps now. So on this top layer here, the one we've just duplicated, we're going to press Command T, and we're going to move it along the X axis -1,800 pixels. So we'll type that up there. And then in our Y box, we are also going to
move it -1,800 pixels. And then that's in
the right place. Now we can press Enter to
set that transformation. And then from here, we would
duplicate this layer again, Command J, and then
Command T to transform. And then this time, we
want to move 3,600 pixels, a full width over to this side. So in the Xbox, we're
going to type plus 3,600 and press
Enter twice again. And then from here, again, we're going to
press Command J to duplicate and then
Command T to transform. And then we want to move it
3,600 pixels down the Y axis. So that's a positive direction. So up here, we're
going to add in plus 3,600 pixels, press Enter twice. And then last of all, we're going to duplicate
this layer again. Command T to transform, and then we want
to move it a full 3,600 pixel negatively
on the X axis. So up in the box here, -3,600
and then enter to set that. And then at this point, we also know we want
another instance of this to come 3,600
pixels over that way. When Photoshop is playing
this action through, it's going to be exactly in the same position
as we are here. So rather than clicking on
this bottom layer down here, we need to keep going
through the layer we're on because it's less likely
to mess the action up. So we're going to
press Command J, Command T, and then
this last one, we want to move it up by
half a canvas height. So that's going to
be in a negative direction on the y axis. So in this box, we're
going to type in -1,800. And then on the X axis, we actually need to move this
one slightly differently. So up here in the Xbox, let's move it plus 3600 and
see where that takes us. And that's actually only moved us halfway across
when we did that. So up here in the Xbox again, we need to type in another plus 1,800 to get it all the way
over to the edge there, and that will take anything
that's sticking out over this side
over to this edge. And now we can press Enter. And at this point, we can
stop recording our action. So we go over to our
actions and click on Stop. I'm going to put all
these steps for recording the action in the cheetseet in the class resources for you, so don't worry if you
missed some of that. So once we've done
all that, we can double click into
our pattern here, and then I'm going to
quickly fast forward making all these changes
and tidying up the motifs. The thing to remember is
that you always need to make the changes with your extra
folder in the same direction, so as in always moving it back over to this
side on the left, if what you have set up in your action out here is to
repeat over on this side, if you make a
change on this side of the canvas over here, then back on this one, it's going to need to be
repeated over here. If you make your changes on
this side of the canvas, you'd have the change here, and you'd actually
need to repeat it back over on this side, over
in this direction. So just keep that in mind, always going in the
same direction. So I'm going to quickly fast forward through
all these changes, and then you'll see
how when we save this, it's already filling
in this gap, and it will have
sorted itself out. So I'll just quickly whiz
through me doing that part now. Now we've fixed this pattern. We've shifted this extra
part over here to the left. So now, when we save this, I'm just going to press
Command S to save. And then when we go back
into our main pattern, you can see on this
original first layer here, the part that crosses the line over there now because
we just moved it. It's been repeated
over here already on the left in this last step of repeating the
pattern layers here. So now that we've recorded that action over here,
I'll build a repeat, I'm going to open up another pattern and
we can test it out, see how it's working, and
you can see it in action. So here in this pattern, if I select this pattern double click group and I press
Shift and F four, you'll see it all run
through that action and has built out
that tile for us. To test the pattern and
make sure it's working, we can add it to our
patterns panel up here. And then if we add a layer above all of
these smart objects, and then we apply this
pattern to the layer, it's not going to
look any different now because it's just added a straight up copy of the pattern on top of the
pattern tile underneath. But if we zoom up here
into this corner, and then with our move tool, we can drag it around so you can see this
is a pattern layer. So if we just drag it
down by a small amount, we can pan along the edges top and the side and just
verify that everything is, in fact, tiling perfectly. So I'm just going to zoom
back out and we can change this scale on here to 50%
for a little preview. And you can just see how there from like air
dropping my pattern from my iPad straight into Photoshop and just
pressing one key. We've built out this pattern, having had all the
maths done for us, which is pretty fantastic. So I'm just going to cancel
out this pattern here. I think I did have one part in the extra section
in this pattern. So let's have a look. And yeah, I can see that I did. So let's just tidy this up
and fix this part over here. So quick refresher, we're going to go to our
extra section. We can delete this
pasted in layer here, and then all we have to do is move this part here, this leaf. Oops. It just needs to come
1,800 pixels this way. So I'm going to press Command T, and now I need to move it
-1,800 pixels along the X axis. And then we're going to press
Return twice to set that, and then I'm going
to get my crop tool, and we can just drag
this out this way. And this is exactly why you
want to make sure you've got delete cropped pixels turned off because moving that off
the edge of the canvas, that would potentially
have deleted that. That's happened
to me a few times when I forgot to
have that unchecked. So we've transformed
that off the edge. So now if we save this, I'm going to press Command
S. And wait for it to save. And then if we go back into
this pattern file here, you can see it's added the leaf in here
going off this edge, and it wasn't there before. But because of our action, we have it set to
bring the last copy up and all the way across here. So we also have this
leaf copied over here. So again, we can add
this pattern in up here. And then if we show this layer again and let's change
the scale back to 50%, And then so this is the old
version of the pattern. And then if we apply this
new one with our extra leaf, you'll see that it now ties perfectly with
the new edition. And yeah, I just
really love being able to build out
all of that just by pressing that button shift F four or whatever shortcut
that you chose for it. So that is how to build
out your pattern tile in Photoshop and
record an action to do it so that you
can import from Procreate then build out your pattern just by pressing one button
or with one click. As I said, the steps
and the numbers that we've used here are specific
to a 12 inch pattern tile. If you wanted to use
a different size, you would use the
exact same steps, but you would just use
different numbers. Instead of -1,800 or plus 1,800, you'd put half of whatever
your canvas size is. As I said, all of
these steps will be in a cheat sheet for you
in the resources section, including one with
blank parts for you to use and adapt to a
pattern of any size. So in the next lesson, we'll go back to our
pink daisy pattern tile, and we'll take a proper look
at that quick and easy way to test that your seams
are, in fact, seamless.
18. Testing Your Pattern: So this is how our tile
is looking at the moment. It's always so exciting to go in that first
moment when you save your changes and
then come back and see it or built out like this. So now the moment of truth
is where we test it works. We had a quick look at
that in the last lesson, but we'll go into a bit
more depth than that now. To do this, we're going to add our pattern to our
pattern swatches up here. There's two ways of
adding a pattern to this. If you want to add the
whole of your visible area, then you can just click on this plus icon and
add it like that. In my normal
workflow, as I said, I don't have the canvas expanded past these
edges like this, so that's how I normally do it. But that only works if you have only your pattern tile showing
like we did for this one. But over here with
our pink daisy tile, we've got bits of the edges showing outside the
edges of our repeats. So that wouldn't
work if we were to add this as a pattern. Let's just have a look at
how that would work now. We add a layer and apply this, and then let's just
change the scale to 50. We've got all kinds of
weird things going on, and it's because we've added the whole of the visible area. Let's just drag that
one down to the bin, and we can height
this layer now. Second way is to use the Marquee tool to select just your pattern
tile to pull from. We're going to choose
the Marquee tool and make sure that we
have Snap turned on. Then using your guides
that you set up, you can click near them, and then it will snap to
the guides and you can drag and select the area there, and you can see down there, it's saying 3,600 by 3,600. So we know we've snapped
to the right position. So then you can let go, and then you can click the
plus icon up here. And then we can click
Okay, and then I'm going to press Command
D to deselect. And then when we show
this layer again here, if I tap on this news watch, you'll see this is now filled
with the correct pattern. So I'm now going
to crop back down to just having our
Canvas showing. So with the Marquee tool,
I'm going to again, select this area using the
guidelines to snap to. And then if you select
your crop tool with C, it's then going to snap to
what you've just selected. You can then press Enter and then you'll just
have your tile on view. So you can now click
on the plus icon, and that would take you to
your pattern properly as well. So there's two ways of
adding your pattern. You can either have just
your patentile showing and you can click the
plus icon as it is, or if you have some showing
past the Canvas edges, you would select the area
of your pattern using the guidelines and then
add just that selection. So now we're going to test the pattern is
tiling seamlessly. So all we need to do is, and we'll pretend we
haven't done this already, we'll delete that
pattern fill there. We just need to add a layer at the top of our layers list here. And then we can apply this
pattern to the layer. It's going to look
like nothing's happened to start with
because it's just applied a copy of the pattern right above the pattern and
in exactly the same position. But if we go up here and we zoom in and then
with our move tool, you can see we can drag it around because it's a
pattern fill layer. So it's not the
pattern underneath. Just going to undo that
crazy moving around, so now it should be in
the same position again. So the way I test the pattern
is tiling properly is just to drag it down and across
by a very small amount. And then I pan all the way up to the top edge and make sure that nothing's
cut off up there. There's no seams
or jaggedy bits. And then that's the top
and bottom seam covered. And then I will pan
down this one as well. Making sure nothing's cut off. And then that's the left and right seemed
covered as well. And then you should find that
if you've typed in all of the numbers correctly
and your canvas is definitely the right size, you shouldn't actually
have any mistakes on it, and it will work
perfectly every time. Just going to quickly
show you how it would look if there was a
mistake in the pattern. So I'm just going to
hide this last piece, which is that one this one here. So where we repeated this over here to account for
that little bit of extra, if I turn this layer off and
then we add this pattern, and then we apply this
pattern to our fill layer, you'll see over here, it's not tiling, and
that's because it was cut off because it wasn't
repeated on the other side. So if you were seeing
things like that, then you would
need to go back to your pattern build
steps and make sure that you had everything being repeated in
the correct place. So we can turn that back on and we can get rid
of our pattern fills. We don't need that now.
And I'm also going to drag this incorrect pattern
over there into the bin. So now that we've verified that our pattern
is working perfectly, and we're happy with
the layout here, can go back into our
smart object and we can merge this extra section back
in with the main pattern, and then we'll do
some tidying up, and we'll cover all that
in the next lesson.
19. Tidying Up: So now let's do a bit of
tidying up of our pattern so that we've got all of the similar motifs
on the same layer, and that's going to
make it easier for things like changing
colors around later. So let's open up our patterns folder
and our extra folder. I'm going to grab this yellow, and I'm going to drag that down above the normal yellow layer. And I'm going to merge that
down onto the layer below. Using the shortcut Command E. So now all of that is
on the same layer. That bit looks like
it's gone wrong, but that's just because these
bits are still above it. When we bring this one
down to above the petals, and we merge that
down with Command E, then that is back in its
proper correct position, and now all our yellow parts
are on the same layer. And you would just do that
with all the other motifs that were in your extra section. Once you've gone through
and cleared all of those, you can then delete that folder. I'm also going to
press Command Shift G on my pattern folder as well, because they don't need to be
grouped separately anymore. So let's have a look
at some other parts of tidying up that
you might want to do. I don't know if you
remember that I said I might rotate this a little bit
when we were in Photoshop. So if you wanted to make
any changes in here, a thing I like to do
is to put a copy of the pattern underneath
these layers so I can see what other
things are around it. So if we come back in here,
we'll add this version of the pattern to our swatches. And then we can go back
into our Smart Object. And then here at the bottom, above my sketch and
below the motifs, I'm going to add a layer, and then I'm going to apply
the pattern to it. I'll look a bit
crazy to start with. And what you need
to do is to try and line it up with the
pattern above it. It doesn't have to
be pixel perfect. It just needs to be mostly
the right position. Is just to help you
see what's what. And then what we're
going to do is change the opacity on this
layer up here to 50% so that we're not getting
confused between what is the actual motifs here
and what is pattern. So I can see it was this petal here that I wanted to
rotate a little bit. So I'm just going to
use my Lasso tool, L to select just these petals. I'm going to make sure that
I'm on the right layer, and then I'm going
to press Command T, and I'm just going to give
this a little bit of a rotate. Press Enter, and then I can then drag that over
a little bit, as well. And then before I
save this change, what I need to do is to
hide this pattern layer. I'll just show you
what will happen if I save without hiding it first. Let's go back to our main file. So this is going to save
all changes we've made, including adding
that fill behind. So weird things are going
to start showing on here. So you need to hide
this pattern layer, and then you can save it. And now you can see
that's been rotated. If we just add a
layer above here, and then we apply our
old pattern to it. And then you can see by
toggling this layer on and off the difference that it
makes before and after. It's a good way of seeing
a quick AB testing and deciding if you do or don't like the change
you've just made. And I definitely
prefer that without having the petal or crossing
over the stalk there. So I'm going to
leave that as it is. Let's now have more
of a look at editing motifs within your pattern and things you might
want to change. I'm going to add this layer of dots that I made back in now, and I'm going to
save this as it is. And I can already see
here where I've rotated this that I'm going
to have to select that blue dot and
move that about. But let's just go
into the main pattern and see how this is
looking in there. You'll see that in
lots of places, I've got the dots of one layer overlapping with
motifs on another one. I just kind of drew
these dots in at the last minute
and didn't bother too much about where they were. So that dot there is
on this smart object, and it's overlapping
with this one. So let's have a go at
fixing things like that. I'm going to add this iteration
of the pattern in here, and then I'm going to go back
in here to my smart object. I'm going to show my
pattern layer again and I'm going to apply
this new instance of the pattern to that layer. And then we'll be able
to zoom in and see where the dots from here are
overlapping with the motifs. We can then either just
move them or delete them. Let's first of all, make sure we're on the right layer,
not on the pattern layer. We need to be on the
layer with the dots. You could either move them
or you could delete them. You need to remember that
you only need to work on two out of the four edges, so this one and this
one on your diamond, because what's down here is
going to be repeated up here. So if we just go along and have a go at correcting these parts. A place on here we see these overlapping or
they're too close. For example, here,
I'm just going to select that and drag
it up here into that gap. That's now going to leave me
with a bit of a gap there. So I might just
select this red one, and I'm going to hold
down command and option, and then I can drag a
copy of it up here. So that's now looking okay here. Up here, I can see that I've got three dots all clumped
together here, which doesn't look so good. So I'm just going to
delete that blue one. And this is an example
of where I said that it would also be
repeated down here. You need to be careful that
you're only editing one edge. If you come down
here and think, Oh, I need to get rid of these
and you delete those two, you will have deleted
all three of those dots. So you can just delete that one. This one I might move
over a little bit. It can start to get a little
bit confusing after a while, especially when
you're working with something tiny like dots. So the best thing to do is
to hide your pattern layer, press Command S to save, and then we'll go back into our main file and have a look at how
it's looking in here. So we can just have a
bit of a pan around and see if there's any parts that are still looking
like mistakes. I think we've actually
got everything. Hopefully, I'm not
missing anything. So yeah, I'm happy with
how that's looking now. So I'm going to give this
whole document a save, and that's basically
how you would go back and forth making
edits and changing things to see if
you did decide that there was something you
still wanted to change. So I would add another
instance of this pattern. And then go back here
into my Smart Object, show my pattern again, apply this updated version
of the pattern. And you'll see when
we did that part here or if you
focus on this part, when we flick between the two, you can see how the
changes update, and then you could go
and carry on making changes if there were still
things you wanted to check. So what other things might
we want to change in here? One thing you might want
to change is the colors. If you wanted to change
some of the colors, you can easily do that
because we were careful to keep our pattern in our pattern, all of our colors
on separate layers. You've used flat colors with
no shading for your motifs, then it's super easy
to change your color. All you need to do is
make a color fill layer above and then you can clip that to the layer below by holding Option
and clicking in between. So if you've only used flat
motifs and no shading, this is a really easy way
to change the colors. You can then click
on your swatches and change the colors like that. Let's just put a blue
one in here for now. So you can pick any
swatch color you like. And then once you've
chosen a color, let's just hide this
pattern fill layer. You can just save this. And then over in
the main pattern, your colors are going
to update like that. If you decide that you didn't like a change that
you just made, once you see it in
your main pattern, then just go back into your smart object file
and undo that change. Let's just undo all
these other ones and get back to where we were. Before we added that color
fill layer on it. There we go. And then you can resave and then go back
into your main file, and that will be
as it was before. So let's go on with
the color changing. If you've used some
texture in your pattern, then you'll want to keep that
intact with the new color. So how I change my colors is to add a hue saturation
adjustment layer to it. And this is the reason I like to just use one
color per layer. If I had various different
hues on the same layer, I wouldn't have as
much flexibility. For example, on this layer where I do have all the dots
on the same layer. If I were to change the hue
and saturation on that layer, I don't have quite so
much flexibility because it's changing all of the
colors at the same time. Let's just undo that,
delete that layer. So this is the
reason that I like to use one color per layer. When I'm creating
alternate color ways, I always make a separate
adjustment layer for each one and
then label them up. So let's start with the petals. We'll go to our
adjustments panel, and we're going to add a hue and saturation adjustment layer. And I'm going to clip it
to just the layer below. If I didn't clip it like that, it would change all the
colors, everything below it. But if I clip it to the layer, it's just going to change these colors on the
layer below it. So we can pick any color
we like for these. It's just a case of playing
around with the sliders. So you'll find when you change
the hue for some colors, the saturation is just
way too much like, for example, on these
greens, that's too bright. So you'd want to
bring the saturation down a bit for a softer color, and then you can also change the lightness or
darkness as well. You can use these
three sliders to play around and
change the colors. I think I quite like that purple color that we
had to start with. So we'll go with
that purple color. And then we might want to change the color of the leaves
to something else. So let's just go
down to that one, add another hue saturation
and clip it to that layer. And we might change
these to more of a yellowy, greeny color. And then because the stems are pretty much the same color, you might want to apply this
one to the stems as well. So to do that, just option, click on this layer and drag a copy of it
above the stems, and then don't forget to clip it down to that layer as well. So when I'm creating
alternate colorways, I always make a separate
adjustment layer for each one, and then I'll label them up. So if I'm calling this
colorway version A, then I would go through
all of these ones and put an A in the layer name for
all those adjustment layers. And then if I were to
save this one and go back into our main
pattern file again, then if I was going to choose a different color
background to go with this, I'm just going to duplicate this one by pressing Command J, and let's just choose a
different color for this. And then I would call this one, add an A to this
layer name as well. And then when I want to go back and change between colorways, I know to turn all of the A
layers on at the same time. This makes it easy for both myself and for
clients who might be using the file to easily
switch between colors once you've got all
your colorways picked. So when you want to switch between the different colorways, you just know that you
need to have all the As turned on and all
the others turned off. Easy for you to
remember and also easy to explain to someone else
who might be using the file. So now that I've
tested the repeat, we've fixed all those overlaps. I'm going to have a
look at the pattern in a smaller scale again just to see how it's
looking overall. I'm not going to keep
any of these colorways, so I'm just going to go
through and delete those. And then we can resave this and go back into our main file. I quite like this
green background, so I might actually keep that as a second option
for the background. But let's add this last
version of the pattern in. And then on this layer, we'll apply it, and we'll
change the scale to 50%. So now we can get a big picture of how our
pattern is repeating. We already did this in Procreate to test and have a quick look. So we would already
have ironed out any major problems with certain motifs dominating
at this point. It's always good to have another
look at the spacing now, too, especially as
we added some dots. Are there any empty
areas calling out to you or gutters or gaps? A tip that a lot of
people talk about is kind of squinting your eyes as
you look at the pattern, and that helps you to spot
any overall gaps in it. And once I do that, I'm
noticing I can kind of see lines going up this
way through the pattern. And I think it's
caused here where I've got a relatively
large space here. So if we just hide this
on our pattern tile, I think it's this part here. So if we go into
our smart object, and I'm just going to put the pattern layer
back underneath, and I'm going to update it with this latest version
of the pattern. So I think it was just here. And I'm thinking if I just
move this flower up this way, it should probably
solve the problem. So I've already got my
lasso tool selected. I'm going to command click on this petal to take
me to that layer. And I'm going to select
just these flower parts, and then I'm going to
drag them up here, the press Command T to
rotate that around a bit. I think we have a bit
of leeway to be able to take this up here a bit more. I'm gonna press Return to set that and Command
D to deselect. So making transformations
like this is obviously a lot
easier in Photoshop, and you'll get better results than the fuzzy edges that
we get in Procreate. No software's 100% perfect, but Photoshop does do a much better job of keeping our nice textured edges intact. So if you want to rotate
or resize things, it's best done in
Photoshop afterwards. So now let's command click on the yellow center that will
take us to that layer, and then we can select this with our Lasso tool and drag this up to the middle
of the flower. And then I'm going to
hide my pattern fill layer so I can fix the spacing
of these dots around here. So I'm going to
command click on that, and then I can start selecting and dragging these around
and moving them about. I option click on this one
and pull that one down there. And then I'm just going to move these others
around into place. Maybe let's put another
green one over here. I'm just going to put
the background on. I know some of these are white, and I can't see them
on the background. I think I might have
messed up there. Yeah, so I dumped a pink one
on top of a white one there, so I'll just delete both of those to take out
those completely. And then let's just put another white one up here
over the top of that. And then let's just carry on
moving these dots around. So I think I'm just
going to hide this and then save it and we'll see how that's looking
over in the main file. And then we'll go back
over to the main file here and have a look at that. And I think that's
probably going to work. So we'll add this new iteration of the pattern to
our patterns panel. Then we will turn this
pattern fill layer on, make sure we have that selected, and then we'll apply
this pattern to it. And yeah, I think that
definitely looks better with that moved up slightly,
flicking between the two. So having these
different versions of the patterns up here is a good way to test
to see if you like your changes before
and after making them. It's also kind of fun to go through all the
different stages of your pattern and see
how it's progressed. But top tip, keeping
this panel too full of patterns can really
start to slow down Photoshop. So I only aim to keep
what I need in here. So I know this version
I want to keep, so I'm going to command, click on the others and drag them down
there into the bin. And then we can
apply this new one back down to our
pattern fill layer. So now that I'm happy
with this pattern and it's all done,
I'm going to save it. And then in the next video, we'll look at exporting it and how I would package
it up for a client.
20. Exporting Your Pattern Tile: Welcome to my
external hard drive. This is what an archived folder for one of my files looks like. I keep several
different versions and formats of each design, and as you can see, I add an SKU number to all of my files so I can
keep track of them. As surprise, surprise, I have more than one pink
daisy pattern. I have the master
version of the file, which is what we saved
in the last session. Although this is a different
pink daisies pattern, it's the same type of
file we saved last time. Then I have a client
ready PSD file, and then a flattened copy, either a PNG or a
JPEG of the file, which I could use for uploading to spoon flour or
print on demand. I might also use
this P&G for sending to clients if the flattened
file was all they'd wanted, or if we'd negotiated
a lower fee for one colorway or
less editing options. Top tip and side note. In general, you should
charge much more if you're giving somebody
the PSD file as opposed to just a
flattened PNG or JPEG because they're getting a ton more value
from that PSD file. They have the option of
creating multiple colors or if your contract gives them permission to modify the file, making edits and such. I also keep all the print on demand assets in this folder, and I have a
separate class which covers making those if that's something
you're interested in. So let's have a look at how to export these different
versions of your pattern. Let's have a look at the folder of the one we've
been working on. I'm going to rename this one, adding the name master to
the end of the file name. And then I'm going
to go ahead and open it up in Photoshop. So I'm going to trim this
one down a little bit and tidy it up so that
it's client ready. But I don't want to accidentally lose any of the
information in this one. So before we change anything, I'm going to do Command Shift S, and I'm going to save this one as under a different file name, and I'm going to call
this one client ready. The first thing I'm
going to do is go into the Smart Object and
delete the sketch in this. The client doesn't
need the sketch for any of their purposes. And then the second
thing I'm going to do is any of the layers which might have had a color
adjustment on them. Let's just pretend that this
one has blue leaves on it. And let's pretend that all of these have an
adjustment on them. Any of those, I'm going
to mark as green. So I'm going to right click
on the layer like this. And I'm going to come down here and I'm going to make
the layer green. And that way, I
can easily direct the client to those when I'm explaining how to
change the colors. It's easy to tell them to go to the green layers and turn
them on or off accordingly. So make sure those are
all labeled up correctly. At this point, I'm going to
unlock the Alpha lock on that yellow layer that was
leftover from Procreate. I'm going to rename this
layer down here as dots, and then I'm going to
delete this pattern fill layer because the
client won't need that, and I don't want to save it with this color change added
to it, so I'll hide that. And then I'm going to
save this smart object. And then at this point,
we're done with it so we can close it to click
on the X up there, and we're back in
our main file now. So all of these
layers down here, we don't necessarily need to
have this quite so messy. What I normally do is
leave this bottom one out. It's the main one of the group. And then all of these other
smart objects above it. I'll click on the bottom
one, shift click on the top, and then put those into a group and just
leave them like that. I just help keep
things a bit tidier. And then I'm going to
delete this pattern fill above because that doesn't
need to be there either. I'm going to leave
these two layers here for the alternate
background colors, but I'm going to right
click on this one and mark it up as
green because it's one that needs to be turned
on or off the same as the other color layers
in the smart object. So if we save this now and
we go back into the folder, you'll see we've got
our master file, which is 209 megabytes. And then this one is
only 143 megabytes. So it's nice when you're
sending files over. It's just nice to have them trimmed down and as
efficient as they can be. That way, they're
quicker to upload and download and you're not wasting
unnecessary disk space. So the next thing we're
going to do is export JPEG or PNG copies
from Photoshop. So I prefer to save as a PNG because it's
a loss less format. So top tip, the PNG image won't lose any of its data
when it's compressed, which makes it much easier
to store and transfer. This is a big advantage
over lossy options like JPEG files where
some information disappears in the
compression process. PNG files will be
bigger, though, so this can be
slightly slower and take up more space
on your hard drive. So ultimately, it's up to you to choose which
one is best for you. So we're going to press
Command option S, and this will save as a copy. You can choose
either JPEG or PNG. I'm going to choose PNG, and I'm going to select to
embed the color profile, and I'm going to
click on up here and just take off the
client ready part. Client ready copy part. You can leave that on there
if you want, though. I'm going to save this. So now I have this pink version
of my tile saved. You can just click Okay to these PNG format options.
They're fine as they are. So if I'd made
alternate colorways, let's just click back into the Smart Object and turn
this blue layer on there. If I had alternate
colorways of my file, then I would save these out and also export a
copy of these at the same time so that I have got a P and G tile for each one
of the different colorways. So now that that's done, we have a master tile,
a flattened file, and a client ready trimmed down copy all nice and tidy and
ready for when I need them. In the next video, I'll show you what the next steps
in my process would be so that we can
make the most of this procreate into
Photoshop workflow.
21. Applying Your Pattern and Class Project: So now I'm at the stage
where I finish my pattern, while it's still up here
and in my patterns panel, the very next thing
that I'll do is pull my social media and print
on demand templates out. Then I can quickly
add it to those so they're ready and waiting
for when I need them. That way, I don't have
to go back and open old files when I'm looking for something to post or upload, and I can get it done while
I'm still on the flow and before I've gotten bored
of working on a pattern. I've got classes with more
depth on each of those things. So if you'd like to know more, then check out those classes. The other thing I do is apply the pattern to any mockups
that I might want to use, which is super easy when you still have the patterns in
your swatches like this. So this one here
is a mockup that I made using a photo
from unsplash.com. And I'm going to put
a link to download this from my website if
you'd like to use it, too. So to apply the pattern to it, all you need to do is double
click on this front boot. And click on this layer here, and from up here,
you can just apply a pattern to it and
then click Save. Go back to the main file
and find the back boot. Double click on that and apply
your pattern to that, too. Then you can press Command
S to save or close those. And on this mockup, you can also change the
color of the boot trim. So just select those colors and then pick one from
your swatches. So if you wanted to save out a high res version of this file, you can do that in
the same way as we exported the PNG
tile with Command Option S. But if you want to export a copy to upload
to the project gallery, then I would use the
save for web option. So you can find that
by coming up here to File and then we're going to come down to export and
choose Save for Web. And then for saving to
the project gallery, over in here, I would change this width to
something like 1080. Actually, let's change
the height to 1080. 1080. And then you can export this much smaller manageable
size 720 by 1080. And then we're going
to save it as a JPEG up here. JPEG low. I'm not worried about compression or image
quality for this because it's just a mockup for
uploading to social media. So you don't need to
worry about image compression and stuff like that. So then we can just click on save And then we'll put this
in our pink daisies folder. We'll just add that
to the file name. And then we can save
this one in here. And then that has saved
a nice small quick to upload image
that's perfect for uploading as your class project. It would also be really
nice to see an image of just your pattern
for your class project. The best way to make this image is to create a new document. So come up to File New. And the dimensions for
this document should be 1,000 width and 690 height, 72 pixels per inch, and you can leave all these
settings as they are. This is the perfect size
for a skill share project. So we're going to create
a layer above this one, then you can come up
to your patterns panel and apply your pattern to it. Now, this document is
only 72 pixels per inch, whereas your pattern should
be 300 pixels per inch. So this is going to import huge. You'll need to double click
on this thumbnail here, and then you can
change the scale down to whatever you
would like it to be. You could make it really small
and zoomed out like that, or you could make it a bit
bigger, something like that. Then you can go to File Export, Safer Web, as we did before. And we're going to leave
these dimensions as they are. We've already made it
in the correct size for uploading to Skillshare, so we can leave those and
we can just click Save. We'll just call this one
Project class project, and then we can save that one. And then you can see
that's made a really nice, small, quick to upload copy. Both of these are
perfect for uploading to your project gallery
for your class project. To upload to your class
project on a web browser, just navigate to projects
and resources tab, then you can click
on Create Project, and then you can upload a
cover image for your project. This rectangle one here is a perfect size
for a cover image. You can give your
class project a title, and then you can write
anything you like in here. You can also add in your images by clicking
on this little icon here, and then you can
select your image. You can add more
text if you want or add more images in there. And then all you
need to do is go ahead and click Publish
up here at the top. And that will then publish your project to the
project section. I can't wait to see
what you come up with.
22. Thank You! : Congratulations and thank you
for completing this class. I really enjoy making these for you and sharing my
workflows with you. My favorite part is seeing your projects and
hearing your stories of how you're implementing what you've learned into
your own process. I'm really looking
forward to seeing all your beautiful patterns
in the project gallery. Don't forget you can find
more info and any links I've mentioned in the
cheat sheet which you can download from the
resources section. If you have any questions, thoughts or tips, please jot them down in the
discussions tab. I love hearing from you, and you guys are also really good at helping each other out with tips and positive feedback, too. So don't be scared to jump in
on someone else's question. I'd also love it if
you could leave me a quick review if you've
enjoyed the class. Reading these always
makes my day and keeps me inspired to make
more classes for you. Reviews also help other
students find my classes, too. If you share your
work on Instagram, please tag me so that I can share your projects
and my stories. You can find me
at Becky Flahaty, so feel free to
stop by and say hi. I host a weekly
Tip swap there and also a front drawing
challenge with weekly prompts to help
strengthen our creative muscles. If you'd like to know more
about me and my work, you can find me at becaflaty.com where you can read my blog, sign up for my newsletter, and get access to
my freebie library. I also have a YouTube
channel where I've got a growing collection
of mini tutorials for Procreate and
pattern design. Lastly, if you want to
see more of my classes, then be sure to follow
me here on Skillshare, and then you'll be notified whenever I publish a new class. Take care. Happy creating, and I will see you next time.
 Rebecca Flaherty, Surface Pattern Artist & Content Creator