Transcripts
1. Intro: Hi, my name is Becca. Welcome to Surface Design
for Fabric and Paper, creating Kaleidoscope
patterns with the Refer App. Bab I'm a full time
teaching artist, and I work primarily
in fabric and paper, incorporating techniques
like paper collage and hand embroidery
to my designs. So I make everything
from garments to covered books and boxes and a little bit of
everything in between. One of the things
I do most often in my practice is to
create surface designs. Now, surface designs
are a different kind of art that aren't meant
to hang up on the wall, but they are meant to
be printed or added to the surface of some other
substrate like fabric or paper. I like to make my art completely
from start to finish, starting with a blank
page and not going out shopping to use someone
else's designs in my art. Surface design can
seem complicated. There are dozens,
if not hundreds of classes on skill share just
about surface pattern design. What I want to do in
this class is give you a different way to approach it that hopefully makes it
a little bit simpler. So with this technique, you don't need to know
photoshop or procreate or really have any technical
computer skills at all. That is the cool part of the tool I'm going
to teach you about. In this class, I'm going to show you how to use
a different tool. One that works kind of
like a kaleidoscope. It's gonna take your art, cut it up into little pieces, and then put it
all back together again to create new and
interesting patterns. So the app is called rep, and I've been using
it for years, and I really mean it when I
say it's one of my favorites. So in this class,
we're going to do exactly the process
I like to use. We're gonna start with
a blank piece of paper. We're going to make some art. We're gonna use this
kaleidoscope tool to create some new
designs for it. And then at the end, I have two different projects
for you to choose from to finish something created from start to finish
with your art. Whether your art
practice uses fabric or paper or some
kind of mixed media, I know that you will learn something in this
class that you can add to your work to create custom designs to
make your own art. So, if that sounds fun to you, let's jump into the next
lesson and get started. Oh.
2. What is Repper: So the very first thing I
want to introduce you to in this class is an
app called Reper. Now, I have reper up on my computer screen
here that you can see. And that's one of the
cool things about reper is that it works
right in your web browser. So you don't have to download
anything to your computer. You don't have to worry
about what kind of computer you have or
how to install it. So it works right in your laptop or you can use it on a
tablet style computer. So it'll work both places. Now, there's not a phone app if you love working
on your phone. There's just a little
too much going on to be able to fit it on
a tiny phone screen. Okay, I want to
talk just a little bit about what Reper does and what we're going to do
with this app with our art. Now, I don't know about
you, but when I was a kid, I used to go to art
fairs and things, and there would always
be somebody who was a woodworker who
made kaleidoscopes. And you could hold them up
and look through them and turn the knobs on
the front of it. And it would change the pattern. And it's based on a
series of mirrors. That's basically what
EPA is doing for you. You're going to add some
of your art into per, and it's going to take your art. It's going to cut it
up into little pieces. It's going to re arrange it in about 30 different
kinds of patterns, and it's going to
make new designs based on the art
that you create. So you can make one piece of
source material and create endless numbers of designs from your own art.
Sounds like fun. I've been letting it just
play in the background here so you can see they call
this the dream state, where it's just going
through different patterns. That's one thing I want
you to take away from this class is that
per really is a tool. It's a tool we're going to use, just like we would
use a paintbrush or a pair of scissors. It's designed to help
us create patterns, and that's how we're
going to use it. So in the next lesson, we're going to create
some art that we then can put inside the kaleidoscope to start creating our patterns.
3. Choosing Great Source Materials: Before we get started
making patterns, I want to talk for a minute
about source material. Like I talked about, the way per works is it's going to take
the art that you put in. It's going to rearrange
it, cut it up, make all kinds of different
patterns from it, and then you can take art back out that you can use
for different things. So what you put in to create your art really
makes a huge difference. That's why I wanted to
take a minute and say, it really matters where you
are sourcing your art from. The app has some libraries of images that are built
in, and that's fine. But as an artist, you really
want to know that the art that you're making is
something that you have done from start to finish. That goes for the
source material that you're putting in also. Now, I'm not going to dig
deep into copyright and those kind of things because I'm not an expert in that.
I'm not a lawyer. I'm an artist. But
here's my rules of thumb about the materials that work
best for these techniques. I've got some source material
potential down here on the desk and I
want to talk about the different kinds
of source material. Over here on the right hand
side are things that I made. This is a little sketch that I did of my dog with the squirrel. This is a piece of marbled
paper that I actually did. I marbled myself, so I created
this pattern on the paper. And this is a paper
collage that I created just from some junk
mail that came one day. All three of these things started out as a
blank sheet of paper. I know that I made the art from the very beginning from that
very first blank sheet. So there's no issue for me here of knowing who
has the copyright, because this is for
sure, all my art. This second stack
is a little ffier. This is just a birthday card. The colors are cool
and everything, but that's a copyrighted
character right there. This is a piece of art
that a friend made for me. Usually hangs up on
the wall in my studio, but I pulled it over here. Of course, this is one of
my favorite illustrators. This is a book. Now, I
could take a picture or scan any of these things and upload them as source
material as well. The problem is, I don't own the copyright on any of
this source material. These are things that
were not created by me. So even though the stack
of pieces of paper all sort of look similar
from a far away view, I want to really
encourage you to create your own art when you are making patterns using this tool
and using these techniques. So to make that easy for you, I'm going to show you one of my favorite ways to create source material
using this tool. And the reason that I
love it is that it makes very distinct designs because of the way that you're going to put the materials together. In the next lesson, we're going
to create start to finish some source material that we can use to create our own
surface patterns.
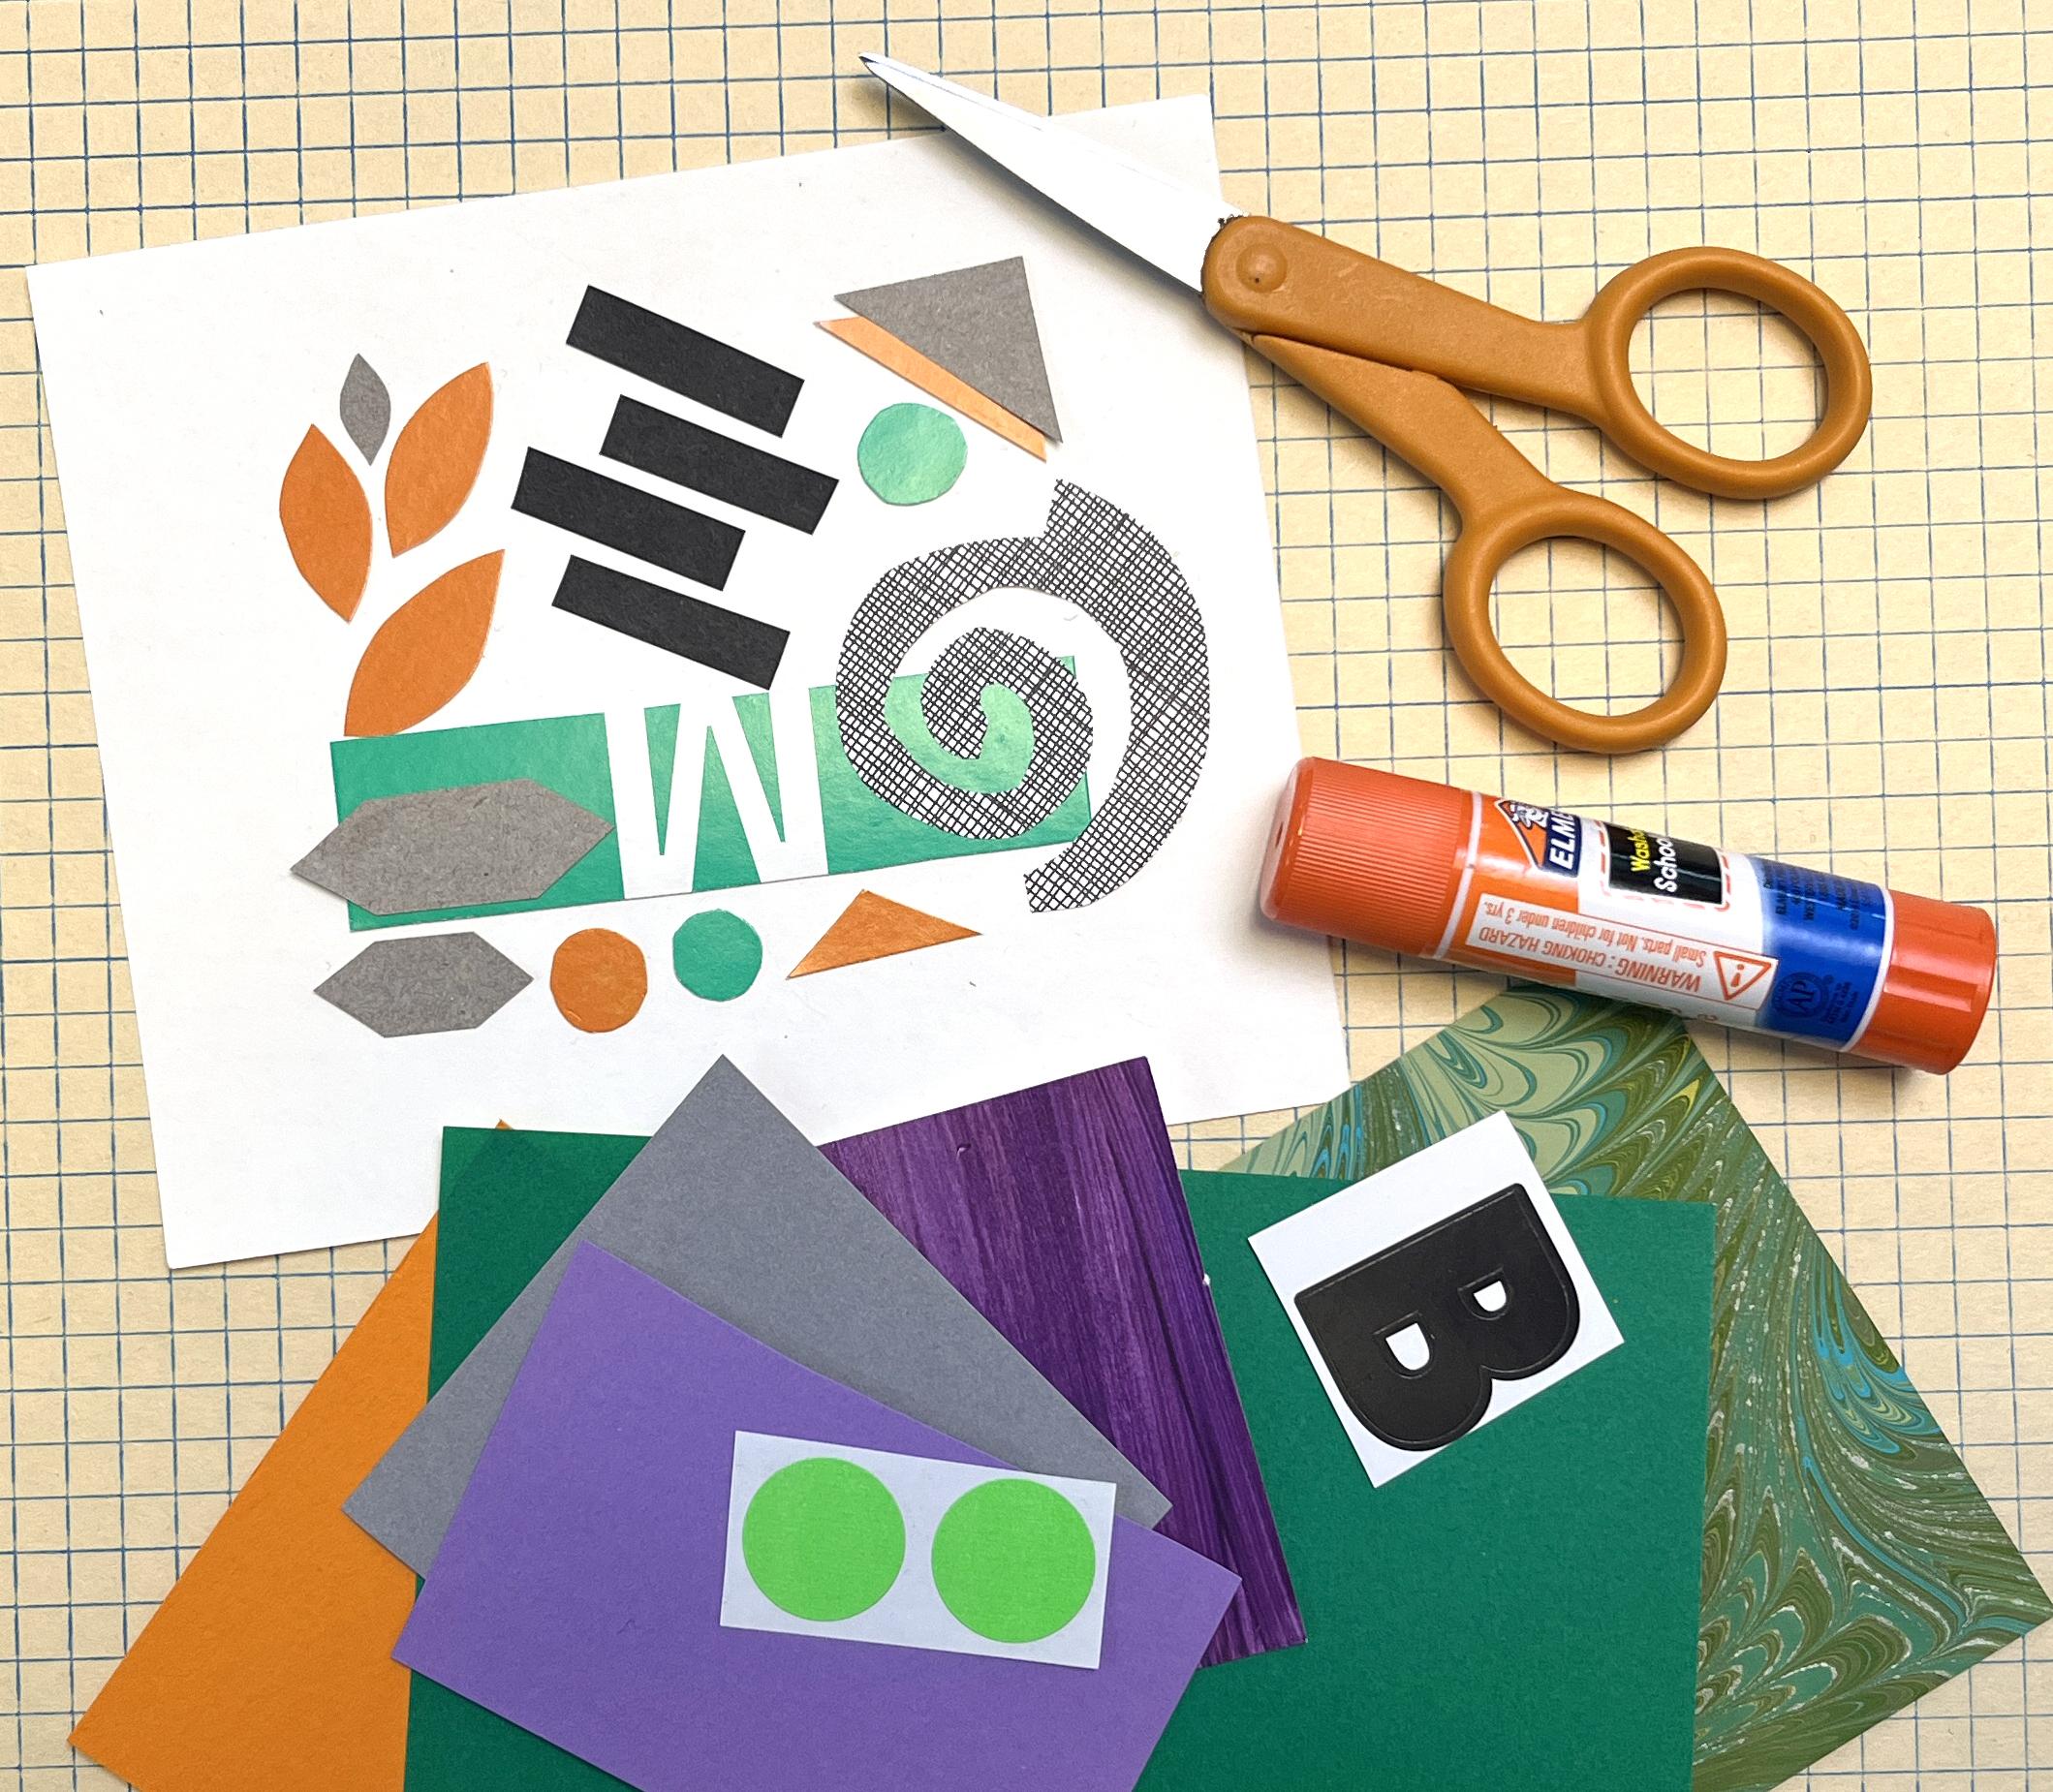
4. Gather Your Materials: Okay, let's talk
about the materials you'll need to get started. So first, you need
a pair of scissors. I love these little micro
tip scissors by fiskers, for cutting small pieces. These are great. Then you need something to attach
pieces together with. So double sided tape or a
gluestick, work awesome. You want to have one piece
of paper that you're going to use as your background
to build your collage. This is just a piece of a little bit heavier
weight paper, plain white. You can use any
color you want to, but I recommend that you
pick out a color that is a good contrast to the other papers that you're going to use
for your design. So black or white are great
choices to start out with. I just use a small piece. This is a quarter of
a sheet that I cut. It's about four by 5 ", which is plenty of material
for you to get started. That piece of paper,
and then you need a collection of recycled paper. This is really
where you can have fun and use almost anything. I want to just talk you through the things that are in
my stack of papers here. I have a few pieces of
just solid colored paper. Some of these are like
lightweight origami paper, some are like
scrapbooking card stock. I just have a bunch of
different plain colors. Then I've got a few pieces
of some painted paper. These are ones
that I painted for different projects are scraps that are leftover from things. These are textures
that I designed, but just little pieces of them. I've got a couple of other fun
things like here's a piece of paint chips because I like the colors
that are in those. There are a couple of stickers. I don't use stickers with
characters or animals on them, but I particularly love alphabet stickers,
letters or numbers. I have some of these that are a little squares and
some little circles. They're just a great way to add some different shapes
to your design. Then I've got some
bigger sheets. This is a page just out of a national geographic magazine. I'm not going to use
like the whole page. I'm not going to use the logos and symbols
that are on this, but this has such
awesome color in it, that I'm going to cut up and
use little pieces of this because I want to
use the texture and the color that
are in this piece. That's absolutely a way to use magazine or junk mail
or pieces like that. If you're only just
taking little elements, not like designs
out of the piece. I have a piece of graph paper. Here's another piece of painted paper that I'm going to use, and then one of my personal
favorite textures to use. This is an envelope from I'm not sure what a bank
statement or something. These are called
security envelopes, and on the inside
of the envelope, you can see if I
hold it up close. There are some black and
white or sometimes they're blue and white textures that are printed on the inside
of the envelope. I use these all the
time in my designs. I love security envelopes. So that's just a few of the kinds of papers
that you can use. So take a minute. You might want to
pause the video to go collect your materials, and then we'll come
back and we'll start creating a collage design.
5. Make a Collage: Okay, let's start
making our collage. So you want to start with your base paper, whatever it is. You can work on it
vertically or horizontally. It doesn't matter. So I've got eight rules or guidelines
for creating your design, and I'll put that up on screen. It'll also be
available for you to download in the resources
section of this class. So this is to help you create a really rich source material that you'll be able to pull a lot of different
designs from. Here are my eight categories or my eight rules of things that
your collage must include. The first one is
geometric shapes. Those can be any kind of
shapes that you want to, triangles, circles, squares,
stars, anything like that. It has to have some of those. You have to have
some organic shapes. Organic shapes are things like blobs or squiggles or leaves, things that are more
irregular shape pieces. You need to include a letter
of the alphabet or a number. So those stickers that I had might be a
great way to do that, or you could cut a
letter or a number out of a magazine page
or a piece of junk mail. You need a shape that repeats
at least three times. So it could be any of the shapes that you're
adding, for example, if you put down a circle, you need to maybe
have circles that repeat at least three times. All right? You need to have a shape that overlaps
another one. So we're creating things that
are overlapping each other and not just individual pieces like sitting next to each other. Next rule is, you need a shape that's larger
than a quarter. You need one that's
smaller than a dime. And for those who
aren't in the US, think about your sizes of coins. I want to have big
shapes and small shapes. And then my last rule, and this is the one that
everyone always hates. I want you to make
sure that there is something that you
think is ugly, and it's totally making
you crazy to leave it there and you want to
peel it off the paper. I want you to make
yourself leave it there. I promise it will make
your design better. Okay? So I'm going to start just talking you through adding
some pieces to my design. And then I'm going to
speed up the video. So you can sit back and
watch me assemble mine. You can work along with
me however you want to, and then we'll join back
together at the end to talk through our
finished collages. Okay, I'm going to start with I'm going to add
some geometric shapes. I'll just start at
the top of the list. So I'm going to add
maybe a triangle. And I'm not thinking about
these things too hard. I'm not making a picture. I want to make sure that I'm creating just
something abstract. So I made two triangles. Those are geometric shapes
and things that repeat. So I'm already starting
out there. Let's see. I like to cut like some long narrow strips
like french fries. I think those are really
fun to add to a design. Let's see. I'm going to
add that letter in later. Let's get some pattern paper. To add some squares. And you'll notice that I'm not
sticking anything down yet. I like to kind of
play with my design a little bit with
everything still loose. And then when I feel like I
have kind of a theme going, I will start sticking
pieces down in place. Let's see. I'm going to put in a little bit of
this graph paper. I think this is fun,
but I'm going to cut it in irregular shape. And put it this one.
Yeah, I like that. I definitely want to
put in a little bit of this great colorful stripe
from this National Geographic. This will be larger
than a quarter piece. Put that down. Put
some stuff out. All right, so you kind
of are getting the idea, hopefully of how I'm
sticking these pieces down. So I'm going to speed
up the video at this point and just keep
adding to my collage. I don't need to fill
the entire piece, but I want to use up as
much of the space as I can. It so feel a little cluttered. It should feel a
little bit busy. You should make sure that you've got lots of good contrast. Darks and lights, straight lines and
curves or jagged ones, small and large, like
as many ways as you can think to add contrast is going to make your
source material better. Sit Okay, I think my collage is finished. I'm gonna call it finished. Some things that I hope you noticed while you
were watching the video. So I wanted to make sure that my collage
really didn't have, like an up and down
or a direction. So you will hopefully have noticed that I was
rotating it around as I was working and seeing looking at it
from different sides, like, where I could
add more pieces to it. So that's a trick to think about as you're creating yours. Now I want to check back in with our checklist and
make sure that I've hit all eight rules that
are on the checklist. So let's start with
geometric shapes. I have lots of those. I made all kinds of triangles and squares and
that kind of thing. So check. Organic shapes. I cut a blob. That's my only real
organic shape, I guess. I could add another
one of those. I'll think about that. These
guys look like lily pads. Maybe that's an organic shape. We'll see. I have my
letter of the alphabet. I've got a K there, a shape that repeats at
least three times. Yeah I did a lot of repeats. I have this French fry shape that repeats a bunch of times. The stripes are repeating. I've got a bunch of triangles,
so I think I'm good there. Shapes that overlap another
one, not a problem. Shapes that are
larger than a dime. I've got a couple of big things, and I have a bunch
that are small, so I've got some
littler pieces as well. Then something I think is ugly and it's making me crazy
to leave it there. I'm not wild about this
little section right here, this navy blue seems too
dark for the rest of it. It might be great, it
might not. I don't know. I'm leaving it there.
I did not peel it back up again. That's
the important part. I think I'm going
to call this done. It's up to you to decide
when yours is done. The more you fill the space, the more you'll
have to work with when we go on to
the next lesson. If yours has a lot
of white space, especially around the edges, you might want to
go back and just add a few more pieces to it. Okay, when you're
completely done, the best way to get this into
a format that we can work with to create a repeating
pattern is to scan it. If you've got a scanner, awesome, throw it on
your scanner, scan it. The resolution doesn't
really matter, just get a clean copy of it. If you don't have a scanner,
absolutely no worries. You can just take a photo of it. So you can use your camera
or even your phone. Kind of take a close up
photo so that you're getting basically just your collage
and not much else around it. And my best advice for you is to actually just step outside
to take your picture. The more kind of soft bright
light that you can have, so you don't have shadows
across your piece, the better your patterns
are going to look. Okay, so two options there, either scan it or take
a photo of it and make either the
scan or the photo as clean and clear as you can. And then go ahead and save
that to your computer or your tablet so that you're ready to work with
it in the next step. If you want a few extra
tips for scanning, I will put a few more in
the resources section, the handout for this class.
6. Navigating the Repper app: Okay, so let's talk a
little bit about Reper, which is the app
we're going to use to create our designs
in this class. So I've got my laptop
here in front of me. The first, like thing you
should know about per is that it's an app that works
right in your web browser. So you don't have to download or install anything
on your computer, and you can use it
on either a laptop, desktop, a computer,
or on a tablet. It doesn't work on your phone. Phone screens are just
a little bit too small. So all you have to do is
pull up the site rep app. And I've got that up on my
screen here that you can see. So mine is going to look just a tiny bit different
than yours when we jump into the
very first screen because I already
have an account. So I have a subscription
to this app. So it'll be a little bit personalized for
me when I log in. So just bear with me. We'll get to the screen
that'll look familiar to you. So the way you start the app
is you go to the website and there's a button up here in the top right corner
that says Start App. Okay, this is the screen that's
going to be a little bit different because it's
personalized for my account. I'm just going to dismiss this and move it out of the way. And this is what you're going to see when you jump
right into per. For this lesson, I'm going
to take you on a tour of how things are arranged and sort of where you find all
of the tools in reper. Starting on the far left
side of the screen, you can see there's
a black column, and it's got some little
tiny thumbnails in it. Basically, what happens in this column is you
can take what they call snapshots of what you're seeing on your screen when
you're creating patterns, and it saves a temporary version of that over here on the side. This will make more sense when I go into demonstrating
how per works, but that's what is happening in that
farthest left column. Where you're going
to do most of your interacting with per is in the narrow middle column
that's on the left hand side. As we look at that,
on the top of it, there are three options, three tabs, that say pattern,
effects, and export. We're going to start
on the pattern tab because that's where
we create patterns. Right now, everything in
that left column is about, like all of those
tools are going to be about creating patterns. The very first thing you see is a drop down menu that's
next to the word tiling. This is where you choose
the pattern that you want Reper to cut your artwork
up into and rearrange it. If I click on this little
drop down menu here, where it says robesque. That's the pattern I
have selected right now. You'll see it pops up
a little menu version. And if yours looks
different than this, right over here on
the right hand side, you can see there are
three different ways to view this menu. So I'm looking at the list view right now that has the
names of the patterns, but there's also two
other kind of grid views, and you can page through and look at what
those look like. It's the same information, just presented in
different ways. So we're starting on
the patterns here. There are two options, again, two little tabs at the top, one that says seamless
and one that says seamed. We'll dig in a little bit more to what those
two things mean, but it divides the groups
of patterns into two. You can see there are
about 20 or so patterns here under seamless, and there are about that
many again under seamed. So that's all the different
ways that you can cut up your artwork and rearrange
it to make designs. We'll explore those
a little later when we get to doing a demo, but that's where you find the different kinds of patterns. I'm just going to click outside
of that to dismiss that. That was under tiling. There are two options underneath tiling, the rotation and the position. I'll demonstrate
those a little bit later when we get to
doing some artwork. Those are functions I don't
use personally very often in my art because I'm creating patterns for
a specific purpose, but we'll talk
about what they do. Now, kind of the
most important part over here is you'll see that there is a big piece of artwork kind of
in the middle here. So this is another
collage that I created different than the
one I did in the last lesson. But we can go ahead and load in the one that I created
in the last lesson. So I mentioned before, you want to scan it or take
a photograph of it, and then you'll be
able to import it here to use as the source
material for your patterns. So I do that by clicking on the little tab that
says Change Image. And it's going to
ask me if I want to upload or from my library. I would avoid using the button
that says image search. That's going to
find something from stock photos that it's
going to pull in here. You can totally play with
this as an experiment, but if you're intending
to create art, you want to use your own art. So I'm going to click on Upload. And I have saved the collage that we did
in class to my desktop, so I'm going to choose
it off of my desktop, and there is the
collage that I created. So a couple of things to know about this preview
of the artwork. So it's going to show you
what your whole piece of artwork looks like here. And you'll notice that
there is this kind of funny looking triangle with some corners on it that I can click on and drag
around the design. And I'm sure you've
noticed the design on the right hand side of
the screen is updating. This is how I choose
what section of my design that I
want it to repeat. And the shape that this is
that I'm clicking and dragging around is based on whatever I have chosen from the
drop down menu up here. So sometimes it's a triangle. Sometimes it's a rectangle, it could be a hexagon. There are lots of
different shapes that it can slice
your piece up into. So I've got this kind of
double triangle shape. Now, you can do lots of things to choose the section of the artwork you're
going to work with. So like I said, you can
click in the center of it and hold down your track
patter or your mouse, and you can drag it around. So that changes the part of the artwork that you're using. You can also click on
any of the corners, and some of the
designs also have, like a bar in the center here, and you can make this
option larger and smaller. So I could drag this down
and take just a teeny, tiny slice of my artwork here. Okay. And move that
around the screen. So every time you change
it, if, for example, we change the drop down up here to this one called Jester, you'll see we have
a different shape now that it is
previewing for us, that we can change around
and update and so forth. Then underneath that, there's just a little
bit of information. It's showing you the image size. That means the full size
of the image that you uploaded and the tile size. How big is that slice
that it's taking? Sometimes those are
useful if you're trying to do a very specific
engineered pattern, most of the time it's
just informational. Okay, so that's kind of
everything that is in that left column under
the pattern tab. Now, if we move over to the Effects tab and I click on the word effects
up there at the top, there are about ten
different options of ways that we can
adapt our pattern. So this is kind of fun. I'm not going to go in
major depth into what all of these do because
that's for you to explore. But I will show you a
couple just to demonstrate. My favorite one in this set of effects is the one
called Duotone. I just click on the
little slider button, and it will change it. And you'll see what
Duotone does is it gives you a selection
of two different colors, and it overlays that
on top of your design. So my design went from
being kind of crazy, colorful to now everything is kind of a deep purple
and a mint green. You can change those
colors by clicking on the little drop
down next to it, so you can choose a
different set of colors. I love this kind of
peach and red version. I think that one's kind of fun. The invert button will
switch the positions, so the darks will become light, and the lights will become dark. And then you can adjust the
amount that it overlays. So you can have some of
your original colors bleed through or you can
have it cover up entirely. I kind of love this
design that it created here just from
me clicking buttons. So you can turn on or off Duotone and any of these other
things that you want to, and you can explore and experiment with all
of those things. The last tab I want to show
you is the Export tab. This is how you get
your designs out of Reper so you can do
other things with them. So if I click on
Export at the top, there are some choices here, again, some drop down menus. Under the mode drop down, there are three
different choices. Tile surface, and three D. I wanted to take a minute and explain what's the difference
between all of those. If I choose the one
that says tile, what it's going to do is show me the preview of one single tile. This is like the individual
repeating element that creates that pattern
that you're seeing. You take one of these and you repeat it over
and over and over and that's going to
give you the pattern that you were previewing
on the screen. So tile is the version I use the most often when
I am exporting something to create a new
pattern because all I need is that basic kind of building
block, that lego element. To be able to repeat
it over and over. That's what the tile tab is. If you go under surface, what surface is going to
show you is repeating tiles. It's going to take
that individual tile, repeat it over and over
to fill a specific space. You can set the size
of this repeat to be, for instance, eight by 10 ", so it would fit on a
piece of 8.5 by 11 paper. So you could print it
out on your printer. Surface means that
you're creating a specific sized something
filled with your design. And you'll be able to
adjust the size of your design to repeat more
times or fewer times, depending on what look you want. We'll do more of
this when I kind of demonstrate some of those things a little bit later
in other lessons. The last one I want to show you is three D. Three
D is kind of fun because what it does is
takes the design that you created and makes a
three D mockup of it. For instance, here it's
showing me a pillow, that it's created
this three D design. Now, you can change what it
is showing you by looking at the bottom left corner of this kind of preview
section of the screen. And you can see there
are all kinds of different choices here
of what it can show you. So we could look at
this as a T shirt. That's what it would look
like mocked up as a T shirt, or we could look at it as something like
maybe a coffee cup. So it's giving you
some mock ups. This is kind of fun as a
designer to be able to imagine what your design would look like in
different situations. Okay? So that's the three D
mode up here under export. Now, each one of these modes under export
has different settings, and we're going to take an
entire lesson to talk about what specific settings you want to export for different reasons, for different purposes
to use these patterns. So I'll dig more into
that a little bit later. Okay. So now let's go
back to the pattern tab. I want to switch this
out of the three D mode, and you can see up
here at the top of the preview panel
on the right side. The three D mode is highlighted. I'm going to switch back
to the surface mode, which is the version we
were looking at originally, where it's just kind of filling the screen with your design. And I'm going to
switch back over here to the pattern tab. Okay. So just a few
more things to mention, kind of working my way
across the screen. So we've talked about everything that's in this left column. On the right side,
you've noticed, this is the preview section. So we can preview
what the design looks like in all
these various ways, and it live updates as we
are moving our design, our cutout around
our original design. So a couple of things
you can adjust here. Right at the top, you can see
that there's a plus minus. This will let me zoom in
and out of my design. So if I click plus, it will zoom in a little bit, so we can see it a
little bit closer. You can also click on the bottom right
corner way down here. There's a little
full screen icon. So if I click on that, that'll bring it up and take
away all of those tool bars, so I can preview, like,
a little bit more of it. And then you just click that
button again to go back. And then the last version
I want to show you is kind of a fun like,
feature they built in. And that's this little moon
and stars up here at the top. This is what they
call dream mode. And so if I click on Dream mode, what happens is that
it starts to drive, basically the design that's changing over here
on the left side. It just kind of does
that automatically. So you can just kind of
sit back and watch it as it changes things around the pattern, which
is kind of fun. Now, what if one of these
designs that it jumps to, you're super excited about, and you're like, I
want to save that one. I want to make sure
I export that. That's when we go
back over here to this far left hand tab and what I told you
about thumbnails. In Reper, they call
them snapshots. And so if I want to
take a snapshot, I'm going to stop dream mode by just clicking on
the Stop button. And let's say, I love this pattern. I want
to save this one. All I do is click
on the plus sign that's down on the bottom
of this column here. And that's going to put a
little thumbnail right here of this design that I'm looking at on the
screen right now. And I can click back to any
of those anytime I want to, no matter what else I'm doing. So, for instance, if I want
to go back to this version, which I looked at earlier. I can click on that,
and now it's going to change here and show me, Oh, there's that version
that I looked at before, or here's one from a different. You'll notice that it's
changing the original artwork. That's because I saved
those snapshots when I had a different original here
that I was working from. Okay? So I'll go back to this
one that we were going to, and we're back to
our original art. Okay, so there was
just a quick tour of how you find everything and kind of how you navigate reper. So in the next lesson, we're going to
start working with the collage design that we
created in the last lesson.
7. Choosing a Design: Okay, here's the fun part. Let's jump into creating
our project for this class. So we're going to make a design
from our collage that we created using some
of the per tools. So just a reminder, I'm going to show you
one more time how to load your artwork into per. So we are going to make sure that we're under
the pattern tab, and we're going to
come down here to the center part of this column where it says Change Image. I'm going to click on Upload, and I'm going to
find where I have that saved on my computer. So I saved it on my desktop. So now we've got the collage
we created from class, and I've got that right here. Okay, next, we want to choose
one of the tiling patterns. So here under the tiling menu that we click that
little drop down. You can choose any of these
designs that you want to. I'm going to demonstrate
just a little bit with a couple of my
personal favorites, the ones that I
use all the time. And I like. I don't know why, but Ciro is one
that I like a lot. I use this one a lot. Right now, so I've chosen Ciro up here under
the tiling menu, and you can see the little
preview of the part of my art that it's going to slice out is kind of tiny right now. So I'm going to make that
a little bit bigger, so I'm capturing a little
bit more of the art. And now it's just up
to you to drive around your design and see when you
see something that you love. The only thing that I have
learned that you can't do, which I think would be
cool is there's no way to take your original
artwork and rotate it. In here, you would have
to do that like in another program and then
re upload it into per. That's one thing that I wish there was because I
think you could get some interesting patterns being able to rotate your
original sometimes. But I'm going to drive
around here and see what I see until I see something
that just strikes. That's interesting. I like that. If this is a pattern
that I'm like, I like this one. I
want to save it. I want to go over here
in this far black, that left hand column, and the little plus
sign right here, you can see when
I mouse over it, it says save snapshot. A snapshot is how I'm
going to save this tile that I'm looking at over on the right hand
side of my screen. I love that one. I've
saved that there. Now I can drive
around a little more. How did I switch designs? So that was Ciro under the
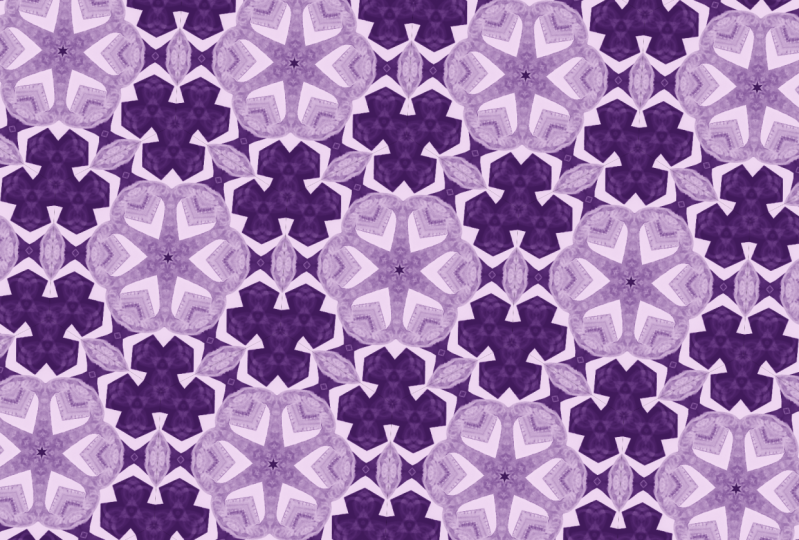
seamless pattern side. I'm going to try Bloom. Bloom tends to create
kind of circular pieces. It cuts this really
long skinny wedge, but it makes kind
of flower patterns, which I think are kind of fun. I like that. I like how
that looks really flowery, I'm gonna save that
snapshot, too. Oh. That one's really fun. That little bit of
a circle that's cutting out are making
really kind of fun like lemon shaped pieces.
So that's kind of fun. Let's try one more design. How about Let's go
with high five? That's kind of, like, a really simple fun pattern right there. I'm going to resize
that one ale bit. Oh. Like a really
simple geometric coming out of that letter K
that I put into my design. That almost looks like starfish. That's kind of
fun. I don't know. I like that. I'm
gonna save that one. Like, a little bit whimsical. I like it. Okay, so I've
got some designs saved. I want to show you one more Maybe I'll choose
the echo tartan. This one makes kind of
plaid looking patterns like this makes
an awesome plaid, just where it happens to be. This is just kind of a fun thing that you can see that there are a little slices
across the triangle, and so it's taking
kind of slices out of your slice and doing
different things with them. So that's a really fun way
to create kind of a plaid. Oh, I like that. I don't know. That kind of looks like, like, paper snowflakes a little bit. Oh, I like this one. I'm going to hit a snapshot on this one. Okay, so you get the idea there. I want to show you one
other thing, which is, when we're choosing patterns, we've been choosing
everything right now from the seamless tab. And what the seamless tab does is these designs are they're kind of created so you don't see the edges of the
tile necessarily, where the seamed
designs have a more distinct like a line between
the repeats of the pattern. So if we choose one
like playing card, for instance, this you can see like some definite
lines between the patterns. One is not better
than the other. It's just a different style, and so that's a way
of organizing them. Playing card does a fun thing
where it's actually flip flopping the two
repeats of the design. So it's flipping the direction
as it's repeating things. Hopefully, you can see
that a little bit. Like the arrows there, the little end of the triangle, they're going one way, and then they repeat going
the other direction. So some of the ones under the seamed section
are more directional. We, that's kind of fun. It's creating these neat
stripes with a bar across them. Okay? Let's look at one
more L et's see. Like, fan. This is picking out a kind
of muddy part of my design, but if I move this around, I'll make it a
little bit bigger. Can see this is creating kind of 66 pointed kind of radiating. It's another kind of
flower like shape. Cool. You can spend
all afternoon. I swear. Experimenting. That's
kind of a cool pattern. I'm going to snapshot
and save that one, too. Okay, I'm not going
to take the time to walk you through every single
one of these patterns. That is for you to explore on your own and
have a great time. Now, one other thing that I said I would come back
and talk about, is underneath the tiling tab, you can see there's
an option here, this pattern, you can
change the rotation on it. So you do that by just dragging the little dot that you can change the way that the
pattern is rotated. This one is kind of
symmetrical many directions, so it doesn't make as big a
difference with this one. But some of the other designs that might be a thing
to experiment with. For instance, bowtie
might have a interesting, if you were to change
the direction. Okay. Like I said, I don't use rotation very often
in my designs, just that it isn't a thing. I often create
fabric and you can cut out fabric going
in any direction, so I don't need to rotate the
design before I print it. Okay. And then depending on what you choose from the
drop down menu, the options might change. So you can see the hexagonal
grid option doesn't have any other options
for rotation or anything like that
underneath there. So it will change based on
the pattern that you choose. Okay. So once you have
chosen some snapshots, Then we're going to go
on to the next lesson, where I will teach
you how to export it so that you can use
this for another project. Okay, your assignment
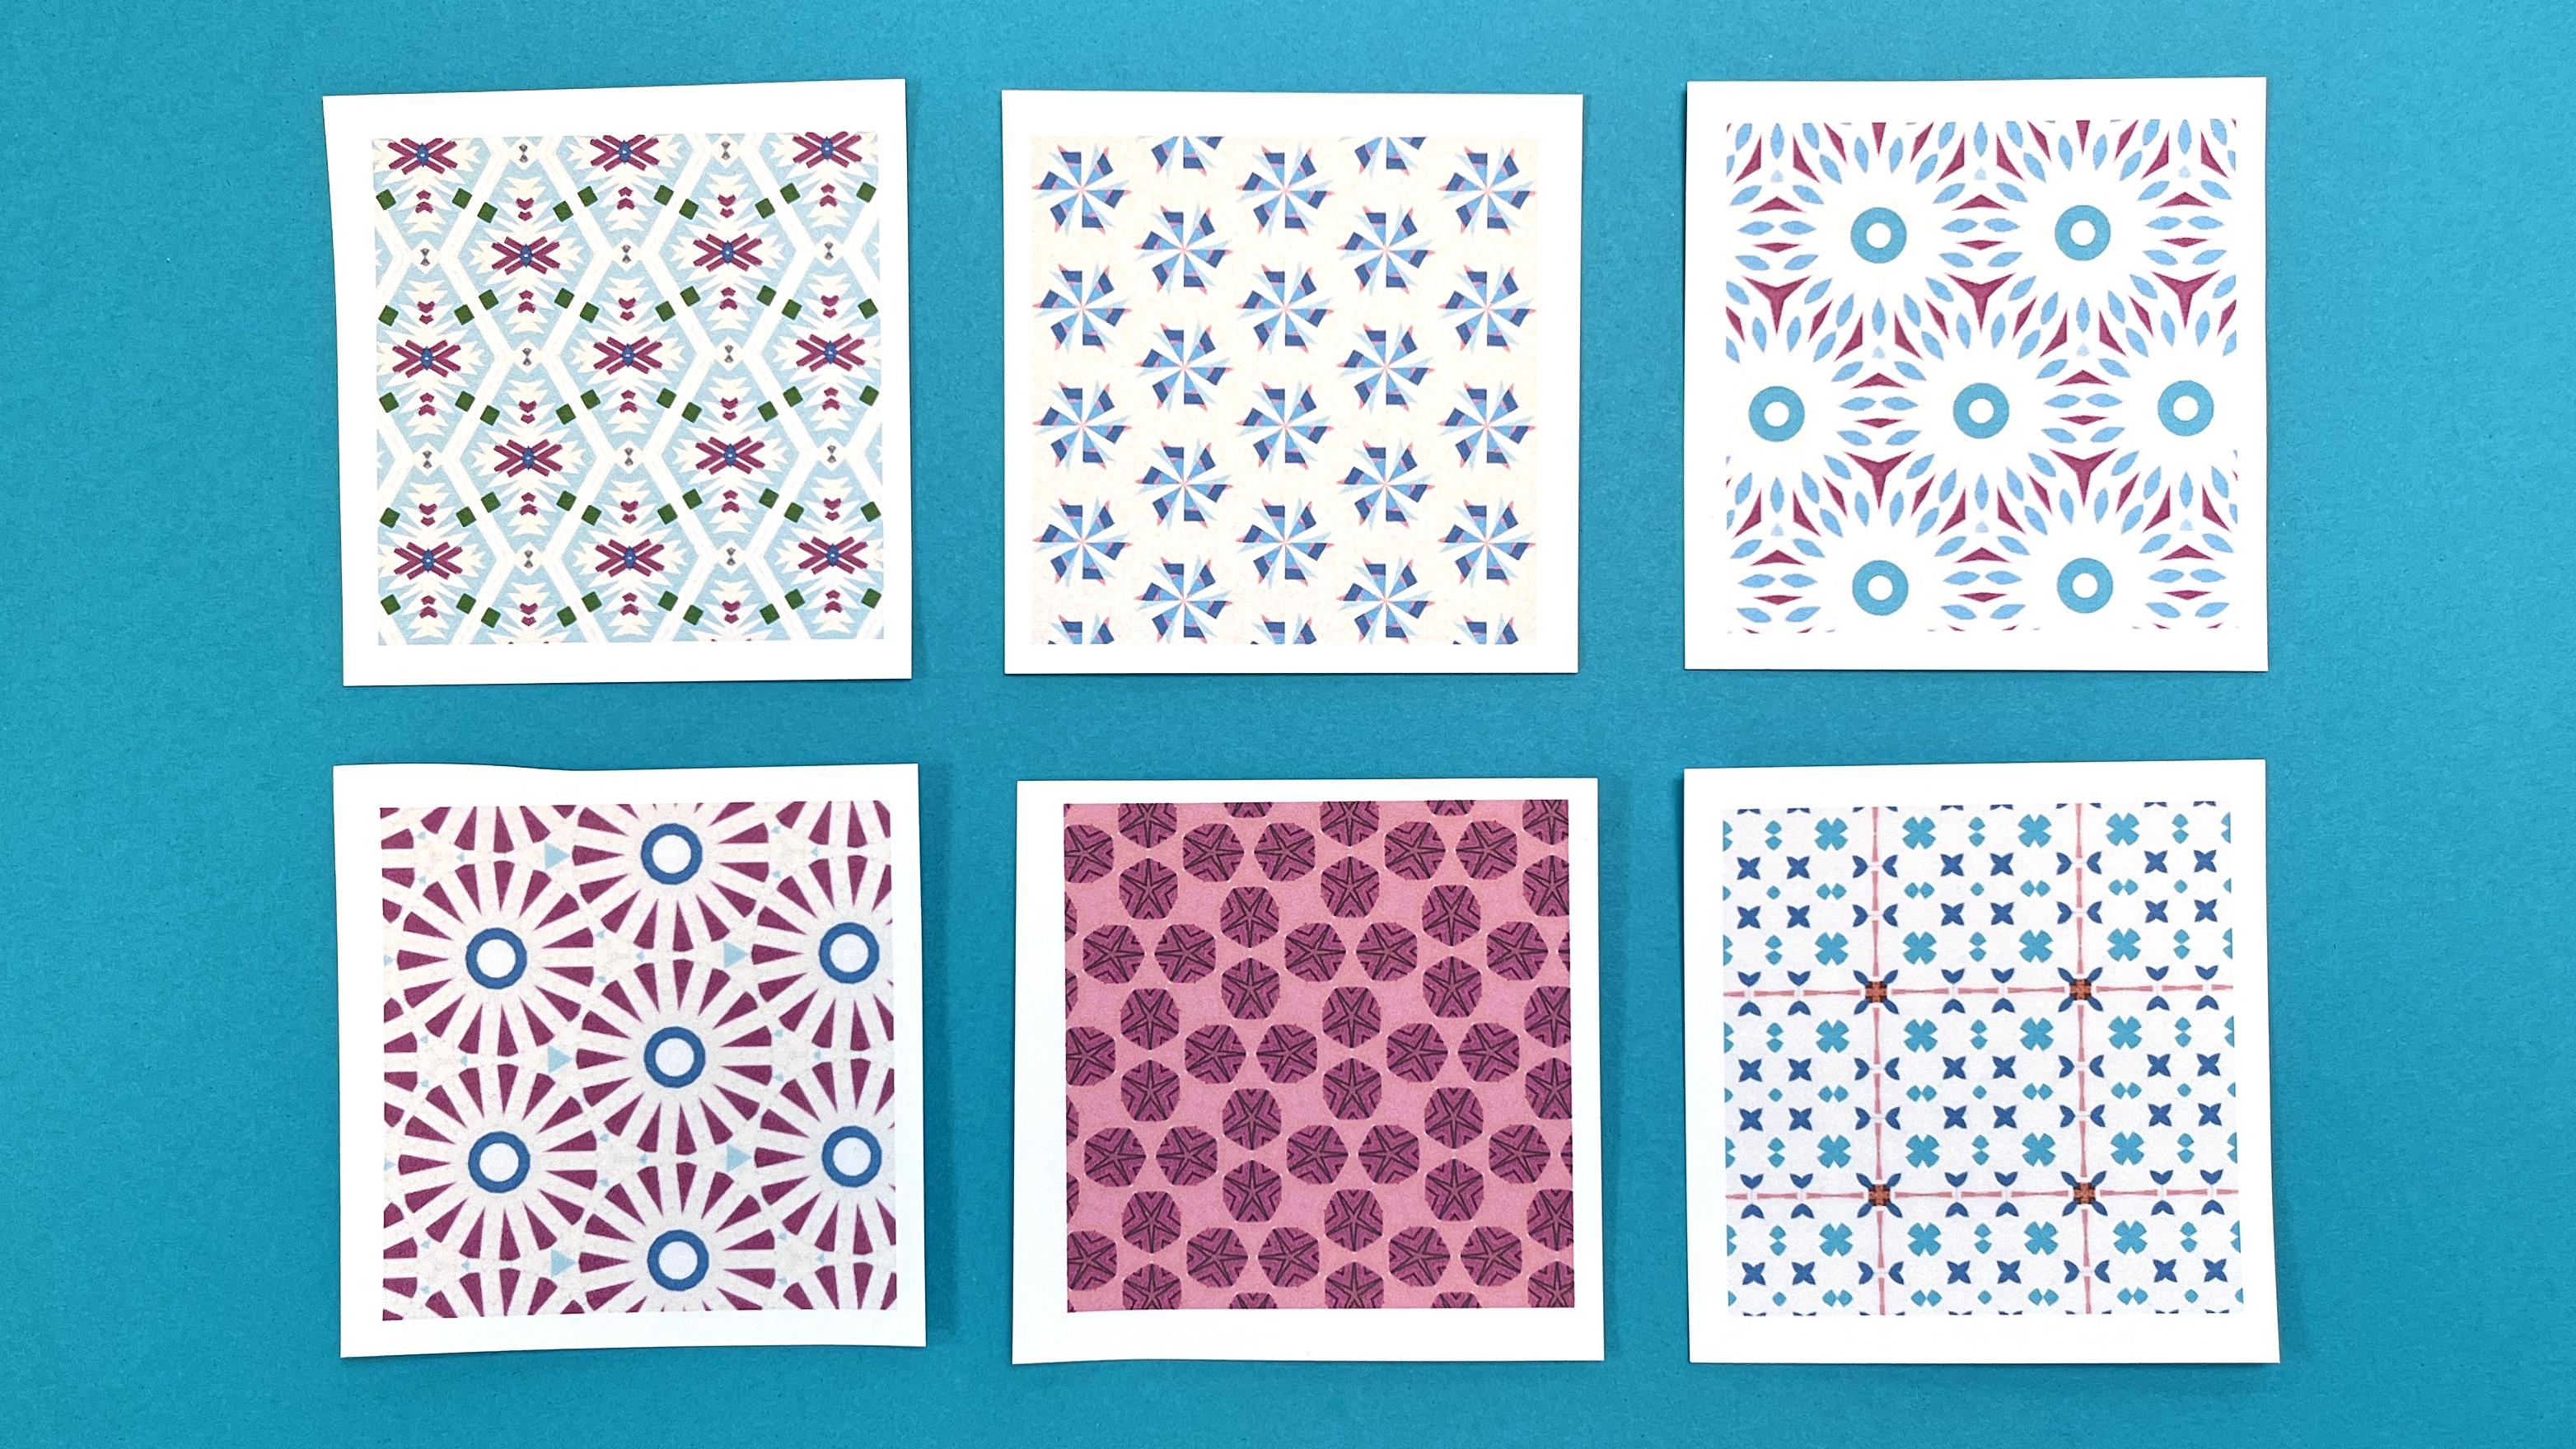
for your project is to play around with patterns and to save about five
or six snapshots. Now, don't forget, try different kind of patterns
from the tiling grid. You can also try
different effects from the effects tab and pick
something that you love. And be sure to save it over
here to the snapshots. In the next lesson,
we're going to talk about how to export
pieces so that you can do different
projects with them to be able to upload it and print
it on fabric or stationary, all those kinds of things. We'll focus on that
in the next lesson.
8. Exporting Your Designs: I hope you had fun
exploring patterns. Now we're ready to export. I'm going to divide
this lesson into two parts because there
are two ways to export, depending on what you want
to do as your final project, like what you want to create
to make more with your art. We're going to start by
talking about exporting tiles. So I'm going to switch over
here to the export tab. We've talked about just
a little bit before, and I want to switch the
drop down menu here to tile. I've chosen one of my designs by clicking on it over
here in the snapshots. And this is the one
I'm going to export. Okay? So I've chosen
first tile at the top. So why do we export tiles? A tile is one individual repeat. So if we're going
to take this and upload it to a place
like Spoonflower, who prints fabric, we only need to upload one repeat
of our design. And Spoon flowers tool, their engine is
going to take it and repeat it to fill
and print fabric. We only need to export one tile to be able to take
it over to Spoonflower. Now, the same thing
applies if you want to upload it to a
place like Zazzle. They also will let you
repeat a tile over and over. So think about how you
want to use your design, and that'll help you
choose whether you need to export a
tile or a surface. Let's imagine I'm going to
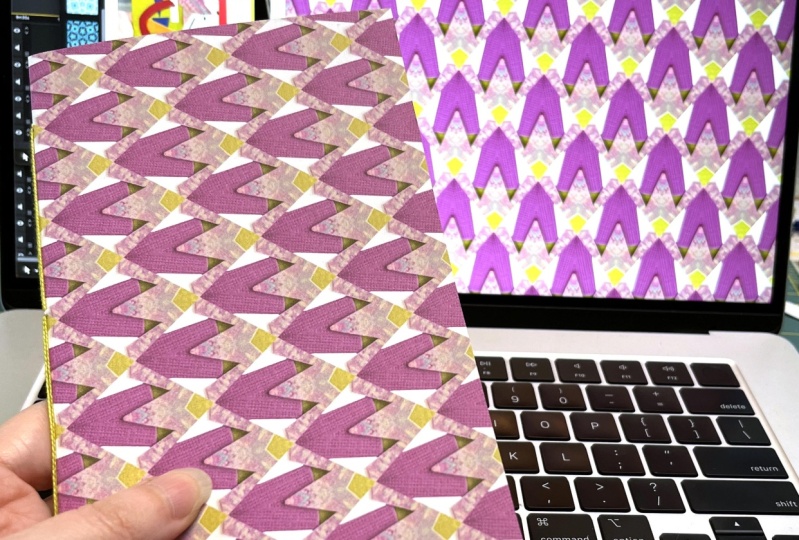
print this one as fabric. I'm going to print this. I'm going to export this as a tile that I could
upload and print fabric. So the next thing
you want to look at is in this left hand column, and the next option
here is size. The easiest choice
you can make here is the radio button
here that says maximum. I always export my designs at the maximum size. So
what does that mean? Okay, so think back to when we uploaded our original collage. When we scanned
that, we captured some number of pixels,
when we scanned it. Then we took it
into reper and we cut out a tiny part of that. Even though we might have
captured millions of pixels, when we got to make our design, we only captured maybe thousands of pixels in the part
that we cut out. When we cut down our design, we might not have enough pixels to print this the
size of a billboard. Probably we have enough to
print it the size of a poster. I don't know. We'll
see when we export it. But what I do is I always choose maximum size so that
I know when I go to print it on
something that I've got the biggest that I
possibly can get it. Now, you can dig in if
you're kind of a math geek and figure out exactly how many pixels you have and how big
the maximum size will be. You can scan it at different resolutions
to make sure that you have more pixels
to print a large. That's totally all
possible to do, and I'm a little bit of a
geek. I sometimes do that. I'm not going to dig in to
how to do that in this class, but I will say it is
completely possible. For you and all the information is available for you
to be able to do that, and I'll show you a little
bit like where you find it. For the most part, if you
export it the maximum size, you're going to have
enough pixels to print it on nearly e surface
that you want to. So I always choose maximum. Under the size here,
I don't customize it. It's going to tell you right underneath that what
the pixel size is. The size of this design
is 1037 by 599 pixels. If you know the resolution that you're going to
print this out at, that will tell you what
size this tile is. For instance, I know that spoon
flower prints at 150 DPI. If I divide those
numbers by 150, that'll give me an idea of the biggest size I
can print this tile. So, just really quick math. If I divide that by about 150, that's probably
about nine by 4 ", just very roughly, that would be the largest size I could
print this individual tile. If the math is just too much, and you don't care.
That's completely fine. You can adjust that once you've uploaded it to spoonflower, Zazzle, or anything
like that and just size it the way that you
like the way it looks. Okay? Then the last
option down here is type. That's the file type
that you want to choose. So there are two options
in the drop down menu, either a PNG or a JPEG. For the purposes of what we're
doing, either one works. There's not one that's
really better than another. I usually choose JPEG
because it's just slightly more universal to
be able to be used anywhere. So once you got all of
those things set up, you'll see at the
bottom of the column, there's a big purple
button that says Export. All you have to do is export. It's going to ask you
to give it a file name, and it's going to
save it wherever you want to save it on
your hard drive. Before we do that, I also want to mention Export snapshots, which is a little button
right next to that. If you choose export snapshots, what it's going to do is export everything that's over here
in your little list of thumbnails using
the same settings that you just set up for
this one that you look at. So this will export
all six all at once. So it's a quick way to gather
a bunch and do one export, and they'll all be
exported at the same time. I'm going to just
export this one. And you can see it gives it
kind of a temporary name. I'm going to call
this pink flower, and I'm just going to
save it to my desktop. Okay, that's all there
is to exporting a tile. Now, I'll do a quick
demo at the very end of this lesson to show
you how you would upload it to a place like
Spoonflower or Zazzle. But in the meantime,
I want to go on to that second part I
was talking about and talk about exporting a surface. So what the different
versions of export are. Okay, so tiles, we understand, we're going to upload to
repeat somewhere else. When you choose surface, and I'm going to switch to surface here, we're
printing out, you can think of it like, I'm going to print
out a piece of paper that has my
design repeated on it. So a great example of this, and I'm going to challenge
you in a lesson a little bit later to create
a piece like this is, I want to print a
piece of this paper. I'm going to use it as
a cover for a notebook. My printer can print on an
8.5 by 11 piece of paper. So I want to create a
surface that is eight by ten because I can fit that on an 8.5 by 11 piece of paper. So I am going to choose surface
as the top dropdown menu. For this one, I do want to
choose custom because I have a very specific sized surface
that I want to print it on. I'm going to click on custom, and it has several options here. I want you to skip over the
repeat one because first, I want to set the size of the design that
we're going to create. So we are going to
create a piece of paper, a surface in inches, because that's what I
know my printer creates. So I'm going to change the unit here from pixels to inches. Now you can see the size up
here in the menu has changed. Right now, the surface
that it's showing me over here is five by 3.333. I want to change
that to the size of the surface that
I want to create. I'm going to make eight by ten. I'm going to make that eight,
and I'm going to change this to ten. Now
it's showing me. This is what it
would look like as an eight by ten surface. Now we can skip
back up to repeat, which is the first thing here. So this has got a kind
of large design in it, like those flowers are kind of the flower shapes are kind of filling
a lot of the space. Maybe I want those to be
a little bit smaller. That's what I adjust
with repeat right here. So I can choose right now it's saying the repeat is 1.848 ", and it's repeating
it four times. So if I want to
make them smaller, I'm going to increase the number of times
it's repeating it. I'm just clicking
the little up arrow. And this you can
totally do by Ii. Keep clicking until you decide that you like
the size it is. I think for a notebook cover, that looks about good. So I'm repeating mine 9.1 times because that's
what looks good to me. Okay? Once you've adjusted
those two things, now you can do the same thing on the bottom here
and export it. And what it's going to export is an eight by ten inch image that then you can print
on 8.5 by 11 paper. So you can think about
this lots of ways. For instance, if
maybe you wanted to print your design on stickers. So you have some sticker paper that you can put
through your printer, and maybe it has like two
by two inch stickers. So you could create a
surface that's two by 2 " and then create the number
of repeats you want in it, make it the way look
the way you like to. And now you could export, you'd have one that's
just the size of the sticker that
you need to print. Okay, so that's how you
use the surface version. So I'm going to export
this one as well. Export, and I'm going to label this one book cover because that's what I
want to use this for, and I'm going to save
that again to my desktop. Okay. So there are the two examples of
exporting a tile and exporting a surface and
kind of the reason that you want to choose one or
the other for your project. Now I want to tag on just a little like bonus at
the end of this lesson. Let me show you how
you take that tile and upload it to a
place like Spoonflower. So I've got spoonflower open and another tab of my browser. If you're not familiar
with spoon flower, they are a printing service, a print on demand service that prints on fabric and wallpaper. So I use their service a lot to create raw materials that
I use to make my art. So I'm logged into my
Spoonflower account here. I'm going to go up under
the little M icon, my dashboard, and I'm
going to choose upload a design here from
the dropdown menu. And I am going to just upload. So I'm going to choose my file. I'm going to choose that
tile that we saved, so the one called Pink flower, and confirm the copyright
here and then hit load. Okay, and here is the tile
that we just uploaded, that we created in per? You can see it's repeating
it over and over, so we can create fabric. And then here you can choose to print this on fabric
or wallpaper, just from the tile
that you uploaded. So I won't dig into all of
the specifics of spoonflower, but I just wanted to show
you how it comes from per. You save it to your computer, and then you can upload it
to another service to print. Okay, in the next lesson, we're going to talk about
your projects for this class. What are you going to create with all of the skills
that you've just learned?
9. Your Project: Export a Tile or Make a Book: A Okay, now comes the fun part, the project for this class. So I've got two versions
of the project. You can choose whichever
one you want to do. So let's start with the kind of simple version
of the project is, I want you to create
a design and per. So make your collage, upload it to Reper and
then export a pattern. You can either export a tile or a surface if you
want us to see what it looks like when it's
repeated over and over and upload that to the project
section for this class. I'd also love to see
your source collage, if you want to
include that as well. Now, the challenge version of your project is to create something from
one of your designs. I think sometimes it's fun
when you are working digitally to actually be able to create a physical object at the end, and I love creating
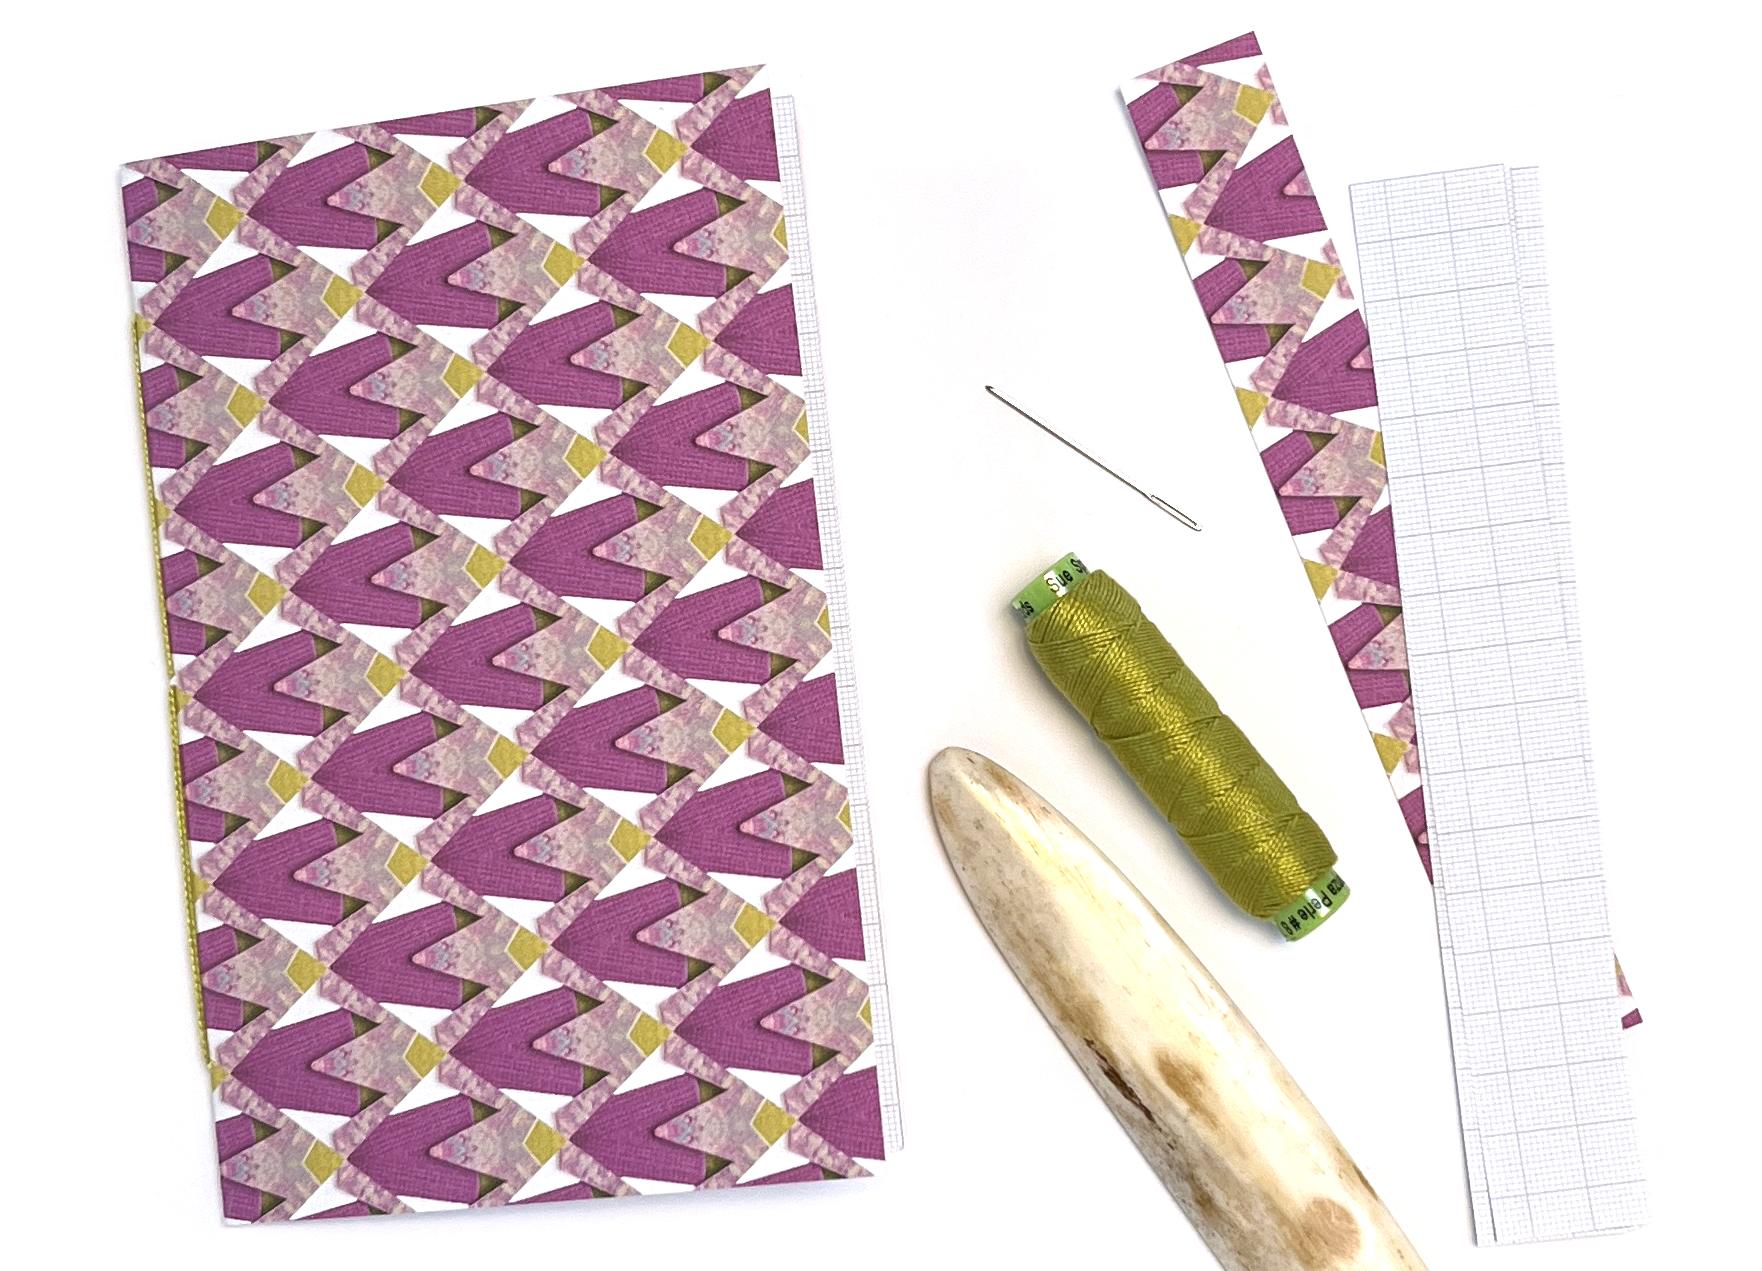
simple books. So I'm going to show you a really simple one
that you can make and share with us using one of your rep
designed patterns. So this piece of
paper right here, hopefully, you'll
recognize this design. This is the surface that we exported from
our last lesson. So this is an eight
by ten inch piece, and I just printed it on my regular printer
that sits on my desk. So I printed it onto
a piece of kind of a middle weight cardstock just that I get from
the scrapbooking store. So it's got a little
bit of heaviness to it. It'll make a great book cover. Okay? So you want
to print out one of your designs on a surface
that's eight by ten, so it fits on an
8.5 by 11 paper. You need some kind
of paper to make some pages for the
inside of your book. So I found this fun kind of graph paper that I'm going
to use for my inside pages, and I cut this down already
to be seven by ten. And I'll put that in the
notes up on the screen. So my book is going to have pages that are seven
by ten folded in half, and I'll make my
cover match that. Then you need a couple of tools. You need something
for poking holes. I have a book binders all. You also could use just
a thick sharp needle. You could use a push pin. Both of those will work great. You need something
to poke holes with and a mat or something
to poke some holes into. This is just a
thick felt coaster. I use those all the time as my thing that I can
punch holes into. You will need a folding tool. This is called a bone folder. If you don't have a bone folder, you can use a popsicle
stick, works great. A nice smooth popsicle stick. We're going to use this to just help us make some creases. You will need a needle. This is just a small
tapestry needle that I have. It has a rounded
point and a big eye. Anything that you can get your thread through is
going to work great. I've got this tapestry needle and then I have just a spool here of size three pearl cotton. This is really thick
embroidery thread. Again, you can use anything
you've got around. You could use some cotton
twine, crochet cotton, fine yarn, embroidery thread, like six stranded
embroidery floss. You could even use a
skinnier embroidery thread. This one is a narrower one. I could just double
this up and use two strands of it to make
it a little bit thicker. You just need some of decorative thread to bind
your book together with. All right, so I've
printed out my design. The first thing I want to
do is just cut this down, and I'm going to cut it
down because my printer can't print quite all the way
to the edges of the paper, so I just want to trim that off. So to trim it, I'm going to use just a utility knife
blade and a ruler. You could use a paper
cutter if you have one, you could use a
pair of scissors. But I'm going to cut my cover down to be the same
size as my pages. So I'm going to trim
that down and I'm going to use the rulers
on my cutting mat, just to get it kind
of squared up. And I'm going to make
it be seven by ten. Okay. So I've trimmed
up one side and one, two, three, four,
five, six, seven. Okay. And then I
need it to be 10 ". A Okay. So there is my cover. Cut down so it's the same
size as my pages. All right. So first thing, I
want to put some ce. I'm going to fold these. So I'm going to fold in half. I want to cover side out. So I'm just going to match
this up really carefully. So I've got the edges in
the corners matched up. I'm going to take my fingers
and kind of sweep back towards me and then push it
to one side and the other. And I always do that
with my fingers first, and then I grab my bone
folder and just kind of go over the crease and help
crease it a little bit more. Okay, so there's my
cover fold it in half. I'm going to do the same
thing with the pages. I have, let's see, one, two, three, four,
five pages here. I could fold these each one at a time or fold them all
together as a group. I like doing them one at a time. That's just kind of
the way I learned. So I'm going to do that quickly, but I'm just going to
do it the same way that I did with the cover. Fold and then
reinforce the fold. I think this graph paper is fun. I like notebooks with
graph paper in them. Okay. Once I got
my pages folded, I'm going to stack them
all one inside the other, so all of the folds
are matched up. And these are blank on one side and graph
paper on the other, so I have lots of
options in the notebook, and then I'm just
going to kind of square those up. Make
sure I've got them all. Okay. Now I want to punch some holes so that I can stitch together
the binding on these. So I'm going to make
myself a little bit of a template so that I can punch the holes
the same way in the cover as I do
with the pages. And I'm just going
to take a piece of scrap paper to do that with. So here's a little scrap
of my cover paper. I'm going to just cut it so that it's the same
size as my pages. And this doesn't have
to be super exact. Okay. So I've got kind
of a template here. And I like to fold it in half so that I can
fit the fold of this template down in the fold
of my pages and my cover. So I'm just going
to fold it in half. So Okay. And now I can mark where
I'm going to stitch this. So I'm going to do what we
call a pamphlet stitch. This is the very first book I learned how to do with
a stitched binding, and I love that it's
kind of really simple. So what I need is three holes
that I'm going to punch. I'm going to grab
a marker just so that you can see it on
camera really well. I normally would do
this with pencil. And what I want to
do is I want to mark three different spots. I want to mark the
center so I can punch a hole in the center
to find the center, I'm just going to fold this in half and make just
a little crease. I think that's way
easier than measuring. Okay, so I've made a little
crease in the center. So one of my holes is
going to go there. And then I want to
make the other holes be some distance
in from the end. So for this book, I
think I'm going to go 1 " in from each end. And I have my ruler here, so that's a quick way
that I can measure that. And I'm just going to
make a little dot, an inch in from the end there and 1 " in
from the end there. Okay. So I got my three marks. Now I'm going to punch holes. I'm going to start with a cover, and I'm just going to
fit my little template down inside the cover, and I'm going to match
it top and bottom. And now I'm going to punch
in those three places. I like to hold it with one hand, and I'm just going
to punch in and try to aim right
down in the corner. So one move it over, so I'm on top of my felts, two, three, there's
my cover holes. And then I'll do the same
thing with the pages, to make sure I'm in the center. I've got them all
stacked up and lined up. Put my template in the middle. Once again, one, Two and three. If you have more pages, you might have to do your pages in a couple of sections if you decide to put more in there just so that you can punch
through all of them. Okay. Now, I can take
my pages and put them inside my cover and
line up everything. And now we're ready to stitch. I'm going to open up so that I'm looking kind of at the
inside of the book. And I want to cut a
piece of thread that is about two times the
height of my book. Okay? So one, two times. And I'm going to
thread my needle. Okay. This one, there's just kind of a pattern
that you do the stitching. So I'm going to start by going from the
inside of the pages, so I'm right in the
center of the book. I'm going to go out
through the center hole. And I'm going but I'm going
to leave a little tail. So a couple of
inches of tail here. We're going to tie
this together. And you can just hold
it with your thumb, if you want to, to make
sure that you don't accidentally pull it
all the way through. Okay? So I come out
through the center. Now I'm going to go back in. I'm going to come
to the right side first through the top, and you might have to
wiggle this around. You want to make
sure that you get through the cover and through all of the pages if that
hole doesn't quite line up. Okay. So I'm coming
back in there. And I'm going to
pull just so that the thread lays across
the spine of the book. So it's not bubbled
up. Now on the inside, I'm going to go all the way
across to the other hole. That's the bottom. I'll be the bottom of my
book. Same thing. I want to wiggle my needle a little bit so I can get through all the pages and
to the outside. That made a big
stitch on the inside. Then the last one, I want to
take my needle and I want to come back in through
the center hole. And I'm going to pull my needle
just off out of the way. Now you've got the two ends on the inside and you've got
two stitches on the outside. All right. Then the last thing, what I like to do is
I've got two ends here and the stitch that's
going across the middle. I like to actually
slide one of these ends underneath that center stitch because I'm going to
tie these in a knot. And that way, I'm tying
that center thread down inside the knot. Now I'm just going
to tie a square knot with these two short ends. I'm going to take
right over left end and pull it down and
then over right. I got a square knot. Then
I can trim these short. And that is a stitched
binding on my book. Now, a couple of little finishing
things, if you want to. I like to take the
bone folder and just run it one more time
across the spine. That helps kind of set
everything in place. And then one other little thing, you will notice that your pages stick out just a little bit past the edges of the cover because they were
all stacked up together. If you want to, you can go back and trim that bit
that sticks out. I always leave it
because I like the way that looks that it looks
like a handmade book. There, you have a little
pamphlet stitched notebook. This is the challenge
project for this class is for
you to print one of your reper designs on a
piece of cover paper and make yourself a
notebook that you can use to take notes
in your next class. So I would love to see a
finished physical object or your digital design uploaded to the project
section for this class, and I hope you will
share with everyone.
10. Inspiration & Wrap Up: To wrap up this class, I want to show you a couple
more examples of things I've made using patterns that I
created the same way. So these first two
are books I made. I printed some of my
patterns on a roll of wrapping paper and used that to create sort
of the covers and the end papers for some
different books. So there's that style. And then this one is
called a flag book. And so all of the little
flags are different patterns. I created using the
same techniques that we just did in class. These two examples are
some pieces of wallpaper. So these are a
metallic wallpaper that I printed some designs on, and I'm going to
use these to make some book covers and
cover some boxes. So those are all
patterns created using a paper collage and
reper And then finally, this is a piece of fabric. This is a lycra fabric, like a swimsuit fabric
that I printed. This design is created from this is a photograph
of colored pencils, like a stack of colored pencils, and I imported that as my original artwork and then created this kind
of honeycomb pattern, and I put some little silhouettes
of bees in this design. So I'm going to make
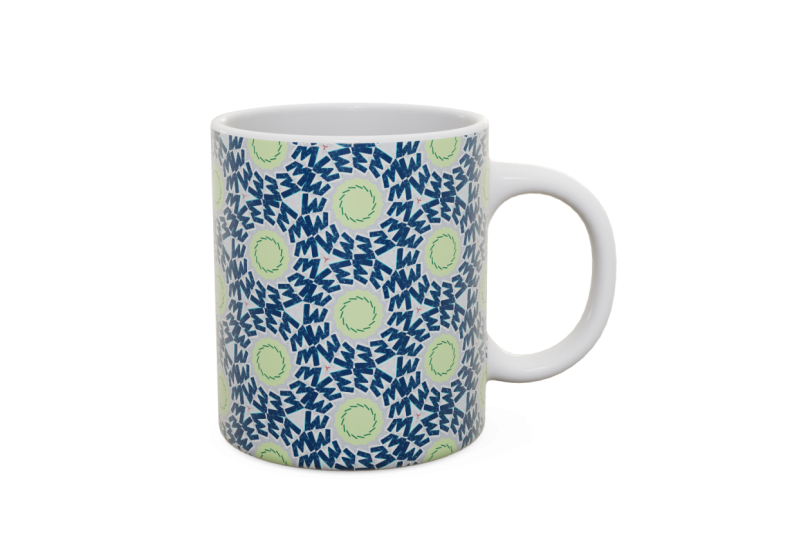
something out of this. And then last, here is, this is a stainless
steel water bottle. And this was created
with a pattern I made with leaves from my garden. I put them right on my scanner. I scanned those leaves and then used repper to
create a pattern, which I got printed onto
the squatter bottle, which I think is really fun. Makes a cool kind
of metallic design. So, hopefully, that inspires you with some ideas of ways that you can use these to create surfaces that you can
make other art from. Please remember to
share your project. When you finished it in the project section
for this class, we would all love to see the creative things that
you try with your design. Thank you for joining
me. I hope you had fun learning a new
tool that you can add to your toolbox for creating your own surface
patterns to use in your art.
 Becka Rahn, Artist & teacher, paper & fiber art