Transcripts
1. Introduction: Eyes are the key factor that can instantly turn anything
into a character. But when you know how to
add emotions to those eyes, that's when the magic
really happens. Hi. My name is ta. I'm an artist and educator
based in Germany. I'm a top teacher on skill share with
classes about drawing in general and working with procreate or procreate dreams. One of my favorite
things to do is create Kirki and fun
illustrations where I personify objects and
add unexpected twists. In this class, we'll
explore how to create super simple
yet expressive eyes. I'll show you how to use
them to bring fun characters to life and even create whole scenes with
simple techniques. Whether you're working
digitally in procreate or using traditional
tools like paper, ink, or Posca pens, you
learn how to give your illustrations personality without overcomplicating things. Grab your iPad, paper, pen, or whatever
you like to use, and let's have some fun
turning super simple eyes into powerful storytelling
tools. Let's get started.
2. Class Project: Now, let's talk about
the class project. This is where you put
everything you've learned into action and create your
own unique illustration. For this project,
you'll be creating a scene with three or
more simple characters, each showing a
different expression. The goal here is to tell
a little story with your characters
using the techniques we've covered in class. I know creating a
whole scene can feel a bit intimidating at
first, but don't worry. I've got you covered with a
prompt list in the workbook. You can mix and match ideas
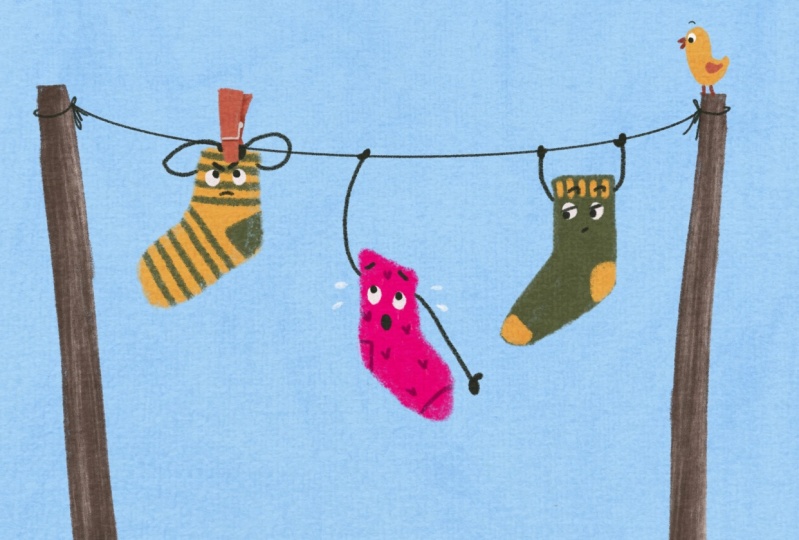
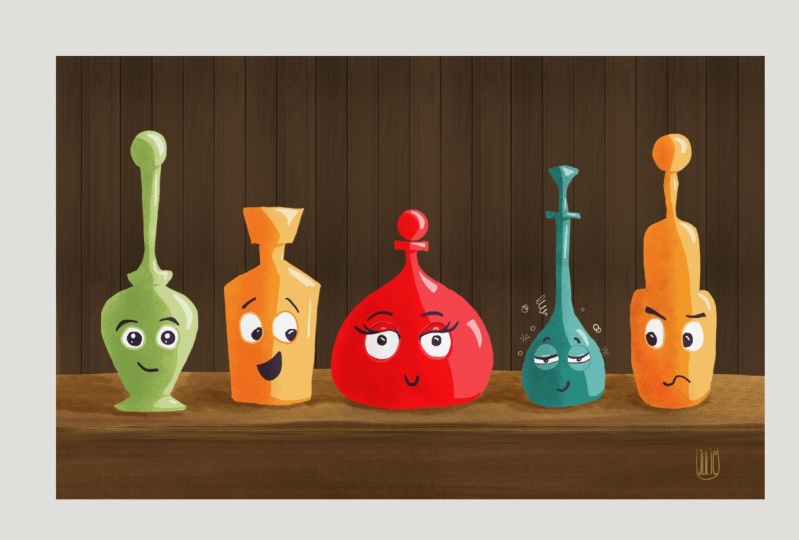
like mugs on a shelf, balloons flying or
crayons in a cup, all showing different
expressions and interacting in
a fun creative way. There are no rules. You can get as creative
as you like and keep things super
simple or go all out, whatever feels right for you. I'll be walking you through
my own process from brainstorming ideas to sketching out the scene and
finishing the project. This way, you can
follow along and get some inspiration as you
create your own story. Of course, you can also
recreate my scene as this can be very helpful when you start your journey of
character creation. I can't wait to
see the characters and stories you come up with. When you're done, share your project in the
project gallery, so we all can admire your
work. Have fun with it. And remember, no
perfection is needed. It's all about letting
your characters shine with super simple,
expressive eyes.
3. Material: Before we dive into
the fun Stuff, let's quickly go
over the materials you will need for this class. Whether you're
working digitally or traditionally, I've
got you covered. For those of you
working digitally, you need procreate on your iPad, and I've included a custom brush set specifically
designed for this class. You can download this brush set directly from the class
resources section. It'll help you create those
super simple eyes with ease. By the way, if you want to use all the brushes I use
for my illustrations, you can get my brand new
Illustrators toolkit brush sit right here on Skillshare. I'll leave the link
in the project and resources box for
you to check it out. Now, if you're a
traditional artist, you'll need a few
basic materials. White or colored paper. Your favorite drawing
tools like pens, pencils, or acrylic markers,
which are perfect for creating those bold clean
lines we'll be working with. Just note that I will be using my iPad
throughout the class. But you go with whatever
you like working with. Of course, everyone gets access to the workbook
that I've put together. It's packed with tips, a handy prompt list to help
your brainstorm ideas, and a few extra goodies to make the process
even smoother. Just download the files from the projects and
resources tab as well. No matter which
tools you're using, the goal here is to keep
things simple but effective. You don't need anything fancy. Just materials that
allow you to have fun while creating
expressive characters. All right. That's it for
the materials. Easy, right. So gather your tools,
get comfortable, and then we'll jump right into the next lesson. I
will see you there.
4. Anatomy of a Human Eye: All right, so here
we have it and I. It's got the familiar
almond shape, the white eyeball,
a colored ris, and right in the
center the pupil. There are also the upper and lower eyelid with the lashes. Lastly, on top of everything, the eyebrow. Pretty
standard stuff. In the inner corner,
we have the tear duct, where tears are produced to
keep the eye nice and moist. It's like the eyes built
in irrigation system. The eyeball, of course, moves around as we
look at things. The pupil expands and contracts depending on
how much light there is. Think of it like a camera
adjusting its aperture. When we blink, the upper lid
comes down to close the eye, then pops back up
to open it again. Usually, it's just the
upper lid doing the work. The lower lid only moves when we squint and don't
forget the eyebrows. Whether they rise,
curve, or push down, they give away our emotions
even if we don't need to. But since this class is all
about super simple eyes, let's see how we can strip
this down to the basics. First, let's ditch
the eye lashes. It still looks like
an eye, right? Do we really need the lids? Nope. Gone. How about the iris? Not necessary, either. And that almond shape too fancy. Let's go for something simpler, like a circle.
Finally, the eyebrow. It can just be a line now. And there you go. Super simple, but our brain still recognizes them as eyes. Technically, you could even get away with just
two black dots. But they're not that great at showing a huge
range of emotions. Let's stick with our super
simple eyes made out of four circles and maybe two
lines for eyebrows. That's it. Now that we've broken the
eye down to its simple form. Let's move on to the next
lesson where we'll explore how these super simple eyes
can tell a range of emotions. See you there.
5. Super Simple Yet Expressive: Now that we've stripped
down the anatomy of an eye. Let's explore how
these simple shapes, circles for the eyeball and pupil can convey
different emotions. For now, we're keeping it very simple by leaving
out the eyebrows. Let me show you how
much expression you can get from the
super simple shape. These eyes are neutral. No big emotions yet, just eyes looking straight
ahead. Now look at these. By changing the directions
the pupils are looking, we can already tell a story. Are they curious, suspicious, or maybe lost in thought? These eyes here are wide open, clearly surprised or shocked. These ones are sleepy
with the lids drooping. If we just drop the
lids even more, well, this character
already dozed off. Here's a fun trick. If you
flip these curves upside down, suddenly it looks
like the character squinting from laughing to hard. That's just a small
sample of what you can do with simple
circles and curves. There's so much room to play. Now it's time for
you to try it out. I've provided a
practice sheet in the workbook where you can
focus on using circles only. If you are practicing
a procreate, don't forget to add a
new layer to this layer. Mark the new layer and the layer below and turn these
two into a group. This way, you won't
damage the original page. I want you to play around with the size of the
eyeballs and pupils. Try different combinations and see how many expressions
you can get. Write the emotion you see
in a pair of eyes below. By the way, Interpreting
emotions can be subjective. One person's happy
might look like excited or relief
to someone else. There's no right or wrong. You can watch how I do it first, then pause the video
and practice yourself. Or if you'd like, pause the video right now
and dive into drawing, then come back to see
how I approached it. I find it very important
to watch others draw to learn about
their technique, like pen angles, how
they draw curves, or their general workflow. There is so much
information communicated and it helps to improve
constantly by just watching. It is also a very mindful
process, I often think. For me, it is important to include a lot of actual
drawing in my classes. If you find it a bit slow, feel free to speed it up, but I think seeing how the art is created can be
super valuable. I hope it helps you to
find your own rhythm. Oh. If Oh And here we have my super
simple eyes practice. To me, this one looks neutral. This one looks to the side. This might even roll its eyes. This one seems to be shocked, and this one scared. This one seems to
be focused, maybe. This one is silly. This one confused and this one. Do you interpret the
same or something else? Anyhow, let's move on to the next lesson
where we'll include the eyebrows to create a wider range of expressions.
I'll meet you there.
6. Expression Through Eyebrows: Eyebrows are one of the
most powerful tools we have for conveying emotions. It's amazing how
just a few lines can completely change
the expression. Now, we're going to
explore how to create different expressions
by changing the shape, angle, and curve of
simple eyebrows. Let's start with
neutral eyebrows. These are straight lines
or slightly curved ones. I leave that to your preference. They don't really convey
a strong emotion, and they're a great
starting point. Next up, we have
surprised eyebrows. These are raised up
high above the eyes, almost forming a dramatic arch. Raising the brows gives the impression of
surprise or shock. For angry eyebrows, we angle them downward sharply
towards the nose. Notice how this aggressive tilt immediately gives the character a fierce intense expression. To create a sad or
sorrowful look. We make the brows arch down in the middle and then slope
down towards the sides. This drooping effect
instantly makes the character seem
upset or defeated. When we bring the
eyebrows closer together and put them
slightly downward, it shows focus or concentration. You can almost feel the
intensity of their attention. Now, let's have some fun
with the cheeky expression. Raise one eyebrow while the other stays neutral
or drop slightly. This asymmetry creates a
playful, mischievous vibe. For an anxious or worried look, the eyebrows take on an upside down V shape with
slightly arched up curves. It's a great way to
show fear or unease. Now it's your turn
to experiment. Play around with
different eye shapes and eyebrow position. Try angling or
curving the brows in different ways to see how
it change the expression. You can also vary the size of the pupils to add even more, like making them larger
for fear or s for focus. Remember, the
possibilities are endless. Don't be afraid to
stay super lose as this is where often
something unexpected, but super interesting happens. Once you're ready, you can move on to the next lesson
where we will add a few more super simple
accents to create an even wider range of
expressions. I'll meet you there.
7. Additional Accents: All right. Now that we've mastered the basic of
super simple eyes, let's take a look at how
a few additional actions can drastically expand the range of expressions we can convey. These small touches
might seem minor, but they have a
big impact on how the eyes feel and what
they communicate. Let's start with closed eyes. By simply drawing curved
or straight lines, we can easily
suggest closed eyes. This works great for
a sleeping character. Now, if we draw the same
curves just upside down, it creates a character that squints their eyes
from laughing heard. Next, eyelids. We can show the
presence of eyelids by adding a line or
curve across the eye. This simple addition can make a character look tired, annoyed, or even suspicious, depending on the position of the pupil
and how much of it you show. See how this gives the eye more depth and adds a
little extra emotion. Eye lashes are
another great tool. By adding a few simple lines
at the corner of the eye, we can suggest that the
character is more feminine, playful, or even flirty. The number and length of the lashes can completely
change the vibe, whether you're
drawing just one line or a few more for a bolder look. How about highlights
in the pupil? Just some small white dots can create a sparkle
in the eyes, making them look more alive, shiny, or even watery. It's a great trick
for adding charm or even a bit of drama to your
character's expression. Lastly, don't forget that it doesn't always
have to be pupils, we draw in the center. But it could also be an iris. By adding a colored dot, you can give your character
a different feel, perhaps more mystical, other worldly or
simply more vibrant. Do you see how this bright color adds a new layer to the eyes, making them stand out even more. Now it's your turn
to experiment. Try adding these little
accent to your simple eyes. Play around with
closed eyes, eyelids, eyelashes, highlights,
and colored pupils? I'm sure you'll be surprised
by how much expression you can create with just
a few additional accents? And as working in my
workbook in Procreate, don't forget to add a new layer
and turn it into a group. And once you're ready,
you can move on to the next lesson
where I will give you a summary of how to depict specific emotions.
I'll meet you there.
8. Let's Get Emotional: Welcome back. Now that
we've covered the basics, let's have a look at
the characteristics of specific emotions. For this lesson, I will
be walking you through my cheat sheet that
highlights various emotions. This is your reference for
later in case you want to refresh your knowledge or need a little bit
of inspiration. Here we have the
neutral expression. The eyes are wide open, pupils centered, and there's
no movement in the brows. This is the resting phase, no strong emotion
is being conveyed. For happy, the
pupils might stay in the center and the brows
arch slightly upwards. The key is the subtle
curve of the eyebrows. Now, if you want
to express joyful, we take that
happiness up a notch. These eyes are squinting
and the brows lift higher, so we only need curves. Next, we have ad. Notice the downturned eye brows, which makes all the
difference here. The pupils are
lower in the eyes, sadly looking to the ground. I wonder what
happened to this one. Now onto angry. The pupils might
still be centered, but the eyebrows angle
downward sharply. This creates tension and for
an even stronger emotion, like being furious, we
crank that anger way up. The brows are pushed
together even more tightly. We add a tilted lid as well, and the pupils are
partially covered, adding a sense of intensity. It feels like this character
is about to explode. Next, we got tired. The eyelids are half
closed, almost droopy, and the pupils are usually centered and halfway
covered from the lids. You can sense the weight
pulling down the eyes. Now, here's obviously
the sleeping phase. The eyes are completely closed, just curved lines, no
pupils, no extra details. It's simple, but
instantly recognizable. Moving on to touched. This one's a little
soft and hard felt. The eyes might glisten slightly. Pupils looking straight ahead, and the eyebrows lift
in a gentle caring way. It's like the character is moved by something sweet
or meaningful, or they are in love. Next, we have surprised. The eyes are wide open, the pupils s and the
brows are lifted high. This sudden widening
gives it that startled effect like something
unexpected just happened. For shocked, we exaggerate
the surprise even more. The eyes wide, pupils huge, and the brows are
slightly tilted. It's a more extreme
version of surprise, just like you witnessed
something unbelievable. Now for fun one, silly, the eyes might look in different direction and
have different sizes. The expression is playful with some
unpredictability to it. Focused eyes are all
about intensity. The pupils are centered. This one looks downwards and the eyebrows move slightly
downward as well, giving the sharp
concentrated look. This character is in the zone. And scared is a little
bit similar to surprised, but there's more tension. The eyes are wide, pupil small, and the brows might lift high, but curve downward slightly. It's as if the
character is paralyzed. Finally, we got suspicious. This brow is lifted, one stays down, and the
eyes look to the side. The character looks like they're not trusting what
they are seeing. Definitely skeptical. And that's the sheet. As you can see, small
changes to the eyes and brows can make a huge difference when expressing emotions. Feel free to reference this
sheet when you're working on your own characters to capture
just the right feeling. And then it's time to move
on to the next lesson, where we dive into creating a super simple character.
I'll meet you there.
9. Super Simple Character Creation: Welcome to the final module. In this lesson, we're going to bring
everything we've learned together and create a
super simple character. Today, we're going to keep
it really fun and lose, so don't worry about perfection. The goal here is to explore expression and just
have fun with it. I have consulted my prompt list, and I'll decide to go with
an Apple as character. Let's just start by drawing
a super simple apple. Nothing fancy, just a
nice roundish shape, a little stem at the top, and maybe a leaf. That's it. It doesn't have to be perfectly
round or symmetrical. Remember, your character's charm comes from the imperfections. It's much more
important to give it personality than to
make it look perfect. Now let's add a
face to our apple. We're going to keep
the eyes super simple, just two white circles. You've seen these before, A trusty, super simple eyes. We're going to draw three
versions of this apple, each with a different
expression. Happy, tired and sad. Let's duplicate our
apple two more times. Now let's start with
the happy apple. We want to give our first
apple a big curved smile. Notice how this small curve immediately brings
a feeling of joy. The pupils are a bit larger, and maybe you can
add a slight lift to the eyebrows to enhance
the expression. It's such a small adjustment, but it really makes
a difference. Doesn't our apple look like
it's having a great day? We could even add two
super simple arms hanging relaxed by its sides. Tada first character done. That wasn't hard, was it? Next, let's move on
to a tired apple. The key here is to make
the eyes droop a bit. We'll close them halfway, and the pupils will be
lower looking down. For the mouth, instead
of a big smile, we'll draw a short, straight line as if this apple is too tired to move
one single muscle. Let's move the arms a bit
towards the center as if its shoulders are slumped
from being so tired. Now for the sad apple, to show sadness, we'll turn the mouth into a
small downward curve. The eyes can stay open, but the pupils will be
lower and we'll drop the eyebrows a little to make
the expression look heavy. You could also add
a tiny tear drop if you want to go all out. The arms are hanging
by its side too, as if there would be
no hope whatsoever. The apple is still super simple, but with just a few lines, it really communicates
that it's feeling down. As you can see, with just a few simple changes like adjusting the
shape of the mouth, the position of the pupils, or the angle of the eyebrows. You can give even the
simplest character a wide range of emotions. The beauty of working with super simple characters is
that you can play around, have fun, and not worry about making mistakes or have
everything look perfect. The charm comes from
the little quirks and looseness in your drawings. All right, now that you've discovered how simple
character creation can be. Let's move on to
the next lesson, where I'll guide you through my process of creating
our class project, a super simple C.
I'll meet you there.
10. Class Project: Create A Scene: Welcome to the class project. Now that we've learned
all about creating super simple characters
and expressions. It's time to bring it all
together into one fun scene. In this lesson, I'll take you through my illustration
process step by step to show you how I create
my super simple scene. Let's dive right in.
Whenever I start a project, I like to refer back to my prompt list for
some inspiration. Let's see what we've got here. I think I've got it. I'm going to create a scene
with cups on a shelf. Each cup will have its own
expression and personality, so they'll all interact with each other in different ways. First, I'm going to sketch
out five simple cups. Remember, we're keeping
everything super simple, just basic shapes to start. We can even duplicate one of the cups and move
it to the side. The cups will be on a shelf, and they'll all be doing
something different. All right. This one
here to the left. This one will be reading. I love it when my characters are reading because
I like reading too. I'll keep it focused. The eyes are looking down
into its little book. The next one will be somehow
worried or concerned. He will have this kind of
eyes looking to the side, and he will have some
droped eyebrows, and his mouth will
look like in a frown. I think he looks really worried. Moving on to Cu three will show why the second
one is so worried. Number three has a chip, and he is obviously
not happy about it. He's looking up in shock. His mouth is an oval as if he wouldn't make
this shock sound. Maybe, maybe he covers his mouth with his hands to highlight
the dramatic pose even more. Just imagine the shock when you discover a
chip in your brim, how awful? All right. This next cup here,
it fell over. I want this to sleep. So he's sound asleep, like having just a small mouth. And because it's laying there, some leftover that was inside
is leaking out of here. And we could even give it a teddy bear like
pressed under his arms. Look, he holds this cute
little teddy bear here. Ah how sweet. I like that. But the last one here, he's a little bit of
a mischievous one. He is trying to tickle
this one there. Pupils need to go over here. He looks at the sleepy one. He is like a little bit
of a mischievous smile, and his eyebrows are a little
bit mischievous as as well. Look and he stretches out his hand to tickle this
one. Tickle tickle. No, no, no, that's not okay. All right, and here
my sketch is done, and I'm ready to ink
out my little scam. I've started by adding a new
layer below my sketch layer and then turned
down the opacity of my sketch to not be
distracted too much. I've also changed the
blend mode to multiply. Then I pick my nice liner brush
and start with the shelf. I have decided to leave my entire drawing
process in this lesson. I strongly believe watching someone draw is very beneficial. You can learn so much just by observing from how
they create lines, control curves, and of course,
their overall workflow. There's a ton of subtle
information being communicated. I've sped it up a bit though to keep this lesson at
a reasonable length. On a new layer, I ink out
the front of the cups, making sure to alternate the colors to have
enough variation. A data data Once all cups are colored in, I clean up the edges. Here I am adding a layer
below the cup fronts. I also turn down the opacity
of the layer above to better see where the inner part of the cups start and end. I am using the same
for each cups inside, but since it is usually
due to the shade, I turn down the brightness
of this entire layer. Now I draw the handles
on the same layer, sampling the hue
from the insides. And now onto the faces. On a layer above the cup fronts, go the white eyes, the teddy, and the book. On a layer below this one, I am adding the books pages. On yet another layer on
top of the white eyes. I draw all black accents, like pupils, eyebrows,
arms, and so on. That's Here, I noticed that I didn't
like the yellow cup. So I changed his
viewing direction and gave him an arm
pointing towards the th. And this is my approach. Doesn't it hilarious and see. The process itself
was super simple, but with all the
imperfections and quirks, we have added a lot
of personality. And now it's your turn to
create your super simple scene. You can use the
prompt list to get started or come up with
your own fun idea. But you're more than welcome to recreate the scene I
have created here. Draw three or more characters, each with a different
expression and personality and see how they interact with each
other in your scene. Remember, it doesn't
have to be perfect. The most important
thing is to have fun and let your
creativity shine. After you're done, upload
your class project in the project gallery to show
off your super simple scene. I can't wait to see
what you create. Enjoy the process. And
once you're ready, I'll meet you in
the final lesson where we'll wrap up the class.
11. Let's Wrap It Up!: Comrades on making it to
the end of this class. We've covered quite a
lot on this journey, haven't we from learning how to create super
simple eyes with just a few circles and lines to experimenting with eyebrows
and other accents. Finally, even designing your very own super
simple characters. I hope you now feel
more confident in using these simple techniques to
create expressive characters. Fun illustrations. Remember, perfection
isn't the goal. It's all about enjoying the process and
playing around with different expressions
and ideas. What's next? Well, I'd love for you to
take everything you've learned here and create your
own super simple seeds. Share them with us in
the project gallery, and of course, the rest of
the world, AKA, social media. Don't forget to tag me. I'd love to see what
you come up with. You can find me on
Instagram, Tik Tok, and YouTube, and be sure to follow me for more
tips and tutorials. If you enjoyed this course, please take a moment
to leave a review. It really helps me and also allows others to
discover this class to. Lastly, thank you so much for
being part of this class. I had a blast creating it, and I hope you had fun learning. I can't wait to see
you in my next one. So take care, keep creating, and we'll see each
other soon. Bye.
 Jutta Schneider, Artist | Educator