Transcripts
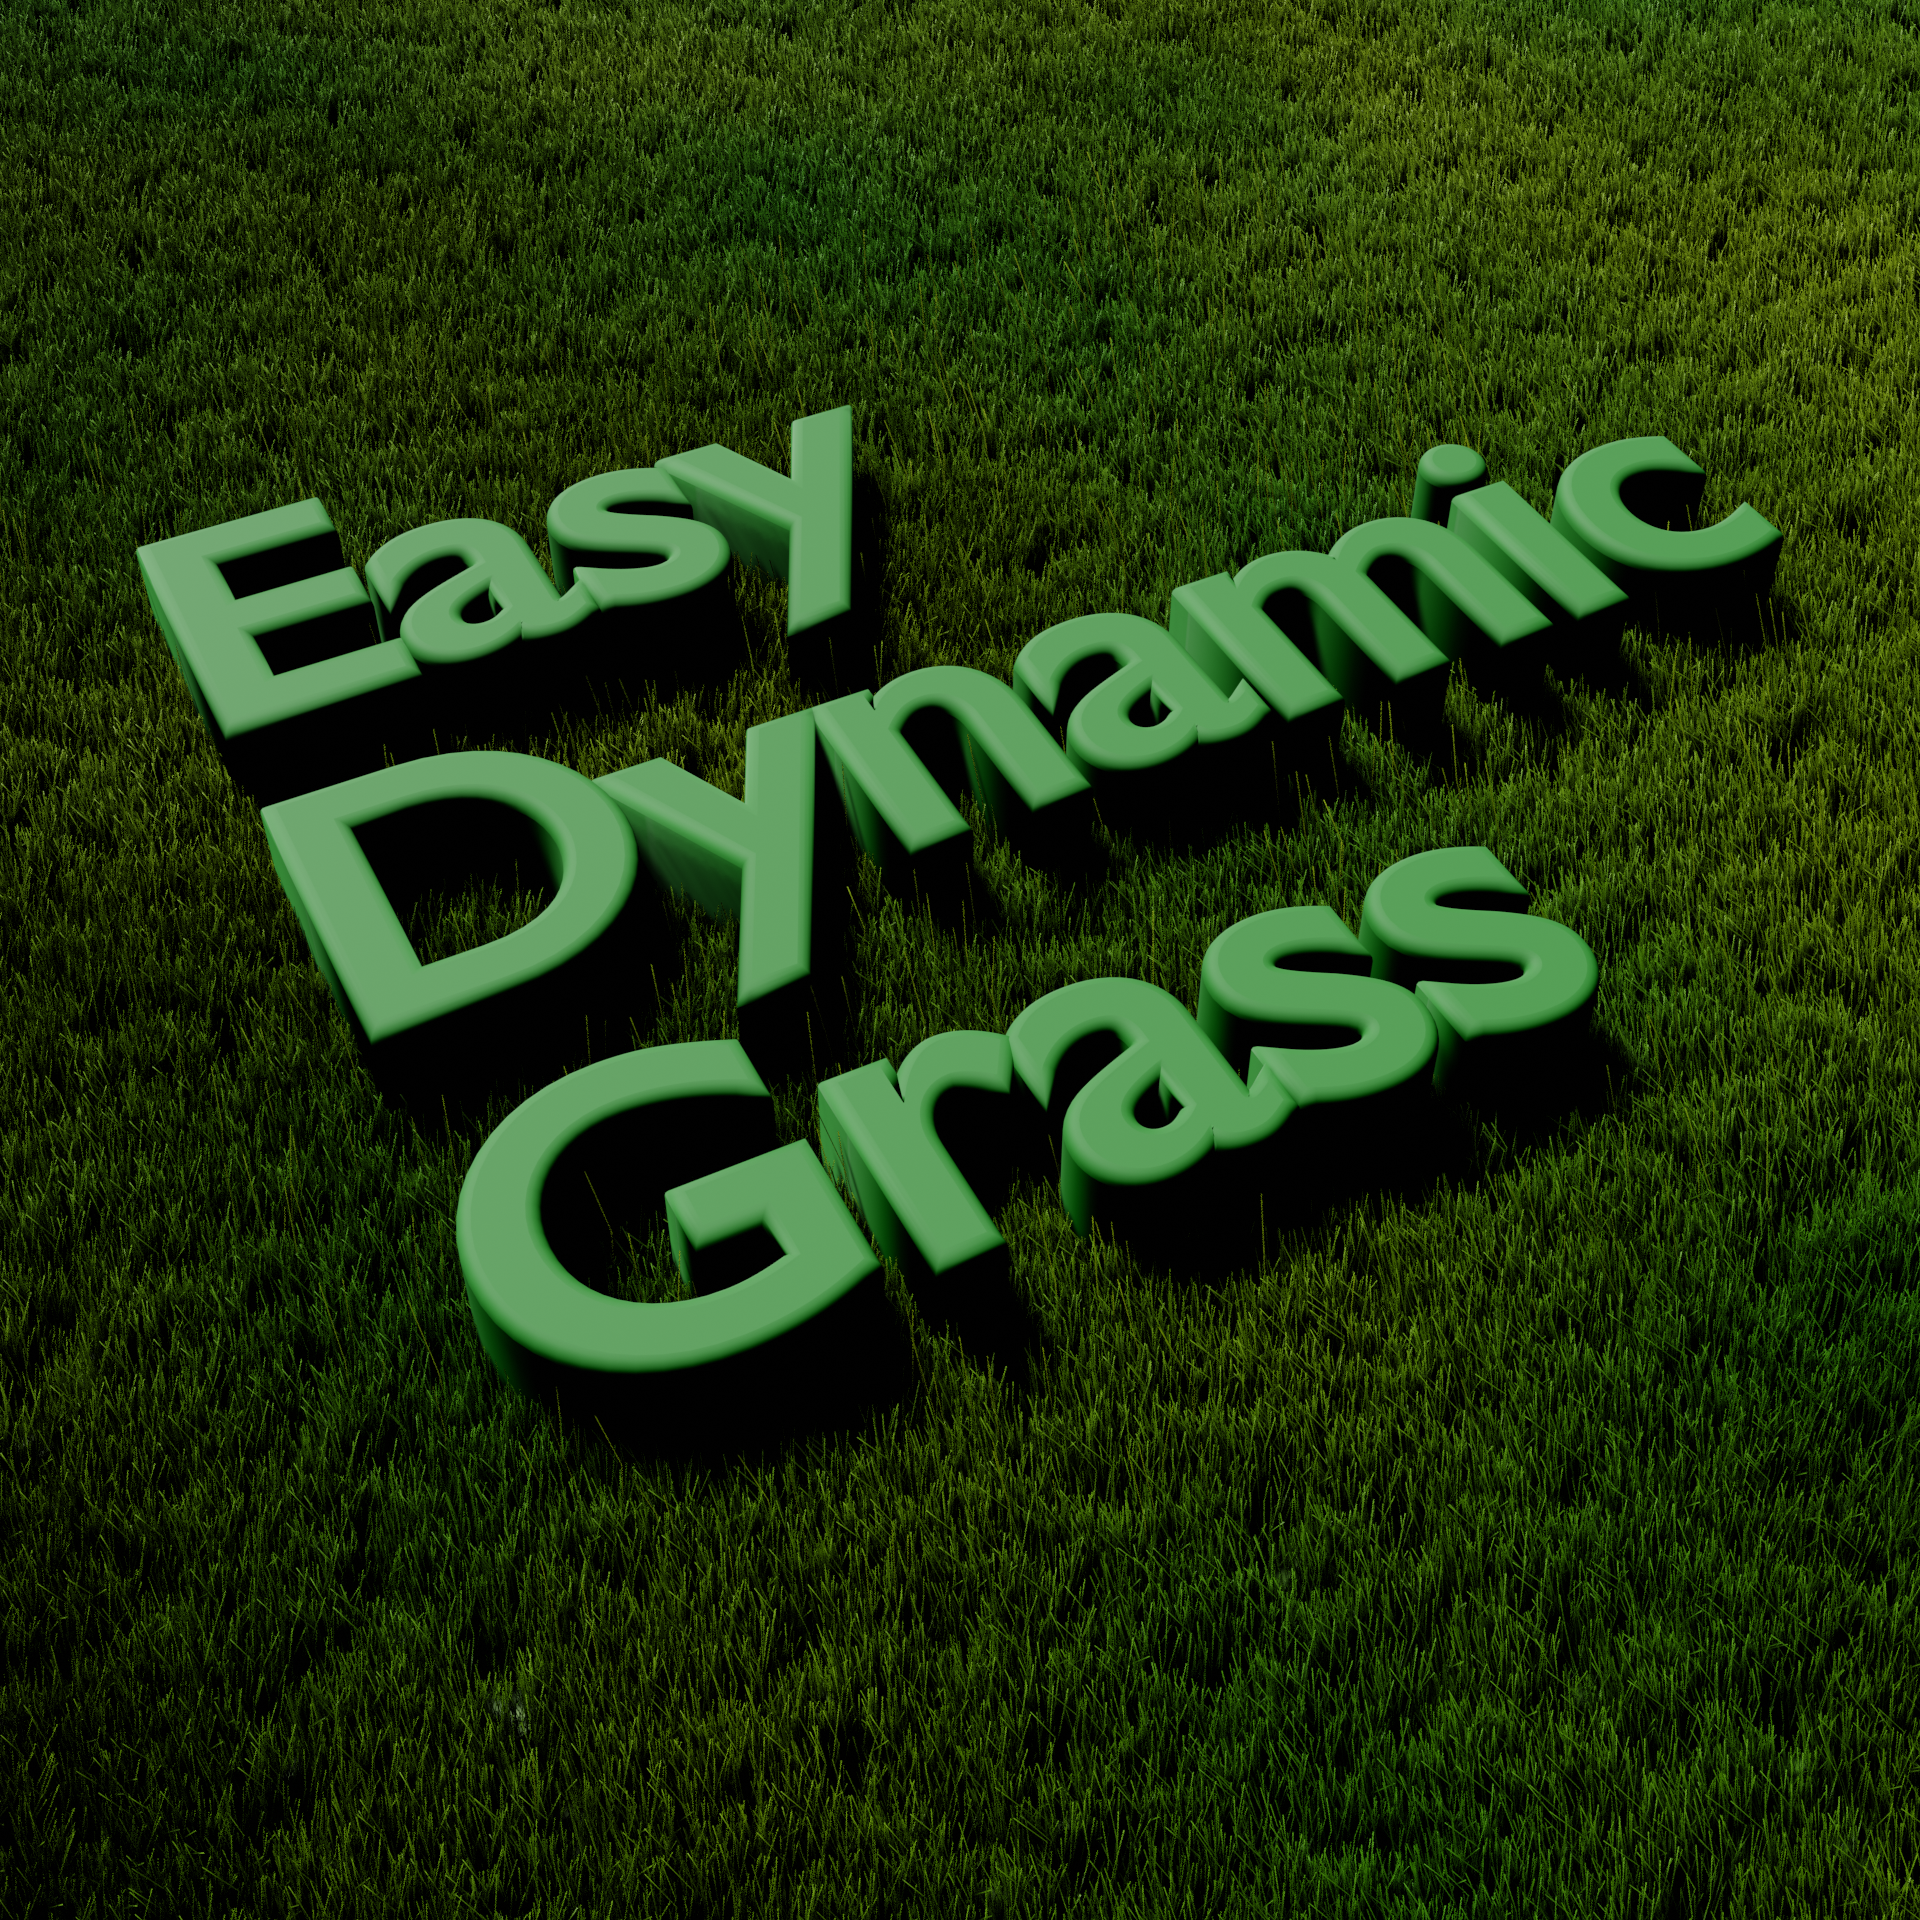
1. Introduction: Welcome toe. Another amazing tutorial. It's good to have you with us today. We are going to create amazing dynamic grass. That's what you're looking at right here. And as you create models with blender and want to do different animation, you will probably at some point want to create grass. And when you create that grass, you may indeed want that grass to behave like real grass as it's blowing in the wind. And that's what we're going to do today. What's even more amazing about this particular type of grass and we're gonna do it includes almost zero modeling that's there. All we're gonna do is create two planes that we're gonna use blenders, particle system, and then you are good to go. This is a super easy, super quick tutorial about creating dynamic rial grass. I can't wait to see what you create
2. Interface: So before we get started with anything of modeling and animation, I just want to give you a good sense of the interface. So right now this is Blender 2.82 If you're looking at anything between 2.80 and beyond for right now, this should pretty much be able to cover everything you need to know just for the general interface. So the general interfaces. This is what you start. When you have a completely new scene. Let's say that you want to zoom in and out and blender that super easy. That's just the middle mouse wheel, rolling it back and forth. So if you hit Middle Mouse button and move the scene around, this is how you rotate the scene. So right now I'm talking about just interacting with the three D View port. Now, if you want to ship things left and right, you hold down shift and use middle mouse button. So hold on shipping middle mouse button. This allows you to pan left and right. So that is how you move around the the three report or in the three D environment. Now, if you are not on the desktop and you do not have a full keyboard, you can go to preferences under edit preferences and just like that, so that you can see it. And under the preferences in input, you can click emulate numb pad. You can also click. Emulate three button mouse if you don't have a three button mouse. This allows you to use one other key and a two button mouse in order to do the same thing. So if that's if you don't have a full keyboard, because you probably do have a three button mouse. Or you should really get one that you're trying to get serious about learning blender. But you might have a full keyboard. You don't really need one. You can click this emulate numb pet, and the reason that's useful is now. When you hit one on the normal numbers on the top of the keyboard, you get a front view. Three Side View seven is top view, and if you want to go from straight on perspective, you to isometric view that is five. So that allows you to kind of move around the interface. So the next thing I'm gonna show you just really quickly is moving around up. So if you want to move an object around, you hit G for grab and then you can freely move it around. But I wouldn't advise that you get G for grab and then the axes. You want to move it on some G m N X moving on the X G, and then why will move it on the y and so on and so forth. Now, if you would like to see all the objects that are in your scene, they're over here on the right side. So this is the what I call the object treat. And it has everything that's in your seat so I can click on the light here, and you see that the lightness selected and I'm left cooking when I do that. And I know that it's selected because it's orange over here and the Brady report and it's orange over here in the object tree. So this just allows you to see what's in your saying now. Everything here I'm gonna cover when we actually use it. But last thing I want you to know other than just grabbing you can broke it. You can get our for rotate and then the axes that you want to rotate about. So if you don't hit the actually you hit our it'll just freely rotate, which is not super useful. But if you hit, why then it'll take about why expletive about the X and so on. And so, for the last thing I want to talk to you about is blenders edit mode. So this was how we interact with objects. How we interact with three D report. Now what if you want to actually change an object so you select that object by left clicking on it and you know it selected because it has this orange outline on it. I hit Tab to get into edit mode. Now, once you're in edit mode, you'll see that it says Edit mode, appear on the top left so I could tag again. See, I'm an object tap. I'm now an edit mode. So now I have access to these individual Verdecia not do all the same things. Constructive urgency G for grab extra moved on. The X and I can do all of those things. I can also hit shift in select multiple Vergis ease and I could hit G grab rotate. I can also, and I can do this to the object or the Vergis e I can hit s for scale. Right? And I can do the same thing for axes liken s rescue of an X or why you see so forth. So that allows you to move objects around change how objects look if you go into edit mode into those things like scale, that also changes the way the object looks because we can scale only part of the object. So that's the general interface. That's just how to move around, how to do objects if you want to add an object. I left that out that shift a ad, and then you can pick whatever kind of object you want for right now. I would go with miss, because that's what you're familiar with, and you can add cubes and spheres and it's always gonna add it with this three d view. Port is So you're gonna hit G for grab like I said before. And then we can actually, Then I can move that object. So that's just really quick and dirty. Be quick interface and how to move in interactive objects When I do later parts of the tutorial I'll cover exactly what I'm doing, but this just gives you an overview of what's up, what's coming.
3. Grass generator: someone you're creating dynamic, good looking grass. It's surprisingly easy. So school didn't start. First thing I'm gonna do is give you this default, que because you don't actually need a cube. But I do need and I'm gonna eat shit A for our ad, and I'm going to add a plane here. No, that's pretty much all of the modeling that you really need to do that. Next thing I'm going to do is go ahead and create more dynamic object. So I come over here, it's on my panel and on going to select the particle properties tab, I'm gonna hit the plus to go ahead and add a particle property. And just right now, to keep everything straight, I'm gonna call this dress. May. This way, I'll be able to tell what it is when I make more than one of these were going to do that in the future. All right, so we have our particle property, and anything I want to do is make this a hair particles. Press is a lot like hair and the way it behaves in the way that we wanted to behave. So right now we don't need 1000 particles were going to do this with 100 particles, and we're gonna have a lot more than 100 particles. We're gonna increase that with something called Children that you'll see in a moment. But we're gonna go ahead and decreased this number to 100 like you can see, that decreased the total number of strands we had here. Now, what we are gonna do also is decreased the length quite a bit. So we're gonna do this. So luckily to scale so I'm gonna choose three inches and look looking about blender is that I can go ahead and put inches in. I can say three and then I end and it will convert that to me is like, if you're not from the United States, that's about 30.7 60 I said about, but that's the actual number 600.762 meters. If you know what grass height, you would like to put it in meters. That's perfectly fine. Already put in centimeters for that, for that matter. So right now we have the grass in length the way we want it gonna leave the seed the same. That's how the grass is kind of situated, uses a random number generator. I'm gonna leave the segments toe five. I find that anything less more than that kind of X funny when we're changing things around . So the next thing we want to dio is add the hair dynamic. So this kind of have a physics of the hair behaves. I'm gonna give that a check. I'm gonna leave the quality steps at five. The more you increase this, the more computing power it's going to take. Pin gold strength has to do with the stiffness, but it's not completely straightforward. But we do care about the structural physics of what we're looking at. So we do hear about it. And this is the structural kind of dynamics of the grass that we're looking at sober text mass, which is like, how heavy the grasses. Right now, it's at the 0.3 and for grass, that's way too heavy. So we're gonna set this to zero point 01 kg and that's going to make the grass less heavy on their 0.3 would probably fall down under its own weight. The next thing we're gonna do is the stiffness. You could think of this as how easy the grass will been. So the stiffness right now like before It's a little bit too high, actually. Decrease it by 10 by a factor of 10 actually, by a magnet by a order of magnitude down. So 0.5 and then random, which is how much thes different characteristics can shift by within all of the strands that are on there. We're gonna change that to 0.147 And I just find that this gives us the correct amount of variability to give us what looks like realistic dress and damping. We're going ahead and leaving at 0.5. So if you think of when spring moves or something isolates, it kind of loses energy or eventually it stops moving. And that's what damping is. And 0.5 work fine. 0.5 will work fine for what we're trying to do. The next thing we want to do is work with the Children. So the Children in this case when you're talking about the particle generator, is based on these like parent particles here. So the Children behave like the parents behave so the Children will take on the movement and the dynamics that the parent take on. So if we change this to interpolated because that's gonna give us the best outcome and now you can see that there are many more particles. So we said 100 before and in the display we have this set to 10 so that means as 100 times 10 which gives us 1000. Now, this is some pretty crappy looking grass if we actually had this because it's not enough grass. But when we actually do the render, we don't actually get the 10. We get the render amount, which is 100 so we get 100 times 100 which is about 10,000. So the reason that we do that is that many particles could slow down the computers. It would be hard, harder for us to render. So right now we do this at displaying on 10. It'll render about 10 times that 1000 times 100. Sorry, it's 1000 times 100. So, um, proceed ahead. So that is 1000 100. And they give us 10,000 like when I said so. Turns out I did my math right now That's all set up. We wanted to be the same length relieving the threshold. The same. The next thing we want to do is what we call the clump noise. So one of the one of the reasons that grass in a simulation which is what this is and wonder would look unrealistic is because everything is the same. So we don't want everything to be the complete same. One of the ways we can do that is by changing the company. So if we go under Children, we go to clumping. We see that we have these here that we can change. So if I change the company, you can see that the grass will tend to kind of come together and one direction. The negative direction brings the bottoms together, and the positive direction brings the tops together. So we actually want to bring the tops together. For this. We're gonna put a positive number of your points 064 and that just gives us some variability. And if you look at this, you can see that it's starting to look a lot less regular, which is what we're going for. The shape we're gonna keep the way it is. And the next thing we're gonna do is change the company because we don't want everything to be completely uniform. Complete uniformity is kind of the enemy off realism. So the next thing is the company ways we're gonna decrease, we're gonna put sorry, not decrease to cos we're gonna add some companies. And the cramp noise is going to be your 0.0 64 That's the companies are actually the clumping itself. We're gonna put that at 0.264 So the clumping is 0.264 and the noise is 0.6 for the next thing we do is the roughness, and the roughness is going to give us our final amount of random randomness that we're looking for here. So if we go to roughness and under roughness, we're gonna go to random because that's what we're using this for. And we're gonna go use 0.764 random And now you can kind of see how everything looks really scraggly. And that gave us the difference between having these completely straight strands, which is kind of unrealistic on gave us some been strained. So this now looks a lot better. It looks a lot messier to you, but in actuality, it's a lot more. It's It's a lot more realistic. So just to give us an idea of what that looks like, let's go ahead and set up some of our camera and everything. So in order to do that, I'm gonna hit zero to go into camera mode. I'm gonna open my side panel that you can get to by hitting and and I'm gonna go to view another view. I'm gonna say lot camera to view. So now if I move my view, the camera will stay the same. So I want this to be roughly in the centre. I'm going to switch to rendered mode just so I can see if I can try to pick up the best angle here. And this is any of that I'm gonna keep I'm gonna un quick lot camera The view I'm going to change our light right now are light is set up to be a point way s I left clicking on the light I'm gonna click the light setting. I can only get to this after this is selected and you know it's like because it's orange. I'm gonna change this to the Sun is already pointed directly at it, and you can see it's Subaru Bright, and that's because it's really high set at 1000. So right now I'm gonna decrease at 10 and that's gonna give us something a little bit more realistic. I'm gonna come out of Render vote hit Number zero to take us into render into the render view a camera remote, and now I'm going to hit. But this is what our environment currently looks like, and it looks a little bit. It looks a little bit. How should we say messy? But it's kind of giving us what we're looking for doesn't quite have enough grass particles . So one thing we can do is we can go to the Children which are up here, and it's that at 10 and 100 and we can go ahead and increase that just to give us an idea of what more particles would look like. So we increases to 1000 and then I hit the same 12 the of a surrender, and you can see that it looks a lot more realistic with this grass, but actually the company looks a bit too much. So what we could do is go to our campaign, and then we could reduce that rate. So reducing it 2.1, we hit 12. Do it again and you can see that there's far less company. So we haven't done the materials for this yet. But honestly, if you wanted to stop here and do the material, you certainly could. We're going to do some things to make it look even more realistic. But this this is right here enough to give you some realistic looking grass once you add material.
4. Grass material: So even though we have grass that doesn't look terrible is far structure and we can really do with black and white grass. So we need to give the grass some material. We need to give us some color perfectly something in the green area. So let's go ahead and add a panel to our three d v poor to our interface here. So in order to do that, I'm gonna hover over this right section here and I'm gonna hit right click, and I'm gonna click Horizontal split. Now, the reason I'm not changing the workspaces because you can do that in blender you can use these different work spaces is that none of them have quite a set of that we're looking for . We're looking for something that's a little bit more simple than all of the other workspaces. We have so little to the left corner here, and we're gonna change this to Shader editor now, this will allow us to manipulate. This will allow us to manipulate the materials using the using blunders, no base system. So I'm gonna go over here to the materials panel. I'm gonna click on the actual plane that we created to make sure that that's what we're working with them and a quick from new here and under the name will change this to grass man. And that'll just help us keep track of it as we create new and different things throughout the process of a screen, this dynamic dress. So right now we look at this. It has this white, this texture here, which is really no riel texture. But we did give it this principle be SDF. But we just want to see what it looks like when we give it any old color. We click on the base color here, left, click on it, and we can just drag this to any green. Right? So I so happen to know that the best green for me zoom in so you can see this, right? So I left click on this I hit Hex. This allows me to give it a specific number that I can remember otherwise. I have to remember the specific RGB values and you're perfectly free to change this to any photographs you want for me. I know that this works the best if I do. 057 200. So zero and then 50 f 7 200 And now I have to do is just type that directly in here. And this is the grass that works for me, so just so you can see what that is. It's zero f seven and I want actually, 200 have 7000 here, so change that, too. Makes it a little bit brighter. And if you want to see what that is, an RGB these RGB numbers 0.5 for red 2168 for green and then zero for blue. Now, if we hit F 12 to give you an idea what that looks like, it has a much better look to it because it looks a lot like grass. But you know what? We're not complete yet because no one's graphs looks that vibrantly green. Now, if that's all you want right now, you could stop. You got some good looking grabs. You can go about your business and free whatever else you want in the model with almost no smiling. But let's go ahead and make things even more realistic. So what we're gonna do is add a texture to this so that we can give some variation to the grass in orderto added texture. The first texture we're going to add is I go to add and under texture. I'm going to pick noise, texture, right. And in order to use the noise texture, you need a couple of different things. One thing is you need to be able to tell blender what part of the texture goes where, so under input, you can go to texture coordinates. Now we're gonna use generated, which is how going there automatically tells it where to go. So we don't have to do what they call you the unwrapping, which is where retail blends or where which part of the texture goes where the next thing we're gonna do is add a mapping node. The mapping node is under vector and mapping, and this allows us to shift the texture left or right or scale it or rotated. So we're gonna take generated. We don't put that into mapping, we're gonna take the vector, put that into the vector size out of the noise section. We're gonna change the noise lecture to two D because we're only working with a plane and it's only in duty And if I wanted to see directly what that looks like just in black and white I can't seven on the number had looked at this from above. And this is what the texture looks like from above. So this is going to allow us to give some variability, Teoh what we see in this environment. So it's set to be like this. We put this in here and it's still black and white, so we need to give it color. And the way we're going to do that is we're gonna add a mix RGB So I'm gonna go to a different way the sun when it shift a my cursor is over the shitter input and I'm going to now and search click I start type and my ex. So this is the way that I prefer to find notes because knowing what menu is on could be quite inefficient. So as long as you know what it's called, going to shift a and then you can search and then under search, you understand what you want. Now I could just drop that in place and you see that nothing really change, and that's because it dropped into the color now the noise sexual were using. We don't want it to actually pick the color directly. We wanted to decide what color goes where. No, next in the mix. Rgb know what's gonna happen is some parts of our node will be will be color one and some parts of our texture. So I texture will be color too. So if I just change this to black, you can see that part of it is black, and part of it is kind of gray, right? And that we could make this pure white if we want to, But we don't want it to be black and white. We wanted to be something more like grass. So what we're gonna do? No, I'm gonna go ahead and hold down control. Right? Click and drag to go ahead and cut that wire. I'm gonna change this first caller to green. So the easiest way to do that since we already have that color saved here is I'm going to hit the color dropper here. Drop that over the color. We already have and left. Click. Now I have a green here Now the color that I want here, we're going to do this the same way. Now you can put whatever color you want by increasing the brightness here and then moving this two way to be whatever you like. But I happen to know that what works best for this case, really, in my opinion, is the eight be and then I believe with Let's try, see you zero. Yep. And I gives us a yellow color, so just so you can see what that waas that was B A B C 00 If you want to see that in terms of if you're going to see that in terms of RV RGB, that's Red is 0.479 g is 0.503 and boo is zero. So this is now going to mix those colors, right? So we have part of this which is green and part of this, which is blue. So if we look at our actual grass actually toiled to give us an idea of it, we see that now are grass has a lot more yellow in it. Now, this isn't bad, but I think this is a little bit too yellow. So what I'm going to do now is show you a way that you can kind of tweak this to be whatever you want. So I'm going to do shift, add a and I'm gonna type in the search Colo. And I want color ramp now, color ramp takes an input and basically maps black and white to it. So if I connect this directly to our material output, you can see that nothing really changes. When we go through it, it shows you the same thing was showing before. But now with these sliders, I can change how much black or how much white there is in our scene, right? Not only can I change how much wider Hamas black, I can flip these two. And now everything is backwards of what it was, what was black is now white, and what was white is now black. So I'm gonna reconnect this to the side. And now I can move these sh aiders and I can increase the amount of green, which is what we want. We want mostly green with little bits of yellow here in there. We don't want necessarily terrible grass. Nothing we're gonna do is change this blend mode to ease just to make it a little bit less abrupt. So now if I hit F 12 for render, we see that we have these yellow sections and we have green sections white what we're looking for here. So I'm going to move this to the side a little bit more yellow. It hit f 12 see what it looks like. And you know what? This is still a little bit too stark, so I'm going to switch it back to the way it waas because I think that was probably a little bit better. So that's what the white on the right in the black on the left 12. And though it is a little bit too yellow, I think that the way it makes is this good. So what we want to do now is change kind of the way the whole thing looks so we can do that by darkening the right side. So now the whole thing is gonna look a little bit greener and yeah, that looks much better. So now we have sections that are a little bit lighter than the rest of the sections, but it looks a little bit more realistic because we have some variation in that grass color . So if you want to stop here, you do have a realistic grass. That looks pretty good. Pretty good. But we're gonna make it even better.
5. Creating Height Variation with Textures: as we have this grass the way it is Now, I'm just gonna hit a quick 12 to go ahead and we render that it does have variation in it, but it's still two regular for it to look what we would think. It's completely, really. So we are gonna add a little bit more variation to it. But before we do that, we're going to make it a little bit easier to see in the three D report. So we're gonna go to our particles tab and we're gonna scroll all the way down until we get to the part that says Children and right now, listen to set to 10 and that's to make sure that everything stays really fast and stays really good. But we're gonna actually increase this because we're not going to really shift a lot of things around in the three D report. But we're gonna have a better idea of what's gonna look like while we're trying to tweak the variation in the heights. I'm just gonna increase this 200. And as I look at that, I see that it still works pretty good on mine. I'm just holding the middle mouse president Button and shooting in around. So I'm gonna go ahead and increase that to 1000. So this will tell me more accurately what is going to look like. And then I'm also gonna quick on our rendered view, and I'm gonna rotate this around until I get a good idea of the lighting and what's gonna look like when we actually look into the camera. So this is a pretty good one, and everything is working still pretty free. Snappy. So I'm gonna leave it here at 1000. So that's what we're gonna do is create this variation. And we're gonna do this by using a texture. What we're gonna do now We're going to stay in the particles tab, running all the way down to textures and under textures. We're gonna click new and the texture name. We're going to give this. We're gonna call it there and call it hype. And that's once again just to keep track of everything. But once we've created that, I'm going to go to the textures tab and you can see in the texture stab. We already have a texture that's called here, right. And instead of an image because we're not going to use the image. We're gonna use blenders built in texture. I'm gonna change this to Musgrave. So Musgrave is another one of those textures that's created with the map algorithm, and it allows us to be able to create this variation that we want. So for right now, this is what the texture looks like. And this is how it's gonna be if we were gonna look at it just on the surface like we did before. This is kind of what we This is kind of what we would see, but we haven't actually added its influence yet. So I'm gonna change the size because I happen to know that 0.6 is a good number, and that makes everything much smaller things that I'm doing. That is because this is going to control some variation in the height. So where it's black, you're going to see or you will see that some parts will now be shorter, where it's really bright. Some those parts will be a little bit larger. And then it will also help us undo, or at least blend Din's on the disc, lumping that we put in to give us some variation before. So now that I have that set 2.6 undersize and selected Musgrave, I'm leaving Linda original as our original generate as our generator. The next thing I'm gonna do is open this context here called influence. And this just allows me to decide what this texture is affecting. So right now it says general time, it doesn't really do anything specifically, but we wanted to affect the hair lengths. I'm gonna check that and you can see that it did in fact, make a difference to our hair. So without it, it looks like this is a lot more uniform with it. It can see that it does have how much more random look to it, which is pretty much what we're going for it. So now I grass looks a lot more wild. It looks a lot more realistic. So if you wanted to make changes to it there, you know other things that you can do to make changes to it by making changes to the actual texture. But I will say if you're going to make changes to the texture. One of the glitchy things about blender is that when you make changes, they don't always show in the three d report. So if I just to give you an idea, if I wanted to make a change and in order to make a change, I'm gonna close these here just so you can see what I'm doing. And I say that Want to change the brightness? So I'm gonna change this number. I'm gonna pull it down here, and you can see that it changes here. But as I move that brightness, you don't necessarily see that the texture or the grass is obviously making a change. Now, it's very, very shimmery right now because it's actually doing the real time rendering. But in actuality, we're not seeing ah, whole lot of change between zero and one, right? So in order to fix that in the influence, all you need to do is click and un quick it and that will re apply all those changes you made. But right now I'm okay with the way this looks. I'm gonna go ahead and turn this off so that it's not so flickering. And then I'm also them and change the Children. And I take that back down. There's something that's a little bit more manageable. And I'm just doing that. But going into the particles, the particle section and then I'm looking for Children on the Children and putting that back to 10 so that we make sure that our computer stay sad because the last thing we want is for our least for my computer to freeze. While I try to teach you this, I'm gonna hit a 12 to give us an idea what that's gonna look like. And, yes, it looks much more irregular and much more realistic as faras grass. So there you have it. That's how we created some variation in the height using the texture, we have the materials the way we want it. The only thing we need to do now is create some slightly different plants within what we're looking at.
6. Creating Long Grass: All right. So we are almost done with having our grass Look the way we want it to some of this hit f 12 to give us an idea what a graph currently looks looks pretty good right now it's a look has a lot more variation. And it then it did before and it doesn't look so perfect. So it looks a lot more realistic. But what it doesn't have is other plants within this. So usually, when you have grass, unless you have perfectly manicured grass professional manicure, there are some other plants within the grass. So we're gonna easily create these this variation in the types of grass within our grass by just making some slightly longer grass. That's slightly different color. So that'll give it, like, a more straw type. Look to it and it's gonna be really easy, for the first thing we're gonna do is select our plane, and then I'm a shifty and then z to bring it down and let me go ahead and turn on or make sure that you can see the capture here. So So now we have a plane that's identical under the original plans, I'm gonna hit one on the num pad to see that from the side minute G for Grab Z to move in the Z, and I want them to be relatively close. They don't have to be super close, but relatively close. So if I look over here in our victory, we have to plants. So let's make this a little bit. It would be easier to read. So the first plane I'm just gonna call grass May and then the new plane that I just created . I'm going to call Grass sparse, and that's because it's not going to be nearly as dense as the first bit of grass suite mates. So we have within our grasp arts. We're going to go to the particle panel and it within the particle panel. I'm going to hit this copy button here. So it's what? It's the picture that looks like a normal copy button. I'm gonna hit that. And now that we and now we have a new particle kind of context to create under, so I'm gonna change the name instead of grass Main. It's good now, but be grassed sparse. I'm gonna do that same thing here. I don't know that you have to, but it's always good to stay consistent with your name. So now we have the name under the particle panel as game as grass sparse. And we also have the name of the object. Also as grasp are so one of the main differences between this grass and the grass that we already created is that this grass is gonna be longer. So we're gonna go to admission under the particles panel and going to leave. This is 100 and I'm gonna decrease this and I mean, put it at seven inches instead and I end. We'll put it in inches. If you are used to the metric system, that is 0.178 meters. Or if you have an idea of how tall breasts the grass we're looking at, it might be You can put in whatever you might. The other thing we do is decrease the total number here because we don't want this to be as density of it. So we could do that here, But actually, we're gonna do that in the Children, someone of scroll down until I get to the part that's his Children. And when under the Children gonna leave. Everything is if I'm going to decrease the rendered amount to text. So the rendered amount and the display amount is going to be about the same. So now if I take a look at 12 and take a look and see what we have, you can see that we have these longer pieces inside here that represent what's going to be a straw. So the missing we're going to do because it's really hard to see is give it some different coloring. I'm gonna make sure that grasp ours is highlighted, and I can see it's highlighted by here by looking at my object tree and on the left side, I'm going to hit the same copy button and change the name to grass sports. Now I'm using the copy button because we're just making variations on stuff that we've already done before. So in order to see it better, I'm going to go to back to the tree here and under main. I'm going to turn off this I now that just makes it so that I can see the one we're talking about. And then grass man is not in the way. So what? I'm going to do to make sure that everything is a little bit different because one is sitting right on top of the other. I'm gonna shift the ex a little bit for the mapping. So if I had seven on the number, that's a look from above, and I just drag over. You can see that I'm moving things to the left or to the right, so I'm just gonna move that on there. It doesn't really matter how much I'm gonna put four meters in there. Everything I'm going to do is change the scale. So right now it sets of five. I missed change that scale until 1.5. That's just gonna make it look more different than the other one. And the other thing I'm gonna do is make it a bit more yellow because I wanted to stick out a little bit more, so I dragged us over some. We can see that the whole thing becomes more yellow, so I'm gonna drag it to about there. Now. I'm going to go to Grass Main and our victory and I'm going to unclip the high. So now we have both on top each other, so If I hit F 12 you can see that it's much easier to see this, but I'm gonna call right now kind of strong grass within it. So that's good for the visuals. But like I said before or like, you know, we're trying to do this is Dynamic Grass is gonna move because there's wind. We need to make sure that the dynamics of the straw are also correct. So make sure that we have grass parse selected and under grass fires under the particles panel. We're gonna go to the hair dynamics and the hair dynamics. Let's see, right here they're tours of the top and hair dye name is their checks. Because we created just a copy of the other one. We're gonna leave everything else mostly the same. The vertex mass stiffness, the man. I'm gonna leave all that's the same. And what we're gonna decrease is the damn things or decrease that up to 0.25 And that means that thes straw is going to move with less damping. So it's gonna be a little bit more jittery gonna move a little bit Maurin the wind than the rest of the grass and that makes sense because higher than the grass. So it doesn't have the same effect from the drag of having the grass, all the other graphs around it. So that's what we wanted for our dynamics, and that's what we wanted from material. So if we get a quick 12 is to see that again, it's just a little bit. You can see that we do have the effects were going for. So that is it for the grass on anything left is to create wind.
7. Wind and Render: So now we just have our last few steps, and that's just to create the wind and make sure everything looks like we wanted to do before the minute before the render. So, in order to create the wind, really do it much like we would create any other object I'm gonna hit, shift A for add and then under force field, I'm going to select winds and wind is the second option, and that's going to spawn right where you're at, right at the center where the three D cursor is now. I'm going to move this on the hit G for grab and then exits to love it along the X. And now that it's beside it, I can hit our for rotate and then lie to rotate it on the line. And I'm not hit 90 And for me, because the way I moved it, that that faces it towards the right way. But if you did yours and face the opposite way, you can just hit 90 and then negative and then it'll flip it the other way. But right now this is looking good now with its selected, and you can see here in the object tree, but not with the selected. We can go to the force field tap here, and that's right here. So under the physics properties, you can see that we already have. The win we already have a selected is because that's how they created it. And this is really easy blunders. Force fields are pretty easy to get started. Everyone do something really complicated. Usually it's still pretty easy, but we don't have a lot of things that we need to a lot of parameters we need to change. So really, the only thing we need to change is the strength. So in order to see what everything looks like now you can hit space bar or you can hit this play button here at the bottom. If you look at it, it lays are grass completely down, which is just way too much. I'm also going to decrease the total number of frames, so I'm gonna decrease that 50. And now we're only gonna look at the 1st 50 frame so you can see that it completely lays my grass down because of this, because of how much when we have. So I'm gonna take my strength and I'm in the decrease it right a bit. I'm gonna take the strength down to 0.5 Now. If I hit that play, you can see that the grass doesn't move as much. So this is more realistic. But what's actually not so realistic is that wants the grass moves, it stays completely still. So if I increase this just so you can see and then I look at later frames the grass looks like it's in stone. It looks like there is no win. And that's because Linda essentially is a simulation program, right? Right now, I told you to put Wind, and I told you to put the exact amount of wind about time and not change it. And that's just not accurate to the way that woman actually works to change this back to 50 because really care about the 1st 50 frames at the moment. And the easy thing that blunder does as I wanted to do, is change the noise amount. This is the variation in the strength, and I'm just gonna put one here. So now if I hit the space bar, you can see that the grass does waver like it's in the wind. And that's exactly what we were looking for. Unfortunately, that's pretty much all we need to do for the force field. The creation of the wind. Now, as this looks right now, I'm just going to check and make sure that when we render it, we get a good angle because now the grass is actually changed from where it was hit zero to get into render view. And then I'm gonna hit Space Bar to stop it from cycling through the animation 12. And we see that this is maybe not the best angle without grass looks really dark. And that just has to do with the way the grass is laying and how are light is interacting with it. So we try to find a better vantage point. So in order to do that, I'm gonna switch to the render view which appear on the right side. I'm gonna switch to our interview. I'm also going to change the number of Children like we did before. So I'm going to select Grass main and under the particles panel, I'm gonna go to Children and under Children. I'm gonna go ahead and increase that to 1000. So now I have a better idea of what everything looks like. It's gonna open up this side panel here by hitting this arrow. You can also get it by giving end and under view. I'm gonna slicked lock camera to view. So this allows me to move my seen around while not moving the camera. And I can see that from this angle, I get a much better view of the light and the grass together. So now I'm going to click that so that now, when I moved everything around the camera stays in the same place zero number zero again, just to see what that looks like, that I'm gonna f 12 to see what a render. And I think that this is a really good vantage point for what we're trying to dio. Now the last thing I want to do is give it a good background. So we're going for realistic. In this case, we're just going for something that's gonna make it look good so you can see the animation and see the quality of the animation. So I'm gonna go to my world settings So right here on Olympic world properties, and here I'm going to decrease this to black. So now if I had left, well, you can see that we can really get good. A good look at what that grass actually looks like. So now I'm all set to do my animation. All I need to do is make sure everything is set up. So in order to set up the actual animation, I need to set up the output. So underneath the and beneath the appetite here on blender causes upper properties, I'm going to change the folder that it's going to go to. So I'm just gonna leave mine where it is. But you probably you'll want to put this at something that makes sense to you. I'm gonna change the file format two FF and paid and then under encoding, I'm gonna change this to before, So this is not a Macon MP for which is something that which is a file from the video that pretty much anything can play, including if you're going to put this on YouTube or Instagram, anything like that. The video Kodak is H two h 20.264 and other than that, pretty much ready to go. We have it set up at the default 1920 by 10. 80 and that's HD, and that'll be perfect. You don't need anything more than that unless you want something more than that. And right now I've set up to be 50 frames and just to give you I just want to cover one thing before we set it to go ahead and start right now. You see this red portion down here? I'm gonna turn this off so it's not flickering so much. And this is how blender kind of saves this animation information in memory is called the cash. And if we go to the particles panel and we look for the cash to see if we can find it here yet here's the cash. Look on the cash we see that is going to save 250 friends worth of cash. We're not gonna look at all 250 frames, but it's here, and you can see that here on the bottom that we have this red bar all the way up to 250 frames. If you wanted to render more than that and probably for whatever reason, that you're going to use this, you are gonna render more than just the 50 francs. I'm just doing that because I don't want you to be here forever while it while it renders, um, it's only gonna do up to 250. If you wanted to do a lot more than that, you would need to also change this number to be the total number of frames that you want to render. So we are all set reiterated the 1st 50 frames just to give you an idea. And in order to do that, we're gonna go under render, and then we're gonna quick render animation. So there you have it. Here. It's all set now to look and see what that looks like. We can go under render, and we can say view animation. Now it's also going to be present on your computer wherever you told it to go. But you can see it here. It looks pretty good. This is what we were looking for. This is only 50 frames. If you want to see you start with the intro. Looked like you saw more friends look like this is exactly what we were going for. I can't wait to see what you make
 EduCraft Ideas, 3D Animation with your imagination!