Transcripts
1. World Generation Introduction: If you're here right now, I know one thing about you. You're a creator, a dreamer. You wanna build worlds from your imagination. Those worlds could be filled with anything. Mount strikes, robots, ninjas means you name it. This class is one stamp on your creative journey of using blender to do that. The completely free and open source program. You're going to learn some great tricks in creating worlds. Your cover how to make mountain ranges. We'll cover how to make your own cloud backtrack. You learn how to make graphs that blows no, when? I use the sunlight to make anytime day. And finally, how do you use images to like your work? Join us as the Agile team takes you on a journey of world Generation. I can't wait to see what you create.
2. Learning the Interface: So before we get started with anything of modeling and animation, I just want to give you a good sense of the interface. So right now this is Blender 2.82 If you're looking at anything between 2.80 and beyond for right now, this should pretty much be able to cover everything you need to know just for the general interface. So the general interface Is this what you start when you have a completely new scene? Let's say that you want to zoom in and out and blunder that super easy. That's just the middle mouse wheel rolling it back and forth, so that will allow you to zoom in and out. So if you hit Middle mouse button and move the scene around, this is how you rotate the scene. So I'm right now. I'm talking about just interacting with the three D View port. Now, if you want to shift things left and right, you hold down shift and use middle mouse button. So hold on ship and middle mouse button. This allows you to pan left and right. So that is how you move around the the three D view port or in the three D environment. Now, if you are not on the desktop and you do not have a full keyboard, you can go to preferences under edit preferences. And then they just dragged that so that you can see it. And under the preferences in input, you can click emulate numb pad. You can also click. Emulate three button mouse if you don't have a three button mouse. This allows you to use one other key and a two button mouse in order to do the same thing. So if that's if you don't have a full keyboard, because you probably do have a three button mouse. Or you should really get one that you're trying. If you're serious about learning blender, but you might not have a full keyboard and you don't really need one, you can quick this emulate numb pad, and the reason that's useful is now. When you hit one on the normal numbers on the top of the keyboard, you get a front view. Three s side view seven is top view, and if you want to go from straight on perspective, you to isometric view that is five. So that allows you to kind of move around the interface. So the next thing I'm going to show you just really quickly is moving around objects. So if you want to move an object around, you hit G for grab and then you can freely move it around. But I wouldn't advise that you hit G for grab and then the axes. You want to move it awesome G, and then X will move in on the X G. And then why will move it on the why and so on and so forth. Now, if you would like to see all the objects that are in your scene there, over here, on the right side. So this is be what I call the object tree. And it has everything that's in your seat so I can click on the light here and you see that the lightness selected and I'm left cooking when I do that. And I know that it's selected because it's orange over here and the three D report and it's orange over here in the object tree. So this just allows you to see what's in your saying now. Everything here I'm gonna cover when we actually use it. But last thing I want you to know other than just grabbing you can rotate. You can hit, are for rotate and then the axes that you want to rotate about. So if you don't hit the axes and you hit our, it'll just freely rotate, which is not super useful. But if you hit, why then I'll rotate about the why x militated about the X and so on. And so, for the last thing I want to talk to you about is blenders edit mode. So this was how we interact with objects, how we interact with the three D report. Now what if you want to actually change an object so you select that object by left clicking on it and you know it selected because it has this orange outline on it. I hit Tab to get into edit mode that once you're in edit mode, you'll see that it says edit mode appear on the top left. So I tabbed again. See, I'm an object moon tap. I'm now an edit mode. So now I have access to these individual Vergis is now. I can do all the same things. I can select the Vergis e g for grab extra moving on the exit act and do all of those things. I can also hit shift and selective multiple Firdous ease and I could hit g grab rotate. I can also, and I can do this to the object or the vergis e I can hit s for scale, right? And I can do the same thing for axes like an Esper Skillman X or why I see so four so that allows you to move objects around, change how objects look if you're going to edit mode and do those things like scale, that also changes the way the object looks because we can scale only part of the object. So that's the general interface. That's just how to move around, how to do objects if you want. Added object. I left that out that shift a ad, and then you can pick whatever kind of object you want for right now. I would go with mesh because that's what you're familiar with, and you can add cubes and spheres, and it's always gonna add it where this three D view port is. So you're gonna hit G for grabbed. Like I said, before and then we can and axes and I couldn't move that object out. So that's just really quick and dirty. Be quick interface and how to move in, interact with objects. When I do later, parts of the tutorial I'll cover exactly what I'm doing, but this just gives you an overview of what's up, what's coming up.
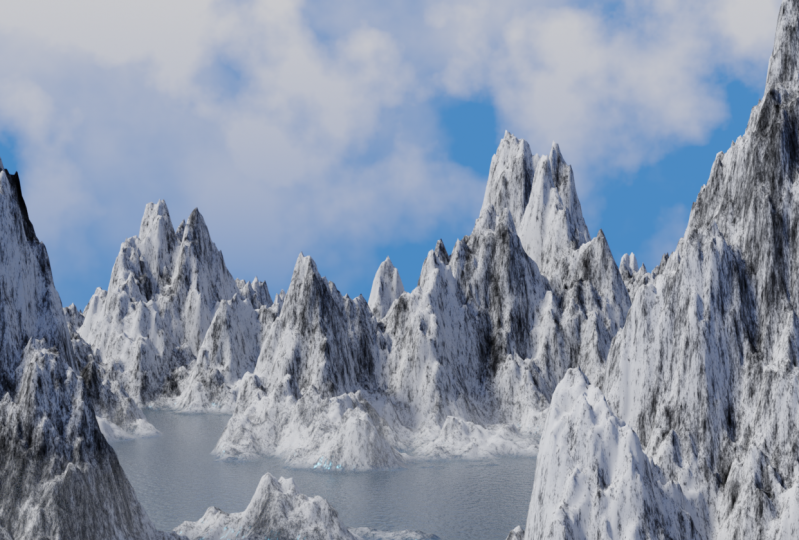
3. Mountain Range: right now, we're going to create mountains and we're going to create in specific these snowcapped mountains that you see right here and what's really interesting about this part. This type of modeling that we want that we're going to do is that is completely procedurally created me. We're not going to do any actual moving around, probably going toe actually with very little. But we're going to create this entire thing, including the materials, by just moving around nodes and using mass to create this very interesting and very actually realistic mountain range. So let's get into it. So this is the opening scene that we're going to start, and the first thing I need to do is prepped the environment to be able to do this kind of procedural modeling that we're talking about. So the first thing I'm gonna do is go to the render settings and this needs to be done in cycles and under feature set, it needs to be experimental. I'm gonna go ahead and switch mind to gpu compute. I think my my gpu is probably better than my CPU, and the next thing we're gonna do is give it somewhere to actually do. The model is so I'm going to get rid of this unit. Cute. And let me just turn on swing cast so that you can see what I'm doing and I'm going to add , but hitting shit A. I'm going to add a plane and I want to do this on something close to scale. So in order to do that, the environment and the models that I create need to be something close to scale. So the way I'm going to do that, I'm going to scale up this plan. And just so you can see with the length of the scale or with the length of the planes, are the edges of the plane. They're about two meters. So I'm going to scale this up 15 100 times and that gives us 3000 meters for the plane. So if I had tab now, you can see that our plane is much bigger. The other way I wanna prep are seen is to make it so that it's viewing distance is more than what it is right now. Because you can see if I move around just a little bit, it disappears and that it's not gone It's just that it's too big, too far away. So I'm going to change the clipping distance. This is starting in here. It's under the end panels. If I hit N, this panel goes incomes and I'm going to switch this to one e 10. So this one times 10 to the 10th. It just means that has 10 zeros we can see really far and now are seen here won't disappear . So I hit seven to view this from above. And from here, if I hit Tab, you can see we have 3000. But I'm going to go ahead and turn that edges length off. And that's just here in this upper panel. I can have it. Tell me how long the edges are. So that's pretty much all of the modeling that we're gonna do for this. So the next thing I'm going to Dio is prep kind of the windows here because we're gonna use the shader editor. But I'm not going to go to the shade of you because the shade of you actually has some stuff that we don't care about that we don't really need these two panels to the left. So I'm just going to go out to our normal layout. I'm going to change this bottom. Since we're not doing any kind of animation, I'm going to change this to the Shader editor, right? And so now I have the Shader editor set up, and I need to start to give it the nodes that we were talking about before. So in order to do that, you say you don't see anything down here and know it. Note editor, I need toe first. Give it a material. So in order to give the material, I'm going to click the materials tab over here. Material properties, and I'm going to click new to give it that material, and I'm gonna give it a name. I'm just going to call it mountain or mountains. But it doesn't really matter, as long as you could have been a name that makes sense to you. And now you can see the nodes that we have here. So the first thing I'm going to do is get rid of this initial note. We'll get rid of this initial node and then under settings. This is within the note within the material properties note under settings instead of bump on Lee. I'm gonna do displacement on Lee. And this just allows us to create displacements based on materials and textures.
4. Mountain Chapter 1: Camera & Lights: So now that we have kind of a file and the interface set up to do what we wanted to do, let's go ahead and set up the environment so that would create the mountains. They look natural or they look, at least in a normal way, that we can see them. So the first thing we're gonna do is go to the camera. So we're gonna go to the camera over here in the right side view over here, and we're gonna click on camera now under camera. We're gonna go to the camera properties or object data. But in this case, it's specifically for the camera and just like we did for the environment as a whole were going to do for the camera so that clipping distance for the camera is set at 100 meters. So if we hit zero and we looked through the camera, we actually is actually really hard to see anything. If we wanna kind of zoom back, I can click lock camera to view, and then I can use the mouse and you can see that it disappears just like it did before, when we were in just the three D view. So in order to fix that, I'm gonna change this to that one e 10. And that's just one times 10 to the 10. So 10 zeros. So now if I zoom out, we can actually see what that looks like. And we're making it so big because we want our mountains to kind of be to scale that way we know everything that we're creating will make sense. And we don't necessarily have to think about baking as much stuff because everything is more realistic. So the next thing we're gonna do is the lighting. So I'm going to go over to year to this right side panel and click so that now I know lighting is selected. I'm gonna unclipped block camera to view because I want to leave the camera right there and then my G for grab Z to bring it straight up. And normally we probably be okay with a point light source. But in this case, we're not. Our environment is really so big. We need something that's a lot more like the sun. So we're actually gonna go to our object properties here for the light. We're gonna quick son, right and Now we can see that this looks slightly different because it has this little yellow dot in this, your little yellow Todd tells us what angle the sunlight is that now, when you use sunlight and blender, it really doesn't matter where the light is because all the light comes through at the exact same angle at the exact same amplitude or magnitude. So all we care about is the angle. And right now we don't have mountains yet, So this angle is really gonna be okay. And it just so happens that 1000 I'm looking over here on the right side. There's a lot more than we need so we can tone that down to 10. And now that's good enough for right now we'll know a little bit more when we actually have our mountains. But our son is all set. I'm gonna just grab Z and then bring that up a little bit. And now I'm gonna look through our cameras on the hit zero on the num pad to see what the camera looks like. Annette all looks good enough so that we can see what's happening when we actually do it. So now I seen it set up for us to create those mountains
5. Mountain Chapter 2: Displacement: So at this portion, we can really start to build these mountains. So I'm going to click the plane. I'm gonna click the plane here, so that is selected and where in no beauty was like we had before. If you don't have this, use knows check. Go ahead and check it so that we can use the notes that we're talking about now. Material put, it doesn't have anything here at the moment. There are a couple of things that we want to use to create these mountains. But before the before I do that, I'm gonna put this in view port shading so that we can actually see what we're creating right now is completely black because there's nothing there. But I'm going to go ahead and hit shift A in the node panel down here and not paying that we're using and I'm gonna use search. The search is usually the easiest way to find things. I'm just gonna type texture in here, and you can see all the different textures that come up in The texture we're gonna use is the noise texture. So that's one way to do it. You could also go to add texture and then noise texture. So we're not using any add ons or any external files for this. But if you did use the node Wrangler, add on that would make it much easier. But right now we just woken up, focusing on using blunder completely out of the box. So if I connect this noise checks Chur, you can kind of see what the environment looks like. Now I'm doing this. If I actually did a render, it wouldn't look very good because I don't actually have a shader here. I'm just connecting it to the output. But in order to control a little bit more about what a little bit more of how it looks, I'm going toe also add. So I'm gonna say shift again and I'm a search for texture coordinates. And then the next thing I'm gonna do shift A and I'm gonna look for the mapping. So these two knows. Allow me to control how the texture is displayed on the pain. So for these particular for these particular ones, I'm going to use what is called the object, and I'll show you what that means. A little bit. Ah, in just a moment And then I'm gonna connect the vector to the noise texture, right. And now you can see that we can't really see what it is, but that's because these values here are not really set to what we want them to be. So I just happen to know the values that work best with what we're trying to do. But I've simply got that by just messing around with it until I got something I liked and you can do the same thing. But for right now we know that these values work best for a scale of 0.0 to 1. We know that a detail the number is 16 which is the max that you can do with the slider here. And the distortion is still zero. So this gives us an idea of what it looks like now, for the really interesting portion here is for us to actually see some displacement based on that. So, in order to have displacement, we had did all that set up in the beginning. But the other thing you need to do shift a and I'm just going to search for D. I s displacement known. And this would This is what gives blunder. The ability to displace objects or displaced Vergis is based on this grayscale. So we're gonna take this factor into the height. That's really important because we're controlling how high each section of this is into into the displacement. Now, in order to see what it looks like, we need to go into rendered moment, right? And right now, you can't really see anything. And that's because we need to go into the modifier panel and Adam modifier. So we're gonna add subdivision surfaces. We're gonna set that this simple? Well, let's say adaptive. This is what allows it to change based on the textures that were using. And we're just going Teoh, make sure that's all set. The last thing that we need to do is get the displacement to be the right scale so that the scale of the things that we're doing are much larger than we typically do because we're tryingto work actually to scale. So the number that happened sort best for this is 652.7. So after that, put that in. You can see here that I do have some amount of changing to our terrain. So this is it precisely what we want. The easiest way to change this is to add a color ramp note. So I'm gonna hold down, shipped I'm a drag across these two, and that just puts them together, gives us this note here, and I can hit G to move it around just like it was a normal object. So now I'm going to say shift a search. I'm going to use a color ramp Note. I'm gonna place the color ramp. No, there. And as I increase the black, you can see that I bring everything down. And that's because black is zero and white is one. So for the displacement, one is displaces it as high as possible and zero, which is black, displaces it. Not at all. So right now this is set to three D. If you want to know a lot more about this noise, texture is called. It's something called a Perlin noise generator. And I encourage you to look that up. Right now, though, we're going to just do two D because we only actually creating a to d texture and we have this scale, said toe All the stuff that we already want it. So all of that is good to go. Then the next thing we need to do, because if you look at this, it looks kind of strange, right? So the next thing we need to do is give it a actual shader. So we're going to do something very simple. We're just going to use the diffuse traitor. So Blender has a lot of options, particularly its principal be sdf straighter that we actually don't need to use at the moment to kind of give you an idea of just how to use this and create mountains out of the box like we were talking about before. So now we have thes mountains. The other thing I'm gonna do is change this dicing angles. The dicing dicing scales are the Dyson's Gill is what allowed what allows us to control kind of how many divisions it's using when it's doing its calculations. So a dicing scale of five will not only look ah lot more Ah, lot more faceted in this view. But when we actually do the rendering, it's going to save us a lot of time. So just to give us an idea what that looks like. I'm going to hit F 12. I'm gonna drag this over here so you can see and this is relatively fast and our mountains are actually before I do that, let's go to our render settings. And let's just say that the 20 it turns out that it's really not a big deal when you're doing this kind of no base rendering the actual render settings. They don't make as big of a difference in this particular case. But it's gonna go much better. It's going to go much faster now with that set to 20 so you can see you can see that we have something that kind of looks like mounts. Not quite, but it kind of looks like mountains. So that's where we are right now. And now we're at the point where we can add some more details
6. Mountain Chapter 3: Texture: so that actually, when we're gonna dio, is give us some tools. I'm gonna give you some tools that help you understand a little bit better. How to kind of organize your node space. So this isn't a tutorial specifically on the node editor, but we are using it. We are learning a lot about it. So let's talk a little bit about how to organize it. Now, one of the hard things about using the node editor is no. One. What all these nodes are doing once you put them all together, some one way to do that is to you can select multiple nodes. I can go to node and under node. I can pick, join in new frame. So the reason I want to do join a new frame is not just the group them, it's because under the item menu here on the left, I can label it. So I know that this is mountain displacement and just try to spoke with this place right after this. Just call them out in this place. And now I can see that all of these nodes have to do with the displacement of the mountain . So when I look at this later. I know what it's doing now If I tab out of edit, moan into object, moan and now look at the mountains. So we have an idea of how this looks like what this looks like. Another thing I'm gonna change is in this color ramp. I'm gonna change this to ease, and that just makes it so. The place that the mountain meets the ground is more gradual. So if I put this linear where it was, you can see that it's students. They stand higher, but they're also more abrupt, and changing it to ease is going to make it look a lot more natural. So if I go ahead and hit F 12 just to give you an idea, I'm now what it looks like. We see that I'm mountains are in fact taking on some form here. Now they're a little bit smooth, and we can change that. That amount of fascinating and jagged Penis Jaggi is crazy word. But that amount of jag itiveness we can change in the dicing scale, but that adds a lot of computer computing load to our file. It turns out that we can do a lot of help to this by just changing the visual texture that's on the top of these mountains. So I'm gonna go ahead and close out of that. Now let's give these mountains some texture. So the first part of the texture that we're gonna do is completely based on another procedural texture called Musgrave. So in order to do Musgrave reckon, go to add texture. Jews, Musgrave. And if I just connect Musgrave to our diffuse now you get kind of an idea what it looks like. But let's just go to the view that doesn't have any displacement and in London and cut this . So I hit control and let drag over this, and that cuts the connection. So this is what the Musgrave looks like when it doesn't have any mapping or texture coordinate note attached to it. But that's what we're going to do. We're gonna attach now texture, a mattering known, so we can control how this is displayed on the texture or on the model or the plane in this case that we're using. So I'm going to go to ad and under input. You could see that I have this text recorded. It known and then under add vector, I get the mapping note that I need So in this case, we're going to use generated and that just means it generate it automatically generates the coordinates that we need. They get distributed along this plan and right now we don't need anything particularly interesting. Eso the generated is fine. So we're gonna connect that to the vector and put a Musgrave. And this is now what we end up getting. And this is not quite what we need, because remember, we're doing a mountain texture. But it turns out that when we change these values, we end up getting what we're looking for. So in this case, for the Musgrave texture, we're going to change it to two D, cause we're only trying to create a two D map rhythm and change this to multi fractal. Now, if you're interested in the Musgrave texture, I encourage you to look it up. But we're only working into the and multi. Fractal is the style of texture that we want from us. Scrape. Secondly, the scale that we want is 116. So you're probably wondering 0.7, which is what I found to be the best for us. You're probably wondering why does this Gail had to be so big? Well, it's because we've sized everything up to try to be as close to normal scale as it would normally be. So we're gonna put that to all that scale all way up to 116 and then we're gonna take the detail and put that at 12.9, the dimensions are going to stay. Or actually, we're gonna put down to zero and the loosen arat e we're gonna leave at 2.0 solutionary. That is not something I typically use. Um, but right now, so everything is set to be kind of what we're looking that. And right now, it's hard to see that this is a mountain texture because it's just distributed around. But now let's start to put some things together. So we put our displacement over it like this, and we look at our environment. Now, if we look closely at the mountains, we can kind of see that this looks a little bit like a mountain texture. Then the next thing we're gonna do to make it even more like a mountain texture is give it some stretch, so stretch along the Z. In order to do that, we're just gonna toy around with the scale. So I'm gonna change the scale here to 0.1. The X and the Y is going to negative 0.1. You could see that actually made a reasonable difference in the way that looks. So if by hit f 12 for render and we look at our environment now, as it renders, remember, it's rendering with the texting scale of five. So it'll make it much more Ah, lot faster than it would be with a much lower Dyson scale but with less detail. We see that our mountains are mountains are starting to look more like snow capped mountains. But everything is the same texture, right? The ground shouldn't look exactly like the mountains, so we need to make some changes there as well. So I'm going to go ahead and excited that so the next part is separating that ground from the mountains
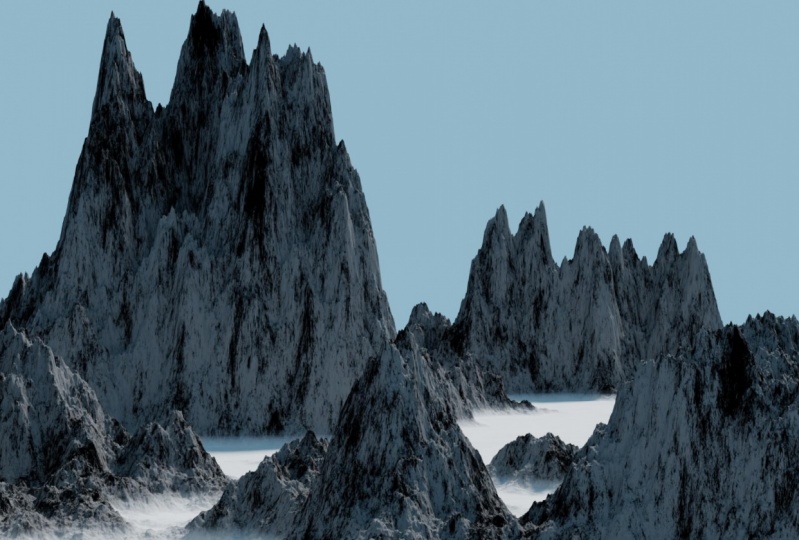
7. Mountain Chapter 4: Sky: so as little as we've done, The funny thing is, we're just about done now. So the only thing we need to do is a few things. Make sure this color ramp is set to ease, and that just makes it easier for our environment to where it meets the mountains. Toe look much better. The other thing is we need to mask the mountains from the ground. And in order to do that, we need a texture that tells us where the mountains are and where the ground is or where the mountain starts and where the ground in. So right now, if we look at this Colorado that's currently there and we just put that into the surface just to give us an idea. Now I'm gonna take this and put it back into view port shading so we can see what this looks like. This is almost what we want, right? We want to know where the mountains are and where the ground is. But we wanted to be a lot clearer as to where this is. So we wanted to be stark white to tell us where we want the mountains to be, where we want this texture to be active. So in order to do that, I'm going to add by sit a another color ramp? No. And when I put the color ramp note here, I'm going to drop it right there. And at first it doesn't do anything. And that's because the color ramp no takes a color input or black and white input and basically convert it to the colors that are in the color ram. So for us, it happens to be black and white. And because we're doing this in the displaced matter, we there's no point in adding color. If we were doing this in with vectors displacement, we'd actually need all the color channels. But we're not so right now the way it's set, it converts everything that's going in to black and white, and the reason it doesn't make a difference is that's because those colors that are actually going into it are still just back away. Now, if we move by left clicking these, we change how it goes, how much of it is black, how much of it is white and how it interpret lates between the two. So after I moved that as close to as close to the black after, um, of the right arrows close to the black as I can. You can see that this demarcation, it just gets more and more start, which is what we want. We want there to be a clear division between the area that is mountain and the area that is actually just ground. So I'm going to cut this connection because we don't actually need. We don't want this mask to go into the displacement. What we do want to go into the displacement is what was here before. Now we talked before about making the environment look a little bit cleaner. And one way to do that is to hold down, shift right, click and drag across. And that gives us this little connector here. But what I use these connectors for is to make my lines a lot more clean. So when I select one of these, collect one of these connectors that can hit G for grab shift left quick to grab, I can do that again, and then I can grab and I can kind of make sure that they're in line, right? And if I want them to be in perfect line. I can't like both of them. I can say s for scale. Then why zero actually escaped s for scale than X zero sum scaling in the X zero, which means that it just put in line with one another. And that helps everything look a little bit more cleaner. So now that I have this color ramp as a mask, we don't actually want to put that mask into the material out port. The material output. We want to use it just on the mountains. So we're gonna add something called mixture now mix. Shader allows us to take to shade er's and put them together. Now, how we put them together is based on what we do with the factor right now. If we do use the factor slider, it'll average the two together everywhere. 50 50. But what we want to do is tell it to use this mass. So we take the mass we created on. We put that into the mix shader, and then we're going to take the diffuse part, which is the mountains, and put that into the bottom connector. So everywhere it's white will go to one of these and everywhere it's black will go to another. And those colors come from this color ramp. So now we're gonna put that color ramp into the surface and we can see that this does make sense. Right now, Everywhere that we have mountain texture, we have mountain and we can double check that by looking at an environment. So the bottom is black, which is the ground and the top or the mountains are the mountain texture that we created Now it doesn't really look, make a whole lot of sense for the ground to be black. So we're gonna quickly select that diffuse Shater I met Shift D for duplicate. I'm gonna feed this into the bottom and Linda, increase the roughness by just a little bit. Now, if I hit F 12 so that you can see it, what we'll see is that we have snow on the bottom, and then we have our snow capped mountains. But right now, the snow capped mountains have the same white as the snow that we're calling in the bottom . So we're not white where we want to be, but we're almost there. So in order to give the mountains slaving more realistic. Look, we're gonna give them slightly different colors. So we're gonna shift a and we're gonna add another color. And I'm gonna drop that right before it goes into the diffuse someone A click on the arrow when you click on the arrow here on the color ramp The actual color of that arrow which controls how it interprets the different inputs that go into it appears on this bottom bar . I left. Click it and I'm just gonna drag it a little darker, right? But I just wanted to have a different look then the grass. Well, sorry. In the snow, there's no grass. Here's just Moni Snow Mountain in this knowing that's it. So now we have our snow and we have our mountains. Now let's go ahead and label that we came back here later we would know quick pro tip. If you want a line these up, weaken, Line them up the same way we did for the connectors. I can say scale. Why zero? And now they're all in a line and they're already selected. So I can say known. And I can now say join in new frame and here I can call this mountain so MNT texture. Now that we can see what that is And for objects like this, we can also change the label and I can say mountain now. So now when we look at that, we could say, Oh, OK, that's the mountain mask. And for this one, this is our snow, so we can just simply say snow. So now we have the environment we want, but in order to get some good pictures from it, we need to make sure that it's framed, right? Someone hit zero, and I'm going to try and find a good shot for us. So the tricky thing I'm gonna click about camera interviews, I could move it around. The tricky thing about taking pictures or taking renders of mountains is that if the mountains don't look big, they don't really look real. So we want to make sure that we get the right mountains in the right angle and that they still look big. The other thing I noticed when I was doing this is that the mountains tend to look better if there isn't sunlight directly on them. So a lot of times it's good to see where the shadows are from the light and you see the shadows Conner on this side, and we want to make sure that with the camera so hitting zero there were on the side That kind of catches the shadow. So the shadows we see are right here. And the other thing we can do in the mountain displacement when we move the white, that controls how tall and kind of how jagged mountains are. And we need to control the black. This will pull our mountains down a little bit. So let's take a look at that, actually was pulled down just a little bit so that it's in frame and let's shift it over just a little bit as well and pull it down so that they were kind of big. Now we hit a 12 just to give us an idea of what this looks like. Once again, we're at dicing scale of five, so it's relatively quick. So we get our wish of making sure that the mountain looks relatively large. And you know what? I am pretty happy with how these mountains look. We can actually make the mountains. We can play around with how these mountains. Look here by pulling them all higher up. Let's come back just to actually let's leave it there. And now if I hit of 12 you can see that there's more mountain in our view, all right? And we're really up close on this mountain. And I chose to do that because I wanted it to look big. When mountains look tiny, they don't really look like you would expect them to look. And we see that also doing the mountains. We added some more, some more mountainous area here, and it it also looks really interesting. Now feel free to play around with this to get it exactly the way you want. It is one last thing I want to do. And that's just Teoh. Use a d noisier. So I'm gonna go to the shift editor. I'm going to go to the composite er quick use nodes and I'm the from positive works a lot like the shader at emit shift A search. Maybe it d end to pull up the d noise. Er so now when it actually does the compositing, it won't have that noise in it that we saw before. So if I hit F 12. It's actually I didn't have to re render it, but let's go ahead and we render it now you can. When you look at this, you can see that texture that we added looks really good. It looks pretty realistic. And it took basically no modeling or understand are actually having to paint at all, just understanding how the texture is work. Now, if you look at this, all of our all of that noise is not gone and we have some glacial looking mountains, so good work and I'll see you on the next one.
8. Mountain Chapter 5: Finishing Touch: So we have everything modeled the way we want it. Now the last thing we can kind of do that doesn't really not really affected by the mountains are two things. One affects the mountains. The other one doesn't Let's do the easiest one now. Right now I have the Shader editor open. We don't really need it open. I have the composite er open. We don't really need that. I can switch that to the Shader editor. But when we render this we saw I hit F 12 again. We rendered this What we saw are there some good mountains but a gray sky like we don't really need a gray sky. Yes, we could have a great sky, but I'd be much more. It's much more interesting toe Have a boost, guy. Now the blue sky we create. We could spend a lot more time on by giving it clouds and we will, but just to give it a blue sky. So we have the idea of what it looks like for it to reflect that blue light from the sky. So right now we have this. Let's go ahead and change that sky really quickly. The most quick and dirty way possible. We're just gonna increase the lightness. So I go here to the world settings here, world properties I go to color left, click on color. I'm gonna drag this toe blue. So I increased How light is here. The grayscale increased it toe white. And I'm gonna have to just have this be blue and you can tell immediately it has a different effect because it's now reflecting that diffuse view blue light we would normally see. So if I hit that left 12. Now, even though the sky doesn't look incredibly realistic, we see that the reflection from the sky, the light from the sky makes everything look ah lot more realistic. Right before we had that gray sky with the Great Mountains and was almost like we had, ah, black and white picture. But now, with the reflection of the sky on this, things look a lot more realistic. Now, the thing that looks the most unrealistic is the fact that we have that perfectly blue sky with no Grady in or no clouds or anything like that. And we will cover how to put a sky on another video. But there you have the other thing we can add, and I talked about this a bunch of times is we can change this dicing scale. It's going to be kind of hard to see. The Dyson skill, if you don't remember, is under the modifier. We added for subsurface scattering. Now that's with simple and add adaptive, with the adaptive option checked, which we need to do for this type of displacement. Modeling is set to five now. If I increase this to to, for example, nothing changes here because this has to do completely with how we actually do the rendering. If we wanted to add more detail here, I could increase this number. I'm not gonna increase it a lot because it's going to slow down my computer a lot. But if we increased Dyson scale and now I hit F 12 you're going to see that it's gonna take a lot longer to actually do the render. But the difference is that the detail of the render is going to be much higher. I also said before that that didn't make a big difference because of the texture reused, and that's true. You can certainly get away with Ah higher Dyson scale, like five or something even more than that and still have good looking mountains. But in this case, I want you to see what it added to go ahead and decrease that Dyson skill. Not from my computer. I wouldn't do anything less than 1.5 cause it takes forever. And I've even had the computer completely. Not the computer freeze, but blender freeze because the Dyson skill was just too low. So you want to you this do this sparingly. So if you look closely at this, you can see that there is more detail here. Then there was before now, in my opinion, because we're using such a good texture for the mountain. We don't really need that lower dicing skill. But you can see if you look closely at it that we do have a decent amount of extra detail that we didn't have before, and certainly it looks a lot more realistic. So I leave that completely up to you with whether you want to have a higher or lower Dyson skill. But there you have it. Mountains, no add ons, no downloadable anything. Just using blender straight out of the box.
9. Mountain Chapter Conclusion: Now that you know how to make your own line, I would love to see you actually make your own Mountains of go ahead and do that and make your own mountain. Upload that. And I can't wait to see what it looks like.
10. Cloud Chapter Introduction: So if you're interested in three D light and specifically the part of three D light that includes outdoor life and that could be outdoor lighting that comes, that's actually for the inside. But lighting that comes in through the windows, you have to understand what that light is composed of. So in a lot of cases, this guy could be lots of different colors. But if you're just trying to do what is the most normal and haps happens the most frequently the sky is made of both the sun, the light from the stun and also the clouds and the blueness of the sky behind the clouds. So what we're gonna focus on right now is creating that mix of blue and clouds that you can use for many different things. Whether you're talking about lighting, be outside or if we're talking about letting the inside using windows from the outside
11. Cloud Chapter 1: Setting up the Scene: so if we want to create an environment that has a cloud based guy in it, first thing we need to do is set up the scene so we can see exactly what that's gonna look like. So first thing I'm going to do is get rid of this default cube, and I'm going to add at play. Now, this plane is just just gives us an idea of what the ground is and normally at the scales were talking about. There would be some curvature due to the earth, but we're not gonna worry about that. Here I am going to scale it up so that it's something similar to the scales that we care about when we're actually taking renders. So if I hit seven toe look at this from above and I'm going to go ahead and make it so you can see the edge like so if I select this, you can see that the edge length is two meters. So we're going to scale that up quite a bit from the scale it up 1500 times. So now if I scale out and have in, you can see that we have now 3000 meters, which I think it's roughly 600 or so miles just to keep things in the scales that we want in order to have a completely natural light. Now, the problem with when you're doing things that are this big, the camera and the report is not really set up to see those distances. So what we're gonna do now is change the view so we can see that. So for clipping distance, we're gonna leave the 0.1 and we're gonna change the end clipping distance to one e 10. And that just means one times 10 to the 10th. And that makes sure that's one with 10 zeroes behind it. That makes sure that we can see everything in our scene. Now we're gonna do the same thing for the camera right now. The camera clipping distance. It's set up to end at 100 meters. So we're gonna change that toe one e to the 10th 1 with 10 zeroes behind it, and now our cameras going to be able to see those distances. So we hit numb pad zero. We're looking at the plane right now, but I'm gonna quick lock camera to view And then I'm just going to shift my view so that I can see partly my surface that I just created and then the environment that we will create . So now that that's all set up, I'm gonna create a dome. Now, there's two ways to do this. You could do this with the dome. Or you can do this using the world settings and wonder I'm gonna show you both. But the first way I'm going to show you is the dull method. Just so you have a lot more control of it. So I'm going to add a UV sphere and of course, you can't see it at first. But if I hit numb pad period, you can see that it tears just really small. So I'm gonna tab into edit mode, and now you can see all these numbers that makes it much harder to see. So I'm gonna go back into my menu here on the top side, and I'm going to run quick so I don't need to see those edge wings. But I am going to scale it 1500 times, just like I did the other environment. So now if we see our environment. We see that the dome is about the same size as the environment we just created. Now the next thing I'm going to do if scale this in the Z, right? And the reason I'm doing that is because I'm not making everything curved like the Earth's surface would be curved. So it's going to seem like if I left it as a big sphere and if a hit zero here, you can kind of see what this looks like. If I left it as a big sphere, it was seemed like you were in a dome instead of on the earth. What we need the environment toe have clouds and the ceiling that seems to go out farther above. So for that reason, we're bringing the sky a little bit closer to the ground, which is what it would look like if you were actually looking at an environment because the clouds all right in orbit, they're closer to the earth. The next thing we're gonna do I'm gonna tab out into edit mode again, and I'm just going to scale this out because that's how the sky would be would be much bigger than the ground that we're looking at and then on the scale, dizzy down just a little bit more. And now we have this dome that were inside of right. And then when I hit zero toe look numb pad zero to look through this, receive that we are inside of this dome and we can, of course, make changes to this. You might be wondering why I'm tapping into edit mode in order to do the scaling. And that's just so that whatever scaling I do is the default amount of scale. Like if I did all the scaling here, sometimes you get some artifacts and issues with the fact that you've scaled, but this is not actually the default scale that it's that. So I'm doing all my scaling and Edenwald to make sure that that doesn't happen. So the next thing we want to do is actually create some of these textures for the globe.
12. Cloud Chapter 2: Small Clouds: Now we're ready to create the texture ring that we need for our sphere Earth Dome thing that we're creating here. And the first thing I'm going to do is change this bottom pain down here to the Shader editor. And the reason I'm not using the workspaces for this like I could pick different work spaces. And the reason I'm not picking the shader, the shading workspace it just cause I don't need all this stuff on the side. I only need the three d v port in the shader Editor, So this is just fine for me. So I'm going to create a new material. So I go to the materials, Tad, I click new and I'm gonna call this clouds because that's what we're doing. So I call this clouds, and I'm gonna go ahead and get rid of this principle be SDF because we don't really need that right now. We do need the material output, but we don't need the clouds. So next thing I'm going to do is hit. Shift a search and I'm going to use the noise texture and you'll find that the noise texture is one of the most breast architectures that you have available to you. It's based on something called Perlin Noise and Blunder has two of the Perlin noise filters . So it's a fractal pattern. And if you want more information on that up, feel free to look it up on the Internet. But it's really interesting. The next thing we're gonna do is had a texture coordinate to this. So in order to do that, we hit shift a again, we're going to search and just hitting txt gives us that texture coordinate hit shift again because now I want the mapping. Now, these two things give me the ability to control how the texture is distributed along the surface right now. So we're gonna go with object at the moment and see if that works for us. And then I'm gonna take the vector component but just left clicking here into the vector component of the noise. Now, you don't see anything initially because we're not in the right view port, so we want to be in the one that allows us to see or preview what the texture is. And that's this one here that is the second to the left. Uh, we're currently in E V, which is the real time view port. Real time render engine. So that's perfectly fine for us to stay there. And if we look really closely, we can see this noise, which is what we have selected. But it turns out when you're doing clouds, it's also a type of noise, right? But the what we don't have set up right here right now are the parameters we really want. So right now I happen to know that the scale we need is 9.0. And we also know that the detail we want a 6.9 and another thing we're gonna add is a color around color rams air really useful when we're doing anything like this because it allows us to control how much of the dark versus the light color or whatever to perimeters that you're using. So right now, our material output this set and you can see how we can kind of change that environment. So object doesn't look like it's given us what we need, and we can switch to generated, and we see that that makes the biggest difference. So we used object. The scale was really low, so we could have changed the scale, but generated doesn't much better job. So when we picked object, everything is based on the size of the environment and where the origin is, which is this orange start here. So generated is given us what we need here and now. You can see if I changed. If I change where we have this slider, what are clouds look like? Also change, right. And this is how we can make changes to the environment. So I want everything to not necessarily be all clouds, so this gives us a set of smaller clouds. But why don't we have slightly bigger clouds here? So this gives us some cloudy skies here, and this is what we're looking for. But we're also gonna add bigger clouds, because when you look at this guy, you have both small clouds and big clouds, and we're gonna take those things and put them together
13. Cloud Chapter 3: Large Clouds: So we have the clouds on this scale, but we want to be able to add some variety in our sky. So we're gonna add another set of clouds. So the easiest way to do that, I'm gonna hit control, Be for sorry. I'm just gonna hit B for Bak Select. And we're gonna box select these two minute shift D to duplicate them because it's based on the same process. And I'm going to take left quick on the mapping node and connect that to the noise texture node. And then I'm gonna take this color ramp, and I'm gonna plug it into the material output and you see that it gives us the same thing because they're identical at this point. But what we really want to do is change the scale of these clouds. So right now, I'm gonna increase this scale, and what I'm looking for is to give the clouds Ah, bigger form factor than the one that we were using before. So as I look through this, I just want to get an environment that looks a little bit different. So you can see now that it's not white as varied and the sky and the clouds are a lot more gradual. So this gives us two completely different looks for the clouds. So if I flood with one into the top, you see that the clouds are a lot smaller. And if I plug this one into the bottom, you see that these clouds are much bigger. So now all we need to do is add them together. So if I hit shift at shift A and what we're going toe, add how we're going to add them. Is using the mix RGB so we could use a mix shader. But at this point, really we just want to mix colors. So we take the top one, which is our small clouds, and in order to keep track of what is what? What we can do is go over here and left click on the noise, texture and under the label we can actually say small clouds that way, and you see here that has changed and we can do that same thing over here so we can say big clouds. And I'm doing that because node trees and no texture. When using the note editor for doing different textures, things can get complicated and I try to do what I can do it so that we come back and look at this. You know what in the world you were doing the first time, So I'm gonna connect this bottom portion with the big clouds. Teoh are mixed rgb and then plugged the mix rgb into our service. So now you see that we have both the small clouds and we also have these big clouds. And just to make things even more slightly complicated and mawr controllable, I'm gonna add another color ramp. So control a search a type in the color ran but could have done shift D as well to duplicate one of the other Clarence we had. And now I can control all of the environment at once, Or I can control the individual aspects like I can control just the smaller clouds, or I can control just the bigger clouds. And then I can also control how their mixed together. So right now, the setting we have the mix. RG beyond is working perfectly for us. But I would say that we probably have too many of the big clouds. So rather than using the mix here What I'm gonna do is increase the black and that's going to make them just slightly fewer And this looking really good to me. So you're looking at this and you're thinking because I can read your mind is black and white like, Wow, why would we make this all black and white? So in order to make it but colors we want all we have to do is use another mix RGB So all I'm gonna do this time it's left Click it hit Shift D and I'm going to drop that in place and this time I'm gonna plug it into the factor. Now I'm gonna delete this bottom one by holding down control and right dragging through that and I'm going to switch one of the colors blue. So now you can see that we have some blue clouds. Now I'm gonna change this toe white play that you can see this a little bit better. And I'm just going to work with this until we have a sky color that we can agree on Looks OK, so this we almost had it right about there. Actually, I happen to know because I did this before that the best color we need. It's gonna work for us. I'm gonna go to Hex, and I'm just gonna paste it here because I know that this color writes the best. So if you want to use this Oops, let's undo that. So that's the color. Now, if you want to use this yourself, you can see if I No, I keep changing it. I need to really stop doing that. So if I zoom in and you look at this, you can see that I have are value of 0.61 point 231 You can stop the video here composite and put this in for you or in the hex. You can just type 4684 capital E to I don't think case really matters, but it might. And that gives us this here that looks like clouds in the sky. Now, if we take a look through a camera, we can see that Ah, the clouds do kind of that sky does look like it has some cloud, so we can also make these clouds a little bit darker, a little bit wider here by using this color ram and that's the reason we put it here is so we would have the control over these clouds. So now we have this environment. We're almost done. Where the sky is both cloudy and blue. The next thing we need to do is control where these clouds start.
14. Cloud Chapter 4: Gradients: Now we don't have to do this, but we do want to kind of control where the clouds are because there might be a case where we want the clouds to kind of fade out at a certain portion. Right now, the way it's set up, you could completely use it like this and you'd be fine. But also, it's a good way to show you how to kind of mask in and mask out different things. So in order to create a portion where below which there is no clouds where there are no clouds, what we're going to do is we're gonna create a mask using the grading right, and there are a bunch of ways to do this. But we're gonna do this. Probably be one of the easiest ways. So the first thing I'm going to do is I'm going to add a separate X y Z right. And as I plug in the separate x y Z, I'm going to also plug in, play this in to the bottom note, right? And just to make things easier, I hit, shift, right, click and drag, and I can add one these connectors and I'm just using that to make things look a little bit more easy to see. So if I look at my sphere or my oval now you can see that it goes from black toe white, which is a great aunt. Now. This means that where it's black, the value is zero. And where it's white, the value is one. So it goes from 0 to 1, which makes sense because we want a Grady. And we could have used the Grady in texture. And just to give you an idea of what that looks like, I'll show you what the Grady Intestine looks like. If I put the grading and texture in here and I plug that in and then plug this here, you can see that it gives us something exactly the same. But what it doesn't do is give us an easy way to control where this zero is, right. So if I connect the X here, then this left side is zero. But if I connect the why, you can see that something perpendicular. So let's look at this from above. So the X once connected, is here from left to right, and if I do the why, it's from top to bottom and in this case, we want the horizon to kind of go with the line. So we're gonna use the Z. So now the dark portion is the bottom and which is zero and the top is one. So if we're going to use this as a mask, what we're telling blender to do is the parts that are white are one thing in the parts that are black are another and then makes them depending on how black or how white they actually are. So Z is what we're looking for and why we're using separate X y z. So the next thing we're gonna do is add that all important color ramp. No, because that gives us control over where that is. And right now we want the horizon to be just here in the center. So I hit number that one, too. See this from the side view or from the front view, and I'm going to shift this until it's right about here in the sensor. So now the bottom is black in the top is white, so if we were going to mix two different things, that mix would be different. on the top from the bottom, which you obviously understand. So now that we have that radiant, we can begin to kind of mix these things together.
15. Cloud Chapter 5: Horizon Mask: So now that we have the grating it we were talking about before and we have these sets off clouds, I want to show you how to to decide where these clouds are seeing and where they're not. So we're gonna kind of ad what's kind of like, ah, horizon line, but not actually ah horizon line. So in order to do that, we need to use this color ramp here as a mask to tell blunder where we wanted to show. So in order to do that, we're going to use another mix. RGB. So I'm going to do that. I'm gonna left click on it, hit shit D and then dropped that in place. Not in this case. We wanted to be the factor similar to what we had before. So I'm gonna hold down control, right, click and drag over, then collect. Click. Connect that to the factor. Now I'm going to feed the clouds into the top portion. So right now, the clouds are fed into the top portion, but it's not actually showing. The clouds at the top is showing the clouds at the bottom. So in that case, I'm going to connected to the bottom and I'm going Teoh, cut it both by mistake. I'm gonna connect it to the bottom this time. Is that what I just did? No. So I connected to the bottom and I have just about what I'm looking for. So the very bottom is all blue and the very top has this region with the clouds. Now, if we want the clouds to be slightly more prevalent, we can change that here with this color Ram slider. And that's why we put it there so we could control everything kind of independently. So now we have the clouds at the top and we have different variations of clouds around. Now, if I hit number at zero to kind of give you an idea what it looks like the camera, we can see that the clouds of very plain banked and if that's what you want, that's fine. If you've it's not what you want. We can increase their white here and we can make them a lot more pronounced. You can also change how the clouds are actually being shown by changing this number by changing this color ramp here. So you have a lot of control over how the clouds are manifested in your environment. Now, if you want to actually rotate the scene, that a couple of ways to do that the first way is we can just select the sphere, hit our for rotate and Z and not weaken. Just rotate this guy. Now, this is a little bit simpler than we would do if we were using the world coordinates, we'd using the world background. To do that, I'll show you how we're going, how you could do that. The other thing you could do is to change it down here. So we're using the same mapping known for everything. So we could also change it here. But that change is kind of a lot about the environment from changing it back here so you can see that we are rotating it. But we're getting a slightly different effect when we do that. So that's not the best way to do it. The easiest way to do that is from here it is just to change the globe itself on. And that's one of the reasons we created it like this is because if we zoom out, we have ultimate control over how this is displayed, and if we want to rotate, it changes scale that we can do all of those things
16. Cloud Chapter 6: World Clouds: So the last thing I'm going to show you is how you would apply this same nerd the same. No tree, too, the world environment instead of a dome. So in order to do that, I'm gonna go in the same shatter shader editor, and I'm gonna pick world. But before I do that, I'm gonna hit be for box select and I'm going toe box, like everything except the material output. And then I'm gonna hit control C toe copy. And then I'm going to go to the world settings here and just to make sure you can see everything I'm typing. So now I'm gonna make sure that use nodes is selected in Africa Also over to the world settings. It says here, I'm gonna click use nodes and you can see that that actually unclip exit. So, in order to really know, if you're using knows you need to look here and see. Make sure that that is selected. Then I'm gonna click over here and I'm in a safe and shoulder be then G for grab so I can move everything to the side. Now I'm going to take the output of our no tree from before and put that into the color of the background. Now you can't see this initially because of the type of shader preview were in. We need to go to the re interview in this case, and that's appear on the right side. The tab. That's always right. And if we look at the sky, we can see the clouds that we put in. But unfortunately they're a bit too high. But luckily we have the ability here to bring it lower. So if I hit Sorry, not if I hit. If I go over here to the Mass, that kind of controls that I can drag this to the left and you can see that now that brings it down. Right And Aiken also hit the right side, and that will also increase the vibrance of it. So now I have this horizon line here. Now, if you want it even lower, there's this Z course in here that will kind of change the look of it. So you could also do is changed thes e location here, and that would shift it as well. Uh, that's probably a kind of harder way to do it. The other thing you can do is over here in the color ramp. Know that controls this. I'm going to zoom in a little bit, select this one, and I'm just going to make it a little bit lighter, right? And as I make it a little bit lighter, you can see that clouds start to reach farther down into our environment. So if you don't want that, if you want it to be a more specific line, you can make that darker here. And then you can control where that line is also, by moving these by moving these these but by moving these sliders here so we can't really zoom out and see anything. But we can look at the sky and given a sentence idea. Next thing, last thing we can do is look through the camera. Well, actually, looking at the dome here. But if I hit h, we can hide that. And now this is the actual sky that we look that we created. So this is the sky. And if we want to see the dome, I'm gonna hit all age. Teoh un Select that. And now if I go back to our object and I couldn't change. I can change where that horizon line is right. So if we want it to kind of fade out as it gets to the as it gets to the floor of the ground, we can do that. And that's what we have done here. And now if I zoom out, you can see what this looks like. I mean, you can see that we also have a bigger sky, so that's how you can create a sky that you have all control over.
17. Cloud Chapter Conclusion: Okay, so now you know how to make the perfect sky. I wanna see what it looks like when you make your own sky. So go ahead and make your own sky rendering uploaded and let me see what it looks like.
18. Grass Chapter Introduction: Welcome to another amazing tutorial. It's good to have you with us today. We are going to create amazing dynamic grasses, which you're looking at right here. And as you create models with blenders and wanna do different animation, you will probably at some point want to create grass. And when you create digress, you may indeed want that grass to behave like real grass as it's blowing in the wind. And that's what we're going to do today. What's even more amazing about this particular type of grass, or we're gonna do, it includes almost 0 model unless they're all we're gonna do is create two planes. They were gonna use blenders, particle system, and then you are good to go. This is a super easy, super quick tutorial about creating dynamic real grass. I can't wait to see what you create.
19. Grass Chapter 1: Particles: someone you're creating dynamic, good looking grass. It's surprisingly easy. So let's go ahead and start. First thing I'm gonna do is get rid of this default cube because you don't actually need a cube. But I do need and a minute shift a for add and I'm going to add a plane here. Now, that's pretty much all of the modeling that you really need to do. The next thing I'm going to do is go ahead and create my dynamic object. So I come over here to my panel and I'm going to select the particle properties tab. I'm gonna hit the plus to go ahead and add a particle property And just for right now, to keep everything straight, I'm gonna call this dress main. This way, I'll be able to tell what it is when I make more than one of these, because we're going to do that in the future. All right, so we have our particle property, and the next thing I want to do is make this a hair particle because grass is a lot like hair, and that's the way it behaves in the way that we wanted to behave so right now we don't need 1000 particles. We're gonna do this with 100 particles, and we're gonna have a lot more than 100 particles. We're gonna increase that with something called Children that you'll see in a moment. But we're gonna go ahead and decrease this number to 100 like you can see, that decreased the total number of strands we had here. Now, what we are going to do also is decrease the length quite a bit. So we're gonna do this so it's roughly to scale. So I'm gonna choose three inches. And the cool thing about blender is that I can go ahead and put inches in, Aiken, say three and then I end and it will convert that to immediately. If you're not from the United States. That's about 30.7 60 I said about, but that's the actual number. 600.762 meters. If you know what grass high you would like to put in meters, that's perfectly fine or put in centimeters for that, for that matter. So right now we have the grass on length. The way we want it, we're gonna leave the seed. The same. That's how the grass is kind of situated so that he uses a random number generator. I'm gonna leave the segments toe five. I find that anything less or more than that kind of acts funny when we're changing things around. So the next thing we want to dio is add the hair dynamic. So this is kind of how about physics of the hair behaves. So I'm gonna give that a check. I'm gonna leave the quality steps at five. The more you increase this, the more computing power it's going to take. Ping gold strength has to do with the stiffness, but it's not completely straightforward. But we do care about the structural physics of what we're looking at. So we do care about it. And this is the structural kind of dynamics of the grass that we're looking at. So Vertex Mass. Which is like how heavy the grasses. Right now, it's set the 0.3 and for grass, that's way too heavy. So we're going to set this to zero point 01 kg and that's going to make the grass less heavy on their 0.3 would probably fall down under its own weight. The next thing we're gonna do is the stiffness. You could think of this as how easy the grass will bend. So the stiffness right now, like before It's a little bit too hot. If they were gonna actually decrease it by 10 by a factor of 10 actually, by a magnet by a order of magnitude down So 0.5 and then random, which is how much thes different characteristics can shift by within all of the strands that are on there. We're gonna change that to 0.147 And I just find that this gives us the correct amount of variability to give us what looks like realistic grass and then damping. We're going ahead and leaving at 0.5. So if you think of when a spring moves or something oscillated, it kind of loses energy or eventually it stops moving. And that's what damping is. And 0.5 work fine. With 0.5 will work fine for what we're trying to do. The next thing we want to do is work with the Children. So the Children in this case when you're talking about the particle generator, is based on these, like parent particles here. So the Children behave like the parents. Behave so the Children will take on the movement and the dynamics that the parent take on. So if we change this to interpretative because that's going to give us the best outcome and now you can see that there are many more particles. So we said on 100 before and in the display we have this set to 10. So that means as 100 times 10 which gives us 1000. Now, this is some pretty crappy looking great has if we actually had this because it's not enough grass, but we actually do the render. We don't actually get the 10. We get the render amount, which is 100. So we get 100 times 100 which is about 10,000. I think so. The reason that we do that is that many particles could slow down the computers. It would be hard, harder for us to render. So right now we do this at display amount of 10. It'll render it 10 times. That's 1000 times 100. Sorry, it's 1000 times 100. So, um, the sea go ahead, see what that is 1000 100. And that gives us 10,000 Like what I said. So turns out I did my math right now that's all set up. We wanted to be the same length. We're leaving the threshold. The same. The next thing we wanted Dio is what we call the clump noise. So one of the one of the reasons that grass in a simulation, which is what this is and blender would look unrealistic, is because everything is the same. So we don't want everything to be the complete same. And one of the ways we can do that is by changing the company. So if we go under Children, we go to clumping. We see that we have these here that we can change. So if I change the company, you can see that the grass will tend to kind of come together and one direction. The negative direction brings the bottoms together, and the positive direction brings the tops together. So we actually want to bring the tops together for this. So we're gonna put a positive number of your points 064 and matches gives us some variability And if you look at this, you can see that it's starting to look Ah, lot less regular, which is what we're going for, the shape we're gonna keep the way it is. And the next thing we're gonna do is change the company noise because we don't want everything to be completely uniform. Complete uniformity is kind of begin and me off realism. So the next thing is the company noise we're gonna decrease. We're gonna put sorry, not decrease to cos we're gonna add some calm poise. And the cramp noise is going to be What's your 0.0 64? That's the company ways. Oh, actually, the clumping itself. We're gonna put that at 0.264 So the clumping is 0.264 and the noise is 0.64 The next thing we do is the roughness. Now the roughness is going to give us our final amount of random randomness that we're looking for here. So if we go to roughness and under roughness, we're going to go to random because that's what we're using this for. And we're gonna go use 0.764 random, and now you can kind of see how everything looks really scraggly. And that gave us the difference between having these completely straight strands, which is kind of unrealistic on gave us some been strands. So this now looks a lot better. It looks a lot messier to you, but in actuality it's a lot more. It's it's a lot more realistic. So just to give us an idea of what that looks like, let's go ahead and set up some of our camera and everything. So in order to do that, I'm gonna hit zero to go into camera mode. I'm gonna open my side panel that you can get to by hitting n and I'm going to go to view and under view. I'm going to say lock camera to view. So now if I move my view, the camera will stay the same. So I want this to be roughly in the centre. I'm going to switch to rendered mode just so I can see if I can try to pick up the best angle here. And this is the end of that. I'm going to keep I'm gonna un quick lot camera to view and I'm going to change our light right now. Are light is set up to be a point y eso I left click on the light I'm gonna quick the light setting. I can only get to this after this is selected and, you know, selected because it's orange. I'm going to change this to the sun is already pointing directly at it and you can see it's Subaru bright and that's because it's really high. It set at 1000. So right now I'm going to decrease that 10 and that's going to give us something a little bit more realistic. I'm gonna come out of render Road hit number had zero to take us into render into render view a camera remote, and now I'm going to hit. But this is what our environment currently looks like and it looks a little bit. It looked for a little bit, Uh, how shall we say? Messy, but it's kind of given us what we're looking for doesn't quite have enough grass particles . So one thing we can do is we can go to the Children which are up here, and it's that at 10 and 100 we can go ahead and increase that just to give us an idea what more particles would look like. So we increase this to 1000 and then I hit the same F 12. Do you have a surrender? And we can see that it looks a lot more realistic with this grass. But actually the clumping looks a bit too much. So what we could do is go to our clumping. And then we could reduce that right? So reducing it 2.1, we hit 12. Do it again and you can see that there's far less company. So we haven't done the materials for this yet. But honestly, if you wanted to stop here and do the material, you certainly could. We're going to do some things to make it look even more realistic. But this this is right here enough to give you some realistic looking grass. Once you add material
20. Grass Chapter 2: Material: So even though we have grass that doesn't look terrible Us far a structure And what can we really do with black and white grass? So we need to give the grass some material. We need to give us some color, preferably something in the green area. So let's go ahead and add a panel to our three d v poor to our interface here. So in order to do that, I'm gonna hover over this right section here, and I'm gonna hit right click, and I'm gonna click Horizontal split. Now, the reason I'm not changing the workspaces because you can do that in blender you can use these different work spaces is that none of them have quite the set up that we're looking for. We're looking for something that's a little bit more simple than all of the other workspaces we have. We're gonna go to the left corner here and we're gonna change this to Shader editor. This will allow us to manipulate the materials using the using blunders node based system. So I'm gonna go over here to the materials panel. I'm going to click on the actual plane that we created to make sure that. That's what we're working with, Amanda. Quick, new here and under the name when it change this to glass man and that will just help us keep track of it as we create new and different things throughout the process of us creating this dynamic dress. So right now we look at this. It has this white ist texture here, which is really no riel texture. But we did give it this principle be SDF. So if you just want to see what it looks like when we give it any old color, we click on the base color here, left, click on it. And we can just drag this Teoh any green. Right? So I so happen to know that the best green for me. Let's zoom in so you can see this, right? So I left click on this I hit Hex. This allows me to give it a specific number that I can remember otherwise. I have to remember the specific RGB values and you're perfectly free to change this to a nickel aggress you want for me. I know that this works the best if I do. 057 200. So zero and then five. Sorry, zero F 7 200 And now I have to do is just type that directly in here. And this is the grass that works for me. So just so you can see what that is. It's zero f seven and I want actually, 200 have 7000 here, so change that too. Makes it a little bit brighter. And if you want to see what that is an RGB thes air The RGB numbers 0.5 for red 0.168 for green and then zero for blue. Now, if we hit F 12 to give you an idea what that looks like, it has a much better look to it because it looks a lot like grass. But you know what? We're not complete yet because no one's grass looks that vibrantly green out. If that's all you want right now, you could stop. You got some good looking grabs. You can go about your business and create whatever else you want in the model with almost no Meiling. But let's go ahead and make things even more realistic. So we're what we're gonna do is add a texture to this so that we can give some variation to the grass. So in order to add a texture, the first texture we're going to add is I go to add an under texture. I'm going to pick noise texture right in. In order to use the noise texture, you need a couple of different things. One thing is you need to be able to tell blender what part of the texture goes where, so under input, you can go to texture coordinate. Now we're gonna use generated, which is how blender automatically tells it where to go. So we don't have to do what they call you. The unwrapping, which is where we tell blender where which part of the texture goes where the next thing we're gonna do is add a mapping node. So the mapping node is under vector and mapping, and this allows us to shift the texture left or right or scale it or rotated. So we're gonna take generated. We're gonna put that into mapping. We're gonna take the vector, put that into the vector size out of the noise texture. We're gonna change the noise, check Scher to two D because we're only working with a plane and it's only in two D. And if I wanted to see directly what that looks like just in black and white I can't seven on the num pad to look at this from above. And this is what the texture looks like from a love. So this is gonna allow us to give some variability to what we see in this environment. So it's set to be like this. We put this in here and it's still black and white, so we need to give it color. And the way we're going to do that is we're gonna add a mix RGB So I'm gonna go to a different way this time when it shift a while, my cursor is over the shitter input and I'm going to now and search click and I started type in my eggs. So this is the way that I prefer to find notes because knowing what menu is on congee quite inefficient. So as long as you know what it's called, even hit shift a and then you can search and then under search, you can just type what you want. Now I could just drop that in place and you see that Nothing really change. And that's because it dropped into the color now the noise texture were using. We don't want it to actually pick the color directly. We wanted to decide what color goes where. No, the X in the mix. Rgb know what's gonna happen is some parts of our node will be will be color one and some parts of our texture. Sorry. Texture will be color too. So if I just change this to black, you can see that part of it is black. And part of it is kind of gray, right? And that we could make this pure white if we wanted to, But we don't want it to be black and white. We wanted to be something more like grass. So what we're gonna do? No, I'm gonna go ahead and hold down control. Right. Click and drag to go ahead and cut that wire. I'm gonna change this first color to green. So the easiest way to do that since we already have that color saved here is I'm going to hit the color dropper here. Drop that over the color. We already have and left Click. Now I have a green here Now, the color that I want here, we're gonna do this the same way. Now you can put whatever color you want by increasing the brightness here and then move in this two way to be whatever you like. But I happen to know that what works best for this case released in my opinion is be eight be And then I believe this. Let's try C zero. Yep. And that gives us a yellow color. So just so you can see what that waas that was B A B C 00 If you want to see that in terms of if you're going to see that in terms our be RGB, that's Red is 0.479 g is 0.503 and blue is zero. So this is now going to mix those colors, right? So we have part of this which is green and part of this, which is blue. So if we look at our actual grass, actually we have 12 to give us an idea of it. We see that now are grass has a lot more yellow in it. Now, this doesn't look bad, but I think this is a little bit too yellow. So what I'm going to do now is show you a way that you can kind of tweak this to be whatever you want. So I'm going to do shift, add shift A and I'm gonna type in the search Colo. And I want color ramp now, color ramp takes an input and basically maps black and white to it. So if I connect this directly to our material output, you can see that nothing really changes. When we go through it, it shows you the same thing it was showing before. But now with the sliders, I can change how much black or how much white there is in our scene, right? Not only can I change how much white or how much black I can flip these two. And now everything is backwards of what it was, what was black is now white, and what was white is now black. So I'm gonna reconnect this to the side. And now I can move these sh aiders and I can increase the amount of green, which is what we want it. We want mostly green with little bits of yellow here and there because we don't want necessarily terrible grass. Another thing we're going to do is change this blend mode to ease, just to make it a little bit less abrupt. So now if I hit F 12 for render, we see that we have these yellow sections and we have green sections. It's not quite what we're looking for here, so I'm going to move this to the side foot a little bit more yellow in it. Then I'm gonna hit f 12 see what it looks like. And you know what? This is still a little bit too stark, so I'm gonna switch it back to the way it waas because I think that was probably a little bit better. So that's with White on the right and the black on the left. I had f 12 and though it is a little bit too yellow, I think that the way it mixes it's good. So what we want to do now is change kind of the way the whole thing looks so we can do that by darkening the right side. So now the whole thing is gonna look a little bit greener and yeah, that looks much better. So now we have sections that are, ah, little bit lighter than the rest of the sections, but it looks a little bit more realistic because we have some variation in that grass color . So if you want to stop here, you do have a realistic grass.
21. Grass Chapter 3: Texture & Height: as we have this grass the way it is now, I'm just gonna hit a quick efforts. Well, so go ahead and we render that it does have variation in it, but it's still two regular for to look what we would think is completely really so we are gonna add a little bit more variation to it. But before we do that, we're going to make it a little bit easier to see in the three D report. So we're gonna go to our particles tab and we're gonna scroll all the way down until we get to the part that says Children and right now, listen to set to 10 and that's to make sure that everything stays really fast and stays really good. But we're gonna actually increase this because we're not going to really shift a lot of things around in the three D report. But we want to have a better idea of what it's gonna look like while we're trying to tweak the variation in the height. So I'm just gonna increase this 200. And as I look at that, I see that it still works pretty good on mine. I'm just holding the middle mouse breast button and shifting it around. So I'm gonna go ahead and increase that to 1000. So this will tell me more accurately what is going to look like. And then I'm also gonna quick on our rendered view, and I'm gonna rotate this around until I get a good idea of the lighting and was gonna look like when we're actually looking through the camera. So this is a pretty good one, and everything is working still pretty pretty snappy. So I'm gonna leave it here at 1000. So the next thing we're gonna do is create this variation, and we're gonna do this by using a texture. So what we're gonna do now, we're going to stay in the particles tab, We're gonna go all the way down to 10 fixtures and under textures. We're gonna click new and the texture name. We're gonna give this. We're gonna call it hair and call it hyper. And that's once again just to keep track of everything. But once we've created that, I'm going to go to the textures tab and you can see in the texture stab. We already have a texture that's called here height and instead of an image because we're not going to use the image, we're gonna use blenders built in texture. I'm gonna change this to Musgrave. So Musgrave is another one of those textures that's created with the map algorithm, and it allows us to be able to create this variation that we want. So for right now, this is what the texture looks like. And this is how it's gonna be if we we're gonna look at it just on the surface like we did before. This is kind of what we This is kind of what we would see, but we have been actually added its influence yet. So I'm gonna change the size because I happen to know that 0.6 is a good number, and that makes everything much smaller. The reason I'm doing that is because this is going to control some variation in the height . So where it's black, you're going to see or you will see that some parts will not be shorter, where it's really bright. Some those parts will be a little bit larger, and then it will also help us undo, or at least blend in some of this clumping that we put in to give us some variation before . So now that I have that set 2.6 undersize and selected Musgrave, I'm living blender original as our original generate as our generator. The next thing I'm gonna do is open this context here called influence. And this just allows me to decide what this texture is affecting. So right now it says general time, that doesn't really do anything specifically, but we wanted to affect the hair length. I'm gonna check that and you can see that it did in fact, make a difference to our hair. So without it, it looks like this. It's a lot more uniform with it. It can see that it does have a much more random look to it, which is pretty much what we're going for. So now I grass looks a lot more wild. It looks a lot more realistic. So if you wanted to make changes to it there, you know other things that you can do to make changes to it by making changes to the actual texture. But I will say if you're going to make changes to the texture one of the glitchy things about blender is that when you make changes, they don't always show in the in the three d report. So if I just to give you an idea, if I wanted to make a change and in order to make a change, I'm gonna closed these here just so you can see what I'm doing. And let's say that want to change the brightness. So I'm gonna change this number. I'm gonna pull it down here, and you can see that it changes here. But as I move that brightness, you don't necessarily see that the texture or the grass is obviously making a change. Now, it's very, very shimmery right now because it's actually doing the real time rendering. But in actuality, we're not seeing ah whole lot of change between zero and one, right? So in order to fix that in the influence, all you need to do is click and un quick it and that will re apply all those changes you've made. But right now I'm okay with the way this looks. I'm gonna go ahead and turn this off so that it's not so flickering. And then I'm also gonna change the Children, and I take that back down to something that's a little bit more manageable. And I'm just doing that. But going into the particles, the particle section, and then I'm looking for Children on the Children and putting that back to 10 so that we make sure that our computer stay snap because the last thing we want is for our is least for my computer to freeze. Well, I'm trying to teach you there's someone ahead of 12 to give us an idea what that's gonna look like. And, yes, it looks much more irregular and much more realistic as faras grass. So there you have it. That's how we created some variation in the height. Using the texture. We have the materials the way we want it. The only thing we need to do now is create some slightly different plants within what we're looking at.
22. Grass Chapter 4: Straw: All right, so we're almost done with having our grass Look the way we want it to. Someone has hit F 12 to give us an idea. What I grasp currently looks looks pretty good right now. It's a look. Has a lot more variation in it than it did before. And it doesn't look so perfect, so it looks a lot more realistic. But what it doesn't have is other plants within this. So usually, when you have grass, unless you have perfectly manicured grass professionally manicured, there are some other plants within the grass. So we're gonna easily create these this variation in the types of grass within our grass by just making some slightly longer grass. That's slightly different color. So that'll give it, like, a more straw type look to it and it's gonna be really easy. So the first thing we're gonna do is select our plane and that I'm a shift d and then Z to bring it down and let me go ahead and turn on or make sure that you can see the capture here. So So now we have a plane that's identical under the original plan, So I'm gonna hit one on the num pad to see that from the side Minute G for Grab Z to move it in the Z, and I want them to be relatively close. They don't have to be super close, but relatively close. So if I look over here in our object tree, we have two planes. So let's make this a little bit a little bit easier to read. So the first plane I'm just gonna call grass made and then the new plane that I just created I'm going to call grass spars. And that's because it's not going to be nearly as dense as the first bit of grass we mates . So we have within our grasp arts. We're gonna go to the particle Ah, panel and within the particle panel, I'm going to hit this copy button here. So it's what? This the picture that looks like a normal copy button. I'm gonna hit that. And now that we and now we have a new particle kind of context to create under. So I'm gonna change the name instead of grass main. It's good now, going to be grass sports. I'm gonna do that same thing here. I don't know that you have to, but it's always good. Stay consistent with your name. So now we have the name under their particle panel as game as grass sparse. And we also have the name of the object. Also as grasp are so one of the main differences between this grass and the grass that we already created is that this grass is gonna be longer. So we're gonna go to admission under the particles panel and I'm going to leave. This is 100 and I'm gonna decrease this. And I mean, put it at seven inches. So said and I end will put it a inches. If you are used in the metric system, that is 0.178 meters. Or if you have an idea of how tall Bresse the grass we're looking at, it might be You can put in whatever you like. The other thing we're gonna do is decrease the total number here because we don't want this to be as dense is the other. So we could do that here, but actually, we're gonna do that in the Children. Someone of scrolled down till I get to the part. This is Children and when under the Children gonna leave everything as if I'm going to decrease the rendered amount to test. So the rendered amount and the display amount is going to be about this thing. So now if I take a look hit f 12 and take a look and see what we have, you can see that we have these longer pieces inside here that represent what's going to be a straw. So the next thing we're gonna do, because it's really hard to see is give it some different coloring. So I'm gonna make sure that grass bars is highlighted and I can see it's highlighted by here by looking at my object tree and on the left side. I'm going to hit that same copy button and change the name to grass sports. Now I'm using the copy button because we're just making variations on stuff that we've already done before. So in order to see it better, I'm going to go to back to the tree here and under main. I'm gonna turn off this I now that just makes it so that I can see the one we're talking about. And then grass main is not in the way. So what I'm going to do to make sure that everything is a little bit different because one is sitting right on top of the other. I'm gonna shift the ex a little bit for the mapping. So if I had seven on the num pad toe look from above and I just drag over, you can see that I'm moving things to the left or took it right. So I'm just gonna move that over. It doesn't really matter how much I'm gonna put four meters in there. Everything I'm going to do is change the scale. So right now it's set to five. I'm gonna change that, Skilling for 1.5, that's just going to make it look more different than the other one. And the other thing I'm gonna do is make it a bit more yellow because I wanted to stick out a little bit more. So if I drag this over some, we can see that the whole thing becomes more yellow. Someone drag it to about there. Now I'm going to go to Grass Main and Object tree, and I'm going to unclip the high. So now we have both on top each other. So if I hit F 12 you can see that it's much easier to see this. What I'm gonna call right now kind of straw grass within it, So that's good for the visuals. But like I said before or like, you know, we're trying to do this is dynamic Grass is going to move because there's wind. So we need to make sure that the dynamics of this draw are also correct. So make sure that we have grass bars selected and under graph spars under the particles panel. We're gonna go to the hair dynamics and the hair dynamics, let's see, are right here. There are tours of the top, and hair dynamics are checked because we created just a copy of the other one, and we're gonna leave everything else mostly the same. The Vertex Mass, the stiffness, the random gonna leave. All that's the same. And what we're going to decrease is the damping Zoran. A decrease of that, but 20 points. And that means that Thestrals aw is going to move with less damping, so it's going to be a little bit more jittery. It's gonna move a little bit Mawr in the wind than the rest of the grass. And that makes sense because higher than the grass. So it doesn't have the same effect from the drag of having the grass, all the other graphs around it. So that's what we wanted for our dynamics, and that's what we want for our material. So if we get a quick F 12 just to see that again, it's amount just a little bit. You can see that we do have the effects were going for. So that is it for the grass on anything left is to create the wind.
23. Grass Chapter 5: Conclusion: so that we just have our last few steps, and that's just to create the wind and make sure everything looks like we want to do before the men before the render. So, in order to create the wind, really do it much like we would create any other object I'm gonna hit, shift a for add and then under for force field, I'm going to select wind. So wind is the second option, and that's going to spawn right where you're at, right at the center where the three D cursor is now. I'm going to move this summer, the hit G for Grab and then X to move it along the X. And now that it's beside it, I can hit our for rotate and then lie to rotate along the wire that I'm not hit 90 and for me, because the way I moved it that faces it towards the right way. But if you did yours and it faced the opposite way, you can just hit 90 and then negative, and then it'll flip it the other way. But for right now, this is looking good now, with its selected and you can see here in the object tree, but not with it selected. We can go to the force field tap here, and that's right here. So under the physics properties, you can see that we already have the win. We already have a selected as well because that's how I created it. And this is really easy blunders. Force fields are pretty easy to get started. Now, if you want to do something really complicated, usually it's still pretty easy. But we don't have a lot of things that we need to a lot of parameters we need to change. So really, the only thing we need to change is the strength. So in order to see what everything looks like now you can hit space bar or you can hit this play button here at the bottom. But if you look at it, it lays are grass completely down, which is just way too much. I'm also going to decrease the total number of frames, so I'm gonna decrease that 50. And now we're only gonna look at the 1st 50 frame so you can see that it completely lays my grass down because of this, because of how much when we have. So I'm gonna take my strength and I'm the decrease it quite a bit. I'm gonna take the strength down to 0.5 now. If I hit that play, you can see that the grass doesn't move as much, so this is more realistic. But what's actually not so realistic is that once the grass moves, it stays completely still. So if I increase this just so you can see and then I look at later frames the grass looks like it's in stone. It looks like there is no win. And that's because blender essentially is the simulation program, right? Right now, I told it to put Wind, and I told it to put being exact amount of wind throughout time and not change it. And that's just not accurate to the way that wind actually works. Something changed this back to 50 because I really care about the 1st 50 frames at the moment. And the easy thing that blender does, as all I need to do is change the noise amount. This is the variation in the strength, and I'm just gonna put one here. So now if I hit the space bar you can see that the grass does waver like it's in the wind. And that's exactly what we were looking for. And fortunately, that's pretty much all we need to do for the force field. The creation of the wind. Now, as this looks right now, I'm just going to check and make sure that when we render it, we get a good angle, cause now the grass is actually changed from where it was. So I hit zero to get into render view, and then I'm gonna hit Space Bar to stop it from cycling through the animation, then my f 12 and we see that this is maybe not the best angle cause I grass looks really dark and that just has to do with way the grass is laying and how are white is interacting with it. So we're gonna try to find a better vantage point. So in order to do that, I'm going to switch to the render view up here on the right side. I'm gonna switch to render view. I'm also going to change the number of Children like we did before, So I'm going to slick grass main and under the particles panel. I'm gonna go the Children and under Children. I'm gonna go ahead and increase that to 1000. So now I have a better idea of what everything looks like. I'm gonna open up this side panel here by hitting this arrow. You could also done it by giving end and under view. I'm gonna slick block camera to view. So this allows me to move my seen around while not moving the camera. And I can see that from this angle, I get a much better view of the light and the grass together. So now I'm going to unclip that so that now, when I moved everything around the camera stays in the same place zero number zero again, just to see what that looks like. And then I'm gonna f 12 to see what a render. And I see that this is a really good vantage point for what we're trying to do. Now. The last thing I want to do is give it a good background. So we're not going for realistic. In this case, we're just going for something that's going to make it look good so you can see the animation and see of the quality of the animation. So I'm gonna go to my world settings. So right here, I'm gonna quick world properties, and here I'm gonna decrease this to black. So now if I hit f 12 you can see that we can really get a good a good look at what that grass actually looks like. So now I'm all set to do my animation. All I need to do is make sure everything is set up. So in order to set up the actual animation, I need to set up the output. So underneath the and the need to be outfit tab here on blender caused this output properties, I'm gonna change the folder that it's going to go to. So I'm just gonna leave mine where it is. But you probably you'll want to put this at something that makes sense to you. I'm gonna change the file format two ff and pay, and then under encoding, I'm going to change this to MP four, so this is gonna make an MP four, which is something that which is a file format video that pretty much anything can play, including, if you're gonna put this on YouTube or Instagram or anything like that. The video Kodak is H 28.264 And other than that, you pretty much ready to go. We have it set up at the default 1920 by 10. 80 and that's HD, and that'll be perfect. You don't need anything more than that unless you want something more than that. And right now it's set up to be 50 frames. And just to give you I just want to cover one thing Before we said it too. Go ahead and start right now. You see this red portion down here? I'm gonna turn this off so it's not flickering so much. And this is how blender kind of saves this animation information in memory is called the cash. And if we go to the particles panel and we look for the cash, let's see if we can find it here Yet Here's the cash. If you look on the cash, we see that it's going to save 250 frames worth of cash. We're not gonna look at all 250 frames, but it's here, and you can see that here on the bottom that we have this red bar our way out to 250 frames . If you wanted to render more than that. And probably for whatever reason that you're gonna use this, you are gonna render more than just the 50 France. I'm just doing that because I don't want you to be here forever while it while it renders, is only going to do up to 250. If you wanted to do a lot more than that, you would need toe also change this number to be the total number of frames that you want to render. So we are all set. We're going to render the 1st 50 frames just to give you an idea. And in order to do that, we're gonna go under render, and then we're gonna quick render animation. So there you have it. It's all set. Now, toe, look and see what that looks like. We can go under render, and we can say view animation. Now it's also going to be present on your computer wherever you told it to go. But you can see it here. It looks pretty good. This is what we were looking for. This is only 50 frames if you want to see. You saw what the intial looked like. You saw what more frames look like. But this is exactly what we were going for. I can't wait to see what you make.
24. Sun & HDR Introduction: Now that we've covered mountains, clouds, and grass, you may want to learn how to use just blenders, normal some lab. Or you might even want to learn how to light your scene with a background image, which we call an HGRI. Adrian, my main main is going to show you exactly how to use a sun lamp and NHGRI. Check it out.
25. Sun Chapter: Hi, I'm a1 values and welcome to this tutorial for the skill shape length three, because today we are going to be talking about the Blender 3D sun lamp objects. Now, when you open up your default scene, you're not going to see the sunlight objects at first. You have to add, when you do that is the shift a. And you go to light and you go to a light and sun. When you have that, you do that, you'll see the sunlight options appear here and you see something similar to the Soviet here. This object. Now the sunlight, as you can imagine, x exactly. The normal son would blended treats the objects in the same way, but it featuring times seen as basically the Earth. And to that end, we have decided to the sculptor small basic scene here. We have a vSphere, a cube, and a plane with a few words faces raised up, as you can see the tab into edit mode of raise a couple of faces. This could be something similar to read anything from ridges on a plate to a small basic mountain. See, let's put the indices can get defects. So you've tobacco out of bed load back into object code. Now, as I said before, the vendor doesn't by default objecting to create. And once you do, you can interact with its individual properties. And you'll find that here in the Light option like section, which could be objects. You'll see the individual options of here. And now, when you get to this point, you'll see a bunch of objects then an options here, but you've got only the sun lamp. For now. We're not going to worry about the rendering engine. We're going to be focusing specifically on the ED engine. So whenever anything else for now? Now, when you look over here, you'll see a bunch of these options that allow you to control the different characteristics and properties of the Sun. Preview of just indicates basic options and settings that you have for your site at the moment. For example, is look at the color. A menu pops up and you can adjust its color accordingly. Now this when you sit to preview mode, so it will do whatever. It will basically just do any options that I change. Now the reason why you will see here this dark things changes because this sun lamp is emitting light as the sun would. But with this option, you can change the color of the light it emits. So it could be anything from alien Greenwald, Rebekah, my sunset to maybe a raid apocalypse. You named do as any other program, you don't like it. Just undo and go back to basics. So yeah. Pretty nice little third, heavy allows you to just do anything when bay with the color. And the strength as you can imagine, is the strength of it. So if you want to have maybe a coup clear day, or if you want something heavy and you can just keep going up and you get a mix of ten. And that is how it looks. You'll notice that the scene is now gotten a lot brighter. But it's because it's as if the sun of the sun got brighten. You seem. So doing that is very helpful if you want something on teams and stuff now. And dual x k. So going on with the options we have here. This peculiarity. Now, if you look at I'm going to go tap into 0 and you'll see what my chemistry yet. If we'll do a quick render, you'll see that there's lot of shine on these objects. You see these faces and it's object that are facing the Sun or catching a lot of shy. This peculiarity controller is what controls that. So if you look here, specularities, if you reduce a specular, you must see seeing the objects indicate darker, right? You could take it back up and it goes back to normal specularities. Especially at this peculiarity controller does. It controls the amount of focus light on your objects. Any object is facing your son or catch the most shine. And that's what this peculiarity that's now mix over here, use there the angle. Now, when you grab somebody moved around, you'll notice that it's changed the scene. If you go back to original position CVA, and we'll move it to just cross the y-axis just a little bit. You'll see a pocket here. Nothing happens. That is because blenders chicken, this entire scene is your sun and the earth and sends affecting us. If you move the sun around, the amount of light, the ceiling isn't changing as long as the Sun, it doesn't go further or away from the objects, which is all of a sudden, doesn't it? It'll be fine. There will be no change. However, the angle, if I can explain this as this is the angle where the Earth is in relation to the sun. It'll pop up its bridges appears is angular diameter of the Sun as seen from the earth. And secondly, sum to 0 radians, radians because you can have it to 0. Now what happens when you move that up? It's like if you change the angle of the light hits, you've seen that. You see CIA shadows of now gone, now almost dissipated by your quick Render. You'll see what I mean. The shadows have become really much more transmissive as if they're all day. So what happens, what's happened is co-vector seen. What's happened is the shadow safe? It's similar to if, say, we think of it in terms of where the Earth is in relation to the sun, the angle that the Sun, the race Pythia. That's what that affects. Ok. Now obviously as we have awesome that we have to have shadows and get final shovel controllers all the way down here. Now, obviously because this is the sun, you can, can you have a lot of control over how Blender fix, how renders and present sunlight and visit Santa shadows. So I know the bias, the bias is basically how accurately shadows are. And you've written a pop-up, CCS is number of texture used by cascade shadow map. What that means is as the depending on the texture and the shape of your object, blender will calculate each one of those rays. Now the bias is how accurate and how nice and how presentable shadows all. That's what the bias controller does. Move on to cascade, it shall map. And because Krishna is basically, as I said, when you have a texture on any object as why I actually did this plane here. So you can see when this addiction object window will calculate how much or how to render and what to do with those objects. So the Shannon map is basically what's shadows will be rendered in terms of what summarizing it. That you can increase and decrease the cut-up dies and is for. And what it says here is number of tissues by cascade Sherman. You reduce it. The same thing happens as what the angle. Shadows don't really aren't really as fine as accurate to take a back up, I become very traced, refocused, useful for say, if you want to render something like a cloudy day or a misty area. Now, the shadow fade is, as it says here, how smooth the transition between each cascade is. So say Yeah, you have.
26. Background Image/HDR Chapter: Hi, this is second Daniel's Welcome to another blender tutorial in a lawsuit toil, you discussed the sun lamp object and how it affected the lighting. The shadows in arsine is another way of depicting that, means by using an HGRI image, you can note that the lighting shadows. Before we do that though, we'll need an object that could maybe better display and illustrates the effects of the HGRI on objects in the scene that we're gonna make the basic peasant ought to be basic. So 70 and select the top four vertices and extrude them along the z-axis. It holds in less than that center. And exactly the same thing with before on the bone. Separate object model. Now we have a basic denote the HGRI cobra to the Sharing tab. I can set it to o. We'll say tobacco node. And to add the HGRI, shift a conviction and environment texture quicker and connect it to the surface of the volume. Now you're ready to load the HGRI Judas. So open and navigate to where you saved your HDR. Now loaded, you may notice that nothing's happened at Paris because this viewport is still sit to object shading mode. To be able to see the effect on the result. You might take a second depending on your computer, but this is what you should look like. And you see the HGRI has been successfully loaded or around your image. Now, screen display the effects of it. We're going to give our prison. But the texture material section here, all the way up and be the roughness all the way down. And now you'll be able to see that reflected nature and also affects on the faces of our present. And all sections seem to have been affected and other completed. Now noting and if you want to load another HER or if you want to see, just test different things to submit to the same thing, open mind. And you see it's successfully loaded the new image. We want to get a little bit in view of this. Go over to the Modeling section. Like this, two results. You'll see that obviously the lighting is having effects on our objects and is being reflected in our object as well. Now, something to be aware of with these is that it's supposed to be set by default. But this section here should be equally rectangular at all times. If you don't and memorable, you have this creepy thing happening in the background, which thankfully so being reflected much. But yeah, you don't want to just make sure it's always we rectangular. Now without HGRI loaded. And how we can go back to modelling of the shading or just a fixed thing. And you can go on modelling as you would normally see. And we'll just keep it the same material as we just did for our visitors. As you can see, everything is being reflected and is working. Well. It's a nice way to the lighting seem that doing it with other objects and is quite new dynamic 2i. So yes, initiative HDR is, they basically think of them as spherical photos. Now, you may notice that your ACR might not be that great. I pivot blurry or at least because you might not be the best quality you can do about that is get a better quality, a CRI, or download, buy them online. They all available for free as you can see here, you can oyster HDR because of the wavy nature of them because as I said, basically spherical photos that had been unwrapped onto a flat surface. Hdr is at most stock websites or freestyle websites. And yeah, this should be free available. Use these to try it for different moods and your scenes. And try four different styles of your worker. Okay. I hope this has been helpful. And if you have any other purchase or do you want to use, you can continue working. You're seen as binormal. And if you have any other questions about that, please feel free to contact us. And I will see you in the next tutorial.
27. Sun & HDR Conclusion: Now that you know how to use both NHGRI and a sun lamp, I want to see what you can do. Go ahead and upload your own render of your own scene using either of those.
 EduCraft Ideas, 3D Animation with your imagination!