Transcripts
1. Introduction : What are color can be tricky. It's really hard to predict the outcome. However, we can't become more confident if we practice the fundamentalists. Now that is to simplify the process. Hi, I'm Abishek realm. I'm a filmmaker and a water colorist. After teaching for more than a decade, I have developed methods to help students understand the basics for their watercolor journey. This course is about telling a brilliant watercolors story. Keeping the human. We will learn how to simplify the real reference photos to become a brilliant watercolor sketch with enough details to suggest the story, built drama, and the most essential thing, timing and atmosphere. This course is for beginners to semi advance artists. They can hone their skills further by learning these three key important signals. Number one, simplifying complicated reference photos. Number do understanding the tonal values and colors to achieve a proper lighting. Number three, character, Porsche's and their movements just del, a particular style of her story in landscapes, cityscapes, or any other topics for that matter. Thank you so much for watching this review and I really hope to see you in my goals get started.
2. Essential Materials: Well, good quality paper is a must, but you can start with whatever you have. The one I'm using is a 300 Judaism fine-grain, cold pressed Bao Han paper. As you can see, the texture is quite fine, explored brilliant, handles, water and paint very nicely. So this is what I'm going to use. You can see the logo over here, but you can use whatever you have, but tried to have a fine grain watercolor paper. That's good. Alright, the brushes. Now, I would recommend good quality materials from good companies. But you know what, you can definitely use whatever you have. Let's start with the brush. We have big ones. Said that Dick, 10-12 pencil, synthetic brush size four or six tissue papers, and a masking tape. That's all we need. We need viridian green, yellow ochre, ultramarine, Carmine, crimson, Alizarin, crimson, whichever you have an orange, trust me, you can use any brand. These are three different brands. I'm just trying to show you quickly. Magellan mission and an Indian Gamblin brand. You can use anything you have. I'm going to use two plates, one big and a small one. Just to simplify the process, you can definitely use a foldable ballot. Definitely. About the water. I always use to. I would recommend to one to clean the brush and clean water so you can mix, you gotta mixes.
3. Understanding Human Postures : All right, to begin with, we have to understand the human anatomy in terms of illustration and also how to use this bushes in your painting. So the first thing first, I am drawing a couple of basic shapes which will show you how to draw human specifically for these kind of watercolor sketches. So we have to want to be the oval shape. 11 would be rectangular, trapezoid kinda shape. So now after this, let's graduate to a little more advanced shape. So the shoulders, as you see, they are kind of natural now falling down, connected to the head. Now the legs. Very simple really. All I can see is it's quite simple. You just have to pay attention to how exactly they move. So one leg further and one late slightly back of the front one. And what I'm trying to do is I'm trying to put those both and into the pocket. That's the posture of this particular character. There we go, slightly darker and just trying to shade to tune value system that I have followed. So if the light is from the right-hand side, we can have some dark shadows on the left hand side. Now, let's try the second method. Now, all the characters that I'm drawing right now, they are frontal, so they are kind of walking forward or maybe they are walking backwards. So either they are facing us or either they are facing other way around. So now this time the right leg is slightly forward and the left leg is slightly back. Take a look, analyze, understand. Okay. So you can actually use any of the method. You can either go for the oval shape and then you can modify them. But you can try the rectangular one. Look at this, this particular character is slightly bent. Now that is the backbone. The I'm just connecting the neck with the head. Let me just quickly shade. Because most of the characters that we are going to use for this particular cause would be in silhouette. So we need to understand the outline of the body rather than the extreme detailing. Because we are going to suggest, rather than creating an absolute detail character. So now take a look. So this looks like the character is having a cigar. He's looking maybe to the left-hand side. And we can see his left-hand side in terms of the viewing angle for us. So now let's continue to the next one. We need to understand the movement. So if I put a over like this and I move it to the left or to the right. We have three different angles now. So that's the hurdle. This one is the right and that one is the left. So they are looking that way automatically. The head, i mean, the small ovals, you have to place them accordingly. So now let me just try to make a character who is trying to walk. So as you can see, this is pretty basic. As you can see, we have one leg. The left leg basically alert you forward and the right lip a little backwards. But you could do the same thing with the other way around. Now let's try the rectangular method. Take a look. So this can be a very simplified approach to establish characters in movement, especially now that can be a wide character, that can be a thin character depending upon the situation and what exactly you're trying to go for. Now, take a look. This one is a thin character, silhouette, completely black. And you can apply the same style if the character is standing or walking quite at a distance. So the same formula can be applied. Now these are angular like left, middle, and to the right. And these are walking forward to brilliant, isn't it? So this is very essential to deploy any characters in any part of your painting. And depending upon the angle, depending upon the movement. If they're walking forward, their back walking backwards, are they going lift? Are they going right? So these things are really important. And let me give you a quick demo in terms of the layout, I'm drawing a quick composition and trying to place a lot of different characters. Pretty minimum, pretty minimized. But they're not going to be quite detailed. But you'll get the perspective. Now. At the distance, as you can see around the horizon, characters are quite small. And as we move to the foreground, like this, characters are going to get quite bigger. Now this is a tricky situation for beginners because they really don't understand how to place the characters and how tall or short they should be. So this is something you should practice before you attempt the main paintings that we are going to do. Trust me, it's a brilliant practice. Now look at these characters. They're completely towards the foreground there facing the camera almost. I mean the camera, meaning exactly where we stand and trying to look at the picture. So what I have done over here is I have followed a pattern like a XID or maybe a, or what kind of a, some kind of a letter, you know. So you can just place your characters according to them and practice. Let's move. Now in watercolor, we were trying to do Blobs, Just basic shapes, but we are going to follow the same technique, the ovals and the rectangles. So take a look. You just have to press the brush entirely on the paper and keep them close to each other. Just like this angular. Also frontal and quite straight. So what's going to happen is this. If I apply a color for the head, now, it looks like there are two characters, endures or couplings. You're trying to talk to each other. The two brilliant. So now I'm just going for a darker shade is to create some legs. Take a look. Straight lines, thin and quite close to each other. So the ratio of legs and the body that will come with practice. But what you can do as of now, the beginning stage, just try to understand to keep the body slightly bigger than the legs. So that will create this idea of perspective where things will look quite at the distance. Now, if we bring them closer, we can make the legs slightly longer. Now this is just a random patch. Where out of this patch I am going to create a lot of maybe standing characters. So let's see. So now I'm designing in terms of color. It's just ultramarine mixed with a little bit of orange, nothing big. So take a look. Now. Here. I added two black lines again here. So when, when we actually do these kind of things, they give us this illusion of item, multiple characters standing, or maybe a couple of them, depending upon the situation, you could design them. Now the white gap, as you can see, that can be a shirt or a t-shirt or whatever they are wearing. Extremely light, which is highlight. So this illusion automatically gives us this suggestion of human standing or talking or maybe eating depends, but take a look. This is the basic format. So one more thing to understand here. If you notice the legs and the body, especially after the torso, I'm in the lower part of the body. They are quite blended because we don't really have to establish the absolute details in them. You can do that. Why not? You can do that, but you can do that if you are specifically trying to design characters. Now some might say, what if the character is wearing a white top and shorts? So now I'm going to show you how. So I'm just trying to do a quick dog, shorts, half pants, and half sleeve top. And we have this warm hands, warm or phase. Just like this. Pretty simple. Very, very simple. These are essential exercises to begin your master. Peas basically. All right, now let's continue with this one angular shape. One more angular shape. Now, at this point, there are two things gonna happen. Keep this in your mind. You have to, you should take notes basically. Now, if you're thinking of a shape, either after putting down the brush on the paper, you might get an idea of a character in one particular post shock. Second thing. You might have an idea in your mind and then you can just go forward with it and try to make the Shape totally okay. But when you are trying to apply on, on, on a painting, it's better to have some kind of a design in your mind. So now these two characters a slightly bent and they're walking in an Angular, but they're walking towards us, but slightly diagonally. Now these characters in the middle, I design them in a way so we can put some chairs or tables, and they are just having a cup of tea, coffee, they're talking to each other. So Illustration methods, a really beautiful if you apply them in watercolor. Now, you can definitely use these characters in this particular way for you. A very realistic kind of a painting also, but you just have to add some more ornaments on them. Maybe a couple of more hard detailing. Now these particular thing, what I'm trying to do right now is to show you the perspective from a short character to a donor, one in relation to each other. They will give you just enough illusion that we'll know what, okay, there are three character standing there. They are talking to each other and doing something. Now this one, what do you think this one is going to do? Yes, you're right. It's basically trying to walk towards us. In the same way you can use it. And you can show the character is walking towards the horizon rather than towards the camera. And this is a small trick which I just showed you, drag lines. So this is something you should practice.
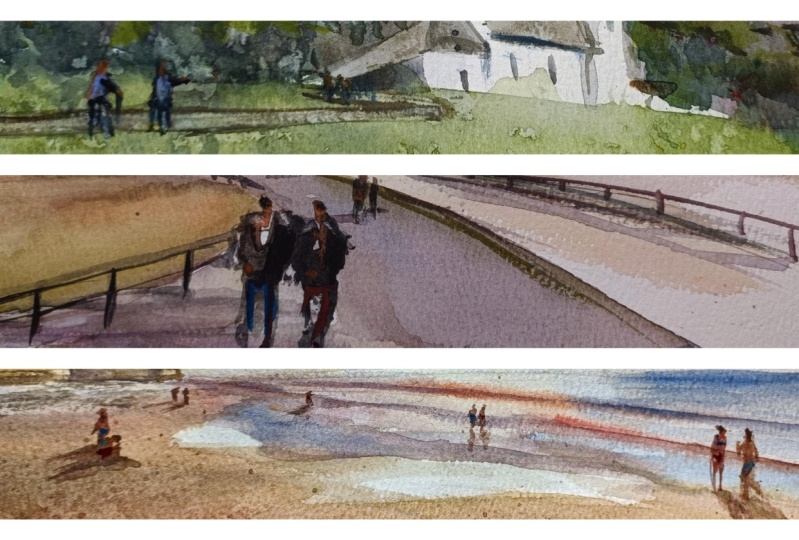
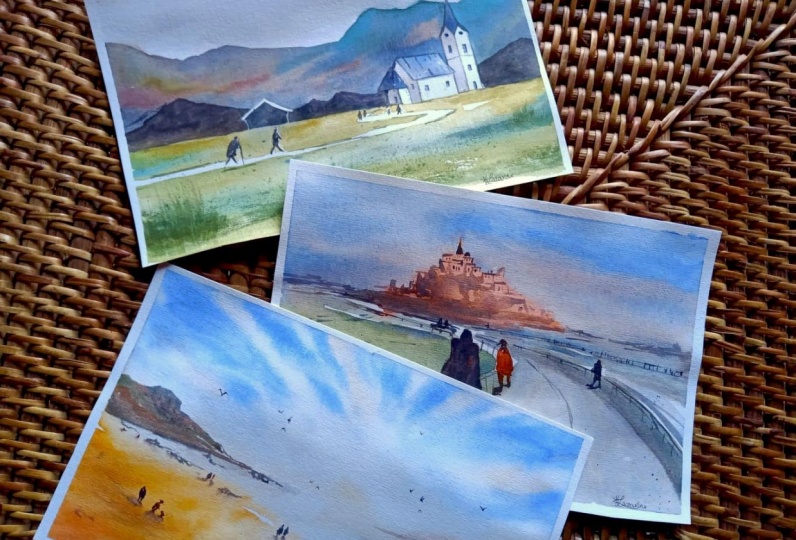
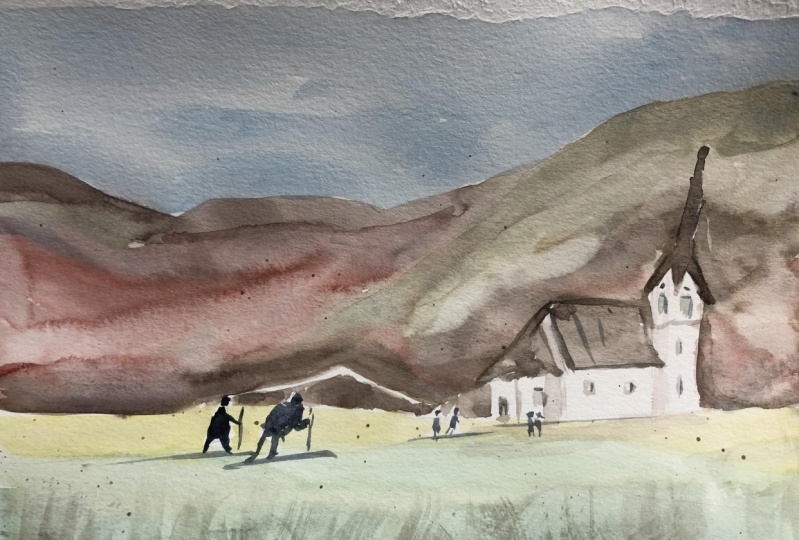
4. The Church- First Painting : So the first painting, the morning z. So this is going to be offers painting and let me give you a quick brief on the topic and how we are going to approach it. Alright, let's start the first painting. Before we do that, let's analyze the pictures. So the first one is the original one. Now, we also have a monochromatic version of the same picture. They have the same values. Only. We can see in grayscale just to understand the values and how dark and how light or the supposed to be. So the third one, I have edited to make it look like morning yet quite warmer, not exactly like the first one and the last one. As you can see, the painting that we are going to do, as you can see, we have introduced a pathway and a couple of characters moving towards the church. Now things to notice, diming color in terms of temperature. Is it warm or is it too cool? Also, manipulating the image to make it exactly like the painting so we can introduce our characters and tell a nice story. Let's start the process. All right, let's see this. As you can see, we have the image, we also have the drawing of the characters moving forward. Now, exactly what we are going to introduce in our painting. There will be more characters also, but they are going to be quite close to the church. But these two characters are going to be the main subject, not exactly in the entire painting, but this is going to be our focal point. So now take a look closely as we have already practice this in the previous session, where learning the postures and movements and characters, how to design them. This is exactly what I am going to do for this particular painting. And now, let's begin the process. Now you can see the difference. There is a church. Pretty brilliant morning. We are going to do the same thing, but I am changing the composition and the placement because we have to tell the story dramatically. Also, the, I mean, the watercolor painting should look like a impression of something that we are trying to depict, which can be used to make a very detailed, realistic kind of a painting. Or if you like to have only a sketch of plain AIR and on field, you just trying to depict something which you like, but not entirely a 100% true to what you actually see. It can be imaginary. Now, you already know that there are no characters in the photograph, but I am going to introduce, I started with the ground line first, then the big shape, the mountain. And now I'm just trying to design the structure over here of the church. And over here, I'm going to add simple pathway also. Let me just finish with this front entrance. And then. I'm going to do the road. Now pay attention to what I'm drawing right now. Quite simple, following the basic shapes. Now this particular structure I'm doing, I'm not going to do any detailing there because it's unnecessary. This is the bath that I'm talking about. And there we go. Alright. So now you know what I have actually done with the reference. Absolutely simplified. First character. Introducing our first character, maybe an old man or something. It's Sunday morning and they are going to attend the church. So there is a second character here. They're just moving forward, looking at the direction, look at the body posture. Now we have a comparison here, two characters or focal point, and also the church. So we have two different sides of the painting. So the drawing is almost complete now. So I'm saying yes. I was saying there are two sides of the painting, left and right, 2D balanced. Now let's start painting. Alright, let's start the painting process and just trying to mix colors. But let me just quickly explain. This is going to be a morning scene, so I'm not going to have heavy vibrant colors, but still will try to get just enough to show it's morning. Maybe it's Sunday and people are trying to walk towards the church, like I said when drawing. So look at my ballot. Mixing water and color. What do you think? Is it cool or warm? This is not exactly blue, red, green, yellow. It's just slightly brown but neutralized. So it can look like faded black, but quite warm. Now. That said, and now this area is going to be slightly cooler. Now green cannot be exactly warm or cool because it's just in the middle. But still, you can push it towards the cooler side of it. Now, as I am trying to come down, I'll try to have a balance just to show the nature of complimenting, you know, because they should complement each other. They should be opposition of warm and cool. And that's all I'm trying to do. Quite a bit of neutral colors. So sometimes it might lean towards blue, sometimes it might be towards green or brown or red. Now, pay attention to whatever I do. Though. I'm thinking of doing the sky also. But as it is going to be Morning, I'm not going to use extreme blue or extreme orange, so to speak. It is going to be sunset years, we can use that, but as of now, it should be slightly Misty. You can say, oh, slightly softer in terms of lighting and gonna values. So slightly reddish, slightly bluish, and just enough to show the sky is quite soft, but clouds are not exactly visible in terms of shapes and proportions. Now take a look. What am trying to do is I am trying to make the colors. And I'm thinking because I'm trying to simplify the and a mountain and also the Bushi trees, maybe just at the bottom of the mountain. But that's none that's none of my concern. What I'm thinking is to simplify the process just to get some dark areas. When I reached the bottom part of the mountain, do suggest that things are not exactly a flat wash. Now take a look here. Negative approach. Meaning you start with the darker areas and try to create the shape that you'd like to have. And now, quite a bit of warm, neutral colors as they come down. All right, take a look. So we started out slightly cooler from the top. And as I'm reaching towards the bottom area of the mountain, things are getting slightly warmer. And I'm doing it for a purpose because I want the entire painting to have the complementary nature of colors, the complimentary nature of warm and cool, and that's all there is. So now let's try to neutralize the colors here and there. And I'm trying to isolate the church. Just like this. Now the shapes getting ready. And we can also see that the Church is slightly visible. Now, this particular structure, he'll maybe you how's auto hot or maybe another bottle for the church? I'm not trying to go I'm not trying to do any d dealing there. I'm just going to keep it like this because I do not want this particular shape to contradict with the characters. Don't blow. These are just the adjustment lines. So we can end the beak shape, right? They're maintaining a couple of highlights to all those white areas that you see. Those are highlights. And now let's see. Always step back, couple of feeds away and try to see your painting. Analyze. And to see what I'm thinking is to have slight warm. Up over here. Now this is not there in the reference, and that's the reason why we are learning to do find storytelling, keeping the characters in mind. And this goes is exactly for that. So there we go. So now, if you notice, we have a cool background, especially the mountain and the sky. The foreground is white, warmer. So it's a mix of yellow and a touch of green. Remember, I'm not using jokers because if you use Bukhara has the vibrancy, might say something else. So it won't be morning or it won't be afternoon or evening. So you just have to keep that in mind as you proceed. These things we've come with a lot of practice and a lot of analysis and lot of observation tried to do a lot of studying, waste, a lot of paper, not recommended obviously, but you know what, you can't help it. You just have to practice. You have to learn, learn, learn, learn and take a look. We have good greenery. The bath is visible. I'm going to keep it white. I'm not going to add any color in that area because I want to have a very simplified painting. Just enough details to suggest that it's morning. And people are walking towards the church. What does is they're brilliant storytelling characters exactly where they're supposed to be. You can definitely go ahead and do your characters in any other way you want to, after you finish copying this particular painting, because I really want you to copy first. So you would practice and understand. And then you can proceed with you own imagination and you can definitely do a lot of things. I do believe in you. Alright, too much talking. Let's focus here. What I'm doing is I'm trying to get the Docker areas and I'm going to let the painting dry up a little bit after this. So now the painting is dried up. Focus. As you've seen. In watercolor, colors actually fade and they become slightly lighter. So you can use that to your advantage. But trust me, if you don't pay attention, the same thing can actually make your painting a disaster. So, well, I'm thinking of a good plan. So I can just out of the context, try doing a lot of different paintings. Just by practicing. You'll actually. Explore many different subjects and get quite knowledgeable. Now if you notice, I'm just trying to add all those tiny details. Now you can do a lot of things. You can do dry brushing, but I'm not doing any drivers as of now. It's just simple colors applied by a mob. Brush. Also, I can say that you can use a synthetic brush if you have to talk to you. Okay. I'm just trying to get more ultramarine. I love ultramarine. It's a pretty good color. It's quite versatile. You can use it to make your complimentary colors. That's not the only one, but it's good. Now, I'm trying to mix a little bit of green so I can proceed with some detailing over here. I'm thinking about making some shadows for the church. And let's just see there. That's the first line. The second line, quite good. White light. It's not absolutely black, which is not good. So we go. All right. Look at that. Look at that. It looks fabulous already. Now what I'm doing here is I'm just trying to get the dough. And I'm also thinking about putting some characters there. So let me just see quickly because these characters are definitely not there in the reference. So guys, when you do, pay attention and please, please bes, practice many, many, many, many characters on your own. So you know what, when you try to create any kind of a concept art, if you work in the industry of designing and, or maybe if you work in the film industry and you try to do storyboarding of some kind, you could definitely use these techniques just by understanding tonal values. Lighten shade obviously. And characters, characters, characters, if you know how to simplify them and how to put them in the right spot. Which will actually come with a lot of practice, which I totally know you will get it today or tomorrow. That's all you need. Now, what I'm doing is I'm just trying to add a slight touch-up with a dark color. It's just YUV color. Basically all the dirty colors from the ballot. Just enough to suggest that it is some kind of a darker area. Now, I'm just trying to appreciate the painting I've done and you should do that too when you are finished with your painting. Now, I'm thinking about the characters. What exact colors should I use? I'm just going to keep them in neutral, probably towards the gray and black. Now, let's see what you can actually use black. But normally in watercolour, it's not suggested. But you know what? Why not? So, but right now I'm just trying to make compliment colors, complimentary colors by mixing blue and a little bit of orange. Alright, I am going to stop talking for a sake. Focus, focus, focus. Look at this. So look at it. Dues, glutes, or you can see the silhouette is not exactly back. Its mode of dark bluish. The we go, maybe he's holding a stick. Just like this. The dequeued, isn't it? Now, the next one. Alright, now this is choice based. If you want to add, you can definitely go ahead and add 57. I don't know, 1012 characters, but that's your choice as of now, I'm just adding do. So we'll have a good comparison between the characters and the church, which is far away. And these people are trying to go towards the church. And it's fantastic storytelling guys. Keep it simple. Minimize the necessary effects or immediate fees. You can minimize the shapes, bring them to their bare minimum. So thanks. We'll look simple yet, just enough to show some reality in the scene. Like it's morning UCLA walking. We have a church. So when people actually see your painting, they automatically identify or they will understand, oh, this is what the artist is trying to do. And that's, that's all it is. And here we go. Brilliant. Just trying to add some more characters. You. And they are quite kneel to the judge and they are talking to each other. Just like this. Maybe one more over there. You can actually do a lot of characters and make a rowdy scene if you want to. But you know what? Once you finish scoping this particular painting, gourd and dry. And if you try something like that, I'll be so happy and you can send that photograph on the discussion panel. I'll try to take a look. If possible. I'll differently give a feedback which I would really like to do, support my students, whoever joins this particular goals. Because that's what teachers do, and I'll definitely do it. So let's see here. These are the final detailing that I'm trying to do. Quite minimum. Nothing fancy. We are basically done. I'm just going to add some lines here and there just to make the painting them out properly. Look at this. Now, what I'm gonna do is I'm going to do sprinkle, sprinkling, sprinkling, sprinkling Docker's. Now is this necessity not entirely on what exactly? This is just for some aesthetic effects, flat brush, which I did not show you in the beginning and the material section. That's okay. You can get anything you want. Use anything you have, you just use the mall brush by drying the more British entirely. So these are all this touch up for the glossy effect. Quite minimum. I'm not trying to do any fancy stuff here. There we go. We've got the baiting, see how values work and how you can use them. In your study. I'm using orange for the phase, for the feet slightly here and there. Now also, let's just go ahead and do some highlights. There are two ways to do highlights while painting. You can leave the necessity, white sports. But sometimes the technique doesn't work and you goof and you just, you know, Governor up some places. So what you can do, you can take white color directly from the DU and apply like Sue for specific areas. Try not to overdo it. Trust me, if you overdo it, it definitely when you're painting definitely a 100% 11020. So I'm just going to do wherever I feel like just enough. The LIGO painting is finished. Now let's do the third one or the second one.
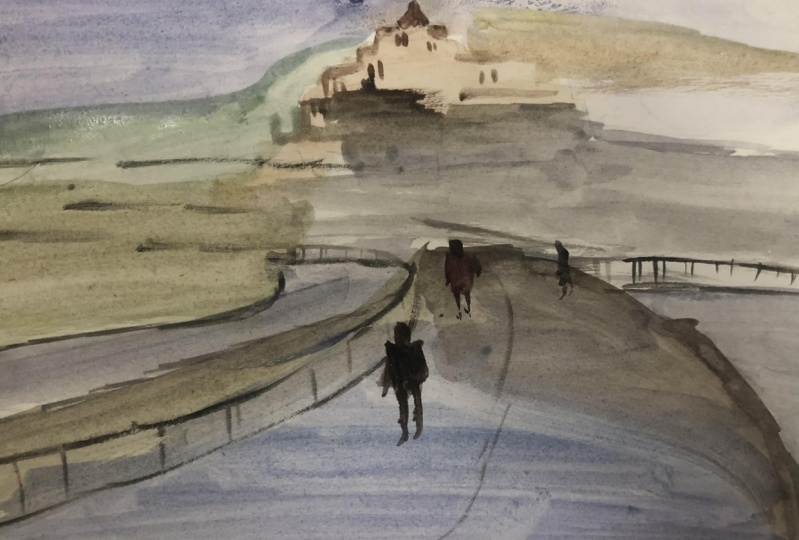
5. To The Castle- Second Painting : And that's finished. This is our second Beidi. Do the castle. Important learning things. How to make for movie characters, how do make afternoon, color and atmosphere, and also the time. As you can see, we have four pictures on the screen. On the top left corner. That's the actual one. And then just to show you the tonal values, there is a monochrome picture. The third one is slightly brighter as we are going to do an afternoon scene. So the sky is slightly neutralized rather than like the original one. It's not quite bluish or cloudy. So I have managed to edit it almost to the afternoon scene. And the last one is the picture which I just made, and that's what we are going to paint today. Alright, this is the second painting we are going to do. So I'm just starting with the quick sketch. Once I finish, I am going to explain what exactly happened. Why did I draw like this and what exactly I did with the reference. So in the meantime, try to pay attention to the drawing. I am trying to minimize the effect of details by just focusing on the perspective, the characters in here, and the castle at the distance. Nothing much. That's all there is. Now, let me quickly explain what exactly happened in this place. Okay, as you can see, we are about to start the painting. But before I explain the colors and the process, analyze the drawing forward moving characters, we are going to do an afternoon scene because we finished the morning. Now, let's understand very simple outline of the castle and the hill. Characters are going towards the castle. Not exactly in the center. Threefold towards the right, like the rule of third. And now let's start the painting process. I request you to pay attention from the beginning so you will understand what exactly I'm doing and why am I doing. So this is the sky. I used ultramarine color, just like this. Now in the reference, as you can see, we have heavy clouds, a lot of white clouds and grey clouds. So what I did as I'm choosing to do it, our afternoon scene, I'm trying to avoid all those cloudy sky and I have also reduced the size of the sky. So if we are medium shape and we'll focus on the ground area and the highway or the root. They are walking on. So on the sky, it's a mix of ultimately in an orange, things got utilized. Just like this. More ultramarine and a little bit of wash. So we'll have a good day times guy. No fancy stuff. Alright, I'll add them blend. In the meantime, let's continue with the. Middle ground. And we're going to do the foreground. As you can see. Now, pay attention. This is really important what I'm going to say right now, please pay attention all the things from now on, from the middle ground to the foreground, things are going to get neutral colors. Besides. On the left-hand side, we have a grassy land that's going to be quite greenish, muted, but greenish muted, meaning we are going to reduce the effect of warmed and extreme vibrancy to do the same consistency of colors, but slightly muted as you can see now. We have green, but we mixed orange with it, so it became slightly brownish. Now I'm mixing yellow ochre just to make it slightly warmer. Maintaining the green, but still slightly yellowish. But the yellow is yellow ocher, so it's not quite violent when it got mixed with the green. The Vigo, if I lose it straight out of two, it will be quite bright, and that's not something we want. Now, take a look at this mixing ultramarine over here. What I am going to do, I'm going to outline all this areas so I can isolate the characters exactly on the highway. And I'm going to bring the highway after this. But before I before I do that, basically, I'm trying to make small adjustments here. Just like this. These are nothing but couple of lines just to show the division between the sky and the ground and the particular road. And these tiny Dukkha ground areas, that's all there is. I'm not going to do extremely dealing here. That's definitely not the purpose. We are trying to simplify and we are trying to learn how not to put in lot of details yet get a brilliant storytelling. Watercolor painting basically with forward moving characters towards the castle. Or like I said, do the castle. Now this is just the highway road that I'm trying to make right now. The colors would be neutral, but on the warmer side, not cool. So if it is cool, I'll be adding a lot of blue in it, but I'm trying to utilized by ultramarine and orange just with right proportion, with a touch of green just to balance out this tiny space off the grassland. There we go. Look at that picture right now. It's quite, I mean, it's getting ready. Remember, remember, remember, have fun. Don't push yourself too much towards the detailing part of it. I'm going to give you a trick, arctic, you can say, let me just quickly finish it. And I'm going to give you. Pretty good idea about my secrets. There we go. Just a little touch up to show this offends all the hybrid barricades. You can say, no. Let's go ahead and let the painting dry up a little bit and I'll be back in a second. All righty. So now the bending is dried up. And we are going to start with the middle tonal values. All you can say the detailing, I'm going to start with the castle first. So like I was saying about the secret tip, the tip is, when you start your painting. Dry to imagine in your mind by simplifying it. And also if possible, try to visualize with what sorts of colors you can proceed with the painting and what kind of storytelling you'd like to do. So that is something you should do before you even start the painting. Now pay attention to the castle. What I am trying to do is I'm trying to simplify it to the bare minimum. Shapes. It is all about shapes. That's all there is. You don't really have to put in all the details that you see on the reference or the reference. Now, the reference is digital and he tried to show you a 100% details, basically everywhere. So if that's your thing, you can definitely go ahead and do it. But that's not the purpose. But look at this. I am only trying to get the highlights or the lit areas of little small, tiny casual shapes. And I'm just trying to get the darker areas. It's called negative painting on negative approach or the negative areas, basically darker areas. And now let me add a little more depth here. This is quite random. Do my eyes. These things are quite doc. But still I have to minimise the effect by diluting. Do the amount which I can actually use to justify that these are the walls and daga areas. Shadows are falling and things are looking really great. And that's all I'm thinking. And nothing else. Because if I tried to put in lot of tiny details, what will happen is I will characters would not be in focus and direly. And we just need to see that there are some shapes that at the distance, and it resembles a hill and a castle on top. That's what it is. Now, let me quickly go ahead and add middle tonal value details. For the road structure and the perspective. I'm going to add a lot of tiny lines just to, just to give the viewers a little bit of perspective that we are going in that particular way. So you must be thinking, am I going to do a lot of detail work on these barricades offenses. No simplified lines. Suppose you own field and you need to do it. You cannot do a lot of things. You just have to get the minimum items which will. So phi is the painting basically a little bit of adjustment. So we can see what exactly they're going towards, are going do to meet something at the horizon. But that's not really important. The only important thing is to link them with the horizon and the Middleground basically. Now, I'm just adding enough lines here. Now if you notice, if we just see this much in a painting, even though the characters are not even there. We can sense that there is a huge, but of course, the distance, a castle. And there are characters who are really trying to go towards it. That's all there is that a lot actually can be done on this left-hand side fence. But that's not what I'm going to do. I'm just trying to give you enough data. So you can proceed with the painting. And you can imagine out of any difference and tried to make a painting on your own. Look at this picture is basically finished. All I have to do is add this directional line. Couple of the shadowy areas over here, couple of reference lines over there. And now, let's continue with the characters. Really that I'm quite happy. Now this is where I want you to do. Once you try this painting, put it on the project panel so I can see them. I can give you feedback. Also before you proceed. If possible, try the characters separately so you can understand the shapes. The particular shape that I am trying to follow is not exactly oval, but I'm going to do both. This is most off. You can say mode of rectangular and the other character who's just ahead. We are going to do a lovely finish. I'm using two different colors, just like this. So we can have some fancy category, they're warmer. And then I'm going to do the shadows. Pay attention. There won't be much, but there'll be just enough to show that this is definitely known. I mean, afternoon maybe around one o'clock or two o'clock. And on a sunny day, and we don't have the shadows, elongated shadows basically, the sunniest quite up. Note that this bit and exactly in this particular spot. See this little bit of silence. Straight do strokes. And that's all there is. The character is basically Reddy. Left leg is slightly forward, rightly is slightly backward. Now. Same thing for this guy. And now let's add another guy. And the right-hand side. Because we should have some kind of comparison and perspective. This guy is a guy who was trying to move diagonally. You can say for some reason, I have no clue, but I'm just putting it for fun. Because in the reference, he's not there. Couple of characters who are far, far away now in the middle ground, so they will be quite tiny. So the last painting we are going to do, we're going to explore these dynein characters, especially. So you'll have a better idea how to establish tiny characters. Now This particular painting is finished. Look at this high noon, or you can say late after, I'm just afternoon, lunchtime broadly. And we have 34 characters walking towards the castle. And it looks brilliant. Practice, practice, practice. And put it into discussion. I'll try to have a look definitely and give you feedback. Okay, and now we're done with this. It's move on to the third painting.
6. The Evening Beach-Third Painting : Alright, so the final way we are ready to do this score at the beach, the beach. Important things. Pay attention to the characters, pay attention to the lighting, the utmost viewer, especially the colors because it's quite orangeish, reddish. So that's very important. Let's start NAD. Well, as you can see, we have three pictures here for the final painting. The original one is the first one. And there is a tonal value study just to show the things in monochromatic so we can understand the tonal values. Now the painting version that you can see is not quite different from the original because this time I did not try to change the temperature, the color, or the atmosphere. Only characters are added. Let's start the painting process. The aspect ratio is quite wide for this painting. So you can see I have used the masking tape to narrow from the top and also from the bottom area. Look at the photograph. It's a simple photograph, quite tricky in terms of the sky. But I'm going to show you the technique, as you can notice already, that I'm waiting of the paper quite a bit. It's not the entire paper, it's just half of the paper. So now I am willing to mix ultramarine, ultramarine blue. It's just the, the main ultramarine blue. It's not ultramarine violet. It's not ultramarine light or deep something just a nominee you can use any brand doesn't really matter. Luca the strokes. This is wet into wet guys. So what's happening here is the colors, uh, trying to blend with each other, especially with water, and they are trying to create soft edges. The main thing in wet and wet and wet is soft edges. There is a purpose to it. Now when you have soft edges and imagine the paper is literally dry after some time, then you can create a lot of things on top and still the background wouldn't look quite hazy of foggy. Blew me just soft Basically. I added a little bit of orange now. Now I'm going to continue over here. Take a look. This is wet on dry. So the baby is not exactly wet right here. So you can have all this gluten free, shiny kind of a water body as we come now. The particular portion that I'm trying to do right now is slightly wet because the water body is trying to, you know, come over the sand. So it's slightly wet, it slightly Sandy, but it's still the water on top, so things might look a little bit of bluish right there. Now this deep orange, I am trying to super impose the beach automatically. They'll fade after some time obviously, but still will get this nice, soft looking sand, but still quite warm to tell a dramatic story. What else do we want? See this. Analyze. Pay attention to everything that I'm trying to do. I'm not touching this guy too much with paint. Instead, I'm going to do this. Scratch some white paper. Why is that? Yes, you are right, obviously. And just trying to get some white paper so it can resemble that the sky is shiny and glittering. It's sunset. We can say the golden hour. It's not exactly laid sunset or early afternoon or something like that. It's just plain and simple sunset. Maybe around 536. I scratched little bit on the sky to get some more white paper. So it'll look like the clouds, slightly going that way, angular. Basically, I'm just trying to give them direction. Now, take a look. So the paper is not exactly, but it's semi dry or semi wet, you can say. So. I have added this faded horizon and you know, what, I'm going to tell you one of my secrets, what I do is I apply paint. And if I don't like them, I try to get rid of them using a tissue paper. Now, you might think then what's the point of applying the pain in what you really don't know. Because watercolor, you have to explore and learn in the same time. Now as you can see, the blended. I like the effect. Now. Again, just in case if I think, you know, this might look a little lighter, I can add Docker plus that particular white spot is the shiny area. There we go. So we have a beautiful background right now. What I'm going to do is I'm going to let the paper drive or like some seconds. And I'm going to analyze how am I going to establish my characters in here? Because I actually did not do any specific drawing for this painting. Because I wanted to show you that sometimes you don't really have to draw anything. Because the characters that we are going to introduce will be plain and simple directly on the painted surface. Obviously, once they're dried up. And let's see, what I am going to do is I'm just trying to mix them colors so I can go and paint the distant structural that maybe I can place. Some kind of a small hill will some kind of with some kind of a architectural structure on top, but they are willing to be quite distant and faded. So from the top, as you can see, the colors might look slightly Dhaka, but as you already know, in watercolor, colors fade slightly wants they get dried up. So what I'm trying to do now is I'm just adding a little bit of orange. So I can get a very good gradation from dark to light. And a little bit of blend here and there. Nothing fancy. Pretty simplified guys. Pay attention to everything that I'm doing. It, it'll really help you when you start painting these. Obviously, you have to copy the paintings that I have done for this particular course. But again, when you have your choice of reference, your choice of photos, this is the learning that you're going through and you can apply all this, all these techniques that I'm trying to teach you. Okay? Now let's continue. As you can see, I'm just trying to add a couple of small marks just to depict the sand and some lines so the viewers eyes can be directed in that way. Do you look like people are actually moving towards the sun? And this is a classic example of watercolor. Everything goes towards the light, not necessarily all the time, but that's something painters use all the time. Now, these are the small characters that I'm trying to introduce. Those in red color of choice. It's just imaginary What I'm trying to do right now because as you can see in the reference, there are nobody, is nobody walking around. So I'm just trying to create on my own, just to give you an idea that you can actually paint from imagination. If you remember. The drawing process we did earlier, I tried to show you characters from at the horizon basically. And then when they planned not exactly a 100%. But if you have a blind in your mind, you know, to place the characters in a way by following any kind of a letter or some kind of a compositional ideas which you might like any anything. Golden ratio rule of third. And a lot of different things, dynamic composition and all that. You can actually have a brilliant painting because of them. Now, that's the same technique I'm using. I'm kind of amusing, kind of s. Let us shape or zed, little shape as you can see. And they are following the trail of that particular letter. So as, as we are going to place the characters in the foreground, we have to make them slightly bigger. It's obvious in terms of technicality. Actually not doing much because all the characters I tried to show you, I have done that in the drawings, watercolors sketch of human figures, also, the first painting. So now you already have an idea. Tiny, tiny characters, quite simplified, basic oval shape may be a little bit of movement and a little bit of bushier depicting their walking towards us or maybe against. So that is a guy wearing a hat with a dog, that is a character just behind it. Maybe they're having a good conversation in the evening. And here as you can see, there is maybe a couple of walking around. I tried to put them in duels for a specific reason. So it'll look like it's walking time. Now, I didn't really have a brilliant plan of putting directors solo or in couplings of anything as such. But I just like them. So I put them now when you do copy this and also try to do on your own, try to create your own characters. Tried to create your own postures and movements. You know what you can do? This is my position or my advice. I'm the DJ is, so I have to say this. Draw your characters before you draw them in your painting and try to paint them. So now, as you can see, one character is wearing red and you know, it's kind of bright. And the second one is kind of worrying a dog trenchcoat. Not necessary for a beach like this, but you never know. And we have the faded shadow. Now whatever I'm doing for the shadow, it's more of compositional, or you can say artistic or aesthetic purposes. Now, I'm just trying to add a little bit of value, a little bit of wet sand effect at the bottom of their feet, basically. So the shadows are there, but it's not quite clear. This is a technique that you can do to use. Now. See this. I added a column batch and I blended the batch, certainly UK wet and just enough reflections or shadows falling on the beach. And slightly abstract, slightly sketchy. You can say it's a simplified painting. Now. Appreciate the painting, not mine. Obviously, it looks good. I know, but when you do appreciate your painting by stepping backwards, go back a couple of feet away, and just try to see if you think the painting is not good. Trust me. All you have do is through the painting in the assessment and try to make a new one. And I don't do that, give that for your study and try to make another one. You fail. That's OK. You make mistakes. Completely fine. Tried to make another one. You'll get those birds. Simplified birds, just two lines or two strokes, as you can see. Quick analysis now. It's a long distant beach. Afternoon. I mean, almost sunset. People walking around. Painting is finished. Time to talk about the paintings.
7. Last words of appreciation: All the pictures and images, references, reference coordinate was there. We just use now, all of those will be available in the section where you can actually download the resources and learn from them. Okay, a quick recap. Now, the first painting in the morning, we learned how to simplify the big mountain. Also how to create a morning seen by changing the colors slightly, by warm and cool color combinations. Second, we learnt how to simplify a church, how to introduce new characters which are definitely not there and a new bad. So a brilliant storytelling by the movement of care. It was really the part in this painting. Now, a second painting to the castle. We also wanted to create something else in terms of lighting. So this is a known subject or afternoon scene, you can say forward movie characters. That's the main thing in here. And we learned how to simplify the castle on the hill, also the fences, the roads. We also understood how to neutralize the colors so we can clear the known seen simplified by the bare minimum. Now let's go to the third one. Okay, now the third painting was quite tricky and British sure, but I am also shield that you really enjoy it. So in this painting, we learned how to introduce beautiful colors built at Moss Bureau and lighting, especially which is the evening thing. Now, something to understand and I would recommend you to explore. Trying to create imaginary characters is a very interesting thing to do. So that's what we learned in this particular painting. Also, we introduced birds, not a big thing, but yes, something definitely learned. So I really hope you enjoy it. And all the best with the course is finished. Thank you so much for learning with me. I really appreciate that. And I'm pretty sure that he learned definitely something. You can check my other courses. I have gotten up more courses in skull shape. Do that, take it will be safe.
 Abhishek Rout, Water colorist and film maker