Transcripts
1. Introduction: Have you ever wanted
to stitch a knit hat? How about a jean jacket or
a tote bag? Tricky, right? We cannot easily trace an embroidery design
onto a knit hat, a denim jacket, or even a
thick textured tote bag. Luckily, this is where stick and stitch embroidery
templates come in handy. We can stitch right through these water dissolving
embroidery templates in order to stitch hard
to trace services. These stickers open up a whole new world of
stitching possibilities. The downside, these stick and stitch embroidery stickers
don't usually come with instructions or the
typical charts and diagrams that you would see with traditional
embroidery design. So how do we know
what to stitch? In this class, I'll
guide you through key factors that will help you navigate free form
stitching projects. Hi, I'm Lauren Webber, fiber artist and designer. I've been a quilter
for over 25 years. I have been featured in Art
Quilting Studio magazine and I've had quilts accepted
into national shows. Part of my style of art quilting is adding in those
delicate details. And embroidery is one of my go to ways to add character
to my projects. I like exploring new ways to try out different stitches and to add my own artful spin
to my stitching projects. Stick and stitch embroidery
is a great way to dip your toes into the world of
do it yourself embroidery, often stick and
stitch projects don't come with instructions
I know, right? But this allows us to get creative and to decide how we want to
stitch our projects. We get to choose which colors we want to use in our projects, which stitches we're
going to utilize, and we can explore different
stitching styles to create a fiber illustration,
that's all our own. In this class, I'll guide
you through a do it yourself embroidery process
so that you can approach stick and stitch
projects with confidence. We're going to talk
about how to set your project up for success. From choosing your floss colors, to categorizing
embroidery stitches based on how they can be
used in your project, to using water
soluble stabilizer. We'll cover the ins and outs of stick and stitch
project essentials. Plus we'll walk through ten versatile
embroidery stitches that you can use
in your projects. For your class project, you will stitch your own
unique embroidery project using water soluble paper. This class is for confident
or experienced stitchers. Beginners are welcome
to follow along, but may want to check out my introductory
embroidery course to make sure they feel confident loading an embroidery hoop, knowing how to use
six strand flaws, and even how to thread
an embroidery needle. Without a doubt, stick and
stitch embroidery can be a great resource to add to
your creative tool box. By the end of this class, you'll not only have
the confidence to navigate stitching
without instructions, but you'll also
have a resource for stitching hard to
trace surfaces. These techniques will help you expand your embroidery
skills and will help you add your
own artful spin to your stitching projects. So if you're ready to expand
your embroidery knowledge, join me now and
let's get stitching.
2. Embroidery Overview: Embroidery is the art
of stitching thread, floss or string onto
a fibrous surface. There's hand
embroidery and there's machine embroidery and lots of different
projects in between. With embroidery, we can
embellish handbags clothing, wall art, hooped fabric, art quilts, regular
quilts, pillows. There are so many different
types of projects. The technique we're going
to talk about in this class is for hand stitched
embroidery projects. You see stick and
stitch embroidery is ideal for transferring patterns and designs onto
hard to trace surfaces. With most hand
embroidery projects you're going to be working
from a design unless you're an expert embroiderer
and you're okay for free stitching and just
making a design as you go. A lot of times we're
going to be working with a set pattern or a set motif that we want
to stitch onto a surface. Usually when we're working with these designs and patterns, we are able to either trace them onto our piece of fabric, or we can use a light box, a window, or some other means of taking that
original design from the pattern and transferring it onto the piece of fabric that we're
going to be stitching. But what happens when we
want to embroider something like a denim jacket
or a knit hat? It can be pretty
hard to transfer a design onto these
types of surfaces. Right? Well, that's where stick and stitch
patterns come in handy. In this class, we're
going to cover the groundwork for
using stick and stitch water soluble paper
to transfer designs and patterns onto those
hard to trace surfaces. Because when we're
all done stitching, we're going to rinse away
that stick and stitch template since it's
water soluble paper, leaving your beautiful
embellishments to shine. The other interesting
thing about stick and stitch
projects is they don't usually come
with instructions. So if you are making your own or if you're
purchasing one, say off of Etsy or from
another fiber artist, a lot of times they don't
automatically come with instructions on where
to place each stitch. Traditionally,
embroidery projects will come with stitch
keys and color keys. And you can put this
stitch in this location, in that color, in that location. Well, stick and stitch projects are a little bit more advanced. They're for intermediate
to advanced stitches. And usually you have to choose your own stitches
for the project. Now, this can be
awesome because we have so much creative freedom with these types of
projects, right? We can choose our stitches, we can choose our colors, We can fill a space, We can
outline a space. We can decide exactly how
we want our project to go. But on the downside, we have created freedom which
can come with overwhelm. I totally get it. I have
been there in this. I'm going to walk us
through the whole process. Things to keep in mind. Stitches to consider when
you're working on your project. If you don't have
instructions to follow some color examples and the whole process so
that we can break it down and make it a
little bit easier. If you're ready to get started, let's talk about
our class project and where we're going from here. I can't wait to get started.
3. Class Project: In this lesson,
we're going to talk about your class project. Your project will be to
use water soluble paper to stitch an embroidery design on the project of your choice. So you can opt to practice with a traditional piece
of fabric in a hoop. Or you can get a little
bit creative and choose a project that's a little bit more outside of the hoop. I mean box, so you're going
to choose your design, your template, your
pattern for this project. If you're feeling overwhelmed
by choosing a design, I do have some that
we can practice on. You can go over to the
class resources and download those to use
for your project. You're going to
apply the pattern to whatever surface you
choose to stitch on. You're going to
decide which stitches you want to use in your project. Don't worry, I'm going to cover a few basic stitches
that will work with just about any stick and
stitch project you have. It'll be a great place to start. And of course, you're
going to rinse out your water soluble
paper template. You're gonna let it dry, and then I'd love
to see it shine. So be sure to take a picture. Share it with a group, Drop
it in the class projects, and I cannot wait to
see what you create. So if you're ready
to get started, in the next lesson,
we're going to talk about water soluble paper. All the ins and outs, how
it works and how you can use it for your project.
I'll see you there.
4. Water Soluble Stabilizer: Let's talk about water soluble
paper and how to use it. I prefer to use sticky
fabric, solve by Sulky. The principle version,
it's sheets of a fabric, like paper or mesh that
rinses away in water. We can use this mesh to print
our embroidery designs. We can cut them out and then
use them like stickers. On our embroidery projects. We can stick it to our
embroidery project, stitch right through it, and when we're all done, it
will dissolve away in water. I like the principle version
because it can be used like printer paper in my home
printer, which is awesome. So I can take digital
designs and print them right out on
these sheets of paper, cut them out, and use
them for my projects. This process works best
with line drawings filled in pictures or shapes tend to fade as you're
stitching on them. So if you're printing your own
stick and stitch stickers, I highly recommend just using simple line drawings and then filling in with your embroidery
floss as you stitch. So if you want to print your own stick and stitch stickers, be sure to find a paper size that's compatible
with your printer. In my case, these
printable sheets are eight a 2 " by 11 ", which is a very standard paper
size for my home printer. I highly recommend doing a test print with just
regular printer paper to make sure that the design that
you're printing is going to print at the size and scale that you want for your project. We'll dive into this
a little bit more in a couple of lessons,
but basically, you want to make sure that
the template that you're printing is going to fit the space that you want to stitch. The sheets can be a
little bit pricey, which is also why I recommend doing a test print
on regular paper first, just to make sure
everything comes out just the way you want it. You also want to do
a test print to see how your printer
loads and feeds. Because there's two sides
to the water soluble paper, at least the one that I use. There's the backing, like a sticker backing that we're
going to be peeling away. It's just a waxy,
shiny piece of paper. And then there's the
fabric mesh that has a sticky back that
we're going to be using to stitch through
in our projects. You want to make sure that your printer is
printing or that you're drawing onto the mesh because that's the part that we need
to stick to our fabric. So you want to know how your
printer is going to load and process your paper so that it prints on
the correct side, on the mesh side, and not on the backing that we're
going to be taking off into. Not using. In my case, I have to load my printer with the mesh side facing down and then it will print properly on the mesh side as it runs
through my printer. So once you're feeling confident with the size of your project and how to load the paper
into your printer properly, you can go ahead and
print out your project. But be sure to follow the
manufacturer's instructions for the water soluble
paper that you are using. Make sure it's going
to be compatible with your printer because you
don't want to gum up your machine or have any issues with your printer and you don't want to damage
your printer. So be sure to follow all of the instructions for the
paper that you are using. Occasionally I find that
the paper will get stuck in my machine and I can
usually easily get it out. But more often than not, it runs through my printer
at home just fine. If you're unsure
and you don't want to risk putting the paper
through your printer. You can also generally
use a water safe marker. So a marker that's
going to be permanent, it's not going to run in water. You can use this on your
water soluble paper mesh. You don't want the ink
running on your fabric. So if you're not sure if the ink from your marker
is going to run, then do a little test patch. I always like doing a little
test patch just to be safe. It doesn't hurt to
test out your tools before you get them onto
your final project. I'll have a few templates
for you that you can use to trace
using a window or a light box if you
want to trace onto your paper or if you want to
print using your printer. That you can download in the class resources so that you can follow along
with this class. If you don't have
your own design templates that you want to use, if you have multiple
designs on one sheet, you can go ahead
and cut them out. I like to leave about
a half an inch or so around each design
just to make sure that I have enough space
to stitch without the sticker peeling up as I'm stitching through my fabric. Once you're ready
to start stitching, we're simply going
to peel off the back of the sticker and stick
it onto our project. We're going to
stitch through it, and when we're all done,
it'll dissolve away in water. Don't worry, we'll go
through this process in later lessons. But I wanted you
to get an idea of the full process as we're moving forward so you can know
where we're heading. If this feels like a lot
and you don't want to print out your own stickers or
draw your own designs, then you can also
buy stick and stitch stickers already made from independent
embroidery artists. A lot of times you
can find them on Etsy and these usually
come in thematic packs. They're super cute, so a lot of times they
will be in packs, you know, winter themes, or you might find ones
that are fall themes. They come in all these cute
little themes usually, so that you can
find stickers that you'll enjoy working on
for multiple projects. So now that we know
a little bit about how stick and chickers work, we're going to go
ahead and talk about our stitching surface or the material that we're
going to be stitching on. Whether it be a tote
bag, a denim jacket, a knit hat, whatever surface you're
choosing to stitch on. We're going to talk about
some considerations for how to make sure that you
have a successful project. As you're choosing what type of surface that you're going
to stitch your project on. If you're ready to
hear those details, go on ahead and meet
me in the next lesson.
5. Stitching Surface & Stabilization: In this lesson,
we're going to talk about what surface
you're going to choose to stitch on
and stabilization. With most traditional
hand embroidery projects, you're going to be
using a piece of fabric and an embroidery hoop. This piece of fabric is
usually cotton, or linen, or something loose in light that's easy
to stitch through. And you're going to use an
embroidery hoop to make sure that that piece of fabric
doesn't pucker or tuck. It's important to
stabilize our project, the base material,
because we are adding heavy thread work
to our project. That's how embroidery works. A hoop or a stabilizer will
prevent warping, tucks, and puckering that can crop up With this heavy thread work, it helps to give the fabric
some extra support so that it can carry the weight
and density of the floss. Heavier stitching
surfaces like denim, might not need a lot of extra
support or stabilization. Because denim is
a thicker fabric. But something thin, like cotton, you'll absolutely need to stabilize your project
before you start stitching. Well, we're going to use similar concepts with our project. The thing is that we can
apply these stickers to other fun surfaces that
can be a little bit bulkier, a little bit thicker, a little bit stretchier than
traditional cotton. So let's talk about that. So the first thing you're
going to need to consider with your project is what surface
you want to stitch on. Are you planning to stitch
on a pair of sneakers? Are you planning to stitch on a jean jacket? A pocketbook. What is that material
like? Is it stretchy? Is it, is it, why is it like a knit where
you can see right through it? If you're opting to try one of these fun stitching surfaces, here are a few things
to keep in mind. You need to consider the density of the fabric that
you're choosing. Is it two dense? For example, if you're
using something like denim, it can be a pretty
dense material. It can be a little bit
tough to stitch through. You might have to make
some adjustments. I'm going to recommend only stitching through
one layer at a time. If you're anywhere
near a seam or where multiple layers
are stacked up, it's going to be pretty
tough to stitch through. So you're going to want
to find an open space if you have a
thicker material and not stitch through
any major seams or any bigger thicker areas. This goes for hats too. If you notice the seams
and baseball caps, sometimes it can be a little bit too thick to stitch through. Or sometimes there's
even a stabilizer at the front of the
cap that's nearly impossible to stitch through. So be mindful of how thick and
how dense your project is, so if you are determined to try one of these
thicker surfaces, but you're having trouble
stitching through it, you might want to consider a sharper thinner needle that will be able to slide more
easily through your project. You also might want
to consider using a thimble because
sometimes if you're placing extra pressure
to really get your sewing needle through
these tough thick surfaces, it can be tougher
on your fingers, so you might want a
thimble or some sort of finger protection
as you're working. And honestly, if it just becomes too much
and too difficult, you might want to
consider just changing surfaces entirely to something
a little bit thinner, a little bit easier to
work your needle through. The other thing to keep in mind, we touched on this briefly, is the material water safe? Is it going to be damaged? Is it going to get
ruined in water? Water is a key component in our project because we're
using water soluble paper, which means this
template needs to be able to wash away in water. You want to make sure
that you're using a material that is going to be able to hold up when
it's exposed to warm water. That way you make sure that your project isn't going to warp, get discolored or
disintegrate when it's exposed to water later
on in your project. The next thing to
consider is stretchiness. I run into this a lot when
I'm working on knit hats. I love stitching knit hats. I just think they're fun
and cozy and awesome. One of the things you can run
into sometimes with knits though is that they
kind of stretch, Which means that as
we're stitching them, they can get warped. With something like this,
you might want to use a small embroidery hoop around your stitching area just
to stabilize your project. I sometimes use an embroidery
hoop and sometimes I don't. It depends on the
level of stretchiness. If your project is really, really stretchy, you might
want to stabilize it. The good news is, the
water soluble stabilizer that we're going to be using
is already a stabilizer. Now usually the stick and stitch stabilizer
that we're using for our template will provide a good amount of support
and stabilization. If you think that you need additional support
and stabilization, you can always add an embroidery
hoop into your project. The other consideration
as you're choosing your stitching
surface is texture. Is the material that you're
going to stitch on is flat? Does it have ridges?
Flatter surfaces are easier to stitch on. If you choose a project
with ridges or bumps, like a knit hat or a sweater, you might need to use a
bulkier string or yarn so that your stitches don't get lost in the valleys and the
hills of the material. For example, if
you try stitching thin lettering on a ridged hat, it might get lost
in the valleys. But using a yarn will work much better to
show off your work. If in doubt, I'm
going to recommend definitely choose
a flatter surface, especially when you're
getting started because it'll be much
easier to work on. So now that we've talked
a little bit about the surface materials we
can use and stabilization, how to make sure that
our stitches come out looking nice and beautiful. We're going to go on ahead and talk about pattern selection. Which designs we might want
to choose for our project. If you're ready to talk about
which patterns to choose, go on ahead and meet
me in the next lesson.
6. Design Selection: So now that you've decided what surface you
want to stitch on, whether it be denim or knit, or sleeker or pocketbook. Now we've got to think about which template we're going
to use for our project. So when you're thinking
about which embroidery design you're going to use, I want you to keep a
few things in mind. The first one is the
size of the template. Will it fit within the stitching space
that you set aside? What scale is it going to be? Right? Also, is the
template going to be too big for your
stitching surface? Remember in the last lesson we mentioned that
you might have to be careful of seams or
thicker folded areas. I recommend being mindful of how much stitching area
you have available to you. If you have something
like seams or bulky materials that are impacting where you can
stitch in your project. Keep that in mind as you're
choosing your design. You want to make sure that
it's going to fit into your space with a little extra
wiggle room on the sides. And especially if you're planning to use an
embroidery hoop. That way you can make sure
that the hoop will fit snugly and you'll be ready
to go for your project. The next thing I
want you to think about is the designs location. Where are you going
to place it? Do you want it perfectly centered? Do you want it off center?
Do you want it angled? Think about how you want your template oriented
within the space. What I like to do is if I have my template all ready to go, you can spin it, twist it, turn it, or scale
it up and down. If you're working off of a
computer designed to make sure it's going to
fit into your space, You also want to consider
your designs shape. Now some templates come
as all around patterns. You can place them anywhere. It won't make an
ounce of difference which way it's going, whether it's the flower
side up, flower side down. They can be spun around. It doesn't matter too, too much. But some templates are actually made for specific
areas in your project. For example, you might see some templates that are
created with a right angle. These are great for placing at the corner of something,
a corner of a pocket, the tag on a hat, something along those lines. You might also see ones that
come with just 180 degrees, just a straight line. Again, these are great for
coming out of pockets, at the edge of seams,
coming out of a seam, or coming out of a space,
or at the brim of your hat. Keep in mind how you might use certain templates in
certain situations. You also want to consider how much time you want to
spend on this project. Embroidery is a slow
stitching project. These are not necessarily
quick projects. They're probably
going to take you a couple hours to create at least the more intricate and the larger
the design you choose, the longer it's
going to take you. So if you want a faster project, you can choose a smaller design or one that doesn't
have as many details. And if you're working
from a stick and stitch kit or something where you
have multiple designs, you can also mix and match. So you can use multiple
designs within the same project
along similar lines. You can also subtract from
the designs you already have. If the design that you like is a little bit too
big for your space, you can trim away
certain parts of the project or just
simply not stitch them. No one is going to know what that original
design looked like, because we're going to
wash away that template. Just stitch the areas in the
project that you like best. And feel free to cut them
out, rearrange them, do what works best for the
space that you have and the project that you're
envisioning when you're already. Make sure that the
design is going to fit in the space.
Don't unstick it yet. We've got a few more
things to talk about, but I want you to kind of
place it on your project. Look at the orientation, does it fit in the space? Does everything work? Is it fitting the way that you hoped? Do you need to trim
it up a little bit? And when you're already, we're going to go ahead and move on to the next lesson
where we're going to talk about color selection.
7. Color Selection: In this lesson, we're going to talk about color selection. What's great about traditional
embroidery projects is usually you have
a little color key. And it tells you exactly
which DMC floss, numbers and colors to use to get it to look exactly like
the original project. But in this type of a project, we have to choose the
colors on our own. I'm going to break down just a few things that you might want to keep in mind as
you're choosing which colors to work
on your project. And again, I'm going to sound
like a broken record here, but make sure whichever
floss you're using, it is color fast, which means it's not going to
run when exposed to water. I personally love DMC,
six strand floss. This is what I generally use. The other thing I
love about it is that it has a numerical system. So if there's a color
that I love that I know I'm going to love over
and over and over again, I can write down its number code and I can make sure to
get it again next time. Or if I run out of that
color for this project, I can make sure I have the
exact same color again. So I use DMC six strand floss. But use what's going
to work best for you. Just make sure that that color of whatever floss that
you choose to use or whatever string or
thread you're going to use is not going
to run in water. So the first thing
you're going to want to look at is what is the base color of your project?
What are we stitching on? What color is it that's going
to impact which colors? You're gonna want to
choose for your floss. You're also going
to want to think about based on that color, do you want your
stitches to blend? Do you want them to stand out? Do you want them to
pop? Consider how much contrast you want your
thread colors to have. I have personally
seen some beautiful, monochromatic and even tone on tone embroidery
projects where the base of the project
is a cream color and all of the floss that they used is also cream colored. And it was gorgeous,
super elegant. But keep in mind
that that's going to be a far more subtle
project than say, a project that has
a very dark base and a bunch of bright colors popping off of it
for embroidery. So keep in mind which effect you want to go for
with your project. In general, I recommend using some colors that are going to
contrast with your project. Now you're going to look at the design that you
chose to stitch on. Are there different
elements in it? Did you choose a
floral pattern that has leaves versus flowers? Or maybe you chose a mushroom
that has a mushroom cap and little mushroom dots and it has some grass and a
couple little flowers. Do you want each
of those elements to be a different color or is it okay to repeat the same color in a couple
areas of your project? If you're not sure, you can also take just a plain piece of paper and start drawing your coloring on it to see what's
going to look best. See how you might like it. See which areas and spaces you want to fill in or outline, and how you want the
final project to look, and how many colors
you're going to need to get that final look. Ultimately, the colors you choose are
going to be up to you. You might even want
to take a few colors, a few floss colors, and lay them out directly on the base surface that you
are going to be stitching. See how they look. Are they blending in too much? Do
you have enough contrast? How do they all look
together as a project? If you're totally not
sure where to start, this is generally a good place to kind of get the ball rolling. You're going to want to choose a main color for your project, so if you're
stitching a mushroom, this might be the color
of the mushroom cap. Okay, You're going
to want to choose a lighter color and a darker color relative
to that main color. So you've got a main
color, a lighter color, and a dark color, and
then you're going to choose a nice accent color. Okay? This is a good place to kind of get the ball rolling. You can always
change your mind and swap out colors later. Or place them against
your base material and see how they look and then make some adjustments
from there. So once you've
chosen your colors, the next thing that
we're going to look at is how are we
going to stitch this? What stitches do
I use and where? So in the next few lessons, we are going to be
talking about some of the key stitches that I love to use in my stick
and stitch projects. These are going to be great, regardless of which projects
you're going to use, they're going to be
a good core sample of stitches that will
work with most projects. If you're ready to
learn some new stitches and see which stitches to use, when and where in your project, go on ahead and meet me
in the next few lessons.
8. Stitch Categories: Stitching by Design: In this lesson, we're
going to talk about stitching for impact
on the bright side. With stick and stitch projects, you have created freedom. You can use whichever
stitches you want and whichever
location you want. But how do you know
which stitches to use? Where? Well, that's what
we're going to break down. There are going to
be four categories of stitches that
we're going to cover. Now, These are my categories. I've broken them down into
categories that I like to use. Feel free to take this
and roll with it, or you can make your
own categories. But these are the four
categories that I think are most important with
this type of project. The first category
are line stitches. These stitches are
ideal for creating outlines or linear elements
within your project. Or whether you're creating
small little lines that tend to pop up in
embroidery designs. Those little added
embellishment lines. Think, anywhere you see a line, if you see a line, whether
it's curved or straight, these line stitches are
going to be what you're going to want to
use in this class. I'm going to be covering
three line stitches that are going to work for
most parts of your project. They're easy stitches.
You're gonna love them. I'm going to be working
on the backstitch, the whipped back stitch,
and the straight stitch. The next category
that we're going to talk about are fill stitches. These stitches are
to fill in a space, so if you have a large area
in your project that you want to fill in that you want
to fully cover with floss, you're going to want
to use a fill stitch for these types of fills. You're going to want to
consider what type of texture you want to use
to fill in your space. There are going to be
two key stitches I'm going to teach you that
are fill stitches. One is a satin stitch, it
is smooth and it is flat, and it is very, very pretty, it just goes from edge to
edge, filling in a space. The other fill
stitch I'm going to teach you is the long
and short stitch. So you're going to use
it for anytime you want to have like a
gradient of color in your project where you're
blending or where you want to fill in a space that's not easily filled
from edge to edge. The other way that
you can fill in space is with dots or
decorative stitches, which are the next two
categories we're going to cover. So let's talk about
dots and knots. So these are for any
circles in your project. Knots can be used
to fill a space, but often they're used for accents or for details
in your project. Common knot stitches
include the French knot, the colonial knot,
the accidental knot. No, I'm just kidding.
Please, I wouldn't do those. So primarily, the colonial knot, the French knot, the one that I like to use the most
of the French knots. So that's the one I'm gonna be showing you in this project. If you have a larger circle
that you're gonna fill in, you're going to want to
use the woven wheel. Why? Because it's
gorgeous and also because it's super easy and you can
fill in larger circles. If you just need
a little accents, you're gonna want to
use a knot stitch. If you have a larger circle that's gonna take a
while to fill in, you're gonna want to use a larger stitch like
the woven wheel, which is a gorgeous stitch. Trust me, you're gonna love it. Gonna love it.
Now, the last type of stitch that you might want to use on a project like this are going to be
decorative stitches. And there are a ton, and I mean a ton of
decorative stitches. We're not going to
go over them all. I'm going to use just a few that I like to use
in my projects. Basically, I like using the fishbone stitch
and the lazy daisy. These come in handy so much Lazy daisies can also be used as any type
of teardrop shape, petal shape, leaf shape.
The stitch is awesome. It's really versatile
and can be used on a lot of your stick
and stitch projects. The other stitch
I like to use is a fishbone stitch because it's a really pretty fill stitch for things like leaves,
foliage, and vines. These stitches are great,
they tend to be unique. You can also use
them for borders. They're just all around
good stitches to know when you're filling in your project and you've
got these little spaces. And you want to add just
a little extra touch beyond the simple basic stitches that we're going to cover
in the other categories. So in the next few lessons, I'm going to cover each
of these stitches. I'm going to break
them down by category. So I'll make sure to list in the lessons which
category they fall under. So that if you're
looking for, hey, I need a line stitch while
I'm working on my project, or hey, I really want to fill in this space
of my project. You can know which
stitches to look at to decide which one you're going to want to use for your project. So I'm going to do all four
categories of line stitch, fill stitch, nuts and knots,
and decorative stitches. And I'm going to do a few
stitches in each one so you can decide which ones will work
best for your project. Keeping in mind
that line stitches are great for
outlines and lines, whether they be straight
lines or curved. Okay, fill stitches are going to fill in areas
of your project. Even with these two
categories alone, you're going to be able to
fill in a ton of your project. Even if you just know
these two categories, you're going to be able
to get the project done. Okay? Dots and knots are great for accents and circles
in your projects. And decorative stitches
are great for details. Adding a little
extra embellishment, little extra flourishes
along the way. If you want to practice
some of these stitches, I have a stitch sampler that you can use to keep track
of these stitches. Test them out, and see
how you like them. It'll also be an easy visual reference
when you're working on these projects to
see where you might want to use some
of these stitches. It'll definitely help you keep organized as
you're learning these stitches and preparing to do your stick and
stitch project. So we're going to go ahead
and break down a few of my favorite stitches that I love to use with my stick
and stitch projects. So if you're ready
to get started, jump on down to the next
lessons so that you can see how each of these works and you can add them to your
creative tool box. It's good to know a
few different stitches and to have them ready and on hand for when
you get going on your project. I'll
see you there.
9. Line: Straight Stitch: We're going to start by
talking about line stitches. The first line stitch
that we're going to cover is called the
straight stitch. The stitch is fantastic for
any type of straight line. It's used a lot of times for little dashes,
little accent marks. And it can also be used just to create nice straight lines
throughout your work. If you're ready to get started, let's check out the
straight stitch. Start by bringing your needle
up through the fabric. Simply take a stitch back
down the length of your line. This will create
a straight stitch and a very simple line. You can straight stitches
in any direction, They can vary in length. Straight stitches
are ideal for adding small accent lines
throughout your projects. Now let's take a look at an example of this
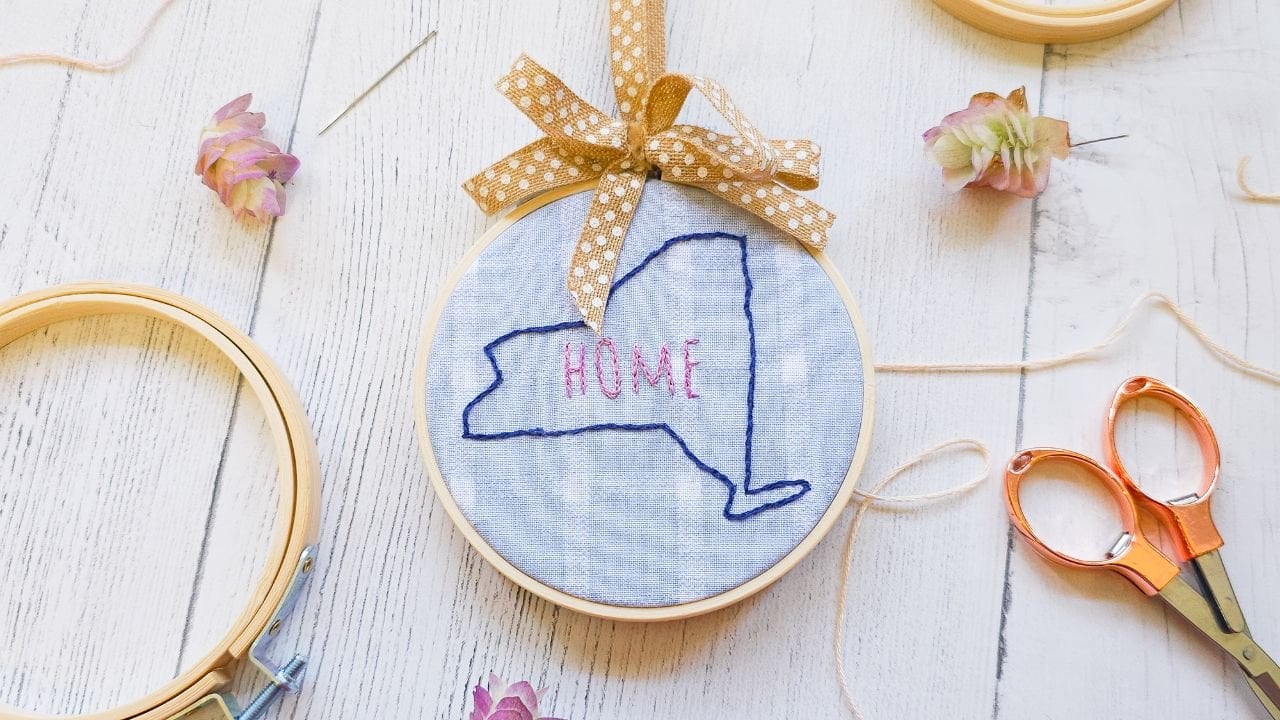
stitch in a project. Here's an example of
some straight stitches used to create rays on a sun. In a simple hoop project, in this hat you can
see the sunflowers have little grass growing
at the base of their stems. And that grass was created with a series of little
straight stitches. And there you have it,
that's the straight stitch. If you're ready to learn
another line stitch, in the next lesson, we're going to talk all about the backstitch.
I'll see you there.
10. Line: Backstitch: Now let's talk about
the backstitch. The backstitch is a
fantastic stitch. It's a nice easy
beginner level stitch. The backstitch is
basically going to look like a dashed
line that's connected. I like it specifically for creating lines. It's
great for curves. It's basically going
to be giving you a nice connected line that you can use
throughout your project. So if you're already,
let's go check it out. Start by taking a
simple straight stitch. Bring your floss up through
to the top of the fabric and bring your needle
back down through the fabric at your
desired stitch length, usually about a quarter
of an inch away. Now you're going to
bring your needle back up to the top
side of the fabric, one stitch length, about
a quarter of an inch away from where your
first stitch ended. And now you're going
to bring your needle back down to where that previous stitch
ended and pull your floss through to
the back of the project. Again, you're going to bring
your needle back up to the top side of the fabric,
one stitch length away. And then you're going
to bring your needle back down where that stitch ended and you pull your floss through to
the back of the project. You're going to keep
continuing these steps until you have the length of the line that
you want to create. So you're going to
leave a gap and then stitch back to
the previous stitch. You're going to leave a gap and then stitch back to
the previous stitch. Try to keep your stitch
length consistent to create uniform,
tidy stitches. And be sure to leave
yourself enough room to tag a knot before
you run out of thread. Now let's take a look at an example of the
backstitch in a project. You can see in our hat
project that there are a number of little line details around our main floral design. I'm stitching these accent lines with a simple backstitch. I also use the backstitch
for the baseline on this floral hoop design and for the stems of
each of the flowers. Awesome. You've tackled
the backstitch. If you like the backstitch, you're going to love
the next stitch. The next stitch is
also a line stitch. It's called the
whipped backstitch. It's basically a way to make that nice dashed backstitch look a little bit more fluid, a
little bit more connected. If you're ready to check it out, go on ahead and meet
me in the next lesson.
11. Line: Whipped Backstitch: In this lesson,
we're going to take the backstitch one step further with a stitch called
the whipped backstitch. The whipped backstitch builds
on the backstitch by taking your floss and weaving it between the lines
within the backstitch. This technique creates
beautiful curves and fluid lines
within your project. If you want fluid
straight or curved lines, you might just want to call
on whipped backstitch. Let's check it out. Start at one end of a backstitch line. Bring your needle up at the
end of the line of stitches. Now, weave your floss
under the nearest stitch, but do not actually bring your
needle through the fabric. Simply weave under the
nearest stitch and then back around to weave
under the next stitch. Continue weaving until
the row is complete. Once you've reached
the end of the row, bring your needle down through the fabric and
secure with a knot. This should give you
a nice cohesive line, and we call this the
whipped backstitch. Now let's look at an example of the whipped backstitch
in a project. In this floral hoop example, you can see the petals
of the flower on the left were made with
the whipped backstitch. There you have it, there's
the whipped backstitch. I absolutely love the stitch
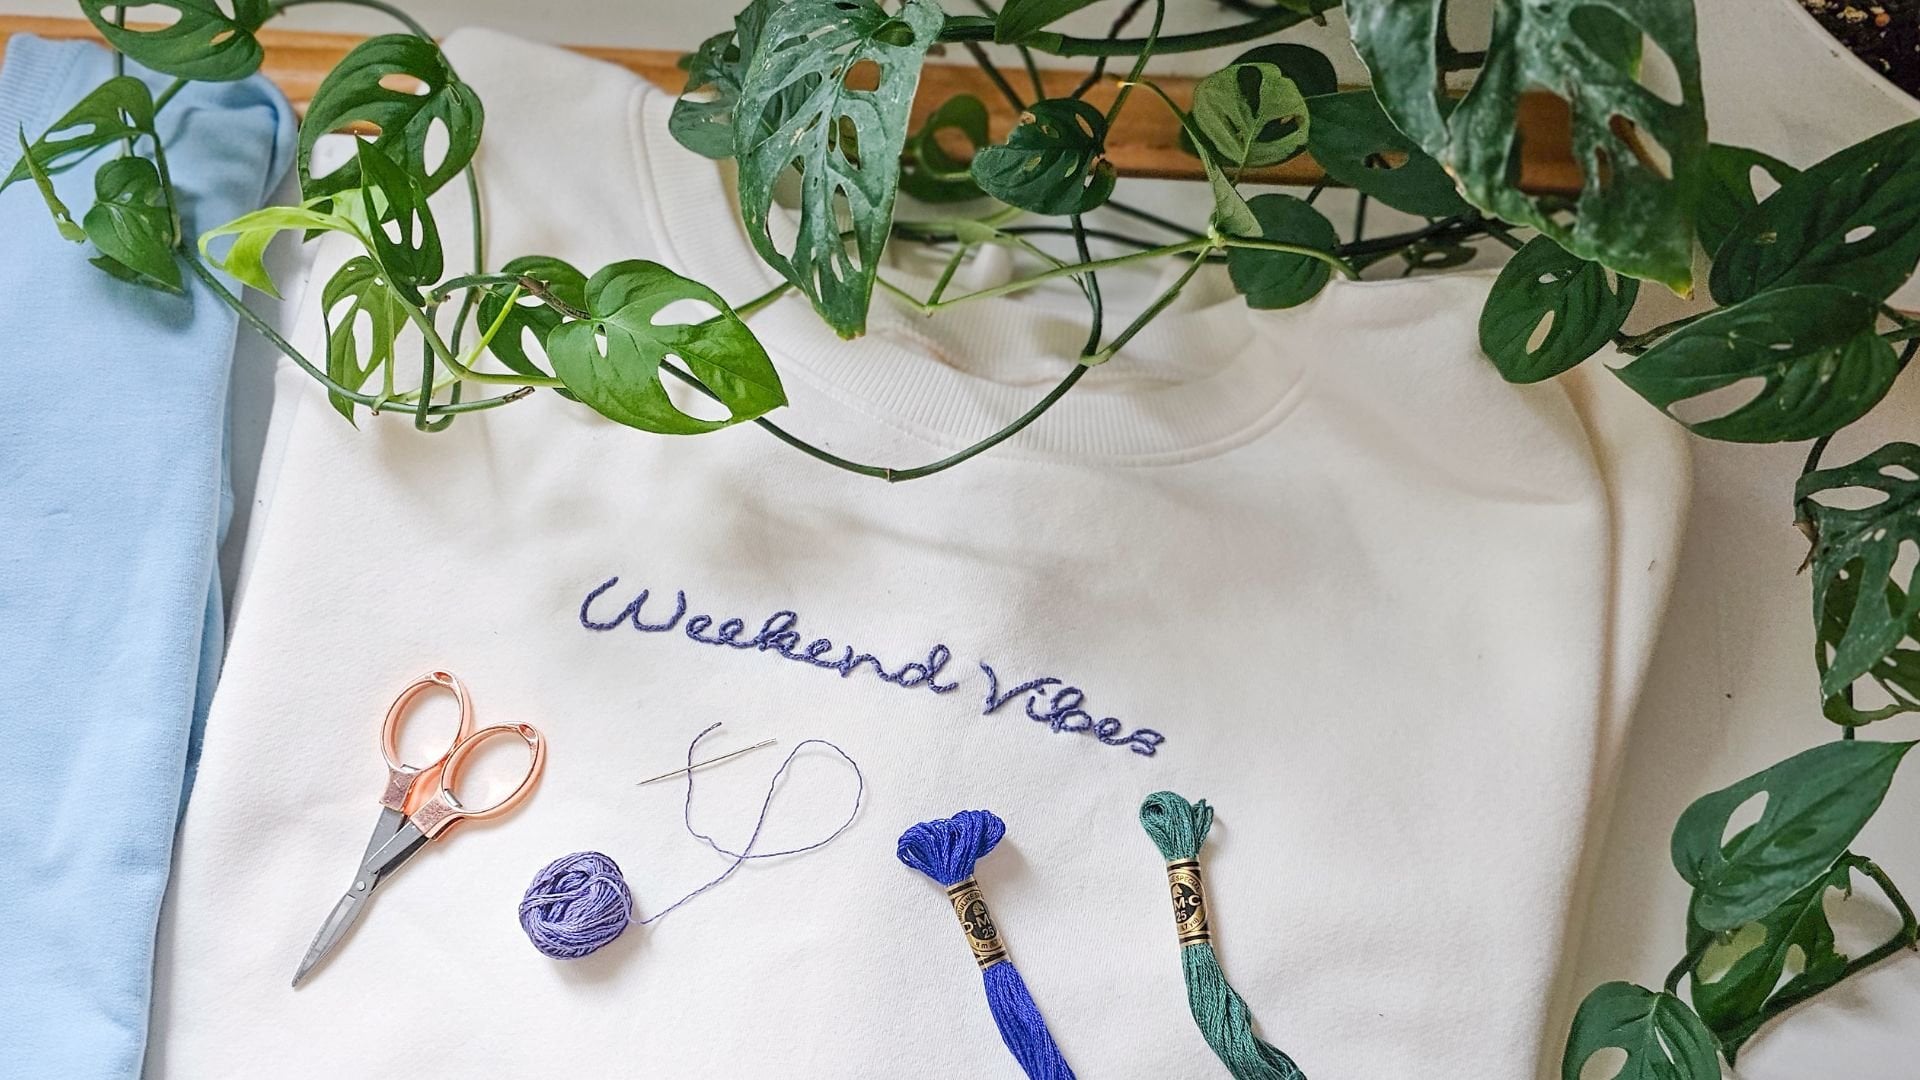
for creating fluid lines. I use a lot for font
work or for lettering. I also like it just as a nice outline for
some of my shades, so I hope you love it too. In the next lesson, we're going to talk
about the satin stitch, which is a beautiful
fill stitch. If you're ready to check it out, meet me in the next lesson.
12. Fill: Satin Stitch: So you're ready to
learn the satin stitch. The satin stitch is a
fantastic fill stitch. It's pretty versatile, you can use it to fill in
spaces within your project, particularly wide open spaces. It is a beautiful stitch to
use because we're taking our floss and we're
moving it back and forth across the space. It gives us a nice
texture and a nice, smooth look within our project. So if you're ready to check out how it works, let's
stitch it out. I like to use six
strands when I'm filling in a larger area
with a satin stitch, because it will fill faster. If you want a more
delicate finish, you might want to opt
to use fewer strands. Using two to three
strands is very common. I separate and recombine my strands to give
them more volume. Once your needle is
threaded and you've tied off a knot at the
end of your floss, it's time to start stitching. There are two ways you
can try this stitch. The traditional method and
the floss saving method. Let's start with the
traditional method. We're going to be
running our stitches parallel to each other, across the space that
we want to fill. Decide which direction you
want your stitches to run. In this case, my stitches
are going to run from the bottom to the
top of my square. With the traditional
satin stitch, we bring our needle up at one edge of the space
that we want to fill. Then we place the
needle back down across the space on the opposite side of
our filling area, just outside of the perimeter. We're going to start
our next stitch at the bottom of the square. And we're going to bring
our needle back down at the top of the square
from the bottom to the top. What makes this method
traditional is that we start our next stitch on the same side that we
started our previous stitch. And you're always stitching
in the same direction. For example, from the
bottom to the top. And then you're going
to start back at the bottom and then go
back up to the top again. You might want to create
guidelines to help keep your stitches parallel
as you're stitching. Continue stitching from
one side of your shape to the other until
your space is filled. This version of
the Seton stitch, the traditional version, leaves just as much
floss on the back of the project as the front
as an alternative. Let's chat about a
floss saving method. The concept is the
same, but instead of starting each stitch
in the same direction, bottom to top, this
time we're going to alternate where our
starting position is. For each new stitch, each new stitch will start
on the same side where the previous stitch
ended bottom to top, and then top to bottom. This saves a lot of F because we aren't taking long travel stitches on the back
of the project. To jump back to the
original starting point. Again, you're going to bring your needle up at one edge of your
area to be filled. Take a stitch across
to the other side. This time instead of traveling back to the other
side of your shape. To start a new stitch,
you're going to start your new stitch right next to where your previous
stitch ended. Now we stitch across the shape
in the opposite direction, continue alternating until
the space is filled. You can see with the
second technique, we aren't using nearly as much floss on the
back of our project. A little pointer
as your stitching. You can use your needle
to brush the strands, to help them blend nicely. And once you're all
done stitching, remember to knot off your
floss on the back of your project so that your
stitches won't unravel. Now let's take a look at the satin stitch in
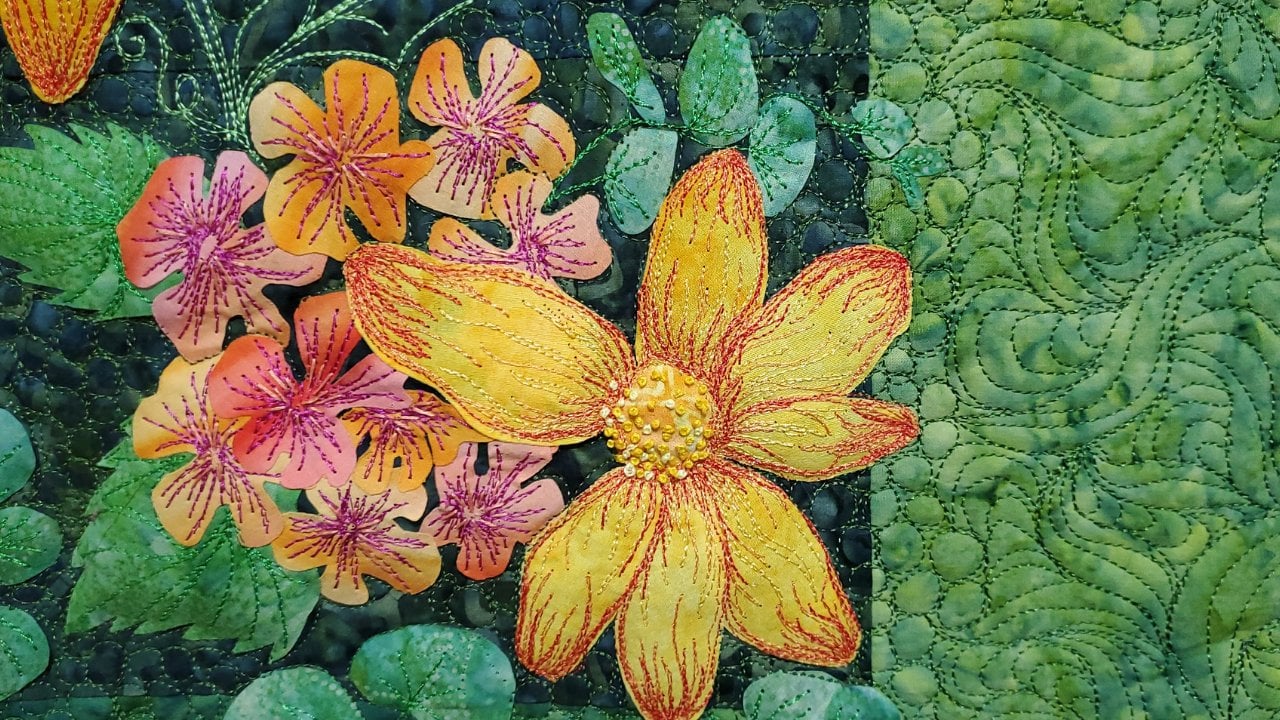
action on a project. In our six in two
floral project, you can see the leaves of the second flower have been created with the
smooth satin stitch. And the petals in the
flower all the way to the right have also been created with a
smooth satin stitch. So that's the satin stitch. The next stitch
we're going to talk about is also a fill stitch. It's called the long
and short stitch. So if you're ready for a
nice blending fill stitch, meet me in the next
lesson and we'll talk about the long
and short stitch.
13. Fill: Long and Short Stitch: In this lesson, we're
going to talk all about the long and short stitch. The long and short stitch
is another fill stitch. This stitch is a lot of fun because it gives a little
texture behind the fill. And I personally love to use
it when I want to create a gradient or shading within
a space of my project. If you're ready to check out how the long and short stitch works, let's go ahead and
start stitching. We're going to create a
row of parallel stitches that alternate long
and short lengths. If you're at the edge of an
area you'd like to fill, be sure to adjust
your stitch length so that it aligns with
the edge of your shape. For example, to fill this square with a
long and short stitch, we can start by making
a row of alternating long and short stitches along the bottom
edge of the square. Each stitch should
be perpendicular to the bottom edge of the square
and parallel to each other. The bottom edge of
each stitch should run with the edge of the square. While the upper edge
of the stitches should be alternating
stitch lengths. You can opt to make
your long stitches the same length and all of your short stitches
the same length. But personally, I like mixing
the heights of my stitches. I think it creates a
nice blended effect. The choice is up to
you for what will work best for your
project and style. I recommend keeping your stitch a half an inch or less so
they don't get too long. Keep repeating long
and short stitches across the first row until you reach the edge
of the area that you'd like to fill next. It's time to start the
next row of stitches. You're going to create
another row of alternating long and short stitches
directly above the first row. Remember to align your stitches with the perimeter
of your shape to keep the edges nice and
tidy in this square. I don't have to worry about
my top edge just yet, so I can freely stitch
long and short lengths without worrying about
the top edge of my shape. For now, each new stitch will be positioned above the
stitch in the previous row. And I'm going to
continue alternating the lengths long,
long, and short. As you're stitching,
you might need to add a stitch or two as you
go to fill in gaps. And that's totally okay. Aligning stitches is
more of a guideline to help you get started rather
than a hard and fast rule. The key is to ultimately make sure that the
space is filled. If you need to add a few
extra stitches, go for it. As another style, you
can opt to stitch a little bit into the
previous stitches. This would create a
more blended look. Continue adding rows of long and short stitches
until you reach the edge of the space
that you're filling. Be sure to adjust and
align the length of your stitches to stop at the
perimeter of your fill area. Once you get to the edge
so that you maintain the integrity of the shape
that you're filling. Now that we've seen
a long and short stitch here in our example, let's go ahead and see how
this would look in a project. In this first example, I used a long and short stitch to blend three colors into this monogram. Next, in our floral
hoop project, I use the long and
short stitch for the petals on the second flower, and I use the long and short
stitch for our mushroom gap. That's a long and short stitch. I hope you loved it again. This stitch is
fantastic for blending. It's a nice, easy, quick fill to use when you have some irregular shapes that
you need to fill around. It's one of my favorite
fill stitches. It's definitely worth adding this one to your
creative tool box. In the next set of tutorials, we're going to start talking
about dots and not stitches. In the next lesson, we're going to go ahead and get started with the French on if you're
ready to check it out. Meet me in the next lesson.
14. Knots & Dots: French Knot: Now we're going to
start talking about our dots and knot stitches. These stitches are fantastic for adding little circles
in your project. The first one we're
going to talk about is the French knot. This knot is a classic
embroidery stitch. It's used with not only a
lot of embroidery projects, but also with a lot of
cross stitch projects. And it's worth adding to
your creative tool box. What's amazing about this
stitch is it not only can be used to add little accents and details to your projects, but it can actually
double as a fill stitch if you take the dots and move them close
enough to each other. You can also do multiple
colors with your knots. If you're clustering
them together to create even more dimension, the stitch is fantastic. So if you're ready to
learn how it works, go on ahead and
let's check it out. To get started, you're going
to bring your needle up through the fabric at your
desired knot location. Now you're going to
hold your needle with your stitching hand. And use your non
stitching hand to grasp the floss about 3 "
away from the fabric. Use your non stitching hand to wrap the three inch section of floss two to three
times around your needle. You can use the index finger of your stitching hand to anchor the wrapped floss in place along the shaft of your needle. Gently lower the needle
tip so that it's touching your desired
not location. You're going to push
the needle tip through the fabric until it
can stand on its own. I'd say about a half an inch
or so through the fabric. Well, keep your needle upright
with your stitching hand. Use your non stitching
hand to lower the three inch floss strand
to the base of the fabric. That way the loops are
going to drop down along the needle shaft and rest
right against the fabric. Now you're going
to readjust your stitching hand so
that your thumb is holding down that three inch floss section
against the fabric. Slowly, you're going
to pull the needle the rest of the way through the fabric with your
stitching hand. And once the majority
of the Flostrand has been pulled
through the fabric, slowly release that
remaining three inch section under your thumb to
form your French knot. Now keep in mind,
with French knots, the more strands you use, the larger your knot
is going to be. And the more times you wrap
your floss around the needle, the bigger your knot will be. If you need bigger
knots for your project, then you're going to want to
either use more strands or you're going to want
to wrap your floss more times around your needle. And if you want a smaller knot, then you're going to want to use fewer strands or wrap your floss fewer times
around the needle. Now that we've seen how
to make a French knot, let's see how we can use
the stitch in our projects. In this first example,
this knit hat, I'm using French knots to create very details around our
main floral design. In our next example,
the floral sampler, we have French knots
in our fourth flower, in the center of the flowers. So we can use French knots to create floral details
within our projects. You can even see I
used French knots at the base of this
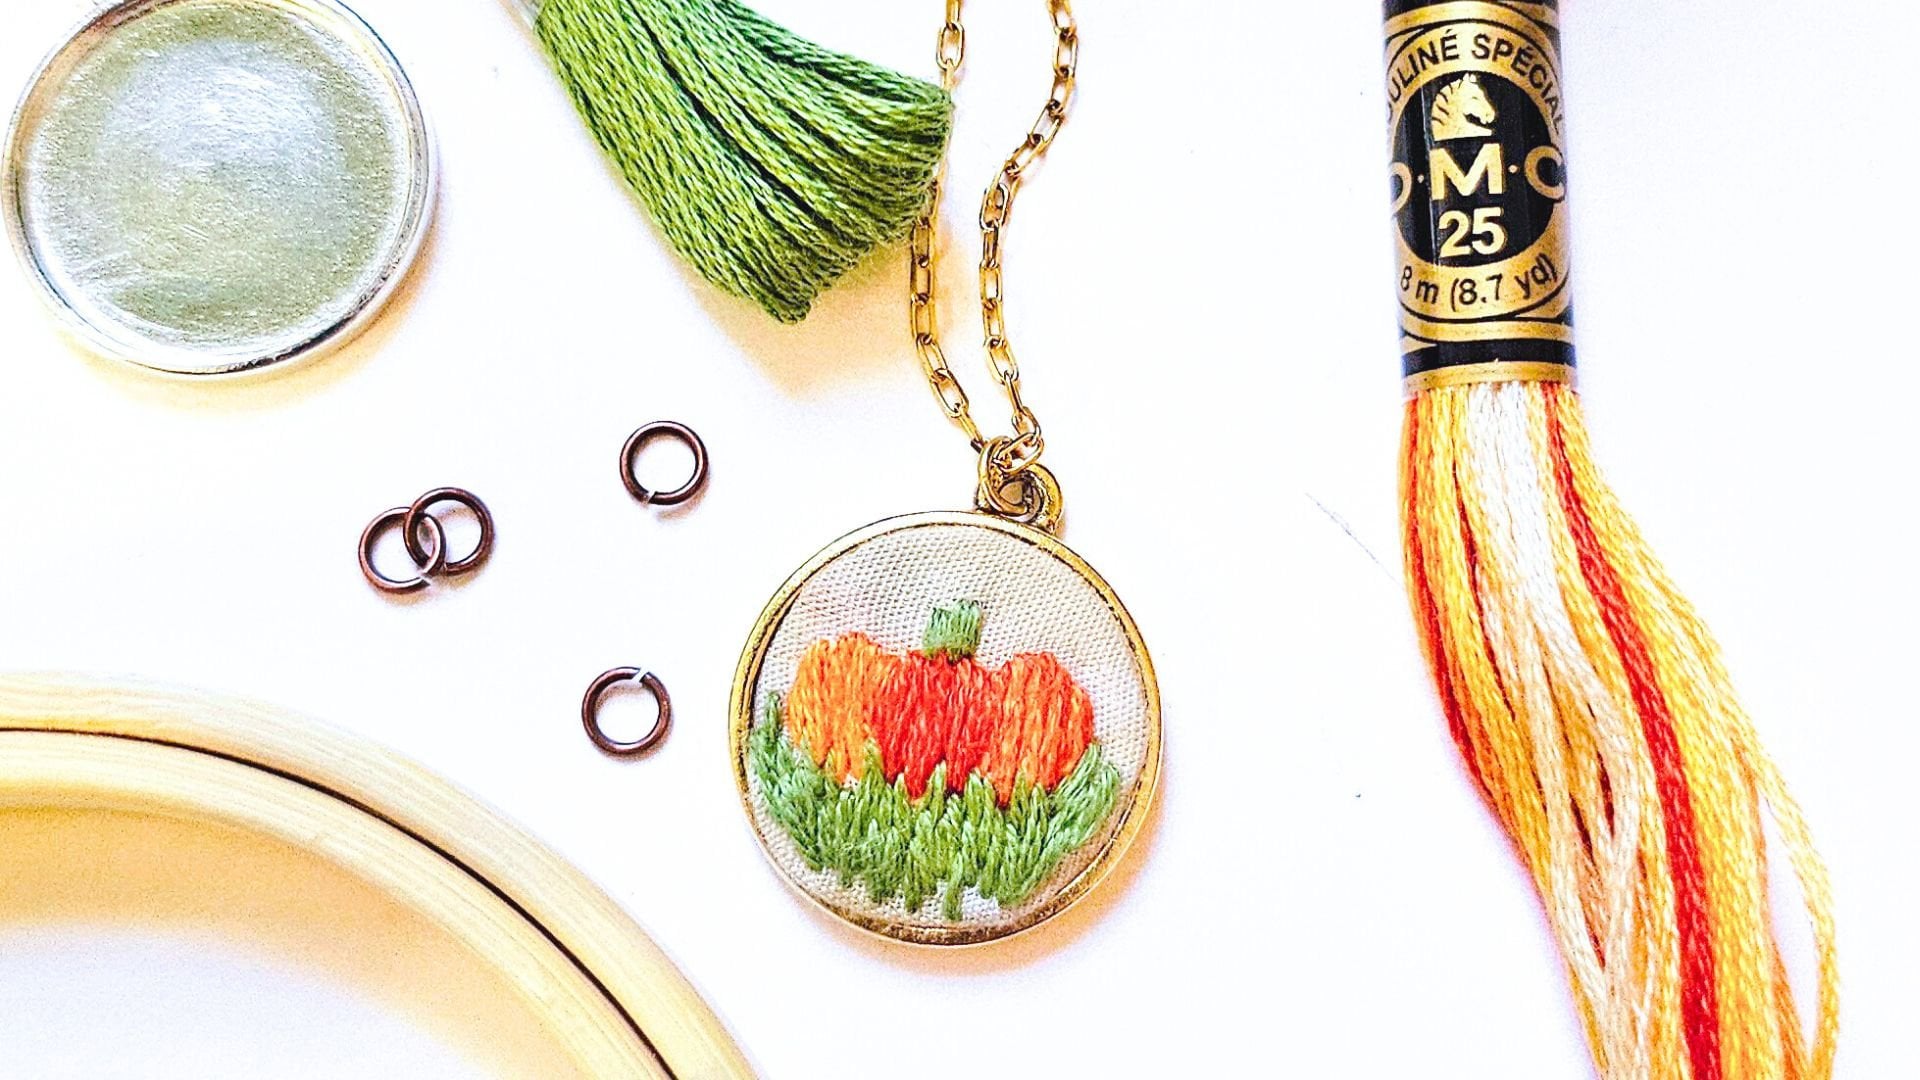
mushroom design. In our last example,
this pumpkin ornament, you can see I actually used
French knots to fill a space. French knots can be used as a fill stitch if
you have a lot of knots filling up one large
space, what do you think? Do you like the French knot? Sometimes the
stitch people love, sometimes people really
don't love this stitch. I think it's worth knowing
just so that you have it in case you want to use it for any of your projects personally. It's a stitch that I love. It does take some
practice to get used to. So don't feel like this is one that you
have to know overnight. This one does take some practice to get used to the rhythm, to get used to the hand motions. But once you've got down, trust me, it's going to be really useful for you
and your projects. Now, the next dot that
we're going to be talking about is
for larger circles. In the next lesson,
I'm going to be talking to you about
the woven wheel. So if you're ready to
check out the woven wheel, go on ahead and meet
me in the next lesson.
15. Knots & Dots: Woven Wheel: Ready to add some
circles to your project. In this lesson,
we're going to talk about the woven wheel. The woven wheel is
a fabulous stitch. Not only is it great
for making circles, but I often like to
use it my projects for circular fruit shapes
like oranges or cherries, or grapefruit or something
along those lines. But also for rosettes, it makes a beautiful
flower stitch. So whether you're trying to
fill in the circles on say, a mushroom cap or
you're trying to make a beautiful rosette or a floral
piece with your project. The stitch is a
great one to know, it's great for larger circles, whereas the little French knots are great for smaller accents, or filling in spaces and
using them for shading. If you're ready to see how it works. This one's a fun one. It looks so complicated, but you're going to
love this stitch. If you don't love the
stitch, I'll be surprised. But this one's pretty cool if you're ready to check it
out, let's get stitching. If you want to add a woven wheel or a rosette to your project, you need to make
sure that you have evenly space guidelines or spokes inside of the circle
that you want to fill. You want these guidelines
to be evenly spaced, as close as possible. Now, this is low pressure, it's okay if they aren't perfect, but the more evenly
spaced the spokes are, the easier it's going to
be to fill your circle. For a whole circle,
you're going to want to use an odd number. I usually use five, sometimes I'll use three for a really, really small circle,
and I'll use more spokes for an
even bigger circle. But five is my go to number. Once your needle is threaded, start by bringing your needle up at the end of one of the spokes. I prefer to start stitching on the outside of my circle
rather than in the middle. That way my knot won't create extra bulk in the center
of my woven wheel. You're going to stitch
straight stitches along each spoke
from edge to center, or center to edge until all
of the spokes are stitched. Personally, I like to use all six strands for this stitch. In this video, I'm
using six substrands, but I'm only going to be
stitching with one strand, it isn't doubled over. Next, you're going
to bring your floss up in the center of your wheel, and weave your needle
under every other spoke. As you work around the circle, you do not actually
need to bring your needle down through the
fabric as you're weaving, you're merely
skimming the surface of the fabric and weaving over and under the floss spokes on
the top side of the fabric. You're going to continue weaving until you've reached
the ends of the spokes. As a tip, it might be
easier to use the backside of the needle to weave
in between the spokes. I'll speed up the
weaving a bit so you can see how to
finish up a rosette. This stitch uses a lot of floss, so you might need to
pull your needle to the backside of the project
to knot off before re, threading and continuing
with a new strand. You're going to bring
your needle back up through the fabric
and continue weaving. If you need to re thread, try not to pull the
floss too hard asa, especially as your
wheel gets bigger. Because pulling too
tight can cause the floss to distort
your wheel shape. Once you reach the
end of the spokes, you might want to add
a few stitches around the perimeter of your wheel
to round the edges a bit, and to mask any uneven spokes that might be sticking
out a little bit. If your spokes
weren't drawn evenly, you might notice a
little uneveness here. Now that we've seen how to make a beautiful woven
wheel or rosette, let's see how we can use
the stitch in our projects. My favorite way to use
the woven wheel in projects is as a flower. I think they make a
beautiful rosette and they're easy to add
to floral projects. I also love to use them
as fruit like oranges, grapefruit, citrus, fruit,
any kind of round fruit. I know that it still
has a lot of texture, but I think it's a
great substitute when you're making a
round fruit design. And in our floral sampler, I used the rosettes as little
dots on our mushroom cap. So that's the woven wheel. Now in the next lesson, I'm going to give
you a little bonus. Because not all of our circular
shapes are well circular. Sometimes we have
half circles or quarter circles or
partial circular shapes. So I want to show you how to
do a partial woven wheel. So if you're ready for
a quick bonus lesson, go on ahead and meet
me in the next lesson, and I'll show you how
to fill in some of those partial wheel shapes.
16. Knots & Dots: Partial Woven Wheel: In this lesson,
we're going to talk about the partial woven wheel. If you're already familiar
with the full woven wheel, the partial woven wheel
is going to be similar. The differences. Instead
of doing the full circle, we're actually going to
do a partial circle. This is great for
circles that are at the edge of something. I use this a lot with
my mushroom caps. Again, some of those circles
are not full circles, they're going off of the
edge of the mushroom cap. So there's a fun, easy way to fill
those in if you don't want to use a
traditional fill stitch. And I'll show you how to do a partial woven wheel
in the next few steps. So if you're ready,
let's check it out. The partial woven
wheel is very similar to the full woven wheel
with a few key differences. With the whole woven wheel, we used an odd number
of spokes in our wheel. With a partial woven wheel, we want to use an even
number of spokes. In this case, I have
two perimeter spokes radiating from the center of my half circle and two
inner spokes, four total. We start the same way, use a straight stitch to
stitch all four spokes. Then you're going to
bring your needle up near where all
of the spokes meet, in the center of
the half circle. Again, we are going
to alternate weaving our floss under
every other stitch, but this time we're
going to change directions every time we reach
one of the outer spokes. Here you can see that I
wove under my third spoke. So now I need to go
over my fourth or outer spoke and then back under it
again to change directions. I continue weaving until
I get to the other side. I'll go back over the third
spoke, under the second, and then over the first spoke, AKA our perimeter spoke. But now I need to change
directions again. So we'll bring our needle
back under that same spoke to proceed again
to the other side. Repeat this weaving process
until you've filled your half circle and reach
the ends of the spokes similar to our whole circle. You might need to
add a few stitches to round off the edges
of your half circle. Once you're happy with your partial woven wheel,
you're all set. Be sure to tie off a knot. If you want to see a few
examples of how I've used this stitch in projects,
let's check it out. In our floral project example, you can see I've used partial woven wheels in my mushroom cap. Any of the circles that
are on the edge of the mushroom cap
need to appear like they're falling behind or they're curving around
the mushroom cap. So this is a good time to use half circles or semicircles, which is when we're going to
use a partial woven wheel. All right, and now that you've learned the partial woven wheel, in the next group
of stitchutils, we're going to talk about
a few decorative stitches. These are ones that I use fairly frequently
in my projects, and I thought that they
would be good stitches for you to know and to learn. And the first one we're going to cover is the fishbone stitch.
17. Decorative: Fishbone: All right, we're on our
last category of stitches. These are our
decorative stitches. Decorative stitches
are fantastic for filling in spaces
within your project, adding fun little details that may not have fallen into any of the
other categories. Honestly, this is a nice
little catchall category. And the first one
we're going to talk about is the fishbone stitch. The fishbone stitch is basically a crossing technique
used to fill a space. I personally love using the fishbone stitch for
leaves, foliage, and vines, but can also be used to create zigzag style accents in details. So if you're ready
to check it out, let's go on ahead
and walk through it. This stitch is perfect
for leaf shaped areas, ovals or tear drop shapes. To get started, bring your needle up at the
top of your shape. Take your first stitch
a third to a four of the way down the center of
the shape you are filling. Essentially, you're
going to be dividing your shape in half
down the center. Draw in a center line, if it will help you
guide your stitches, Bring your needle back
up at the top left outer edge of your
shape directly next to the starting point. Now you're going to cross over the center line and
bring your needle back down next to the bottom right
of your starting stitch. Now bring your needle back up to the top right of
the starting point, along the outer
edge of your shape. And you're going to cross over the center line again and bring your needle back down next to the bottom left of
your starting stitch. Continue alternating
sides, crossing over, and ching slowly down the
center as you stitch. If stitching a leaf shape, your stitches will
likely get wider in the middle of the leaf and will become shorter as the leaf. As you reach the
base of your shape, your stitches will meet at the bottom center of your shape. You can add a few stitches
to the bottom edges as needed to fill out
the rest of the space. I'd like to add a few extra
stitches at the base of my leaves to keep the bottom
edge nice and rounded. Now that we've seen how to
do the fishbone stitch, let's take a look at
a couple examples. In this hat project, I kept my fishbone stitch tight to create delicate
looking leaves, whereas in this hat, I made a looser fishbone
stitch to create a cute little accent detail
in my floral pattern. One of my favorite
techniques to use with the fishbone stitch
is actually to create an ombre leaf by
changing my floss color about a third of the
way through the stitch. And then again in the
last third of the stitch. This could be a fun
technique to play with different colors to create a fun new style
for your project. So that's the fish phone stitch. Pretty cool, right?
I love this one. I think it makes super
elegant leaves and foliage. That's what I
primarily use it for. But feel free to use this
stitch where you see fit. It's great for oval shapes. It's also good if you want to stretch it out and make it a nice abstract geometric shape or accent within your project. The next decorative stitch
that we're going to talk about is the Lazy daisy stitch. This one is a lot of fun
and it is super versatile. You're not going to
want to miss it. So I'll see you in
the next lesson.
18. Decorative: Lazy Daisy: In this lesson,
we're going to talk about the lazy daisy stitch. Now, I'm not sure what
makes this stitch so lazy. I'm not sure why
they call it that, but I think it is a super
hard working stitch. It can be used to create
tear drop shapes, flowers, petals, basically the foundation
of a chain stitch. It can be used to fill in
spaces, accent spaces. This stitch pretty much does
it all, it's worth knowing. The base of it is essentially a tear drop, which is awesome. We can use this to, again, create flower petals, accents, leaves within our project. It is a super versatile stitch. If you're ready to
see how it works in ways that you can use
it within your project, let's go check it out. We're going to start by learning the basic teardrop shape that is the foundation for the
lazy daisy stitch. Start by bringing your
needle up where you'd like the pointy end of
your tear drop to be. Bring your needle back down
in nearly the same location. But do not pull your floss all the way through the fabric. Leave a loop on the
top of your project. Next, you're going to
bring your needle back up through the fabric and
through the loop in the location where you'd
like the rounded edge of your tear drop to be gently
pull the flostrand through the top of the fabric until
the loop rests gently on your flostrand and has made a nice tear
drop or petal shape. Place the needle back down on the outside of the loop
to tack it in place. This is the base
tear drop shape that can be used in a
variety of ways. With a lazy daisy stitch, you can repeat the
shape as desired. If you're making a
daisy, continue making this teardrop shape radiating
around a central point. Make sure the pointy end of your tear drops
are in the center. And you can use five or more
tear drops to create petals. If you would like your daisies
to be uniform in shape, make the petals the same length. If you'd like your daisies to
be a little more exciting, turned at an angle, or if you'd just like them
to have some character vary the petal lengths and
sizes within your daisy. Now that you've seen how to
create the lazy daisy stitch, let's take a look
at a few examples. In our hat project, you can see I use this lazy daisy stitch to create the classic
daisy floral accent. But over here in this
tow bag floral project, you can see I used the tear drop base shape
to create leaves. And also stacked daisy flowers, which could be a delphinium or a lilac or other
fun flowery shapes. You can group lazy daisies
together to make them look like bigger flowers
in your projects. There you have it. That's
the lazy daisy stitch. It's a great decorative stitch. It's very versatile. Let me know in the
discussion how you plan to use some
of these stitches. So now that we've learned all of these wonderful stitches, if you're feeling confident, we're going to go on ahead and I'm going to show you how to get started on this
project. I cannot wait. We're finally getting
to the fun of it. So if you're already, go on ahead and meet me
in the next lesson. I'm going to show
you how you can use the sticker from your
template design and the water soluble paper to get
started and to prepare for stitching this project
so that we can finally get started. I'll see you there.
19. Sticker Placement: We just did so many
stitches. That was amazing. Okay. So now you have
all of these stitches in your creative tool box ready
to use for your project. I think it's time
to start sewing. We just did so much
background work. It is ready. Let's
start this project. You ready? I'm ready. Let's get going. So you
have your base material, you have your stick
and stitch project. Remember, we figured
out our orientation. We know exactly where
it's going to go. If you find that before you're
sticking on your sticker, it needs to be
trimmed a little bit. Go on ahead and trim
it a little bit. I recommend keeping it
within like a half an inch, four of an inch, of the design. If you have too much
extra template, it's going to be
more that you're going to have to dissolve away later and the dissolving
process takes a few minutes. So if you have less of the template to dissolve,
all the better. Keep in mind you want a little
bit of a gap between where the inky lines end and
the edge of your sticker, just so that it's a
little bit easier to stitch sometimes if you're
a little bit too close to those lines where you're
going to be stitching the template and kind of starts moving, which just isn't fun. Once you're ready,
you can go ahead and score the back
of your sticker. If it's tough to get it unstuck from its backing material, you can use a needle to score the backside and just
peel away that backing. Make sure you peel
off the back layers, place it where you like it. Try not to remove it
more, two, two too often, but you can absolutely
pick it up, put it back down if it's not
quite in the right spot. It's not like the
end of the world. If you got to, you know, move it around a little
bit, no big deal. And then once you're happy with the location of your sticker, go ahead and press firmly. Make sure you give it
a nice firm press. With your fingers or your
hands or your palms, not with anything heat related. It's firm press. Make sure it's going to stay in place as you're stitching. You want to make sure
there aren't any air pockets or any air bubbles. If there are, just go ahead
and try to work them out. Or relift part of the sticker at that side of the edge and
just work it back down. Once you have
everything in place, you're going to be ready
to start stitching. In the next lesson,
I'm going to give you a few more key tips as you're
sewing so that you can feel confident working
on your project and getting started. So
I'll see you there.
20. Stitching Order & Tips: So now we have our
template ready to go. We're ready to start stitching. The question is,
where do we start? We totally get it.
There's a lot, right? So let's break down where to start stitching
in your project. Because this is not the type of thing where you go like top, bottom, left to right. So let's talk about where to start and which order to
fill in your project. In general, I like
to work section by section or stitch by stitch. And there are a few key tips you want to keep in mind
as you're working. You might want to start by working with the
larger elements in your project or the key focal
elements in your project. This will help anchor your
project and make sure that it's all coming out the
way that you envisioned. Sometimes as you get stitching, you have to make adjustments
and it's easier to adjust the smaller accent details rather than the bigger
elements in your project. Now if you aren't feeling super confident with your
fill stitches, like if you have wavy borders
on your fill stitches, a lot of times you want
a nice crisp edge. You can either do your fill
stitch and then go ahead and outline around the
edge of your fill. This is going to help give
you a border that you can use to make
sure that you have a nice, crisp edge with
your fill stitches. This works especially well
with a sentence stitch. The other thing to
keep in mind as you're deciding where to
start is consider. Does your template
have a lot of details? Are those details going
to get covered up? Are you going to remember where those details were and if not, put in some of those accents, some of that line work
in ahead of time so that you don't forget where
it is once you cover it up. If you're filling in
with a fill stitch, a lot of times when I'm working, say on a mushroom cap, if I want to fill in the dots, I'm going to fill those in with my woven wheels first so
they don't get covered. As I'm filling in the rest of my mushroom cap with a long and short stitch
or with a satin stitch, It's just that way
I make sure that those dots don't get covered up. And also remember that not
everything has to be filled. Sometimes I like to
leave things outlined. A lot of the leaves
in my projects, I'll leave them as
outlined or I'll alternate between a
fishbone stitch and an outline Just because
I think it's going to give the project a little
bit of extra character. Not everything looks as uniform. It's just going to add a little bit more variety to my piece, which is my personal style. That's what I like to do. So if you like doing
the same thing, feel free to mix it
up a little bit. Use different stitches
in different spaces, or add some variety
to your work. Not every space
has to be filled. Some things can be outlined. See what works best for your
project and your style. Go ahead and fill your
project in space by space within the big spaces
that you're starting with. If there are accents
and details, go on ahead and fill in those accents before you
forget where they are and you cover them all up and then work your way
through your project. Don't forget to take pictures of your progress as you
go to and upload them. Get them ready for
your class project, because I'm excited to
see what you're creating. Once you're all done stitching, we're going to go ahead and
wash away that template. So if you're ready to see
how that process works, meet me in the next lesson.
21. Dissolving Sticker Template: Awesome, now your project
is all filled in. It's time to wash
away that template. We want to get this all
cleaned up and looking nice, so let's check it out. Remember to follow
the instructions on the template that you have
that you're working on. I'm going to show you
what works best for the water soluble paper
that I used on my project. But you got to work with
what works for your project, so be sure to read
those instructions. For my water soluble paper, the manufacturer says
to rinse in warm water. So there's a couple
ways I can do this. You're going to remove your
project from the hoop. If you have a hoop, the best way to rinse out the stabilizer for my projects is to rinse
under pretty warm water. The warmer it is, the
faster it comes out. Obviously, I'm not
going to be using scalding hot water because I
don't want to burn my hands but rinsing it under warm running water
while agitating it. Meaning you're going to
kind of rub your fingers through a little
bit. Works the best. Now, you don't want to rub
your fingers too hard. Just some gentle agitation as it's running.
That works best. Now, when I want to save water, if I have a lot of
projects to do, I don't want the water to
be running constantly. I fill up a bowl full of warm water and I let
my project soak. You're going to make
sure that you're kind of agitating
under the water. It's going to be nice and
warm and you're going to get the major stuff rinsed out. If that water gets
too cloudy and murky and you still want
to keep rinsing it, go ahead and you can dump that water. Fill
up the bowl again. After you're all done
rinsing it in the bowl. You're still going to need
to run under the tap, but you won't have to run
it for quite so long. Then you're going
to go ahead and let your project air dry. I usually like to
lay it flat to dry. Once it's dry, if you still see some dark remnants from
the ink or from the paper, or still feels tacky or sticky, go ahead and give
it a second rinse. Sometimes I have to
rinse my projects two to three times to really get them totally
clean and ready to go. So you might have to rinse
it two or three times, but eventually that stabilizer is going to come out and
it's going to look good. And again, my trick
lately that I've been using is really warm water. If the water's nice,
don't burn yourself. Do not spell it yourself,
I will be very upset. Okay. But make sure that the water is a
little bit warmer, not on the cool side.
A little bit warmer. And it rinses out
much better if you're trying to avoid wrinkles
as your project is drying. And you have a hoop
that is metal free. Okay? There's absolutely
no metal in the hoop, because if there's
metal in the hoop, it's likely going to rust
on your wet project. And we don't want to
rest on our projects, but you can let your project dry in a
hoop that is metal free. And this will help
prevent wrinkles or your project from
warping a bit as it dries. If you opt to lay your
project flat to dry, it might get a little bit
wrinkled and just a little bit warped from where the fabric relaxes near the
heavy thread work. Especially if you're
using a thinner fabric. But never fear, simply use an iron or a bit
of steam to reset the stitches in your project and to work out any
wrinkles that you see. But a hoop can also help
reset your stitches once you have it mostly ironed
and your project is now dry. That way we get our
project looking it's best. So go on ahead, let your project dry. This is the exciting part. It's kind of like, you know, waiting for your project
to be in its final stages. So we're almost there.
We're really close. So in the final lesson, I'm going to give you
just a few more notes for care handling and just my
final couple of thoughts. I'll see you there.
You're so close. I'll see you in the next lesson.
22. Care, Handling, & Final Thoughts: Yeah, you did it. You need to give yourself a big
round of applause. I'll wait. Perfect way to go. So now we're going to talk about just some final
care instructions, handling instructions
so that you can enjoy your project and really enjoy all of the effort
behind your work. Keep in mind that with major
embellishment projects, you might want to hand wash the material that you're using if it ever does
need to be washed. If it's clothing or a hat or
something along those lines. If it gets dirty, you might want to consider
hand washing it. Your stitches are
delicate, right? I mean, yes, they hold up, but you want to
take care of them. You worked hard on this project. You don't want them to get beat up with a washing machine. So consider hand washing
whenever washing is needed. Also going to want to
probably lay it flat to dry. You're probably not going to
want to put it in a dryer. And don't forget to
upload a picture of your project to
the class gallery. Share with a group, share
with the community. I can't wait to see what you create and what you stitched on. I want to see what you made. You worked really hard and I tell me a little bit
about it if you want, but please upload a picture
to the class project gallery. And if you enjoy this class,
let the community know. I would love for you to
leave me your review. Let me know your
thoughts on the class. And this helps other students find courses and materials
that they will also enjoy. And I love and appreciate
your feedback. Helps me know what
types of things you want to see in the
future where I can work on so that I can make you the best class as possible. Thanks so much for following along to the end of the class. Don't forget to upload
your class project. I can't wait to see what you create until
next time, friends.
23. Bonus: Tote Bag Project Part 1: Hey, there it's me again. I just wanted to pop in
with a quick bonus lesson. I know that theoretical
embroidery knowledge and talking through the
process is all well and good, but I think sometimes
it's easier to actually see all of those principles
put into action. So I wanted to jump in
here for a quick lesson to stitch up a tote bag with
a simple floral design. Using our stick and stitch techniques that we talked
about during this class. I've created this extra video
to show you exactly how I would stitch up this floral
design onto this tote bag. I'm going to talk you through all of the different
decisions I'm making along the way so that you can see how I would work
through this process. And I know that every project
is a little bit different. So your project may
vary relative to my, but I thought this
would be a really fun project to work on together. So if you're ready to get started, we're going
to jump right in. When I was selecting
these tote bags, I wanted to make
sure that it was something that I
could stitch through. This is a heavy ish canvas. Actually, I'd say this
is a mid range canvas. It's not super, super thick, but it definitely is thicker
than say, a quilting cotton. So I wanted to make sure that
I could stitch through it. And I had seen a number
of projects where people who had used these bags could do embroidery on them. So I knew that the project
was going to be successful, that we would be able to actually stitch
through this bag. And I wanted a bag that
had a little zipper. So it's got a little
zipper on the top. And just something
that I knew could be useful that I could
actually take to a farmer's market and enjoy. So without further ado, I'm going to talk you through
my stitching process. So let's dive right in. Okay, so to get started, we
have our tote bag. I did just a really
light iron toward the center of this bag just to kind of get rid of
some of the wrinkles. Honestly, they're
going to come out more when we go to rinse
off our project. But at least at the start,
and I printed out my project, and I'm going to be doing
this smaller floral bouquet. I'm going to go ahead
and cut that out. I used a full sheet to
cut out these templates, but we don't need a
full sheet of them. I'm going to stitch
right around the edges. Because this is a
botanical project, it doesn't need to be perfectly
aligned in the center. But I would like it
mostly centered. I don't necessarily want it
in the center of the bag. I think that will
look a little bit on, I kind of want a third of the way up the
bag, give or take. And then I'm going to try
to center it between, I could go from
end to end to bag, but I think I'm going
to use actually these two handles to get a good idea of where
the center is. So let me go get my ruler. Okay, I have a
simple ruler here. It looks like it's about 8 ". And actually I might use
that as a marker here. We want to mark at
the four inch mark, I have a frixion pen. This I'm hoping
we will basically cover with our
stitches, But if not, it comes off in heat, so I can just use an iron
to get it back off again. We said we wanted it
to be about a third, which that's looking
close to a third. I'm just going to mark
roughly the center here. Just a small dot just
to give us an idea. I know that that's
like really tiny. I'm going to take my sticker, I'm going to score the back with a needle so that it's easier
to take off the backing. I might try, I might just put the center of
my rosette there, actually. That way we know it's covered. I won't have to worry about it. I think I like that location. Okay. That's looking
really good. I chose colors already. For this project, I'm
going to be working with some springy colors because I am ready for spring right now. We just had a long, cold winter. So these are going to
be my flower colors, and these are going to be
the colors that I'm using, foliage and my leaves. Now I wanted to choose
some brighter colors, colors with a lot of contrast. Because if I use any
white bezier cream on this canvas bag, it's
going to blend right in. The closest I have is this
buttery yellow color. And it gives us some
variety between the brighter and the darker
and the lighter colors. But it still will pop a little
bit against this canvas. I think it's going
to be passable. To get started,
I'm going to work from my rosette in the center, and then I'm probably going
to fill in my other flowers, followed by my accents
and my foliage. Let's get started. Okay, something important to keep in mind as you're stitching through unusual projects
like hats, pants, jacket. In this case, a tote bag. You don't want to stitch
through all of the layers, because if you stitch
through both layers, then your project is going to. You won't be able to open
the bag, I got to make sure. And I've already done one larger floral on the
back of this project. I wanted a smaller
floral on the back side. I'm going to actually stitch
upside down so that I can make sure that I'm not
stitching through both layers. So I got to be able
to have my hand in the bag and potentially scrunch the bag a bit so I know
that I'm not going through to the other side now. I'm not using a hoop
for this project. And the reason is, don't panic all my hoop
lovers out there. I know I love a good hoop too. But this canvas is heavy enough that I don't
need the extra support. The stick and stitch
stabilizer is stable enough. I haven't had any
warping and didn't have any warping issues on this side. We're doing great on this side. We are also not going
to use the stabilizer. I also need to be mindful of my handles to make sure that I don't accidentally rope them in while I'm stitching. So you'll probably see me
throughout this video, kind of moving them, tucking
them out of the way, just depending on what
we're working on. So I'm going to start in
the center with my rosette. I am going to make
my little spokes. And throughout this
project, I may speed up these stitches just because you have the tutorials so
you know how they work. But I'm going to guide
you through how I'm going to fill this
out step by step. But I might take some of the stitching portions and either speed them up or
kind of cut through them, but I'll try to keep you
updated along the way. As I'm going from here, I'm going to start working
the edges of my rosette. I'm running low on spoke
space, if you will. This side I still have
a little bit more room, so going to come back up, angle it when I'm coming up too, that it tucks back
into the rosette. So the petals look like they're coming from the
center of the flower. This bottom side
you can see here, you can still see a
little bit of that spoke, I want to fill in
just a bit more. Let's go ahead and work on
that just a little bit more. I'm going to go ahead and
come all the way around. Actually, I'm going to keep, this handle is trying to tuck under here and I don't
want it to get caught, so I'm going to pull
it out of the way. I'm actually going
to guide this strand down and along the
edge there. Good. I might take a couple
smaller strokes. Partial ones that was
a much longer one. We're going to go a little
bit shorter this time. I think one more along this
edge right here just to fill that out again, no one's going to know where
these original lines were. If you're happy with
your rose, you can stop. You totally don't
have to do what I'm doing here by adding in more filling
Exactly to the line. Make this project your own. Okay? I do want this to
look a little bit smoother. To do that I'm going to
come from underneath. We're just going to
take a small stitch. And again, we're going
to tuck our needle under the rosette. If
we can get it in there. There we go. That way it
looks like it belongs. I think we're happy
with this rosette. Let's flip it around, make sure. Yes. Okay. So we've got
our main focal rosette. Now we're going to
work on our flowers that are around the edges. So I'm going to do a
couple yellow lazy daisies right here in that
buttery yellow color. I'm going to use three strands, because I want them to
be a little bit thinner. I don't want super, super
thick daisies here. I'm going to pull three
strands out of this. Let's start with our little
daisies down at the bottom. I tend to like to get
the bigger parts of the project out
of the way first. It makes me feel like
I am making progress. I also, with this tote bag, know the deeper I go, the harder it is going
to be to stitch. I like to get out of
the way just then, I'm not leaving the hard
parts too, too late. Although I will be
doing these stems somewhat last, but that's okay. Okay, so those are my daisies. I'm going to wind up putting
French knots in the centers, but I want to do it
in a different color and I have my light yellow
right now threaded. And I don't want to unthread, just simply to put in 2 knots, I think I'm going to
do a darker yellow, which should be the same
colors as these knots. When we do these knots,
we'll also add those knots. This will just save us time.
24. Bonus: Tote Bag Project Part 2: I'm going to go ahead and
I'm in a lazy daisy mode. I'm going to add these
stitches up here, and I'm actually going
to add them in lavender. This color here, 3727. It's a slightly lighter color
as well, but it's okay. You're allowed to add colors
as you go and make changes. I want this to look like
a lilac or a piece of stock or some other type of flower that's not
just simply a daisy. I'm going to do that by
changing the color to give the signal that this is a
whole different flower. Okay, so I'm going to add these little lazy daisy
esque flowers up here. But they're going
to, in my world, I would like them to be like a lilac or stock or some
sort of upright flower. So we've kind of grouped them slightly differently
and they have a different number of petals to our daisies that
we did in yellow. But we're in a lazy daisy mode. So sometimes it'll save time if you're working on
one type of stitch, if you just keep on working
with that type of stitch, if you kind of have
a rhythm going. So that's something
else to think about while you're working
on your projects. I'm actually pulling
out toward that pedal, it's gonna make that
falling place a little bit nicer. There we go. Okay, so here's our progress
so far. We're getting there. Next I'm going to do
these little flowers on the side because I like doing my main floral elements first. And then we'll start filling
out some of these details. Okay, so we're going to be
using 3824, this peachy color. I am again using three strands because I don't want
them to be super thick. And these little
flowers you can see are actually made
up of little lines. Actually just going to be little straight
stitched flowers. They almost remind me
of dianthus or Flo. I'm just going to be taking little straight stitches
from the center. And I'm going to actually
start on the outside because I don't want my not in the middle cause we're
gonna keep coming back to the middle and I don't
want to catch my knot. But we're just
going to take like two or three straight stitches. Gonna be three or
four per petal. I'm gonna kind of stagger
them a little bit. I'm kind of following
the lines, but yeah, these are really easy
flowers to make. It's slightly different
look than the daisy. And I'm going to
keep bringing these straight stitches right back to the center so that they
look kind of petally. There we go onto the next one. Okay, so two are done. We have one more but I'm
running out of thread, so I'm going to re
thread and then we'll do this third flower. Okay, those main
flowers are done. I think it looks
super wild flower and pretty. I'm really
happy with that. Next we're going to add
our French knots to make a little poof kind of
seed sort of flower, and to add our centers
to our daisies. We'll do that next.
For this one, I am using 742, We're going to be
using our brighter yellow to fill in our
French knot space. So let's get started. I'm going to start
all the way at the tip here and work my
way this way so that I have a shorter travel stitch to get to my two daisy flowers
when I want to fill those in. Again, be careful here because I'm going to be
putting my needle down, but I want to make sure
that I don't go through both pieces of fabric and accidentally stitch
my toe back together. So be mindful as you're
doing your French knots, how many layers you're
stitching through, because you don't want
to accidental sew your project closed if it's not supposed to be sew enclosed. We defend that knot was just a little too tight in the loops around. This is a really thick material like this is one time
when like pulling your loops too tight
might make it harder to pull your needle
through the fabric, You might just want
to make slightly looser knots, which is okay. It's not a bad thing. It's just a slightly
different style. But instead of me like pulling super tight with the needle, I'm going to let
them be a little bit looser on there
because I am having trouble getting it through the fabric because these knots are at the base of this flower. Generally, the flowers or buds do get bigger as
they go down the stem, so it's going to look
natural, which is fine. But keep in mind that if you're working through
a thicker surface, the French knots might be
a little bit trickier. I think next time I might use a slightly smaller needle and see if that helps me at all. There we go, Get the
rest of that through. I know there isn't
a dot down here, but I think it needs
one more just to cover that gap
just a little bit. We're, we can go off
script a little bit, but we're going to
stick one more knot right here just to create just a smidge more balance
at the base of this set. I think it looks like Solidago
or golden rod personally, but wild flower here. There we go. That looks
much more balanced. I am going to take just a couple quick travel
stitches and just do these 2 knots over here
while we're in the vicinity. Three, just to give our daisies some centers help distinguish them from our lavender
flower at the top. Make them look a
little bit different. We go and one more. Okay, perfect. Let's take a quick look at that. Okay, so we have most
of our flowers done. Next, we're going
to start working on our foliage accents.
25. Bonus: Tote Bag Project Part 3: Let's start with
these bigger pieces, and then we will do our
T. This is actually a lazy daisy esque
flower at the end. Let's get started on that.
Hey, we're going to start with this little set of leaves or
accent details if you will. And these are just going to be really long straight stitches. I'm not going to even
backstitch them. I think they're going
to look really cool as long straight stitch strokes. Just something nice and simple. And we're going
to kind of again, bring them all down
to the same point. I really like that. I think it's super cute. If you're worried that these stitches are a
little bit too long, you can tack them in the center with a tiny little
overlay stitch in, similar to the one
that you use when you're tacking down
your lazy daisy. But I'm not super
worried about it. I think it's going to
look just super adorable. I am going to knock
this off here though, because I don't want
to travel stitch with stitches that
are this long. But yeah, how quick
and easy was that? Pretty cool, right?
So for this leaf, we're going to do the
same type of leaf. I want the same kind
of type of style. I could see it was a little off my mark there,
but it's okay. No one's going to know
because we're going to wash away that line anyway. So it's going to be fine.
We're okay with it. Our stitching doesn't have to be perfect, which is awesome. Okay, last one. Now I am going to start stitching down some
of these stems. And I want some of them
to be green and some of them to be our like
Eucalyptus blue. Because this leaf is
attached to this stem, I also want it to be green. And for this I am
going to be using a back stitch. Okay. And I'm going to quick just whip this backstitch so that it
looks a little bit more fluid. I think I just prefer whipped backstitch,
but that's just me. Feel free to make your backstitches just
plain backs stitches. Or if you want them to look a little bit more cohesive too, that is totally understandable. Okay. And I'm going
to go back down. Not off, there we go. And we'll add just a
little bit more green. We'll choose a couple
more of these stems to fill with green before we go ahead and we
do our blue leaves. It looks like these two daisies are going to be
attached to blue. So we're going to make
this outer one blue and maybe the second one in blue. And then let's make
the third one in blue. We're going to do
like every other, let's just do every
other one green. That way we have a nice blend of blue and green
in our stem work. And I do want to this stem here, we're going to make
this one green coming down that way we have a mix
of blue and green stem, so it looks like a
little bit more blended. Okay, so we have our green leaves and
green stems filled in. Now let's tackle our
Eucalyptus blue, which we are using 37684. We're going to be doing a
combination of Mac stitch, whipped back stitch, and a lazy daisy stitch
for this portion. And again, I am
using three strands. Okay, so to get started, let's tackle this
leaf on the side. I'm going to just be doing a quick back stitch down the main stem just to give us a
little bit of support. You don't have to do this, but you theoretically
could just do the. The tear drop portion of
lazy daisy along the edge. I like how it looks with the
backstitch in the center. Just a little bit better so, but I'm not going to be
whipping this backstitch. Okay, now we're
going to be taking just a little lazy
daisy stitches on the edges to fill out this leaf. Let's do that by, This petal looks a
little bit small here. I'm going to probably make
it just a touch bigger than what the line
work is showing. Okay, this leaf is done. Now, I'm just going to go
ahead and fill in my stems. We're going to, again, just
do a whipped back stitch on the remaining stems
in this project. One of the other things I guess you can see based on
how I did this project, was I try to do all of the same thread
color at the same time. Because if I already
have my needle threaded with that color, it saves me time. Rather than changing
thread colors and re threading and unthreading
and threading again, one way that you can approach
your projects as you're working on them is
by thread color. You can do all the areas
with the same thread color, or most of them, or some of them that might give you a direction when you're thinking about how you want
to approach your project. Okay, so we're all done stitching up our
little flower bouquet. I need to rinse
out this sticker, and I actually need to rinse out the sticker on
this side as well. So I'm going to go ahead
and rinse those out. And then I will lay
them flat to dry, and I will show you
the final results. Awesome, we did it. Our bag came out great. I hope that this
lesson was helpful and that you picked up a few
pointers along the way. If you love this project and you want to see
another project, let me know and I'll
try to put together either another class or
another bonus lesson for you. This was so much
fun and I'm so glad that you took the time to
hang out with me today. Thanks so much for being here
friends until next time.
 Lauren Weber, Artist + Quilter + Gardener