Transcripts
1. Introduction: Look at all of these details. Isn't embroidery awesome? Whether you want to add
a little extra flourish to your home decor
or even apparel. Hand embroidery is a
great skill to learn. And did you know that you
can even make Custom Gifts, wall Art with hand
embroidery? That's right. If you're new to hand embroidery and
you're not sure where to begin then this
class is right for you. Hi, I'm Lauren Weber, the artists and quilter
behind Garden Girl Studio, if in quilting for
over 25 years. And I've had quilts featured in both Art quilting
Studio magazine and displayed a national shows. Adding details is my
favorite part of Art. Quilting in embroidery
is one of my go-to techniques for
adding embellishments. And even beyond the
world of closing, I love reaching for hand embroidery project
at the end of a long day, finding my rhythm
stitching is super relaxing and I'd love to help
you find your rhythm to. The project for this
class is to create a simple hand embroidery project customized with
something that you love. This project is ideal for
personalized gifting, wall Art, or even holiday decor. A cover core hand embroidery
techniques to help you get started into set your
project up for success. Not only am I going to break the process down into
Easy to follow steps, but we're also keeping this
low pressure in this class. You don't have to worry
about perfect stitches. We will cover how to
use classic tools, such as six Strand
Embroidery Floss, how to load an embroidery hoop, and even An easy way to
thread your Sewing Needle. I'm also going to walk
you through how to do a great beginner
embroidery stitch, the split stitch,
which is perfect for doing linework and
lettering in your projects. Also going to demonstrate
how you can create a simple lettering
design that you can use as a template to
guide your stitching. If you're not comfortable
with creating your own custom Embroidery
Design, never fear, I'm going to be providing a few template designs that you can use to practice the techniques that we cover in this class. Plus, I'm going to
show you how to add a little extra glands so that
we can take your project. The next level, this class
is intended for beginners, but Stitches of
all Sewing levels are welcome to join
in on the fund. In addition to building
new Sewing skills, this class will help you expand your creativity as you create
your own custom design. The techniques we learned
in this class are also a great way to
practice mindfulness. I am going to encourage
you to slow down, find your rhythm and enjoy
the stitching process. You can use the skills that
you learned in this class. Take a step back from
your busy day as you create something
new with out a doubt, hand embroidery can
be a great resource to add to your
creative tool box. By the end of this class, you'll not only have
new Sewing skills, but you will also have a great foundation for
embellishment projects. So grab your favorite
Sewing supplies and let's get stitching
2. Embroidery Overview: Welcome, I'm so glad
that you're here. Embroidery is the Art of
decorative stitching. Embroidery can be hand
stitched or machine stitched. But in this class
we're going to be focusing on hand embroidery. Embroidery is amazing. It can take a simple piece
of fabric and elevate it to the next level by adding
flourishes and details. And when we're working by hand, we have full control of where those stitches
are going to be. Now, if you're new
to Hand Embroidery, keep in mind that
this is considered a slow Stitching Art. Slow and steady is good. There's no need to rush
these projects personally, I find that when
I start rushing, are trying to move through my hand embroidery or
projects quickly. That's when I make mistakes. When my thread starts
getting tangled, when the project just isn't going to come out
as smoothly as I like. So be sure to take your time, go nice and easy, and enjoy the process. You can take some practice
to find your rhythm, but once you have it,
it is so worthwhile, you're going to
learn your stitches. And then once you've
learned your stitches, you'll be able to do them
almost rhythmically. And then you're going
to be able to just start creating and building your portfolio
of Embroidery projects. The techniques I've shown you in this class are
techniques that I've found that work best when you're first learning how to sell. And even as someone who spends
Sewing for over 20 years, I still use these techniques if you aren't
experienced tissue. And do you find other
techniques and tools that work better for you by
all means, use them. That is what this is all about. Making sure that you
can find a practice, a technique that
is going to work best for you and your project. Feel free to adapt these
techniques to work for the tools that you have and the project that
you're working on. If you do have special techniques and
tools that you like to use, be sure to share
them with a group, share them in a
discussion panel or in your class projects so that
we can learn from you, so that we can discuss it, so that we can all learn
and grow as a group. That's what we're all here for. If you're a beginner and
you're ready to learn some basic hand-stitching
tools and techniques. I'm going to cover
some core techniques that are going to
help you get started. So if you're ready,
let's dive in
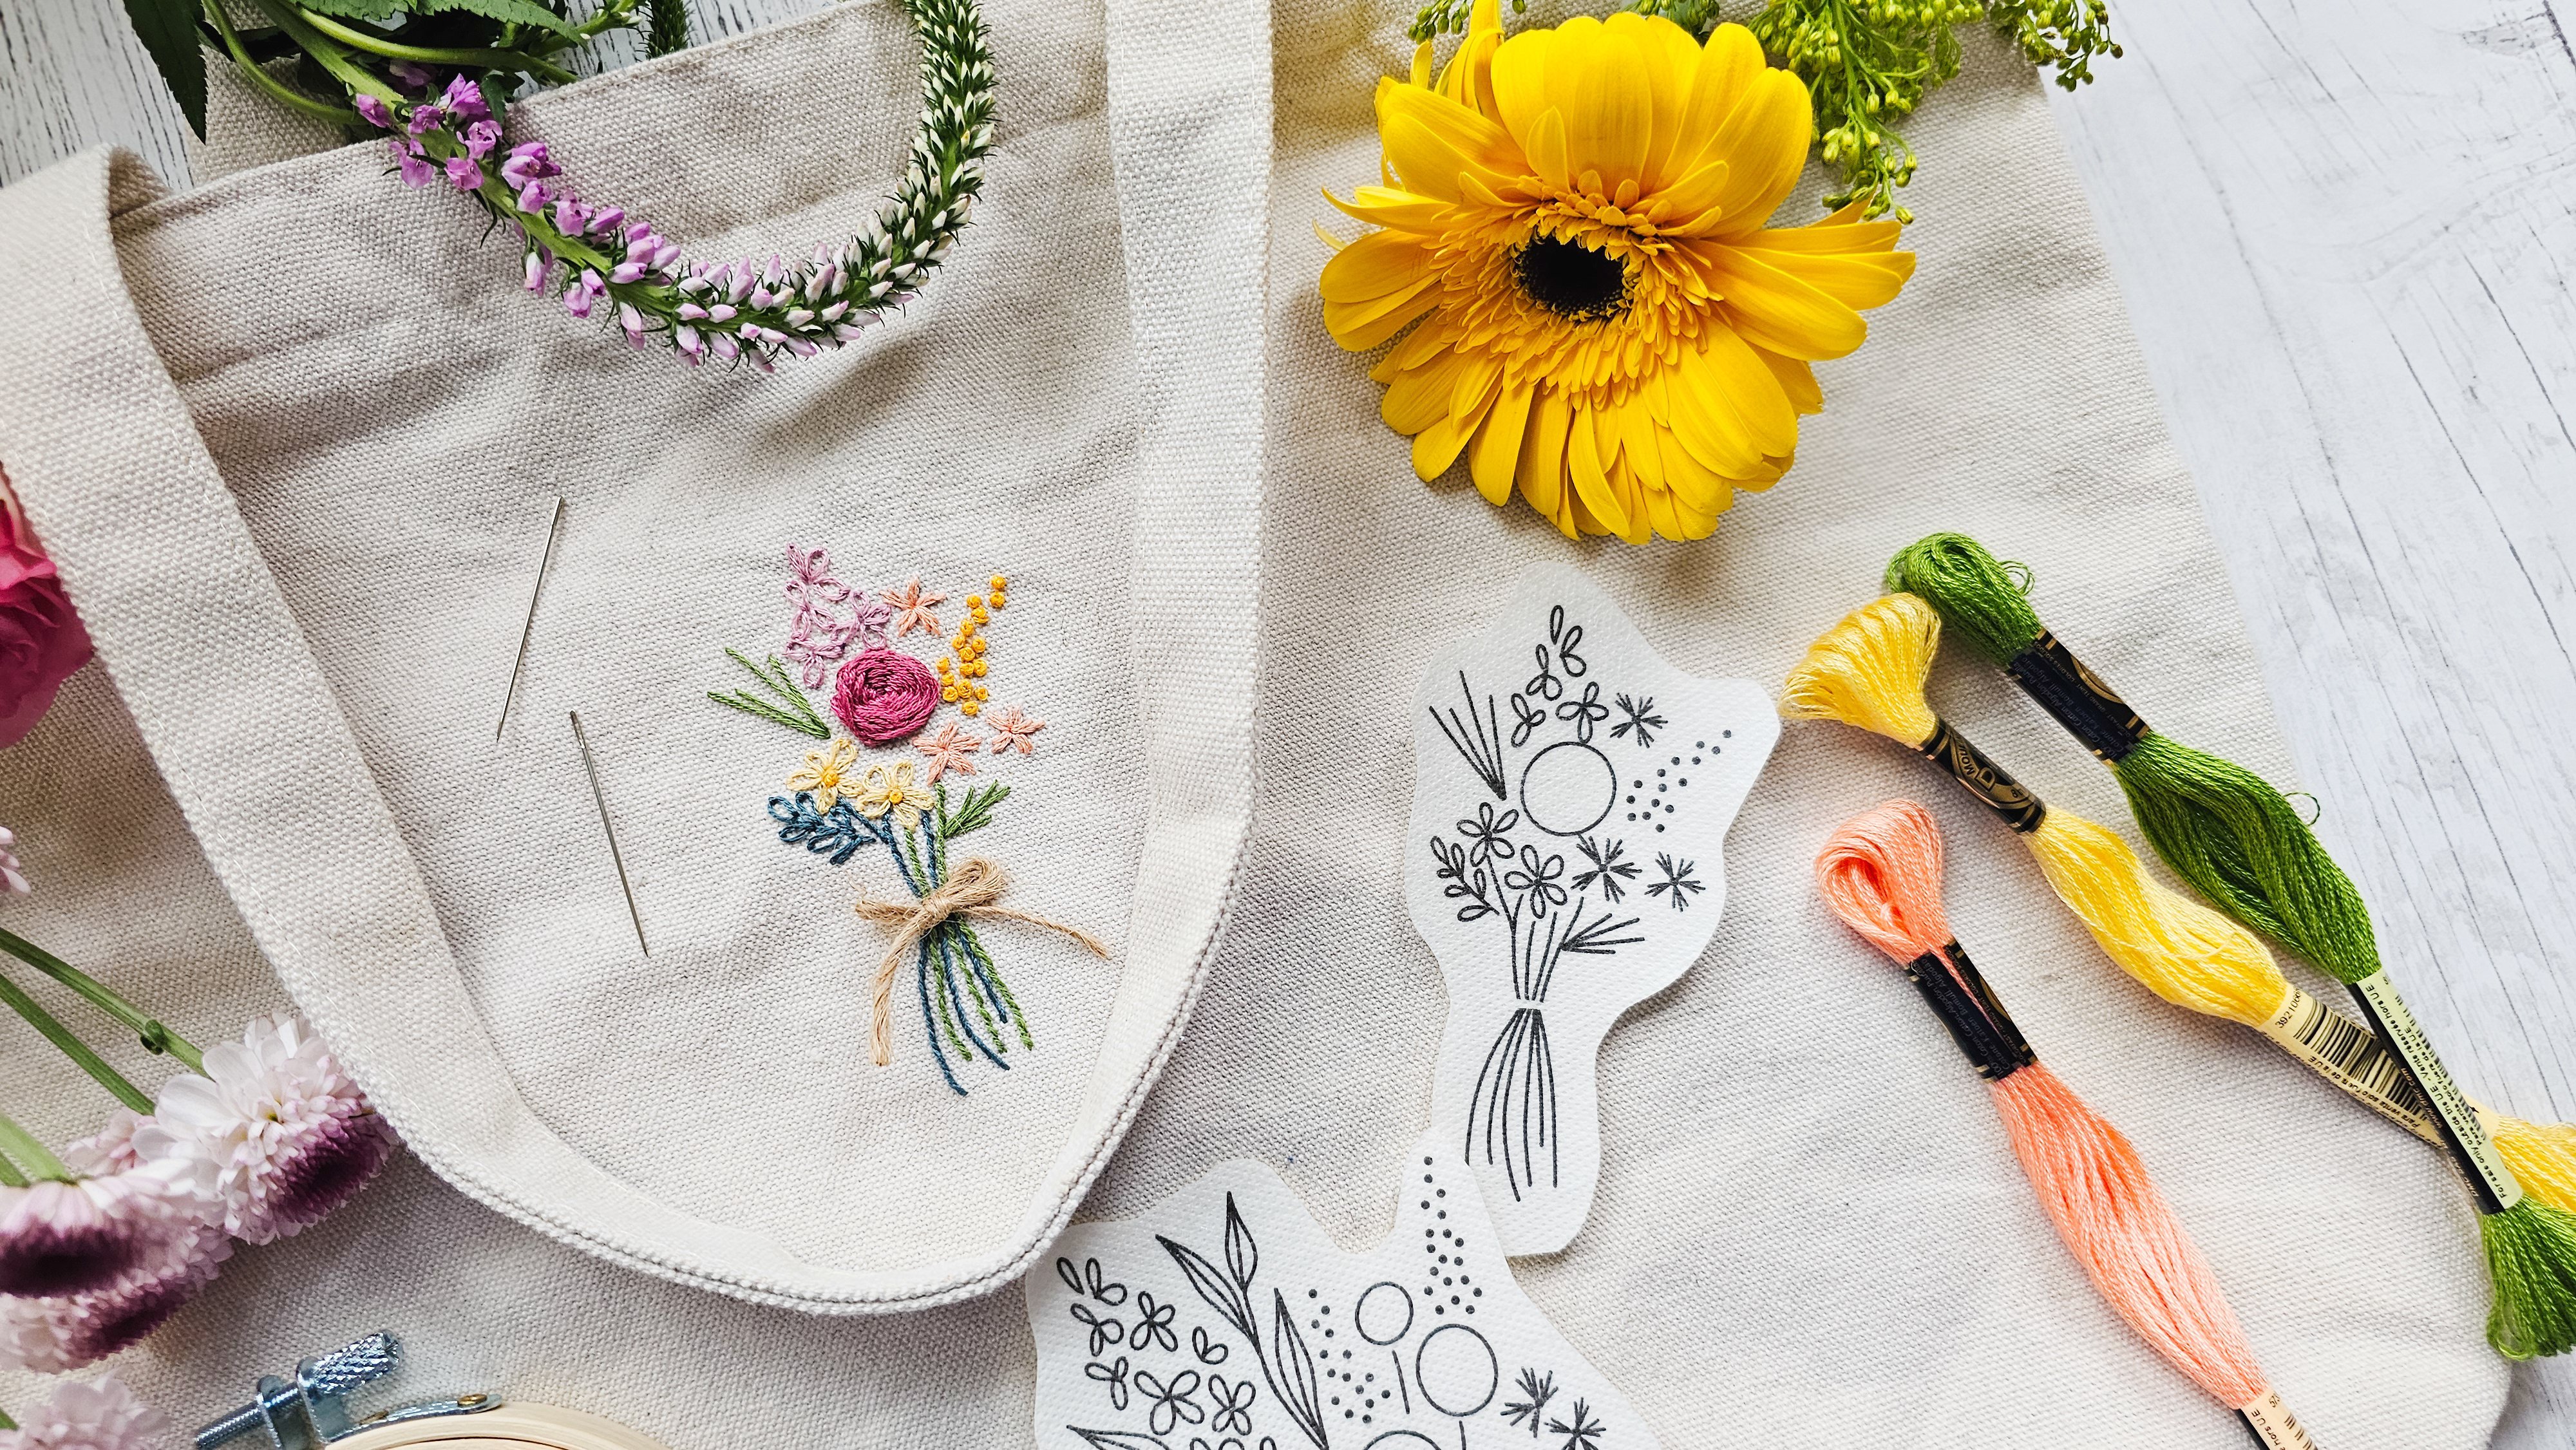
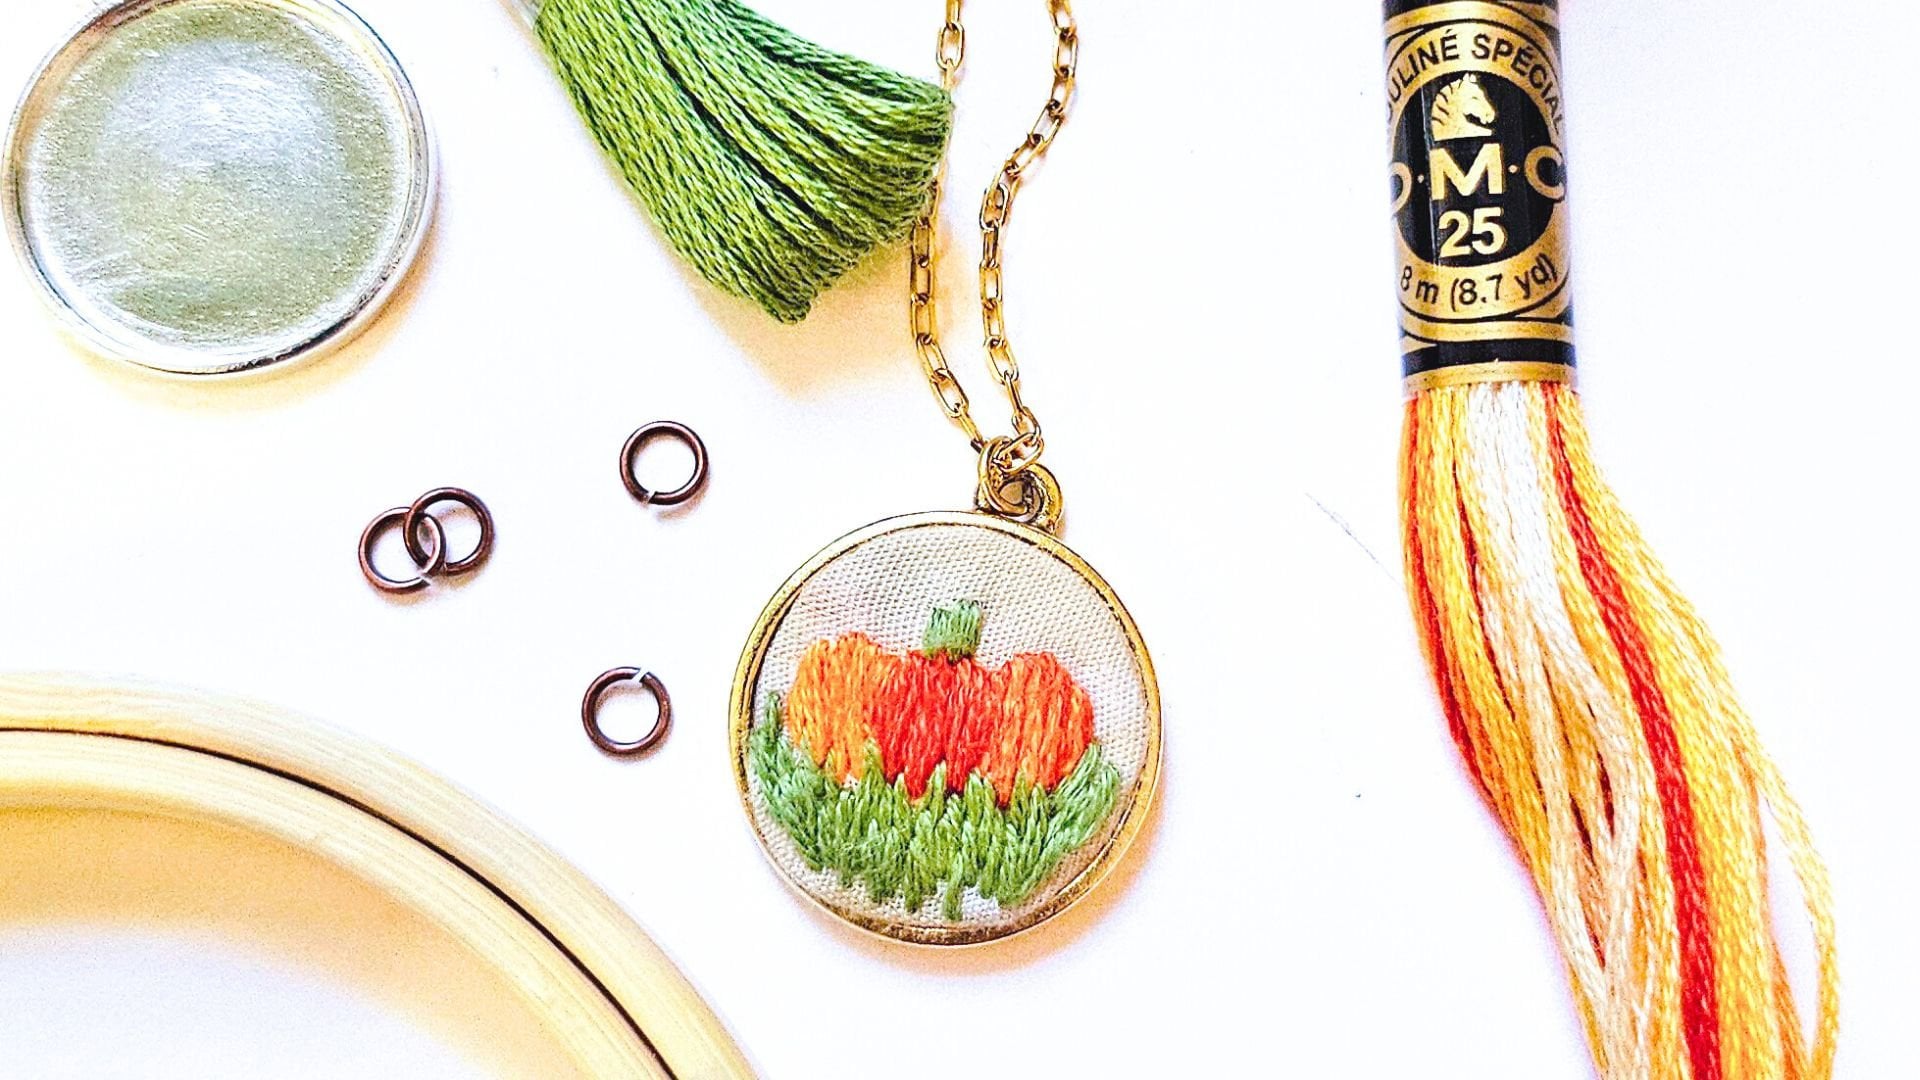
3. Class Project: Let's talk about
your class project. I'm going to recommend
that you work on a small project
to get started. A simple three-inch,
four-inch hoop that is customized with
something that you love. In this class, we're gonna
be focusing on lettering and linework and customization
for your class project. I want you to create your
own little three-inch, four-inch embroidery
project that you can use to hang as wall Art. You can use it as an ornament or a decoration
for the holidays. The possibilities are endless. It's totally up to you, but I want you to start with a little three or
four inch hoop. You're going to choose
a personalization. That means something to you. Can be a FirstName, LastName, a family member. It can be a place
that you visited, place that you love. It can be a special word that
means something to you or a special small quote that means something to you
wherever you choose, you're going to create
a little template. I'm going to have
you Hand stitch it within your
embroidered project. And I would love to see
you Finish the edges on your embroidery project with the techniques that
we use in this class. When you're all done, you're
going Upload a picture of your project to
the class gallery. And I would love to see
exactly what you create. So don't forget to upload
it to the project gallery. So the next lesson we're going
to talk all about fabric and our stitching surface and what we're going to
use for our project. So if you're ready to
talk about our base, meet me in the next lesson.
4. Fabric Selection: So we need a surface
to stitch on. This is where fabric
comes in handy. In this lesson, we're
gonna be talking about fabric options that red colors, and ways that you can use Fabric throughout your
hand embroidery project. Personally, when I'm working on a hand embroidery project, I'd like to use quilting
cotton probably primarily because it's what I have on hand. I'm a quilter. I have a lot of quilting cotton. I use a Sewing through it. It is my favorite,
but you can also use other loosely woven fabrics, like linen or muslin
on your project. Don't go crazy buying
something super fancy, especially for your
first project. Use what you have on hand, use what's available to you. The key is to try to avoid fabrics that are
super tightly woven. He's gonna be a little
bit trickier to Sew through for
your first project. If you're a little bit more
of an experienced stitcher and you know how it's going to feel
to stitch through thicker fabric by all
means go on and go for it. Some people stitch
even through denim so it can totally be done. Just make sure that you're going to find a fabric that's going to work for your project that
makes you feel comfortable. If you're not sure
where to start, I'm going to recommend
a quilting cotton, muslin or linen fabric to get started when you're
choosing your fabric, you're also going to want to
consider your base colors. So this is going to set the stage for your
entire project. This piece of fabric is
going to be the foundation, is going to be the
background colors. So anyway, you're not stitching. It is going to be this color. So keep that in mind whether you choosing a light
color, a dark color, a bright color, wherever
you're not stitching, this color is probably
going to show up. So keep that in mind as
you're considering which color you want to use
for your project. You might also want to choose a second piece of fabric
to use with your project. This can come in
handy in two ways. One of the first ways
that comes in handy is, remember earlier I mentioned that we can cover our stitches. Well, you can use it at
the end of your project. You can load it behind your fabric base
in order to mask or cover the stitches or the message you
made on the back. The other way you can use
it is right from the start. You can place it directly behind your main base
piece of fabric. And this will help
keep your project a little bit more stable. Pretty soon we're going to talk about stabilization,
embroidery hoops. And sometimes as we're working in the fabric
just gets loose, even if we've tightened
down our Hoop. Sometimes it just gets
a little bit loose depending on what type of
embroidery hoop we are using. So one way to try to
tackle this issue is to actually load two pieces of
fabric rather than just one. Keep in mind if your stitching through two pieces of fabric, it will be a little bit
of extra thickness. So you might have to work a little bit harder or
get a little bit of a sharper needle in order
to work through this. Usually I work with just
one piece of fabric. That's just my style. And I'm gonna be
using a second piece later on to cover everything up. So that's just how I go. And I tightened down my embroidery hoop like
with a screwdriver. I keep them super tight, so that's just my style. But many embroidery artists use that second piece of fabric, not only for stabilization, but also because it's going
to mask any Stitches. Sometimes our base
piece of fabric is a little bit thin or
it's a little bit light. And you can actually see
the stitches are shadows of Stitches behind
that pizza fabric. If you have a second
piece of fabric, it helps with the
light diffusion. Basically not as much light is going to get through
that Fabric. So you're not going to
see as much of the MSCI back as you would if you're only using a single piece of fabric, if you do opt to use the
second piece of fabric, it doesn't have to be
anything particularly fancy. Generally I use just
a piece of Muslims, something simple, neutral color. It's not really going
to be showing anyway. It's gonna be sitting behind the main base piece of your fabric. So don't buy anything
super expensive. Don't use anything super fancy. Do keep in mind that if you
are using a background color, I like using a lighter
color because if I'm using a light base and I use a dark extra piece of fabric, it's going to show right
through that light base. So I tend to use just a neutral or
natural colored Muslim, white or cream colored. Those tend to work best for me. But again, do what
works best for you and what you have available. This is also important. I run into this all
the time is a quilter. Please wash your
Fabric ahead of time. If for any reason your
project needs to be washed, generally I recommend
hand washing, but if it ever needs to
be exposed to water, it is generally always a good idea to pre
wash your fabric. So you're not worried
about shrinkage or the color running. Now if your project allows, you're gonna go ahead and cut your main base piece of fabric, an inch or two outside of the size of your
embroidered hoop. Again, if I have
a three inch hoop that I'm using for my project, I'm going to have a five
inch piece of fabric. And if you're using an
extra piece of fabric to either mask stitches or
it for extra support. Gone ahead and make
that the same size as your base piece of fabric. I generally still work with a square piece of fabric
because it's easiest to cut. I don't cut circles
very frequently. You don't want to cut
it the exact size of your embroidered
hoop because you need a little bit
of extra fabric around the edges in
order to keep it taught, if you need to move your hoop at all to extend the design, you just need that little
extra bit of Fabric. There's no need to
round the edges yet we can always
do this at the end. I personally like having the extra space, the
extra wiggle room. The only thing that you
need to worry about if you leave the corners
on the square as you're loading it into
your hoop is sometimes as your stitching they
can flop down. And if they flopped
down, they might get caught in your stitching. If you don't realize this, then you might have to go out
and pull out a few stitches and rework the fabric a little bit and rework
your project a little bit. And that can be frustrating.
So just be mindful that if you leave the corners
on to be aware of where they are and make
sure they don't flop under your work and you're not
selling them into your project. Awesome. So now we've covered Fabric. We've talked a little bit
about your fabric base. We touched on this briefly, but in the next lesson
we're gonna start talking about your embroidery
hoop and stabilization. So if you're ready to talk about how to stabilize
your project and why we need to use an
embroidery hoop and let's chat about it
in the next lesson.
5. Embroidery Hoop Basics: In this lesson, we're
gonna talk about one of the most important aspects of hand embroidery and that is stabilization for most
hand embroidery projects, traditional hand
embroidery projects, you're going to be using
an embroidery hoop. Embroidery hoops are
important because they prevent your fabric
from buckling, puckering, and tucking as you're adding thread or
floss or string. When we add heavy thread
work to a piece of fabric, it can lose some
of its integrity. It's going to start
buckling under the weight of that thread, Floss string, whatever
it is we're using to carry out heavy Stitch work. So in order to not let
our fabric buckle, we're going to be
using some stabilizer, or in most cases and
embroidery hoop. And in this project,
it's no exception. We're going to be using
an embroidery hoop. So as you're choosing your hoop, There's lots of different
groups out there. They're made out of
different materials. The one that I'm going to be
using is made out of bamboo, has a metal screw with the top that is used to
tighten down the hoop. So let's take a look at embroidery hoops and we can
get an idea of how it works. Basically, an embroidery hoop
has two rings and a screw. And what you're gonna
wanna do when you go to load your embroidery hoop, you're basically gonna
make a sandwich. Your fabric is gonna be secured and pulled taut in the
middle of this hoop. So you're going to loosen up the screws so that you
can pull the rings apart. The small loop is
gonna be the base, lay it flat on your table. Then you're going to center your design in the
middle of your hoop. This means you need
to choose a hoop that is going to be large enough to accommodate
whatever pattern or design you're
going to choose. Or if you're working from a set, from a set size, if you know you
want to work with a three-inch hoop in order
to make a certain project, then you gotta make
sure that your design is gonna be able
to fit nicely in the middle with a little
space around the edge. You don't want your
design going right to the edge of the border
if you can help it, because then you're
gonna have to move your hoop as you work
through the project. And that can be tricky. So unless you've
got a huge project where you're gonna
have to move your, I recommend just
sizing up your hoop, making sure that
you've got hoop that's big enough to accommodate
your project. Okay, So back to our
embroidery hoop sandwich. You've got the
little ring, set it flat on your table or
at flat on a surface. You're going to center
your piece of fabric. Next you're going to take the larger ring and you're going to place it down over
the top of that. It's all secured in there. Now you're gonna want to try
to keep everything centered. This might take a
couple little tries, make sure it's all kind
of staying nice and taut. You don't want any waves. Keep tightening it
slowly, slowly. If you need to secure it with
a screwdriver gone ahead, you can use a screwdriver with most embroidery
hoops as you want it nice and tighten the
hoop so it doesn't start puckering as
you're working. Then you want to tap
the center of the hoop. That's how you know, it's
going to be taught enough. If you want to do two layers of fabric, then
you're gonna do both. In that case, you would do your supportive layer on the bottom and then your
main base piece of fabric, the one that you want
everyone to see. That one's gonna go on top, place the larger ring over both pieces of fabric
and tighten it down. In the case of our projects, I want to make a family Momento, but again, work on whatever
works best for you. So if you wanna do a larger
project, that's totally okay. I'm gonna be using a
little four-inch hoop because I want to use
it either for the, for holiday ornaments,
decorations, Gifts, gift tags. Hey y'all. This can be a FUN
little gift tag, kinda cute little extra gift. Keep that in mind what size you're going to
want your project to be. Because the hoop is
gonna be important in dictating how much working space you're going to have
for your project. And in the next lesson
we'll start talking about our design and
our templates into how we're going to figure out what we're
going to be stitching. So if you're ready
to decide what you want to stitch and how to create a template that you
can use for Stitching. Gone ahead and meet me
in the next lesson.
6. Design Embroidery Template: So let's take a second to talk
about embroidery patterns. There are a ton of embroidery designs and
patterns out there. Some are free, some are paid. And everything in between
the scope of our project, I'm going to recommend keeping
it simple to get started. So instead of going
out and buying a huge pattern and learning
ten different stitches, trying to figure out how the pattern works and what
the different keys mean, I'm going to show
you how to create just a simple pattern that
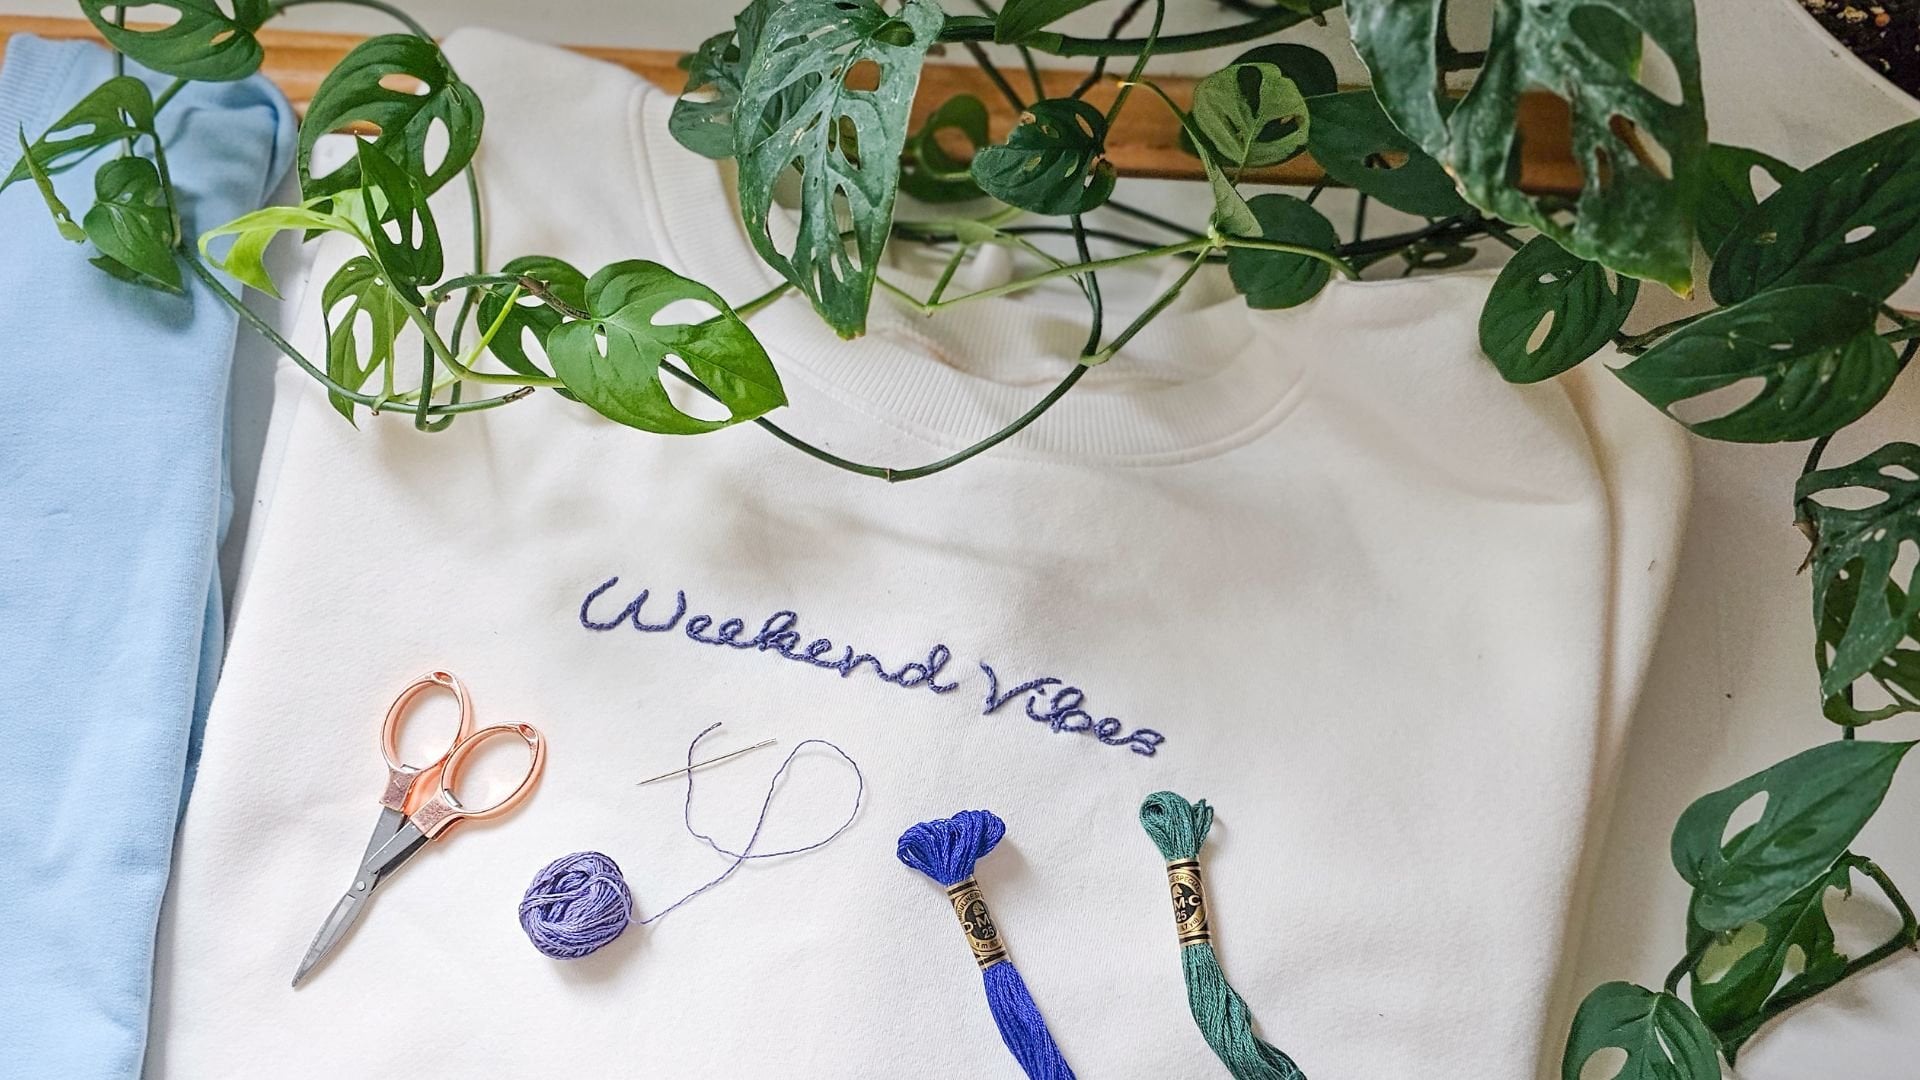
we can use to stitch on. To keep this project simple, I'm going to recommend you
choose a name, word, or place. We're going to write or type those words to create a
guide for us to stitch on. You can opt to write
by hand or you can use any software that
comes with fonts. You can simply size the font or your handwriting to
fit within your hoop. Do a test print or paper test to make sure it'll fit within
your embroidery hoop. It's that simple. If you want to see how I made
my regional design, I'll be showing you exactly
how I created my template and procreate an Adobe Photoshop
throughout this lesson. But don't feel like you
need to use these programs. A handwritten design
will work just as well. So before I show
you how to create your design template
and procreate and an Adobe Photoshop, let's talk about font selection because this is going
to be important. And as we are
creating the design for our stitching project, we are going to
choose a simple font. And I'm going to
recommend that you choose either a simple printed font
or a simple script font. Nothing with a lot of seraphs, nothing that's too ornate. Just keep it simple. When I'm choosing fonts, I like to look for
fonts that are thinner. If you want to choose a
thicker or bolder font, you might have to do more
than one row of stitching. So in this class we're going to learn a simple line stitch. It makes it nice and simple. I can just do a single row of stitching and just
follow the line. It's not going to be enough
to fill in a broader space, but you can place that line, stitch side by side
to fill in a space. Basically, you can do
multiple rows of stitching if you want to fill
in a broader area. Keep that in mind if you do want to choose a thicker font or a font that varies
in a line width, that you can do
more than one row of line stitching in
order to fill it in. If you're working on
a commercial project, make sure that you have a commercial license
to use that font. So either an open source
or open type font, or that you have a
commercial license to be able to sell your work. So keep that in mind if
you're using a font, which font you're
choosing and whether you have the clearance to be able
to use it for your work. But if you're just working
on a personal project, a gift to a family member, or something you're going
to hang in your home, then you should be
good to go with whichever font you
want to choose. When you're designing
your template or choosing your font, you want clean lines, especially if you're
working on a small project. Here I'm going to be working on a three inch or a four
inch embroidery hoop. There's not a lot
of room to work, which means there's not
a lot of room for very, very, very fine lines
and heavy detail work. If I'm working on a big project, say a larger scale quilt, I might have a
little bit more room for intricate shading. Everything's going to
be scaled up a bit. Just keep in mind the
scope of your project, but you generally want
to keep just nice, simple, clean lines are
where we want to be. The next thing you're
going to want to keep in mind is the size. Remember earlier we were talking about our embroidery hoop, and the design needs to fit
within that embroidery hoop. So make sure that
whatever font you choose, it's going to be scaled so
that it fits within that hoop. You don't want it so small that there's no room for you to
actually make any stitches. But you don't want
it so big that it's not going to
fit within the hoop. And remember, when you're
working on an embroidery hoop, you want to leave
just a little bit of extra edge around the
rim of your project. Because the closer you get to that embroidery hoop
as you're stitching, the harder it is to stitch. So you kind of want to leave a little bit
of a gap between the edge of the hoop
and where you're actually going to be
stitching your project. Now I'll walk you
through the process. I used to create my
embroidery hoop design using Procreate and Photoshop. The first thing we need to do is decide what we'd like to stitch. The stitch I'm going
to show you will be ideal for line work
or simple lettering. You can choose to do something similar or make it
totally your own. Family names, funny phrases, or the outline of a pet
could all be good options here if you're thinking about what to choose
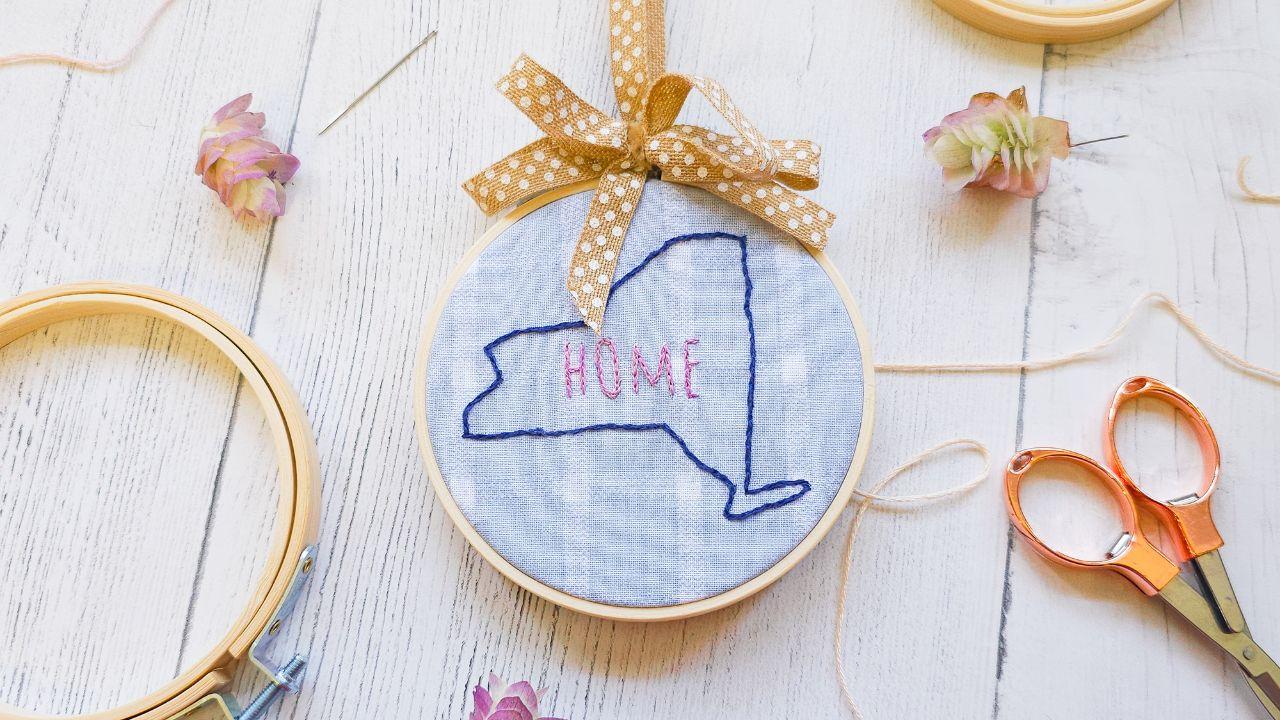
for your design. For my project, I decided to do an outline of my home
region, New York State, with the word home
in the center, To get the outline of my region, I simply traced it from a map. Using procreate. I
started by opening Google Maps and searching
for my area, New York State. I used the snipping tool to extract the area I wanted
to use for my design. You could also take
a screenshot of the map or print to PDF. To get a copy of the map, I save the photo
to my desktop or you can choose a folder
that's easy for you to find. Then I need to get this
photo into procreate. So I'm going to
drop the photo into Google Drive so that I can access it on my
ipad and procreate. That way I can trace an
outline for my design. I tend to use Procreate
for tracing and Photo Shopper Illustrator
to finalize my designs. So I'm going to walk you
through my general process. But keep in mind that this
isn't a procreate class. So be sure to choose a program that you feel comfortable with. If you prefer not
to use any program, that's totally cool too. You can simply trace the image
by hand to get an outline. If you are going to
use some software, I'm going to show
you how I open and trace my photo in procreate. So I'm going to go ahead and open my map photo and procreate. I made a copy of
that photo and I'm pulling it onto an 8.5
by 11 inch document. So I wanted to use
an 8.2 by 11 inch document because that's
a standard print size for my computer and my printer. So you're going to open a
new layer in your workspace. Choose a color that's going
to contrast with the map that you are going to
be tracing on here. I chose am on a
line brush because it has a nice smooth
texture for drawing. You can adjust the
width of your brush. I chose something in the mid to narrow range, nothing too wide, because later we're going to use this as an outline
for our stitches, so we don't want it
to be too bulky. Next, you're going to outline whichever object you want
to stitch for your project. In this case, I'm
outlining the region on the map that is home
to me, New York State. You can use this technique for
tracing a map of your own, a pet, a portrait,
outline, a flower. Just remember to keep it simple. If you're new to stitching
whichever object, person, place, or thing you
want to stitch, you're going to go ahead
and trace an outline. Now I want to add a little
bit of text to my project. And you can add text and
procreate by selecting ad text from the
ad drop down menu. Type the word name or phrase you've chosen
for your project. In this case, I've selected
home in the layers panel. You can select your text layer, tap the layer icon, and choose edit text
to modify your phrase. You can choose nu font. You can change the
size of your font. And you can use the
selection tool to move your text and
resize it as well. You can also use the
drawing guide grid to help you scale your project. Under the Actions menu, turn on the Drawing Guide and
select Edit Drawing Guide. Now change the grid size and units to coordinate with
the size of your document. I chose an eight, a two
by 11 inch paper size, so I'm going to tap the numeric grid size to make adjustments. In this case, I'm choosing
inches for my units, and I want the grid to
be in 1 " increments. Now we're going to
draw a circle to represent the width of the embroidery hoop that
we're going to use. I know that I want to use a four inch embroidery
hoop for this project. I'm moving the circle so the top is aligned with a grid line, and the left side of my circle is aligned
with a grid line. Now I'm scaling down from the bottom right
hand corner until my circle is four grid
lengths or 4 " wide. This represents the
space that I'll have for stitching within
my embroidery hoop. Next, I'm going to duplicate my New York State
drawing outline and hide it from view just in case I need the original later
on in the project. Now I'm going to resize the other New York
State outline to fit inside my circle
or hoop guide. Please note that I left the
room around the edge so that the outline of my region isn't right at
the edge of the circle. Rather, I left a
little bit of space. Now it's time to
resize your text. Once you're happy
with the sizing, make sure your project is named, then you can export it
as a Jpeg or a PNG file if you'd like to make
any final adjustments in Illustrator or Photoshop. In this case, I'm going to be saving as a Photoshop
file because I like to do all
of my final edits in either Illustrator
or Photoshop. Here I saved to Google
Drive so I could open the document in Photoshop
on my desktop computer. Now I'm opening my procreate
design in Adobe Photoshop. You can add guidelines
if you want to confirm the scale or
size of your project. You can also add text
directly in Photoshop. Personally, I like
this amatic font. It has simple slender lines
and it has a nice cozy vibe, which is ideal for my
home themed project. You can adjust the
font size by clicking the corner and using a
fixed ratio transformation. Basically, you're just going to click and move that
corner around. Try not to free
transform a font, or it'll become warped. And don't forget to
remove the circle guide before exporting your
design as a PNG or JP. Once you've exported
your design template, it's time for a test print. It's important to
do a test print to make sure the size and rendering is exactly
how you want it before we trace it
onto our fabric base. If all looks right and
you're ready to trace, we'll cover this in
the next lesson. If your design needs some work, now is the time to
make adjustments. So to recap, you're going to choose the theme
for your project. You're going to trace or type your design elements onto a document or onto
a piece of paper. You're going to arrange
these elements into one design template that you're going to use to
stitch your project. You're going to
test print and test your design for size accuracy to make sure that it
fits in your hoop. And then you're going to make any adjustments as necessary. So once you're happy
with the scale, the size, and the font
that you've chosen, go ahead and make sure
you've got a printed copy, because we need to transfer
this pattern onto our. In the next lesson,
I'm going to go through exactly how to
take this piece of paper, whether we've drawn
it or printed it, and how we're going to trace that design onto
our main piece of fabric so that we can have guidelines for where we're going to
stitch our project. So if you're ready to see
how that process works, go on ahead and meet
me in the next lesson.
7. Tracing Guide on Fabric: Now that you've
chosen your design, we need to transfer
this design onto our piece of fabric
so that we know where and what to stitch. So we need to
actually physically trace this design onto
our piece of fabric. And there are few key tools that we can use to get the job done. The first tool that you can use is pretty
simple. It's a pencil. So you can use a pencil to trace your pattern onto
your piece of fabric. It can be a little bit difficult to remove the lines though, but it's a little
bit easier to remove the lines and say using ink, which is another option. You can use a pen,
a fabric marker, or say infeasible ink as well. Now these tend to be
pretty permanent. So if you're going to be
using this technique, make sure that your
stitching is gonna be thick enough or that the lines
are gonna be thin enough that you're not going to see those guidelines after
you're all done stitching. Now another option, and I use this with a lot
of my embroidery or projects is water
soluble stabilizer. I love water-soluble stabilizer. Basically it works
right with my printer. So instead of printing on
a regular piece of paper and tracing my project
with a window or lightbox. I can print directly on
the water-soluble paper. And then I can stick
it to my project. And you're so right through
it and when you're all done, it washes away in water. I love this stuff.
It is fantastic. Now, this is why I mentioned
earlier that you wanna make sure that your fabric and your floss Art color fast
and that nothing's going to run and nothing
is going to shrink. Everything is pre washed. For today's project,
I'm going to use a size three Pigma Micron pen. It's really 0.35 mm. But what's awesome about
this pen is that it is waterproof and fade proof, which is gonna be great
for our project because the lines aren't going
to wash away in water. I'm going to make
sure that my lines are going to be thin
enough and accurate enough as I'm
tracing that they're not going to show up once
I'm all done stitching, I'm going to make
sure that all of my stitching is
going to cover up all my lines because this pen isn't going to wash
away afterwards. So there's a few ways that
we can trace this design. Ultimately, we're
going to be tracing directly on the piece of fabric. Once your fabric is in the hoop, it's elevated, it's
no longer on a table. And it can be kinda tough to draw on top of that
elevated piece of fabric. That's not too much FUN. And if you take the
fabric out of hoop, then how do you know
if your project is centered and it's right
where you want to be. So little handy trick to get by both of those
things is you're actually going to
reverse load your hoop for the tracing portion
of the project. So let's lay it out. If your hoop is
already put together, you're going to quick
unscrew it and we're going to reassemble it real quick. You're going to take
the bigger hoop, you're gonna place
it on the table or on your working surface. Then you're gonna put
down your piece of fabric and then you're going to tuck the smaller
hoop in the middle. This is going to be the middle of where you're
going to trace your pattern. This helps to make
sure that you are a not too close to the edge when you're tracing your design, be that you have a flat surface
that you can trace on and see that everything is centered so that when you're ready
to work on your project, everything is exactly
where you want it to be. So you're going to trace
right in the center of the little ring that we've rearranged and
reassembled temporarily while we trace our project, to trace your design
tape or secure your printed template to
a window or lightbox. Place your reversed
hoop over the template, make sure the printed side
of the fabric is face up. So you'll be drawing
on the good side of the Fabric where ultimately
you'll be Stitching. Be sure to send her the
design within the hoop. And once you're happy with the designs placement carefully start tracing your design
onto the piece of fabric. And when you're all done, you're gonna have a
beautiful template that we can stitch directly on. Now, before we get to
the stitching part, makes sure that you
rearrange your hoop, which means you're going to have An unscrew your
hoop one more time. You're going to place the
small ring on the table, your pieces fabric on top,
and then your big ring. Tighten it down, make
it nice and taut. And your design
should be right in the center, ready for stitching. Once you're done all reloading your hoop, we could started. So if you're ready to start
working on your project, we're going to start
off with a Basics. And in the next lesson,
we're going to talk about six Strand
Embroidery Floss. If you're ready
to hear all about the colorful world
of Embroidery Floss. Meet me in the next lesson.
8. 6 Strand Embroidery Floss: Do you love embroidery floss? One of my favorite
tools to use for embroidery is embroidery floss. Now, there are
lots of tools that you can use to embroider. You can use ribbon, you
can use pearl cotton. They're also metallics and different types of
fun, fancy threads. But the most common one
that you are going to encounter is six strand
embroidery floss. Not only does it come
in a ton of colors, but it is made up
of six strands. So while it looks like one
thick strand of floss, it's actually made up
of six smaller strands. What's fantastic about this
is you can actually take this one thick
piece of strand and divide it into thinner strands. You can use one strand
for your project, 2345 or all six. It's totally up to you. And what this does for your project is it allows you to decide which thickness you want
to be stitching at. So if you have a thinner line, you're probably going to
want to use fewer strands. If you have a thicker line
or a bigger space to fill, you might want to consider
using more strands. So how do we divide up
all of these strands? The first thing we need to
do is cut a length of floss. Now, as you're using
your embroidery floss, keep in mind that
you don't want to use a strand that's
too, too long. It's far more likely
to get tangled or knotted and slow
down your project. Sometimes I like to try to
push the limits on this, and I usually wind
up regretting it, because I've got to stop
and take out a knot somewhere in my project
because the floss got tangled. You're going to want to cut
a piece that's about 18, more than 20 " long. This should be a good
size for your project. And then you're going
to go ahead and decide how many strands
you want to use. Once you're ready to
divide out your strand, hold onto that
piece of DMC floss. You're going to tap
the end of the floss so that each of those six
strands appears to be loose. So you're going to hold the main strand of
floss in one hand. And you're going to gently pull exactly one strand
out at a time. And you're going to
pull this strand straight up and away
from the other strands. Once it's all the
way out, you're going to go on the head and re, straighten those
other five strands, and you're going
to set the single strand off to the side. You're going to repeat
this for as many strands as you want to use
in your project. Traditionally, most
embroidery artists use two to three strands. Sometimes I like
to use all six if I'm trying to fill a
space relatively quickly. The more strands, the
thicker the line, the fewer strands,
the thinner the line. Decide what's going to work best for you and your project. The other thing you want to keep in mind is you're choosing your floss is to make sure
that it is color fast, meaning that it's not going
to run on your project. This is especially important if you're working on any kind of garment or a project that might get wet or might get
exposed to water. I like to use DMC floss. I have not had an issue yet with the color
or the de running. It is supposed to be colorfast. If in doubt, if you don't
have DMC or if you want to use a different type of
floss, that's totally okay. What I'm going to recommend
is just testing it out. Take a little bit of that floss. Use a little bit of it on your project or on a piece
of fabric and just run it under a little bit
of water to see if it stains to see if the
color runs that way. You know that your
project is going to be safe before you get working. And again, this is important if you're going to be working on any type of
project that's going to be exposed to water. So with our little
hoop projects, it really shouldn't
be exposed to water unless you're using a
water soluble template. If for whatever
reason you think that this project is going to need
to be washed in the future, if you're going to wind
up incorporating it into a pillow or a coaster or
something along those lines, then just make sure that your
floss is going to not run. The color is not
going to run so that you're good to go
for your project. What I love about DMC Floss is not only are they color fast, but also they have
index numbers. Which means if I
need to color match, I will be able to do it. So if there's a
certain color that I'm looking for or certain color that I'm using for my project, I will note its index number, which is on the
little paper fold that is holding the
floss together. When you first buy
the skin of floss, make sure that you
note down your index numbers if you think
you're going to want to use a color again and maybe just note
them down anyway, just in case it
really doesn't hurt. So that you can be sure that when you go back to the store, if you need to restock
or get more floss, you're going to get
the exact same color. Because there are a ton
of colors to choose from. And it's really easy
to mix them up if they're just a shade
off of each other. Now that we've talked
all about floss, we're going to go ahead and
move into the next lesson. We're going to
start talking about how to thread a needle, the anatomy of a needle, and one of my favorite
tools, a needle threader. So if you're ready
to get started, go on ahead and meet
me in the next lesson.
9. Threading a Sewing Needle: Let's talk about sewing needles. There are a lot of different types of Sewing
Needle is out there. Some sewing needles are
made just for machines, but are also a whole range
of hand sewing needles. Let's start by talking about the anatomy of a Sewing Needle. There are a few key
parts to recognize. First, we have the
eye of the needle. The I is a hole at
one end of the needle and holds the thread or
string as we stitch. Next we have the main
shaft of the needle. One end is pointing. That end goes through
the fabric as we. So the other end is home to the eye and it's usually
a bit more blunt. However, it can still poke
you if you're not careful, it's best to hold the needle along the shaft
and when possible, you can even brace the
floss around the eye. This will help keep your
needle from coming unthreaded. One of the cool things
about embroidery needles is they have a much larger eye. They usually have a larger eye than most own needles because we use thicker string
when we're going to be doing embroidery work. Now there are pros
and cons too large in the embroidery needle because it is a larger eye than
the rest of the needle. Sometimes it can
be tougher to move these needles through
thicker, denser fabric. So if you have a very tightly
woven piece of fabric, it could be a little bit
trickier to use this needle. I still stick with the
embroidery needles. I think I must have
fingers of great force. I can usually get it through what fabric I want
to get through. But if you want to try
out a thinner needle, I say totally go for it. The key to keep in mind is that the eye of the needle needs to be large enough to accommodate whatever string or Floss
you're going to be using. So make sure that
you'll still be able to get the string or floss
through the eye of the needle. I'm going to recommend
starting out with a hand embroidery needle. You can always move
on from there. Speaking of threading a needle, Let's talk about one of my favorite tools, a needle thread. Or basically the idea
is we want to get that thread through
the eyes so that we can go ahead and move our needle and thread in one
motion through our Fabric. Because the large eye,
you might be able to thread this I with
no problem at all. But sometimes when
you're working with multiple strands
of thread, well, each of those strands can
have a mind of their own, sometimes trying to
work multiple strands through it once can be a
little bit challenging. So let's talk about
threading are needle. The first thing
you're gonna wanna do is make sure the end of your floss is nice. And even if you need to
give it a clean cut, gone ahead and give
it a clean cut, basically the needle thread
or is going to have a base and it's going to
have a metal ring, or it might look like
a diamond shape. That little metal
ring is actually going to be an I extend her. So what you're gonna wanna
do is you're going to place that little metal ring through
the eye of your needle. Now, you basically have a much bigger target for
your thread to go through. Instead of trying to place your threat or floss through
the eye of the Needle. You're actually going
to place it through the metal wire and
your needle thread. Or the next thing you're gonna wanna do is
you're going to pull the base of your
needle thread or back through the needle so that the little
metal wires coming back through the eye
and it's bringing the string or the
floss, right with it. Now sometimes this can be
tricky if you're using five or six Strand severe floss, if it feels like it's tough, you might not be able to get
the threat or back through. You either a have too small
of an eye on your needle or be just try moving the needle thread or closer
to the center of the eye. Sometimes if you're pulling the needle thread or through too close to the top or too close
to the bottom of the eye. It's a little bit narrower
and they can get stuck. So you're just
gonna kinda want to work your way down so
that you're pulling your needle thread or through the center of the eye
where you can have just a little bit more space, release the needle
thread or you should have a shorter tail
and a longer strand. And that's going to give you
a nice threaded needle. In. The last thing I'm going
to recommend is working with a knot at the
end of your strand. Now if you're looking
at your Floss strand and your needle
as it's threaded, there should be a shorter tail that's going to remain loose. You don't want to
not that piece. And then you're gonna
have a longer strand. I am going to recommend tying a little knot at
the end of the strand. If you're a beginner Stitcher, you can just try a nice simple not going to make a little loop. Put the end of the floss through the end of the loop and pull. Now you want to make
sure that not as thick enough that it's not going to come
through the fabric. So you might need to tie a
double naught or a triple not, but you're gonna
go ahead and just tie little knob at the end. Now some experienced
embroidery errors do not tie knots and
that's totally okay. They've learned ways that
they can hold our anchor, their Floss, they're going, but if you're just
getting started, going to be one less thing
that you have to think about when you start Sewing. If you're trying to figure out your new embroidery
stitch and you're worried that your floss is going to pull
through the fabric. It's a lot for your hands to do in addition to holding onto your embroidery hoop and making sure, you know,
drop your needle. So to relieve some of that pressure when you're
first getting started, go on ahead and tie a
little knot at the end of one strands that when you
pull through the fabric, the floss is going to stop. You don't have to worry
about pulling all the way through and you having to start over from the
beginning again. Now, if you're
worried about having a messy back and you're worried that all the
knots are going to show, I've got a technique
that's going to cover them all up so don't stress, we're going to cover
a little bit later in the next few lessons. So don't worry, by the
end of the project, I'm going to make sure
that the back is covered. So whatever messy stitches we make, we're not going
to worry about it. We're just going to start
stitching and we're going to use to the practice. Later on as you get
more experienced, if you want to try to
tidy things up a bit, that is totally okay. That is totally cool. So now that we've talked
about our Needle, how to threat or Needle, how to anchor our Floss. And of course my favorite tool, the needle thread
or we're gonna talk about the split stitch. The split stitch
is a great stitch. It's really versatile. It's just a good
one to start with. It's a nice simple stitch. In the next lesson,
I'm going to show you the split stitch. If you're ready to get
stitching and you're ready to get started
going ahead. And let's talk about the split
stitch in the next lesson.
10. Split Stitch: Hey, so ready to
start stitching? So we got to learn our
first embroidery stitch. So in this lesson we're going to talk about the split stitch. Traditionally it is
used as a line stitch, which means it's great for lines and curves outlining things. First, I'm gonna go ahead and show you how the stitch works. And then I'm gonna
show you how you can apply it to your project. This is what the split
stitch looks like. Let's break it
down step-by-step. Start by bringing your
needle up from the backside of the project to the
top of your project. Next, take one stitch by
bringing your needle back down a quarter inch or so away from where you
brought the needle up. You now have one
straight stitch. Now you're going to bring
your needle back up through the second half of that stitch, thus splitting it, giving
you a split stitch. You are literally
bringing you needle up through the floss
in that stitch. Now let's continue
and do it again. Bring your needle back down
one stitch length away, about a quarter
of an inch or so. Then bring your needle back
up through that stitch. And repeat it again. Take one Stitch,
split the Stitch. Take one stitch,
split the Stitch. Take one stitch,
split the stitch. Try to find a good rhythm. It might take a few stitches
to get into a flow. Now let's check
out this stitch in action to the place to
start your project. I usually start at
the end of a line. Now we're going to
start stitching. You're going to bring your
needle up and we're gonna do the same process that we just did in the practice stitching. We're going to take a stitch, then split that stitch. We're going to take stitch and then we're going
to split that stitch. When you're working
on lettering, be mindful of your
stitching route. You might need to take
travel stitches to move to a different part of
the letter you're working on. For example, with this H, I'm stitching all the
way down the first stem. Then once I'm at the
bottom of the stem, I'll end by searching
through the backside of the fabric at the
base of that stem. Then I'll come back
up the center of the H at the crossing bars
that I can continue stitching. This stitch that extends
from the base of the stem to the middle of the
bar on the back of my project is called
the travel stitch. You can use travels to just
move around your project. Personally. In this project, I use them
within the same letter, but I tied off my floss
between the letters and started fresh with
a new stitching line. More on nodding and
tying off your floss. In the next lesson,
you should also be mindful of letters
that have curves. In traditional embroidery, It's common to try
to make all of your stitches as
close as possible to the same size or
the same length. But when your stitching a curve, sometimes need to make
your stitches a little bit smaller in order to keep
the curve looking smooth. Because we're creating
a curve using little lines, aka our stitches. Smaller stitches are
going to appear smoother, whereas larger
stitches will come out looking less curvy
and more angular. If it's important to you to have even Stitches throughout
your project, you might want to
figure out what size stitches you'll need
to make smooth curves, then you can adapt the
rest of your stitches to match the size that you
use in those curves. Now you're going to continue
stitching your project. You can change floss
colors if you'd like, or you can keep all
the same color. If you want to
change floss colors, you'll have to tie
off your floss and anchoring your stitches on
the back of the project. But don't worry, We'll review
that in the next lesson. So go on ahead and
keep on stitching. One last note. If you
chose a wider font, if you stack the
stitch side-to-side, you can also use it to
fill in your spaces. So feel free if you
want to get creative, you can use this
stitch to fill in larger areas within
your project. Also. Now that we've
started stitching, now that we know
the split stitch, let's talk about what's
gonna happen if we run low on floss or if you're ready
to wrap up our project, how we're going to
anchor our project. I'll see you in the next lesson. If you're ready to
learn how to tie off your six strand floss
11. Knots and Anchoring Stitches: Welcome back. In this
lesson we're going to talk about how to
stop stitching. So whether you want to move
to a different section, you need to pause your work or if you're running
on a thread, let's talk about what
we need to do to make sure that our
Stitches don't unravel and to make sure that we secure our project properly. To do this, make sure that you
still have a few inches of your six strand floss or
your string available. You don't want to completely run out of Floss if you
can help it because you need a way to make a knot with the tail
end of that Floss. Leave enough string
that will be able to tie a knot on the
back of the project. Anytime there's something that
we don't want to be seen, it needs to be on the
back of the project. And anchor knots
are no different. We don't want those to be on
the front of the project, so we're going to make sure
that those are on the back. So we're everywhere
were there project, make sure you've a couple
inches of string and then bring your needle down to the
backside of the project. You're gonna flip the hoop over and you're going to tie a knot. You can do this in
one of two ways. You can either tie a loop with the main strand of your Floss, pull the end of
the floss through. I usually like to work that loop all the way down to the
base of the fabric. I'll secure the
little twisted part of the loop with either my
finger or my fingernail. And then I'll pull
the main strand not rests right at the
base of the Fabric. If this is proving a little
bit tricky and you can't quite get the not to lie right
on the base of the fabric. The other option is to
use your needle to pull your strand floss through and nearby stitch to
make a small loop. Then you can loop, that's gonna be your new loop. So then you're going to
loop or right through those two strands and you're going to tie a knot that way. Now makes sure that if it feels like a loose not
tie a double knot, make sure that those strands
don't come unthreatening. Now if you're all done
stitching, congratulations. If you need more floss or if
you want to change colors, just simply read
thread your needle the way that we did at the
start of the project, tie a little knot at the end
of your main strand and go on ahead and keep stitching your project pick up
right where you left off. In order to pick up
where you left off, make sure that
you're starting on the underside of your project, that your new, not on the
new strand is gonna be seen. And then go on ahead. Bring
your needle right back up to the top of the project
and keep on stitching. Also. Now that we've
started stitching, now that we know
the split stitch, and now that we
know how to anchor our project as we're working, let's cover some key
hand embroidery tips that might come in
handy as you get going. I'll see you in the next lesson.
12. Stitching Tips: In this lesson, we're going to cover a few key tips that are gonna help your
project runs smoothly. I like working with a Stitching
surface in front of me. Sometimes it's handy to have a number of your tools near you, whether it be a small pair
of scissors, a pin cushion. Sometimes you need to just set your project down
for a second so can help to have
a table near you. Now the next thing that you
want to think about is if you don't have an
embroidery hoop holder, you're going to have to
hold onto your project. You want your project to
be primarily facing you. The main visible part, you want that Stitching surface to stay upright every known then you're gonna have
to flip it over if you need to tie a knot or if something got caught or
get snagged on the backend, you need to inspect it,
see what's going on. And I know it's gonna be tempting when you're
first starting to stitch to flip it over to see what
your needle needs to go. But the truth is you're
templates on the front. So you need to be
looking at the front to see where your needle
is going to come up because we can't see on the front and the back
of the same time, there's a little trick
that you can use to know your needle is gonna be, you can gently run
your needle along the back of your hoop
and this will show you, you'll see the kind of
the indentation and we're needle is moving
at the top of the hoop. So this will help show you exactly where your
needle is going to come up without you having
to flip back and forth, which is just going to
slow down your project. As you get more practice, you're going to realize
where your needle is in relation to your fabric and
in relation to your hoop. The next thing you
want to keep in mind is your stitching tension. So this means how tight
you're pulling that thread, how tight you're
pulling your stitches. You want your stitches
to be taught, but not so tight that they're
pulling at the fabric. This is especially important to keep in mind
if you're working on a stretchy surface now
most quilting cottons, linens, Muslims aren't
going to be stretchy. But if there's ever a time
when you're working on say, a knit hat or a sweatshirt or
something that might be a little bit stretch here. Then you're gonna
want to keep in mind not to pull your stitches too tight because it will
start to work your fabric. Now as you're working,
sometimes the needle comes unthreaded because
you're gonna be pulling the needle
through the fabric. And sometimes we forget that, well, there's an end. Strand is only so long
and we can over pull the needle and strand
can become unthreaded. So to prevent this, I'm
going to recommend that you pinch your needle at the eye. This does two things for you. If you pinch your
threaded needle at the I just very gently, that's where you're gonna be
like bracing your Needle. This is going to
help remind you that your strand is only so
long and you're not likely going to overwork your hand to the point where
it's coming unthreaded. So it should help. You have to read thread
your needle fewer times. And the other thing
it'll help with is the backside of the Needle
and know it looks blunt, but it can still poke you
if you're working through a very tough fabric and you're trying to push
that needle through. Sometimes it will
poke into your hands, especially if you don't have
a symbol or a finger guard, pinching over the
eye is going to help protect the backside
of your fingers so you're not pushing that needle
and you never want to push a needle and you want to work it through gently
with your fingers. So keep that in mind as we move forward with
our stitching project. The next thing you
want to keep in mind is travel Stitching. Sometimes in your
project you want to work on one section and
then you kinda wanna skip ahead to
the next section. Maybe you're just done in
one space and now you gotta go fill in another object
and another space. So there are a
couple options here, depending on how close
together those objects are. You can either you can do all of your stitching
and then you can just move your needle over
to the next step section and start stitching
in the next section. That is called a travel stitch. Now, there are pros
and cons to these. Travel Stitches can
make the back of your project look a
little bit messy. And B, remember how we talked
about light diffusion. So when the light is shining
through your fabric, you'll be able to see some
of these travel stitches and sometimes that's a
little bit unsightly. Those shadows aren't
always FUN to see. If the objects are
close together. You're not going
to notice much of a travels digits are
going to look like you're hopping from one space right
next to a neighbor space. It's no big deal. But if you're hopping all
the way cross your project, what you're probably
going to want to do is cut your thread. Now, don't just cut it because your stitches
will start to unravel. First you're gonna wanna
anchor your project. You're going to tie
a knot when you're ready to stop working
on one space, whether that be because
you want to take a break, you want to change
thread colors. You're done working
in that space. Or maybe you're just,
you're almost out of Floss, anchor your thread, and then start again in
the next section, the next key tip I'm gonna
give you might seem obvious, I'm not sure, but just in case I'm going to bring
it up because well, we've all been there
needle storage. But basically you
don't want to lose your embroidery needle because you don't want to find
that the hard way. They are pointy
and they are sharp and you don't want to accidentally get
poked by the needle. So if you're just taking a
quick break from your project, you can just pop your Needle
probably on the side of the corner of your project
and it won't get too lost. But if I'm stopping
work for the day, I put my needle in a pin cushion
because if I don't and I don't remember that I put
the needle in the side of my piece of fabric arts
side of my working piece. And I get poked by it.
I'm gonna be really sad and you just don't
want that to happen. So in an effort not
to lose your Needle, not to get poked
by your needles, make sure that you have
a pinkish in handy. Or sometimes I'll use
just a small piece of linen canvas or something
along those lines, just somewhere where, you know, your needle is not
gonna get lost. It's gonna be easy to find in that it's less
likely to poke him. Okay, so now that we've covered
some key stitching Tips, once you're all done
stitching, it's time to clean up the edges
of our projects. So if you're ready
to learn how to make our project look neat and tidy, meet me in the next lesson.
13. Finished Edges: We're finishing up our design. This is the exciting part. So now that everything's
been all stitch, we need to clean up the
edges of our projects so it looks a little
bit more finished and refined if you want to cover the back of your
project in order to hide any messy stitching or
travel stitches are knots. Now is the time. This
is what you want to do. You're just going to
unscrew your hoop. You're going to
remake your sandwich this time with the smallest, the smallest string
on the table. Put down your piece of fabric. There's going to be covering
the pack of your hoop. You're going to put down your main stitched
piece of fabric. And then your larger hoop
over the top of all of them. Make sure they're
nice and centered. Re, tighten the hoop now with both pieces of fabric
sandwiched right in there. And now the backside of your project should
be covered so that it looks nice and neat. Now as an added bonus with
this piece of fabric, you can sign it,
you can date it. You can add a little memory. I like to sign the back of
the extra piece of fabric. It's a nice little Momento,
a nice keeps sake. So once you have
your hoop reloaded, you can go ahead and
you can trim around the edge of your hoop. Now you don't want to trim too close to
your embroidery hoop, leave a good
three-quarters of an inch to a half an inch all
the way around the hoop. You can use pinging
shares if you don't want your fabric to fray. That is a good option. Or if you just have
regular shares available, that'll be okay to. Next, we're gonna do what's
called a running stitch. Basically you're
going to get a piece of floss or thread or string. You need to make sure that
it's long enough that it can go around the whole
circumference of your hoop. This is gonna be
really important. Make sure you have a
string that's long enough. You might want to match the color your base
fabric materials. So that's not as easy to see. You're going to tie a
little, not at one end. You can leave a little
tail if you'd like, because we're gonna
be pulling that tail. Once we've stitched
all the way around. The not can be
hidden underneath. It's announces a little bit
easier to access a few, the not is actually
on the top side. This is one of the few
instances when you might want the on the top side depends on if you wanted to show or
not. It's up to you. The ins and outs
of running stitch our you're going to have a stitch and then you're
going to have a gap. And then you're going to stitch and you're
gonna have a gap. In most traditional
running stitches. You want those
stitches in those gaps to be the same size. This is the back
of your projects, so not super stressed if, if the sizes are imperfect
or if they're different. In this case, you want those
to just to be fairly large. You don't want them to
be teeny, teeny tiny. So make sure that they are
big enough that they're gonna be fairly easy to pull. Where most stitches
we want them secure, we want them smaller. We don't want to be able to pull any tension on them,
these stitches. Just for the back
of this project, we want to be able to pull them. We want the tension to
be a little bit loose. So go ahead and make really big running
stitches all the way around your project
until you get back to where you started. Once you get back to
where you're started, you're going to pull
the tail that you started with and
what's left to have the strand that
you have until all of the fabric is tucked to
the back of your project. It's like magic. This is
like my favorite part. I love this part.
Then you're going to tie those two
strands together to secure it so the tail
that you started with and the end tail. So make sure it is secured with a knots so it doesn't
come undone and so that fabric stays pulled
to the back of the project. Now that we've
tidied up our Hoop, join me for another lesson. I want to show you how to just take this Hoop in the next level so you can use it as Walmart. You can use it as a
decoration or an ornament. We're going to add a string
and a bow to this project. So if you're ready to
see how that works, I'll show you in
the next lesson.
14. Prep For Display: You're almost done. So if you want to hang
your embroidery hoop, use it as well, Art,
use it as a decoration. This lesson is going to help give your project
it's a little bit of extra pizzazz so that
it is Display ready. And so that is just a
little bit more FUN to hanging around your home
or to use as a decoration. So if you want to hang up your
embroidery project and add a little extra glam,
let's get started. The first thing you're gonna
do is cut a piece of string, makes sure that your string is going to be at least
double the length that you want to hanging out plus
room to tie off a quick not so that you can tie
those strings together. So basically whatever
length you choose, you're going to pull it through underneath the screw on
the embroidery hoop. You're going to tie a
quick note at the top. Then what I like to do is I like to twist around
that strings that I like to tuck that
not just right in the little area
underneath the screw. Now this will give you a way to hang your project if you have tax or a hook or somewhere that you can hang your project. The next thing you might
wanna do is add a bow. If you're not sure
how to make a bow, you can also visit my
other Skillshare class all about how to
make a handmade bow. This is something I loved to
add to my embroidery hoops, I think gives it just a
little bit of extra dazzle, which to me as FUN, it makes it a little
bit more formal when it's hanging on your walls. If you are familiar
with how to make a bow, instead of using a floral wire, I like to use either
a Shamil stem or I like to use a twist tie
on the back of the both. And I'm going to use for
my embroidery projects. So you're going to
make a small bow, nothing to chew huge because we don't want to overwhelm
your project. You are going to
use that she Neil stem or that twist
tie and do your wrap and go ahead and
secure the twist tie right around the screw hook
on the embroidery hoop. So that's going to
not only keep the, not in place underneath
that little area, but it's also going to hide the unsightly screw that is at the top of the
embroidery hoop. So now we have a little bow and a little place
to hang our project, and a little loop to
hang our project. And it's ready for Display. So if your projects all set, if you have your
little loop and you have your little, little bow, or if it is made up just
the way that you want it. Go on ahead, meet me
for one last lesson. We're going to talk about
some care instructions. And so Final Thoughts, You are almost there. I am so excited for you and I cannot wait to see
what you create. Meet me in the next lesson just for some final care notes.
15. Care & Final Thoughts: You did it. You got to the end
of your project. If you've decided to keep
your project as Hoop Art or as a gift that's going to remain in
the embroidery hoop. All you'll ever really need is hopefully a little
bit of spot cleaning. If you've embroidered a
project that's gonna be on clothing or a bag or something
that's gonna get more use. I'm going to recommend hand wash and lay your project flat to dry because you want to protect all of your
delicate stitching. In general, your embroidery
may be able to hold up to refer Washington circumstances,
but why risk it? I highly recommend
protecting your work. It probably took a
little while to work on your project and you don't want all of that
Stitching to go to waste. You want to protect your work. So handwashing and air
drying is the way to go. But if you've kept your
project in the hoop, likely all you're going
to need a little bit of dusting once in awhile, maybe a little bit
of spot cleaning, but hopefully just a
little bit of dusting. The other thing to keep in mind, just to be mindful
of where you're displaying your project because of its exposed to
a lot of light, it could fade over time, but most importantly,
just enjoy your work. Hopefully you place it somewhere that it'll give you a smile. It'll bring up a
good memory for you. If you left this class, please. I would love for you
to leave a review. It'll help other students find classes that they will love and it'll help me make
even better class is for you in the future. Thanks so much for following
along and don't forget to upload a picture of your
project in the project gallery. I can't wait to see
what you create.
 Lauren Weber, Artist + Quilter + Gardener