Transcripts
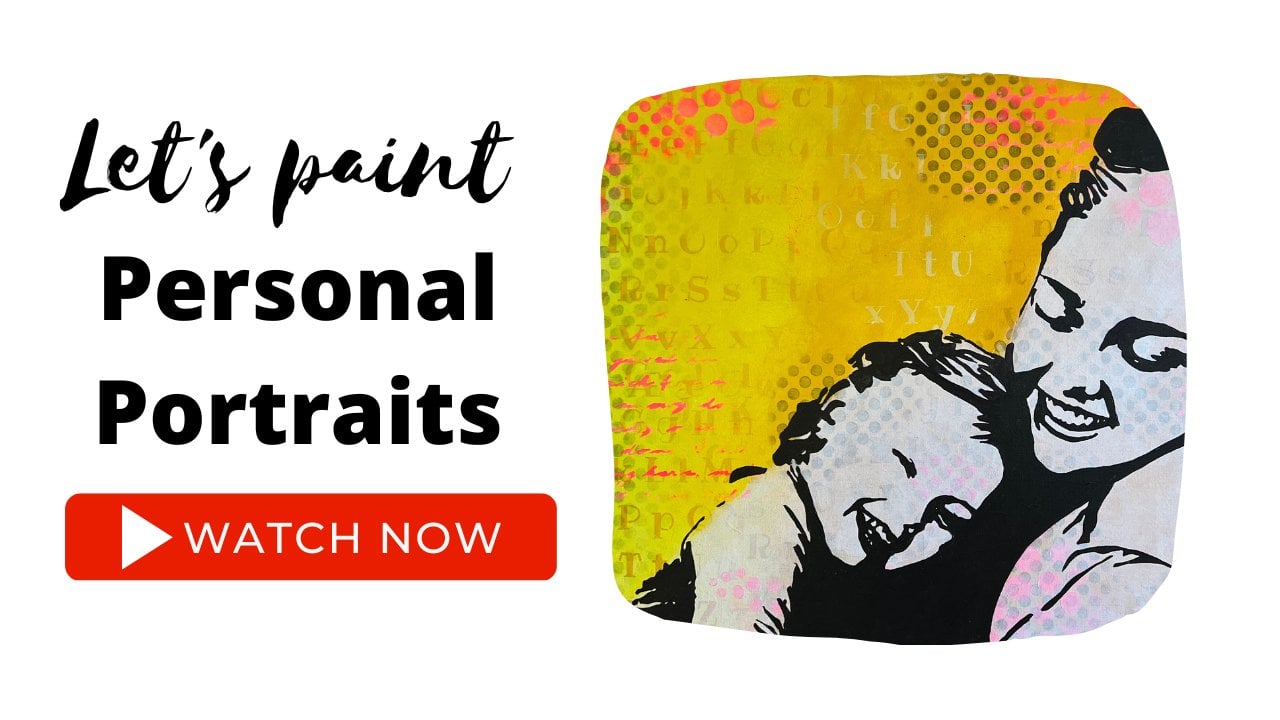
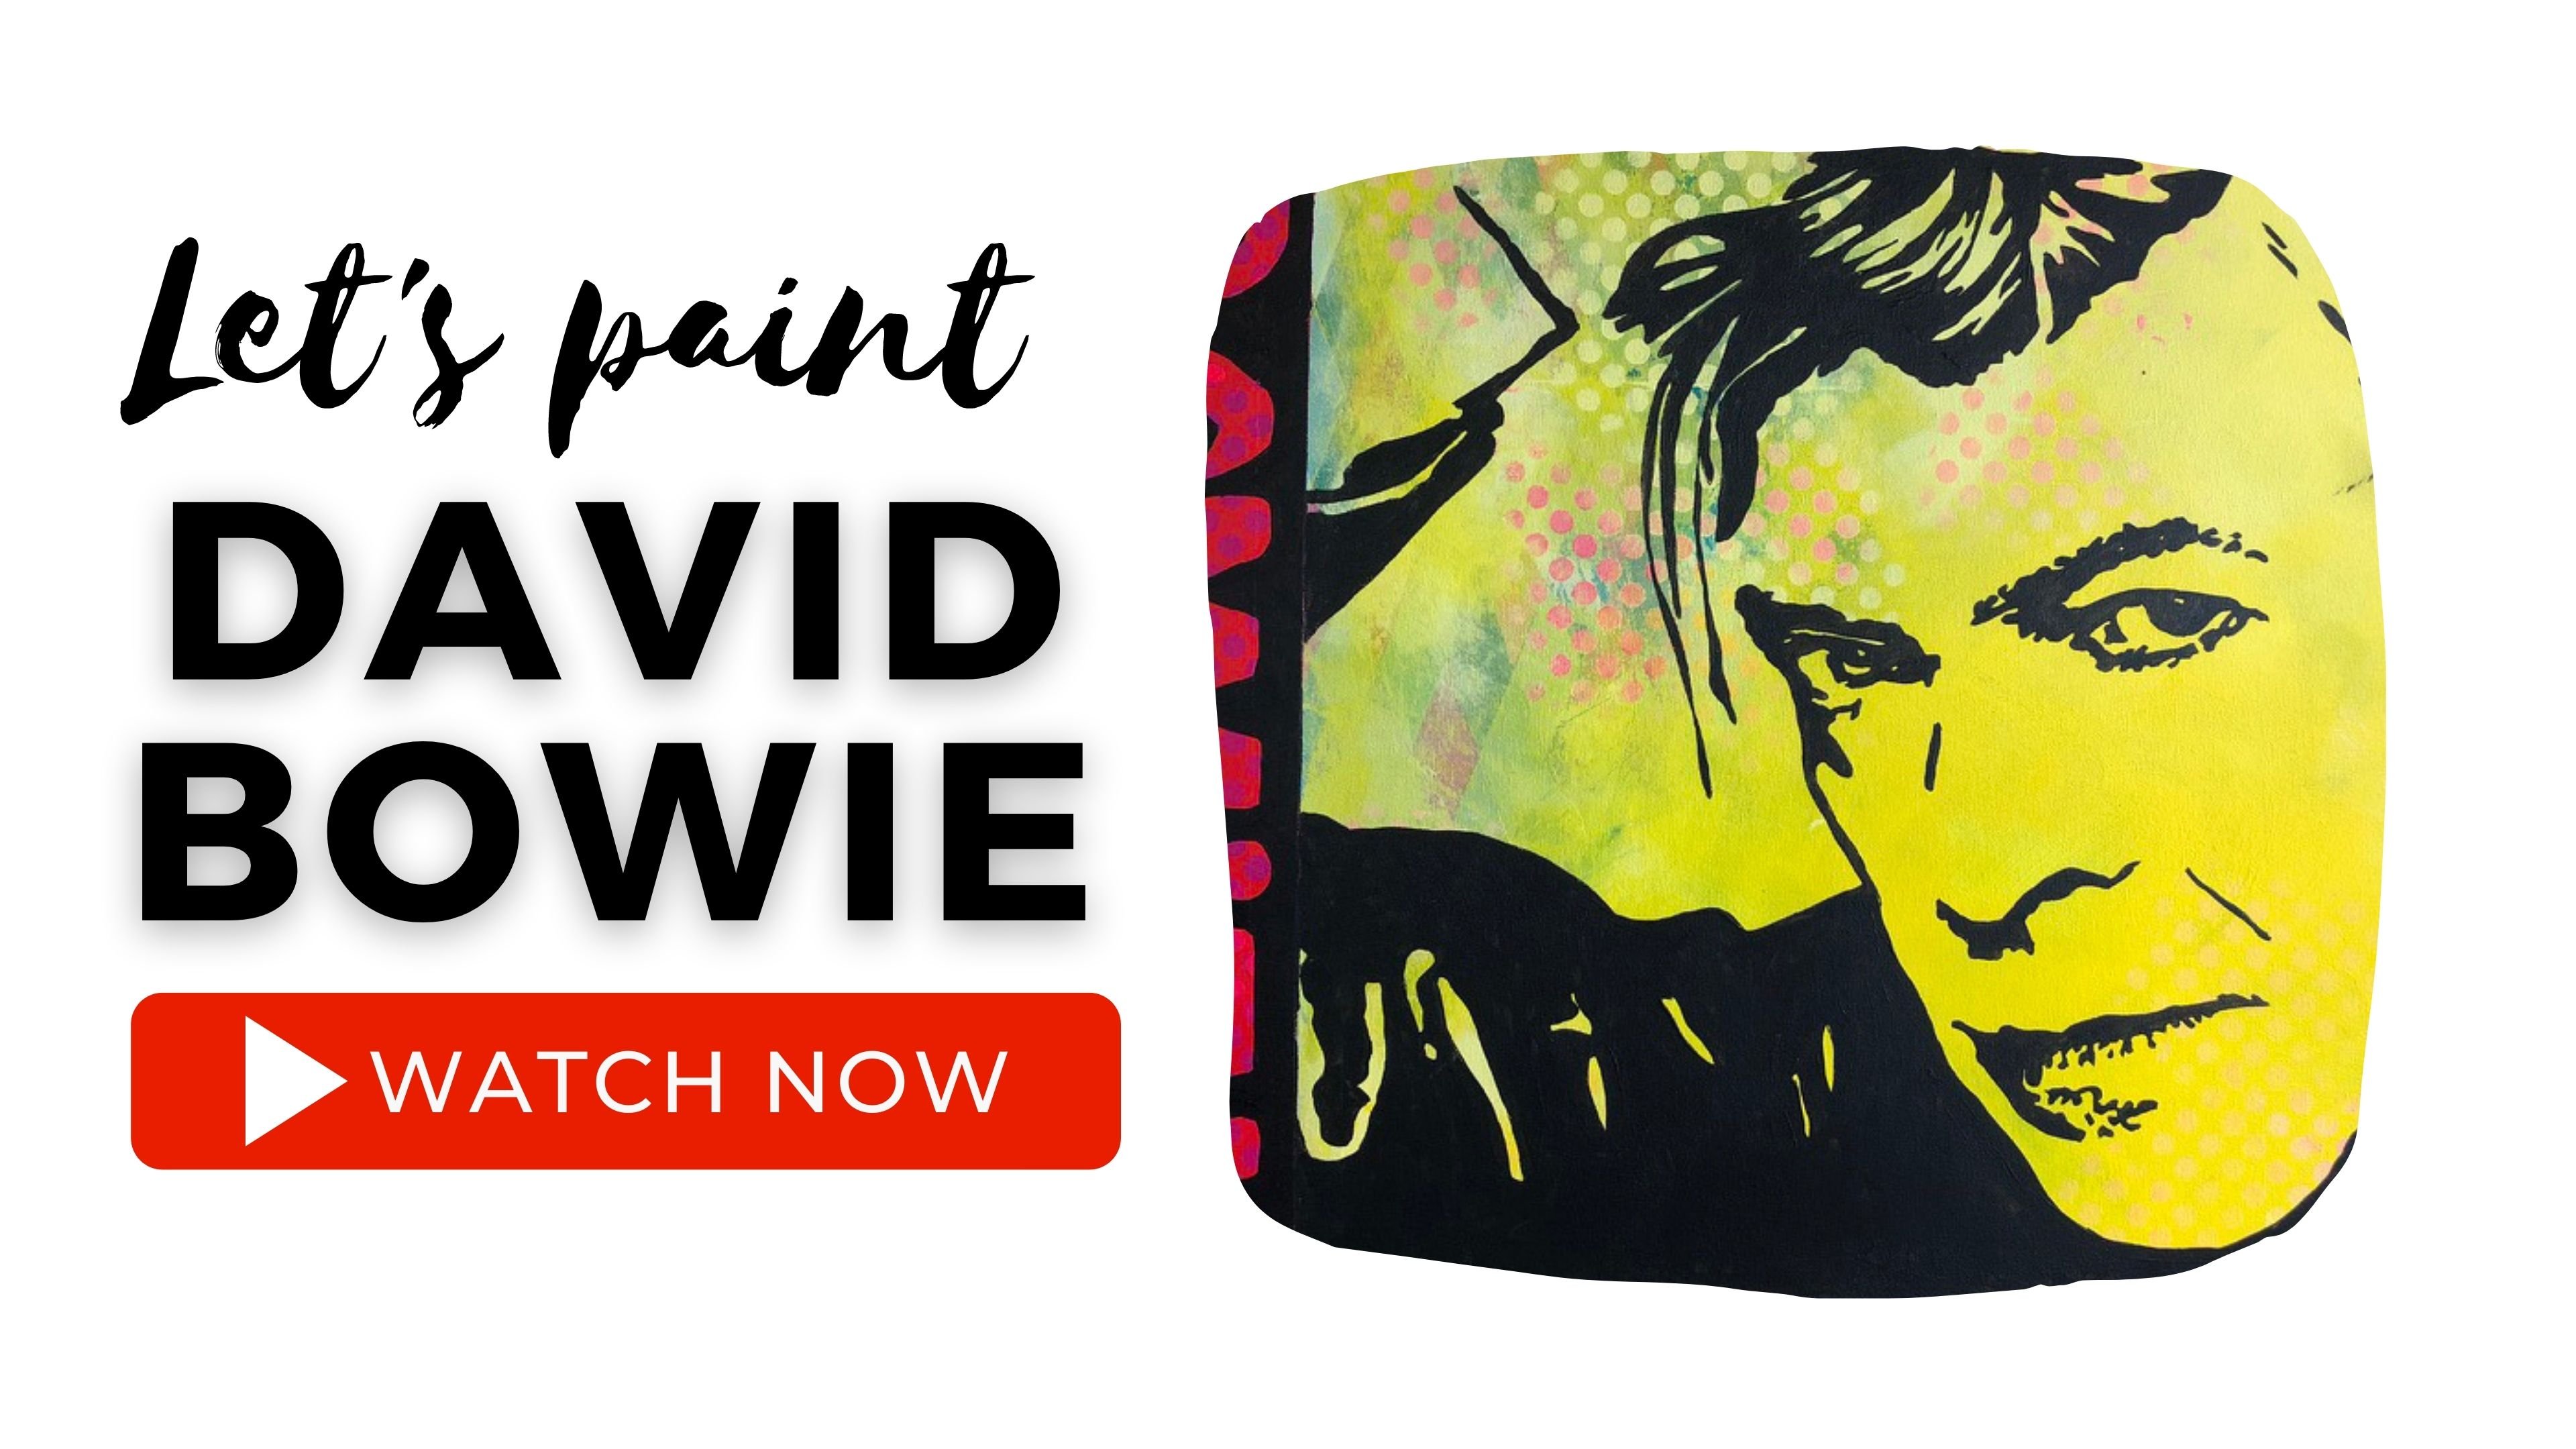
1. A short introduction to building an amazing background: Hi there and welcome. In this course, I'll teach you how to create a super nice painted background. As you can see here, it is Harlequin pattern in the background you're learning to make. Later. There will be more paint colors, more effects, and emotive, and it can be any motive of your choice. When I paint and paint based on the fact that it looks like something made in Photoshop, layer upon layer upon layer that the viewer can explore. It gives an incredible beautiful depth in a painting. And if something everyone can participate in and find out this is, as I said, the Photoshopping effect we're striving for. And therefore, it is important that you understand the structure of the painting, how we build it from the back layer to the front. My name is minimized e-book, a Danish artists who since 2009 has taught over a 1000 happy students in my own developed techniques. I work in many layers and create both simple paintings and very rustic paintings like this one. I would like to teach you how to create personal paintings with personal motives, but you have to start somewhere. And therefore, this little cost is only about building the harlequin pattern. You can see in the background of these paintings, whether you paint a holocrine person or choose another pattern is entirely up to you. I'll just show you the endless possibilities and how to do it. Think out of the box, you can use any peasants Denzel masking tape for stripes or maybe draw text with your projector and let it be your background. In this course. Ruler, a canvas, a Posca tush, a kitchen sponge, and black and white paint. That's it. I want to give you the know-how and ideas on how to develop your own beautiful backgrounds. Later on in the follow-up to this course, you can work on and make the most beautiful personal paintings like these. Whether you want to paint your biggest idol, your child, or perhaps you're working picture. We always have to start by creating an exciting background. So check it out here for more ideas and paint along if you have the opportunity, I look forward to teaching you how to build a super nice painting. Your friends and family will enter. You see you in there.
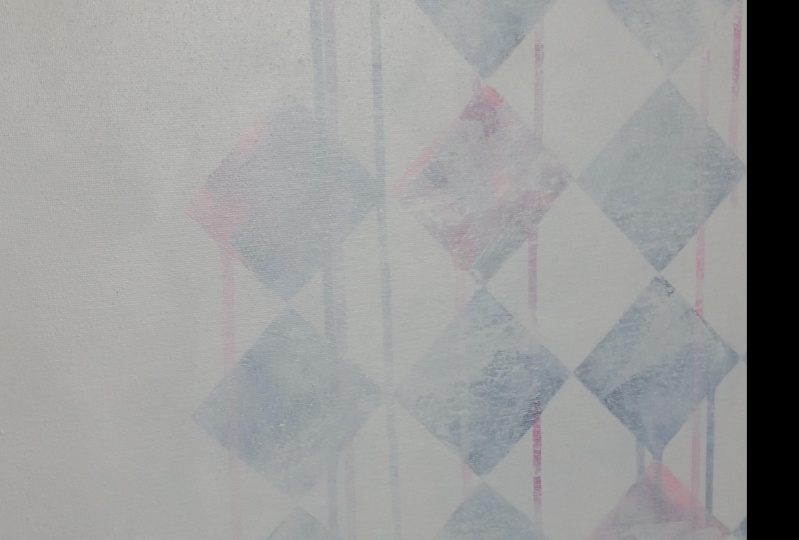
2. Getting started with the background: Okay, now let's get started on this background. The effect we have to work with is a kind of a Photoshop effect when we work in layers upon layers. So the part we are doing now comes all the way in and lies in the background. As you can see on this painting, I will show you two examples with Holly can squares in the background and two different ways to make them. One is with distances and the other one is with a ruler. The resources just grade, but stencil can be expensive and therefore, I will also show you how to make it manually with a long stick or a ruler. Of course, with stencils, it goes really fast. Remember, it does not have to be squares. It can be all kinds of patterns. You can use. One thing I just wanted to ask you when painting background this way is that you should work it over the edge. Many people tend to do a little bit here and a little bit there. And then it often just hangs there and dangles in the air. I like that you make the same effect on an entire side of the canvas or on the side on the top. So you have a larger area with the same effect. And when working with a pattern, keep the same direction. Do not turn and twist it as it is hugely confusing to your viewer. It creates com to get it out and stick to the edge while making a larger area of the same effect. Remember that you are telling a story and it's your motif that's in-focus. If the I have to deal with, with too many small interrupted effects all over the place, then it quickly steals focus. And we're not interested in that. We're only interested in making something fun in the background, which elevates the overall experience of the painting with this effect, I could show you a bunch of different techniques here and now on this canvas, but then it becomes a big mess. And I'm not interested in teaching you that. You can also use Barbri rep to make dots. Then you take a sponge, apply a little paint, turn it over and press gently. It also creates a very good effect. But again, remember not to turn and twist your bubble of plastic as it has a direction in the pattern which is then interrupted. And again, that would look very messy. Just keep the same direction. When I make backgrounds or use a kitchen sponge, they achieve and you can throw them away afterwards. You can also use a foam roller, but I think there's too much paint compared to this brunch. You can also spray paint, just make sure that it's not alkyd paint because then it smelled for several months after. Find water-based paint without Solomon's. When I make backgrounds and never usually inexpensive paint, but a good study quality. There must be some pigment in, as we only bother to paint once. But saved the expensive paint for the front of the painting as we are only creating an effect in the background right now. Now just put paint on your sponge and some of it off on a piece of cardboard so it does not get under you. Although this is the background we're working in. We want sharp edges. I do not press this bunch nice and easy, just working in small circles and getting that do the work. Now just carry on all through the stencil. The good thing with Denzel sees that it goes super fast. Here. I just move my stencil to fit the pattern, and then I just continue until I have the whole side put the pattern. Afterwards. We'll have to go in and make the cubes are missing in the middle. I'll show you that in the next video.
3. Painting the other half so that a Harlekin pattern appears: If you're a little impatient like me, you can use a hairdryer so that the cubes are completely dry before you put your center line again. Now you need to find the tip of the other cubes so that just tensile is placed correctly. Remember, I will teach you to do this manually and without a stencil afterwards. Once you position just answered correctly, paint the rest of the cubes. Mass density is a bit transparent so I can see through it when I need to place it, or it was when I made it. But now it's full of paint as I do not get cleaned after US, then I have to wash it and wait for it to completely dry every time. And I'm way too impatient for that. I have a cutting machine and I also make my own stencils. If you want to append a lot, it can definitely pay off to have one. Ukip do not have to be perfect as it is something that is in the background. So now just paint the rest of the QPS. Okay.
4. Creating Harlekin pattern the manual way, without a stencil.: Now I want to teach you how to make these cubes in a really cool way. This way you can decide for yourself how sharp your cube should be. So you get some freedom here that you don't have with this denser. I have quite a few students who come up with making one kind of cubes in one side and another in the other side. I would recommend you not to do that as it makes your painting look very messy. Provide some continuity as it creates calm in your painting. In order not to make several different cubes, I have found a ruler that has the same size as the cubes that my stencil head. Now you get the idea of how to do it and then you can do it as you want. You can use anything with a straight line to do this. I choose to start my lines up with the same angle as before to maintain the same pattern. Use a marker with acrylic paint so you can paint it over and without it breaking through. If you use ink with alcohol, it will break through again and again. Even if you paint seven or eight or 10 layers of paint on top of it, now draw lines all the way through. Bite off your lines so you get an inaccurate edge at the end of your lines. Do not be afraid of errors in these lines as we will cover it later. When you're done, you need to find the angle you want on your cubed. Imagine that the other cubes were not there. You can now turn the ruler little bit and you will get a sharper cube. If you turn it the other way. It will be less point and there's highly can like, but more square. Play with it and find the anchor you like the best. I like to break by lines, but we get white paint on afterwards so you can break them more there if you want to. Do not think much about it at this time, I want my cubes all the way to the edge so they don't look like they're just hanging there and dangling in the air. I always put a cross where to paint before I start. As I have otherwise seen, several students paint from one side, then a little from the other side, and, oops. So when they meet in the middle, it was wrong. This is not too smart with the small crosses, you can completely relax when you are painting, and it is very meditative to paint. When you paint a cubes, it's a good idea to use a brush with a flat side rather than one that has a rounded tip. The flat side does half the work for you. Do not put too much paint on your brush as it dries quite quickly and thus start to clump. Only apply paint on 1 third of the brush and then wash it when you can feel it starting to dry out. It also makes your brush more flexible. The brush I use here is called obliquely, Which is really good when you're painting pointed cubed. If you paint is a little too thick, you can add a little water. Not too much though, as we do not want to lose our coverage. If you paint outside the lines, then do not despair because the whole thing would be more or less covered with white paint afterwards. If you paint on a well primed canvas, it will feel softer to paint on. If it's achieved Canvas, then it can feel like painting on sandpaper. I always use a good Canvas with cotton and polyester. But the canvas I paint on here is one of those cheap canvases that feels very rough and absorbent and it's not very nice to paint on. Alternatively, you can give your canvas is ghetto before you start painting on them, then it won't absorb as much paint and it will feel softer to paint on.
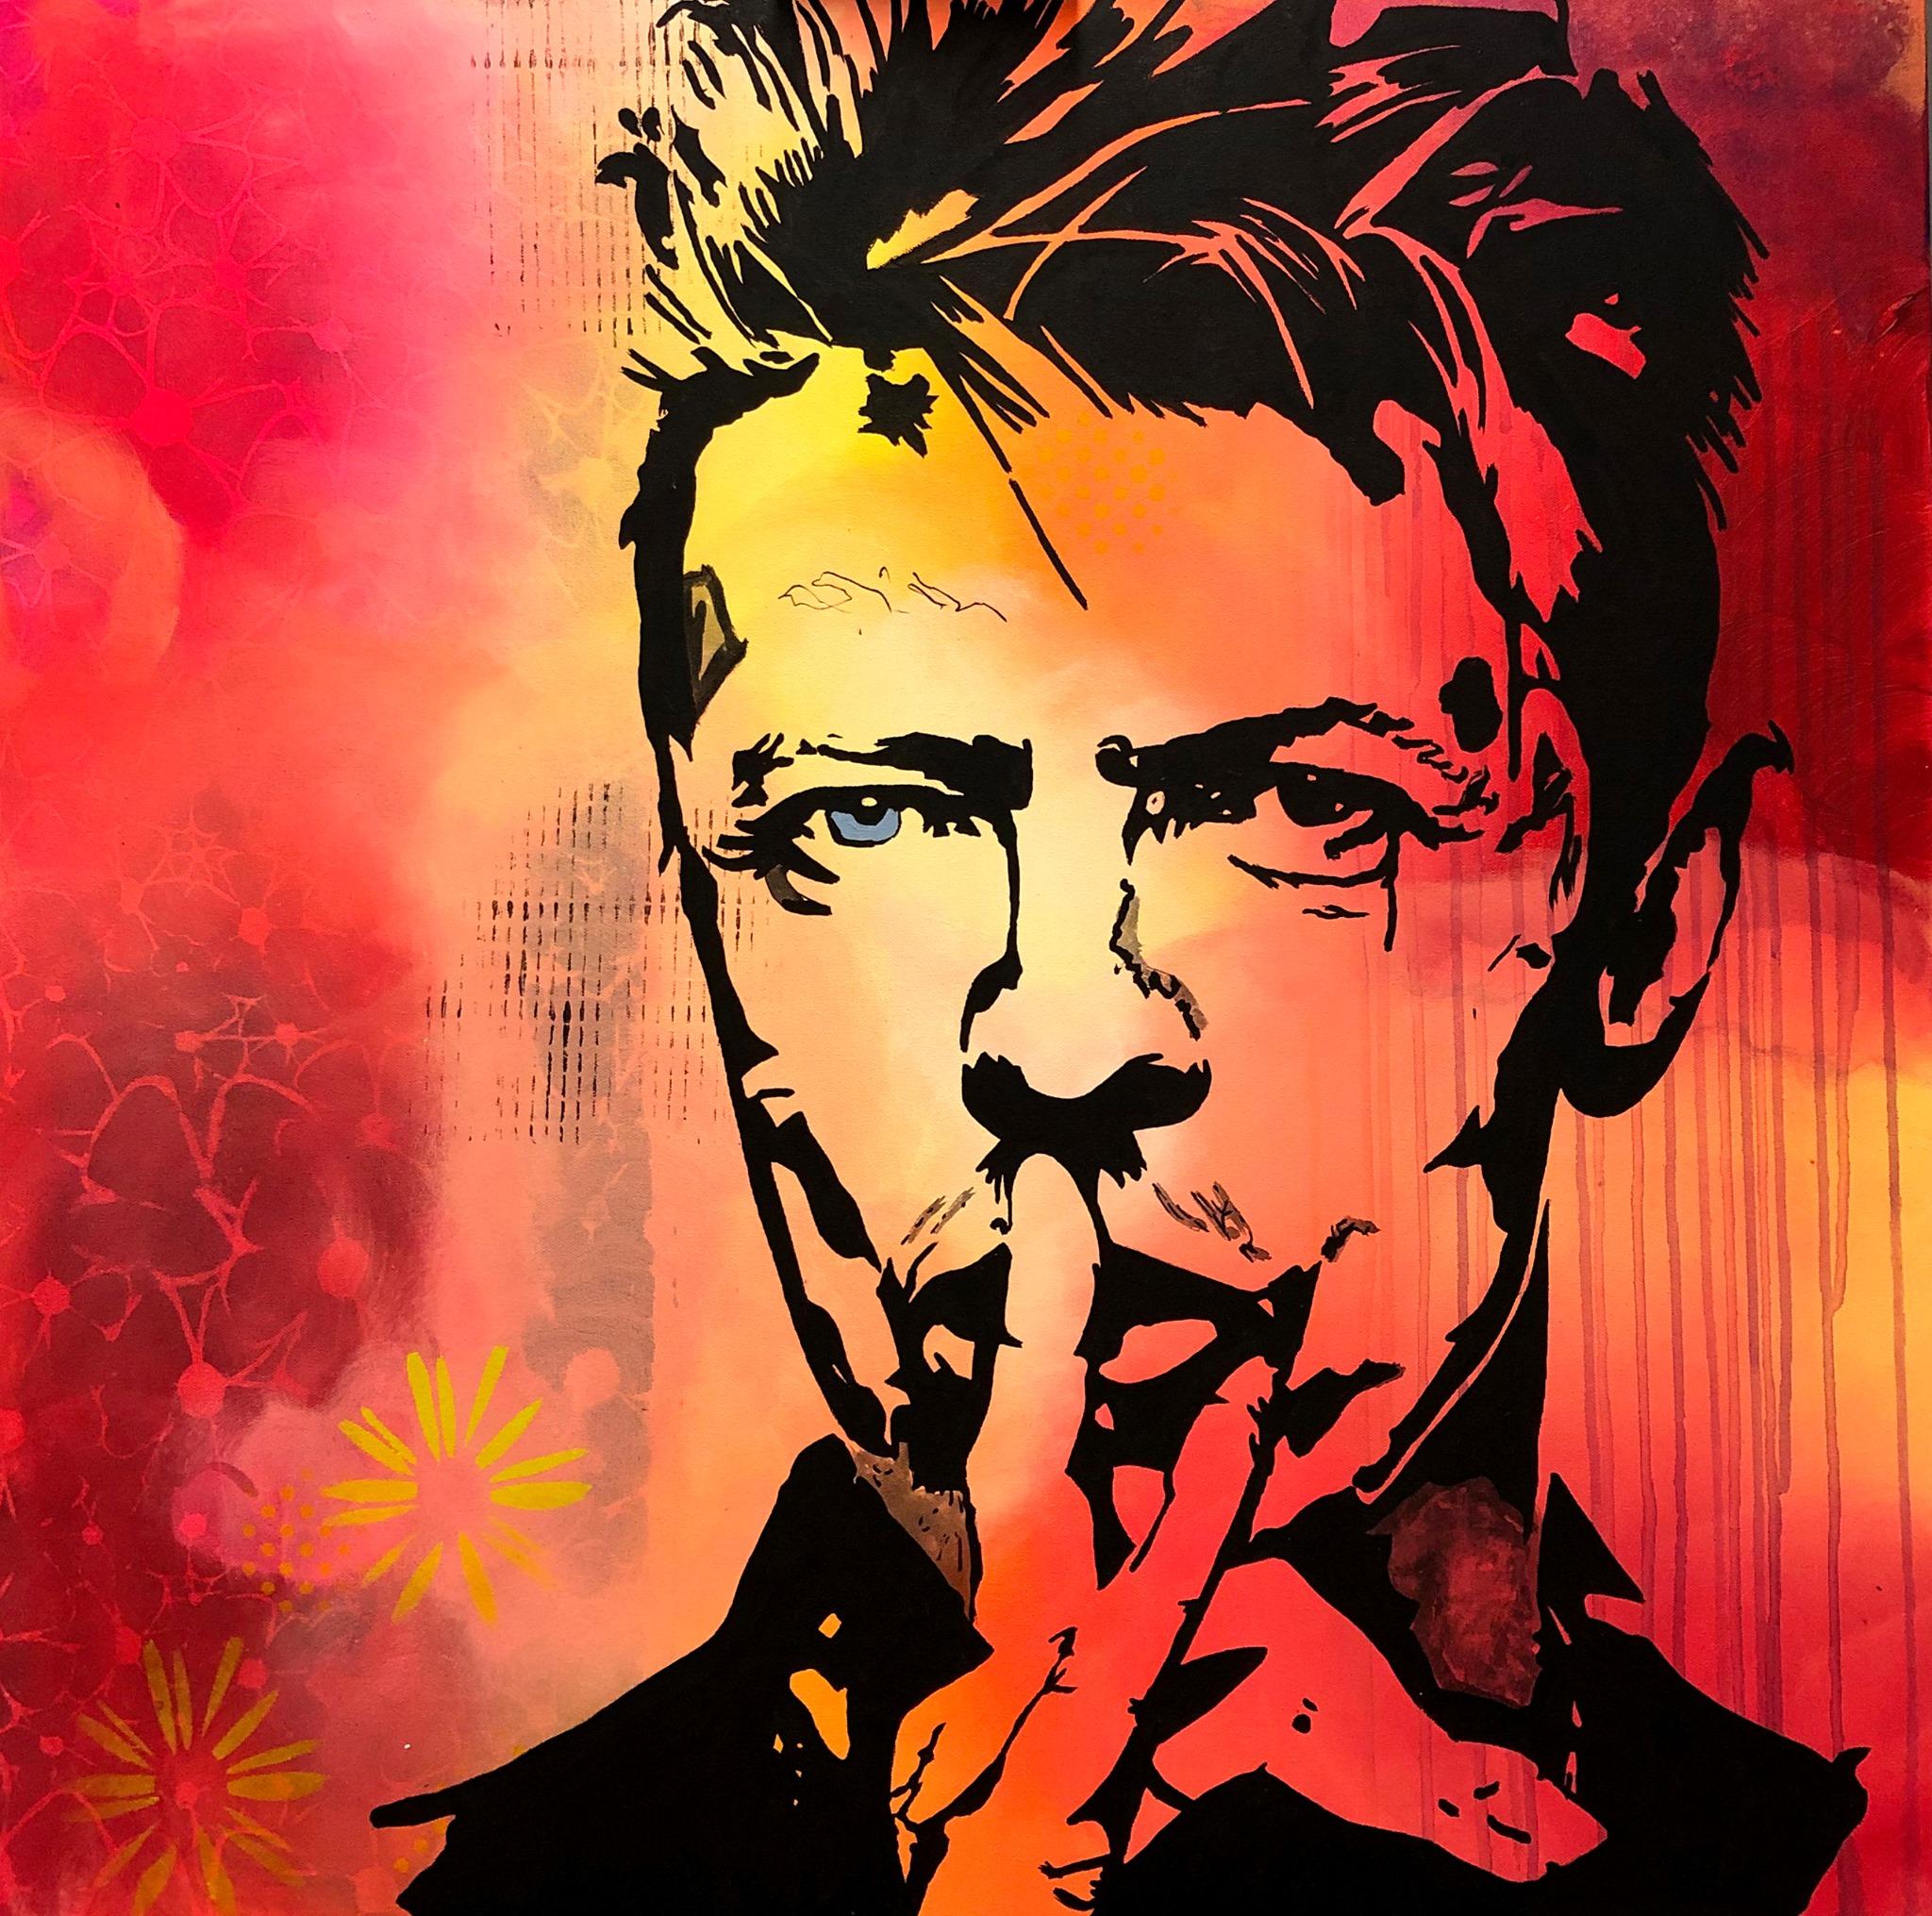
5. Getting your pattern into the bcakground, for that "photoshopped" effect.: Okay, Now we've gotten this far. I hope you're still hanging in the, now we have to have our dice or whatever other pattern you may have chosen into the background. We need to cover all the ugly lines. So it looks like our dice face from the background. It will create a super cool effect almost as if they were coming out of the frog. We do this by applying wet paint in thin layers. It must be titanium white so that it has opacity in it. Think white is for mixing and does not contain much pigment. We should not have our background pattern to dominate as much as it does right now, as it just has to become something one census behind everything else we're going to paint on later. So now you have to destroy what you just made. As I usually say, kill your darlings. I know it's tough. Let's get started. Find your white paint in the kitchen sponge. Be aware that depending you use to make the lines might be water-based. I used a Posca pen and that's water-based, and therefore it will dissolve if you work too long with the white width paint. Therefore, the first layer that will have a fixing effect must be a thin and first layer. There's also another reason why we only work in thin layers. It is that the white paint has opacity. Just as many tinted colors also have opacity. And they attempted with titanium white. So if you have to work with colors in your background afterwards, which I will show you in the next course about building the background. Then you need to be aware that each color will get two dice further and further into the background. Now we need to make the second layer, uh, take care not to cover too much here as I would like to be able to see my dies at the age afterwards. As you can see from the student paintings, it is this effect we are creating in the background. And remember, it does not have to be dice. It can also be anything else. As you can see here, circles have been used. And in this painting made by another of my students, numbers have been used. You can learn to make them in my stencil course about making your own stencils. In this painting, some squares have been used, and here are straight squares have been painted up with the ruler. The possibilities are many. Here you can see one of my own paintings where I have used an old tablecloth, which I have spray painted through in the background.
6. Making it even more rustic...: Before we get started with the second layer, I just want to show you a little extra effect you can make with a putty knife. Make sure your putty knife has a C-shaped. It should be the underside that does the work for you. Put some paint on the spatula and run a careful over your canvas. Now you can scratch in it and make it fit. Do not scrape with the putty knife in the paint to remove some of it again, at this will not look very nice. It will just make a thin layer. Later, we will cover even more with the white paint and the kitchen sponge. So just play with it for now. If you do not want the variable glue, then just apply thin layers with the sponge, as I will show you afterwards. You can come off less the architect transitions between your dice and your background this way, as the layers of paint gets thicker, when I've worked to create the worst dig look, I like the undisturbed and disorganized. This is what makes it looks really want afterwards. The more control you can be, the better results you will achieve. Be careful not to systemized. It's important that it is allowed to dry now before we continue, okay, let's get started with this second coat of paint. I start with a thicker layer from the middle, you can either lay several thin layers or double slightly thicker layer to cover the transition from the dice and the white background. The layer should get thinner and thinner as you work out to watch the edge. So it looks like it's coming out of the frog. Spend plenty of time making it nice. And if you get too much paint on, you can take a damp cloth and wipe a little bit off. As you can see, I also made with dabbing and driving in Circus. It should definitely have one more layer when it's dry, I wanted completely covered in the middle. It should look like the dice are coming out of the fog.
7. Where to go from here....: Okay, Now we're done with the background, and now it looks like this. It's now ready to get colors on and be worked on further. If you want to learn more about how you can continue working on this beautiful and colorful background that ends up having this beautiful engine motor neuron. Then take a look at the next course in the series, where I will teach you how to make the most beautiful transition between your colors, create contrast field effects, as well as exciting effects with water. I also teach you how to create art with your IT protector Oreo, old-fashioned overhead. You can make a lot of different paintings and make your very own unique expression with your own personal chosen motif. I hope you enjoyed this course and I look forward to seeing your projects and exciting backgrounds. See you in the next course.
 MilleMajArt, Danish artist teaching modern art :-)