Transcripts
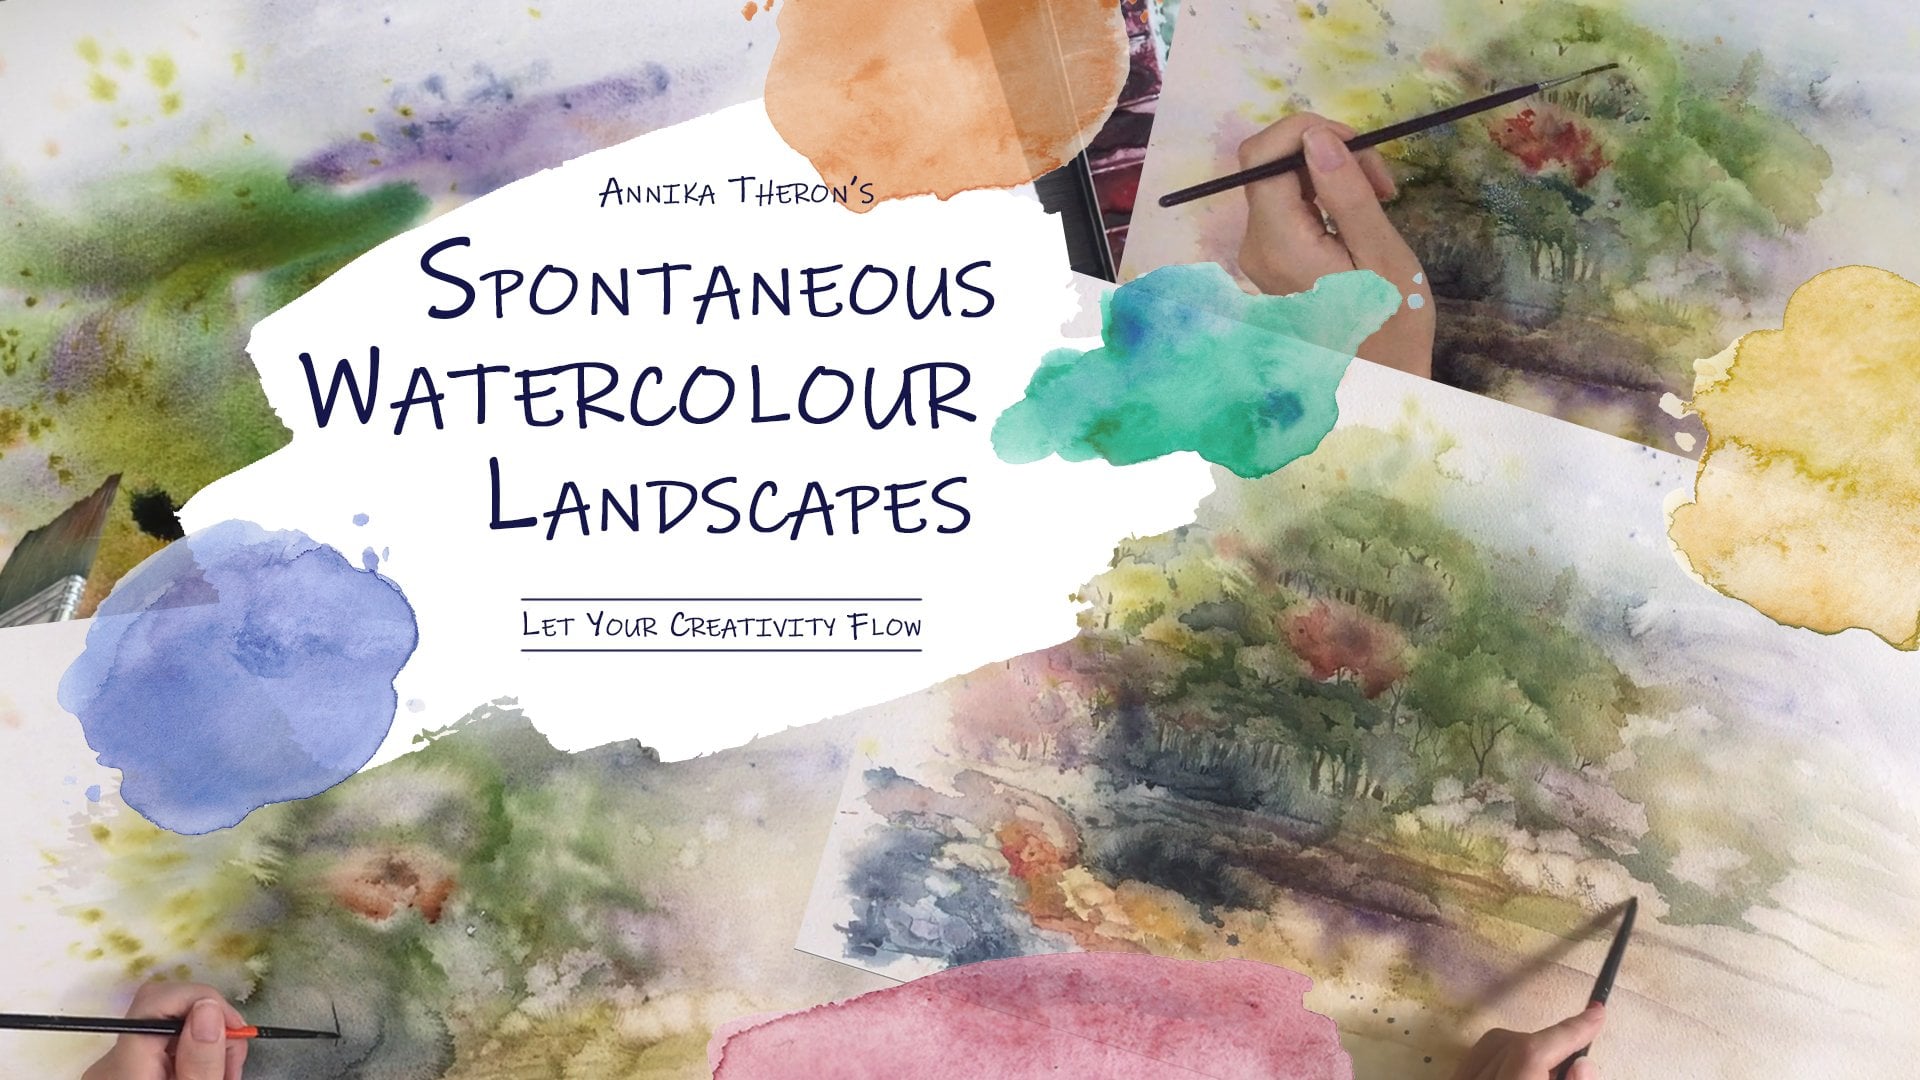
1. Introduction: Hello and welcome to this class on spontaneous watercolor landscapes, creating a winter landscape. My name is Anika, and to teach you how to make a snowy winter landscape by starting off with only a few splashes of bytes. This clause is beginner friendly, and all you really need is some watercolor paint, a few brushes, some watercolor paper, and lots of water. This gloss is a follow-up on the class. Spontaneous watercolor landscapes lead to creativity flow. So go ahead and check it out to learn more about the tools and materials you'll be needing, the basic techniques you'll be using. And for some extra information on watercolor paper. If you're unsure, please follow the links provided. As for the structure office gloss, apart from the next lesson, all the lessons were recorded and narratives in real-time. I thought this might give a better understanding of my thought process and give you a better idea of how long it takes to finish a painting. Sometimes when we watch in there, I did time-lapse. It's hard to get a clear idea of how long it really takes to complete a painting. Additionally, I've added a bonus track at the end, which is just a time lapse of the whole process. You can watch it before you start so you can get a better idea of where you're heading. Or you can leave it to the aim and jump right in and follow along as I create my binding. If you need some more guidance, I've created a handout that you can download showing all the steps to follow SAD your paint water bypass and bipedally already because we're starting right now.
2. Splashing Colours: Start off by weighting the bypass using a spray bottle in the previous clause for bad thing died by blue with a sponge. Now we're trying something different. Taking a big flood brush loaded with a dark blue for your winter landscape. My grandma marks and a few splatters. Now splatter clear water onto the paper. Using a mix of pinks and purples. Add more, bind and move them around to let the paint flow. Spray more water to let the paint flow. With a brush. You are going to help distribute the paint in some areas. He's a paper towel to prevent the bank from running off the paper. Try different things like sputtering the paint with a brush, paper, every non-thing to let the paint flow in one direction. Yeah, I'm tilting mind downwards because I'm trying to get some cool effects at the bottom. Adding more concentrated to enhance safety. That's the bank created at the bottom. Well, here I'm just smoothing some of the lines at the top so they fade away into the background. You can try adding salt. Again, gi fine or coarse salt for different effects depending on how wet your paper is and how much paint you used. Here we'll see different results. He's a brush. You can try to lift out some areas. When you're happy, pretty dry completely. And meet me in the next lesson, where we will start defining some shapes.
3. Creating Bushes: Everything has dried. I absolutely love these affects like linkage here. I can see I did that with the bank brush and I just likely they began to some salts. Can see some nice effects likely there and do that much. I think it's because I didn't use that much paint or water. Okay, Now we can start looking for shapes. I think I'm going to have a completely different scale than I did with the ones from the previous class. So I'm going to try to see if I can make bigger trees, maybe one here and there, as opposed to a forest in the background. And I want to see if I can do some things with these nice areas. And maybe year because it's much lighter year. And here, if I darken this area and push it back, I can maybe have different layers of depth. And here I can maybe have a tree line like I lift it out, having that in mind. So I can maybe make grasses and more trees more distantly. But basically, I wanted to have a main focal point here and then let it kind of disappear. Let's try that. Okay, So first before I'm going to paint in any trees, I want to define more of these bushes here so I can just see what I can work with. So I'm going to go sorry. I'm gonna go in with my rigger brush. And what I'm going to do is paint directly onto the dry paper and then take a wet brush and gently blend it in. They may show you because these areas already purplish. I'm going to take my palettes and mix some purple color. And maybe they, but now you see that is very, a very distinct line. We don't want that sand. It's going to take a normal round brush like this with aids starting from far away. That's just water. You won't see it. Go towards it. And you'll get that. He blames him completely. And I'm gonna do the same. Maybe, yeah, maybe mix a bit of blue in with my purple just to change it up or bed or even some pink would have worked there. I'm just looking at the background colors and see what will fit in nicely. You can also read the area beforehand, like say what I'm gonna do you see now with this area? And I'm taking a more purplish pink. I'm just working with the gunners that's already on my palette. I'm going to drop that in there and legged runs really nicely there and you can also spray, but I don't want to spray too much now because then everything is going to be to wait for now. I just want to work more precisely like this. Goes. I want a tree line there. I'm going to take my clean water. And with this area and try not to make a straight line but kind of going like up and down as if they were grasses or bushes close to the ground. And then I'm going to with this whole area here because I want the pain to run. Glad to see it. The more pinker color changed to blue. That looks pretty. And maybe I can spray a little bit here with the one side just to see what will happen. Just to kind of let it fade. Now, yeah, I will make another line of bushes because I see there's like this white line. And there will be nice as HDAC, the top side of a bush. So I want to darken the areas behind deeds. As you see, this painting is much more control than my previous spontaneous landscapes. Just trying something differently. Now I'm going to use a different browser and see what happens. I'm taking my fan brush. Let's see what color I want to make a more of a lighter blue, a more vibrant blue. Maybe. Drop that in. Yeah, I think looks nice. Maybe some more earthy terms. And now I just want to disperse them out that turkey, my small brush again, if you don't have a small rigger brush like this, just use whatever brush you have. Like you'll be surprised. Even a thick round brush like this can make a very fine line if you use, just use the tip. Just wanted to move some of this in there to form pushers. Like I feel like those lines are straight and I wanted to look more organic. You will notice this is also the first clause that I'm actually recording live. Usually I just record this and they narrate the time labs or afterwards. But today it's nice quiet. You can maybe use some beers chirping. And I decided to just try something different. I'm going to take my fan brush and clean it and dry it. Maybe left some see if I can lift some grasses out. Yeah. I think it's dried too much already. That's fine. Now, that line is a bit distinct there, but don't worry, we'll fix all of this as we go along. Well, that entry When I say fix because there's nothing wrong with eight. Let's do the same here. Some Paying down here. But that's quite a lot. Might have been too much. Let's see. Now I don't want it. They did run over that line. I just graded there, so I'm going to try to divert the pain towards the surroundings, some of weight reading the area first and then they fly. Yeah, that's nice. Cleaning the brush again and maybe making it run towards the other side. Maybe up here. Now I'm just using the same brush that had gain water on it, but it's got a bit of the purple on it. Now. I'm just painting directly on two areas that look at that. Another BU she's forming, they get going, they're tuning it up little bit. Leaning that area. Now you can go even further and make it more and make it more dramatic. And again, getting and paint onto my rigger brush. And now I'm just kind of making little dots and areas as if this was a bright bush here and these are just the top leaves here. The reason I didn't go into detail like this with the previous classes is that I basically just wanted to have a very open, free-flowing clause, if that makes sense. Just so that everyone can get the hang of dropping in colors, letting it run wild and actually seeing what happens. Now that you've done that like a good exercise. You can actually take it a bit further. Now, work more closely and putting more details. It's always tricky to construct these glosses Because there's so much that you as a teacher wanted to teach. But there's some steps you need to follow first. So it's always better to start with something home based week. And don't mind the dogs that had been neighbor's dog. And what I was saying, it's always tricky to just construct these classes and building up it up in such a way that everyone can follow along. So hopefully in the future I'll be able to teach you much more complex glosses. And then everyone will be able to follow along. Because they started off just playing with spontaneous watercolors. Going to do the same thing. So you make a bush like this. Try not to darken everywhere around like from here to this. Internally that goes, then you're going to have too much of a line. You need variation like this area they announced dog, it's fading away. And then maybe down here I can make it dark again. And maybe, Yeah. See you can still your eye will still turn that area into a bush, but you don't need that dark blue line every way. Again, taking my clean water, I'm going to move down here to wait. Store too much veins just donating into some water. Be careful to that end. I'm just going to go ahead and do that with the rest of the area. I'm going to splatter some water. I want some bigger droplets and then maybe splash some veins. So what I do is I take my brush and then loaded with acquired a lot of paint and water in and just hold my wrist like that and I'm just going to flip my iris like click. And then you get these nice big splatters, as opposed to say maybe talking it on another brush to get smaller.
4. Grasses and other Details: Making sure my brush isn't too wait, I'm going to try to put some little dots in here. Sometimes it works really well. So let's just see what's happening. I think that looks quite nice. Let's maybe do some here as well. Yeah, I think that looks beautiful. And it's going to take a clean brush and just blend this area in a bit. And injecting the same brush, just putting a little bit of paint on it. I just want to darken some areas. Green is a variation in colors and lights and darks that create all these beautiful pictures. See now we have this area of interest right here that we can use as a focal point. Again, I'm not liking this big line. I want to break it up as if there was a little bush here with little the US jazz sketching the lines. This is actually the first time ever that I'm painting snowy landscape. Even though I love snowy landscapes, he then you don't get much of them in these parts. The first time I actually saw real snow was when I was 23. I, I moved to South Korea for a few years. And then I experienced my first winter. I've said was quite magical. Like smell is beautiful. And no one ever told me that snow actually glitters. Honestly at night with street lamps shine. Just looks like glitter sprinkled all over the place. The winters in South Africa on 3D, that's cold. Well, I think they were called because I had no point of reference, but I guess that I guess 12 or 14 degrees Celsius maximum and maybe like 10 degrees at night minimum. Isn't that called? It's basically like autumn, winter countries. The Cryogenian hours that I'm putting these grasses with the fan brush. But just to make them stand out a bit more, I'm using much more saturated paints, just darkening some of the areas here and they get so excited. I ordered this book online. She, my sister ordered it. And its own watercolor like these types of paintings. And when you've been wanting that book for so long and couldn't find it in the way. It should be ordered it online, got back ordered. We waited a few months, but I was informed you derive this morning. So once I get a look at that, then who knows what kind of other interesting lesson sunlight creates? It's crazy to think. I'm not that long ago. People had to learn to make things by using books. I think it's much more easier to just follow along on your video. I mean, don't get me wrong. I love a good book, especially one with beautiful pictures in it. But having, but to be able to actually just watch a video and see someone paint in real time is much better. That's why I love skillshare. Like honestly, I just started out being a student, garden so much on this platform. And one day I decided, hey, why not teach? If I was excited to learn something? And I'm sure someone else will also be excited to learn it from me. I'm going to use this orangey color between our grocers for variation. You now what I actually started recording this class yesterday and The first round along I I didn't like the results. So I started with a new one if actually do so good. Like these effects you see down here, they were all over the place. It was grades. And then after I did the weight on Wheat Board, I realized that I never recorded it. I was so bummed and then I didn't have any paper lifts. So I couldn't keep on recording. And that's actually why this paper is bucking a bit. It's actually the backside of the one sheet I used yesterday, but I didn't like so I just read the paper again. But instead of soaking and new birth DOB like I usually did, I just widget with a sponge and then stretch it again. Baton didn't do the best job. So yes. And also I was curious to see what happens if you paint on the underside, like the backside of the paper? Not really seeing a difference, but I assume it's wrong. So what I'm doing now is I want the orange sides you mix in with the purple color. Because I don't want our market verbal spot and an orange spot. Also. I apologize if I never actually used the names of the paints, like the colors names because I usually just mix and match and whatever comes out I use. Like, I guess it's good to be aware of the properties of some kinds of pains. Like some pains are generally more transparent and other colors are Sanders more opaque but just improvise as I go along. And also all my paint is labeled inquiry. And even though I can read it and a little bit, I just never really bothered translating eats properly and writing down all the names. And I appoint even find the box with my paint in it. So yeah, just excuse me if I talk about the orangey color and the purplish color. Wow, that looks great. I'm going to stop for now because I want to add in some trees first and then maybe come back to this. I don't want to overwork one area now without even knowing what will go there. So let's see if we can put in some trees in the back. Actually, I want to let it dry completely because I'm thinking about building a big tree in some way. Yeah. I kind of in the foreground. But this area is still slightly damp. And if I go in now, thick paint is just going to run all over the place, which was fine earlier, but I don't wanna do that now.
5. Painting Trees: Okay, and now that it has dried a bit, I'm going to see if I can put in a tree somewhere. So I think what would be nice if I start something with the steam year kind of behind these two bushes. And such as family, kind of get an idea of what I actually want to do. What shape I want for the tree. Because once you put the paint down, it's part of permanent. I drew a bunch of trees earlier just due to practice. I think if I get a branch that goes out here up here, but yeah, it can like maybe split into yes. Okay. We got all the mice. I don't know. Let's see. Getting my my Macy Macy palate. So for this, I'm just going to use a rigger brush for the whole tree. Because I want really fine brushes. And I'm thinking of having a very dog, blue color, maybe some black in it. You can see that light is a bit funny now. But yeah, I'm mixing a very, very dark blue and I kind of wanted to be very concentrated, so thick, consistency, I'm loading my brush up completely. And just at the bottom here, I'm just going to be careful because I want the shape of the bush to be. Okay. Here we go. We are making a tree. But more water and paint. It's going to go all the way up. I find it's easier for me if I just draw the first stretch, the first main branch just trade up. And you can always have branches branching out here and there. So again, the trees, I find it looks better when you have all kinds of crooked branches. And very fine tweaks here and we'll put in more finer branches just now. I just want to get the basic shape loop with streets. You can basically do what you want. As long as you know the figure at the bottom, center towards the top. And just keep on making forks and bronchi bronchus. So to get these redefined born second kind of just have to flip your wrist. Like maybe you have some variation in the bronchi, some no tweets coming out there. So before I go further, I want to maybe put another tree like a bit towards the back. Maybe just right here. Let's see what we think right here. I can have another one. Like it. Before I do that, I just want to fix this, staying, make it a bit more natural or crickets. Yeah, I'm gonna pin another steaming right here. Maybe kind of an angle. Starts trying to see what happens from there. Maybe this can be a smaller tree. If you don't have a rigger brush, you can just use whatever round brush you have and try to just use the tip of it. You can, even especially with your trees that are further away, leave some open areas in the bronchus. Because if they're thin and far away like the light might catch them in such a way that you don't see the entire branch. Yeah, I think that looks really nice. Now I'm just going to take some lighter, maybe just dilute it a bit more. Let's check on a space of scrap paper. You can't see it. But I do have a piece of scrap paper next to me that I look scholars on or just. So I often brush a bit. Starting to look really nice. Baby like that for now. And always come in again and make some changes. But for now I really like it. Maybe I should dilute the paint a bit more and put a tree towards the back. Because now I don't want to fit in too many trees here because it's just going to start looking messy. But what I'm gonna do is dilute the paint much more. Maybe put some trees in and let him try to fade into the background. So now with my brush having mostly water on it, just bangs. And we're gonna see if I can make some trees here.
6. Rocks and Finishing Touches: So taking the same color as the background. Let's see what will happen if I just decide to turn to create a rock god of thunder came right? And interests pick off some of the color. I think that's working like look at that. Just putting down paint and then taking a clean brush and softening the lines into the surroundings. Funny. Rock I've seen. Sometimes you get lucky. Just gets asked a lot. Okay. There we go. The blue. See what happens. You just looks like a bush. Looks like rock. We're getting there. Just to not just this light area. Okay. I'm going to let it dry and see what happens. And then once it's dried, we can put in a few finishing touches on Pretty cool now that it has dried completely. I think I'm just going to keep it like this. I like the little rocky area they in the trees that stand out and everything. They're just fades away. I'm sorry that the salts didn't get a bigger effect like the looks really nice, but not really. Maybe yours with it differently. Okay, So the only thing left to do is to maybe signing it. Let's see here in the corner. In the next lesson, we'll just do a quick recap of everything.
7. Wrap-Up & Recap: Well, this is my finished painting. I hope you're just as much fun creating yours as I did creating mine. Let's take a quick look. Stapes really follows. First, we spray some water on the paper and statutes some paint with a big flat brush. We then told that the bipeds, you let the paint flow and added more water? Yeah. And b, we also use the brush to remove some paint around. We dropped on more concentrated color to enhance some effects and lifted out color with the clear brush. We also added salt. After it dried completely, we started defining bishops by darkening areas behind where we want the bushes to stand out. We weighted the area where we added more bind to let the bank blend in with the surroundings. We added grasses with a fan brush. Next we added trees in the front with very concentrated paint and a final rigor brush and some in the background with diluted by int. Lastly, reminded in some rocks in the foreground by working with the light and dark buttons created by the banks. Okay, Cool. That wraps up our spontaneous watercolor landscape. Please upload your pictures because I would love to see what you've created until next time have been creating.
8. BONUS: Full Time-lapse: Yes. Hi. Okay. Hi.
 Annika, Illustration | Painting | Digital Art