Transkripte
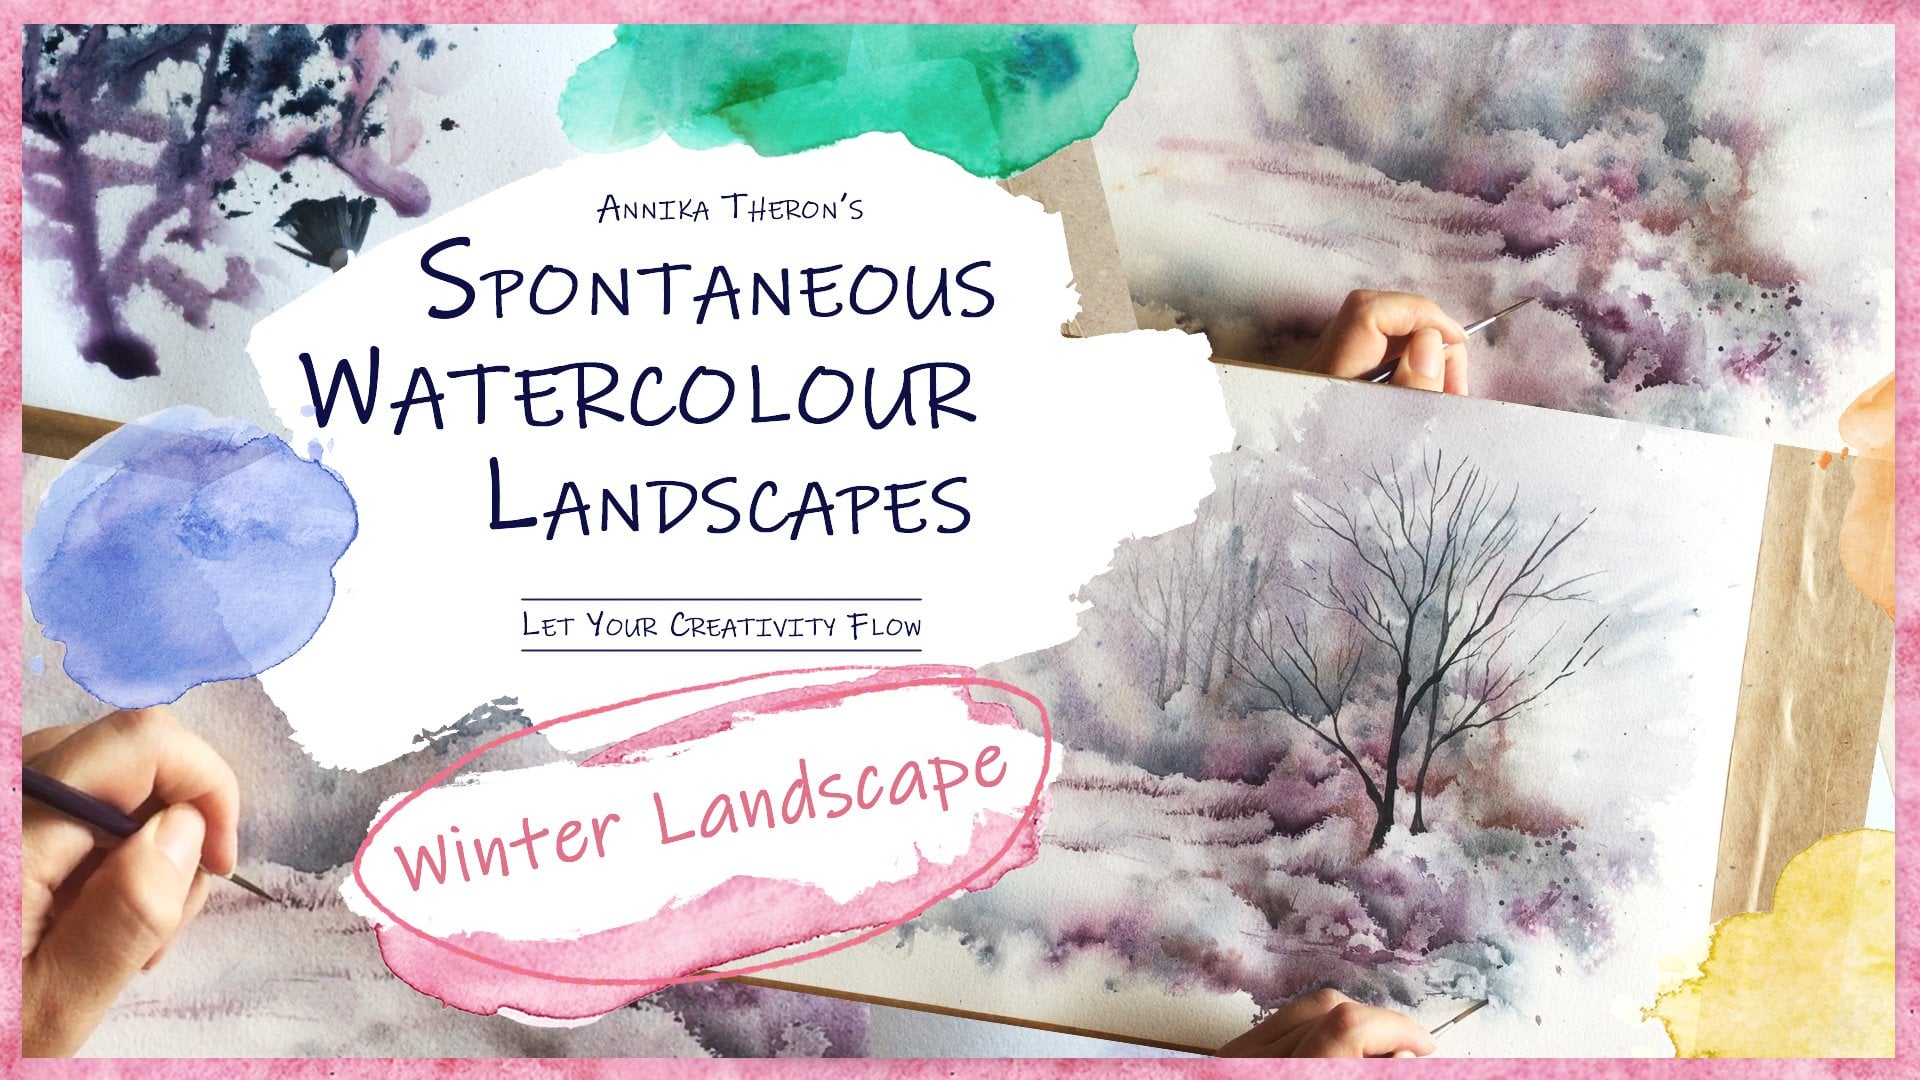
1. Einführung: Spontane Stationen machen, Gala-Bindungen, diese meiner Lieblings-Dinge zu tun. Es macht nichts mehr Spaß, als
eine Bibel Bandbreite zu spritzen und zu sehen, was meine Namen auf einem Mädchen passiert. Und heute werden wir zwei spontane Aquarelllandschaften schaffen. Ich werde Ihnen zunächst einige grundlegende Wassergala-Techniken beibringen, die wir in diesem Glanz verwenden werden. Und er bespreche schnell die Materialien, die Sie benötigen. Dies wird ein feiner streunender Spree Glanz für hoffentlich literarische Lags und lassen Sie Ihren Geist wandern. Also, wenn Sie von diesem zu Westen gehen wollen, Grad, etwas Papier, Farbe, viel Wasser, und bereit sein, später Kreativität fließen. In der nächsten Lektion werfen
wir einen Blick auf die Materialien, die wir verwenden werden.
2. Tools und Materialien: Unser Mann, erster Mensch, etwas Aquarellpapier, eine Vielzahl von Pinseln, binden und viel Wasser. Für die erste Bindung habe ich diese Bambusfaser verwendet, die ich uns die Geschenke besorgt habe. Ich mochte es sehr, da der Strahl sich wunderschön über
das Papier ausbreitete und ich mit einem trockenen Pinsel etwas Farbe herausheben konnte. Es ist auch sehr glatt, wie Off-Base-Papier, das ich lieber als Entladepapier, in der Regel bevorzugt von Bruce, eine Dicke von etwa 300 Gramm, weil ich viel Wasser verwendet. Aber das hier war wohl 200 Gramm und es hat gut geklappt. Sie müssen den Baraboo vor dem Lackieren dehnen, Sie benötigen einen Holzblock oder etwas, das Sie umhüllen können. Ich werde so etwas verwenden, das Sie einfach in einem Baumarkt oder bei
einer Bankinstallation kaufen können und dann Gummiband verwenden, um das Papier an Ort und Stelle zu kleben. Wenn Sie nicht mit Stretching
Aquarellpapier vertraut sind und gehen Sie einen Blick auf meine andere Klausel, wo ich eine ganze Lektion, wie Sie Ihr Papier strecken. Für die zweite Bindung verwende
ich ein 300 Gramm Papier, das auf einem Aquarellblock kam. Aquarellblöcke sind schön, weil man die Bibel nicht vorher dehnen muss. Sie bekommen uns binden direkt auf den Block und wurde durch Brühe angehoben, wenn Sie fertig sind, wurde
dieses Papier als verspannt bezeichnet, was bedeutet, dass es ein bisschen eine Textur hat, ist Honors nicht mein Favorit, aber ich beschloss, etwas zu versuchen anders. Ich habe eine Reihe von verschiedenen Pinseln für die Projekte verwendet. Ich benutze diese große flache Bürste, um das Papier
vorher zu benetzen und am Anfang aus der Farbe zu fallen. Dann verwende ich die Kombination von runden und flachen Pinseln, um
mehr Farbe hinzuzufügen und unsere Gelehrten zu heben, um verschiedene Effekte zu erzeugen. Auch verwendet diese Fächerpinsel, die ich gerne missfallen Schmerzmittel, und einige Ross Urin Tag zu machen. Und dann schließlich, einer meiner Favoriten ist der Strenge Pinsel. Es hat diese feine Linie. R ist perfekt für die Herstellung von Bäumen. Falsche Aktien und alle Arten von anderen Dingen für die Banken sind keine Hispaniker. Ja, ja. Jetzt bin ich zu ihm in der Brown des Klienten gegangen, weil ich es vor einer Weile gekauft habe. Ich weiß nur, dass es grüne Markenanzeigen waren. Ich ziehe es vor, Farben in Tuben zu kaufen. Und dann, was Sie tun, ist, dass Sie sie einfach auf Balladen drücken, lassen Sie es für etwa einen Tag trocknen. Und dann fügen Sie diese Ballade hinzu, die immer bereit ist. So können Sie immer Wasser auf Hilfsmittel sprühen und diese Bereiche reinigen. Aber dann haben Sie alle Ihre Farben schön organisiert und immer einsatzbereit. Dann, wenn Sie fertig sind, stellen Sie sicher, dass alles vollständig getrocknet ist. Dann kannst du genug schließen. Jetzt sind wir nicht verbiegt. Sonst habe ich zwei Behälter mit Wasser wie diesen. Es hilft immer, auch zu haben, weil Sie die One Flow Digi Bürsten verwenden können. Und dann haben Sie immer noch sauberes Wasser, wenn Sie etwas zu Ihrer Bindung hinzufügen möchten. Und dann etwas anderes, das ich viel benutze, ist eine Sprühflasche, nur um etwas Wasser zu meiner Patentierung hinzuzufügen. Und das Letzte, was du brauchst, ist Baguadao Wille, irgendwann wirst du die ganze Bibel durchlaufen. Und sie wird sich freuen, das zu haben. Nun, da das sich niedergelassen passt, um einige grundlegende Techniken zu bekommen, die Ihnen helfen werden.
3. Wasserfarben-Techniken: Hier haben wir also drei verschiedene Arten von Papieren auf ein Brett gespannt. Ich wollte Ihnen zeigen, wie verschiedene Papiere unterschiedliche Auswirkungen auf Ihr Gemälde haben. Auf der linken Seite habe ich ein 100% reines 300 Gramm heißes Presspapier bekommen. Dies ist eine Garantie für mein Papier der Wahl, da ich viel Wasser verbringe. Und Papier bekommen ist großartig dafür. Bei Biden werden große Blätter benötigt, die ich je nach Größe aufschneide. In der Mitte habe ich ein Stück aus einem Aquarell Skizzenbuch genommen, was ich denke, war etwa 200 Gramm. Und ich brauche fünfundzwanzig Prozent Baumwollfaser. Der Rest ist unhöflich Glühbirne. Falls Sie sich gefragt haben, wenn ich direkt in ein Skizzenbuch male, mein Papier immer Partikel. Dies ist das erste Mal, dass ich ein Stück aus Bezirksblatt und ich bin neugierig zu sehen, was passieren wird. Auf der rechten Seite. Ich habe ein Stück Papier aus einem Mixed Media Skizzenbuch, das für Aquarell,
Acryl, Bleistift und was auch immer verwendet werden kann . Es sind 160 Gramm und ich bin mir nicht sicher, woraus es besteht. Ich habe aufgehört, Skizzenbücher wie diese zu kaufen, weil es unmöglich ist die gleichen Ergebnisse zu erhalten, die Sie auf Peer-Aquarellpapier bekommen. Ich habe das hinzugefügt, weil ich weiß, dass viele Leute diese Skizzenbücher haben, besonders wenn sie anfangen. Zuerst habe ich gerade meinen Buy-In-Pinsel in ziemlich viel Bindung und Periode auf dem trockenen Papier gemacht. Wenn ich nun mit klarem Wasser darunter reingehe, wirst
du sehen, wie die verschiedenen Papiere eine andere Wirkung auf die Schmerzen haben. Als nächstes werde ich warten und Bereich und
einige Fenster fallen lassen, um Ihnen zu zeigen, wie Warten auf Breite aussehen wird. Hier sehen Sie deutlich einen Unterschied zwischen
den verschiedenen Papiersorten und wie sich die Bank auf Hilfsmittel verteilt. Eine andere Technik, die ich gerne verwenden, ist Unmut einige Schmerzen. Nehmen Sie einen Fächerpinsel alarmiert mit viel Farbe und Wasser. Und während ich mein Risiko fest halte, schüttele ich meinen Arm, um einen Status zu schaffen. Sie können den Unterschied zwischen dem , wo das Gitter auf das trockene Papier fällt, und auf die nassen Bereiche sehen. Je nachdem, wie gut Ihr Papier leicht ist, werden
Sie unterschiedliche Ergebnisse haben. Eine andere lustige Technik, die ich in dieser Klasse nicht verwendet habe, ist das Hinzufügen von Salz. Versuchen Sie feines und grobes Salz, um zu sehen, was die Ergebnisse sind. in klarem Wasser fallen oder klares Wasser spritzen, während Sie malen, warten Sie immer noch. Wir werden einige der Bindungen wegschieben, um Defekte zu erzeugen, mit denen Sie arbeiten werden. Nur eine letzte Sache, die ich hinzufügen möchte, ist der Effekt, der durch das Ablegen aller Ziele erzeugt wird. Alkyl bösartig stürzte viel dramatischer weg als das Wasser. Dies funktioniert nur, wenn das Baby noch Gewichte hat. Aber Sie können wirklich schöne Effekte bekommen, wenn Sie Bereiche
entfernen wollen , wo Sie bereits in einigen Schmerzen gefallen sind. Nun sehen diese drei Quadrate vielleicht nicht nach viel aus. Aber ich würde sehr vorschlagen, dass, wenn Sie verschiedene Arten von Papieren herumliegen, gehen Sie zuerst auf sie anwenden,
wissen, wie Sie gebunden sind, um auf verschiedene Arten von
Papier und mit unterschiedlichen Mengen an Wasser zu reagieren , gehen Sie zuerst auf sie anwenden,
wissen,wie Sie gebunden sind, um auf verschiedene Arten von
Papier und mit unterschiedlichen Mengen an Wasser zu reagieren,
ein besseres Verständnis dessen, was beim Malen zu erwarten ist. All seine Sachen brauchen Zeit. Und wenn Sie ein paar davon machen, um eine bessere Vorstellung davon zu bekommen, was zu erwarten ist. Wenn Sie anfangen, kann
es ziemlich frustrierend sein. Kosten billiger durch, wir geben Ihnen einfach nicht die gleichen Ergebnisse wie Aquarellpapier mit hoher Schwerkraft. Offensichtlich möchten Sie auf GBA by
VR üben, weil Sie am Anfang viele Fehler machen werden, aber Ihre Ergebnisse würden wahrscheinlich nicht wie
das Tutorial aussehen , das Sie auf höherer Qualität
durch meinen Vorschlag gemacht haben ist, dass Sie mit dem arbeiten, was Sie sich der Einschränkungen bewusst sein müssen. Und wenn du zuversichtlich bist, probiert etwas Neues aus. Leider gibt es keinen schnellen Judys Überschuss. Es braucht Zeit und Praxis und Patienten. In der nächsten Lektion werden
wir mit unserer ersten Landschaft beginnen.
4. Landscape 1: Einrichten von Farben: Wir beginnen mit der Gewichtung des Papiers. Sie können entweder einen großen Pinsel oder eine Antwort verwenden. Vergewissern Sie sich, dass Sie das gesamte Papier lesen. Mit Zielen wird die Bank nur mit Preisträgern gehen. Nehmen Sie einen großen Pinseltropfen in den Farben, die Sie verwenden möchten, wo Landschaft, weil ich von Bushveld umgeben bin. Ich wählte mehr gelblich-grüne und bräunliche Farben ,
weil ich das gewohnt bin, um mich herum zu sehen. Ich mag es, etwas verbal für den Kontrast hinzuzufügen. Und das wird später bei Schatten auf Hundebereichen helfen. Nun, da dies eine spontane Landschaft ist, können
Sie den Banklauf dort stricken, wo immer Sie wollen. Die Idee ist, das Gehirn seine Arbeit machen zu lassen und es dann von Bay zu nehmen. Abgesehen davon hilft es immer noch,
eine allgemeine Vorstellung davon zu haben , wie Ihre Landschaft aussehen soll. Er kann sehen, dass ich auf eine Baumlinie und
einen Bereich vor der anstrebe , um ein paar Felsen und Gräser hinzuzufügen. Abtropfen in klarem Wasser, entweder mit der Bürste oder mit einer Sprühflasche hilft Ihnen, das Flugzeug noch mehr zu zerstreuen. An diesem Punkt ist mein Papier etwas nicht,
es ist, weil ich die Spannung will, die Sie nach unten laufen ,
so dass die Unterseite meiner Baumlinie dunkler ist als die Spitze. Entscheidend, dass ich mehr Grün hinzufügen wollte. Ich ließ einige mit meiner Bürste direkt
hineinfallen und spritzte mit einer Bürste auf. Das Papier an der Spitze hindert mich am Schlachten, verboten auf meinem ganzen Tisch. Jetzt ist es wichtig, an dieser Stelle zu beachten, dass
abhängig von Ihrer Art der Faser und wie viel Wasser Sie verwendet haben, Ihre Ergebnisse leicht sehr unterschiedlich. Die grünen Schlitze sind wirklich gut für mich gebucht, aber hatte mein Baby ein bisschen später, wenn man sich komplett mit der Umgebung mischen würde und wahrscheinlich verblasst. Dies ist der Punkt, an dem es einfach ist, einfach Wasser hinzuzufügen und zu binden. Aber zu viel davon zu tun, wird zu einem schlammigen Durcheinander führen. Da ich am Boden viel Wasser
habe, habe ich es etwas bewegt. Sie erstellen eine noch größere Fläche von einem, was ein Feld sein wird. Mit der trockenen, flachen Bürste lebte
ich einige Bereiche aus, wo ich möchte, dass die Baumlinie beginnt. Dies ist ein guter Zeitpunkt, um in klarem Wasser zu spritzen. Dies wird zerstreuen Einige der Bindung und nach und nach zu fixieren, um mit leichter zu arbeiten. Auch wenn der Befund noch schwer ist, wird
er nicht den gleichen Effekt haben und vielleicht trocken lenken. Es wird überhaupt keine Wirkung haben. Durch Versuch und Irrtum. Sie werden lernen zu beurteilen, wann es der richtige Zeitpunkt ist,
mehr Wasser ausgelassen zu spritzen oder wenn Sie mehr Behälter hinzufügen. Mit der trockenen flachen Bürste habe
ich wieder getrocknet und einige Gräser erschaffen, indem ich die Biegung in Bereichen
nach oben bewegte , wo ich das Gefühl habe, dass das Leben gerade ist. Dies ist ein guter Zeitpunkt, um zu stoppen und für
ein paar Minuten weg zu gehen und die bipolaren trockenen kleinen Bits zu führen. Sie wollen immer noch, dass es seltsam ist, mehr Effekte hinzuzufügen, aber nicht so, dass alle Gärtner nur aufeinander laufen.
5. Felsen und Rocks ausheben: Mit einer trockenen Rundbürste lebte
ich bei einigen Schmerzen, um Steine zu schaffen. Stellen Sie sicher, dass die Bürste zwischen geht trocknen. Hier macht die Qualität Ihres Bipolars einen großen Unterschied. Wenn Sie gemischte Medien auf Papier oder
etwas aus einem Skizzenbuch verwenden , das nicht die beste Qualität ist, das Pint, das wir wahrscheinlich nicht abheben. Na ja. Ich benutze eine Bambusbibel, die ich finde, sehr ähnlich zu Baumwollfasern in dem Sinne, dass es sehr verzeihend ist, Wasser hinzufügen und entfernen. Mit einem normalen Pinsel. Ich halte diese Wohnung an der Bibel, lese noch ein paar Brazi-Texturen. benutze immer noch meine Strenge, füge
ich mehr zwischen den Felsen hinzu, um ihnen zu helfen, herauszukommen. Der Schlüssel zu diesem Hund der Bindung ist, einige Bereiche zu haben, die auf einigen Bereichen, die lose und abstrakt sind detailliert sind. Jetzt, da ich mit einem unteren Abschnitt zufrieden bin, habe ich meine Bindung belogen, um vollständig zu trocknen. nächste Stopp bewegt sich bis zur Baumlinie und beginnt, in einigen Formen zu definieren, dort.
6. Busen und to formen: Das Papier hat Ziehungen komplett und ich bin auf der Suche nach Bereichen zurück zu schieben und nach vorne zu bringen, um die Illusion von Bäumen zu geben. Hier können Sie sehen, was passiert, wenn Sie den Kauf auf
Drive-by br setzen , um es zu mischen? Ich füge mehr Wasser hinzu. Ich mache das in mehr Bereichen, in denen ich wollte, dass es dunkler wird. Zuerst sind die Bindung und dann gehen Sie mit einem sauberen Gewicht Pinsel, um es zu bewegen, so dass Sie in die Umgebung verblassen können. Eine andere Möglichkeit besteht darin, zuerst den Bereich zu lesen und dann das Band hinzuzufügen. Auch hier füge ich weitere Details hinzu, um den Felsen hervorzuheben, während ich darauf warte, dass die Hintergrundbäume trocknen. Gut Alterung für einen Teil der Bindungen trocken. Sie können hin und her gehen, hier und da
hinzufügen, mehr Formen
hervorbringen. Im nächsten Abschnitt werden
wir einen Himmel hinzufügen.
7. Einen Himmel malen: Um einen Himmel hinzuzufügen,
verwenden Sie erneut einen sauberen Pinsel, um den Bereich zu belasten. Etwas Blau fallen lassen. Und denken Sie daran, dass die Farbe viel leichter trocknet. Vergewissern Sie sich, dass Bereiche, die zu konzentriert sind, durch Tropfen in mehr Wasser zu verteilen. Hier entschied ich, dass ich das nicht mochte,
aber wie ich es vorhin gemacht habe, und ich beschloss, sie mit klarem Wasser zu mischen , ist
es völlig an Ihnen, wie abstrakt und wie realistisch Sie ihn binden wollen. Die Idee dieser Klausel besteht darin, einfach herumzuspielen und zu sehen, was nach einer Weile passiert. Gehen Sie weiter und spielen Sie ein bisschen mehr herum. Im nächsten Abschnitt beginnen
wir mit dem Hinzufügen von Bäumen.
8. Bäume und letzte Details hinzufügen: Jetzt ist es endlich Zeit, einige Bäume zu zeichnen. Mit meinem normalen Pinsel fange
ich an, die Tropfen von den hinteren Bäumen hinzuzufügen. Zuerst mache ich es sehr leicht, weil ich später reinkommen und sie ändern könnte. Dieser Spot ist wirklich bis zu Ihrem kreativen. Ich definierte die Formen und verwandle sie in Bäume. Denken Sie daran, dass die Waage kein Geburtsdatum sein muss. Hier geht es darum, Spaß zu haben und mit dem zu spielen, was Sie haben. Ok? Und das ist diese spontane Aquarelllandschaft. Ich hoffe, Sie haben diese Aktivität genossen und sind bereit für den nächsten Teil. Wir werden uns krank und Landschaft machen.
9. Landscape 2: Einrichten von Farben: Wieder beginnen wir mit der Gewichtung des gesamten Papiers. Ein paar Leute mit dieser Landschaft fallen lassen. Ich hatte keine Ahnung im Sinn. Ich habe das Flugzeug völlig seine eigene Sache machen lassen. Fügen Sie mehr Wasser hinzu, um die Pined laufen zu lassen und vielleicht ein paar mehr Spritzer, um einige verschiedene Effekte zu erzielen. Denken Sie daran, Sie können die saubere trockene Bürste verwenden, um einige Farben anzuheben, aber es wird funktionieren. Beta ein Abonnent hat ein wenig mehr versucht. Ok? Ok. Wenn Sie mit den Farben zufrieden sind,
versuchen Sie, einige klare Wassertropfen hinzuzufügen, um noch mehr Texturen zu erstellen, mit denen Sie später arbeiten können. Versuchen Sie nicht, entweder tun jedes Papier ist immer noch sehr warten. Im Nachhinein hätte ich wahrscheinlich hier aufhören können, aber es ist immer schwierig, deinen eigenen Rat einzuholen. Sie können verschiedene Pinsel ausprobieren, um zu sehen, welche Formen sie machen. Ok? Zwingen Sie sich zu stoppen und lassen Sie es vollständig trocknen.
10. Gebüsche und Bäder:: Jetzt ist es an der Zeit, einige Formen zu definieren. Wieder zerstreute ich die Farbe, Ich biete auf dem Papier, indem ich über jeden gekauft wurde Tod. Ich sehe, ob ich ein paar felsige Gebiete definieren kann und vielleicht bösartig. Wenn Sie Bereich dunkler machen,
versucht, die gleiche Farbe wie der Bereich zu verwenden, über den Sie malen. Das ist grün auf Grünflächen und braun auf braunen Flächen und so weiter. Nachdem einige Formen definiert,
versuchte, ihm einige Baumstämme an Orten zu sehen, ob Sie etwas zu arbeiten bekommen. Denken Sie daran, Sie können immer mit klarem Wasser hineingehen und Bereiche entfernen, die Sie nicht mögen. Aber um irgendwohin zu kommen, muss
man irgendwo anfangen. Wenn du das Gefühl hast, in einem Boot stecken zu bleiben. Wechseln Sie zu einem anderen Teil. Sie können immer später zurückkommen , um verschiedene Bürsten
für verschiedene Defekte auszuprobieren . Ok. Das ist ein Boden links meine, Ich habe ein paar Gesteinsformen, aber die Wassertröpfchen von früh und erstellen Sie es. Also beschloss ich, mit ihm zu arbeiten und, aber suchen Sie nach Formen, die bereits vorhanden und verbessert sind. Sie können den Baum aufstehen lassen, indem Sie die Tastenleiste H verdunkeln, indem Sie die Tasten Töpfe machen und die obere Box verlassen, wo das Sonnenlicht sie ausstechen. Leichtere Ausrüstung wird ihm ein mehr 3D-Aussehen geben. Wenn Sie sich stecken fühlen oder mehr Spritzer des Kaufs hinzufügen, um zu sehen, was passiert. Ich mag es, einen feinen Pinsel zu verwenden, um ein paar Gläser herauszuziehen. Aber spielen Sie mit, aber Sie haben die Krankheit.
11. Felsen hinzufügen und Bäume definieren: Sie können immer mehr Bindungen hinzufügen und völlig neue Bereiche zu Ihrer Landschaft hinzufügen. Ich fühlte, dass dieser zu ähnlich dem vorherigen war und beschloss, einen extra felsigen Aufschluss zu setzen. Für dramatischere Wirkung, fiel
ich in allen Ziel, die Banken wegzuschieben. Es macht immer Spaß, mit verschiedenen Dingen zu spielen. Zum Beispiel könnten Sie Salz hinzufügen und sehen, welche Effekte Sie haben. Nun, ein Bereich der Malerei, seine Fahrt zum anderen. - Ja. Ritter DOM,
um sich in das Gemälde zu verlieren. Habe mehr Baumstämme auf Felsen hinzufügen und die Auslöser Kugeln aus den Bäumen Docker machen. Stressvoll. Siehst du, danke. Ok. Es wird
der nächste Teil sein . Wir werden mit der rechten Seite der Seite arbeiten.
12. Berge und letzte Details: Im letzten Abschnitt füge ich nur einige Details zum Hintergrund hinzu. Hat es in einen Berg verwandelt. Wieder mit dem Bereich, in dem Sie wollen, dass die Schmerzen fließen und sehr wenig Schmerzen verwenden, um den Bereich verblasst und weit zu halten. Nur ein paar letzten Schliff hier und da. Ja. Ok. Ok. Treten Sie weg, kommen Sie zurück und zwingen Sie sich schließlich dazu, aufzuhören, bevor Sie es überarbeiten. Und wenn du glücklich bist. Landschaft Nummer zwei. In der letzten Lektion werden
wir eine kurze Zusammenfassung machen. Einige Schritte, die Sie befolgen können, um dies auf eigene Faust zu tun.
13. Wrap-up und Recap: Ja, Kaninchen haben Spaßklausel. Ich hoffe, es hat dir gefallen. Ich habe gehört, dass du dich entspannen kannst, loslassen und deiner Kreativität freien Lauf lassen kannst. Jetzt ist es eine Sache, mit dem
Zeitraffer zu folgen und eine ganz andere Sache zu gehen und es selbst zu tun. Hier finden Sie eine Zusammenfassung der grundlegenden Schritte, die Sie ausführen können. - Rest. Es wird für jede Bindung etwas anders sein, aber im Allgemeinen können Sie Folgendes versuchen. Die erste von denen von bipolar in dem Bereich, in dem Sie wollen, dass der Schmerz fließen. Denken Sie daran, dass die Farbe nur dort fließt, wo die Wasserschilf mit einem großen Pinsel in einer Vielzahl von Farben fallen, spielen mit Lichtern und Hunden, abhängig von der Stimmung, die Sie erstellen möchten. Sie können Ihr Papier kippen, um das Wasser fließen zu lassen und die Schale ohne Wasser mit einer Sprühflasche aufsprühen oder sogar einige mit Ihrem Pinsel spritzen. An dieser Stelle können Sie auch verschobene Farbe hinzufügen. Denken Sie daran, dass es völlig anders aussehen wird, es ist getrocknet. An diesem Punkt ist
es immer noch schwer zu beurteilen, wie Ihre Ergebnisse aussehen werden. Dies ist ein guter Zeitpunkt, um es für ein wenig trocknen zu lassen. Warten Sie, bis der größte Teil des Xin getrocknet ist. Denn wenn Sie versuchen, Farbe zu heben, wenn es noch zu warten ist, wird
es keine Auswirkungen haben. Dies ist eine perfekte Zeit, um Felsen zu heben. Denken Sie daran, einen sauberen Pinsel zu verwenden und denken Sie auch daran, dass Ihre
Fähigkeit , Farbe herauszuheben, von der Qualität Ihres Papiers abhängt. Literal Malerei trocken vollständig, bevor Sie in den nächsten Zustand übergehen. Jetzt, da alles getrocknet ist, können
Sie beginnen, mehr Formen zu definieren. Sie können Büsche oder Bäume erstellen, indem Sie einige Bereiche
zurückschieben, indem Sie mehr Band hinzufügen. Der Unterschied zwischen dem dunklen Bereich, den Sie zurückgeschoben haben und dem hellen Bereich definiert Ihre Büsche. Baumstämme in offenen Räumen, um Bäume zu erstellen. Sie können spielen, indem Sie Cluster von Bäumen in einem Bereich, oder vielleicht eine Woche Baum in einem anderen Bereich. Durch die Verdunkelung der Unterseite Ihrer Bäume, Sie werden ihnen ein 3D-Aussehen geben, wie die Spitzen der Bäume sind leichter mit einem reflektieren die Sonne und die unter BOD noch im Schatten auftreten. Darüber hinaus können Sie versuchen, einige alte Ziel spritzen, während die Farbe noch warten, um Sub-Band zu verteilen und interessante Effekte zu erstellen, mit denen zu arbeiten. Denken Sie daran, die Idee ist, einfach herumzuspielen und Spaß zu haben. Wer weiß es? Vielleicht hat dich diese Klasse dazu veranlasst, etwas anderes zu tun. Ich bin keine neue Technik für deine Werkzeugkiste. Bitte gehen Sie weiter und laden Sie Ihre Bilder hoch und lassen Sie mich wissen, wie es wartet. Und dann sehe ich Sie in der nächsten Klausel.
 Annika, Illustration | Painting | Digital Art