Transcripts
1. Introduction: This class is an introduction to one stroke binding
using acrylic paints. One start binding is a decorative painting
technique in which the artist
learns the brush with two or more different colors simultaneously to create
a unique blending effect. This works especially
well to depict the delicate nuances
of flowers and leaves. Welcome to my studio. My name is Anika, and today I'll be teaching
you the ones start painting techniques that you will need to create botanical paintings. I created this class because I wanted to learn these
techniques myself. I enjoyed drawing and
painting flowers. And I thought this
technique would make a nice little addition
to my skill set. If you enjoy painting flowers and wanted to
try something new, this class is
definitely for you. I'll guide you through
loading your brush, creating petals, simple flowers, complex flowers, different
types of leaves, onto eventually individual
floral bindings. It is a fun technique
that is easy to learn and will give you striking
results in a short dime, this glass is beginner friendly and all you really
need to get started. It's two different colors
of acrylic paint and medium-sized flat brush
and a surface to paint on. Join me on the spending journey
and let's have some fun.
2. Class Project Discussion: This class will start
off with a series of lessons covering basic one
stroke painting techniques. This includes lessons on how to load your
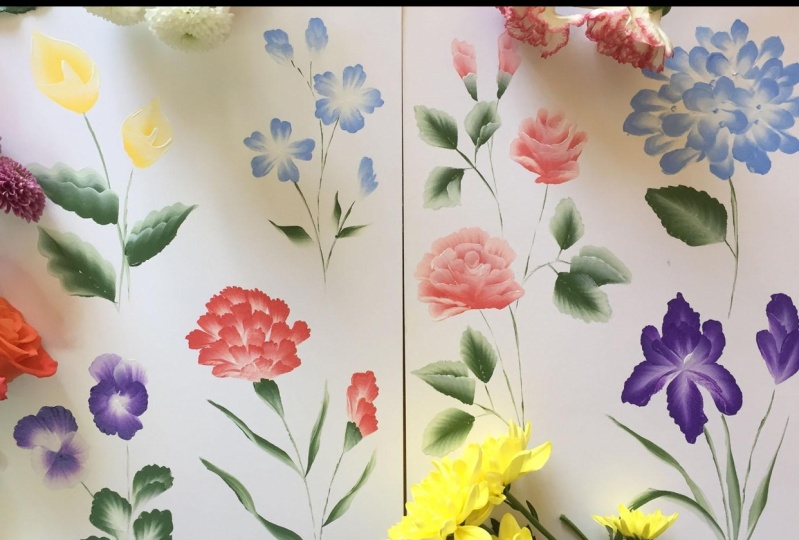
brush with paint and how to bind various shapes that form petals and leaves. For the class project, we will find seven
different flowers using the techniques
that we've learned. This includes wild flowers, a color allele combination, pansy, hydrangea,
roses, and an iris. The flowers chosen for the
class projects all have different petals and leave
shapes and vary in size. This will give you the
opportunity to practice a wide variety of
techniques and in doing so, add to your skill set. Next up, we will
cover the tools and materials you will
need to get started.
3. Tools & Materials: First, you will need
a variety of paint. I'll be using white, green, red, blue, yellow, and purple
throughout this class. If you don't have these
colors available, use what you have. Strictly speaking, you
only need two colors. For the white. It helps a lot to
use titanium white. It's a very opaque white, which makes it ideal for
this type of finding. I find that with more
translucent whites, like zinc white, it's very hard to make the white stand out and to paint
multiple layers. Next, you'll be needing a
medium-sized flat brush. I'll be using a number eight. I find that smaller brushes
don't give the same effect. And larger brushes
required too much paint. You'll need a palette
for your pain. I use paper ballots
that are disposable. Alternatively, you can
just use a paper plate. Next, a palette knife comes in handy when you
want to mix paint. You will also need a paper towel or an old rag to clean
your brushes with. And don't forget a
jar of water next to you to rinse your brushes in. Now let's talk about paper. I'll be using sheets of triplets that I got from
my local art store. I like painting on them because they are very
smooth and firm. The smooth surface, the easier
this type of painting is. I don't recommend using a sketchbook paper
that stick to it. Since it makes the painting
process much more difficult, you can use normal paper. It might just wrinkle a bit. I practice most of my flowers on the back of an old calendar. The smooth glossy surface makes this technique much easier. Again, use what you have, but just take these
things into account. Now that we've covered that, get all your things together and meet me in the next lesson, we will learn how
to load our brush and start painting basic petals.
4. Loading Your Brush & Basic Petals: For this lesson, we will
be using white paint. Again, I'm using a
titanium white is a bit more opaque
and dries faster, which makes it perfect for
this type of painting. Together with that array, here I have the cadmium red. And then I'll be using
a number eight brush. Again, use what you
have and follow along on a separate palette. Get yourself some white paint and read to load your brush. Tip half of it in red and
the other half in white. And gently stroke
back and forward. Keep on doing this a few times until your brush
is fully loaded. Okay. Now I'll be starting in the top right corner and
move towards the left. That is because I'm left-handed. If you're right-handed,
I suggest you start in the top-left guy. Let's go gently. Just make one stroke. If this happens, then you might need a little
bit more paint. Simply load up
again, back forward, back forward. And start again. Bring your brush up and lift. Now the nice thing about acrylic paint is that you can just paint over an area you've
already painted on. Let's try that again. Lift your brush
perpendicular to u, budge and lift up. Now, if your lines aren't
coming out as smooth as mine, then try using more paint. You can even mix a tiny bit
of water in with your paint, but not too much because then it will just make a watery maze. Next. But I need to
put our brush down and start wiggling up
and down, up and down. And make a wave-like motion. Up, down, down, up,
down, up, down. Keep on wiggling. Do this for a bit. Stop and lift your brush. Again. Renal regal, regal, up, down, up, down, up, down, up, down. And lift. Now you can always flip your
brush and invert the colors. Down, down, down, up, down. All right. Now this will be the basic movement we will use for most of our
flower beetles, as well as leaves. So I suggest you
try that a few more times until you
feel comfortable. Next, we're going to
make small arches. Place your brush on the paper. Down. Down. Now try the same but make a slightly bigger arch from
there to there. Again. Go up, press down, come down and left, and left. Maybe invert your
brush and lift. Okay. Now we're going to combine this movement together
with this movement. Load your brush with your
brush at a slight angle. Again, if you're right-handed, you will start here
at a slight angle. Down, wiggle, wiggle,
wiggle, down, up, down, come up, come up, and go back down, go back down, go back down. And then you have a nice
scallop shaped petal. Let's do that again. Wiggle, wiggle, wiggle, down, down, down, down, down. Beautiful. Down. There we go. Again. Now we're going to combine
it with this movement. Unlike a slightly bigger Beatle. Down. Keep on going. Keep on going. There we go. Again. Flip your brush. In the next lesson, we will take these petals
and turn them into flowers.
5. Basic Flowers: Let's see how this will
look like as a flower. You might want to
start in a new spot. If this is getting
a bit too much, move a bit away from the side to make room
for the fiddles. Down, down, down, down, down. Turn your paper to
make it easier. Again, if you are right-handed, you will turn your paper to
this side and go clockwise. If you're left-handed, it's much easier to go
counterclockwise. If you slip a little
bit and make a mistake, don't worry. We're
using acrylics. You can just paint
over it again. Maybe got it. Let's do the same, but invert the colors with
the white on the outside. Beautiful. Let's try the same using
a slightly bigger petal. Now for these, you can make the petals overlap a little bit. Now let's try a few
variations with bits or size. Here I'm making a small one to two to three lobes. Now you don't always have to
use this color as a beetle. It can also just make
a very smooth beetle. Let me show you by simply pushing you're
putting your brush down, going up and coming down. They can create a beautiful
tears shed, brittle. Again. Push, release pressure. And the same. Now at this point, if you feel like your paint
is getting a bit dry, can always use some new paint. It might also be a good
point to clean your brush. Or just take a new one. Let me show you another petal. This one is going
to be even bigger. It's the perfect petal
to use for something like a hibiscus flower. So give yourself some space. Start making slightly
bigger loops. Keep on wiggling
while you do this. Dan, stop wiggling. Load your brush. Though legal, legal. I need a bit more red. We're not always going to paint flowers that live
directly up at us. We can also find flowers from the side as if the
folding onto themselves. For that, she will maybe
make the top leaf. Another one here,
another one here. Another design you're going
to use the following. This works really
well for carnations. Again, to this. There we go. Keep
on practicing this. And then I'll see you
in the next lesson. We will take a look at a
few more different petals.
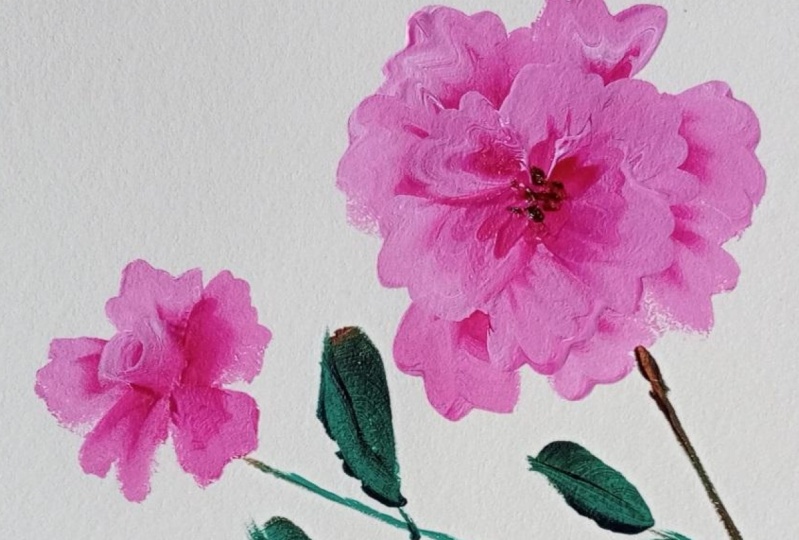
6. Rose Petals: In this lesson,
we're going to learn a few more petals shapes to make a variety of
different flowers with gang gets some new
paints and clean your brush. You can see here putting
the one at the top now, just to make it easier for me for the flowers I
want to paint now. So for a rose, the inside officer rows, we're just going to
make a little arch up. And another one. You can go a step further by
adding another tool here. Now leave enough space
and start about here. Let's do that again. Down and another one. Now the next petal up
we're going to prove they will be the
following basic movement. We're going to go up a
little bit and either flip your wrist or just take your other hand and
come back down. Again. Flip your wrist and come back down. Let's try that. And we will wiggle, wiggle, wiggle, wiggle,
wiggle. There we go. Now this side we're
going to do the same. We go legal. Purists either or change hands and
wiggle, wiggle, wiggle. Let's try that. And Louisville we go. That is the basic inside
structure for rows. Let's add some more petals. Now I can start going
out a bit bigger. Flip, do the same. On this side. Flip and come back down. And maybe put one petal. Now I'm going to
always combine this with what we've
learned previously. Stored by making two
leaves at the back. Maybe puts another leaf here. Yeah. There we go.
7. Other Complex Petals: Next, let's make something that looks more like a color allele. We're going to start with
a basic teardrop shape. Again. Grace up, release, and come back down. Get more paints. I might need a little
bit more white. So why do they make
a little loop? The rigor and white
on white there, come down through and end point. Let's do that again. Teardrop and fold over. Now let's try a more
compact cluster flower. Something like a hydrangea. A little loop. There you go. Now another
flower I want to look at is the basic structure
for a Pansy. Please note that later on in this class we will
take all of what we've learned and create beautiful flowers
together with leaves. For now, let's just practice
the basic structures. So for a pansy, we're going to
make two leaves at the back. Let's do that. Now. The next two leaves will be slightly smaller. Around here. What I like to do is to invert the colors to
make the leaf stand out. So now instead of
putting red at top, I'm going to put a
white adult at the top. And the slightly less pressured
to make a small elite. Come all the way and make sure to 0 the lab that top leaf. Let's do that again. And now I can turn
it around your page. I'd like one big
leaf at the bottom. There we have a balanced. Let's try it again and
invert the colors. Now we can go even
further and make some he like an iris with a completely
different leaf shape. For a very basic iris. Start by making a
big top, please. Now there's going to
be two leaves here, one at the bottom and then
again two at the top. So let's do the two
bottom side ones first. You can even go so far as
to make one fold on itself. For that, we're
just going to make exactly the same motion. We're going to do this a lot
with the exercise as well. Then let's make another leap
like that on this side. To give some variation. Might want to turn your paper. Then one big one at the bottom. Lip smack, two at the top. It's due the WAN side of
come down, stop halfway. And I, instead of going
down and continuing it, we're going to do flip the
brush so that it folds in time stress too
much about this. We will practice this a lot
in the upcoming lesson. Just giving you a little
taste of what you can expect. And then the other side, again, you might want
to flip your page. We got there, we have an iris. Let's stop there for now and
move on to making leaps.
8. Basic Leaves: This lesson, we will
need some white. Again, I'm using titanium
white, some green. I'm using chromium oxide, green, and a medium-size brush. We start by getting our colors
really white and green. And then loading our
brush with both colors. In the top-right corner. Start by practicing
your strokes. Make sure you have enough
paint on your brush. And remember, if you want
a clean straight edge, lift your brush
perpendicularly from the page. Now wiggle, wiggle, wiggle, up, down, up, down. Make some small
way the movements. This a few times. And also try flipping your
brush to invert the colors. Again, let's practice
some small arches and then move along
and make bigger ones. Our first leaf is going
to be a very simple, oval or teardrop shaped leaf. As we did with a flower bagels. Put your brush at an angle down and come up and
release pressure. Turn your page and
do the other side. Practice this a few
times and play around with the size and by
inverting the colors. Now for my favorite leaf, let's combine that shape
with some extra movement. At an angle. Start wiggling your brush. Start moving up and slowly
remove pressure and end in a flip your page around
and do the other side. Inverting the colors. You can also try to do this in one stroke without turning
your paper around. Now to create a
heart-shaped leaves, we're going to start
with a little scallop and then extend the
leaf towards the tip. Keep on practicing this a few times until you
feel comfortable.
9. Complex Leaves: Next, let's look at a completely
different shaped leaf. By making a simple
two-level petal, we can put four of them
together to make a clover leaf. Remember, you can
always play around with the shape and size and the
amount of leaf segments. Next, let's make a
round leaf for this, they will just keep on going in a circle and always remember to keep on
wiggling your brush. Try that again with a bit more movement and
maybe inverting your colors. Now let's vary the shapes of the leaves by varying
the edges and size. We can try making
some rounder edges. Or as a night beliefs,
some sharp edges. We will use this leaf later on when we paint some pansies. Next, let's try an oak leaf. They are more elongated, with rounded edges sticking
out in various directions. Now let's invert the colors. And then lastly, we can also just press
down our brush and lift to the side at an angle to create a small,
very basic leaf. Now we can use that
small basic leaf to make up a more complex leaf. Then we can take
this even further by changing the shape
of individual leaves. Next up, we will practice
some long grass like leaps.
10. Grassy Leaves: Now for some long grassy leaves, start by bidding the
flat tip of the brush towards the paper
and move upwards. Slowly flatten your brush a
bit while moving upwards, and then come back to the flat. You can also make a
thinner leave by not pressing down as
hard when you go up. Now to put a wave-like motion in your leaf starts again with a flattened
and as you move up, press down, lift up, press down, lift up, press down, lift up. To put a twist in your leaf. Give yourself some space. Press down and lean to the left. Come up and press again, but lean over to the right. And gamma. Let me
show you again. Press down, lean to the left, come up, press down into
the ride to come up. Let's do that again. Press down, lean to the left, gun up, press down into
the right. Come on. Now let's do the same and invert our colors stored with
your green at the top. Now if you want you to
call to the other side, then you have to press
down to the right first and then come back
up and press to the left. Again, press down and
flip to the right. Come up, press down and
flip through the lay. Press down over to the right, come up, press down over
to the left, come up. Now let's do the same
and invert colors. Next, we're going to make
a leave that folds over to the front like an arch and stop using the color that's at the top in
this guy's white. White on white and come back
down again and end in a tub. Now this one might
take some practice, so I suggest you
do it a few times. Again. Arch up. Hold on. There was too much
paint on my brush. Let's try again. Arch up. Come to a stop. This time, green at the top. Match it up and come back down. Again. There we go. Now say we want a long leaf
that cools multiple times. Then we can try the following. By repeating the wrist movement, Britain down to the lips and
pressing down to the right. You can make a long curly leaf. Press to the left, come back up, flip over to the right, come back up, lift up, right up. Let's try that again. Beautiful. And why not? One more time? In the next lesson, we will take some of the
leaves we've learned previously and learn how
to make them fold over.
11. Folded Leaves: Again and let's grab
some white and gray. The load your brush. Just to get started, let's just make
basic leaf. Again. The shoot be easy by now. Now what if we see the
leaf from the side? And it is folded clothes? For that, we're
going to do the same that we did with the
iris petal earlier. For me, it's easier to
go from right to left. Again, if you're right-handed, just do the opposite and the other. Let's invert our colors. Also make a little stem. Let's try the same with
a heart-shaped leaves. Now what if we want this
bottom part to flip over? We're going to find
everything and stop there and leave this
last section I've been laid me show you guy. Down, down, up, down, come back down. Stop there. Load again. And come in from here. I'm going to do that
again because there was a big blob of white
paint in the way. I can either flip your wrist
for coming from the bottom. Flip your wrist is a little bit harder to get the same results. Or alternatively,
moving from the bottom. Let's do the same with
this side. Again. Leave the sides you
want to flip for lost. This is just the
top of the knee. Come down, come down, come down. Load your brush. Flip yours. Now say we want the
top to fold in. Let's try that. Let's try the other side. Now we don't have to
use the leaf like this. We can also use a smooth leaf that wraps up our leaves. In the next lesson, we're going to take what
we've learned and put it together to create a bunch
of pretty little flowers.
12. Class Project: Wildflowers: In this lesson, you
will again need white, green, and then a variety of other colors to make
different flowers. But I'm using red, blue, yellow, and purple. Will also need a pallet knife
to mix your colors with, as well as a brush. Again, I'll be using
a number I brush. Our goal for this lesson is to fill up this
entire sheet with different types of flowers using different leaves and
different colors. First, I'm going to start by mixing a little bit
of blue with white. To create a lighter blue. For this, we will need a
palette knife to mix the colors with some of your white and
mix it in with the blue. If you want to, you can use a different color or you
can follow along with me. Six, good. Clean your palette knife with
a piece of paper, towel. Grab a clean dry brush. Let's start. Again. I'll be starting in the top right corner and move across the
paper from there. Let's load our brush. Blue at the top,
wide at the bottom. That forward, back,
forward, back forward. For the first one, I'm just going to make up a little Wildflower
with 2.3 load vitals. Let's start putting
my brush at an angle. We go, we go, we go
down, down, down. Bottle number one. Down, up, down, up, down. Again. If you're right-handed, you might want to
move clockwise. If you're left-handed, it's
easy to go counterclockwise. Good. At the top, I'm going to make a closed
bottle for this mike. Back pixel and one
in front of it. There we go. I can maybe make another one. Over here. I'm going to
do something similar. But instead of three labs, I'm only going to
bake two lobes. Now we're going
to take green and make a little steam
here and some leaves. Before we do that, I just
want to put one tiny flower. They balance everything out. Now let's grab some green
paint with a clean brush. Now, gently using the
tip of your brush, make a fine line for the stamen. Going to start. Here we go. The trick was binding
stems is to not make it completely stripe things. So usually a bit faint or cold, which gives it a much
more organic look. Now for the leaves, Let's start by making one there. Praise down and beautiful. Another one there. Down. There. You might want to
flip your brush. And I think that is enough. Let's leave it there.
13. Class Project: Calla Lily: Next, I'm going to use some yellow because I'm not
a fan of this yellow. Again, I'm going to mix a
bit of white in with it. Making sure my palette
knife is cleaned. To take a little bit of white
and mix it with my yellow. Not too much because we
were still want there to be a difference between
the yellow and the white. Clean brush. Let's loaded with
yellow and white and get ready to paint
a color lily day. I'm thinking of binding one over here and one towards the side. Let's start with this
one at a slight angle. Remember what we learned. We're going to make a
teardrop shaped leaves. Whoops, I want the
y to be outside. Let's try again. With the white outside. It's got out and out and down. Because these colors
are so light, you might have to paint
over it a few times. White at the top. Let's make the inside load again and fold over. Good. It's Mike Another one day. Let's do the inside
white on top. Load again. Fold over. Let's do the leaves. Grabbing my clean
brush, dry it off. Let's make the stems
starting here. Another one. Let's grab some more green. Now call alleles have
big flowing leaves. Going to pick one white on top. Start here. Out, in, out, in to load again. Folding another. Beautiful, That's
like another one. And maybe one more. Flip one page.
14. Class Project: Carnation: Next, I'm going
to use this space here to paint a carnation. For that, I want red and white. I'm going to mix a bit
of white in with my red. Nike using a clean brush. Let's load up colors. Using the space I have. Going to put one big flower
and let the steam guy down here with a carnation. We will start with
the back petals. This again to make a
little scallop shapes. Again. Like that. That's the basic shape will be using another one. Slightly overlapping, beautiful snake one in the center. And just as we did with the rows legs make it
fold in on itself. Just like that. Before we the
petals around the center. Let's just extend it out a bit. Dislike another tiny one. Okay, Good. Grab your green brush. You might want to
add a little bit of water to your green. If it's dried. Let's make a steam down here and leave some room
for the leaves. Now carnation has a
little green part here. Let's do the same here. And couldn't make it. For the coronation.
We're going to make the long flowy leaps. To practice again, grab
a piece of paper and do that first little bit of pressure and come back in. Again on the other side. Let's do another one with a flip in. And let's make
another tiny leaf. There we go.
15. Class Project: Pansy: Last, I want to use this bottom space to
paint some pansies. So for that, we will
need some purple. That is a bit too dark. Let's try again. Guys. Let's make pans a year. And here, and leave this
space for some leaves. Again, the back leaves
are a little bit bigger. So I'm going to put a little
bit extra pressure on it. Leaf number one. Let's try that again. Now like the other
leaves overlap this one. Flip your brush with
the purple on top. Let's make the side
leaves slightly smallest. So with a little
bit less pressure, we go other side. And the bottom leaves. Good. Now let's make another one here and change
the colors a bit. Now let's grab our green again. It's like I'll stay. Now the Pansy leaves are
a little bit around it. And for that you need to wiggle, wiggle, wiggle like a loop. A loop, loop. And come back down. Come back down. You can stop there and make
it to fold in on itself. Let's try one that
face forward to us. Let's put another big one here. Another one folding over here. Next up, hydrangea
rows and Iris.
16. Class Project: Hydrangea: Thinking I would just
use the same palette. I'm going to get rid
of this old paint. It's the next day. They're all dried. Of course, you can always
just use a new clean palette. Let's start with
the next clause. Projects. In this project, I want to make some blue
again to make a hydrangea. And then I was thinking
some pink roses over year. And in the space lift
up purple, iris. Grab my white and blue. Violet. Nice. Again in the top right corner. Late start. So that Ranger is a cluster flower. It's basically made up of
small particles like this. Little flowers made
of four pixels. Let's give them a bit. Before I'm going to do that, I'm just going to
make a bigger outline to see where I'm going to paint, like the circles. So I'm just going to
extend it out a bit. Much better. Let's add the
next layer of flowers. Let's start adding the
other petals number 1234. So that's 123. Good. Now I can always
go in with some blue and make the
center of the flowers. Now for the leaves, we're going to need some green with a clean brush like your green and white to make a stain. So for that, I think
I'm just going to make one big leaf here
because I'm embed limited with spice and we have
to work with what we have. Nothing fancy. Just a big leaf facing forward. Let's give it a little stalk. And placing a bit holiday
for a bigger leaf, we go, we go down, down, down. Right? Next up. We're going to use
this space for some roses.
17. Class Project: Roses: Grab some red paint and
mix it in with wide, make sure your palette
knife is clean. I'm going to add
a bit more white because I want a lighter pink. Alright, loading your brush with some pink and white. Let's start small
and go a bit bigger. For this, I want my
whites to be on top. Let's go. Go make an arch. Before we go up. Flip your hand. Do that again on the other side. Swat at the top. Another week. Another one here. I'm just going to make a
small arose, but up here, starting with some
leaves at the back, maybe another one here, and another one here. Let's start with the center car. Down the side. Now I want to leave
some space for the leaves because
all like a stain year and there were
three leaves coming out the same year with
three leaves coming out. And also here, maybe we can
have another bud up here. You know what? I want this rows to be orientated at
birth more like this. I'm going to put another leaf here so I can make this
thing come down here. Grab your green. Now let's find a way for
the steam to come down. Let's make the first bunch
of leaves down here. You have a little steam
with 123 leaves coming out, unfolding over to the side. And another one at the bottom. Let's do the same here. Then another three. Let's try painting one with only the one part of the
bottom folding over. All the way to the top. Come back down, stop there, reload and flip over. Let's try the same here as we did for the carnation. Let's put some leaves to cover the buds. Daily guy.
18. Class Project: Iris: Next up, let's see if we can
fit a little iris in here. Go in some white. Let's start with the
big leaf at the top. And maybe two small
ones in front of it. May be something like this. And another one. Right here. Irises are very complex and they all look a
little bit different. So we're just going to
create our own one. Let's do the two-sided leaves. Since we don't have
a lot of space here, I'm just going to make
to lead to leaves here. Come back down, stop and curl. And another one day. Maybe we can make another one
here that is half-closed. Now for the leaves, again, we're going to make
those nice, flowy long leaves. And one that flips over. First the steam. Now it's an iris. All the leaves come
from the bottom. Going up or down. Let's swan. Fold over, come back like an arch and reload. Jake, what color is at the top? Make it line up. I think we can stop there. In the next lesson, we will wrap up
everything we've learned. I think talk about
future projects that I will add onto this gloss.
19. Wrap Up: That brings us close to an int from petals still leaves
the botanical paintings. We covered a lot in this class. And I hope you enjoyed
it as much as I did. Please share your
creations with the rest of the class and
leave a comment. If you want me to teach
another type of flower, I'll be adding more flowers over the next couple of
weeks and months. So keep your eyes
open until next time. Happy painting.
 Annika, Illustration | Painting | Digital Art