Transcripts
1. Promo Video: Hi, my name is Ada, and I'm a professional
guitarist. In this course, you
are going to learn about Spanish guitar
strumming techniques. And you can learn techniques like Flamenco
triplet Rasgaduzap. But today I'm just
going to show you how to play the Flamenco
rumba technique. Rumba is played in 44 times. Probably this is the reason
why it is so popular, because audiences
are easily able to relate to this
familiar 44 rhythm. The sequence is as follows, with all of the
fingers up with all of the fingers down with
all of the fingers. When you turn your wrist
and up with your thumb up, up, up, up, up, up. Now the question is, how
can you make this faster? There are a few steps that you need to do to make this faster. First step, only play with your index or middle finger
instead of all fingers. The sequence and index finger, index finger down, and thump up. Or middle finger up, middle finger down, thump. I actually prefer the index
finger to use second step. Turn the risk properly. The sequences it up,
turn back, turn. If you don't turn your wrist, then you won't be able
to make this fast or have power to do
this movement properly. Third step, be very
close to the guitar. If you stay close
to the guitar and you don't make so
much movements, then you can go fast. Because if you make
too many movements, it will take so much time to go back to the
original position. If you see when
I'm playing fast, I'm very close to the guitar. I'm only turning my
wrist four step. Try only one quick movement
and after stop, for example, do one round and hit stop
sign up for my course. Have fun and keep on practicing.
2. Basic Rumba Technique: The first technique
that I'm going to show you is the basic
rumba technique, and after this lesson, you will learn
something like this. Rumba is played in 44 times. Probably this is the reason
why it is so popular, because audiences
are easily able to relate to this
familiar 44 rhythm. The sequence is as follows, with all of the
fingers up with all of the fingers down with
all of the fingers. When you turn your wrist
and up with your thumb up, up, up, down, up, up, up. Now the question is, how
can you make this faster? There are a few steps that you need to do to make this faster. First step, only play with your index or middle finger
instead of all fingers. The sequence and index finger, index finger down and thump up. Or middle finger up, middle finger down, up. I actually prefer the index
finger to use second step. Turn the risk properly. The sequences up,
turn back turn. If you don't turn your wrist, then you won't be able
to make this fast or have power to do
this movement properly. Third step, Be very
close to the guitar. If you stay close
to the guitar and you don't make so
much movements, then you can go fast. Because if you make
too many movements, it will take so much time to go back to the
original position. If you see when
I'm playing fast, I'm very close to the guitar. I'm only turning my
wrist four step. Try only one quick movement. And after stop, for example, do one round and hit Stop. This will help you
later on to connect these movements together and
you can do it continuously. Fifth step practice with the
metronome to be on time. For example, no, I set up the metronome to 80 BPM and after I will play
one movement on each of the beats up, you can set up the
metronome to higher speed. And you can follow this
return until you can reach the point that you can do one
round on each of the beats. Now the metronome
is still on 80 BPM, but I will play one round
on each of the beats. You can influence the sound once you're comfortable
with the technique. If you hit to the sound hole, then you have a deeper sound. But if you hit closer
to the breach, then you have a higher sound. And combining these two hits, then you can have a
worried technique with a, it sounds like this. If you would like to keep up with the speed with the rumbo, every movement has to
come from the wrist. That's why it is
very important to warm up the wrist before
you start playing. This warm up approach is very similar to a
fitness workout. You prepare the wrist for the first movements
before you start playing. At first make in 10-20 counterclockwise
circular movement, your wrist 1-234-567-8910 And then you can do the
same to the clockwise 1-234-567-8910 And then you can turn it away from
you for 3 seconds, and then towards for 3 seconds, away from 3 seconds, and towards for 3 seconds. You can just repeat
this movements until you feel like that your
wrist is ready to go. You can also do
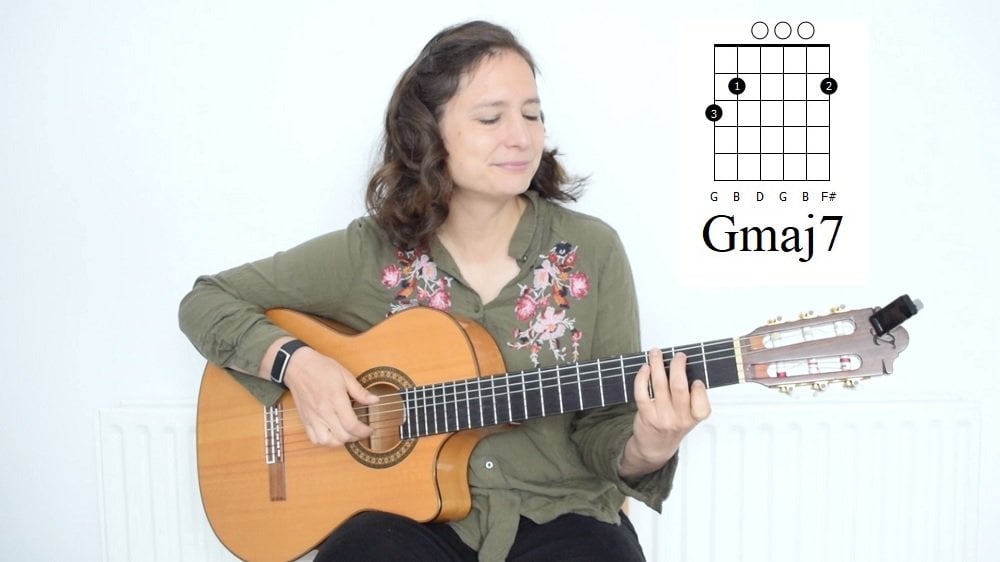
the same movements with your other hand as well. The first exercise is changing
in between major and major seven because there
is only one node which is the difference in
between these two chords. This is and major seven. I set up the metronome to 120 BPM and I will
play the exercise. But please, if you don't
feel so confident, start with a slower speed.
3. Rumba Technique Variations: Before we go on to
the rumba variations, I would like to introduce
a new technique which is called gop. This is go. Gop is a Spanish word
and it means to strike. And it literally means to strike with your ring
finger on the soundboard. It is best to have
a little bit of nail to get the proper sound, but not too much because
it can easily break. Be careful with this technique, you should protect your guitar. If this technique is used a lot, the guitar can become damaged
after a period of time. It can even result in holes forming in the wood
of the guitar's body. To avoid this problem, some people use a guitar
protector called Colador. This can be in bod, below and above the sound hole. To do this technique, the
best is to start at first. Without the guitar, this
movement is very similar, like catching something with your thumb and your ring finger. But at the same time you
need to turn your wrist, it is more like this. To do this on the guitar, at first you need to place
your thumb to the east string, But do not it down, just place it there. You make a hit with your
ring finger and then you turn until you can
do this altogether. The first variation that we will learn is the most common rumba. After this lesson, you will
learn something like this. So the sequences gop down
with the index finger, up with the top, up
with the index finger, down with the index finger, and up with the top, it is still in 44, but there is an accent
on the goal pay, which means it is lasting twice as much as
every other movement. So it could be like go
up, break down, up. It, up, down, up. You can transform this
technique to a percasive rumba. And the only difference
lays on the left hand, you are incorporating several
mutings to the left hand, and then it will sound
like very percasive. It will sound
something like this. It is exactly the
same technique, although the mutings
are incorporated, which means you hold the chord, touch the strings, hold the
chord, touch the strings. The next variation will
be the one not Rumbo. And after this lesson, you will learn
something like this. The sequences you go on with your thumb and you
end up on the next string. After you go with
all of your fingers, with your thumb and
with your index finger, it is a little bit softer
way to play rumbo, although it can sound
very nice because you can play little
melodies with your thumb. Also, a new technique
was inside this rumbo. It is called pug. Pugar means playing
with your thumb, and your thumb always ends
up on the next string.
4. Pulgar: Although this book is mainly
about strumming techniques, this Sloman Coo guitar technique needs to be introduced because it will be often used in the
patterns described later on. Pulgar means stump in Spanish, and it involves playing a string and ending up on the
next string below. It is a little bit
different from the classical
technique because they do not end up on
the next string. The best is to practice
Pulgar with a metronome, for example, this is one Pulgar. Before we go into the exercises, one more technique
needs to be introduced. This is oudado. Oudado sounds like this. Oodado is a technique that uses the index finger
to support the tomb. Meaning that the highest string is played with the index finger, and every other string
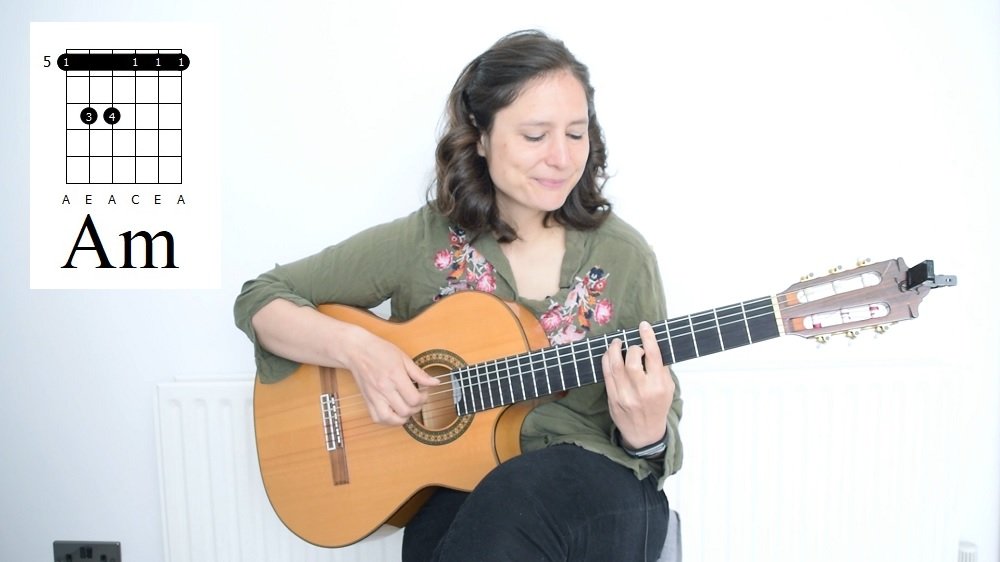
is played with Pulgar. For example, in the A minor, we played every other
string with the Pulgar, and only the string played
with the index finger. So, Pulgar, index finger. Oh.
5. Flamenco Triplet: The next technique I'm
going to show you is the Flamenco
triplet, or Abanico. And after this lesson, you will learn
something like this. The triplet consists of three
notes within a single beat. And the sequences at
first you go down with your middle and ring
finger only with your fingers and not with
your wrist after thumb. And you turn your wrist and
turn back with the thumb, it is down turn. Flamenco guitarist
actually start the sequence with
different movement. They always start
with the up movement, it's up, up, downturn. But I show you this way because you can add
the hit later on. Mustering the triplet
requires that every single movement be
performed precisely as follows. By making the first movement, only the two fingers moves and the entire hand remain stable. They end up just below the strings and they
are curved like this. The second movement, you
use your finger or thump, and you turn your wrist. On the third movement,
you turn your wrist back, fingers turn, fingers, turn. The question is, how can
you make this faster? First, be very close
to the guitar. If you make two big movements, you won't be able to get fast. It is more like second, turn your wrist properly. If you don't turn
your wrist properly, you won't be able to go fast. In the end, it's
supposed to be like a shaking movement
only with your wrist. Third, make one quick
triplet and stop. If you are able to make one
quick triplet after a while, you can all connect
them together. Fourth, practice
with a metronome. I set up my metronome to 130 BPM and I make one
movement on each of the bits. It looks like this. If it is too fast for you, you can slow it down. And once you are confident, you can go faster
with the beats. The best way to practice the
triplet is making accent. For example, in the
three movements, you can make at first an accent on the first movement
all the time. It is a strong kit. And after you make an accent on the
second movement, after you make an accent
on the third movement, you can do a lot of rounds on this one up until you feel confident and you can go
for the triplet itself. Start this exercise at a slower
speed first, like 100 PM. But once you're comfortable with the rhythm
and the technique, you can go up higher. Like I will play
this in 190 BPM. Once you're comfortable
with the triplet as well, you can make oxens. This means that you make a
triplet on each of the bars at the first time after every other triplets is a
little bit lower volume. The other way to make accents on the triplets is combining
them with eight notes. This means that you do end after one T two tele, two triplets. You can combine
these triplets with the previously learned
rumba techniques and it will sound
really amazing.
6. Adding Hit to the Flamenco Triplet: After building up the confidence with the Flamenco triplet, you can start adding heat. After this lesson, you will
learn something like this. The sequences you go down with your middle
and ring finger, like in the triplet before. And you go down with your thumb and turn
in the triplet before and turn back and he do. I call this Gabriella technique because Gabriella Quintero from the popular Mexican
guitardoor Rodrigo Gabriella using this technique a lot. The, it doesn't
necessarily need to be after the first triplet, but you can do several
triplets and do a hit. You can do, for example, two triplets and do a hit. It sounds something like this. And you can combine
these two triplets, hit with one triplet
and the heat. You shouldn't start doing this technique before you
can roll the triplet, but once you're comfortable
with the triplet, you can start doing this. And you can even make
different hits on the guitar. If you hit to the sound hole, it sounds a little bit deeper. If you hit closer to the
bridge, it sounds higher. Using this technique, doing the different sounds
something like this, and with a chord it sounds
something like this. The next song will be the
same chord progression, although there will
be a triplet and hit and strumming up and hit. The first exercise will
be from the song Tamac. And you use double triplet. And it, and after triplet it
triplet hit on the chords, alternating in
between each other. You can make other variations to make this a little
bit more interesting. For example, instead
of triplets, you can use up and dance
drumming and the heat. After this lesson, you will
learn something like this. The technique is your hand is in an open fist position and you go down with all of
your finger nails. After you go up with your thumb, finger nail, it is in the end, only your
wrist is moving. And that's why you can go fast because you should
be able to draw your wrist in the end to
make accents on this one. You can just make one done
movement and after up. And it, it's up up. When you master all
of these techniques, you can practice and combine
everything together. And you can use a lot of
different progression. But now I will show
you an example on a minor, major, major, major. And I will play the
different techniques on each of the courts.
7. Replacing Hit with Golpes: Fast and percasive
playing can be produced other ways than just making
hits with the hands. Replacing the hits
with goal pace will add the different
feeling for the play. After this lesson, you will
learn something like this. To do this, playing
your hand is in an open fisted
position and you go down with all of your fingers
and up with the thumb. It is up, every movement
is coming from the wrist. You only move your wrist
when you do this movement. After a while, you
can speed it up. The next step is
incorporating ocent. You can make accent
on a vary that you go down strongly and after up, down, up, down, up. You create triplets
this way fast. It sounds something like this. The next step is replacing
the accents with goal pays. Go pay is hit with your
ring finger and you catch with the Tom why
you turn your hand. Then the movement will be Goop with a chord. It sounds something like this. Step four is building up different oxens using
this technique. For example, you can build up a 44 with this one
and then it will be like it sounds
something like this. You can build up other
types of rhythms as well. For example, some Bork
or Turkish rhythm. And then it could be up up, the first will be,
the second will be. And of course you can build up any other rhythms that you want to on your imagination is the limit to use
this technique.
8. Rasgueado: Rasgiado is a Flamenco
strumming technique and it is executed on a way that your thumb is placed
on the low E string, and you use one or more fingers from the base of the thumb, and you go down on the strings. The one Stro Rasgiado looks
like this or like this. The strings are struck
with the finger nails and it gives a much stronger sound
than the other techniques, because we use the
nail to make the hits. The thumb is placed
on the low E string, but do not push it down. Just place it there.
Your index finger is in the bottom of the thumb, and you hit the strings
with your finger nail. When you end up, you
are still curved and you are just below
the strings like this. When you do the up movement, you use the treble strings to go up and you go back
to the bottom of the thumb when you
hit the first one, then you try to hit the bass notes so it
has a strong sound. Some people do not
flick properly. It's advisable for
them to use a coin or any other little things and practice the flicking
without the guitar. One sto can be combined with
a hit using the ring finger. This technique is
also called Golpe, what you are doing, your
thumb placed on the string. Your index finger is the
bottom of the thumb. And then you make the hit and go down at the same time
with your index finger. It is like this with a
chord, it looks like this. It can be a bit
unnatural movement at first because your
index finger and your ring finger is moving towards different directions
without the guitar. It is a bit like this form and hold any
chord of your choice. To make it easier for us, I will just hold
an E major chord, which is this one set
up the metronom to 100 BPM and start playing
one strum per beat. If you do not hear a
strong bass sound, then you need to stop, correct the technique,
and start again. For example, it is
something like this. You need to stop
and start again, but you need to hear
the bass sound go away. That's when you know that
you play this correctly. Once you are confident
with this one, you can start playing
two strums per beat. It means you play one Dan
Strom and Pst as well. It is the same, same speed, which is 100 BPM. Once you are confident
with the speed, you can go higher
with the speed. For example, I can set up to 110 BPM and then do
the same exercise. And of course, you can
go higher and higher, you can keep up with the rhythm. Once you are confident
with these ones, then you can go back
to 100 BPM and start combining the one strum per beat with the two
strum per beat. Then to start with, you start playing
four times one strum per beat and four times
two strums per beat. It will sound
something like this after you can do like one strum per bit and
12 strums per bit, just to make it a little
bit more difficult. After you are confident
with all these exercises, you can go on further to do
something more difficult. For example, Bularias,
which is a floor Thm. If we put 150 the metronome, we can play that one. And we can also do
the same exercise, but we now add the goal
pace to make the oxens.
9. Muted Rasgueado: Staccato is a specific
performance technique. It means that the cord or a node is shortened by duration. And there is a brief silence
after before the following. It means that it is
something like this. Basically you are holding a
cord and after you hit with the one stroke rasgiado and release it and you just
touch the strings. It is also called, because of this reason, muted rasgiados, because
you mute the cord. This technique works
the best when you hold a bar and then you can hit
and release it very easily. But you can do the
same technique with an open cord as well. The best is to try to
hold, for example, an E minor cord and
try to mute it. Then when you hold minor cord, you can hold two
strings together with your index finger after you can use either your ring finger or litter finger to mute it. Some people find it easier
in one way or the other one. It looks something
like this with the ring finger or with the little finger,
it looks like this. For me, it is actually easier with the little finger
to mute the cord. The next exercise will
be to mute the A Major, and it will be in an
open position as well. To do that one, you need to use only two fingers to
hold the A major. Your index finger
holds the E and A, and your middle finger
holds the C sharp note. Actually, this chord
is used widely in Flamenco music because you have the other two fingers
to do other stuff. To mute this chord, we will use the little finger,
it looks like this. Another way to add accents. The conventional
strumming is flicking the guitar body with
your index finger. After this lesson, you will
learn something like this. It is done similar
way as the Rasgiadom, although instead of placing
the thumb on the E string, it is more like in
the mid air when you hit the body of the guitar
and you end up on the string. The sound consists of wood
and strings together. And you also use your wrist to add a little
bit more on the movement. Actually, this technique
is widely used at the beginning of the songs
or end of the songs, But not many people or
nobody is using to strum continuously like
this because it can be quite tiring for
the index finger.
10. Rasgueado Variations: Now we will learn about
the 3.4 stro Crasgiado. Three crasgiado looks like this. For the technique,
three fingers are used, and they are always relased
in the following order. Ring finger, middle
finger, index finger. The thumb is placed
on the low E string, just resting on the string, not pushing it down. The other fingers are held in the shape of a fist and flick down from the base of the thumb in such a way that
after the dance stroke, they end up just below the strings and remain
slightly curved. It is very important to make
contact with the bass notes, otherwise the sound
won't be so strong. I mean, this sound, it shouldn't sound like this. More like adding one more note, you will get the force throw, cross Giado and
it can sound like this or like this. In the first variation, the index finger is used
to end the sequence to play both a dance
stroke and an up stroke. So it will be middle,
indeed, index up. The second variation
will start with the little finger and
it will look like this. Little middle index,
little ring, middle index. How do you practice this? To get the rolling rasgiadom,
for example, you can set up the
metronome to 80 BPM and you can play
three notes per bit. Or you can set up any speed that you are comfortable with. And you can hold any chord. Now will hold an E minor chord. And I will play three
notes per beat on 80 BPM. Once you are comfortable
with this technique, you can set up the metronome
to higher and higher. For example, 90 or 100 BPM. And then you do
the same exercise, but if you don't
hear the bass sound, you need to stop and correct the technique
and go back again. You can do the same exercise
on the four through Rasgado, but you need to go lower with the speed because you
play four notes per bit. Now I set up my metronome to 60 BPM and I play
the first variation. Lastly, you can do
the second variation with the same speed. The first few
exercises will involve changing the base nodes
on the five chord. Five chords are also called power chords and they are
widely used in metall music. But influent chords were to create dramatic and
powerful effects. They are not major or minor because they do not
have a major or minor. They only have root
and perfect five. For example, five
looks like this, what it consists of. The root is an E and the
perfect five is a B. Then it consists of another. And then now I would like to share with you
a few more power courts. This is C five, this is five. This is five, this is D five.
11. Hammer-on and Pull-off: Before going on,
another technique needs to be introduced. And this is legato, which utilizing the Homeron
and the pull of technique. Homeron is like this. Pull off is like this. Legato means that
the nodes are played without intervening
silence in between them. Technically, it means
that the Homeron and the pull off are played
without the right hand. You just play one node
actually, with the right hand. And after when you do the Homer, you add the next with one
of the other fingers on the left hand with the pull
of the method is the same. So you don't play
with your right hand, you use the left hand
to add the next.
12. Tango with Rasgueado: In this lesson, I will show you a way to accompany *** parcito. After this lesson, you will
learn something like this. Before I describe
this technique, I just would like to say that Argentine Togo players
do not play like this. They do not mute every bit. The original milongo
is in 24 time. It is just a technique that I developed and I think
it sounds good. When I accompany lacomparsita. There are two different ways to do this kind of technique. The first one is using the sad. You hold your thump on the
string after you add beats. Why? You incorporate mute
things in every single bit, after every single bit,
it looks like this. Then there is one part. When you use the
three stroke rasgado, after you go back to the
staccato or muted agido, There is one more
way to do this. One. It is the stroke and
the Flamenco triplet. And we are using
the muting again. It like this, instead
of the three stesgiado, the Flamenco triplet, which
is three notes as well, and it sounds quite similar. Maybe the rosgiadove is a
little bit stronger. Sound
13. Alzapua: The next lesson will
be the Alza poem. After this lesson, you will
learn something like this. Alsop is a type of triplet, which is played with the thump, and it occurs almost
exclusively in Flamenco guitar. Although Flamenco guitarists use this technique to play
solos or falsetas, it can also be used as a written playing in
non Flamenco settings. To play the Zap at first, you place your thumb on the string where you
want to start it, and you do one pulgar, you go one node down, or one string down, you
end up on the next string. The second movement is a turn. You turn your wrist with your
thumb and you turn back, It is done turn. When you do the turn, you can go few strings down or
all the strings down, it doesn't really matter. Do turn when you go
back to the string, then it's good to have
all of your other fingers just to end up just below the string so you have
a stable position. Also, you can add the goal
pay to this movement. And to add the goal pay, you need to audit. On the second movement, it is go pay, turn back. Pay, turn back. Now
the question is, how can you practice
this and go fast? The best way to
practice this is to make accents at first, make accent on the
first movement and play this for a while. And then you can
make an accent on the second movement and then make accent on the third movement until you are feeling more confident
with this technique. And then you can
start the exercises.
14. Drumming Techniques on Guitar: The guitar itself can be used as a percussion instrument because the guitar's body can produce a wide variety of
percussion sounds. If you hit in different
places, for example, if you hit here, it sounds different than
hitting it here or here. At first, we will use
the rumba technique to drum on the guitar. After this lesson, you will
learn something like this. The steps are, at first, you need to mute the guitar
with your left hand. If you are right
handed guitarist, then it is up, done up. Actually, this was in
the seventh lesson. And it is exactly
the same technique. But now we will use it as
a percassive technique. When you mute it, you
can just do it at first, in one place up after you can start hitting
in different positions. For example, it closer the sound hole and
closer to the bridge. The next step could be
to go even further. One heat could be
near the soundboard, and the next heat could
be over the bridge. Then it can look very nice
in a live performance. The last step could
be that you move the whole technique and you do exactly the same thing
on the guitar body. Or you can involve the strings as well
and the guitar body. It's really up to you how
much to use this drumming. The second technique
that can easily be applied as a drumming technique is the open dance drumming. After this lesson, you will
learn something like this. This technique is actually previously described
in less than 12. At first, the wrist
should be very relaxed because all the movement
is coming from the wrist. Then you are in an open
fist position and you go down with all of your
fingers using the fingernails. And you go up with the
thumb fingernails, and you mute the strings
with your left hand. Then you just go up. The best is to practice
this with a metronome. So you can set up the metronome to any speed which is
comfortable for you, and you can do an up
movement on one beat. I set up my metronome
to 110 BPM and I practice it after. Of course, you can go
faster and faster with the metronome until you
can roll your wrist. You can do the same thing
on the guitar body as well. The next step will
be to make axens. So you can do, for example, up, done up, up, up. And the next thing to move
this to the guitars body. Then also you can build
up rhythms with this one. For example, you
can build up 44. It will be done up on the body, it sounds like this. To make the previously described drumming a little bit
more interesting, it is great to add hits with the whole hand to this type
of strumming or drumming. After this lesson, you will
learn something like this. The first thing to develop this technique is to mute the strings
with your left hand. And you do the strumming
with your right hand. The first thing you could
do is up, up, up, it. Then to make this a little
bit more interesting, you can do the up, down, up on the guitar's
body and the hit on the strings after. You can combine all these
techniques together and develop different rhythms and you can reach something
very interesting. For example, you
can do it up it, then you can do the same
thing on the guitar body. Or you can do the open
dance drumming on the guitar body and the
hits on the strings. The next drumming
technique I show you will be the triplet. Because this can be used
as a drumming technique. To, after this lesson, you will learn
something like this. At first, you need to mute the strings again
with your left hand. After the sequence is done, with your middle
and ring finger, and turn your hand with
your thumb and turn back. You can find this technique
on less than ten, where it is explained a
little bit more deeply. But once you are confident
with this technique, you can start using it
as a drumming technique. Also, the thumb part
will start when you start combining this one
with different techniques. For example, the up
and dance strum. And you can make
amazing rhythms, for example, you can do. And then the Flaming
Ople three times. And then first, let's see how does it sound
on the guitar body. It's a little bit
difficult to do this one on the guitar's body, but after practicing, I'm sure you can get
the right sound. Of course, there
are many other ways to drum on the guitar. These are just the
techniques that I developed and I used to drum on the guitar of when you
play with another player, it can be much more fun. The other player can do some kind of bass drumming
or basic drumming, and you can do the solos
with these techniques. The question is how to
do this bass drumming? There are a lot of
different ways that people use or I use. One can be when you use your thumb and your three
fingers, your index, middle ring finger to
drum on the guitar, your thumb is hitting the bridge and the three fingers
hit the body. It's something like this. There are another way that you can do this, bass drumming. And it is using both
of the hands and you use this bongo
style of drumming. On the guitar, it is
something like this. There is even a style
which is called Percussion guitar that people use on the steer string guitar, and it sounds very
spectacular when they play and drum
at the same time. There is actually
a record company called Candidate Records, who signed the best guitarist in the world in
this kind of music. I highly recommend
it to check it out. I hope you enjoy these
lessons and it helps you to learn something new
and develop your own music. I just want to say
I'm so grateful for the people supported this
project on the Kickstarter, because without you guys, it could have never happened. I would like to say
thank you to my editors, Ron Llano and Mark Wheeler, because without their help, I could have never
wrote this book with their proof reading
and voluable advices. They help me all the way. I also would like to say, thank you for RP Films in Hungary who filmed the
video lessons with me. Hopefully after this book, you will go further with your music studies and you will become a great
musician in the future.
 Edina Balczó, Award-winning Guitarist