Transcripts
1. Promo video: [MUSIC] Hi guys, my name is Edina, and I'm a professional
guitarist. [MUSIC] You might know me from the Spanish Guitar
Hub YouTube channel, which has over 70,000 subscribers and 10s
of millions of views. Do you feel that your body
is not clean enough and that you don't know most of
the cords around the neck? Now, in this course, we're going to tackle this problem and
we're going to learn all the major minor cords and all the body shapes of these
cords all around the neck, so you can be free to play the songs that
you want to play. Guitar studying do not
need to be boring, that's why we are
going to do this, not just through guitar lessons, but through six
different songs to practice lot of
different body shapes, and these songs we'll be
in two different speed, one practice speed, and one full speed. [MUSIC] During these little songs, you will also learn some fingerpicking exercises and you can learn, for example, arpeggio soloing technique, lot of freedom exercises
to make you sound very musical when you
are playing these songs. [MUSIC] Now, let's play it with music. [MUSIC] After I'm going to challenge you to do
a chord chart exercise, then I'm going to play the lead guitar and
you need to strum the cords with me just by
reading the cord symbols. [MUSIC] Finally, we are going to
do an ear training game, when I'm going to play for
you three different cords and you need to tell if it
was major or minor, and this is so useful
because later on, this will help you to
learn songs by ear because sometimes the tab
is not available online, so you need to use your
ear to learn the songs. Sign up for my course today and start learning the
cords with me.
2. Little Intro: Before you start the course, I just want to say
it would make me really happy if you
could leave me a review. So I know how I have done
with the course for you. Also, you'll see
some assignments in the course if you
decide to do them, I have a loop
personally to each of the assignments and either
give you a feedback. So I know how you have done. I hope you will enjoy this
course and I'm really looking forward to see your
reviews and assignments.
3. CAGED system: In this lesson, we
are going to look at some basic major and
minor chord shapes. We will also learn
about the CAGED system, which means that you
can hold certain chords in open position in
the first three frets and after with the
use of bodies to hold all the other chords
all around the neck. What is a chord? A chord is when you hold two or more notes together
and you sound them. In this case, I had E minor. When you play major and
minor chords together, it just means that you play three different notes
together at the same time. Because you are playing it usually with all the
strings on the guitar, it means that some
of the notes are repeating. Let's have a look. For example, an E major chord. The E major consists
of three notes, which is E and B, and G sharp. Some notes are repeating
because this is E, B, E, G-sharp, B, and E. At first, let's learn all of the
major open positions, which is also called
the CAGED system. The CAGED system means
that you can hold a C, A, G, E, and D chords in the
first three frets in the open position
and after you can add the body and you
can move them around, and then they will
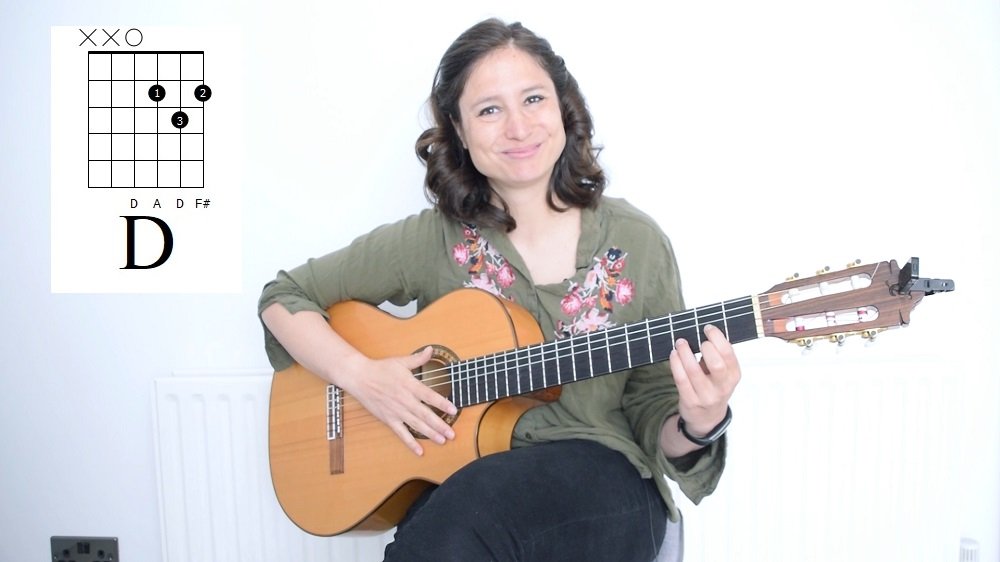
become different chords. Let's look at the first chord, which is C major. Now we can add the
body to the C major, and then we can move it forward, and then it will
become the next note or the next chord
in the sequence. So if I add the body here on the first fret and
I hold the C-shape, then it will become
C-sharp major. Then, of course,
you can go forward, and then it will become
D major and D-sharp major and E major and F major. I actually quite prefer to play this F major than this F major because this
sounds a tiny bit softer. Although they both consist
on the same notes, they sound a tiny bit different. Now let's have a look
at the next shape, which will be A. In this case, you can hold a major and minor chord as well in the
first three frets, so it is A major or A minor. This is one of the most
common ways to hold the body because the most
common ways to hold the body is either the
A shape or the E shape. This is also called the A shape. Then you hold somewhere. For example, this is D minor in A shape because you
have the same shape like you would hold it in
the first three frets. But then this is A minor, and then you move it forward, you add the body, and then it will become D minor. Again, the same rules
apply here as well. The first chord will be A, and if you move it forward, you will get to a
different chord holding the body and this
will become B-flat major or B, and so on. You can move forward. Some people hold this
shape differently. They try to hold
it, for example, only with one finger
or two fingers. But I think a lot of tension you will need to
build up and a lot of strength to be able to
hold this chord like that. The best is to be curved
with all of your fingers, so it means middle, ring, little finger, and then you have a straight
body with your index finger. You can be the most
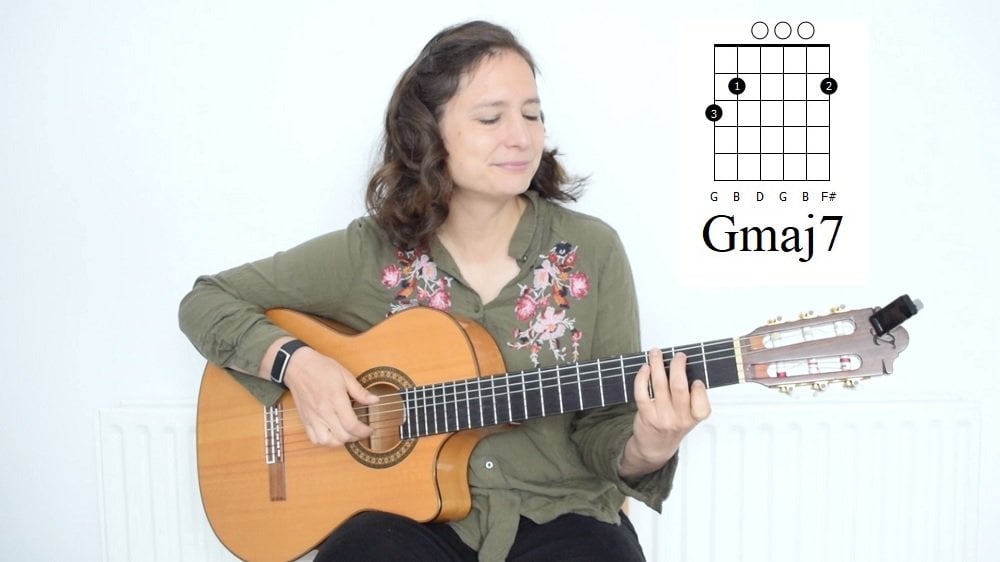
clean this way. We have the G shape, and in this case, it is just a major
chord, G major. Sometimes you can hold G
major like this as well. This is not really used, especially in classical guitar. Maybe sometimes in electric
guitar, they use it, but definitely not
in classical guitar because it would be like a
really awkward position. It will be something like that. It would be very difficult
to hold it clean. The next shape will
be the E shape, which will be in major
and also in minor. Now this is the
most popular shape, and this is probably the first
one that you will learn as a body chord because the F
major is in so many songs, and then when you are
holding the F major, you try to hold it here. Then this is the E shape. You are just pushing
it forward to one chord and that's
how it became F major. Now, let's have a look
at the next shape, which is the D. From the D, you have the major and
the minor as well. So this is D major, and this is D minor. Now, this shape is not quite
popular with the body. Sometimes it is actually used
in some classical songs. But in most cases, it is not really
used with the body. But it is quite nice when you are actually
harmonizing something. For example, you
can harmonize the A minor with A minor here. This is the D minor shape, but it's A minor chord. D shape doesn't appear so
many times in the body, although sometimes in some
classical song it appears. For example, in Capricho
Arabe from Francisco Tarrega. It comes up this kind
of shape with the body, but most of the time
it is not appearing. [MUSIC] Now that you learned about the
CAGED system and the major and the minor chords
in the first few frets, let's move on to
our next lesson.
4. How to hold a clean barre: Now, let's have a
look at how you can work properly about A chord, and how you can get a
really clean sound. Also, we will look
at how you can check if your sound
is clean too. At first, let's have a look
at two different shapes, which is the most popular. So we will have a look at
how you can hold E shape, and the A shape with the body. When you are holding a body, you need to hold
your index finger straight and everything
else curved. But the index finger needs
to be that straight. Also, the index
finger needs to be just on the bar or
just behind the bar. Because if you are
holding it here, in the middle of the fret, then you need to have a
little bit more effort and strength to be able
to hold it properly. So the best thing just to be on the body or just
behind the body. Now, the other thing
that you need when you hold a good body
is a good grip, and the good grip is in
between your index and thumb. After a while, actually
we develop this muscle, which you can see
in my hand as well. This is quite strong, and actually this is a good
sign that you can tell that somebody is a
guitarist if they have this muscle in their hand, because not every
person has this muscle. But if you keep
playing the guitar, if you keep holding
bodies after a while, you will develop this muscle. Now, this can take a while and that's why maybe at the
beginning you won't have so much success
when you are playing a body because you don't have enough strength in your hand, and you need time to develop this muscle so you have a
really nice and good grip. But I'm going to tell you
what you need to do to hold a body and become really
clean with your sound. Your index finger is straight and everything
else is curved. Now, I'm holding actually
an F major chord, which is the same
shape as the E major, but now I'm adding a body. You can see that everything is curved except the index finger. The index finger is straight. Lot of people like asking
where your body starts. The body usually starts in the bottom of your index finger. So if your index finger
is quite long and longer than the
fretboard of the guitar, then you need to over-body, which means that you
don't just hold it here because this for me
even it's really difficult. If I would need to stop the body with my index
finger on the top, this wouldn't be
good for me to or it will be much more
difficult to hold any chord. So the best is just to put the bottom E string here,
and then over-body. Now, the other thing that
you can do is instead of pushing so hard to
have a clean sound, you can actually
just pull your hand. A little pulling
will go a long way, and it is more effective than pushing so much because
if you push so much, then you will get quite
tired after a while, so it's sometimes
easier just to pull. So if you are pulling, especially at the
bottom of the body, a lot of people are
not so clean and they have this [NOISE] tick sound, so then the way to overcome this one is
just to pull a little bit more your hand and then you will have
a cleaner sound. Now, let's have a look
at the A major shape. [NOISE] So this is
actually a B flat major, which is after the A major, so it is the same shape, but it is one fret forward. This will be much harder
than the other one. In this case, you need
to have a flexibility, a flexibility between the index
finger and middle finger. Sometimes it's good to
do some stretching or some massage with your fingers
before you start playing, and if you do it regularly, which I mean around
every second day, then you will gain
more flexibility. But also of course, just trying a lot to play this shape will help
you a lot as well. My index finger is over-bodying. It is just behind the fret
and everything else is curved and it is
quite clean this way. Now, there are some
things which will tell you that you are holding
your body wrong, and one can be that your little finger is straight
instead of being curved. Some people have this issue and they have maybe this shape, and you can see that my whole position is
towards one direction. So if you can see that
you are really towards one direction and not
like towards here, then you need to change your
position because you need to be parallel towards
the fretboard. If you have this way, it's good to sometimes
move the hand and then it will naturally bring it to the right position. Also, if you try to curve your little finger
when it is straight, then it will get into a
better position as well. Now, how you can check
if you are clean, because sometimes when you
are strumming you won't hear if you are
properly clean or not. [MUSIC] Now, I sounded clean, but am I really clean? The only way to check if you are really clean is that you play every single note on
the body one-by-one. [MUSIC] Now, you could see
that I was really clean. But what if you hear
a sound like this? [MUSIC] So in this case, you need to have a
look at your position and you need to
work on it to sound much cleaner because you shouldn't hear any tick
tick when you're playing, every note should be clean. Same here, with the A shape
you need to do the same. So you need to go through all of the strings and
everything needs to make a sound and everything
needs to sound clean. There shouldn't be any tuck tuck sound when you
play through chords. Now, let's move on
to our next lesson.
5. Barre exercise: Now we arrived to our first
exercise for the body, and it will be the five-step exercise
to hold a clean body. In this exercise, we will go
through five different steps that you can do in order
to have a clean sound. We will start or exercise
actually on barre 5, just because it's easier
to hold the body, than in barre 1 because in barre 1 your frets are wider so you need to have more
strength and also more flexibility to hold all
of these positions. Our first step will
be just to hold our index finger and
to hold the properly. It means that the
bottom string is here and you're overbearing. Then you can use your middle finger to push
down the index finger. Then just to check
you are clean, you play all of the
strings one-by-one. [MUSIC] Once you
can do that one, you can go either backwards
or forwards and repeat it. [MUSIC] If you hear a tock tock sound, [MUSIC] then you need to stop and correct your
positions and try again. In the second step
of the exercise, we will add our middle
finger to the G string and von fret forward from
the index finger. Then we will do exactly
the same like before. [MUSIC] Now this will be so much harder than
the one step before, because in the before
step you could use another finger to push
down your index finger. But now that there is nothing
to support this finger, so you really need to push
it from your own grip. The third step of the exercise is adding the ring fingers to the A string to flat forward
from the index finger, and now we are actually holding
a dominant seventh chord. Now we will do exactly the
same thing like before. We will go through
all of the nodes. [MUSIC] On the fourth step, we will hold the minor shape. It means that you
will hold an E minor. [MUSIC] But adding the body to start with the A minor chord, and we will do exactly the same. [MUSIC] Our final step of
the exercise will be holding the E major shape, and in this case it
will be A major chord, [MUSIC] and we will
do exactly the same. [MUSIC] Now that we went through
the five-step exercise, let's go to our next lesson.
6. Correcting the click-click: Now that you did all of
these exercises and you still have some strings
that are not clean, you can do something
about it as well. Sometimes it happens with
people that they play a barre [MUSIC] and there is always one string which
is not so clean. [MUSIC] They hear the tick, tick, then you need to
attack that string. How are you doing that? It depends on which string
is the problematic one, you just play that
string by holding a barre and you are moving the barre up and
down in the neck. If you're problematic
string is B, you can just do three notes [MUSIC] and after move
to the next barre. [MUSIC] This way you can concentrate a little bit more on the
problematic string and also how you can place your finger so then it
sounds a little bit cleaner. But you can also do this with the bottom
string as well and then you can just do exactly
the same if it is not clean. [MUSIC] The other thing that you can do, maybe you can also
do some finger picking when you are
playing barre chords. Then you can just do
a very easy exercise, for example, you can play thumb, then you play the bass
note and then ring, middle, index on the
bottom three strings. Then you you are
just playing up, so it will be [MUSIC] 1, 2, 3, 4. After you can change
your thumb position, [MUSIC] so then you play the A string and
now the last time, you can play the D string. [MUSIC] This way you can really hear if
some strings are not clean enough so you can
change your position as well.
7. Songs examples with F major: Now let's have a look at some song examples
that you can play. The F-Major chord,
the F major chord. So you would, von
street, street, Von Braun scored, can
come up in the Lubanga, which is like a
really famous song. It's originality
like a Mexican tune, but it became famous
by Ritchie Valens and then G. So now this can be quite hard
because there is a lot of movement when you are
changing between chords. The way to change
course is actually trying to hoard the court
in the air already. So the shape of the chord and try to move everything together. Lot of people just
do one by one. And then it will stop
you to play fast. Because if you
want to play fast, but you need to try to
arrive at the same time. So instead of doing this, you will need to go together. So wanting to practice this
one is just to like a chord, like the C major chord, and then go and try
to play it together. Now you can do exactly the same when you play
the other chords. So the F-Major, you
are kind of already holding the chord
shape in the air. And try to word it. And for the G major as well. If you are not arriving
at the same time, it doesn't matter so much. But you need to
arrive at some times, but don't stop strumming
because a lot of people like and then they changed
the cord and they stop, then it will stop the
floating of the music. So even if you are not
that the cord is best to just keep strumming and then you will arrive
there at some time. Now, this is the other way
that you can play this chord because changing between the
F-Major And the G-Major, it just so much effort. So you can just toward the G-Major the same
day as the F major. So the E shape and just move
the threats to fret for var. So that way it's easier and you don't like
necessarily they have to lift up so much when you are changing with these two chords, you can just slide. So now let's have a look at another song which
will be happy birthday. Now, I'm just
choosing these kinds of songs because they are
quite well-known ones. So you can like
use the body cord in practice and you will
recognize the song as well. And also, it is so
much more fun to practice with songs than just doing like endless exercises. Obviously exercises will help you to play the songs batter, and technical exercises we're just like improve you so much. So it will be just
easier and easier to learn new things
and new songs. But it's good to
practice with songs. So let's play Happy Birthday. So it will be seeing
the GG, GG CC. And now we are
introduced a new chord, which is the dominant
seventh chord. You just need to place your little finger on the G
string of the third fret. And then the other half.
9. Etude 7 guitar lesson: In episode 7, we introduced
first-time the body chords, which will be the F chord. When you hold an F chord, your index finger
is straight and you try to have the neck
around this position. The best is to over
bury if you have longer fingers and
everything else is curved, but the index finger is
just behind the first bar. Then you can check
if it is clean on a way that you play
each of the strings. [MUSIC] If you hear this, [MUSIC] it means
that you are not holding properly and you need
to change your position. I have a few other
videos actually when you can change your way
toward the body, to be cleaner, so you can
check out these videos. But anyway, in the song we introduce first-time
the F chord. But this is not
the hardest thing in the song because there are some new returns and
some crazy returns inside, so we need to learn
how you can play this and how you can
count and clap it first. Let's have a look
at the first bar. In the first bar, we can see that the
time signature is four, so it means that
we need to count until four to play the song. [NOISE] Also we will have
some 16th note inside. You can tell because
when you see a note and when you see
two lines on the top, it means it is a 16 note, so we need to count
in a different way. The way to count the 16
notes it is with e and a. It means we have four measures in each of the bar and we
need to count like this, 1, 2, 3, 4. But because we have 16 notes
we need to count like this, 1 e and a, 2 e and a, 3 e and a, 4 e and a. The reason why you
need to count this, because 16 notes is one-quarter of a measure [NOISE] and
if you count like this, every sound can be matched
with a note or with a clap. Now the first note
[NOISE] you can see it's a dotted eight note. You can tell it's an eight note because it only has one line on the top and you can see a
little dot after the note. What does that mean? Dotted means that it lost one
and a half of one measure. An eighth note usually
last for half a measure. [NOISE] It means that this will last for
three-quarters of a measure. Where do you place the claps when you are
clapping this one? it means we start on
the first measure, so it starts on the one
and after 1 e and a, the last clap or the next
clap will be on the a, so 1 e and a. After we will have
to eight notes, so then the next
clap will be on the two because eight note
last for half a measure, so it is 2 e and a. After we have two quarter notes, so it means that you
just clap on the beat, so it will be 3 e
and a 4 e and a. Now, let's see how does it
sound with the metronome if we put our
metronome to 50 BPM; 1 e and a 2 e and a 1 e and a 2 e and a 3
e and a 4 e and a. [APPLAUSE] Now, let's play it with music. [MUSIC] Actually, this is
quite nice to add off beats into your music because it will
always sound better. In this one that is an offbeat, so that's why it sounds so nice when you play it
with some chords. Now the second return
problem that we will come across will be on the third
bar because on the third bar, we will have 16 notes, we will have eight notes, and we will also
have eight triplets, and we will not play to under
served part of the triplet. How can you count this one? Because it has 16 notes you
need to count with e and as, but you can't count e
an as on the triplet, so you need to count
like tri-po-let. Now let's look at
the triplets first. Because you need to count
the tri-po-let you can just practice with a metronome and you clap three
notes per beat. Again, the metronome
is on 50 BPM. Let's clap the triplets. Tri-po-let. [APPLAUSE] Now because in this music there is no
note on the third part, you cannot clap on
the third part. So you need to
practice the same way, you count the same way, but you don't clap on
the third measure. Tri-po-let. [APPLAUSE] Now how does
it sound with music? [MUSIC] Again, you can
count the first and the second measure and
add the triplets as well, but you need to change counting. The first two measures you need to count with e and as because the first four notes are 16th notes and after
you have eight notes. But after you have triplets
on the eight notes, so you change the
counting in the middle. How you can count
and clap this one, 1 e and a 2 e and a tri-po-let. Let's see how does it
sound with the music. [MUSIC] This will be a little bit tricky part
to get it together but once you practice the clapping, I'm pretty sure you
will be able to do it on the guitar as well. Otherwise, the whole song
is pretty straightforward because we have C, G, A minor and then F, E minor and A minor. There are some alternative
picking in the song, which means that at the
beginning you will play with the thumb and you
add the arpeggio. It means that thumb, ring finger [MUSIC] and
the middle and index. After, then you go
to the third bar. You again, continue
with the arpeggio. Now you can play this one
in two different way. You can either play
it with the ring, middle finger [MUSIC] and then you use your
ring finger twice, or you can play it with the
middle and index finger. But when you play the triplets you need to do an
alternate picking, which means that you play with the index
and middle finger, or middle and index. You choose the direction
in one string. In my case, I prefer going with the middle
and index finger. There is a little
melody as well I did. With the little melody, you need to play the
alternate picking as well with the index
and middle finger, it's on the C. Again on the F, you will do an arpeggio. [MUSIC] Otherwise,,the song
is pretty straightforward. When you see four
strings playing, it means that you just
use your four fingers and play it on the strings
indicated in the tempo.
11. Etude 8 guitar lesson: In Etude 8, we're going to introduce
some new barre chords, and we will start the song
with four different chords, and these will be
B minor, G major, but this is the barre version, the E-sharp version of the G
major and D major, A major. The rhythm will be
pretty straightforward although the picking will
need some attention. The best way to do this one, when you play the B string, you play with your
middle finger, and otherwise you play
everything with the thumb in the top three strings and you play everything in the bottom, three strings with the
other three finger. It means you start with thumb, middle, index and
then thumb again. [MUSIC] This picking continue throughout the all four chords, and after the song
is going to change, because it will add
some new chords, which will be B minor, goes to F-sharp minor
or D-flat minor, and goes to the D major. When you play this
part of the song, it is a little bit harder because you need
to add an offbeat. Again, we have a dotted note, which will be a
dotted quarter note, which means it will
last for one and half. Then you are counting this one. You need to count like
this at the beginning, like one and two end. Also in the tab, you will see two notes
which will be connected, and these notes means that you need to hold the note
longer than the bar. That's why they're conducted but you are not going
to play anything here. It means [MUSIC] this will
be on the fourth measure. It will be one and two
and three and four, and one and two and
three and four. Now there is one more
thing in the song. In some parts, you need
to add some melody. It means that you need
to play the chord. Then you add the melody. You can actually do
it from the chord. You are still holding the chord, but you are using
your little finger on the left-hand side, and you open up your middle
finger to add this melody. When you play this
melody, again, you play an alternate picking the index
and middle finger. Same thing on the D major. When you are playing melodies
from course it is the best to look at to
stay in position. Which means that you will only move the fingers that
you need to move, and everything else is staying. Then you are reducing movements, which means that you
can play it faster and then smoother as well when
you're in a higher speed.
13. Etude 9 guitar lesson: Etude 9 is not so
difficult written-wise. It's pretty straightforward
because it has just eight notes,
but technique-wise, it will be one of the
hardest, to be honest, because you need to
be so clean with your barre to make
the song nice. We are actually using
an F-major barre, [MUSIC] but holding the C shape. [MUSIC] This is the same
chord like the F-major here, but I like to use this
one because this is so much smoother sounding
than the other one. [MUSIC] After, we will go to the A-minor [MUSIC] and
to the D-minor. [MUSIC] Now there is one more thing that you need to pay attention in this tab. We've even introduced
the alternate ending. What does that mean? You can see that in the tab
that there is a repeat sign and in the repeat
sign, it says one. After the repeat sign, it says two on the top. It means that you will repeat the first three
bars of the repeat. At first, you finish it
with one ending and after, you go to the second ending. Now let's look at the technique. You need to be quite straight
with your index finger. If you have any nail
on your middle finger, it will stop you to be clean. Even for me, when I
recorded the song, I realized the reason why I'm not so clean when I'm playing this because I had a little
bit nail in my middle finger. The best is to cut it, and then you can be a little bit more clean when you are
holding this chord. [MUSIC] With the technique, you just play with
the thumb at first, [MUSIC] and then
index, middle, index, ring, middle, ring, and then you move the ring
finger to the E string, so ring, middle, ring. [MUSIC] After, you can
move to the second chord, and you just repeat
the same technique. [MUSIC] First ending. In the second part of the song, you will just use
together your thumb and your ring finger and
index and middle finger. [MUSIC] It's a pretty song, although it will take some work, especially if you are not so clean with this
part of the barre because this is a hard way
to hold an F-major chord, but it will come up in a lot
of different songs later on, especially if you are
playing classical guitar, so it's better to
master it early. [MUSIC]
15. Etude 10 guitar lesson: In Etude 10 we're
introducing a new technique, and this is called vibrato
and also we are sliding. We start the song, a B minor chord. [MUSIC] Again we have a
dotted note and offbeat, so it means [MUSIC] we need to count again
with one and two, end. So one and two, end. That's how the dotted note works because a dotted quarter note
lasts for 1 1/2 measure, so you need to start on the
offbeat on the next measure. [MUSIC] This is what we
introduced, a new technique. It means when you play, you can add your little
finger, and of course, you can play it with
the same finger on the same string so you can
slide with your ring finger. [MUSIC] When you are doing vibrato it means that
you are sideways, a lot of little movements. [MUSIC] If you are playing this on acoustic
or electric guitar, you can also do it up and down. [MUSIC] There the vibrato
a little bit different. But on classical guitar, we do the vibrato sideways. On electric guitar
or acoustic guitar, you can do it up and down. [MUSIC] The next chord here will be B major to A major. Goes to G major. [MUSIC] Again, we have another slide
[MUSIC] and the vibrato. Again, you can do the slide and the vibrato up and
down if you're playing on electric
or acoustic guitar. [MUSIC] You go to the E minor, but the A shape.
This is the shape. You are holding the barre
on the seventh fret. You are finishing
on the B minor. This was B minor the start. [MUSIC] We started on B minor, the whole song, but this
is another B minor. It is just two different
positions because [NOISE] the B minor
here is under A shape. [MUSIC] The A shape is this shape like you would hold an A minor chord but you
are holding the barre, but here, the B minor
on the E shape, so it's the E minor shape. [MUSIC] The last few
chords are just E minor. [MUSIC] Then you can
just count one 1, 2, 3, 4, 5, 6, 7, 8. 1, 2, 3, 4. Then you go to D
major, [MUSIC] 1, 2, 3, 4, 5, 6, 7, 8. Go to A major
[MUSIC] 1, 2, 3, 4.
17. Etude 11 guitar lesson: Etude 11 is another
toughy to be honest. Let's look at first what
kind chords we here. We have [MUSIC] D minor, which is the easiest
because you are just holding the first
shape of the D minor. After we have B flat major, now this chord can be hard because you need to be
able to stretch quite wide between your
index finger and middle finger and also you need to be quite
strong to hold this. This is one of the
hardest body parts. [MUSIC] Again, you
need to practice it, but if you contoured
it properly, you need to do some
stretching exercises, which will help you to separate these two fingers but also sometimes it helps to massage the fingers and
then get it ready. But the best is to try to
separate these two fingers. Even just to do
exercises like holding these two fingers
separately and von bar in-between them
and just moving it [MUSIC] between bars then it can help you if you
can do it regularly. You can also add the
little finger [MUSIC]. After the B flat major, you'll have a G
minor chord [MUSIC]. But you don't have to hold the full G minor chord as a normal shape
because you are using your little finger to add an extra note and you are
not playing the A string. It's just better to hold
it with the ring finger on the D string [MUSIC]. The next chord is a
toughy again [LAUGHTER]. This is a D sharp major
[MUSIC] or E-flat major. Again, you need to be
quite clean with this one. But because you are not
playing the D-string, you can just hold it without
the D string [MUSIC]. Then you need to move your little finger to
add the extra note. After the final chord
is again a D minor, but it's in a different position [MUSIC]. Now, this song is quite nice to practice with a metronome because you need
to play triplets, which means three
notes per beat and also when you add an extra
note or a different note, it is just one note. You actually have more
time to change between chords because you have a
little bit more space there. But this song can help you
to master the triplets. But before you play this song, you can also practice
clapping the triplets. Eight BPM, 1, 2, 3, 1, 2, 3,1, 2, 3, 1, 2, 3 [NOISE] How do you know if you are clean
with your triplets? It means that you don't have
any space between two bars. If you are doing this, [NOISE] this is not right because you need
to be even all the time. When you clap threes
and you have a space, it means that you are not
exactly doing triplets. It needs to be always even 1, 2, 3, 1, 2, 3, 1, 2, 3, 1, 2, 3. This is what the song is
following as well [MUSIC].1, 2, 3, 1, 2, 3, 1, 2,3, 1, 1, 2, 3, 1, 2, 3, 1, 2, 3, 1, 1, 2, 3, 1, 2, 3, 1, 2, 3, 1. Of course, if 120 BPM, which is the final speed of the song is too fast for you, you can always play
it in a slower speed.
19. Etude12 guitar lesson: Etude 12 are pretty straightforward written
barres because it only has eight notes
and it's changing to triplets on the eighth
note at some point. But otherwise, not
too difficult. Although, it has a lot
of really quick changes. So that's why this song is a
little bit more difficult. It starts again on
the F major [MUSIC], which is on the C-shape. So it's the same
F major as here. [MUSIC] But this
is a lot smoother, so I like to use
this one instead. The picking, you play, again, with your thumb
and ring finger. [MUSIC] After, you use your middle and index finger
for the other strings. [MUSIC] You change to D minor. [MUSIC] But in this case, you will use your thumb
on the E string because the base note of the G
minor is on the E string. Then you go to the C major. [MUSIC] Then the hard part is coming after this
one because you need to change in every measure, so it will be A minor, [MUSIC] B-flat major, C major, [MUSIC] and D minor. [MUSIC] In the second
part of the song, you are playing triplets. So it's good to practice how can you change to triplets
from eighth notes? The best way to do this
with the metronome, and you can just
practice clapping, twos and clapping threes. And you can switch, maybe after two twos and two threes or four
twos and four threes. The metronome is on 80 BPM, and you can just count [MUSIC]. This can take a while to master and also to change quickly. In the end, you
should be able to do two twos and two threes. [MUSIC] Also, you can practice this in
many different speed. I was at 80 BPM, but you can go to 60 BPM
or you can go to 100 BPM. To be honest, it will get harder and harder
the slower you go. It is very difficult
when you go to 40 BPM. It takes a while to
master this one, but I think with daily practice, when you practice the guitar, it's good to practice
some rhythm exercises as well with the metronome. You change to triplets. [MUSIC] Basically, you just do some arpeggios in your right hand
and in the left hand. It's pretty easy because
you just open up your index finger to add a
different note to your chord. [MUSIC] This will be F to
A minor [MUSIC], G minor, [MUSIC]
C major [MUSIC]. After, you just pick the chords. A minor to G minor, [MUSIC] to C major, [MUSIC] A minor to B-flat major, [MUSIC] C major, and in the end, it is just a D minor. [MUSIC]
22. Learn half a barre: There are some other ways toward a barre and it is also
called half a barre. It means that you are not
holding the full position, but you are holding the bottom
three or the bottom four, it depends on which
song you are playing, it is used so much
in classical guitar. Because sometimes when
you are holding a barre, you will need to use different bass notes
and if you are holding the barre and then you need
the bass note on the A, but you will need to
play everything else, which is easier from the barre, then you just need to hold it up until the bass note appears. This may be a little bit more difficult than holding
the full barre at first, but it is just necessary, so then you have
the right sound. Half a barre usually had either on the bottom
three strings of the guitar and then
you are trying to work everything with this
part of the finger, so mainly the tip
of the index finger and the bottom string
is somewhere here. But it is important to have
this part of the finger on the guitar because
otherwise it will be so much more work to hold it, so it's better just
to try to push it a little bit forward and
you have a better grip. Or a lot of people with half a barre in the
first four strings or the bottom four strings of
the guitar and then they can use the bass notes of the
A string and the E string. Now, let's have a look at some examples that
you can play with these kind of position and the first example will
be Cielito Lindo. [MUSIC] In Cielito Lindo, I was actually holding four strings because what
it does that you play the A string first
and after you add the G and the D and the B string with the
other three fingers. [MUSIC] Of course you
have working baseline, so at first you play the
A and after you play the E and then all the melody is played from the barre afterwards because
that's the easiest way to play this one. The next song example
is in Spanish romance, which is a quite famous
classical song as well and it will come up actually in the middle of the song
of the first part. [MUSIC] This is the part
that it comes up. In this part actually
the picking is you play with the thumb
and the ring finger at the same time and you pick together and the middle
and index finger. [MUSIC] Then you play
everything from the barre. But you can't hold
a full barre in this case because you
need the A as a bass, so that's why it's
better to hold this half a barre position and then you have the right
right sound for this one. It also has some other parts where you are holding the barre, which is a little
bit hard especially that is a quite of
bit of stretch, but this is a very
beautiful song, so I included the tab if you would like to
work on this song.
25. Ear training game with barre chords: Now, before you
finish this course, I would like to
challenge you for another game of
the ear training. I'm going to play for you
three different chords. It will be either
minor or major, and you need to guess, what are these chords? I'm going to use all of the body chords in
different positions. Then you can just tell
if it is major or minor. Let's start our game. [MUSIC] This was minor because I played A minor, C minor, to G minor. Next. I played major because
I played F major, A major, and E major. Next This was major again because I
played B flat major, C major, to G major. Next. This was major again
because I played E major, to F major, to B major. Next. This was minor
because I played, F minor, to B flat
minor, and B minor. This was major because
I played C major, D major, to B major. This was minor because
I played E minor, D minor, and A minor. This was minor again
because I played E minor, G minor, and A minor. This was minor again
because I played A minor, D minor, and A minor, but this A minor is in
a different position. This was major because
I played B major, G major, and A major. This was major because
I played D major, E major, and F sharp major. This first major again, because I played C major, B major, and another C major, but it's in a
different position. Finally, This was major again, because I played D major, F-major, and C major.
26. Outro: Thank you so much for
taking this course. It would make me really happy if you could
leave a review so other people can read your experiences and
what you learned. If you would like to learn more, I have some other courses. For example, I have
Spanish guitar strumming techniques where you can use all of this course and you can learn some right-hand techniques
to learn rasgueado, flamenco triplet, or
Roomba techniques. [MUSIC] If you are interested more
about playing lead guitar, I have another course
called Play Solos in Spanish and flamenco
guitar where you are going to learn some
skills and also some techniques to make
your skills sound good. I'm going to give you a lot of backing track so
you can practice your improvisation
and also how you can sound good
with these skills. [MUSIC]. Finally, I have written
course as well and it is called Learn to Read Rhythm
from beginners to mastery. In this course, you can
learn how to read rhythm in seven different levels and
14 different exercises. This will be so useful later on because the more rhythm
you use on the guitar, the better you will
sound when you are playing your songs or
when you're improvising. You can sign up for
that course too. One and two and three and four. [MUSIC] Thank you again for
attending to this course and maybe see you later
in another course.
 Edina Balczó, Award-winning Guitarist