Transcripts
1. Introduction: Learn how to paint a
cute and whimsical snow globe pet portrait
in watercolor. In this class, you'll learn all the essential techniques for creating a fun pet portrait. This course is perfect
for beginners and intermediate artists
who want to learn how to paint a unique and
memorable pet portrait. I'm Marisa Marquez, an
artist and illustrator. I paint a lot of pet portraits and landscape
watercolor paintings. I live in Colorado with
my husband and two dogs. We spend a lot of time
outdoors, skiing and hiking. In this class, we'll be painting a golden retriever and
a wintry snow globe. This project was inspired by an especially wintry day when I was walking my
dogs in the woods. The snow was coming down
in big fluffy flakes, and it felt like we
were in a snow globe. That walk inspired a series
of snow Globe pet portraits. I'll guide you
through the process, starting with transferring a basic outline onto your paper. Then we'll build layers
of watercolor to bring the background and the
golden retriever to life. Finally, we'll add snow to
finish our wintry scene. I hope you'll join me in painting a snow
globe pet portrait.
2. Supplies: Let's go for materials
that you'll use in this project. First,
you need paper. There's a variety of
different brands of watercolor paper out there and each has their own
pros and cons. It's usually a balance
of quality and price. I use a lot of watery layers, so make sure the paper is at least 140 pounds to
minimize the buckling. I use the Canson Excel
for the demo painting. You can use a watercolor block such as the Windsor
Newton block or Arches. If you aren't using a block, I like to tape down my paper
so I can move it around. These are some of
the brands I've used in previous pet portraits. For this project, I'm
going to use a piece of fabriano studio
watercolor paper. It's cold press and 140 pounds. I'm going to cut it
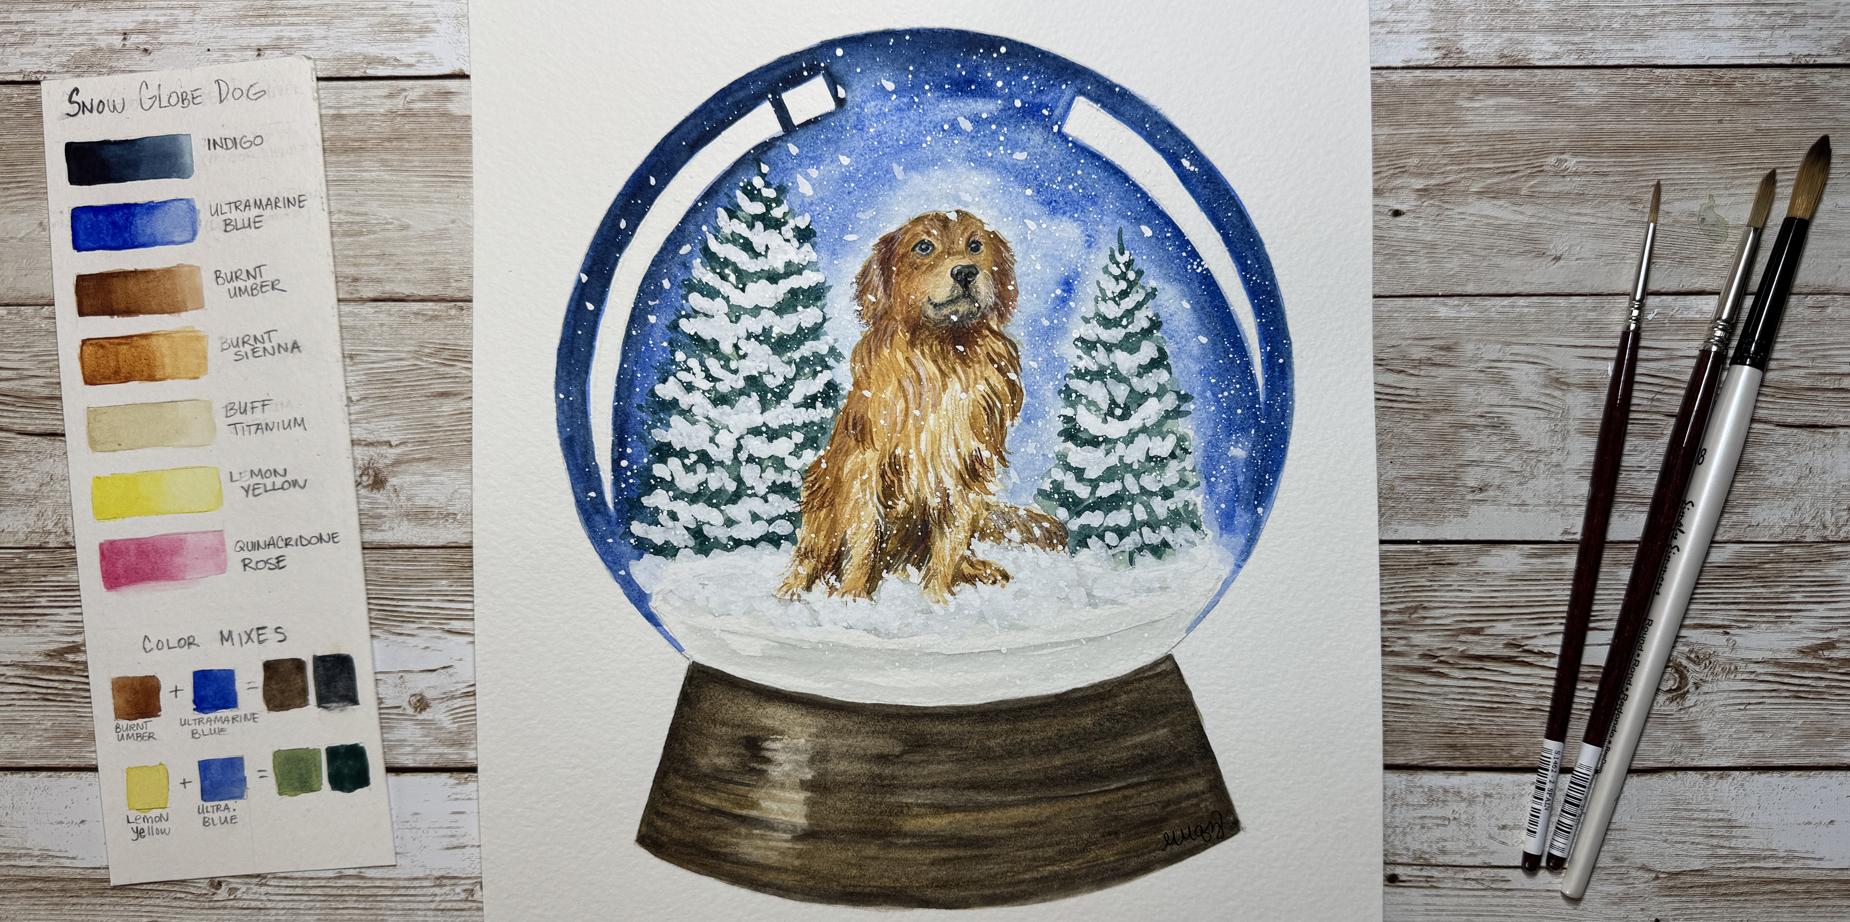
down to nine by 12 " and tape it to a board. I've swatched the paint
colors we'll be using. You don't have to use
these exact colors. I've listed the
colors and brands I use and some alternatives
in the resources. For this project, I use indigo, ultramarine blue, burnt umber, burnt sienna, buff titanium, lemon yellow and
quinacridone rose. We'll be painting a
golden retriever, so we'll need a couple browns. But if you don't have the
specific ones I listed, I wanted to show
you some options. You can use a premixed
brown like Vandyke brown. You can also use a burnt umber plus ultramarine blue
to create a brown. If you add a little
more ultramarine blue, you can also create a black, which we'll use for
the eyes and nose. For the trees, I used a lemon yellow and
an ultramarine blue. Adding just a touch
of ultramarine blue to the lemon yellow
creates a lighter green. I'll add more ultramarine
blue to create a darker shade of green
to use for the trees. Instead of indigo,
you can also use a darker blue or pains gray. Instead of buff titanium, you can use a water down
version of yellow ochre, burnt sienna, or quinacridone gold to mimic the buff titanium. I'm using watercolor in tubes, but you can also use pans. You'll also need a palette
to mix your colors. You'll need three or four
different size brushes, basically a small,
medium, and large brush. I'm using a size two and a six. These are as good a brushes. You'll also need a larger brush, roughly a size six, eight
or ten for the background. I'm using a size six simply Simmons brush
for the background. The sizes of brands
do vary by companies. So I'd recommend
using a size zero or two small brush that has a nice point for
the small details. I use the six for the fur and trees and a bigger brush
to create the background. I also use doctor PH
Martin's bleed proof white for the snow on the
trees and the snowflakes. You can also use white
gash for the snow. I do like to use cheaper brushes for this part of the painting. I use a bigger brush to create the splatter and a small one
for the snow on the trees. You'll also need a
pencil and eraser, a paper towel for removing excess water from your brushes, masking tape or
painter's tape to tape your painting onto a board
if you're not using a block. A big jar of water. I also like to use a scrap piece of watercolor paper to
test out my colors. For more details, I'll
also use colored pencils, but I'll review that
in a later video. Gather your materials
and let's get started.
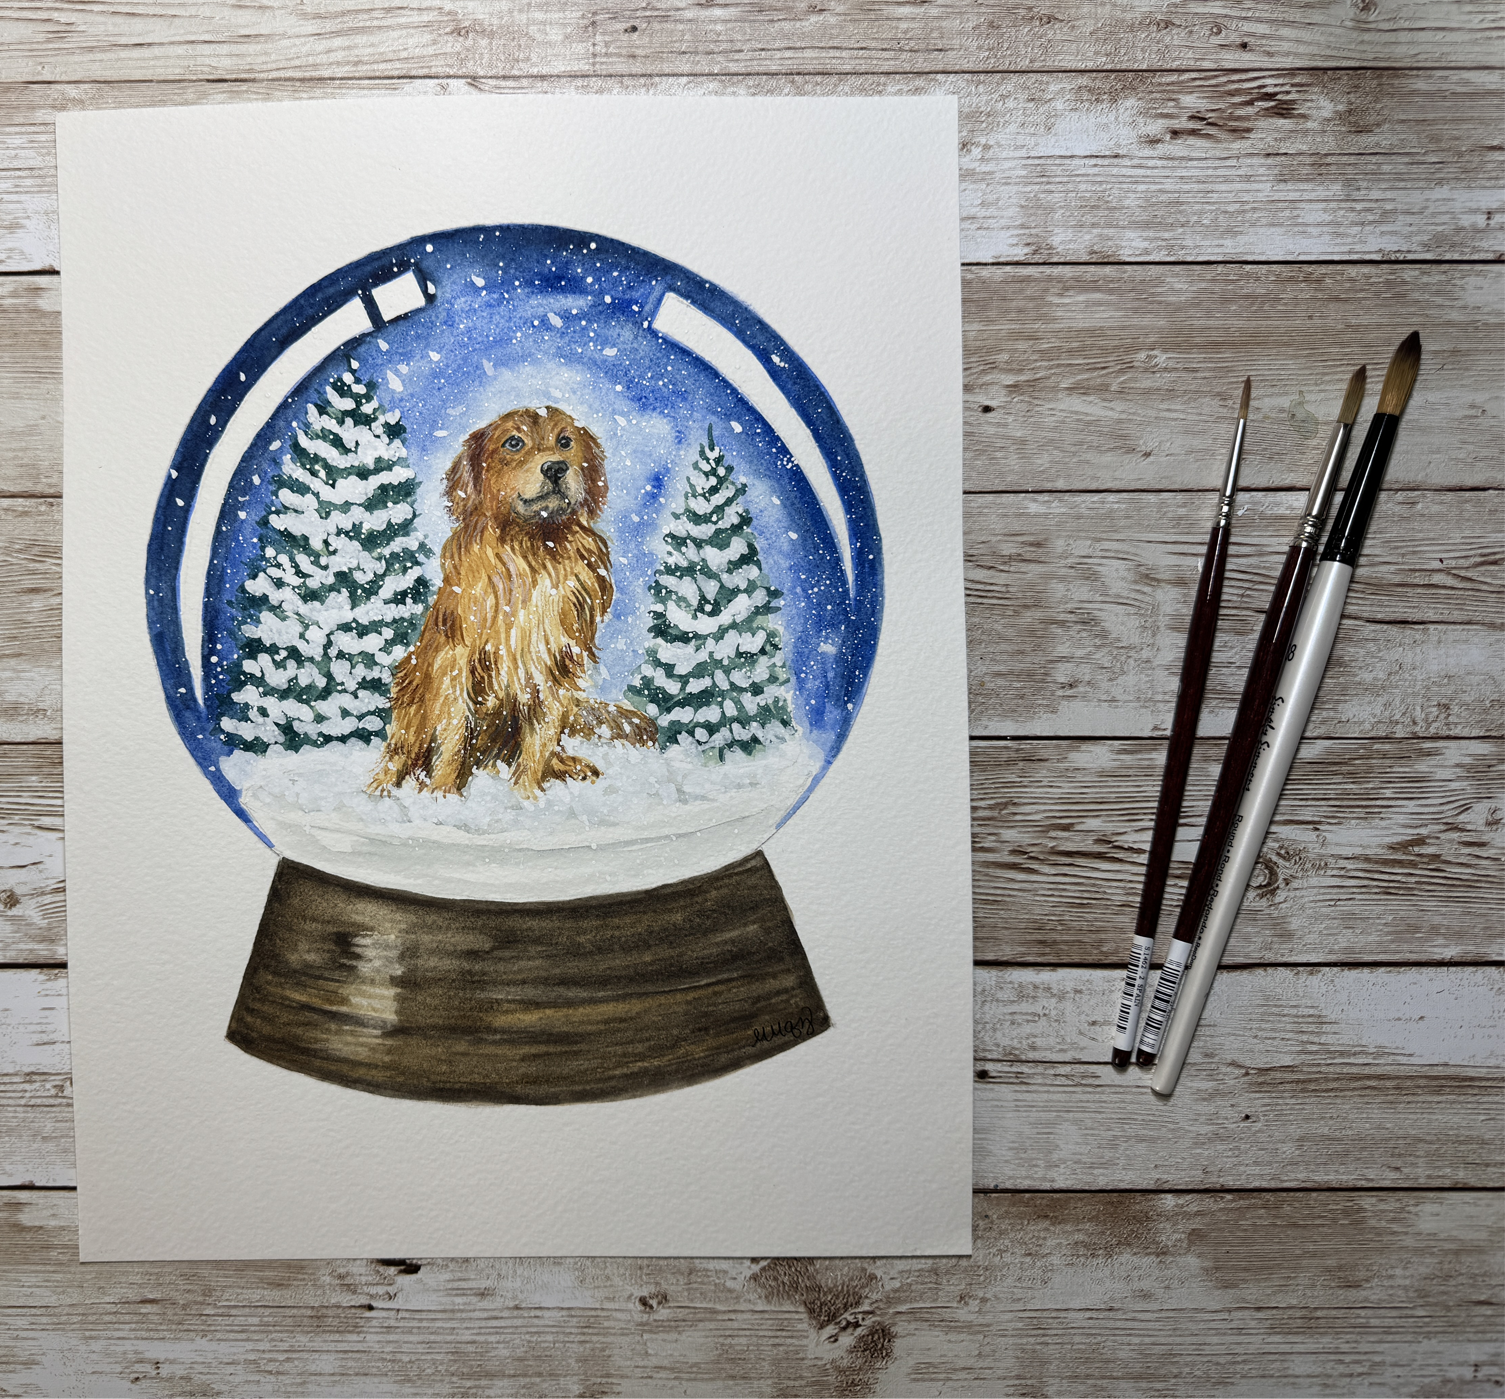
3. Getting Started: Here's the painting
we'll be creating. This painting will be
done in several layers. We'll paint the
background, the dog, the trees, the base of the snow globe, and
then add the snow. I created an outline
for you to use. I'll go over a few
different methods you can use to
transfer the image. We use a wet on wet technique and your paper
might buckle a bit. If it does, you can flatten the paper after the
painting is finished. If you have a light
box or tracing paper, you can use that to
transfer the drawing. If you don't have
either of those, you can rub a pencil over
the back of the outline and then flip it over and trace the lines onto your
watercolor paper. You'll want to use a pencil with a soft lead like a two B, but the softer the
lead, the better. This one is a three B. I'm
going to mark the key areas. Put a white sheet of paper behind the outline so you can see the lines better. I'm going to rub the pencil
lead over the outline. Make sure the
outline is centered. I'll use a pencil to loosely check that it's
even on both sides. I'll tape the outline to the watercolor
paper so I can lift it and make sure
it's transferring okay and the paper
stays in place. I'm going to start with a dog. I switch to a mechanical pencil. Press down firmly as you
trace over the outline. I'll lift the paper to make
sure it's transferring okay and I'm using the
right amount of pressure. Make sure you lift often
and check your work. You want to make
sure you're pressing down hard enough
to see the line, but not too hard that you're indenting the watercolor paper. You're going to create the
fur effect in watercolor, so you're really just making sure you have the
right proportions. For the highlight reflection, you can simplify this
part and just create a rectangle instead of the four squares or
make it one shape. Now for the bottom
of the snow globe, you want to flatten the bottom. It's not a perfect
circle because the snow globe sits on the base. Oh you can trace the globe, but I also used a bowl to
create a continuous line. You can use a bowler plate
that's about 7.5 " wide. It doesn't have to be perfect. Close is fine. Now we raise any extra lines. I'll go back in and
darken some of the lines. I want to make sure we don't
lose some of the details. One more thing we need to
add is the base of the snow. Alright, there's our drawing, and now we're ready
to start painting.
4. Painting the Background: Before you start painting, let's make sure the drawing
is how you want it. I decided to simplify the reflection on the right
and make it one shape. I also like to tape down my watercolor paper
onto a board. You can use a piece
of cardboard too. I'm using painter's tape. You can also use masking
tape or washi tape. If it's pretty sticky,
you can stick it on your clothes once before
taping it onto your paper. This will help when
you're removing the tape so it doesn't
tear your paper. Having it on a board helps to be able to move your
painting around easily. We're going to start by
painting the blue background. One thing to note
is that the area behind the dog is a lot lighter. We'll use a wadded up
piece of paper towel to lift some of the color when we're painting
the background. If you're using pans or if your tube paints
have dried up, I'll miss the
palette with water. Take a size six or eight brush and load your brush
with clean water. We'll take our brush and apply the water around
the dog and trees. We'll carefully add
the water around the highlights and the
edge of the snow globe. We'll use a wet on
wet technique so the blue background
flows easily. Tilt your paper around, and if there are any
excess wet areas, you can move the water
around with your brush. I'm going to use
ultramarine blue and make it nice and watery. I'll test it on my
scrap piece of paper. Now, I'll carefully paint around the highlights and
edges of the globe. One of the reasons we
wet the paper beforehand is so that the watercolor
won't dry so quickly. I'll turn the board so I can paint some areas more easily, like the curve of
the highlights. If the paper starts to dry, I'll go over that area with
a watery mix of ultramarine. Paint all the way to the
bottom of the globe. As I start to get
closer to the dog, we'll use a more watery mix. I'll take the dry paper towel and da up the area
around the dog. Now I'll go back in with the ultramarine blue
and blend the area. Now take clean water and we'll soften the edges
around the trees. You'll do this while
the paper is still wet. Now we'll take some
of the indigo and outline the edges
of the snow globe. I'll start at the
top and carefully paint around while the
paper is still wet. We'll paint around
the highlights so it'll stand out more. Again, I'm turning
my board around, so the angle is a little
easier for me to paint. Before it dries, I'll take the ultramarine blue
and blend the color. You'll want to
create a darker area so the snow will stand out more. Now we'll do the same
to the right side. As you go lower, you'll make it lighter by using a
more watery mix. Y. Finally, take a clean brush and soften the hard edges. That looks good. Let
it dry slightly, and we can move on
to the next step. I'm going to wet the palette. Here we're going to use
a dark brown that I made using burnt umber
and ultramarine blue. Test that on your scrap paper. H. To mimic the wood grain, we'll add lines following
the curve of the base. We'll also paint underneath
the bottom of the globe. Okay. Using the side of my brush, I'm going to run it
across the paper and let the texture of the cold
press paper come through. A lot of this will be
covered with another layer, but it'll create more
depth to your painting. Now I'll paint the bottom
of the base and I'm going to flip it around so
it's easier for me to paint. I'll use burnt sienna to
create more wood grains. I'm going to shade in the edges. Remember, this is
just the first layer. Here's the demo
painting again so you can see how the
finished base looks.
5. First Layer of the Golden Retriever and Trees: Now we'll work on
the first layer of the golden retriever. I have the reference in front of me so I can
keep an eye on that. I'm going to use my size six brush and paint
the lighter fur. I'm using buff titanium
by Daniel Smith. If you don't have this color, you can use a diluted
version of yellow ochre, burnt sienna, or CacidoneGld. Just make sure to use a lot of water to make it very
light and diluted. Test the color on your
scrap piece of paper. I'll start with the muzzle area. Then the top of the head
and rest of the face. She's got a lot of
nice tufts of fur. Try to paint in strokes that mimic the direction
the fur is going in. Most of this will
get painted over, but doing this will give
the fur more definition. Okay. Next, I'll work on the tail and pause
using short brush strokes. I'll go over some of
the first strokes to make the area
a little darker. While that's drying, I'm going to paint some of the snowy area. I'm going to use indigo
and make it very dilute by adding more water
and testing on my sheet. I'm going to add the black
I created earlier using the ultramarine blue and Burt umber until I get a nice gray. You can also use Paine's
gray if you have. I'll paint the
shadows underneath the dog and create
little snowy banks. I'll paint a line here where the glass meets the
snow at the bottom. Now I'll take a clean brush with a little water to
soften the edges. A Don't worry if it seems dark. It will dry lighter and will also cover a lot of this
area with white paint. Now we'll work on the trees. I'll take my mixture of ultramarine blue
and lemon yellow. It's a little dark, so
I'll add a little more lemon yellow and make it
a little more watery. This is just the first layer. I'll paint a line down
the middle and run my brush back and forth
to create the branches. Be a little careful
around the dog. I'll work on the other side, moving my brush back and forth. I Now we'll go back and create a
darker green by adding more ultramarine blue. Keep testing the color until you get a green
shade that you like. I'll go back and add
a little more detail. I'm dabbing the brush to
create more branches. Most of these branches
are going to be covered in snow so you don't
have to be too careful. O. As I get lower on the tree, I'll start to point
the branches downward. I'll add more
details by painting a few pie needles
that stick out a bit. Now we'll work on
the second tree. I'll paint a line down
the middle again. I'm dragging my brush to
create rough branches. Again, towards the bottom,
I'll drag my brush downward. I'll add a little more of my black mix to make a
darker shade of green and add that to the bottom and some small dark branches to give the tree
more definition. We'll add a few strokes
to the other tree, too. While that's drying, we'll
continue to work on the base. We'll paint a darker line underneath the globe
and at the base. We'll create a dark brown using ultramarine blue
and burnt umber. I'll dilute that a little
more and make it a little darker by
adding burnt umber. We'll outline the edges
with the same color. For the bottom of the base, I'll turn the paper upside down to make it easier to
paint that curve. A now I'm going to switch to a bigger brush and paint the rest of the base. I'm going to soften the edges of the lines I just painted. Now, bring in the paint from the outside edge
toward the middle. I'll do the same
to the other side and paint over the base. While the paint is still wet, I'll add a couple more dark
lines for the wood grain. I'll create more of
the dark brown mix. I'll go over some of the
lines we created earlier. I'll keep adding thin lines following the curve of the base. I'm going to add a little
shiny area on the left side. So I'll add lines to the
left and right of this spot. I'll add a few more
lines of burnt sienna. Now I can clean my brush and
blend the colors together. A I'll grab my paper towel and dab that area to
create that shine. I'll take the burnt umber to darken the area
around the shine. I'll add it to the other side. Now we'll glaze the rest of the base with the burnt umber. Rinse and clean the brush and then soften the
edge of the sheen.
6. Second Layer of the Golden Retriever: Now we'll work on our golden
retriever's features. We'll use the burnt sienna. Make sure to test
on the scrap paper. I'm adding a little bit of brown to make it more of
an orange brown. I'll start on the
face and remember to apply your brush strokes in the same direction
as the fur. I'm painting around the eyes and the ears. I'll dilute the color, dab it on the paper towel
to remove excess water, and paint around the muzzle. I'll add a touch of ccadon rose to create a peachy color
to use around the muzzle. Y. Now I'll paint the other ear. I'm going to paint
the patches of fur. Look at the reference photo and follow the
direction of the fur. I'm going to add more paint
and fill in the darker areas. Okay. I'm also leaving some gaps between brushstrokes, so our first light
layer shows through. Okay. Now, I'm rinsing my
brush with plain water, and I'm going to soften
some of these edges.
7. Painting the Snowy Trees: While that's drying, we'll
paint the snow on the trees. I'm going to use doctor PH
Martin's bleed proof white. You can also use whitewash. I'm going to add the
bleed proof white to a small dish and add a little water to
make it more fluid. I'm also using my
other mid size brush. I'm dabbing the paint along the tree branches
to create snow. I This looks a little too uniform, so I'm going to vary some of the snow shapes around the
tree to give it more variety. Now I'll go to the
other side and add the snow to the branches. At this time, I'm going
to add big dabs of white along the ground to
create mounds of snow. Now I'll add details to the dog. I'm using my smaller
size zero brush. I'm going to use the black mix of ultramarine blue
and burn Humper. Add a little water so
it's a light gray. Remove any excess water and we'll paint the nose
and her mouth and chin. We'll create a more watery mix and paint the area
under her nose. A Now we'll make a thicker blend, dab the brush on
the paper towel. We'll carefully
paint the line above the eye and lightly
fill in the eye. We'll do the same
to the other eye. Paint the line over the eye
and fill in the inside. Now with clean
water, we'll soften the area under the
nose and muscle. We're going to add
another layer of fur. We want this layer to
be a little darker, so we're going to mix
a dark orangy brown. I've switched back to
my size six brush, and I've also got a new
scrap piece of paper. We'll mix the burnt sienna with a little ultramarine blue. That's a little dark. Here's
a regular Burnt sienna. I'll add more Burnt
sienna. That's better. I'll remove some of
the excess water. I'll start with the left ear painting in the
direction of the fur. I'll paint the side of the face. I'll rinse the brush
and blend that area. I'll work on the other side and add more paint to my brush. I'll paint the ears and create the edge next to her cheek. Y. With a clean brush,
I'll soften the edges. Now I'll reload my
brush with paint. I'm looking at the
reference photo. I'll paint in the
patches of fur. I'm using some longer strokes painting in the
direction of the fur. She has darker fur
underneath her chin. I'll keep layering
short brush jokes for these fur patches
around her body. S. I'll paint the paws
and darken the legs. Now I'll rinse my brush and soften some of the
areas under her chin. So we'll let that dry.
8. Painting More Details: Now we'll work on more details. I'll spray my watercolor palett. We'll work on some of
the details on the nose. I'm going to use
my smaller brush and makes a nice dark brown. Now, we'll carefully paint
a line around the eye. And outline the other eye. We'll add highlights
to bring out the details in the
eyes in another layer. Now, we'll fill in the nose
and outline her mouth. A We'll work on the darker fur areas
using a darker brown. We'll start underneath the chin. We'll add more dark brown on her cheek and
under her mouth. We can go back and
add some definition above the eye and the forehead. And the years. I'll water that down and soften the brush
strokes on her forehead. Again, following the
shape of her face. We'll continue to soften
the fur of the ears. Now, we'll darken the other ear. I'll add a darker brown
to the right ear, too. A I'll add some dark lines
above her face, forehead, and side of
the nose and face. Take a clean brush and
soften all those edges. I'll add a little more colour
to the bottom of her mouth. I'll create a darker brown and dab some paint under her nose. I'll add a few more fur
details with the darker shade. There's a lot of darker fur
since this area is in shadow. A I'm going to paint the top of the tail and blend that with clean
water to soften it. I'll add some more detail
to the paw and front leg. Well, let that dry a bit. I want to mix a
reddish brown color using the cacodone
red and burnt sienna. I'll add a few more details. I'll add this color above her
eye and side of her face. I'll add a little more to
her ears next to her face. I'll add some of this red below her chin to
define it more. It's a little dark.
I'll dab my brush on the paper towel to remove the excess paint and soften
the mark I just made. I'll add some pops of this
reddish brown around the fur. I'll find some of the areas
I want to accentuate like her tail and the boundaries between her front legs and body. I'll take the dark brown and paint in the nostrils and mouth. I'll go in with a clean brush and soften some of
the dark lines. I want to add a little
definition in her forehead. We're almost finished.
9. Final Details with Colored Pencils: You can take a white
colored pencil, a white gel pen or use
the bleed proof white or guash and a brush to add some white highlights
to the eyes and nose. I'm going to add
even more details to the fur using
colored pencils. We'll start by taking a
white colored pencil, adding a highlight to the dog's
pupil and around the eye. I'll soften the white around
the eye with a gray pencil. Now I'll take the brown
and color around her eye. I'm using a yellow pencil and a lightly shade
below the eye. I'll press harder to create
a fur texture over the ear. I'll add a few strokes to
the other side of her face. I'm taking a lighter yellow and creating a few fur
strokes around her face. The lighter pencils will show up better on the darker areas. I'll add a little
orange to her ear. I'm going to take a
light orange color and add some fur texture
to the littus areas. Again, how far you want to
take this is up to you. I'm going to continue adding
some more fur details. I lost some of the
color in the tail, so I'll add a lighter shade. You can emphasize more
of the dark areas, too. Remember to apply
the pencil strokes in the direction of the fur. It'll make your dog
look more realistic. I'm taking various shades
of brown red and gold to create more fur texture. Okay. Finally, I'll take
a black pencil and outline her
nose and nostrils. And add a little more definition
to her mouth and chin. I'll shade in the part
under her nose, too. I'll take the light
yellow and add a few small strokes around
her mouth and chin. I'll highlight the area under her nostrils and
top of the nose. I want to bring back a little
more detail on the eye. I'm grabbing my
black pencil again. Make sure you have a very
sharp point on your pencil. And adding a little gray
underneath her eye. I'm going to shade in a
little more under her face. I'm going to add a few
highlights around her ears. I'll soften the edge between her muzzle and ear
and under her chin. All right, we're finished with the extra details on our dog.
10. Creating the Snowflakes: I'm going to finish by adding some final details with a
gel pen and black micron. I'm going to darken
those nostrils, the eyes and pupils. For the white gel pen, I'm going to add a couple lines on the ear and add
some whiskers. I'll add some more
highlights on the ear. And a spot on her nose. Now we'll add the snow splatter. The next part is going to
be a little messy and we're going to splatter some
white paint for the snow. I'm going to take our outline and cut around to
create a template. We'll also cut out the outline of the dog to create a mask. We're going to cut
out the globe shape. So I have a template that just reveals the globe part
of our snow globe. I'm going to tape the
area near the edge here. Now we'll loosely cut out
the outline of our dog. I use a different cheaper
brush for the splattering. We'll take two brushes and
we'll tap one against the other to splatter the
paint onto our snow globe. This can get messy,
so I'm taking some craft paper to protect the work area
behind my painting. Now I'm going to take my mask to cover everything
except for the globe, and I'll cover the
golden retriever. I'm taking the bleed proof white and adding
it into the dish. It's really pretty
thick, so I'm going to water it down and mix it so it has a smooth consistency and more fluid. You don't
want it chunky. So you'll hold one brush in one hand and tap the other
brush over your painting. This is giving us
some small flakes. I'm going to add a
little more water to make bigger splatters. Now I'm going to
take off the mask over the dog and add
a few more splitters. Keep going until you're happy
with the amount of snow. I'll remove the mask and
see how it looks overall. I'll take my same
brush and dab it in some areas where I want
to add bigger snowflakes. I'll add a couple
snowflakes to face. And I'll add a little
more snow to the ground. I think we're good
for the snow now. Once everything is dry, I'm going to touch up the eye with my black colored pencil. And use the white pen to
bring that sparkle back. A Now, grab a pen and sign your name. You can sign it
wherever you want. I'm going to sign at
the bottom of the base. Now, let's pull off the tape. Be careful and pull
off the tape slowly, and at an angle so it
doesn't tear your paper. There you go. There's our golden retriever
in the Snow globe.
11. Final Thoughts: Thank you for
watching this class. I hope you had fun creating
a snow globe pet portrait. Try using your own
pet or other animals. Try a different background like a mountain scene or
other types of trees. I would love to see
your paintings, so please post them
under projects. If you have any
feedback or comments, please reach out
under discussions. Thanks again and happy painting.
 Marissa Marquez, Painter & Printmaker