Transcripts
1. About This Course: Hey guys, I'm Blake Calhoun. And in this course
you'll not only learn the fundamentals
of cinematography, but you'll also learn how
to turn your smartphone into a professional
quality video camera. This is the studio
I worked out of, and so it will be
the backdrop to many of the lessons
throughout this course. And this is Ripley. She's
a mannequin who does a stand-up job as a stand-in for many of the
various composition, framing and lightning
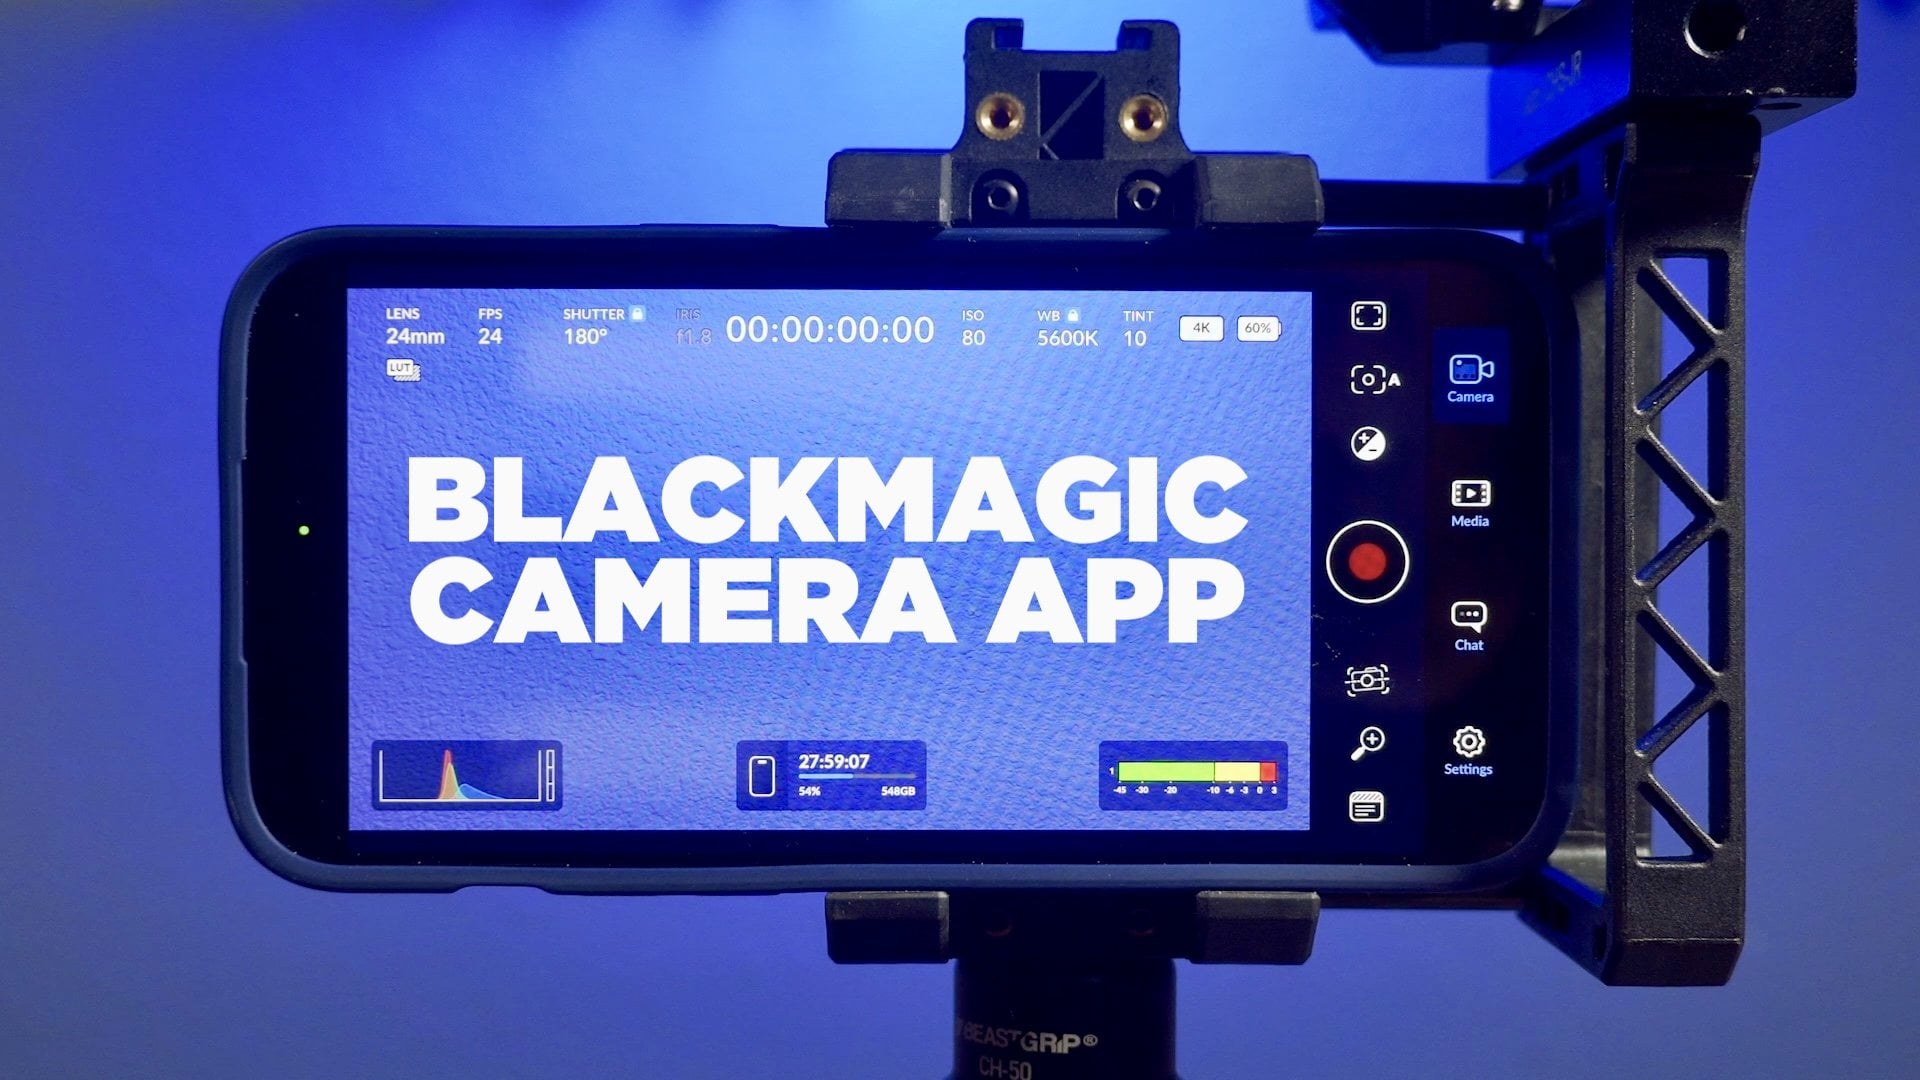
demos I do. Speaking of demos, I use an iPhone and the filmic
pro app in this course. But you can use any kind of smart phone or video
camera app you prefer. Apple, Android, or
whatever you like. I want to make one thing clear, this course is not just
about tech and apps. Yes, they play a role in how you create content
with a smartphone. But technology
changes all the time. You'll always be
learning new stuff is that's just the tech
driven world we live in. But the craft and techniques of cinematography don't change. They apply it to today and to any and all future
ways to shoot video. One last thing, I
will be showing real-world examples from
my video and film work. Some shot on smartphones,
and some not. Ultimately, cinematography
is all about storytelling. No matter what kind
of camera you use. I'll see you inside the course.
2. What Is Smartphone Cinematography?: Let's forget about the
camera tech aspect for a moment and just
talk cinematography, the foundations of
what it actually is. This is really the most
important thing to learn here. Technology changes all the time, but the fundamental
principles of visual storytelling do not. Cinematography is
capturing motion pictures. And that can be with video or film with the right framing, composition, and lighting
to tell a story. And this applies to using any
and all kinds of cameras. In this course, we'll focus
on shooting with smartphones. But you can take most of what
you learn here and apply it to whatever camera you
choose to use in the future. Right now though, mobile video
technology is getting so good that with a little bit of know-how and a few
camera accessories, anyone with a desire can shoot amazingly good video
with their smartphone.
3. The Cinematographer & Key Crew: Along with the definition
of cinematography, we need to define the crew, and on a movie set, that would be the director of photography or the
cinematographer. That's not always the
name that's used. In some countries, it
could be called DOP. We call it in America.
We call it DP, short for director
of photography. It really just depends on
where you are in the world. However, in the end, it's the same job, no
matter what you call it. Now, this would be
more for movies and TV and music videos and
more narrative work. If you're doing corporate work or any kind of other type work, maybe news, you might call the person that's
shooting a shooter. You might call him
the videographer, and in some cases, you
might actually call him the video guy
or the video girl. Not my favorite
name, but as long as you're getting the
work and getting paid, it doesn't really matter
what they call you. But in addition to
the cinematographer, you have an entire
crew around you. And again, it really just
depends on what you're doing. On movies and commercials,
you would have a bigger crew. On corporate video, you might do a one or two person crew. Then on news, you might end
up being a one man band. Lots of times on news,
mobile journalism, you end up being the shooter, the producer, the
editor, everything. On larger shoots, though, you would typically have a crew. And depending on what
you're shooting, that would consist of
normally a gaffer. A Gaffer is the
person who works with the DP and is in charge
of the lighting. And then you would
have a G and E crew, which is grip and electric. Rips move equipment
around and help with lighting,
help with dollies, and they report to
the gaffer who then reports to the DP of
the cinematographer. So on film sets or music
videos, there is a hierarchy. But really, it just
depends again, what kind of project you're doing and how big of
a job it really is. If you're doing YouTube videos, then you might be the one
man band crew as well, and it might just be you kind of like with mobile journalism. So the point is today, the word cinematography
or the word cinematographer can
mean a lot of things. There's so many different ways
to produce content today, and there's so
many amazing ways, including smartphones
to do that.
4. Different Kinds of Video & Film Work: When you think of
cinematography, you probably think of movies. And you might not connect that
with smartphones, though. Would you be surprised
to learn that Steven Sonaberg and Zack Snyder, two big Hollywood directors have used smartphones
in their work? Steven Sonaberg in particular, has shot two feature
films on an iPhone. And then Danny Boyle surprised
everyone when he shot a $70 million Hollywood
movie on an iPhone. And the invention of Apple Log
was a big reason for that. And then, of course, there are Indie film
directors like Sean Baker. His movie Tangerine
was a hit at Sundance, and it was shot on an iPhone
five S several years ago, even before the newer
devices have gotten so good. And then there's a New
Zealand filmmaker named Steph Harris who made a really great Indie
film called Blue Moon. You never introduced
yourself. I'm Darren. What's your name? Dave Jones. Nice to meet you, Dave, Jones. And what's your real name? I did an entire episode on my
YouTube channel about that. And that movie really
turned out great. You should check that
out if you get a chance. But of course, movies are really only a small part of this. You can shoot any kind of
project on a smartphone today and get really,
really amazing results. And the thing is, the
same principles of cinematography will apply no matter what kind of
project you're shooting. Now, of course, if
you're shooting a movie, you'll approach it differently than if you're shooting
a corporate video. Or if you're shooting
a music video, you would approach that
differently than a YouTube blog. Really more from the scale
of the job and the crew, more than the actual
way you shoot it. Because, again, shooting things, once you learn how
to do that properly, using composition and
framing and lighting, you'll apply that to any
and all kinds of projects. In my work, I routinely use my phone to shoot B roll
from my YouTube channel. I also use it a lot for travel films and
documentary work. I routinely mix and match that footage with other cameras. For me, it's all about the
right tool for the right job. But that's not to
say you can't use a smartphone for pretty
much everything these days. It really just depends
on what you want to do, what kind of project
you're producing. For example, mobile
journalism is a huge player in
mobile video today. Here at the BBC, many
people are using iPhones. And while a lot of the advice in this video applies
to those phones, specifically, many of the tips apply regardless of the
phone you're using. The BBC, in particular, has really grabbed
onto this technology, and they produce full
on stories that air on TV and the Internet using
their mobile devices. Lots of corporate video
producers now use smartphones to do interviews and to shoot training videos. Real estate is a big
player with smartphones. Lots of realtors will
shoot their own videos or reality companies
will shoot videos routinely using smartphones to help market their properties. So really, smartphones can be used in a wide variety of ways, whether you're making a movie, a corporate video, a
real estate video, a training piece,
a YouTube blog, it really doesn't matter. So the bigger point here
is in all of these, the basic cinematography
concepts are the same. Yes, you'll approach
things differently depending on what
you're shooting. But when you learn
the foundations, the fundamentals
of cinematography, you'll be able to work on any and all kinds of productions.
5. What Are Composition & Framing?: Okay, We're going to talk about technique and craft first, which as mentioned earlier, is really the most
important thing to learn. Then later we'll move
into the technical realm. If you'd like to skip ahead and watch the tech
stuff though first, that's totally fine, but definitely come back
and watch this. Composition and
framing are really what cinematography
is all about. Do you shoot a wide shot? A close-up? Is the subject
centered or offset? Do you shoot high
angle or maybe low? These are questions
asked on every shoot. And in this section
we'll go over what each one is and why to use them. Composition and
framing or two of the most fundamental aspects of cinematography and
visual storytelling. And two of the most important. You probably don't give it a lot of thought when you watch a video on YouTube or
TV series or a movie. But there's a reason
behind every shot. Every shot has a meaning. Often before you
produce a movie or an advertisement or commercial,
you'll do storyboards. I knew where I wanted to frame. I knew that I've drawn out
the shots are new ways, ways that where I wanted
to place the camera. I don't want us to keep the
camera moving the whole time. This was the style of the film, is to have a camera, the briefs and moves with
the actors and the story. Storyboards are just a way
to pre visualize your shots. You're framing and composition. Simply put, composition is how you compose an image
within a frame. And framing is the field of view and angle you
decide to shoot. So the two are very interconnected and work
together to create a shot. And of course, lighting
plays a big role here too. We'll get to that in
the next section. This is Ripley, our
mannequin stand in that will be helping
throughout the course. And she's standing
in the studio. I'll workout up
next to a payphone. This is a pretty standard look shot on a normal lens
at about eye level, maybe just a little
bit below eye level. But if we move closer and
put the camera lower, you get a totally
different feel. So all I did here was moved
the camera closer and lower. Didn't even change the lens. But if I raise the camera up
and change the lens here, I put a telephoto when you get a totally
different feeling. Again, the exact same scene, just a different way to
compose and frame a shot. Or I could put a wide lens
on pretty much stay in the same place and do
some unique composition. Had the shot composed a
little lower in the frame. This then evokes
another feeling, probably more of
a comedic field. Or you could put a
stylized lens on. This is a fisheye. I lowered the camera, now have a big wide shot here. And this could fall into the comedy world because of
the distortion of the lens. Or it could almost
be a superhero look without changing anything in the scene besides
where the camera is, in which lens I'm using and how I can pose and
frame the shot. You get completely different
feelings with each shot. So now we'll look at a couple of these examples in more detail. This is one of my personal
favorite kinds of shots. It's often called a hero shot. You lower the
camera and it makes us subject look
bigger than life, especially on a movie screen. But this could work
in any kind of production, commercials,
music videos. And this is a normal size and lens and so there's
no distortion. And she's framed offset. That's called the
rule of thirds, and I'll talk more
about that shortly. But this can be a very
cinematic style shot, makes the person on-screen seem powerful, being
controlled, strong. And I think it's just a
great way to frame up characters in a narrative
piece, especially. I always try to
watch out and not shoot too much eye level. I level can be fine, but you want to
vary your angles. Now this shot, I change the
position of the camera. I'm still following
the rule of thirds, which has her a
little bit offset, especially when I'm
looking at her eyes. The eyes are very important
feature of the face. I always really tried to
pay close attention to where I compose people's
eyes within the frame. The shot is also just a
little bit low angle, which is nice I liked
that just gives a little bit of style
and energy to the shot. And then this being on a
tele lens, a telephoto lens. This typically is to incite
more emotion, usually drama. But it could be sadness, it could be anger,
it could be comedy. You're really getting into the person's head when you
get a shot this close. And that goes for any
kind of production. Movies, TV shows,
even corporate video. Think of 60 min where they do a really tight frame on people's
faces during interviews. They are telling the
audience that something important is being said or
is about to be conveyed. And more times than not
has to do with emotion. Whatever kind of
emotion that is. Fisheye shots like this
or stylized shots, It's almost like a GoPro. So for action sports, you'll see this
Look all the time. You'll see this in music videos a lot, but also narrative. And even YouTube blogs,
that kind of thing. Usually it's for more
of a stylized look. And it can also play
more as a comedic field. Especially if you've
got the camera right up in a person's face, it'll really distort people's
features like their face, their nose, that kind of thing. And here I've got
her slightly offset. Often with these kind of lenses, you might Center somebody up. But here, even though I'm
using a stylized lens, I went for a little more
traditional composition, albeit with the
low angle framing. This definitely feels different
than the previous shots. It just gives you a
totally different feel, a different emotion. One final shot here. I'm shooting
approximately eye level. I would call this an
extreme wide shot, and I am using an 18
millimeter wide lens. Oftentimes a shot
like this would be simply to
establish a location. Especially if you're doing a news story or even in a movie, you're just trying to
show where the character is to get the geography
for the audience. But from a symbolism
perspective, primarily in movies or TV. A big wide shot like
this makes the character feel small or
insignificant or lonely. So it really just depends on what kind of project
through shooting. And of course, I
probably should mention, it's always a good idea to
get a variety of shots like this just for pragmatic
reasons and that is editing. You want to be able
to have a variety of shots to edit a scene together. So learning the fundamentals
of composition and framing will really help you be a
better visual storyteller. There's a reason
behind every shot. And you dictate that with
how you choose to shoot.
6. "The Rule Of Thirds": The rule of thirds is one of the most fundamental
principles of composition and something very important to learn and use. So the rule of thirds
divides the frame into three sections, horizontally
and vertically. You typically want to frame
your subject, in this case, someone's face in
the crosshairs, so to speak, within one of the sections of the
rule of thirds. When it comes to faces, I like to really
focus on the eyes. Make sure the eyes feel properly composed within the
rule of thirds. For beginners, often
you'll want to use the grid that's
inside your camera. In this case, I'm using filmic pro and it's a
setting within filmic pro. You can turn the
guides on or off. So I'm going to go ahead
and roll on a clip here and I'll demonstrate
how to frame this up. So again, that would be a centered shot and
centered would be something you might do for news. Or if you're doing
an introduction like we did on this course, where we had Aaron
centered up in the frame. But for most stuff you do, whether it's interviews
or whether it's cinema, you are going to want
to offset people. You can also call this lead
room or negative space. This side of the frame over here would be considered
negative space. Or look room. Look room is another
way it's called. So our mannequin here, she can't look necessarily, but I'm gonna go walk
over and make her look. Now she's looking over here
to this side of the camera. So that would be
called Look room. And look room is a really
common look in movies. Or again, any kind of
interview situation. Now, if you are shooting
this as an interview, you would typically
want to do this though, because the key light is on
camera, right, her left. Alright, so now I have her looking camera
right to her left. And that is how you
would normally want to frame up if you were doing
an interview or something, you would typically want
to look into the light, look into the key light. Something you'll
often hear is to say shoot into the dark side. So the left side of her face, that is a dark side of where
we would want to shoot into. So she's looking over here
on this side of the camera. You don't have to do this. I'm going to say this
throughout this course, rules are meant to be broken. But whether it's in
photography or video, shooting with the
rule of thirds is a pretty standard way and for the most part a pretty good
way to approach things. When I was just starting out, I worked for a company
called Dynamite films. And the director there, a guy named Gerald Kane, had me do an exercise
and I thought I would pass it along here and it
was really pretty helpful, especially when
you're just starting out and you're
learning how to shoot, how to keep control
of the camera. So what he had me do
was take the subject and keep her right along
the edge of the frame. So it's just a good exercise to really work on
your motor skills, but also being able to keep
something within the frame. And especially when
things are moving. You can also work on the
quadrants of the rule of thirds. I've got her face
lined up right now. And one of the quadrants. This may seem simple and it is once you've been
doing it awhile, but it's a really good way to hone your craft and to begin to understand not only
composition and framing, but how a tripod works, a fluid head tripod works, and how things just flow
when you're shooting video. No matter what you're shooting, whether it's a movie, whether it's a new story, whether it's a music video. This is a very basic setup here, but this is how you learn. Okay? Now I'm going to do
the same exercise, but with a telephoto lens. And this is an external lens
that you put on the camera. This one happens to be by
a company called moment. Now we have a much more
traditional looking shot. So I'm going to do
the same thing. But first let's look at
the rule of thirds again. You've got the
grid pattern here. This would be awkward framing, although in a show
like Mr. robot, they frame shots like this. Again, rules are
meant to be broken. But traditionally speaking, whichever way the
actor is looking or the person the
interviewee is looking. That is where you have
the negative space, this space over here
where nothing is. You could also do alternate
framing like this. Again, you're still utilizing
the rule of thirds. You'll see this kinda
look in movies, sometimes especially
comedies where you're doing unique framing. You might also see the occasional interview
done like this, especially on a wider lens. But let's do the exercise. And you can go back
the other way. Again, it's just good to work out the hand-eye
coordination, but also to be familiar
with the frame. Alright, so that's
a very general look at the rule of thirds, something you will utilize
on every shoot you ever do, regardless of what
kind of shoot It is.
7. Composition - Centered or Static: The rule of thirds is something
that is there as a guide. And again, more times than not, that's what you'll end up using. However, there are times
depending on the project, where sintering something, breaking the rule of
thirds is the way to go. You may scream now, it makes you feel better. Who are you most in the
town called me the founder. You may call me that. Somehow I can't see us being
on a first-name basis. The man. Where did you take your still
inside the glass house. This is a hidden room
built for my use long ago, but I didn't think vampires
could get into this house. You are vampire, right? I am the founder
of Morgan Ville. In all ways that count, I am the vampire. This house knows its master, even if it's resonance. Don't. My role on a clip here. I've got a big wide shot here. I'm using a moment 18 millimeter lens and
I have her centered up. This is sometimes called
static composition, where you are framing something
straight down the middle, straight down the
alley, so to speak. Composition and lens choice and lenses we'll talk about
here in just a minute. Evoke emotion. And that's one of the
main things to take away from any kind of
cinematography is, what are you trying to
tell on your story? What is the emotion
you're trying to convey in the shot like this, a big wide shot like this. Typically it's showing that someone is maybe
small or far away. Maybe they're lonely. Again, every story is different, every shot is different. But as a general rule, that is kinda the idea behind
a big wide shot like this. Now again, I'm talking about narrative film making more here. If you're producing
YouTube content or if you're producing mobile
journalism, doing new stories. That's a little bit
different case. In those situations. You're gonna do it for
different reasons. You're gonna get a wide shot, a medium shot, and a
close-up typically speaking. And that just helps in the edit. You're not necessarily
conveying emotion, although you can, depending on the story or the
senior shooting, you also might use
a big wide shot like this to
establish a location, to establish a scene. Again, regardless of
the kind of project, but the rule of thirds wouldn't necessarily apply
in that regard. It could, depending on
what you're shooting. I always think about that
in the back of my mind. Once you've shot like
this for awhile, it just comes second nature. You don't really have
to think about it. I don't typically use
the guides myself, but I've been doing
this a long time. So composition
works together with framing to create emotion. There always is a
reason behind the way you compose something
or frame something. Okay, now I've got a
close-up shot using a 58 millimeter tele
lens from moment. The same idea here
with the close-up I've got here reframed in the center. Let me roll on this. So traditional rule of thirds would be
something like that. But framing grep in the center. This is just a different
way to approach it. When you're referring to movies, those big wide shots
that are centered could also portray comedy, be more of a comedic feel. Same with these
kind of close-ups. Typically though, she
would be looking like maybe either directly in the camera or above the camera. But it's just another
variation on composition. If you were shooting
for YouTube, like doing vlog style video, this is a way you would
shoot a lot of your stuff. So whether you're
shooting wide or tight, this kind of framing is another option that may go
against the rule of thirds, but depending on what
you're shooting and doing can look really good.
8. Composition - Dynamic: Okay, one other kind of composition that I
wanted to show here, and again, this is
composition 101. And so you've got
the rule of thirds. You've got more static or
straight on composition. And then you have one
called dynamic composition. Dynamic composition is where you have lines are
angles in the shot. So I'm shooting the grid here. You can see the angles, you can see the lines
of the grid that would be considered a
dynamic composition. So even though the
light is in the center, the composition is interesting
because of the lines. Let me pan over here
and do the same thing. So right there again, you've got lines going across that are
interesting composition. So this kind of
stuff would apply more towards architecture maybe, or real estate videos. It can apply though, and
music videos or movies. You could do high
angle kind of stuff, looking down and composing two characters sitting across
from each other maybe. But this is a good
general look at how dynamic composition using diagonal lines in
your frame can add some creativity and visual
interest to your shots.
9. Framing - High Angle: Alright, now we'll
talk about framing. Framing relates to composition, but framing is more about
the field of view and that's the lens choice and
the angle of the shot. This is a high angle shot
with a standard lens. Now the same thing
with a wide lens. This is a moment 18
millimeter wide. It creates almost
a comedic field looking down on
someone like that. Of course, this can be used
in a wide variety of ways, establishing a scene,
a point of view. This can almost be
like a peephole shot, not quiet, but in that world. Hi angle typically is also more flattering to people's faces. Not necessarily using the
wide lens just in general. Okay, and then now here
is the telephoto look, high angle telephoto look. And this can be a
very flattering shot. Keep in mind, high
angle can vary wildly. This isn't that high
angle of a shot. You can have the camera at 10 ft up in the ceiling
if you wanted to. But high angle is
always something to consider along with low angle, which I'll show next. Shooting everything at eye
level is a beginner's mistake. Actually, it's not even just
the beginner's mistake. A lot of people, even
experienced people, will shoot things at eye level. And high level is
fine for some stuff. But try to get away from my level and give a
different perspective.
10. Framing - Low Angle: Next up we'll show low angle. Low angle is lowering the camera and shooting
up at a subject. This sometimes can be
called a hero shot. And this again is
more for movies, but it could also apply to a wide range of different
kinds of productions. E.g. shooting news. If you shoot news, not necessarily the people, although you can shoot
the people that way. But getting B-roll of stuff, getting different
perspectives again, like high angle,
use low angle to show the world from a
different point of view. And here's the same thing now shooting with a wide angle lens, the moment 18
millimeter wide lens. One more look here. This is
the moment telephoto lens. A telephoto low angle
shot can really be a hero shot. Hero shot. Imagine the rock or
whoever walking towards the camera makes the
person seem superior, bigger than life, especially
on a movie screen. But again, regardless
of the project, you're shooting a low angle shot can add a very cool look. Then here one last
low angle shot, this is considered an
extreme low angle. This could definitely be
in a big action movie, you might see a
dolly shot tracking in front of guys walking. Again, this is really
all about getting unique perspectives
and being creative. But make sure it ties in with the story you're
trying to tell. Hi.
11. Framing - Side Angle: Another way to frame a person in particular is a side angle. You could frame anything
with a side angle. But when you're
framing a person, there's a couple of
things you really need to pay attention to. First would be the look room. And right here in this shot, she's on the left
side of the frame. And so she's looking
to this side. This would be a traditional
way to shoot it. You could even you could frame
are way off to the side. Or you could do like the
Mr. robot kind of framing. If you've ever seen that show, it is very unique framing. Even though they're looking
to their left camera rate, they frame them
offset like this. Since this is a
one-on-one course, I'm not going to dive
too much into that. Typically speaking. You would frame it
more like that. The second thing to keep in mind is seeing the
people's eyes. Now unless you want to do
an exact profile shot, I always like to see two eyes. Meaning you can
see both her eyes. If her head was
turned a little bit more or if it was a profile, you wouldn't see the second eye. And it's just not as flattering. A lot of profiles are not necessarily an overly
flattering shot. It really depends on
the person of course. But typically speaking,
I like to see two eyes. It's a more flattering shot. And then if she was talking
to someone across the way, you would shoot a similar shot of the other person
looking back at her. This is probably more for
movie or narrative stuff. This wouldn't be for
interview kind of stuff. If you're doing an interview, you wouldn't have her
look that far off camera. She would look over here
closer to the lens. So I've readjusted the
camera and her look. And this would be
more of the kind of look for an interview shot. So a traditional side angle and a narrative. She would
be looking over there. You get two eyes. If
you're doing an interview. Most interviews, whether it's
corporate video or news, I like to have them
look off camera. If you're doing a live shot than they would look
into the camera. But traditionally speaking, have him look over here and again, look to the side of the camera that you have the
negative space on, the look room as
it's often called. So this relates to the
side angle shooting. Another way to frame up and compose a shot depending
on your project.
12. Framing - Dutch Angle: Okay, one last aspect of
framing I want to touch on unrelated to angles is
something called a Dutch angle. Dutch angles are simply turning the tripod and
shooting at an angle. You might sometimes hear
this called a Batman shot. Because that series
from the 1960s, the Batman series from the 1880s used a ton of a Dutch angles. A lot of filmmakers
use Dutch angles. And you can do at handheld. Handheld is a pretty
common way to do it. Actually. It just gives energy to a shot. You might see a
low angle shot of a street and a car comes up. You can obviously shoot him with people if you're
doing interviews, like incorporate
video, event video. Oftentimes when you're
doing an interview, you might frame it up like this and just have a little bit of a tilt, a
little bit of an angle. And it gives a little bit
of energy to the shot. Or you can leave it on a tripod. This particular tripod has a way to adjust the head to
where you can tilt it. This is a personal
preference thing, but when you're talking about look room or
the way you look, when someone's looking
screenwriter or to their left. I like to have the Dutch
angle tilted the other way. Like that. To me, that's just
more visually interesting. It opens the frame up. You've got nice negative
space over here. Don't overdo Dutch angles
though Dutch angles are something that are nice to
throw in every once in awhile. But too much of a good thing
is too much of a good thing. I think that's a
good general rule of thumb for everything I've
been showing so far, especially the
more unique shots. You want to mix different
things in here and there. Whatever helps tell your
story, but don't overdo them.
13. Framing - Over The Shoulder (OTS): Okay, Another way to
frame this shot is using a style called
over the shoulder. Let me go find my phone. I'll call my boss and
I'll see if this is okay. What did you not hear me? I am a star. B. Stand behind the camera. Typically, this will be used
in narratives and movies, but it's also used the news. You might see a reporter with a shot over his shoulder
talking to a subject, talking to an interviewee. So that's what I'm going
to demonstrate here. In this case is just me talking through our
mannequin friend. I've affectionately
called her Ripley. You're looking over my shoulder into her face as the subject. Sometimes this is actually
called dirty framing because the little bit of
my shoulder and the side of my
face or framed up. She's the main part
of the composition using the rule of thirds. She's pushed over to
the side of the frame. And we will be having
a conversation if this was a real seem or again, if I was a reporter, I might be talking to
the interviewee and she's talking back and the
cameras over my shoulder. If this was a movie, however, you put the camera on that
side of her shoulder, shoot back again towards me. Now there will be called
a reverse angle shot. And then you would edit
the two shots together. And we'll talk more
about that later. But right now, just to
understand that this is a pretty common setup
called over the shoulder. It's used in movies, it's used the news. It can be used really in a
variety of different things. Whether you're shooting
B-roll or whether this is the main subject
that you're shooting. This is another way
to frame and compose a shot in the world
of cinematography.
14. Framing - Lenses & Shot Sizes: Okay, The other component
to framing is shot size. When you're talking
about shot size, you're typically
talking about lenses. When you're shooting
on a smartphone, the native lens is usually
considered the wide lens. Although newer phones have
a built-in super wide lens. So you'll have a wide, a type, and a super wide. In this particular model of
iPhone, I have two lenses. I have a wide, which
is they are right now. This is the wide shot. And then I have a telephoto. This is the telephoto shot
built into the iPhone. Now beyond the practical reasons for going between a
wide and the tight. In other words, framing a shot, whether you want to see more
of a shot or less of a shot, there are reasons
behind different shots. I'm not sure which is worse. My husband thinking I'm crazy
or him not believing me. It's gonna be okay. A tight shot like this. This would be considered
a close-up shot. This is typically more
for inciting emotion, whether that's sadness
or fear or happiness. But getting in tight
on somebody's face is usually because there is something intense going on in their life and tints
going on in their world. Again, I'm talking more
about movie production here. But this would apply
to new stories. This would apply
to YouTube blogs. Tight shots tell the
audience that you are getting emotional
with this person, whatever kind of
emotion that is. And wide shots do the opposite. You have to go Daddy. See you later in the week. I love you baby. Let the bedbugs byte. Wide shots. Not this necessarily why this would be considered
a medium shot. A medium shot like this would be more of a traditional shot. A big wide shot would be
an establishing shot. And then an extreme wide
shot might be a shot of an entire neighborhood
that could establish wherever
you are in the world. Actually. Your sentence
will bring me out. Being late. Shot sizes are
things you see every day. You just may not realize
that you're seeing them. You just may not
realize what they mean. So now I'll run through
the various shot sizes that you'll use on
most productions. Keep in mind though,
there are no rules. These are just really
general guidelines and best practices. Now, depending on
who you talk to you, this would be considered
a close-up or really it would almost be considered
an extreme close-up. Right now I'm using a moment tele lens on the
iPhone tele lens. So it's like a four
times telephoto. Depending on the project, this would again insight, some sort of emotion, something dramatic, maybe
usually go in tighter on shots as drama unfolds
or there's conflict. So now I adjusted the
camera to be even closer. And this would be what I would
call an extreme close-up. This is almost getting in the Spaghetti Western
close-up style where the old Clint
Eastwood movies from the 1880s, Sergio Leone. This is more of a stylized shot, probably more used in a movie, but varying your focal length is always something good
to keep in mind. In this case also, it's not just the focal length by actually moved the camera. I moved the camera
closer to the subject. That's something
to keep in mind. You don't always just
put a new lens on. You often have to put
a new lens on and then move the camera closer
or further away. Okay, and now here
is a wide shot. This is an extreme
wide I would call this usually for me
knees up like this. I would call it a wide. Some people might call
this a medium wide. There are wide shots, medium wide shots,
extreme wide shots. To me, you're talking
about a person. This would be
considered a wide shot. Now I'm only using
the iPhone wide lens. So the iPhone lens on
this particular phone is about 26 millimeter roughly. And so it's not super wide. I've also got the camera
just a little bit low, a little bit below eye level. Again, when you're shooting, you wanna think about
the composition where you want to place
the subject in the frame. The framing, the field of view, which lens, and then the angle. Now I'm going to demonstrate
an extreme wide shot. And this is one thing
nice about using lenses, because I'm going to
add a moment wide lens to the iPhone wide lens. And it will instantly give us a much wider shot without
having to move the camera. So now you've got a
head to toe shot. My book, this would be
an extreme wide shot, in particular,
being at a studio. If you're outside, that's
a different story. An extreme wide shot might
be a landscape or again, the exterior of a house. But in this environment, a head to toe shot
like this would be an extreme wide or it could
just be called a wide shot. Now, just to demonstrate this, this could also be called
an extreme wide shot. The only difference would be now you're seeing
the entire set. And so while this is cool, it's behind the scenes and you could call it an extreme wide. The previous one I did. Where you're seeing
her head to toe. I would consider that an
extreme wide in that scenario because normally you're not going to see behind the scenes, you're not wanting to see the walls and the lights
and that kind of stuff. You've got extreme wide shots, wide shots, medium wide shots. You've got medium shots, close-ups and extreme close-ups. Use all these in your production
to help tell your story. And remember, there's a reason behind the different shots.
15. PRO TIPS - Compostion & Framing: Be sure to pay
attention to headroom when you're composing
and framing a shot. You don't want it to be
too high in the frame and you don't want it
to be too low either. Really depends on the shot
and what you're shooting. But a good rule of thumb
is to keep it about ten to 15% down from the top. That is, unless you're
framing someone's eyes, then their head can
be out of the frame. If e.g. you're shooting an extreme close-up
of someone's face. When you're doing interviews, whether corporate interviews or news interviews or any
kind of interview, it's really best to have the camera just slightly
above eye level. I mentioned high angle is more flattering and this wouldn't
be high angle necessarily. But just a little bit
above eye level is good. This will help minimize
any double chin look even from people
that aren't heavy set. The old adages, the camera
can add ten pounds. And that's absolutely true depending on what lens
you're shooting with. That's another topic, but doing this can create a
more flattering shot. If you're filming kids. Maybe news B-roll or
a marketing video, or maybe a school promotion
video, whatever it might be. I'm talking about
small children, preschool, elementary age. It's best to bring
the camera down low. Don't shoot down
towards the kids. Lower the camera down to their eye level or down to
their level near the ground. That just creates much more interesting and appealing
footage for the audience. And of course, remember rules
are meant to be broken. Everything I've said is
more of a guideline. Be creative, break the
rules if necessary. Whatever works in your project.
16. Lighting 101 - Simple Interior: Moody film NWA, or a bright high key lighting can make all the
difference in the world. Sometimes you'll even hear cinematography called
painting with light, as lighting is a vital
aspect of the process. And really, lighting could
be a course all on its own. So here we'll go over tried and true
techniques to get you started and later talk
about some gear options. But this is something
you'll continually learn about as you advance in your craft and as technology
advances and changes. This is a scenario you might encounter when shooting video. A small room lit with
fluorescent lighting. So we'll say you want
to shoot an interview, or perhaps it's a
scene in a movie. What do we do here?
Well, the first thing we'll do is bring the
camera in and set that up. So here's the initial
setup minus the lights, and it matches the
overhead diagram. And so now here is
the actual shot from the iPhone pre lighting. I'm going with a
little bit more, what I would call movie framing here more than
interview framing. Although this could be
interviewed framing, I've got the camera
a little lower than I probably would
for an interview. But they look room
and the composition could work for probably either. So now let's add some lights and make this thing look good. The first light we're going
to add is the key light. Key lights are traditionally the brightest light that
you're going to use on a set. Not always, but more
times than not. And it's the main instrument and the main light that will
be lighting the subject. Here I'm using a large LED with a soft box and also a grid
on it, a grid pattern. We'll talk more
about that later. I like to use soft gliding,
especially on skin. Soft lighting is probably
my favorite for key lights. Here is that look with
just the key light on. This is a work in progress. I'm going to adjust the
light here in a moment, but this is going in
the right direction. Next step is the backlight. This slide I actually had to put outside the room
and I'll show that in just a second to get a
good angle on her back, lights are great for separating a subject
from the background. They can give more
dimension to a shot. And in this case I'm
using an aperture LED. It's a spotlight more or less. And this is not a soft light. This is more of a harsh light. And I'm shooting it through
this opening in the wall. You could diffuse, you could soften a backlight like this. But in this case I chose not to. And so here is that progress. We now have the key
light and the backlight. Now I'm adding a
background light. This would be the third
light in the setup. And background lights are sometimes not necessary
and sometimes they are. The idea behind the
background light is, as the name indicates, is to light up the background. Here I'm using an LED panel that does have some
diffusion built-in. And I'm basically
just lighting up the back wall
behind our subject. Now here's the shot with
the background light. You've got a key
light, a backlight, and now background light. And the last thing I'm
going to add as a fill, this can be a light, or in this case I'm using
a bounce card. And the way that works
is the key light will bounce into the card,
onto the subject. The balance card is
also called foam core, has a white side that
bounces and it has a black side that
will cut the light. Alright, so we've got our
key light or back light or background light and our fill. And as a reminder
here is the backlight outside the room shooting through an opening,
through a window. And just a different angle
here of the final setup. And now the overhead
diagram of everything. This is a pretty simple
and pretty common way to light a scene like this. Keep in mind though,
five different people lighting the same scene with light at five different ways. But it would be done
in a similar fashion with the same techniques. And now here is the final look. And a quick camera
tech note here the ISO is at 76 and the
shutter is at 01:48, shooting for k 24
frames per second. Now the final look
with the key light, backlight, background
light, and fill. In this case a bounce card. The shot does have color
correction in post-production to so here's the
shot with no fill, no fill and no background light, no fill and no backlight. And the original shot with
only the fluorescence on. By the way, a side note, I did turn these off to do
the other lighting. And now just a final recap with different
lights on and off. So here's the shot
without the key light on. The key light obviously
does a lot in this setup. And so there it is back on. Now without the
background light. The background light too does
quite a bit in this scene. Now without the backlight. I'll show that to you again. On off. You can really see
what it's doing here. Now without the
fill the balance. This is kind of subtle, but look at her side. The shadows get really
dark without it. And here it is back on and it's also adding a little bit of
light to the background. Now off. Now I'll turn the
background light back on. Now I'll put the fill back. And lastly, I'll turn
the backlight back on. And so that's the setup. So again, this is a
pretty common way to light something I do routinely regardless of the kind of project
I'm shooting. Now every project is
different of course. But the concept of
this lighting scheme, the techniques used here can work on pretty much
any kind of project.
17. Lighting 101 - Modifiers: Often you'll need to diffuse the light
or NACA light down. And one way to do that
is with these devices. White one is a silk, the green one is a net, and the red one is a net. And then this is a flag, this block slight completely
no light can get through it. You typically use
this to flag off unwanted light spill from a key light or
from a back-light. You can also use this to
create negative fill. This is a C stand and
systems are one of the most used accessories
in the film business, especially when it
comes to lighting. Stands, are used to hold lights, to hold flags. Silks. You name it. A very versatile tool that
you may not own yourself, especially when
you're starting out. But if you ever work on
any kind of production, there will be C stands
on a grip truck or perhaps part of
someone's lighting kit. If you're setting up
a studio by one or two of these for your studio
is a really good idea.
18. Lighting 101 - Reflectors & Diffusers: Another way to modify
the light is with a flex fill or a bounce. This is a very nice small, compact one that zips up, you can drop it in your bag. So the default look is a white. So you could use this
as a bounce or gold. You can unzip it. And it
also has a silver inside. And then it has a black
or it has a silk. So depending on what
you're trying to do, this is a great accessory to
have in your lighting kit. This kind is nice
because it has a handle. So you can either hold it or
you can actually mount this. Those are little
quarter 20 mounts. You can mount this
onto a light stand or even a tripod or a C stand. If you have the right
kind of connector, I use these mainly
out in the field. They're easy to travel with, especially when you're
shooting outside. But they can also work
in a studio setup or wherever you
are in an office. This kind of stuff though
I typically use for interviews or maybe
product shots. Not necessarily
something I would use on a larger production, although they can be useful depending on
what you're doing. Okay, so I'm going to
demo this flex fill now. Let me roll on the iPhone. I currently have
the white card in the board, the foam core. But if I wanted to go gold or if I wanted to
do just the white. It's very subtle. The main thing I was trying to do is
raise up the side of her. Just gets a little dark. And with iPhone that
can get really noisy. Ok, and now I flip this around and I've got
the silver side. Or you can use the black. In this situation,
this doesn't do much. This could be like
a flag or it could be used as a negative fill. A negative fill is
taking the light away. Again here it's not
doing a whole lot. Silver does quite a bit. These are really good to carry
outside and probably best used and running again,
kinda situation.
19. Lighting 101 - Using Modifiers (Silks): Alright, it's probably a
little bit hard to see, but on the key light there is a softbox and on top of the
softbox there's an egg crate, which I sometimes
also call a grid. The grid helps keep
the light more directional so it doesn't
spill quite as much. This is a large light, It's a big source and so it's a very soft light
and it spreads out. So what I'm going
to show though, he's taking the grid off and
taken the diffusion off. So now I've got the light
off and I'm going to take the grid and the diffusion off. They both just go on with Velcro with this
particular light. And actually I changed my mind. I'm going to leave
the diffusion ion for a sample shot and then
I'll take that off. Okay, now I've got the
grid off the main light. And so this is the
exact same shot. Didn't change anything
on the camera yet. Now it's a little
bit overexposed. The grid was knocking
the light down some, but mainly what it did was it controlled it from spilling
all over that back wall. Now there's spill everywhere and that's really
not what you want. You can control that with flags, but the grid helps keep that
light more directional. I'm going to lower the exposure
here just a little bit. Okay, I'm rolling again. I adjusted the exposure
just a little bit, brought it down and now that
looks about right to my eye. It was just a little bit
hot with the grid off. Alright, now I'll take
the diffusion off. So now the LED lights
are just exposed. This is a light
that can roll up. It's a really great
light to travel with. But as I'll demonstrate now, it's also very bright
and can be harsh, especially on skin tone. Alright, now that's the
light with just the LED is no diffusion and it's hard to
look at, It's hard to use. So now this is the
lighting that is just the raw LED
lights hitting her. And again, the exposure
is too bright, which is not a surprise at all. And it's more of a
harsh light now. It's not as harsh as a light
might be with a single bulb, but it's still
pretty harsh light. So what I'm going to do
is diffuse the light. The first way I'm going to
use is with this flex fill. So instantly you get a much more pleasing
look on her face. So imagine being outside
and I'll show this. You can use this outside
to knock the sun down off of somebody. Without it. There's width. And
now the same thing with a silk that
I showed earlier. This is a big silk
that you could use. You would normally put
this in a C stand. But I'm going to hand hold it. And by the way, hand-holding
a silk like this or hand-holding a flag
on a film set. It's typically called Hollywood. In Hollywood, a flag or a silk or
something out of the frame. So now I've got that
in front of the light. Now I can't see the
monitor right now, but just to my eye, it really diffused it and makes her skin tone
looks a lot better. So there is without it. And that's with it. So these both help to diffuse the light, soften the light, and can be
used on any kind of light, really including the sun.
20. Lighting 101 - Using Modifiers (Nets & Flags): Now, depending on the kind
of light you're using, you may not need to
soften the light. So in this scenario now, I'm going to use a net. The net simply lowers the
intensity of the light. This is a green net and
it's called a single. So now we'll see what this looks like in front
of the camera. This will soften the light, but it lowers the intensity. So now I've reduced the
exposure for lack of a better word of the light and made it more
pleasing on her skin. So that's without the net.
And that's what the net. Again, I'm Hollywood
in this right now. But typically you might set
this up with a C stand. It really just depends
on what you're doing. And often you'll use these to fine tune things other
than a key light. You might use it on a backlight
or another way, e.g. a. Light that doesn't
have a dimmer on it. I don't use nets
that much anymore, but they are something
good to understand. Now I'm going to show the
doubleness, the red net. Alright, and here's the red. This is a double net. This drops down the intensity of the light with the
exposure even more. Now you can see this is probably too much
for this example. But you're really
knocking the light down. Again. You could use this
outside and the sun. You could use it on any
instrument, any light though. So nets and silks are great thing to have in your
kit to really help you modify or get the exact look you want with the various lighting
that you're using. Okay, one last look here at a device to help modify the
light and that is the flag. Let me roll here on filmic pro. So I've still got
just the raw LED, no diffusion and no
egg crate, no grid. And without that, there is
major spill on the back wall. And so I'm going to use a flag. This is a flag. The flag
the light off the wall. Now in this situation, pay attention to the back wall. This has nothing to do with her her skin tone or
anything like that. I'm simply flagging the
light off the wall. So I'm flagging the light from the key light off the back wall. There is the light
from the key light. Now it's off the wall. So now the background
light I hat is the only thing
illuminating the wall. So again, there is without the flag and there
is with the flag. And so Hollywood and this
can get kind of tiring. And again, I would put this
on a C stand back here. Unless you have a bunch
of grips on your shoe. Typically you don't
really do that. Whenever I have someone
Hollywood ally, it's usually for a
very quick shot. So they could just stand
there for a minute or two and hold the flag. And that situation, it's fine. Sometimes it's
faster to do that. Then set up a C stand. Okay, I added the flag
in there on the siesta. And just so you can see, after I watched
the footage back, I could see the flag
was in the shot, which again, I was just
doing a demonstration. So not a big deal. But I wanted to show
what it would look like with the actual
flag on a C stand. And this is the reverse angle, the other side of the flag, in front of the LED light. Depending on the shot,
depending on the scenario. Using flags is a great
way to modify the light.
21. Lighting 101 - On Camera Lights: Sometimes you'll find yourself
shooting and lower light, especially if you're
doing a vent production, maybe wedding stuff. Some people do
shoot weddings with these smartphones and
maybe a B camera. You might use a DSLR or mirrorless cameras.
You're a camera. You might do
corporate event work, or you might be a
mobile journalist. And this is a really
common thing for that. Shooting an interview
in lower light. Right now I have it
lit lower and I'm lighting it with my main key
light like I've been doing, although I brought
the intensity down. So what I'm going to do though, is I'm going to turn that
light off and then light the scene or light the subject
with only a camera light. Camera lights can create
interesting looks. They can be good and bad. And I'll show you the
differences right now. I want you to pay attention to how this side of her
face is nice and lit. And then there's a
little bit of a drop-off over there, which is nice. That's called modelling. And you want to have
a little darker side. Typically speaking, when
you're shooting something, just a little bit
of definition when were doing an
interview especially. So I'm going to turn
this light off. So now if you were
shooting this interview, you would be in trouble. You could crank up the ISO, but cranking up the ISO on
a phone does bad things. Plus in the end, even crank and the ISO up, meaning brightening the image, it would still not look good. So I've got this light on
top here. There you go. So now that it's on 100%, right now, it is
illuminating her face. But it gives almost
like a spotlight look. Some people call it a deer
in the headlights look. I don't disagree because I
mentioned a second ago with the key light here you
can see on the side of her face the modeling
right there. It's now gone because this
is a totally flat look. Flat lighting, completely
flat lighting. Sometimes flatlining is okay, but more times than not, you want to have a little bit of definition to add
a little bit of drama to make it not so flat to give it a
more 3D appearance. Now you could lower
this light's intensity. The lights are redeemable. And so bringing the intensity down does help a little bit, but then you don't
have enough exposure. So what do you do? Well,
if you're by yourself, there's not much you can do. And this look is not
uncommon for news or think about a red
carpet where a movie star, it looks into the camera or as being interviewed
by some reporter. Usually it's this
kind of lighting. They just have a
light on their camera and they might be handheld. Using these kind of lights are routinely you'll be handheld. But one option if you have
someone with you helping a production assistant
or maybe a producer, they can take the light off the camera and hold
it to the side. I'm going to take the light off. And you bring it over here. You have someone
hold it like this. Now you're getting the modeling on the right side of the face. So I can point that
out. Yeah, right there. And you're still getting a nicely illuminated
shot again to compare, bringing it back over
here, It's very flat. Bring in the light over here. Have someone hold the light. And you've got a nice solution. But using an LED
light like this can definitely work depending on what kind of job you're doing. But if more traditional
filmmaking, you want to use the key light like this to get
a polished look.
22. Lighting 101 - Golden Hour & Clouds: One of the best
times you can shoot outside is called golden hour. This is the last hour or so before the sun sets or
after the sunrises. I like to say golden hours, because for me it's
usually 2 h maybe up to 3 h before or after
the sun sets or rises. But it's a really
great way to get beautiful footage using
natural available light. The following scenes or from the feature film killing
down that I directed. All of these scenes
were shot with available light in or around
the golden hour timeframe. So even shooting
movies where you often have artificial lighting, using the sun, using natural
light is a great way to go. This shot is also
available light and we use the reflector to bounce
the light in on her face. Well, what makes
you think it's him? I think I recognize the voice. I was there and here if you notice the shimmering
of the light, this is coming off the water and it's an early evening shot. A really cool way to add interest and texture
to your footage, Evans and 85, which Hugo
wasn't the main facility until this year. How do
you know this stuff? Like I said, it's
part of my job. Here's a reverse
angle of that shot. Now in silhouette and you can see the water off there
and then distance. That's what was the
lighting their faces. And if you look closely
in his glasses there, you can actually see the
reflection of the water. One day these men come
out of the jungle. Again, this is all
available light, no modifiers, just
golden hour type light, which is a great way to go. I don't know what they
were. I still don't. One last scene here, It's a continuation of
the same sequence. What are you gonna do? This is also all available
light, golden hour. Although we are using a
couple of reflectors to shape the light around the
actors, just his conscience. And I really think
this is a cool shot. It's one of my favorite
shots and the entire movie, It's got great depth and just an all-around interesting feel. Maybe could be, you know, enough to know what
can happen out there. So you wanna be ****
sure you know what's happening in here before
anybody else gets hurt. Maybe you're just going crazy. Yeah, maybe. And then I really liked
this close-up insert shot. Alright, so lecture. Again, we're using a bounce. It's actually called
a shiny board. That's why you see
the light flickering ever so slightly on her face. That's from the
water, but there's no artificial lights added here, just golden hour sunlight
and some bounce. I'll think about it. Most of the time when you
go out and shoot B-roll, you'll shoot it and
available light as well. B-roll is cover video. It's video that goes over the main topic or
the main subject. Whether that's an interview or a product review or a new
story of whatever it is. B-roll covers that. And a great way to shoot
that is at golden hour. But shooting golden
hour footage is not just restricted
to being outside. You can shoot inside too, with light coming in a window. I'm often amazed at how good
natural light can look, especially this time of day. Golden hour light coming
through glass bricks like this can add a really nice
look and texture to a shot. Love the pattern on the wall. And if you notice the clock, this was about 2
h before sunset. I tend to avoid shooting outside at any other
time of the day. Unless you have cloud cover. Clouds act like a big silk. They diffuse the light from the sun and can create
a very pleasing look. This is a scene from the
series pink that I directed. And this was shot under
a tree on a cloudy day. So the light looks very soft and diffused and it's
a really nice look. This was all available
light with no modifiers. What would your girlfriend? A
girlfriend from the museum. I see with her all over campus. You mean Hannah? No, no, no, no. She's my sister. I tried to introduce you to her. Why didn't you I tried. You ran away. Are you serious? I did. And here's something
that often happens on shoots when you're
shooting outside. It can be sunny like
it is in this shot, which can make it challenging to shoot depending on
the time of day. But then the cloud cover roles in and makes it okay to shoot. Actually, it makes it really
great to shoot, right? This is a scene
from the short film Miranda that I directed. Once we hear you say Miranda, the cavalry with bust through
the door and save the day. It's like last time. But what happens if you
have to shoot outside? There's no cloud cover
and it's bright, sunny, and it's the
middle of the day. Well, in that case, you
create your own clouds. This is a twelv by 12 silt. This is not something
that everybody would have access to. This actually was part of a
grip package on a grip truck. This was for a book
trailer that I directed. But you set up this
large silk over the scene that you're shooting
and it softens the light. Looks like this can also
be used in a studio. This is an eight by eight celt. The eight by eight
is a lot easier to use than the 12 by 12. And you can use it to
diffuse large lights like this LED 12 by 12, you've got to have
multiple people. So pay attention to
the DPs arm there. That's Alan Love favor. He was the director of
photography on this shoot. And disarm is very blown
out by the sunlight. But the person
underneath the silk, that's a crew member there. She looks great. Nice soft light on her. And so here's the actual
scene that we shot. Notice the nice
dapple of light from the tree on the right hand
side on the guy's arm. But the overall
image is very soft. It's very diffused. But the nice thing is silk
still let light through. So you're not just
blocking the light, you're diffusing the light. And again, it works like a
big cloud diffusing the sun. I realize most shoots don't have access to a big silk
like this though. But pretty much
anyone has access to a reflector or
a smaller cell. So I'll show you one
more example from the short film Miranda
directed, doing just that. Listening. I'm sorry.
Okay. About every Let's just work together
and we'll nail this guy. And after that happens, those charges against you
are going to disappear. Plus you'll get your
badge and your gun back to you got to backup
just a little bit cliff. So that's Cliff holding the
diffuser, also called a silt. And if you look at the
actress that Susanna gib, you can see the bright
sun on her face. It's directly above or
creating very harsh shadows. So this is the actual
shot from the movie, but you can see a little bit
of behind the scenes here, right before I
actually say action. I am rolling. Okay. Stepping towards the car. You're kind of
leaning on the car. You're listening to him action and in case you're wondering
and post-production, I actually pushed it on the shot to hide the reflector,
to hide the crew. And now here's the actual
final scene one more time. I'm sorry. Okay. How about everything? Let's just work together
and we'll nail this guy. And after that
happens, those charges against you are
going to disappear. Less. You'll get your
badge and your gun back to shooting outside and available light is
a great way to go, especially if you can
shoot during golden hour, give or take two or 3 h, either after sunrise
or before sunset. And if that's not an option, shooting under cloud
cover is a great way to go or create your own
clouds with a silk.
23. PRO TIPS - Lighting 101: If there is a practical light in the scene you're shooting, regardless of the kind of
video you're producing, that light should
typically be turned on. And that's not necessarily
to help light the scene. That's just because
a light, otherwise we'll just look
dead in the shot. And this can
definitely help with the production
design of the scene. Again, this could be for
interviews, movies, whatever. Another way to diffuse light is to use sheets of diffusion. This kinda diffusion often comes in rolls and you just cut it and attach it to the
light using clothespins, something we usually call C41 sevens and the film business. So this would be used
if you're a light doesn't already have
diffusion built-in, e.g. an LED light. Or if you're trying to add
more diffusion on top of that. There's kinda diffusion
is used pretty widely. I would say it's
probably more for location shooting
part of a light kit. If you're in a studio,
you would probably use the other kind of diffusion
that I already showed, silks and that kind of thing. Color temperature is related
to white balance and lights come in different
color temperatures and some of them are adjustable. So the most common LEDs
are daylight balanced, and most are 5,600.5600 Kelvin. But some lights are by color, and they can be dialed
into an interior color, which is normally
called tungsten. That color temperature is
approximately 3,200 Kelvin. This will depend on your scene and where you're
shooting though. But with a lot of lights again, you can dial this in. Then you would white
balance your camera or your camera app to match
whichever color you want it.
24. Camera Movement - Pans & Tilts: Moving the camera can add lots of production value
to your project. And it has never been easier
to do than it is today. But makes sure it's
motivated movement. In other words, make sure the movement reflects what's
happening in the story. Now this mainly
applies to movies, but it can apply to other
types of productions too. So definitely consider
moving your camera, but makes sure there's a
reason behind the movement. Panning and tilting
or two of the most basic camera
moves you can do, but when done properly, that can be two of
the most effective. One thing I want
to go over though, is the difference
between a pan and tilt. A lot of beginners
make this mistake and a lot of clients when
you're doing client work, we'll just use the word pan, no matter what they're saying. When they really mean that tilt. This is a graphic I found
on the Internet and it is perfect for what I'm
talking about right here. You've got each move
you can do with a camera spelled
out here, Dolly, boom or Gibb truck, which also can be track, pan, tilt and roll. But when I expand
the full graphic, it's actually an Internet meme. You see what the client calls
every one of those moves. So it's just a little
bit of humor here, but the thing is
it's really true. And I don't say this
to be critical. I'm actually showing this because I want to make sure that you say the right thing when
you're describing a shot. Pan goes left or right? It's that simple. A
tilt goes up and down. Now you can tilt and
pan at the same time. You can pan and tilt down. You can pan and tilt up. But you don't just
pan up and down. Now let's see some panning
and tilting inaction. Alright, this is from a series I directed called Morgan bill. And using tilts
and pans here are a nice way to make this
feel more cinematic. It's just one shot
with no edits. Michael, make it up. We need to talk about
the meeting tonight. And this is also
from Morgan Ville, a good example of using pans
to reveal different things. And also a nice way to do
a transition with a tilt. Now this is from a short
film I directed called home. I loved doing a simple
tilt like this to set up a scene to
reveal a location. This is from a Warner
Brothers Digital Series I directed called exposed, using some pans and till
along with some dolly. Died. Back to the series Morgan Ville. Everyone's set, this place is haunted and using whip pans are fast tilts is another way to add excitement or
energy to a shot. Same with the sequence here, and I include a dolly as well. He's already toast. What did
you do to Michael Fitch? And in this scene
from Morgan Bill, I'm using width pans to
follow the conversation, but to also add a little bit
of a comedic element, smart. Oliver must have reported
the book is stolen. Hear about some stolen property. Pans and tilts, although simple
when used appropriately, it can really improve the
look of your project.
25. Camera Movement - Handheld: All right, Another way to
add camera movement is another simple way and
that is to go handheld. The beauty about going
handheld is you're very free to move the
camera as you want. And from a filmmaking
perspective, it helps add urgency
or tension to a shot. It can also be good
for a point of view because as the
camera's moving, it looks like
someone's perspective as they're walking through
a room or what have you. It's used a lot in horror
films or other kind of suspense thriller type movies and in a totally
different direction. And it's also good
for Event work, maybe shooting weddings
or even new stories, lots of times the
quickest and best way to go is to shoot handheld. This is a short film
I shot and directed, all shot on iPhone. It was for the moment
invitational short film contest. And I shot it all handheld to add tension and some suspense. I can't believe it. This is from my short film home. And this is more subtle
handheld movement, but it does create a
feeling of urgency, maybe a little bit of anxiety. Naturally. Another scene here
from Morgan Bill and I incorporated a whip
pans to add comedy, but also to make it
feel suspenseful, we should get stakes is
that what we need to fight vampires and Brandon can't come inside unless
we invite him, will be fine if we stay in here. Monica is not a vampire, just your garden variety psycho. Really hoping you go a
day without mortal peril. And this is a handheld POV
shot from Morgan bill. Adds tension to the shot. My bad. This is a sci-fi series I
directed called continuum. Here we're using a mix of static shots with hand-held
to create tension. And there's also
some cool POV shots. Another good use for handheld
is shooting action scenes. Think of the Bourne movies or other kind of action
scenes like that. Hand-held just
heightens the action, heightens the feel
for the audience. One thing to be aware of
with smartphones though, is because most smartphones have OIS optical image stabilization. And so if you move
the camera too much, bounce it around, you'll
get jitters in the image. So we do recommend using image stabilization
anytime you're going handheld and just be careful not to bump the camera. As long as you don't
bump the camera, you'll typically be okay. This is from a feature film I directed called killing down. And speaking of
the Bourne movies, that handheld vibe is what
we're going for here. And we also mixed in some snap zooms just to really
up the tension factor. Graphs and severe. In this sequence here
is also from killing down using hand-held to
complement the action. And here's another
scene from Morgan bill, and this time a fight
scene and go in hand-held really helps with
these kind of action scenes. Ground. Ovo, stupid
rules, gentlemen. The stupid rules
are in fact mine. I'll see you for it lets you touch either one careful column. There, anyone I care
about, I'll put them down. You know, ground rules. So shooting handheld is
another great way and really a simple way to add production value to
your next project.
26. Camera Movement - Gimbals & Steadicam: Gimbals. Gimbals are one of the coolest things I think you can add to your filmmaking kit as it relates to smartphones. They're great for other
kind of cameras, too. But with smartphones,
it's really amazing the production value you
can add with a gamble. This is another short film I
shot and directed. All shot on an iPhone. I'm going to show most
of it here because it's a good example of what you can do with just a
phone and a gamble. D. Alright, now let's look at some other projects
shot on a gamble, and we'll see how the camera
movement was motivated. This is a short film I shot
and directed on an iPhone called Miranda and it won the FilmicPro short
film contest. And this is more gimble footage from the short film Miranda. You know that. Plus,
you lost your weapon. You don't have to
be an ***. Just get the guy horizontal.
Get him bragging. Don't steer the conversation.
You'll get there. Once we hear you say Miranda. That's when the
cavalry will bust through the door
and save the day. This is a music video I shot and directed using a red
camera and an iPhone. These are some of
the iPhone shots. What What is set. What. This is another
pretty high energy scene from Morganville
shot with a gamble. Come on. Oh. Long before gimbals,
there were Steadicam. Now, I don't have a Steadicam
here on the set with me. A Steadicam is like a Gimble, only it'll hold a
lot bigger cameras, typically speaking, and it's
also much heavier to use. And they're much more cost prohibitive and
really specialized. These days, gimbals
are everywhere, but Steadicam primarily lives in the domain of bigger
budget projects, Hollywood movies, NFL football
games, that kind of thing. In many ways, Steadicam are actually better than
gimbals, because gimbals, you get the Xaxis up down movement that you
don't get in Steadicam. This is one of my
favorite ways to shoot with a steady cam or a
Gimble, for that matter. I call it a walk and talk scene. And this is from the series
Morganville that I directed. Nothing in town to
draw them off campus. Never suspect a
thing. Those that do? Transfer. So were any of
the Morganville kids? Uh, he's local. You know him? Look how he walks. Natives are always ready to run or fight. Yeah. That's sad. That's life. Whenever you see a Morganville human that's
not paranoid, watch out. Why? Because they aren't afraid. And that means
they've got reason. This is from a series I
directed called Pink. This was shot on Steadicam. Today I would probably
use gamble on this, but this is still
a good example. It's the White
Rock Child killer. Police at this time,
have no clue as to the identity of the killer or if he even remains in our city. But parents are urged
to use extreme caution. This is another sequence from the series Pink that I directed. He'd been stalking the
neighborhood for weeks. Hey there. Hey, aren't you late for school? You know I'm headed that way. You want to ride?
You want to write? And one more walk
and talk example here from the movie Killing
Down that I directed. This time we shot over the
shoulder back and forth shots instead of just
walking in front of them. Well, I didn't think
that they gave job interviews to guys like you. Yeah. I mean, they do. Hm. Thanks for coming to my show. I wouldn't miss it. I know. For most smaller productions
and Indie filmmakers, gimbals have become
the way to go, but Steadicam definitely
offers a lot.
27. Camera Movement - Dolly Shots: Okay, dolly shots. Dolly shots are a great way to do more controlled
and precise movement. This is a slider dolly. This is also a dolly, It's a tabletop Dolly. And then of course
there's big dollies, There's Fisher dollies,
There's all kinds of dollies. There's Dana Dolly. But the nice thing about
dollies is they can add movement that are much more
controlled and precise. And dollies are often used
to add emotion to a scene. Fast dolly shot from my
short film, Miranda. You understand the deal, right? Yeah, I understand. This is from my iPhone shot short film, Casey's
favorite song. She said, This is her
number seven favorite song. Okay, Casey, It's one
of my faves as well. It's the police with don't
stand so close to me. This is from the indie feature I directed called spilt milk. And that is Jake
Johnson who has gone on to become a pretty famous,
well-known Hollywood actor. What do you care? This is also from spilt milk, a really nice emotional scene here using slow dolly moves. She's my mom. You only play nice
with them when you want something, Am I right? Yes. What are you afraid you're gonna
lose your allowance? This is about at
all. Sure it is. I'm pretty sure the
feeling's mutual. Unless you actually
get away with murder, Just so you leave her alone. She does time. Oh,
here's some money. Go be annoying somewhere else. It's not like that. Sure it is. I know that. No. You do. Let's face it, Sabrina. She doesn't care
about you. She never did stop it until now. Because you don't know,
you got until it's gone. This is a Stanley
Kubrick inspired shot from the sci-fi series
continuum I directed. Take the hood off. This is a sequence from killing down Dali's work really well
on these kinds of scenes. She's perfectly okay. Another nice thing about
dollies is you can slide and reveal a
character or an object, and you can establish the scene. This is from continuum. It was great being able to use the set we built
to reveal things. Reveal character is
revealed locations. This is a nice sequence
from the short film home. I directed some
subtle dolly moves that are very effective. I think. We move the camera a
lot and spilt milk. I really like this shot. Password. The first thing he
types every time, a very simple but effective
shot from killing down. And a nice simple shot
here from Morgan ville. But it really works
well to establish the location and then
reveal a character. Whereas another similar shot
here from Morgan Ville, a nice way to reveal characters. You must be so laws. This is an actual university. I'm pretty sure
janitorial school is on the site training. And one more from Morgan Bell. Another way to reveal the characters and
show the location. I don't think I needed. Oh, well, yes, I do. Laura. Layer. Another thing about dolly shots, or they are an
excellent way to help propel action in
a shot or scene. More camera movement
from spilt milk, this time an action sequence. This is another scene later in the movie with a
similar aesthetic. Open the door. You don't have to keep pushing
me, I just do it. And this one too, albeit
not as fast of a sequence. The sequence from
the short film home is not necessarily
action packed, but the Dolly makes it feel
more like an action scene. Dollies are also good to
use as a tracking shot, kind of a walk and talk as
pseudo steady cam or a gimbal. But with a lot more precision. These are some of
my favorite kind of shots for dolly or steady cam. I can't open the safe. Hey, you got a gun. Remember, it's everybody had no choice. It doesn't matter. I can't open the safe is
what I'm trying to go. She's got like 30 pictures
of a cat owner Fool. Why? I can't open the
safe bands when we get cork kit, Let's go. And in spilt milk,
we use them a lot. So what happened with
the whole school thing? I decided to get my own place. So your dad finally
kicked you out? Yeah, he did. That's fine. It really have the
money for books and classes and all
that stuff anyhow. So when I got my own place, it's right around the corner. It's stamped smaller.
I've got a cat now. Cool tool. I've been getting really
into the stock market which is awesome. Like Wall Street. Yeah. Yeah, yeah,
like Wall Street. Hey, man, I've been
thinking all what you're saying about Colorado. You quit messing around, man. Hey, another way I like to use dolly shots is as a
point of view or a POV shot. I mentioned that earlier
in the handheld section, dollies can do the same thing, but as I've been trying
to hammer home with a lot more control
and precision. This is from the sci-fi
series continuum. And we use this technique
quite a bit in this show. And I think it was
really effective. Let's call it. And this is a
similar sequence in the short film
homes 24 years ago. Scientists say this
is the final time our eyes will see this
particular astronomical event. So definitely get
your telescope out this weekend and enjoy the view. And one more shot
here from killing down using a doorway
Dali on this one. Hey sweetie. Come from, I didn't
even see you. So dollies are a great way
to add camera movement and production value regardless of the kind of project
you're shooting, I focused on movies, but you could use
this in commercials, YouTube videos,
corporate videos, product shots, you name it.
28. Camera Movement - Jib & Crane Shots: Okay, So this is a
jib and jobs don't get used nearly as
much as they used to. Largely in part because
of the advent of gambles. Gimbels have replaced
the subtle movement that you can get with a jib. And for the most part,
they are easier to use. However, using a jib or a crane, even a little four-foot
job like this can really add scale and size
to a shot or scene. This is the opening shot to the sci-fi series
continuum I directed. This is a great
way to reveal not only the feel for the show, but the main character
and the location. Glad you are awake. Now this is kind of a traditional old-school
Hollywood crane shot to reveal a location
and a character. This was shot with a large
25 foot-long crane arm. This is part of
the same sequence and the movie killing down. Today, you could use a small drone to get this kind of shot. This is the same big crane, but we also use it to
dolly in my submit Steven. I couldn't believe
it at first myself. You can get some sleep. And this is another kind of classic Hollywood looking shot. Hold on. Stephen adds a lot
of production value. Stephen, hang on. Hold. Yeah. Diane, I thought we were gonna
shoot you, buddy. This is another big crane move. This is the ending
of spilt milk. Later guys with a job. You can also do really
small subtle moves that on-screen can look big. We move the camera
quite a bit in this show to this continuum, we use a lot of
Dolly and we also used a lot of these
subtle Gibb moves. This is from pink, a lot, a little Gibb moves
in the show too, but chance to Wilson half the different angles and subtle movement can really
add production value. So I knew I would never have to go back to doing what I do. Now Changes Everything. I never even knew I
had a biological clock that I've made my decision and nothing's going
to change it. These next two shots
also from pink. Subtle movement, but
very effective movement. And then this is the
big climactic ending of my short film home. So if you've never used a job, you should really
consider adding one to your next production. This one was only about $100 and I've got it connected
to my main tripod. So it's really an
affordable option that can add a lot of production
value on your next project.
29. PRO TIPS - Camera Movement: One way people really move the camera today
is using drones. I didn't talk about drones in the main section because putting a smartphone on a drone is not something you really
do much of today. A few years ago you did, but these days, a
lot of the drones, the affordable drones
like from DJI, have built-in cameras and
they're really pretty good. So the main way your
smartphone would interact with a drone is really
controlling the drone. A lot of the controllers, you mount your smart phone or your iPad and to control it. But adding a drone to your
filmmaking kid is a good idea. You wouldn't typically shoot video with your
phone on the drone. This is more of a hack
than anything else, but you can put your
phone on the end of a mono pod and create
your own DIY Gibb. I talked about Jim's, but this is another
way to do it. And the nice thing about this is you can move it to wherever you want and you don't
need to add counterweight. You can definitely get
interesting shots doing this. You just have to of
course, be careful not to damage your phone. This isn't necessarily
camera movement, but it would be considered movement of the image
and that is zooming. And I really discouraged
zooming on smartphones. You can end up doing
a digital zoom, which really degrades
the footage. The only reason I would
really zoom is to switch between
different cameras. In that situation, that's okay, especially if you want to
quickly go between the cameras. But to make sure you're
doing an optical zoom, you want to make sure you
switch the camera within the app versus the zoom
lever versus zooming. The old saying is
Zoom with your feet, not with the camera, not what the lens meaning. Move closer to the image
or move further away. The only exception might
be if you wanna do a stylized Zoom, a snap Zoom. Otherwise, I don't like zooming. We call it a node zooms zone.
30. Tech - What Is Exposure?: You've learned how to compose, frame, and light a shot. You've learned how and
why to move the camera. Now it's time to take
all that craft and combine it with the camera
tech side of things. You don't need to be
a technical expert to shoot great looking video, but there are some
things like aperture, ISO, and shutter speed that
you need to be familiar with. In this section,
we'll also look at how some technical
aspects are different when shooting with
smartphones as compared to shooting with
traditional cameras. So what is exposure? Exposure is the amount
of light allowed to hit the image sensor of your camera while capturing video or stills. And getting the proper exposure is extremely important
to produce quality work. If something is overexposed,
it will be too bright. If something is underexposed,
it will be too dark. Most people probably don't even think about
exposure because most cameras and
especially smartphones shoot everything
with auto settings, and that includes auto exposure. However, to get the best and
most professional results, you really need to use manual control and set this yourself. There are three things that
affect exposure aperture, shutter speed, and ISO. The aperture is the opening in a lens that allows
light to enter. Most traditional lenses
have variable apertures, and so making the
aperture smaller or larger will affect the amount of light that hits the sensor. However, on smartphones,
the aperture is fixed. So it cannot be adjusted, and this makes
setting exposure with a smartphone somewhat different
than traditional cameras. The size of the aperture is typically numbered in F stops. A lower number indicates a wider aperture opening which allows more light
to hit the sensor. This is often
called a fast lens. And on most smartphones, the standard wide lens
is the fastest and thus, also the best in low light. So just remember, the
wider the opening, the sensor will see more light. And the smaller the opening,
it sees less light. But on a smartphone, it's
fixed at one opening. The shutter speed is
the amount of time your camera sensor
is exposed to light, and smartphones use an
electronic shutter. Unlike the aperture on
smartphones, though, shutter speed is variable and affects the amount of light
captured by the sensor. The faster the shutter speed, the darker the footage because the sensor has less time
to expose an image. For example, if shooting
24 frames per second at 1:48 shutter in
properly exposed light, the footage would look and
feel natural to your eye. But shoot the same shot at 24 frames per second
and in the same light, but with a faster shutter, the image would be much darker, along with having
different motion. So shutter speed not only
affects the exposure, it also affects the motion, the motion blur, and
motion blur is a big deal. In order to create the best looking and most
cinematic footage, especially using a smartphone, you have to get
good motion blur. Lack of proper motion
blur is probably the single biggest giveaway that you're shooting
smartphone video, and especially when shooting
outdoors in bright sunlight. I'll talk more about this
in an upcoming section, but you'll use neutral
density filters, also called ND filters to
achieve the proper motion blur. But relying heavily on the
shutter to set exposure, instead of a variable
aperture on the lens is one of the biggest
differences between traditional cameras and
smartphone cameras. Again, since the aperture
is fixed on a smartphone, you have to use the shutter along with ISO to
set the exposure. And ISO is what I'll
talk about next. First, let me mention
that some people say ISO and some people say ISO, which I've actually really
only heard on YouTube. I say ISO, and I've been
saying it that way forever. And really, everyone I've ever worked with over the
years has said ISO. So it may be a regional
thing. I'm not sure. ISO ISO, however you want to say
it, doesn't really matter. What matters is what ISO is
and how it affects an image. ISO is also known as gain, and it's the range
of sensitivity of the actual camera sensor. As you increase the ISO, you increase the exposure, and depending on the sensor, your image quality
results will vary. On smartphones in particular, because they have
a small sensor, the more ISO you add, the more video noise you'll see, especially in low light, and
that's not a good thing. High ISO can also decrease
the detail of an image. Again, not good. So
for best results, I always try to shoot with
the lowest ISO possible. And this will depend on what device and video camera
app you're using. The newer phones definitely do better in lower light
shooting situations. Keep in mind that when
you shoot a scene, whether that's outside
in natural light or in a studio with
artificial lighting, it really isn't what you
see is what you get. You're lighting for what
the camera sensor sees, not necessarily what you see. So by knowing the aperture of the lens and the best
shutter speed in ISO to use, you can make the exposure
and the image look great. And if all else fails or
you get in a jam, remember, you can always turn
the auto settings on to check and see what the
camera thinks is best. But then definitely either lock those settings or go back to manual once you
actually start shooting. Properly exposing your
footage is obviously very important and something you'll do on every kind of
project you shoot.
31. Tech - Using Built-in Lenses: And now we'll look at the
built in lenses in a phone. It'll depend on which
phone you have. Almost everyone, even if
you're not a filmmaker, is familiar with the camera app, the video camera app or
the photo camera app. It's very straightforward.
It's very simple. We'll look at it
first, and then we'll jump into a third party app, which is what I recommend using. But just as a general look, you've of course got your
one times and two times. Almost every phone has
a standard one times wide and a two times tell. Android or iPhone. And then a lot of iPhones, since I think the 11 or 12, I forget, will have an
ultrawide, which is 0.5. And then later
generation phones will have a four times or five times, again, depending on
which one you have. And this particular model
has an eight times. So you can really punch in a long ways with these
newer generation phones. The problem arises, though, is that the other
lenses or cameras, each one of these is the
actual camera in the phone. The sensor is not as large or
as good as the main sensor. The main sensor on the one times camera is the best by far. You also don't have
the same apertures. The one times has the
fastest aperture. The tell lenses will have
the slower apertures. The main benefit there is the faster aperture will
be better in low light. And ultimately, will just give you better results in the end, whether you're shooting
photos or video. Now I'm in a third party app, and this is really
what I recommend using for anyone who's trying
to do more serious video. And even if you're
just doing home video, I still use a third party
app more times than not. The main reason is you
have more control. Now in here in Black Magic, and by the way, this
could be any app. I'm just using Black Magic because that's the
main app I use today. A lot of this course I shot with the FilmiProApp because that's the app I used to use a lot. There's definitely other
good apps out there, so just use the app you want. But no matter what
app you're using, the cameras and
lenses will work the same depending on the
model phone you have. And the nice thing
about being in a third party app is you
can see the details. It's a 24 millimeter, and it's an F 1.8. The 48 is a virtual camera, and so it pushes
in on the sensor. It crops in more or less, which on video doesn't affect
the image, which is great. On photos, it does. So doing photography, you
don't really want to do this. The main sensor, you get 48 megapixel with this
particular phone. When you punch in the 48, you get 12 megapixel, so
a pretty big difference. But for video, it works great, and you really have no
quality loss whatsoever. You're still at an F 1.8. The 13 millimeter is ultra wide. It drops down to an F 2.2, which isn't bad, but
it's not near as good in low light as the main
sensor. Keep that in mind. And then the
telephotos you've got 100 millimeter,
and it's an F 2.8. And then on this phone,
I've got a 200 millimeter. And it too is an F 2.8, but it's not actually
fully optical. That's one thing I
want to point out. It's using some Apple
magic to push in 100 millimeter four times
is completely optical, and so are all the other
ones except for the 48, but the 48 is a virtual. As I mentioned, it's working
off the 24 millimeter. And what that really means is, you'll get the best
results when something is an optical and not a
digital version of it. And that mainly refers to Zoom. I personally don't recommend
zooming on a smartphone. More times than not, especially
if you're not careful, you'll go into the
digital Zoom realm, and you'll degrade the footage. You can grab this slider
in the Black Magic camera app and you can zoom in. I think you can go all the
way to 16 times, 15 times. And so you've got
quite the zoom range, but you go too far with it, and you're doing a digital zoom, which again, can
degrade your footage. But if you need that shot, depending on what you're doing, let's say you're shooting
a basketball game or a documentary and you
need that long shot, you can absolutely use it, but just understand your footage won't be as high a quality. And, of course, the one
camera I didn't mention that all phones have is
the selfie camera. And so you got that option, too. And with modern phones, the selfie camera is
much, much better. It's not near as good
as the main camera. And so if you're going
purely for quality, always use the 24 millimeter
for everything you do. 48 would be my second
choice because that's why you can put external
lenses on the camera, and that way you can get
different focal length, but still use the
main 24 millimeter, which if you want the best
low light performance, the most shallow depth of field, and just best overall quality, you want to pretty much use the 24 millimeter at all times. The only exception would
be if you want to use telephoto that goes on one
of these longer lenses, they make telephoto specifically
for the four times, five times or eight
times lenses, depending on which
phone you have, then you can put a lens
on that external lens. And I'll talk about
external lenses in an upcoming section as well. But it's good to understand
what you have here in the base lenses within the phone before you even
consider doing external lenses. External lenses are great, but today with smartphones, you actually have
a lot you can do with just the built in
lenses and cameras. So to summarize, because I know that was
a lot of information, I would use the 24
millimeter for best results, depending on what
you're shooting, of course, you can use them all, but for more professional work, I would stick to 24 mainly, especially if you're
shooting in low light. If you're in bright
light, the 13 millimeter and the telephoto works fine. Use the 48 millimeter
to push in, and you're still on the
main sensor and for video, you get no real
quality loss at all. And so, ultimately,
it just depends on what you're doing and
what you're shooting. But now with the later
generation phones, you have a lot of
camera options. And so just really use the one that works best
for your project.
32. Tech - Best Frame Rates: Now we'll look at frame rates, and frame rates can
be pretty subjective, depending on where
you are in the world. In the US, our main frame rate is actually 30
frames per second. In Europe and other what's
called Pow countries, it's 25 frames per second. The US and Canada
are NTSC countries. But the universal frame rate
is 24 frames per second. And that's what I shoot
most of the time. That's what I recommend
everyone shoot. That's whether you're
doing a YouTube video, a commercial, a feature film. All movies are shot at
24 frames per second. Anything narrative
in particular, you want to shoot 24
frames per second. So you can also shoot 30, as I mentioned, and you can
shoot 60 frames per second. You can also shoot up to
120 frames per second, depending on your phone model. Now, when you shoot 120, you can see how it's
getting darker. You need more light.
Same with 60. You need more light when you're shooting the higher frame rates. And when you're shooting
higher frame rates, and my workflow, and this
is, again, what I suggest. If your base frame rate
is 24 frames per second, and again, that's
what I recommend. And when you shoot 60, it's shooting high frame rate, that would actually be
shooting slow motion. So 60 frames per second on a 24 frame baseline would
be a 40% slow mo look. If you shot 48
frames per second, based on 24, it'd
be a 50% slow mode. So then 120 frames per second would be a
20% slow mo look. And you can now
do that in four K on most later
generation iPhones. Again, this is all
phone dependent. What phone model you use. So in the Black Magic camerap, if you set your
initial project up at 24 frames per second and
you want to do off speed, so you want to do slow motion, you can hit off
speed right there. And now I'm controlling how many frames per
second I want to shoot. In combination with 24. And so what that does
is actually we'll do a conform for you in the app. Normally, if you're going to conform the way I
was showing earlier, if you're shooting 60 frames per second, it'll just shoot 60. You take it in your editing app, you slow it down there, and then you can get slow
motion that way. By doing the off speed mode in the app, let me put it on 48. So now we're on 48
frames per second. You can see over
there, you got 48/24. So when I roll in that clip, I'll actually get a 50% Slomo. And Black Magic
has some defaults. They got 72 frames per second
or 96 frames per second. Again, when I choose these, you can see the image gets darker because the sensor needs more light when you're
shooting a higher frame rate. So usually you'd want
to do this outside, or would you have
a lot of light? But more times than not, I'm shooting 24 frames per second. And if I'm shooting slow motion, I shoot 48 or 60. But again, it depends on what part of the
world you're in. If you're in Europe, places
that are Pow countries, you'll shoot mainly 25 frames per second or 50
frames per second. If you're in the US and Canada, you'll mainly shoot
24, 30 or 60. And then the rest of the
world, it just depends on where you are and what
your local norms are. But the nice thing
about smartphones today is you can shoot in
all those different formats, especially using
third party apps, and you can do that in
four K on most phones. So choose the frame rnate
that's best for your project, and if you're doing
anything narrative, movies, et cetera, no matter
where you are in the world, I would shoot 24
frames per second.
33. Tech - Video Codecs & Apple Log: Okay, now we're going
to talk about Codex, and on iPhones, in particular, you have a large assortment
of codecs to choose from. Codex you might be
familiar with are HDt 264, Hot 265 or TBC, ProRes, ProRes Ra, and then you have the ability to shoot
Log mixed in with the Codec. And now on an iPhone,
again, the Kodak is, for example, ProRes, which
writes into a QuickTime file. So I don't want to get
too in the weeds there, but let's hop into the menu here and I can show
you what I'm talking about. So on this particular
version of the iPhone, I've got HDT 264 I've got
PRRs proxy. I've got HEVC. And by the way, the main
camera app shoots HEVC. And that's what most
people probably shoot, and that's what I shoot for
most everyday type videos. But you can also shoot in PRs. You got PRRs Proxy, LT, 422, HQ, and now on later
generation phones, you can shoot on
PRs Ra and Raw HQ. To shoot in those formats, you have to use an SSD, though. These other ones you can
all record in the app. Now, when would
you shoot ProRes? Well, I shoot PRs, mainly when I'm doing
something more on the professional
side or anything I need to do heavy
color grading on or if I'm doing visual
effects type stuff. Anything that you're going
to do heavy post work on, then I would shoot PRs. Otherwise, shooting an
HEVC is more than fine. And down here in the
Black Magic camera app, and again, this
works in other apps, too, you've got bit rate. When you're shooting
h.265 or h.264, I don't shoot h.264
much anymore. You can, but more
times than not, I stick with TBC now. You can choose the
bit rate, though, and always choose the
highest bit rate. There's no reason to go lower. Now, that's a nice thing
about a third party app is you can actually
choose bit rate, in the native camera app,
you can't choose that. Now, you can choose PRs
in the native camera app, but you can't choose
the bit rate otherwise. And in the native camera app, I should note that you
only can shoot PRRs HQ. You can't shoot in
other flavors of PRs. Again, this will be dependent on which phone model you have. Now, in addition
to Codex, and now, these are high quality codecs, you also have the ability
to choose your color space. On iPhone, it starts with the iPhone 15 Pro going forward. And the big thing that
they've added is Apple Log. Now, the current generation that I have will shoot Apple Log two. But if you have a
15 Pro or later, you can shoot an Apolog or Apolog two now with
the 17 or later. Shooting Apple Log has
really opened the iPhone up to a lot more
professional applications. Shooting log in general
has been around on the iPhone since
I think 2017, and a lot of those early logs
were really pretty good. A lot of people
called them fake Log, but like Fil Mac Pro, et
cetera, had it for years. They were using
computational imaging, but it was a true log. It was a real log
arrhythmic curve, whether people wanted
to believe it or not. It really was. So you did get some better dynamic
range. That's the key. What log does, it gives
you more dynamic range and ultimately more latitude in post production to do color
correction, do color grading. And when you shoot log,
the image will look flat. And that's the whole
point. I've got a lot turned on right now,
but you can see there. Without the lout on,
it's a very flat, milky looking image,
desaturated milky image. You turn the let back on, that's what it's going to look
like in post production. So you can preview the ts in the app when you're shooting, which is what I would recommend doing, but that's another topic. For almost everything I do
now today with an iPhone, I am shooting an Apple Log. And on the later
generation phones, I'm shooting an Apple Log too. And that's even if
I'm shooting an HEVC. I showed the Codex a second ago. Let's go back to that. You can use Apple Log on all these. If you're shooting ProRes Raw, you want to use ApologI exclusively at the time
of this recording. But if you want to do
smaller file sizes, you can actually shoot HEVC with Apolog two.
No problem at all. And then you'll get the
benefits of shooting Log, but with a much smaller file. Quality is not near as good. You'll have more digital
noise and you won't have as much information to work
with in post production. But again, that really matters if you're doing higher
end color grading, visual effects, or heavy
work in post production. If you're shooting
everyday videos, without question, shoot HEVC, and that's even if you're
shooting Apple Log. What I end up doing
a lot is I'll shoot Perez 422 LT, sometimes 422. But LT, I found gives just the right amount of
quality and file size. So you get better
quality than VC. VC is compressed. It's a good quality.
Don't get me wrong. But with ProRes, you're getting higher quality files that also play back very
easily on a computer. HEVC, a lot of computers, even modern computers
can struggle, in particular when you add multiple video
layers and effects. So ProRes is a
great codec to use. PRRs Ra is for really
high end stuff. HEVC is for everyday videos. But using Apple Log, I would do for everything. You do have to do
color correction in the end or you can bake
the light in in the app, which I don't recommend
doing very often. But shooting Rec seven oh nine is what standard
video looks like. That's basically what the
iPhone camera looks like, the native iPhone camera. Apple Log, you have a
lot more flexibility in post production
in particular, and you can create much
more cinematic looks, and that's really
what I'm going for. And if you're
taking this course, that's probably what
you're going for, too. But with the later
generation phones, you do have a lot
of flexibility, not only in the
color space options, but in the Codex. And so use whichever one
works best for your project.
34. PRO TIPS - Tech: I wanted to mention
shallow depth of field. That's not something you usually associate with a smartphone,
but it is possible. You just have to get
close to your subject. I recommend using a
telephoto lens and then also using the iPhone wide lens, because it has a
wider aperture and wider apertures will help
with depth of field. So e.g. putting a tele
lands on the wide lens. However, if you
put the tele lens on your camera tele lens, even though it's a
smaller aperture, because you're
getting more or less a four times telephoto look, you can definitely get
shallow depth of field. But keep in mind that
shallow depth of field is not the end-all be-all. It's great to get separation
from the background, but that's super shallow depth of field look is really not necessary or required for
something to be cinematic. I just want to make
sure that's understood. If you're shooting something
that's going to be heavily color corrected or color graded
later in post-production. It's a really good idea
to shoot a color chart. This will help you
in post-production to get the best
color correction. Now this might be a
little more advanced, and this is not a
requirement by any means. But it's a good idea and
it's a good practice. Especially again, if
you're going to be doing heavier color correction or color grading and
post-production. And tying into the color chart. You especially want to use
that if you're shooting log or flat footage
log in particular, this would be more
we're using filmic pro or the Moment
Pro Camera app. Log is something you don't
really need to worry about if you're just shooting
everyday kind of videos. Or if you're doing quick
turnaround videos for YouTube or maybe social media. But if you're doing commercials
or real estate work, or music video or
a movie for sure, you should consider
shooting log or flat. Not only does it give
your footage and more cinematic look
right out of the camera. When you get in post-production, you have more options
for color grading. And that's especially
true with filmic pro log. Filmic pro log, you get
more dynamic range. Now I don't want to get
too technical here. But basically you can see
a little bit more into the shadows and the
highlights of the image. With the Moment app, I haven't found that to be quite as true. It's more of a look. You're not getting
more dynamic range, but it does look pretty good. So the choice is yours. But these are really pretty
cool and advanced features to have at your disposal, especially shooting
on a smartphone.
35. Camera Apps - Airplane Mode: Okay. So before we do anything in an app, a very important thing
you need to do to your phone is put it
in airplane mode. Depending on the device,
this is done different ways, but it's still the same idea no matter what kind of
phone you're using. So we go into settings. We do airplane mode. I also want to make sure
my Wi Fi is off, and I even want to turn
on, do not disturb. The other thing you
might want to look at is your notifications. You can turn your different
notifications off. If you're shooting
something really important like a scene in
a movie or an interview, I would turn all this off. At bare minimum, put it in airplane mode and turn
do not disturb on. That way, you'll be set
up and ready to shoot.
36. Camera Apps - Native iPhone: So if you're just getting
started in smartphone video, you might just use
the native camera app on the iPhone or whatever
phone it is you use. And so this is the iPhone
native camera app. This app is fine for a lot of different
things you can do. I use it for more everyday, kinda like family videos. Or if I'm just quickly needing to get
a shot of something. But if I want something more professional with more
control and more quality, I use third party apps, which we'll talk about
in just a minute. But if you're just
getting started and don't want to spend
any money on apps. Or if you're just learning the
built-in native camera app on the iPhone again, or whatever phone you have. Some of the Android
phones actually have pretty decent
built-in camera apps. More manual control
is the main thing. So just use whatever
works best for you. And I'll give you some pros and cons of each as we
go through them. The number one point I
wanna make clear though, and I just touched on it briefly is the manual control aspect. Shooting manual is imperative if you want to shoot
professional quality video. I don't care if you're shooting
on a mirrorless cameras, smartphone, a DSLR,
it doesn't matter. Manual control, you
have to learn how to do that to create
professional-looking footage. And so even using
the built-in app, you want to use manual control. You'll see here, putting my
hand in front of the camera, you get all kinds of pulsing. The cameras trying
to focus on my hand, the exposure shifts, the white
balance actually changes. That's not good,
none of that's good. The idea that it
changes so quickly, like for focus and such, if you're just doing
something like shooting a kid's birthday
party, that's okay. However, some of the techniques you'll learn in this course, you'll want to use those even shooting your kid's
birthday parties, I assure you, but I digress. Even using your
native camera app, you want to use manual control. Now again, on the iPhone, you don't have a lot
of manual control, but you can touch the screen, hold it down, and lock it. You'll see the AE AF
lock across the top. That means your exposure and your focus and your white
balance are all locked. So then when I put
my hand out there, you don't get any shifts. Focus today is on the subject
that I haven't locked to. The exposure doesn't shift in the white balance
doesn't shift. Now, you can also take, if you lock it like that, you can also take and move this slider up and
down and adjust it to whatever you
think looks best. However, I would caution
you that for most things, the phone does a
pretty good job. It averages out the exposure. And again, it looks pretty
good more times than not. However, if you're trying to, let's say the back wall
was really bright. It would expose
for the back wall and then your subject in
the front would be dark. So in that case, you
would want to bring it up and make your
subjects bright. One thing to keep in mind, this is good advice again, on regardless of what kind
of camera you're using, is exposed for the highlights, meaning exposed for the
brightest part of the image. You can always bring footage
up in post-production, meaning making it brighter. If your highlights get clipped, meaning there are overexposed,
they're just all white. There's no information there. You can't bring those back. You can bring up shadows. They may get noisy, but at least the
information is there. So always exposed
for your highlights. So like in this example, I would pick the
brightest spot on the screen and that's
what I would expose for. So you could click on
it and then you can actually adjust it as needed. But then when you
click and hold, that is how you set
it and lock it. Another reason you want to
use third-party apps, though, beyond the excellent
manual control features they offer, is higher bit rate. The native iPhone will
vary the bit rate. A normal shot is anywhere 20-30, maybe up to 60 mbps. It really depends on
what you're shooting. But third-party apps
you'll get up to 100 mb. In some cases, like
with filmic pro, you can get 130 mbps. And there's other apps out there that will even give
you more than that, up to 200 mbps. Again, it depends on your
device, Android or iPhone. So you really just want to pick whatever app works best for you. But if you're just
starting out and you're learning
smartphone video, smartphone cinematography,
using the native camera app, it's probably a
good way to learn. Iphone 13.13 Pro and Pro Max have actually updated
the native camera app. And it does have
more functionality. Just want to
highlight two things. The first one is, you can now shoot a high-quality video
codec called ProRes. Prores is a codec. And so you are now
being able to shoot in a professional Kodak within
the native camera app, but also within filmic
pro and filmic pro, you have a lot more control, a lot more manual control. And that's one of the key things that I talked about
in this course. As you want to shoot
manually whenever you can. It is nice that you had that ability in the
native app now. And this is really geared towards
professional film-making because the file sizes
are incredibly large. This is a 1 tb. And with that, I get 2 h of footage shooting
in this Perez. When I don't have
progress selected, I would get up to
countless hours. And so only use this
in certain situations like visual effects or if you want to do
heavy color grading, or you're using your phone
to do an insert shot, a B-roll shot into another
higher-end type project. So that's one really nice
addition that they did. You still don't have manual control features in the phone. Although you can now come in and do some exposure
adjustments, which that can be helpful. But it's still not the same
as using a third-party app. Now the other new feature that's worth mentioning in
the native camera app on the iPhone 13.13
Pro and Pro Max. The ProRes feature
I just mentioned, it only works in the Pro
and Pro Max version, but the iPhone 13, we
have cinematic mode now. And cinematic mode is more
or less portrait video. So just like you can do portrait photography where you get simulated shallow
depth of field. We now get that in video. And this is a pretty
cool feature. It's not really for
professional use yet because it's using
math more or less, the LIDAR sensor to
create a depth map. And the depth maps
aren't perfect. And so the footage you'll see, whenever there are objects
or people or subjects that have complicated edges or frizzy hair, that kind of thing. The cut-out isn't very good yet. This will advance and be
much better in the future, but it is pretty good right now and it's a neat feature to use. I use it for social
media primarily. And you could use it
as an insert shot for B-roll and that
kind of thing, matching any with
some other cameras. And that is a cool
aspect to this. But really right
now it is limited. Again, this course is not
really about specific phones, but I know a lot of
people that take this course have iPhones. And so I wanted to
include this information and make you aware that these new features to iOS and the new devices are
definitely worth checking out. But now we'll look
at some apps will offer you a lot more features and will really help you create more professional
looking footage.
37. Camera Apps - FiLMiC Pro V7 (subscription): We've been talking
about it for months and now it's finally here. Filmic pro version seven,
these subscription model. Now I know a lot of you aren't real happy with filmic pro, but don't shoot the messenger. Okay? So filmic Pro has been
working on this a long time. I actually thought version seven was going
to be out back in 2020. Who knows the pandemic
may have stalled it. And then they got acquired
by bending spoons this year. And so nonetheless, it's here. And today I'm gonna
look at the main things they've changed with the interface that would of
course include the controls. They have new manual controls. They also have a
new info slider, which is really important and probably is one of the
best things I've added. And then they've added
these quick access modules are menus called clams, QAM. These are interesting too, and it gives you multiple ways now to do different settings. By the way, just to be clear,
I'm not paid by filmic pro, I'm not sponsored by filmic pro, but I did better test them. So at first glance, this UI looks pretty
much the same. You've got your white
balance controls, your different profiles. If you bought the film looks, you've got the same
presets over here. If you have the
cinematographer kit, and then you've got your
different saturation vibrance and histogram controls here. You also have your library
which looks the same. You've got this
timecode medallion down here with different wave forms. Those are a little bit
different, but that's really it. The rest of everything
has been changed some more dramatically
and some more subtle. The camera picker looks
a little bit different. Works the same, just a little
bit of a different layout. I do like how there's
more information there now, interestingly though, they don't have the
two times lens yet, this is a 14 Pro
Max and by the way, I'm using a small rib-cage. Then they have a menu up here. The menu looks very similar
to filmic pro version six. And then when you step
inside each for more detail, they are the exact
same as what you're used to if you add
filmic pro version six, basically they had started
implementing some of V7 V6. The biggest thing to me is at
the top here they now have a drop-down menu that shows everything that's going
on, which is great. This has been sorely
missed and filmic pro. So you can instantly
look here and you see your ISO right now
it's set to 195. You've got your
shutter, which is 148. You got your white balance,
the format you're shooting, I'm shooting ProRes four to two, and then also the color profile. So I love having information, but they take it
one step further. And this is the
really cool part. Now you can click
on those and change it down here with a quick menu, clams, QAM, quick access menu. Now you can come down here
and pick a different ISO, or you can slide the
slider to choose the ISO you want
that I really like. Same with the shutter. Now if you click on the
shutter at the top, you can come down here
and instantly choose a more or less preset
180 degree shutter rule would be what you would
choose most of the time. And so I'm shooting
24 frames per second, which would be 148 Shutter. But I wanted to go
to a faster shutter. You could do that 196. It's equivalent to 90 degree
or a 45-degree angle. And the angles are nice because whenever
you set it on that, no matter what
frame rate you do, that will then create
the proper motion blur for you that comes from
film cameras originally, the different shutter angle. So I really like that. Then the same goes
for white balance. So you click on that and
the white balance comes up. You've got your various presets. You can be on auto. Everything works
the same as in V6. It's just a little bit of
a different layout and I really do like how you
can quickly pop up. One thing you might be
seeing here is this is more or less the same as going
into this menu here. So you can do white
balance here, or you can click here and do
it quickly on the screen. So you have two ways to do it. Same with choosing your format. So now you click that and you automatically go into the menu. So instead of having
to hit Settings and go down two or three
layers into a menu. You can do it from
the home screen. And of course lastly, same thing with the
actual color profile. I want to shoot log,
or flat or dynamic, which I never shoot by the way, natural is fine for this. So it's really quick
and I think that's the overarching theme
here of the new design. It's easy to use and easier
to use and quicker to access. Now, the other
thing that they've changed is when
you come up here, you can choose the way you set the exposure and, or the focus. You can do radical, which is the way I've been
doing it so far. You can do center weight. This is a way that I use a lot. That way you have a
larger sample area for your focus and
for your exposure. Or you can go to manual. Now this is where, again, the design has gotten
considerably different. Instead of having
the arc sliders, they now have regular sliders. I just go up and down. This is reminiscent of a lot of other apps on the market,
and I do like it. I also think it's a
little bit easier to see now because of the different
colors I've chosen. I like the yellow and then the darker shade right
here is nice too, that way you can kinda
see the numbers. And so over here, just like when I hit
shutter up here, you can go to ISO up here, or you can still swipe in. You can come over
here and hit ISO and set your ISO
with the slider. Same with the shutter. And these are
independent controls. I'm setting it with the
slider there on the shutter. And then there's a
zoom right here too. At any rate, it's nice now
with the sliders that you can individually set the
different setting you want here. And when you move it, it will stay put
hill lock and you can see up here when
it says it's locked. And so when you come back
out here, what I just did, ISO 3,490 s shutter,
that's a lot. But then if you
undo the radicals, it'll go back to auto
until you lock it again. Same with the focus. Focus has a nice slider now too. And if you wanna do focus poles, which is a pretty cool
feature and filmic pro, that's what this aqua and I guess that's
pink arrows are for. And that's much easier
now to see and to set. Again, that's kind of the
overall theme here is step is easier to use and
easier to access. And I do like it. Speaking of that audio, same thing now you
click on the audio, the mic icon and it pops up that right now I don't have
an external mic connected, so it's just using
automatic gain correction. But if I had a mike,
you can select the mic and you can set
the levels right here. One other thing that
is new to filmic pro version seven is this function button and
you can set what it is. Right now I have it on
reactive analytics. So that means if you go in and focus, peaking will come on. Or if you're setting the
exposure, you'll get zebras. And if I turn that
off, they go away. Now, you can choose what
you'd like to put up there. Have several different options. This is completely
subjective and I would tend to put
stuff that I use the most up there and I liked the reactive analytics hiding interface might be a good
one to occasionally. That way you could clear it off because one thing I'm noticing, again, I haven't used this long. But this top information
here, while I love it, it is a black bar and the
top of the screen is there. And so it could be a little bit confusing when you first look, especially if you're
on a tighter shot. Like right there. If you just quickly glance, you might think you're
framing is weird because of that line
touching his head. But if you click it there, it goes away and the framing, the headroom looks proper. And so you can click
that and do that. Just a minor little thing. Maybe they should
make that a little more transparent or maybe it should be clear with just
the numbers coming down. I'm not sure. Again, I'm brand
new to this app, just like you, but overall, I do like what they're doing. I liked the new color scheme. You probably noticed that the
radicals are a new color. There, kind of a bright yellow or maybe an
orangey yellow. Easier to see. They were white,
I believe before. And they still go read
when you lock them. So I do like that.
White sometimes when you're outside shooting, if you're shooting
into the sky, e.g. a bright sky, you can lose the radical and you
just couldn't see it. I'd always have to tilt away to something darker to find
the radical and go back. So I assume that's
why they did it. Overall. I think it's a pretty
nice update I really do. Now, is it worth
subscribing at $50 a year? That I can't tell you for
me as I've said before, I'm going to do it for
a year and see what I think and we'll go from
there and remember, the biggest thing is you
can revert back to legacy filmic pro version
six by going into the settings menu
and information. And then down here
download filmic legacy. So you always have that. That's not going
anywhere anytime soon. Now understand though, I am not a fan of the subscription model. Not at all. I'm just trying to
make the best of it because I do like filmic pro
38. Camera Apps - Alternatives To FiLMiC Pro: What about alternatives
to filmic pro? So I've put together a
preliminary list of apps that I have either used or
I'm pretty familiar with. And I had a few criteria
that I wanted each to meet before I would
actually recommend it. The main one being that they are a quote unquote
professional app, meaning you get manual
control with the app. That's super important
when you're wanting to create
professional-looking video. Now these aren't in
any particular order, and these are just
quick overview looks at these apps
that I'm recommending. I'm going to hop over
here to my workbench and show a quick
little demo of each. But again, this is not
a detailed tutorial. So first up is movie Pro. This is movie Pro, and I think it's very
inspired by filmic pro. You hit this white balance. You've got the
controls over there. You've got similar
radicals for focus and exposure where you can
lock and move them around. You've got a menu that looks
very similar down here, although this menu is
different than filmic pro. Now I'm not saying
that they copied and I'm saying they
were inspired by. And if you are a
filmic pro user, this will feel like a
fairly familiar interface. Everything that's
nice about movie Pro is it's a onetime purchase app. I believe it's 799 at 10 min. Or you can get the
app and the remote. It actually has a remote like filmic Pro has filmic remote. And so you do the
app with remote, I believe it's $10. And the nice thing
is with this app, you do have a lot of the
same things with filmic pro. You can shoot with ProRes. So that is nice. A lot of apps you
still can't do ProRes. You also have the ability to connect Gimbels and of
course, anamorphic lenses. I think all the apps will
let you do anamorphic, but not all of them will
let you connect Gimbels. You can always use a gimbal
with any of these apps, but the ability to
control the gimbal, or at least the start
stop from the gimbal is great to be able to
do that within an app. This also has, of
course, the controls. They call it DSLR, like which I guess today you
should say mirrorless or DSLR or not really
in vogue anymore. They're kind of old technology, but you have all your
different controls of ISO and shutter, et cetera. Again, very reminiscent
of filmic pro. The other thing that I
like about this app, and this is something
that I do like in any of these prolapse is when
you record a clip, it goes to a library, it goes to a gallery
within the app. It does not go to the photo app, although you can send
it to the photo app. The reason I don't like going to the photo app is
when you're doing a, let's say a short
film and you're shooting 50 or 100 clips, sending it to the photo app, then sends it up to iCloud. And if you have that cloud
match turned on and then it sends those clips through
all your different devices. And if you're shooting
big pro res files, it really becomes a
pain in the butt. So I like apps that have their own individual gallery or library and movie Pro has that. Next step is the beast Cam app. Bce cam has become
pretty popular, I would say, in the
professional video app market. And it's only probably
two years old, maybe not even that old. It's a relatively new app. All things considered
filmic Pro has been around since
2010 as a comparison. But be scam is a great
full-featured app. It also has radicals and it has detailed data
management where you can go in and you have all kinds of control on the
way you do file management. That's one of the
selling points. If you want to really
get granular in how you detail and save your files. But that's not
necessarily glamorous. The fun stuff is, of course, the different codecs and
different recording modes, and it is full-featured
like filmic pro as well. You can record ProRes and you've got the different
flavors of ProRes, including proxy in HQ. Some of the other apps like
the native camera app, you can only record HQ. And the other thing
these cam has is it does have a photo library
or a gallery. So these clips are
recorded in the app. They don't go into the
photo app, which is great. There anything interesting
about BCE cam is, it is also a photo app, which I didn't know
until recently. So you can shoot photos with the beast Cam app and or video. And then of course you have
all the manual control. You can set your ISO and you can set your different
focus, et cetera. And so just like the other apps, they are similar in that way. They're just set up a
little bit differently. The only thing
about the beast Cam app is, to my knowledge, you can't control
Gimbels with this app. You can of course use
anamorphic or you can even set up using
their DOF depth. They sell a very
cool DOF adapter, so you have great
control for that. Bees cam at the time
of this recording is a onetime purchase and
it was on sale recently, and it may still be Roebuck 99. So $2 for this
very powerful app. Now we'll take a look at
the moment Pro Camera app. The Moment Pro Camera app has
been around a good while, and they used to support both
Android and iOS and Apple. And this is a very solid app. I liked the app, but
in my humble opinion, it's really a photo app
first and then a video app. Let me switch over to that. So there's the photo
app aspect you can see right now
I have zebras on, so it has a full functions
that you would expect an app. But one thing that has always
been a little bit weird, and it's possible I've
got it set up wrong, is it really feels
like it's designed for more vertical
shooting than horizontal. And that's probably
what I would use this app for more
anyway, truth be told, more social media, but it does have professional
features. That's for sure. E.g. you can shoot in log
like you can with filmic pro. Now there's a debate
whether it's true log or it's just an effect.
It's really an effect. And that's okay. The filmic prolog is a
true logarithmic curve, but we're not going
to get into that. But now, it is nice though
you have different options to shoot the two negatives for a
moment from my perspective. Number one, when you
record something, it actually goes to
your camera roll. They don't have
their own library, at least not that I know of. And so that's a negative. And the number two thing, you can't shoot ProRes
with the Moment app. That seems like a pretty
easy thing to add. So that may be something
they add in the future. But currently, at least with the version of the
app I'm using, it's H.264 or HEVC H.265. But you have all the
different manual control of ISO and focus, et cetera. And so in that
respect, it's good. And you've got histograms and then you've
also got radicals. Just like with filmic pro. And you can control
Gimbels with this app. So that's nice. This has
been a popular app I think, because it's also
a onetime charge, I believe at the time
of this video at $6.99. So seven bucks, they do
have in-app upgrades, and so you have to purchase certain things to get
different features, but you do get the
basic app or one price. Next step, the Mavis app. Maybe this has always been
kinda my number two app. I've always liked
filmic pro, burst, and Mavis, second, That's what I recommended
over the years. If you didn't like filmic
pro for whatever reason. But maybe this is
great and maybe this has been around a long time. I think they've been
around as long as filmic pro or
shortly thereafter. I've had this app probably
nine or ten years. It seems like maybe this is also a very professional
feeling app. And by the way, a side note, they recently got
bought by animals and so they are now part
of the Atomos family. Maybe they were
acquired kinda like filmic pro was with
bending spoons. Right now I have focus
peaking out omegas. And so you can see that it
looks very professional, just like filmic pro
and the other apps. It's just a different
way of working. They have their different
controls on screen here. You control the exposure of the focus and you
can go back to auto, the really cool thing
that Mavis hazard, I've always liked as you click this little thing in the
corner and you go into, I think they call it the
directors viewfinder. The screen shrinks back, but then you have a vector
scope and a waveform. And then of course you've got your audio meters and then you have your different
readouts over here. And another thing that Mavis
does that's nice is you can actually see the shutter in
angles like a film camera. So 148 would be 180
degrees shutter, or you can do it in fractions. The other thing too
is it defaults to timecode its time
of day time code. But you can also connect the time code generator to this if you're getting
really professional, especially if you're
shooting audio and you want to
sync the timecode. Mavis also shoots
ProRes, which is great. And additionally it has its
own gallery or library. So the files that I've
shot here are in the app. There don't go into
the Photos app, but you can select that if you want to, which I
don't recommend. But then to my knowledge, and I've been through
the app looking for it. I can't find any way
to control a gimbal. Oh, it's not subscription, but it's also not as
cheap as the other ones. So to unlock the all
the features you have to do various
in-app upgrades. But in the scheme of things,
it's very affordable. And the last one is pro movie. So pro movie is a
pro app in quotes, I personally think it's a step below the professional field. The other apps not
saying it's not pro, because you have all
the manual controls of white balance and ISO
and shutter, et cetera. It's just a user interface feels a little bit in your face. The controls are
all over the place. You can hit this and
make it go smaller, kind of like Mavis, you have
various ways you can do it. Then the audio meter, as you can see, I'm talking, it's up here at the top, these dashes, so that's
a little bit different. Again, this kind of stuff
is very subjective. In the end, this app absolutely allows you to have manual
control of an image. It does have a
library which I like, then you can copy them to
the photos app if you want, or go to a computer. You can shoot 4k a HEVC, you cannot shoot ProRes, at least I can't find
the polarizability. You do have high bit rates
though, which is nice. But if you want ProRes, this is not the app for you, nor can you control a
gimbal with this app. But you can slide the
sliders up and down here. But this app feels a
little bit simpler to me, which you may like. And it's the cheapest
app I'm showing right now as I believe it's
free to download. And then it's like $1 to
unlock the watermark, because otherwise it
has a watermark on it. It's a very affordable
app and it's not a subscription per movie
is one to consider. One bonus app. This is prototype, and
I'm sure some of you are wondering if I was going
to include all right. So hesitated including this one because this is a
subscription app, at least to get the pro
features right here. You can download it for free. And so it's great
because you can work in auto mode and you have a lot
of functions of the app, and it's a really good
app and you can even use their portrait mode
video for free. And so that is pretty cool. But when you want to use the manual controls and the various lengths
they sell, et cetera. You have to go pro and the
subscription is $20 a year. Now let me say that I
really debated whether to subscribe or not because
as a general rule, I'm against subscription apps. The reason I did it is I've had so many requests from
people about this app. I went ahead and subscribe so
I could do some demos, etc. But again, I'm primarily
use filmic Pro, but now that they're
going subscription, all options are on the table and protect works a
lot like filmic pro. You've got the sliders on the side to adjust
exposure and focus. You can set your ISO
and I do like how the ISO controls
the screens pop up. Same with the shutter. You can adjust the shutter. And in this app you
also have a library. And so all your clips are recorded to a library
which is great. You can swipe through them and see him at the bottom here. So I do quite like that. You can also shoot
ProRes, which is great. And they have different
flavors of Perez. They didn't have
ProRes quad 44444. So that's really high bit rate. And then you can
additionally shoot with Gimbels and DOF adapters
and anamorphic lenses. Of course, you can
also do the HDMI clean feed out very
similar to filmic pro. Anna has time Code as
well, which I like. And then protein also has
dual cameras built-in, just like filmic Pro
has doubled take, it's a separate app, but you
can do that within protect. And I think movie Pro
does that as well. So pro take is a great
app. I really like it. This is a subscription, but only $20 a year, in my opinion,
that's affordable. So out of these, the ones
that I've probably used the most are obese
cam or moment, although I've started using
Procreate quite a bit to, it really comes down to
personal preference and it can be very subjective
truth be told, at any rate, checkout these alternate apps I went over today
and by the way, this is just a few, there are lots of
other apps out there.
39. Camera Apps - Cinema P3: Alright, this is not going
to be a full tutorial. This is a brief overview
of the cinema P3 app. This is the free version, so we'll look at what's in the free version and then
what's in the paid version. The free version, I have to say has quite a bit
of functionality. Pretty clean screen. One thing I like is that
across the top here, you instantly can see
what you're shooting for 24 P3 color. I'll get into that in a minute. Afc means you're using autofocus continuous light
balances on daylight preset, got your ISO and
your shutter speed, and then your battery indicator. Then you've got your
normal settings buttons around the edges. Over here you can
choose your camera. This does shoot
photos by the way. You've got your
creative section. Creative is going into using lots and different
presets that they've created. This as part of the
paid version though. Got to upgrade to do that. Speaking of that, I'll
show that real quick. So you can get a
seven day free trial. If you don't want
to use the free one and you want
to try the proton. And then after that
it's seven bucks and seven bucks unlocks it forever, which pretty good,
pretty good price. And it lists the
Pro Tools that you get with that purchase. Right here is nice. You can instantly see
what you're shooting. And so right now, it's set
up in for K 24, H L G. It's good that you
can know what you're shooting across the top and
then change it right here. You've got rec 709, P3, and H L G, this down here, the ten bits, 7.9 as part of the pro, anytime you see these
little yellow probe icon, obviously that
means you've got to pay to get those upgrades. Over here on the
right, I mentioned white balance and so you've got your white balance
controls and you can manually adjust it right here, or you can set it with a preset, which
I'll show in a second. You also have tint controls
here, which I like. I probably wouldn't
do that too often. But Liz, nice feature
to have there. There's two different
tools, menus. There's one here at the top, and then there's one on
the right over here. So the one on the right
that I just clicked on, these are the settings that
affect the mode you're in. In other words, if you're in video mode, it will affect that. If you're in photo mode,
it would affect that. Invideo, you can come down here and choose a different
settings you want. Or appear at the top is global. This affects
everything in the app. Right here, you've
got a lens picker or camera picker have
we want to look at it. You get 0.5 ultra-wide angle. You got to three times
this, the iPhone Pro. Then you've got
the standard lens. One thing they haven't added
to this at the time of this recording is
the two times lens. The 14 Pro has the
48 millimeter. I assume that's coming. You gotta record button. It does say record on there, which I find is
unnecessary. I don't know. That's just the minor
little nit-picky thing, but I think you can That's the record button
without having that on there, you've got this play icon
button here in the bottom. When you click that, it brings up the last shot you just did. And that way you can preview it. It doesn't, at least
to my knowledge, bring up the library though. Actually, we should get
to the library from here. To get to the library,
you actually have to go into the Settings. Click that, and then
you've got your library. Library is nice though, because it tells you right
here you've got p3 color. You have all the
different details and you can turn the details
off if you want. I like having a mom so I know
what the file was shot in. But then at a quick glance, this has Dolby Vision. And then this has 709 a shot, different clips in
different profiles. I do like that. You can quickly see when
you come to the library. And it does have a library
which I like and you can record to the library
or to the photos app. I prefer going to the library and that's a big
plus in my opinion. Back over here to
the menu though, I was starting to show earlier, you've got your white balance. One thing that's cool
though, is you can actually, you can do auto white
balance continuous, or you can do auto
white balance where you actually hit and you choose your white balance
and it does it for you. Now, that didn't really work, but let me pull out a card here. What you normally do is
put something white in front of the camera
or a gray card. And then you do it. Now it's got that setting, which is really cool
and that will stay. You can go back into the tools now where you can choose
your white balance right? Now it's set on the one I
just did a custom setting, but you do have your
various presets, daylight, interior
tungsten or cloudy. And I think that's shade. Or you can do auto
white balance, which I don't really recommend auto white balance unless you wanna do auto white balance
and then you can lock it. So in other words, it's
auto white balance. Until you do white balance. White balance is
automatically until you roll. Very similar to how
filmic Pro has it. Couple other things I'll
show in the menu is you have different ways to
set your focus up. I think the autofocus
continuous is the way to go. It also has regular
autofocus and it has based detection,
which is pretty cool. Autofocus with the C
autofocus continuous lets you focus and then lock
it anytime you want. If you do regular autofocus, what it does is let me
just show that real quick. So you can move it around and
select something in focus. But whenever you
release it, it locks. That can be handy,
especially if you're doing something
that's locked down. But if you're moving
the camera around at all and you're
fishing for focus, that really doesn't work
well. In my opinion. I like autofocus continuous. And then of course
you can also go in and manually focus too. One other thing I
wanted to show is what the exposure mode you can do center spot or manual
if you do center. Now the radicals gone. And so whenever you
aim the camera, it'll focus for you, but you
don't have control over it. But when you're just
regularly shooting, I like spot or manual and then you do have a
Zoom control as well. So again, I'm comparing the
stuff that filmic pro and so these features are
somewhat a filmic pro just implemented in
a different way. And one little interesting thing this app has is it
has this p3 button. So what that means is the color
that it's highlighting is outside the norm of what you
would record in rec 7.9. That means that would be
better recorded in P3 color, P3 color, when I think of it
typically is a wide gamut. It's an HDR color profile. I think about it in
displays mainly like DCI, P3 is the way movies are
displayed, many of many way. But the nice thing is
with this app and this is a cool feature you can select, as I showed earlier, you can select a shoot and P3 and P3 color according
to the app makers. And I've heard this, although I haven't done a lot with P32, truth be told, is
shooting an SDR, not HDR, you can get about 25% or so more
color information in your image, and
that's an eight. So as you can see,
you get quite a bit here with the free
version of the app. Everything I've been
going over right now is part of the free
version of the app. But if you want to pay
and that's where you can really get additional Pro Tools. You get scopes if you pay, you get the different analytics. And importantly, and this is almost worth the price and of itself as you get manual audio control
as it is right now, in the free version, you only get automatic
audio input. And I don t think
even get meters with the pro version,
you get meters, audio and sound are 50% or more sometimes
of a production, good audio is vital, so that alone is really
worth the upgrade to me. However, as a basic app goes, this is more than basic. This app really includes
a lot for a free price, but now we'll check
out the paid version. So now I have the Pro
version activated. I paid the seven bucks. And you can instantly see
the main thing you get are the different analytics ways to measure and manage your
different settings, which is super important
if you want to do more professional content. The very first thing, and I
mentioned the audio meters. They're right here on
the left, and you've got your scopes right here. And you can click there
and they'll switch the different varieties
like RGB Parade, histograms, Vector Scope, stuff that affects this
button right down here. I did have this on P3, but now you can hold it down and you've got all
the different analytics. And so you can see
full-screen versions of what I just did there,
which is pretty cool. I got to say, Oh, and then you can do zebras. And you can still do the
P3 aspect if you want. And you got false color as well. You can set which
one you want to have displayed all the time in
the actual settings menu. Right now I've got
false color set up. You can put that on
whatever you want. Either way, you can, again hold that down and display and choose the
one you want to do. Now you also have focus peaking. And I've got a loop
set up there where you can really see
what you're doing. And you saw the gimbal there
go into focus speaking mode. Which focus peaking is great. Although if you've
watched my videos, you know that they're
not super accurate. It's contrast based. And so it can be out of focus, especially on a phone, but
it's definitely helpful. And so then back into the menu. You've got all your
different controls and settings for audio. As I mentioned, that
way you can come in and change the microphone where the, if you're using the mike
built in or if you use an external mic because you
can do audio monitoring, you got to timecode track. You can do one thing that wasn't available in
the free version is now you can set your data
rate, your bit rate. So it's right here.
You can do auto or you can come in here and
choose the different levels. I guess 18 would be the highest. And Otto is just that. Now, I typically would always record the highest
bit rate I can, because that way you'll
get the best results for calibrating and
post-production. And also my experience
that helps reduce noise. But again, it just depends
on what you're shooting. You can export the lungs.
This is pretty cool. They include lots here for the different log profiles
and sets that they use. These are basically transform or utility Lutz that will
take the log footage and make it look normal and editing like a standard look
a wreck seven to nine load. If you're editing
an SDR, that is, but that is nice that
they include that. And speaking of that, now
that I did the paid version, you can go into creative
and you'll actually have access to these various
different profiles. And so they have a
C log and a d log. My understanding is the
c log and the d log is for shooting log in HDR. So let me go back to mp3. Now that shouldn't
be a different log. A log, and it's not
nearly as milky looking. But then they also
have a bunch of different settings
throughout here that you can play with. I haven't shot with
any of these yet, so I don't know if this is
a true logarithmic curve, but just based on the app, whoever has developed this, and I don't know the
developer of this app. They know what they're
talking about. In particular as it relates
to HDR and color grading. This is pretty advanced stuff, especially for a phone. But the nice thing is of course, you don't have to use it, that you can just use
the basic features, although if you want, but then you have the options. And I do like that. That's similar filmic
pro, but I would say, at least with my initial
impressions of this app, these guys take it
even a step further. And one little thing I
mentioned earlier about the Record button
that I don't really like it saying Rick on there. But with the pro version, you do get a cool feature.
When you hit record. You get the red box around that. And I do like that,
reminiscent of my Sony mirrorless cameras, BCE cam does that as well. Just a nice way to look down
and know you're recording. Little touches like that do
make a difference to me. This video went a little more in-depth than I had planned on. But that is a
general overview of using the free app,
which by the way, you get a lot and the
paid version of this app, I haven't used this
that much yet, but so far, I'm thinking this is a really good
alternative to filmic pro. If you don't wanna do
this subscription, a lot of people asking
what I'm switching to and I'm gonna keep filmic
pro for the time being. I've mentioned that if
you follow my channel, but there are some great
options out there. Now there's cinema
P3 camera app has really climbed to
the top of the list. I would say for me it's BCE cam. Now this one, I'm
probably movie Pro. I know there's other
apps out there, but for what I do and
the filmmaking realm, and I want to have a lot of control over my app
and my final product. These kinds of apps are
the way to go and they really do compete nicely
with gnomic grow. And of course, this is
$7 a onetime payment.
40. Camera Apps - Blackmagic: So the Blackmagic camera app really came out of
nowhere and kind of took the mobile video industry by surprise and by
storm, I would say. And so I've spent the last six months or so really
learning the app, and if you follow my
channel for a while, you know that I was
a big FilmiProGuy, made tons of videos, and I've actually made a
course on Filming Pro, a couple of courses
around FilmicPro. Well, I've taken that
same approach and now created a course for
the Blackmagic camera app. And I didn't think it
would ever happen, but I now don't really use
FilmicPro much anymore. I mainly use the Blackmagic camera app as my video camera. And so what I'm going
to do in this video is show you a couple
sections of the course. The first section
I'm going to show is just a very general overview of the app interface and controls. This first section, I
am shooting in front of a basic background just so
you can see what I'm doing. And later when we get
to the H two section, I'll have some sample objects
in front of the camera. But initially, I'm
just going to do a general overview for the
app interface and controls. The first thing you'll see
is the app is fairly clean. The interface is fairly clean. When I say clean, I
don't mean there's not information on the screen.
That's good, though. You want that information,
but everything is kind of laid out in a very
clean way, I think. And I like that. In particular, compared to other apps. And the nice thing is not only is it laid
out in a nice way, everything is actually
right here at your fingertips really
on the main screen. So you don't have to go into other menus to do
most of the stuff. And the main menus are
over here on the right. We'll get to that in
a minute. But just looking at the interface, we'll start from left to
right. You've got your lens. The information below
that is showing a ut, which I'm using right now. Luts are used when you're using a log profile to
show as a preview. And again, I'll talk about
that more in a minute. You got your frames per second. I'm shooting 24
frames per second. You've got your shutter.
I've got it set to angle. You can use angle or shutter speed, which
would be a fraction. Next, you've got your iris or your aperture. That is fixed. And this particular
iPhone is F 1.8, but you can't change that like you can on a
traditional camera. And that's an important
point to remember. Then you've got time code, and ISO, ISO and shutter is
how you control the exposure. You've got white
balance across the top. Ten is related to white balance. You've got your resolution, which is four K, and then you
got your battery indicator. And then at the bottom
left, you've got a histogram and then your storage indicator
showing how much is left on the phone or if
you're using external drive. And then this is audiometer. On the right, you've got your record button
in the middle. And then you've got some
other controls that, again, are right at your
fingertips that are ones you will
use quite a bit. And then on the
far right, you've got access to your camera, which is what we're
on right now. Your media, which is your
library, and then chat, which is if you're
using Blackmagic Cloud, which we'll talk about
later, you could chat with people editing your footage in DaVinci Resolve
or what have you. And then you've got your main
settings menu down here. And so, again,
everything is laid out. You can just quickly look at the screen and know what's up, which again, for a lot
of apps is not the case. If you've ever used a Blackmagic camera,
traditional camera, like the cinema camera,
the pocket cinema camera, this has a very similar
layout to that. Now we'll look a
little bit deeper into the app and talk about
ISO and shutter. All right, now I want
to talk about ISO and shutter speed as they are very interconnected
using a phone. They're part of the exposure triangle on a
traditional camera, your ISO, shutter,
and aperture iris. But again, on a phone,
your iris is fixed. Right now I'm on the ultra
wide, and it's a 2.2. And so you can't change that. But what you can change is
your ISO and your shutter. And as I've mentioned
throughout this course, you want to have more times
than not 180 degrees shutter. And so what I tend to
do is set it to that. Or if you're using fractions, you'd want to be at 1:48. I'm shooting 24
frames per second. Remember the hundred and
80 degree shutter rule. And what that is for is
to get ideomotion blur. If you're not shooting
with ideal motion blur to big giveaway on a phone. And the way you get
that when you're outside is to use an ND filter. ND filters are like
sunglasses for your camera. So you put an ND filter on if
you're out in bright light, and that way you get
the proper exposure with the right motion blur
and the shutter using, again, the hundred and
eight degree shutter. If you're inside
like I am right now, you don't have to worry about ND because the light
levels are fine. So again, I'm on 180 degree
shutter, so I'll lock that. And then to get the proper
exposure, you have to use ISO. And on this particular lens, the lowest ISO I can do is 32. On my main camera, it's 55. Each one is different, again. And as a general rule,
you want to keep your ISO as low as possible. The more ISO, the brighter
the image will be, but you're also
adding digital noise. And so, do your best to keep
the ISO as low as possible. Again, in here with the
studio lights and stuff, I'm having no problem
because a low ISO like that, 32 with a good shutter is an ideal setting.
That would look great. But just remember to lock your shutter in particular
when you're shooting motion. Like, right now, it
wouldn't really matter, but anything that
has movement in you want that motion blur that
gives it a more filmic, more cinematic. It's
not just for film. It's for any kind of video. It gives it a more
traditional look, and that's what you want. But one thing, whenever
you lock the shutter, you don't have auto
ISO over here. And so if you wanted to lock
the shutter and then ride the exposure like you're doing a running gun shoot,
you can't do it. Unless the way you do that
is you undo the shutter, and now you go back to exposure, then you can hit Auto, and
that's like full auto. So now you got the A next to ISO and the A
next to shutter. That is something
that I would only do if I'm doing maybe
a documentary shoot, and I'm going to be
going in and out of different settings because
the camera will auto expose. Let me cover the
lens, you can see, see how the it moved. Not something that I would
do very often at all, but if you do want to use
Auto, that's how you do it. But if I turn that
off, and then I end up locking my shutter on 180, which is what I want to
do more times than not, now when I go back to exposure, it is adjusting the ISO. That actually kind of confused me when I first got the app. So hopefully that makes sense. And then, hopefully,
it also makes sense that you lock your shutter
to get ideal motion blur, whether you're inside or outside because you want
180 degree shutter, or again, if you're
shooting 24, it'd be 148. If you're shooting
25, it'd be one 50th, shooting 30, it'd be
one 60th and so on. And that also applies
to those slow motion shots I did earlier. If you're shooting 120
frames per second, you'd want your
shutter to be 240th. Again, that's a
fractional. But if you leave it on 180,
you're good to go. But getting the proper shutter
and the proper ISO not only makes the image
look better from a motion blur perspective
with shutter, but then it allows
you to also get the best exposure
and overall look of your footage. S
41. Accessories - Why Use External Lenses: One question I get a lot is why even use external lenses with the later
generation iPhones? Because the phones have a
lot of really great built in cameras and lenses today.
I'll get right to it. The number one reason I use
external lenses is because I want to use the main
24 millimeter camera. It's really that simple. That way, I can put
whatever lens I want to on that camera,
meaning a telephoto, anamorphic, a wide, whatever, and get the same
focal length as I would using the built in
cameras or the built in lenses. But the key is with
that best camera, because that camera not only
has the largest sensor, it's also the fastest aperture. What does that mean? Well, it means it's better and low light. You'll get much cleaner images. It means using that sensor, you'll get more shallow
depth of field, which, in turn, can make your footage look more like a
traditional camera. And if you're shooting photos
and this is really big, you get that main 48
megapixel sensor, which makes a world of difference
because if you push in, even on the 48 millimeter, if you have a 14 pro or later, you get the two times telly. That drops it down
to 12 megapixel. And so that 48 megapixel
really makes a difference. And again, you can
shoot images with your phone that rival
a traditional camera. You really can. And all that is because
the main sensor is the best one on the phone. So if I want to do
a telephoto shot, I put a Telly on
the main sensor. That way, putting the
telephoto on that main sensor, you get the same
shall depth of field as you would with
that wider lens, which really is great. And then the telephoto
adds compression. And so you get even more
shall depth to field. Because one thing
when you're using the built in telephoto, even though you get a
longer focal range, which is really pretty great, you don't get the normal
associated shallow depth to field like you would
in a traditional camera. The other thing I think
people forget about is the main camera has the
sensor shift stabilization. So it's a hardware
based stabilization in combination with their
great software based. And that way, if you're doing
a shot like a car mount or you're connecting the camera to a bike or a skateboard
or something like that, it will really help
eliminate the unusable, almost warbly looking stuff you'll get because of
the rolling shutter. And so I use that
a lot, especially in those kind of
shooting situations. Again, let's say I want a big wide shot, almost
like a fish eye look. I'll put a fish eye
on a 24 millimeter, and that way I get really
great stabilization in addition to the wide look. And speaking of fish eye, that's obviously
another thing that makes it cool to use
external lenses. You can get looks you just can't get with the phone alone. In particular, anamorphic, fish eye or really long
range telephoto shots. Again, with more traditional
looking shell depth of field versus the
built in camera. One other thing I should
add is I talked about the 48 millimeter two times tell on the 14 Pro
or later iPhones, and what that allows
you to do then it's when you have an external lens on there, whether
it's an anamorphic, a telephoto, or a wide, you can push in inside the phone without
changing the lens. And so that way you get
multiple looks with one lens. And I really, really
like doing that, in particular, with
anamorphic and telephoto. So it just adds more
production value in a way and can give you a whole new set of looks without doing a
whole lot of work. Now, of course, what
I'm talking about more times than not is
doing a short film, a music video, maybe
a YouTube video. If I'm shooting family videos or I'm doing vacation videos, I'm not messing with
third party lenses. I'm just using the
built in camera. But if I'm doing
anything more important, I absolutely want to use lenses and, of course,
filters, as well. Filters is another topic, but those go hand in
hand with using lenses, and actually using a lens, depending on which
lenses you're using, makes using filters
easier because a lot of filters will just
screw right on the lens. Again, just depending on
which brand you're using. And then the other question
I get occasionally, not as much as I used to,
because I think phones, the quality of phones
is getting much better, and people can see the
value in using a phone. But the other question is,
why don't you just get a traditional camera instead of spending all this
money on your phone? Well, I've never said don't
use a traditional camera. As a matter of fact, right
now, I'm shooting on a traditional
camera, Sony FX 30. What I like to do with my
phone is use it as a B camera. But I know there are
a lot of people that use their phone as
their main camera. And so, again, because
quality has gotten so good that it doesn't
really matter anymore. To me, it's really
never mattered. But in particular, today,
it doesn't matter. And the main point, though, is you already own your phone. You're going to have a
phone, no matter what. It just so happens, it has a great camera
built in, as well. And so picking up a
couple lenses that go with that is not that
big of an expense. And really, it just depends
on what you're doing. If I'm shooting a movie,
talking about a feature film. Very open to using my
phone as a B camera or as a pickup shoot camera mixed in with a
traditional camera. I've done that quite
a bit with my Sony, my black magic, and
even my red camera. And with the Apple Log now,
using external lenses, shooting Pro reds, HQ, you can really match
that in very well. And so having a phone now outfitted like a traditional
camera is a great way to go, whether you're a beginner or whether you're a professional, just needing a secondary camera to do a quick pickup shot. So that brings me back around
to the original question. Why do I use lenses? It just looks better. If you're doing anything more on the higher end or you want
higher quality images, higher quality footage,
higher quality photos, you want to use
that main sensor. And when you do
that, the way you get an anamorphic look or a telephoto or a fish eye
is to add an external lens.
42. Accessories - Using ND Filters: One thing that's
imperative to use with a smartphone is an ND filter. Now, this is a V ND filter, and I'm not here to talk
about the different brands, but this is a mount
for a moment, and this is a free well or
maybe it's a moment filter. I can't remember. They
all make similar ones. But this is a full size filter that's more professional filter. And the nice thing is
with different mounts, you can put this on a foam. Why? Why do we
need an ND filter? And the main thing
is motion blur. With a smartphone, you adjust the exposure by using
the shutter and ISO. So that means you can have
a really fast shutter or really slow shutter depending on what the light and
the scene is doing. And if you have a
very fast shutter, then your image gets staccato. It's one of the
number one things I see when people say, Hey, my smartphone footage
doesn't look professional or my smartphone footage
doesn't look like a movie. It's primarily because they're not shooting with an ND filter. And it all goes back to the idea of the 180
degree shutter rule. So in basic terms, if you're shooting 24
frames per second, you want your shutter
to be double that. You want it to be 148. If you're shooting 30
frames per second, you want your shutter to
be one 60th and so on. That equates to a
180 degree shutter, which comes from film camera
terminology in the past, but it relates to all
cameras either way. And so by putting an
ND filter on there, you can get ideal motion blur. Now, on traditional cameras, ND also affects depth of field. On smartphones, it doesn't because smartphones
have a fixed aperture. You can't change the
aperture on Smartphone, or at least the ones that I use and we're talking
about in this course. On a traditional
camera, you adjust the aperture or the iris
and you open and close it, so a wider aperture, you get more shallow
depth of field. And with a stop down aperture, you get deeper focus or
deeper depth of field. And so that's one
thing when you see an iPhone shot compared
to a traditional camera, another big giveaway is
usually the depth of field. The iPhone sensor is so small, you usually have
very deep focus. Now, with the newer phones, they do have better
shallow depth of field, especially if you're
close to a subject, or if you use a telephoto lens. The main point is
that ND filters with smartphones don't
affect depth of field, but they make all the difference in the world with motion blur. And motion blur is
something that you want no matter what kind
of video you're shooting. So depending on which
kind of phone you have, which case you have, will depend on what kind
of filters you buy. Again, this one's from moment, and this one's actually
attached to the phone itself. There's no lens on there.
It's just the filter. But when you use
third party lenses, you can easily attach
filters to those two, depending on the brand
and how they work. But pretty much every lens out there has filters that
will work with it, whether they're magnetic
or screw on, et cetera. So ultimately, if
you want to shoot professional quality
video with your phone, and I know you do, then you've
got to use an ND filter.
43. Lens Focal Length Comparsion: Mm. Mr. Mster Master Master. Master.
44. Accessories - Tripod Mount: The number one thing that
you're going to need is a way to mount your camera onto a tripod or to whatever device you
want to mount it to. This is a shoulder pod and
it's one of my favorites. So it doesn't matter
which brand you buy. I like shoulder pod
because it's strong. They're easy to use
and they clamped down, well, I really like them. The only negative
two, this one is it doesn't have a cold chew on top. And so there are some other
ones that have cold shoes. The cold shoe that you would use with this comes out to the side. It's an attachment. So it doesn't have a built-in. But for most of the time
that doesn't really matter for me
because I'm shooting B-roll or footage and I'm not recording sound or using
a light on my camera. And if I'm doing that,
I'm using a cage. But you get a mount, your phone in the mount, and
you tighten it down. Tilt secure. Then has a
quarter 20 on the bottom. Then you can attach it to whatever you
want to attach it to. This is a great tabletop tripod. I like it quite a bit. It's a Manfrotto. Then here's
another kind of tripod. It's more of the Bindi tripod, the Casey nice that tripod. This one is by JOB,
does the same thing, but this one obviously you can bend it around a pole or a, you know, any kind of handrail or something you
might be shooting with. But you're going to need to get amount to mount
your phone first. Then you'll need to get
some sort of tripod. These are tabletop tripod
is more or less or, or vlog or tripod. You might put your phone there
and walk around with it. You could do that
with this one too. That's one thing nice
about these handles as well as grips. Or for bigger jobs. And depending on what
you're shooting, you might want to look at
getting a traditional tripod, either a photo tripod or a
fluid had a video tripod.
45. Accessories - Portable LED Lights: Okay, we've talked about
lighting and lighting a movie or lighting a corporate video is definitely different
than lighting, say, a news interview
or event video. However, you can use these lights in pretty
much any kind of scenario. But what I'm going to
talk about here is how to mount them on a camera. These are two nice options. This one's from bowling, and it is an on-camera LED light that has a unique design. As this arm flips out and
mounts to your camera. You can mount it in
different positions. Really just depends on
how you want to use it. But it's a really bright LED. And it does different
colors, which is nice. It's an RGB LED. This light does effects as well, which is pretty cool. There. It's doing lightning. That's a candlelight
or a fire flicker. Here's a police light effect. Then of course you can just
use it as a regular LED. And as demo. This slide has a lot of options
for filmmakers. It's pretty cool
because of the effects. And then for traditional
event video, it will mount onto your camera. And just to make
sure I was clear, this amount onto a camera or it'll mount onto a light stand. Or someone could just hold it at a frame to do the effects. Now this light is one of my
favorite all-time lights. It's the size of a credit card. It's so small and
it's very thin. It's made by aperture. And this light was about
45 bucks when I bought it. You can literally drop it into your pocket or drop it into your backpack and have this light with you
at any and all times. You can also mount this light to a camera or to a light
stand if you want. Or you can hold it. But it is surprisingly bright
for such a small light. It also has double. And the thing is I can
power either one of these with a USB
battery, which is great. So they'll charge up
and they last about two or 3 h depending on
how bright you run them. But if they run out of juice, you can plug it into a battery. And again, you can mount
this until I could be scrip or any kind of camera cage or case
that you have for your phone or mount
that has a cold shoe. So that way you can make
it an on-camera light. Or again, you can
make it an accident light anywhere in a scene, put it on the shelf,
Do whatever you want. But these little LED
accessory lights are really great and something
you should really consider adding to
your filmmaking kit.
46. PRO TIPS - Accessories: This course is all
about cinematography. But the one thing I
did want to mention is don't forget about the sound. So basically that means
good a good microphone. It can be a camera mounted mike, like from road or deity. Or it can be a lavalier mic
or it can be a boom mic. It really just depends on what you're doing and what
you're shooting. But good sound is imperative for a good video of
good final product. A lot of people actually say sound is more
important than video. I think they're both important. But don't forget
about your sound.
47. Wrap-Up & Additional Tips: Congratulations. You've
finished the course. We hope you found it
informative and educational. Now it's time to take everything you've learned and
go create something. Go make a movie, start
a YouTube channel, produce a new story,
whatever it is. But before you grab your camera, here are a final few shooting
tips to keep in mind. When you're shooting, don't just think about pretty shots. That's important, but you got
to think about your edit. Now, this is a cinematography
course, but in the end, you take your footage back and you edit it together
to tell a story. So think about the shots
you need to tell a story. Think about your edit. And so that means get
plenty of coverage. Coverage is more or less B roll. You want a lot of wide shots, medium shots, close ups. And this is for the practical
reasons of editing. An editor will rarely complain that they
have too much footage. It's almost always the opposite. So be sure to give them
plenty of choices, plenty of shot selections. And speaking of post production, cinematography goes hand in hand with color correction
and color grading. Color grading is an entire
choruse of its own, but along with thinking
about your edit, you need to think how your final product
is going to look, how it's going to be color
graded and color corrected, especially if you're shooting
log or flat footage. Good color grading
can really make a big difference in the
look of your project. Shoot horizontally
for most stuff, but vertical is okay
for social media. But really stick to horizontal, if you can more times than not. No matter what app you're using, always lock your exposure
and white balance. This is imperative.
Use a tripod. This one simple
thing will instantly elevate your videos and make them look much
more professional. Or use a gamble. The point is to
stabilize your camera. When you're shooting
outside in bright sun, always use an ND filter. I know it's not a
glamorous accessory. It's not that exciting, but it really makes
a big difference. I can't stress that
enough. Use an ND filter. And for me, the
one biggest secret to shooting great video
on your smartphone, that is, don't treat
it like a phone. Treat it like you would
any other camera. Take your time, be deliberate,
think through your shots, have a plan, and I think you'll really be surprised
at the results you can get. Part of my goal with
this choruse is to demystify this process,
the filmmaking process. And so I hope that has
been the case for you. And now you'll take what
you learned here and go create something cool,
no matter what that is. It's a great time to be a
video creator and a filmmaker.
 Blake Calhoun, Filmmaker