Transcripts
1. Introduction: I can't think of something that you always end
up sketching flowers. Just so fun and relaxing. Hi, my name is yeah. I've worked on all kinds
of things. So I put X. But in my personal work, I love drawing things
close to nature. Imagining possible
improbable, pretty things. I've been asked how I draw flowers and plants
from imagination. So now I'm sharing simple, beginner friendly
steps to drawing flowers from your imagination. You will need just a
few basic materials. We'll start by constructing
simple flower forms, using basic shapes and then
practice getting them. I'll explain the loose
watercolor processes are used. And we'll add color
to our sketch. And then we'll have a look at the different parts of a
flower in a bit more detail. And use that knowledge to imagine a huge
variety of flowers. The focus will be on past
and expressive sketches. You can use the same
process to throw things with as much
detail as you would like. Let's draw some cute and
expressive flowers together.
2. Class Project: Hi guys. I'm glad you joined
me for this class. In this lesson, I'll
explain the class project. Teaching you how to draw a loose watercolor flowers
from your imagination. The goal of this
class is to have fun. While learning new skills. Your class project will
be completing a page of flour sketches with
ink and watercolor. I'll give you a
small, easy to digest theory lessons before
each sketching session. You start drawing. The focus should
be on having fun, enjoying drawing and
going with the flow, not getting stuck on
technical detail. Let yourself experiment,
try silly things, and just enjoy being creative. Lots of fast small sketches. And move quickly from
one sketch to the next. The right time to check if you're happy
with your sketches is after your sketching
session, during it. Even if you're not happy with all your sketches when Penn, but the fun you
had and appreciate the work that you
put in yourself, the permission to explore
and make mistakes. To recap, focus on having fun and aim for
quantity over quality. Remember to share
your sketches with everyone after you're
done with the class. In the next lesson,
I'll be going over the materials
we'll be using.
3. Materials: In this lesson, I'll introduce
you guys to the materials. You'll be using. The basics.
You're going to need. Some paper, a waterproof pen, watercolors, and a small brush. Personally, I like
sketching with depends. We waterproof ink because they
sought nice variable line. But sometimes I also use fountain pens or other
types of ink pads. You can use whatever
paints you like, as long as you make sure
they have waterproof ink. It can be really
fun to play with the variety of line you can
get with different pens. I'm using a snake pan, watercolors, but you
can use tubes to, if you have them. I have quite a few different
reds and greens here. So right now, I'm mainly using my colors straight
out of the pan. I don't want the stop
and mixed colors when I'm drawing
this sketch fast. But if you don't have
as many colors as I do, or you just don't
like your colors. It can be a good idea
to premix your colors. Suddenly you can move fast
when you're painting. This is hands down, my favorite sketching brush. It comes to a predefined point, but it can hold a lot of
other megawatts drug. If he is really versatile. I really like using just one
brush when I'm sketching. Then I don't have to stop
and think about my brushes. Preventing the patterns can be a good idea since it helps you get deeper color out of them. Since our focus here is on
a lot of loose sketches, I'm using my regular sketchbook and even some basic
printer paper. I know that's terrible for the archival
quality of my art. But the summons, so freeing
up weld saying that these sketches are
supposed to be disposable, not permanent works of art. This is possible because I'm not using large washes
or a lot of water. Your experience
might be different depending on your painting
style and your paper. It's a good idea to check
if your sketchbook can handle water before you
commit to using it. You can also use some cheap watercolor paper
or mixed media paper. Or if you're really
into sketching on expensive paper,
knock yourself out. Orange arrow. The sketches will look amazing. To point these, not the stress too much above your materials. Just use whatever you have and
focus on enjoying drawing. Just remember to let your ink dry before you move
on to watercolor. In the next lesson, I'll
show you how to construct simple flower forms using
basic geometric shapes.
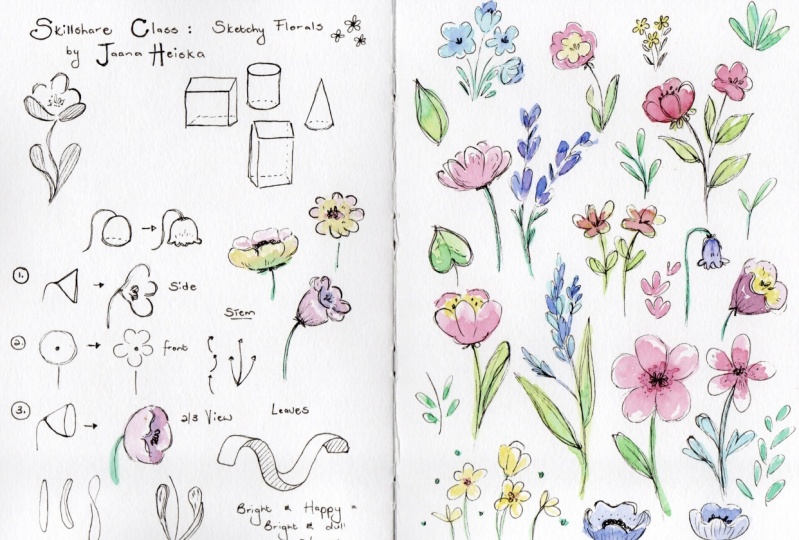
4. Flowers: The Basics: In this lesson, I'll show
you guys how to construct simple flower forms using
basic geometry shapes. We'll have a look at the
large, general shapes first. Get into detail
in later lessons. It's really easy to get
lost in detail when you're drawing and lose sight
of the bigger picture. Simply buying the flower in the geometric shapes
will help you understand the form better and give your overall shapes solid while you're drawing the detail. This is especially helpful when you're drawing
from imagination. Objects. Straight from the side or
straight from the top, can end up feeling a
bit dull or lifeless. When you understand the three-dimensional
shape of the flower, you'll be able to draw
it from any direction. When you vary the shape, you will be able to draw any
flower you can think of. We'll get started by imagining
the flower as a cone. The side view is pretty simple. All you really need to
imagine is a triangle. Once you have your
basic shape down, just add the detail
following the form. Likewise, for the fund, we're basically just
looking at a circle. Once we start rotating, oh, shape in space, things
get interesting. Now, we're able to see both the inside and the outside of the
flower at the same time. Just by rotating
this basic shape, you will be able to
draw your flower from any direction
you can think of. Now, let's have a look
at the stem and leaves. The first thing to remember, Eastern draw with curves,
not straight lines. Alternating the
direction of your curve. First going one way
and then another, will help you create
shapes that feel natural. This works great for all plants, big and small, from
tiny flowers to trace. When you start drawing
your leaves from the stem. Remember the give
them a curve two. The most important
thing to remember about the leaves is that they
will both curve and bend. To understand how the
leaf Benson space, it can be helpful to
imagine it as a ribbon. Try drawing out a few ribbons to see if you can
get the hang of it. So we will take your
basic leaf shape. Then we'll add a curve. Finally, we'll bend it. So you can see the shape in
three-dimensional space. It's super fun to add movement
and life beliefs as y. You can use this process to draw a leaf shape,
you can imagine. Now, you can just combine all these elements and have
the body of your plant. To recap. Focus on imagining your flowers and leaves as
three-dimensional shapes, curves rather than
straight lines. You can draw out your
basic geometric shape and add detail on top. Or you can just
imagine it, value, draw, whichever feels
easiest to you. In the next lesson, we'll
sketch some flowers.
5. Sketching Flowers Shapes: In this lesson, we
will warm up by sketching some basic
flower shapes. We'll be adding
watercolor sketches next. So make sure you're
using waterproof ink. I'm using a fountain pen
with waterproof ink. It has a really
nice variable line and I enjoy sketching
with it. A lot. Wouldn't call it super accurate. But that's actually
good for sketching since I can't get
stuck on detail. Thanks will always feel a bit steep when you get
started sketching. So it's important to
focus on just warming up your hand and making
nice loose strokes. Really important not to
judge your sketches. Felt way. You'll just hamper your process. I'm definitely not happy with
all the sketches I make. But that doesn't really matter because I do also make sketches. I do like it usually takes me at least two sketches before I feel like I'm
really warming up. The goal here is to just
do small, fast and loose. Just get used to the
shape of the flower, making nice curves
and just feeling it. I'm not trying to be accurate
at all in my sketches. I'm just trying to find
flower shapes and leaves. Feel nice to capture an overall shape and a
feeling with the sketch. Just enjoy the lines I'm making. It can be a good idea. Looks through some images of flowers before you start this, just so that your
mind is prepped for lots of different
shapes and sizes. Point to try and recreate
any real flower. Even though you can do
that if you want to. But just to think about all the different things
you can play with. You can see that ohms
getting really small. That's another thing
that helped me move fast from one sketch to another and helps me not get stuck on doing
too much detail. I really enjoy wild flowers. There's something so sweet
and nostalgic about them. Drawing them always
makes me feel happy. Eats an interesting challenge. Trying to find out
those few lines can indicate a flower which actually has a ton
of tiny flowers. If you just draw out the outline of every one of
those tiny flowers, you usually end up
looking a bit stiff. Now, remember to think about the basic geometric shape
you're basing your flower on. Try and turn it in
different directions. See what kinds of shapes
of flowers you can make. What will the petals look
like from different angles? Have fun with the leaves. Such wildly different
shapes and sizes, different silhouettes, and try to turn them
so that they look fun. Even when you have a plan, we will elif type two leaves aren't necessarily the
same shape and size. They have variations. And adding those variations will make things
look really lively. The same goes for the petals. Adding a bit of
variation will go a long way into making your
drawing look natural. I'm not really focusing on
throwing out every detail or even making sure I know what the number of
petals my flower has, is I'm just trying to feel
the shape of the flower. Try and use bigger, bolder lines instead of
lots of small strokes. It's easier to get a feel for
the overall shape that way. Once you're feeling the shape, it's a lot easier. Later on. Do a tighter drawing
and add more detail. And overall, it's just
important to like what you're drawing and
focus on having fun. Find those shapes
and lines you enjoy. To recap, focus on the overall
shape, not the detail. Remember the lead your sketches dry before you move
onto watercolor. In the next lesson, we'll be going over some
watercolor basics.
6. Watercolor Basics: In this lesson,
we'll be going over the basic process of using watercolor to paint our flowers. My goal here is to get
sketchy and energetic color, area and lose, use Pride colors and leave
lots of white spaces. I'm mainly using just a
few colors per flower. One lighter tone, and one. The more saturated color. I laid down on my
color in two steps. First, a large shape with
my lighter single color, and then a charge
in my deeper color while the first wash is
still wet and let it blend. Charging in me is dropping pigmented color into
an already wet wash. This is not really an exact science when
you're using cheap paper. But I don't really
mind what happens. You will end up getting those interesting
natural textures. In any case. Remember the geometric
shape of your flower, and think about
your light source. Where would the shadows fall? Clarity is usually best to use your darkest shadow
only in one place. Decide if that will
be the outside of your flower or the
inside of your flower. Whenever you can. It's good practice to combine your shadow shapes and
combine your light shapes. It will make your
image more pleasing to the eye and easier
to understand. Try and keep things simple. In general, we're not looking
to draw realistic flowers. We're looking to have fun sketching for the
leaves and the stem. I follow the same basic process. I love how adding
just a little bit of color variation will add so much life and
energy to your image. It's important to
note you shouldn't be using colors with equal
brightness everywhere. Surprisingly, a color
will appear a lot prouder if you surround it
with less saturated colors. So if you want your image
to appear pride unhappy, you'll want to include dull colors in addition
to the bright ones. To recap, keep things simple. And remember your light source. Focus on being fast and decisive so you don't end
up money in your course. In the next lesson, we'll
be painting our sketches.
7. Adding Color to Our Sketches: In this lesson, we'll add some quick color
to our sketches. The focus is still
on keeping things fast and fun and just trying to find those basic
flower shapes. So even though the
sketches are pretty small, don't pick your smallest brush. It's a good idea to start
by wetting your pants. If you're using pan watercolors, you might like to premix some colors that you
just enjoy looking at. This is we're trying
to be realistic, just focused on using
colors you really like. I love painting in a fresh, loose way with watercolors. We went over my basic
thought process and approach to watercolors
in the last lesson. But I'm not really focusing
on following a formula here. In the end. I just do what feels right
and fun to me in the moment. Sometimes I lay
down a light wash and then I charge
in darker colors. Sometimes what I end up doing is actually starting
with a darker color and then just taking a brush with clean water and blending it out. As long as your watercolor
is still really wet, you can change the edges of your wash. What do you
need to be really fast? Especially on bad
paper like this. As you can see
though, even though this paper is just my
regular sketchbook, not really working badly
when I'm using tests, tiny areas of color. I definitely don't recommend this if you want to
use larger washes. The sketchbook also ends up soaking up the
water really quick. So who need to be really
fast with your changes? On the other hand, since it's
forcing you to work fast, you are working fast and moving fast for one sketch to another. It's all about working
with materials that are forcing you to do what you
want to be doing anyway. How the sketches really
come to life with color. Color is such a fun medium. To make your flowers
look really bright, it's important to focus on
leaving those whitespaces. Think about using your
colors meaningfully. Remember that if you're using only the brightest colors
you have at full saturation, that will actually make
your flowers look dollar. For color to appear
visually pride. You need this rounded
with less bright colors, like the white or
less saturated, lighter version of
the same color. You can also make a
color film upright by adding the complimentary color somewhere else in the picture. That's why it's so easy to make an impact with red flowers, since they'll usually
have stems and leaves. Eats a lot harder to
make a green flower pop. Another thing that can make
your colors look more lively. He's using a different
color temperature in the highlights and shadows. Like using cool highlights
and warm shadows. Since we have
already defined our flower shapes with the earlier, It's really easy
to just play with the colors and go over
the lines if you like. You can even leave
some part blank or add some details or
leaves the background. You didn't add anything. Feel free to play with it. It's also important
to remember to control the amount of water
you're using in your brush. If you use too much water, it's really easy to
just end up with a puddle that we'll
try unevenly. You can't really charge in color because it will just end up
going on evenly all over. Usually squeeze some water out of my brush every
time I read it. The basic approach
here is pretty simple. Just add a color and shadow. If you go in and start
adding more layers, It's really easy to lose
that fresh, bold look. This way, we can really
enjoy the fun shapes and textures the red colors
create when they blend. To recap, be fast and decisive. Remember, do not
stress the details. In the next lesson, we'll have a closer look at the
different parts of a flower.
8. Flowers: In More Detail: In this lesson,
we'll have a look at the different parts of a
flower in more detail. Understanding how the partial of the flower connect to each other will make drawing them a lot
easier, especially close up. Let's start from the bottom. Part that connects the flower to the stem is called a receptacle. The tiny leaves growing from the receptacle are
called sepals. The receptacle hold
center of the flower. Smooth, pointy
thing growing from the sender is called a stomach. The stomach and holds
pollen that will help fertilize the
flower and make seeds. Sometimes a plant can have separate male and
female flowers. Then the stomach will only be
present in the male flower. The petals form a ring around
the center of the flower. From the side. You can see how
the receptacle looks like. A tiny cup holding the center of the flower with sepals
growing from it. The stamens grow in a ring around the
center of the flower. Usually they will
appear in odd numbers, like 35 or seven. They can vary a lot
in size a number. So you can have a lot
of fun drawing them. Now, let's have a closer
look at the petals. Shape can vary a lot, but the heart shape
you are seeing here is a pretty common one. The key to drawing petals is understanding how
the curve and bend. One pedals can curve in lots of different ways and forms,
pretty complex shapes. To make sure understand
the shape you're drawing. It can be helpful to draw construction lines along
the form of the petal. Then it'll be
easier to visualize where the shadows and
lights will actually fall. Let's have a look
at how the petals come together to form a flower. The petals ten, bend in similar, but not necessarily
identical way to each other. The simplest way
is to imagine each pedal bins like any other, and then add a bit of variation. If you draw them
completely identically, you end up looking
a bit artificial. It's also important
to remember that usually the petals will
overlap each other. In that case, the flower won't have any gaps
near the center. Let's have another close
look at the leaves. We went over the basics
in the earlier lesson. But now we'll dive a little deeper and have a look
at different leaf types. When I'm drawing,
I like to divide the leaves into three
different categories. Simple, compound and parted. The simple leaf is
your basic leaf, just marrying a bit in shape. Compound leaves of
leaves that are actually made up of
lots of smaller leaves. Finally, the parted leaf is basically
everything in-between. Leave that looks like it's attempting to be lots of leaves, but isn't quite succeeding. Use it lots of leaves
like this on wildflowers. Once you have your leaf shape, you just need to think about
how you're going to bend it. Try to imagine them
as ribbons to help you understand how the
forms turns in space. There are so many
different kinds of leaves, have lots of fun
imagining different ones. The last thing we'll
have a look at the different ways of
flowering plants can grow. The leaves can grow
from the stem, either symmetrically,
asymmetrically. All the leaves and flowers can grow straight from the
root of the plant. A plant might have
one straight stem. The stem can also branch
out in lots of directions. A bigger flower, we
will need a thick, sturdy stem to actually
hold the flower app. While pining wildflowers might have tiny, tiny wispy stems. You probably know some garden
flowers that are excellent, so heavy that they need additional support structures
for the flowers to stay up. To recap, flowers are made out of lots of
interesting parts. You can vary while you draw. So have fun coming up with wildly different flower designs. In the next lesson,
we'll be drawing some flowers using
our new knowledge.
9. Drawing Flowers in More Detail: In this lesson, we'll be
using our new knowledge to draw some flowers
in more detail. This time, I'm using a dip pen with a blue pumpkin nib to draw. The blue pumpkin is a really fun nib since
it's pretty soft. And it's also hard to be really, really accurate with it. Even though it does
feel a bit more accurate to me than
my fountain pen. Trying to stay loose. I'm just drawing a little bit bigger and adding more detail. I still want to move
fast from one flower to the other and just
draw a lot of flowers. I'm really focusing on
having fun with my pen. I really like hatching. So now I'm adding tiny
hatching lines to indicate the shapes of the
petals and the leaves. Adding some tiny hatching
that follows the shape really allows you to test your understanding how
the shape is turning. I liked doing it anyway though. And remember the things
from our last lesson. Add sepals when they
would be visible. Thinking about how
big your standards are and if they
would be visible. And we'll concentrate on the
curvy shape of the petals. Right? To see if you can
imagine flowers with petals curving in all
kinds of different ways. The basic shapes of the flower and use petals
of different shapes. Remember, at the
centers of the flowers can also be all kinds
of different sizes. The angles of your flowers. So I can turn them in
different directions. Remember how important
the silhouette is? A silhouette that's
completely symmetrical, ends up looking pretty
static and born. Adding some variation due to shape really makes
it more dynamic. I really like starting to hold drawing from
the silhouette. I tried to get a
sense of it by first drawing a loose
outline of the petals. When I look at
what I have drawn, think about the details I should be adding to make
it more believable. After I feel like I've established how the
petals excellent Look, I start adding smaller
details and shading. The stem and leaves do end up being a bit
of an afterthought. You might think, I
start my drawings by already knowing the kind
of flower I'll be drawing. But if we really often, the only thing I'm starting with a rough outline
of the petals, then I just make things up. I really like deciding what
I'm going to draw beforehand. In general. I just really enjoy living the drawings
happen on paper. That's why it's getting flowers feels like such
as stress relief. Because I don't need any plan. I can just put my pen on paper. Flowers come out. I'm definitely not
saying though, that you should only be
drawing from your imagination. It's really helpful to
study and draw flowers to get ideas and a sense of details to your
imaginary drawings. But it's also really fun to not be constrained by reality. Flowers is one
thing where you can really let your imagination fly. And still everyone
will recognize, hey, that's a flower. It could be real. Here. You can see I've actually
spent quite a lot of time drawing those old type
of roses from life. So they end up coming up
in my imaginary drawings. I had a lot of fun feeling this sketch book
page with flowers. I really hope you're going to
enjoy drawing your flowers to hit loved to see
the finished results. To recap, focus on trying out the different flower parts
in varying shapes and sizes. Remember to think about
how the curve and bend. In the next lesson, we'll
be adding some color.
10. Flowers in More Detail: Adding Color: In this lesson, we'll add some watercolor to
our flower sketches. The goal here is to
enhance our drawings with color and follow the shape
we've already established. My approach to this
flower is pretty simple. The center will be shadows and the highlights will come
out towards the edges. I'm just letting
the width colors blend together for
a loose effects. Then just a depth of
yellow in the center. I'm done. A little bit of
green to the stem. In essence, my watercolor
approach is fairly similar. Then with the fastest sketches. The biggest change here
is that my drawings are a little bit bigger
and a bit more detail. You can see here
how I'm following the shading I laid out with the pen, with
the watercolors. Remember to try and group your highlights,
your shadow shapes. Here, I'm trying to group the darkest shadows
near the center of the flower and have a being of highlights going through
the petals near the top. I really like blue flowers
in addition to draw at once. Because the blues just seem
to play his own well with the oranges and yellows do use at the center of the flower. Here, I'm having a bit more
fun with color variation, especially when you go in
the darker, bluish reds. It's so fun to add in those
purples. As a contrast. The parts of the flower
that reflect light back on itself end up
being really deep reds. While the parts of the
flower that take in environmental light
from the outside end up being cooler blues. I don't really like
this color combination. I love these small
and simple flowers. Are they really bring me
back to my childhood. And these new movies. When you have a lot of
flowers together like this, It's really fun to vibrate the color a bit between
different flowers. That way you end up getting a really vibrant fun
and breach result. Since I'm working
with more space now than with the
previous sketches. Adding a bit more color
variation, do everything. It's still really important to be fast and decisive though. If you let a wash,
wait too long, like a couple of
seconds too long, it will be impossible
to add in more color. It might be a better solution. The chest, let your flower try and add in the
final details. Afterwards. I'm really enjoying. I think everything starts
to blend together. But this flower, I love how the yellow
blends into the blue. I'm really happy. I have
this one bigger flower here. Since it's now allow me to get
in with a bit more detail. I'm really enjoying playing
with the purples and third crisis and the
shape of the flower. Again, I'm using the darkest and the brightest
colors at the center, creating a nice point of focus. Really hope you guys have enjoyed painting
flowers with me. Through recap, focus on following the shape
of the flower. Remember the plan, your
shadows and highlights. Now we're done with the class. In the next lesson, we'll be going over what
they learned and wrap up.
11. Final Thoughts: Great job finishing the class. I had a lot of fun sketching
flowers with you guys. Be led to construct
flowers using basic geometric shapes and
have fun with our imagination. We learned about the
different parts of a flower and how to apply that
knowledge in a creative way. The focus was on fast
and loose sketches. But you can use the
same basic steps to draw things with as much
detail as you'd like. And you can use the
same basic process we used to learn to draw anything
from your imagination. I hope you guys are going
to have a lot of fun to think flowers in your
sketchbook in the future. Please share the
sketches you've made by clicking the project
tab under the class. I'd love to see and
comment on them. If you'd like some
constructive feedback. Just say so in the description. If you post your
work on Instagram, remember the tag them
so I can find them. You can find my work here. If you're interested in learning more about drawing
with depends on ink. I have a class
aimed at beginners. You can check out. I'd love to hear your
feedback on this class since I want to give everyone the best possible experience. So leave a review if you liked it or if you have
any suggestions. Bye guys. I really hope you
enjoyed this class. I hope to see you again.
 Jaana Heiska, Illustrator