Transcripts
1. Hello and Welcome to this Course!: Hello and welcome
to sketch up in 30 minutes by Farber Academy. Sketchup is a 3D CAD
drawing program with which you can easily model
and design products, furniture, and entire interiors. The great thing about
it is that there is a powerful free and
web-based version that runs in your browser. In this short course, we will get to know the
basics of how SketchUp works. We begin by logging
onto SketchUp and directly start drawing our
first piece of furniture. There won't be much theory. Everything is
learning by doing so, you are always encouraged
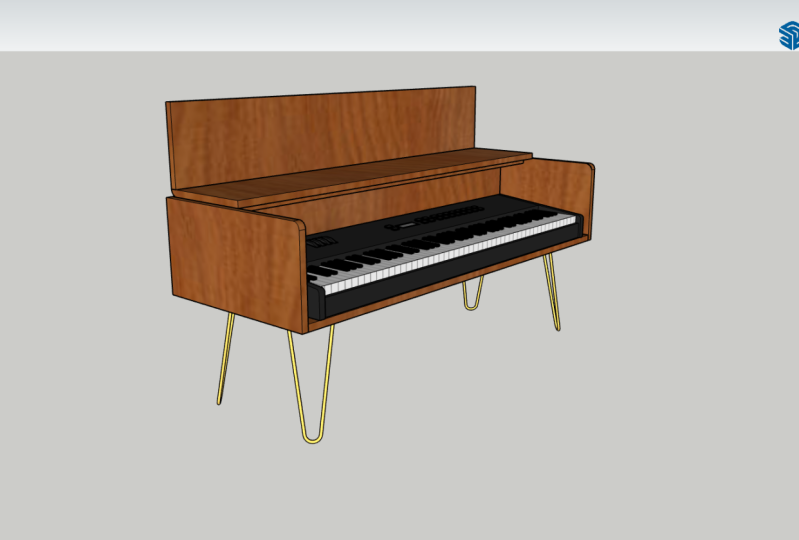
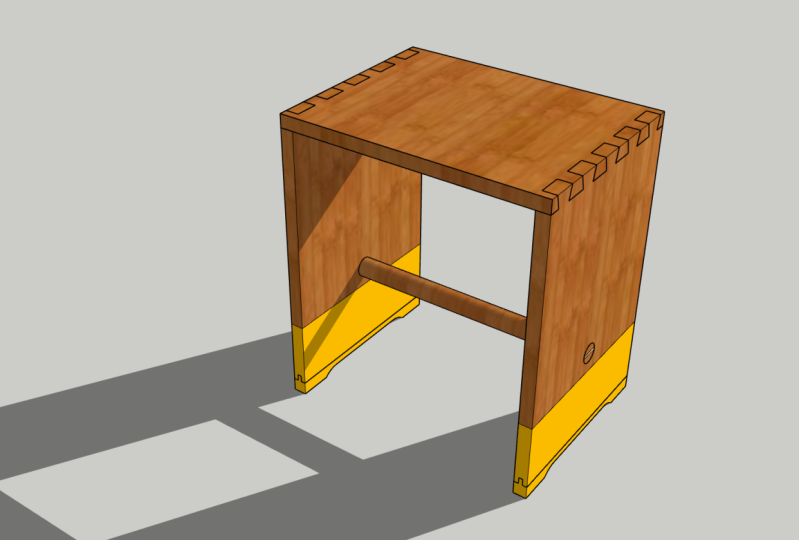
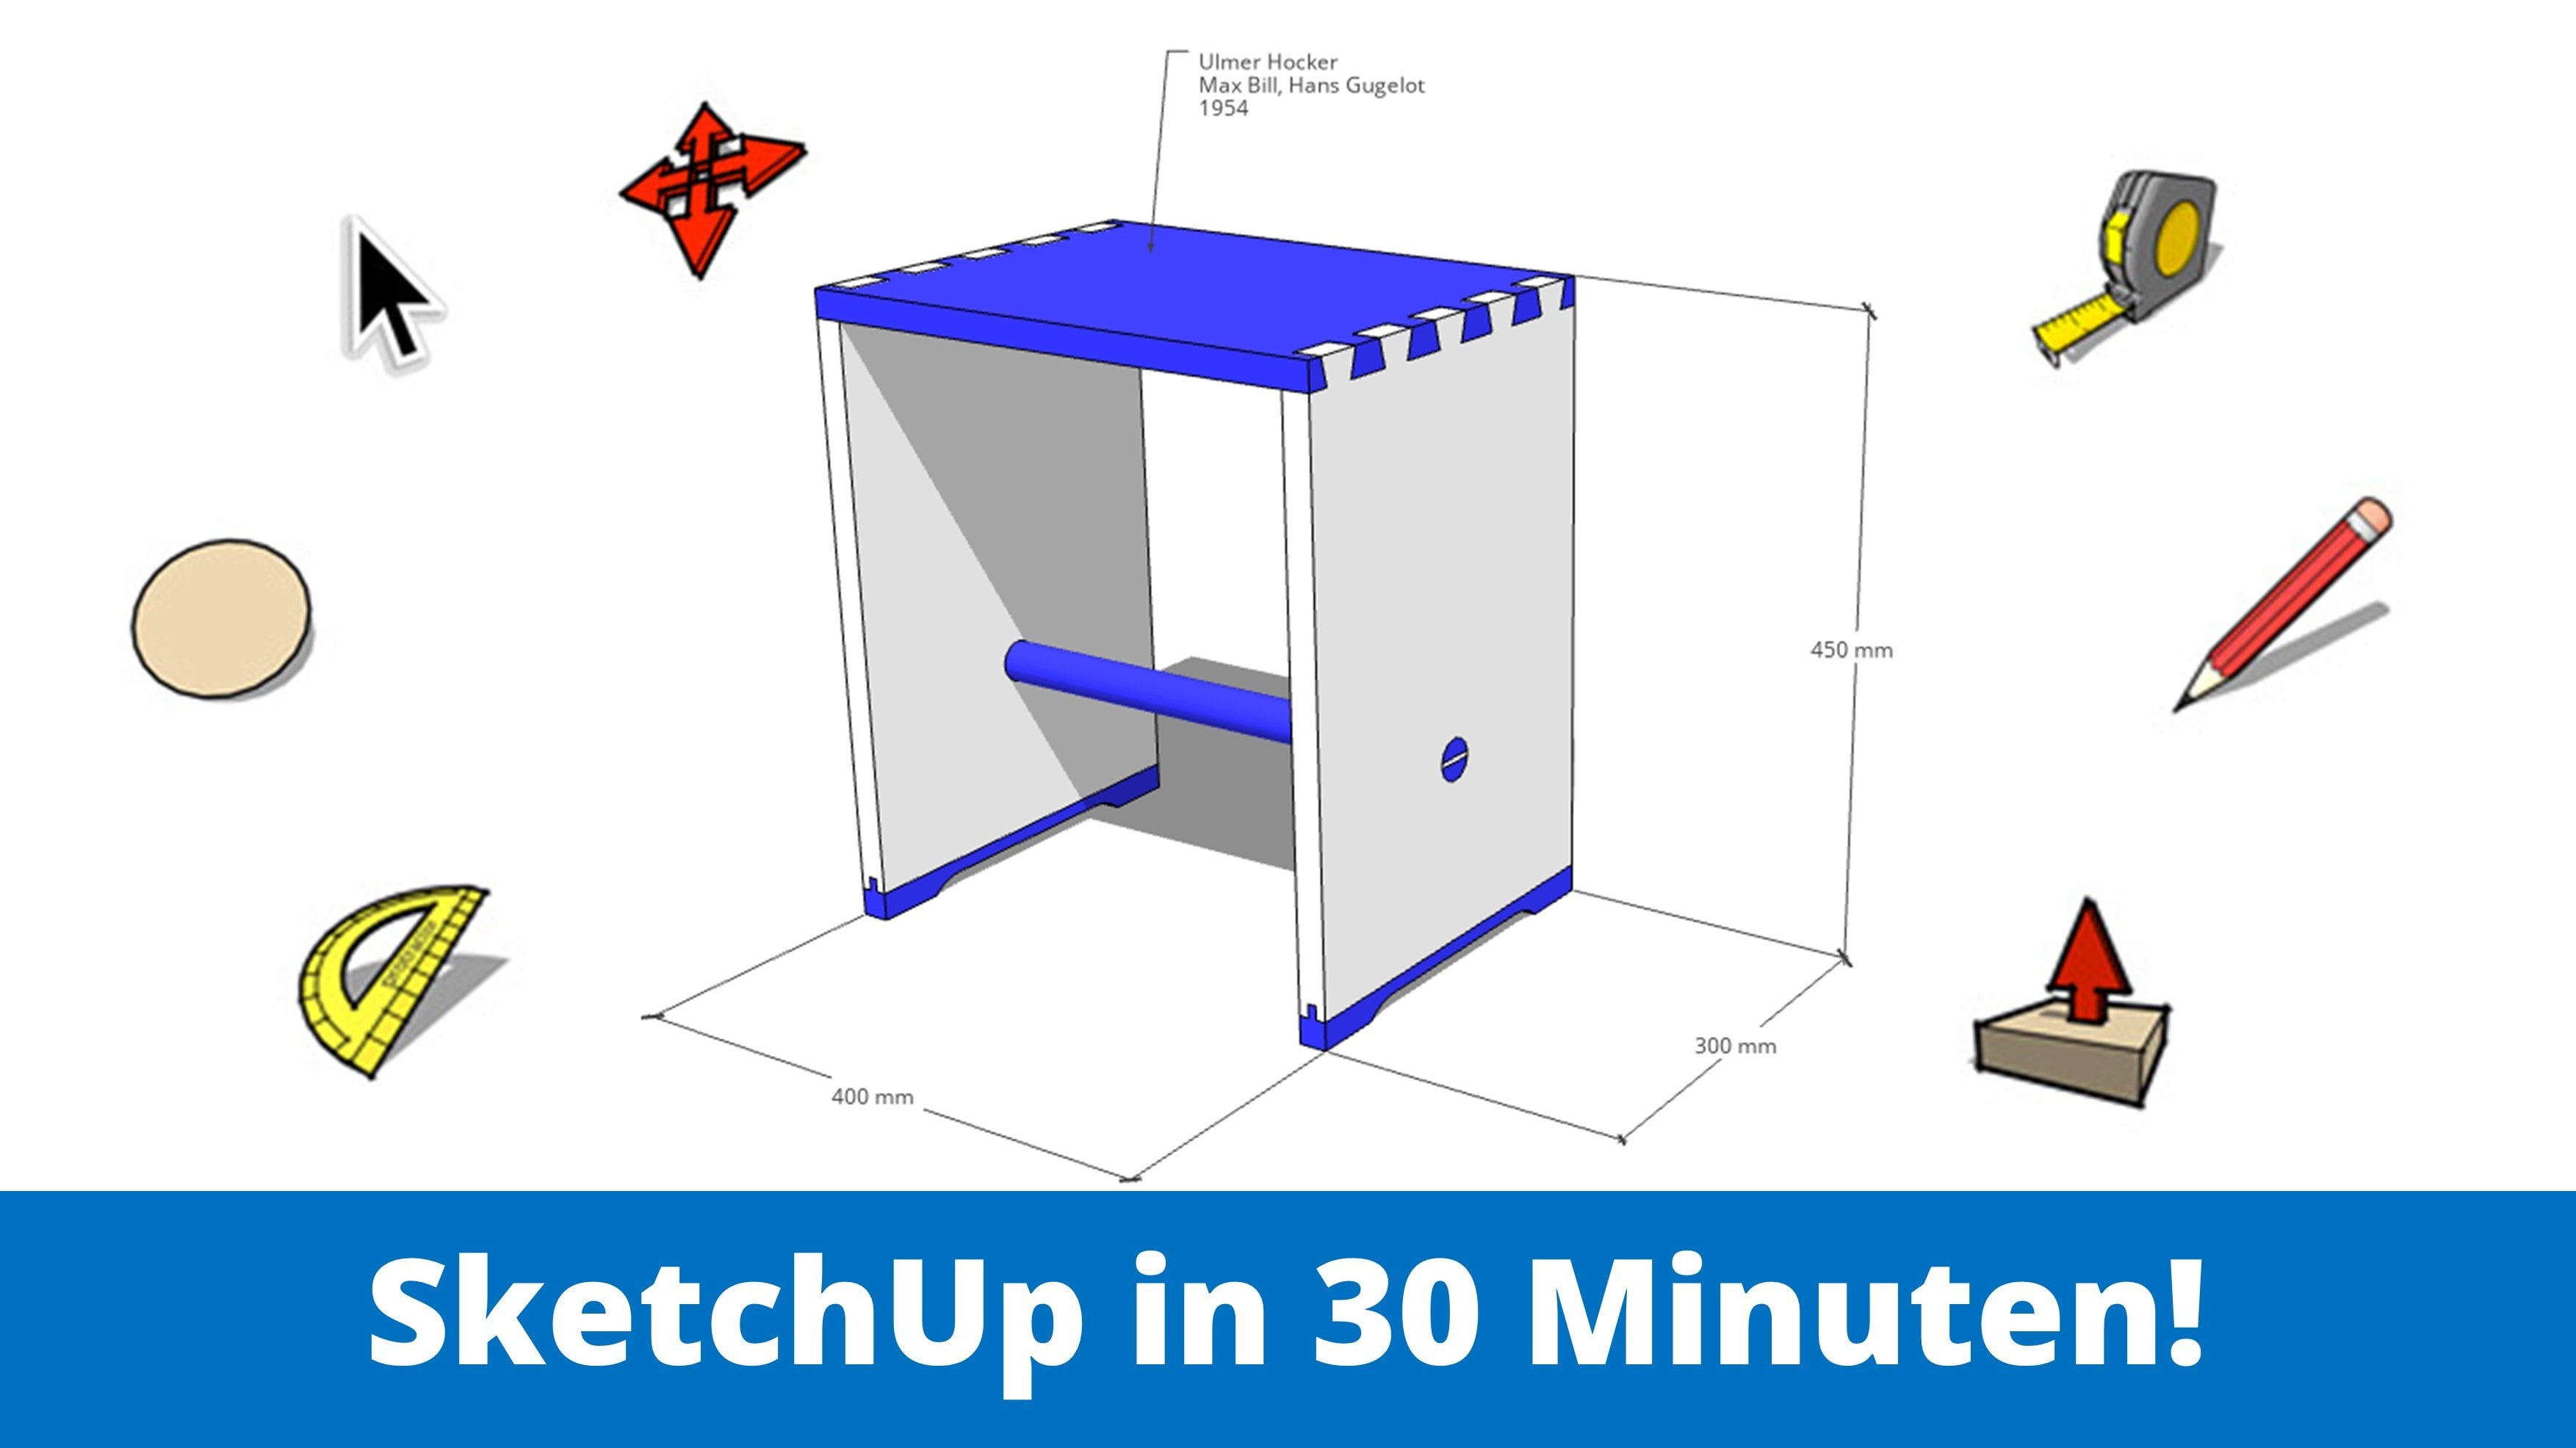
to draw along. In just 30 minutes, we recreate this iconic wouldn't share of the German
Bauhaus movement. And step-by-step, you will learn the basic functions of SketchUp. If you are a creative
mind looking for a simple but powerful
way of modelling your own ideas and
projects directly in 3D. Then this course is the
perfect start for you. I hope you have fun
sketching and let's go.
2. How to get to the free, web-based Version: Okay, so let's start by
getting access to SketchUp. So for that we're going
to sketch up.com. You see we land on this
website of Trimble, which is the vendor of SketchUp, and then we'll accept cookies. You can check out the sides so you can check out
what SketchUp can do, what it is used for in which
areas sketch up as helpful, like architectural plans
here, for example. But we want to have access to
the free version right now. So you can go here to plants and pricing and go to
personally use. You see here you have
SketchUp for different users, for personal, professional,
higher education and so on. And what's interesting for us as this web-based free
version here of SketchUp, you'll see there
are other versions for personal use as well, the sharp version
and the pro version, but they come with a price, but this version of SketchUp
here is free and we continue by signing
up to the program. You see it takes you to this
side here where you can either sign up with Trimble if you already
have an account, or you create a new Trimble ID. So if you don't have
one click here, go through the process of creating a new
account with Trimble. And then it takes you
to the home screen off SketchUp and we
continue from there.
3. Importing a File: Okay, so here we are. This is our home screen. This is what you see when
you start with SketchUp. Probably my home
screen is a little bit more cluttered
than yours because I already have recent files or my recent files
are shown here and all my other files
are shown here in this folder on the left
side, tremble connect. Then you see where ten
gigabyte of cloud storage is. This is where you can store all your files and you
can create folders, and you can import models here. But let's go back
to the home screen. And what we can do now here is we can create
a new template. We could, for example, go here to this
drop-down menu and choose the scale that
we want to draw in. Or we open something
from our device. And this is what
we're going to do because I hope you download it, the file from the materials. We are going to
open the file now. And we opened this file
SketchUp in 30 minutes. Now you see our
file is imported. This is what we're
going to work with. And I'm always doing
first is I'm going to the full-screen mode so I
don't have any distractions. So I'm clicking here because I have this
symbol and Firefox here are your press F11 and then you go into the
full-screen mode. And then also, if you want
to draw in another language, you can go to this little
globe here on the bottom, and then you can choose a language that
you want to be in. The first thing that
we're going to do, we are saving the file
because it says here you are viewing a temporary file because
we haven't saved it yet, so let's save it in
the cloud Storage. Let's go into this folder here. And I'm going to this folder
and I'm giving it a name. I'm saving it. And also one more
thing for this course, whatever I'm typing
on my keyboard, you see here in the left corner. So I'm clicking left
and it says left. I'm clicking write it as
I'm typing 120 and you see the numbers down here in case I'm too quick with my
keyboard commands.
4. A quick look at the User Interface: Now before we start modelling, let's have a quick look
at the user interface. So first of all, on the top
here we have the filename, we have undo redo, we have a function for a saving, but then SketchUp also saves every five
minutes because we have this auto save function
and we have our menu here. So you can always go
back to the home screen. You can create new files, open files, save, import,
export, download, whatever. You also have app settings here. If you could change the
auteur safe interval. Now we have five-minutes. We can change the language and we can change the template. So we are drawing
in millimeters, but we could change
this by clicking here. But let's go back again. On the left side you see
that we have a toolbox and behind every tool
with this little arrow, there are more tools. So that means like here, we have four tools, which makes some kind of ironic. Here we have some more tools for the rectangle function and from the round shapes and so on. So those are the most
important tools. They are more tools, but in this course those
tools will be enough. Then on the right
side here we have those panels and we can change, for example, the
appearance of our model. The first thing that I'm going to do is I'm going to change the style because I don't like this gray
background so much. I rather have the shaded
with textures style here. So you'll find this with
the default styles. I like the style better,
it's much cleaner. I'm staying in this style. And then also down here, you know this maybe from other programs you see
what a tool can do. You always have a little
description here on the bottom. And then on the right side you see the measurements
are, for example, if I'm creating a line now, you see the length of the line here in
this bottom corner.
5. How to nagivate in SketchUp: One of the most
important things that we should start with
is the navigation. First of all, I hope
you have a mouse. In case you don't have a mouse, you can use your track pad
of your laptop, for example. And to make the
navigation easier. Down here you have this mouse
symbol and you can choose between mouse or track pad in case you're
using the trackpad, Just switch in case
you have the mouse, just leave it as it is. Then you probably
have figured out by now if you use
your mouse wheel, you can zoom, you can zoom in, you can zoom out
and you can always zoom to where the mouse is. So if I wanted to go to this guy with a cool
dinosaur t-shirt, I use the mouse to
zoom in and zoom out. Now if we click the mouse wheel, you see that we get
this Rotate tool, which lets us orbit around a certain center and just
change our position. There's one more
navigation tool. If we hold down the Shift key
and press the mouse wheel, we get this white hand here. So this is the pen tool. And now Pen tool lets you basically move
into one direction. So now I could go along
the red axis, for example. Those are the three
important tools for navigation in SketchUp. So I hope you have
your left hand always on the left
side of your keyboard. So you can have your
pinky finger on the shift button so that you can zoom in with
the mouse wheel. You can click your mouse wheel and you hold down the Shift key, you press the mouse button
and you get the hand for panning the pen tool. And those are the three
navigation functions. And I encourage you
just to try it out how the navigation works and to get a little
comfortable with it. So try to move here, this piece to this side
piece of our object here. And use the pen tool just to
move along the side of it. Or use the mouse
wheel to rotate to another perspective and
back to the start again, so that you're getting
comfortable with the navigation. Okay, but now let's
start building.
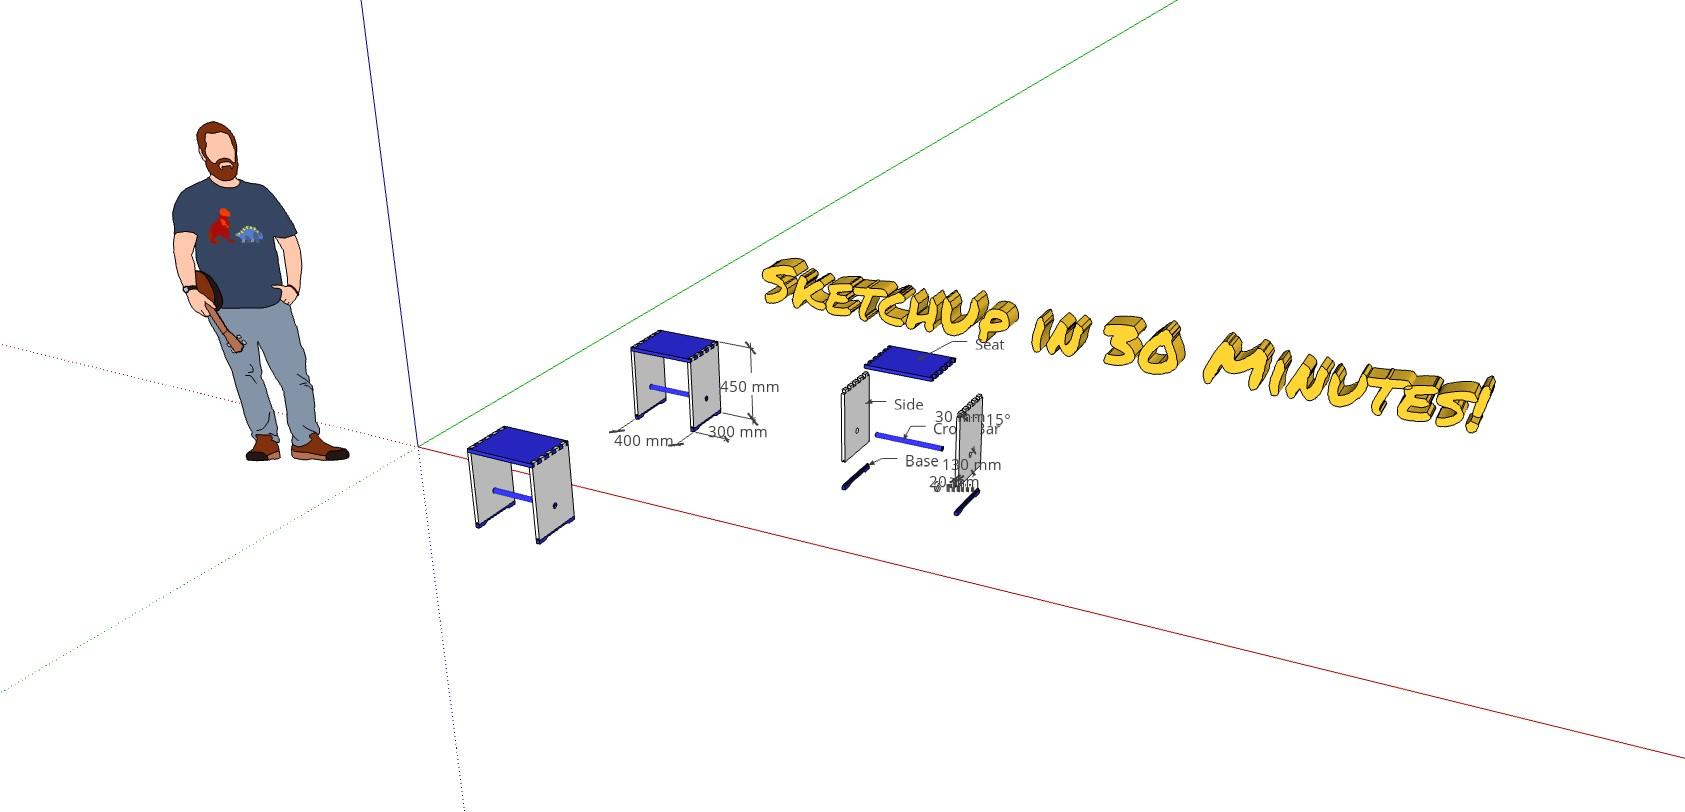
6. Building the Sides: All right, So we are
building the piece somewhere here in
front of the original, so we can see the measurements
and our original piece. And we start by building
one of those sides here. So aside is basically
just a rectangle on the ground that we pull upwards so that we
get a 3D object. And this is what
we're going to do. So let's start with a rectangle. You find the rectangle tool here in the middle
of the toolbox. And then we just click here on the ground and
open up a rectangle. Don't hold the mouse key, just click once to
open up the rectangle. And now of course we need
to enter measurements. And we need the material
thickness, which is 20. So enter 20 and then comma 300, separate two dimensions with a comma 20 ester
material thickness 300 is the width of this side. So hit the Enter key and you see there's our first
rectangle on the ground, and it's a
two-dimensional shape. But what we need now is we
need to pull it upwards. So go to the left side here you'll find the
push and pull tool. And this is really what makes sketch up special because now immediately we can go to this rectangle here
we can click ones, don't hold the mouse key. We pulled this thing upwards. On other programs,
this is harder, but in SketchUp we
are directly in 3D and we can pull r objects
out of the ground. And how far do we go? Well, it says here
450 millimeters, so enter four or 50. Hit Enter, and there we are. Now to get back to
the Select tool, you can either go
here to this mouse or you can just
hit the Space key. You have a hand on the
keyboard and you hit the Space key and there you
are back in the select tool. Now the next thing that we're going to do is we're going to triple-click on our side so that the whole
side is selected. Every piece here, every
edge and face is selected. And then we right-click on
it to make it a component. Because this is the
component side. You can give it the name site or any other name that you like. And this now is kind
of a closed object. So if we wanted to change
something on the site, we needed to go into the editing mode by
double-clicking on it, but we don't want to change
anything now it's fine. We just want to
have another side. So let's select the
site by clicking on it and then get
the move tool. This cross here on the left
side, this is the Move tool. And then let's just move to one endpoint here
and click on it. And now you see we
can move the side, but that doesn't
help us very much. We need a duplicate of the site, we need a second side. So hit Control ones. Then you see your original
P stays where it is, but you can now move with
duplicate of this thing. You could move it in any
direction that you like. You can go along parallel to the green excess,
for example, but our side should be
parallel to the red Xs. So this red excess year,
whereas SketchUp snaps. And then let's move this
piece to right side. How far do we need to go? Well, in the original
it says 400, but that's the total width
between the two sides. So we actually need to subtract the material thickness of
the site, which is 20. So we go 380 millimeters
to the right side. So enter 380, hit Enter, and there we are. Now, you can leave the move tool by
hitting the space key. And here we are back
in the select tool. Now we can continue with
the dovetail joint.
7. The Dovetail Joint: Okay, so for the dovetail
connection, first of all, I'm still in the move tool and to go back to
the Select tool, I hit the Space key. So there I'm back
with the mouse. And now we have two components. But the thing is whatever
I'm doing to one component, I'm doing to the other as well. So whatever I'm changing here, it's changing the other
component as well. And I can edit the side piece here by double-clicking on it. And now I can edit
this component here. And at the same time
the other component is being edited as well. And let's move Here. Now I'm getting the
tape measure to which you find below
the Move tool. And actually it looks
like tape measures, so it can create guidelines
and it can measure distances, but we need a guideline now which goes from
this top line here. So go to the top
line and click once. And then you see you can
open up a guideline. And we need a guideline
20 mm from the top, which marks us where the end
of the seed piece will be. So this is basically
the material thickness of the seat piece. And then we need also
another line in the middle. So let's click here once
again and go 10 mm down. We need another line
from this side, 15 mm in wards, and now a line 45 mm in
words from the edge. And what we need now is
aligned with an angle. We do not need straight lines, but aligned with an angle and we can use the protractor
tool for this. So go to the tape
measure once again. When you see it opens up more tools and here you
find the protractor. So this tool is what we need. And with this tool, we go to this intersection
point here in the middle, and we click once. And then you see we can open up a reference line
and we're going, we're going upwards with
our reference lines. So We are parallel
to the blue X's. So go upwards and
then click once. Now you've established a
reference and then let's open up this angular
line to the left side, and let's establish an angle
of 15 degrees, 15 and enter. And we are doing the same here. So let's go to the other intersection
point in the middle. Click ones, go
upwards to establish a reference line and
then open up the angle. And you see SketchUp is smart. It remembers that we used 15
degrees for the first line, so it already snaps here
in the 15 degree angles. So I can use this. I
just click once here at 15 degrees, and here we are. So we have the outline of our dovetail connection
of the first piece of it. And now I'm taking
the line tool here. So this pencil on the left side, and I'm connecting this
intersection point on the edge with this intersection point of the angular line and
this point on the top. And then also I'm going from
this intersection point to this intersection point and back again with the Space
key to the select tool. And now all those guidelines make our drawing a
little bit messy. So I want to delete them. And I go here to
the display panel. On the right side, there are those glasses here. And this is the display
panel. When you click on it. And you see here
delete all guides. There's a button. Let's delete all guides. Just click there and you see
all the guides are gone. We can hide this panel
once again by going to the close panel arrow
here on the top. Now you see I once again
hit the Space button. I'm back in the select
tool because I want to select this line and this line, but I want to select them
both at the same time. How can I do this? Well, we can do this with
holding down the Shift key. So you see when I
hold down shift, the Select tool gets this plus and minus
sign on the side of it. So that means I can now add another line
to the selection, and now both lines are selected. And I can move them. Well, I can move them or I
can move duplicates of them. I want to move duplicates. Let's go to the move
tool here once again, and go to this midpoint here. So this is the point in the
middle of the left line. And let's click here. And now you see you can
move the originals. But once again, when
you press control, once you see that you can move a duplicate and
this is what we need. And we wanna go along
the green axis, 60 mm to the right side. So let's enter 60. Enter. Now we can use the
multiply functions. So hit the multiply key. You see it in the bottom
corner where it says distance. It now has this little
Multiply sign this star. And now let's multiply
this by four. So type in four and then Enter. And you see now
SketchUp has multiplied this selection and has put it four times here to
the right side. So this is basically our
dovetail connection. It needs some extra lines here. So we create them manually. Let's go to the line tool. And let's connect
this end point with this end point and then this endpoint with this and so on. You get the drill. So we are drawing our dovetail connection on
the side of this face here. And now of course this is
just an outline and we need to push away all the
material that we don't need. So let's get the
push and pull tool, which you find on
the left side here. Let's get it and then let's push all the things away
that we do not need. So click here on this face, click ones maybe to see
what we're doing better, let's go a little bit higher. And we see also the
other component. And now you see, of
course I can manipulate this side by using the
push and pull tool. And you see what I'm doing
to this component here, I'm doing to the
other one as well. We want to delete now
this space that's not part of our dovetail
connection on the pieces here. So we can do this by
really pushing it back. And then you see
this gray area here, you see that it looks
a little bit strange. And it says on phase, and if you click now, it's gone. So we're doing the same with the other empty areas as well. So click on the face, go backwards until you see on phase and until it
gets bluish-gray. And then click once,
and it's gone. So click once, push
it all the way back. And we're doing this with
the other pieces as well. And there's our
dovetail connection, not only on one side, but on both sides since they are components and components
are always connected.
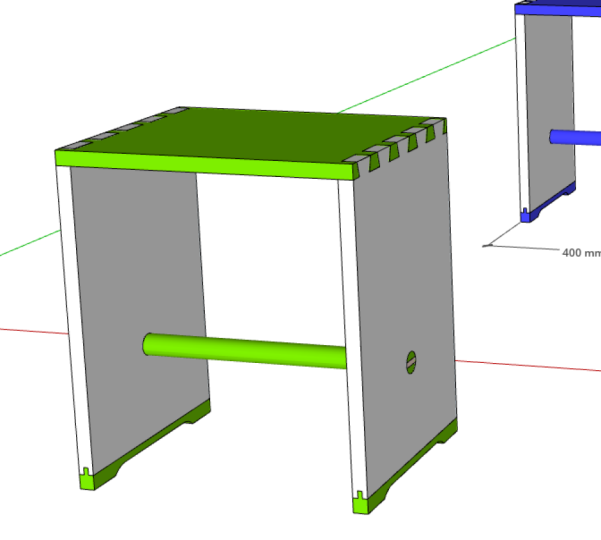
8. The Seat: Okay, so let's start building
the seed piece on the top, which of course also has the
tough TO connection here. We start just by navigating ourselves so that we see
the top of our pieces here. And then we get the
rectangle tool and we just open up a rectangle
from this point here, from this point on the corner to the other point
on the other side. And this is the
base for our seed. And we'll, what do we do? Of course, we push it or
we pull it with a push and pull tool upwards
20 millimeters. You could either enter 20 or you can just go
to a reference point here and click because those
are the 20 millimeters. Now, we have created
the top piece, but we still haven't created
the dovetailed connection. So you see when I
move this piece away, we just have a blank piece here, but we don't have
the connection. And we can simply
now transfer what we've built here on the
side to this top piece. For this, we open
up a rectangle. So once again, I'm back
in the select tool, so I hit the Space key so
that I can select my pieces. Now, what I want to do is I
want to create a frame by holding down the mouse key and opening up this
rectangle here. So a select frame. And then I read, I release
it so that all my pieces, all my new pieces
are selected now. And I right-click on them. And we have intersect
phases here. We intersect with
model, and there we go. So you don't see
any changes yet, but when I move this piece away, and you should do that
to get the Move tool. When we move this away, you see that we now transferred the outline of our
dovetail connection to the side of the top piece. And we're doing the same here. So let's go back to the
Select tool of space, select the site and then get
the Move tool and just move the site out of the
way so that we can now work on this piece here. What we're doing now is we're just getting the push and pull tool and pushing all the sides or the material that
we don't need anymore. We pushing it all the way inwards back to this line there, and we're doing it the same
of course on the other side. So push in the material
that we do not need a way. And there's our next
piece, Well the seed. So I'm going to the Select
tool and I'm triple clicking. And I'm triple clicking
on this top piece so that everything is selected
now and then I right-click on it
and say make group. And now we've not
made a component, but we've made just
a group because we just have one top piece here. So we do not need to
make a component, but a group will be fine. Okay, let's assemble the
pieces back together again. So I'm selecting the side
and then I'm going to the Move tool and I
move the side all the way up to where
it belongs to here. And I'm connecting the
pieces once again, the other piece of
course as well, backwards space to the select
tool and then the move tool to move this site
upwards to where it belongs and
connect those points.
9. The Base: Okay, We have the
sides, we have the top, but we need those
base pieces here and you see they are
independent parts. Let's move to one
of those sides. Let's go into the editing mode by double-clicking on the side. And then we start with the
guidelines once again. So get the tape measure here. And let's create a guideline 20 millimeters from the bottom and another 110 millimeters
above the first guideline. And then go to the
edge on the left side and create a guideline
seven millimeters inwards. And from this new line, another line six
millimeters inwards. Now we take the line tool and just connect the
intersection points here. This is the part that we do
not want to have anymore. So we get the push and pull tool and push this part
all the way to the back until we hit
the reference here in the back and we click
once and it's gone. Now, what we also do not need
anymore other guidelines. So go to the display panel here, the glasses, and then go
to delete our guides. And now it's much cleaner. And once again, I hit the Space button to
get the select tool and I click here to go
out of the editing mode. Now, we create a new outline, also, once again
with the line tool. And we're just connecting
this end point with this endpoint,
with this endpoint. So we're just
drawing along here, along the layout and then we're going downwards, 20 millimeters. Go to the left. Make sure you're using
the red Xs here. You're going along the
red axis and you see here that you get another
reference point here. So that sketch up, snaps onto this point here. You can either now enter a 20 or you just use the
reference point. I'm using the reference
point and I click once. And then I connect
the two points here. And then I have a new layout. And I'll take once again
the Select tool with space. And I'm selecting this new
layout with a triple-click. And I make this a component, a component because we need two bases and I
call this the base. And now I take this base and a duplicated so that I can put
it below the other side. So it is marked now
with the select tool. I go to the move tool
here on the left, and I'll just grab it on
this point, for example. And I'm not moving the original, but I'm moving duplicates, so I press Control ones. The original stays in the
same place and I go over here and I put this layout here, and I go back to the Select
tool, I'll double-click. I'm in the component
editing mode. And from this 2D layout, I'm creating a 3D object now by using the
push and pull tool. I push this all the
way to the back, and I'm using this reference
point here on the line. In C. We have now
to face parts here. And once again I'm
hitting space and then I'm clicking somewhere
here in the free area. You see the base pieces
are not yet finished because in the original
has the opening here. So let's create those openings and also we get to
know a new tool. First of all, let's
navigate ourselves in front of this side here and we double-click on our new component so
that we can edit it. We take the tape measure
again to create a guide. First of all, one that's ten millimeters upwards
along the blue X's and then a guide that's 50 millimeters inward
from the left side. And we're going, and we're
creating another one, also 50 millimeters
from the first line. And we're doing the
same on this side here. So 50 and from this line
also 50 millimeters. And now what we need is
the Arc tool because we want to create a round
arc here to round arc. So this is where you
find the Arc tool. So below the line tool
you'll find aurochs. And what do we need here
is the two-point arc, very simple two-point arcs, or get this tool here
on the left side. Now we connect this
intersection point with this intersection point. And you see now we
can open up an arc and we go all the way up to
the line that we created. So click here and we're doing
the same on the other side. So from this
intersection point to this intersection point and
then upwards to the line. And now let's make another line. So get the line tool and let's connect the top points here, the endpoints of the arcs, the highest point of the arc. Let's connect them
with a simple line. Now get the Select
tool hit Space, and then let's select the part of the art that we
do not need anymore. So this part on the left, this part on the right. Let's select this
part here that we can now push away with the
push and pull tool. So click on it and
then push it all the way to the back
until it gets gray, bluish gray, and
then click here. And now we've created
this opening here. And once again, we do not
need the guidelines or go to the glasses here to
display delete all guides. Once again, the Select tool with space click somewhere
in the free area. And here we are.
10. The Crossbar: All right. You see there's
still one piece missing, which is this crossbar here, which gives us another
new shape, a circle. So let's navigate
once again here. Let's go into the editing
mode of this components. So double-click on the side and then we start again
with the guidelines. So the tape measure, we start with a guideline from the left that goes
right to the middle. Now since this side here is
300 millimeters in total, I could either enter 150
to get to the middle. Or you see here that SketchUp always gives me those
blue round points here. So this is the midpoint
as a reference, and I could just click
here on the midpoint. Then the line is exactly in
the middle from the bottom. So not from the
bottom of the side, but from the bottom
of our base year. I'm also starting a line that goes 150
millimeters upwards. And now I have to enter 150. I have an intersection
point here, which will be the
center of our circle. So we have a circle tool that you find here where
the rectangle is as well. So it's not where the arc is, but here is the circle
behind this rectangle tool. So this is the circle
in the middle. And now we go to the
intersection point here. And you click once and then
you can open up a circle. And it should have a
radius of 15 millimeters. So 15 Enter, and
there's our circle. First of all, we create
an opening in the side. That means we use the push
and pull tool and push this circle way to
the back until we, until it says on
phase a quick ones. And you see we have an
opening in each of the sides. Now, I'm not deleting
the guidelines. I leave them here
because I need them as a center for our crossbar. But I wanted to go out of this component editing
mode because we are creating now
a new piece which is not part of this
component here. So I'm going back with
space to the select tool. I click here. Now I'm out
of the editing mode of this site component and
I'm creating a new circle. So let's get the
circle tool again. Let's go to the
intersection point here. And now let's start the
circle once again in the middle and open
up the circle. I could enter 15 millimeters, but I could also go
here to endpoint inside and just create the circle with the
reference points. What I can do now is I push this circle all the
way to the other side. So I take the push and pull tool and I click here once and
now I can pull it out, but it can also pull it
into the other direction. And I'm going here on the end point inside and
there's our crossbar. Now I can also delete
the guidelines. So I'm going here display,
delete all guides. And I'm closing this panel. And I'm going back
to the Select tool that you'll see our
crossbar is not yet a group or
component since we have this piece only
once in our drawing, Let's triple-click on it
to select everything, and then right-click on
it to make it a group. And now you see it's one single piece that we
could move away, for example. Now there's still one
tiny piece missing. When we look at the original, you'll see that we
have some kind of wedge here that
spreads the crossbars. So we have a tight connection between the bar and the sides. So we're not building the wedge, we're just painting the layout of the wedge on the side here. So double-click on this
group here on the crossbar. And then let's just get the line tool and just
paint it on there. So I'm just, I'm really just
connecting two points here. Just giving the appearance of the wedge also
on the other side. So I'm connecting this
point with this point, this point with this point. Now it looks like we
have a wedge in here, but it's just painted
on the outside. Back to the Select tool space. Now this stool is finished. Basically, we have
created all the pieces. The only thing missing
now is the color on it.
11. Applying Color: Okay, so let's bring some
color into this model. So we got to the right side and on the right
side in the middle, there's this cube here. If you click on the cube, you see the material panel. So first of all, you have this little house
here which says that those are all the colors and
materials that are in use now in the model already. And those colors mostly are from this guy with
the dinosaur t-shirt. They are used here in the
model of this person. And what do we need now are all the colors go here so you can browse all the
materials and colors. And now you see we have
a lot of categories here with textures
and materials. But let's go to the colors here. And you select a
color that you like. I once again, I'm taking
this blue color here. I think it was this one
and I'm applying it. You see that I automatically, if I click on the color,
I get this paint bucket. And I can directly apply
a color on the crossbar, on the seed on the base here. Well, this piece here
needs to stay wide. The wedge is in another color, so I'm double-clicking
on the group. And then I can, then I can give the
wedge a white color. I'm going into the
selection mode out of the editing mode. And we are finished building this first
piece of furniture. So congratulations. I can encourage you to try out, sketch up some more. So you have the tools
on the left side, you have those panels with more functions
on the right side. So just go ahead
and check it out. If you want to know more, check out my other
sketch up course. I hope you continue
to use this program. I hope you put your ideas into SketchUp and then into reality. And thank you for
participating in this course.
 WerkStrich, Zeichnen fürs Handwerk