Transcripts
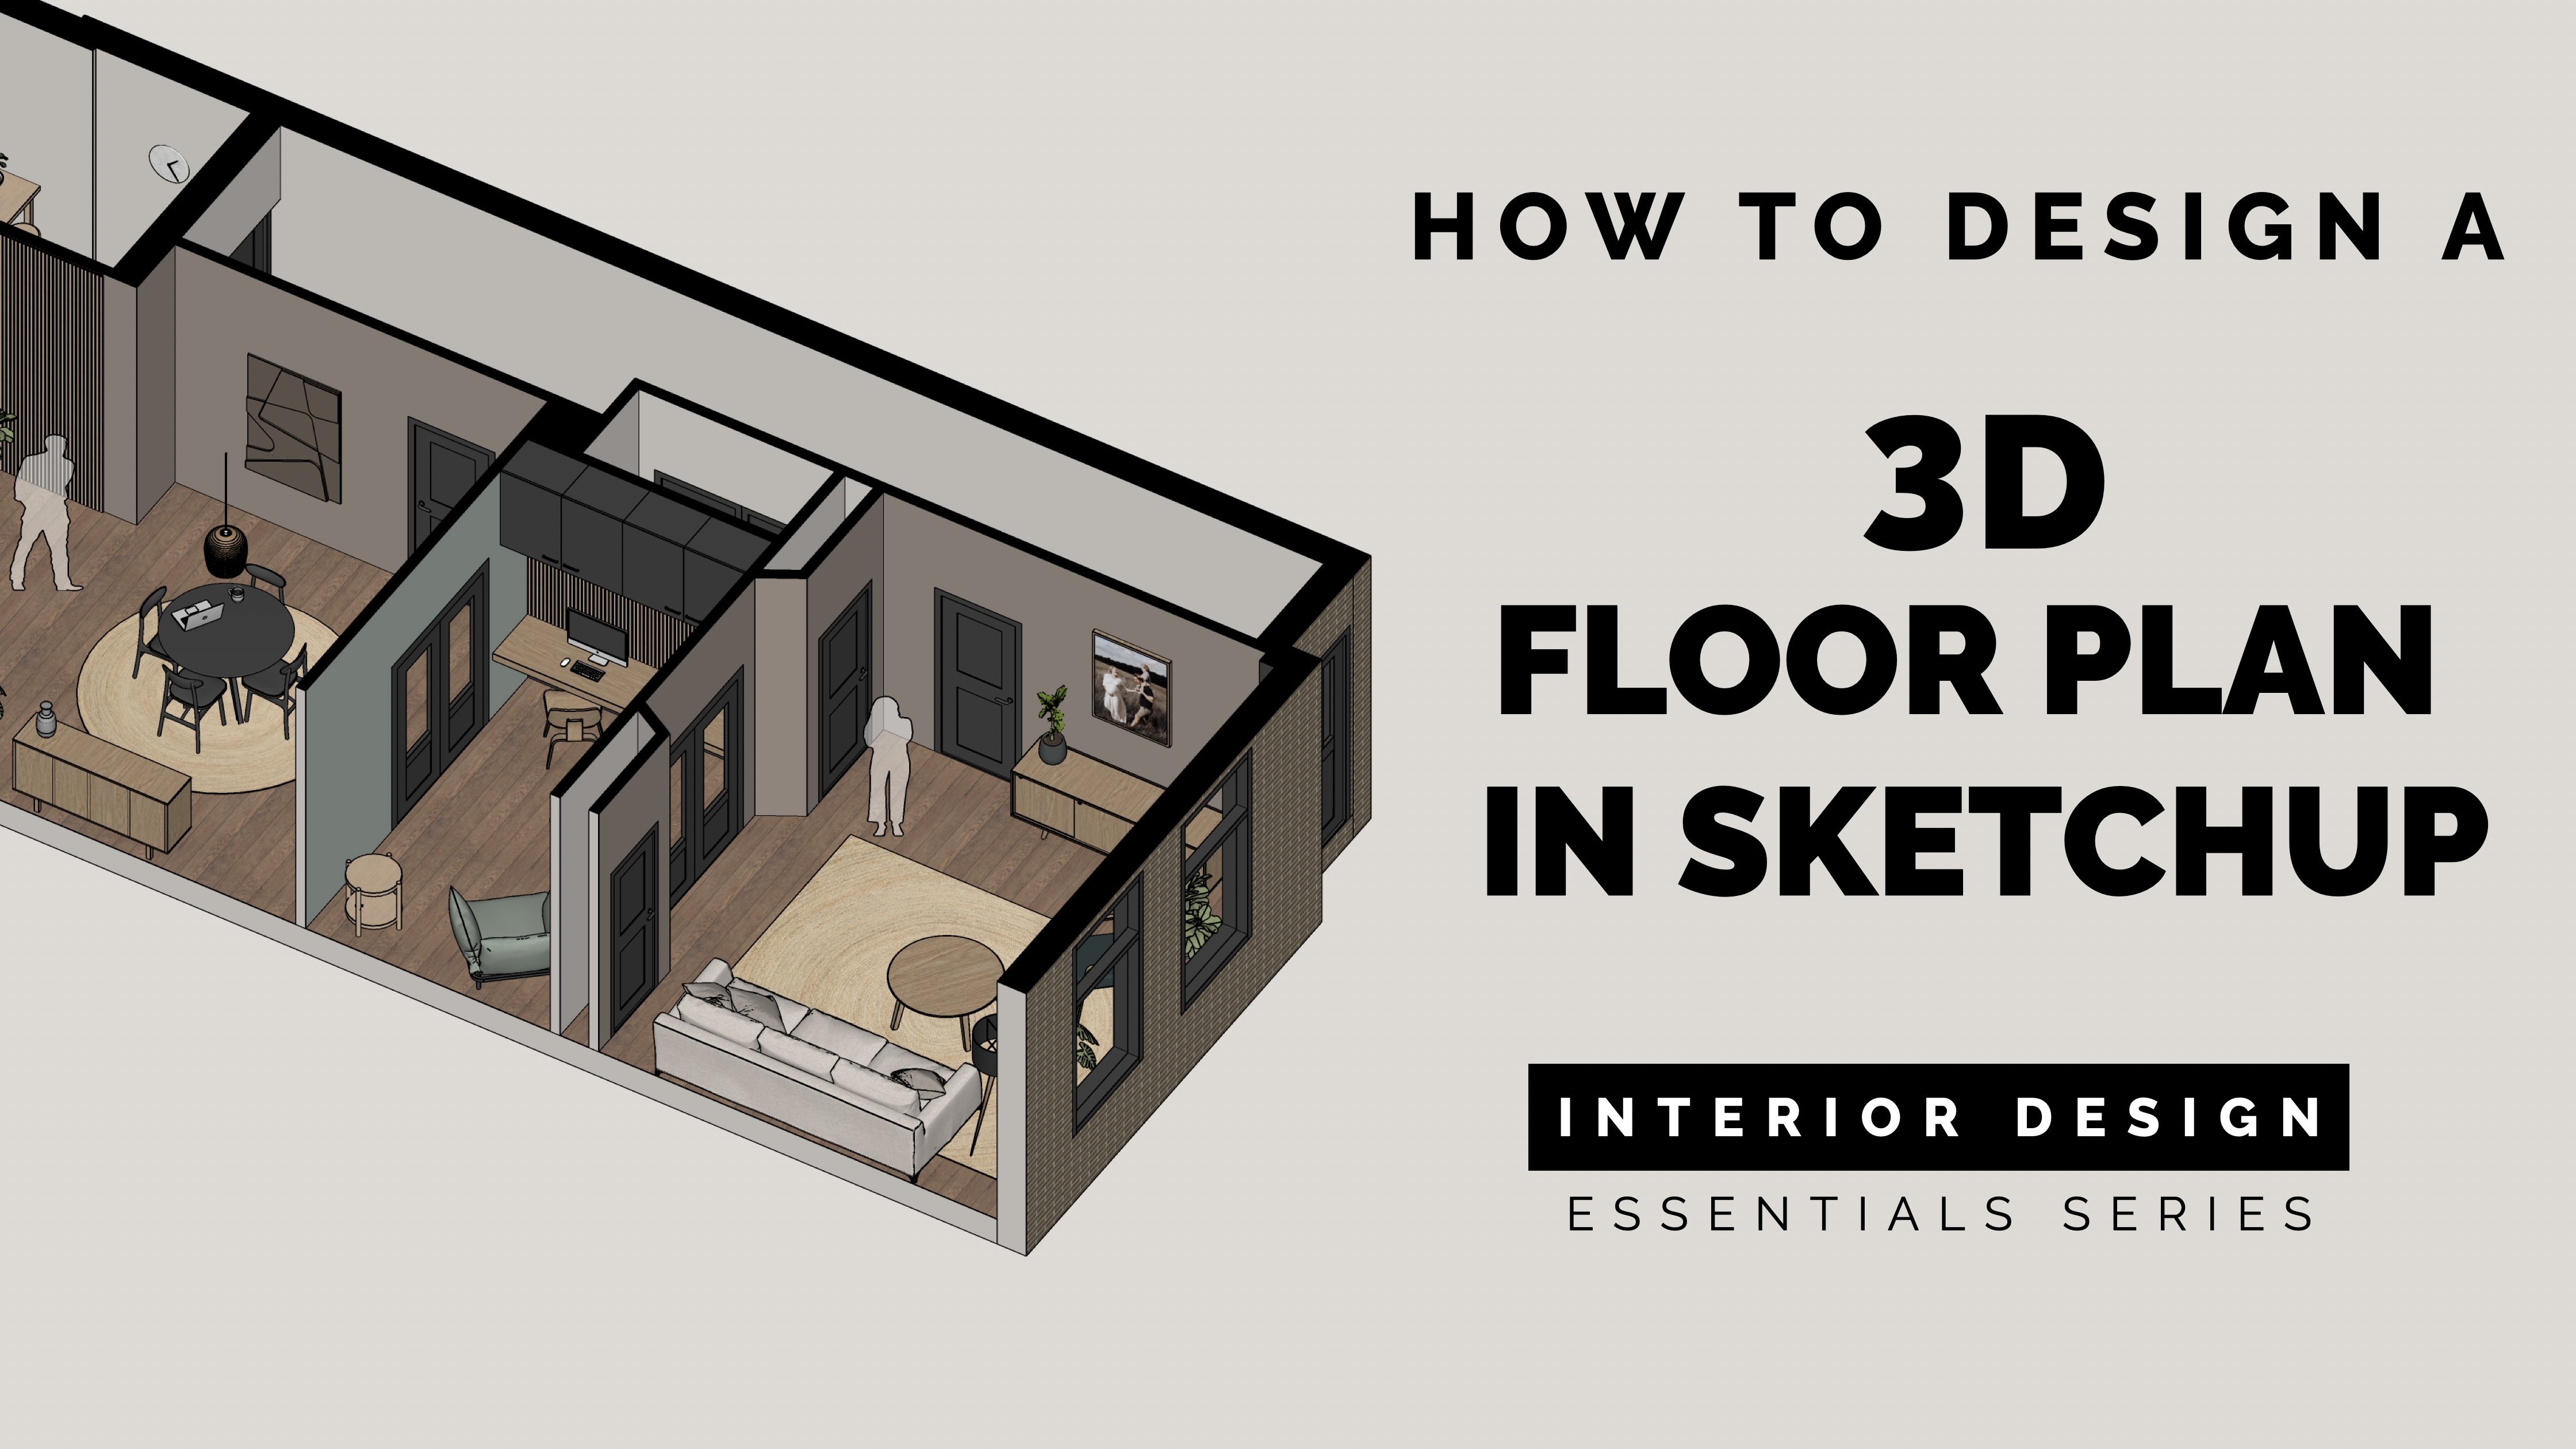
1. Introduction: Hey, my name is Danielle Brown. I'm the owner of SketchUp trainer.com, where I provide SketchUp courses, online training, live workshops. And I'm happy to be teaching SketchUp for over a decade now, in this course, you'll learn how to begin modeling SketchUp using your bedroom as an example, we'll begin by showing you how I like to measure a room and survey a space where you can easily translate into a SketchUp model. We'll start with the walls, lift them up, and then we'll create door and window openings, will then import and space, plan out the furniture using the 3D warehouse. From there, we'll add the small details to help bring it to life. This includes extra elements like the end table, lighting fixtures, artwork of rug, as well as materials like the wall and floor surfaces. We'll finish it off by adding some trim around the base boards and around the doors and windows. Lastly, we'll export this out using scenes in SketchUp to create a rendering view that we can then export out to our client. This course is a great way to quickly get into sketch up and get your feet wet. I highly recommend it as well as take a look at my Learn SketchUp, the right way Course, which is much more in depth than this one. So I hope you're ready to jump right in and start learning SketchUp.
2. Measuring and Surveying a Room: Before you begin modeling your bedroom in SketchUp, let's first go over a couple of tips that I have when you're actually measuring the space. So for me, it's really handy to have obviously, a tape measure is tape measure actually has a little laser on it, makes it really nice and easy to grab longer dimensions. And generally to obviously a piece of paper I usually like actually using grid or graph paper. It just helps keep the drawing a little bit more to some kind of general scale or proportion. But for right now this plain piece paper will be fine. So what I always like to do is I always like to draw the general shape of the room first without really kind of putting anything dimensional down on paper. All right, I'm just trying to kind of draw out the general shape of the space. So I live in a row house. The bedroom that we're going to draw is the front bedroom. So front bedroom has two windows as a window here. That has a window that actually tucks right up against the wall because next to that wall is a wall of closets. So this wall is actually 123, deposits three double doors or a wall of doors there for the closet. The entry is here, the door swinging that way. So again, nothing pretty doesn't have to be perfect. You just want a general shape of the room. Now, if your room is rectangular, I always suggest your first measurements. If you have a laser tape measure or even if you can extend your tape measure long enough, is to grab the overall rectangular shape here. So I'm ignoring the inside depth closet. I believe it's two feet, but I'm treating everything to the edge of the ball. So the length of the wall is 13 feet, 10 inches, and then the length of the room is it's like 11 feet, 11 and 13, 16. So I'm just going to round it to 12. Now, if you do round, just be careful on how you measure them to set positions for doors and windows. Because if you just do line measurements and do line tool Azure drawing, you're going to come back around and not have a spot where these two match up, they're going to be off maybe half an inch or so. So I always like to start with the overall dimensions because once we're in SketchUp, we're going to start from this corner here and we're going to draw a rectangle for the space. Or I might start here and draw the rectangle. Either way, we're going to draw that rectangle first from there. What I usually like to do in SketchUp is draw the doors and windows. So I need measurements to help me figure out from a corner what that distances. So there's 35 and a half inches to the door doors 30 inches wide. And then this dimension, I'm actually not too sure about. There is a piece of furniture here was hard to grab, but that's okay because I have the overall so I can figure out the distance, the difference there. Now on this wall, this wall is a mess because remember, it's six doors. So that's my really poor way of drawing closet doors here. But with this wall, you have four inches then the first so these are double doors front. So any meaning? The first dimension I'm measuring opening width from here to here. That first one is 51 inches, then there's 5.5 inches of space. Second door is actually a little bit thinner. This is 44, and then for some reason this is six. This really drives me crazy that none of these actually line up. And then there's another 51 inch door and actually there's like maybe four inches there. I have to refer back. I think there's just enough and there might even be just two inches there. Then for the window, lot of times what I'll do for the window is I might draw an elevation. I know this isn't going to be to scale, but that's okay. So technically would have to flip this around because I need to look at it this way. So for these windows and for this wall, one is the sill height is at 36 inches, and then the window is 51 inches long. The width of the window starting from here, since this was an easy one to do this with, is 26 inches to the edge of the window there. And then the width of the window is 30 and a half. And same thing over here. This is the same exact window, so I don't have to write if I don't need to act just type 5130.5. And what's really awkward about this is it's it is brought up against the wall there. So really the wall ends here. Now, obviously, it's probably the fact that they added these closets after the fact. Right. So outside the house looks proportional with where the window placements are inside. It's right up next to that. Couple other things to note within the within the measurements here. One is you want the overall ceiling height. So I usually kind of make a note over here on the side is kinda say ceiling and say 107 trim. So all trim. So there's trim around the doors, trim around the windows. It's all wood trim in my house. Believe it's 2.5 inches. All right. It's actually two and a quarter the door heights. So doors are all 78 inches. And then what the trim It's kind of 88 and a quarter. The base boards are four inches. And then on this wall here, along this wall here, there's actually a radiator that's two inches by 11 inches tall. So it's a long old water radiator unit that goes along that whole wall there, which definitely makes it difficult for any furniture and things like that because it's proud of the ball, but problem for another day. So the measurements don't have to be pretty it just so that you can read these, right? And I usually try to do my overall notes. Again, do your rectangular space, but then go from your corners. So if I was dimensioning this for like an architectural drawing, I would need these dimensions in between. You can go in as much detail as you want. But remember, you can save corners like I don't need this to mention, don't need this dimension. If I know the distance from the wall, she can kind of work from your outside corners. And generally, if it's not a space that I can get back to easily, it's obviously easy for me to just go upstairs and measure this. But if you can't or if you don't want to go back on site, then by all means, add in all the dimensions that you can and all the references, particularly to you might add things like outlets. If that's something that you need to know or need to be aware of if you're doing anything with lighting. So for example, there's switch here. There's a switch here to the closet. There's an outlet just below. There is an outlet in the closet here. There's an outlet below the window. I'm testing my memory now. There's an outlet here and then I believe there's an outlet. They're not critical if we're just designing where the furniture is going. But actually kind of critical in the sense that if you need to plug in something or make suggestions for lighting, you certainly can. Or having those will certainly help. Alright, now that we have this, we can quickly just take a photo of this and scan it if we want an electronic copy of it, which I'll do for you in case you want to draw using these dimensions. But I highly encourage you to use this creating your own badge. So the one last thing that I'll mention is you might have a room that has an angled ceiling, or you might have a room that has an angled wall or curved, do your best to kind of create the dimensions from it. So let's say that the space does something like this. Then also maybe has like a miter corner, right? So kind of difficult to draw if you're just going from Line Total line tool. So what I would suggest for this is still do your overall, so treat your overall rectangle as overall distance, right? So still grab that distance and still grab this distance because you can grab it from this wall to this wall. Actually put it down here. Alright, so we'd grab this distance here, and we grab this distance here from there, pick a corner that works so like in this drawing, it start here and then I would figure out what that distance is. So we'd measure from here to here. We'd measure from here to here, which we did. We'd get from here to here. We'd measure this distance. We'd have to graph this distance here. That way we can figure out that corner. And then from here to here, we would grab that distance. That way we could define what that angle is. But if I were to draw this in SketchUp, I would still draw the rectangle first. And then it would be a matter of taking either guides and creating guidelines for where are these bricks are going to be. So maybe it's from here to here to create that break here to here to create that break, whatever that is. It's just one way to, to get there. They're always try to do your overall distances first and then you can always go back for the other one. All right, so that's enough of tips and tricks for measuring. Now let's take this, see what's going to look like in SketchUp.
3. Creating the Walls: Now that we have the dimensions of our room measured, let's take a look at how we can actually begin drawing it and sketch up here. So we're going to start with a new document. And in this document, I'm going to click on the Rectangle tool, okay, array here. Now, all these tools you'll of course want to click and release when using them. And a big tip here is to begin drawing a rectangle always at the origin point. That way your model is close to the origin point and it's just better for SketchUp. And it's better when you're creating objects and placing them into this file, it just is always best to draw close to the origin point. So I'll click and release to start drawing. And then I'm going to go up into the right from here. You'll notice down in the value control box that it'll show that dimension. So it's usually the longer distance first comma, the second distance. So I'm going to move up into the right. And here you'll see it's the x distance first and then the y. So x meaning red, why meeting green? So in this case, I'm going to type in distance, the width of the room, which is 12 feet. It's really like 11 feet, 11 and 13, 16. But again, I rounded it up. So I'll type in 12 foot sign. So 12 apostrophe comma and then the height, so 13, but sine 10. So notice in all of that there are no spaces. So when you type feet and inches, you never have to put the spacebar between them. The only time that you would as if you're typing in a fraction. So let's say it was 13 feet, pen and a half inches. I would have to hit the space bar and then do one slash two. Otherwise, if I go back, otherwise, if it looks like that, so no space bar in between. So see how there's a space between the reaction and the amount you want that space that, so again, 12-foot sign comma 13 foot sine 10 and then hit Return. It's going to draw a small rectangle because our model space small. So I'm going to click on the zoom extents tool here. And that's just going to zoom into and bring it in a little bit closer for our room. Now remember there's the closet here as well, but I'm not including this closet here because there's really no point. I'm not drawing a floor plan for this. I'm just drawing the end goal here is just to have a rendering of the room. So I don't need a floor plan to really show the closet space there, but certainly if I did, I would of course include it. Now, if you have a more complicated space, like let's say it's a rectangle, but then it sort of angles and sort of cuts out. This is where I would draw the initial rectangle of the room first and then use the guides. So use the tape measure. So at the tape measure, I can draw a reference point. And let's say, I don't know that at 36 inches There's a little break here and then going down. So if I click and release on the horizontal edge and go down maybe another 36 inches. That would then give you the ability to draw with the line tool by clicking, releasing and then click and releasing. You can draw that break so that you can then take the eraser and erase the extra geometry. Same thing if you had a room that wasn't completely rectangular, I would use the tape measure. I would click and release on the edge and kind of bring my guide point out, I don't know, let's say five feet and hit return and then maybe click and release and bring this out, let's say 24 inches. So it gives you the ability to draw and to reference to the guide points. And I really like I points because particularly before you push, pull this, you can draw whatever you want here. And then you can take the eraser and just kind of erase the extra points that you want. Now also, you can also go to Edit and then Delete guides. And that's going to wipe away all the guides within the model. Now I'm going to go back because I rims not like this, it's more like this. Now, I'm not going to draw guides for door and window openings because we want to push up the wall. And to push up the walls, we're going to click on the offset tool. Offset works by hovering over the surface, click and releasing to start your offset moving either inward or outward. This case I'm going to move outward and I'm going to type in a distance. So I'm going to assume that all of the interior walls are six inches. So I'm just going to type in six and hit. Now if you want to be more accurate, you could type in 4.5 or 4.5 inches or if they're 5.5 inches or if they're masonry walls and thicker, whatever that is, that's fine. But remember, we're, we're saying that the objective of this rendering is just to create that one image. So I don't need to worry too much about the floor plan and I don't need to worry too much about thickness of walls because I'm not creating that plan. Certainly you could, if you wanted. This room really kind of extends out. It goes this way a little bit more and sends out its row house. But for right now, all intents purposes, let's just worry about the room. Next with my mouse, I'm going to press and hold the scroll wheel. Or if you don't have a mouse, you can press the orbit tool here and you're going to click and hold on that tool. And you're going to drag up into the left to turn and release the model, release your cursor. And then if you want, scroll out a little bit or you can use the zoom tool as well to drag out. But be aware that all the tools in SketchUp, primarily our click and release, its only the orbit tool and the zoom tool that are more likely click and hold or click and drag. So those are the few tools that you want to click and drag as I'm clicking holding that middle cursor. If I want to hold down Shift, you can hold down shift. And now I turn orbit in Japan so I can pan the screen a little bit from here. Let's push up the walls. So I'm going to click on push pool, which is also P, has a keyboard shortcut. I'm going to hover over the surface. E, careful not to hover over the floor because you don't want to push up the floor surface. You want to make sure you're pushing up just the wall. So a little tip is that the arrow on the push pull is the highlighting point. So as long as your arrows over that surface, you can click and release to start the push, pull. Move your cursor in the direction that you want to pull it or push it. So we're going to pull this up and then typing the ceiling height. So my ceiling are a 107 inches. Notice when I type 107 that I'm not putting a symbol afterwards. So I don't need to hold down shift and do the quotation sign or symbol because inches are my default unit. So I'm just going to take 107 and hit return. That is going to push up our walls to be a 107 inches. And now we have the space here. If we look at it in slight plan here, we're going to put a door here. We're going to put two windows here. And then this wall is a wall of closets, which in the next video, we'll take a look at how to clean some of that out.
4. Adding Door and Window Openings: With the walls created, we can now create the door openings and the window openings within the room. So in my room here, I have to address first the long wall that I have here. So this long wall is the wall of closets. And for this particular application, Let's just say that the rendering that I'm going to create is going to be looking into the room from this wall anyway, because I want to have sort of a bed here and I'm going to have sort of nightstand and nightstand and then the door opening here. So if I know, I only have to create one quick visual here, what I may do is I may take the line tool and create a little break. I'm just going to create a little line break there. I'm going to create another little line break right there. So I'm breaking the exterior walls here are the outside walls here. That way I can take push, pull and push this down until it hits the ground. And the reason for that is when we do a rendering, now we don't have to hide the wall, we don't have to subtract it. We can just kind of set the view to be something like this here. So when you're an interior designer like this, you sometimes want to think like a set designer. So you want to be able to kind of hide these walls in certain situations that way you can get into the space. Now in more advanced videos, what you can do is you can group those walls or you can actually create section cut to actually remove or cut the wall to see it in that. But if I know the intent here is just a quickly model this and just to give a quick visual that I won't worry too much about creating that organization and that information for or more detailed model. So this is just kinda nice and simple. From here, let's take a look at how we can create this door opening. So this is the door that will actually bring us into the room. So I'm going to hit T for tape measure. I'm going to click and release on this edge and I'll go to the right taping in the distance. So 35, spacebar one slash two and then hit Enter. So it's 34 and a half inches. Now the other way you could type that is you could type in decimal and this is actually what my preferred method is. I type, I don't like typing fraction, fractions. I think it just takes a little bit longer. So I'll type 35 0.5 and then hit return. I'll click and release, go over, type in 30 inches and press return. And then the door height, I'm going to click and release on the bottom edge and move my cursor up so that I'm in the blue 78 and press return. So now I have all the instances that I need to click on the Rectangle tool. And notice that rectangle is going to be right at the intersection. Make sure it's there, make sure it's not awful little bit. Otherwise I won't be on that rectangle to make sure you click and release at that x. Move your cursor down, click and release again to finish. Next, we'll take push pool. We'll hover over the surface, be careful not to push the wall in. Instead, click on this surface and push forward. So what I usually like to do, because sometimes you don't get this offset limited. It says where you get this little warning. I like to move up so that I can see that little red dot that lets me know that I'm on the back edge of the wall. Once I'm on edge, I'll go ahead and click and you should see a cutaway. If you orbit around with your scroll wheel, you can orbit around and you can kinda see now we can see through that space. Now. I'm going to orbit around again. So I'm gonna click and hold the scroll wheel. I may hold down Shift as well to pan, I'm going to look at this wall here. So this is the front of the house. And remember, this has a series of windows. So I'm going to turn my piece of paper to reorient it. And remember that that window on this left wall is actually right up on this edge here. So I'm going to create a guide from this point here. I'm going to go to the right because the window is 30.5 and then hit Return. And I like to do all the vertical ones first. So 26 inches from this side and then 30.5 to there. Again, azure doing windows, do all your vertical lines first and then come back with your horizontal lines. So start at the ground here and go up in the blue, the sill height for this window is 36 inches. And then the window, if I click and release on the guide that I just drew, it can go up again and be careful here. Notice right there, if I click, that's going to draw a guide out in the model space. So Azure drawing these guides, you might need to change your view a little bit. You might deem to be more in like an elevation and less from a bird's-eye year. So just be careful that you see the blue axis. You want to see that that way when you type 51 and hit Enter, you're gonna get your height there correctly. All right, so now we have our two rectangles there. I'm going to draw the first rectangle with the rectangle tool here. And I'm going to click and release again from intersection to intersection to draw the second rectangle. Now it's just as simple as clicking, push, pull, click and releasing on the surface to start your push pool. And as we did for the, for the door opening line that back edge click and release to fit. Now what's nice is SketchUp remembers your last push pull distance. So if you draw all the rectangles for your windows and doors and all your walls are the same thickness. On the next surface, just double-click. I double-click on a surface, it repeats the last push pull distance. So if I double-click, double-click, it's going to automatically create that distance for us. It's going to undo that. Now that we have the door and window opening set, let's go up to Edit and Lex, Let's select Delete guides. That way it gets rid of every Guide and the model with the door and window opening set. Let's now take a look at how we can throw some furniture in here to kinda see the sense of scale and size of the space.
5. Importing from the 3D Warehouse: We can import furniture in the model using SketchUp 3D Warehouse. 3d Warehouse is an online database of SketchUp components. So components are a way to organize geometry. Later we'll learn more about groups and components. But in general, groups isolate geometry and components act like clone objects. You're an AutoCad user. Prime way to think about this is a component, is a block in AutoCad. So every time you copy it, It's a cloned object of that existing one, and they all relate to each other. So when we bring in objects from the 3D warehouse, the object is a component. And depending on how the user created the geometry within some of the objects might be groups or components within it. So if we know that we have a better idea and understanding of how the object is going to react once we bring it into the model. So to bringing a component, let's go to Window and click on 3D Warehouse. And I'm going to do a search up here for bedroom. So when you're searching the warehouse, you can start very vague and nondescript. And then notice you have some categories and then you have some examples here to sort. So by default, it usually brings you to the products and these are more or less like trusted providers. So my first skim is usually kind of going through this here. And then if I don't see something that I like, I'll then type in something more specific. Or if I like something, I might open up page and see more details because maybe it's not this particular piece of furniture that I want, but I can see that it's drawn in a style that I like. So I may be able to find other items like it from this author here. And if not, I can always go back. So I'll go back one and I think we'll be good with this one here. So this looks like a queen size bed, which is fine. I'm going to go ahead and click Download, and then we'll click Load this directly into your model. You're going to, of course, click Yes. Now the key thing when you bring in an object, we don't know how this user created it. So hopefully it's drawn at the appropriate scale, which I hope this one is. And secondly, we don't know where we're inserting from, where he mean by that is, every model has an origin point and we don't know where that user created it. So notice when we created our model, we set our origin point at that bottom left corner. And it looks like with the object that I've selected, it looks like the inserting point is kind of on that bottom left-hand corner of the object. We may have to rotate it and do some things like that. But some cases, let me bring in another object. In some cases you might have an object and let me go and find something that maybe isn't model those accurately. So let me just throw this and let's see what happens. So yeah, see how my cursor is not really even near the object, it's kind of far away from it. And that's really just because this user created the origin point here for that object. You know, in hindsight, if I were creating this, I would kind of move it so that it's the back corner of the law. So that way when you insert it, you're inserting it to that corner. And same thing, even with this one, I wouldn't have the origin point there. I'd really have a kind of up. However, the point here isn't to fix. Other users, geometry, really we're using this as a place holder. So, you know, I might not want this particular color fabric or material and maybe don't want this high the headboard or that color. You can colorize this and you can change these objects once they're in the model. So I can delete these two pillows if I want using the select tool. I can stretch. This may be a little bit. Those are all things that we'll learn a little bit later. This intent here is really just about getting objects in space, understanding the size and shape of the room and the size and shape of the furniture. And then kind of creating a quick visual. So now that the objects in the model, I'm going to take the move tool located here and notice how I have anchor points. So it sets a boundary window around the object and then I can click on one of those anchor points. I want you to do this versus just simply clicking on an object. Notice that if I just click on the center of the object here, if I click and begin to move it, It's very likely that I'll drop this model below the floor or worse yet, I'll have it kind of floating and model space. So I don't want you to do that. I don't want you to accidentally move this and why? So one way to really kind of prevent that is just moved from a point on meaning corner of the boundary box. So I'm going to click on that corner there and I'm going to drop it onto the wall. And I'm just going to try to orbit and sort of set my view so that it's kind of, you know, it's on that edge and I'm just trying to kind of center at left or right. So I'm going to click and release to set it. Now looks pretty good, left to right. Notice also too, you don't have to move by clicking on the object. So maybe I want to just kind of center this left or right. I can click on the wall here, but be careful not to dip down or dip up. I'm just going to stay in the green and this case in my orbit a little bit just to help my view. And it's something like that. If you want it perfectly center, well, let's first rotate it first and then we'll make it perfectly center if we want to rotate it. Notice as I hover over the object with the move tool, I get these little plus signs. So that one there, this one here, one here, and another one here, those are built-in rotation points. So all you have to do is find that point. Notice the cursor chain click and release to start your rotation and then begin working clockwise counterclockwise. Don't have your cursor way out here, bring it in, close. The protractor. That way you can feel be 15 degree increments. I'm going to click Set it there. Now if I'm really OCD, I want to actually center this perfectly within the room. So one easy way that I can do that, and I want to be careful, I don't want to use the object sort of starting point. I actually want to use the center point of the base of this, which is right there. You can see a little midpoint in composite there. And then you'll see there's a midpoint here within the wall itself. So what I can do is with the Move Tool, I'll click and release on the midpoint in the component. Be careful there, It's a really tight point. You might hit the rotation here, so don't do that. Just go a little bit to the right there. So it should be, again, I'll click and release to start that movement. And when I'm moving, objects were free to move it in any axis or axes. So if I want to limit it to just a particular axis, like the green axis, I can press a couple of keys. Right now as I'm moving this, I can press the right arrow key on my keyboard and that will lock it in just the red. And you don't have to hold this. So I'm not holding down the arrow key, I'm just pressing, releasing it. If I press and release the up arrow key, it will do this blue. And if I press and release the left arrow key, it'll do the same thing for the green, which is what we want. Now you can press and release the arrow key again to disable it, but I'm going to press it to enable it. So now, regardless of where my cursor is, I'm constrained to the blue, I'm sorry, the green axis. And I'm going to find this midpoint as I move my cursor up. And you can see have that dot there, it says constraint on line from point. So now I can click and release to set it in place. So now that we have one object set and in our model, let's take a look now at how we can just quickly import some other furniture in the file.
6. Adding more Furniture: Let's take a look at how we can add more furniture and the space using the 3D warehouse to bring in and tables and maybe a dresser. So as we get back into the model, we can simply just go back up to Window, click on 3D Warehouse. And it's going to bring us back to the previous page that we're on. So this is fine if you want to search still within the bedroom realm, or if you want to be more specific about the type of APN table that you want. There's something that I saw if I go to products kinda liked, yeah, this end table. So I'm going to click on the download button again here. It's going to load it directly into the model. We'll go ahead and click. And then what's nice about this object is it's right on the cursor. So I'm just going to kind of click and release. Now I'm going to scroll in to get closer. And as we did with the bed, we need to hover over the top, bind that little red plus sign click and release, move our cursor and then click and release to set it. And then from here I'm going to find this back little spot right here. I'll click and release it and have it touched the wall and click it. Use the set so that n table, I mean, realistically, I kind of cheated a little bit closer. That way. It's easier to grab the light switch or whatever that might be. And then to copy this, we want to identical one over on the other side. So we're going to stay within the move tool. We're going to press Control on a PC or Option on a Mac. And this is a trick that I like for space planning. Try not. When you're calm, try not to click on the object because it's very hard sometimes to keep it in that green axis. All right, so what I like to do is with it pre-selected, I'll then click the Move tool. I'll press Control. And I have all this floor area here to use as dead space here. So if I click and release on sort of a line here, I can move it and it's much easier to stay within the greenhouse. And notice to my camera position, my camera position is really kind of looking at this to kind of get the visual to be a little bit easier. So I'm gonna stay in that green and I'll click and release, kinda set that right there. So we'll go back, we'll go to Window 3D Warehouse. Let's add a dresser, maybe go to models. This one. I'll click Download again, click yes, and then I'll place it. So now at this one, I'm going to click and release and place it. And now we kinda notice that this object. So remember there's, there's a closet door here that is going to take up that space. So I can't have a piece of furniture this big. I need something about half the size of that. So there is really no easy way without an extension to kind of stretch this and keep its proportion. But for a quick little visual, may just take the scale tool located here. And I might grab this point, right? So it's less Center at. If I click and release on that, I can now skew the dresser and the amount is in a ratio. So if I want this to be half the width, I'd type 0.5. So it's a scale factor. So it's not a dimension. You can't type the dimension, you have to type scale factor. So that might work. I mean, ideally you can see how it's starting to skew the knobs and it actually thinned out that here. But if you're looking for something just quick and you just need to kinda give the client a sense. Okay, We're putting a dresser here. It's non-descript, so it's white and just have some knobs. Sometimes you can get away with that, right? You don't have to specify the exact piece of furniture. You might use a photograph to do that anyway. So a lot of that is maybe just about getting the placeholder or actually I don't like this at all, so I'm going to delete it. And that's the beauty where you can go back to the 3D warehouse, find something else that you'd like to see what's in here. Let's see maybe this one. Yeah, it looks better. All right, so we have a couple objects within the space. Now, what you'll find is when you visit the 3D warehouse, for example here, this care SketchUp, right? Let's say, let's say you found a collection. So if I go back, I'm going to go to trust her. I'm gonna go to collections. Collections are like folders or catalogs, while shouldn't say catalogs, collections are very similar to catalogs. It's really just a nomenclature thing, but you can search both basically, let's say you find a catalog or a collection, either or. So. In this case I'm going to be in catalog. And let's say in this dress, her catalog, I like all of the models within this catalog. So maybe I'll references for other projects. Maybe let's just say this is like a particular style or a creator that you like. So what you can do is you can add this to your favorites. You can like, so if I add this to my favorites when I go on my page here and I click on the little home button, when you click on my content, this is content that you've created and actually uploaded. So models are going to show first, you can see any folders or collections that you've subscribed to. And then here more importantly, you can go to Favorites. So if I go to favorite catalogs or collections here, say, and as you can tell, it is a little confusing, which is which because I was in catalogs but saved a favorite collection. If I understand this correctly, collections or folders within a, a larger catalog, That's one way of looking. Either way, they'll, they'll get you here, right? So here is where you can really quickly go back and kind of see. So in ACF saved some other things like this folder here or this collection here. So it's a has over 1000 items and I remember what this was. It just oh, yeah. Okay. So it was just nice kind of secondary items, right. Things that you would not necessarily know how to search for or specifically search for, but you want those kind of entourage kind of elements. So I kinda refer to these as like your secondary bag and you can go to decoration. And then, yeah, here I think I just liked all of the style of onset they had here. They are more modern than some of the other crap that you'd find. So that's the beauty of collections and catalogs in particularly adding them to your favorite or even liking them. If you like a particular model, it's an easy way to go back and find it. So for example, I like this and maybe I didn't like the catalog or the collection that this was n, But I'd like the fixture so I can quickly go back and just kinda download that. Think of it like sort of bookmarking the object. So I'm going to close out of the warehouse. And in the next video, Let's go ahead and add some of those secondary items, some of those entourage elements.
7. Adding Entourage Elements: Adding the little details like these secondary items are going to take the SketchUp model and sort of fill it out and make it feel more lifelike and make it feel more cozy and less sort of rigid and static. So know a couple of things. One is when we do this, this should be towards the end of creating things. So we have the walls built up. We might, we're gonna do a little bit more detail with the wall and floor textures. But generally we have the architecture built, so we have the walls built. So there's not much more detail. You'll notice in this step, you add a lot of entourage elements. It's going to significantly increase your file size. And the reason for that is anything that you bring in from the 3D warehouse brings in its textures and its own model complexity. So one thing that we can do as an example is we can use images or objects that are low poly or low file size. And you shouldn't have to worry about this too much in a one-room environment. So we are only modeling this one particular room. But if you are modelling an entire house, every little bit that you put into that is going to increase the file size. And so it's very easy that you can get a file size up to a gig and you have a SketchUp model run really slow. And the reason for that it's just image size, which we can certainly use some tools later on on how to compress images and kinda clean up your file. But let's not worry about that in just the first little exercise here. So I'm gonna bring in a couple more images, but I'm going to be a little bit more specific. So I'm gonna type in the word artwork and I'm going to be a little bit more stringent on how large the file that I want. So I really don't want something more than five megabytes. The reason for that is if you're bringing a model is usually some users will bring in sort of high artwork graphics and it just, it's, it's unnecessary. I'm going to go to models and I'm just going to find something that I like. I think that first one's fine. Actually say I'm going to click Download. It will load this directly into the model. And what's interesting about this piece of artwork is, you can see it is a clue to component. So there's a property within SketchUp components that allow you to glue any particular surface. So I can put this on a floor to be good if a rogue put this on the wall, whatever that might be. So I'm going to click and release to set that on the wall. And this is way too big for this space. So I'm going to click on the scale tool and just kind of scale from the corner here. So I'll click and release once and click and release again to set it up from here, I'm going to take the move tool and I'm not going to click on the object because sometimes it'll have it pushed back into the wall. I'm just going to use a spot on the actual wall. I'm just going to kind of I it up myself. So something like that looks pretty good. Now other things that we can bring in, let's ground this a little bit. So let's go back to 3D Warehouse and let's bring in a rug. So again, all of these secondary items just really kind of add an extra layer of detail to it. So bad design decisions. Now this is again the scales really off, but that's okay. I'm just going to kind of click to set it in the model. And then I'll click this scale tool, grab the corner and just kinda scale it here. And then take the Move tool and just kinda move it forward a little bit. And even if you want to break the distortion, something like this, I might be able to get away with. If I click the scale tool, can grab this little middle. There's a lower one, a middle one, and then the top one, I'm gonna grab that middle one. And you can see I can now stretch the leg this way a little bit. So that's pretty much identical to what we did over here where we scaled it this way. And it looks be a little too long here. So I'm going to hit the scale tool again. And I'm going to grab this middle one here and just kinda pull that in. And then I'll take the Move tool, kinda move it over. One thing I noticed with rugs, this one's actually done well in that they gave it a little bit of thickness. If you bring in a rug and you notice, I'm going to move it down if it was just a single surface and you see something like this, that is because the rug is on the same surface as the floor. So that's what that flickering showing. So an easy way to avoid that is just to take the rug and move it up in the blue axis. Or if it was a flat surface, you can also double-click inside with this Electoral, you can double-click inside the object and then you can take push pool and just push this up a little bit just to give it some height. So you might have to push in to give it some thickness. Usually like a quarter of an inch is totally fine, but this rug already has that. So I'm just going to undo that a little bit of moving that I did to tell that looks good there. And then I'll just go back and scale this just to get the width. That's just something that other entourage elements are lighting and any candles or bases or anything else. That's just going to soften this up. One thing that I always like to do is just add some kind of plant. Plants or any type of greenery certainly helps off in the space a little bit. Do this indoor one here. This could be interesting on the wall here where haven't put in the model, but I have a dresser. I'm going to click and release to set it. I'm going to click and release to rotate it around. And then I need to put it back onto the wall. So I'm going to click on this point right here, and I'm going to just find an endpoint. So I'm not worried too much aware it's going, just going to click and release to kind of set it. And then from there I'm going to move it along the floor just so that it's in room now move it just along to there. You see there's a little, slight little error with the object here. So you can see this is like flush to the wall. So I might put out just a little bit and pull it back until it's on the face or on the surface of the cell. Something like that works. And again, it's just practice of moving an object, clicking on a point, moving from that point are using the arrow keys to adjust as well. I'm going to lower it a little bit. Now notice something that I'm doing here. After each little iteration that I do, each little sort of adding a piece of furniture, whatever that might be. I'm constantly going back to this view because I'm sort of trying to anticipate what might rendering or what my last view is going to be. You know, you might have it tilted a little bit more one way versus another or you might be a little bit more straight on like I was there. As you begin to sort of set objects, you might work on that vignette or that little rendering to kind of anchor the view. So in this case, you want to think like a photographer, start thinking about your rule of thirds. Start thinking about the composition of this rendering. So for example, this view here, probably not ideal because I'm losing some of that plant material there. So, because now I have a balance of sort of geometry on the left and right. I probably would argue that the best way to illustrate this is something more straight on that way, I get a little bit of glimpse of the items on the left and a little bit of glimpse of the items left. A little bit a glimpse on the items to the right. And I have this nice sort of semi, let's add two lamps just to finish this off. So we'll go to Window 3D Warehouse again. Let's actually do a Scott's. So again, I might go to products first and I might go to models. Again, you're just kinda looking for something that you like. There's really no you can be more specific with what you're searching for. But honestly, I'll do a search for models and then I might switch for popularity. Or if I don't find something but I see somebody's created a nice model. I might click on that model and again go to, go to the author here, or it might go to others within other collections are other models here in that just kind of helps find similar files to that, right? So you might click See More here. And it's just going to show you some other sort of objects. Or yeah, you might click on, see more within that related models, which these actually feel like they relate that much. But you get the idea here. And I actually, I like this model here. So I'm going to go ahead and click Download, and download this directly into the model. And I'm just going to click and release to place it. So this scalar, this looks way too big. So I'm going to go through on the next video and really just kinda show you how to clean this up and make it part of another object.
8. Scaling Objects and Cut and Paste in Place: In the previous video, we took a look at how to add entourage elements. And one of the last thing that we imported was this light fixture. And the light fixture, we want to do two things. One is we want to place it in the right location, but then we want to move and copy it because we want something identical here to have over here. So let's focus on just getting it kind of in position where we want it first. So I'm going to click and release over the top of this with the move tool and just kinda rotate it. I you see how large that is? It's way too big. So I'm just going to move it forward a little bit and I'm going to place it so that it's on the wall. So I'm going to click on this little point here. Or you might have sort of a corner point as well and just kind of get it on the wall, right. So it's not floating through the wall, It's just kind of on that back surface. Now just looking at this, I would say it probably needs to be half the size. So I'm going to click on the scale tool and I'm going to grab this opposite corner. I'm going to click and release to start that. I'm going to pull this down to about 50 percent. So you'll see it, it kind of snaps at 50 percent there. I can go ahead and click and release to set it. So it looks a little bit better. Again, I'm trying to set my view second better, kind of see what works. So I'm going to move this down now and I'm going to try to position it underneath this piece of furniture. I might try to line up source a little bit, maybe something like that, that feels balanced wise, a little bit better. Okay, now from here, you have one or two options. The first option is to just select it, which we have. Click on the Move tool, click Control or Option on a Mac and click and release or click to move and copy it. So this is good if there, if you want to move and copy a component similar to how we did here. The problem with this though, is an easier way to do this, is actually make this component part of this component. Because remember, groups in SketchUp, you just draw a box over here for you. Groups in SketchUp. If I make this a group, groups in SketchUp, as you modify one, it has no relationship to the other, right? So groups just contain it. Whereas if an object is a component, and remember, components in SketchUp, r objects from the 3D warehouse are brought in as components. So this is a component, this is component, all of the objects that are brought it. So if you have a component and you copy it, then any change that you make to that component will affect any copy of it. So what we can do, delete all this. So we can do is as we set our position for this object, what I want you to do is go up to Edit and click Cut. So we're removing it out of the model. We're then going to take the select tool and double-click inside the object. We're gonna go to Edit. We're not going to do paste because paces going to just put it back on our cursor. It's going to force us to position it. Instead we're going to go to paste in place because we cut it from where it was set and now pasting it back in place, we'll put it exactly where it was. But it's putting it in the object here. And by doing so, you'll see whatever changes I make here are happening over here. So that's the beauty of components now where you might want to sort of not do this or not have an object. Part of the component is when you're putting in things that you want unique to that particular side. So let's say I want to grab some kind of magazine to have on the table, right? So if I download this, load it directly into the model, I can place it on this table here. And doing so only because I'm outside of the object, it only places it on this object. So if you wanted that to be part of the file, then of course could edit, cut, bring that double-click inside and paste in place. But you're going to have that duplicate look here. So again, remember components actually cloned objects as you make a change to one affects the other ones. There is a way later that you can make an object unique by right-clicking on it and making it unique, that makes it its own instance and it's no longer linked back to the original. So only make unique if you have objects that you need to kinda create a variation on. And for stuff like this, I wouldn't worry too much about making objects unique. So I'm just going to undo that and I'm going to leave it without the magazine because I think this looks pretty good here. All right, so now that we have a better understanding on how to modify components, I'll do add other items to them. We can finish off this model and add some textures and materials, as well as add some trim.
9. Adding Baseboard Trim: The model nearly complete. We can do a couple more things to add a little bit more detail to the model and just make it feel a little bit more realistic. So the first thing we wanna do is create some trim. Are there a lot of different ways that we can do this? But one easy way is to use the offset tool and then another way is to use moving copy. So what I'd like to do first and what we're gonna do is we're going to keep this as low profile and simple as possible. So I mentioned before that the trim around the doors and windows was two and a quarter inches. So what we can do on the store here is we can take the select tool, hold down shift, and single click on the three exterior lines of the opening. Well then click on the offset tool. And now this way, offset will offset only these three edges. So when I click and release, I can move my cursor out, and now I can type 2.25 and then hit Return. Now I also could have clicked and released and type To Space bar one slash four and then hit Return, do the same thing. Now the challenge is make sure you pre-select when you do that, because if you don't, you're going to offset all of the edges, two and a quarter inches and that we don't want. So again, make sure with the Select tool, you pre-select these three edges. Click on F or click on the offset tool, click and release to start. Move your cursor out 2.25 and then hit Return. Now the same thing is going to happen over here with the windows, but I'm going to cheat for the Windows rather than pre selecting all four edges. I'm going to take the line tool and I'm going to trace back in the front surface. So I'm just going to click and release, and click and release. And you'll see it heals and generates that surface to bring it back. So now if you have a surface, now when you click on offset, you can click and you can actually, you'll see it's pretty selecting still my previous object. So let's make sure we take the Select tool and select the surface that we want to offset first, then click on offset. So I'll click and release, move my cursor out, type in 2.25 and hit Return. Now you don't need to select anything at all. So I'm just going to de-select there. And offset actually remembers its last offset distance. So if I hover over this surface without pretty selecting it, it'll highlight it, and then I can double-click to offset. Now at this, this trim is actually gone. So it's really weird how the wall is here. So I'm just gonna take the eraser. I'm just going to erase any of those kind of extra points there. And I'll take the select tool and I'll select the surface and just delete it, select the surface and delete it as well. Alright, so now we have the trim Done and that just helps kind of polish off the doors and windows. We need to do the baseboard. And in this situation, the baseboard is four inches around the entire room. So there are two ways that you can do this. One quick way is double-click on the floor surface with the Select tool, hold down Shift and then single click. So what we did there is a double-click, select the surface and the edges that make up that surface. And by holding down shift, we are adding or subtracting from that selection. So if I single click on the surface again, it's subtracting the surface from our selection and then we're left with just the edges. So if we have all the edges selected, we can then take the move tool. We can press Control on a PC or Option on a Mac. And we're going to copy, and I'm going to zoom in close to a corner here. I click and release here the start, the copy gonna move up. And now I'm just copying the lines up in the blue axis, oranges. So type in 4 and press Return. Now the downside to this is it offsets all of the edges here. So you may have to take the eraser and just erase a couple extra edges, but it's not too difficult. The other way that we could have done this, I erase these two real quick. The other way that we could have done this is simply take an existing lines or just take one edge and move and copy that up or inches. And then sometimes from there what I'll do is I'll take the rectangle tool and I'll draw from the top edge here down to the bottom edge here. And then I would just manually do each wall just to kind of set that. Now, in real life, the baseboard does come out. I think in my case it's three-quarters of an inch, but it has a rounded edge to it. So yeah, it's just more detail. What I say for first-time users and in general, for interior renderings is unless you're creating this as a photorealistic rendering, I wouldn't go to the trouble of giving your baseboard thickness. And the reason for that is even if I bring it out a half inch, notice what it does on the other areas of the model. So I'm gonna double-click these trim out so that the everything pops out a half edge. Yes, it looks a little bit more detailed. You can see the trim there, but in a lot of cases, it will create the illusion of sort of a double line. So it creates something that makes that ground, that baseboard look even heavier. So I don't recommend doing this unless you're creating a photorealistic rendering. Or if there's some kind of custom profile that you need to build. But in general, you're just trying to give the perception of my undo this. You're trying to give the perception of that space. And quite honestly, one tip for any interior designer is always make sure you have some kind of baseboard, even if it's just this, obviously, unless you're designing something without baseboard for a more modern look. But generally, that baseboard separation is going to help ground the model and just make it feel a little bit more. It makes it feel more like an interior rendering and less like just a kind of cartoon drawing right now that the model is grounded and ready to go for some materials. Let's take a look at how we can add some textures or materials for the floor surface and maybe a pink material for the wall surface.
10. Use Sun for Shading and Profile Edges: One way to quickly add color and textures into the model is to use sketch ups default library. Now there are more advanced ways of doing this like importing a texture, but those are for other videos. For now, let's just focus on adding some quick color and adding a wood surface to the floor just to kind of finish off this rendering. So let's first bring up the paint bucket. So I'm going to click B for bucket, or I'm going to click on the paint bucket here. Now, this is where the user interface for Windows looks very different than the user interface for Mac or Windows users, you're likely to see something that looks like this over here in your Default tray. You're going to see materials. You're going to see a bunch of folders. And then in that drop-down folder, you can select one of the sub folders, right? So I can go here and select wood, and then I can click on a material and then apply it to the surface. Now for Mac users, that's going to look a little different. Mac users, you're going to click on the Paint Bucket and it's likely that your screen is going to look something like this, where it gives you this color wheel. Let's get your interface to look similar to what our window users use. So you're gonna click on the brick located here. And then in the drop-down menu, go ahead and select what single click on the desired floor surface that you want. And that's going to make it active so that when you go to apply it, you'll be able to click on that surface to apply it. So you'll notice it's active on a Mac by seeing a preview of it here. So notice when I click, it's going to change that thumbnail texture. It also puts a little blue rectangle around. Now back over in the PC world, it's kind of the same idea. But instead of the box being down here, you're going to notice the box up top here. So again, select the material that you want. I'm going to go with this flooring material maybe first, and then I'll click and release on the floor surface. So I don't really like that. So if you want to change the material, just click on another material and then click to apply. Now for colors, you're gonna go to the drop-down and you're gonna go to the folder called colors. And this has basically in any color that you can use as a starting point. If you want to get to a specific color, you can later use a color wheel. But in general, I like to begin with one of these colors first, and then I'll change the color later. So I'm going to use just a gray material just to kind of, you know, all the trim right now is white. So I want to use just 10% gray just to kind of click on these three surfaces. Now you're going to notice in this particular rendering that doesn't do much. And the reason for that is see how this right wall looks to be a different color than the front wall. The reason for that is SketchUp naturally shades the model. And notice if I go to, on a Mac, if you go to Window shadows and on a PC, if you open up just your shadows toolbar, one really important thing. So again, over here in Mac, if you get a window shadows, now look like this here and expand this toolbar on a Mac just so you can see the light and dark settings. And then that should look pretty similar to what our PC users see. So one challenge when you're rendering in SketchUp or when you're creating interior views in SketchUp, is that SketchUp naturally shades the surfaces and by default, it doesn't do a good job at it. And actually puts too much contrast. So if you've ever printed out a model, this is going to look really muddy. So what we're gonna do is we're not going to turn on shadows because that would be this button here. But notice if I turn that on, it's going to let sunlight in. So this is good for doing architectural studies and more exterior models. The shadows would be good if we had a ceiling and had some other elements. But we don't in this model and really, I don't worry too much about showing shade coming in here. What I really want is not to actually have the sunlight cast, but to use what's called use sun for shading. If you don't see this, just make sure you hit this little box here. And then you can click Use sun for shading. So notice it's a totally different feel. And this quite honestly is one of the first things that I always change within a custom template that I save, or it's something that I make sure I change before I export out an image. So the reason for this is notice the time of day is going to affect the shading of objects, right? So Cl, it's super dark, are super light. So lot of times what I'll do is I'll just throw it so that it's all the way off. So meaning, if we actually turn on shadows, it wouldn't really change much in your orientation of anything. And what I'll do from there is I'll adjust the lightness and darkness, mostly the darkness. I'll slide that to the right to really brighten up the model. And then for the lightness, this is going to be really dependent on the time of day that you choose. But you can kind of balanced this out. All right, so now regardless of the time of day, it doesn't matter because I have the shading set so that there's just kind of a universal kind of fill to this. You will generally have some change in shape. And that's actually a good thing because if it's too flat, you can really kind of lose all your color and material. So be careful in certain textures look better than others. So this is really using the settings that I have here may not work for your image. It's going to be a look and feel. And a lot of that is based off at the time of day that you choose the orientation of the model and your lightened dark settings. But this now looks much better. And one other thing that we can do is we can go to styles and we're going to click Edit Style. So over on a Mac it's going to look pretty similar. But in this case you want to go to Window, click on styles, and then click Edit. So in edit styles, what's happening within this rendering is that the profile edges located here create a two pixel thick line, meaning see how heavy it creates the edges, right? So that's kind of adding a little distraction to it depending on your resolution, you know, it might feel like that, right? So you can turn profiles off altogether. That's one option. The other option is simply change the line weight so that it's just to one pixel. So I'll type in one that'll hit Return or hit the Tab key. So I prefer doing that because notice around the circular light fixture, it's showing the profile of that same thing with the bedding. It's showing the edges there. I turn that off, it flattens it a little bit so you lose that perception of depth. So again, I like that on last and most important thing here is you made a change to the style within the file. So we want to make sure we just click back on the thumbnail just so that it updates the settings. And this is really helpful if you are using this style for different scenes or camera positions within the model.
11. Scenes and Exporting the Model: To finish off our bedroom model here, let's create a scene that we can export out as a 2D graphic. So scenes are a way to save a particular view within the SketchUp model. So if you take the orbit tool, you can kind of orbit and kind of find a position that works for you. And a couple of tips that I like to give, particularly when looking at composition, is frame your view. So whatever you see in the model space, what's going to export? So I'm going to pan an orbit and kind of adjust my view. I might also click the zoom tool and drag in just a little bit. And I'm going to try and kind of find a view that really works best for me. Now, since I'm doing this sort of straight on view, I can actually take the select tool and I can right-click on this surface and select Align View. And it's going to put almost like an elevation. It's going to align our camera position exactly straight on with that view. From there, I'll take the pan tool and then I'll just drag down or over just a kind of center this. And what's nice about doing that alignment is that your two-point perspective is, it's perfect, meaning all of my vertical lines are in fact straight. If I orbit and maybe look down at the model, you might need to do something like this where you don't have to do that alignment. And something like this might be better if you're trying to figure out spatial sort of planning a furniture. If you have a larger space, it might be better to do this type of view. Or you might kind of do something like this where I'm cheating sort of a corner and I'm trying to clip off as much of the ceiling as possible. Maybe I don't want to show that ceiling or just kinda show it just a little bit, depending on the view that you want. There's times where I kind of cheat just to like not see the ceiling a little bit. So I'll pan down a little bit. And then there are times where I want to be kind of, you know, maybe lower and sort of in that room and in that space. Again, this is going to depend on the furniture and what you're trying to sell, and how that composition once they come together. So I'm going to say for this sort of rendering, something like this is fine here. It gives enough sort of space. It removes us from the room a little bit because we're in this bird's eye view. So a lot of that you're going to take at your own discretion on what works and what doesn't. So if I just needed to export this in, I wasn't going to have another export or wasn't going to kind of send multiple views to this, I would just go up to File Export 2D graphic and send it. However, I want you to get in a habit of using scenes. Scenes are a way to save camera positions within a model. So on a Mac, you can see, excuse me, on a windows, you can see scenes here. Over on a Mac. You're just going to go up to window and you're going to click on scenes. And another little tip for Mac users, these toolbars tend to kind of take up the space so you can dock them under each other. You can dock all of them except the colors or the paint bucket. And then you can click on the title. The title will dock the tools that you don't need. I just need scenes. I can click Open scenes. Then I can kind of cascade or open up the secondary tools within that windows. You don't have to worry about that too much because you can dock it here. You can just click on the name of it here. So a seam in SketchUp saves the camera position, the shadow settings, the time of day, what tags are turned on, what objects are visible or hidden. So it seems allow us to save kinda of those points are those properties within a model right now, just think of scenes as saving a camera position. So I'm gonna hit the plus sign here. That's going to add scene one, and it's going to create a tab up here. Now Mac users, your tabs going to be centered, aligned. So you're going to see it in the center of the screen here, not left align. So let's say you're working on the file, you're doing some things and you're kinda making some changes. When you click back on the tab for scene one, it's going to take us right back to where our camera position was. Now it's not a property that saves the position of objects, right? You can't sort of move an object here. It's going to stay there, right? So don't think of camera positions as keyframes. So it's not an animation tool in the sense that it won't move objects. There are extensions that you can certainly explore if you're trying to show, like production sequences or having furniture move into place. Those all require third-party applications like key-frame animator or there's another one called animator or no, I think it's called SU animate. But again, most users do not worry about that or do not use that. Most users are just looking to create a camera position. So I'm going to do one hi one here. And maybe I'll do another sort of low one, kind of angled like this here. So again, in the scene manager, I'll just hit the plus sign at that as the scene. Now where SketchUp does create an animation is you can create the animation of the transition from scene to scene. So you can go up to Window model info and you can set how long that transition is. You can create multiple scenes here. But again, those are more complicated for right now, let's just focus on creating a nice little export of our file that we finally got to and finished. So to export this, to wrap it up, we're gonna go to File, click on Export, click on 2D graphic, and then we're going to save it as a JPEG. Don't choose pdf, don't choose. You could choose PNG if you prefer. Lossless image files are uncompressed image files, but generally try to, I usually just leave it to JPA care. Make sure you go to Options because there are some other additional settings that you could enable here. Typically I leave the defaults that are there. The image will export out to the same size azure Monitor. So just be aware of that it's using the view size of your monitor. And then when I click Okay and click Export, it's going to take a second. It's going to export that image. And I'm just going to pull it up over here. And so you can see it, and there you have it. So you can see the JPEG is created, names the file, this is a really small file, is only like a two megabyte file. The one thing that you can control a little bit is if you don't like how thick the line weight is here, so see how it's like a yeah, I would say it's not a heavy line, but it's heavy enough. What you can do in your options there, if I go back to export 2D graphic and go to options, you can change the scale factor. So if I uncheck, Use your size, we're going to keep the width and stuff, that's fine. But I'm going to bring this limescale multiplier back to one. And then I'll click, Okay, I'll click Export. It's going to replace that image. Let's go back to the image. So I'm going to close that out, open it back up and you see there it's, it's very subtle, but the line will be a little bit thinner. So even if you have renderings and you go to export them, if they do look heavy, meaning the line work looks heavy, change that multiplier. And again, just to wrap up, that was under File, Export, 2D graphic and then Options, and then just change the line scale multiplier there. So now that you have a good grasp of how to model a bedroom, you can take these tools and principles and use those to model any other type of space. So you'll see in other lessons and other videos, will model a bathroom or model a kitchen, and we'll model the living room as well. So take a look at those. And best of luck moving forward and modelling in SketchUp.
 Daniel Brown, Leading SketchUp Trainer | Designer | 3D