Transcripts
1. Introduction: Hello, welcome to my class sketching with intense
watercolor pencils. My name is Imran. I'm a graphic
designer and illustrator, and this class is
a follow on class from my original introduction
to intense pencils class. So if you want to
really delve in to how to create beautiful
layers and textures, specifically referring to a
reference from real life, then you're in the
right place because this class is perfect for you. In this class, we're
going to be looking at the application methods that we went through in the
introduction class. So if you haven't
watched that, then do give that a go before
you start this class. However, it's not
a prerequisite. If you've not watched
the first class, then you can still
jump into this class. We will cover some
of those aspects, but we'll go through really quickly so that we can
really get involved in creating our beautiful artwork using these lovely,
intense pencils. So we will start the
class off by going through the basic class
supplies that you're going to need for this class
to follow along in the exercises and then
we're going to quickly go through what your class
project is all about. The process is going to be super simple and we're going to
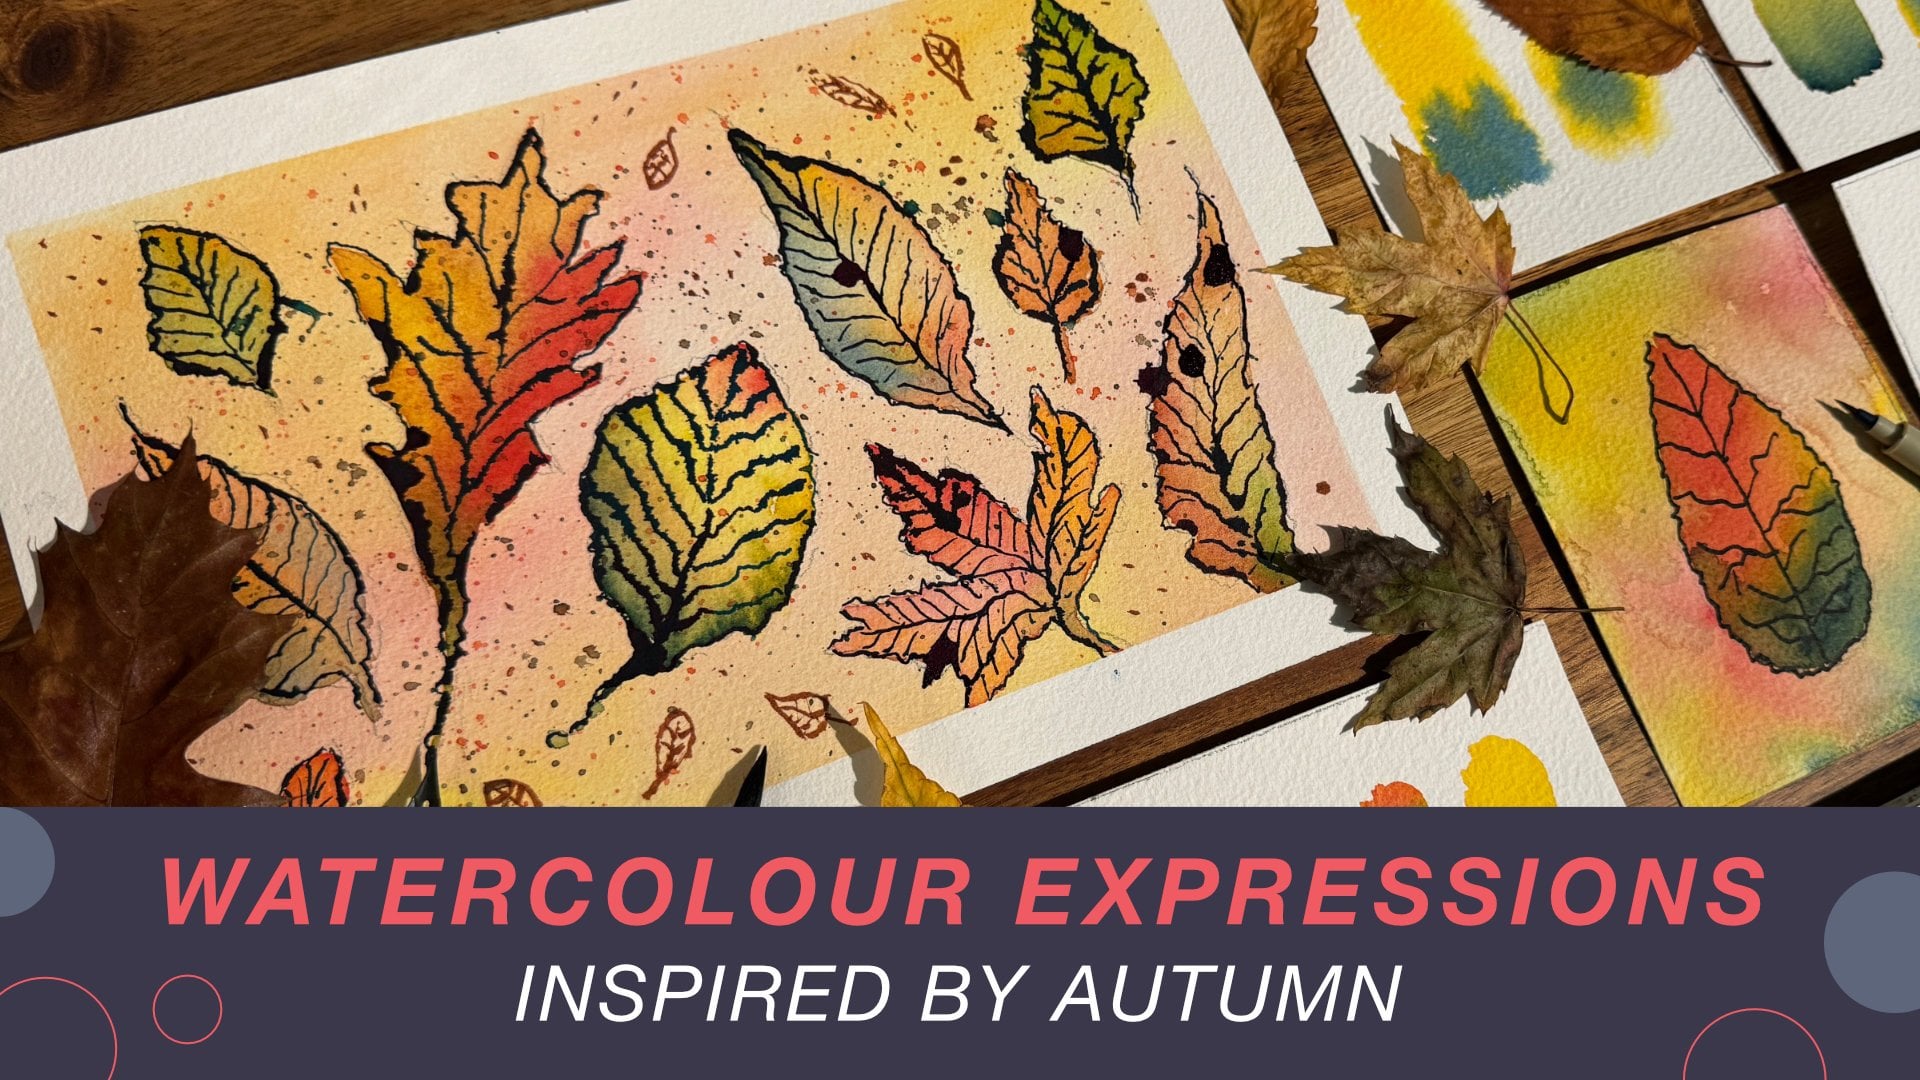
go along step by step. I will be providing you with a reference image of a beautiful apple that we're
going to draw together, but we're not going to focus on super details or hyperrealism, or any type of realism, but just focusing on how to use these wonderful intense
pencils to create really nice deep sketches that
you can do really quickly in layers and add textures so that you can really explore
this wonderful medium. And then once we've gone through the step by step
exercise where you will have three examples of this beautiful Apple
sketch that you've done, applying all the methods that we learned in the
previous class, you will then be ready
to have a look at my full sketch where I
will go in with a lot of detail and I will cover it really quickly
so that you have a first hand experience and view of how these
pencils can be used. And then once you've completed the exercise and you've had
a look at my full sketch, then you're going to be
ready to start going into this wonderful adventure and creating your own
beautiful artwork, using your own reference images, or the reference images that are provided in the resource sheet, and then you'll be
able to really explore the magical wonders of what
these pencils can really do. And that's it. So we're going
to keep it nice and simple. We're gonna keep it
nice and steady. So grab yourself a nice drink, get yourself a nice
treat, sit back, relax, get your intense
pentels ready and sharpened, and let's get started the class.
2. Class Supplies: Okay, welcome back. Let's now go through what we need
for our class supplies. These are going to be the essential supplies
that you're going to need to follow along
in the class exercise. Firstly, you're going to be needing some ink tense pencils, and the ones that I'm going
to specifically use in this class exercise part of the class are as
follows on the screen. So there are seven colors. So grab hold of these colors
if you can from your set. If you don't have these colors, get some colors that are
similar in hue value. If you have a decent red tone, grab hold of that, a
darkish red, a yellow. These are the main colors
that we're going to use for our lovely ink tense
pencil sketch. Grab hold of your
inktense pencils, make sure they're
nice and sharp. And number two, you're
going to need a brush, preferably a watercolor brush to apply beautiful water
to the intense pencil. And yes, you're going to need some clean water in order
to do that process. Grab yourself some
fresh clean water in a jar or in a pot. And also, we're going to need
a pencil and a sharpener. Grab yourself a pencil
and a sharpener. A will do to do the
sketching and you'll also need something that you can make a round circle with. I'm just going to be using the lid from the jar
of water that I have. So whatever you have, that's rounding grab hold
of that and then you can easily draw a circle because that's what
we're going to be doing for the exercise
part of the class. Most importantly,
don't forget to get your watercolor
paper ready because watercolor paper is going to be the main paper that I use. Throughout this class, I'm
just going to use a standard, decent quality, smooth
watercolor paper. Get your watercolor paper ready. Addition to the
essential supplies, these following supplies
are just optional that I'm going to be using in my full
sketch part of the class. So if you have them, grab
hold of them or grab hold of whichever other extra multimedia
supplies that you have. Number one, I've got
some Posca markers. I'm going to be using
these two color Posca markers, acrylic markers. I've got a white and a yellow. If you have acrylic
markers to hand, get them ready, so you're ready for your full sketch
part of the class. I also got some lovely
brush pens as well. These are water
based brush pens. I'm using some
nice hues of gray, warm gray, and cool gray. If you have these,
grab hold of them. If you haven't, absolutely fine. Then number three, I've got a lovely pencil, colored pencil. This specific one is by lumos from my Lumos
range, Karen dash one. If you have a nice
dark color pencil in a colored pencil
range, grab hold of that. Very useful for when you're
going to do your full sketch. And some washi tape
is always handy, especially if you want those beautiful crisp lines
on your artwork. So if you have some washi tape, grab hold of it and
put it on the side. Then some extra colors
from your ink tints, I'm going to be using a range of colors for my full sketch
when I go to do that. So whichever colors that
you have from your set, just make sure that
they're nice and sharp and ready so that you have access to
them when you go ahead and do your
lovely artwork. And that's it.
That's all you need for this class. Nice and simple. You've got your
essential supplies, as you can see on the screen, and then you've got
your optional supplies. Again, in a nice list form. You can refer back to this in the class resource
sheet if you want a reminder or just
pause the video and grab hold of your supplies so that
you're ready to go. That's it for the
class supplies. We can now move on to what your class project now is
going to be all about.
3. Class Project: Ok, welcome back. Let's now go through what your class
project is all about. Number one, all you
need to do is complete the sketching exercise
from lessons four to 14. They're coming in sequence, follow along the best you
can and complete them. Then number two, watch the
full sketch that I do, which is Lesson number 15. This sketch actually took
me quite a long time to do, so it's a sped up version. Just give it a watch, learn from the kind of
techniques that we've already done in the first
class in the introduction, if you've watched it,
and then alongside that, the sketching class that you've just completed
in part one. And then, number three, create your own wonderful sketch using the techniques that
we've learned in the lessons, use your own reference images, draw from real life
rather than a picture, or have a look at some of
the gallery pictures that I've added to the reference pack of this class,
whatever you like. For a small version or a
medium sized version drawing, it's entirely up to you, but do give it a go
and express yourself with these wonderful,
lovely, intense pencils. Then number four,
ensure that you take some beautiful pictures
of all of your artwork, whether it was complete or not, and also the sketches
that you did in the sketching exercises
and upload them to the class project
gallery so that we can all see and learn from your beautiful experience and that will encourage us
to take part in the selves. Then finally,
number five, leave a wonderful
review on the class so that other students
like yourself can find the class and take part and join this community of ink tense,
pencil, traditional mediums. Do leave a nice review on the class so that
fabulous students like yourself can get together and learn from your experience
and enjoy the journey. That's it. That's all
you got to do for your class project,
nice and simple. Let's now move on to the exciting stuff and actually
start off with the class.
4. Classs Outline: Hello and welcome
back. Let's now make a start with the class. So firstly, quickly just going through the process
that we're going to follow. Number one, we're going
to look at observing our subject and then just creating a small little
outline with pencil. And yes, you know what
we're going to look at. We're going to be
drawing an apple, a lovely apple that I picked
out from the supermarkets. It looked absolutely delicious. So I thought, let's use this for the class exercises and the lessons for
ink tense pencils. Then number two, what
we're going to do is we're going to
start analyzing the patterns and
colors and selecting those tones and hues from
our set of intense pencils. Then the exciting
stuff starts with the final step where we're
going to explore and create our lovely sketch using beautiful hues and colors
from our intense pencils and we're going to be concentrating on the application methods that we covered in the first class where we went into
quite a lot of the different methods of
applying this wonderful medium. So if you haven't had
a look at that before, then quickly recap that in the lessons in
that previous class. All of the methods were
covered in lessons five, six, and seven of
the first class. So do give that a
quick little recap. But as I go along in the class, I will be talking
through each method. So even if you haven't watched the first class or if
you don't have time to go through the previous
lessons, don't worry about it. You can still make
a start with this.
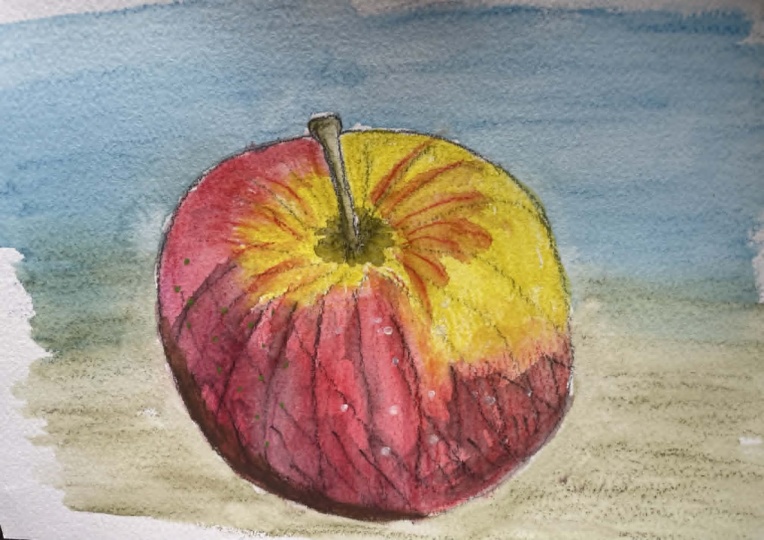
5. Observe & Outline: Okay, so let's start
off with step one, the observing and outlining. So if you can see on the screen, I've got myself a nice
sheet of paper over here. This is approximately
a five sheet of paper, and I've just got
a standard pencil. So grab yourself some
watercolor paper or mixed media paper if that's
what you prefer to use. This class, I'm going to be using specifically
watercolor paper. The one that I've
got on the screen here is a nice smooth surface, hot press watercolor paper. It's not 100% cotton. It's just a standard
watercolor paper. So you don't need to be
too particular about what brand or what content
of cotton you have in it. Just grab hold of whichever decent watercolor
paper that you have and cut out a nice A five shape so it's easy for
you to work with. The pencil, it makes no
difference which pencil you use because this is just for
sketching and outlining. The first step really is
to create some outlines. Don't want to start going into a lot of detail
with the outlines. We just want to keep it
super simple and clean. So what I'm going
to actually do is I'm going to grab hold of my water jar that I've got over here and I'm just going
to use this cap from here. So let's just grab
hold of that cap, and now I've got the cap, and that's a nice little
round shape that I can use to mimic the overall
structure of the apple. Again, it doesn't matter if you're not
accurate with this. This is just a class teaching
you the techniques of how to layer and really create a lot of depth
in your sketches. We're not doing realism. We're not doing
hyperrealism, absolutely. Don't want to get
bogged down into that. We just want to keep it nice
and fun where you can learn this layering technique to
really enhance your sketches. The first thing that
I need to do is I want to go ahead and
just place this on my piece of paper like this and then all I'm going to do
is when I get my pencil, and I'm just going to
draw around that circle. Again, it doesn't
need to be accurate. It doesn't have to be perfect. As long as you've got something
round to draw around, you can see there
nice little circle. I've got a little
bit coming out from the side there, but
it doesn't matter. Just go with what you have,
and then I'm going to do another one in approximately the center part of
the paper there. So I effectively have two
circles, and then again, just create that nice
little round circle with my pencil and then finally, I'm going to do
another one over here. So that we have three circles in a nice row that are
similar in size. The reason for this
is so we can create variations of this technique so you can compare and
contrast the results. The next step really is to just mark in a little
area on the top. So if you see on
the reference image that you can see on the screen, I've given you this
as the resource pack, do download that and put
it up on your screen. You're doing this
exercise so you know whereabouts to place these
little elements of the apple. I'll start off with the left. I'm just going to draw
in a little circle approximately about this
top area down here. So on the top, draw yourself a little
circle and then again on the next
one in the middle, just repeating that same shape. Again, it's just free hand. It doesn't need to be accurate. These are just really
placeholders so we can concentrate on our colors. That's that part done. The
next part really is to just draw in that stork so you
can see on the picture, the stork has this
nice funny old shape don't need to mimic
that shape completely, drawing something that
looks roughly the same. Just like this, I've just
drawn this odd little shape. Just repeat that
now on the others. And that's looking really nice. Again, it doesn't matter if
they're not all the same. This is just for
illustration purposes. The actual reason for
doing three lots of these is so you just get a bit of practice and that's what
it's all about practice. You can spend your time and minutes and hours and days
perfecting your sketches, but it's always good to
get in some practice at the start so that you're
comfortable with your medium. That part is now done,
we've done the first stage, which is the observe and
outline, and that's it. I'm just going to
leave it at that. What I might do is I
might get myself an eraser and with me a razor, I might just go ahead
and just clean out the middle part of
the stork so we don't have too much lines
crossing over, so I'm just going to
quickly do that now. Then again over here.
Just like that. Move me eraser to the side. Give it a little, wipe. There we go. Look at that. Fantastic. How easy was
that, and that's it. That's the basic
structure of the apple. So that's step one now done. Observe and outline. We can now move on to step two, which is going to be
Analyze and select. So let's move on
to that one next.
6. Analyse & Select: Okay, welcome back.
Let's now focus on analyzing and selecting our beautiful colors
for our subject. So what we're going to
do on this stage is, I'm just going to grab myself another kind of small cut
out of a piece of paper, so I'll just move
the actual sketches of those apples
that I did first. So I'll just move
that out of the way. Now we've just got this
nice little sheet of paper. Try using the same
paper that you're using for the sketch so that
you get similar results. For this, we're
going to concentrate on the main colors of our apple. You can see on the screen that the division of
colors really is, we've got red tones, we've got brownie earthy tones, and then we've got this really
nice yellowish tone there. My set, I've decided to
use these colors that will match closely with
those color hues that we have on the subject. These are as follows, I've got a nice light red shade, which is the poppy red
and the number is 0400. If you remember if you
watch the first class, I used a lot of this color in the first class and then
for the darker red, I've got this color called
Shiraz, which is 0600. Now, if you don't have these colors, that's absolutely fine. Just pick out a lighter tone of red and a darker tone from
the selection that you have. And if you don't have
two tones of red, just pick whichever
red you have. So you can start
practicing this. It's not about creating the exact colors that you
have in your subject. It's really just about picking something that's as close
as possible so that you can really start building this sketch and building
your illustrations. So just to demonstrate what I'm going to do is,
I'm just going to go ahead. I'm just going to do a
little swatch over here to show you the kind of red
color that I'm going to use. So there's that poppy
red light red color, and then I've got the
dark red color here, and this is just like a
little swatch example just so that you can see the colors that
I'm going to use. You can see got a nice bit
of variants over there. And then I'm going to look at the browns and for the browns,
you can see on the screen, I've decided to go ahead with this beautiful willow color
and leaf green color. And that's mainly
going to be used on the stock of the apples. So here they are. I'll just give you the numbers
of these one. So we've got the leaf
green first, 1600, and then I've got this beautiful
brown called Wow 1900. So if you want to
follow along with these exact colors
that I've got, then get these colors ready. And do remember to
sharpen your pencils, keep them nice and sharp
before you start your sketch. As we mentioned in
the previous class, it's really important
to keep your tips really nice and sharp so that you can get
the best results. So I'm just going to
do a quick little swatch of these colors. So I've got my leafy
green color there. Beautiful color there, isn't it? So just a quick little
swatch over there, and then a nice
swatch of that wow, beautiful brown, like so. Then finally, I've got
my yellow shade and the yellow shade that
I'm going to go for is the sun yellow, and this is going to be the main base color
for this apple to produce those variations of colors between red and yellow, creating a gorgeous
orange effect. So that sun yellow 0200, just a quick little swatch
of that over there, and that's about it. So what I'm going to do
is I'm just going to do a quick little
wet of those colors, so just rid of that
dust from there, just to show you really
what the colors look like, and it's always a good idea to swatch out your
colors before you start your sketch just so
that you know what to expect with the
colors that you have. So you're just dipping in
me, brush into me water. I'm just going to create
these nice little swatches of color so I know what
I'm working with, so I don't kind get
surprised or shocked at any stage when I lay down some color and I'm thinking, where did that color come from? I'm sure I didn't pick that
color, but there you go. It's always nice to be prepared, and it's a nice little
exercise, this, isn't it? Just swatching your
colors and relaxing. So therapeutic, isn't it? So let's just
quickly do this one. Look at that gorgeous color, that one, that chiraz color. And then finally, I've
got my poppy red, fantastic, vibrant red
over there, and that's it. So that's my kind
of selected colors. Select the colors from your set, give them a little swatch
and it'll give you an indication of where
we're going to move forward with for the
main part of the class. So that stage is now done, and now we can move on to
the exciting stuff and explore and sketch
our beautiful apple with our chosen colors. So let's have a little break, and then we can move
on to that one next.
7. Explore & Create: Okey doke, welcome back. Let's now do the exciting
stuff and start exploring and creating beautiful layers of colors with our intense pencils. Let's get our attention back onto the screen where we have our lovely little three
easy style sketches with pencil of our Apple. We're going to concentrate
on this left one first. Then we're going to
move on to the next. Then we're going to move
on to the one at the end, and each one of these, we're going to explore
using different application so as a quick little recap where we went through
in the first class, if you watch the first class, you would recall these lovely little things
that we created. These were just two of the application methods
that we went through, which we are going to
focus on in this class. This one on the left here, we did the dry first
application method where we went on with dry
beautiful intense pencil, and then we wet
it with our water just like I did with this
swatch sample that I did. So this was the
dry first method. That's what we're
going to concentrate on this first apple here, and then we're going to go
with the wet first method, which was this method that we had where we add water first, and then we go in with
these beautiful color. We're going to concentrate on this middle one with
the wet first method. And then the final one
that we're going to do is we're going to
do the dip method. So we covered that as well. The first class and we'll explore more of that
when we come to it. Let's just move these
cards out of the way, the quick little recap
from the first class, and then let's concentrate
on this first one. As I said before, what
we're going to do is we're going to do the dry
first method here. So what I've got here is now, I've got my three colors. I've got my beautiful yellow, my mid tone, red, and then my dark red. These are going to
form the base color of the layer of this apple. Let's start off with the
lightest tone first. I'm just going to move
them through pencils out of the way and
I'm going to go straight in now with the dry
first application method. I'm going to look at
the area where we can see where we have the
yellow tone of the apple. From what I can see,
we've got quite a lot of yellow in this section
on the right hand side, just like this, I'm
just going to add in my beautiful yellow color
over here, just like that. I'm going to really
get that layer of color in there in
this up and down motion, effectively just coloring it in, getting as much of that beautiful beautiful pigment on the circular motions
is good for this. If you find that the actual
pigment isn't coming off that quick depending on the surface of
paper that you use. Use circular motions, go over it like this
in one direction, do whatever works best for the taking off the color from that pencil
onto your paper. The application method
will work great. Then what I'm going to
do is I'm going to go in and I'm going to add that
color onto this side here, where we've also got a lot of
that light shade of yellow, just like this, just filling
it where we see the color. Now again, from the image
that I've provided, it's the same image that
I'm actually working on. So you just fill it in
the best you can see exactly it's not going to be in the exact kind of
position that I've got it in. You might see the angle
slightly differently, where your yellows ending
or beginning, not to worry. It's just about
practicing this kind of sequence of layering with
this first base layer. So I think that's enough for me. I think that's going
to work quite nice. That's enough for the yellow. Let's move that one
out of the way. Let's now start off with the
midtone red, the poppy red. And just like so, what
I'm going to do is I'm just going to add poppy red now into those areas where I see quite a lot of the red
that's quite predominant. Just like this, just
going to add it in circular motions where
I can and in between in this gap over here and
then making sure that the white area gets a lot of that pigment being applied
to it because essentially, the more pigment you add, the more color saturation
you're going to get and we want this to
be nice and vibrant, especially on this first layer. Just like that, I'm just
going to add in the red. Then what I'm going
to do is I'm going to overlap this area. So where we've got the
yellow, I'm going to start overlapping
it and you can see, while I'm doing this
circular motion, you're kind of getting a
bit of a color change. You're getting the
orange being formed. So that's really
interesting, isn't it? When you're doing the dry
first application method, you can actually predict where the color change is
going to happen. So that's a huge advantage
of using this technique. You can really plan it
out the way you want. There's a lot more
control in this method. Again, we went through
this in the first class, give it a recap if you want
to, but it's not necessary. You can do this class without
even doing the first class because it's quite simple
and easy to follow. Just like that, I've got
that nice overlap of that color and I'm
going to do the same here on this area where
I've got the yellow. I'm just going to go in
with that poppy red, nice circular motions, not
pressing down too hard, just keeping it nice and light. A nice and easy just like that. I think that's enough
with the poppy red. Let's move to the darkest
red now, the haras. So with the chase,
I'm going to add the haras into this kind
of bottom left hand side, where we've got the darkest area and just applying
it in the same way, getting it into all the
white areas over there. Circular motions, and then just filling it up,
that's looking great. Just like that with the haras, Shres is a very nice color that a beautiful dark shade of red, looks
absolutely fantastic, then maybe just a
little bit over here underneath the sok where
we've got some shadow area, but it's not necessary, just a little bit there
on the left hand side, and then maybe just a
little bit of an overlap where we've got the poppy
red there, just very gentle. We've got to remember that
the darker colors do tend to overpower and oversaturate
the actual paper itself, you do have to use
them with a lot of less pressure and
really sparingly, keep it nice and
clean and simple and not overpower it with the
dark color. That's about it. The stork, we're going to
leave the stork as it is. We're going to work on
the stork once we've covered the basis of the
main shape of the apple. That's it for the first part
of the dry first method. You know what we're going to do? We're going to add in the water, so let's start adding
in the water now. You can see over here,
I've got my water. I've got me watercolor
brush here, giving it a nice drench, making sure that
it's nice and wet. Now, if you remember
from the first class, we want to make
sure that our brush doesn't have too much
water dripping from it. Otherwise, then it's difficult
to maintain any control. So this is just about
right over here. It's nicely drenched. The bristles are
nice and drenched. There's nothing dripping
off the tip of that brush. What I'm going to do is I'm
going to start by going in to the yellow area first
and just giving it a nice little wet in
circular motions here, just wetting that yellow
area first, just like this, nice and wet and I'm going to give it a little bit
more of a dip of water, just like that, a
little bit more water. Then what I'm going to
do is going to drop that water like this onto those edges where the
yellow meets the red, just like that dropping it in. Not pressing down too hard, letting the colors
merge into each other, blending to each
other like this. I don't want to maneuver
them around too much, adding these little dots. I've not gone onto
the dark area yet. I'm just keeping it into
the light area first. So just like this, another dip
of the water on the brush. We don't want the water
to completely dry out. So just like this,
just adding in these dots and just
letting it melt away. Into a wonderful world of color. So just like that over
here, I've got the red. Now I've got quite a lot of red on the tip of my brush here. I want to go into this yellow. But if I go into this yellow
with the brush as it is, it's going to overpower
the yellow with the red. So we need to give our
brush a nice rinse. So I sure when you're wetting
the areas that you've got dry and you have different kind of shades
and tones of color, you do tend to
clean your brush in between the wetting process, especially if you're
going back in from a medium to dark color
to a light color. Otherwise, your colors
are just going to merk up see like this, I'm just adding back
into that clean yellow, just adding in those dots, and then I'm just going to
go into the red area and just double dabble it all
the way just like this. Let the water do all the work, not using too much water. Otherwise, it gets all over the place and you lose
all that control, and then it just
really becomes a pool of marbled colors, and
that's not what we want. Well, it might be what you want, but at this stage for
this dry first method, let's try keeping it
nice and controlled, and you can maybe explore the marbled effect
in your own class. Project. So let's
continue over here. And again, I'm just
going to now bring in the actual brush as it
is into the dark area. So just like this, I'm going to go into that charaz
color and look at that. Look how beautiful that looks. Gorgeous, isn't it? Beautiful color merging
into each other, that dark tone to light tone. And you can see how
quickly we just created this beautiful pattern
design in our drawing, going to give my brush a clean. And now I'm going to go into this area here where we put
the chiraz color there, wetting it a little bit
with that brush and letting that water merge
into the other colors, letting it spread
on its own accord, and that looking fantastic. What we want to
make sure that we do is we want to make sure that every part of our pigment that's dry has been
touched with water. Otherwise, you know
what's going to happen when we move
on to the second, and we activate
the second layer, that first layer
is going to start muddying up the second layer,
and we don't want that. Otherwise, it just creates a
lovely abstract variation, and we don't want
that at this stage. So just ensure that wherever
you have the dry pigment, you've kind of touched
it with water to just avoid having a
muddied mess at the end. And remember, from
the first class, we did mention in the
information about these pencils that once
these are fully dry, completely dry,
once they've been wet, they become permanent. They effectively add as a
lovely base tone that you can add on top and you
don't have to worry about wiping the
first layer away, great advantage of this pencil. Let's now just keep adding
a couple of dots here and there to make sure that
we've got decent coverage. If we look back and
have a look at this, that looks rather
nice, doesn't it? Let's just put the
brush away now and you can let this
dry on its own accord, go for a tea or a coffee. I think I might go for a
nice little cup of tea because I'm getting a little bit warm now because of the weather. The weathers actually
turned out really nice. You can tell with my Hawaiian
shirt that I'm wearing. I'm in the mode of summer. Let's let that dry
it'll dry up fairly quickly and I'll see
you once that's done.
8. Wet First Method: Oh, that's quite nice, that. Bitter licorice and
green tea, isn't it? Licorice? Oh, no, not
licorice and green tea. It's licorice and peppermint. I've not had one
of these before. Actually, quite nice
that. Nice little change from me ginger herbal tea. So I think I'm going to
put that to the side. Gonna have to remember
that name peppermint, licorice and green tea,
something like that. Anyway, I think Walworth, I think is time
for the class now. Oh, hello and welcome back. Okay, so I was just
enjoying one of my new tea varieties over there. It was a peppermint
and licorice kind of combination type thing.
Really nice, actually. I was wondering what it was
going to be like kind of, you know, you've been watching
me recently on my classes, I've got into tea these days. You know, I'm a coffee
drinker, and I always will be. But I thought I'll try tea
and see where it takes me, and it's taken me to
very nice places. So let's continue
with the class, and I'll sip on me
liquors as we go along. So on the screen, you've got the first
application method. That's an early
dried out. But we don't need to wait until it completely dries because we're
still on the first layer. Let's go ahead and work on the first base layer
of the second method. What I'm going to do is,
I'm just going to shift this sheet into the middle over here so that you
can see it better. Then while this dries, we can go ahead and work
on application method two, which is the wet first method. Again, we're just concentrating on the base layers for now. For this method,
what I'm going to do is I'm going to get my water, give it a nice drench
on the brush over here. And make sure that
the water is clean. Now, how do I know that
the water is clean? Well, what I can do
is I can just go ahead and see if it's clean. Do a little swatch over there. Yeah, that's nice and
clean over there. So I know me water's clean. Always make sure
that you're using clean water when you're doing these techniques or working with watercolor so that you don't get all this
muddy stuff everywhere. So let's get a bit more
of a drench on there. And for this one, we're
going to have to work fairly fast for this
particular technique. What we're going to do is we're just going
to add the water in onto the apple
surface over here, going to get a bit more
because we're going to need a fair amount of water. Otherwise, it's just
going to dry out. The weather is very hot,
like I mentioned earlier on, and the water does
tend to dry really quickly because
it's a little bit humid at the moment in the UK, which we don't usually
get that much, so might as well enjoy
it while you can. But again, for watercolor and water type mediums
have liquid in them, you do tend to have
to work fairly fast. I've got myself a nice amount of water there
again I'm going to add in a couple drops just so that we have a
nice pool of water. Then what I'm going to do is I'm going to use the same colors again that we used previously in the first
method over there, and I'm just going to
go straight in now. What I'm going to use
is I'm going to go with my pencil with the yellow
straight into that water. You can see as I'm
adding this in that yellow is spreading
out beautifully. That's the difference here from the first method where
we went in dry first. We're just going in wet and then dry onto the wet
effectively working like an ink, thus the ink tense pencil, but I'm sure that's not the reason they
called it ink tense, but anyway, it's
just another fun little fact or fun
little analysis. Again, I'm just going to
work really fast here, get the yellow in roughly the same area that I did before. And then just like this, I'm going to move
my pencil away. But you've got to remember
when you're doing this, when you're using the tip of your pencil onto wet surface, that's going to remain wet for a while and to avoid it
going all over the place, make sure you place this
on a clean surface or on a tissue where it's not going to interfere
with anything else. Let's quickly move on
to the midtone value, the red there, the poppy red. You can see it's so
nice and beautiful. It's just like you're using
watercolor from a marker, and it just adds
it in so nicely. So it looks
absolutely fantastic. So just like this, I'm just going to go in
and add that red, where I added red before
with the midtone value, making sure that the base
in surface remains wet. Otherwise, it's just going to
be the first method again, the dry first method. We want to work
really fast on this. So just like so, move that onto my paper
towel on the side. Then let's go in with the
chiraz, the dark color. You can see it's
still nice and wet. We're getting this really
nice velvety, inky effect. And all I'm going to do is I'm just going to fill in that area. So that we don't
have too many gaps. So if you're working on
this kind of method here, try your best to work
as fast as you can. But don't panic if it dries out so you can see the water
started drying out there, not to worry, not
about stressing. All we want to do is practice
and try these techniques, so we just get a
bit of experience. What I'm going to do
now is I'm just going to get me brush,
dip it into water. And then I'm just
going to encourage the blends of the colors like this by dabbing onto the edges where
the colors meet. What that will do
is it will avoid this stark contrast between the colors and give it an encouraging blend because that's what we effectively
want to achieve. Beautiful blends,
just like that, in between the colors,
not doing too much, just dabbing the
tip of the brush to just encourage that movement from the colors into another. Then again, over here
from the dark and red, and you can see that the effect already looks quite
different, doesn't it? It looks a lot more
vibrant and saturated, a lot more contrasty
compared to the first one. And that's what it's really
all about just to explore how these application methods
produce different results. And then you just pick the
method that you like to use or if you want to
just experiment further, mix and match them,
and that's what this class is really
encouraging you to do. I've done that now for this one. We can actually go ahead and
move on to this one as well. So let's quickly just shift
the paper on the side while these two dry let's just
move into this final method, and this was the dip method. So
9. Dip Method: This method, let me just get a little bit of a
clean on the brush. With this method, all
we need is our water to keep me water over here on
the top corner over there, and we're just going to
basically just get our pencil, which is already a
little bit moist, which will work in our favor. And then all we're going to
do is we're just going to dip it into the
actual water here, you can see on the
right hand side, I'm just dipping this in. We went through this
method in the first class, so just dipping it in over there while the tip
is nice and moist, I'm just going to go straight
and I'm going to start laying down that
color just like I did in that previous
one and you can see, we're not getting
any movement here. This one's going to be the
most contrasty in effect, but you've got to keep
wetting that tip. Otherwise, you're
just going to get dry onto the dry
surface, just like this. Keep wetting the kind tip of that beautiful
pencil to maintain that beautiful gorgeous
flow of ink like so. So just like there's roughly in the same areas as we had before. That's all I'm going to
keep doing just giving it a nice dippy dip in me water
and just adding it on. Really nice and easy. So beautiful. The actual color. It's so vibrant, isn't it? Absolutely love this color. So that's enough for the yellow. I'm going to move that
onto my paper towel. Then I'm going to go in with my poppy red color, dip that in, give it a nice little dippy dip, and then just go straight in
onto me paper, just like so. Then again, keep dipping it in. And you've got to remember
with this method, the more kind of you dip, the more flow you're going
to have of that ink. So do bear that in mind. If you don't want to
do this method for your class project or you don't really like
doing this method, or you don't like the results it achieved, that's
absolutely fine. I just think it's
worthwhile giving this a go really to get that
first hand experience, to see how these pencils can
work in different methods. So that's enough with
the lighter red. Let's go in with the chiraz, the dark red, giving it
a dip into that water. And then just adding
this in now on the bottom area over
here, just like that. Round circles, just to
really fill in that space. You can see it looks
really nice, doesn't it? It would be great
abstract art this. This method using it to produce beautiful abstract paintings.
It would be fantastic. Again, dipping it in
again, just like that. And I think that's about enough. What I'm going to do now
is while it's all wet. I'm going to get
me brush. I'm just going to dig me brush into the water and then I'm
going to encourage this blending that I was talking about before, just like
we did in this one. Otherwise, we're just going
to have the color lumping up on one edge and not really
creating much of a blend, but we've got to work fast with this because if the
color dries out, then it's not going
to be maneuverable, and then we're going
to really have just pure color in one section. Just like this,
encouraging the blend. And that's looking great. I'm just going to clean
me brush because we don't want to overpower
with the dark color. Otherwise, we'll have all sorts of issues and it'll just be one huge pool of darkness all over the
place, just like this. Very nice and light.
Keep it moving. I think that's about enough for that so let's move this back onto the screen
so you can see all three. You can see that the
results look similar, although they're
not been dried yet, so you can't really
compare and contrast, but the general look
is very similar, and we've used three different
application methods. So let's let that
dry and I'm going to enjoy my lovely licorice tea. And then once it's
completely dried out, then we can move
on to layer two.
10. Second Layer: Oh, that was really
nice, that one. Oh, what a fantastic tea that. But it's a shame that I've all finished it and I have
to get myself some more, but I wonder if that shop still stocks this
particular brand. I'm gonna have to
find out. I think I might have to make a note
of that one, actually. Yeah, let's do that. Ok Dog. Let's get back to the class. So where are we? Oh,
hello and welcome back. So we're back to the class now. I was just thinking
about restocking my licorice tea because
I'm enjoying it so much, but it does kind of run out from the local
shops that I go to, so I do need to
stay on top of it. So that was just a kind
of reminder to myself. But anyway, get
back to the class. Now you can see on the screen, we have all of the three methods that we applied with Layer one, and they have dried out
beautifully. And look at that. They just look
gorgeous, don't they? Subtle differences in them. Some are a bit more contrasty. Some are looking really nice and kind of beautifully
blended together, and some are different,
aren't they? So you've got
different results with the three methods using the
same colors for layer one. Now that everything is dry, we can now move on to layer two. For this part now, what we're
going to do is we're going to get our medium tone,
which was the poppy red. So I've got me poppy
red, pencil ready, and I've given it a nice
little sharpen over there. Make sure that for layer two, you have your pencil
nice and sharp. Also ensure that the tip is dry, especially if you've just done that third dip pen method
or dip tip method, then you've got to
make sure that this is completely dried out before
you go ahead and sharpen it. Otherwise, your sharpener is not going to be very happy and
then neither will you. Do make sure everything
is completely dried out before you go ahead
with the next step. What we're going
to do now is we're going to concentrate on the first one the
dry first method and start doing layer two. I'm just going to move
this into the center so that we have a better focus and you can see
what we're doing. We're going to do for
this second layer is, we're not going to go in and
start coloring anything in. We're just going to add on top, what we're going to do
is we're going to add on top with some hatching lines. The reason we're
doing this is to build texture and depth. That's what it really is
all about sketching with these pencils in
different layers and using slightly different methods
and styles just to build up your lovely sketch of your
subject that you're doing. Let's start now. What
I'm going to do is I'm going to use that middle
tone and I'm going to go ahead and just create these really nice
loose lines like this. So just like that, I
don't know if you can see it properly on the camera,
it should be able to. So just like that, you can see, I'm just going in
this direction. I'm going over the yellow here just in this half of the apple. Again, just like
that over there, and then I'm going to do the same for the one in the middle. I'm just going to move
that in the center. And again, just very loose. They don't all have
to be the same height or kind of the same spacing. Just try keeping
them nice and loose. And again, I'm just
going over what I've already got and that's it. So again, with that dip method, first layer, doing
exactly the same. And you'll notice that
depending on how much of this particular color you
already have in layer one, it will give the effect of an
actual line going over it. And what I mean by that
is that if you've got too much of a saturated color and you're trying to do a
hatching line on top of it, it's not really going to show, but don't worry about that. Just go along with what
I'm doing for layer two. And what you'll see
is that eventually building up this
wonderful texture. We've got that now for
all three of them. They look very similar. What we're going to do now is we're going to go
ahead and start creating further lines now using that same color
just like this. What we're going to
do is we're going to effectively create
a cross hatch. Just like that with my
lovely intense color there, I'm just creating this
beautiful cross hatch pattern. Then let's move on to the one in the middle and we're going
to do exactly the same. You don't need to worry
whether your lines are going to be a little bit
wonky or here and there, or if one line goes above the other, don't worry about it. Just relax and just follow the steps so that you
get familiar with this method and
technique in using your lovely intense pencils. That's what it's all about,
just enjoying the experience. You can see now if
we move back and have a look at all of
them at the same time, we've got this beautiful
cross hatch going on, and it's already started adding
a little bit of texture. What we're going to do
now is we're going to get our lovely brush now and give it a nice dippy
dip in the water. And for this section now, what we need to make
sure we do is we don't overdrench our brush tip. So I'm going to get a decent
amount of water on there, but I'm going to just
get that water to kind of trickle off on
the edge of my jar. I'm going to put the jar away on the side so you can see this. And this is what we really want. So we want a nice
drench on the brush, similar to what we had before. And all I'm going
to do is let's go back into the first apple here. I'm just going to go ahead
and I'm going to follow along those lines that I just
put in with the pencil. So just like this, we put the lines in first
going upwards, and all I'm doing
is following along, and then I'm going
to go ahead and do the cross hatch lines
all the way across. So effectively, we're
just wetting those lines. And what we don't want to
do here is we don't want to press hard on our brush
while we're doing this. Otherwise, the
line is just going to melt away and it's going to melt away into that first layer, and that's what we don't want. We want to preserve this kind
of textured pattern with our lovely brush and that
intense goodness that we have. And just like that,
I'm going to leave it. You can see most of that has
now been touched with water. Let's move on to the next one. So same method again, I'm just going to go
ahead and give me brush another little dip
so it's nice and clean so that we don't
rk the colors up, even though we're
using the same color, it's always good to use a clean brush every
time you do this. So just like that, Nice
just a little bit of water on that brush and I'm just going to go
ahead and do the same. I'm just going to go up
on those lines that I can see and don't worry
about it if you can't see your lines because
the colors are the same. No need to worry or panic, follow the steps, the
more you do this, the more practice
you're going to get, and then you can
adjust it however you like when you come to
doing your own artwork. Or creating your class project. Just like this, got to
make sure that we get that water to touch most
of the dry pencil work, and that's looking good. Again, just to clean on
the brush and I'm going to follow up and do the
same for that third one, just so that these lines look
a bit more prominent and they have that
lovely inky effect of these intense pencils. So just like that. And
then across coming across, maintaining this
wonderful texture, especially when it goes over that yellow, that lighter color. That's when you'll be
able to see it the most, and that's looking great. So let's just put
the brush away. And what we're going to
do now is we're going to wait until that
completely dries. We don't want to go in
with anything else until this kind of first step of the second layer
is completely dry. So I'm going to let that dry, maybe go for a little
naughty snack. Might get myself a
little chocolate. There is a lovely
Cadburyse flakonry table, which I can see over so I'm going to go grab
that enjoy myself, and then hopefully by that time, this should be nice and
dry and we can move on to the next step of layer two.
11. Darker Texture: Mm. Ah, what a fantastic
chocolate that. Cadbrees flake. Better put it on side. I've got it all over me hands.
What am I doing? Get some tissue. Clean it up. I bet I've got it all over
me face, as well, right? Quick please, get rid
of all the evidence. Get rid of all the
evidence, right? Okay. So what are we doing? Something about intent,
watercolor pencils. Mm. That's it. Oh, dear. We're recording. Hello. Okay. Welcome back. I think you've caught me having me
chocolate there. I snuck it in while I was
waiting for this to dry, and I don't regret
it because it was gorgeous right hunky hook. Let's continue with this now. We've got a nice bit of dry, lovely cross hatching
work on our three apples. So what we're going to
do now is we're going to add few more hatching lines on these top areas just to add a bit of curvature
to the shape, so it looks like things
are flowing nicely and that we have a nice kind
of curvy shape going on. So with that same color now, I'm just going to
go ahead and add in some lines like this or just bring this into
the middle again. So just like this, all I'm going to do is
I'm going to add in some lines coming
down from this side. So it effectively looks
like there's some curves, and then from this side, I'm going to bring in
some lines like this, just some normal lines going like that,
normal hatching lines. And you can see it's
just added a bit of depth to the
actual overall shape. And again, I'm going to repeat that now for these other two. So just like this. Very loose. It doesn't matter if
the lines go wonky, don't worry about anything. I don't want you to stress. This is just a method. You can follow it along
the best you can. If your lines turn out
completely different, then don't worry about it. You can practice because
practice makes perfect. But as I always say, we're not here creating perfect realism. We're here just to enjoy ourself and enjoy the journey in art. Let's have a look at this now looking great and what
we're going to do now is we're going to go ahead
and get our darker color now, our lovely chiraz color there, the color that we
used on the bottom. Now what we're going to
do is we're going to go in on the first apple
and we're just going to start adding in some
hatching lines like this with a little bit
of a curve to the line, so not completely straight, just a bit of a curve, and you can see like this, it's adding more depth and
more texture, just like that. Then on this kind of base of
where the actual stalk is, just a couple of lines like this coming out of that stalk. Fantastic stuff. That's all
I'm going to do on that one and then I'm
going to repeat the same on here, so just like this, curvy lines going over the cross hatching
work that we did before, beautiful curvy lines, and then just from
here, a couple of lines coming out like this from where we have a little bit of dark
going on over there, and then again, we're going
to do it on the last one. Lovely curvy lines like this. Nice and loose,
but just following the curvature of the shape
of the apple and then again, some lines coming out like this. Nice and loose on the base
of the stark. Look at that. That looks gorgeous, doesn't it? Again, what I'm
going to do now is I'm going to go ahead and do just a little bit of cross hatching in this direction here, just like this, cross hatching on the base of
the apple like this, just to add a bit more depth. Do the same on this one, little bit of cross hatching
lines like this, creating effectively
more pattern and more depth to
the overall sketch. Just like that again
on this one, like so. Just add a bit of variation, and I think that's
looking fantastic. So you know what we're
going to do next. We're going to get our brush, and we're going to add
nice little drench of water just like
we did before. And you know what we're going
to do, we're just going to go ahead and
we're going to wet these lines that we put in the darker lines of
haras and look at that. See how that texture
started to form now. I'm trying to follow those
lines the best I can. It doesn't matter if you don't
follow them exactly or if the wet color goes a little
bit all over the place. As long as you maintain
the texture of the line and don't completely melt away the beautiful inky, painty stuff that comes out
of this beautiful pigment, then you're good to go. Just like really nice and easy. I noticed a dry line
here and there. Going to add that
tip of the brush just to give it a bit of
a wet and look at that. Look how it's enhanced that
overall beautiful shape. We're going to do the
same for this little part over here under the stalk. So, give it a little bit of wet. Now I'm going to
use the same brush to wet those previous
lines that we put in, those curve lines
because I'm not that bothered whether it mixes or merges with the chiraz color. We also had some over
here on the top, it will just add to the overall balance
and flow of color, and that's looking good. Maybe just add a little bit of that color at the back
there to complete it. Look how nice that
looks. Fantastic stuff. I'm just going to
go ahead and repeat that now quickly on these other two and then we'll see once it's all dry what
results we get. Ok Dokey, we're done now. We've put a little bit of wet onto those lines
that we added on, and that looks absolutely
fantastic, doesn't it? So what we're going to do
next is we're going to actually go ahead and add a few more textural elements to this just to give
it a final enhance. And then we can start
looking at those storks, which are going to be
really easy to colour in. So let's maybe move
on to that one next.
12. Dot Texture: Ok Dokey. Welcome back. Let's now move on to adding a little bit more texture with another technique that
you're going to be familiar with because
we've used it before. We're going to use
the dip tip method. So we're going to go ahead
and grab ourself our lovely, lovely red, that poppy red, that first red that we use. So the poppy red
is going to go in, and I'm just going
to go ahead and do a nice dippy dip
like I was doing before for third
application method that we did on the third
apple, just like that. A nice bit of dip,
and I'm going to keep dipping it in
as much as I need. And then what we're going to do is we're just going to move this in the middle so you
can see what we're doing. And it's just going to
be a case of adding in some beautiful little
dots like this. You can see on this yellow area, there's no point
adding them where we've already got that color. So in the color area that we don't have this particular
color, so where the yellow is, I'm just going to go ahead and add a couple of these dots, random dots like so, and now the tip is getting dry, so I'm just going to
give it another dip into the water to get
it nice and moist. Just going to shake
off that excess water because I don't want water
droplets going everywhere, and then just like that,
a little tip here, a little one there,
a little one there, and you can see how
beautiful that looks now with those gorgeous
little dots of red. Going to do that now
in this area here, I can see a few here and remember with these
beautiful pencils, the actual ink itself
is going to be opaque, so you can still go over with a lighter color on dark and
you should be able to see it. That's a huge advantage again, of this pencil and this beautiful formula
that it has that it dries opaque and I
think that's about it. For that one, maybe just add some really teeny
teeny weenie ones here using the edge
of the pencil, maybe just add a couple here, just to make it complete and maybe just scatter a few across, even if you can't see them, just to make it look
a bit more complete. So just like that, I've
done it with this. What I'm going to
do is I'm going to go ahead and put that on my paper towel now so that it
doesn't smudge everywhere. And I'm going to go ahead
and I'm going to get the darker colour, the chias. So with this chias again,
I'm just going to go ahead, do my dippy dip now
into the water, same method, same technique. And I'm going to
go straight into the apple and where we have
more of the red area here, that poppy color over there, I'm going to start
adding in some beautiful dots of charaz there. So just like this, look at that. Look how fantastic that looks. We're using the same colors in a different sequence using
different application methods, and we're getting some
fantastic results. Again, my tip is getting
a little bit dry, so I just going to dip
it into that water, shake off the excess, and then I'm just going
to continue adding these dots into this
kind of area here, this concentrated
area down here, and then maybe just throw in a couple where we've got
the edge of the stork. Really to bring out contrast. What you don't want to do
is you don't want to put the darker dots on
the darker color. You want it to contrast with the color that
the lighter tone. So just like this, adding in a nice bit of chase. We wouldn't want to
have too much has coming on this
side because we're actually thinking
that the light source is coming from this
kind of corner here. So really, although
we're not doing realism, but just to make it a
little bit more decent, we want to keep this
area nice and dark. We concentrate our
dark dots onto this left side and we have the lighter dots on the
top right hand side. But again, if you want to
just scatter them around just to make it look nice, you
can go ahead and do that. I'm just going to
stick to this kind of method and sequence. So all I'm going to do is maybe just add a
couple more here. I don't want to overdo
it because again, this is just an exercise. You can spend your
time doing this when you're doing
your class project, spend as much time or as
little time on it as you want. I think I'm going to
leave it at and all I'm going to do now is the
exact same method that I applied here with
the poppy red and with the charaz we're
going to do the same for the other two apples, and then we'll see what
results we can get. Ooky, welcome back. You
can see now I've done a similar pattern and sequence on all
three of the apples, and it just looks
beautiful, doesn't it? So it's still a bit wet now, so I'm going to let
that dry completely. And what we're going
to then move on to is we're going to move
on to the stork area. So what we want to really
do is just kind of, like, move this onto
the side, let it dry, and then I'll go through
the sequence that we need to do for the stork
which is really super easy. Not too much textures
or layers on it, but let's maybe have
a little break, and I think I'm going
to end up eating the rest of this flake. So I'll see you once
that's done. And
13. 13 Apple Stalk: Oh, dear, oh, dear. I shouldn't I've eaten all that chocolate. I'm gonna have nothing
left to have for me dessert later on today now. I'll have to come up with
a plan. Yes, indeed. Okay, Okay, welcome back. So, what we're going to do now is we're going to
have a quick look and see if this is dry and I can see that it's not
completely dry. So what we'll do is
let's just move this to the side for now so that we
let it dry on its own accord. And what I'm gonna do now is I'm just going to grab myself another sheet of that
same watercolor paper that I used previously. And we can start looking
at how we're going to colour in the stok
of our apples. So before we start, let's get our colors out. I've selected these three colors for the stork, and again, we're not doing realism or any type of imitation
of real life. We're just doing sketches
and having a bit of fun. Select whichever colors
you have available. I'll read them out to
you which ones I've got. This is a beautiful
leaf green color. The number is 1600. Then I've got this
lovely color called Wow, 1900, beautiful
brown shade that. Then I've got my charcoal
gray color, 2100. And these three, I think
will work really nice. If you've got these colors,
then get them out and let's quickly go through how we're going to
color in our storks. I'm going to do this on
this sheet so I can do it a little bit bigger
for you so that you don't have to
concentrate too much and might miss some of the details when I do it on those apples because
they are quite small. I'm just going to grab hold of my pencil, put me
colors to the side. Let's just do maybe let's just do it this way so that
you can see more of it. Generally with the stalk, we just had a that was
similar like this, didn't we it was just curvy
from the top and then we had the bottom part of it
coming in like this and then we had the edge of
the apple over here, and I think that decent
enough size for you to see, or shall I make
that a bit bigger? I could possibly make
that a bit bigger. Let's just make this a little bit bigger
because it's just for illustration purposes so
that you can apply it to your drawing when you
go ahead and color it in. I think I'll just make that a little bit bigger like this, give that a nice little
erase so that you can see that this isn't just some funny little abstract
shape, just like that. I think that's good to go. You don't have to practice this. You can either watch
or you can maybe do this little drawing
yourself or do the version from the
picture that you have and maybe for
your class project, the exercises leading up to it, just as a practice,
or you can just go straight on to your
actual apple itself. From these exercises, just use this method
that I'm going to go through over here and
everything so let's move on. I'm going to start off with a beautiful green
color over here. So on that picture, I'm looking at it and I can
see some green there. So I'm just going to add a
little bit of green here, not going to worry too much
about making it accurate. So just green on
this side over here. I'm going to leave
this right hand side without too much
color so that we can mimic a bit of light coming in from the
side, just like that. I'm going to add this
leafy green there, and then I'm going to
keep a bit of willow brown and really bring
that in overlap it. I'm just going to overlap
that, use circular motions, just to effectively just
color in this shape and I'm ensuring that I leave that beautiful white on
the edge, just like that. Then what I'll do
is I'm going to get that charcoal gray color
and I'm just going to add in a line of that charcoal gray. Just so on the edge, just on this left hand
side, and that's about it. I'm just going to give
this a bit of a shake because I've got some
sediment on there, just like that, that's
looking lovely. What I'm going to do now is
I'm just going to go ahead and wet me brush
and have a nice bit of a drench on the brush and
then I'm just going to go in and add some water in
to this white side first. So just like this, I'm adding
in water to the white side, very, very, very subtle
and just adding it in. And then I'm going to slowly
start bringing the brush over in this upward
and downward motion. And you can see it's just creating that beautiful
willow color and effectively just
bringing it to life and it's just making it
real and gorgeous. So just like that going
over the beautiful green. And you can see, using this technique of having
the water on the edge, it just made it so easy and simple just to add that color. And so what I'm going to do now is I'm just
going to go ahead and do the same for that
dark charcoal color, but you do have to be
careful with dark colors. They are overpowering,
so I'm just going to be very careful
while I do this. I don't want too much
of the dark going in. This is effectively
just going to add a bit of an edge outline
to it. And look at. M han moved out of place, and it just created this weird and wonderful bump over there. But if that happens to
you, don't worry about it. I want you to relax
and chill because that actually looks quite
nice and natural, doesn't it? It's a happy little
mistake, isn't it? Well, I say there's
no mistakes in art, so I'm going to say it's a
lovely little abstraction. So there we go.
I've just colored it fixed it as I'm going along. And now I've got a bit of that dark charcoal gray colour
on the tip of my brush, so I'm going to give
it a rinse to make sure that meat tip of my
brush is nice and clean. And then I'm going to
just add in a bit of water again onto this side, just to make sure everything
stays nice and moist. And just like that, you can see we're getting a nice movement
of colour going from light into kind of
the main tone of color and just kind of just working it in this
circular motion, just to really fill it up
and make it look decent. Now, I'm happy with that, I'm going to put my brush away, and now I'm going to go straight in with that beautiful
willow color and I'm going to go and as the surface of
that is still wet, I'm just going to go in and
draw in some lines like this. That will add some detail to the overall shape and you can see just by adding these lines. Bumpy wumpy curly wly
lines like this following the kind of shape of this
stork that I've got. It's just added that extra
depth to it, hasn't it? And then just like this
where the white area is, I'm just going to drop in
some very gentle lines here and kind of the top part of the stork and you can see how easy and quick that was
to fill and that's it. I'm not going to
leave it like that. I'm not going to go
into too much detail. I think that's a really nice
little lovely little shade of color onto the stok. So what do we need to do next? We need to add this now
onto our lovely apples. And that's all I'm
going to do now, so let's move that to the
side so that you can see, you can see it on the screen. I'm just going to follow
this lovely step by step process to create this wonderful stock that
we have on our apple. I'll do it first for this one, and then I'll do it
quickly on the others. I've just got to make
sure that this is dry. Otherwise, I'm going
to get smudgy, smudgy everywhere, and then
I'm not going to be happy. No, I'm not. So I
think that's dry. But just to be safe, what I'm going to do is
I'm going to grab hold of that lovely little card
piece that I had to make sure that I don't
do any smudgy smudgy. Always a good idea,
nice little tip that to cover your artwork. Some paper or some
card so it doesn't smudge your beautiful artwork. Let's just line this up next
so that you can see it, and we're just going
to follow this. What we did first was we added in our lovely
colors. We got the green. With that, again, I'm just
going to go in and I'm going to start adding in my
lovely green like this. Onto the shape of the stalk. Again, the shape of the
stalk isn't important. As long as it looks similar or resembles what you've got in your image, it's
absolutely fine. A little bit of green on the side there starting
off with that. Then going in with
that willow color right in the middle
of the stalk again, because this is small, it can be a little bit more fiddly, take a bit more time
for you to do this. But just take your time again. Don't stress if you mess it
up or if you put in too much of one color and not enough of the other, don't worry about it. Just follow it through
and you'll be fine. Then finally, that lovely charcoal gray color very gently, just adding it into the
edge over there, like so. And that's about it. What I'm going to do now
is let's wet the brush, make sure we've got
an ice cleanly clean on the brush just like that. Now I'm going to
add in that water onto that side
like I did before. Then just going to drag me
brush down over the colors and let those beautiful
colors merge into each other. Look how gorgeous that looks. Beautiful stuff. Okay. So let's just wet the edge where we've got that
beautiful dark color there, and then let that merge
in a little bit as well. It's absolutely fine. Again, take your time with the stock. Don't worry about it. If it doesn't work
out how you planned, just keep going with it. And I think that's about it. For that, put the brush away, get that wow, beautiful willow. Just make sure that
when you're adding in pencil work in a small area, you have the tip
really nice and sharp. Otherwise it might not work. It was a lot easier doing it on this because it
was a lot bigger. So if you feel that,
you're going to add some pencil marks
in it like this, and it's just kind
of kind of maneuver that water that's already
there, then leave it. And I think that's
what's happening with me now because we've got too much water on the
actual stork itself. So I'm just going
to add a couple of dots just to add some details. We don't really need to
put too many lines on this because it's just
a small little sketch. So I think that's fine as it is. We'll let that dry, and
then what I'm going to do is I'm going to go ahead and I'm going to do it
for the other ones, and then I'll see you
once that's done. Ok doke. Now, I've added in the color on the stalks, and you can see, it's nice and lovely
and kind of unique, but we have quite a
bit of water on it, so I'm just going to
let that dry naturally. I'm not going to use
me hair dryer to dry it because if we put
too much force on it, it's going to
splatter everywhere. So I'm going to let that
just relax and dry away into the atmosphere and create a
beautiful blend of color. And if we need, we can add in some details with
that willow colour on top once it's dry. But I don't think I need to
do that for this exercise. I'm going to save
that for my project. Again, we just quickly
went through how we could color this in on a bigger sheet just so
that you have an idea, and this is the
technique that I'll be using in my class project
when I go to do it. Give that a go on a
separate piece of paper and then just
incorporate it in the best you can on
your Apple sketches and then we're nearly done
with our sketching stage. We've basically done
the first layer, we've done the second layer. We've added onto the stork and then we're just going to do some final little tweaks
for the final third layer, and then you're
going to be ready to do wonderful class project. Exciting stuff. I'll
see you on that one.
14. Final Layer: Welcome back. Let's
now finish up our lovely sketch with
the final layer because, yes, everything is nice and dry, then lovely little
storks have dried up and they look
absolutely fantastic. So you can see, just like we did our pattern on
our bigger stork, we've got a nice little pattern on our teeny weenie
apples over there. I hope you've tried this out and followed the steps step by step. This last part now
is just adding in some final highlight and we're going to move
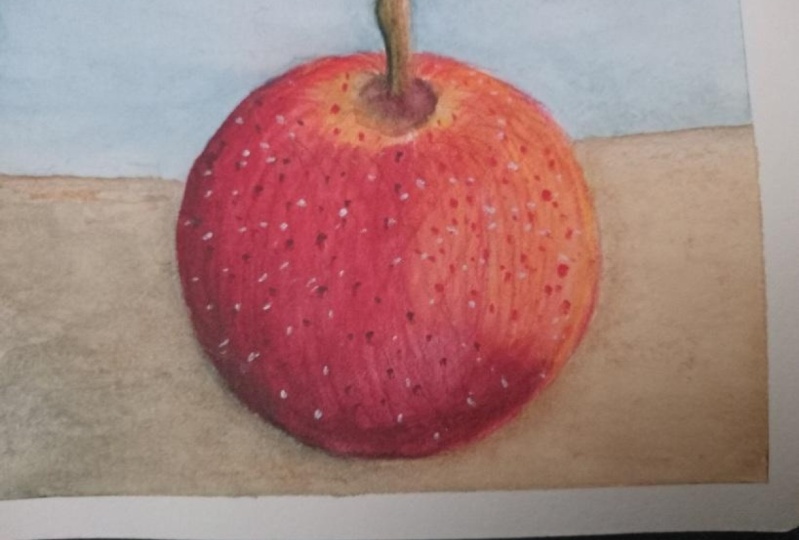
on to that one now. For this, I've got two lovely colors here
of my intense pencils. I've got the antique
white, the 2300, which is generally the
white that you get with the sets or any sets that
you get with intense. Then I've got my sun yellow, the 0200 that I've
been using throughout this class for those
yellow areas of the apple. And all we're going to do
is we're just going to use that same dip method to just add in some white and yellow
highlight dots on the right hand side of our apple and just
get it scattered around so that we have nice bit of detail
in some highlights. But we can also use another
medium, if you like. So over here on the side here, I've two gorgeous posca pens. Yes, then posca pen markers, fantastic medium that
acrylic paint in a marker. But because I'm doing ink tense, I'm just going to
follow along and just complete these
apples just using my intense pencils
and I'm going to save these markers and any other type of mediums for my full sketch, which I'm going to
move on to next. So I think I'll keep
these to the side. I thought I'll just
mention it to you. So just in case you don't have a white in your set or you
just got a couple of colors. If you do have these
acrylic markers, you can even use these when
you're doing the dots for your apples with
the red colors and the darker red, it's
absolutely fine. But because we're just
doing this simple exercise, let's stick to our ink tents, so I'll keep these on the side now ready to use
for my full sketch, which we're going to be doing
next after this lesson. So let's get back
to this lesson now. So like I said before, I'm just going to add
in some highlights. So I'm going to start off
with the yellow one first. So we'll build up
to the lightest. And yep, that lovely dip
method that we've got, just dipping in my
lovely pencil there. Nice bit of a dip, shake it off so we don't want
too much going on. And then all I'm going to do is I'm just going to
start off again on this left side
apple and I'm just going to drop in a
couple of these dots. Now, you might not be able
to see the dots immediately, but you will see them
once they've dried. It all depends on where
you actually place them. And how much kind of pigment
you've got on your tip. If you've oversaturated
it with water, then you're not going to
really see it that well. So do bear that in mind
if you're thinking, Oh, I can't see any of this, I can't even see it on
my lovely apple design. Don't worry about it. Again, I'm just doing this
for completeness, just to show you how to hide in some lovely highlights onto your beautiful objects like this and you can see it just
looks great, doesn't it? I'm just going to
give it another dip on that tip just like that. Keeping it very, very light. I'm not going to oversaturate it just in this kind
of right hand side, where we've got a
bit of the dark then maybe just a little bit
on the stalk there at the bottom to show some type of a reflected light going
on there, and that's it. So I've done that
with the yellow now. Let's move the
yellow to the side. Let's now move on to
the white, though, go to dip that white in just
like I did with the yellow. I'll just show you over here. Nice dippy dip on the white. And remember, this is opaque, so the white should
go on nice and opaque onto our
lovely apple here. So again, just going to drop these little dots of white randomly onto
this right hand side, and you can see it's
very, very subtle. It's not very sharp, and that's absolutely fine. You're just getting
these little speckles of white here and there, and it just adds to the
overall image itself. But do remember when you're
adding lighter colors, you do need to add them
onto the darker areas more to get that contrast
and that nice sharpness. If we had a couple of whites
here, just like that, get a dip on the pencil, shake it off, and you can
just dab them on like this. And you can see that it's just looking fantastic.
Very subtle. We don't want to overpower it. Just give it a nice firm little diby dab like
that, and there you go. So we've got a bit
of white there. My areas a little bit wet there, so I don't want to kind
of merk it up too much by putting too much white on and maybe just add a
little bit of white. Kind of highlight
areas on the corner here of the stork and
it's very subtle, but I think it gives
it a nice touch. All I'm going to do is, I'm just going to repeat that now, go in with the yellow first, then go in with the white on the other two, and
then that's it. We're going to leave
this exercise as it is, and then we can move on to the exciting stuff where I
go through a full sketch, which will take me
quite a long time, so I will speed it up, but I'll speak about that
after I've done this. So let's get back to it now, starting with the yellow, and then I'll see you once I've done the same on the
other two apples. Ok doke. Now we're done, so you can see them little, lovely subtle dots
of yellow and white. They're very subtle. They're kind of, like, muted into the actual
colors themselves, but I think it just adds
a lovely little touch, and it's just kind
of a finishing layer onto our wonderful
little so that's it now. So I'm going to wait
until this completely dries so you can see
the final effect, and then I'll show
you from different angles what this looks like, and then we can move on to the exciting stuff and
do our full sketch. So let's wait until this dry
and maybe have a little tea, maybe another chocolate, or
a treat, whatever you like. And I'll see you
once that's done. Okey doke. There we go. It's lovely and dry and
it looks beautiful, doesn't it? So, look at that. Absolute gorgeous mat finish on those little teeny weeeny
sketches of our Apple. And you can see on the
other angle what it looks like compared to the actual
lovely picture itself. Again, we're not looking at perfect photorealism or
any type of realism. It's just sketching,
loose sketching, enjoying the colors and the flow and using
different techniques. So I hope you've given that
a nice go where you have three lovely apples
and you've used the techniques that we've
gone through in this class, and especially the ones that we did in the first main class of this intense pencils so that you've got
something to work towards. So after this sketch now,
if you're following along, what I want you to do next is do a full sketch using
your beautiful colors, work on something a
little bit bigger, and in fact, that's
what I'm going to do. Let's maybe talk about
that on the next one.
15. Full Sketch: Okay, welcome back. Now we're ready to do our full sketch, and this is going
to go all out in spending our time designing
this lovely apple again, whereas before we just did
some quick little sketches to see what the textures and techniques would bring
in terms of results. So you can keep this
as a reference. And what I really
want you to do is concentrate on a nice
single sketch now. So if we just move
this to the side, I'm going to use the same
reference that I've used for the particular
sketches of that apple. I've got it on the screen
again and I'm going to use a different
watercolor paper. Previously, the
one that I used on this one was a normal
smooth surface, hot pressed watercolor paper, and it was just a normal
grade watercolor paper. It wasn't 100% cotton. It was just a normal paper
grade watercolor paper. But now I want to use a
nice decent quality paper. I'm using a cold press
paper that's 300 GSM. And it's arches. In fact, it's a
beautiful arches, cold press, 100% cotton
watercolor paper. So try using different
grades of paper to see what textures you can produce with these
wonderful pencils. I'm going to go
ahead and do that. I'm going to use this
nice small cutout size. It's approximately
a five this size. So I'm going to use
this and I'm going to use all the techniques
that we've gone through in the first class
in this class using these lovely apple
kind designs that we going through exactly
the same things, not doing anything different. And then what I'm also going
to do is I'm going to use some other mediums
to really make this into a lovely mixed
media sketch. I'm going to go in
with a lot more detail than what I did before. I'm going to think about
adding in some shadow work, using my Posca markers
for highlights, and also using some lovely
brush markers like these, these water based
brush markers to add in depth with some
darkness overtones. But again, whatever mediums you have for this full sketch, if you want to follow it
step by step, you can do, but it's just to give
you an idea of what you can do with these intense
pencils that we've got these wonderful intense pencils and other mediums so that you can really explore this medium and start creating
some gorgeous results. If you don't want to
follow this step by step, then that's absolutely
fine. Just watch it. The actual video
itself is going to be sped up because I'm not going to spend over an hour drawing something and expecting you
to watch it step by step. So it will be a nice, quick video where you can see
what I'm doing and I will talk and explain what
I'm doing at what stage, and I can't wait to get started. But I think I might have to
get myself a drink first. So let's get ourselves a nice tea and then get
our reference picture up, get comfy, relax, remember what mediums we're going
to use and tidy our desk. I think that'll be a perfect way to start
our full sketch. So I'm going to grab myself a T. I'm going to let you sit
back and relax and watch me design this lovely apple scene
with the apple in there. I might add in a little
color background or whatever I feel like, depending on the tea
that I'm drinking. So let's do that now. Back. So I've just got
myself a nice ginger tea, and I'm ready to do my sketch. So I've started off with a nice pencil outline
of the apple. You can see the apple on
the top right hand corner, the same reference
image that we're using, just drawing in some rough
kind of contours and lines. Then I'm going straight in with that beautiful
sun yellow color, just like we did
in the exercises. Then we're going in over with
that beautiful poppy red. And again, it's going
in dry first method, just like we did in
the class lessons. And then at the bottom, we're adding that gorgeous
chias, and on top of that, I'm also adding in
a bit of that leaf green on top to create some
beautiful blends of color. And then with a
bit of willow and then having a nice sip
of me lovely ginger tea. And now we're ready to
add in that lovely, lovely water to create that
gorgeous blend of color, just like we did in our class. And that's what it's
all about building in these beautiful colours, just giving them a nice
little wet with a damp brush, not oversaturating
with water too much. Let the ink tente work for you. Let it create that magic. Then now what I'm doing is just drying it up with my dryer, and now it's nice and dry
and I can work on the stork. Again, just added in those
same colors like I did before, the willow, the leaf green, and that beautiful
charcoal gray, giving it a nice
little dry again, making sure that we're nice and dry in between our layers. And now I'm adding
in that texture, creating some hatching
lines and cross hatching lines with the
chias and the poppy red. And then just following
that same kind of lesson structure and method
of going in layer by layer, and then just building
in more and more detail. I'm spending a lot longer doing this than I did
with the exercises, you can see, it's really
bringing out that contrast. Now what I'm doing is adding in some green dots here and
there and just giving them a little bit of a wet with that charaz at the bottom
and a bit of charcoal gray. And you can see it
really brings out the deep contrast in this
lovely, lovely little sketch. It's looking more realistic, although we're not
working on realism. It's just sketching. So it's nice and dry now again. Now I'm going to go in
with my posca markers rather than going in straight. So just testing them
out and going in with those little stipple
dots of the yellow. It looks really nice. It just brings in those kind of extra highlights and then adding in some white marks
on the right hand side, just to give it a
nice little pop of color and add another
dimension to the sketch. Now I'm going in with my
Lumos colored pencil. It's a dark shade
of black just to add in some kind of
dark lines and tones, just to give it that effect
that I always like to do. Again, this is very
stylized because this is my personal way of drawing what I
really like to do. You don't have to go
in so much detail in your full sketch or
your class project. So what I'm doing now is I'm just taping up my
piece of paper, which I should have
probably done from the start. But there you go. You learn as you
go along and you just forget because you
enjoy yourself so much. So what I'm going to work
on now is the background. And with the background,
I've just added in that willow colour on the bottom and a nice light
shade of blue on top. And then I'm adding some white on the top,
right hand side, and then going in with a
darker blue on the left, just to create some layers. And then on the left hand side, I've just added a darker
shade of the charcoal gray. And then I'm going to wet the lighter part
first with some nice, decent amounts of water, just letting it
all blend and let those colors create that beautiful blend
in the background. Same again with the
bottom part, again, going into the lighter
shade first and then just overlapping
with the darker, and it creates this
gorgeous gorgeous effect, doesn't it so quick
and easy to do. So I would recommend
that you try doing especially when you're
doing your class project. So everything is
nice and dry now. Now I'm going to
use the dip method. But this is another
technique I've actually used over
here in the class, so I'll slow this part
down a little bit. So what I've actually
done here is this is actually a
technique that I did in my watercolor pencil class that if
you've watched that, you would have seen
me do this where I actually go ahead and I the brush first
into the water, and I pick off the color from the tip of the actual pencil. We've not covered this
particular method in this ink tense series yet. We've actually covered this in my watercolor pencil class. And this is an additional
method that you can use if you want to go in with just
pure color on a brush, like you would do with
normal watercolor. It's really nice to kind of try different techniques
out as you go along. So do try that out in
your class project or try it out if you're following along in
this whole sketch. And that just gives you some nice subtle
colors where you don't have to worry about
dipping the pencil. You're just using the brush
like traditional watercolor. So again, all I'm doing is adding in a little
bit more water, a bit more pigment from the
pencil, using the brush, and then I'm just spreading
it out so we have a nice bit of dark where we've got a little
bit of shadow, and then it's the drying
process again, very important. As I keep saying, to dry
between your layers. And now I'm just going in with that beautiful willow color again on top of
what's already dry, adding in a little bit
of the charcoal gray, and then just giving it a nice
little wet just to create some more texture lines
and give it that kind of other dimension to stop
it from looking too flat. And there you go. There's
the reveal, tape removed. Final little bits and bobs. Now, we're going to
use that dip method. We'll be going straight in with that poppy red to really add in some more nice elements of color to the overall
sketch itself. I think that just adds further depth and
texture to this sketch. I think this is about it now. So all I'm doing here is
I'm just drying it out. Final dry using the dryer. If you don't have a dryer, just go for a little walk, go for a little
break, have a tea, and see how it goes, and it
should dry fairly quickly. So all I'm doing now
is just adding in some more little ditty dots
with my white posca marker, giving it a little dry. And then what I'm going
to do is I'm going to go in with my brush markers. So my brush markers that I use are really nice water
based brush markers. The tones that I've got
are the gray tones, warm gray and cool gray. And I'm just using these to mute out some of those
highlights and just add in a little bit more bit
of shadow work just to give overall balance to the
overall illustration itself. And again, adding in a bit of cool grade there
onto the foreground and the background areas where we've got the blue just to
add a bit more interest. Okey doke. Finally, the
actual design is complete. So I spent quite a
long time on this one. I think it took me
well over an hour, but I did it in stages. I took a few breaks
while I was doing it, and you can see the overall kind of design looks quite nice. It looks quite kind of jazzy and quite themed in its color and its mood and
atmosphere compared to the nice bright
colors that we had for our sketch
exercise that we did. But again, that's my
particular style, as I mentioned before. I like to use a lot of
contrast in my artwork. I just think it gives
it a lot of character. Again, with a lot of
my work that I do, I write some poetry
to go alongside it. So it's a specific style. But again, if this isn't the
style that you want to do, if you want to keep it nice, airy and light and vibrant and beautiful then
go ahead and do that. Try using some of the methods
that I've gone through in this full sketch by adding in
maybe some colored pencil, color pencil that I was using, the Lumos one over here, just to add in some
hatching lines over once everything
is dry and then maybe adding in some gray tones with some water brush
colors if you have them. Then maybe using some
Posca markers to just add in a couple of
highlights and dots, see what it does, see
what results you get. Now you've got yourself a nice
library of techniques and skills using ink tense pencils to start creating some
beautiful artwork. Give this full sketch style
a go if you really want to try applying some of these techniques to
maybe another fruit, a strawberry or a
pear or a banana, whatever you fancy
eating on that day. One of your five a day fruits. You should be
eating your fruits. Absolutely. Not all
about chocolate. We need to go healthy, as well. So draw whatever
you like to eat, apply this kind of
method of dry first, and then letting it dry, building the layers, using
some cross hatching, using the dip method, using other mediums for your
beautiful class projects. And I can't wait to
see what you produce. So I think now I need a rest, and I'm going to go out
to the coffee shop, get myself a nice coffee, get myself a nice little treat. Yes, indeed, and then I'll come back and then we'll do
some final thoughts.
16. Final Thoughts: Okay, Dokey, welcome back. Let's now just wrap the class up with
some final thoughts. Hopefully, you would
have gone through the step by step
process to create the wonderful three Apple
sketch that we did using the different
layering techniques and application methods. And then that would have hopefully inspired
you by watching my little kind of
exercise that I did to complete this
sketch of this apple. I know I went through it pretty fast because we
sped up the video. However, if you want to watch kind of a real
time version of this, then just let me know
in the discussion or just send me a little
email or contact me, however you like
on social media, and I might be able
to even upload this up as a bonus in real time. It took me approximately
just about an hour, maybe hour and 10 minutes
to complete this one. So if you're interested in that, I will put this on as a bonus. But generally, it's not really about watching
every step of this. The most important part is that you went through
the techniques and the differences
that we did when we actually creating these
beautiful three apples. That's what this
class is all about. It's not about realism. It's just about really exploring the capabilities
of these pencils, and then you can go in with as much or as little
detail as you like. So, you know, I enjoyed myself. You know, I had a couple of treats while I was doing this, and I hope you did as well. And if you haven't
done this, then have a look at
those videos again, maybe refer back to
the first class, the introduction
intense pencils. You might be able to pick
up some things from there. There was quite a
lot of resource with that original intense
introduction class where I gave you a resource
pack with that as well. That was part of my
published book series. And again, with this class, there is also a digital
version that I have, which goes into more
details and has some more reference pictures
for you to check out. So do check out the links in the description
of the class if you want to go further into that or if you like a
digital version. Again, these are
all available in my digital section
on Skillshare. So do check them out if you can. Please give the class a go, please give the exercises a go and create your
beautiful art project with the techniques that
we've learned and do share it on your class
Project Gallery. If you share it,
we can all see it and be inspired by
your beautiful work, and we can get others onto this wonderful adventure of
intense pencils and art. So also remember to leave a wonderful little
review on the class when you've completed it and uploaded your lovely class project
to the Project Gallery. And again, leave me a little
comment in the discussion, ask me any questions you like. This is an open arena for us to learn from
each other and really to create this lovely community in art that I'm always talking about so that we can relax and so that we can
just chill out, get away, escape away from the day to day grind of this
live because, you know, it can get us all wound up
and grinded down till we need a little escape
into a world where we can just relax and have
our little adventures. So hopefully, that's giving
you some inspiration, and it hopefully gives
you a kind of kick start into delving into the
traditional mediums of art. Do check out my other
classes on Skillshare, have a look at what I
do on social media. I'm constantly creating artwork using different medium
because, you know, I'm absolutely bonkers about art and especially
traditional medium. So do check that
out. Stay in touch. Don't stress. Don't
worry about anything. Take it step by step. If you make a
mistake, don't worry. I don't want you to start panicking and thinking, Oh,
I've messed something up. There's no big deal. Just relax. Have a nice cup of tea,
have a nice bit of coffee, have a nice chocolate or a
treat or a black forest gato. Whatever tickles your
fancy, to have it, enjoy it, have that lovely meat where you're relaxing with. And hopefully we'll be able
to learn together and really take control of our
mental well being and our physical health. So thank you so
much for your time. Thank you for your patience and thank you for
your amazing support. Without your support,
I can't do this. I can't create these classes
and spend time with you. So thank you so much for
everything that you do for me. That inspires me and motivates me to produce more
classes for you so we can get together and enjoy the adventure of art,
traditional medium. So take care of yourself. No stressing, only enjoying, and I'll see you on
the next one. Please.
 Imran Mughal, Graphic Designer & Illustrator