Transcripts
1. INTRODUCTION: Hello. My name is Minahi. I'm an artist and
an illustrator. I love to draw and
paint flowers. I am a self taught artist, and I want to share with you all my learnings on
sketching the natural world. I have designed this
class for beginners, so I will be teaching
you right from the basics like the
different drawing pens, how to draw the flower, and different
shading techniques. It is going to be a step
by step class where you'll be drawing the flower along with me right
from the scratch. This class will give you
a foundation on not just how to draw antimonies but all kinds of flowers in general. If you think this
class is for you, we'll meet in the
next lesson. Bye bye.
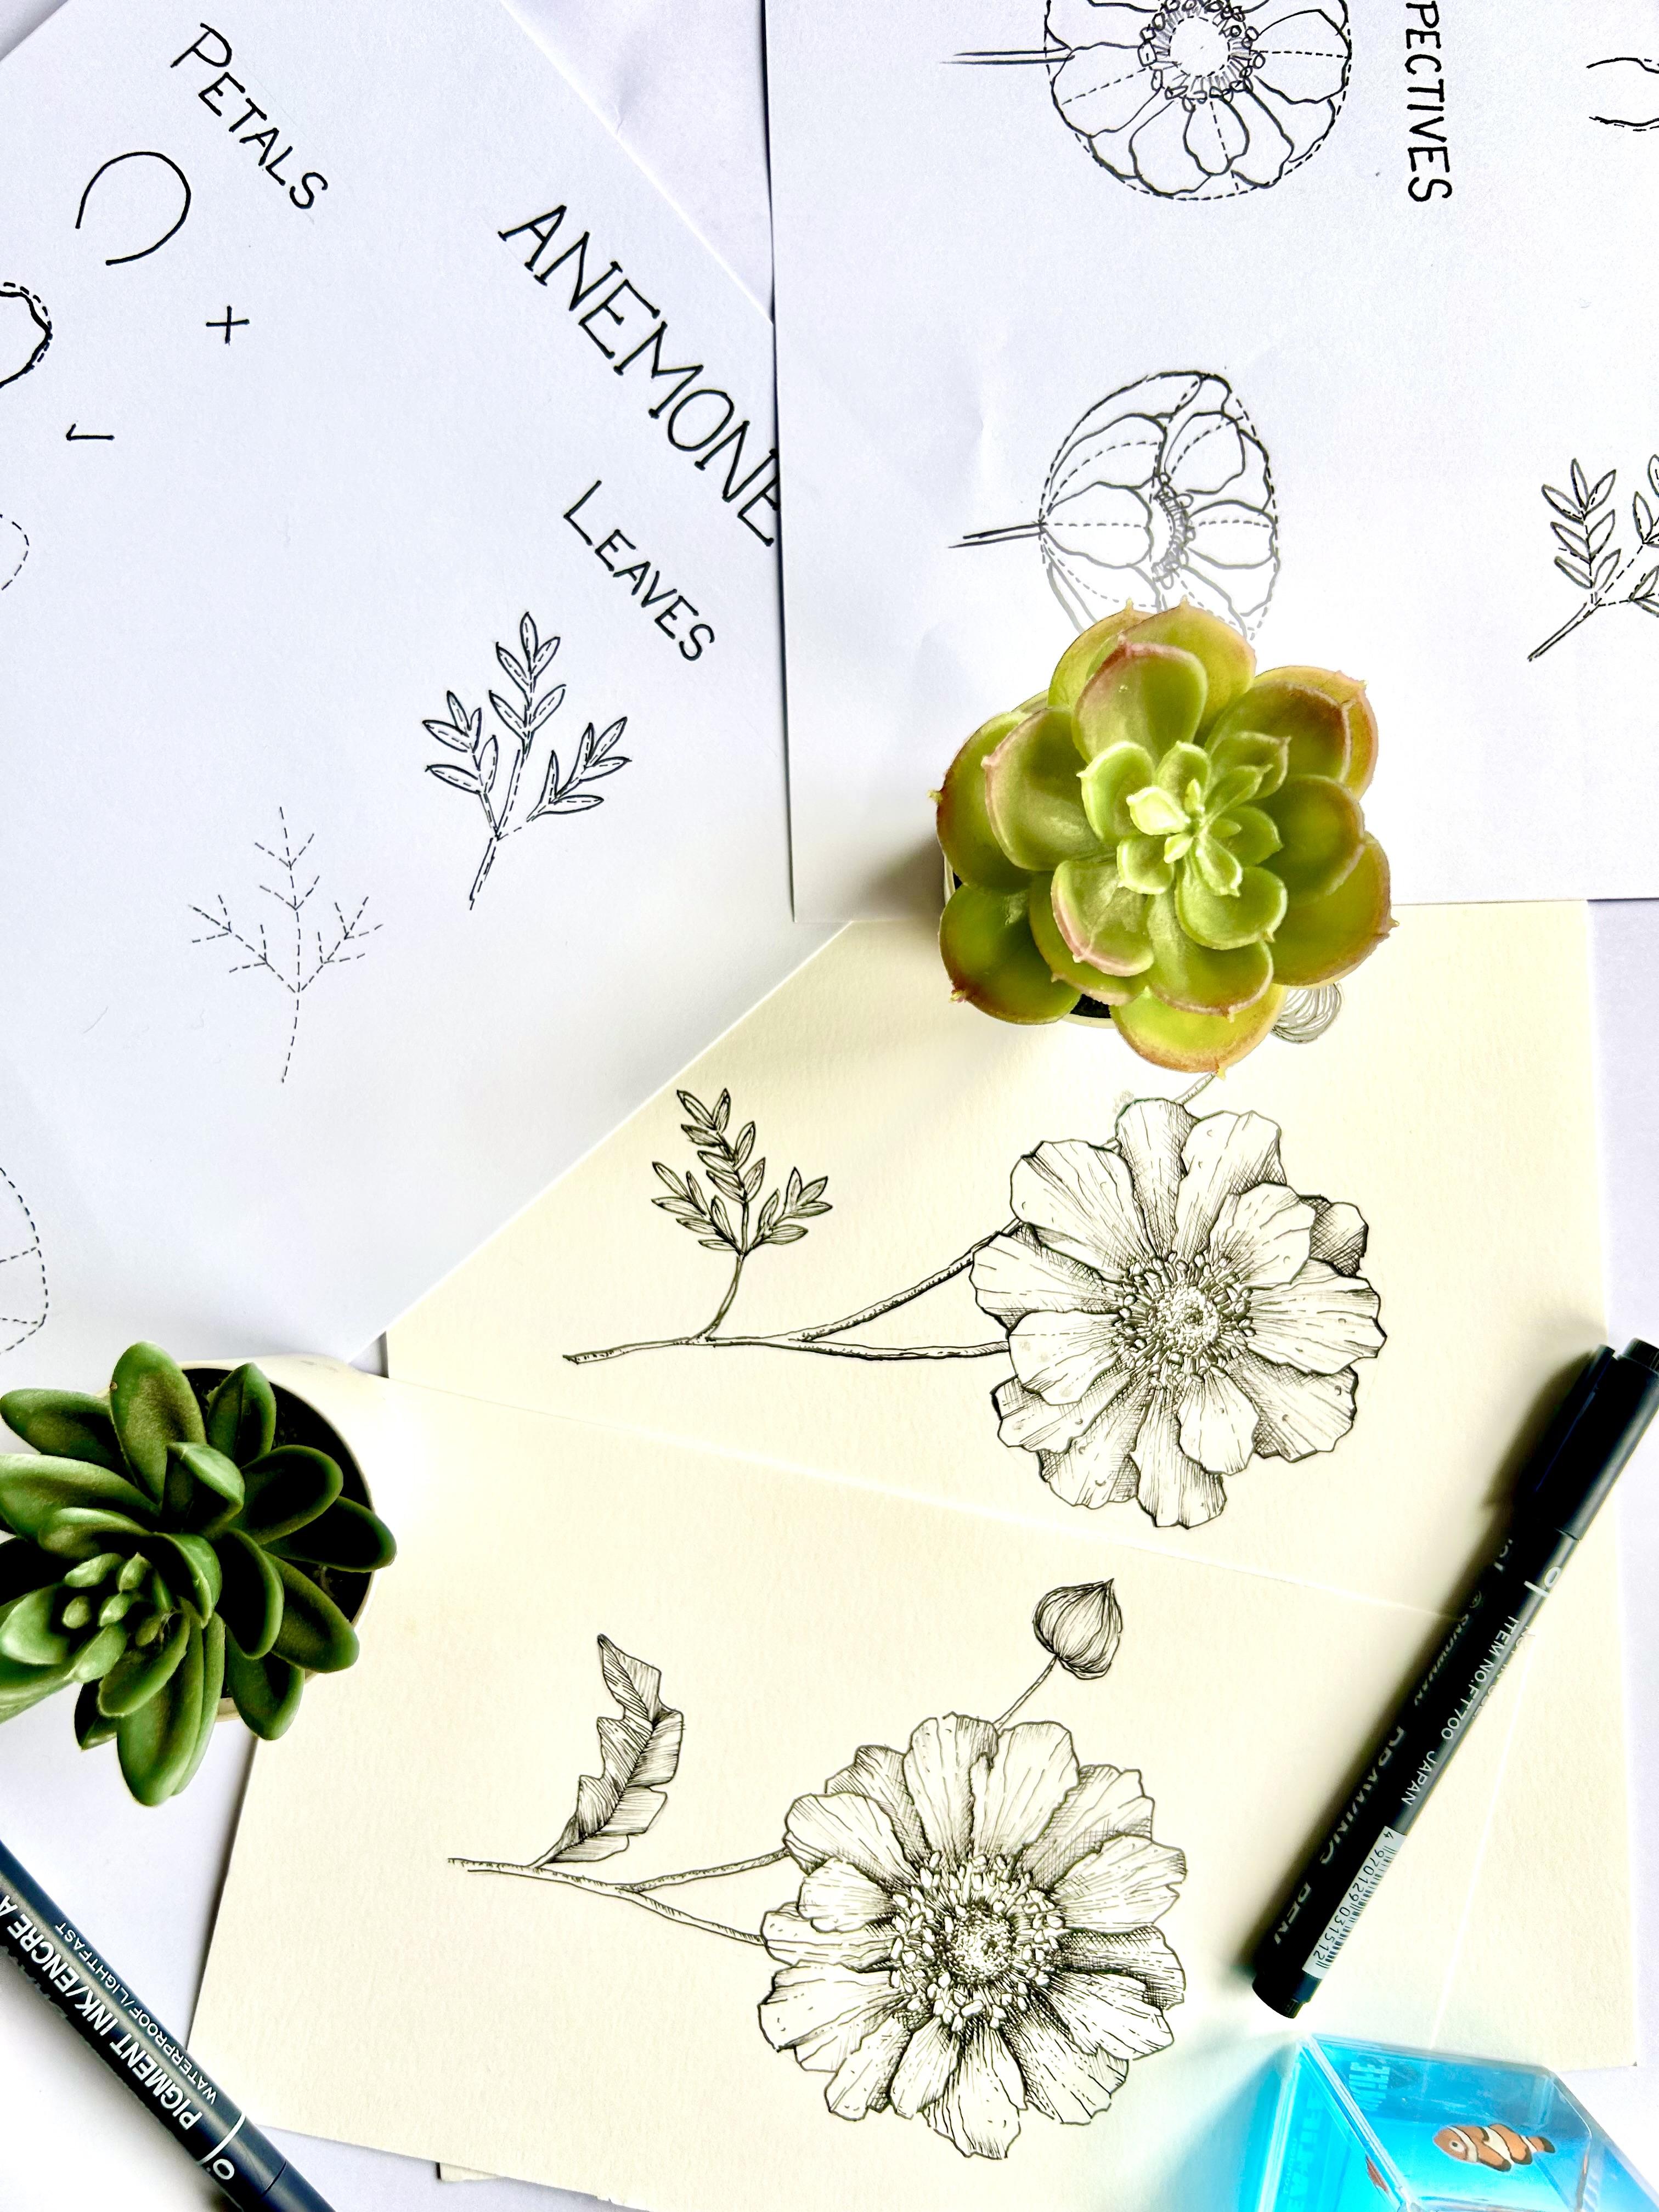
2. REQUIREMENTS: U coming to the requirements, I'm using Stratmoor drawing
paper for this class. It is always my
paper of choice for my color pencil drawings and also my pen
and ink sketches. Regarding the thickness,
I love working with thick papers minus 270 GSN. It's heavyweight, acid free, but you don't always want a
fancy paper to start drawing. You also want a
pencil and an eraser. It could be of any brand. I'm just using a normal student grade pencil
and an eraser. Then you'll need
some pigma microns. I'm using various
sizes of drawing pens. Each size gives a
different effect. This is 0.8 of snowman. You can see how thick it is. And this would be
0.5 of snowman. These are some of the different pens that
I love in my collection. I use different brands of pens. I use pigma micron,
Snowman, art fly. The brand is not much important. Just make sure you have
different sizes of pens, and these pens should work
smoothly on the paper. So these are the
different supplies you'll need before we
move on to our lesson. So grab your supplies, and let's get started.
3. SHADING TECHNIQUES: Shading is adding
dark and light areas to a drawing to create
space and light. Let's explore some of the shading techniques we are
going to use in this class. The first method is tippling. Stippling is a shading
technique that uses small dolls to create
lights and shadows. As you can see, I'm using
the stippling technique to create lights and shadows on
this center of the flower. Let's practice tippling, grab
any pen of any thickness, and start by placing dots. Begin by placing dots spaced
out from one another. Slowly, I'm adding
some more dots to darken the area
as per my liking. The number of dots used and their placement can be varied to create
different effects. The more closer you
place the dots, the darker the area will become. As you can see, we are slowly getting a three
dimensional look. The next shading
technique is hatching. Hatching is nothing but adding lines to create
lights and shadows. Let's practice hatching. Wrap any one of your pens, start by drawing lines from
one end of the circle. These lines can be
drawn at any angle. However, the direction should be uniform throughout the
area being shaded. The next shading technique
is cross hatching. Cross hatching is a
technique that uses two sets of parallel
lines, drased at an angle. This creates a mesh
like effect that can create more depth
to your drawing. For example, in this flower, I'm using cross
hatching technique to give even more
depth to the shadows. Or I can see even more
clarity to the shadows. I start by drawing one
set of parallel lines. Now, turn your paper and draw one more set
of parallel lines which are perpendicular
to the firstly drawn set. I also add one more set of lines at another angle to
create more depth, to create the shadows
even more visible. These are the three
shading techniques we'll be using in this class, stippling, hatching
and cross hatching.
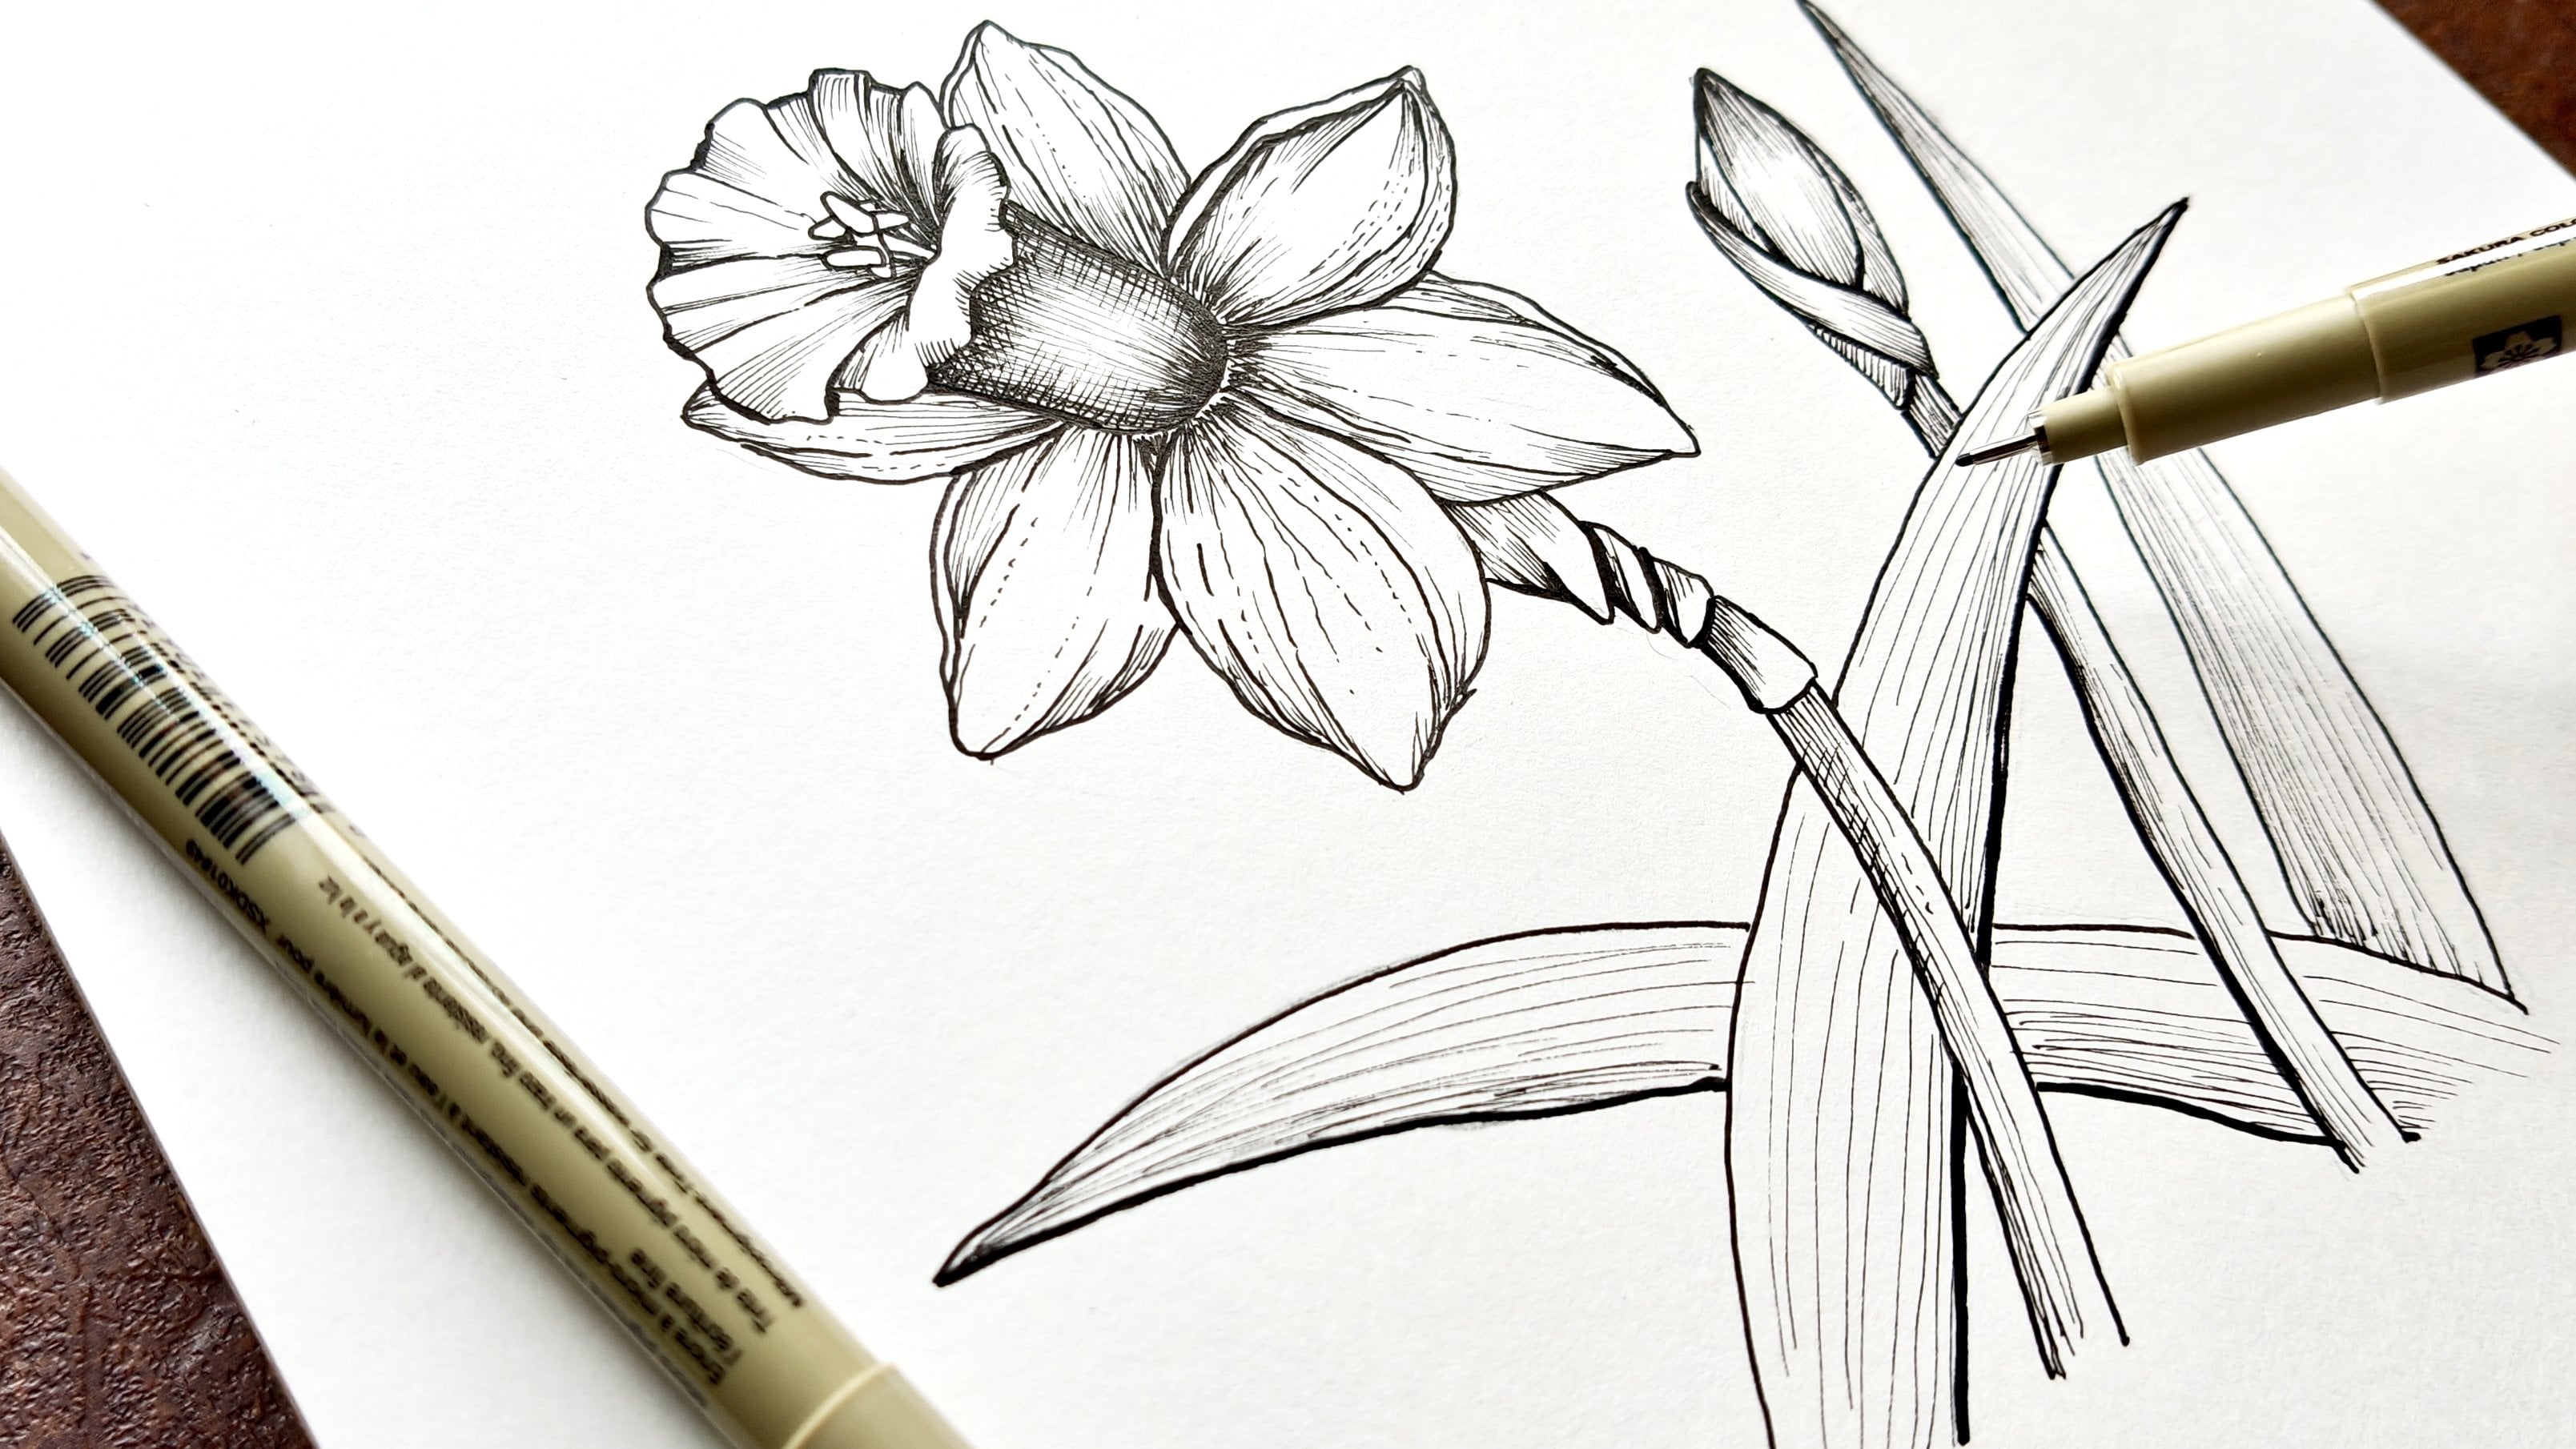
4. KNOW THE FLOWER: I would always prefer to learn about the flower
before drawing it. Let's take a closer
look at the flower. The center of the animales
is called the pistol, and they are surrounded
by a crown of stamens. Around that, they have beautiful petals falling
towards all the directions. I have attached a
worksheet below the video. You can either take
a copy of that or just grab a pen and
paper and draw with me. Let's start with the petals. Drawing a perfect curve for the petal makes it more artificial. So I suggest you to give
some bends to your petals, some ups and downs to
make it more natural. Let's try one more time. Moving on to the leaves, I'm using the dotted lines as a guide and drawing
the small leaflets. The dotted lines give more
control for a beginner, so I suggest you first draw the dotted lines and
then draw the leaflets. Finally, I'm doing this ten. Then coming to the
center of the flower, as I said before, the
center has two parts. One is the pistol and
the next is the stamen. The stamens are small oval shaped structures
around the center. So I'm doing small oval
shaped structures around the center and joining the lines to connect
them to the center. The one I'm working with
is a frontal flower. So the shapes of
the petals are more simple when compared to
the perspective flowers. I mean, the side flowers. Using the dotted lines as guide, I'm drawing petals of various
sizes over the lines. Now we have to draw the
petals which are behind. So I'm starting by inserting few petals below the
first drawn ones. For your better understanding, I'm going to draw one flower
at a different angle, even though we are not
going to concentrate much on perspectives
in this class. Again, keeping the
dotted lines as guide. I'm doing the center, first the pistol and
then the stamens. Then the petals. The petals, as you can see on a perspective
flower are more curved. These petals fall towards
the curved dotted line. Now I'm going to do the petals which are on the other
side of the flower. I'm drawing the petals
first on the dotted lines. After that, the petals
that are beneath. I suggest you practice
the worksheet before we move on to the
main flower drawing.
5. ANEMONE OUTLINE: Let's move on to
draw the flower. To start with, I'm using a circular object
to draw a circle. Then mark the center, and I'm drawing two more
circles around the center, one for the pistols and
other for the stamen. I'm using a normal student
gray pencil to do this. Just make sure that you do it lightly so that we
can erase it later. Then I'm making two slightly
curved lines for the stem. Now I'm making a one more
curved line for a bud. A bud, a flower, and a leaf. It's a perfect drawing, right? Just want to incorporate all the elements so that you
get a better understanding. For the leaf, I'm making a small curve and then
small V shaped structures. That's all without line.
6. ANEMONE CENTER: Let's start by
doing the pistols. For the center, I'm using
02 of pigma micron. I'm going to use stippling
method to do the pistols. As I said before,
stippling is nothing but adding dots to
create more values, to create shadows
and highlights. I'm starting by adding
dots first on the sides. Slowly, I move
towards the center. When you start to
stipple a certain area, start by placing dots
paced out from each other. Then add more dots
wherever you need shadows. This will be the first layer. Now I'm going to add more depth. For that, I'm using even
more larger pen for this. So I'm using Snowman, 0.5. On the center, I want one
part to have more shadows. So I'm adding more dots
towards that point. And also on the edges, I want it to be a
little more dark. So I'm also adding a few
more dots towards the edges. When you use a larger pen, the process will be quite
easy and less time consuming. As you can see, we are slowly
getting that gradient. The drawing is now more
three dimensional. A few more dots from the top
and also some on the middle. I'm using an eraser to get
rid of the second circle, not completely, but somewhat so that only I can
see the circle. Let's do the stamens now. For that, I'm going back
to my pigma micron 02. As I said in the
previous lesson, stamens are nothing but small oval shaped structures
around the pistols. So I'm using my
pigma micron to draw the oval shaped structures.
How do I do that? I'm just drawing some random
oval shaped structures. You know, some are oval and
some are circular in shape. You need not be perfect. I'm drawing few oval shapes
on the top and some behind. Complete the entire circle. As I always say, nature
is never perfect. So you don't try to be perfect. It's okay to be imperfect. I'm going back to my bigger pen, and I'm drawing a few lines to connect the stamens
towards the pistols. This may not be a straight line. Some may be curved, some may be slanting. Why do I use a
bigger pen for this? It's because these lines
are usually thick, and to add more depth, I'm using a bigger pen. I'm connecting all those tiny little oval shapes
to the center, and it's almost done. These old shaves, they have
a small slit on the center. So I'm making a small line on the center of
all the old sheaps. We will be doing some more
highlights on the center, which lifts up the drawing in the coming lessons.
That's all for now.
7. PETALS PART 1: For the petals, I'm going to draw the guidelines
using a pencil. Now, draw the petals
over the guidelines. Since you are using a pencil, you can always go back and change it if you don't like it. As I mentioned in
the previous lesson, you need not draw a perfect
curved shape for the petals because drawing a
perfect curved shape makes it more artificial. As you can see, I'm doing
petals of various sizes. Some are small and some are big. Using a variety of sizes
gives a more organic look. Make sure you give
some ups and downs, few bends to your petals. Now we have drawn the petals
which are on the front row. Now let's do the petals which are beneath the previous petals. For that, I'm drawing petals over the
previously drawn petals. And then I raise off the
intersecting curves. Here we go, can you see
how beautiful it is? Similarly, I do more petals
overlapping each other. The idea is very simple. We're just drawing more petals, overlapping each other and getting rid of the lines
that we don't want. In general, these
overlapping petals, they will be of a
bigger size than the previous ones
since they are behind. Use the same technique and complete drawing all the
petals of this flower. Now that we are done, I'm erasing off the
unwanted lines. And also, I'm making the
petals outline much lighter. Now let's start to pay. Again, I'm using my
pigma micron or two, and I'm just
outlining the petals. I'm just going over the
outline with my pen. After you complete
making the outline, erase off the pencil
marks using an eraser. Now that we have
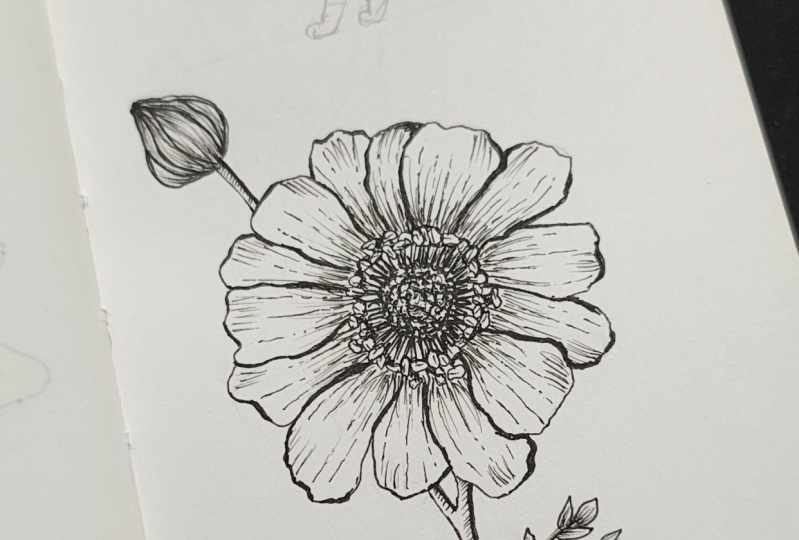
drawn the outline, let's do the shading work. For the first layer of shading, I'm using the
hatching technique. As we have discussed in
the previous lesson, hatching is nothing
but adding lines, palo lines to create
depth and shadows. I want to create more shadows towards the bottom
end of the petals, so I'm adding more lines
towards the bottom and starting from the bottom towards the top of the petals. These lines, they can be broken. Or it can also be
a complete line. The only rule is
that these lines, they go towards the
direction of the petals. If a petal is facing down, the lines will also face down. And the petals
which are beneath, they have more shadows, so I'm adding more shadows to the petals that are beneath. And also in the folds, you can create some lines to
create that folding effect. It is a combination of lines, few broken lines, and also dots. If you take this petal, which I'm drawing, it
is behind a top petal. So it has more shadows, so I'm drawing more lines. So that's the concept. If you
want to show more shadows, you add more lines, less
shadows, less lines. These more lines on the top indicates the forms
on the petal. Using the same method, complete the entire flower. This forms the first layer of shading. In the coming lesson, we will add some more layers
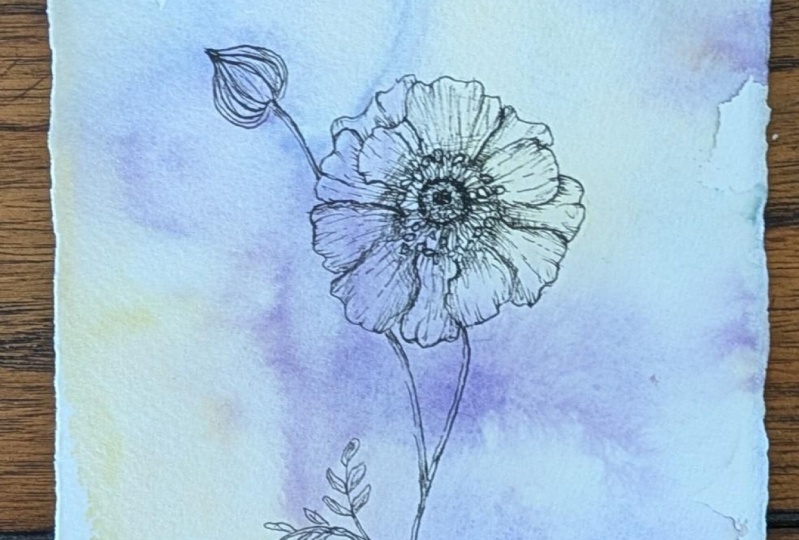
to this to enhance its look.
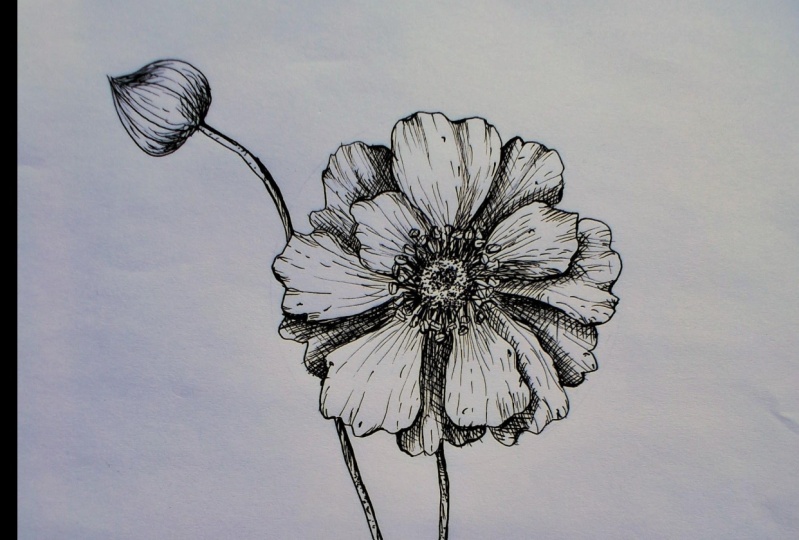
8. PETALS PART 2: We are going to do
hatching again. But this time, you should
hold your pen at an angle. For this, I'm using
01 of Pigma microme. I'm drawing lines by holding my pen at an angle
of 45 degrees. This will help us achieve a nice shading effect
to our drawing. I'm drawing more lines
where I want to represent the shadows for the petals that are beneath and
adding more lines. Also, I'm drawing few lines to represent the foldings
on the petal. I'm just drawing lines on top of the lines we
have drawn before. You can always turn the
paper and be comfortable. These lines are more closely spaced than
the previous layer. The next step is to
do cross hatching. By the way, I'm
using the same pen or one of pigma micron. Cross hatching is shading with two or more sets of lines
at different angles. I'm making new sets
of lines which are intersecting the
previously drawn lines at a different angle. I'm doing this cross
hatching technique to the areas where the
petals are beneath. Since those areas have
a lot of shadows, I want to use this cross
hatching technique to make those areas much
darker than before. I'm just making those
tiny little lines at a different angle. One more thing to notice that these lines are
parallel to each other. Even though they are at a different angle than the
previously drawn lines, these lines, they themselves
are parallel to each other. I'm also making one
more set of lines which are at a completely
different angle than before. Doing this makes the area
much more darker than before. I'm doing a lot of
cross hatching to the petals that are beneath
than the top petals. By the end of this lesson, our flower starts to get a
somewhat realistic look. We are going to work with the highlights in
the next lesson, which enhances the
flower much more.
9. ANEMONE HIGHLIGHTS: For the highlights, I'm using a bigger sized
pen, 0.5 of Snowman. Using your pen, start
highlighting the petals. Wherever the shadows are more, I'm using my pen to highlight. Don't just outline
the entire petal. It will not show any
difference in values. Instead, highlight wherever
you have a lot of shadows. You can also add
some highlights on the folds like what I do now. I love this deep because this is where a drawing
comes to life. So highlights are very important
for a realistic drawing. After you complete
highlighting your petals, let's move to highlight the
center part of the flower. I'm highlighting the stains now. I'm just highlighting
those small lines which connect the stamens to the pistols and also those
tiny oval shaped structures which are the stamens. You don't have to highlight
the entire oval shape. Instead, just
highlight one part of the oval where there
is a lot of shadows. As you can see, our
drawing is coming to life. In the next lesson,
we will do the stem, the leaf, and the bat.
10. ANEMONE LEAVES AND BUDS: For the stem, I'm using
02 of pigma micron. Slowly, I'm drawing a curve using my pen over
the pencil mark. I'm making another curve. And for the bad, it's going up. I. It's going to be wide on the bottom and
pointed towards the top. So I'm going to
draw in such a way. Then I'm making the bud. The bad has a lot of segments. So I'm making a few
C shaped curves. Then the sten goes
down to the leaves. For the leaves, I'm going to
draw using a pencil first, and after that, I'm going
to use a pen so that I can always go back and erase
if I don't like the shape. I'm making small leaflets over those small V shaped guidelines. I'm making the outline
for the same with a somewhat medium
sized pen, 0.4. Just going over
those pencil marks. Then drawing a curve to connect
the leaves to the stem. After your ink is dry, get rid of all those pencil
marks using an eraser. I'm making the leaves propy. Now I'm using a bigger sized pen and drawing one side of the
stem to indicate the shadows. Same for the stem
which goes to the bad. I'm using the pen only
for one side of the stem. This is to indicate the shadows. I'm not satisfied with
the outline of the bad, so I thought I will go back and draw the same with
a bigger sized pen. Now for the shading, I'm using a mix of stippling and a little bit of
hatching for the stem, few dots and few lines. That's all. Same for the
stem which connects the bud. As I go below, I'm making the lower
part a little bit darker because it has a
little bit of shadows. Then I do the shading
for the leaves. I just draw a few lines
over those small leaves. I draw a few lines which follows the
direction of the bad. I'm making the lower part of
the bud a little bit darker. I do this by drawing lines which comes from the bottom
towards the top, and also for the same
on the top of the bud. These lines come from the
top towards the middle. This creates a three
dimensional effect.
11. CLASS PROJECT: If you are drawing along
with me in this class, I encourage you to
share your projects, or if you are just
watching this class and if you want a specific
project to work on, I first suggest to you
to get some inspiration. There are so many
photos on the Internet. You can always take a look and start to draw your own flower. You can try incorporating
all the elements we learned in the
class like a flower, a leaf, and a bud. Whatever you draw, it
might be very simple, but still, I encourage you to post it on the
project section below. Thank you so much for taking
my class. It means a lot. And please share your feedback. It helps me create
better classes in the future. Thank you. Have a great day. Bye bye.
 Meenakshi Muthuraman, Artist and Illustrator