Transcripts
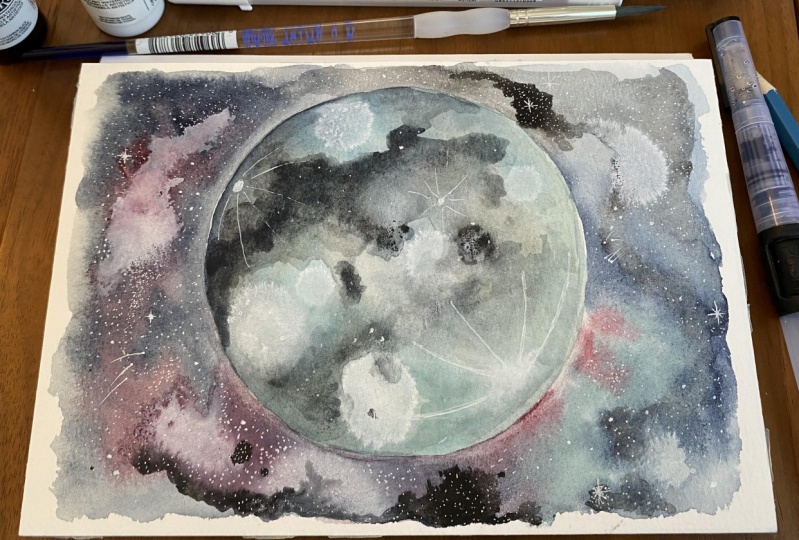
1. Moon trailer: Thanks for joining me for another class in this passage, put together a step-by-step process and how you can create this quarter ending. Because it's perfect for those necessary to get into watercolors. Or if you just have one person who lose water from exercise. Since we use simple techniques to achieve texture and variation of the normal color palette. And these are honestly so much fun to make, and they don't take one girl. So I hope you enjoy the class.
2. Layer 1 : So first thing we're gonna do when starting our mood paintings. Just gonna get a bowl here, being given like a mug or anything. You have that circular. Trace it on my page. So I'm just getting my brush here. And I'm just going to cover that whole thing in water. And I'm just going to be very careful about I'm not going over the edge because the pay is gonna go wherever the water goes around. A really light coat of paint first, layer it. So I'm going to grab my brush. Maybe just makes it a little bit. And you can go in and change the color a little bit. Brown on my brush. Mostly gonna go in with some just really lightly. I'm going to pick up too much my branch. And she's gonna make sense with the boil a little bit. I've got a little bit so I'm just taking water and picking it up. Brush your eyes. So another thing you can do with this layer is just grabbed, clean your brush and then grab some water. And just make little dots where you've painted. I'll give it some texture. And you can also do this with salt if you'd like to. We're just gonna grab a little bit. So do the same thing to sprinkle it on. Any use, clean up the edges a little bit here. If you notice it kind of spilled over. So I'm just gonna wait until it's almost dry and then I'm going to go back in with a darker color, maybe some more black, mix with Boyle and make some darker spots airing.
3. Layer 2 : So just coming back to the second layer. And just by looking at this, I guess satellite, we can tell it it's dried up a little bit, is still a little bit damp on the top. So entrepreneurs go back with some mix up the little bit of blue. And I'm just going to start making some darker shapes in here. And of course I am going to add some water to it. So I don't have hard edges there. You can see it's starting to just bleed into the background and that's perfect. And I'm really trying to fix the edges here really carefully. Just kinda moving around these areas where the paint is just kind of pooling to add a little more black, a little bit darker. It's gonna make flow creators here and soften. This edge here doesn't have any like how that looks. I'm just kinda six these edges, a little bit more black to that big blob in the center. Speak a little bit longer. I think I'm going to add a little more salt actually to this. Is in the bottom part. A little bit up here. Can do marvelous. Brush, rinse it off. Just kill back into some of those spots. The painter, just to create more texture instead. Look like there's craters there. You can just pick up some paint, can just pooling here to feed on like that. So I'm just going to let this dry. And next layer will add more black and make it a little bit darker on the top.
4. Layer3: So now that that layer is done, we're going to start on the next layer. And as you can see, it's kinda created these nice little textured areas from the salt. And so I'm just going to start dipping into some black and starting to get a little bit darker with the leaders. And I'm going to take my brush and just wash it off with some water and use that water to spread out the paint a little bit and get rid of the hard edges. So this is our last paint layer. So I'm really just aiming to get down as much detail as possible. And I'm going to be using this wet on wet technique where I'm gonna be taking just some water on my brush and spreading it out and just adding a little dabs of this black paint everywhere. And this will create a really interesting textured look. And I really like this technique for this moon paintings, the PINKO does, does its own thing when it spreads out. And it also just meshes with the other layers, which is really what I'm trying to achieve. And I think it looks really cool. So next I'm just going to clean up, pay off my brush, and just take a little bit of water to clean up those hard edges. So well that side I painted as so a little bit what I'm just going to continue doing those same technique with the wet on wet and add a little bit more dots of paint and even just go a little bit darker. I picked up a little bit more pigment on my brush. And I'm just continuing that process. Just keeping in mind, well, I'm painting those spots that I meet with assault. So I want to I want to be able to see those that don't want to paint over them to keep that detail in there. And I've just got a little bit more pigment on my brush. And I'm going a little bit darker because watercolors all about layering. I've just been going darker and darker with every layer of w1. And I'm adding a few more spots. And I think that's it for the third layer.
5. Layer4: So moving on to our last layer now and just make sure everything is dry and all the Soul is wiped off. I'm just going to grab my weight pen here and start adding some detail. I'm just going to be doing some dots, kind of in random spots. And I'm also going to be adding this other little details, just a circle with these curved lines coming out. So click bigger craters. And I'm just going to add another one of those creators, the sides, you can put your server if you want. I just like how it looks to the side. And I'm also just going to add few more dots around in different spaces and different sizes. So it looks a little more interesting. Just adding a few more of these little dots of different sizes all around. You can add as much or as little as you want. It's really up to you how much detail you want to add there. And once you're happy with the level of detail you have done is the last layer and you have your final painting. And these are really fun. You can do this a few times with different colors and the alternate different every time. So I hope you enjoy it and maybe try another moon painting.
 Tori Sopel, Artist + Instructor