Transcripts
1. Hello!! An Intro about me: Hello everyone, myself also use undergraduate and my Instagram handlers was who are 2020? And a mother of two girls. And I couldn't contain the excitement former first co-chair class project. I'm an artist and I found myself working mostly with watercolors, allowed to explore that medium. And I fell in love with this passion for painting during the lockdown. Today, I have come up with an amazing art projects for you, all the struggle. So let's dive in and see you in the next session.
2. Materials I use: Let's quickly see the materials I'm going to use for today's class. As for the paper, I would suggest you go with any paper with 300 GSM. Today in my class, I'm going to use Canson Excel watercolor paper, which is 300 Judaism, and it is cold pressed. As for the pressure's, I'm using ROM pressures of various sizes of round and flat from Princeton and Betty Haley's, along with pencil and masking tape. As far the colors. This is my advisor collection of Article of cubes, which I use often. And today we will see the color palette for each project's before we start. We also need a cloth to wipe boat excess water from oppression. And along with two glass jars of water, grab all your art supplies and yet stat our first project in the next session.
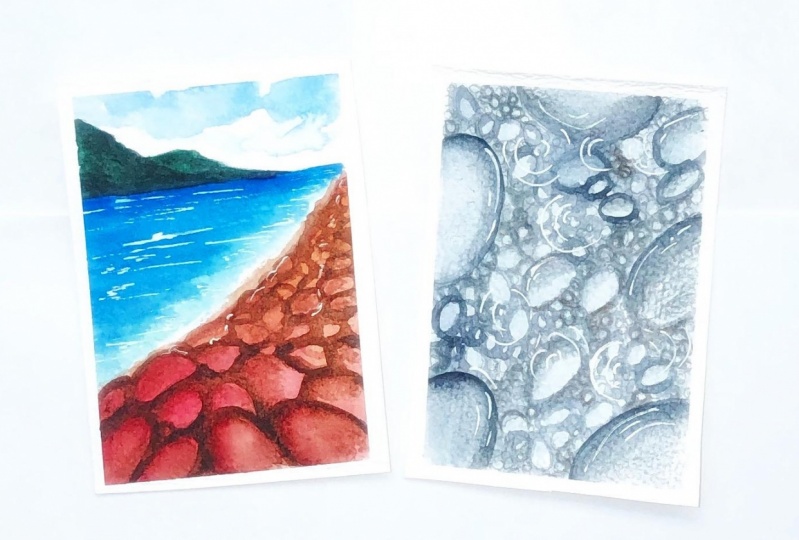
3. Project 1 - Pond Pebbles: Hello, I'm Gary joined the class. This is alpha's project on Pebble series. It's been inspired from one of my favorite coupon painting. As for realistic art books or concern, takes more time and we're hopelessly lose patients before completing it. But today, I'll teach how easily we can get this realistic effect in the pebble series using minimal color palette and time. So come let startup project.
4. Pond pebbles - Part 1 (sketching): For all our projects, I'll be using the E6 version and this can be transferred to any sizes of Yochai's. First, let's fix all the four sides using a masking tape. The tape I'm using is bark from a stationary shop. Now let's sketch the basic sketch of upon purpose. This is a simple sketch and it's all your intuitions to how the pebble should look. From the top, I'm going to draw a few larger pebbles at the edges. You see this coil pond painting. There are raining bubble sizes randomly distributed, which would please ask that dep in that bond. So make sure your sketch includes different sizes of pebbles from smaller to larger size varying randomly. The more differentiating the perverse, the backorder realistic effect, it gets. Just fast forwarding sketching so that you could tensile, mature, larger sized paper, all the insects washing up your paper. According to the different proportions. We need these patients to bring our atomistic scale to next level. But I can assure you this is going to give very less time. Ask you follow negative painting technique. Actually this realistic effect, which is easier than the painting individual purpose. So just enjoy the process and see how realistic and beautiful your project is going to look at the end of the crushing. These parabolas are either circular or oval shapes and it's very easy to draw random shapes. Yes, I agree it takes time, but it's totally worth it. What was our final sketch? I'll add this and that. And so section barrier offense. Next is going to be painting time.
5. Pond pebbles - Part 2 (Layer 1): Okay, let's call that a bus. We can choose any greenish blue, always glue. So fast legs went this office. I'm going to show up to my Raja brush of sizes from bernstein. So this is how am I going to use? This is a gone blue from Artesia. First light wash. As we're going to read ako, once we give the retailing, we can obtain this calendar by mixing any bluish any blue of yours with fend off me. So that's our first courting. Let's wait for it to dry. Now. Let's try. Now let me explain how I'm going to proceed with the printing. Let's construct this is our problem. I'm going to give one side of the Berber darker than the other. My painting, I use mine sites three brush since my paper sizes small. So if you see this barn painting, this is what we are trying to achieve in our painting. First, I'm going to give a light color to the purple. And then I'm increasing the dome at one site. And then I'm blending it twice bordering the edges. So to again increase the vibrancy, I'm giving a second jacket on. And then again, I'm learning it. The depth to the pebble by giving a darker color. I'm here, I'm going to use black color around the purple. So this is what will follow in our painting. This assert that this is an example of how we are going to proceed without verbal painting. So now backdoor project, I am going to start with the H bubbles. First, I'm granting visit on the inner side of the table because this is the regenerative embedded inside the barn. And hence it will be data. So we are going to follow the same for all the purpose. It is not difficult as it sounds, because it's very simple procedure which can be easily followed and carried out. And this will ultimately give that 3D effect like it is being under desktop upon. Yeah, I'm going to work with regions. First. I'm going to paint in this region. If you look closer, you can see I'm bending around the bubble and making one set of the pebble agenda. This will help you get that realistic effect in the company. So as you can see, I am increasing the tonal value around the edges of older smaller pebbles. And once this is done, we have to blend that darker region along the one side of the table. That is, as we discussed in this, we are going to increase one tonal value of the pebble. And this, we also have to make sure that the darker region is smoothly blended along the background of the Pebble. Once we have painted around the edges of the temples, we have to be very careful and blending colors for the pebbles. Now, you see here, I am trying to blend that background which I have given around the edge to the English only value along one edge, one edge of the problem. So I'm documenting that. I'm giving more darker sheets to the purple so that it can be smoothly blender and gives tax gradient effect via toggling or the gradient African the poverty, so that it looks like a greedy voltages inside the bomb. So now let's focus in the downgrade. Now I'm going to follow the same procedure. I am trying to give Dhaka coating around each carbon. So once I am done with that, I'm going to blend it in and I'm going to try to get the gradient effect as we noted earlier. And I'm going to blend the data. Whenever I leave the dot current, just blend it in and make it small so that we get that darker shade at one side and white trade at the other side. I have zoomed in here so that you could clearly see what is happening. How I'm giving the coloring each bubbles. As you can see, I'm just following the same procedure again and again for all the diverse given color and I'm living it in. So this is like a darker shade and you bring blend Newton per every paper. And if you could see, I am just repeating the same thing. I am making. Darker region around the edge and I'm trying to blend written and I'm giving the gradient effort to each bubble and so that it gives a 2D effects. So this is the usual technique we are falling for a religion. So as we blend in, we should make sure our brush does not hold much water. We have to remove the excess water from our brush and lift the fresh damp and knock wood which holds more water, used a damn brush to Blender edges and make it smooth so that it brings data variation in color from one edge to the other. I think by now you understand the procedure and phalanges of bubbles. I'm just trying to bring out that gradient effect in each bubble. And you're going one should, one bone darker at the edge of each bubble and may make it look like they deeper well-wishes embarking upon. Since it is the same procedure we are following, I have fast forwarded so that you can observe the formation of each pebbles. So if you observe here, I'm going to give now a darker shade of AIG and glue along the edge of like other than the parabola, I'm going to get a job. Like this is the one we are talked about in the technique section. And we are giving the depth by giving a Docker donor around the edges so that you dislike it. It is like the bottom edge of the bond is completely filled and appears dark so that we get that the effect of depth in that I now painting. So if you could see any of them so that they can form. It looks like the bubbles are the smaller and medium peppers are being being at the bottom of the pond, right? Ps, I have to agree that patients is something that we have to have to achieve this result. We are doing the same thing again, like coloring around the edges of each and blending it. And we are doing one shared data into one side of the purpose. And we are failing in the areas which are not our recovers in a darker region so that it could doing that. And SO following the same thing. And now we can see that we have our end of the first layer. Because this is not done yet. As you can see, just the faster layer and bring cleans the vibrancy in your painting. And but Brenda, perfect 2D effect. We have to go in with much more details. And you could absorb that. Much difficult like Curtis does enthusiastic have given order the first layer. The second layer is not going to be difficult at all. So now we are done with the first layer. And the second layer we'll just see how Paul Increase the vibrancy and how to increase the depth by increasing the tonal values. So, see you in the next session.
6. Pond Pebbles- Part 3 (Detailing): Welcome back. We are in the final detailing of the pond pebbles and let me explain how it is going to be proceeded. Firstly, I'm applying a da Cortona gauges and I'm washing my brush and clean water or to make sure doesn't hold much water to flood the purpose. So we have to dab it in the cloud so that our bashes damp enough was the rough edges, which ultimately gives you that gradient effect. I am repeating the same procedure for darkening the edges and blending them with the background. You can see here in this walk, they have to perfect that water inside the backend flux. I am doing this for all the larger pebbles and I'll do the same for small converse as well. So our main aim in this project is to concentrate on the highlights and shadows of open ball to make it more realistic. Once after the final layer is given, we will be done with the first project. Let's start with the two layers. If he managed to give Reverend colors in the second layer itself. As you see, my cholesterol freedom into layers and I have to go wild, trade darker than this. I'm going to make the empty areas Docker rather are no pebbles. This is what we call negative painting technique, which will further discuss in my next project of Superbus. Now I'm filling a brush with black and making all the areas black. There are gaps in between purpose. This is a very important step as this is where we could differentiate individual pebbles and the gradient effect on them, which make it look as if it is embedded deep. I'm using arrows lab and I am going to blended to make only one edge of each parabolas data. And the other one is lighter so that it gives that pretty looking bubble in that part. Was if you seek and a field of depth and appending wet steam inside the bond. I'll fast forward here so you can see the permission. So you can notice I'm only printing the outer edge of each bubble. And this darker layer is bringing a whole new perspective to the planned purpose. Here, the technique is very simple. First we have to darken the edges and smooth and the rough edges to their damn brush. Once we managed to put on the same technique, pot all the pebbles, you can get a beautiful end result. As we'd like to see me, I'm posting Postel Chair students who enroll in this class. And also gratitude for everyone who supported me in my check, my Instagram handled. And also our 20-20 low water bond and give back to the project, as you can see, giving data sheets that have been in region. I am suddenly enjoying the process. Once we repeat the process of darkening the MPI spacers in between each of those, the project will be completed. So this is a representative process. I'm doing the same thing for all the regions. And if want to buy this on a larger scale, you make sure you use larger dimensions of comparables so that you don't consume more of your time. And mostly going directly why red color and the bullet's finish it off that dollar. As it was faster project for me, I wanted to go take slow. So I took three layers, was player with only a light wash off for blue. And the second layer, I'm extra level blue, blue and black. And then a third layer. I look all of mostly black that laissez gone blue. This consumer more time vanitas required. So when you go for larger scale mixture, Tokyo Carlos vibrant says that you don't forget to give gradient a factory of permits. So now we are nearing the completion of darkening the layer around. The closer look probes on what actually I'm doing. So because of our blender and just are so rough. So that's why I'm making a blend over each bubble so that it gives a smooth finish to dopamine. But I am my damn brush to do this. I'm killing the brush and clean water and having it in my Claude and removing it disc-like lifting the pain from either the darken existing layer and ultimately giving their depth to their area. Here I'm repeating the same process again for all adult regions or bring out that gradient effect could each company's distinct for a final minute detailing gods are white gel pen. You can use your whitewash. Learning some random white lines and circles to permit them look like water droplets. You can also use larger Western culture may give a wave back and maybe patently water to bring out the effect of making it look like it is under the water. The next project I make when using negative painting technique and ask what this work is concerned. You can use this work to create bonds with fisher's, like the one I have written. So in the next class.
7. Project 2 - Sea pebbles: So welcome back. I'm so glad you're back on second project of bubbles. So the materials I'm going to use masking tape, a pencil for sketching. Razor. And seismic material is don't breath, long Roundup and stand over the edge. And natural head pressure of size p and phi m, the wash brush to wet the surface. So let's get started with the basics cutoff. See bubbles with Docker, birth, seashore, and some mountains at the backdrop. Simpler sketch on C purpose. I am growing larger size bubbles at the end of the variables like curbing point and ask me go nearer and nearer to the shore, that pebble size decreases. If I reach the middle of the paper, my size of the bubbles will be medium-sized. And as I reached the near of the show, the size of the perverse will never be small. So that's how we are going to see bubbles from one end. Let me fast forward the sketch for you. So as you go to the pebble size decreases because your viewpoint it from a larger distance, the size of the first decreases. So this is the line which is a horizontal line in the sky and ocean. And these are the mountains of the band gap. So this is the simple sketch on fisher with perverse and some mountains at the backdrop. You look closer. You can notice there are differences of size in the numbers from one end to the other. I'm going to quickly switch the colors, which I am going to use in this project. The first one is pink. This is paint from Artesia. The second one is grown. It can be burnt sienna, band number four, darker, rational Brown. I'm gonna mix brown, black. So you can choose any of your brand. The next color is yellow ochre. And mixed colors, they're lighter version of a Loca. So these four colors, R4, bubbles n Does he showed so far the C. I'm going to use ballo blue. For the darker side of the CAM, use tallow blue, and for the lighter side, I'll use emerald green. So after the sky, I'll use Prussian blue. You can use any of your blues, civilian blue, cobalt blue, and the blue is finite. Next color is black.
8. Sea pebbles - Part 1 (Layer 1): Well, let's start with tarring the Superbus. First, I'm going to wet the surface. I'm going to use pencasts, my base layer for the caboose. Archer sprinkler's my thus basically because I wanted it to look more vibrant and attractor. Explain what does negative Lincoln now? So as I said earlier in my first project that I'll be using that to printing technique to paint shippable negative painting when you leave the subject and you played around the subject. We did this. They span from V2. So here I have made an outline, but I'm not going to correct it. Instead angling to collect outsider averts which are made outlined. This brown color is darker than the pink color which are used as the base layer. You notice I'm not waiting for my main program and I'm looking in the rectum with medium itself. They don't have to worry too much about the detailing in this layer. Next, I'm going to pick a one shade darker than the previous one, and I'm going to give another layer, which is the median price bubbles. If you notice the pattern, you can observe that each layer of pebble is darker middle previously. We should remember the sketch that, that at the end will be larger, near the shock will be smaller. As we approach, we have the short, the size of the purpose should be smaller. So now I'm going to get my darkest brown. I'm going to mix wrong with black. I am given the outlet for the smarter purpose with my darkest brown. You can use the same Brown who continue giving the Auckland region for all smarter burst through the end of the short without learning of the smaller purpose we done with our fast layer. As I mentioned earlier, in this step, you don't have to worry about the detailing. And next session, UNC Help or continue with the second layer.
9. Sea Pebbles - Part 2 (Layer 2): So welcome back. Let's start with the second leading for say, bubbles. Fast clearing. We did not care much about the details. And we just established a base layer for all those smaller bubbles and the larger purpose. The second layer, we will concentrate on giving our definite outline to our servers. As you could see, I'm using concentrated thing for this. Let, I will use this concentrated color to bring out the gradient effect in the purple. I'm shifting now to my long run from Stan velvet touch of size eight. As it has a long run pointer, it is easier to work with detailing. I'm killing my brush with the darker tone and I'm trying to give a brilliant attacker dependence. The second layer is all about giving our definite shape two out, but we can choose our own color palette for coloring the peppers. I have chosen here bring can groan requests. I feel that being Carson shiny effect on the pump. If you see I'm not falling the sketch which I did in their snack after project. I am randomly drawing them both at the place where I feel that will be Roger polymers and a place when it will be smaller pebbles. And here I have drawn us more capable in between each grumbles to bring out that affect, which I said, you know, first project of varying sizes will give you a reality effect. So that's why he introduces smaller in-between there. Because for the first line of progress, I used concentrated thing to bring out the definite shape to that. And for the second line of code, I am using a dorm darker than the pink by mixing a brown to it. If you could observe, I have not very interpretable. Instead, I'm painting around the pebble, could just buy. It is easy, time consuming to complete the project. Every time we make an outline to the pebble fissured, make sure that these mood on the edges for doing that. I am dabbing my passion, death. And I'm smoothening the edges by removing the color from my brush. As I go higher and higher, my kinda purple changes and I'm using dot concentrated prom for the medium size for both. To see I'm using things further, faster, cool layers. Now it's time to view definite shape or smaller sized bubbles. For this, I'm using brow black. If you see I'm only giving a shape to 1.5 of that because the other half is not visible as it is hidden behind a bus which is in the front. As you could see, even the brush size of minus eight has a very long pointed to. It is very easy to draw them lens using this. You can use any office smaller size, detailing brush to give our definition for a smart campus. They have almost given an outline to all sides of the purpose. And I could see a difference from past layer to the second layer has got a definite shape this time. Finally, I am trying to smoothen out the rough edges because of the outline using this thin pointed brush. Near almost gone for our second layer. The next session, we'll see more about the detailing for the bubbles.
10. Sea Pebbles - Part 3 (Layer 3): So we are back. Let's start with minor detail links. First two layers, we try to establish a base layer and also gave our definite shape blow bubbles. In this session, we'll try to repeat the same step as SoftLayer group by increasing the tonal values and Ursell filling up the empty spaces with dark brown and black. You can see that I have filled my brush with a dark brown and I am filling their spaces in-between the larger bandwidth as Small, Smaller purpose. This is to give the definite shape, do up habits as well as the perception that the layer below that the birds aren't doc, randomly choosing spots wherever I feel that will be a gap in between the pebbles. So my sketch would vary a little from your skills and you measure back to dock on the latest web that is above, one over the other. So in-between there and by that covers, you can doctor, one side of the robot should automatically give you that kept effect. Now connect all the spaces in between each bubbles. I'm giving you a solid dark colored only to the places where I feel that there is a gap. And also side-by-side, I'm also trying to bring up the gradient different independents. And one important thing is that if there is a pebble placed one over the other, which is below the other one will be darker in color than the one we just above. So if you consider these two parabolas, the one which is below should be darker than the one which is about. This session is mostly for darkening the already existing layer and also bring out light gradient effect. We will constantly and the gradient effect of pebbles and darkening the tonal values when we start with our detailing. So I am now giving light gradient to all the pebbles by giving our darker tone to one, only one edge of the perverse. I'm smoothening lip with my damn crash. The car. I'm using stock from shop to choose a color which is darker than the one which we have used earlier. I guess, for the first and the second layer, I have gotten with pink and light brown for the base layer. And for the second concentrated layer, I have added a little love Blackpool, my brown. And again, I'm repeating the procedure of smoothening the edges using my damn brush. Repeat this procedure. Differentiate the integer pebbles and also you are satisfied with the gradient effect you have given. I'm satisfied with the first layer of Maclaurin effect. And now I'm filling my brush with black and I am filling the spaces in between the bubbles, which I already felt that dark brown and black, concentrated black in between each pebbles per block painting. I'm choosing some non-random sparks of one non pool. Thus MOLAP adults viewpoint on the shores as far as bubbles, foreign is not clearly visible and leading our dots on all the spaces between them. These dark layers are the Southeast rather bizarre layer, one about the other. O, this depth is almost done. And I could clearly see that we have established a proper shape to a purpose and also given the first dip layer to our painting ridiculing session, we'll also see wacko member should be darker so that we could bring out the effect of the perverse being placed one over the other. So after giving Dakar tonal values in-between each bubbles, we will be done with our step. I'll also add few more dots in between this model numbers. I catch you in the next session for painting the fisher ASP Alaska sky also mounted and the backdrop.
11. Sea Pebbles - Part 4 (Sea and Sky): Hello, welcome back. Let's paint backdrops for our receivables. Bragg stack coloring with us. See, Sure. I am giving a law court for this. This is the portion where there is sand. I am bending this with the brand we have already given furrowed area as far as the watercolor is concerned when the pain dries, the cholera also fits along with that. So I am giving to layer a little ok. Now for the C, I'm going for tallow blew. The foreign democracy is dark and solve the afterglow for NACA, washing of blue here, my bluest blue, and the water near the shore is lighter in color, so I'm going for a matter green. You could absolutely. I'm not giving much attention to my C as the sea is far away from our view. I'm going here for one more darker layer of color, blue and a modern clean. You don't have to worry about giving detailing to the sea for Now. Once we start our final detailing, we will add in some Waves and some rocks inside the sea to bring out a beautiful seashell. So let's not worry about the C. I'm adding some brown and yellow corn mixed color in the shadowed region as if it is like a Smaller purpose. That's my layers are ready with. This is slake our downward technique where the color gets absorbed to the width region. Anyway, this will not have an impact on our final detailing. What I'm using Prussian blue, you can use any blue, like serine blue on cobalt blue. You see our tissue or a per dollar or remove paint to form clouds in the sky. Since myself, as a spirit, I could do this easily. The mountains in the background can be given with detailing either, and these are located far away. So we add shades of brown mountains about the C. So that's it. We're done with our band grubs. So let's move on to the next session for the final detailing.
12. Sea Pebbles - Part 5 (Detailing): Hello, welcome back. I'm so glad that we are at the final stage of our project. So in this final part, we will concentrate on the following steps. First, we will try to bring out their darker variance to repurpose. We're trying to bring the shadows toward bubbles per, we'll bring out the effect of pebbles overlap. And finally, we'll bring the illusion of pebbles being placed front and back. Here I am falling the faster bread and trying to darken that redeemed effect to this moral purpose. Let me explain you with an example. Consider this is pogrom layer. This is the background layer which we have. And I am just trying to improve the gradient different by giving an outline. And then we'll bring that up. And just if you notice, we have darker the gradient effect of foreign purpose. Now we have to follow the same procedure for the original purpose as well as zoom it to have a closer look showed that you can understand the actual process. So if you consider these two pebbles, the smaller pebble is behind the pebble, which is in-between the two pink bubble. So that bubble will be darker than the one in front of the brown ribbon. Also Darren Brown bubble is located behind the pooping published. The dollar value of the publisher be darker than the one which is located in front of that brown? Well, this is what we call shadows. That is, the shadow of those pink labours was shot in the front, will be falling on the pebbles which is at the back. And hence, the darker tone sometimes becomes difficult to achieve for more layer for both past, this means we have to increase their tonal values and each layer of overlap. That is why in negative painting technique, MY goal with lighter tonal values first and slowly increase the colour concentration as we proceed with more layers. Nick and easily achieved this as this is the another form of monochrome, our product. They have to understand that differentiates of the same color. This picture is an example of monochrome negative painting, left only one color is played with different tonal values. Now we are almost done. Return basic darkening. If you see the picture from the last step, my C has faded it scholar. So I'm darkening it by adding another layer of yellow, blue, and immoral clean. Finally, to finish off with some waves, using my white children back some lines and stops at the end of the show as if he didn't then this x and y planes in between the bubbles per shock, water patches in between them. Also at some wavelengths in the c to indicate the waves. And we do not have more layers might donor values and only for the ground, darker brown and black. Now, this is a step back. We bring the shadows to our purpose. This can be achieved by darkening of the beavers more darker than that. It is very important to leave white highlight, which plays a significant role in giving a volume to the purpose. To make the pebbles look in such a way that it is heavy and not at 2D form. Closer look on how to achieve this. Next process in this step is bringing the effect of overlap, but make the bubbles looked like overlapping, simply darken that agents of intersection and smoothly blended mixture, they imposition line as prominent and have a smooth finish. Consider these two perverse. There are bubbles will be seen automatically by darkening the intersections, has some portion of it and then behind the bubble in front. So the shadows of the friend Pebble, they fall on the back. So we have to make the region one turn darker. Also, keeping in mind, leaving no white highlight. Upset that I'm doing the same procedure for other purpose as well. So we have so far seen the first three things in our last session that is darkening the gradient effect concept of shadows or lapping pebbles. And finally, the illusion of front and back covers. Taking this bubble as an example, notice that both side of this rock is behind the front of us and only the region with intersection should be dark and leaving a white highlighted. This step will be done with the increasing the donor values to Dhaka Brown and rip the final layer of black or project lead definition has mentioned earlier. We have to start with lighter tones and then increase the concentration. For the finite black one. I'm mixing Blackfoot membrane for the front layers and will slowly make it a black aspirational foreign doctor, Smaller purpose. This bubble, for instance, making it that current must craft that agent guess weight to that. So I'm going to repeat the same steps wherever that is, intersections and overlaps. So I have shifted, grew darker ground as I approach the boundary layer. This bubble is behind one of the pebbles and at the intersection, the half region of this bevel should be given a darker tonal value to bring the illusion of pebble at the back. So again, I am repeating the same steps for intersections and overlaps. First, use your brush to build the Docker plane. And use third damn brush to Blender rough edges. I'm so glad we are nearing to finish our second project from yeah, we're redoing the same process of darkening the edges of the bubbles that are overlaps as all the smaller ones are one or the other. They have protested oppression by practicing this. Let me fast forward here and zoom it far closer observation. Finally, use black or brown. We'll add a few more drops inside the C that I am dropping fuel darts of black and brown here and there in the C sharp. Use your white gel open when glide planes and the bottom of this small graph to indicate waves hitting them. With this, we have completed our second project. Completed version of the second project. Thank you all so much for joining this class. To check the next video for an exciting announcement.
13. Thank you!!+ GIVEWAY ANNOUNCEMENT: Thank you so much for joining the class. Knows about publishing my own class in skull shape. Because of the support from my family and all the artist Prince supported when Instagram? Yes, the courage to take the step. I hope you all like the projects. Don't try. And Tasmania works in Instagram. I give a huge shout outs to all the ones who cried out the project. I'm also hosting a giveaway for artist sketcher students who enrolled in my class. Bouchard, your friends to join us by 20th February. So good luck everyone and thank you so much for joining the class. Cleanup ostium note, it's goodbye from me to meet you in my preschool, jackass. Thank you.
 Vasugi Sundarrajan