Transcripts
1. Introduction: Charcoal can look intimidating, but it's one of the
fastest ways to create bold expressive art once
you understand control. This is rima the artist and art educator taught over
200 plus students online. In this class, I'll
show you exactly how to fix all the
charcoal problems. We'll start by breaking down the essential
charcoal materials, what to use, what to avoid, and why it matters. Then I'll guide you through
blending techniques that give you smooth depth
without mudding your work. Finally, we'll focus
on creating clean, striking highlights that
make your drawing stand out. By the end, you won't
just stir at two you'll understand how
to control light, contrast and texture with
confidence. See you there.
2. Charcoal types: Welcome here to know more
about the charcoal materials. And in charcoal types, the basic tools, the heroes are going to
be with the pencils. So this charcoal thing, it's not only comes under
the pencil in pencil type, but also as with a
chocol powder form. So this is like charcoal powder. You can see I have created
this powder as a DIY one. So it's like I have
made it out from the chocol stick so you can see, next is going to be with the
compressed chocol stick. This is the stick
compressed charcoal from Camel Brandegin. So we can just use all these three things
in different forms. So it depends completely based on the area
that we are working. So if we work in some minute
places and for portraits, some detailing works,
we can just go with these pencils for great
edges and clarity. So it enhances the
definition of the picture. And this and this is, like, for working over larger areas to produce good amount
of charcoal effect, so to create a
blurred background behind a complete black scene, we can use these two materials. So it's like in the pencil, it comes with three versions. So it's like with heart and
soft and the neutral thing. So three different types. So I'll be here explaining with what heart soft and neutral are in the pencils
and how it's going to be with a powder,
also with a stick. So these two mostly goes
with a greater value, not a very lesser value. So value, in a sense, it's not like a lighter
version of black. It's completely black. So a pure charcoal working happens one day with a
powder and the steak. And in the pencils, yeah, let me show you how
it differentiates. So firstly, we have to, we can practice working with
any paper. That's fine. So here I'm just going to
show you how hard pencil is. Here, we just go in a look with three different
types you can see, have made a detailed working. So you can just make work
like this in your paper. So to try for the beginners,
it would be great. Now, just in the three,
I'm just going to pick my hard pencil and
it's sharp already. So when you just give a good
pressure and make a working, you can feel the sound also
the flow of the pencil. The swatch, the flow of the
pencil is not so smooth. It feels hard. Also, it goes
kind of a gray scale tone. Now, let's switch
to the neutral one, this neutral one, and
it's again sharp. So you can see the difference. It goes a little smooth. The value is a bit increased
here in blackness, not so gray tone. And finally, with a soft pencil, so it's like when we swatch, it's very buttery smooth, and we can see so much darkness
coming out of the glare. So even I have just applied with all of
the same pressure. Now, let's just try using the charcoal powder and let's know the difference how
it works, actually. So this is my powder. Actually, what I did was, like, I have my compressed charcoal
stick and my sandpaper. So with this sandpaper, I have rubbed the
charcoal stick over like this and created with
it. Now, let's do it. So this is how it forms So next, we can just have it and with our brush to
create the working, we should always
have a makeup brush, and I'll be explaining
about the tools and techniques in the
upcoming sessions. So it's just a general thing to know about the basic tools. So this is how we can work with chocol powder effortlessly
using the brush. And not only the brush, we
have so many materials. So we can just take it
from our sandpaper, then work again like this. Again, so it is great for the very huge
large backgrounds. And finally, we can
just go with a stick. It's quite easy works
in a larger space. It produces so much
black than the pencil. And when we just blend, you see so much
powder coming off also sits on the paper greatly. Used to cover larger areas
with gray blackness. So always, after
the gets produced, we should never ever wipe up with our hands
to just blow it. So just a simple blow is enough. And this is a very general
idea on how pencils, powders, and sticks,
can be used. And in upcoming sessions, next session is going
to be completely with techniques and the
highlighted tools, also with blending techniques. So we'll be learning with
so many things in detail. So stay tuned for the next session, and we'll
be meeting you there. Have your practice sheet, so we can just know how
the charcoals work. Then we can just dive into
our main project. Thank you.
3. Blending tools: In the previous session,
we have just gone through with different
forms of charcoals, that is with a
pencils, powder form, also the steak in a
compressed format. Next is going to be with
handling a charcoals. So it's like, whatever
the tool may be, that is whatever the form
of chaco type maybe, whether it is pencil
powder or steak, we should know clearly on how to handle them and how
to create textures, effects, highlights,
how to blend them, and what are the
tools we have to be ready with us
always so that we could just implement
all the textures immediately when we just make
up with our main projects. So here, firstly, I'm
just going to explain on how we can just make
with our blending thing. So blending is very
much important here. Firstly, here we are
just going to start making with the
tool makeup brush. So it's very essential and the first recommendable
tool must have in chuckles. The pencil is like, I'm just going to grab
all the three things, starting with the hard and
moving dress like this, keeping it slanting, or
you can also hold it up right unless test how
this works and smudges. So next with the neutral thing, Finally, with soft. So I'll just tick
with my makeup brush. So this is the size I
have, and it's like, okay to use for kind of
a medium sized spaces. And also, it's like recommended to use with paint brushes. But first priority is with
makeup brushles because it has with soft bristle
hairs, and it's like, more it comes with
a natural thing, also the synthetic hair fibers, but it's secondary, and this is a very primary
recommended one. So let's just start with blending using
this makeup brush. So let me start with
the hard thing, and you can see it
goes, covers the area. Smoothly and evenly,
like this so hard is like this is a
hard one of charcoal, and this hard type will not
produce much blackness. So as you can see, not
that much blackness. Also, it feels a
little gray tuned. And secondly, it's going to be with a medium, the
neutral thing. So it produces kind of a
little increased value in the darkness,
comparing the hard. So all these things will be used under some kind
of a lighter area. So it goes not
completely in shadow, so it goes with only
in the lightness. Also in the places where
it requires kind of detailing because as it goes
with a heart type of lead. So finally, using a
soft over the soft, it gives more amount of
black and feels so smooth covers all the
whites of the paper beneath and covers
beautifully with black. So we need to just go
along in both directions. This is how brush works. And next is going to be
with a different tool. So we're just going to use our tissues and
the cotton tip. Cotton tape and a tissue paper. And let's see how that works. So for making with the tissue, I'm just going to use
onely our soft pencil. So like this And here, again, swatching soft to
work with cotton tip. So majorly the makeup
brush and the cotton buds, cotton swabs, all those are
used in a smaller region. So for baking in the pot rights when working in the pot rights, just working on the face
near the eyes, nose, all those very particular area, a small region is completely used either with the makeup
brush or this cotton bads. And for the very
huge, larger area, we'll be just using chocol
powder as the base. And for the tool we use tissues because
handling them with little uh objects tools like the cotton tube or the make a brush will take so,
so much heavy time. So by the places we'll be
using with a tissue paper. So we can just make
small foldings of this. We can create a small square
piece folding of this. So here, it's like
a small thing, and I'm just going to make
use of a small peeper. And we need to create at
least this much of width. So after that, just very
slowly smudging in. So it produces like textures. Makeup brushes are very soft, but it's a little hard and
produces kind of textures. So next is, like, with the cotton pads. So it's very small, particularly to use around the nostrils or the nose sides, inside the eyeballs, eyebrows, the hair thing for
making small baby hairs. All those regions
can be just covered, blended with this cotton pads. So let's consider kind of a landscape painting in the
landscape to create a cloud, a very fluffy, rainy cloud. So those kinds can be
done with this butt. So makeup brush goes
in different way. And it's like to
create a smooth, soft blend, we can use our
cotton swabs in smaller areas. So this is kind of a
textiy and this goes with different texture of this
bad can see the difference, and even here, it varies. So all these tools
can be used with its requirement depending
on the space and need. So these are the main
heroes for blending. And next, we're
going to look with our highlights to
create highlights. So we need to create lifting technique. So
it's another technique. These are blending
and highlight, we have to use our
lifting technique and the tools for lifting technique little differs, and I'll
be showing you that. And before that, I
missed a great tool. This is paper stump. So these are the three
different blending tools, and this is the fourth
one, very important one. I must have one. So sorry
that I have missed it. And very thanks, so I
remembered it well. Um, with this tools, it comes in different
paper sizes. It's completely made of paper, rolled over and created
with the sharp edges. It's available in market with
the pre sharpened edges. So for small areas, we can just use with
these tiny things. And for the larger spaces, we can use our bigger tortilon. So this is like tortilons
or paper stemps we can go with any names
we are okay with. And I'll be showing you with blending using the
paper stump on here. So firstly, I'm
just going to here, I'll just use with
chocolate powder. So my chocolate
powder here is ready, half with chocolate
powder and half with compressed chocol
stick because we have already experienced and tried
with our chocol pencils. So it's going to be kind
of similar reaction, but we have to experience with our chocol powder,
also the stick. So I'm going to create using
with a little blackness. So for that, I'm
just going to take my make a brush to load
this on the paper. We have to open up and just grabbing in my brush.
Just like this. So if you feel a little scary, this is just a practice lesson, so I'm just working
directly from my bottle. So working while
with main projects, serious projects, we should
never have our bottia. So we have to take in some
deep depth space container, a small container,
and we have to load a little over that. And from that, we have to
da use our shackle powders. So it's just to avoid messiness and have a protection
for our main project. Okay, just loading. So it
creates good smooth surface. So excellent for
creating backgrounds. Right. Low nap away the accessory. And this is with chocol powder. Next, I'm just going to use
my compressed chocol stick. So with this stick, I have
just rolled up with a paper, a baking sheet behind. So just to avoid the blackness. You can simply just
move on like this. Okay, here I'll just show up how to work with o tlons
that is paper stumps. So it's a little larger area, and I'm going to pick
up my bigger one. So it's exactly like a pencil, so we need to hold
it in the center and slowly just we
can move around. Or we can just keep it
slanting to cover it a little faster or if you're
working with the details, we can just hold
it a little closer and create precise definitions. So even this is a great
important must have tools.
4. Highlighting tools: Now it's very important
thing to just introduce our
highlighting things. So these are the highlightners. It's nothing wet with all different kind of eraser
and highlighted elpin. So this is a jelly roll, and it is 080.8 nib size. It comes in different
sizes. 0.53 like that, and it's from
sakura brand 08 is. So it goes to a kind
of little bigger knob, and I'll show you
how this works over. And the second thing is it's a necessary one that
is our needed area. So we can just shape
in any form we want. So if we are just working with a bigger space and we need to dab our base
sketch base layer. We can just slowly go like this or this way, and it cleans up. So we want little sharpening, we can just make it
sharp with our fingers and slowly we can
just remove it off. So it works for
both the pencils, and it's black now, so we have to just knead again, create a sharper edge, and just can't clean it easily. And the second thing
is the third thing is with the phenre
hard mouth eraser. This is pencil eraser. We can sharp and work. So to create effects of
grasses in any forms, it works really well
or with a hairs, some negative images
like mostes of cat All the fine lining
lifting technique can be done with this pencil
eraser and it must have. So it works really
well in everything. We can also create
kind of boquet things like soap bubbles, anything. Next very important thing, all these high likeness or much important and
must must have. I'm here using my
battery eraser that is electric eraser and it's
from Montmartebrand. When we just press the button, it operates really well. So the eraser, actually, it comes in kind
of a little sized or cylindrical shape, actually. So this is how the cylinder
form of eraser is. But when we load in the eraser, we have to just
take our sandpaper. So with the sandpaper, we go like this, it just
shops away really well. This is completely to create a working for smaller
areas and sharp objects. So inside the eyeball, want to create with small
white dot for reflection, we can sharp and lose it. So this is how it works. So if we want to create some
kind of bigger highlights, We have to give heavy pressure. For light ones, light
pressure is enough. So we can work for
long time with this. We need to keep on change
with batteries over time. And it works really well. Can create any kind
of designs we want. So this is how all the
highlightus works. And finally, with this chalkin can just read kind
of dodge again. Any kind of effects. To create highlights,
more highlights very pure form. Works really well. So these are all the must haves for creating
the lifting technique. Hope you enjoyed and learned
it with all the basics and art supplies that we need for creating our
charcoal painting. And next is going to be with
our light shadow theory. We're going to work with small
example of light shadow, and we can experience
how to handle with our charcoal pencil,
and let's dive into that.
5. Lightshadow: Here in this session, which is going to start with our light shadow theory concept. So let's see have to work with the charcoal pencils here and also learn with the
light and shadow theory. So let's consider light
from this direction. So next is going to be
making with an object. So let's draw a ball here. I'm making this ball
with microphte pension. And light just it falls on here and shadow is going
to be at this place. So very highlighted area
will be around on this side, and it goes with little
increasing values. So the values, it'll
be lighter here, lighter value here and
darker value here. So it goes with the
shadow the shadow. Now, let's just start
with our charcoal. And here, I'm just going to
start with the darker area. So firstly, I'm just
going to choose with our soft pencil here. So with this, I'm
just going to make it like a little
darker on this side. And here, this
portion comes with our reflected light path. So it has little
lighter value there. So leaving the space there, and we don't want to worry if we have just accidentally
smudged over that. So we can just remove
with our double as so finally to create the
reflected light portion. So I'm just shading this way. So always to create a three
D form, the three D object, we have to create shading
exactly like object. So it's a ball here, so it's like a sphere shape. So I'm just shading exactly in this sphere shape and
not like this or this. So in hatching,
crosshatching types, we can just shade
in that direction. So it's just a shading. And you're going to blend
it smoothly with a tool. So this is core shadow path, and it goes with zero light. And it goes with a complete
darkness absence of light. So it's core shadow
and it'll be black. Next switching to
my neutral pencil. So as it just slowly moves to the light area in the front, And here in the inner area also I'm just swatching
with the neutral thing. And finally, with
the hard pencil just working lightly at the top. That's it. And for
shadow, it is like, again, we have to
use our soft pencil. And before creating
this shadow portion, we have to blend this. So it's a little like
a medium sized object, and to blend, we can
use our paper stump. So I'm just going to grab this size of paper
stump, a medium size. So just picking up one side, starting from lighter
always and not in the darker because whenever we start from the lighter shade, it will be like it goes in
a gradient and no problem for them or gradient effect. So we have to never use our dark sf first and
move in the reverse way. So only at required places, we can use that, but
not at all times. So if we just go from our dark place and move
on to the lighter place, what will happen is
this lighter value will hide from its originality and produce kind of
darkness over it. So to avoid that slowly, we are just moving it
from the lighter part and just getting into
the darker area. So with the tip, I'm using
good pressure blending. Even this blending should happen only along the sphere shape. This is how we have
to work step by step inch by inch
without any force. So here are the lighter space
I'm discovering it first. Then moving on to the Taco one. Looks. We have to
create highlights now. So I'm just taking my heated
eraser and at the top, just removing the unwanted
and creating highlights. And finally, with the highlights
even in the base here. So this is reflected light path. Next for this area, I'm just going to
completely use with a soft because it completely
goes with a darkness, and we have to start
it exactly from here after the object. So near the object, it goes with a great dara value of shadow, and then we just move on, you have to reduce the pressure
with same soft pencil. Now with the makeup rush, I'm just going to
slowly move on here. So this should never
disturb our main object. Now to create a more
depth, precise highlight, we can use our pencil erasure at the corner here and lift up. So this is how the
lifting technique works. Create highlight. Finally, to remove all the dust, we can just take any
normal natural hair, paint presses and remove
this not wipe with a hunch. So this is the light
and shadow thing. Also, we have learned how to use our tools of charcoal pencils, also with blending tools
and the highlighters. And next is going to be
with our main project. So get ready for that, and we'll be meeting
you there. Bye bye.
6. Artmaterials: Now, let's just get ready with our art tools for making
the main projects, and it's again with
our charcoal pencils. So these are the pencils
I'm just going to use and the chocol powder for
creating the background. So next, it's going to
be with our highlighter, that is the pencil eraser. And for blending tool,
it's going to be with a makeup brush and paper stems
of medium and small sizes. So next it's going to
be with our sandpaper. So this is our sandpaper. And next, it's the
pattery eraser, a regular HB pencil to
create the pencil sketch, and to wipe out
natural hair brush. This is Kneat table eraser. And very finally, we have to use our 200 GSM drawing sheet from Brewto brand.
I'm using this. You can see the
texture, it is so good, a great brand to start. We have to use like
artist thing, and if not, we can just go with a good
quality of 200 GSM, at least. Not a regular one,
not a regular paper. 200 GSM paper is necessary. So these are the
materials we need to create our main project. And yeah, so that's it for now, and I'll be meeting you
in the upcoming session where we'll be creating with
our main project sketch.
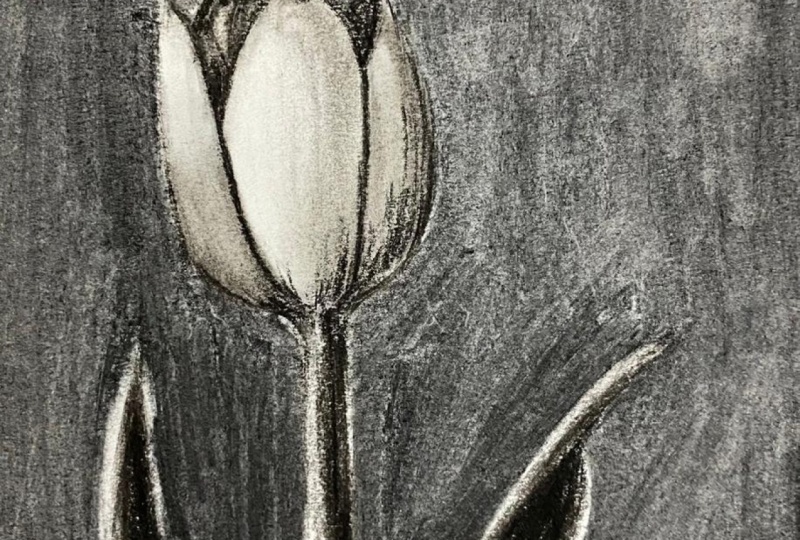
7. Main Project Sketch: This is our main project. And in this main
project, we are going to make with a beautiful
flower, a tulip. And it's like petals with a light test shade and
lays in little lightness. So like kind of a gray scale and background completely dark. So we are just going
to create that. And I'll just put up with a reference picture on the side. And let's just have a H or HB pencil to
make a rough sketch. And this is my 200 GSM
Buster drawing sheet. So I'm just going to start
making with our tulip. So I'm just going to
make it a little faster. So just drawing up
with the leaves in a little curvy shop way. And next with a
stem in the middle. And the second leaf on the side, it's going to be
elevated like this. For building up the flower petals. So it's like we're just
going to create a base. This is our side petal, and the front one
starts like here. A This is like three beetles done and
the final one here. It's a very simple sketch
of making a tulip flower. And next is, like,
we have to create our backgrounds and all
the shading portions. So just be making with the continuation
in the next session. And just take your
own time and create a beautiful sketch, and
they'll be meeting you there.
8. Main Project Shading: Here, after making our sketch, next is like I have taken my needed eraser and erasing
all the unnecessary things. So it would be very precise
and detailed to work with. All the unnecessary
should be removed. That's it. And next, I'm just going to
take my soft pencil. So with this soft, I'm just going to create with
a dark depth of petals and silently just work
very carefully on here because this is
mostly with lightness, and this stem and the leaf portions are little
in the darker portion. This goes. I'm just going to
slowly make with a little shade of
this sharp pencil. And here we can see
a little darkness. Now, next, I'm just going to
move over on here to shade. So this area
completely goes dark. Just keep on shading with
the black on this side, so we could get with good dark shadow
portion over the leaf. And we need to keep on just
moving to the gray scale too and reduce the darkness. So it's like dark here and
lighter to the other side. And next switching to
the neutral pencil and shading lightly like this. So again, with a soft to make over the stem,
it's like on here. I'm just shading only
in the center part. On the side goes with little
white or the lightness. And on here, it's with a fold, which goes lighter and
the fold inside here, the hidden part goes darker. You need to go along
this shape like fish. Now, next task is to
take our makeup rush and slowly tris move on from the dark to the light
path and blend well. And with the paper stem,
the linear one I'm just using to make
it more smooth. So this will hide all
the pencil strokes and create a smooth
texture over the leaf. And the second thing on here. Finally, this is the
inner part of the leaf. Now, just starting adding with more layers of black
to make it super dark. Now, to make the inner
sides of the tulip petals, I'm just going to make
a little swatch of the hard pencil using the hard pencil and
make light swatch. When light falls here, the
darkness is on this side. So in this petal, we
have to just take our new stump and go
with the other side. We can use the other
side and start from the lighter area like this. And with the lighter area, we
have to just smoothly blend it to create the dark effet. So with the other side,
it already holds with a little blackness as we
previously smudged on the leaf. So with that left out, I'm just going to
create depths on here. So this is just a
flat shading and we have not yet created with
our details over the petals. So this is just very flat. Now here, again with
my soft pencil. So just creating
with little textures and producing the
details like this. Just lift over with
a paper stump in the same direction we have
a play with our pencils. Now to create with
the highlights, I'm just using my pencil eraser, with this just slowly just making with
good great details. We can see more highlights here. So I'm just going to erase it. And on this side,
too, we have to create with our highlights. So this is like I'm creating very lighter version
of the highlight, and the complete thing, we
can just create it after we create with our background,
appla our background. And this is just to know
what small effects, I'm just going to create I'm creating here
with the highlights. And next on this part, it's like going with a texture like this. And the petals are more
goes like this direction. In a cross pattern. So next to create the
background effect, we need charcoal powder and
butts or brush, makeup brush, or with that tool,
we're just going to create the background effect, and we can just create
backgrounds in the next session.
9. Main Project Background : So in this session, we can just create
with our background. And for that, I'm just
taking my charcoal powder. So with this just moving around. So with this fine
powder, what happens is, it just covers all the
white spaces in the paper and produces a great spread of charcoal powder,
the background inside. So the background particles, it is like around the object. The little space away
from the object, it can be completely very freely filled with
chocolate powder. But when you just work near
object, chocol powder may, if accidentally drops
over the object, it may destroy the originality and create it
creates little mess. So to avoid that, we can use pencil, soft pencil around it. I'm going to use my
soft pencil in between. All these small areas, it's like required to cover
completely with a pencil, it goes inside the Mopen corner, not with a chocolate
stick or powder. So it's best to use the pencil. Now, after completing this
pencil thing, and to blend, I'm just using the bigger
stump, go over here. So using stump again, settles the powder well
and smudge as well. We have to very slowly closely, we have
to just move over. So in this place, I'm just going to switch to
my smaller one and work here. I'm making it a little faster, so it goes with complete
patience and working. So I can still find
with little whiteness here to just block
all the white spots. I'm taking my
charcoal powder and spreading it this place.
10. Main Project Highlights : This session is
completely to create with a great highlights
of the flower. So first, I just have
my battery eraser. So with this just creating highlights on the
sides of the stem. And same way on
the opposite end. And next at here So without operation,
I'm just slowly removing all the excess blackness
from the edges of the leaf. And even here just to make with a light sight from the left As my eraser is little flat, I'm just sharpening
it with my sandpaper. You can see as it is
becoming sharper. Our next is making
highlights again. So with very light pressure, I'm creating all
the fetal effects. So wherever the light goes, I have created with highlights. So simply just blending and
operating at some places for very brightness and not operating at some
places for least. Cleaning up all the places with my paint brush or any unused, very synthetic hair brush. So finally, using
my pencil eraser to create with more
of the highlights. And with a used stump, again just giving a little bit of blackness here and there. Smudging again. So with
another empty one. And finally, just cleaning off. Just fixing up all the places.
11. Windup: So the last step is to
just peel off the tape, so I'm just going to
remove from all the sites. Now, there is another
one last important steps like whenever after
completing it. So this is like my
finger. It's clean. If we just go over that, we can find little charcoal
powder just fixing on our hands and also not
only making us mess, also the other projects. And even inside, this
will not be protected. So to seal it to fix all the
charcoals over the paper, we have to use a spray
called a fixative spray. So I have my fixative spray, and we need to just
spray it over from at least like 15 to 20 centimeters
away from the project, and we should avoid sunlight, and we must have
to just go to out the area where it
is spacious and we need to spray it I'll show you the trick
how to make it. This is the spray I have, and we need to shake
it a little well. And with that, I'm
just going to spray it lightly like this all over. So hope you all enjoyed and learned so
many things with charcoal, and here is our sprayed one. Next is, like, you have to keep it dry to make it
clearly dry for at least one or 2 hours and then work with just packing
all the stuffs. So before that, if we stack up, it will just not dry, it will not dry, and it will
be like wet in a wet state. So we need to allow it to dry completely for at least 2 hours. And you please
just drop a review on how the chocol class was and how you
learned the things. Submit a project in
assignment session area. So it's not necessary
you have to just make with the
same tulip again. Instead, you can just choose
your favorite picture, download with black and white, and then apply the light
shadows or all the highlights, blending techniques
and create some new project and then submit in assignment session
so that I could see your works and then
make a review of yours. And that will help me
just share more projects again and again in this page. So hope you all enjoyed
this and meet you with a great project little
soon and bye bye.
 Srimathi, Artistcastlebysri - Art Educator