Transcripts
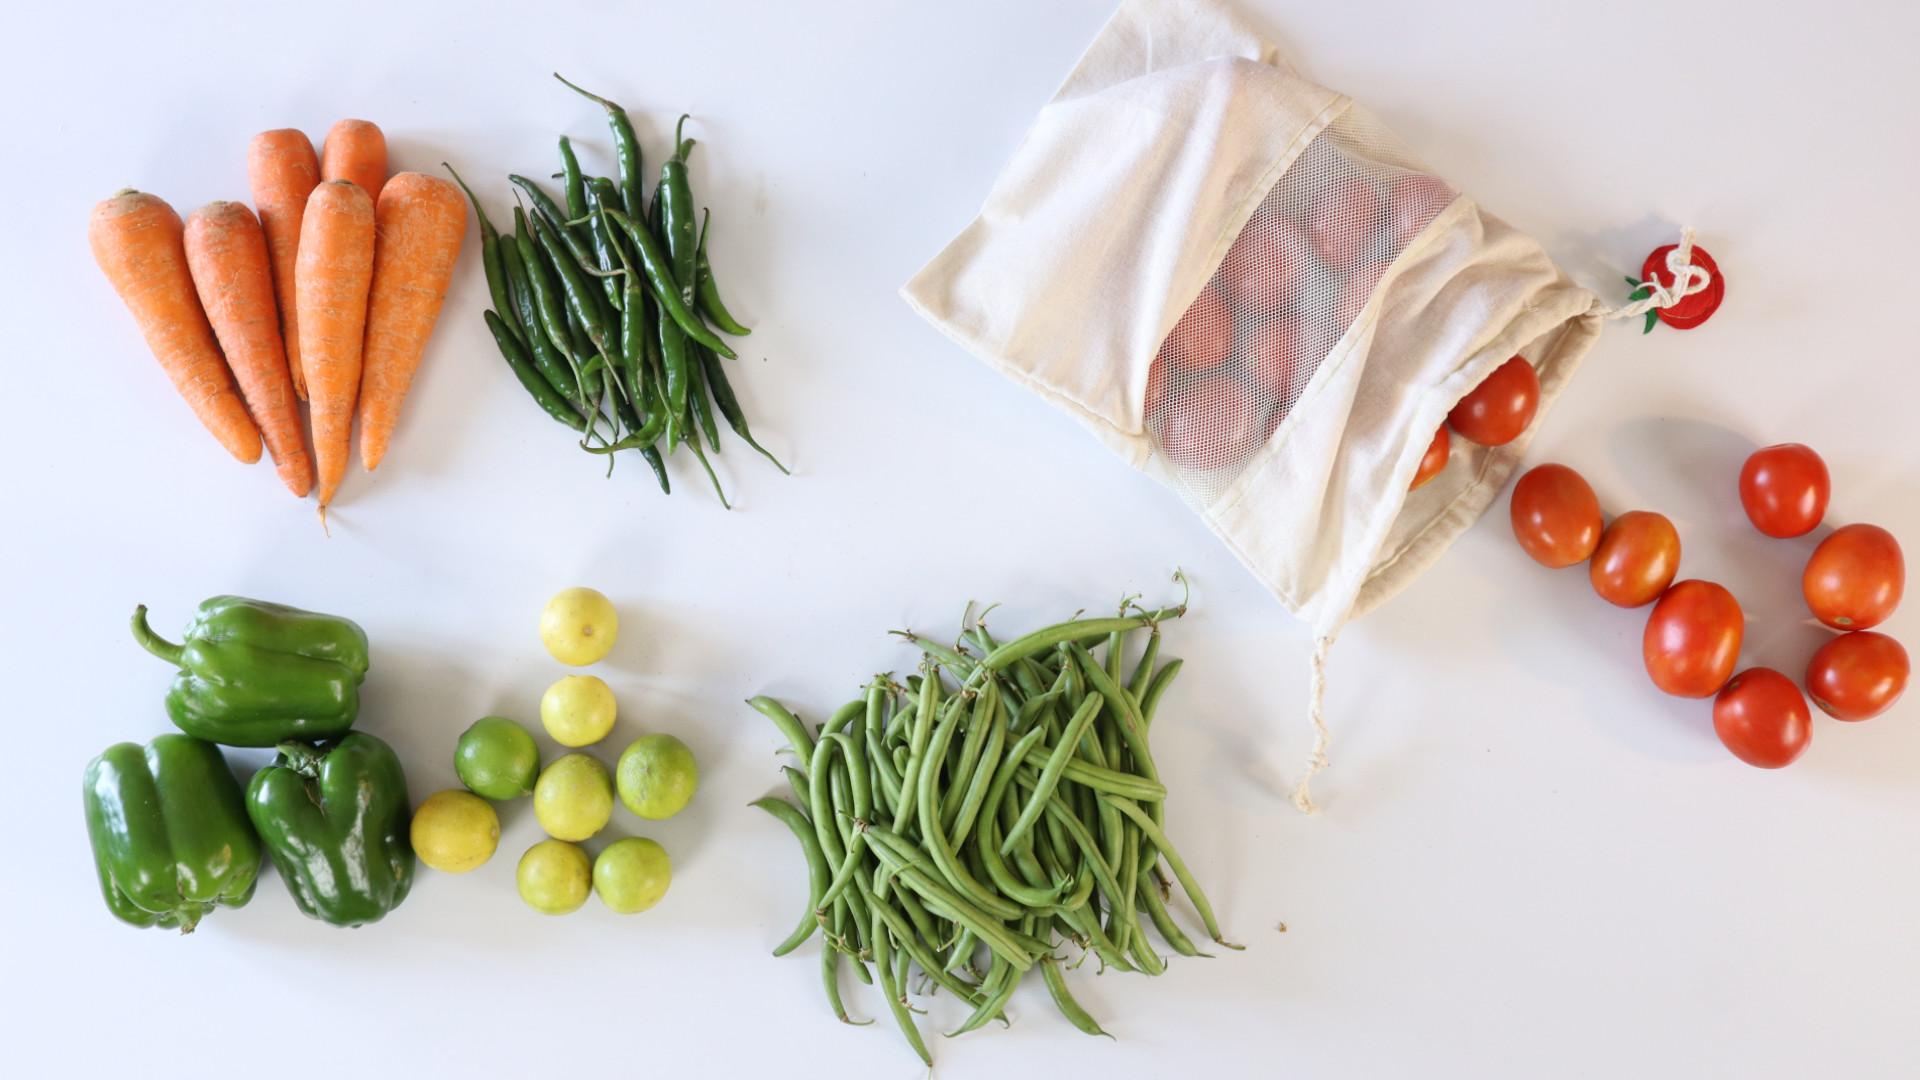
1. Introduction: Fridge bags are a great way to organize the storage of
fruits and vegetables. It is a simple solution that enables organization
inside the refrigerator. And Claudia, and just like
many of you out there, I do have problems in
organizing veggies. Whenever I buy groceries, I always had to separate
the veggies individually. I really loved the idea of using these simple banks to organize my grocery shopping and storage, gotten fridge bags
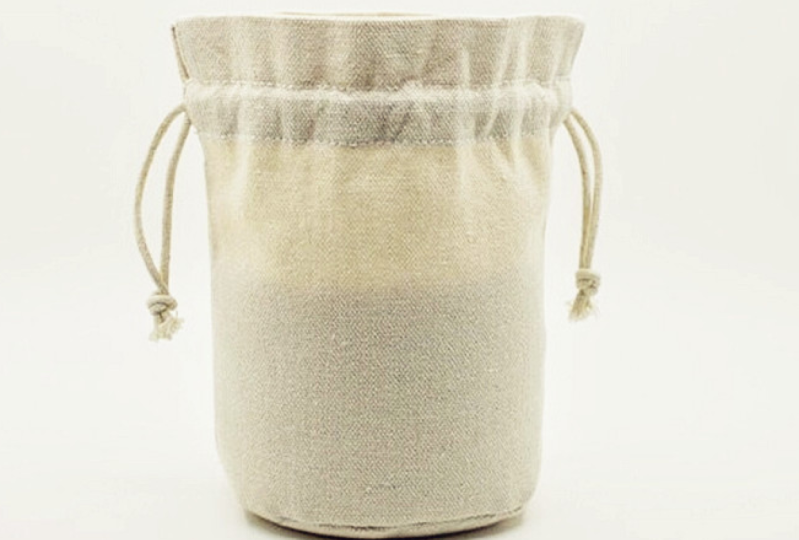
or alternative for plastic bags as the
upper lobe readability. The design here also
has a mesh fabric to enhance the miscibility
and air circulation. In this class, I will
show you how to stitch of rich bag for yourself so that you get enjoy
grocery shopping. Expedience to be, will
also be creating tags for our bags in a creative way so that we can identify
them easily. We will cover at the end of their process from
pattern-making, cutting, stitching, finishing
till the final product. These banks can also
be used for storing, organizing things
in a smock away. You will be getting
digital templates for the pattern and which during tags so that you
can get started, try to weight loss or shed my best tips and
tricks which will help you enjoyed the process and make your own bags joined now and I hope to see
you in the class.
2. Pattern Making Of The Bag: I have sublet the digital
pattern in the resources. You can download and
print them on A4 sheet, or you can also
construct them by hand. You can skip this video if you are getting the
pattern printed. I have also included a list of materials regarding
the resources. Let's get started. We will be making the entire pattern on
this single A3 sheet. We need a bit of 29 centimeter mark performed on 29 centimeter knit
up and the middle. Now connecting these points
will give a straight line. We can now trim off the excess. The recommended size
for our design is 29 centimeter, bite
41 centimeter. Now we have the right
size for our design. It's recommended to use a little thicker sheet
for this purpose. We have three parts,
NAL, French bank. The top and the bottom. Every part will have
29 centimeter length. One meter width of each part will really, from the bottom, we will mark 16 centimeter, mark 16th centimeter,
the other side, do the purpose of
getting straight line. Now we can join the points. Let's now mark the
middle portion. We need ten centimeter as the width of the
middle portion. Measure ten centimeter from the bottom part
and mark a point. Similarly on the other side too. Now we can join them together. We have gotten
middle portion here. Now let's mark the DHAP, but I would like to go with
15 centimeter for the top. As you can see,
the A3 size paper is perfect for our pattern. Now we have got the basic division for
all the tip three parts, the bottom, middle, and top. Next we need to mark the same
lines and the loop area. Let's start with the
bottom side seems equally. We need 1.5 centimeter or C
media for closing our bag. The two major glossing themes of the bag on the side and bottom. We don't need a bottom seam if we have taken alone
folded fabric. Or the seams are just
simple join any of fabrics. They don't need much seen area. Before we got, Let's mark DC Amelia's let's measure 1.5
centimeter from the bottom. I have marked two points on
both sides from the bottom. Now let's join the points
for a street line. Now, we can mark the sites
for these sides seem to be having an excessive
diarrhea or no sheet, which we don't need. I will continue marking
points in the middle with a distance of 1.5
centimeters from the side edge. Now, we can join the points
to get the side seam area. Repeating the same
on the other side. We have got all the
parts with the CMB, ADR, top, middle, bottom, side seam. Bottom seam, another side seam. Now we have to mark the loop
area on the top of the bag. We can now mug that approximately while stitching
it can be marked exactly. We also need to mark
the join any seams. Let's see how this can be done. For the loop area. Let's take codon for
centimeter from the DHAP, mocking four centimeter
on the other side. Now we can join them
to get the loop area. Now within the loop area, we need to measure a
distance of 1.5 centimeter. This would be the space where
we insert the drawstring. This space should not
have any stitches. I'm Dr. string needs
to flow freely. Now we can write the
names of the parts. This will be the top, the middle, and the bottom. Now let's begin cutting. Let's cut off the excess piece. We can now mark the
joining themes. Let's mark one centimeter
as the joining seam. I'm referring to the
markings on my cutting mat. Let's draw a line. There will be two joining
seam on the middle. Draw an a deadline. We take one centimeter
area for the scene because we will be marking doubled
stitches to close the seams. These lines are
just for difference and we won't be transferring
these lines to the fabric. Let's mark or joining
seam of one centimeter. We can write the names
of different genius. This will be really
useful in the future. This is smeared
the string comes, let's call it as
string insertion area. I will name the
January seem as js, the side seam as SS. Again January seem
hand side seams. Naming the areas will be great reference
when transferring the pattern onto the fabric. For less for future purposes.
3. Cutting The Fabric: The top and bottom
portions of the bag will be in plain gotten
and bleach to fabric. The middle portion will
have a mesh fabric. I have taken a mesh fabric
larger than the pattern. Make sure to align them
straight and start coding. I need two identical pieces of the mesh fabric for
both the sites. I have folded the
fabric into tube. After we make the first cut, we can use clips to
hold the pattern in, please, while we cut
the other sites. Now we can remove the clips. We haven't got a neat cut. Since we had folded
the fabric into two. We have to separate
it by cutting. Now, let's cut the bottom part. Since we need two sites, we add folding the
fabric into tube. Here, I have a long
piece of fabric, so I won't be needing
a bottom seam. For best results, use
a heat pressed fabric. If you don't have
an indie fabric, you can add a seam
at the bottom. I do not want to
seem at the bottom. I have aligned the
pattern with my fabric. Let's use the clips to hold
the pattern with the fabric. Now, let's start cutting. You can add the eclipse
aspect your convenience. Let's remove the clips. Bottom piece is now ready. In a similar way, I have taken a folded fabric. Let's cut the top part. We have got the top part ready. To avoid confusion, we can keep the pattern
and the cut fabric together that would serve as a visual indicator
of the fabric.
4. Finishing Seams: In this video, let's
see how we can stitch two pieces
of fabric together. Please note that just
random pieces of fabric is used here to demonstrate
this teaching method. This is not the
actual bag itself. The same technique will be used to stitch and finish our bulk. Feel free to watch
this video again and again till you understand
the method Clearly. You may also treat this
video as a reference. What does the seam and
how to finish them. We will be using close to seem. Let's see how to create a
close to seem by stretching. Let's first understand why we are going for clues to sync. The joining of the two
fabric results in raw edges. For the purpose of
meat finishing, we chose close to seem. We also get an added line that results in
better is the decks. Close the seams also results in good
strength of the path. The first step is to
overlay the fabric, one on the top of the other,
matching the edge-to-edge. This is the edge map. We will create the scene. The stitch line will
be coming here. I even make a stitch. The stitches are placed about
five MM away from the edge. We have got the stitch line. As you can see, we have got raw and
finished to seem. First we need to trim some of the area would
save the stitch line. We are doing this
because we have a located one centimeter
for the seam allowance. After we make this cut, we have completed
the first step. In the next step we have
to open the fabric, gently press and flattened
the fabric near the stitch. Now, for the fabric such that the raw edge
lies between them. Basically, we are
just locking the raw seen between the
two fabric layers. I will repeat. We have made a stitch, just folded the fabric to
cover the unfinished erosive. Giving little pressure on
these seem to flatten it out. We now need to make a
stitch from the top end. We can go for a
simple running stitch with five MM offset. This reset the unfinished
edge to be hidden. This enables us to make
nice-looking scenes. Extra stitch will also give
more strength to the joint. Now, the fabric
edges are concealed. With this, we have
completed the second step. Now let's again
spread the fabric. We can see an edge like this, which is not looking
good and may catch dirt. To solve this, we will fold the seam towards the
plane plots side. If he folded towards
the net side, it will be recipient
from the front to avoid the visibility of the
seam through the net, we fold towards the
plane clot side. We are going to fall and
stitch along this edge. For best, datasets flattened the same area nicely by a plane, gentle pressure
with your fingers. Now, let's make this stitch. We have now got
the final stitch. Let's take a look
at the other side. We are going to use this method of stitching for all the joints. We have gotten a
nice-looking seam here. With three stitches. We improved three points. First, we get finished edges. Second, we improve
the joint strengths, the extra stitch line and
to the overall aesthetics.
5. Aligning all the parts together: Next step is to remove the patterns and
align all the parts. Before starting the
stitching process, we can pick all the parts together so that we can stitch
ECD and avoid confusions. Let's take the top
part of one side. Then. I will take
one minute part. If you see the bottom part, it says single fabric. Let's spread it and keep. Now we can overlap the fabrics
and bin them together. We can even use suing
clips instead of pins. We do this for all the joints at the beginning so that we
can speed up the process. In this similar way. I will pin it for the
next two joint as well. Now, if you'll see, we have arranged the bytes
for one side of the bag. I let start with the
either side of the bag. Now I'm adding the tags
to indicate the parts. I have been them to the fabric. This will help us to remember
the order of the paths. I'm not adding the
tags for the middle because we can easily
identify by its magnesium. Once we make one bag, then we might not get confused. We have added the tags clear. Now we can move to
the stitching buck.
6. Stitching the parts together: Let's start stitching. First, join all the
pin fabric pieces I demonstrated earlier. We are going to join the
fabric pieces to get that.
7. Marking the no stitch area: We can now move on
to the side seam. The first step is
to fold the fabric. After folding, make
sure that the finish to seem as facing you
as shown here. This side will be the outside of the bag after finishing it. Before going to decide stitch, we need to mark the
gap area on the top because we don't want the
stitch on some areas. Let's take the template again. Align it to the top. Let's mark the
string insert gap. This would be the
area of no stitch. Let's repeat the same
on the other side too. Let's flip the fabric
and mark the same media. Their own needs stitches.
8. Stitching the sides: Let's jump, really hold the fabric layers
together using pins. This will restrict accidental unwanted
movement, white stitching. I have just added three
pens on the site. Now I will add some
pins on this edge to the same three bins and added the side. Let's get these edges
stitched together. Now, we need to
stop stitching men. We reach the mark, the point. Now lifted the presser foot and move the balance wheel
by hand manually. They'll be cross
the non-stick area. Once we cross the
non-stick area, we can again, unless the presser foot and
continuous stitching. Let's take a look at
the non stitched area. You can notice that
the thread that is not stitched and can be cut ECD. We can cut the loose
straight on board states. Here, we have successfully
made a non stitched area. We now have to repeat the same
on the other side as well. We have reached
the Gnostic idea. I went first, lifted
the presser foot, spin the balance wheel and move the fabric and delay
reach the monk. Then Tracy presser foot
to resume stitching. We then cut off the loose
threads on both the sides. Now we have got the area
for deer drawstring. Since we have two in
the edges to gather, we no longer need depends. So we can remove them. Now. Let's flip the bag now. The gardeners can be
flipped to using a ruler. I have used a ruler to
gently poke the corners. This will give a
nice and clean edge. As you can see, the ruler
can fix the corners. Let's mark the
gnostic area again. Since the monk two points
are not visible anymore. Stitching with Ben minimum
offset from the edge. Stitch on the gnostic area. Let's flatten the outer edge. Begin stitching with
an offset of an MM. Avoid stitching on
the no stitch area. Let's release the presser
foot and continues to make sure that you are lame. Big clot to ten MM. Now let's continue to spread
on the new stitch area. Now let's flip the bag
to the correct site. Let's flip the edges here. We have successfully
completed his side seam.
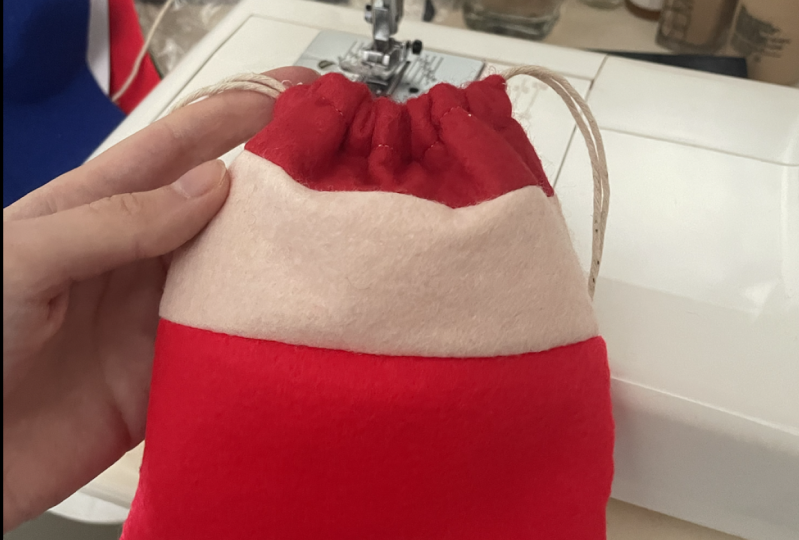
9. Creating the loop area: Now we can make the loop for the draws string from the top for the edge with a
distance of one centimeter. Then make another folder
of 1.5 centimeter. We need to threats for the drawstring to travel
through the loop. So a full distance of 1.5
centimeter will be sufficient. Let's grab a clip and
security fold in place. Let's continue the
folding process. Throughout the top edge. First, for one centimeter and the second fall
of 1.5 centimeter. Use clips to hold them in place. Jess, continuing default, the window need
and a deadly pure. We can go ahead for stitching. We can make a stitch
on this edge. We can remove the clips
as we continue stitching. Let's get started Now. Let's hold the loop straight. Simply made this stitch. As you can see here. I'm gently moving the bag to
aid the stitching process. Weekend, remove the clip. Continue stitching. Now we can remove the next clip. We have finally arrived
at the last clip. Make sure that the loop
is placed straight. This, we have
completed stitching. Mccain cutoff the exists thread. Now we can take a look at the hole that is created
in the gnostic area. This will beat I'd entry
and exit through the loop. This can be used to
insert the drug string.
10. Cutting The Vegetable Tag: Let's get started
with making the tags. I have given a
template to print. Let's make the first
one on the list, which is the capsicum. You can notice that
there are two pieces in the template and there is a complete drawing
with the pieces together. We can use this complete
peace to plan these stitches. This standby drawing
over the graphic with the pencil I have already included to stitch
lines on the print. Similarly, I'm going to mark my stitch lines, the edges too. This is just a rough markings to visualize these stitches. We can always use this method
to plan out the switches. In this way, you
can visualize and predict these stitches
before stitching. This will also act as a reference line
where it's stitching. Now, if I don't like
these teachers, I can simply erase them
and try again here. I liked my lines. We can use felt in
shades of green. We can use the lighter
shade for the stock. I've been reselect
default color. We can go ahead to cut. We have printed this
on an ivory sheet, which is good because
we can use this like a stencil and trace and
transfer the design to felt. Before we start cutting, I will get a cutting mat. Let's keep the felt
aside for the moment. Let's grab a paper cutter. You can also cut
using a scissors, but such small
details that easy to cut with a paper cutter
and a cutting mat. As you can see, I'm rotating the paper to
change the cotton direction. This enables to cut small, sharp turns and gardeners. Let's get it out. We have got the stem now. The Capsicum is big enough and simpler to cut
with assessors. I will keep the lighter side. It's just a board,
performance and comfort. Let's grab a scissor
and start cutting. I'm just going to run my
scissors along the boundaries. I'm not cutting the details now. Now we can go for the
detailed cutting. Small piece becomes
much easier to handle. Perfect. Now we haven't got the stock and the
body of the Capsicum. Let's keep our
template the side. Now we need to transfer
the design to defend it. First stands for this talk. We need to lay some felt. We can fold the felt, give it a gentle press. Now let's place the
stock cut piece. It can be a little tricky
as it is very small piece. We can use clips temporarily
to make the process easier. Clips help a lot in holding
two layers are felt. By folding default, we can cut through two layers
at the same time. Using a pen, I will trace around the cutout to
transfer the design. This is why we went
with and I will ishit normal copier papers will
be flimsy for this purpose. That design is now transferred. We can now start cutting this. I'm cutting apache first so that it becomes a little easier. Now, let's cut the
stock, please carefully. I'm trying to cut exactly on the top of the line
that I marked earlier. This way the line
won't be visible. We have now got the two pieces. If there are any
marked lines visible, you can always
considered by flipping the site and hiding
it on the back. Let's now Tracy Capsicum. Similarly, we need two
layers, so let's fold. Let's start tracing the shape. You can mark reference
points for the stitch lines. The same way. I will first cut the patch around my
design to separate the felt wholly layers firmly together and
start cutting slowly. We have got d2 parts for
the friends and the back.
11. Stuffing The Vegetable Tag: Let's stop some cotton between
the two layers are felt. To give it a slightly 3D look. I have just flattened
the cotton. Using my bumps. We can trace the design
roughly on the cotton. Now I will got the cotton piece. You can also staff they
felt waste pieces inside. Now I will place
the cotton peace. Sandwich it with another fellow. This stock needs to
be put in place. We are going to see
them by stitching. Using small flips. I went secure them together. We can remove them
one-by-one, lights touching. That's it. This piece is
now ready to be stitched.
12. Stitching The Vegetable Tag: I have loaded a
neon green color. That will give some details. Now, I'm just switching
around the plant lines, which we did earlier. This will seal the cotton
between the two layers. Also attach the stock
to the capsicum. You can see how the clips
are very useful here. In temporarily holding
the layers together. I'm going to remove the
clip that holds the stock. Now we have stitched
everything together. We can make a lock and cut-off. Now we can trim off
the excess threats. We have joined the
pieces successfully. Now we can add the
details digits. Just adding extra stitch
line for the dates. Let's remove the extra
threats and clean up. We can now shape out the
entire piece if required. I'm dreaming a little on the
edges To get a better shape. It looks a little better. We can now convert this
into a usable tag. Let's grab a small thread. We will also need a puncher. I haven't mark a point where I think it's a form location. Let's punch a hole. Cut a piece of thread
of a reasonable length. Insert the drapes and not the attached thread will be useful when we add
the tag with the bag. Now our Capsicum tag is ready.
13. Finishing The Bag: Let's now attach the
drawstring to our bag. We need those strings for
the mechanism to work. Now, I'll fold the
two strings and half. After folding, the length
of the string must be at least ten centimeter longer
than the width of the bag. I will make a cut pair. Since we had folder D string, we have got two
identical strings. With the help of a safety pin. We can insert these
strings into the loop. We can connect the safety pin to the thread by poking
through two to three times. It should look
something like this. Now we cannot the safety pin. Now. We need to insert
the safety pin into the whole guide the
patient through the hole, put the drawstring
into the loop. This is very simple to do
with the safety pin trick. We need to guide the drawstring
throughout the loop. Then depend reaches
the exit hole. The drawstring has
executed successfully. The string length in
the entry and sit needs to be the same length. We can achieve this by pooling
and adjusting the bag. Now, we have got the entry and exit string length identical. We can remove the safety pin now and make a knot at the end. Now we have inserted the
drawstring on one side. Similarly, we need to insert another string
on the other side. Let's repeat the
same process here. Connect the string with
the help of safety pin. Insert through the hole to put
these strings in the loop. The inserting point might
be a little tricky, but be gentle on
pulling the safety pin. Little extra force might
disconnect depend. Now we can just write the pin and the string through the loop. Then the pin exits
out of the same hole. You can always adjust the bag to help the string
to pass through. We have reached the whole
depend through the except. Now we need to make
the length identical. Let's remove the safety
pen and make a note. It's just a simple
and basic naught. Naught will be very useful to pull the string to lock the bag. We can now cut equally. Now let's try to lock the bag. And it works perfectly. Now, I will unlock
it and try again. Just pull both these
strings together to lock. Let's unlock it and see
how to attach the tag. The back-end be
washed on demand. But the felt tag is not
advised to be washed. We can keep the tag removable. To attach the tag. Insert the string from the tag
between the draws strings. Now bendy tag and insert
the tag like this. As you can see here, we have attached the tag
to these drawstring in such a way that can be
removed before washing. Now, let's drop
the bag and we can tie the string like this
to shorten the length. Now, we have got a tagged
for each bag ready.
14. Conclusion: I hope you enjoyed the class
and learned something new. I wouldn't know
how to go through.
 Cloudia David, Co-Founder | Entrepreneur | Designer