Transcripts
1. Introduction: Hello and welcome to a
new sculpting class. In today's class, I'm
going to show you how to sculpt stylized,
simple, easy birds. I am Stephanie Kilgast
and I have been a professional artist
for over a decade now. Today's class is going to
focus on air dry clay and creating simple bird shapes that we are going
to paint in bright, fun patterns and colors. This class is absolutely
fit for beginners. I'm going to hold your
hand from start to finish, explain everything I know about air dry clay and how to
use it, the drying time. But I'm also going to take the time to show
you color mixing, speak a little bit
about color choices, and show you the ropes of
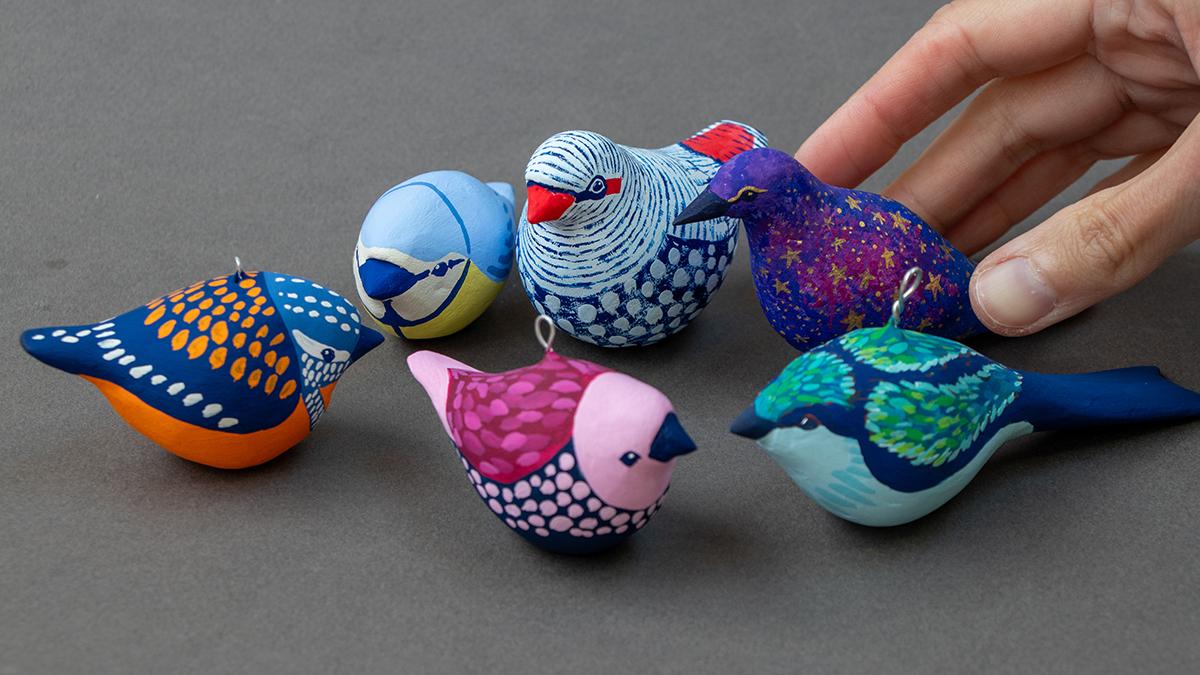
sculpting and painting. Will show you six
different birds to paint so you can have plenty of ideas to create
your very own bird or birds. I'm going to give you
options on how to make your bird sculpture
yours and truly yours. But if you don't
feel that creative, you can just follow along
and do what I'm showing you. I had so much fun
creating this class. I'm super inspired to make more bird sculptures and
paintings right now, and I really hope that
you're going to feel the same way and that you're
going to enjoy this class.
2. Time Management : First a note about
time management. Now, this class is going to
be easy in terms of skills. However, it's going to be a
little bit tricky in terms of time management because
there's a bit of drying time. What I would suggest
is to work on this class over three weekends. The first weekend,
you're going to focus on the sculpting only. You're going to create
amateur and the body of the birds and make different kinds of birds
and play around with that. Maybe even do something
completely different than birds. You feel free to explore
other life forms if you so the second week, we're going to focus on prepping
your sculpture. Now, that second week, the prepping week
can be skipped, however, would not advise you. What we're going to
do essentially is to strengthen your sculpture and prep it properly for painting. And then the third week, we are going to focus
on the painting. Why do we do it like that? Now, there's quite a
lot of drying time. So the sculpture itself, we're going to use air dry clay. It needs at the very, very least one day to fully dry. Where I live, my
climate is a bit humid, not overly so nothing tropical, anything like that, but
I live near the ocean, and it's on the humid side. And it usually takes
a good three days for the sculpture to fully dry. That's why if you go from
one weekend to the other, one week is going to be enough to let the sculpture dry. Now, for the prepping,
it's a bit similar. Basically, you're going to
have two phases of prepping, and the second one, you
have to wait 24 hours. So again, it's going to
add some drying time. And then, of course, once
you come to the painting, you also still need one day of drying time after you finish the last bit of paint
before varnishing. So in terms of time management, really doing one
weekend sculpting, one weekend prepping, and
then one weekend painting, it's just going to be easier
in terms of drying time. Now the second advantage of doing it like that is
that you're going to be really focused on one
particular thing every weekend. So it's going to be a bit long, but it's also going to
be fun because you're going to be able
to use that class for quite some time just to enjoy and paint and
have fun with birds.
3. Materials: For today's class,
we are going to need following
materials, air dry clay. I will be using
the premiere clay from padico, a Japanese brand. There are many brands
of air dry clay, but this is my favorite. You can use a more local to
air dry clay for this class. It does not have to be
this specific clay, acid free white glue. Acrylbnder so for prepping the surface before
painting. Acrylic paints. I will be using Turner Acrils, golden so flat, and
Holbein Acrils. You do not need to
buy these brands. On the contrary, please use the acrylic paints you
already own at home. I will be going into details about color mixing
during the class. A palette knife for
mixing your colors. For my working palette
with acrylics, I'm using the simple setup, a plastic container with
a ceramic tile inside. We will also need a
few different sizes of round brushes and a
flat brush and varnish.
4. Armature: So this is the sculpture we are going to aim
for, and for that, we are going to
start with the core, which is going to be made
out of aluminum foil. So what you want to essentially
do with the aluminum foil is to sculpt rough bird shape. And for that, you start by
crunching the foil together. Now, what you want to
keep in mind is that you are going to have the tail
that goes slightly up. Then also, you're going to
have the beak on this side. So you essentially are making
a sort of lemon shape, but that goes up on both sides. Now, on the tail side, you want to have
it a little flat. So you want to push together
and then pinch down. On the beak side, you basically want a
very small triangle. You also want it higher
up than the tail, as you can see on
this final sculpture, doesn't have to be
exactly like that, but you get the sense
of having the head and the triangular beak and then the flat tail
slightly lower. And overall a round shape. It's also easier
to crunch and push the aluminum foil down slowly because then you can
better readjust the shape. This is not bad, however, you have holes everywhere, so we're going to add a layer of aluminum foil around it
just to round up the shape. Add the aluminum
foil but bit by bit. You are likely going
to need to add tape. This is simply painter's tape around your aluminum
foil sculpture, just to hold every bit of
aluminum foil into place. This is about how it should look. It's not perfect, but the
shape is already there. You ideally want to think that when you're
going to add clay, it's going to add a bulk, so your final bird is
going to be chubbier. If you want a very slim bird, you need to make the aluminum
foil sculpture slimmer. H. Let's just do a bit
of a thinner bird, maybe something that
might become a starling. The body is going to be a
bit longer and thinner, not as round as this,
which could be a robin. We're not going too much
for accuracy in this class, but if you want to do
a very accurate bird, then feel free to
pick up references, reference pictures and
illustrations that you have maybe at home in natural
history books or online, so you can be closer to reality. I want this class
to be mostly fun. And more about exploring
a simple shape and a simple sculpture to get you interested and curious
about sculpting. The styling is going to be
slightly more upstanding, you have to take
that into account. I'm just going to push
it a little bit up. I'm actually looking at reference pictures as I
speak so I can make it work. I like me, you suddenly have
too much aluminum foil, don't fret, we can cut it out. I'm using cutting
pliers for that and I'm just simply going
to cut out the excess. As you can see, I just
cut at an angle because I do want that very
thin beak shape. As we're not going to
add any kind of legs, I would also encourage
you to kind of see if this sculpture
holds on its own already. Simply pushing down
onto your table, your working surface is going to let you go if it stands or not. And as you can see, we now have two very different
kinds of birds. Another thing I
would recommend is once you have about a square of aluminum foil to turn it
around so you have a spade. And then essentially, you're
going to have tail and beak, and this where you
need the most mass, you have the most aluminum foil. Let's make this one
with a longer tail. Because the tail is extra long, I'm going to add a bit of reinforcement through
the aluminum foil. I'm also going to
add a little bit here under the hand
because there's a gap. And then add some tape to make sure everything
stays where it is. So this bird is loosely
referencing a long tailed tit. Now, I think the tail is
still a little too long, so I'm just going to
cut it a bit shorter. It's also in a V shape, so we're just going to go for that. You don't need to do this. You can free sculpt and
invent your own birds. Again, this is not really
about natural history. It's more about learning to sculpt these simple
shapes with air dry clay, having a lot of fun. The last option I want to give you for this class is
to create ornaments. So I've prepared some ornaments already, as you can see here. And the idea here is to simply
use some aluminum wire. This is one millimetre, but you can also use
stainless steel wire, and we just want to
add a tiny hook. If you want to
create a small loop, and then add it onto the bird. And you can wrap it around. And so it's easier
when you're going to start to add clay later on. I would suggest you
add tape again. This is how it's going to
look before adding the clay. Once you've added the clay, you're going to
have a little loop. Feel free also to
make different sizes, different shapes,
have fun with it. Now that we have all our
aluminum sculptures, we can move on and add the clay.
5. Adding Clay: Okay, so now it's time
to go from this to this. And what we're going to
do is we're going to first add some acid
free white glue. I am using this no name
brand. What is important? It's vanilic glue. And what is important
is that it is acid. Acid free is very
important when you do artworks because it will ensure the longevity
of your work. For the air dry clay, I am using this
Japanese air dry clay. It's not always easy to find, and you can find more
affordable types of air dry clay in local shops, and I would encourage
you to do so. I personally really like this clay and use it
in my professional. But again, it's not
that easy to find. I actually order it
directly from Japan. It's not expensive clay as it, but taxes, import
taxes, and so on, make it a little
bit less affordable than what you might find
in your local craft store. Again, I would encourage
you to go and check out your local craft store
first for air directly. We're also going to
need some water. So this is how I work. I have this little pot
of acid free white flu. I keep it in this here
in this little jar. I sometimes add a
little bit water to it, if needed, but usually not. And then I keep it in
this airtight container, and in yet another
airtight container. And so I have always a little
bit of glue ready to use, and I don't risk drying
out this huge pot of glue. As for the air dry clay, I keep it also in an
air tight plastic wrap. And what I will do when working, I'm just taking a piece of it, and I put it in a
similar plastic bag. Now, if you don't have those, you can also use allopan bags. And so I have clay
ready and more easily aaable than the better wrapped
clay that I took it from. Also tend to work on baking paper as working with
clay can get messy. Last detail is this brush. I use this brush with the glue, and it is by far, my favorite brush to
work on sculpture. It's a brush from
Rosemary and Co, and it's the ivory long
filbert in size too, and it's gotten so much abuse, but it's still holding
up pretty, pretty well. These are my favorite
brushes for sculpture work, so I can only recommend it. Of course, you don't
need to have this specific brush to work, but if you're looking to
replace an older brush, and if Rosemary and Co
is affordable to you, then I can only recommend. Now, what we're going
to do is to first add some glue onto the bird before adding the clay.
Why are we doing this? This will ensure that the clay really sticks nicely
to your aluminum foil, but it's also going
to make sure it is perfectly sealed
on the inside. Now, what you need to know is that air dry clay
is an open clay, so that means that you put water on top and then
you can reactivate it. Now, generally speaking,
I go bit by bit, so I added glue on top. Now I'm going to add the clay, and then I'm going to move
on and add more clay slowly. So you want to
flatten out the clay and then just place
it over your bird. And then you just
smooth down the clay. Now, if you live
in a dry climate, I would advise to use
a allophane just to keep the air dry clay smooth while you add the
clay onto your bird. So when you start
smoothing the clay nicely all over and starting
to give it more shape, it's going to be easier. Simply keep repeating those two, adding first the glue,
and then the clay. Once the clay is in place, you want to use water and you'd simply dip your
fingers in the water, not too much, and then you're going to
smooth down the clay. You also want to kind of give the head a little
bit more shape. So for that, you're going
to pinch and turn the beak. And for smoothing out the clay, you simply push and pull. For the tail, I would advise
to pinch on the sides more, so it's going to give
you the illusion of being thinner than it is. But first, you want to
smooth everything down. And this is about the
smooth nest that we want. Now this is going
to be an ornament and the tail is very long, but just make sure that
it can stand on its own. The reason I'm doing
it that way instead of using a big blob of clay is to ensure that the
clay dries properly and thoroughly and doesn't
crack while drying. One of the biggest mistake
I see beginners make with clay is to not create
any kind of armature, but this is how you
make it properly. You first do an armature, so this time just foil because
it's a very simple shape. And then you add the clay. And depending on the
clay you let dry, it cures on its own, or you put it in the oven. Now, simply keep
doing and adding clay like so on all of your
aluminum sculptures. The important part with birds
is the beak and the tail. So if you want your bird to really look like
your reference, this is where you want to
make a bit more effort. For this one, which is a tit, we are also going to add a bit
of clay because with ****, you often have a little
bulge for the head. Right now, we have
the pointy beak, what I'm going to
do is I'm going to add with my finger a
bit of water on top. And then clay. You don't
want to add too much clay. Also on a side note. If the clay is starting
to feel a little dry, you can simply dip it in a
bit of water and re mix it. Since it's air dry clay, what basically happens is that the water
content dries out, making it stiffer, but
you can simply dip it into water and then you
have smooth clay again. Here we're just going
to add the head on top. Like so. Then we just smooth
it out to the back. We push it down a bit and we
smooth it out on all sides. Now we have a very cute
looking little chubby bird. Now you basically
have the essentials on sculpting the
bird from scratch. Oh, before I forget, you also want to
push this bird down onto your table so it
can stand on its own. So it's going to be a little
bit flatter on the belly. Unless you don't want
to for the ornament, it can be perfectly round. But I find it's nice to be
able to have both options. So either just standing
or if you have an ornament somewhere in a tree
or something on your window, On this starling, I want to I find that the
back lacks a bit of matter, so I'm just going to add a
bit of clay on the back. And I'm showing you this because I want you
to see it again. So I want you to
add water first. This is going to help the
clay really stick together. And then we're going
to do an oval shape, bit like a lemon, flatten it. And you want to
flatten the sides. Like so. And then add on top. Of course, maybe you got the shape right away,
so that's fine. But I just want to show
you how to troubleshoot any shapes that you think you are missing or if you want to add a
little bit more clay, to your bird, and then you
simply smooth it down. So as you can see, this
clay is really fresh. I just opened a package, and it is going
down very smoothly. In general, when you're
working on sculpture, I can only encourage you to turn your sculpture
around all the time, especially on birds because
they are quite symmetric, and so you want to make
sure that they look good from all sides because you sometimes might miss
certain odd looking spots if you just sculpt
from one view. I'm also going to remove
a bit of clay here. Just remove it like that. You can put it aside. It's going to still be
usable, and if it dries, you can put it into
water and wait for it to dissolve a bit before
bringing it back to life. Once you have all your little
birds ready with the clay, you can let them dry, like so simply on your table. It's going to take
one or two days depending on your climate and the way you know
they are completely dry. So this one is actually dry. The spot that is touching the
desk is going to dry last. And basically,
when you touch it, it's going to still be cool
to the touch if it's not dry. But once it's dry, you can feel that it's warm to the touch or it's basically
the warmth of your hand. And it makes hollow
sound, as you can hear. So this was the first step, and I imagine this was your
first day or first weekend, and now we are going to
wait for it to fully dry, and I will see you next
week or tomorrow or maybe the day after to go on
and move to the next step, which is going to be prepping
and painting the birds.
6. Sanding: Once your birds are dry, and you will know
because they going to feel warm to the touch and they also going to sound hollow
and you're going to feel it. It's going to be
dry and very hard. Now, the next step
that we're going to do is to send the piece. So I'm using sand paper, and this is P 120. The idea of sanding
is to just get rid of all these bombs and to have
a very nice unified shape. Now, if you can send outside, it might be even better. Powdery, things like that are
quite dangerous to inhale, so I would advise also to wear a mask if you do
that very often. Through sanding, you really
can find certain shapes. Once you're happy
with your first bird, keep on sending all your
other bird sculptures to the same smoothness. You now want to remove most of the dust from the
sculpture with your hands. And also from your table.
7. Surface Preparation: And once your birds are sanded, we are going to seal them. And for that, what I'm going
to use is a krill binder. So this is a no name brand. It usually comes in
these pretty big pots, and what you want to
do is to dilute that. So for that, I have a
dedicated glass jar, which used to be jam. And what I do is simply
to take one part of a krill binder and to this
one part of a rill binder, you are going to add 123 parts of water. Acryl binder is basically
the binder that is used to make acrylic
paints, but also gesso. And you can use it like so in a quite diluted way to prep
all kinds of surfaces, often it's wood to seal that surface before
adding the paint. Going to add a bit
more water to it. You do want it quite liquidy. I just rinsed my brush so I don't accidentally
put too much on it. But then you simply cover your bird sculpture
with this acrl binder. And this is very
important because right now, just after sending, your bird sculpture is going
to be very porous and again, unprotected, and you really
want to make it stronger. And this here is going
to make your clay super strong and prep it correctly before adding
the paint later on. Because I have to hold
the bird sculpture, I will have to do it in a
few times, but that's right. And also because it's
standing on the desk, I cannot add the binder
where the bird is touching and simply repeat that gesture and prepping for all of
your bird sculptures. Now, if you do not
have a krill binder, you can also dilute the acid
free white glue to do this. But it's not going
to go as smoothly. Don't overdo it. You can always add another
coat later on. You want to let it dry a bit before being sure to
cover all surfaces. Once the top is dry, you can add the acril
binder everywhere else. So on the sides where you were holding the bird and on
the bottom. It's okay. If you go over other places, you can add more than one layer. As a matter of fact,
it's actually probably best to add two layers
just to be sure. And again, let dry. Now, the first layer has dried, and I'm going to add
a second layer of that same mixture of
acrill binder and water. This mixture is also going to
strengthen your sculpture, because what it
does, it goes into all the little pores that
we have from the sanding. And since it's
essentially plastic, it's just going to really
strengthen your whole piece. It's also going to protect
it from humidity or anything that could weaken
your sculpture with time. Again, let's dry and
don't forget to add another layer underneath on
the belly side of the bird. Once you send it and frap your little sculpture
with some acrylic binder, now it's time to add gesso. So is going to ensure
that your paint properly sticks to the surface. Now I'm using a gesso
by liquitex here, but honestly, any gesso will do. I don't really have a strong
feeling towards any brand. I often use even no name brands. Now, some artists feel very strongly about certain
brands of gesso. So if you have a favorite
gesso, go with that. Basically, gesso is just acrylic paint with
a bit of tooth, and this is going to really help your acrylic paint
later on, stick nicely. Wait for it to dry
before applying gesso on the beak and the tail. One layer is going to be completely enough for
these sculptures, and you want to repeat
that for all of your birds and then
wait for them to properly dry before moving
on to painting them. Lastly, with gesso,
you want to wait 24 hours for the gesso to dry
completely before painting. And this is important because
it's going to make sure that the gesso is
really hard and dry.
8. Painting - Red Eared Firetail: Now, the first bird, I want to use a specific
reference bird, which is the red
eared Fire tail bird. I just think it's
really interesting because of all the patterns. And I'm going to use
this convenience paint, which is a mixture of ultramarine
fallo and lamp black. This one is called
Prussian blue hue and then red and,
of course, white. With Turner cull guash, you want to add some
water to the paint. That's how they designed it. So it's very, very
pigmented and very thick. And so it's really meant to add some water to it before you kind of mix and prepare it. And that way, you're
going to have a much more fluid
consistency of the paint. So I started here with white, and I'm just going to add a
bit of that Prussian blue ho. As you see, I'm also using a palette knife
to mix my colors. Now, in general, I
would really suggest that you do that instead
of using a brush. Because mixing colors with the brush can end up destroying your brushes because you get the paint way to
upen your bristles, and that damages the
brush over time. Now, you might also want to
spray the inside of the lid, and this will sort of
ensure that the paint stays in a very
humid environment. Now for that specific bird, what I'm going to do
is to hold the bird at the beak and the tail because I'm not
going to paint those, and I'm using a
round brush here and you just paint all
over the body. I would also advise
to make sure you have enough of
mixture of your color because you might need to do a second layer and since
you want the same color, it's going to be easier
to have the mixture ready already instead of remixing and having a slightly
different color. Now, it's not an issue per se. In nature, especially
colors are not precise, but still, I think it's going
to make it easier for you. You don't really
see the difference because everything is blue, so I'm just going to give
you a bit of a close up. So it's a very light
shade of blue, and I find that it's better in general to not use pure white, but to add a bit of
a tint to the white. It makes for a more
interesting white. For the beak, I used cadmium
red medium hue. I apologize. It did not record
when I started. What I basically
did is to create a triangular shape on
the side on both sides, and then I just link
the beak all around, and then I color the rest. Now, I like to start with
the beak of the bird because the eyes are going to
follow along those lines. So it starts from the
beak and the eye is in the continuation of that point
of that specific triangle. So it's easier to start
painting the beak before adding the
eyes onto your bird. I'm also using a much smaller
round brush right now. It's a size zero. It's the brand
Rosemary and Co. And this specific one is Rose
of England, Series 201. Now, as I mentioned for the eye, I'm going to use
Prussian blue who, so it's basically going to
be my black for this bird. It's going to be easier if
you turn your bird around. Start your line at the
top of the triangle, and you draw a small line, and then you're going to create where the eye is going to be. Like, so this bird has a little bit more black underneath. So you just want to
make that line thicker. The other thing
you want to add to this red eared fire tail is
a bit of red after the eye. So it's looking almost like a rectangle and just in the
continuation of the eye. And then you want to redo the exact same thing
on the other side. Now, the tricky parts with sculptures is that you want
this to be symmetrical. So this is where you are
going to really want to keep your sculpture in
one hand and move it from one side to another. So you're looking
and you're like, Okay, this goes like this, and you really try to give it the same angle and then it goes and you have to double check as well if you
don't go too far. Then you have to double
check from front if that looks good and go back on the side to check if the eye
shape is right and so on. Because a sculpture needs to be okay from all sides,
you look at it. So this is pretty nice, and all I have to do now is to thicken the line on the bottom. And then I'm just
going to add the red. Okay, now for the eye itself, I want you to use the same
pastel colors that I used so. And so what you want
to do is to kind of slowly add white. And this time, the eye is going to be slightly
lemon shaped. If it's not opaque enough, just add another
layer later on and, of course, do it on both sides. Going to wait for the white
to be completely dry. And lastly, we're going to
paint the actual eye with the Prussian blue hue or black or any other dark
color you might want. And basically, this
is just going to be the round actual eyeball. And let dry. And lastly, you want to add a little
speck of white into the eye, which is going to give
the illusion of light hitting onto the eyeball and make it just a little
bit more realistic, a little bit more lively. For the next step, this is
going to be with a flat brush. And what you want
to do is you take the color you'd like,
the dark color. So in my case, the
Prussian blue hue, and we're going to dry brush it. So what we're going to
do is we have a piece of paper towel and remove
most of the paint. And then what we
want to do is go in circles around the head. And as you can see, it's
making a really fine line. So I like to use a flat
brush for that because you get really nice straight lines if your brush is in good shape, and you also can, like, push the paint a little down, which is going to remind
you a bit of feathers. You also want to
dip only the tip of your brush into the paint before removing
most of the paint, not the full brush, just the tip because this is also
going to ensure that the bristles
stick together, but it's not going to damage your brush because
the paint might dry onto the tip but not at
the base of the bristle. What destroys your brushes
is dried paint at the base. Oh now we also want to add a darker
line around the beak, add the junction of
the head and the beak. Once you added all
those circles, you might want to
go back on certain that don't quite
reach the eye here, but also maybe add a bit of
thickness here and there. As you can see, I'm just pulling
the paint slightly down, which gives the line
that feathery effect. Now that we finish the
pattern around the head, we are going to use
the same technique to draw the outline of the wings. It's starting more or less
at the center and then it's sloping down and then
back up towards the tail. For this specific bird species, those rings continue for a
while until about the third. After that, you're going to see first some bigger feathers. And after that, it's
straight lines. And then what happens here at the end is that the feathers, the wings, they go like this. So you just want to bring them back up
until about the middle. And don't forget the circles. Like we were painting the head, you want to make
sure that the lines fall at the same spot. So try your best art moving and checking if
this looks correct. You might want to go over the lines a bit just to
mark them a little bit more, especially at the junction just after the feather and also beneath the wings you
want the wings to pop. Now for the tail, if you haven't done so, first add a layer
of that pale color. For me, it's this very pale
blue and let that dry. First, we want to
add that bright red. But not on all the tale. You want to round up the shape. And the top just from, like, some small lines to blend in with the top
feathers and let dry. And now we are also going to
add a pattern onto the tail, which is similar to
what we did before. So a lot of lines again that go over the red at first
and then just on the sides. You might want to
strengthen that line that touches the red on top here between the
wings and the tail. And then don't forget
to turn the bird around and you are going to
do the same lines, but on the other side on
the underside of the tail, And lastly, we are
going to work on this whole portion, again, with the dry brush, but we are going to just go over
all of it like so. You do not want to cover it
completely because this is going to emulate the feathers
a little bit like this. If it's a bit darker on
certain places, it's fine. We're going to go back
and create dots over. And then using a round brush, you're just going to make dots.
9. Painting - Starling: The next bird that
I'm going to paint is the starling or
Starling Inspired. I have a very fun
idea for this one. We are going to go for a galaxy
theme with these colors, and then we are also
going to add some gold. So this one is less realistic
and more stylistic. So let's start mixing
the colors first. I will be using both blues, which means salblue,
ultramarine blue. Quin magenta, which is mixing
magenta with Turner guh, and it's already mixed
with white a little bit. You will also need some black. I'm using lamp black,
and some white. The gold we will be using after, so I'm not putting it
on my palette for now. I'm spraying my colors, and then I'm going to
mix the ultramarine and the magenta is going to make the most
beautiful purple. And since it's a bit dark, I want to add a bit
of white to it. I'm not too precise with
the mixing because I wanted to be a little diverse since
we're going to do a galaxy. You can also mix the sal
blue with the magent It's going to give you
a different shade of purple and also
add a bit of white. And then we also
want a dark indigo. So for that, I'm going to use black and basically
all the other colors, so a bit of magenta, quite a bit of ultradian
blue, actually, some shallow. As you can see, there was
actually too much black. It looks more black
than anything else. So when that happens, push it a little aside and then just add all the
other colors to it again. This is much better. Let's also mix a bit of a lighter pink and a
lighter ultramarine blue. Again, spray everything
with some water. Don't forget to add water on
the lid or inside the lid. For the brush, I'm going to use this very rough looking brush to show you what
interesting texture you can create with
those old brushes. However, if you have
only new brushes, then of course,
use a round brush. And especially for sculptures
that are smooth like that, I really like to add a
lot of texture with it. So what we're going to do is
I'm going to randomly pick colors and go over the bird, and I'm going to
hold it by the tail, so the tail is not going
to be painted for now. So I started off with a purple
and then the idea is to work rather quickly
and then go over different colors
in a gradient way. So now I'm going over pink. You might want to brush
off some of the paint to have cleaner
colors if you'd like, I'm just going to show you
I'm using a paper towel for that to remove
most of the paint. Then I just go over and pick any color I
find interesting. So maybe some of that
ultramarine blue, which is going to be
slightly pink now. And then if you go
over like that, it creates an
interesting pattern, as you can see, then
maybe some indigo on top. And if you find this
is maybe too dark, then just go a bit
lighter with the white. Maybe add a bit of s for something a
little bit different. Then just keep going like
that going around your bird, going over the colors that
you might find less nice, adding the colors you prefer. You can go as dark or
as light as you wish. Now, of course, galaxies, we have that tendency to
think of them as rather dark. But with the stars, they can actually
get quite bright. Because I'm not rinsing my brush too much in between the colors, it creates that very
natural looking mixture. And also, because I'm using
this brush, as you can see, you can create a sort of
dotted pattern without making any kind of effort
because it's just the way your brush is
going to make a mark. Now, for the beak, we want something a little
bit more precise, go ahead and take the
really dark indigo we mixed or black, and then we want to
create a triangle on the side and then paint
everything in black again, in that very dark indigo. We are also going to paint the eye in a continuation
of the beak. And even connect it to
the triangle of the beak. You just want to make sure
that the eyes are symmetrical, try and move your sculpture like we did with the other bird. This paint dries pretty quickly, but still you can double
check. This is almost dry. It has a little bit of shine, but everything that looks
really mad is good. Now we can paint the tail and I'm going
to go with indigo. And when I work on
these birds, I thought, it's nice when you have at least the head and the
tail look more bird like, and then the rest
of the body can be more stylistic,
more funky, more. But I find that when you have the tail and the
beak and the head, basically, tail and head, when they look like birds, then your brain
accepts more easily whatever ideas or patterns you are going for with the rest. So here I'm just hinting at some lines like feather lines. And I see there's
some spots missing, so I'm just going to add those I'm just going to give it a
few minutes to fully dry. Okay, for the next step, we are going to add
some golden stars, and I'm going to add
some golden paint. It's called gold light
from Turner qrillh. It sprays a bit. Spray
the inside of the lid, and this time, I'm going to take a very thin pointed brush. This is a size zero from it's Rose MariencoRose of
England Series 201. It doesn't have to be
this specific brush. You just want a rather
thin pointed round brush. And then essentially, you're
going to make tiny stars. I'm just going to give the
gold paint a little bit of a steer with some water
because right now it's a tattoo heavy body. So you just want it to
be a bit more flowy. And you can also add tiny dots, which are going to look
a little bit like stars. Another option is
to use just white for the stars or
maybe a silver color. You could also imagine
a very pastel color, very light blue or very
light purple or pink. I really want you to play around with the colors
that you like best. It doesn't have to be
galaxy themed at all. It can also be stars, black stars on green or
something like that. When creating art in general, I think it's always
a good idea to kind of go to the colors
that inspired you most. Now, for the tail,
I would just add a few dots that
fade into nothing. So onto the body,
there are quite a lot. Also make the sides
variable bit, make bigger and smaller ones, and just add a few
onto the tail. Now for the eye, I decided to
add a line of gold just on top and the highlight
we're going to do in gold as well and do the same
on the other eye, of course. So first, a line of gold that follows the eye
and goes towards the beak and a small dot of gold for the
highlight of the eye. And we are done with this very
shiny galactic starboard.
10. Painting - Pink Throated Twinspot: And for the next bird, we are going to go
for pink theme. Basically, we're going to
need two different pinks, one pale pink and one
darker richer pink, and then one indigo. Now, for nice pinks, you always want, of course, some white quin magenta, the mixing magenta from Turner, cadmium red medium hue, which is PR 254,
a bit of yellow. Here I'm using the cadmium
yellow medium hue, which is PY 154. So adding some water. We want a darker pink first, and we're going to
use the quin magenta, which has a tendency to be very cool leaning and since I want it to be a bit
of a warmer pink, going to mix that first. We're basically aiming for quinacridone rose but
mixing it ourselves. This is actually the right color already and we are going to add white because that's
going to be really nice for our pastel pink. I want it still even a
little bit more pastel. I'm just going to move it to the side and go fall
in with the white. Yes, that's better.
Now for the indigo, I'm going to use
ultramarine blue, palo blue and black. So it's lamp black. It's pretty tainting. So the black is what you
want to have the least of. I'm just going to mix the
blues with a bit of black. Then indigo usually has a
slight purple undertone, so I'm just going to add a
bit of the quin magenta. Going to add some water. For the darker pink,
we're going to start like the first pink, so quin magenta, the pyral red, tad of yellow, we mix together. Now we're going to add a bit of that indigo hue that we mixed. For the brush, I'm going
to use rosemary and co designer red.in size
four in good condition. This bird is loosely inspired by the pink
throated twin spot. I find it's easier to look at pictures of real
birds to work on, but if you want to
differently, that's fine too. We're going to do the neck area. So maybe turn around to
have a better angle. But yeah feel free to turn
your sculpture as you paint. I'm just going to go all
over around the neck. Now, if you're trying to look for inspiration of real birds, I would suggest to simply
go and do an online search of maybe a color
that you like and just type in pink Bird
or something like that. That's how I found
this specific pink throated twin spot bird, and then you can adjust
the colors to your liking. You also want the tail to be in that same bright pink color. Here I'm making a
V shape because the wings are going
to look like that. And the wings are going to be
in that darker pink shape. I'm going to go a
little bit further and do a very thin triangle
towards the tail. Also simply from observation
of actual birds. Whenever you're working on arts, it's always good to go and
look at nature because that is going to show you how the shapes are
supposed to look like, and then you can simplify them and then it will
look right to your eye. Now we are going to add
the wings, and for that, I'm going to use this
darker shade of pink. Normally, the pink
throated twin spot has wings that are of
a dirty yellow, a mixture of ochre
with a bit of green, but I wanted a really pink bird. So that's why I decided
to go with this. Now, as you can see, right now, it's getting a bit streaky. Don't worry too much about it. We're going to do a
second layer later on. We're going to let
it dry like this. Now we're going to
paint the belly. And for that, we're going to use the indigo that we
painted before. I also switched to a larger round brush
as it's simply faster. Wait a bit for the paint
to dry in your hands. Now, once the indigo is dry, we're going to add some dots of the same pink pastel or
slightly lighter to the belly. And that pattern is going
to be around the neck, but not on the belly. And same on the other side, you're just making round dots and you want to
vary them a little bit in size. And dry. Now for the wings, I think that that's maybe a bit
uninteresting. So I'm just going to go
from that dark pink, and I'm just going to mix
a bit of a lighter shade, and I'm just going to
create a feathery pattern. And I want to do that
in different colors. Let it dry. Lastly,
using our indigo color, we're going to do the beak, make a small short
triangle towards the head. This one has the head
slightly tilted, make sure that it makes sense
with the shape of its head. Then in the line of
that shallow triangle, make a little I. And let dry. Add a tiny dot
of white in each eye for a little highlight
and you're done painting this little pink bird inspired by a pink
throated twin spot.
11. Painting - Long Tailed Tit: The next bird is loosely
inspired by the long tail tit. So what we're going
to do first is to make a nice dark teal. And for that, I'm going to use the two blues that
I always have, which is sal blue
and tremoring blue. We will also need, of course, to get something more
greenish, a yellow. And we're also going
to need a bit of burned sienna to mute
the teal a little down. We're going to spray that. I might need some white. I'm also going to add
whites to my palette. That tube is almost finished. For the teal, we are
starting by mixing the two blues to which
we add a bit of yellow. Start small first, and
then add as you go on. We're also going to add a
bit of the burn sienna. I'm going to add the white because this is
entirely too dark. I feel like we can
add all the yellow. So we don't want green.
We really want a teal. I think this teal is
starting to look quite nice, but we want it a
little bit lighter. I actually want it still
a little bit more green, so I'm going to add more yellow. If you have a silo
green, you can use that. I'm trying to keep it a bit
minimal in terms of colors. So if you have no colors, you don't feel obligated
to buy 1,000 colors. As you can mix a
lot of colors with just a few different
hues and shades. Okay, yes, this is the
color I was aiming for. So I'm just going to scrap it all into a nice little heap. And now, of course,
we're going to need a much lighter paler teal color. And for that, I'm going
to just use the white. That's not going to be
enough for the whole belly, so I'm just going to add
more white. Okay, very nice. Okay, so for brown, I always mix it myself
for the dark browns, and I always use, and I think those are the colors that I cannot live without
ultramarine blue and Burnsiena mixing those two
will give you a range of really interesting colors
from dark browns to almost black or midnight blues. So it's a very
powerful combination. So this is a bit too dark. I want it a little bit browner, so I'm just going to add
more of the Burnsiena. Now, I'm just going to
add a little bit of that in the whites, and this is just going
to mute it slightly. Now we have our main colors and we can start and paint Okay, for this one, we're going
to start with the belly, which is going to be
that minty color. It's also going to
be on the head. So we are going to paint the
wings in a different color, but you can already more or less hint at where the
wings are going to be. The tail is also going
to be a different color, so you don't need to paint that. Just paint basically
from head to the tail in that mint color or another color that
you might have picked. I'm not being too
precise, as you can see, as I will have to be
precise with the wings, no need to be twice
precise. Saves you time. It's also a very pastel color, so it's not really an
issue to paint over. And it needs a second layer, once it's dry, feel free
to add a second layer. But other than that,
just wait for it to dry. This bird is going to have a
bit of a geometric pattern. So you're going to have an
arc over the eye and first brown as the first outline of the wing that is finishing
as a triangle here. We're just going to do
that again on this side. Again, I would advise to move it around so you can
see what you're doing. So first, the arc,
the wing shape, You might want to thicken
that first wing line a bit. Then we are moving
on to the dark teal, and the dark teal
is going to be all over that long tailed **** head. And you also want to paint the tail in that same
dark teal shade. You want to bring that dark
teal up to the wing in a line and then stretch
it onto the tail. Like so. And underneath, you're just going
to round the teal. And again, you want
a similar line on the other side that is
going to link to that arc. And let it dry. Now, once the first layer of
dark teal is dried, we are going to add some lighter feathers just to make it a little
bit more interesting. So we're just going to
paint lines all over. You can go also more blue, just to give it a sense
of vibrancy and movement. We are aiming at
something that looks quite natural and organic. You can also make it more
green if you'd like. As often birds that
have that teal color, have some green highlights
mixed into the feathers. And same for the tail, but make the feathers longer or the lines
longer, should I say. Feel free to add as I'm doing
here, really bright strokes Uh same for the brown. You want to add a
little bit of interest, so push the brown more towards the Bnciena more towards
the ultramarine blue. And we are actually going to add more brown around the neck. And then's a pattern
around the body. And here again, you really
want to play around with slightly different colors
just to make it more lively. And the dry. Lastly, we're going to do the
beak, and for that, we're going to mix
almost black with the burnt sienna and
the ultramarine blue. You want the triangle
to go like so using the same color, we're going to create
eyes in that brown patch. Now, the eye is
actually going to go slightly down
underneath the brown. We also need to add some
teal where teal is lacking. And some pale mint where
that is lacking underneath. As I decided to make the beak visually smaller by
painting it smaller. And finally, a little dot of white in the eye
as the highlights. The last thing I want
to do is just to add a slightly darker mint color
around the neck just to mark it So I've been living with this bird
for a few days now, and I just don't like it. So I'm just going to rework it. So, first off, I think the brown and teal are
just too close in hue. So I'm going to
change the brown in a much more indigo
kind of color. And I wanted to show you
that because if you are working on different
things and artwork, sometimes you live with your
art pieces for a few days. And then you realize
that's not quite it. If you're looking
at your piece and you just don't like something
about it, just change it. The good thing also
when you work with different types of paint
or different paint colors, sometimes it can be actually
quite nice to leave the previous colors
show through a little as it gives a bit of a more interesting
kind of texture. So this is what I'm going to do. Here I'm going to leave a
bit brown to show through. And I also want the tail
to be completely indigo. So it's not something
you have to do. Maybe you actually
liked that tail a lot. And so, in that case,
please keep it like that. But I just I don't
so I'm changing it. And it's also to show you that whenever you
don't like something, you can always paint over it. And the other thing
that I want to add is a very pale mint at the limits of
the tail just to make it even more striking. And yes, I like it
so much more now, so I'm just going to leave
it to dry completely.
12. Painting - Eurasian Blue Tit: The next bird we are
going to paint is a very common bird in Europe and around the
world. It's the tit. For that, we're going
to need some yellow, ultramarine blue,
white and black. So first, we are going
to mix the yellow. We're going to use
all of that yellow, quite a bit of white as well. And to make the yellow
slightly dirty, we're going to add a tiny
bit of ultramarine blue. We don't want green. We just want a bit of an off
yellow, so to speak. The next color that we're
going to mix is a pale blue. So for that, I'm
going to take the white and add the
ultramarine blue to it. The last color we are mixing is going to be a indigo color. It's more of a dark
blue this time. I'm going to use the ultramarine
and add a bit of black. I'm actually going to need
to add more ultramarine blue to it because
every time it gets me, if that lamp black
is really strong, I don't want it to be too black. You can actually use black
for this specific sculpture, but I just like it to
be more blue leaning. I'm not sure you see the
difference on camera, but there is one. I'm still going to add more ultramarine and
I'm actually going to add a tiny bit of white to it, but not too much
because if you add too white to the dark color, it's going to turn too gray
and you do not want that. So just a bit. Okay.
I like that better. Now, normally lid has
some white color, but I find white is just
too white, usually. So I'm going to create
a bit of a sand color. It's actually very easy. You're going to need
a lot of white, a tiny bit of burn sienna. A bit of that yellow as well. Feel free to use the
pastel colored mix, then you don't have
too much because we want something that
is really off white. You also can use ochre instead
and mix it to your color. I'm also going to add
a little bit of blue. Again, I'm going to use
the pastel color because that is going to be easier
to keep it really light. It's going to look a bit
like a buff titanium. This still needs a
bit of burnt sienna. I'm going to add a bit
of it. I quite like it. We are going to
start with the pale pastel white as most of the head is going to be that color and
now you can see how sandy it looks next to the
rest of the body. So go ahead and paint
that onto the head. So as you can see, I didn't use a lot of colors to mix this, and it's a fairly easy way to mix very muted earthy colors. You really can do a lot
with just primaries. Then we also have some of the white that goes
down on the belly. So we're just going to
paint the belly like that. Let this dry. Now we are going to
paint the yellow belly. So it's starting at the neck. So we are going to decide
that the neck is about here. I'm just going over
the other side. And you can already more or less decide where the wings
are going to be. So the neck is going to be a
bit higher than the wings, and the wings are
going to come more or less like so generally speaking, they go towards the tail. If you go a bit further, then you think the
wings are going to be actually not an
issue because we are going to paint with the blue and the blue can go over
the yellow easily, and you want to keep a
bit of that off white. The off white is
going to be a sort of oval shape at the back, you also want to round
the yellow towards the tail and just repeat
on the other side, so the neck area is going
to go a bit more up, and then the wings Let dry. I'm going to add a second
layer of the yellow, but you might not need to. It depends on how opaque your paint is or
how well you painted it. I generally find that I
like to add two layers of whatever paint I decided
on my sculptures because usually the first layer
isn't quite perfect enough. And again, let dry. Next, we are working
on the blue, so we are going to do the wings. And the blue is going
to go towards the tail, but as you can see, my finger is slightly blocking
the way right now. So for now, we're
just going to focus on the wings that
go around the neck. There's also going to be
some blue on the head. And let it dry. Now that it's dry, let's
finish off the tail first. And now we're going
to work on the head. So the head is going to
ask for more precision. So I have switched to
a smaller round rush, and we're going to start with
a triangle for the beak. And now we are
going to do the I, and it's going to be in between this point and the triangle. And you're also going to draw a line from the I towards the triangle and
from that specific point to your e. Then from
the beak to the belly, we're also going to draw a line. Yet another line that is
going to go around the neck. Don't forget the white
highlight in each eye. And lastly, we're going
to mix an in between color between the very pale
blue and the indigo color, and we are going
to mark the neck. And with the same color, we're going to hint
at the feathers. The first layer of feathers
are going to here, just going to draw a few lines. And your tit is finished.
13. Painting - Spotted Pardalote: For the next bird,
we are going to do a spotted padlot which
is an Australian bird, and these are the colors
that we're going to need. Essentially, we're going to
mix an indigo or a dark, very dark blue or almost black. And then technically or
normally or naturally, it is not an orange, but more of very
orange leaning yellow, but I want to go for an orange because I really like orange. And I took out my
cadmium orange, and I often mix those two brands together because
sometimes I am missing certain pigments in
the Turner range and golden so flat
feels kind of similar. First, we are going
to mix the orange, and we don't want
such a bright orange. We want something a little
bit more, let's say, yellowy. Cadmium orange is
very, very strong. So you don't need
that much paint. It usually is very high tinting. It's very vibrant. It almost looks neon, only it's light fast, and that's why it's one
of my favorite pigments. Then we're also going
to need yellow, and I like to add a
bit of burnt sienna, just to mute it a bit down. And burnt sienna, I feel like, is only a dark muted orange. And if you want really
bright oranges, honestly, cadmiums are
the best to create that. You can also use
certain pyral reds, the yellow leaning ones. Those can be really good
at creating oranges. I'm actually going to
add a bit more yellow. And now we're going to
mix a darker color, going to use mostly
ultramarine and burnt sienna, but with a bit of black
and this time, hopefully, I'm not going to add too
much because so far, I've added a lot. I've said it before, but burned sienna and ultramarine blue, such a powerful
combination. You know what? Actually, I'm not
going to add black. I think this is a perfect shade of color I was aiming for. Adding a little bit of water. Yes, this is nice, maybe a bit more
ultramarine blue. Ultramarine blue is really
a color that I use a lot. You can actually also
use cadmium orange to mix with ultramin
blue for neutral colors. But with the burn siana, you get a bit of a
darker midnight blue. And then we still need some
kind of a whitish color, and we're going to
create a sand color. It's going to be mostly white. And then we're just going
to add a bit of that sort of midnight blue and
a bit of orange. Let's mix that together. I'm going to add a
more burnt sienna. Wing to add a bit
of yellow as well. And now I'll have a nice kind
of, like, buff titanium. For this one, we're
going to start with the orange and put it
on the bird's belly, and we're going to go up
to the beak and actually quite a lot because
it's going to go up to the wings as well,
so something like that. And it's also going to
go under the tail a bit. When the belly is done,
wait for it to dry. Okay, let's do another layer. I would also like to add if you see some kind of cracking
on your painting, then it's likely
going to be fixed if you just add another
layer of paint, or it might be because you
added too much paint at once, and so the upper layer dried before the underlayer and
that caused cracking. I just wanted to
mention that because sometimes you make
something by mistake, but you don't really
know what is causing it. Now I added the second layer, I'm going to wait
for it to fully dry. For the next step, we're going
to mix the pale sand and the dark indigo like midnight colour to have
like an in between blue. And we're going to paint
around the neck era, so fully onto the orange. And we're also going to
paint the head like this. And let dry. And now we are going to paint the wings with the dark
blue indigo color. Try to not overlap
your neckline. And since the indigo color is made of a lot of
ultramarine blue, it might actually be a
little bit more transparent and you certainly will
need another coat. Stretch the paint to the tail. Of course, don't
forget the underside. And wait for it to dry. I'm going to add
a second layer of that indigo color and letting it dry. I'm also adding another
layer onto the head. Using the same indigo color, we are now making the beak, you want a slight
triangle that's going to go into that
muted lighter blue. We are now going to use the sand color that
we mixed and we are going to draw a line that is going to be where the
eye is going to be, and it's starting at the
triangle of the beak, and it's going to be in an
arc and slightly up and, of course, repeat
on the other side. And then on the top of the head, you are going to
draw lines of dots starting at the beak and
then going towards the tail. And you're also going
to create something similar just beneath this
white line, but tighter. And this time, you're
going to follow that arc and then go down, staying strictly on
that light blue color. And you also want to do this onto the line that
goes around the neck Now we're going to switch colors and use the bright orange. This time we're going to add
that on top of the wings. So you want to start at this intersection and then aim
for about the middle here. You can actually start by
drawing your two goals. You simply draw those feather like strokes from
one to the other. Oh. For the last line of feathers, we're going back to that
sandy color and you're going to follow the shape of
the orange feathers, only you're going to go
midway between the tail and the orange feathers
and just do one line, try to be as symmetrical as
possible between both sides. And then draw a line down let this dry a bit and finally, we're going to do the eyes. They are going to be
on the white patch and slightly on the lower side. Like so make sure it is
symmetrical on the other side. This beak is slightly askew, so be sure to check that. And let it dry before
adding the highlights. Now add the little
highlights in the eye And you are done with
your spotted pad at.
14. Varnishing: For varnishing, I will be
using this specific brand, Vallejo premium for airbrush. I discovered this brand while working with my
airbrush on another project, and I realized I quite like it, and it's varnish that doesn't
get sticky on polymer clay, so it's the varnish I use whenever I need a varnish
for my sculpture. Now, do you need to
varnish your piece? That's always a big debate? It does protect acrylic paint. It does protect from
impact from shipping, and it also just protects
better from dust. I don't always
varnish my pieces, so I'm going to leave that up to you to decide if
you'd like it or not. If you don't have this brand or if you are starting
out with varnishes, I would always
recommend you test out the varnishes on the specific
paint brand that you use, on the specific
materials that you use just to make sure that
everything runs smoothly. Now you have three types. You have gloss, satin, and Now, satin is basically a sort of mixture
between t and gloss. Gloss will make you paint
look like it's looking when it's perfectly wet with
something like acrylic wash, it's going to make the
colors change a little bit. So you're going to see the
darker colors are going to be much darker and the
lighter a little lighter. So it's going to
be more contrast. Now, t is well, it's mud, so it's going to
look a bit like it's looking right now without
any kind of varnish, and the satin is in between. I would also recommend to use always the same
brushes for varnishes. Don't take very
expensive brushes, but take those nylon bristles that are on the softer side. And yeah, just dedicate certain brushes for
varnish specifically. Last thing, it is generally recommended to make two
coats of varnishes. Whatever you're doing, the
first coat is always gloss, even if you want a
satin or mud finish, and the last coat is going to
be the sheen that you want. So either gloss, satin, and mud. Now, certain brands
tell you to make just one coat, and that is fine. From practice, usually, you're not going
to be able to make just one coat because
you're going to miss a few spots here and there. So two coats is generally
easier to work with. Before applying
varnish, you want to wait at least a day because the turn acryl guash
has the tendency or you can slightly reactivate it
within the first 24 hours, so it dries quickly, but a bit like gouache, you can slightly reactivate it, so you don't want to varnish
before those 24 hours. And what I do when I varnish, I have this tile
where I'm going to pour some of the
varnish onto it, and then I'm going to varnish. Now, the little issue
we have with these is they don't have any
feet to hold them. So we are going to have to
varnish them in two times. So I am going to hold them
by the beak and the tail. And what you want to make
sure is to not varnish the belly because
it's going to stand on the belly and you don't
want the varnish to not be dry before placing them
on your working surface. And when you varnish your piece, you want to add just
one thin coat all over, and you don't want
to fiddle with it. So of course, if you see air bubbles or
something like that, then remove them
as you see them. But if you realize you forgot a place or
something like that, then you just leave it B, and you're going to readjust your varnish work
at the second coat. And you do not want to pour
varnish on your artworks. It's something that
has been made very popular on social media because
it looks very satisfying, but it is very bad
practice, so don't do that. Okay, so I just added one
layer and I'm just going to place it on the desk and keep
going on the other ones. So when you have an
ornament, of course, you can hold it by that, and it's going to make your
life a little bit easier. And again, don't add
varnish onto your belly, and adding varnish to
mud paint is extremely satisfying because
suddenly the colors are going to pop so much more. And just keep going,
varnishing all of your pieces. I would also advise to check the manufacturer's
recommendations regarding their
specific varnish. I recently varnished
an oil painting using Gamva and I was actually quite surprised on their video and
how they were varnishing, but I followed basically
what they were saying. So if you are trying out a new varnish or if it's
a new brand or whatnot, I would always check out
the recommendations of that varnish and to make sure you're doing
everything correctly. So, honestly, the most important is to work
in very thin layers. I'm going to wash this brush. I'm going to let this
dry calmly, a good hour, maybe, and then go back to
finish the belly, et cetera. I'm going to varnish the tit with another layer
of mat varnish because I don't
really like the look of the gloss varnish
on this specific one. And that way you're
also going to see what mat varnish looks like once
it's onto the bird sculpture. And for comparison, we
are going to varnish the spotted pada lot
with the satin varnish. I just switched brushes so I
don't mix the two varnishes. Lot of artists actually
enjoy the satin finish because it's kind of an in
between between gloss and mat. And here are the finish words, and I just wanted to show
you the different glazes. So we have satin and glossy. Now, I was a bit surprised
because I find sata to be very close
to the Of course, it has a little bit of sheen, and it probably looks
the most natural. A lot of artists like the satin finish because it does make the colors
pop a little more, and it's a little
bit more contrasty, and it has a bit of
sheen but not too much. Glossy is great for
certain things. The contrast is the highest, and especially for paintings, it sometimes is very
striking for sculptures, Glossy can be a
little bit too much unless you want it
to look really wet. And mud is also a
finish that a lot of sculpture artists really like
because often in nature, if you see my hand,
for instance, it's closest to the t, so it looks very natural. In any case, if you want
to varnish your piece, and I would suggest you do
because it's very round and it's going to protect it really well, please,
please, please. Try and make some tests on a piece of paper
or something else, a piece of wood that
you painted before. Just to see how it looks, and then you can better decide what finish you really like.
15. Final Words: Thank you so much for
taking this class with me. I really hope you enjoyed it. I hope you learned a ton. I really tried to add everything I could
think of while working, adding, you know, a few
details, brushes, techniques. Now, if for some reason you have some difficulties or if
you have more questions, don't hesitate to
ask those questions. The project that you're going
to leave in this class, please do leave a project for the class because I find it really inspiring to see
what you come up with. Pick your favorite colors. It's going to be so much easier. I picked a lot of
different colors, but these are my colors. So if you want to do everything in black and white,
please do so. If you want to pink or
just green or just blue, just go with the
colors you like best. No need to buy a lot of things. I'm showing you what I use. But really, I think the
most important things are to use what you have. And I hope this class has inspired you to make
plenty of birds, plenty of patterns, and
just have fun with it. Thank you so much for
being here with me, for choosing this class, for watching it until the end. Don't forget to leave a
review if you enjoyed it. I really hope to see you in another one of my classes. Bye.
 Stephanie Kilgast, Contemporary artist.