Transcripts
1. Introduction: Hello, I am Stephanie Helios and I've been a professional others for a decade. In today's class, I'm going to show you how to sculpt a tiny Fen. More specifically, this one, maidenly our spleen word, which happens to be one of my favorite plants. You can see it in many cities. Just growing on rocks, on stone walls. It is extremely common and I really happened you like it a lot. And so in today's class, I'm going to show you how to sculpt it. So of course you don't have to make that specific plans. You can do whatever firm plans you prefer best. And for this we are going to use resin Andrei clay. Now I'm very excited to show you the technique of resin address clay present Andrei clay is really interesting to work on plants because it stays extremely flexible and durable once it's done. And it's also what we proved a really quite like wet clay for plans. And this is why I wanted to show you the basics. And in order to make this tiny plant, now like most of my classes, I do them so they are fit for beginners. However, as usual, you will need some patients to make it. It's, it's still a fun class for more advanced sculptors, especially if you've never used resin Andrei Klee. And once you see how to approach a sculpture with that specific medium, the class project is going to be very straightforward. I'm just going to ask you to make your own tiny planned, but you can go wild on the colors. You don't have to make it super realistic like here, you can go with purples and blues on our interests wherever you'd like. Just have fun with it. I really hope that you're going to take this class, but most importantly, that you're going to enjoy it.
2. Materials: For this class, you will need resin and dried clay. I am using Medina acrylic paints. Protective gloves. Nitrile is best. Small plastic bags while the clay wire in 0.3 millimeter thickness, sculpting tools, brushes, masking tape off floral tape, acid free white glue, and optionally varnish.
3. Preparing the Clay: We will be using acrylic paint to color the resident address clay. For the mixture of green, I will be using yellow, PY 74 ochre PY 42 chromium oxide, PG 17, and follow green, PG seven. I find it a lot easier to mix the right green shade before mixing the color into the clay. As you know what you are getting. If you have a green shade you like that comes out of a tube, you can also use that. I use a small ceramic tile as pallet so I can keep it in an airtight container. More on that later. If you want a less vibrant green, you can also add a bit of brown or red to mud, the color here, I will be using Medina resin Andrei clay as whale researching which resin Andrei clay was the best. Medina kept coming up. It's very flexible yet strong one stride, which is ideal for flowers and leaves. However, there are many, many other brands of resin Android clay out there. So feel free to experiment with other brands. You also want to keep resin clay in an airtight container and use it within a few months. As this clay cannot be reopened, unlike lightweight stone Andrei clay or paper clay, once the clay is dry, it's waterproof and unusable for mixing the colors into the clay. I am using a latex gloves. However, if you will have to buy new gloves, go for nitrile. I still had some latex gloves around, so I'm using those nitrile is much safer to use and more protective. You might think that paints are okay, but most pigments are actually rather toxic. So it's best to avoid getting too much in touch with them, mix everything thoroughly, and then put into a small plastic bag, push the clay in one corner, I decided to make a few different green shades for variation. However, you could also keep the leaves all the same color and working variations at the end. When painting, you can also skip the college clay mixing and just paint the raw leaves on the end. Once the mixing is done, I put the small tiles that are used as palette in an airtight container. I spray with Watch her to keep it moist and close the lid. That way you can keep your acrylic paint for days. If not weeks, simply add some sprayed water every time you use an open the lid will also be using the same paint at the end. Once the sculpture is done for the stem, I will be using burned scanner, which is a mixture of PBR 33, PY 119, and PY 164, and ivory black.ppk nine. Like previously, I mix the color you want onto the palette before mixing it into the clay, we are going for Doug Brown here. At the end. I want to spray the paint and close the lid tightly to avoid wasting the acrylic paint.
4. Making the Stems: For the stem, we will need wire in 0.3 millimeters thickness. Cut a piece of about ten centimeter length. Now take the dark brown clay re previously mixed, cutter small bits of one corner of the plastic bag. It isn't. Then push the clay out through that tiny hole. The plastic bag helps to keep the clay moist while you work, but also helps to go the amount of clay you need for each stem. Wrap the clay around the wire, twisting and rolling the stem between your fingers. As the plant we are working on well-being, almost one-to-one replica of the real fern. This stem is actually life-sized. For one plant, we will need about eight stamps. Prepare the stems and set aside while we go on and Scott the leaves in the next step.
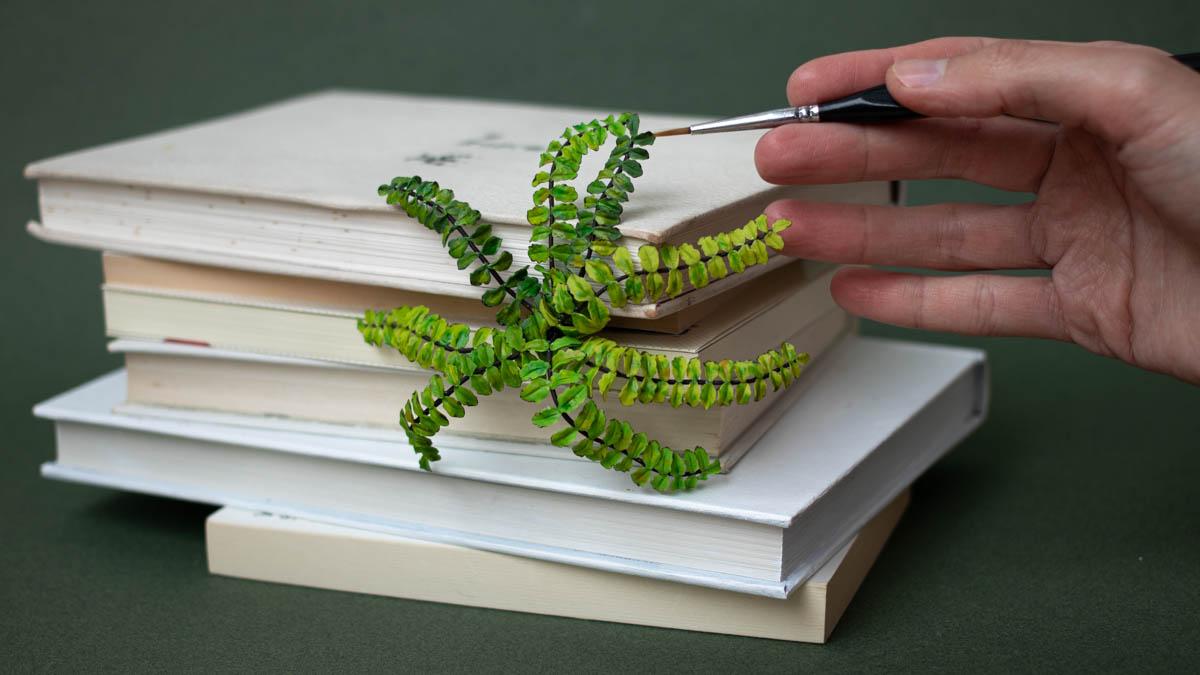
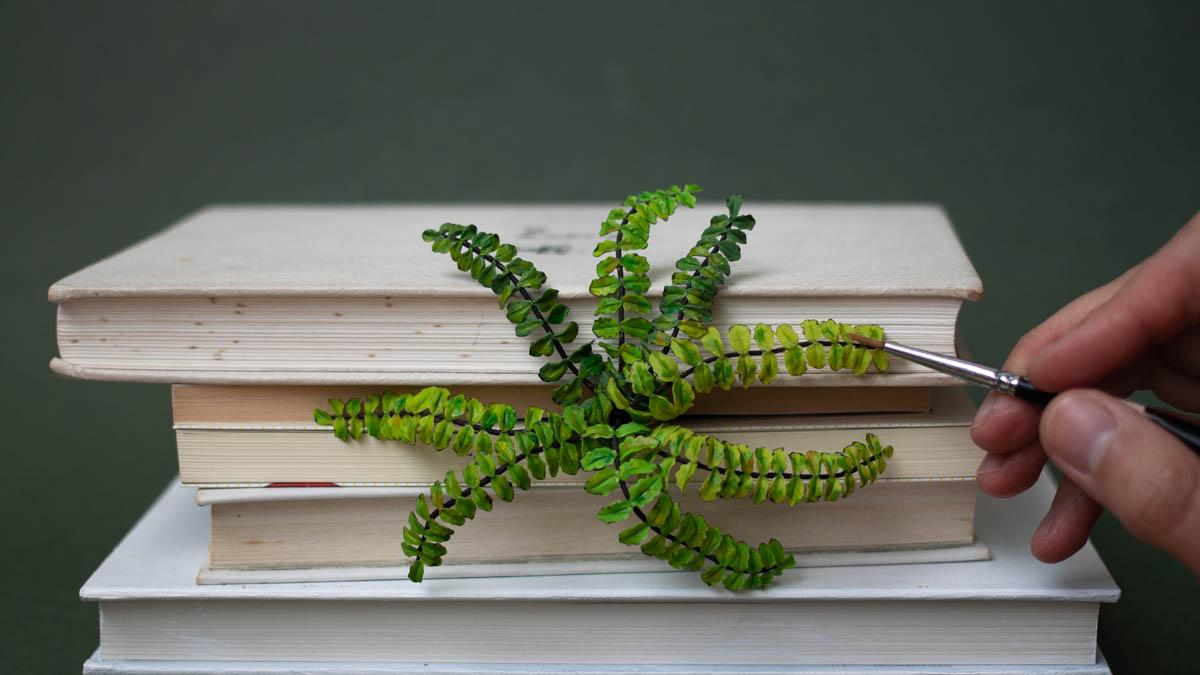
5. Making The Leaves: For the leafs, we are going to make them one by one. They are not difficult to make, but this is going to require some patients or madness depending on how you see it. Like the stamps we did before, we will cut out a corner of each plastic bag where the green clay is. Now push the clay out of the bag and form a small teardrop. By rolling the clay between your thumb and forefinger. Push the clay onto your forefinger using a Bull ended tool, push the clay on all sides, creating small indents. Now push the leaf down onto your finger using your other finger. Then carefully roll over the leaf using a metallic tool to smooth down the clay and flatten it using a metallic needle aspect to our tool, draw a line in the center than folder leaf into carefully and with your fingers, give the leaf some movements. Now repeat the steps until you have enough for one stem. You will need about 31 leaves for just one stamp. Note than beliefs are paired along this TAM. And there's one single leaf at the end of each stem. So you will have an odd number of leaves for each stem. You will also want to give the leaf some sized variation. When making the leafs order them along sides, you will be able to go to the quantity of clay to squeeze out after making a few leaves. The leaves I did are ranging from about five to ten millimeters. Pick one green shade for each stem. I would also suggest making at least two stamps before moving on to the next step, which will be about attaching reliefs to the stem. You want your leaves to be completely dry before the next step. You can also go ahead and sculpt all leaves in one sitting. However, since the leaves are tiny, I find it less risky to work on 2.2.3 stems, then attach the leafs and then go back to making more leafs. You will also be less likely to sweep the leafs onto your floor accidentally. It will also be a little more exciting and satisfying to see the stamps coming to life and should motivate you to keep going if you decided not to call it the clay in green, the sculpting process is exactly the same and you will want to paint the clade after having attached the clay onto the stem.
6. Assembling: You want to be sure you leave so completely dry before starting to assemble them onto the stem. As beliefs are very thin, they dry pretty quickly. So it's a matter of half an hour. But if you see that your tweezers are leaving marks on the clay, wait a little longer. At this scale, the assembling is simply done or the white glue, also known as vanilla glue, PVA glue. You really want to make sure to use an acid free white glue as to not damage your work in the long run, acidity and glue can damage the clay and the pigments beyond repair, considering the time you took to make all the leaves one-by-one, not that much more effort to buy the right view. I am using an acid free glue of museum quality that is meant to be used in framing. A lot of Andrei clays use a form of white glue as a binder. That's why it's the best glue to use for assembling way to glue as also non-toxic and can be used in a closed room IF bonds and one liter can of glue. So in order to avoid the glue to dry out too quickly way I work, I simply put a small amount in a small that it's container. I also spray a little water onto the glue from time to time to keep it moist for the assembling, simply dip leaf into the white glue and then placed onto the stem to avoid gluing everything onto your working surface or table. Placed the Stem onto some parchment paper, simply baking paper, start by adding the tiniest leaf at one end. Then our leaves in a symmetrical fashion around the stem. Going from the smallest leaves to the biggest one. Don't worry too much about getting each leaf straight. It will actually look more realistic if some arbiters Q, once you have added all the leafs, let dry until the white glue turns completely transparent. That's when you know the glue or has fully dried. Repeat these steps for all of your stems before moving to the next step. Before closing the tiny container of white glue, I spray some water on top and mix it thoroughly to ensure it keeps moist, longer. White glue as wilder beast, so it can easily be mixed with water if it starts to feel too sticky. You can also water it down if you need to.
7. Painting: Once all your stem sa, assembled and the glue dry, you can proceed to add painted details. The paint will really give life to your sculpture, but also create a cohesiveness among all stems. So it's really important to work on several stamps and the same time with the same colors. As I announced in the first step where we colored the clay and we'll be using the exact same pains for the final touches. If you have decided not to cover the clay, you will have a bigger painting job. Now, the ideas to our touches off lighter and darker greens randomly on some leaves. You can also add some washes of pure colors here and there. A wash is simply very diluted acrylic paints. The painting process should be as organic as the leafs you are working on. Having referenced pictures of real fern. The one we are doing here is made and hair spleen words will help you go and lay colors onto your leaves. The key is to and variation, but also to use the same colors on all stems to create a coherent and results. Okay? Okay. Once you leaves have enough green variations, it's time to add some withering on the leaves edges. For that mix, a dark brownish color. I mixed the burnt sienna with ochre and scholar green for dark muted color. Dip your brush into that mixture and go over the edges. Don't worry too much if you create spots as it will just attitude the real ism. However, you want you almost dry brush to get the address rights. If you add too much water, the Doc Brown, Well simply go over all the leafs. You don't want that. You really want adopt Brown. You might want to go back and forth between the different stems and adding more colors here and there until you are satisfied when everything looks nice together. Let's aside so the paints can dry.
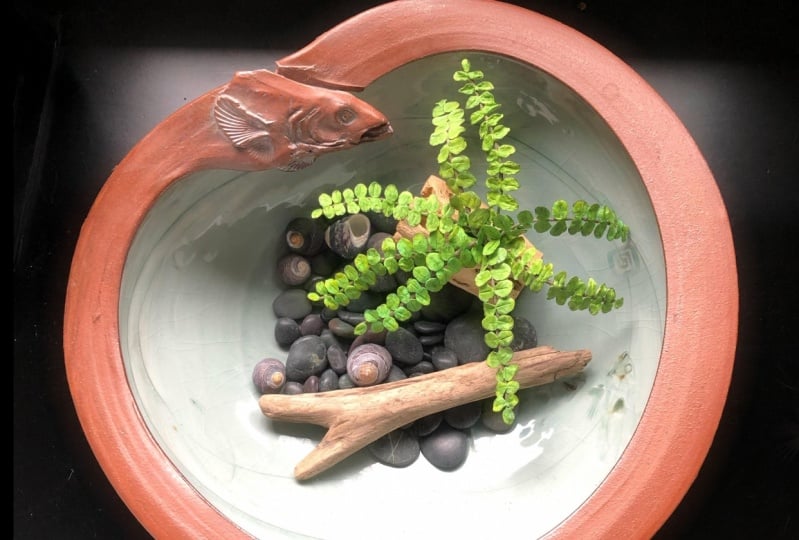
8. Finishing The Plant: Finally, it's the moment to assemble all the stamps together to form the plants. First we will give the stem some movement. This is where the resin Andrei clay really shines. You can twist and bend the stamps so they look like a real plant. Of course, bending back and forth too much will eventually caused the clay brick. Or at least I think I haven't really gone that far. But it's flexible enough for you to find the right shape. This flexibility also makes the sculpture very resistant. Flexible is what makes sculptures more durable. When they are rock hard, they can break much more easily. Once you're happy with how you stamps look, we will put them together for this. We'll need some masking tape, cut it in half or more to have a thin strip. You can also use floral tape for this. Start with two stamps and wrap the tape around then and the next stem and wrap the tape around. Keep going until you have all Sam's wrapped together. And it ended. To make sure the stamps don't move, add some white people do all around the tape. And then the different Noakes led the glue dry until it comes complete transparent. And finally color the tape in the same color as the dark brown stamps, resin, Android clay, it's usually waterproof, and Madonna certainly is. But you might want to varnish that planned for extra UV and scratch protection. You can now add this little plant in a tiny planter or integrated in any of your current projects. Personally, I will be adding to a current artwork in process that is rooted on a book.
9. Conclusion: Thank you so much for taking this class. I really hope you loved it. The class project for this class is very straightforward. I'm simply going to ask you to make your own planned. You can change the scale, you can change the colors. You don't have to use the same green shades, just do whatever you like bests. Please share your project with the class. When you are done, it helps other students a lot and I love to see what you come up with. If you want to share your project on social media, pleased you. Don't forget to tag me. I'll go by the money capital, pretty much everywhere. But in mostly active on Instagram, I really hope you had fun in this class. Don't miss all my other classes on skill share. I have lots to choose from and I really hope to see you in my next one by.
 Stephanie Kilgast, Contemporary artist.