Transcripts
1. Introduction: Hello everyone. My name is Stephanie and I've been a professional artist for the last 12 years. In today's class, I would like to share with you something a little bit different from my other classes. This is going to be about the process of a very big project I've been working on for a few months. Very big sculptures. And now in that regard, this class is less project-based. In there. We'll share with you quite a lot of different sculptures. But since it took me about two months of full-time work to have about two meters high of sculptures. I do not expect you to do the same as it's just a lot of work was, I do hope with this class is that it opens some possibilities for you and that it will help you to find ways to tackle your own wall sculpture project. I am also going to use a lot of different clays and materials in this class. So if you have never sculpted before, I would highly suggest for you to check out my class on modelling clase first. This class is also not really for beginners simply because I'm using so many materials and I'm going to be rather fast and rather quick in explaining what I do. Because I know it's not something that a complete beginner can really tackle. That being said, I still try to explain everything as detailed as possible. So if you are a beginner and if you really, really wanted you whilst captchas, then please watch the class, try to make it out and maybe try one or two scopes from here. Because if it motivates you, then you will likely tackle it and make something great out of it. If you would like to sculpt one of the sculptures, please share your final results with the class. I love to see what you come up with. And if you want to share what you do from this class are what inspires you from this class and share it on social media. Don't forget to credit me and tag me. I go along the Monika. But pretty much everywhere though I'm most active on Instagram. And I really hope the process and thoughts that I'm going to share with you are going to be very helpful for you. And I hope you will enjoy this class.
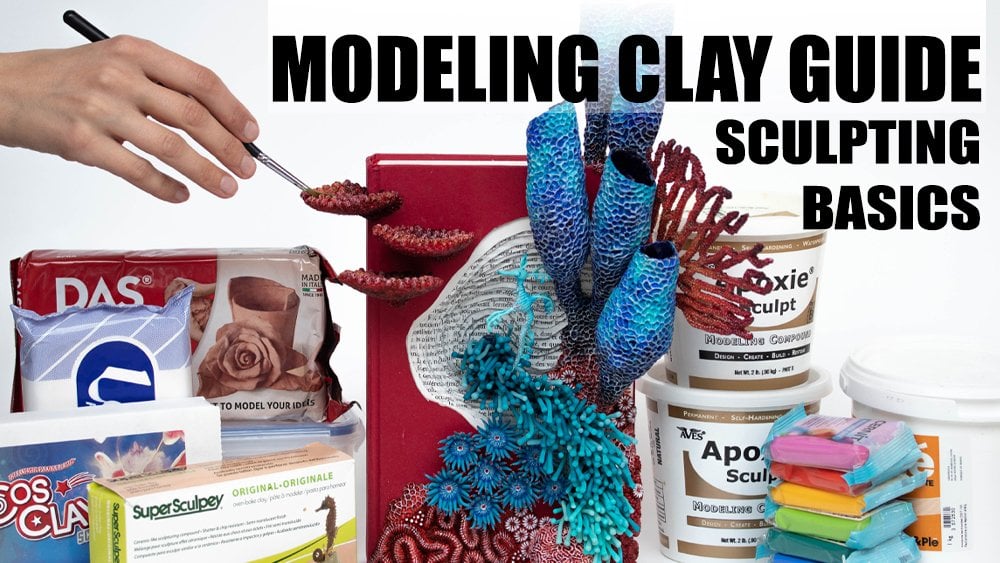
2. Materials: So for this project, these are all materials that are used. Seller said in the introduction, it is a lot of different clays and I don't expect you and I would also not suggest you to buy everything. But these are what I'm going to use. So I have been using cliche, which is a powder that you mix with water, some air dry clay, some cost clay, which is polymer clay and flexible. Madonna clay and Japan are both called parcel and the Moderna is a lot more flexible epoxy clay. And then of course we also have some protection. This is a gas and particle mask. You didn't do need the particle mask for this one and the gas mask for epilepsy sculpts two, these are 21 and some nitrile gloves for the epoxy, for the epoxy clay. But they can also be useful for the other clays. If you want to avoid fingerprints. I will go more in depth on all of these clay while working during the class. Now if you have no clue what any of these are, then maybe check out my class on modelling clay first I do go and you go more in details about them, apart from cliche and to these glaciers really for bigger sculptures and is not really use for, for smaller things, which I usually do. For the armatures, I am basically going to use some crumpled paper from my trash, some wire, aluminum foil and also some wire mesh for certain sculptures. Now for the basis of the sculptures, I did use MDF boards, so I caught them in those huge shrubs where you buy a home decor and construction shops. I'm not sure you say that in English. And then in case I used that, I simply cut pieces usually for my paintings. And then what I did was to use protection. So this is a glove that protects from cuts and a contact nine very, very a diamond on protecting your hands because I didn't cut myself with a counter two years ago and I almost lost the ability of using my thumb. So yes, be careful. It's not very expensive to buy a protective glove. It's not difficult to wear and use, and it's much, much safer. Now, these are two other essentials for this project, which is accrual binder and asset free white glue. So these are the ones that I easily found here in France. It's kind of a no brand really. And this one, the same logic and clear, is basically like something like Jackson's, which is as well here, gosh, deca is also something like Jackson's. Doesn't really matter. You just want to be sure to have an accrual binder and to make sure that your white glue is acid free because that's really important for artwork. And yeah, you're good to go and then some water to thin them down. Now I will be also using acrylics and I ended up using a lot of the standard series, Amsterdam series from royalty lungs. I actually bought a huge sets and they're pretty cheap, but they're actually good quality. And considering you're going to use a lot of acrylics to paint those huge sculptures. I think these are good deal. I also should note that I used acrylic wash, which I really love and I really like the final result. There are however, a bit more expansive. And then I had other shrink colors, Academy, which is they are fine acrylic, so these are all fine acrylics. Now I tend to favor usually extra fine acrylics. But for these huge sculptures, I think fine acrylics are good enough. I also did a list of colors from rail talons Amsterdam, if you have no colors, so you can pick a few callers and have a rainbow to work with. But otherwise just use alcoholics that you already have at home, no need to buy something extra. Now for one of those sculptures at, did use paper and watercolors. I personally use cellulose paper. Pretty cheap one actually that I got in Berlin. It's cellulose paper. It's not a paper that I would recommend for watercolors in general. However, uh, for what we're going to do in this class, It's quite good enough. So if you have cellulose peoples whom no need to buy expensive ones. Now, however, if you have a 100 percent cotton, that's fine. And if you're looking into doing some proper watercolors artwork, then I would recommend in general to take 100 percent cotton paper. And we're going to choose cold press for this one just because it has a nice texture. Now for the colors I just used to, I used ASR green from M Graham and Winsor blue, green shade from Winsor Newton. Everything is in the PDF that is attached through the class if you want to check it out for the vanishes, this is the obligatory vanish for polymer place. The only one that I personally have found that is not making it sticky. Then we also have some polyurethane, which is expensive, toxic, not correct for the very strong. I'll explain a bit more on that later. And then otherwise you can always use a krill vanishes for all the rest.
3. Sculpture Bases: Before starting to sculpt, I needed good basis to hang vertically. After some careful thinking, I decided to create MDF basis with holes in them for the screws. Now these spaces might not be the most adequate ones for your project. And depending on the size and weight of your sculpture, you might want to build an actual wooden frame and cover it with your Scots. For me, it was the easiest to do by myself and at home. Now I always have MDF boards at home as I use these to make my own canvas's, I simply took them out, drew organic shapes onto the boards that would fit together like a loose puzzle. I was going for an organic growing installation and wanted to be sure that hanging would not be too difficult. Now I cut each piece using a craft culture. Now without wanting to become too graphic, but I also want you to be safe. I have cut myself accidentally in the past a few times and onetime very badly and landed in the hospital. Since then I always wear protective glove. This is a very specific type of glove that protects your hand from blade cuts. I would highly valued, very highly encourage you to purchase a glove like this. If you use cutting tools regularly, you can easily lose the ability to use your hand if you're not careful, distracted, or simply tired, it's simply not worth it. As a general rule, you want to be in good shape, fully awake and aware when using cutting tools. But I cannot stress enough that Blades can kill if not damaged severely. A glove is easy to where you can also wear a leather apron on something similar to protect your body. Now cutting MDF like this is a bit difficult, so ripping is easy. Do your best to cut away from your body. As a general rule, you always want to cut away from your body. Now plenty of people hurt themselves badly because they put all their weight onto the knife and then they rip towards their crotch. A few vital veins from that place. So cutting yourself new legs can be fatal. I don't want you to be too scared or I don't want to sound alarming or anything like that. But I want you to be careful. Accidents happen all the time. It happened to me, it happened to plenty of others. And it's so much easier to be careful and where appropriate protection then you go to the hospital. Now, once I had can't all the organic shapes, I also added some holes to hang these onto screws. I used a carving goat format. The one I used is a file of five millimeter gauge size to slash five. It's slightly curved on one side. Alternatively, you could use a drill or use a craft counter. I like to cut onto your scrap piece of MDF and ordered not to just try the cutting board? Yes. Cutting boards are made to be cut onto you, but gotos are extremely sharp. And you put your whole weight on top to cut through the wood. It's not a lot of extra work to add a scrap piece just below to protect the tool board and your desk in order to cut safely, please also use clamps to secure the piece you are working on onto your desk. You may also use clamps when you cut the shapes of each base like we did before. Depending on your strengths, that is a safer way to cut through the MDF. Another option on how to cut MDF or what basis like these, would be to use fabrication labs with heavy machinery that would also be much faster. 3d laser cutting is also a good option. Once you have all your basis, you need to seal the MDF. This is also necessary if you are using wood for the ceiling, I use accrual binder. Find ME local brand that will do just fine. And you want to dilute it with water to milky consistency. Check your manufacturer to see how much you can dilute it. I usually go for one-to-one ratio of binder and watching. Then using a large flat brush, simply brush over all surfaces. Let's dry in between each layers and you want to add between three to four layers on each surface until it starts to look shiny and feel a little different to the touch. Once you have added a few layers of diluted acrylic binder on one side. You want to turn the base over and repeat the process. I like to brush the basis over baking parchment as the basis will not get glued onto my working surface. If you want to avoid that waste, you can also let them dry onto an object so that they do not touch your desk and cannot get glutes to it. Please clean your brush with soapy water between all applications. Once you have your basis, you can start to sculpt on top of them.
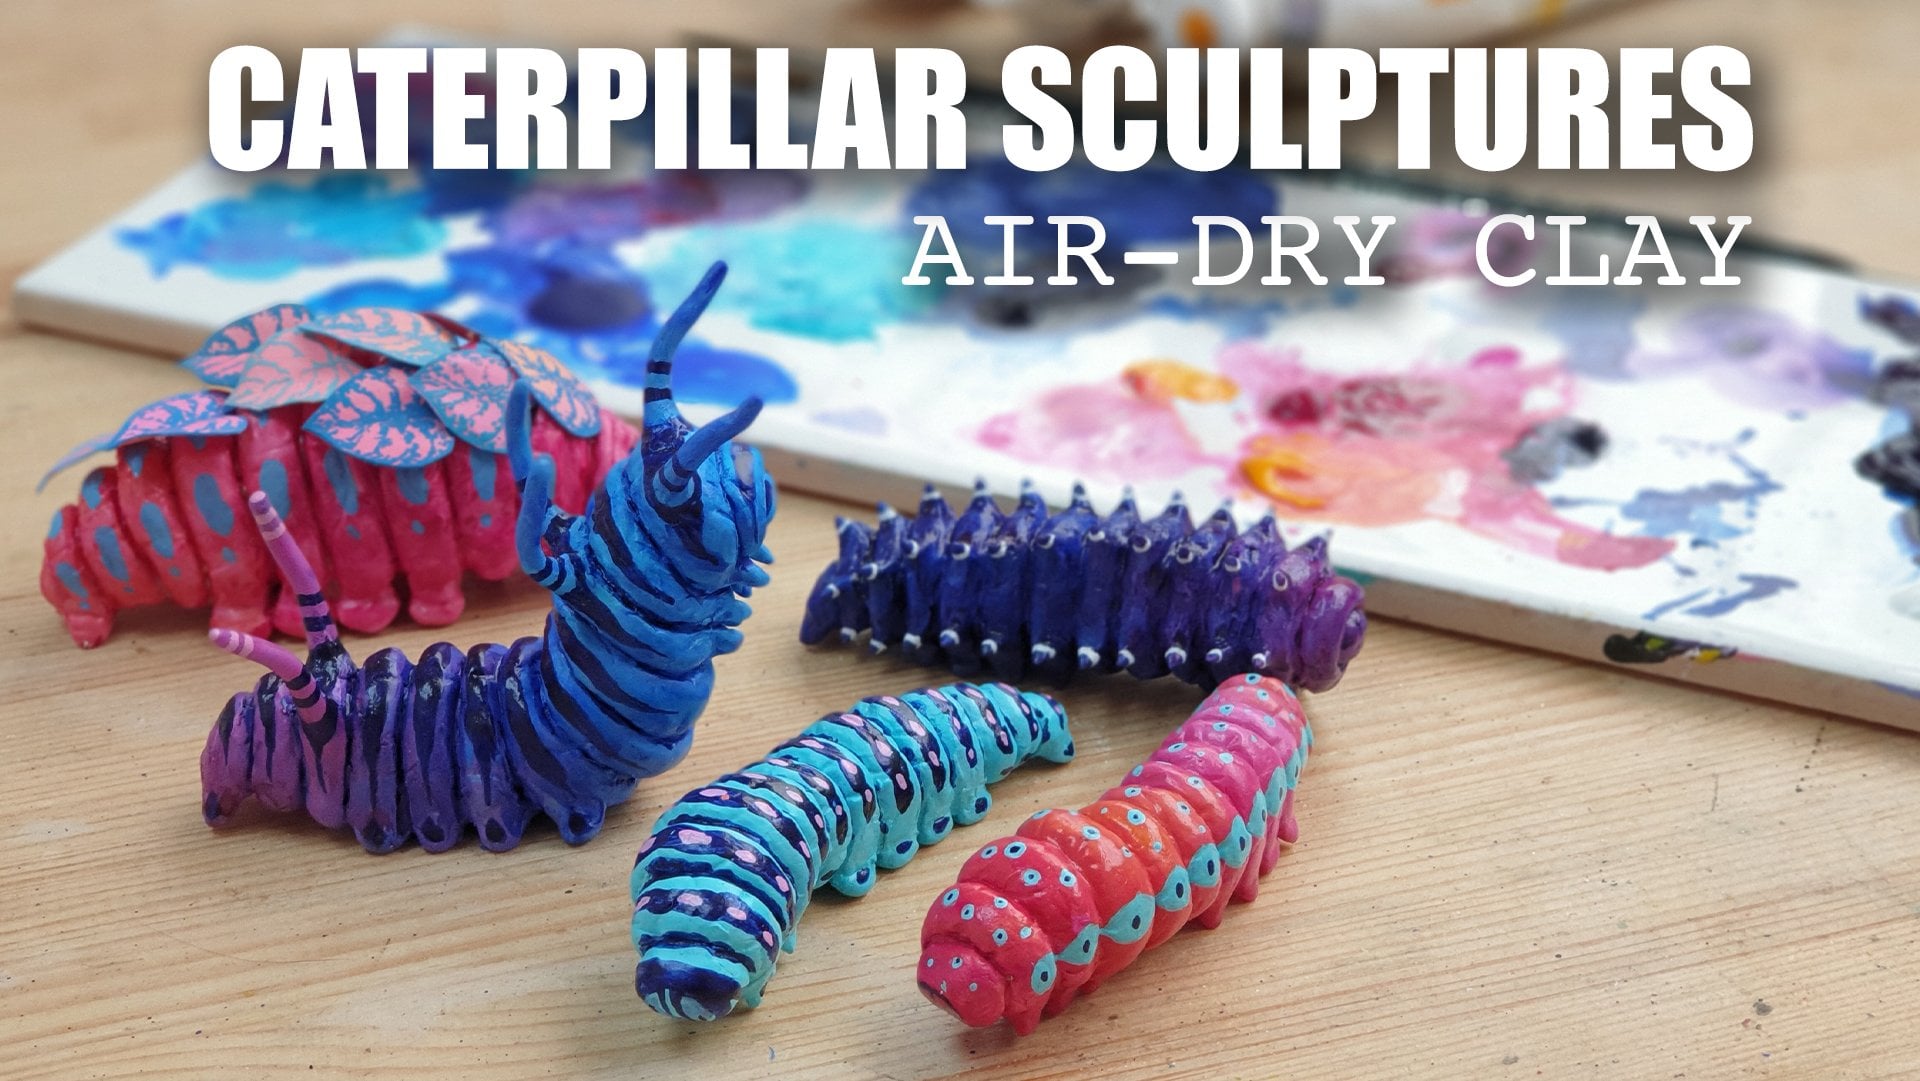
4. Sea Urchin: I made a few sea urchins and for those, I decided to go with the Android clay. I took one of my prepped basis and boxed up some paper. Then I've wrapped in aluminum foil to create an antibody. Now if you want a firmer on the body, you can use foam. For instance, reuse polystyrene that you get when you buy electronic goods or furniture. I tend to favor recycling for the under body as you're not going to see it anyway. Not working with Android clay and any clay and that scale, you do need to build onto a body of some kind. Otherwise, the clay wants dry properly track and the sculpture will end up on reasonably heavy for no good reason. Once you have your armature, you want to brush acid free glue over it to ensure the clay will firmly stick to it. Then you start covering it with flattened out clay. Now you want to smooth the clay out as you go and add more clay. If you plagiarize out too much, add some water, some clay and shape it into an extruded triangle. Now brush some glue on to it so it nicely bonds with the body and smooth the clay down. You just want to add these pieces in a symmetrical fashion. That's the easiest way to work around your sea urchin. For the sea arch in the simplified representation was to add symmetrical lines all around the buddy. At least that was my take on it. And it's also an easy way to work with. Hello, right? I then decorate the whole sculpture by pushing in ball and the tools. Now I personally decided to go with the Android clay because it's a clay that I enjoy working with. It's non-toxic and smooth. It's cheap and can easily be re-wet it if drying out too quickly. There's no baking process and it's lightweight. It's generally reasonably strong if handled with care and can be painted easily. However, it can ship ever so slightly if something hits it roughly. So if you need a final sculpture that is going to be handled more roughly, or if you want to be sure nothing ever happens, epoxy clay might be a better option. However, keep in mind, epoxy clay is harder to work with. You have to wear a mask and gloves and it's also very heavy. For me. The inconveniences by far outweigh the pros. So I just use it for very specific things. Now, of course, if you're sculptures are meant for outdoors, it's a better option. Though. There are other options out there if you want, you go even bigger for outdoor Scots. Quite rapidly to telephone to keep it moist. Now once this you can start spotting, you want to cover it with TO well, so it dries slowly and that way you will avoid cracking once it's dry to the touch, meaning it feels warm and not cold. You can seal it either with a thinned down, a pro binder or a thin down acid free white glue, then let dry and then paint to your taste. Here I went with a bright blue acrylic wash, and the details are painted with regular acrylics in dark blue and teal. Now acrylic wash is quite a park, so I did use it for that purpose, alot. But you don't have to specifically use acrylic wash. I just like to play with it. Acrylics work perfectly fine and would however, recommend using acrylics for these types of sculptures. Because acrylics and another layer of protection to your Scots.
5. Simplified Brain Coral: Now this one is a simplified version of brain coral. I personally like to play with scale and complexity in my work and do switch between a very tight and a much more loser approach to keep the final result more vibrant and more of a personal expression rather than accurate representation of nature. I don't really do realism. However, this is very personal to myself. And if you want to go full on realism, then go for that. And if you want to be more abstract and more simplified, because that rings true to you, then go for this. You really have to listen to yourself when it comes to doing art, because you're the only one who's going to have the final answer for it. There's no right and wrong really, it's just personal preference. Now as for all the big sculptures, you do need to start with crumbled paper and wrap aluminum foil over it or anything else that it's lightweight. And we'll create the bulk of the sculpture. Once you have your armature, brush the bottom with acid free white glue and fix it to the previously prepared base. Let dry for at least a few hours. But a day is better as it's going to be much faster to dry before adding the clay. If you would just go into the armature than and the clay on top of it. It's going to take a longer time to dry and you're also not going to be completely sure if a try. The other issue you're going to have is that the armature is not going to be fixed to the base, so it's might slip all around. So please just wait until it's dry before moving on to adding the clay. Once it's dry, you can brush acid free white glue all over the armature and then start covering with thin layers of clay. Don't worry too much. You can always add a little bit more clay if you realize it's not enough when you start to actually and the patron later on. And here I am using air dry clay. Now also, if I had to redo this one, I would probably not get the air dry clay, but use the clay shale instead simply because of the thin edges. Now, the specific shapes really can get shipped very easily and while you can try and protect it before and then after with heavy varnish, which I did. And we'll get back to you later in this class. If I were to recommend which material to use, I would go for a cliche. Now, for this one and the patron is basically done with using your fingers as tools. You want to push your fingers into the clay to create cavities and pinch the clay between cavities to give the pattern its shape and edges. I'm also using water and simply dipping my fingers into the water to smooth the clay down a lot easier and to create the shapes. Now that scale, it's not much of an issue, but if you want to avoid fingerprints at all cost, you can wear LaTex R nitrile gloves for that purpose. Now I would recommend getting nitrile gloves simply because those are the best ones in terms of allergies and protection. And you can use or you will need nitrile gloves if you want to use epoxy clay, whereas you cannot use latex gloves if using epoxy clay. And now, I personally don't think fingerprints are ever an issue in such very organic work, but it's a personal opinions, so you have to find what is best for you. Now, once the brain coral is done, cover it with a towel and leaf to dry over a few days. Once it feels warm to the touch, it is perfectly dry and you can paint it. Ideally, you do want to seal the clay first with either thing down, acid free white glue or thin down accrual binder. Now for this one, I went with shades of orange and mixed cadmium yellow, cadmium red, pyrrole red, and all occur rather freely. I do like to make the column X's move and dance onto the sculpture. Because I think it looks more natural despite the very vibrant and psychedelic colors that I use. And once this is done, simply let it to dry.
6. Brain Coral: Another piece I did was a life-sized brain coral. Now, this specific one is a little longer to sculpt. However, it is quite a satisfying sculpture to do similarity the previous sculptures, you do want to create an under body by using crumpled paper and aluminum foil. Then start to rub the whole body and flatten out clay, just like shown before. Now, since this sculpture is quite big, I did leave cellophane onto the body at all times to ensure it would not dry out too quickly. You can also spray onto it some water to keep it moist more easily. The drying out will depend on the climate you live in. So you might need to adjust accordingly to actually sculpt the brain coral, roll out some clay, flatten, one signed and place onto the body, twisting the clay into curves. You want to see smooth down the clay and then create a patron over it. Here I am using my usual tiny spatula for this. However, a needle tool, dental tools, toothpicks are anything that can create a line will work as well. Now I would suggest to use your favorite sculpting tool simply because the tool you use the most is also the one you know how to use best. As you can see, this is quite a long process, albeit meditative. Now if for some reason you would want to use epoxy clay instead of air dry clay for this. Make sure to mix up clay as you go and don't do a tube big batch right away. As with anything in realistic art, time is of importance to get the details just right. And as you can see here as well, I am adding the sinews of the corals one after the other and finishing one before adding the next. It is a lot easier to work and add details on fresh clay vent. You try and re-wet clay that has started to dry. Once the whole brain coral is sculpted, covered with a towel. So dry slowly and evenly. And let right. Now after drying, you want to seal it with thin down acrylic binder or things down, acid free white glue. Let dry again, and then you can proceed is to paint it. Now here I decided to go with purple by mixing ultramarine blue, PB 29 and quinacridone magenta PR E122. To achieve this vibrant purple color. To make the coral more likely, I purposely changed the ratio between blue and pink to create places onto the coral that we're leaning more towards blue and sometimes more towards pink. Now I always do that on sculptures because it just looks a little bit more natural, even with very psychedelic colors I use. If you cover an entire sculpture with the exact same shade, it's going to look a little flat and boring. So unless that's what you're going for, a really suggests, to mix in more freely and to kind of make the mixture move and change a little bit over the sculpture. Now, I would also like to remind you that painting sculpture is especially rich details like shown here, is really rough on your brushes. So one thing to keep in mind is it often works better with stiffer brushes. And please buy cheap ones because you aren't going to destroy them really fast. And no matter how good care you take off your brushes when it comes to painting the sculpture, it's not going to last forever because he really pushed the bristles down all the time to get into all the nerves. Now another option would be to use airbrushing. But I don't have an airbrush, so it's not really an option. However, if you do own an airbrushed, then this is a good option to really cover the whole sculpture over details of nooks and crannies. And it's going to be a lot easier.
7. Acanthophyllia: A personal and Kiran favorite of mine are a cancer Ophelia. For this specific one, I roughly shaped doughnuts from aluminum foil and glued them with acid free white glue one after the other on one of my wooden basis. Note that you wanted to push the donuts together so there's no gap between them. I did leave the foil stick out of the wooden base just a little. Once the fall donuts are glued, leave them to dry. It's impossible to add clay of the glue isn't dry as they will slip around the base. Once the glue has dried and the donuts can't move anymore. Acid free white glue and then start to cover with clay. Did you want to work on a cancel feel yeah. After the other. So the clay wants dry on you. Add a thin layer and then place some cellophane on top. And using a tool, start to draw lines over the cellophane and onto the clay. This specific technique will ensure that the clay will be shaped with rounded edges. Now here you first see me see and use Andrei clay that they did switch too cliche later on. Now both work and I would even argue that sculpting the Andrei Glee is the little easier. However, cliche does not shrink when drying, which is a huge advantage for this specific agglomeration of separate small sculpts with Android clay. Once the clay is dry, you will have to get back into it and add more clay and between the occurrence of feeling out to cover the cracks. Now this is not difficult, but it's just that much little extra work which you won't have to deal with cliche. Now, the mean difference between the two is that clay sheet is a lot softer and I find it helps to let it set for a little before starting to Scott and add the details. Now, while you work on each outcome to feel yeah, you also want to cover the rest and cellophane, especially the Android Claiborne. As a general rule, you want to avoid letting Andrei clean, dry on covered as the outer skin oil dry first and much faster and will thus be more prone to cracking during the drying process. Now, this is not really an issue with the clay sheet which doesn't shrink, so won't really crack. But as a general rule, it's always good to let things dry more slowly. Now you can make some pigments are pains, which I did. Did you try, but honestly don't do it. It's kind of pointless us, you will cover it with acrylic paints later on. Now cliched rise to a light gray suit. Not much of an issue to cover. Once everything is sculpted, let Ri covered in a towel. It, it's dry when the clay feels warm to the touch. Now, especially with clay sheet, you do want to seal the clay first with thin down acrylic binder or thin down asset free white glue. I personally prefer using the acrylic binder as it leaves a more direct surface behind. And then you can start painting in the colors of your choice.
8. Nudibranches: Now for this massive order of coral reef inspired sculptures, I also decided to add five MUD branches. So what I did to simplify my life is to replicate my own designs in big, I have a nudibranchs class here on Skillshare, where I show how to sculpt these and small and polymer clay. You might be interested in these. In today's class, I will only show you one, so you understand the general principle of it. Now, nudibranchs have seen tentacles, and that's what I started to do using cold console. And from Medina, I attended the clay with watercolor to get the colors I wanted and corrupt clay around the wire. Now this is the best way to achieve a thin, flexible tentacles that can bend without breaking. I've tried a few other cold Castile and brands. But so far, the one by Madonna is by far the best. That being said, feel free to try out other brands or make your own called penicillin at home, called porcelain in general, is pretty flexible and a very, very sturdy. Now, once the tend to cause are done and the two frames antenna as well, you want to let them dry overnight for the body itself. No surprise here, we are starting to create an armature out of aluminum foil in order to easily glue the crumpled paper and aluminium foil onto the wooden base. I use clips to hold everything in place until the ACLU was dry. We'll also be using other video mesh for the mantle flap to be able to sculpt something thin, cut a piece of mesh in the shape of the new deep crash, and then push and pinch around the body, creating waves. Now, she attached the mesh onto the aluminum body. Staples are good option. Now, I have only used cliche for the needy branches, so I'm showing you how to mix it. You want to wear a particle mask to protect your lungs. As we are dealing with very fine particles, the mask is only necessary when mixing the powder to watch her. When you work with the clay later on, no mask is needed anymore. Use a dedicated glass bowl, take four to five tablespoons of powder and start adding water little by little, mixing well until you get a soft clay. Now you can easily adjust the softness of the clay by adding more or less water or adding more or less powder. If you want to add a coloration, you can add pigments are Panes now. But I found it to be pointless as I will be painting the sculpture afterwards anyway. Once you mix the clay of rapids into cellophane and keep it there while working. Now, I would also suggest to not mix too much at once. So the client wants dry on your brush, some acid free white glue onto your armature, and then start slathering the clay onto it. Use some water to smooth it down. It's a bit messy. So I find wearing gloves a lot easier to work with it. Cover the whole needy branch with clay, making sure you leave no holes. That being said, you can still readjust this cult wants dry by adding more clay or sending down certain parts to fine tune your sculpting. Remember however, whenever you sand sculptures, you want to wear a particle mask. Once you are done, leaf to dry until it feels warm to the touch. Then seal the clay with thin down acrylic binder are thin down, acid free, white, clean. I personally used at trial binder and it's really what I liked the best to drink the horse coating process. Let try and then you can paint it. As I said in the beginning, I replicated new branches from another class I have here on Skillshare. Now the painting process and technique is exactly the same. Only on a bigger scale. I started by doing a gradient on the body and then added a pattern on top. Feel free to look up nudibranchs online to find inspiration. Nudibranchs are naturally very colorful and with rich details which you can reproduce easily in your artwork. They are very fun and forgiving subject to work on. And I can only encourage you to look at the natural world that you seek more references and ideas.
9. Zoantharia: For the Zoom and feeds, I decided to go with paper. Now, Xun feeds are basically bunched sea anemones, which means a lot of tentacles. Now I did not want to roll out thousands of small tentacles and cold puzzle and clay. So decided to simplify the shape and make it out of paper. It's still remained one of the longest sculpt of the whole installation. But it looks nice, so I'm fine with it. I took some water color paper and drew circles on it. What I did was to draw two circles, a bigger one and a smaller one in the center for each Zhuan TD, I used to jam jar lid and a small jar of pain for that, a washi tape would have been a good option as well for the Center for painting, each zone feed, I only use two watercolors. I went with n-grams, 80 green, which is PY 12, 9 and Winston nutrients, phthalo blue, PB 15. Now to get a nice gradation, I first add water to the outer circle. Ben, go in with a loaded brush. So green. Finally trace a water line next to the color to blend it into the paper. The other option would be to cover the outer circle and a little more with a washer and the color without reaching the water's edge. We'll leave that with the blue later on as the blue is so much stronger. For this sculpture, I made about 36 is 0. And heeds, I didn't take the most expensive watercolor paper I had. I actually took some leftover cellulose paper for this. However, if you have to buy watercolor paper, I would suggest you always take cotton paper. It is much more qualitative. Now this watercolor paper was cold pressed. Once the yellow is dried, go back in. First, add water to the inner circle, and going a little further around that inner circle. Then going in with a loaded brush, starting from the center until I touch the line of the inner circle. The paint will then blend that to the remaining what paper around. Making a nice gradation. After drying, I cut out all the painted circles and turns them the back. I only added yellow paint and let dry again. Now comes the longest part of the sculpture, which is to cut the tentacles with a cutter cut small petal like shapes in the yellow part, all around the blue center. The zone td will look a bit like a flower. This is quite tedious and long. And other option would be to find a wage, cut it through machine. I must admit I personally prefer the handmade approach. However, if you are on a deadline or have a very limited amount of time for your project. Using a laser cutting paper machine or a punter of a similar size might be an easier option. Once the tentacles are done and using a small jar, I simply bend them up and then back into a curve. For this co-opting base, I used some polystyrene that I had at home. We recently purchased a coffee table to dine on and it came wrapped in that. Now, I would not advise to buy that type of material. However, you can easily get it from France or even shops who would otherwise throw it away. Alternatively, you can also use the usual paper and aluminum combination. I have to admit that once the polystyrene was carved, it was a nice base to work on. The carving itself is quite messy though. You need to roughly cut the polystyrene around the base shape first, as you can see, I used three different pieces. I could cover the whole base as it was fairly big. Make sure that you were a protective glove and you always cut away from your body. What I did was to first glue pieces of the polystyrene onto the base. I used my usual wide acid free glue far land. Put some books on top as this white glue take some time to dry. Once dry, I calf to posturing, careful with the blight, be sure that whoever protective glove and cut away from your body. I ended up adding a little mount on top still which I glued and then carved these. I then covered the whole base with some colored model span paper that I had left from prior sculpture. The colors fit perfectly. Now when working in sculpture B, it big or small, it's good to keep an open mind and open eye on what you can find in your home or studio as plenty of things can be repurposed or upcycled. Now if you want to create similar colored paper, I simply cut striped pieces of the models, pan paper and watercolor washes on top. Just make sure you use similar colors to this. So and heats we did on watercolor paper. Models span paper has the advantage of being very thin and sturdy even when wet. So when I started gluing it on top of the base, It's not going to tear and it can move itself nicely onto the base. Again, I use my acid free archival white glue to glue the strips of paper onto the polystyrene. I used a dedicated glue brush to really go over and make sure the paper would nicely mold over the shape. Once this was done, I like to drive. Finally, I proceeded to glue this Lewontin needs one by one onto the base. As I mentioned, this was a fairly long process and including the drying process, it did take me a few days to do. It might have been long, but I would do it again exactly with the same technique as I think the result is convincing and it's still much faster than using clay. However, if you are looking into making a similar sculpture to you outside, and then paper's not going to be a good option. In that case, a waterproof clay would be best, something like call parcel and our polymer clay cost clay for flexibility.
10. Sea Anemones: Last type of clay and sculpt I did during this project with sea anemones. I simplify sea anemone is to their tentacles. So that's what I sculpted here. Nothing very difficult about it. You need some wire. The thickness depends on how big you want your tentacles to me and some flexible clay. Now here I have used a cold porcelain from a Belgian brand, we Pam, but I would not recommend it as it's not very flexible. It's quite strong, so it certainly has its use. And if you live in Europe, it's more local than the Medina clay which comes from Japan. It's also a lot cheaper. However, it's very sticky and I find it annoying to work with. But that's more a question of practice. All clays have their quirks and you learn to deal with them. I was really hoping this brand could be a substitute for the Medina clay for all the advantages I cited before. But alas, if I add, you pick between those two, no doubt, I would go for Medina. Note that I also call it the clay with some watercolor. I usually do that with cold porcelain as it's a fairly translucent clay. So I'm taking advantage of that by coloring the clay rather than painting it afterwards. Now the other clay I used was cost Clay, a flexible polymer clay. I did end up breaking one or two of the tentacles and I'm not exactly sure if I did something wrong or if I was just too rough because the clay is very flexible, but it's still less flexible than Madonna. And I tend to forget that. Now the biggest advantage of polymer clay is that you have time to Scott details. Not super-useful here for very simple tentacles. But depending on our to-do, that will be the decisive argument for one or the other.
11. Attaching and Protecting: In this final lesson, I would like to touch on everything that is around the sculptures. Now once you finish sculpting everything, you might need to attach certain pieces together. Now, I personally favor using epoxy clay whenever I need to glue a sculpture somewhere or attach several sculptures together. Here, for instance, I am attaching the tentacles of the sea anemone knee to a base next to sea urchin and some akin Sophia, I am using epoxy clay because that's the easiest and most reliable way to do so. Fxy clay is clay and to glue at once. It can be molded in sculpted. It can easily hold a piece when wrapped around it, and it's strong and not flexible once rye, which are only advantages in that particular case, where you're trying to attach things together. Just keep in mind that you will need to wear nitrile gloves and gowns mask when using epoxy as it is toxic, you also want to be in a well ventilated room. Fxy clay can also be useful to add smaller details without having to worry about how to fix them later on. Like these small balls, I often do a very abstract representation of the tip of sea anemones. It's a lot easier to do these with apraxia clay than with any other type of clay. Another use of epoxy clay is to fill up cracks. Holes are smooth down certain parts of sculptures. It can also strengthen certain delicate parts. I did that a bit on some needy branches. Now keep in mind, you do not need to use epoxy clay for that. You can also use any other type of clay to go back in and fill holes or cracks. However, if he knew you're going to need strength than epoxy clay is a good final add-on. Other ways to attach sculptures together is of course, the asset three white glue, but it can be a little bit more fiddly to use. Here. I used it for air dry clay balls that I made previously. Now these tiny balls were really quite the hassle to sculpt at that scale from my experience during this project, unless away is crucial, I would go for epoxy clay to make these simply because you've gotten the clay and glue and a one and no worries of shrinkage. Second option would be clay shape, every clay shrinking quite a bit when drying makes that specific agglomeration of small sculptures a bit of a nightmare. Now lastly, let's talk a little about varnish. If you want an extra very strong protection than pulley URI fan, varnish is a good option. However, it is a nasty varnish and has a lot of inconvenience. It has a very strong smell and it's toxic to inhale. So where mask work in a well ventilated room or even better outside, use, cheap synthetic brushes is you will sacrifice one brush every time use that varnish. It is expensive as well, on top of all the other inconveniences. And lastly, it is extremely glossy, which might not be the look you're going for. Now. This lands bit isn't quite as bad as you can potentially always add a layer of matte varnish on top later on. Now the sole advantage is its strength, which I found to be very helpful for the air dry clay sculptures. However, cliche sculptures seem to be much stronger, so didn't really need that extra protection. This project is going to be put up and down a few times. I wanted to make sure the sculptures were more protected. That being said, I did not use the varnish on all sculptures because I liked the math aspect of certain paints I used, notably the acrylic wash. If you seal it all your sculptures before painting and sculptures are meant for indoors. Varnish isn't absolutely necessary. But if you're looking for an extra layer of protection, polyurethane might do the trick.
12. Final Words: This concludes this massive project that I've been working on for a month. I really hope that all my thoughts and process really helped you to figure out a little bit more about sculpting bigger for bigger indoors contrasts. Now, if I had to redo it, I would probably go with cliche as the main material because that was the big discovery for me and I find it really easy to work with no shrinkage and very strong and pretty cheap. And for the flexible details, I would go with Madonna called puzzle answer, that doesn't change. And lastly, epoxy clay for everything else, attaching pieces together, our retouching. Now, Eric, ELA, I would probably not use again unless I just have a lot to use up simply because of the shrinkage, which makes everything a little bit more complicated when working. And that scale also, I feel that air dry clay is slightly less strong or quite a lot, actually less strong than cliche. And I find it's just safer to use cliche for that one. That doesn't mean that it's the only clay around in the world for biggest sculptors, they are lot more. But yeah, in terms of ease of use, et cetera, I would go for cliche. Other materials that are would probably look more into it on the paper and water color combo, which I find to be all the way is very easy for me to use and very strong papers flexible and yeah, you can do a lot with it. I really hope this class has opened up possibilities for you that you've got inspired or maybe that you've got some answers on your questions for bigger sculptures. If you have any other questions that I haven't addressed in this class and I'm sure you've got some. Please just ask in the comment section below and I will do my best to answer as fast as possible, though. It can take a few days. And we'll also be adding a PDF to the class with all of the materials is two for you as references. Thank you so much for watching this class. I hope you loved it and I really hope to see you in my next one. Bye.
 Stephanie Kilgast, Contemporary artist.