Transcripts
1. Introduction: Hello. I am 70. Kill you asked and have been a professional sculptor for the last decade. In today's video, I'm going to show you how to sculpt Mean yatra bamboo. This class is very mixed media, and I'm going to use a huge varity of skills. In that sense, I think it's for more advanced cultures rather than pure beginners. Simply so you're going to use a lot of materials and you're going to use different skills. However, if you are a beginner, don't be shy and try it out anyway if you're really interested and also think just watching classes that are maybe a little bit more advanced can always bring a lot t two. We're going to use a modeling clay. I'm going to show you with a polymer clay, but also with epoxy clay. We're going to use some paper, which is a very specific paper wire and acrylic paints. If you do a project inspired by this class and want to share it on social media police, do you don't forget to tag me so I can see it. I go by the moniker antique clock for too much everywhere, but mostly active on Instagram. I really hope that you're going to take this class, but most importantly, that you're going to enjoy it
2. Materials: For this class, you will need modelling clay. I will show you with Poma Clay and Epoxy Clay, but you can also swap it with and right clay. Jess. Oh, Model span Paper Mulberry, Archos up Labour works as well. Acrylic panes Woods cures 28 goats wire, acrylic gel or, alternatively, white glue brushes, sculpting tools. Scissors optionally a pasta machine if you using polymer clay nitro gloves if you're going to use epoch, sickly and varnish.
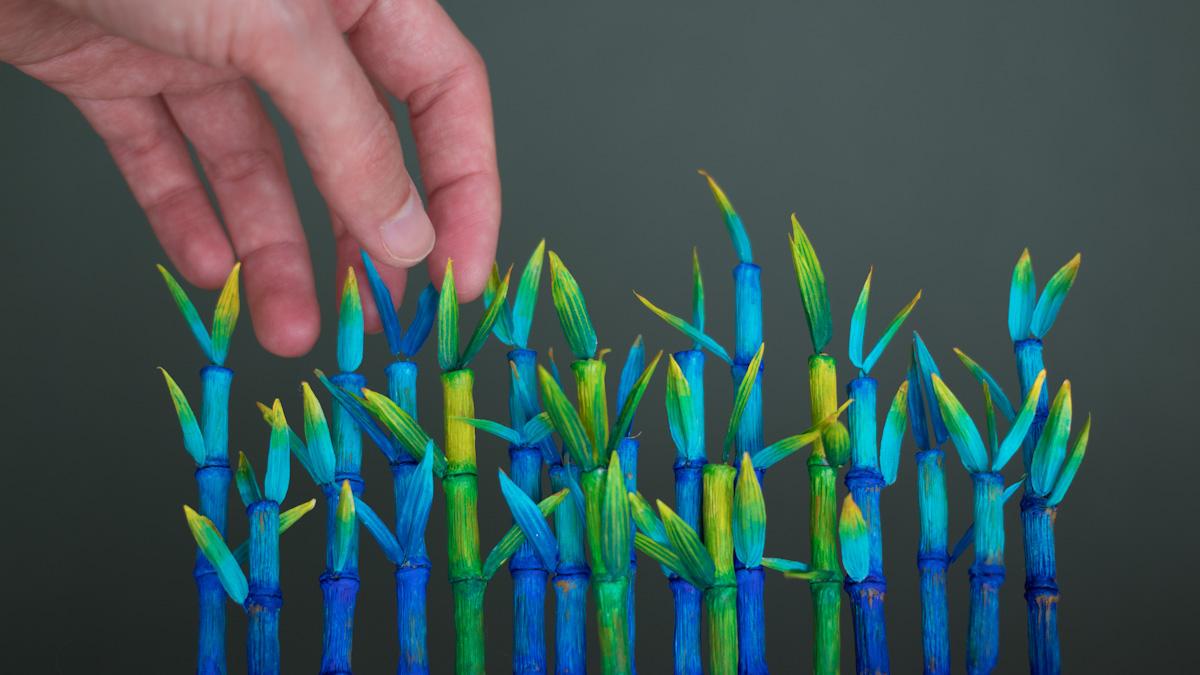
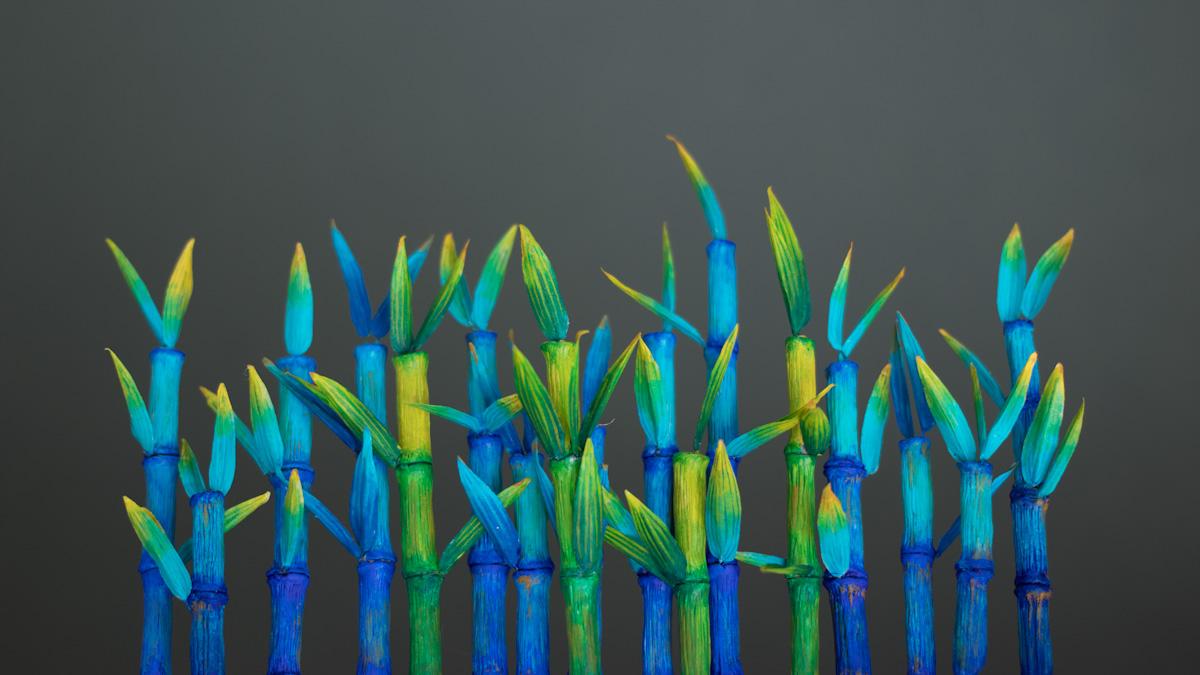
3. Making The Leaves: for the leaves. We will be using the model span paper cut along, stripe off about 25 millimeters, then cut thin rectangles of about five millimeters. Model span paper is an acid free paper made off manila fibers and is a very thin and very strong paper meant for miniature models. If you cannot find that paper Mulberry paper, Archos Oh, papers are other options, However. Please note that model span is by far the cheapest, as it's not a handmade material. Once you have your rectangles, cut them into leave shapes on one side of the rectangle. Cut the edges into Ronan's on the other side, cut into a spike from the half of the long side to the half off the short side of the rectangle. Repeat for all leaves. You will need to pieces awfully shaped paper to make one Lee, and you will need between 3 to 5 please, for one shot Bamboo. Once you leave, shaped papers are done. Cut pieces off 28 goat wire off about six centimeters. Using the brush. You don't care too much about lather some acrylic gel on one leaf side. Place the wire in the centre, leaving space at the tip of the leaf. Add some more acrylic gel on the tip and at the base of the leaf. Take another leaf shaped paper and lather that one with acrylic gel. Place it on top off your previous leave. Starting on the tip. Use a tool to push the paper down around the wire removed from your table and let dry. Repeat for all leaves. You might want to use tweezers if it's too hard on your hands. Using tools might also be easier for you than using your bare hands. Find what feels most comfortable and natural to you. Doing reliefs also needs to be done a bit quickly as the acrylic gel is drying and you're using it as glue. If you're using white glue, you need to be even more careful as it might stick to your working surface and tools. In that regard, the jail is a bit easier to work with. Don't worry if you must up your first leafs and just keep practicing until you're happy with the result to let the leaves dry. I simply put them in some tacky pretty
4. Painting The Leaves: Once the leaves are fully dried, which would not take more than 10 minutes, you can move on to painting them. I decided on a blues color shihm and will show you the colors I have picked, but feel free to use a call issued like we are starting with a combination off yellow and turquoise blue. These are the colors are used. Both are Mona pigments. That specific yellow is transparent P Y 154 and that blue PG 50 is a bit on the opaque side . Honestly, it's probably best to use the same A pass ity for both colors, but I tend to pick after crew, mom or you will also need to pointed. Brush is a very thin one and a thicker one off the size of your leaves. The first step is to create a Grady int from one color to the other on each leaf. If you've never done a really great agents before, you might want to try them out on paper before how many ways to do them. But I like to work more, wets in wits, and for that you need to be a bit quick about it. You start with one color, and then you switch to the other, going back and forth with your brush to blend the two colors. We are not aiming at a perfect radiant. As for one nature's rarely perfect, but also we will be drawing very thin lines on top of the Grady Int later. So no need to go all obsessive about your Grady in snow. Please rinse your brush regularly to have clean colors at each end of the leaf. You want a nice blue one on one side and a nice yellow on the other side and green in the center. Another color combination is from Stella Green to yellow. Repeat the same steps than before she created Radiance. Another option is to work with more watcher in washes that will keep you paint. What longer for you to get your Radiance writes. Start with one. Call the wash on one side. Rinse your brush on the other color wash on the other side and then brush back and forth to create the Grady Int. - And the last color combination I did is from a Dhaka Baluch. You lied to Coy's Blue again creating ingredient between these two colors. I said all the leaves aside to dry us. Previously, I placed them in Tuckey pretty to dry properly. Once you leaves are dry, we are going to paint stripes. For that, we need a very thin pointed brush. You can use low drying acrylics well. This step Add a slowing drying medium to us if you are afraid of ruining you very thin brush. It might also help ease on the stress off, working fast to pain, very thin lines. The trick is to watch her down the paint so it's very fluid. Dip the tip of your brush into it and then lightly paint lines on each leaf. If you are a beginner, you might want to try painting thin lines on a piece off struck paper before doing reliefs . Father to a khweis yellow combo I used to darker blue to paint the lines on top. You might want to draw over the lines a few times. If the color doesn't show enough, this is going to depend on the opacity off your pains. I really like to work with transparent pains as they are very versatile. If you want your transparent paints to be more Pake, try mixing in some zinc white or mixing white to get them more opaque. However, I would not recommend that for leaves and would really encourage you to stick with transparent pains as the papers, transparent and with transparent pains. You will keep some translucency in the end result, which looks like really leaves. Keep drawing lines on old leafs and don't forget to paint the other side as well. After the first side has dried for the two other combos, I drew the lines differently. Indeed, I used a dark and a light color for the radiant, so I decided to draw a dark line on the light signed of the leaf and then a light colored line on the dark side. Basically, he I use Stahler green on the yellow and then yellow on the green. Note that for this time I used an opaque yellow cadmium yellow as one working light on dark . You cannot work with transparent colors that are lights on. Doc wants. Start by drawing green lines on the yellow sides, then draw yellow lines in between the previously drawn green wants repeat on old leaves and on both sides, simply used the same approach for the dark blue and light leaves. Let everything dry
5. Bamboo Sculpting - V.1: first, let's build the armature of the bamboos. We will be using wooden's cures for that. Take your leaves and rub the wire around the wood. Leave about two centimeters between each leaf when wrapping around the wood. - Well , the sculpting process. You can use Paula McLay or an ad dry clay. If you prefer using Epoch Sea or every clay, I will show you how in the next step rollout your polymer clay. If you're using a pastor machine from Makato, I use the thickness. Three. You want something that is about two millimeter thick cut stripes off clay off about two centimeters. Theun robbed the clay around the wood and cut the excess clay. When working with blades, always cut away from your body. To avoid cutting yourself way, control the clay with your fingers around the would you want to make it thinner. In the center, you can push down the wrapped leaves so it's easier to shape the bamboo segments. - Use your nail and push it to create uneven end. Slide the leaf back towards the clay and then repeat for the next sections. - Once you bamboo segments are shaped and done, we will give them some texture. We are simply going to draw lines all around on each segment. Here I am using a needle tool, but you can use whatever tool you'd like to create lines. Also mark the line more with a tool between segments. Once you have finished your sculpting, take them all together for 40 minutes at your place recommended temperature.
6. Bamboo Sculpting - V.2: if using a proxy clay work on a baking sheet paper and uses nitro gloves. If using a proxy clay very often, either use it in a very well ventilated area or use a gas mosque mix of the amount you need for the bamboo poles. I would advise you always makes a little less and mix again. If you don't have enough as once the clay, It's cute. It's set for life. Send the clay assigned for 30 minutes before starting to sculpt. FXC Clay is most sticky within the 1st 30 minutes, but it's also very soft and so sticky that it sticks to your gloves, making it really hard to sculpt with. After the 30 minutes, take a piece of clay and flatten it into rectangle that will fit the first segment. Rub the clay around the wood and roll between your fingers. You want the center of the segment to be smaller. You can push down the other leaves so it's easier to sculpt using a silicone tool to adjust the clay. Repeat for all segments. Once you're happy with your segments, create some texture by drawing lines on each segment also marked the line between each one said to side to cure
7. Bamboo Painting: Once you bamboo poles are cured, you can paint them. First. We will cover all the bamboo poles with some Jess. Oh, this will ensure the paint has a good grip on the clay, but it will also create a white base for the paint's, depending on your just so you might need to wait a bit once to the test so is applied. Before starting to paints. Check with the manufacturer Cezanne, The Jessel Bottle. For a better coverage, apply two coats off Jess Oh, for the painting of the polls. We will work ingredients similar to the leaves, However, this time in layers, we will work. Form Turquoise Blue PG 52 ultra Marine Blue, P B 29. The first layer is the under paint, so simply paint one segment in one color. Start with the two a coy's blue, then add a bit of ultra marine blue to the turquoise for the next segments, always adding a little bit more until you arrive to the last, which will be on Lee Ultra Marine blue. Set aside to dry and repeat these steps on the other bamboos way , way. Now it's time to layer the paints layers usually work best with washes. You want to send down the paint with water, we're going to add first some ultra marine blue on the lines between the segments. Make sure to brush back and forth onto the segments, creating ingredient towards the segments color way. Then, at a wash off turquoise blue on each segment center, you're probably going to need a few washes until you get the coloring you like. - Lastly , she at some interest. Let's add some yellow and okra lines and dots. You can also add a light yellow ochre wash on the center. Off each segment. It has to be very light. You don't want to turn it green. You just want to add some variation. - Alternatively , paint in a similar fashion, but going from fallow green. PG seven She transparent yellow P Y 154 again. Start with a quick under paint and let dry way using washes. Take the tele green to accent the lines between segments. Brush back and forth over the segments to created radiance, then other wash off yellow and walker over the segments again. You might need a few washes until you like the results way at some dots and lines off Oakland yellow for some variations, let dry. If the paint on your polymer clay is a bit sticky, you have two options. You can varnish it while you can cover it with a liquid polymer clay. I like fuel liquid because it is transparent and bake again. You will want to von Isha's. Well, if you want to use varnish only. Make sure you use varnish that doesn't make you play sticky. If painting on epoch CE or ad directly, you will not have the same issues with the acrylic becoming sticky, so simply vanish with any good acrylic varnish. No worries either about the one issue are using. Just make sure you're using a good quality one and you are dumb.
8. Conclusion: thank you so much for taking this class. I really hope you enjoyed it. The class project for this class is pretty straightforward. I'm simply going to ask you to make your own time. You bamboo, you can use whatever colors you like. You can use the ones that are butts realistic, like mine and blue tones. But you also can use more realistic colors in green and okra. Awesome being completely different, pink or purple, it's really up to you. You can put your bamboo in a tiny parts making fake earth, for instance, or in some glass, or use them in any ongoing mixed media project that you might have. Police also share your project and result with the class. It always helps students a lot to see what other students come up with. And I really love to see the results that you are doing with your class. I'm often actually really impressed with your skills. If you want to share it on social media, you can do that. Simply tag me. I usually go by the moniker at particular pretty much everywhere, but I'm mostly active on Instagram again. Thank you so much for taking this class, and I really hope to see you in my next one by
 Stephanie Kilgast, Contemporary artist.