Transcripts
1. Introduction: Hello. I am Stephanie Kilgast, and I've been a professional artist for over a decade. Now, I'm mostly known for my sculptural work and this is going to be the topic of this class, sculpture and more specifically, mixed media sculpture. I've been preparing this class for a few weeks now, and have really put all my heart and everything, all my knowledge and skills into it, and extremely excited to finally share it with you. I think it's going to be a great class for beginners and more advanced sculptors alike, who are just really interested in mixed media sculptures and in clays but are a bit overwhelmed by the sheer amount of modern clays available and don't quite know where to start. This class will go in-depth on four different types of clays. Namely, I am going to talk again about polymer clay, obviously, this is a clay I've worked a lot with, I'm also going to add a small project to it. Then there's going to be air-dry clay, which is something that I am deeply in love with and that I have been working more and more lately. Then I will also talk about cold porcelain, which is another type of air-dry clay and a very interesting one. The last clay I will be talking about is epoxy clay, which is a clay for more advanced sculptors and not a clay that I would put into the hands of a beginner. On top of these four clays, I will also talk about paper which has been a recent addition to my own practice and that I think is often underrated. I think it has a real spot into modern mixed media sculpture and as thus, I just really wanted to share with you that specific medium. Each medium will go through the same stages. I will first present it to you, so what it is, how should work with it, the [inaudible] , the strengths, the flexibility, how it works basically, then we will have a project for each material, so you're going to have a total of five projects in this class. This class is quite long, so I would really advice to cut it into chunks and work on it over the time of a few weeks. I really hope you will find this class helpful. If you have any questions, don't hesitate, you can always ask in the comments below the video. I'm also adding a PDF to the class with relevant information. Without further ado, let's just jump in and discover all these clays.
2. General Advice: Before we dive into all the clays, a few words of advice in general when sculpting. There are three main things I would like to touch just before we talk about the clays. The first thing is studies. Now, studies are basically you drawing whatever object or subject you're interested in before sculpting. Now this seems like something that might not be useful. Maybe you think, well I can use pictures and that's enough. But trust me, once you start to actually study and use your drawing skill to really comprehend shapes and forms and proportions before starting to sculpt, your sculpture is going to really gain in terms of quality, but you're also going to gain in confidence. This is something that is often overlooked and not every sculptors does this, but I would really highly recommend that you study your subjects before sculpting them. That is really going to impact your whole sculpting process and really help you to get better at sculpting. The clays I will be showing in this class are all quite different, and while I really try to show how they behave, how they work, and how they look like in the end, it's important to understand that you could technically use any of these clays to sculpt almost anything. It's often a question of preferences. If you like one clay better than another, if you are a fast or a slow sculptor, if you like to really touch and feel the clay with your bare hands, or if you are someone who's very meticulous, if you work large-scale or small-scale and just testing the clay, just having the feel in your hands if you like the clay on art, it's going to be decisive in your own choice. Something to keep in mind, while I try to show you everything, in the end, you will have to test certain clays yourself to know if you like them or not. The last thing I would like to touch are armature. Now, armature are basically the skeleton of a sculpture. Often it's simply wire to do the structure with some aluminum foil or paper for the book, and yeah, that's pretty much it. You have also wire mesh that can help you for an armature, and you're going to see the armature. I'm going to use some in this class in the different projects. Now, armatures are not always necessary. If you're sculpting very small, you can often forgo armatures, but most of the clays today, apart from polymer clay, are very soft and without any armature, they will fall onto themselves, so you will need some structure just to hold the clay in place. Another thing with armatures is that it forces you to make the proportions and the composition before starting to even touch the clay. Meaning all the intellectual work is happening when you work on the armature, and once you take the clay out, your brain and mind can really be focused on details and textures. Armature is something really important and I feel that if you're starting with sculpting, start with armatures right away, you will need them sooner than later, and if you get used to them right away, it's going to be much easier.
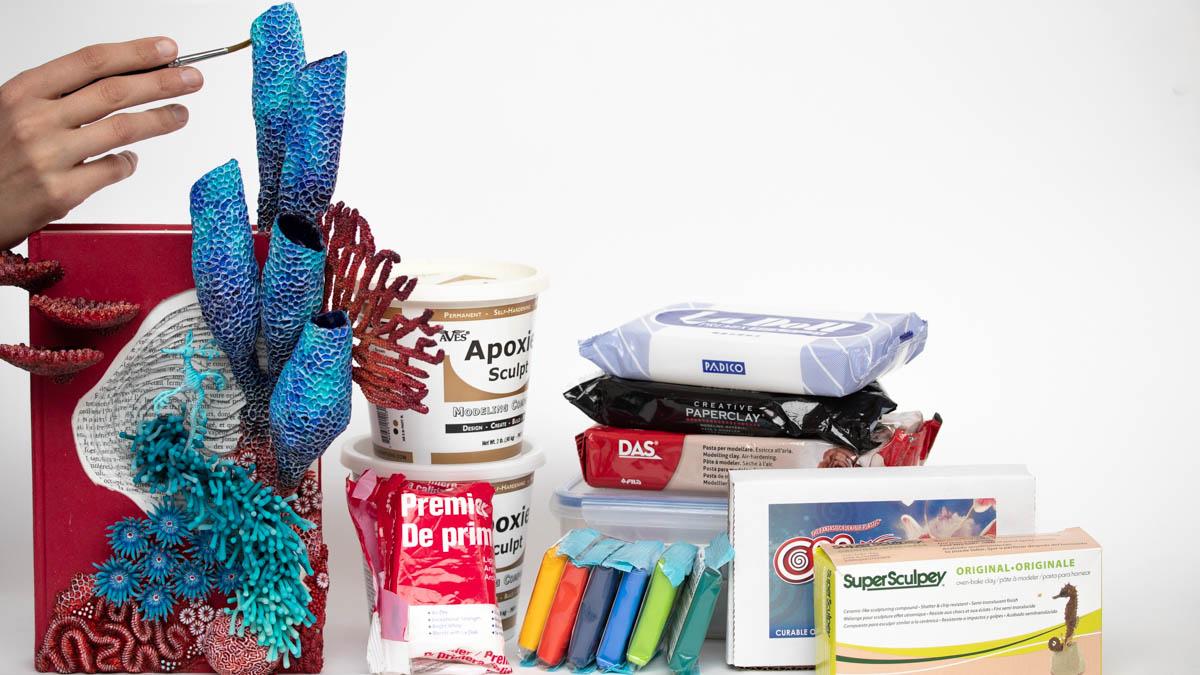
3. Polymer Clay: Polymer clay comes in many brands, and brands can be quite different in the final result. These are the brands that I have personally used and know how they behave. However, there are many other brands, and depending where you live, you might find certain ones easier than others. I live in France in Europe and Cernit and Fimo are probably the most common polymer clay brand around. It's really easy to find and it's overall a good clay. Super Sculpey is also a clay that you can easily find. The one here I have is the beige original, which is quite soft. Now Cosclay is a very recent clay. I think it came out in 2019 or '20, and it is a clear that I haven't used a lot yet, but it is extremely interesting. I think one of the key points of polymer clays is that it comes in many colors, and you can sculpt in colors right away, and I feel that most polymer clay brands are focused on that point, so you really work in colors from the start. So you can get things like that, which is only polymer clay and no paint at all where you can create gradients and things like that, but in the sculpting process. I think that's quite interesting because polymer clay can come in a certain translucency. It can be a bit translucent like this one. You can work in colors yet still have some of that translucent effect. Here I painted the tiny dots on top, but still you can see that it's not completely opaque. Not all clays have the translucency thing. Cernit and Fimo certainly have. They also have special clay that is especially translucent, Fimo effect has that, but Cernit as well. Now I have had polymer clay for a year or two. The shelf-life of polymer clay is pretty long, but they get a bit crumbly a lot of time. What I've always done is to have some fresh translucent clay and to mix it into the older polymer clay, which adds more translucency to it. That's something that I've always liked to work with before. Now I work with it differently but still. Again, I think it's really interesting to use the clay in its colored forms. This is, by the way, a tutorial that you can find on Skillshare as well. It uses a technique called canning, which also is very specific to polymer clay, even though it originated from Murano, from glass canning. Again, I would suggest to check out this class. It's on Skillshare, so if you're watching this one it's not going to cost you anything more apart from a bit of time. Polymer clay is a very interesting material because it opens a lot of possibilities in terms of work. You can sculpt in colors but you can also sculpt and then paint it later on. Now in terms of specificities, Cernit and Fimo are slightly flexible. They're not super flexible, but still you can see this wire here that goes into the jellyfish. I also have a tutorial on these jellyfishes on my YouTube channel, I will add the low specific tutorial so you can check them out, and I have a lot of tutorials on polymer clay because it used to be the clay that I use the most. Now it has changed a bit. There's wire on it, and it has some flexibility. It makes it pretty sturdy if you want to ship this. Then this is not going to break just because you have that flexibility. However, it's not magical, so it has some flexibility but you cannot bend it too much or it will break. You can see the petals as well have some flexibility, but if you go too far it's going to break. But usually it's sturdy enough for most applications. However, if you are looking for very flexible polymer clay,it comes in Cosclay. There's a piece of wire here, and the clay, I shifted around and I baked and I painted it, and now I can do things like that. As you can see, very flexible, doesn't break at all, so it's very interesting as well if you are doing stop motion and you want to have something a little bit more durable. It keeps the texture and the shape, you can bend it. It's almost like rubber. That's how they advertise it, between polymer clay and rubber. It's quite interesting and I'm sure it can solve a lot of problem, especially if you're working on very thin things. Now another clay that I discovered last year is Super Sculpey. I don't have any finished sculpture here, but it's the least flexible once cured, and I would even say it is slightly brittle. It comes in different firmness. This is pretty soft, which I personally like. But what is interesting is that it sticks to metal very easily. Now if you've worked with polymer clay before, you know that polymer clay in general, especially Fimo and Cernit, do not stick to metal quite that easily. But this one, you just push it on and yeah, it sticks nothing more than that. You just easily put it around the metal and yeah, it works. When I discovered that I was like, that's interesting. This is something I really like especially when working on more complex sculptures, you do work on metal and armatures and having a clay that sticks to your armature without finding ways to make it stick is very, very useful. It is a soft clay. I personally really like it, but it comes in different firmness. That's up to you if you like, very firm clay or more soft clay. Now, Cosclay as well as Super Sculpey, sticks to metal really nicely. This is the soft gray. It comes in a few colors, flesh colors, and two grays, one very soft. This is the soft and one medium. A friend of mine told me the medium was not very stiff, so that's something to keep in mind if you like stiffer clay. Again, this one beautifully sticks to metal, so working on armatures is really nice. Once baked, you get this flexibility. Another thing about polymer clay is that it is waterproof. It's basically a plastic once it's hardened. You have a clay and you want to condition it until it feels soft and it's malleable. But once you have that, you can work on it, and you can work on it for hours, days, technically weeks, but days is better because it does dry after a while or sediment or I'm not sure exactly what happens, but you don't want to wait too long to bake it. You have a long time to work on it. Now, once you are done with your work, you bake it, and then it goes from being that modeling clay to something like that; a finished sculpture. This finished sculpture is waterproof, so you can bake it as many times as you want. However, you have to keep in mind that most clays, Cosclay upon this different, but most clays will lose a bit of their flexibility when you bake them too much. They're still good to go. They're not brittle, they're just a little less flexible. You can technically curve polymer clay, but it has some flexibility. It's not a clay that curves very well. There're clays that are lots stronger and not flexible at all once they are done. Super Sculpey is not flexible and can be curved quite easily. But FIMO and Cernit or Cosclay, I mean, it doesn't make much sense to curve them. Again, polymer clay has a very long sculpting time as you only stop to sculpt when you're ready so to speak, and then you just bake it. You didn't really need to curve it, you can work on the clay before baking it, and that usually is sufficient. When it comes to baking, all brands bake at a slightly different temperature, so you can bake it in a regular oven, no need of a special oven or [inaudible] that, however, all brands have a different temperature. Cernit bakes at 130 degrees Celsius, That's 265 degrees Fahrenheit for instance. But FIMO, which is very similar in a lot of ways, bakes at 110 degrees Celsius, that's 230 degrees Fahrenheit. Super Sculpey is a maximum of 130, and indeed Super Sculpey has a tendency to burn. Cosclay is a little bit higher even 135 degrees Celsius. As you can see, they're all different temperatures and recommendations. So when it comes to baking, please follow the exact recommendations of each brand and also the thickness of it. To be sure that you are baking correctly, I highly suggest you get a small oven thermometer just to check if your oven works well in terms of temperature. Often ovens are not that precise and they will be either a little bit too high, a little bit to low, so to buy a simple metallic oven thermometer will help you to know if you bake at the right temperature. Just to note on conditioning your clay, this is a Therm-O-Clay as you can see right now, I just took it out of the package. Yeah, it's not really malleable, it breaks down into trunks. That's quite normal when you get it out of your package unless it's straight from the factory. What you need to do is to warm it up between your hands, and there's a term for it and it's called conditioning the clay. Conditioning the clay just means to transform this into a clay that is malleable, use your hands and then a pasta machine to really try to get the clay softer and malleable. Here the clay is really not conditioned enough yet, as you can see, it just crumble sound so you have to keep [inaudible] it until it is soft. Now the clay is conditioned and as you can see, it is a lot more malleable and you can really start to sculpt with it. Now the clay comes in different colors, or most brands bring different colors, but some don't. You can always add your own color, so you can mix in pigments for instance. Here's phthalo blue. Whenever you intend to mix colors into the clay, I really recommend using nitrile gloves to protect your hands. Now, most pigments are toxic and they can go through your skin. If it's something you do a lot, mixing in colors into your clay, then you really want to wear gloves. You can always reuse the gloves. Simply wash your gloves like you would wash your hands afterwards. Here I'm mixing in pigments, however, you can mix in oils or acrylics, I've done both. I also used dyes at some point. Just be careful because dyes are not made from pigments and so they are not lightfast. I would suggest you always be careful with lightfastness. If you are doing sculptures that are meant to be bought by people then you really want to be careful with that. If you already own pigments, for instance, or have a large assortment of paints at home, it might be a good idea to look into that type of coloring instead of buying thousands different colored clays. This is also a good option to make gems. I have a class on Skillshare, but to keep a translucency for sculpture gemstones, you want to use translucent polymer clay, and to color it, it's best to use either pigments or paint. That way you keep the translucency but can add colors in it. Adding pigments to your clay is also a good way to know which pigments are used. Usually, polymer clays don't state which pigments are used, so you don't really know what lightfastness they are. When it comes to coloring your clay, you can also use the pigments to color it on the surface and so not to mix everything in but just on the surface. Doing this on the surface will also show the different textures that you might have done on it. See for instance I'm making some simple lines here. If I take whatever pigment is left here and go over, it's going to show the texture much more. Now on the same principle, you can also use dry pastels. You can either use them like that and go over. I would suggest to take high-quality pastels as there're going to be a lot more pigment rate. But that might be cheaper and easier to use than buying raw pigments like this. Raw pigments usually come in bigger boxes and are fairly expensive. But I know a lot of artists use them to make their own paints, so that's why I include them. If you're starting out, I think it's quite interesting to look into making your own art material. These are those dry options, with that coloring technique, you really can have a nice blush onto colors like for this rose. This is a tutorial I made on Skillshare. If you want to know a bit more about it, you can check it out. But very basically, I did each petal on its own with the texture, and then I just use a very light pink to blush the petals. That's pretty much it. You can do this before or after baking. Before baking the dry pastel is going to hang onto the clay much more readily, however, it might brush off the texture a little bit. Whereas when you use dry pastel on clay after baking and the texture is going to be set, and so no worries about that. You do want to seal it if you use it afterwards, however. When it comes to painting polymer clay, it can get a little tricky. Here are some of the paints I have tried and tested because I realized while using my favorites acrylic. These are the acrylics that I would use for other things. Schmincke, Sennelier, Golden Heavy Body, and Golden Fluid. These paints which are very high-quality, extra-finaholics, they happen to get sticky, especially on FIMO and Cernit, but also some on Super Sculpey and even the most recent edition that I tried on Cosclay. When I realized that when it's on trying out all the acrylics I had, and also ended up buying other acrylics. When you want to work with acrylics on polymer clay, know that you really need to try the acrylics onto a small piece of clay first just to see if everything is fine, if it's not sticky, see this one is not sticky at all. But if you take this one, for instance, see how it sticks to my finger and it can get worse. Again, see how this one sticks. This here, for instance, is the whole collection of Schenker. The extra fine acrylic. Again, very high-quality paint, nothing faulty with that. But you have to remember that acrylics are a form of plastic, polymer clay is a form of plastic, and sometimes when plastics meet, they will do something weird. In this case, it is the paint becoming tacky. So yes, something really to keep in mind. I also wanted to show you these because if you've never bought any acrylics, that might maybe help you or maybe you only have one of these and you realized it gets tacky. Again, I have not tried it on all polymer clays. I would even go so far as depending where the paint is made, sometimes the paint that you might buy in Europe is made somewhere in Europe, but the same brand somewhere else, might produces in somewhere else, and there might be differences. I know this with food, so I suppose with paint, that is true as well. In any case, whatever I'm telling you today, I would really highly suggest to just do a few test batches before starting to paint your sculpture. For a few [inaudible] on it, what I have found is that golden open works fine. Golden open is a slow drying acrylic so it might not be your thing as I think, especially when working on sculptures, it's actually nice when it's quick drying because there's a lot of layering. But knew that this one Golden open works everywhere, on all the place that I tried, without any problems. Liquitex both the studio range and the professional range seemed to work fine as well. I have not noted any stickiness on any of the brands. Then I also just went and tried another studio or two other studio paints that are fairly cheap. So Pebeo which is a French or Belgian brand, I'm not sure. This worked well on all clays as well. Amsterdam, the standard series, again, the studio quality works fine as well on [inaudible] and other clays. This leads me to suspect that the extra fine acrylics that again, in the end result, looking a lot more like oils than the studio quality that have that plastic he looked to it. I feel like the studio paints might in general be better on polymer clay, but that's just a hunch you have to see and test for yourself. In any case, I would not go lower in terms of quality. I would not really dive into crafts paint, which I think have a big issue especially in terms of qualities of pigments. Don't go lower than Studio Paint that still have again, usually get pigments. You can always check the pigments on the tube. Just be sure to take mono pigments and good-quality pigments, and you should be good to go and paint on sculptures. Checking your pigments and knowing your pigments is very useful for the light fastness of your sculptures. These are things to keep in mind if you want to sell your sculptures. Of course, if it's just for fun or just for yourself, then it's not so much of an issue. But as a professional sculptor and I sell my work, I have to be very adamant on pigment quality and checking which pigments are used. Now, once you've painted your sculpture, you might be tempted to varnish it, especially to protect the painting more so than the polymer clay, which is waterproof. Varnishes can be a bit of an issue as well on polymer clay. As a very general rule, acrylic varnishes don't really work, they get sticky so you have to forget those. I personally use only two varnishes on polymer clay, one that is glossy and one that is not, depending on what I want. Haven't tried them all simply because those works and I don't really want to try and invest in thousands of varnishes that might not work. There's an extensive article about vanishes online and I will add it to the resource sheet that is going to go with this class so you can check out other vanishes. Again, you can always try with vanishes that you have at home and see what works best. Another thing to note is that I have found so far that all the shimmery types of acrylics gets really sticky, at least on Fimo and Cernit, and also on Super Sculpey. I'm not sure if it's the shimmery. Maybe there's some add-on, maybe it's those brands. I'm not completely sure, but just to note that I wanted to add. Now, if you really want some shimmery effect, you can use [inaudible] powders directly or buy it in powder, or you can buy the golden glitter effect in powder. I would recommend to use rather that of polymer clay just to stay on the safe side and then either varnish it or add some liquid polymer clay and bake the shiny powder on the polymer clay with the liquid clay on top. On the note of shimmery effects on polymer clay, so I just talked about the acrylics and the shimmery acrylics not always working. There might be brands that work fine, I just haven't found them, just wanted to make that perfectly clear. But other options that personally, I think look much better anyway is to buy gold powder. It's really Mica or silver powder, or even use something of that is called Pearl Ex. You can have it in many, many different colors. It's simply a powder so you use it a bit alike you would use the dry pastels. Just be a little bit careful. Maybe not the best color I picked. You just go over the clay. Since the clay is still raw, it really sticks to it nicely, and then you get that shimmery effect. Now, you do want to seal it afterwards because it is a powder, and so it might come off later on. But as you can see, it really is very covering and this one is very silvery. Now, it's a bit mixed with the silver in my brush. You want to change brushes in between. But just to show you like the effect, the very shimmery effect you can get with those powders. In general, but please double-check, Mica powders are very light fast. Light fast is not too much of an issue with these powders. But double-check because I'm sure, certain fabric can smites mixing dyes and you do not want that. As a general rule, just you want you avoid dyes. As I said, they come in many colors. This is green here, but it is a shimmery green. Then of course it's powders so you can mix it, for instance, here with gold and the green, and you can get very much of an insect look to it. This covers everything I can think of today about polymer clay. I did the polymer clay beginner's class on Skillshare, which you might want to check out where I go a bit more in details on certain details of polymer clay, if you're interested. Again, I'm going to add a few more resource links and tutorials in the PDF that goes to class. Resource sheet that I'm going to make for the class with more details resources, more tutorial for each material, so you can really dive into it and learn as much as you can.
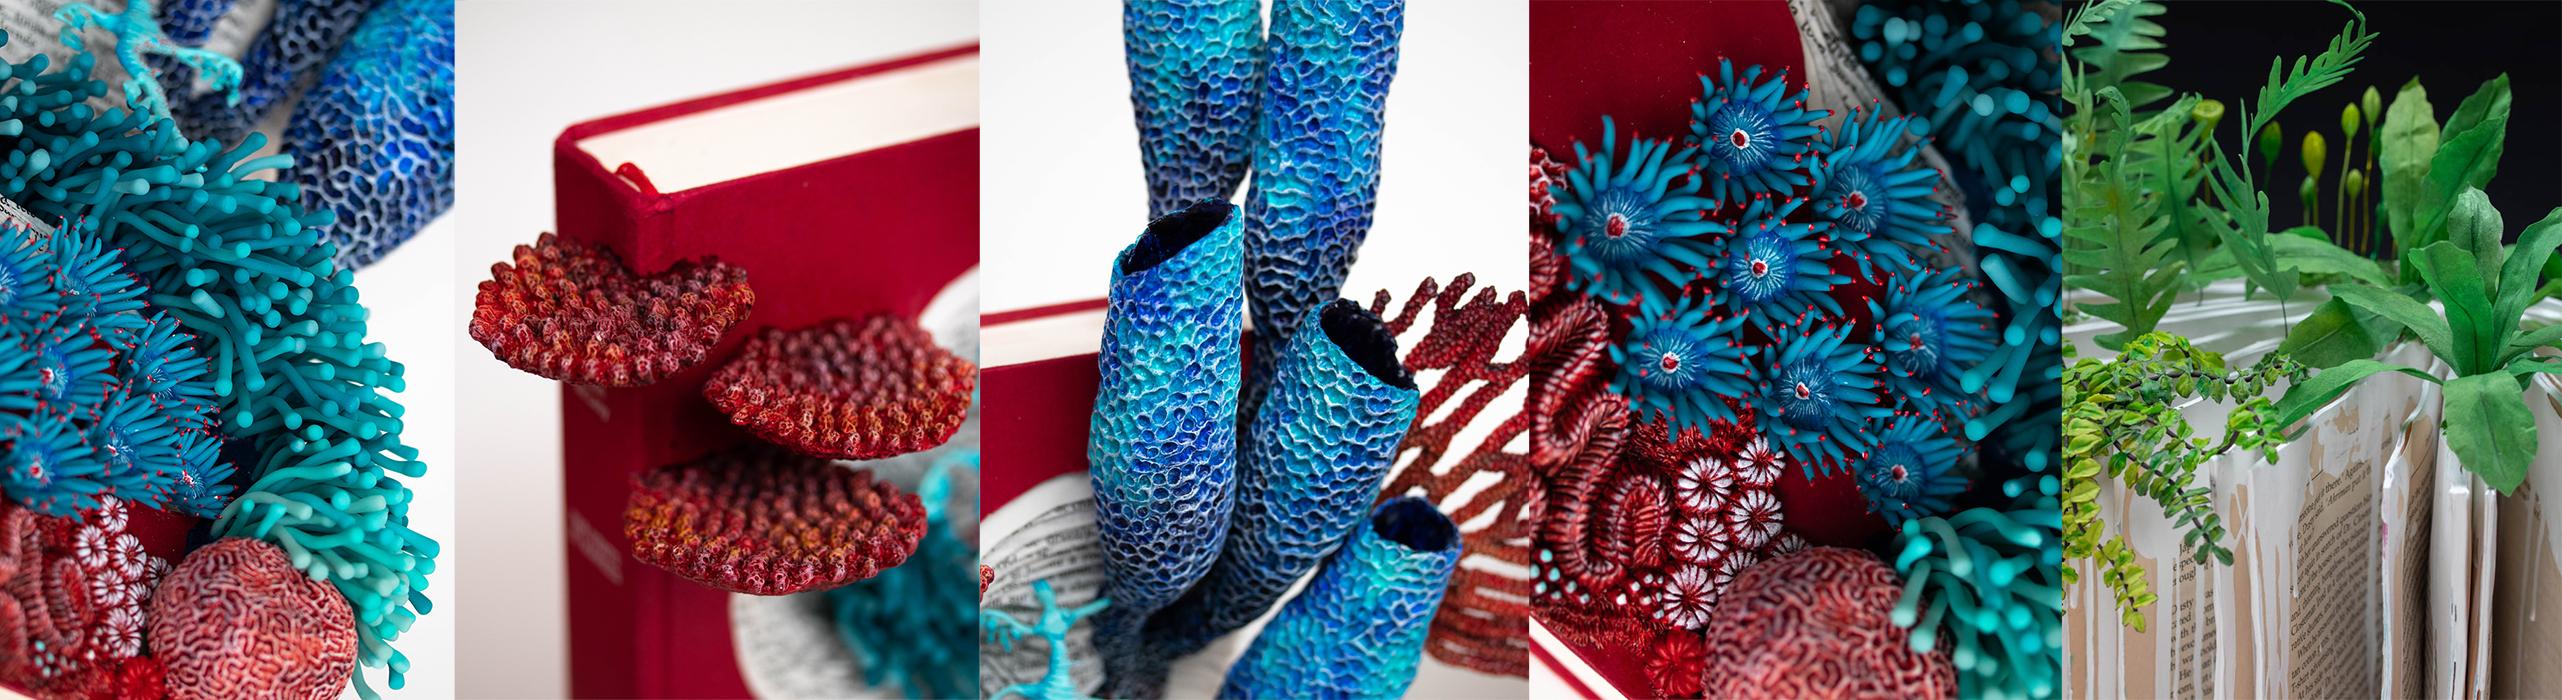
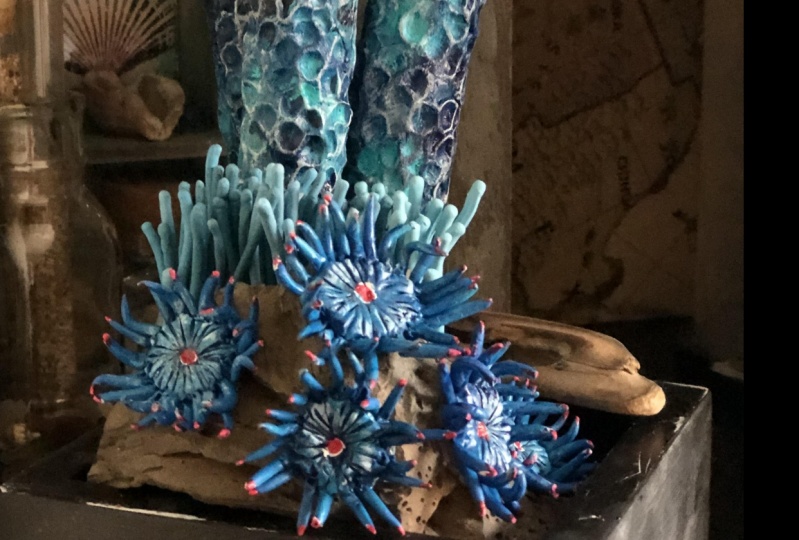
4. PROJECT // Polymer Clay: Zoantharia: For this project, I decided to go with Cosclay to make advantage of the flexibility of the clay in terms of strength, but any flexible polymer clay will do. Fimo or Cernit are good options as well. The Cosclay I have is a light gray, so I decided to color it with phthalo blue pigments. Alternatively, you could use a bit of oil paint or acrylic paint to color the clay or another option would be to leave the clay raw and paint the clay once it's cured. When mixing clay with pigments or paint, wear nitrile gloves to protect your skin. Start with a ball of clay and flatten it into a disc of about 12 millimeters, that's half of an inch. Then roll out the clay into a long sausage of about 1.5 millimeters. That's one-eighth of an inch. Form a spike at one end and cut a piece of around 12 millimeter length, that's half an inch. Place and push the tentacle on the side of your disk. Repeat the process and add the spikes one-by-one, side-by-side. Using a pointed silicone tool, smooth the clay from the disk towards the tentacles. You can hold the tentacles in place by keeping your nail on the outside while smoothing down the clay on the inside with your silicone tool. Be gentle, you don't want to change the overall shape, only consolidate the clay between disk and tentacles. To give the disk some texture, start by creating a centered hole with a silicone tool. You could also use a ball and a tool for that. Then draw some lines on the disk following the tentacles, draw one line starting in between all tentacles and one line starting at each tentacle's center. Give the tentacles some movement by using a silicone tool and gently bending them. Now, it's time to add a second round of tentacles around your disk. Roll the clay into long sausage again and proceed to make tentacles one by one, then place each tentacle at the junction of two tentacles, pushing the tentacle into the clay so it's nicely consolidated. You just finished sculpting one polyp, now repeat the process to have a total of at least five polyps. I personally decided to go for seven, but you can do as many as you wish. I also decided to brush some ultramarine dry pastel powder on the junction between body and tentacles and inside the hole. Bake the clay according to the recommendations of the manufacturer. After baking and cooling off, it's time to liven up the sculpture with some acrylic paint. Add a touch of white at the tip of each tentacle. You will also want to dry brush the disks' texture with white acrylic paint. Dry brushing is a technique involving dipping a dry brush inside paint and brushing it over your palette or towel to remove most of the paint. Then going over a textured sculpture that will retain only so much paint then the texture visually pops. After the white, add some bright red over the white tips. Also paint the inside of the disks hole in white. Add some bright red in the center of each polyp and you are done with your sculpting and painting job. For [inaudible] effect, place the polyps close to each other over an object or a bigger ball of clay. I will personally be adding these to a book sculpture I am currently working on.
5. Air-Dry Clay: Here are a few air-dry clays that you can use. Air-dry clay is currently my favorite clay to work with. There are many brands. In Europe, you can find easily those two Das and Giotto Plastiroc. If you look online, most people will recommend this clay, which is from Padico, which is Premier La Doll clay, which is also an air-dry clay and is white. Then you also have so-called paperclay. Again, this one has been recommended online a lot, the Creative Paperclay, but the La Doll, not Premier, but just La Doll, which is also from Padico, are very similar. These are the clays that commonly fall into the category of open air-dry clay. You will need some water to work with them. Also, some type of tea towel to rinse your hand if needed. Now, I just would like to show you how each clay looks like because there are so many out there that it's sometimes difficult to pick and choose. You have to note that Giotto Plastiroc and Das, they both come in white and terracotta. I have one of each, so I can show you. This is Giotto clay and it is sort of paperclay, as you can see, is fairly rough. This is Creative Paperclay, as you can see. Here again, you have the typical paper clay. It really breaks down into fibers, as you can see. I'm also going to show you La Doll. To show you how similar are these clays are. Again, that paper texture with something that is very fibrous. Here is the Das one which is terracotta and as you can see, it's pretty much the same material. That's paper clay, very fibrous, only it's colored in terracotta to resemble more clay. It has little to do with clay, you really have to think of these clays as more of a paper clay, mostly paper clay. Sometimes they put some stone in it, but it's mostly paper clay. All of these are very similar. As you can see the Das, the La Doll normal, the Giotto, the Creative Paperclay. All of these clay are very similar in texture and a bit fibrous. However, this clay feels and reacts a bit differently. This one is a lot smoother. It's little fibrous as well, but it's not as fibrous. There are some paper fibers in it obviously, but they also added some pumice stone, which makes it smoother. As you can see, it's just smoother overall. Here now I just want to show you a bit more of a close-up of each of these different air-dry clays. As you will see, they are quite different, and in that regard, if you are interested in air-dry clay, I think it's worth it to buy a few different brands and see what you like best because I personally might like the most expensive one, which is the La Doll Premier, but you might love Giotto for its texture. I'm just going to show you quickly. I made these two or three days ago and now they are dry, so this is how they look dry. You can see the difference in color shifting when they dry. Some don't shift that much, but some do. This here is Giotto Plastiroc, and as you can see again, it's quite fibrous. Now, that doesn't mean that it's a bad air-dry clay. It's just something to keep in mind. It is the least smooth clay of all of them, but you can still do very precise things. For instance, I made this with that clay, so you can still achieve a good amount of detail. It's just that the result is going to be rougher, which can be interesting. It's not a bad thing. It's just something to keep in mind depending on what you want to do. Das clay is also rough, but I find it smoother than Giotto clay. It's about the same prize, the same type of texture, but still I find it a little bit smoother. I'm not sure if it's terracotta or the white. I didn't try Das white, I didn't find it when I went to try some more local air-dry clays or something that I find in Europe. However, the terracotta, and this is something that I don't really like. As you can see, it's colored clay and so it sticks to your fingers quite a bit, which I don't find nice, so yes. Something also to keep in mind. You might like the color lot. I know many do. But yes, since it's colored clay, you're going to have that pigment, whatever pigment they use, some kind of earth pigments on your fingers. Now, this is paperclay and it's bit drier now. As you can see, it crumbles down. Let me, just going to add some water to it. So if your air-dry clay is starting to get a little dry, just add some water to it, and that's quite enough. You don't really need much more. If it's really dry, if it's a lump of hard clay, then you can leave it in some water overnight. So now that's more the texture of it. As you can see, it's also a bit fibrous. But again, it's smoother than Giotto. I'm really trying to show you the difference. It seems very similar, but it breaks down in bigger chunks if that make sense. This is fresh clay, so it's not a question of water. Here La Doll, and La Doll is also fibrous, and I think it's quite similar to the paperclay, but slightly smoother maybe. But for me, yeah, it's pretty much the same clay. Again, slightly smoother. As you can see, I smooth it down a little bit easier, but still very similar to the paperclay. However, the last one, and honestly this is my favorite, is the Activa La Doll Premier and this is very smooth. It's teeny tiny, bit fibrous. Obviously, there are fibers in it, but it's extremely smooth. You can really smooth it out nicely and it doesn't break into those big chunks. Again, if I take Giotto, I cannot quite smooth it down the same way. It breaks into these, see and here. Yeah, I really hope you can see the difference. Here also the difference between wet and dry. I find Giotto has the most dramatic drying shift, which is good because it looks much better once dry. Once dry, it's a bit of an off-white. When it's wet, it's really gray. Not very pretty so to speak. Terracotta becomes a lot lighter and looks really like terracotta, to be honest, like real ceramics. Paperclay has a bit of a drying shift as well, so it's more yellowish when it's wet, and then it's quite a nice color, to be honest. I think this is my favorite color, once dry. Then you have La Doll, which has also a bit of drying shift, and the Activa also a bit, but not as dramatic as Giotto or Paperclay. So what you have to keep in mind with air-dry clay is that air-dry clay is extremely soft. You do want to have some kind of an armature. This is simply wire with some aluminum foil, or you can use just aluminum foil. Like here, I put basically a ball of aluminum foil and wrapped some clay around. You do need a structure for the clay to hold on. But now I just want to show you how the tools go into each clay. I'm just going to push it down. It's to show you, so it's not a real sculpture. I'm going to show you how to sculpt with air-dry clay in the project later on. But just so you can get a feel of how the tools go into it. Again, this is a simple spatula tool, nothing too fancy. When you push it down, as you can see, it doesn't. The clay is rounded, that makes sense, so it's not cutting through the clay. Here it's cutting a little bit more into the clay that's why I ordered them like that. This is the least smooth and you can see that it doesn't give way as easily. This is smoother, but still you've got that rounded thing. Now paper clay, a little less, so it really goes into it. This is basically because the fibers here are much longer so they hold the clay completely differently together, and the more you go there the less big the fibers are. You can see here hardly any round, and here not at all. Here the spatula really slices the clay so to speak. You see the difference. Quite a difference. I basically did the same here on the on the dried ones. I'm doing the same. It's not much of a problem. With rounded tools, obviously, it's a bit less obvious but still. The more you go here the cleaner the edges basically. Here everything is rounded, and here the edges are sharper. That's why this clay is considered smoother than this one. This is also the reason I like this one a lot because you can get really ,really, fine details as here, I find that everything is a little bit rougher, but you can still have details. It's just the fine look is a bit different. Everything is not flexible. Yeah, there's no flexibility with air dry clay whatsoever. You can have a bit of flexibility if you put glue on it. So if you use diluted glue with a brush and brush over it, you can have a bit of flexibility, but it's never going to be really, really flexible. This is just to show you a bit the differences between air dry clays with really paper clays. I'm not sure about ladle but ladle premiere has some palmness in it, so there's a bit of stone and there's quite a difference between those two. They react quite differently, they feel quite different. These are really nice to work with, and yeah, so if you've tried just Giotto and thought, I don't like it, maybe try [inaudible]. If you try this and you're like, that's too smooth for me and you have more of a rough work, then maybe try another air dry clay. I hope this clears a little bit things up about different brands. Another thing because I was putting it back into the bag, air dry clay doesn't dry very fast, which is a good thing. It means you can work on it for a long amount of time, and even if it starts drying, you just simply take some water spray and spread over and keep the clay moist. You can also keep it moist by wrapping your sculpture in clean wrap while you work or using a wet towel. These are also options to work with air dry clay, and again, air dry clay can be turned back into clay if you just leave it into water. This is also why you need to seal it on a finished sculpture, but more on that later on. Now a note about carving. This clay is not flexible at all. It's very lightweight, and in that sense it carves quite beautifully. This here is a simple needle tool. I'm just going to show you how easily it carves. You can really push it in and create patrons once the clay is dry. It is from all the clays that I'm showing you in this class. The easiest to carve because it's just so lightweight. As you can see, very, very easy to carve. We can go at it with exact a knife as well. You can also cut things out if you'd like. You see there's really little effort to put in just to create interesting textures by carving. If carving is something you really enjoy, then I think air dry clay is a good choice. Just to show you the whole curve as nicely. Of course, those that are more fibrous will be a little bit more fibrous, but still Giotto was the most fibrous and it still really carves very nicely. Another thing that you can do that I find quite interesting is on dried clay, you just use some water, but you have to wait a bit for it to smooth down again. But you use some water and then you can go back and texture the clay after a while. See, now I'm making a bit of a texture as well with the ball-ended tool just by simply having added a bit of water. This is interesting because the clay being hard, it's just going to wet the surface. See, you can do really interesting things like lard. Yeah, so you really can work your clay once it's dry with that factor of it not being set in time, as long as it's not sealed. Just a close up of a texture I just made. See, quite interesting. With the difference of this pushing ball-ended tools when the clay was still wet and here simply spraying some water and then texturing it. When it comes to coloring the clay, this is wet clay. [inaudible] one. You can use dry pastels to color the clay. As the clay is wet, it really takes the dry pastels quite beautifully, so these are dry pastels. You can also, if you have pigments at home, I know many artists do their own paints, you can also use pigments directly. Here, this is phthalo blue. These are always options if you like to have something that is a bit different. You don't always have to buy paints to actually color things. You can work directly with pigments, again, dry pastels. If you have these at home, these are good options. Again, when the clay is still wet, it's a lot easier, though you can color once it's dry, as you can see this here on [inaudible]. So pigments, but dry pastels work very similar. They will take the textures up quite nicely. Now quite obviously, you can also use acrylics. I'm going to show you that a little bit more later on during the project. But it takes acrylic really nice and honestly, it's a joy to paint. If you like to paint your sculptures, acrylic is really nice. The only thing you have to keep in mind is, if you work in a very watery way like I do, it might rewet the clay a little too much and smooth down your texture. Something to keep in mind. I never found it to be too much of a problem, but still. Air dry clay being fibrous, is very close to paper. You can use watercolors as well. You can also again, mix colors and watercolors in one tube, of course, into the clay before. Again, it takes the colors beautifully. You can play around with wetting your clay first and looking what happens. It doesn't work like papers, so watercolor's not going to migrate like when you work on paper, but still, it will follow the water. It's a very interesting clay as it offers so many possibilities. This clay accepts all paints and obviously, they also will accept oils. Now, I personally don't like to use oils because you want to varnish your piece, and with oils, you need to wait for the oil painting to dry for at least six months before varnishing it. With air dry clay, you want to seal it. You can't seal the sculpture before adding the oil paint. That's what I would suggest if you really like to work with oil paints, but I would not suggest to work on the air dry clay directly with oil paints. You really want to seal your sculpture first, and then work with oil paints, then wait six months, and then varnish your oil. That's something to keep in mind. That's also why I personally don't really like to use oil paints, apart from the fact that I'm just not very invested in oil paints in general, right now at least. Now, once you have a finished sculpture like this, you want to seal it. You have different options to seal your sculpture. You can use a simple varnish. Since I often work with acrylic, I simply use an acrylic varnish. Any brand will do. Unlike polymer clay, air dry clay has no issues whatsoever with any products you might use on it. You really have to think of air dry clay as a paper clay in your brain so to speak. It will accept any medium and I haven't seen anything that is problematic. You can varnish it again, with some acrylic varnish. If you paint with oil, obviously, with a specific varnish for oil painting. If you're using watercolor, maybe a spray or something like that to just keep the watercolor in place. Then acrylic varnish will usually work fine, but please check on your side. The other option is to use glue. Obviously, you don't want to use the acid-free. I really insist on that. It has to be acid-free, white glue. Acid-free ensures that your sculptures are not going to dissolve over time. You don't want to use acid-free white glue pure on your sculpture, but you can simply mix it with a little bit of water and then you can brush it or use sculpture a few time until it's sealed. If you're a bit stressed and I know I often, you can also do different things. You can start with a layer of watered down white glue for instance, and then add vanishes on top. Just make sure you really seal all sides of your sculpture. Here, I simply added that again, watered down glue. I want you leave it to dry and then probably add one or two more layers to it. Lastly, I would like to say, air dry clay is again, a very interesting material. It is very light, which I think it's interesting. When you work in mixed media, you can work on bigger sculptures and it's not going to be super heavy, since it's air dry clay, there's no baking involved. Air dry clay can be really cheap as well. You can buy huge packs of air dry clays if you're working on a bigger scale and it's going to work nicely. You can easily seal it with acid-free white glue watered down. You can also add acid-free white glue right after the sculpting process. Before painting it, as you can always add [inaudible] and acrylic paint over it later on. [inaudible] really many options on how to seal it. Once you seal it on the sides, and it offers a lot of different possibilities. It's nontoxic. I would recommend it for anyone, beginners, and more advanced sculptures alike, and even kids. No worries, whatsoever. I think that covers everything I can think of about air dry clay.
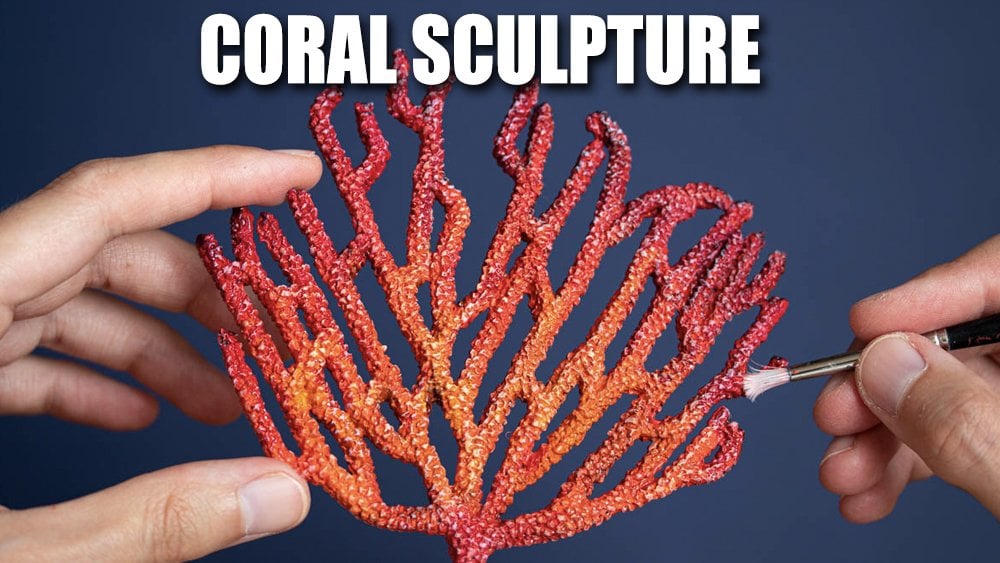
6. PROJECT // Air-Dry Clay: Sponge Corals: To create the sponge corals, we need to make the armature first. This armature will be the structure of your sculpture. Once you add the clay, all you have to focus on is the texture and later on the painting job. There are many ways of doing an armature for such a sponge coral, but I decided to go with a combination of aluminum foil and aluminum mesh. Start with a piece of wire, here, gauge 12 per two millimeter thickness and wrap the aluminum foil around it, shaping it into an oblong shape. Your armature needs to be able to support itself and the clay that you will add onto it. So as a general rule, pick the thickest wire you can get away with. Please use reference pictures of sponge corals you like. I tend to make them with a bit of a thicker belly and more rounded. But a lot of sponge tube corals are a lot straighter than this. Feel free to adjust to your personal preference. Using a ball tool, push a hollow at the other end of the sponge coral into the aluminum foil. Tube sponge corals are generally hollow. So you do want to create a bit of a hole. Wrap some masking tape around to keep the foil in its place. Now using the aluminum mesh, cut a piece that fits your coral. Wrapping the mesh around the body, you might need or want to readjust or cut the mesh to fit your needs and visual preference. Then add masking tape on to the mesh and body to further strengthen the amateur and to make sure everything stays put. Once your armature is done, we can now start to add the clay. Prepare your working desk. Take some of your air dry clay and wrap it in cell. You might want to spray some water onto the clay to keep it nice and moist. In short, the idea is to brush some acid free white glue onto the armature and then add the clay bit by bit. Do not cover the whole armature right away. We will be working gradually, waiting for the clay to dry before continuing on the other sides. Start with the hole of the sponge coral. Brush some acid free white glue on the inside, take some air dry clay, and flatten it out and then push the clay inside, smoothing the clay out as you go on covering the entire hole, then add some white glue on about a third of the outside on the total length of the coral. Take some air dry clay, flatten it and add where you brush the glue. Smooth that the clay onto the armature. If the clay seems to dry to the touch, you can add some water onto your fingers to work it more easily. Once your clay is smooth, it is time to texture it. The idea here is to create a little cavities that are next to each other. Simply use the bowl-ended tool and push into the clay, creating [inaudible]. Once you have finished texturing, set the sponge coral aside to dry until the clay feels warm to the touch. This will generally take about a day. Then simply repeat the previous steps one or two more times until the sponge coral is completely covered. Again, set aside to dry until it is warm to the touch. If the clay still feels cool when you touch it, it means that the water is still evaporating, so simply wait one or two more days. Once your sculptures are dry, it's time to paint them. Again, they will be dry once they feel warm to the touch. If they still feel cool, it means the water is still slowly evaporating from the clay. I personally did not have any cracking. However, if you have, simply wet the crack a little bit with a brush of water and add fresh clay to the crack, then let dry again. For these corals, I decided to go with a blue color combination. I went with Ultramarine Blue PB 29, Cobalt Turquoise PB50, Anthraquinone Blue PB60. Originally I also used a bit of model brown - PR206 to the ultramarine for darker shade. But in the end, I only used Anthraquinone Blue. Feel free to use the colors you prefer for your own sponge coral. I recommend trying out color combinations on paper first if you are unsure. Air dry clay is real joy to paint as it's fairly porous. That's the reason I never start with gesso. It's also why I favor this crisp white and dry clay, La Doll Premier from ACTIVA. Technically, you can use watercolors on air dry clay, but I personally find it difficult to manage, especially with a complicated texture like here, acrylics are just easier in that regard. I also favor acrylics over oils because they dry quickly. Since this sculpture needs to be sealed, I'd rather be able to varnish it in a few days after completion, than six months later. To paint sculptures, use a brush with medium strong bristle and dedicate it to sculpture painting. Painting sculptures is rough on your brushes, and while I still would recommend buying quality brushes as they simply keep their shape much longer even when used harshly, don't buy the most expensive ones either. As for the colors, I start with the lightest one. Here, Cobalt Turquoise and dab it in patches all over the clay. Then start mixing the turquoise to the Ultramarine blue, add the paint around the light parts, then comes Ultramarine and finally, Anthraquinone Blue. You're really trying to give the color a bit of pulse. Then paint the whole in Anthraquinone Blue. Once you have covered all your sponge corals with the paint, set aside to dry. Most acrylics will dry within an hour. Now check for white spots to cover. Using a smaller, more precise brush, go over all white spots, making sure your entire sculpture is covered in acrylic paints. Acrylic paints being a plastic, it acts like a part sealer as well. Let dry again. Now we will make sure that texture really pops with a bit of dry brushing. I find this works best with a flat nylon brush. Simply dip your brush into some liquid white acrylic paint. Brush over your palette to remove excess clay and then go over the sculpture swiftly. The paint will only hang onto the rims, making the texture really pop. I use a ceramic tile as a palette for acrylics as it's very easy to clean after. Cover the whole sculpture and let it dry for a few days. Finally, varnish your piece two to three times to properly seal it. Always start by varnishing with glossy vanish one or two times. Then the last coat will be the coating of your choice. Glossy, satin, or matte.
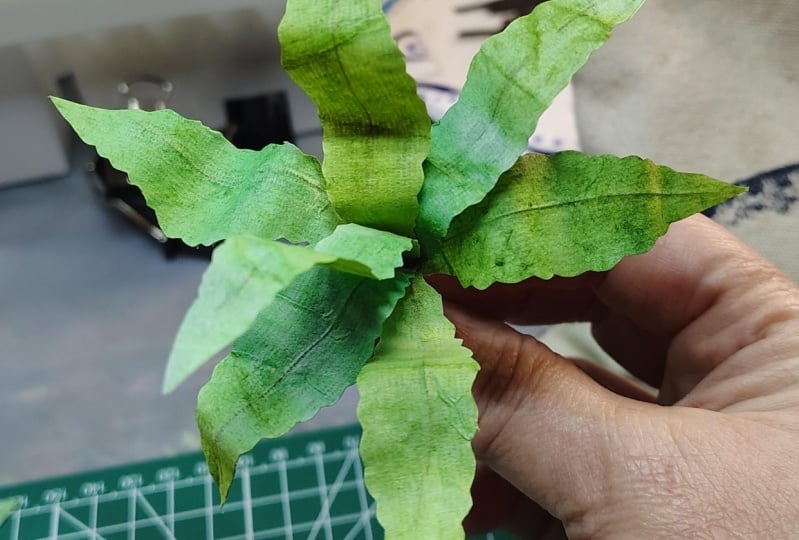
7. Cold Porcelain: The next clay I would like to show you is commonly known as cold porcelain. Now, many people do this at home, but you can also buy cold porcelain. Here I have Modena Air Dry Polymer Clay. This is how they call it. This type of air dry clay is waterproof and very flexible once dry. I'm just going to show you a few things here, a few tests that I've done. You can color it before or after. This one I mixed in the gray into the clay before, and then I've wrapped it around wire, and as you can see, it's extremely flexible. Please keep in mind that this is, in fact, air dry clay, so you don't have to bake it or anything like that. This one here, which is like a small anemone, I colored after with acrylic paints, no stickiness as well. So contrary to polymer clay, which often has a bit of difficulties with acrylic paints. A lot of them tend to get sticky on clay. Here on this specific so-called air dry polymer clay, which is very different from what you would think of as again polymer clay. It's no issue at all to paint, and as you can see, it's extremely flexible. The flexibility, of course, makes it super-strong, so it's a very strong clay. Now, the downside of this clay is that it dries really, really fast, and I find it difficult to texture. Unless you use some molds, then it's going to be a bit difficult. As a matter of fact, there's a whole community of flower maker that use that type of clay, either home-made cold porcelain or Modena or similar clays. They're also sometimes called resin air dry clay. They use it to make flowers, and so they use so-called veneers, which are molds. They simply roll out the clay, push the veneer on top, form the petal shapes or the leaf shapes and let dry. That's one of the use of Modena. I really like it for all things like that that aren't very hard to sculpt, that are pretty fast to sculpt, and so it's not too much of an issue. You do want to make sure to wrap it correctly so it doesn't dry on its own. I'm just going to show you how it looks like. As you can see already, it's very different to the other air dry clay. I'm just going to close that again. Now with most air dry clays, you can limit the hardening a bit with some simple water or some oil. But it's not magical. But as you can see, it's very creamy, it's hard to put it differently. It has that creaminess to it. You can really push it very thinly, it doesn't really stick to itself. As you can see like most air dry clays, I find stickiness is not a great thing, and that's pretty much it. It's very smooth. It's very different from other air dry clays. It also feels more plasticky. The air dry clays, the open ones that I showed you previously, you really can feel the paper pulp and it's not as smooth. But this one is really very smooth. Again, the problem is that it dries fairly quickly, and so you cannot really sculpt complicated things with it or you would have to do it really gradually, small bits by small bits. But I think it's still a very interesting clay to work with, again, because you can do things like that because it takes acrylic paint very well without getting sticky, and also because simply of its flexibility, which is very useful when you do sculptures, and want something thin that needs to be sturdy. If you are looking for an air dry clay that needs to be flexible, I think this is a great choice. Now, when it comes to cold porcelain, you can also mix in colors before sculpting. I would suggest if you want to do that, to mix the color you would like first before mixing it in. You can use most paints with it. Here I am using watercolors, but gouache will do as well or acrylics and even oils. You don't want to add too much color to it. Of course, you can also mix in pigments directly. I would recommend using gloves simply to avoid having your fingers completely covered in pigments or paints. You can always wash your gloves later on and reuse them later. You can always add a bit of water to make sure the clay stays nice and moist. This is an option for most clays to mix in colors or pigments before sculpting. Just make sure that once you have your color to keep it in a clean wrap, and possibly even if in a box if you're not going to use it right away just to ensure that it doesn't dry, and yeah, that's pretty much it. This is dried cold porcelain, as you can see, very flexible. You cannot use watercolors on this because this is very plasticky, but you can use any type of acrylics or oils. Here I'm going to use some open acrylics so they dry very slowly, but again, any acrylic or oils will do. Here I'm almost dry brushing, but you can go at it much thicker or much thinner. Really it's going to depend on the look you are going for. Adding pastel is also working to a certain extent. Again, with dry pastels or raw pigments, you do want to seal it later on.
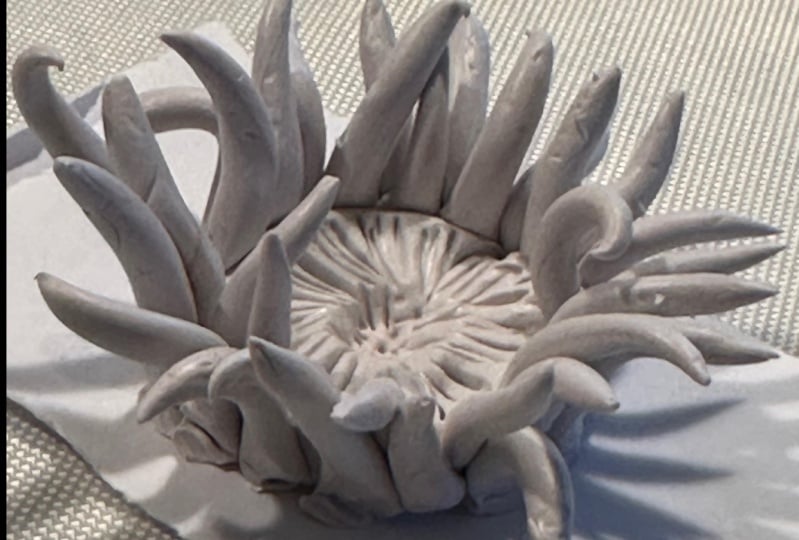
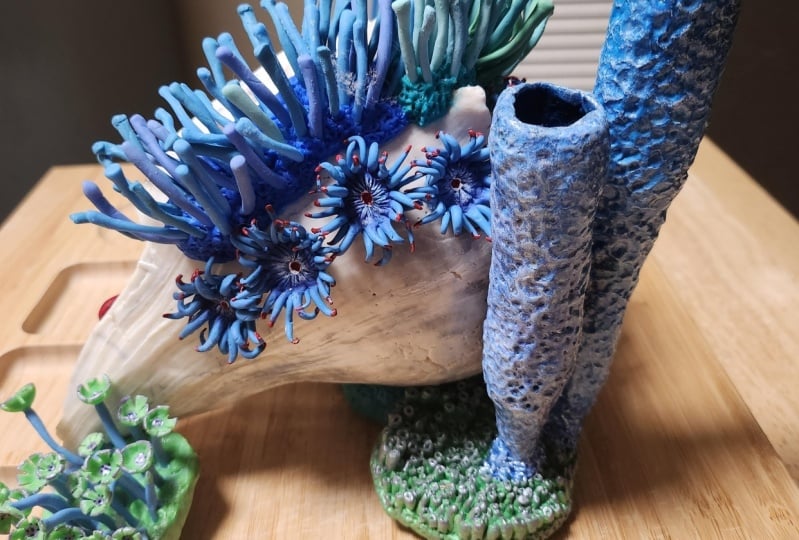
8. PROJECT // Cold Porcelain: Sea Anemone: For this project, I went with a sea anemone as I find the cold porcelain's flexibility especially useful. I will show you two options. The first is a lot easier to create overall and will offer a beautiful, tactile experience. But the second one is posable and also can be made larger. For this project, I am using the cold porcelain Modena from Padico. If you would like to use another cold porcelain or make your own, please bear in mind that it might not be as flexible as Modena. Homemade cold porcelain is flexible. However, it is generally stiffer. In order to retain the slight translucency of cold porcelain, I call it the clay with watercolors. For this first anemone, I went with the turquoise color combination. I used following paints for the tentacles. Cobalt teal PB28, glacier green from Schmincke, which is a mixture of potters pink PR233 and another cobalt teal PG50. Cerulean blue PB36, turquoise, which is a combination of phtalo blue PB 15, 3, and phtalo green PG7. Payne's gray. I used the one from [inaudible] which is a combination of PV19, PB15, 1, PBK7, and ultramarine blue PB29. Now, keep in mind that colored, cold porcelain has a drying shift and will become darker once dry. In doubt, you can try a little mixture and see for yourself to get a feel for it. What I did and would suggest you do as well, mix a walnut amount of clay with a bit of watercolor. Moisten the clay by spraying some water and keep the clay in cling wrap. Now sculpt all tentacles until there's no colored clay left. Repeat this process as many times as needed. That way you won't have clay wastage and won't have to worry about more than one clay at a given time. I would also suggest you wear nitrile gloves when mixing the clay with the watercolors simply because many pigments are toxic or at the very least, irritant. Once to mix in the clay, they will stay there. But while mixing, the paint will go everywhere, and especially on your skin. Now you can easily reuse the nitrile gloves for a very long time. Simply wash them like you would wash your hands. For each new walnut of colored clay, you want to change the watercolor, you mix in slightly to create a gradient of colors. In our example, I started with just cobalt teal, then I added a bit of glacier green to it. Then I also used cobalt teal, but in a lesser amount to create a lighter version, and then I started adding a little bit of cerulean blue to it and later turquoise, and I also added some of the payne's gray and the ultramarine blue just to give some variation. For a better effect for your sea anemone, you will need a lot of tentacles and a lot of different colors. In the end, I personally used about 10 different colored clays for the sea anemone I'm currently showing you. Leave the tentacles to dry overnight. In order to create the body, mix some clay with watercolors again. I used anthraquinone blue, which is PB60 because I wanted a dark-colored body. If working on an object like I will be showing you first, add some acid-free white glue onto your object, then push some clay on top of it. I like to spray that clay with a bit of water just to ensure the drying is extra slow. Then tape each tentacle, one-by-one in acid-free white glue, and then push it into the clay. You will have to occasionally reshape the body with your tools or fingers. Proceed through small bits of clay added onto your object of choice. Cold porcelain dries fast, so you do not want to cover your object in it as you simply won't have the time to add all tentacles before it dries. Simply add a little bit of clay for the body, then your tentacles, and then add some more body and again more tentacles. Proceeding like this to create the sea anemone gradually. Now you can also create the body without any object you put it onto. I'll show how in this next approach to sculpting sea anemones, this time with posable tentacles. We will be sculpting the tentacles around pieces of wire. For this project, I used wire and gauge 18. That's one-millimeter thickness, and cut it in pieces of about six centimeters, two inches, three-eighths. Cold porcelain is rather sticky on its own and will readily stick to metal. You want to keep a nut size of clay in some cling wrap while you work, and some water at hand. Take a small piece of clay and roll into an elongated teardrop. Then, place the wire in the center, wrap the clay around. Rolling the clay and wire in between your thumb and forefinger, push the clay along the wire. If needed, smooth the clay by dabbing your finger in some water and running over the clay. Now you have to keep in mind that this clay is rather sticky, but also dries very fast. So making these tentacles will require a bit of trial and error until you get a feel for it. I would suggest you take your time and don't hesitate to redo the clay wrapping if it fails. You can always rewet the clay a bit and knead it so it's workable again. For the anemone I will be showing you, I made about 35 tentacles. However, the more tentacles, the better the results. If you feel confident and your fingers are agile enough, you can also wrap the clay around a thinner wire. Let all the tentacles dry. Cold porcelain dries pretty fast, so one hour is usually enough. Once your tentacles are dry, it's time to paint them. I'd like to start with dry brushing them in a gradient of colors. For this specific sea anemone, I used following colors. Cadmium red light PR108, cadmium yellow PY25, madder brown PR206, and Titanium White. Feel free to use whatever color you like best. I mix the colors I wanted with a palette knife first and then proceeded to almost dry brush all tentacles. Dry brushing is a technique where you dip your brush into paint, remove most of it, and then paint with what is left in your brush. That technique enables you to create a bit of a gradient. I wanted to keep the ends of the tentacles paint-free, so roughly painted the rest of the tentacles. I also created a general gradient for all tentacles going from yellow to dark orange. So the tentacles can dry easily, I simply stick them upright in some reusable pate. Once this is done, let dry. Then you want to paint all the tentacles again, but with a more fluid, wetter paint. This will smooth out your painting job. Again, stick them upright in some reusable pate for them to dry easily. Once the tentacles are dry, it's time to assemble them together. First, you want to create a little loop or fold with the remaining wire on each tentacle. Then, take a small piece of clay and acid-free white glue. Form a little ball of the cold porcelain clay and push against your working surface. Ideally, either a ceramic tile or some baking paper, so you can easily remove the clay later on. Then, take the tentacles one-by-one. Dip each into the acid-free white glue and then push into the clay. You want to repeat this until all tentacles are into the ball of clay. You can wet the ball of clay by spraying some water on it if it feels dry. Also, push the clay together every now and again to make sure the tentacles are nicely enclosed in the clay and close together. Continue until you have no tentacles left. Let dry. Once this is dry, it's time to sculpt a body around the tentacles. For this, brush some acid-free white glue around the clay that keeps the tentacles together and then push some clear around it, shaping it into a pouch. You can give it some texture or shape as you see fit. Let dry again. Finally, we will paint the body. You will need to add two layers of paint again, letting each layer dry in-between. Fluid paint will work very fine. You can now play around with the tentacles, bending them how you see fit to recreate your little sea anemone.
9. Epoxy Clay: Now before we dive into epoxy clay, a word of advice. While epoxy clay is considered non-toxic and epoxies in general as well, meaning that you're not going to die if it touches your skin or not very harsh damage is going to happen. It is considered as being an irritant and it also can cause allergies. When I say it can, it's just a question of time. So epoxies, and by that, I mean all epoxies, so epoxy clays was also epoxy resins, will cause allergies when in touch with your skin for longer periods of time. For some sensitive people, it might happen in just a few days, and for others, it might take years. But if you use epoxy clay on the regular, you really should wear nitrile gloves and not just latex gloves, really you want to use nitrile gloves. Nitrile gloves are quite easy to find and to use. They're actually pretty cheap. Now I know many of us don't really like to work with gloves as they can be restrictive. But a word of advice on that, take sizes that fit you. You want them to be a bit tight but not too much so that it doesn't slip, and you just learn to get used to it. If surgeons can do very complex things with your body wearing gloves, then certainly we artists can as well. Your health is going to thank you for that. That is really important. Now the other important thing is that when you start to mix the two compounds, there's a very strong smell, and this is where it's most irritant to your nose and respiratory tract. This can also cause allergies. Something really simple to do is instead of mixing of the clay where you're going to work, you just prepare your clay. Get outside or get out your window, or just get out of your house or your apartment, mix it outside, and then you can go back to your studio or wherever you work, maybe it's your kitchen, and then get to work on your sculptures. Of course, needless to say that your work studio should be well ventilated. That's true for most clays, but especially for epoxy clay. If you're starting to have headaches, if you feel nauseous, if your nose itches too badly, then maybe consider using another clay and stop using epoxy clay. Or if you really want to use that material, invest in a good gas mask and yeah, use full protection while working with the clay. These are just a few words of advice that are important. Your health and body are worth more than just a clay. What you want to do is, I am using these wooden sticks. Basically, I will keep B for B and A for A, and you want to take a bit of this off. Usually, epoxy clay, it depends on the freshness of your clay and the brands, but usually it's going to cure in about three hours. I really recommend not to mix too much clay at once, because the curing process is about three hours, and so that's pretty fast. Another recommendation is that the clay is especially toxic right now. Here I'm going to mix it while I'm going to work, but normally what I would do is I would go outdoors while mixing the clay, and this is the moment where the smell is quite intense. Just mix it thoroughly but outside, and then just wait a few minutes until it's a bit less sticky and then work with it. Epoxy clay is not air drying clay as it is more of a chemical curing as soon as you start to mix the two compounds together. It's not a clay that cures by losing its water content and becoming hard in the process, rather it's becomes hard by curing and that's a chemical process that happens when you mix the two compounds. Now, the curing usually takes about three hours more or less, and 24 hours to be rock hard. Once it's completely harden, you get something that is very, very hard. It's also heavy. It's heavy because it stands. It's very hard and it's not flexible at all. There's also no shrinkage because you don't lose any water content. Now I would like to show you the difference between the different moments where you mix the clays. I mixed the same clay at different times. This was two hours ago, and then every half an hour I mixed a bit more, just to show you the difference in texture. I feel like that is an important factor in mixing and working with epoxy clay that is very specific to it. This here has been mixed two hours ago. It's still, as you can see, malleable, but it is a bit stiff. Now if I compare that to the clay that I just mixed, this one is a lot softer and it's also a lot stickier than the two hours one. They are still both very soft, but this one is harder to push down and mix, whereas this one is extremely soft and can easily be smashed down. Now this one is a lot harder. I really need to push the clay to get it thin. Now as you can see, they are still both usable and mixable, but what it's going to show is when I'm going to use two of them. Now also bear in mind that the clay that I just mixed is a lot stickier and will really stick to any type of surface. Whereas this one is not going to really stick to anything, doesn't stick to my gloves [inaudible]. It's quite nice to work with that way at that moment. But yeah, not much time left. I'm just going to put them closer together so you can better see the difference in the tools. Now I'm just using my spatula tool. Also a thing, because I'm seeing that it's a bit dirty. Now epoxy clay sticks to anything and well, metal is one of those things and yeah, you can clean it with water right after and that's fine. Or you can just let it dry, and then using a blade, you just remove the clay that has dried, if it hasn't completely dried, to get it clean again. If I take this one and push it down, you will see that it doesn't really cut through the clay, rather it creates that dome texture. Now, if I go forward in time, you will see that the tool gets into the clay very indifferently. Now, the very recent clay, it gets in very easily almost a bit too much. The recent clay here is really going to stick a lot, as you can see, it goes out. It's going to be more visible with the ball-ended tool. I'm going to take a bit of a bigger one, so you can see better. But when I push it in, as you can see, the clay sticks to the tool and is removed slightly. You can easily avoid that by using water and just dipping your tool into it removing most of the water, and then when you push that in the clay, the clay is not going to stick to it. However, this can be a bit annoying. If I remove all water content, or better yet, take another ball-ended tool, I go here. I don't have that problem at all. The clay doesn't stick to the metal, and it's just a lot more enjoyable to work with. However, the edges are less clean than this one, so it's going to be more rounded. Everything is more rounded. The textures are more rounded than this one because it has already started to cure for a lot longer. Again, this one, two hours, this one just two minutes or so, and this in-between. If I go through, it doesn't stick, doesn't stick, and this here, half an hour, doesn't stick either. This is here is the interesting thing. I feel like when you mix the two ingredients, it's extremely soft and extremely sticky, and just generally speaking, not very nice to work with. At that stage, the best way I can describe it, it's still in that glue stage. See, it also sticks to my gloves. It's just a general mess to work with. However, since it's so sticky, I think that's the interesting part, is that you can work on objects and at that moment, you can simply start by adding the clay onto your object. Here, I'm working on some headphones that were broken, and you can just add the clay and leave it be for a while. Just add where you want it to be, and then you wait maybe half an hour, and then you start to actually sculpt and do things onto the clay if that makes sense. Of course, here, I'm working on an object, but if you're working on armature, it's going to be more or less the same. For instance, here, I prepared some very basic armatures for some corals, and at that stage again, very sticky, so easy, very soft, very easy to work with and to smooth down onto your armature. With a bit of water, you can really smooth down the clay, that's really the moment you want to do the rough work. Again, not too much. Two hours can go pretty fast. I feel that with epoxy clay, in general, you really have to be very focused on what you're doing, more so than other clays that are more easy to work with. With epoxy clay, you really have to know where you're going. Let's say this is the stage where I put on the armature, and then you can actually also pre-mix certain clays for certain texture that might be easier to work with. Since I am going to take this one, and since this clay doesn't stick at all to my tools, I can easily work and shape it as I see fit, and then push it onto the fresh sticky clay. As you can see, that's a lot easier, whereas if I take the fresh clay and try to do the same, it's going to stick to my tool, so I have to use water. It's also a lot softer, so it's going to stick to my gloves. Overall, it's not going to be as nice and also not as nice-looking because I'm going to have a hard time managing the shape. These are things to keep in mind when working with epoxy clay. It cures gradually, and it's really a bit of a learning curve. You have to see and test for yourself how you like it best. Since it's chemically curing, you don't really have to worry about the thickness of your clay. If you use a big lump, it's not super big, but if you do a bump like that, it's not going to crack, no worries about cracking, and it's going to cure quite normally. So that's something that is pretty helpful. It's also waterproof, obviously. For sculptures that are outside, this might be a good option. Actually, with polymer clay, it's the only option within all the clays and materials I'm showing you today to make a sculpture that stays outside. Colored epoxy clay does exist, but epoxy clay is yellowing over time, so not a great idea to buy colored clay because it is going eventually to yellow if you don't paint it. That's the first thing, and the second thing is the texture of colored clay is awful. It's hard to describe otherwise, but I tried, it is very awful. Basically, natural clay is gray, and colored clay is that clay but with a lot of pigments in it to make it colored. The addition of a lot of pigments makes the clay react very differently. It's more sticky, it's less binding if that makes sense. It's overall not nice clay to work with. We're starting to get really nice. This is the clay that I mixed two hours ago. When you do that type of texture where you use a tool and push it down several times like this, the texture is just going to take without the tool ever getting dirty or sticky which is really nice. While when you use this here, it's going to be. This is the clay I mixed in, now it's been 20 minutes, and it's getting better, but still, it's pushing too much in. I have to be more careful. You can't quite see it because it's really small, but the clay is sticking to the tool, and generally, the texture is less regular than on this one. It's not necessarily a bad thing, it's just a different way of working. Also, you can note that the clay's color is shifting already a bit, once it's completely cured, the clay is quite dark as you can see here, and it's also slightly translucent which is not going to be used in our case. Again, I would not suggest to do so because epoxy clay is yellowing. I haven't met a clay so far that isn't. Epoxy in general is known to be yellowing. You cannot use whatever slight translucency you see, it's really a clay that is meant to be painted. Now once your sculpture is done, it's time to paint it. There are many ways of painting your sculptures, so it's going to be up to you. I like to start with white. I already had this sculpted and painted this in white. This sculpture now, I'm just going to add the white on that. I prefer to work on a white base, but some people prefer to work on a black base, so that's up to you. You can also use gesso, however, you have to know that gesso is basically just acrylic paint with some grids to it. You can go ahead and just use acrylic paint altogether. The other option are oil paints. I don't use oil paints on my sculptures because that would make it too long for me to wait for it to completely dry and varnish, so I personally don't like them. But yeah, you can use oils on any type of sculptures really and any clay I'm presenting you today. Acrylics as I've mentioned before can be an issue with polymer clay, but with epoxy clay, really you can put anything you want on it, same with varnishes. There's really nothing that doesn't work on epoxy clay in terms of art supplies, so go wild. As a general rule, you want to add layers of colors and really build it up, and try to work with thinner layers and just add a few more on top. Otherwise, you're going to have brushstrokes on your sculptures, and you don't want that because you don't want to hide the texture of your sculpture itself. Here just to show you epoxy clay once it's cured and once it's completely cured, it's not flexible at all, and it has a bit of shiny hard plastic look to it. It's very smooth, it's not very porous, and it's very strong. I cannot break this even though it's not that thick, so it's plain, nothing inside, just clay, but I cannot break it. It's chemically cured so no shrinkage. However, if you have something like this, there's wire in it and this is clay, and it's not going to take much to break it. I already broke it. This is why when people advertise epoxy clay as being strong, I'm like yes, but if you're looking for strength, then you want to have a flexible clay, something like coast clay for instance that is not going to break, or something called porcelain that also is not going to break once set because this is plane. Without wire, it's going to break. I don't put a lot of effort in it, it's really easy to break. The only moment where it becomes virtually unbreakable is when it gets thicker. As you can see, it's not super thick, but this, I'm not going to be able to break it as much as I would like to. I don't, of course. I don't want to break the clay just to show you. You understand that strength doesn't mean much. Be a bit careful when it comes to strength. Depending on the shape of your sculpture, it might break. In fact, the only breakage I personally had with my sculptures, I didn't had a lot but I had two with the epoxy clay. Just to think to be in mind.
10. PROJECT // Epoxy Clay: Acropora: For the epoxy clay project, I decided to replicate table corals that I will personally be attaching to a current sculpture on a book I am working on. This specific sculpture will need some kind of object for support. Feel free to upcycle trash or unwanted objects, but you could also use a rock. We are starting by a very basic armature using some aluminum foil, shape it into a disk. Now, take some aluminum wire mesh and bend it over the foil disk, thus adding strength. Prepare as many disks as you intend to do. I created three. Wear nitrile gloves and now mix the two compounds of epoxy clay together in equal parts. If the clay is too sticky to handle, let the mixture sit for a few minutes. Keep in mind, you will need it to be able to hold the disk while sculpting, so keep a bit of clay free space to hold to later on. I forgot to do it on the first one, so here's some footage on the second disk where I left some place to hold onto while I will be sculpting onto the disk. Now start adding the clay to the armature. Dip your gloved finger in some water and smooth the clay over the armature. Then roll the clay into an elongated sausage and cut small bits of clay. Roll them into tiny balls and place them one by one onto the disk. Each ball needs then to be smooth down onto the disk using a ball and a tool. If the clay is too sticky for your tool, you can also keep adding the tiny balls of clay and smooth down the clay once all the balls have been added. Then it's time to give the coral a bit of texture. Using a smaller ball and a tool, poke up the clay to create a bit of a rough texture. Now, let you rest until the clay is cured. It will be completely cured in 24 hours. However, you can touch and feel the clay and see if it gives on the pressure or not. Often, it's okay to hold after just 12 hours. Now, repeat the same steps to cover the top of all disks. Adding the clay, then the balls, and finally texturing it. Let it cure on its own. Then we will cover the other side with clay. On that side, add a simple texture with the ball and the tool. If the clay is too sticky, you can wait a little for it to set, about half an hour will do, or you can dip your tool into water, removing most of it on your glove, and poking on the clay to create a certain roughness. Let it cure completely and repeat so everything is completely covered. Now it's finally time to paint. Start by priming the sculptors with some white acrylic paints, let dry. I went with the red scheme and ended up using the following paints; cadmium red light PR108, carmine PR254/PR264, madder brown PR206, burnt umber PBr7, ultramarine blue PB29. Feel free to use your favorite color combination. Color the corals while being more bright on the edges and darker in the center of the disk. Let dry. While your paint is drying, keep your paint moist by spraying some water on top and putting your pellet in an airtight container. I like to use small tiles as pellets. Now, repeat the first layer of coloring on the back of the coral. Let dry again. One layer of paint is generally not enough, so don't hesitate to add another layer of paint to really cover all the white spots onto your coral. Let dry between layers. Now, in order to show off the sculpture's texture, we will be doing some dry brushing. Dry brushing is the technique I always end my sculptures with. This time you want to use white or the reds and also a bit of yellow. Dip your brush into the paint, remove most of it over the palate or a towel, then go over your sculpture swiftly. The texture of it will retain the little paint that is left in your bristles. Repeat working in patches of colors, bright on the edges, darker in the center. Let dry again. Now, the last step, and this step is true for any sculpture you would like to add to another sculpture or object. Using epoxy clay, attach the sculpture to your object and proceed through the same steps, texturing and then coloring the clay. I find epoxy clay especially useful for that specific purpose, acting as a glue and clay in one. You might need to add armature depending on the object and sculpture you'd like to attach together.
11. Paper: The last material I would like to talk about is paper, and this is going to be a lot shorter, because there is a lot less to say in terms of techniques. But I find paper to be an interesting material to use in mixed media sculpture, because unlike all the other clays, it is naturally flexible and thus very, very sturdy. Anytime you want to use something that is very thin but needs to be strong enough for traveling, paper is a good option because it's not going to break during transit and even when you handle it, there's no breakage possible. The only way you can damage paper is really by tearing it, and that is something that you do as a human but is not something that will just happen, if something moves a lot or it falls onto the ground or something like that. In that regard, paper is one of the sturdiest material. The other advantage that I personally like is that you can paint it with watercolors very easily. This is cotton paper, so it is watercolor paper in that sense. It's perfect for watercolors, it is meant for it. This paper, which is a paper that is called modelspan is a very sturdy paper as well. Very strong even when wet, and I use this to make these butterflies, but also feathers on a bird that I made a while ago. As you can see, it has nice translucency to it, which I find really interesting. I personally really like to work on plants and flowers and thin things and a lot of insects, and with that type of paper, I am able to keep a certain translucency in my work, which I find interesting. I'm sure there are many other ways to use that paper, just interesting material to try and work with. Now, cotton paper is used a lot in sculpture, if you just Google papers culture usually. It is cotton paper that is used or cellulose paper, but I'm just guessing it's mostly cotton. The way it works is because of its thickness, you can really shape it easily with sculpting tools. I'm just going to show you quickly. But basically, this is a ball ended tool. If you just push the paper a little bit around, you can easily create and bend the paper unto your will and create a sculpture. The way paper sculptures work is basically, you are going to have many, many pieces of paper and build them around an armature or a body of some kind. You can work on air dry clay as well or any other clay that I showed you, and in that sense, you can create sculpture and this is going to be your final texture. Also on the note on paper, you can always recycle paper as well. So be it in books, which I have been working on a lot lately by carving books, reusing the paper differently, maybe transforming it into wings or plants or flowers. Those are interesting options in terms of upcycling, and you really can easily upcycle any paper. Just bear in mind that the light fastness of the original color is probably not very high, and if you intend to sell your upcycled work which I think is perfectly fine, please try to either varnish it with UV protection or clearly state that it is upcycled work and that you have no power over the pigments used in that paper, because it's basically trash that you upcycle into art. Which, again, I think it's perfectly fine. I just think you owe that to the potential art collector that might be interested in your work.
12. PROJECT // Paper: Plant Sculpture: For this paper plant, we will be using the model span paper in 21 GSM. First, paint the paper in watercolor washes of green. I used a loose mixture of following paints, Azo Green PY129, Azo Yellow PY1501, Perylene Green PBK31, Phthalo Green PG7. I would recommend using a ceramic plate or palette to mix your greens before applying them onto the paper. This paper is very absorbent, so you cannot mix the colors on it. If your green mixtures seem too neon-bright, add a little bit of orange to mute them down without losing their vibrancy. Greens are deceptively difficult to get right, so practicing upfront is a good idea, as you will develop a feel for the correct colors. You can also use convenience green mixtures. For the easiest application of paint, hang the paper onto something. Hold the paper with your hand and use a larger brush to apply the paint. I am using a lamp to hang the paper, but anything will do. I would also suggest to add color variations in your greens onto the paper. Don't overdo the wash, we will be gluing two leaves together later on, so you don't want something that is too strong a color. Once your wash is done, let dry. Then proceed to cut the leaves. To make one leaf, you will need cheap leaf shapes. First, cut a strip of paper of about seven centimeters, that's 2, 3/4 of an inch, roll your first leaf then cut. Then use this leaf-shape to draw out five more, that will make a total of three leaves with the same shape. Repeat the process two or three times, so you end up with a total of nine or 12 leaves for one plant. This is the best way to create natural variation among your leaves while still working relatively fast. If you use a cutter or use the same shape for all leaves, your plant will look weird as it will be too regular. Once you have cut out all your leaves, it's time to assemble them. Take some green metallic wire, go to 28 or 0.3 millimeter thickness, cut pieces of about 10 centimeter, that's four inches length. Now to glue the two leaves together, you have two options. You can use acid-free white glue, which is going to be a lot cheaper, or an acrylic medium like soft gel from golden, which is going to be a lot more expensive. Both work equally fine, however, with the glue you need to work a little faster as it dries quicker than the soft gel medium and is consequently a bit more stressful to work with. Use a dedicated brush for the glue or soft gel, I favor using nylon brushes like long flats of feather words as I find them easier to clean up with that type of rough work. Also, I would suggest to work on a ceramic tile as you can easily clean it down in between two leaves. Now, lay the two leaves next to each other in symmetry, brush the glue or soft gel on one side, place the wire in the center of the leaf, add some more glue or soft gel onto the wire, then brush the other leaf, and finally, add the second leaf shape onto the first. Use a metallic tool to really push the paper down, especially next to the wire to ensure the paper is well glued together. Then remove delicately and let dry standing up. Repeat for all the leaves and let them dry thoroughly. For this plant, I loosely replicated a dandelion, and so once the leaves were dry, I cut the sides into a scalloped edge. Now it's also a good time to readjust your leaf shapes or to rectify any misshapened leaves. I simply use a small cutting board and an X-Acto knife and do it by eye. But you could also draw with a pencil first to know exactly what you cut, and instead of an X-Acto knife, you can also use a pair of scissors. Now if you want to garnish your leaves for a glossy look or extra protection, do so before assembling the leaves. I personally did not garnish them. Once your leaves are dry, it's time to shape them. You can simply use your fingers to round and bend the leaves or use the bowl ended tool, both work fine. Shape all your leaves, making sure some stay more straight and some are more bent down. Finally, assemble the plants by twisting the remaining wire of each leaf together, adding one leaf after the other, reshape the plant to your liking and you are done with this plant sculpture.
13. Choosing Media: Now that I've shown you all the clays and project, I really hope that you have a better understanding of the different clays. Now, the question arises very often, how to choose which clay for what? Now, I personally work with all of these clays, but for polymer clay. Personal choice, I just really don't like baking the polymer clay. I don't like the process of baking clay, but that's personal. If I had to suggest or recommend just one clay, I would suggest polymer clay, because I feel like it's one of the easiest to work with. Now, with the addition of Cosclay, you can have the flexibility, the strength, the ease of use, so I would probably go for that. Again, personal preferences are very different. When you're working on a mixed media sculptures, you have certain questions to ask yourself. The first question is, does it need to be flexible? Sturdy? Strong? Now, this is a big question and as we've seen in this class, some clays might be strong but not flexible, like epoxy clay. If you have a sculpture in mind that needs to be flexible, that needs to be touched, or that is with a lot of tiny arms like a [inaudible] for example, or something similar, then you want a flexible clay. In that sense, flexible clay, you have certain polymer clays, Cosclay being probably the best in terms of flexibility, or cold porcelain. Those are your options. Now, if it needs to be really strong, but it's going to be a very bulky sculpture, then epoxy clay might be a good choice. Now, another question you might want to ask yourself is, is it difficult to sculpt? Are there many details? If you need a lot of time to get the details right, you will need a clay where you have the time, the luxury of time to sculpt. In that sense, you can use either polymer clay, obviously, because you can sculpt as long as you want and then just bake it, or air dry clay, because it's a clay that stays open for a long time, that dries really slowly, and that can be rewetted really simply. On the contrary, epoxy clay, especially for beginners, but also for, let's say, medium sculptors might be really hard to tackle, because three hours is actually very short when you're sculpting. You have to be either really focused or fast or work in many small bits to get the details right. Cold porcelain is really difficult to get a lot of details because it dries very fast. However, that doesn't mean it's impossible. You can always rewet the clay while you work. Just have to keep doing it all the time to be able to texture it. Again, it's not just a question of is it possible or no, it's also a question of workflow. Do you really want to be bothered with rewetting clay or not? Is it something of importance to you? Now, the next question would be, is the sculpture meant to be outdoors? Now, if it is yes, then you cannot use air-dry clay, simple as that. Air-dry clay, of course, you seal it and it will resist humidity, but it will not resist rain. In general, for outdoors, you don't really use that type of clays. You would rather sculpt something to a cast and then maybe use bronze or something like that. However, if you don't want to do that, you cannot use air-dry clay, but you can use epoxy clay, polymer clay, or cold porcelain. Next question is, are you going to work with other media? Now again, it's going to depend. Some clays like epoxy clay are really easy to work with. Epoxy clay being a bit like a glue, you simply put it on top of any object and you're good to go. Now, that doesn't mean you cannot use other clays, it just makes it slightly more complex. Now, a polymer clay has to be baked, so either you have to use an object that can be baked in the process, so anything metallic is fine. But if you have plastic on your object, then not so much. In that sense, you have to bake your polymer clay and then attach it with glue or another clay, maybe epoxy clay or something like that, to the objects. Now, with air dry clay and cold porcelain, you can, depending on what object it is. If it easily accepts white glue or rather, if white glue glues itself to the object easily, then you can work directly on the object. Otherwise, you will need some kind of stronger glue to glue whatever object you're sculpting onto the mixed media. There's a bit of a learning curve and things to ponder about and to decide, but it's always doable. It's just a question of what is easiest, what do you have at hand, and what do you prefer working with? Next question would be, is you're sculptures going to be very big or very small? Because cost of material might come into place. Now, my work tends to be on the small side of things, so cost of material is not really an issue for me because I spend weeks on a sculpture that is about the size of a book. I don't use a lot of clay and I'm also very adamant of using minimal amounts of clays for plenty of other reasons. But if you want to work on a bigger scale, then maybe air-dry clay could be an option. You have a lot of air-dry clays that are very cheap that's maybe more fibrous, more in the paper-mache department, but still things that are going to be much more accessible financially. Polymer clay is going to be limited by the size of the oven. You can, of course, divide your final sculpture in segments and then attach them together at the end, but polymer clay might be a bit tricky to do. The baking process is sometimes a bit annoying, a bit delicate as well. So things to keep in mind. Also the question of colors, if you're going to paint it or not. How you want to paint it? Which materials you like to paint with? Many questions you can have that will help you choose what materials would work best on top of, of course, your personal preferences.
14. Conclusion: Thank you so much for taking this class. I hope you loved it. Also congrats for watching it until the end, I knew it was quite a big trunk today or several weeks from now. I don't know how long you took to take this class. I know it took me several weeks to make it, so I expect it's going to take you a while to go through all the information and the projects. In any case, I really hope you enjoyed it. If you have any questions, don't hesitate to ask in the comments section below, I always answer the questions. You can do any project of the class that you'd like. Please share it with the class because I love to see what you come up with and it really helps other students as well to see what students are capable of. Don't forget to check out my other classes on Skillshare. I have a lot of different sculpting classes that are more project-based and now that you have some understanding of the clays, you can really tackle any project with different clays or the clays you have at hand. In either case, thank you so much for joining. If you want to share your projects on social media, please do simply tag me. I usually go by the Monica Petitplat pretty much everywhere. But I'm most active on Instagram. Again, thank you so much for joining me and I really hope to see you in my next class. Bye.
 Stephanie Kilgast, Contemporary artist.