Transcripts
1. 001 Introduction: welcome to seeing creation with blender and substance painter. I'm Daryn Lile, a Blender Foundation certified trainer, and in this course we will create this scene of a co working space. We will go over blenders modelling tool set as we use blueprints of the space to build up the walls, doors and windows. And then we will use reference images to help us model each piece of the furniture in the rooms. We'll go over how to UV map each object and how to prepare each one for export into substance. Painter as an fbx file and in substance painter will create realistic PBR textures for our models, and you'll learn how to best set up those textures for use in blender. After we add the textures in blender here in the shading tab, we will begin working on the lighting will add spotlights and area lights to the scene and will render the scene out using both blenders cycles render engine and the new evey render engine. And in doing this, I think you'll see the differences and the benefits of both. Now this is an introductory course, and it does assume at least a little knowledge of blender. I've tried to give a broad overview of Blender in this course and how it can work with substance Painter to give you great results in a scene like this. But there's always more to learn, and my goal with this course is to give you a solid foundation that you can build upon in your learning journey. All the project files are available for download, so at any point in any video, you can look at the specific scene file that I'm working on and all the reference images air here, too, so you can work from the same references that I am. I'm looking forward to getting started, and I hope you are too. In the next video, let's take a look at the reference images and bring the office blueprints in the blender.
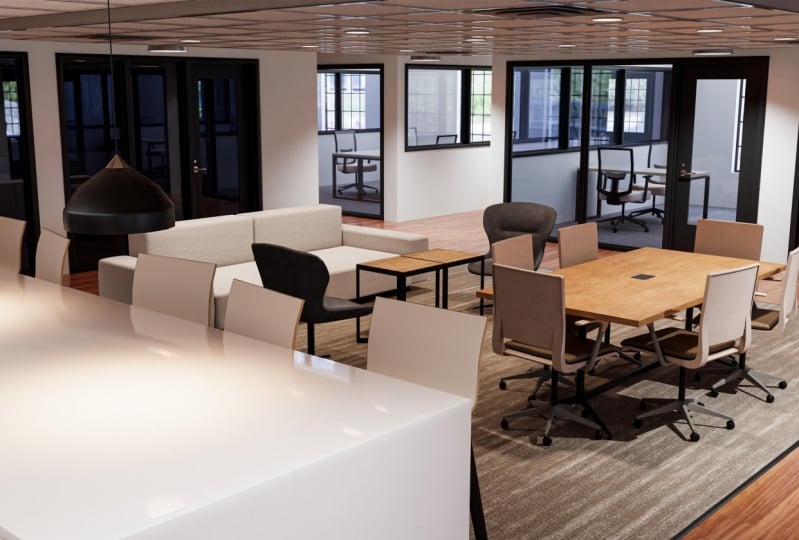
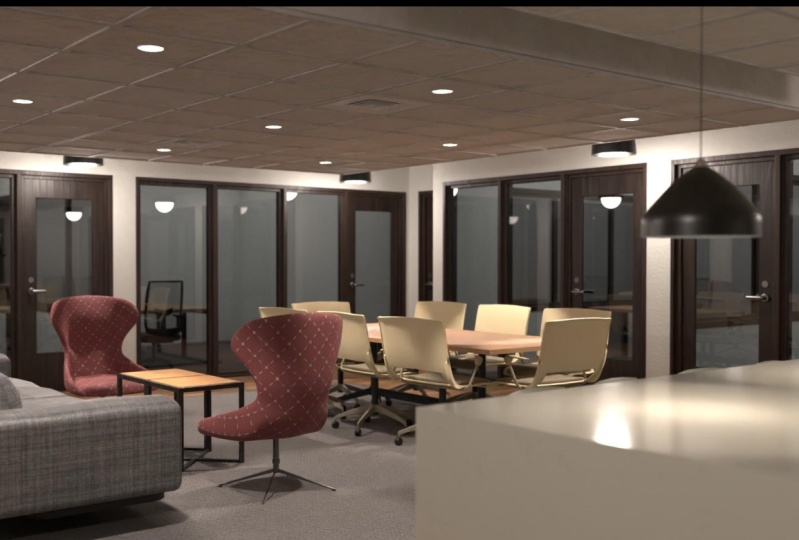
2. 002 Importing a Reference Image: Before we begin creating our scene, let's take a look at the reference images and kinda get a feel of what we're going to create. So this is a coworking space in the building where I work. My office isn't in here. It's nowhere near this nice, but I thought this would be a good environment to create. It's got a lot of different things going on here. Even though it may not look real complicated. It's got the furniture and the walls, and the doors and the windows, the ceiling tiles, the light fixtures. It actually has quite a bit going on here that I think would be pretty fun to create. If we kinda scroll through the images here you can see I've just taken some images walking through of the furniture and the general layout of the space as well. So what we wanna do is block in the walls, the floors, the ceilings. And to do that, we're going to use this floor plan here. If I zoom in a bit, we can see that it's got this blue line around it here, and that is the co-working space. This over here is just other office space. We're not going to concern ourselves with this over here. We're just going to work on what's inside the blue line here. So this is that main co-working space here. Here's that kitchen area and the counter. And then all the offices around here and even back into here. Now, we'll create the walls and the windows and the doors for this area, but we may not add a whole lot of detail inside here, but I do want to create the whole thing so we can walk through the whole area. So how do we begin something like this? What do we, what did we start with? Well, I think what I'll do is bring this reference image into blender and put it on the floor, put it on the ground plane, and then try and get this image to be real-world size. So when we get to the part of the project where we're going to create the lights for this scene. We're going to need our office space here to be real-world size because a lot of the shadows, light bounces, global illumination. All of that really looks for real-world scale, so it can provide real-world properties for the lighting. So our first task then is to get this image into Blender and to the proper size. Alright, well let's work on that. Let's go back to Blender and we've got to cube the camera and this point right here, that's always in any new default scene. So to get rid of these, let's just press the a key to select everything and then we'll hit delete, and there they go. Alright, so now actually before we begin, let's talk a bit about moving around in this 3D view. To do that, it's really just the middle mouse button. If you click the middle mouse button and hold it and move the mouse, you can tumble around. If you press the Shift key and hold the middle mouse button down and move the mouse, you can pan. If you hold the control key down and click the middle mouse button and move the mouse. You can zoom in and out. Now you can also scroll the mouse wheel as well, turn it and adult zoom in and out as well. Alright, so as I said, what I wanna do is bring in that reference image and put it on the floor here so we can see where the walls will go. But also we need to get it to the proper size. So to bring in a reference image, what we can do is go to the Create menu. Now, we can come over here to add, and we can add a mesh and armature and image. And we're going to use this background image here. But we can also get to that Add menu by pressing Shift a, and that will bring up the menu as well. So now let's come down here to image and background. And if we then browse to our folder where those reference images are, I can actually come up here and just click on this and that'll take me to that folder. I'll go ahead and click on the office floor plan and click Load background image. And there we go. Now, there's a problem. It's in line with where my camera view was when I brought it in, and that isn't what we want. Let's go ahead and hit the delete key. So as you can see, that image comes in aligned to your camera view. So we need to put our camera basically looking down on the floor. And to do that, we can use the number pad keys on our keyboard. We can also go to View, viewpoint, and you can see here that you've got the top view is NUM pad seven. The front is NUM pad one, and the right view is NUM pad three. So for the top, what I'll do is I'll just hit the seven key on the NUM pad and go to the top orthographic view right here. Now let's go ahead and press shift a image and background, and I'll select that office floor plan once again. Here we go. Okay, now if we tumble, There's still a problem. We can't see it here. What's happening is if we go over here to this object data properties tab here, we can see for this empty, for this background image, the display perspective or display in the perspective view is turned off. So let's just turn that on. And there we go. Now we can see our image. Alright, but is it the right size? How do we know that? Well, we don't really have any measurements on this floor plan to work with. Oftentimes, if you have blueprints, you're gonna get the measurements for the walls and the doors, et cetera. But for here we don't have that. So we're going to have to kind of wing it just a bit. I happen to know that the doors are about 40 inches wide. So what we could do is we could create an object, say just a cube that we know is 40 inches wide. And then we can scale up our image here so that the doorways here match the width of our object. I think that's probably the way to go. But first what I'd like to do is take this center of the grid here and I want it to be in the center of this coworking suite so that when we create a new object, it pops into this area here. I'm gonna kinda consider this the home area or the center of the scene that we're going to create. So what I can do is I can come over here to this offset x and y. And I can move this whole thing with these fields. So first of all, what I'll do is I'll take this offset x and I'll click and drag. And you can see I can kind of slide this over. I click and drag in that field there. And then I can maybe click and drag on the y field and drag that over here like this. There we go. So that kind of puts that center of the grid into the center of what I'm thinking is are seen here. Now you can type in values here if you want. I can type in say negative 2.5 and let's type in negative 0.6. Here we go. So now we know that's the center of arsine. All right, now let's go ahead and create an object here that we can set as the proper size. I'll press shift a once again and we'll come up here to mesh and cube. And there we go. Now we've got a cube. And if we hit the end key to open up the sidebar here, we can see that this cube is two meters by two meters. So that tells us that our floor plan here is probably way too small. But let's change the size of the cube to get at the proper size of the width of the door. What I'll do is I'll go to Google and let's type in 40 inches, 40 inches in meters right here. And let's see what it says. So it says it's 1.01, maybe almost 1.02 meters, 440 inches. Alright, well, let's come over here then. And in the dimensions, let's maybe in the y-axis a type 1.02 and hit enter. And so that's how wide our doors should be. Ok. What I'll do now is come over and click on this move tool. And now we can see the x, y, and z axes here fairly easily. I'm going to scale in the x to bring this in just a bit. So I'll press S and the X key, and I'll move the mouse there. Alright, so there is the width of our doors. And if we take a look at the width of our doors in the image, there's quite a difference there. So what let's do in the next video is let's work on getting the floor plan the proper size and begin blocking in the walls where this blue outline is. So that's coming up next.
3. 003 Setting the Proper Scale: Before we move on, let's go ahead and clean up our scene here. I think we can change the name of this cube to, let's call it door size. And the four plan, let's give it a name. Let's call it floor plan. Well, it looks like I need to take a letter out of that. There we go. And these objects are reference images. So let's call the collection that they're in. Let's call them reference objects. All right, now I think what let's do is let's scale this up to see if we can get this to fit in one of these doors over here, let's say. So I'll select a floor plan. And when I move this over, when I use these sliders to move this around, what I did is I slid the image but kept the object origin, that little orange dot there. I kept it in the center of the grid. Now, if I say clicked on the y-axis and moved it over, you can see that orange origin point is here. I'll press Control Z to bring that back. But when I scale this up, what it's gonna do is scale from that point. So if I come over here to the size field, I can click and drag and start bringing that up, scaling it up so it's a little bit bigger. Now, I can take this door object right here, and I can move this over and put it right by the door opening and just to see how we're doing and we've still got along ways to go here. Let's go ahead and keep going. I'll click on the floor plan again and click and drag and I'll drag this up pretty high. Let's go up to say 50 meters here. I'll then click on the door and I'll drag this back. And it looks like actually I'm gonna hit the period key on the NUM pad. And it looks like this is still yeah, it looks like it's still a little off it it may be now too big. Well, that may not be too bad actually now that I take a look at it. Yeah, let's go ahead and go with 50 here in the size field for our image. Let's, let's go ahead and go with that. I think that could work. Now in addition, I think this image is a little too bright. So to reduce the opacity on it, I'm gonna come over here and click on Use alpha. And then I can click and drag in this transparency field and bring it. I can take it down to 0 or maybe I'll just type in 0.3 and see how that'll work. Yeah, so that gives us a little bit of a toned down image. I think it was a little too bright. Now what I'd like to do is take this door object and I'd like to get it to about the size of the door in the z-axis as well. So if we take a look at this office space, let me go to our reference images here. Via the door opening the door and the glass opening here is about eight feet tall. And I think there's another two feet up before we hit the ceiling here. So I'm going to say that this, this room is about ten feet tall. The ceiling tiles here, it's kind of a drop ceiling. Our probably eight feet tall around the height of the doors and windows, but I think the high part, the upper part of here is probably ten feet tall. So let's go over to Google here. And first of all, let's type in eight feet in meters. Let's do that first. So here we have eight feet. It's about 2.45 meters. So let's go ahead and plug that in. I'm gonna come over here and let's type in 2.45 meters. So there's how tall the door is. That actually looks pretty good. I'm gonna hit the S key and then the x key and kinda scale it in. I felt like that. Alright, so now I'd like to take it up. So it sits on the grid here, so it sits on the floor plane. To do that, I really need to bring it up half the size or half the height of the door. And so half of 2.45 is well, I'm not quite sure. So what I can do is up here in the z location, what I can do is just type in 2.45 divided by two and hit enter. And then that will bring it up to sit on the ground plane. So it'll actually do calculations in these fields for you, which is kinda cool. Alright, so now if we go back to Google and let's type in ten feet. So ten feet is 3.05 meters, let's call it that. So if we go back here, what I wanna do is take this and duplicate it and make it ten feet tall instead of eight. So let's do that. Let's duplicate this shift D and then Enter. And then I'll just click on the x-axis and drag it out like this. Now let's type in the z-axis is Type in three, 0.05. and we go. And then once again, lets do that trick here to divide by two and put it up on the ground plane here. And let's type in 3.05 divided by two Enter. And there we go. Now that's sitting on the ground plane and that is the height of our walls. So what I can do is take this piece now, click on this little blue icon right here, which means we're going to turn off the z-axis and move in the y and the x. I'm going to click and drag. So I'll just kind of slide it along the floor plane without moving it up or down, hit the period key to zoom in. And there we go. So this is where we're going to begin our wall. It could be a little bit thicker. Let's press S and then the X key kinda make it a little bit thicker there and we go. And we could maybe bring it over here. Now, you may be wondering why if I know the measurements in feet and inches, why I'm not just using feet and inches instead of meters. Well, for me it's just easier to use meters here in blender. You can change the units of measure here. You can come over here to the scene properties. And under unit you can twirl this down and change from the unit system of metric, which is the default. And you can change to the imperial system and you can see that it's changed now ten feet, 3.351.06 feet. And you can also change it so its feet and inches, you can come over here and choose separate units. And now it's ten feet, 79 thousand seven-inch here or three feet, 4.2 inches. But frankly, every time you enter something in, you have to either type in this single quote, four feet or a double quote, four inches. And I always forget that. It's just easier for me to deal with the metric system when I'm working here in blender. So I'm gonna switch over to metric again and I'm going to turn off separate units. So just for me personally, this works out better. You would like to do it in another unit system. That's fine. Alright, so we have our wall in place here, at least the beginning of our wall here in place. I'm gonna come over here and give it a new name. Let's just call this walls. And also I think I'm going to move it outside of the reference objects collection. Let's just take this, click it and drag it and drag it up into that top collection, the scene collection. And now it's sitting here outside of the reference objects collection. Now we can do with this wall still selected, we can tab into edit mode. I'll just hit the Tab key. And we can switch to face mode by coming over here and clicking on select. We've got vertex, edge and face select here. We can also change between them with the one key for vertex, two key for edges, and three for face. So with this selected, I'll just select that one face there. I'll turn on the Move tool here and then I'll just click and drag on the y axis right there. And drag that wall all the way down to the n there. And there we go. We've begun the walls for our office space here. So in the next video we'll it's do is continue extruding this wall on around where the blue line is and get the exterior walls taken care of.
4. 004 Beginning the Walls: Now let's begin extruding the wall 90 degrees here to continue on along this wall. So to do that, what we need to do first is insert an edge loop so that we can create a face that we can extrude. So of course, there's always a couple of ways to do that in Blender, we can come over here and we can choose the loop cut tool. But you can also see that the shortcut is Control R. So I could come out here and press Control R. And there's our edge loop. Now if I hover over a horizontal edge, the edge loop will be vertical. And if I hover over a vertical edge, the edge loop will be horizontal, so I want it to be vertical. So let's go ahead and click and then just move the mouse and drag it over here, and click and there we go. So now I'm gonna hit the period key on the NUM pad to zoom in. Now we've put that edge loop there so we can have a face to extrude. We can hit the three key to go to face mode and select that face. And now to extrude it, we can come over here to extrude region. And the shortcut is E. You can also come up here to face and choose Extrude faces, but we can just hit the E key and move the mouse over to about here. Now what Let's do is insert another edge loop. Let's press control our hover over a horizontal edge. And there we go. Three key, select that face, it e and pull out. There we go. So I'm just going to continue adding edge loops here and selecting the face that we create and hitting E And just extrude this out along the path of the wall in the blueprint. So once again, control are, and we go three, select that face, get a0 and pull out control are, and create that face, select it. And this is a pretty long run here. So let's just hit II and pull it straight out all the way down here. And I'll hit the period key to zoom into the selection. Let's press control are and bring that over here so you can see what we're doing. We're just continuing to build the wall using the extrude tool. Using the loop cut tool with control are selecting that face and just extruding it out like that. And we've already got the height of the wall built into this. So now all we're doing is just creating the length of the walls and the basic shape. Let me zoom in here, control are and three and select that face. Now for this, we want to continue with the blue line here. So let's just get e and pull this out just a little bit. And then I'll go ahead and add an edge loop in here. And let's just bring this edge on or this wall along here with the blue line. Now, I happen to know that this is a stairway here and I don't think the blue line should go here. I think it should go around here like this because this stairway isn't part of this office space, so I'm going to change it just a little bit to go around that. But let's go ahead and hit II and bring it to their will. Add an edge loop here and slide it over. And then select this E and pull out again. I'll go ahead and use this face right here. And let's hit II and extrude this out. And I'll create another face right here and hit Ii. Pull that out. Here we go, add that edge there. Then we just need to come this way. Go this way like this. And right here I'm going to turn it around that stairway here. Here we go. And select that face and hit the period key and then hit IE. Printing it out like this. Extrude here. Another edge right here. And let's select this face. And now we can bring this all the way across here, so e to extrude and I'll bring it all the way to here. Now we just need to build the wall here through that kitchen area. So I'll press Control R and move that to their face mode, period qui e. And we go. And then this one here, this, and we'll just go around or along the kitchen area here. Select that and extrude it. Hit the period key. Control our add an edge loop. Here. Extrude that. You are now, you may be wondering, what about all the doors and the windows here? What, how are we going to create those? Well, what we're gonna do is use the Boolean modifier to create a couple of objects, say one for the windows, one for the doors. And then we're going to actually use those to cut the windows and doors out of these walls. And when we do that, It's going to ensure that all of the doors and the windows are the same size, exactly the same size. Let me hit the period key to zoom in here. Now, I could just bring this in and just put it like that. And we could be done with that. But I think I wanted to be a little bit cleaner. There's some other walls that I think I'm gonna do that with, just pull over and insert into another wall. But for this one, I think what I'd like to do is maybe actually bridge edge loop to get these together. And in fact, maybe I could do that for the whole length of it. Let me show you what I mean here. So I'm going to press Control R and create an edge loop and go ahead and bring this down here. And I just wanted to show you this and then maybe we'll do it for the whole length of the wall. So with two faces here, one here and one here, I could bridge edge loops. I'm going to press Alt Z so we can kind of see through this. You can also press the Z key and go to wireframe to see-through it completely. Wanna press Z and go back to solid. And this all Z allows me to toggle between solid and well, kind of solid. So to bridge edge loops here what we can do go to the edges menu and the edges menu is right up here and you can see bridge edge loops here. But you can also open that menu with control, ie for edge. And you can also open the vertex menu with control V, and also the faces menu with Control F. So I'll press Control E and choose bridge edge loops. And there we go. Now let's press all Z to go back to solid mode. And there we go. We've got the wall connected up. Now, another way to do that, of course, as I said, is we could undo this. And what if we press Control Z to go back a ways, say right back to there. I'm going to press Control Z all the way back to here. So here's that face there. Now, I press the G key to grab and move. You can just press G and grab and move and then hit the Escape key to undo that. Alright, so what I'm gonna do is I'm gonna create that edge again over here. Control are, let me zoom out a bit so we can see it. Control are there it is. Click and drag over here. Okay. I will maybe grab this face here and pull it out just a bit. And then I'll select this face. And let's go ahead and select this face. And then what we can do is once again just bridge edge loops. So I'll press Control E and bridge edge loops. And there we go. And that connects up that whole wall. All right. That takes care of our exterior wall. I'll go ahead and tap into object mode. In the next video, let's begin working on the walls coming out of it. So we could maybe begin here and extrude a wall all the way across here. Alright? And in addition, we could maybe extrude a wall all the way across here as well. So in the next video, we'll work on that.
5. 005 Creating the Interior Walls: Alright, let's now work on these interior walls. And actually before we do, I want to show you just one thing. I'm going to hit the seven key on the NUM pad and go to the top orthographic view. And when we do, we can see that this wall here is a little bit out of alignment and that's the one that we bridged, that we used bridged edge loops with. And the reason why is because when I put the edges in there, they weren't quite aligned here in the y axis. And this can be a problem when you're creating an interior like this. You can sometimes get things a little bit off of the main axes. So how do we fix this? What, what can we do? Well, one thing we can do, we can tab into edit mode here, and we can select this edge. So let me zoom out here and let me select this edge. I'll hit the two key and go to edge mode and then select that edge, get the period key and zoom in. Now to select an edge loop all the way around, what you can do is press Alt and then click on an edge. And that will select the whole edge loop all the way around as best as it can now, it can't always get all the way around like this. So you have to come over here and press Shift and click to choose that edge there, right? So we've got that whole edge selected. Now we need to come over here and do the same thing over here. I'm gonna press Shift and click, and then I'm going to press alt Shift and click that edge there. And that will select that edge all the way around. So I've selected these two edge loops. Let me hit the Z key and go to wireframe or press for, right. So now we can see those edges selected. Let me go back to the top view with the seven key. Now, there those edges is selected here and here, what I can do is scale in the y axis. So if I press S for scale and y, now I can only scale on the y axis. And if you can take a look at those two edges that we've selected as I go back and forth like this, you can see them kind of seesaw up and down, right? And if you look at the top left-hand corner of your screen, you can see that as I move towards the center of those two selected edges, the scale is approaching 0, right? If I go past it, then it goes into negative territory. And over here, positive territory, right? So I can go back and forth. And if I go straight into the center here, as I said, it's going towards 0 more and more and more, but it's really hard to get it right at 0 and, and that's what we want. If we get it at 0, then there will be perfectly aligned there in the y axis. So how did we do that? What I'm hit the Escape key to get out of that. And what we can do with those edges still selected is we can press S, y, and 0. And now if you look up here in the upper left-hand corner of the screen, it says scale equals 0 along global Y. And that's what we want. So now we can press the Enter key. And now those two edges are perfectly aligned in the y axis. And that wall is perfectly straight and that's what we want. So we can use this trick as we continue creating the interior walls as well. Now, what if we want to align the outside wall here? Well, we could go to vertex mode with the one key. I'm going to press Alt a to de-select everything, and then I need to select all of these points on the outside. So what I can do is hit the B key for the border select tool. And then border select, just click and drag all of these points right up here. Now I can press S 0 and enter, and now those are aligned as well. Alright, so Let's tumble around again. I'll hit Z and go back to solid mode. And now let's begin working on these interior walls. So to begin with, let's get this wall here. It goes clear from this exterior wall all the way over to this exterior wall. So let's, let's work on this. Now if we come down here, it looks like we've got an edge right here that we could use, and we can add another one here. So let's press Control R and add an edge loop. And I'm gonna put it right here. And so what we're gonna do is we're going to use this face here, but we need to create the edges over here to do that. So what I'm gonna do, go back to Edge mode and alt click this edge, that's the edge I want to create a companion edge two over on the other side. Alright, so I'm gonna come over here, press control our click and drag and put it somewhere near this. Kind of drag it over here. There we go. Now what I need to do is make these two in perfect alignment in the y-axis so I can Alt, Shift, click this one. Here we go. I'm gonna move him back a bit like this, and we'll do our same trick. I'm going to press S y 0 and we go and those perfectly aligned now, and I can pull them up to here. Now. Also, I want to do another one for this. Let's, let's do that. I'll press Control R and click and drag and bring one in here. And I'm going to ALT shift, click this edge right here. And now I'm going to press Enter. And there we go. So now those two are aligned the way we want it. And now alt click and Alt Shift click this one. And we're going to pull this forward like this. Since I can't get to this gizmo very easily, we can use the G key. So I can come over here so I can see this a little bit better than Press G and Y. And now that'll allow me to move this back and forth here. And there we go. So now I can select this face, come all the way over here. Select this face. And as I said, these two now should be aligned so they're the same width. And we can press control E and bridge edge loops. And there we go. Alright, so let's give that a try for a few of these walls in the center here, the interior walls in here. And as I said, we're gonna go through and use a boolean modifier to cut the door and window openings into these walls. But let's work on these interior walls here I'm gonna hit the period key to kinda zoom in to the selected area here. And then I'll press Alt a to D select. Now, we're going to need 12345678 edges for these four walls. So if I press control are and I scroll the mouse wheel, you can see down in the bottom left-hand corner of the screen the number of cuts I'm creating some going to scroll the mouse wheel out to eight here and click and then click again. Now I can scale them in here and the x, I can press S and X and scale them in a bit. Here we go. I'm a slide them over that like that. And then I need eight more down here. So control are and scroll the mouse wheel Intel. We get number of cuts equals eight. There we go. Click and click again. I could press S and X and scale out in the x axis just a bit. Alright, so there we go. Now we can do is we can use our same trick. We can press Alt and click this edge so it selects that entire edge loop. And then we press Alt Shift and click that edge. Now to even them up in the x-axis here, we just need to press S, x and 0, and that will align them up. And then we drag them to where we want them to be. The next one, I'll click here, Alt Shift, Click here Sx 0, Enter, and then slide over to where we want it to be. Now those two faces that were going to bridge here are the same width. So let's press control, ie, voyage edge loops all day to deselect. And there we go. And so that's kind of our process here. Alt, click this edge, Alt Shift, click that edge, sx 0, enter, and there we go. So we're gonna go through and do this on, well, all of these and get these into place and then ridge edge loops. So I'll select this face and this face control, ie bridge edge loops all day to de-select. Back to Edge mode with two key. Click Alt Shift, Click sx, 0, enter, et cetera. So this is the way I'm going to get these wall edges in place here and kind of ensure that we're getting him pretty much lined up. Control, ie, bridge edge loops. And if we go back to Edge mode with two key, alt, click, Alt Shift, Click sx 0, enter. I'd better do this one here. And we go. And then I'll put that there. I'll click Alt Shift Click, and then we'll bring that one over to here. And we go and we'll grab these two and bridge edge loops. Alright, so we're making a bit of progress here on the interior walls. What let's do in the next video is continued doing the same thing for this wall here and these interior walls. And over here as well.
6. 006 Tricks for Aligning the Walls: Now let's work on this wall coming out from here all the way down to here. May tap back into object mode and select this and just move it out of the way. In fact, what I could do is just hide it completely. We could scroll this down in the reference objects collection and just hide it by clicking on the icon here. Alright, so now let's select that wall again, tab back into edit mode. And let's insert some edges for this wall here. Control are, and I'll click and I'll drag it over here. Control are again and let's get it about like this. Let's hit the three key to go to face mode. And then we can just E and drag all the way down here and drop that right there. Let's hit the period key to zoom in and see how we're doing. Yeah, that's about right, I think right about there. Now let's also add an edge for this little extrusion coming out here. There's a doorway here, so we have these two little extrusions there. So let's press control are, and bring that over here. I'll hit the period key to zoom in and let's just get it right where we want it right there. Now we can hit the three key, select that face e and pull out right there. Okay, so now what we need to do is create the walls here. Now, we can do the same things we've done before with these walls pressing SY and 0 to get them inline. But how did we do this over here? These edges here are already in place and we don't want to move them around. Well, what we can do is use our transform tool over here or sidebar, I should say. And we can copy and paste the Y value to get the edge just where we want it. So let's say I want to match this edge up here. I'll go ahead and come over to the y field here. Click and press control C, and that will copy that value. Now if I click and come out here and press control are. And let's move this over here. Now with this edge loop selected, I can come back to the Y field and press control v and paste that in and hit enter. And it'll pop exactly where that other edge is. So in that way we can get edges exactly aligned even without using the scale tool. All right, so let me click on this one here. Select the y field control C. Now I'll come back out here. Press control are, and let's move this over just a bit so we can see it here. And then I'll go back to the why of field press control v and enter. And now we've got these two faces in exact alignment. So I'll select this and this, and then press Control E and bridge edge loops. And there we go. Alright, so we can use that same trick throughout all of these as well. Or you can use SY, whichever one you want. Now, using this trick with the pasting into the transform fields here, we can also create the walls with a uniform thickness. So let me just show you what I mean here. If we are gonna do these four walls here, that's 2468 edges. We're going to need. So let's press control are, and I'm going to scroll the mouse wheel and keeping an eye on the bottom left-hand corner with the number of cuts there, I'm going to have eight cuts. And I'll click and click again. And then I can press S and Y and kinda scale these in just a bit. And we go, same thing over here. Let's create edges along here till we get to eight. And there we go. Click twice. Scale in the y again, about like that. We don't need them. Perfect because we're going to realign them. Alright, so now what we can do is grab, say this edge, all click this edge and move it to just where we want it to be. Now we can copy that y value here in the transform fields Control C. And now if I select this edge loop over here, alt click, I can paste that same value into here control V enter. Now, what we could do is we can take this edge. We could paste that same value in control V, and then we could use that trick where blender will actually do the math equations in these fields. So let's say we want our walls to be 0.3 meters thick. We could type in here, we can type in minus 0.3 and enter. And there we go. Now we've got a wall thickness of 0.3 meters. And we can do the same thing over here. We can type in negative 0.3 or minus 0.3 again. Or we can just grab this Control C and paste it for this edge loop as well. Enter. Now we have a wall right here of exactly 0.3 meters thick. So that the three key and select these two faces Control E and bridge edge loops. So with the combination of those tricks, you can get all of your walls the same width. All right, so let's select this edge here, and let's move it over to where the wall is going to be. Let's grab this value here, Control C. And then we want to grab this edge and paste this control V enter. And there we go. And now we want to take this one control V minus 0.3. And then we go, now we can take this one right here and paste that same value minus 0.3. And there we go. So select this face and this face. Oops. When their control II and bridge edge loop. Now I see a problem here and that's going to be an issue. This is actually a hallway. Why don't we bring in a reference image here into blender so we can see this a little better. What I'm gonna do is hover over a corner of one of these windows and click and drag down, and that'll create a new window. And maybe I can bring this down a bit here. Now let's change this particular window from an outliner to an image editor right here. And then we can go to image open. And I'll click on my reference images here. And let me scroll down to find one of these that I think this is a pretty good when this 2778, let me open this one up and it's a bit small. Let's enlarge this by pressing Control Spacebar. And here we go. So you can see over here this is a hallway going to an exterior door. So we need this to be open and we can do that. We'll go ahead and add the walls and then we'll open that up again. So control spacebar to minimize that or make it small again within this window. And then let's work on these here. Alt click this. Oh, let me press the two key to go to edge mode. I'll click this edge loop. Let's move it over. Come over here, press control C. I'll click this edge and then control V. Now let's select this edge, Control V minus 0.3. And then we go, Let's go ahead and copy this again, that new value. Select that edge, and we'll paste that into there. Okay, now we've got that walden control ie bridge edge loops. And we go And one more over here. Let me once again go to edge mode. And let's move this one out of the way. And this went out of the way. And then let's take this and put it where we want it. Oh, I dragged the gizmo instead of dragging on the Y axis, let me press Control Z here. I'm going to really try and click on that y-axis. There we go. And I'll bring that to about right here. Let's go to the y field control C. Let's click on this. Paste in the y field here. Now these two are in the right place. Let's select this one. Control V minus 0.3. We go, I'll go ahead and copy this value. Select this one with alt click and paste this into the field as well. Okay, now let's grab that face and that face control, ie bridge edge loops. There we go. Now to make this a hallway instead of a room like this, we need to just delete all of these faces. So let's hit the three key to go to face mode and to select this entire face loop all the way around, we can also click on an edge between any two faces. So let's press Alt and click here. Now you can see that loop has been selected all the way around. I'll hit all Z so we can see it a little bit better. And there we go. Alright, all z again, and let's go ahead and delete this. I'll hit the delete key, and let's choose to delete faces. So we'll click that. And there we go. Now we've got these holes in here. We don't want those. So what let's do is let's choose one of the edges around this hole here. Let's hit to and select an edge. And now we can just hit the F key to fill that face. I'll hit F, And there we go. Alright, so let's go do this other one here real quick. Select this edge ef, and there we go. Alright, so now we know several tricks of placing our walls, getting them aligned and even making them a uniform width. In the next video, let's go ahead and work on this area here, this wall and these interior walls. And then we'll need to apply our skills to this area over here. So that's coming up next.
7. 007 Continuing with the Walls: All right. Our first order of business is to make this a hallway instead of a very tiny room here. Let's hit the three key and go to face mode and alt click an edge between two of the faces to select this whole edge loop here. And then I'm just going to hit delete and choose to delete faces. There we go. Now, when we do that, we have these holes here and we need to fill those. And the fill tool is just the F key. So if I go to edge mode with the two key and select one of the edges around that hole and hit the F key that we'll just close that up. So let's grab this edge here and hit F, And there we go. Now those have been closed up. Alright, let's go over here and work on the walls. Here. I think once again, I'll begin at this wall and just extrude out. And then we'll bridge edge loops to connect it up here. Alright, so let's press control are here and move this to where we think it should be. And then let's copy this y value, right? Let's copy this control c, and then control are. And I'll paste it here, control V. And for this one too, I think I need a minus the direction of the arrow that the green arrow is pointing is the positive side of the axis. So I think I need to go back from that. So minus 0.15. Let's see how this works. Enter. Yeah, there we go. Alright, so let's grab this wall and I'll hit II and move it out. Hit the period key to zoom in, and let's just put it right about here. Now let's create another edge right here. And for this, let's grab this edge. And this is the x-axis and it's the positive x is going this way. But let's grab this x-value Control C will grab this edge loop and we'll press control v in the x field. And for this we'll type plus 0.15 enter. And there we go. And now let's hit the three key and select that face there. And well, no, we need to actually bridge an edge loop here. I was thinking we just needed to extrude here to here, but this extends all the way across. So instead of extruding, let's select this edge once again, copy that x value. And then we will press control are. And let's paste that value into the x field here. Let's create a new one. And let's once again press control v and plus 0.15. There we go. Now let's grab this face and this face, Control E and bridge edge loops. And there we go. Now as I've said, we're going to be creating the window holes here and the window frames all at the same time as well. So we'll be using our Boolean modifier for that. Let's come over here and press Control R. And I will. Let's get one right about here. Control are, and I need to grab this value here in the x control C. And then this one is going to be control V to paste, and this will be minus 0.15. There we go, right there. So once again, the direction, the arrow of the axis points is the positive side or the positive value. Alright, let's press control are over here. And oh, I do need to go ahead and paste that value in the x control V. Enter. And then let's press control are dear. And we'll paste that value. And then this is once again minus 0.15 year. Alright, let's grab this control, ie bridge edge loops. And let's do the same thing over here. We could add an edge loop here. Add an edge loop here. Press Sx is 0, and enter. Put these in place wherever we want them. And then let's press control are over here and control are over here. And then we need to find that value of these edges, right? So I'm just going to grab this Control C. And then if we select both of these here, we can paste that value and type in minus 0.25. and there we go. Alright, so let's grab this and this control ie, bridge edge loops. Alright. Now there are a couple of little extrusion that we need to deal with like this one over here. We ought to go ahead and grab this or create this. Let's press Control R and move that to about right there. Well, I'd really like this to be exactly the same as this over here. So let's, let's grab this edge. And this is in the y axis you can see here. So we want to grab or copy that y value. And let's select this edge loop and paste that there. Okay? Now I guess we can just grab this one and copy this y value. And then over here let's insert an edge loop and paste that y value into here. There we go. Okay, so those are exactly the same. So let's grab this. And I just need to move this out, right? And I just need to hit extrude and move that out a bit. And there we go. And over here, looks like we've got a little bit. This is a closet, I believe. So. Let's work on this. I'll just press control are and one there. And let's put one here. I guess I should go ahead and measure those out. How so let's grab this. That's the y-axis. Let's copy it. Let's all click this edge, and let's paste that. And then we're gonna go minus 0.15 there, right there. Okay, so we've got that, let's hit II and extrude this out. And then once again, let's grab this edge, let's copy it. This is in the x axis, so let's copy the x. Let's insert an edge loop here with Control R. And let's say this is the x, we want to paste it here, control V. And it looks like it's in the positive x. So let's type in plus 0.15. And there we go. Alright, so I'll grab that, get a0 and pull that out, just a smudge. And now over here on the other side, let's grab this edge. That's the x Control C. And then we grab or insert an edge loop here and paste that value. And we go and hit enter. And then this one here. Let's grab that x value. And let's do that for this right here. Paste, enter. There we go. And we could maybe move this out just a smidge. I think if we press Alt Z and take a look at it, there's just a little bit of an extrusion there. It's really hard to tell, but I'll go ahead and put one there for now, at least in E and pull out just a little bit. Here we go. So that's a closet there. Alright, what else can we work on here? I think we're to the point where we can begin working on this. Let's go ahead and get a few of these walls in. I will go ahead and press Control R and add an edge loop over here. Let's do that. And then I'll add another one. Well, let's copy this. This is the y-axis. Let's copy that. Press control are. And then let's paste in the Y with control V. And we'll call this minus 0.25. since we're going in the negative side of the y-axis there, I'll hit enter, and there we go. So now we should be able to take these two faces here. And I'm gonna hit the seven key to go to the top view. And we should be able just to hit B and extrude these straight out all the way to here. Let's do that. And we go. Now we can come through and create the walls for these three here. Let's press control are, and I'll put an edge over here. I'll copy this x value here. And I'll put an edge over here and paste that X value right here. There we go. Now we can go ahead and create edges here. And over here. Let's get these even by pressing.'s x and 0. And here we go. And then we'll plug in that x value. And we'll type in plus 0.15 in the X. And there we go. So we have these. Now, let's grab this face and this face and press Control E and bridge edge loops. Let's do two more of these walls here. Let's press control are here. Control are over here. And I'll go ahead and make them even in the X, so sx, z. And we'll do that right up front. I'll move them into place and grab that x value Control C. Now I'll create two more over here, like this. Go ahead and even those up with Sx and 0. And then I'll press control v in the x, and we will type in plus 0.151 more time. And there we go. Grab these two faces. Control ie, ridge edge loops. And one more here. Alright, so we've got some of the inner walls here. In the next video. Let's go ahead and work on finishing this up. Getting these walls in place as well as this little piece out here. And then we can begin working on cutting out the doors and the windows.
8. 008 Using the Boolean Modifier: Well, let's finish up the walls here by creating the ones right inside here. Think all I'll do is just insert two edge loops for each of these walls right here. And then I think I'm just going to eyeball it. I'll select these with Alt, Shift and click. And then I can press S y, and let's just bring it in until it's right about here. I'm just going to as I said, I'm going to just going to eyeball that and get it done. And I'll grab these and bridge edge loops. And let's get this one and this one. And let's bridge edge loops there. Okay, so now this one over here, similar deal, although we're not, although we're putting them in two different width of spaces. So they aren't they aren't going to be quite the same. So maybe I'll just bring it over like this. And then I can grab these two here, like this. Press SY 0, and then I'll grab this and this and S y 0 as well. Then we can take all of these once again and we can scale them down S and Y till we get them about the width that we want and bring him over and kind of line up with that. There we go. And I'll grab these. Looks like we've got one more here. Let's do that real quick. I'll press control are addtwo and two over here. Now let's take them all scaling in the x this time with S and X and then bring them right into here. Like so. Okay, now we'll grab those faces here and bridge edge loops. Okay? So I think that's all the internal walls that we need. It looks like oh, there's one little piece over here is in there. We need to do this. Let's get this real quick and just move that over. Sy, get it to a respectable width. I think something like that. Let's press the three key and select it and then extrude. And now I think what we need to do is just add an edge loop here and add an edge loop here. And then we can just take these two faces and hit E, S, Y and kind of bring them in just a bit like that. There we go. That's good. That'll work just fine. Alright, so now that we've got all of this done, we need a way for the people to actually get into their offices. He'd need to create the doors and windows for all the offices. And to do that, we're gonna do it in a little bit different way. We're going to use the Boolean modifier to do that. First, let's bring back this door size reference object over here. I'll just click the eye icon to bring that back. And here it is. Now, I'm going to keep this as it is and I'm going to. Duplicate this object and let's create a window and door cutter object to cut holes in the walls. So I'll press shift D And I'll hit the x key and just drag this out in the x axis. Now let's take that door again and hide it away. And let's call this in the outline. I'm just going to double-click that and let's call this window door cutter. So this is the object we're going to use to actually cut the holes. I think I'm going to scale this out a bit in the x axis, so S and x, something like that. And also I wanted to extend down below the floor because I want to be able to cut it so there's an opening, the bottom at the floor. So I'm going to tumble down here and tab into edit mode, hit the three key and select that face and just bring that down a bit. That's all we need, something like that. Alright, I'll tap back into object mode. Now we can begin to put this in place. So what we're gonna do is put this in the wall to create these openings. Now, which openings are we talking about though? Let's bring in a reference image. I'm going to bring this down a bit. And then I'm going to hover over the corner or top right corner of this window and drag down and that'll create a new window. And then I'm gonna change the window type from the outline or to an image editor. And then I'll click on image and open. And let's go into our reference images folder here. And let's take a look at these images. I think this one, this 2778, is a good view of this. So let's open this up. It's pretty small. Let's increase the size or look at it full screen here, I'm going to hover over that window and press Control Spacebar. And that'll expand that window over the whole interface. And now I can zoom in to this guy right here. Alright, so what we're doing is we're creating this opening right here. So each one of these offices has one of these and within this opening, We're going to build the frame. All right. And then we're also going to place the door inside. But first we need to cut these openings, were going to cut these openings. And we're also going to cut the openings for the windows here, but that'll be a little bit later. So to get this big opening here, we're going to use our window and door cutter object. I'm gonna press Control Spacebar again to minimize that or reduced the size of the window here. And now, let's put this in place to create that opening. I think this is probably a pretty good location right here. And if I tab into edit mode and hit three and select that face, I can then grab it and move it over here. Let's see how we are doing here that looks like it's a little bit too close. I'm going to hit the seven key to go to the top view. And I'm maybe want to move that back just a bit like that. All right, I think that looks pretty good. Let's tap back into object mode. And now to use the Boolean modifier, we're going to apply the modifier to the walls themselves. And this is going to cut a hole in those. So if we select the walls. Then come over here to our modifiers panel. Let's then click add modifier and select Boolean. Now what we need to do is tell it what object we want to use as the cutter. We're going to use the difference operation here because it's going to be the walls minus the cutter. But we need to tell it to use the cutter. And if we click here, we see a list of our object and we don't have too many objects in here. But if you do, if you have a whole ton of objects here and the outliner and therefore here in the list, which you can do is you can click on this little eyedropper here and then come over here and eyedropper the actual object, the cutter object, go and then that adds it to that field. Alright, so if I click apply here, then we should be able to take this object, move it to one side and see the hole that we've created. And there we go. So that's what we want. Let's try it again. Let's, for this one here, I'm going to hit the seven key and I'll move this over to about right here. Let's tumble around and grab that face just like we did before. Go back to the top view and you're going to bring that right over here. Okay, now I'll tap back into object mode. Now, the way we just did it, we couldn't really see the results of the Boolean until we hit apply. There is a way that you can see the results and it's kinda cool. What you can do is you can select the actual Cutter object and come over here to the Object Properties panel. And down here you've got this viewport display. I'm going to twirl that down and scroll down here and write down here you can choose display as wireframe. So if we choose that, now you can see right through the object right here. And therefore when we add the Boolean modifier, we can see it happen in real time before we click apply. So let's go back to the modifiers panel here. And let's go, Oh, and we better choose the walls. Let's choose that object. And let's click add modifier boolean. Let's click our eyedropper here and I'll hover over the cutter object and select it. Now take a look at that. We can see what it's, what it's doing, right? Well, we could even take that and we can move it over and watch what happens as we move it around. So I could even maybe, let's take it and just move it over here. We can actually see it happen in real time just like that. Which is kinda cool. Alright, I think I'm better. Undo this. Let me press Control Z and take this back. Here we go. So now that we've got that in place and we can see what's going to happen. I think that looks pretty good. Let's select the walls again and click apply. And there we go. Alright, so we've got two of our window door openings. Let's work on these over here. Let's select the cutter and I'm going to click on that blue plane to kinda drag it along the x and y-axis. And then I'm going to turn it in the z-axis. I'm gonna press our Z 9-0 and turn it 90 degrees in the z-axis. Alright, so now we need to move it into place over here. I'll hit the seven key to go back to the top view, I'll hit the G key to move this around and maybe I'll put it right about here. And then I'm going to tab into edit mode. And I'm gonna hit the three key to go to face mode. And what we can do is we can press all z to see the little dots in the center of the faces. And so I can come over here and select this one, and that automatically selects that whole face. So I can just grab that and move that back. Say to write. Sit down right there and let's say I'm going to press Alt Z to go back to solid mode, and then I'm going to hit the Tab key to go back to object mode. And now let's give this another try. So I select the wall, Boolean, eyedropper, the cutter object right here. And there we go. Now we can see it there. Now, another thing we can do here, here's an interesting thing that we can do. We can select this and we can tab into edit mode. And if I hit the a key, we select all of that. Now, if I duplicate this and move it over, what happens? I'm going to press shift D to duplicate. Then I'm going to press the X key. And I'm going to slide it in the x axis and move it right over here. Take a look at that. It's actually created the other window hole in the office there. So we can now grab a face here and we can move it. You can grab a face here. Oops, let me grab that one right there. Let me go to the top view here and then just pull that over. And there we go. So now we've got two openings there. Let's go ahead and cut these. I'll select the wall and come up here and click apply. And there we go. Now I can take this and move it out. And there are those two openings. Alright, so in the next video, we will continue with this. We will work on the office openings over here and on back down the hall. So that's coming up next.
9. 009 Creating the Openings for the Doors: To continue creating the holes for these offices. Let's get rid of one of these here. Let's tap into edit mode. And I'll just hover over one of them and press the elk. And the L key is the select linked tool. So we can just select everything in that part of the object. Then we can press delete and delete faces right there. Okay, so if I tab back into object mode, that's what we have. Now so far I've done pretty well of keeping this object in the same place in the z-axis. And in other words, I haven't accidentally moved it up or down, but that could happen. And the way I can maybe avoid that is to come over here to the transform window and lock the z axis for the transforms. And you can see here once I did that, the z-axis goes away, so I don't accidentally do that. In addition, I could maybe locked the z-axis in the scale as well, so I don't accidentally make it any taller here. So you can see if I come over here to this scale tool right here and click. Now we do not have a scale part of the gizmo here. Alright, a lock that again and go back to the Move tool. Now let's use this to create these other openings over here. I'll slide this over the period key, and let's go to the top view with the seven key. And I'll move this over till we get it about to where we want it right here. I can tab into edit mode. This time I could go to vertex mode by hitting the one key. And then I could border select all four of these vertices to move them over. But I just want to show you what happens when I do if I hit the B key and select these vertices, if we tumble around, you can see that these haven't been selected. Now, usually when you're in wireframe mode, all the vertices behind here gets selected as well. But keep in mind, we aren't in wireframe mode, we're just viewing this one object in wireframe. So if I were going to do that to border select these points, I would have to hit the Z key and go to wireframe. And then I can hit the B key, border select. And you can see here we've got all four of them selected. So sometimes I get fooled when I'm working with an object that's in wireframe that I can just border select and get all of those points. But you can't, you have to be in wireframe for the whole view. Alright, I'm just gonna move this over right about here. I'll hit the Z key again and go to solid view tab back into object mode. And there we've got that one ready to cut a hole in that wall. So let's select the wall and then go to add modifier Boolean. And now let's use our eyedropper to select that cutter object. And there it is. There we can see the opening. Now, once again, what I'm gonna do is select that object and tab back into edit mode. I'll hit the a key to select everything. And this time I'll press shift D and X. And let's slide this over here. And now I need to make sure this is adjusted properly on this one and it looks pretty good actually, if I just move it maybe right to there. I could press S and X and scale that in just a little bit like that. Maybe get it something like that. Let's do that. Tab back into object mode. So there we go. We've got those two. Now what we could do is if we go back to edit mode and hit the a key to select everything, we could go ahead and just duplicate them over to here to let's press shift d and y and bring him right over to here. And we go and we tap back into object mode and you can see the holes being created there. Now we are gonna do these here because these are gonna be windows here in the middle. But for these four doors, it looks like we could do this all at the same time. So let's select that wall and then let's click apply. And there we go. Alright, so we've got these, I'll go ahead and move these out. Just move these over here and you can see the openings there now for those offices. Alright. What I'll do now is maybe tab back into edit mode. And I'll hover over a vertex on this one and press the CTRL key. And then let's delete these again because we're gonna need to just move one over and then duplicate them again. I'll hit delete and choose faces. And there we go. Now we can take this guy and move him all the way back over here. And this looks like a pretty good place right there that I need to tab into edit mode, select that base there, and let's move this into place like this. Okay? Oh, I guess I better grab this again. Let's select this. Oh, no, I can't do that. Okay, so let's go to wireframe. I'm gonna go to wireframe, and now I can select that little dot in the center of the face. There. There we go. Let's go back to solid mode. Now I'll go up top and take a look here. There we go. So something about like that. Okay, we've got that. Now let's go ahead and add that Boolean modifier to the walls. We select the wall at the boolean, eyedropper, the cutter, and there it is. Now let's grab that cutter tab into edit mode at the a key. And let's do this again. Let's press shift d and x and move this over something about like two there. And I'll grab this face here and move it over to there. Then what I'll do is hover over this and press the L key. And let's press shift d and x and move this over. Now, the walls in the blueprint have changed a bit here. S X dummies to scale this in, in the x just a bit. But in the actual real-world co-working space, these walls are the same as all the others with the large opening. So many go ahead and do that here. Alright, so let's tap back into object mode. Stumble around and there we can see are, are openings. Good? Let's select the wall and let's click Apply. We go. All right, so now let's bring those out. And there they are. About these openings here, let's get those. And then the openings for the conference rooms we're gonna do in a little bit different way because they actually go up higher, if I recall. So let's just get these two for now. Tap back into edit mode. I'll press the L key here and delete these back to object mode. And let's turn it in the z-axis. I'll press R, z 9-0. Now we can just hit g and move this over here. Let's go to the top view and put it in place. About like this. And tab into edit mode, select that face there and move it over here. And this time I'm just gonna go ahead and select that while we're in edit mode here, press shift d and y and move this over here like that. And I'll grab this face here and move it over. So I've just gone ahead and duplicated that in edit mode before we added the modifier. So tap back into object modes like the walls. At a Boolean. I drop or the cutter right here. And there we go. Let's click Apply. And we've got those openings done. It looks like we've got two more down here now. These are strange kind of sliding doors, but I think we can still just create an opening for them. I'll tab back into edit mode. Let's get rid of this one here. And then let's bring this back over here. Let's turn it r z 9-0. And I'll go to the top view again. And let's put this right here. I'll select that face there and move this back. Let's put it about there. And then I'll just select it, duplicate it with shift D, hit the x key and move it over here like this. Okay? Now what we can do is once again, grab the walls, add Boolean. I dropped her the cutter object. And there we go. Now we can click apply. And we can move these to the side. There we go. Alright, so I think we've got generally most of the office openings done. We still need to do a couple of the doors here. And here. We need doors over here, and we also need our conference rooms. But in the next video, what lists do is let's begin working on the windows in between here, on all the walls here. These are all going to be pretty much the same height. So we'll create another cutter object and work on all the windows.
10. 010 Finishing the Window Openings: If we take a look at our reference image again, I'm going to hover over this window here and press Control Spacebar again. We can see that the windows here are pretty much really at the same height as the openings we just cut for the front windows and doors. So we could just duplicate that cutter object that we've been using. And then bring up the bottom of it inline with the bottom of the window. So let's try that. I'm gonna press Control Spacebar. And over here we probably need to delete one of these. So let's tab into edit mode and looks like this one's already selected. So let's hit delete and delete those faces. Now for this, we need to duplicate this. So let's press shift D and I'm going to click and I'll bring it out in the y-axis right here. And now let's give it a new name. It's got Window door cutter 001. So let's just call this window cutter instead of window and door. And let's bring it over and let's kinda put it in place and see how far we want to bring it up. I'll slide it over to here. Now, how far do we want to bring this up? I think we tap into object mode and select that face. And let's bring it up. And it looks like actually it looks like that's probably a pretty good place right there. Yeah, I think I'll go with that. Ok. We can maybe put it in here like this. And now we need to spread it out. It looks like it goes right up pretty much to the very edge or corner there. So let's tap into edit mode and select a face. And I'm gonna bring it pretty close right about in here. And this one here as well. Let's bring this one right up to here. There we go. So now what we need to do is duplicate this for all of these walls. So if I hit the a key now and go to the top view, well, let's just bring this one up here like this. First of all, and then we'll just press shift d y and move it down to here. Shift DY. And I'll just keep doing that. Right down for these other walls. Shift and shift. Dy, There we go. Okay. So now we've got all of those in place. I'll tap back into object mode. Now we can select the walls again and add a Boolean modifier. Let's click the eyedropper and grab that window cutter there, and there we go. Now we've got all of our windows cut. Alright, I'll come over here and click apply. And there we go. Now let's grab this again. And it looks like I could get rid of a few of these because we're going to need to bring them around, swing around here and get the. So I'll tab into edit mode. And the origin is here. So this one I'm going to keep and I'll just go through all of these, pressing the L key and then delete these. Now let's grab this and move it over here. R z 9-0 to turn it 90 degrees. And let's zoom in. And put it in here. And we go, let me go to the top view with the seven key press S and Y and bring that in a bit, maybe right about here. Now, the question is, is this decides that the windows all the way through or does it actually come all the way out to that front wall the way the others do. I'm pretty sure that it comes back out to that front wall and I don't know that I have any images to prove it here. But let's take a look. No, I don't really have any images of that sidewall there. Let's take a look at this one just to see Control Spacebar. And it looks like yeah, it looks like there's that wall there that we just we just put that window in and then it looks like the others come out to the front wall the way these do here. Okay, so let's go ahead and go with that. So what I need to do now is duplicate this all tap back into edit mode and hit the a key. Then I'll press shifty and x and move this. But now I need to grab this face here and just bring this forward like that. There we go. I'll hover over it and press the L key, press shift D and X and duplicate it and slide it over. And we go. Now let's select the wall. Add a Boolean, eyedropper, that cutter object. And there we go. Alright, I'll hit apply. Now. We've got more windows over here. Let's work on those. I'll select this and let's slide this over here. We don't need all of these once again, so I'll tab into edit mode and select this one and this one with the L key. Let's delete that. And now we need to move these over to here, this and this one. Let's go to the top view with the seven key. And actually I think this looks pretty good just as it is right there. So we need 12. And I don't think there's a window here for the conference room. Kind of like over here. There isn't a window here. So let's just do two more. I'll tab into edit mode and press the CTRL key and duplicate this one and slide it in the x axis. And one more time. Now we select the wall at a boolean and select that cutter object. And there we go. Okay, let's apply that. Now we have these windows right in here, these four walls, and they look to be pretty much the same that we may have to do a little bit of tweaking. Let's tab and edit mode, and I'll select these and delete them. Let's now move this over to here. And what I'll do is, well, now that I have it here, let's go ahead and just put this one in place. I'll press S and Y and scale on the y axis. And let's do that. Maybe printing it out just a little bit more like that. Ok, so we have that tab into edit mode, select that, and let's press shift d and y and move this down to here. Now let's go back to object mode. Select that wall, and we'll add a Boolean. Grab that Cutter. And there we go. Now it's at the seven key to go to the top view. And well, actually before I spin this around for the other ones, we should go ahead and apply the mirror modifier. So with this all set up, let's choose that wall and I'll click Apply. There we go. So now those openings are permanent. Let's go back. Now. What I'll do is I'll tab into edit mode and hit the Akin. That'll put that pivot point between those two objects. And then I can press our 9-0 and spin them around there. And I'll press S and X and scale that in a bit like this. See how this works. Yeah, I think that's pretty good. Let's go with that. So now what we can do is go ahead and tap back into object mode and select the wall. And we'll add another Boolean modifier. Will eyedropper the cutters right here. And there we go. Now we can hit apply. And now we have our windows in those offices as well. I'll go ahead and grab those cutters and bring them out. And now it looks like we've gotten most of the window and door openings cut out in our offices. What we can do now is maybe walk around the office and see how it looks. Blender has a handy little navigation tool over here under view and navigation called Walk navigation. And we can do that here in a minute, but first we have to put a floor down or else will just fall through continuously. So let's press shift a and bring in a cube. And I'll go ahead and hit S and X and scale this out quite a bit. Maybe you get it about like that. And let's press S and Y and scale this out as well. Maybe about like that and then bring that over like that. Okay. So that's gonna be our floor. We need to bring it down. It's two meters thick. We need to bring it down one meter. So let's type in negative one in the transform Z, and that brings it down to the grid plane. Now to activate this walk navigation, we can come over here to view navigation and click on walk navigation. And then once we do that, you can hit the Tab key and that will drop you down to the floor. Now we can hit the WASD keys and move around. We can also move the mouse around to look around in different directions. So now we can walk around, take a look at our offices here and see what we think. We can see down the row of windows here. That's kinda cool. Can walk over here to the kitchen area. And here those small office. Oh, let's walk around back here into the backhaul hears that closet that we made. Here's the back hall, back here. Here's that conference room here. And here's the back room. So yeah, this is actually looking pretty good. Let me show you where you can get to the settings for your walk navigation so you can adjust those. I'm going to hit the Escape key to get out of that. And if we come up here to edit and preferences, we can then go to navigation right here, and that's where I am currently. And then we can twirl down the walk and gravity sections. So what you need to do is turn on gravity. And what I've done is I've typed in my height. This 1.75 to six is how tall I am. So I get a good sense of kind of what it feels like as I walked through the environment. You can change the walk speed and the mouse sensitivity. So you can set up the way you want to have the walk navigation work. Now, since I have this gravity checked, what happens is when I go to the walk navigation here. But if you go to view navigation and walk navigation, now if I move the mouse a bit, then I'll drop. So that's the way I have it set. You can set it however you like. I'm going to hit the escape key there. Well, that's looking pretty good. I think what we need to do in the next video is begin creating those frames around the door openings and the windows. These black frames here. So we'll begin that coming up next.
11. 011 Beginning the Window Frames: So let's begin working on the frames with the windows. I think that's a good place to begin there. A little bit simpler to do than these front openings, so it'll give me a chance to warm up a bit. Before we go on to those. I'm going to tap into edit mode. And I think what I'll do is I'll begin right here. And let's go to face mode. And what I'd like to do is just alt click between two phases to select this whole face loop here, all the way around that window opening. And what I'm gonna do is I'm going to duplicate these faces. And then we're going to break it out into its own object, that frame. And we'll begin to extrude in and build the frame kind of from the outside in. So let's try that here. First of all, with this selected, what I'm gonna do is press shift D and enter to duplicate those faces. And then what I'm gonna do is I'm just going to scale it in the y here. Just winded out just a little bit so that they kind of stick out from the wall just a tad. So I'm going to press S and Y, and I'm going to bring it out. And as you scale, you can hold the Shift key down and that will allow you to move it a little bit slower if the normal scale is moving a little bit too quickly, you can use that Shift key to slow it down just a bit. Alright, so I've got it widened out like that. Now what Let's do is split these faces out into its own object. We can go up here to the mesh menu and go to mesh and separate, and separate by selection. But you can also see that the shortcut key is P. So what we can do is just press the P key and choose to separate by selection. And there we go. Now if we tap back into object mode, I can select just that RIM. They're just that trim around the window. Now its tab back into edit mode. Now we can begin extruding this in. There's this kind of flickering happening over here, and that's called Z fighting. And that's because those two faces are in the exact same place and they're fighting with each other as to which one is going to be displayed first is just a display issue. It really isn't a problem. So we're just going to select them all with the a key. And then what I wanna do is extrude and then scale in the x and the z without also scaling in the Y. So to turn the y-axis off, we can just press Shift Y. All right, so let's just hit a0 and then S to scale. And then I'm going to press Shift Y. And now you can see we're only scaling in the z and the x axis. And I'm going to bring this out. I'm looking at the vertical parts of this. I'll hold the Shift key down and I'm just gonna bring it out so the vertical parts are in the right place. And then I'll scale and the z-axis with S and Z and kind of bring the top and the bottom in like that. Okay, so there we go. There we've got the basic frame. Now we need to insert these vertical cross bars here to split it up into three sections. So let's do that. We're going to need four edges on each of the top and the bottom to do this. So let's press control are, and I'll scroll the mouse wheel until we get four edges here. And I'll do the same thing down on the bottom Scroll the mouse wheel and there's four there. Okay? So now what Let's do is press Alt and click and all shift. Click these edges here. And I'll scale on the x axis, S and X and bring those into about like that. And then I'll do the same thing over here. Select all of these edges, and let's bring these into S, x. Bring those in about like that. Okay, so now we can go back to face mode. Select these two, press Control E to bring up the edges menu and choose bridge edge loops. And there we go. So let's grab that one and this one. And bridge edge loops. There we go. Okay, so now we've got our three part to that window. The next thing we should do is create those interior ridges. You can see in here that there's just kind of this extrusion, this ridge here in the center where the glass inserts into the frame. So we need to add that as well to the window frames here. So let's hit the three key to go to face mode again. And what we wanna do is select all of these face loops in the center here I'll press ALT shift click and Alt Shift click here. Now to create those rims, what let's do is let's extrude again and this time scale in the y axis. So let's hit E, S, Y. And now if I push in, well, kinda narrow that in a bit. So it's a little bit thinner than the frame itself. There we go. So now we can extrude these in as well. The problem is going to be, is they're going to try and scale all toward the center here, and we don't want that. So let me just do this so you can see what's going to happen if I hit E and S and Shift Y and scale in, they're all going to come in like that. And we don't want that. So let's get escape and I'll press Control Z to go back to, oh, I went back to here. Let me press S and Y and I'll scale those and again, oh, I've got to extrude them in again. Let me do that. E, S, Y, and now let's bring those in just a pit. There we go. Okay, so we've got those again. We need to be able to scale those in individually. So they scale in to their independent individual origins for each of the selections. To do that, we need to come up here and change our pivot point from median point for all the selections to the individual origins of each of the selections. Now let's try it again. Let's press E, S, Shift Y, and then bring these n like this. Here we go. And that's what we want. So you can see there each coming in. Individually. Okay, there we go. Alright, so we've got that. The next thing I'd like to do is to create a little bevel on the edge here, on the edges. These are very sharp corners and you can see in here that there's kind of a, kind of a curve to those edges. Can only press Control Spacebar to maximize that view. And you can see we're just getting a small specular highlight along that edge. And that's because it's just got a little bit of a curve to it. And I think adding that to our frame would just add a little bit of realism to it. So let's try that. I'll press Control Spacebar and then let's come in here and begin selecting edges. To do this, I'll, I'll press the two key, and let's press Alt and click. And then I'm gonna press Alt, Shift click and grab some of these as well, all the way around here. And in here. Oh, this one isn't selecting all the way, so I'll click here. And here. We grab these over here. Yeah, it looks like these loops aren't selecting because they're not specifically loops per se. And let me just select all of these here. And what else do we need? Well, we need some on the other side as well. It's spin around over here. And I want to select edges here and here, and here and these. So I'm just trying to select all the edges. I want to add that little rounded beveled edge to. Let's take a look over here. Yeah, I want to get this one and this one. And over here, this, that looks good. Okay, so I've got basically three edges on each side, 1-2-3, and A123, hopefully for each opening here. I think I do all the way around. Alright, so to create a curved beveled edge for this, we need to go into the edge menu and right here is beveled edges. Now you can see that the shortcut is Control B. So let's use that. I'm going to press Control B. And then I'm going to pull the mouse out just a little bit. In fact, I'm going to press the Shift key so it moves a little bit slower and smoother. About like that is all I want. And then I'm going to scroll the mouse wheel and add edges. You can see I can add one or two or however many you want. I think I just need two and there, I'll add that and then I'll click the mouse. Alright, let's take a look at how we did here. I'll hit the tab key and go back into object mode. And you can see now that we've got this slight curve to those edges and I kinda like that. That's just adds, as I said, just that little bit of realism. Alright, so in the next video we'll, let's do, is let's take this and begin duplicating it and moving it to fit in to all the other window openings.
12. 012 Finishing the Window Frames: Before I begin duplicating this, it looks like the spacing of the three windows, maybe just a little off. So I'm gonna go to the top view and hit the Z key and go to wireframe. And let's take a look here. Yeah, I think I'd like to line up these posts with this part of the floor plan right here. So let's tap into edit mode, hit the one key to go to vertex mode, and I'll hit the B key and border select. And I'll just drag this over about like that. And then hit the B key and drag these over about like Pat. So yeah, that hopefully will even that spacing out just a bit. So yeah, that looks a little better. Now, I think I can just begin duplicating for all of these. However, the pivot point of this object appears to be way over here and that's where the pivot point of the walls themselves are. So we need to move that pivot point. Let's do that. Let's go up here to object, set origin and origin to geometry. And then we can go back to the top view in wireframe. And let's just duplicate here shift d and press the key to slide in the y-axis there. And let's get this kind of in place there. Do that again, shift DY and move it up to here. Alright, shift d y. And let's move this one down to here. And we'll just placed these kinda try and get them centered on the wall as best we can. Bring that down there. And this one looks like one more right here. Okay, so now what about the others? We've got we've got other windows along here. Why don't we just take this and duplicate it and see if we can get it to fit into here. And let's try that. Let's press shift D and bring this over here. Let's turn it in the z-axis, since we're already in the top orthographic view, I don't have to push z. It already knows that. So our 9-0, and there we go. And I'll hit the G key and move it down to here. I just want to get it right, lined up with this line right there. Okay, so now what let's do is let's just go back to edit mode and let's begin moving these to match the drawing. So let's border select this and move it up to about here. And this one here. And then let's bring this one up in line with this write here. There we go. Alright, now we can just begin duplicating again. And as I mentioned, these walls in the floor plan don't have windows in them, but they do in the actual co-working space. So I'm gonna go ahead and add them here. Shift d x and move these nab, this area is before we began with a uniform wall thickness, I think so. Let me press G and X and kind of put that right in there and then I'll press S and X and wideness out just a smidge like that. Okay, shift dy, dx. Let's move this over to here. And once again S and X and kinda scan out just a little bit. There we go. Okay, and I'm not going to put a window over here, sensitive conference room. Now let's look at these windows over here. I think we can just do the same thing over here. So lets just grab one of these right there. Shift D and move it over here. Are 9-0. And once again, let's put it in place here. I'll hit the Z key and move that right into there. And tab into edit mode. And let's grab this crossbar and this one. Move it into place. And down here as well. Move that right about there. Now we should be able to duplicate it for this one over here, shift dx and move it over here. And then we should probably shift dx. Let's move it over here and we're going to have to do a little bit more editing here. So let's bring this one in to here. Select this and move it up. And this, and move it up to right about here. Okay, so we've got those. Let's go back to solid mode and take a look. Yeah, those are looking pretty good. Now all of our windows so far have had three sections in here. If we go to the top view and wireframe in these smaller offices, they've only got two sections. So should we recreate these or should we try and duplicate them? Let's try and duplicate them and see if we can get it to work. I'll grab one of these and press shift D, and let's move it over here. And I'll press our 9-0 to spin that. Now what I'll do is just grab this and move it to right here. We'll grab this one here and put it in the center right there. This one we're just going to have to move a bit for now. We'll do that. Maybe read about there. And this one down here will move up and get right on that edge right there. Okay, so now that we've got that, let's think about how we're going to get rid of this extra bar here, this extra separation. This is the one we want in the center. This one is the one we want to get rid of. So what we can do is we can actually select this whole thing. Once again, I guess I do need to go back to that top view and wireframe unless just border select that whole thing. There. There we go. Now that we've got this, let's go back to face mode with the three key, and then let's just delete all of these faces. So I'll hit delete and choose Delete faces. Now let's go to edge mode and what we can do is we can alt, click this edge here, Alt Shift click this edge, and we can bridge these edge loops. So let's just press control, ie. And bridge edge loops. And now in edge mode, we can select these edges again and we can hit the Delete key and we can choose dissolve edges, and that will just dissolve those edges away. And there we go. Alright, let's do that down here. I'll click this, I'll shift click that bridge edge loops. Now we can select these edges and delete and dissolve edges. And there we go. And now we've got just that to panel virgin or two section window that we need for these offices. Now let's go back and to the top view and I'll go to wireframe. And also let's re-center this pivot point. I'll go up here to object set, origin and geometry. There we go. Let's now take this and duplicate it for the window down here. So shift d and y and we'll bring that down to about right here. Okay, we got that. Now let's select these two here. I'll select this one and this one. And let's duplicate it and spin it around. So let's press Shift Enter and then our 9-0. Ah, but look at what we've done here. I'm going to hit the escape key. And the problem is, we're not rotating at this point. We are still rotating at the individual origins here. So let's change it to median point. Now if we select these two, Let's try it again. Let's press our 9-0 and there we go and enter, and now they pivot around that central point. Okay, so let's just select one now and let's get it in place. I'll hit g and move it to that edge right there. And then let's tap into edit mode. Go to vertex mode, border, select this, get it in place. Same thing down here. Get this in place right here. Okay. Let's go to this one. Same thing. Get it in place. Border. Select this, slide it over. And this one over here, and put it right there. Alright, let's see what we have here. Let's maybe walk around and take a look at it. I'll come in to right about here, press Shift, tilde and Tab and dropped down. And let's walk around and take a look. So here's the windows for these small offices. Those look pretty good to go over here. Hit the shift key to move quickly. Yeah. Yeah. I think these are looking pretty good. We can go back into the offices. Back over here. Yeah, that looks pretty good. Okay. I'll hit the escape key. And now what we need to do is work on the frames for the office openings. We need to create one or two of these in a similar way and then we'll duplicate them around for all the others. So that's coming up next.
13. 013 Starting the Office Frames: All right. For the door openings here, I think we need to go through a similar process. Let me just select the walls and let's tap into edit mode. And if I go to base mode and I alt click between two of these faces. Well, we've got a bit of a problem here. Looks like that edge loop or that face loop is going all the way around and the top into the other office and also down here along the bottom. So we can't just select that whole loop. So Let's de-select out with all to a. And I think what I should do is go ahead and hide the floor here it is, here it's well, it's still called cubed, so let's call it floor. And let's hide it away. Also. We can hide away that floor plan there as well. And that'll just allow us to see if we accidentally select those on the bottom are not. Alright, so now what let's do is let's just choose individual faces here like this. And I'll hit the period key to tumble around that selection. Now we need to go through the same process. So once again, we'll press shift D and enter will scale in the x axis here, S, X and scale out just a little bit like that. Maybe a little bit too much for me. Bring that in a bit with S and X. There we go and just bring that in just a bit. Now let's go ahead and split this out as its own object. So I'll hit the P ki and choose to separate by selection. And then I'll tap back into object mode and select that one piece right there. Okay? Now we tap back into edit mode and hit a to select all of those faces. And now if we extrude and scale those in, I think we're going to pull these edges up. So we're going to have to fix those, but let's give it a try. So I'll hit E, S, shift x to turn off the x axis. And let's scale in and you see how these edges on the bottom are being pulled up. But we can fix that, will fix that. I'll just pull these out to about where they're supposed to be about like that. Feel like this top part could come down just a hair. And then these edges down here, what we can do is go to edge mode and select these two edges. And then over in the sidebar, if we press the Enter key, we can use our transform values. Again, I'm going to switch to global, so we're sure to take it down to the global 0 in the z-axis. So here on the z-axis I'll just type in 0 and enter. And that drops those down to the floor plane or to the grid there. Okay, so now we've got those in place. Next thing we should do is figure out where this vertical bar is going to be for the door right here. So what we can do is turn on that door size. I'll do that. Tab back into object mode and selected. And let's move this back into here, about like that. And that'll give us a good gauge as to where we should put those edge loops to extrude that down there. So let's select that door frame there and let's tap into edit mode and I'll press control our scroll, the mouse wheel and create two edges right here. I'll pull this one over to about like that. And let's click this on and pull that one over where we think we wanted about like that, okay, it, the three key, select that face and then let's extrude down in the z axis, let's say E, z and pull down. And then how far should we go? Well, we can come over here once again. And in the z field type in 0. And that'll once again drop it to the ground plane. Okay? Now we need this cross piece here on the bottom. So for that I think we can just add an edge loop here in the center of this bar. And then once again over here in the center here. Now, this one is angled. So what let's do is Alt Shift click this one over here as well, and then we'll press S Z and 0 to even those out. So S z, 0. There we go. Now let's drag them down. Maybe about like that. And let's now select these faces here. And bridge edge loops control ie, bridge edge loops. Alright, so now we have the main opening for the Windows, but we need that single vertical bar here in the center. So let's press Control R again and scroll the mouse wheel for these two edges. And I'll do the same down here, and I'll just hit the Enter key twice to complete that. And then let's shift click this and all shift click and that edge there. Now let's press S and Y and scale those in to a reasonable width, maybe something like this. And once again, we can select these two faces and bridge edge loops. And there we go. Alright. So now we've got the basic outline of this frame. We're going to need to create those inner ridges, of course, and do our beveling around the edges. But before we do that, I think what I should do is go ahead and duplicate this and move it over because over here, well, we can't see it here, but I'm pretty sure over here there are three window panes. Let me see if I can bring up an image real quick. Yeah, here's one, this 2770. I'll press Control Spacebar. And this office right here has three of those window panes, whereas the one we just created as two. And if I tried to duplicate this and add an extra vertical bar in here after I've created the ridge and done the beveling, I think it'd be a whole lot harder, I think will have an easier time if we if we do it now. So I'll press Control Spacebar and let's go ahead and move this object origin to the center of the geometry right here. And then I'll go to the top view and the Z key for wireframe. And let's duplicate this shift d and press the y Ky. And let's move this up about right here. Let's, there we go. There's that edge right there. I'll just put it right there. Now. The door frame, I want to keep the same. I'm going to keep the width there. But it's this part I want to move, so I'll go to the vertex select and then B for border select. And let's drag this down to here. And here we go. Now we could probably also move this a bit. I would imagine something like that. Now what we can do, I'll go back to solid mode. And let's go ahead and add two edge loops once again up here, and two down here. And then let's select all of these edges right here and this one here. And then let's press SY and scale these n once again to a reasonable width. I'm just kind of eyeballing it here. And then let's hit the three key and select these and bridge edge loops. Okay? I think that looks pretty good actually in terms of the spacing between those. I'm gonna go ahead and hide the door size reference object here. And now I think we can go ahead and add the bevels and internal ridge to these france because everything else I believe is only two windows. I think this was the only three. Let me look one more time over here to make sure. Even the ones over here, I believe. Yep. These are too as well there quite a bit thinner, but they're still only two panels, so that's good. Let's go ahead and go with this. So I'll take this frame now and let's do our thing with, with the internal ridges here. Go ahead and go to this face loop. And this face loop. I should just go ahead and select these individually or else once again will get a loop all the way underneath and on top for this and this one right here, two. Now let's scale in the x-axis. Let's press E S, X to extrude and scale in the x axis a bit like this. Now let's once again go to our individual origins. Now let's press E, S, shift x and begin scaling in just a bit like this. You know, I'll go like that and then let's scale and in the y SY and bringing those in just a bit as well. We have a similar problem over here. We pulled these bottom edges up. So let's go to the, let's hit the two key and go to edge mode and select these two. And then we'll press N and come over here and type in 0 in the Z to drop those down. Okay? And then let's add our bevels. Let's do that. I'll press Alt and click Alt, Shift and click here. And I'll get all of these down here. And let's go inside and see if we have them all in here. Now I still need to select all of these. Ok, I think I have them all selected now let's go ahead and I'll zoom in one of the corners here so I can see what's happening as we do this. Let's now press Control B and pull out a bit. And we go, we can pull those in like that. And let's tap into object mode and see how it looks. Yeah, I think that's going to work out. Okay. How do we do on the inside? Pretty good. Okay. Alright, so there we have that office opening done. From here. I'll just use this to duplicate and re-size for all the other openings. This one here I think is just a one-off. We'll add the beveled edges here pretty soon, but I don't think we'll need to duplicate this one off anymore. So in the next video, let's just work on placing this on all the rest of the office openings.
14. 014 Finishing the Office Frames: To begin duplicating this for the other openings, I think I'll turn the floor back on, so we have that there. And I'll turn the floor plan back on as well, just so we can see how the drawing looks. Sometimes they have an indication as to where these vertical bars should go. So let's try that aisle. Go to the top view and let's go to wireframe. And well, they don't really have the indications here, but they do have it for the door and that's good. That helps at least that tells us what side of the office the door should be on. So let's go ahead and press shift D and duplicate this and bring it over here. We can turn this by pressing the archi and then holding Control down and it snaps every ten degrees. So that can help us just turn that in the correct direction. And then let's place this where the door should be. It looks like we've got this right here, along this edge right there. And then let's tap into edit mode, hit the one key for vertex select. And let's just grab these here and I'm going to bring this back. Tell we line this up right here at that edge, right there. And then let's try and put this in the center here. But let's just move this until we get it right about, right about there. And that looks pretty good. Let's go back to solid View. Tab back into edit mode. And yeah, I think we're looking pretty good there. Okay, let's now grab this and move it over. I'll press shift D and x. But if I recall, we're gonna need to spin this around. So let's go back to that top view and wireframe and yeah, the doors over here now. So we'll lets do is go ahead and just spin it around. We can press R18 0 to spin it around a 180 degrees. And we'll move it to this point right here. And it looks like we need to bring it in some. So let's tap into edit mode and grab this part right here, bring it into this edge. And then we'll move this a little bit to get it centered right in there. There we go. Alright, let's see how we are doing here. Yeah. Okay. Let's take this and work on these over here, these office openings over here. So it looks like we've got one with the door in the same place over here. So let's do that shift d y, and let's bring it over here. Once again, let's keep that door in the same place or that with the same width. So we don't want to move this one here, but we do want to move this down here. Let's move this to this edge right there. And therefore, we could probably move this up just a bit right into here. Let's try that. Okay, now we need to do the same thing here, but we need to spin it. So let's go ahead and press shift d y and put that there. And then let's press R z 180 to spin that around. And let's go back to the top view and put it in place. So this one could go right about here, right on that edge, right there. And looks like we've got a ways to go here up. Let me select that again and tab into edit mode. Now let's grab this and move this over to here. And take this one and move it about right there. Okay. Yeah, I think that'll work. There we go. So now in this hallway over here, we could grab these, I think, and let's move these over. Yeah, it looks like we could just take these and duplicate them and move them in the y and move them right down here. Something like this. It looks like this walls a little bit thicker than the frames we have here. So let's press S and Y and just scale these up just a bit. Cheat it just a bit there. And then for these over here, let's grab one right here. Let's do that. And let's press shift D. And I'll just move this over here. And let's turn it this way. This is the door, I believe so. Let's press R and hold Control and turn it this way, 90 degrees. There we go. And move this up here like this. And then let's tap into edit mode and grab this. Looks like we don't have to move it too far apart like that. Maybe move this over. Just a smidge. There we go. Now let's try it again. Shift d x. Bring this over here. Once again, these walls are a little bit different, but that's okay. We'll go ahead and put them where we think they should go like that. And then shift dy, dx. Let's move this over here. Anything else that we need to oh yeah, over here. Let's do these two over here. We can grab this frame and let's press shift d and x and move this out. And let's see which side the door is on. Let's go to that top view with the seven key and look at wireframe. So we've got a door here and a door here. Alright? So what we can do is press our control and turn it 90 degrees this way to G and move this up into here. And let's line it up with this edge right there. And we just need to do a bit of work to bring this in here. And let's center this one up. Something like this. Okay. Now let's do this one here. However, for this when the doors on the other side. So lets just grab this again, shift DX, and let's turn it 90 degrees in the z, r z. And then I'll hold that control key down again and move it this way. And you can see in the upper left-hand corner the degrees that I'm turning us. What's move it there? Now let's move this into place. Wireframe, and let's get this right here. And then I want to extend this over here. Let's do that. Extend this, this way and centre this up a little like that. And there we go. Okay, so now we've got all of our office openings in. From here. What we are going to need to do is work on the doors. We've got doors over here and here. And we'd need a door here. I think what we can do is just use a frame out of one of these. Since this is basically a standard door width, we can use our frame here. So let's work on that in the next video.
15. 015 Creating the Door Frame: As I mentioned before, to create these door frames, I think we can probably just grab one of these and delete everything except the door. Now we're going to have to do a little bit of editing, but I think it'll still work fairly quickly. Let's go ahead and duplicate this with shift D, And I'll bring it out in the y-axis, and I'll zoom in with the period key. Now to work on this, I think I want to isolate it from everything else. I want to hide everything except this. I could go into the outliner and hide each individual thing. But Blender has a nice feature where it can isolate the selected object and hide everything else and you just hit the division key on the number pad. So if I hit that, it'll partly do it. And then if I hit it again will go back the way it was and then hit it one more time. And then at isolated and then from here on out, it'll do a better job of isolating. And each time we select an object and hit that division key. And to bring everything back, you just hit the division key one more time and it brings it back. So we just toggle that isolation mode on and off with that division key. Okay, so for this I think I'm going to tab into edit mode and go to face mode. Then I'll go to wireframe and let's go to the top view with the seven key. And if I hit the B key to border select, I can select all of these and delete them. We had X and delete faces. Oh, and you can also hit the delete key. So the delete key and x are pretty much the same thing. Now for this, as I said, there's gonna be a problem here. We've got this part here, that's kinda the interior of that other frame, that other part of the window frame. And then we've got this part over here, which is the way we really want it. So how do we get this part over here to look like this over here? Well, there's kind of a tricky solution for that. And I wanted to show you this because it sometimes comes up that you have to do this. So what I wanna do is take this object, put the origin in the center of it, and then move the object into the center of the grid. And then I'm going to be able to split it in half, delete one side, and married over so that both the sides look like this here. Alright, so if we tab into object mode, let's first of all moved this object origin. I'll go to object set origin, an origin to geometry. And notice that it's kind of over here off center. And that's because there are more polygons over here on this side, then there are over on the other side. So how do we get that origin in the center of the object? Well, what I'm gonna do is I'm going to tab into edit mode and I'm just going to select an edge here and shift select an edge here. And now the pivot point of that selection should be right here in the center of the object. So what I'm gonna do is move the cursor to this and then move the object to the cursor. So to move the cursor to here, I can press Shift S and choose. Cursor to selected. Now the 3D cursor is there. I can tap back into object mode. And from here I can go to object set origin, origin to 3D cursor. There we go. Now, I can move this origin to the center of the grid by hitting the end key and zeroing out all of the location field. So if I just click and drag down across the three fields, I can hit the 0 key and then Enter. And that will move that to this center of the grid. Okay, so why is that important? Well, it's important because I want to add an edge loop right down the center so that I can delete 1.5 and mirror over the other side. If I go to the top view here, let's go to wireframe. You can see that there's my origin, that y-axis is going right down the center. So if I press Control R and add an edge loop here and click and click again. You can see that it's kind of tilted like this. Well, of course we can press sx 0 to straighten that out. But then we can also in the x field over here, press 0 and enter and sense that zeroed on the grid. It's also zeroed or centered on our object. So that's why I went through that little bit of a process, is to ensure that that edge right there is down the center of the object. So from there what we can do is just delete the half that we don't want over here. So let's go to wireframe. I'll hit the one key actually, let's go to the top view here so we can see it a little better. And then let's go to three per face mode. Hit the B key and border Select All of this. I'll hit delete and delete faces. And now we just have 1.5, which is the half that we want to keep and we want the other side to look just like it. So what we can do now is come over here to the modifiers panel right here, and click add modifier. And we're going to add a mirror modifier. So we click that and we're mirroring in the x-axis, but we're not seeing anything happening here. If we turn off the X and turn on the y-axis, we can see it here. But the y-axis is this way. We're actually 90 degrees off from where we should be. And if we click the z axis, you can see, well that's in the correct direction there. But why isn't the x-axis working for us? Well, I think the reason is, is because we've got values over here in the rotation. We've got a 90 degree value in the z-axis, and I think that's throwing us off here. So what let's do is let's apply the rotation to make all of these zeros again. So with this object selected, we could come up here and go to object, apply, and we could apply the rotation here. You can see that the shortcut key is also control a. So we can press control a and apply the rotation. And when we do that, theirs are mirrored object. Now, we want to be sure that this edge up here, right here closes off, seals up when we apply the modifier. And to do that, we need to turn on clipping right here. So that ensures that that connection between the two sides will be sealed off or clipped. Alright, so we tap back into object mode and then we click Apply. Alright, so now we've got our new door frame and we can actually go back into here and select this edge, alt, click that, and we can just hit Delete and dissolve edges and get rid of that now. So now we have our door frame the way we want it. Let's hit the division key again to bring back all or other objects. And in the next video, what Let's do is begin taking this and inserting it into the places where we need a door frame.
16. 016 Inserting the Door Frames: Alright, let's get the door frame setup. I'll take this one and maybe slide it over here. And let's hit the period key and zoom in. And I just want to put it right into here. Let's go to the top view and wireframe and look at where we can put it. Maybe right about here. And we're gonna have to move these walls back just a smidge. So let's go ahead and do that. I'll select the walls and let's grab this face here, right there and move it back just a little bit like that. Let's grab this one and move it back a hair. About like that. Now what we should do is insert some edge loops so we can extrude this or bridge edge loops across the top of the door. So let's press Control R and click and drag up to here. Like that. And yeah, that went around to the other side. That's good. And then let's press control are and do the same thing here like that. And that went over to the other side as well. Ok. So now we can take this face here and this face here, control II and bridge edge loops. And there we go. So now we've got the opening for that door. Let's take this and let's move it all the way down the hall. Let's duplicate it. Shift DY and let's just move it all the way down here. Let's hit the period key to zoom in. I will go to the top view and wireframe again. And let's get this in place. I'll hit g and move it. And it looks like we can move it to right about there. And I may need to widen this just a bit. I'll press S and Y and widen that out just a little bit. There we go. Now we probably need to insert some edge loops so that we can cut this piece out because we want that to be open. Let's select a wall and tap into edit mode. And then let's press control are. And let's add an edge loop here. And let's add another edge loop here. Did they go around to the other side? Yeah, they did. Ok. And then let's press control are, and let's add an edge loop up here. Now, I'm guessing this didn't go all the way through. Yeah. So let's add one over here and put it right there. Maybe bring it up just a hair. Ok, so now we can take these faces here in the doorway and delete them, delete faces. And also we want to get rid of this one right here and delete faces there. Okay, so now we have an opening for that door with the door frame. Let's do this one over here. Let's bring it over here and do this one. So I'll go ahead and just select this one again. Press shift D and X, and let's slide it over, get the period key or go to that top view and wireframe. Let's place it in here. I guess right about in here looks pretty good. Maybe over just a bit, something like that. Okay, now let's do the same thing. Let's select the wall tab into edit mode, and let's insert an edge loop here and I'll bring it right over to ban, right there. Same thing here, over to this side. And let's do one up here as well right in there. And it looks like we need to add one on this side. So let's put it right about there. Ok. So now what we can do is select this face, this face, and delete it. And this face here, and delete that as well. Okay, now we have our door frames in place. And while we're here, we might as well do the openings for the two conference rooms as well. Let's take a look at a reference image that might help us. Let me go to image and open and looks like this one here, this 2785 maybe that'll help. Let's press Control Spacebar. And yes. So we can see that the opening to the conference room here is just a glass wall and the opening is actually as high as these window and door frames to the offices. So I think what we can do is use that original window cutter or window and door cutter to cut these out. Let's give that a trial press Control Spacebar again. And here it is, this one right here. That's our window door cutter. Let's bring that in and see if we can get this to work. I'll pull this into here. Let's go to the top view and wireframe. And yeah, it's pretty well placed as it is. Let's tap into edit mode and go to vertex mode and border select these vertices. And then I'll drag this over to here. And let's give this a try. So if we go back to solid mode, let's select the wall. Add a Boolean modifier, will use our eyedropper to select that window door cutter. And there we go. Yeah, I think that'll work pretty well. Lets click Apply here. And then let's go do that other conference room over here in the corner. This one over here. Let's move it down here and put it in place. And maybe move these out just a little bit. And we go. Now let's take a look at this. Okay, let's select the wall. Add a Boolean modifier. Select that window door cutter. And there we go. Yeah, I think that'll work. Let's click apply. And there we go. Do we have all of the door openings that we need? Well, there's this one more out here going out to the hallway where the other offices are out here. And that's a little bit different height than everything else. Let's open this up again. If we take a look at this, this is more of a standard door height here. And then all of these are this taller opening where the windows and doors, et cetera are. So this is just a little bit shorter. If we took this and duplicated it and then moved it down a bit on the top. That might work. Let's try it. Let's press shift d and y, and let's bring that over here. I'll spin it in the z-axis, r z 9-0. And we go, and the question is, how much should we bring it down? It's a good question and I may just resort to eyeballing it here. So here we go. Here's the image of that. It's just a little bit lower. Let me bring this over to about here. And then let me grab this and bring it over to about here. And then if we go to face mode and select this face, it's currently, as you can see, the same height if we just bring it down a little bit like that. Yeah, I think we could probably get away with that. Let's go ahead and give this a try. I'll select the wall, add a Boolean. Select this new cutter, this window door cutter 001. And there we go. Alright, let's give it a try. I'll hit apply. And that is done. Okay. So I think we have all of our door openings now and the windows all cut in. We still need to do the top frame and the bottom frame of the conference room doors and also the doors over here. But what I think I'd like to do in the next video is actually create the doors that are going to go into the offices. These over here, these doors right here. Let's create these doors. We can even create the door handle and the lock. And then once we get one done, will then duplicate it for all the others. So that's coming up next.
17. 017 Beginning the Doors: Well, to begin one of these doors, I guess we can just use this door size again right here. Let's just bring that out. And I'll zoom in with the period key and let's just duplicate this shift D. And I'll call this, I'll call this Door main because this is the one we're going to create and then duplicate all the others off of. And I'll hide the door size again. Now, the first thing we should do is fit this to the door opening. It's a little big. So let's tab into edit mode and hit the three key to go to face mode. And I'll press all Z so we can kind of see through here. And then all the Z to come back. And then let's just bring this down. And what I wanna do is fit it inside this inner rim that we created inside the door jam there. I'm just going to bring that up to about right here. And let's grab this face. And and I'm on the inside of the door here since these open toward the inside, they're going to be on the inside of that door jam, that interior rim. So I'll bring that over here. I'll just press all z and find that this one there it is. And then I'll bring this over. Let's get this in place. We need to look at the bottom here to let's bring that up so it's not going through the floor. Something like that. Alright, and then we also need to bring this base right here back so it fits behind that ridge. Right about in there. I think. She asked behind there. And this one needs to go probably just to the outside or excuse me, the inside, I guess, of the door right there. Okay. We have our door generally in the right place, I think. Now what we need to do is cut that hole in it. And I think we have a door that we can take a look at right here. Let me press Control Spacebar and let's zoom in and take a look at this. So we're going to need to create the hole in the center of the door. And it's kinda hard to tell if this part, the bottom of the door is a little bit thicker than the top part. It kind of seems like it is like the hole is raised up just a bit from the bottom. So let's keep that in mind. I'll press Control Spacebar again. And so let's select it. And let's tap into edit mode. And I guess what we should do is just go ahead and make two edge loops or press control Arne scroll the mouse wheel here. And then let's press S MY and scale out in the y. Now, it isn't doing anything as I scale. Well, do you remember we switched over to independent origins or individual origins awhile ago and that's why it's because they're scaling. Each edge is scaling independently of the other and we don't want that. So let's go back to median point. Now if we hit S and Y and scale out, That should do a little bit better. That looks pretty good. Let's try that now let's press control are and do two edges here, express S and Z. And let's bring this out and As we said, I think the bottoms old little bit bigger than the top, maybe like that. And since all of these polygons on this door or quads are four sided polygons. The edges, the edge loops go through all the way around the edge loops only go through four sided polygons if they're three-sided or tries, or more than four sides, n guns, then the edge loops won't go through. It feels like that these edges are still a little bit too close together. Let me bring these out just a little bit more like this. See how that works. Alright, so now let's select this face and this face. And let's press Delete and faces. And there we go. Now we've got the hole in the door. We just need to seal that up all around the edge there. So if we select each edge inside here, alt click, Alt, Shift, click that as well. Now we can just bridge those edge loops. So control II and bridge edge loops. And there we go. So there we've got our door, at least the beginnings of it, right? Since I've beveled these edges along all the window frames, I feel like we ought to do that here. Let me tap back into edit mode. And let's select these edges again right here. And we can't do it with Alt Shift Click cause they're not exactly edge loops all the way around because they extend out here. So we just need to go through and select them all individually. Here. There we go. Now let's take a look at beveling these. Let's press Control B, and I'll move the mouse out just a bit. And it looks as if see how flat the bevel is. There isn't really an angle to it. It's just kind of staying flat against the outside of the door. That's a problem and we don't want that when we do a bevel. And the reason why that's happening is because we haven't applied our scale. So let's press Control Z and tab back into object mode. And if we hit the end key, we can come over here and we can see our scale is non-uniform. The values in here are all different. And for the Bevel tool and many other tools in blender to work properly, it needs to see a uniform scale here, say all 1s instead of like 0.05. 0.51.2, et cetera, we need to see all ones here. And to apply the scale, we can always come over here to object, apply, and apply the scale. Or we can just press control a and click scale here. So if I do that, now these are all ones, those are uniform values. Now let's go back and let's try that bevel again. So if I tab back into edit mode, let's try this again. Let's press Control B and pull out just a bit again and now take a look at it. Now, see how they're angling in. Now. It's using the scale value to apply the bevel more evenly. Now, I didn't scroll the mouse wheel and add edges here, but I can always come down here to this bevel settings panel and increase the number of settings here. So maybe I'll just add two more edges or three segments to that. And then let's tap back into object mode and see how we did. Yeah, that's looking pretty good. If we scroll way in here, if we zoom way in and take a look at that, we can still see the polygons. It isn't a pretty curve like it is on the actual real objects. We could smooth this object to get more of a pretty curve there. Let's try that. If I select this object again, the door, let's go over to object and shade smooth. And let's try this. Now those are looking pretty good actually, but look up here, we've got a little bit of, a little bit of strangeness happening up here. And over here as well when we smooth that, we can clean that up to if we come over here to the object data panel. And if we go down, let me twirl these up. If we go down two normals, we can turn on auto smooth and look how that cleans that up. Now we can change the angle of smoothing here if it isn't quite what we want. Because take a look at this. Now we've got this kind of strange angle here. So if we click and drag on the angle field, I'll just click and drag on that. You can see how we can clean that up just a bit. There we go and get that. And that's kinda nice. Now if we go too far, if we click and drag and go above, say 90 degrees, we get those artifacts again. But if we take it down below 90 or even 80 and above 60 or so, let's take a look. Yeah, that works pretty well. In fact, let's take it down a little bit further, see what it looks like. So there it is, the way it looked pretty much before we began. And we can drag this and bring it up. That's too much. There we go. I think that'll work pretty well. All right. So there we have the beginning of the door. The next thing we need to do is work on the door handle and the door lock, and we'll work on that in the next video.
18. 018 Creating the Door Handle: To create the door handle, I think I'm going to need another reference image. So what I'm gonna do is hover over this corner right here and bring this over. So I get to Windows. And then let's bring spring another image into here. So I'll go to image open and I've got a new photograph here of the door handles, so I'll just open that up. And here we go. Let me press Control Spacebar so we can see this a little better. So what we're gonna do is we're going to create this piece here, the actual handle and the lock. And I'm not gonna go into super detailed with all the little gears inside and everything. And also, I'm not gonna do this flat part here. I don't think we need it. It'll add extra polygons and it'll add extra time. So what I'm gonna do is just create a cylinder here and extrude out and then turn the end of the cylinder and extruded OUT 90 degrees this way as well. And of course just a cylinder for this. We'll do some extruding to kind of hint at this detail inside here. But we're not going to get very intricate with it. So let's just press Control Spacebar and go back. All right, so to begin, I think we want to begin about over on this side because it looks like the door handles are opposite the wall. The doors tend to open toward the wall. And in fact, what we can do here is we could change our point of pivot to give us a sense of how the door would swing open. If I tab into edit mode and hit the two key, and I'm going to select this edge right here. I'll press Shift S and let's move the cursor to that selected edge. And now if we tap back into object mode, we can move this object orange Into the cursor. So I'll go to object set origin and origin to 3D cursor. Now that that origin is right there on the edge where the door hinges would be. I can press r and z, r z and turn and there we go. Now I've got the door swinging on its hinges there. Now, we could put hinges in here. I don't think we need to because I don't believe we're ever going to see those hinges. I don't think we're ever going to be inside a room with the door closed. Right. So I think I think this'll be fine. Now to get that back, we could come over here and press the Enter key and 0 out our z axis. We can also select this and clear the rotation by pressing all are, and that clears the rotation. You can also press Alt S and Alt G to clear the scale or location as well. But all we need is the rotation there. Alright, so now that we've done that, let's go back over here and I'm going to select this face and I'm going to move the cursor to here because when we create these cylinders, I want them to pop in over here. Let's press Shift S and cursor to selected. And we can move that cursor up or down however we want. If we come over here to the view, you have a 3D cursor location fields here. And we could click and drag in the z-axis holding that Shift key down and move that cursor up and down wherever we want. And we can of course move the handle once we create it. But I just wanted to show you that. Let's now create that cylinder. Lets press shift a and R create a cylinder right here. And it's kinda big. We don't need to be quite that big. So what let's do over here in the cylinder settings is let's take the radius down to maybe 0.1 meters, and we'll take the depth down to 0.2. So now we go to a little smaller. We don't really need 32 vertices are 32 sides to the cylinder. We could take it down to 24. Let's say, let's try that. There we go. And if I hit the period key and zoom in, we can pull this out. We can rotate it around the y-axis, RY 9-0. And so we don't need the face behind here. We could tap into edit mode and hit the three key and select that and then delete that face there. Alright, let's now take this and scale it down a bit. Scaled in the X with S and X. Let's bring it back and put it in the door back here. Maybe I'll make it a little bit bigger than we go. Let's try that. Now. Uh, let's do is select this face here. And previously we've hit the E key to extrude, and then we've scaled in, in the same way. We can hit the I key to inset. And it kind of does two things at once. It extrudes and scales all at the same time. So let's just hit the I key and then move the mouse and we can scale in maybe to about right here. Let me zoom in a little bit more. Maybe scaled that back out just a bit, something like that. And then let's go ahead and extrude out in the x axis II, and we'll move it this way. Now, what we wanna do is we want to take the handle this way. In the picture, it's going the opposite way, but we wanna take it this way. And what I wanna do is actually turn this 45 degrees in the z-axis. But before I do that, I'm going to add one more edge here. I'm going to press Control R and add an edge. And you'll see why I'm doing this here. Now I'm gonna take that face and I'm gonna type in our C45. And you can see how it's turned like that. And I'll hit enter. Now what I wanna do is go to the top view. I'll hit the seven key and I better go to wireframe so I can see it here. And the reason why I put that edge in there, so it wouldn't collapse all the way back to there. What I wanna do is scale this out. So these edges are even. But I don't want to scale it in the z-axis because these are pretty even as it is if I hit the one key, you can see the top and the bottom edges are pretty even. So what I'm gonna do is press S, Shift Z to turn off that z-axis. And then I'm going to scale out like this down. Those are just about even. There we go. Now what let's do is let's go ahead and extrude in the y-axis. So I'll hit E, y and pulled this way. Now as we know, we can straighten this up or flatten it up by scaling it in the y and hitting zeros so we can press S y 0, and then we are, alright, so we've got the beginnings of that handle there. I kind of wanted to curve just a bit here at the end. And one way to do that, we could do that just really easily. Actually, we could just hit II and pull out and then scale in. And E and pull out and scale in. I'm just hitting the S key and E and pull out and scale. And so just do that a couple of times until you get it Just generally to a curved shape there. Now there is quite a nice rounded edge right back here. Let's go ahead and add that with the Bevel tool. I'll hit the Enter key and let's go up here. And let's take a look at our scale. Yeah, it's non-uniform. So let's go ahead and press control a and apply our scale. And then what let's do tab into edit mode and hit the two key. And we're getting a bit of that clipping. Lets go over here to this View tab. And for our clip, let's type in 0.01. And so that allows us to zoom in a little closer to our objects here. I'll hit the two key and alt click this. Let's press Control B and pull that bevel out like that. And I'll scroll the mouse. We'll just a bit to get a couple of edges there. And there we go. Okay, so now we've got that. Let's now smooth it and see what we get. I'll go to object shade smooth. And then let's come over here and turn on auto smooth. And maybe I'll bring this up just a bit like this. It's a little too much. So it's kind of hard to get both a nice area here and a sharp edge back here, but it looks like at 89.6 right there. I can get that where I both have a sharp edge here and a relatively soft edge here. If I wasn't able to do that, if let's say let's go to here to 91. What I could do is I could select this edge right back here. I'll click that. And then what I could do is I could make this edge sharp. So no matter what I said it here, this edge would just always stay sharp. To do that, I can go to the edges menu. You can do that up here or by pressing control II. And I'm gonna go to Mark sharp. So I'll click that and you can see it changes that edge to that blue color. So if I tap back into object mode now, no matter where I put this, that edge is always going to stay sharp. I can drag this all the way up to a 180 and it's still going to stay sharp. I probably don't need it quite that high, but you could bring it down to maybe 98 or something like that. And there we go. Alright, so I'm gonna move that cursor, I'm gonna press Shift S and move it into the world origin. And so there we have our handle. I feel like it needs to come down a bit and move it down a bit. Just looking at it here. You'll like it needs to come down a bit like that. Alright, so now it lets do is in the next video we'll work on creating the lock here, and then we'll combine them all together and begin duplicating them to the other door frames.
19. 019 Creating the Door Lock: To begin on the lock, I think I'll move that cursor again, shift us cursor to select it. And then I'll just come over here to view and move it up in the z and just move it up like that. And then maybe somewhere around in there. And once again, we can of course move it once we have it created. But I'll press shift a mesh and cylinder. We don't need 32 again, let's put it at 24 and I'll type 0.1.2 for the radius ended depth. And then let's move it out RY 9-0. And we'll go through a similar process here. Let's take away the back face. There we go. And I'll shrink it down a bit scaled in the x and let's put it in place. Still little big when it's bringing that down some and it looks like it's just a tiny bit smaller than the handle. Or maybe they're the exact same size. I can't tell but we'll get it kinda close. And then let's bring it down about like that. Okay, so now that we have that, let's once again tab into edit mode. And I think what I'll do is before I do the inset, I think I'll apply the scale because even the inset can be affected by this scale. And we're at a non-uniform scale here because I just scale it all down and then scaled in the x, et cetera. So let's press control a and apply the scale. And then what I'll do is I'll select this face and just hit i, and I'm going to bring it in. And what I wanna do is just kind of hint at this edge and hint at this edge here or that little groove in there. So I'll just hit II and push in just a bit like this. It i and bring it in some and then e and pull out just a bit like that. And then we'll hit I and bring it in like this. And what I'll do is I'll just drag this down like that. So we get this key hold down here. Maybe something like that. And then let's do the same thing again. Let's hit I, move it in, it, e, push in a bit, and move it in. And E and push out just a bit like that. Okay, so now we've got that, Well, let's do now is get that little keyhole. We're just going to hint at it. We're not going to create all the little intricate details added. I just want kind of a slot there is all. So to do that, what I can do is hit I once again and I'll bring that in and then I'm going to bring it down because it looks like it's down here. At the bottom of it. Maybe scaled up a little bit more, something like that. And then let's collapse these together. So what I can do is go to vertex mode and I'm just gonna go through and select all of these. I can press Control and click and it'll connect those up. And then I'll get these over here like this, like that. Okay, and I'm leaving the top three unselected. And then let's press S and Y and scale in like this. And it looks like we've still got individual origins selected, which is of course helpful here. And that's good. So now that we have that, let's change it back to median point and press S and Y and we'll scale in like that. So we get kind of a Slot there. And then we'll take these two and press S and Z and kinda straighten that up a bit. Okay, so now we've got this face that we can just hit II and push in. And there we go. So now we've got just kind of a hint at that detail there. Alright, so it feels like it's a little bit, let me scale it down just a bit and then we'll add a few bevels to the edges. It looks like we could do that. Let's once again, let me go back and yeah, let me go ahead and apply the scale again. And then let's select this edge, this edge, this edge. We could do these down here, I suppose, something like that. And then let's press control, be bold that Shift key and pull out of it. And then let's add how many segments we want. That's probably plenty. That's pretty high poly for such a small thing, but I think that'll be okay. Now let's smooth, it. Shades smooth. We've got some issues here. Let's turn on auto smooth and that tends to take care of it pretty well. Okay? Alright, so there we have our lock that looks okay. What we need to do now is combine these together and begin duplicating these to the other doorways. But actually, what we should do first is put some on the other side here. So let's go ahead and do that. What I'm gonna do is just select these two items here, these two objects. And let's join them together. And the way you join objects together is to press Control J. So let's do that. Controlled j, and there we go. Now you can also come up here to object and join here. And if you wanna do it through a menu, and it looks like once I join them, the smoothing got a little bit different. We could maybe try and adjust these a bit. Something like this. Yeah. It looks like when I try and get this okay. Above 90, we get some issues here. And when I'm OK here, we get issues here. So what I can do is drag this up and then come in here and select this edge here. And maybe if I made this sharp, lets try that. Control, ie, mark sharp. And there we go, that cleans that up. Okay, so now we have these. What Let's do is duplicate them and bring them over here to the other side. But we can't just spin them around in the z-axis a 180 degrees because then the handle would be facing the wrong way. So if we press shift dy and Enter and then press our x0, y1, 80. You can see it's facing the wrong direction. So let's undo this Control Z. So we have our duplicate here. What Let's do is mirror it along the x axis and see if that helps. So to mirror an object, there are a couple of ways to do it. You couldn't use a modifier over here, mirror modifier here. But that's really good for linear in the center of the grid. And you can mirror around the center of the origin of our scene here, however, were not there currently. So we can use the other tool which is just control em. Now, if you go up here to object and mirror, you can see here it's Control M. And then we can choose what axis we want to mirror along. We want to mirror along the x-axis. So well it's do is press Control M, X, enter. And there we go. Now we can take this and pull it out. And we've got our handle over here on the inside to, okay. Now we can select this handle, this handle. And now let's select the door and let's join everything together with the door control j. Alright, now once again, our smoothing was thrown off because we've joined with the door that had different smoothing settings. So let's come back down to here, and let's see what we can do. Let's bring this back up. And if we go right about here, we get a little bit of an issue, a little bit of that artifact going along the inside of the door. But other than that, not really too bad. All right, so now what we're gonna do is just begin duplicating and placing these where we want them. So let me go to the top view here and wireframe. And I think we could just hit shift d and y and move this right up here. And we go, let's just put this right in here. Maybe a little bit further, right in there. All right. How are we doing there? Yeah. And once again, that opens towards the wall. Now, if we want to have a door open the other way, what should we do? Well, let's just deal with that real quick before the end of this video, let's press shift D and X and bring this over here. For this, all we really need to do is just rotated around the z-axis. We don't need to mirror it the way we did the handles. So let's press R and Z and I'm going to press Control to snap to five degree increments. And you can see up in the upper left-hand corner, I'm gonna move this over to 90 degrees right there. And let's move this into place. Let's go to the top view and wireframe. And let's move this over here. And we want it on the inside and now definitely right in here. Yeah, I think that looks pretty good. Alright. Let's take a look at it. Maybe I will press Shift tilde and the Tab key and then let's walk over and take a look. Yeah. Alright, let me go inside. Same thing. Ok. I think we got it while it's due in the next video is copy all these doors to the door openings and all the other offices. And then we should think about the little cabinet doors for this area here and this over here. So we'll work on that in the next video.
20. 020 Placing Doors and Organizing the Scene: I realized that before I begin duplicating this around the sea and I should probably try and fix those little smoothing artifacts. So why don't we tap into edit mode and go to edge mode. And I think what I'll do is I'll just make these sharp right here. I'll just select these edges. And we'll see if this will clean that up for us. Select this one and this one here. And then let's press Control E, Mark sharp. And let's see, I don't know that that really well, it cleaned it up pretty well down here. Upon top. Yeah. That's not too bad. I think that'll work. I think that'll be just fine. So what let's do now is let's begin duplicating this around the office space and get a door on each of the offices. So for right here, I guess I could just press Shift dx and move this out. Let's spend it in the z-axis. I'll press RZ and I'll hold that control key down and I'll rotate it over here, snap it to 90 degrees right there. Okay. And then let me zoom in, go to the top view and wireframe and let's place it right here, right in there. Okay, now where we should probably let's work on these down here. So this one right here, right there. We'll go into here because it's opening toward that wall. So let's duplicate this and hit Y and move this down here. And let's put this in place. We could duplicate it. Well, we need one here that goes the other way. So is there another one that would go, well, here doesn't look like it immediately. I'll just use this one and spin it around. So shift DY, move that to here. And then our z 180, spin that around there. And now let's go to the top view and put this in here. Now, when I do that, notice that the hinge pivot is in the wrong place. It should really be out here. So we could fix that if we wanted to the cursor to that. And then go up here to object set origin and origin to 3D cursor. And now that allows it to spin at that point here. So as we spin them around, we may need to fix the hinge. But now that we have that, really, we should be able to just duplicate this off wherever we need it. So let's look at these doors here. It looks like we could just do this one here, shift dx. Then I will press our control and that's spin that around 90 degrees here. And let's move that back into here. And let's get this right into here, I think. And we go. And let's see what else we should we guess let's stay in wireframe here for a minute. This one, I guess will work over here, right? It's opening that way. So let's duplicate this. Move it over here. And let's press RZ control and spin that around 90 degrees there. And get that in there. I'm going to zoom in place this right into there. Ok. What else do we need to do? But we've got these doors along here done. And these I bet we could take these two doors right here. This one, oops, I don't want to select the floor. Maybe I'll hide the floor here. Let's hide that. And we go and then select this door here. Now let's go to the top view and press shift d y. And let's move this down here. Let's just take a look at one of them. And that should allow us to press G and Y and just slide this down like that. There we go. Okay, so we've got those in place. We need these back here. So which way do they mainly turn? It looks like this way. This way it looks like they all turn in the same way, which is this way right here for this one. So let's begin with this shift dx. Let's put this in here, and then we'll zoom in and place this right here. Okay. Let's go ahead and move this one over here, right into there. And we'll keep going on down the row here. And I think one more, yeah, one more here. And put that one right in there. Ok. So we've got this whole row of doors done. We've got the four offices in here done. These have all been done. Looks like we need this door here and this door here. Well, this one looks like it's the same as this. Let's go ahead and do this for now. And move that into place. And then this last one here goes the other direction. Do we have one that can go there? Well, I guess any of these can go there, right? So let's bring this one out. And I'll press the Control key and let's spin it to around 90 degrees right there. And bring this back and put it in place. It cheeky and move that right into here. Okay. Let's see how we're doing here. Yeah, I think those it looks like we've got them in all the doorways that we need. I'm sure there's probably one I forgot, But I think that's pretty good. Now that we've done this though, I feel like we need to clean up the outliner. It's kind of a mess. We've only got one collection here called reference objects, and that has a bunch of things in there that aren't necessarily reference objects. So let's see what we can do to clean this up a bit. I'm going to bring this down some, let me bring this down here just so we can see it a little bit better. So what do we have here? Where we've got things called walls, but they're really windows here. So we should probably create a collection called Windows or window frames. Let's do that. Let's select the scene collection up here and right-click and click new, and here's our new collection. And let's call this. Window frames. And now let's see how many we have here. Let's select one and then shift select another here. And then I'm gonna Control and add to it. They are now that one is a door frame here, we don't want that in their swell Control. Click that to de-select it. Now let's just click and drag these into the window frames collection. There we go. Now what else do we have here? We've got door and window frames, so let's see where we are with these. Let's keep clicking down. I'll press control. It looks like that's all of the d's. Okay, so those are door frames. Let's go ahead and create a new collection here. Nu. And we'll call this door frames. And then all of these go into there. Okay? Now we just created all those doors there in the reference objects collections. So let's create a new collection for the doors. Here's our new collection and let's call this doors. And it looks like it's here to here. Yeah. Let's drag those in. And then we've got the floor here. We don't really need that in there. I'm gonna drag that out to the main scene collection there. So it's out here. Then we've got our cutters. I guess we can create a collection for those. I'll just call them cutter objects. And we'll select those and drag those into their Alright. Yeah, that looks pretty good. And then at some point in time I'm going to create a ceiling. Let's create a new collection and let's call this walls floor, ceiling. Let's do that. And let's just take these and put them in there. Alright, that cleans that up quite a bit. Now when we want to do something for all of these, say, let's say we want to select all the window frames and smooth them. We can do that now by just selecting the window frames collection and then right-clicking and choose, select objects. Now we've got all of those selected. What we can do is we can come down here now I don't believe they're smooth at all, so we'll probably need to smooth them to begin with. But yeah, our auto smooth under normals hasn't been selected. So let's come up here to object and shade smooth. And now let's go take a look at one of them here. Yeah, they're looking a little on. So what we can do to have the auto smooth applied to all of them, we can press the alt key and click. If we just click this as is, only one of them would get the auto smooth, whichever one we happened to select first. But if we press Alt and click, now that applies the oddest smooth to all of them. And in addition, if we press Alt and click and drag on the slider it to changes all of them. So we probably don't want it to much higher than say, 50 or so. So there we go. Now we've got all of our windows smoothed all at once. So as you can see, keeping things relatively organized here in the collections really can help you do things more efficiently as you're working on your project.
21. 021 Creating the Closet Doors: Now that we've got the doors finished for the offices lists also work on the doors for these closets. We've got one over here and one over here, but I think I need a reference image to help with this. So let's come over here. And first of all, I'm going to make this one window instead of two. Let's hover between the two and right-click and choose Join areas. And then we can move the arrow back and forth here. I think I'll go this way and open that up like that. Now it's find a new image. I want to go to image open. And I think if we scroll down here, there's one of the cabinet right here. Yeah, this 2775. Let's open that up and zoom in to where that closet is right there. I'll press Control Spacebar and let's zoom in a little more. So really all it is is just kind of a flat door. Two of them here. We've got this tubular handle here. These handles are kinda like tubes. And we've got a very thin frame around the whole thing. And I don't think I'm going to worry about these locks here. I don't think we need those, but everything else I think we need. So probably the way to begin is to work on that frame first and then we can put the doors in. So let's do that. I'll press Control Spacebar. And so down here with this closet, if we tab into edit mode, we can see we've got an edge here that defined the top of that door. And it looks like the top of the cabinet or closet is at the same point. So I think we can just select this face and this face over here. And we can just bridge edge loops to close that off, let's press Control E and bridge edge loops. So there we've got that now. Now the frame around that, well, I think we could grab this face, this face, and this face right here. And it seems to me that the, the frame kind of extends out from the wall. Just a hare, not a lot. So let's press E and then I'm going to click and then let's scale in the x. Let's press S and X and I'm going to scale that out just a little bit. And then I'll hit me again and I'll press S y. And let's scale in just a little bit this way I'll hold that Shift key down. And then let's grab this face up here and let's pull that down as well. Not like that. Alright, so there's our frame around the doors. Now what let's do is let's go ahead and put a door in there, at least create a cubed for that. Let's select these three faces once again. And if we do that, selection point should be in the center. So let's move the cursor to this shift s, And we can press to curser to selected as the two key here. And now that, that cursor is in the center of that frame, let's go ahead and press shift a and create a cube. Alright, so that places that right there. Let's press S and the x key and scale in quite a bit here like that. Let's say bring it out just a hair. And then let's scale it in with S and Y, About like that. And, you know, I'm having trouble seeing if the model isn't in a particular point of view, I'm having trouble seeing the edges. You can see here that frame just kinda blends in. So I'm having a little trouble seeing, I might look at changing the material here, my viewport. To do that, you can come up here and pull this menu down and you can change from studio lighting to Mat cap. And if we do this, if I change this, yeah, that actually looks pretty good. We can select or click on the sphere and choose other ones. So maybe something like this. Now about this ad don't really like that color. Well, I tried that. I think I'm gonna go back to just that studio light default right here. Yeah, that allows me to see it a little bit better. Well, let's try that. Let's see how that works. Okay, so I'm going to bring this down not too far. I don't wanna go too far down about like that. And then let's grab this face here. And let's pull that up. Not like that. Okay, so now we've got that in place. What we need to do is split them apart down the center, so we have that center line between the doors. So to do that, let me just pull this out. And let's insert two edge loops. Control are, and I'm going to insert one there and then scroll the mouse wheel and then I'll hit Enter twice just to ensure that they're in the center there. And then I'm gonna press S and the Wai Qi. And let's scale these in quite a bit like this. And now let's select that row of faces. I'll get the three key and press Alt and there. And then let's just hit delete and delete those bases. And now we need to fill that hole on either end of the door. So let's alt click this edge. So it's like that all the way around. And then hit the F key to fill that phase. And over here, let's do the same thing. Let me tumbled around here, and let's press alt click here, and then let's hit F to fill that face as well. Okay, so there we have our doors. Let's slide them back into place here. Okay. I want them just coming out of there, just a little bit, kinda like that. And now we need to create those handles. And those handles are just basically a tube that's bent 90 degrees at the top and the bottom. So I bet we can do that pretty easily with the curve tool. I'm gonna go ahead and save this with Control S. And then I'll hide all of this. I'll just come up here and click and drag on all of the icons and that'll hide everything. And then I'll press Shift S And the one key to take the cursor to the origin. And now let's create a curve. Let's just press shift a and create a curve right here and a path. Let's do that now. It's hard to see since it's aligned right on the axis. But if we tab into edit mode, hit the period key. You can see there's our curve and it's got 12345 points on it. So let us do is hit the seven key and I'm just going to select this point and this point, these two points on this curve, and I'm going to extrude them up or along the y-axis. So lets do that, lets it e and y. And I'm just going to pull forward and see what it's doing as I'm pulling that new point forward, it's bending that path. So let's bring it to about right here, let's say, and if we tap back into object mode, you can see there's that curve, there's that path looking like our candidate handle here. Now, I could take these, let me click on the Move tool here so we can get the gizmo and I can maybe move these back down like that. Yeah, something about like that. So there's our path. Now, uh, let's do is make it a tube. It's just a line now we need to make it a tube. So over here in the path panel, this object data properties is the properties of the selected object. So we can come down here to the geometry section and twirl that down. And what we need to do is increase this depth field under bevel. If I click and drag on this, like what happens, I get a tube that's pretty slick. So let's just bring that up. Oh, I don't know. I'm going to hold the Shift key so I move a little bit slower. Let's move that up to about right here. That looks pretty good. Now let's go put it in place. I'm going to click and drag on the eye icons to bring everything back. And it looks like we need to turn this in the y-axis. Let's press RY 9-0 and we go. And then I'm going to press RZ, hold the control key and turn this 90 degrees about right there. And we go, and let's move it over. Scale it down. And let's see if we can put this in place. It looks like it's kind of in line with the handles here. So let's scale is down. Move this n, and we kind of intersect with the cabinet door. Maybe about like that. Now it looks a little too thin now that we have it in place. So what we can do is come back over to the depth and I'll hold the Shift key down and click and drag. We can increase or decrease the circumference of the tube there. So maybe, I'm thinking something like that. Maybe a little bit smaller and let's try that. Okay. Now, you can always tap into edit mode and, and bring these out or in however you like. So while we still have it in this path mode, you can come in and make adjustments in edit mode. Alright, so I think that's pretty good. Let's go with that for now. Let's do that. I'm going to bring that in just a little bit more. And then let's go ahead and duplicate this shift d and y, and move it over here. And we go. All right, so now that we have this closet done, we can use the door And the handles and duplicate them for the other one in the hallway. And we'll work on that coming up next.
22. 022 Finishing the Closet Doors: Okay, now I'd like to take this closet here or the closet doors and duplicate them and move them over to the other closet to create that. But what I'd like to do first is just combined the handles and the doors so that I can just move it all as one object. And to do that, I'm going to need to join these two handles together. And to do that, of course we press control j. And there they are now they're all one object that went fine. But if I take these handles now, this one object and then select the closet doors, just shift click that. Now if I try and join needs control j, I get an error. No mesh data to join. What does that mean? Well, what that means is this is still a path. These two, if we tap into edit mode, you can see there are still paths. And that means we'll need to convert these from paths to polygons to be able to join them with the closet doors. So before we convert this, let's take a look at how many polygons we're going to actually create once we do the conversion, if I hit the Z key and go to wireframe, we can see here that really there's going to be quite a lot of polygons in there if we convert it. Now, what I'd like to do is reduce the resolution just a bit. So we don't have quite so many polygons. To do that. We can come back over here to the curves panel or the path panel. And let's scroll down to this bevel area and let's reduce the resolution. If we click the arrow here, go down to 321. You can see when we go down to one and even 0, that really reduces the resolution along the length of the tubes. And, and we don't want it that low, I don't think so. Let's take the resolution bag up to one to see how this looks only at the Z key. Go back to solid mode. Yeah, that looks pretty good with it's smoothed, that, that looks pretty good. So let's go back to wireframe now. And now let's work on these horizontal polygons here. If we scroll back up to this resolution preview you, it's at 12 now. So let's reduce this. I'm going to just click the arrow and go down a bit. And if we go down to one, this is what we get. That's not quite what we want. So let's go back up and let's take a look at this. Let's hit the Z key and go back to solid. It's a little too blocky still along the curves. Let me go up one maybe one more. Yeah. That looks pretty good. I mean, we'll probably never get closer than this. Let me take it up one more and see what happens. Yeah, I'd say six or seven is pretty good. Let's hit that z key and take another look. That's reduced it quite a bit. So let's go with seven there. Alright, now with the resolution the way we want it, let's select that object and go up here to object and convert. And we want to convert these curves to a mesh from a curve. So convert to mesh from curve, we click that. And now if we tap back into edit mode, there the polygons. Now we should be able to select this, shift, select the doors, and since they're all polygons now we can press control j, and there we go. Now it's all one object. So the trick is, is just to make sure that when you're joining objects there all of the same type, a curve, a mesh, whatever. They just all need to be the same type. Alright, let's go take this over to that other closet door and you know what? I'm looking at this and as I tumbled around, I still can't really see the edge of that frame as I tumble around. I really want to be able to see all the edges in here as we're working. So what I'm gonna do is come back up here to the viewport shading and we changed it to Matt cap. Let's turn on cavity here. And so that should give us a little bit more of a view of all the edges no matter where we're tumbling around will even here still that's kind of disappearing. Let's go back to the studio and see how this works. That's a little better. It's still kind of disappears, but we have some of it here. Yeah, let's go with that for now. And I think that helps me see the edges just a little bit better. Okay, so let's grab this door here and let's duplicate it. Shift D And I'll hit the x key and let's bring this out and slide it over here, and let's put it in this closet area here, I'll hit the period key in the seven key and go to wireframe. And let's, well, let's maybe move this about like, about like this. Let's say it looks actually like if I put this right in line with this wall under this over here, it's kind of sticking out. So I think this is a little bit off. Let's see if we can fix that first. Before we create the frame of the door, I'll select a wall and go to vertex mode, and let's hit the B key and just border select this. Now I don't see my move gizmo, so let's undo or excuse me, de-select everything alt a to make sure everything's de-selected. And then I'll hit the B key again. And borders like and there's that move Gizmo there. We had some other part of the wall selected in another part of the scene, and that's why that gizmo was way off the screen. Alright, let's just move this back so it's kind of in line with the door there. And in fact, we could use our old trick of selecting all of these points and then pressing sx 0 and enter. And now they're all aligned in the x-axis there. So I think that should take care of it. Let's tap back into object mode and select the door. And let's get this kind of centered up. Alright, let's also come down here. And it looks like the walls may be a little bit far out from the door. So let's select the walls and just grab these bases in edit mode. And let's just bring him in some SY, bring these in a little bit tighter because that frame is pretty small. Now that we've got this, let's go ahead and create that top part. We can press control are and insert an edge loop, maybe ride up here, let's say something like that. And then of course we can select this face just like we've done before and this face and press Control E and bridge edge loops. Okay, so now we've got that. Let's go ahead and create the frame around our door here. And they pull that base up just a little bit. There we go. So now let's select all three of the faces around the door. Let's just like we did before, let's press E S, x and pull out just a little bit to give it a little bit of a edge along the wall there. And then let's press E SY and scale in just a little bit to that door or something like that. Sy and I'll bring it in just a little bit more. There we go. And I'll select that face there and bring it down to just the top. And there we go. Alright, so that gets that frame around our door there. I think that looks pretty good. Let's press Shift tilde and I'll hit the tab key. And lets walk around and take a look. I'll hit the W key and move around here. Turn. Yeah, so let's walk out here and take a look at that other closet over here. Yeah, I think that'll work. We've got our closet, our doors with the handles and the locks. I'll hit the escape key now to come back out of that. There we go. So what else do we have to do here in our office space? I think the glass panels and doors of the conference rooms and also these front doors. But since they're glass, since they're transparent, I think I'm going to wait to create those until we create the glass and everything else in the doors and the windows all through here. So I think I'm no weight on that. And if that's the case, then I think it's time. If we select the floor and maybe hide it. We could come over here and hide it here, or we can just hit the h key and that'll hide that. So there are these counters here. We can see that there's this counter here where the stools are in front here. There's also the kitchen counter. And we also have a copy print counter over here in this area. So in the next few videos, let's go ahead and begin placing these, getting these counters built throughout the workspace.
23. 023 Beginning the Kitchen Island: Before we move on to the counters, I just wanted to mention one thing. If you are interested in having these doors actually open. The way we have these with the object origin at the edge or where the hinges would be. What you can do is we can tap into edit mode here and you can use the L key to select linked components. So if we hit the three key to go to face mode and then I can hover over this handle and press the L key, and then hover over the door and pest the L key. And then we can split this out as its own object. To do that, you can press the P key, so I'll just press P and then choose to separate by selection. And there we go. So now this piece is its own object and this side is its own object. So what we can do now is tab back into edit mode and go to edge mode and select this edge, snap the cursor to this point. Shift S cursor to selected. And there we go. And then we tap back into object mode, go to object set origin and origin to 3D cursor. Now we can hit the R and the Z key and we can open that door up like that. So if you're interested in having those actually open, you can just move the object origin to that point. All right, let's take a look at creating this counter here. I think I'm going to need a different reference image in here. Well, actually this one's pretty good. But maybe let's bring in another one. Let me come up here and click and drag to create a new window. So we have that view there and this one's going to image and open. And there was one. Yeah, right here, this 2772. Let's open this one up and let me press Control Spacebar and let's take a look at it. So you've got the counter and inside are these drawers and cabinets like these two are drawers that pull out for garbage and recycling. And then these cabinets open up. So we're gonna need to create those. In addition, controls, Space-bar again. Over here. Let's open this one up. Take a look. This one has this area pushed in where the chairs can slide in underneath there. I say pushed em. But actually what we're gonna do is define this edge, this edge frame, and then we'll just extrude it out. So if we go back and get this in place here, now let's go ahead and begin on this. I'm going to move that cursor to the center of the grid by pressing Shift S and cursor to world origin right here. Now let's press shift a and create a cube. Alright, here we go. So I'm gonna hit the Enter key. And if you recall, with our dimensions here, if we have that up here in the z-axis, we can bring that up to the ground plane. I'll hit one and hit enter. And now we can move this over here. I'll go to the top view, and let's go to wireframe here. And I'll tab into edit mode and go to vertex mode. And let's just border select these and kind of pull them in to where they're supposed to be. Like this just to get a general sense of how big this is going to be. And I'll move these up to here. And I'll move these down to here. Now, what about how tall it is? Let's take a look here. I think that's a little too tall. Let's go back to solid mode now, I don't have the specific dimensions of this and we're going to have to kinda eyeball it. I think if we bring this down, it looks as if it's around the height of these handles here. And maybe I'll bring it down about like this. I think it's a little taller than the actual kitchen counters over here. So let's begin with it like that. And what we're gonna do is we're going to leave it in a state where we can adjust the height as we put other things in here to get it to look correct with everything else. But what I'm gonna do now is take this face here and let's pull this back because as I said, I want to pull this back to that inside position and then define the frame here and pull those edges out. But let's move this back to kinda where we think this might be. And if I look over here, I can see the width of that. So maybe, maybe it's about like this, let's say. And then what I'll do is come over here and press control our scroll, the mouse wheel for two edges. I'll hit the Enter key twice and then I'll press S and Y and scale these out to about o to about right here I think. And then I'll press Control R. And let's bring this up to write up here near the top. Now, let's go to face mode and select all of these faces up front like this. And then what I'm gonna do is just extrude these out. I'll hit E and X just to make sure we're moving in that x-axis and I'll bring them out, write to their, Alright, so that's that inset space there where the stools are gonna go. Now let's go over to the other side and work on where these drawers or excuse me, cabinets are going to be. I guess it is a drawer there, isn't it? These two are. But where we're going to put all of these, let's come over here and you know what I wanna do, I'm going to isolate this from everything else. So what I can do is select it and instead of pressing h to hide it, I can press Shift H to hide everything else that isn't selected, so I'll press Shift H. And there we go. However I do want that floor plane. Let's go back and grab that. I'll go into my reference objects collection. Here's the floor plan. I'll just bring that back there. Okay. So now let's go to the side view here and let's take a look at this. So because we inserted edge loops on the other side, they came around here on this side as well. So we can just take this face right here and we can extrude it in to get this hole where the cabinet doors are going to go. So I'll just hit II and push back. Now of course, we've got this extra faced down here and this one here. So I'll select those two and just hit X and delete faces there. Now it lets do is create a cube right here that we're going to then duplicate along here. Now it turns out, let's take a look at how many we have in here. I'll press control. Space-bar again, and it looks like we have 123456789 of these cabinets, and they all are pretty much the same size or the same width. So we need to figure out how we can fairly easily distribute evenly spaced or equal sized cubes along this space here. So Well, let's do, first of all is let's create a new cube, shift a mesh tube. I'll go ahead and bring it up to the ground plane again by putting one in the z axis. And let's bring it over here. And now we need to kind of scale it down to get it in place. I think what I'm gonna do is tab into edit mode. And I'll select this face here and I'll move the cursor to it like that. Then I'll move the origin to that cursor. Now when I scale this, it's going to stay on the ground plane. So I'll press S and scale and you can see it's going to stay on the ground plane while scaling here. All right, so let's move this back in here and move this over to here. Alright, so what I'm gonna do is, I think what I'll do is just hit the S key and I'm going to scale it up to about where it needs to be, about how tall it should be. Alright? Now I'm going to scale it in Y, S and Y, and let's bring it in like this. Okay? And then it looks like I need to bring it in in the x-axis as well. I'll press S and the x key and kind of move that in like this. And there we go. Okay, so that's generally the size we want. But is it how do we know how wide we should have this? I'm gonna press S and wind scale that's in just a little bit more and then move this over. Well, what we can do is we can use a modifier called the Array modifier. And this will allow us to select the actual number of objects we want, and then we can fit it into this space. Let's come over here to the modifiers panel. And I'm going to select add modifier and array. And we go so it's coming out in the x-axis, so we don't want that. You can see here these fields here are the x, y, and z. Here. It's got 1 in the x. So let's take that and let's make it 0. And then let's type one in the y axis. And there we go. Now it's moving over some, but it's right up against that. So let's click and drag on this and we can move it out or n, I'm going to hold the Shift key down just so it moves a little slower. So I'm gonna move it right really close to there. Now here in the count, we've got two. Let's increase this to 956789. So there's how many were supposed to have, but that's a little too big. What we need to do is shrink amend to fit in this counter. So let's come back over here and let's scale this main object. Let's press S and Y and scale this in a bit. And then we'll move it over some. Let's try this. And then we go. Now we're still not quite there. And let's press S and Y and scale and just a little bit more like that. And I don't want to move it over just a little bit. And we go, let's try that. I think that's probably pretty good. Yeah, we've got it here. And over here that looks pretty good there too. Okay. So now we've got our nine cabinet doors, the right size for the size of the overall kitchen island here. Our next task is gonna be to create these handles on each of the cabinets and place them either horizontally or vertically here. So we'll work on that in the next video.
24. 024 Modeling the Cabinet Handles: To create the handles, let's first close this off, join areas and get this down just to one screen. And then let's just zoom in and take a look at one of these. It looks like it's a cylinder. And then it looks like we could just extrude out from the cylinder to get these pieces right here. And since it's a symmetrical, the same on either side, we could use the mirror modifier, so we only have to deal with one side at a time. Alright, so let's work on this. I think I want to hide everything just so I can concentrate solely on this. So lets first bring everything back with Alt H. There we go. And then I'm just going to come over here and hide everything. Well, before I do though, I was just going to click and drag all the way across these. But you know, what I'll do first is maybe create a scene collection for the counters. Let's do that. I'll come up here to the scene collections and click on new. And let's change the name of this and let's just call this counters will include the kitchen counters, the copy print counter, all of that in here as well. And this is the what call this kitchen island will do that and then this will probably ultimately become part of that kitchen island object, but for now I want to keep it separate. So let's call these island cabinets. Let's do that. And I'll drop that in that group as well. Okay. Now that we've cleaned that up just a little bit, let's now click and drag down all of this and hide all of that. Let's move the cursor to the center of the grid. I'll press Shift S and one, and that will move the cursor to the origin. Now let's see if we can create one of these. Let's press shift a and create a cylinder. And we don't need 32 sides. So let's take it down to, let's try 16. Let's spin it in the y-axis, RY 9-0. And then I'll maybe scale it down a bit and let's scale it out in the x-axis like this. So something about like this. Maybe it's a little bit wider like this. Let's say something like that. Let's say, yeah, let's begin with this. Now. The first thing I'm gonna do is cut it in half. Let's just tab into edit mode and press Control R. And when I do, I don't know if you can see, let me zoom in a bit here. When I press Control R, I get an edge right down the center automatically. And all I'm gonna do is just hit enter two times to ensure I don't accidentally move it with the mouse. So now that that's down the center, what Let's do is delete 1.5. So I'm gonna go to face mode and border select this half here. It dx k0 and delete faces. Now, uh, let's do is let's mirror this over. I'm gonna go over to my modifiers panel here. Go to add modifier. And mirror. Now I don't see anything. It should be mirroring in the x-axis, but it isn't. If I hit the y-axis, I don't see anything. But if I hit the z-axis, I do see something, but the z-axis is going up and down. So we have a few issues here. And I think the reason why this is happening is because we haven't applied our scale or rotation. So let's hit the Enter key and take a look. Sure enough we've got 90 degrees and the y, and our scale is all off. So let's apply the rotation and the scale. I'll press control a and apply the rotation and scale. And there we go. Now we've got the x axis going in the proper direction. So once again, applying the scale and rotation can really help using these tools here. Alright, let's go back to solid view and tab into edit mode. Now what I can do is insert an edge loop, let's say right over here. And I'll bring it right about here. And that also puts it over on the other side. We can't see it yet because what we need to do is turn on the edit cage for the modifier. If I turn this on, now we can see the polygons on the other side in edit mode. So it looks to me like maybe we need to bring this in just a bit like this and you can see it moves it on the other side as well. Alright, so let's maybe do something like this. And then if we hit the three key to go to face mode, let's select these faces right in here. And now let's just extrude out, let's just say E and pull out like this. Not like that. Well, we can do now is flatten these up. We can press S Y 0, and that flattens them up. And then we can just scale it out in the x just a little bit. I feel like it's just kinda flares out just a little bit. So let's press S and X and we scale that out just a little bit. Yeah, I think that's pretty good. Now let's delete those faces. We're not going to need those. And also what let's do is let's select this edge and this edge. And if we go to the side view with the three key, let's just expand these out. In fact, when I think I better do is use the whole face here and here. Now let's go to the side view, and let's just scale these up in the z-axis. Let's hit S and Z, and let's just bring these up. See, I'm just bringing those out like that just to get it in line with the top and the bottom of the cylinder. Okay, so there we've got our basic handle. It appears to me that maybe this whole side could come in a bit like this. Maybe it's a little bit too long. Kind of hard to tell, but I think that's OK there. Now let's smooth it and let's go to object and shade smooth. And we're getting a little bit of artifacts in there. Let's go over to our object data panel and turn on auto smooth. And how are we doing here? Well, we've got an edge right here that's kind of visible. Let's click and drag on that angle field. Yeah, we get it up to about 35 and that cleans that up pretty nicely. Let's bring everything back. Let me bring this down just a bit. Let's call this. Cabinet handle here and I'll drop it into the counters seen collection. It disappears because it's hidden. But let's go ahead and click and drag on all of those and bring them back. Now, let's turn this. Let's press RZ 9-0 and hit enter. And then let's scale it down quite a bit. And let's move it over and put it into place. Oh, we need to spend it in the z-axis. Let's do that. I'll press our Z1A 800. I pressed one 7-0. Let me hit escape our z1 8-0. There we go. And let's move this over. Put it in place. Now I've still got the mirror modifier on here and I wanted to keep it on just in case I wanted to do any adjusting once it's here, but let's just get it on here that's a little too big. So let's scale that down. Maybe bring it down a hair. Kinda put it in here like that. It needs to be centered a little bit more, right? Let's go ahead and apply our mirror modifier on this and then we'll duplicated over. So to do that, let's come over here to the modifiers panel. Let's turn on clipping and what that will do is ensure that that center edge is welded together. So let's turn on clipping there. And yeah, let's go ahead and click apply. And there we go. So now if we tap into edit mode, you can see it's all one piece. And what we could do is take this edge right in here. I'll click that and we can dissolve that edge. We can hit X and dissolve edges and that'll just clean that up. Alright. It looks to me like these are a little bit too low. Let's lift our cabinets up a bit. I'll press g and Z0 and pull those up just a little bit. I combat like that, and there we go. Now let's duplicate and copy these over. I'll press shift d y, and let's move that over. And now we've got some vertical one tier. So let's press shift d y. Let's move this over and then let's spin it in the x-axis, RX 9-0. And let's put this in place. Something about like that, and move that over. And now we can select these two and duplicate these and move them over to here. And then let's see. Oh, we've got one more pair. Okay. Like that. Oic, I've been putting them in the wrong place. That's why they're off. So let's take these and move these over to here. And these need to be moved over to here. There we go. We make sure these are kind of centered here. And then I think one last one down here. So we take this one, shift d and y and move that right over here. There we go. That's a little bit better. Alright, so now we have our cabinets for the kitchen. And since we put in the counters seen collection as we've been creating these and duplicating them. They've been put in the counters seen collection. We can of course create yet another scene collection. In this collection, we can right-click and click new. And in here we could call these Cabinet handles. And we could take all of these and drag them into there just to clean that up a bit. Okay, so now I think what we should do is concentrate on creating the kitchen counters over on this wall.
25. 025 Beginning the Kitchen Counter: To work on the kitchen counters here, let's go ahead and bring in a new reference image. I'll click Image open and let's see what we can find here. I've got this image. Let's take a look at this Control Spacebar, and that's not bad, but it's kinda hard to see what's going on on this other side over here. Let's see what else we can find. I'll scroll down here and it looks like we've got well, it looks like it's split between two. We've got this one here. Let's open this one up. And that takes us down to about right here. But there's more to the kitchen counter beyond that. So we've got that one. Let's maybe this time, bring this up like this, and let's add another window right in here. I'll hover over that corner and click and drag down to create a new window here. Let's switch this to an image editor once again and go to image, open reference images. And let's go down to where it was that here, this one looks like that's kind of the end of the counter right here. Let me press Control Spacebar to bring that up. So this is where it ends and it kind of goes down and over for a little reception desk for the co-working space as a whole. So I guess we want to do that to, let's do that. So first of all, let's go to the top view. Let's hit the seven key and go to wireframe and take a look at it. We've got the kitchen counters here, we can see those and here's that little reception desk here. This is where the fridge is. We could just put a cube in there for now just as a placeholder, let's go ahead and do that. Shift a Nash cube and I'm just going to bring this over here, shrink it down a bit, and just kind of fit it in here just so we have something as a place holder. So we kind of get a sense of how big this is going to be. I'll move this back. It looks like it sticks out beyond that door just a little bit like this, something like that. Okay. And then let's tumble around here. I'll go back to solid view and let's open up the sidebar with the end key and guess I could bring it up onto the floor plane by copying this number right, and pasting, dividing by two and hitting Enter. And that'll bring that up to sit on the ground plane. And if we grab this, it looks like it maybe goes up. Something like this. Let's say something about that tall is just say that's good for now. That just gives us kind of a placeholder so we know where that counter is going to go in. Alright, so let's go back to that top view. I think what Let's do is begin with a cube. I'll press shift a again and create a cube. And let's bring that over here. And I'm going to put this corner right in here and tab into edit mode. And then I'll just grab this face and bring it right into there. And grab that face and bring this right over here. And we go just kind of blocking and the general shape of it. And then if we tumble around now let's scale in the Z-axis, X and Z and kind of bring this so it's a little bit thinner like that. I'm gonna go ahead and bring it up to about right here for now. We can always adjust this once everything is in. But I think for now, let's go ahead and do that. I will grab this face here and let's see how thick this should be. I'll grab the z-axis and bring it up just a little more like that. And we go, Okay, now let's get this turn here, this turns down and then goes out for the desk. And also we've got this going down right here. So if we insert an edge loop with control are and bring this over to about right here. Let's then take this face down here, right here. I'll hit E and let's pull down just a little bit like this. About like that. I'll then add an edge loop right in here with control are. And let's take this right here and let's extrude this out. Let's go back to that top view. I'm just going to press Alt Z to go to x-ray view and then I'll hit E and let's pull straight out to here. Then I can take this face here. And we could extrude this straight out. Actually, I think I'm going to add that face right there. And then let's extrude this out in the x-axis like this. Maybe I'll go to wireframe here. And then let's come back and extrude these down this area right here. So if we insert an edge loop right here, and also insert an edge loop right here to define those faces that we need on the bottom to select. And let's do that. Let's select this face and this face. And down here, let's select this face and this one right here. Now let's go ahead and just hit II and goes straight down until we kind of intersect with the floor right there. And then we go. All right, so there's the beginnings of our kitchen counter. The next thing let's do is work on these drawers here. I'm gonna go ahead and join these together here, join areas like that. And for these, I think we can do a similar thing that we did before with the cabinets over here. Let's just create one here and then create an array of 12345 of them. Let's do that. I'll press shift a and create a cube. Let's bring it over and shrink it down a bit. I'm going to scale it in the x to make it pretty thin. We aren't really going to see how far back these go, so that's OK. And then I'm going to bring it down and let's start placing one of these cabinets. I'll do the one over here. Let's do that, maybe bring it in just a little bit like that. And then bring this all the way over to here like that. And then, well, how far down should we go? We've got this area down here. It's kind of hard to know exactly how deep that should be. But I think that's probably pretty good for now. Let's bring this down below here. And bring this over to here. Say. Now we can use our array modifier to fill this in with however many we need. So let's go ahead and first of all, let's move the origin to the center of the geometry. Let's go over here to object, set, origin and origin to geometry. And then let's also apply the rotation and scale before we do anything here, let's press control a rotation and scale. Alright, so now if we come over here and add modifier, choose the array modifier. Let's change this from the x-axis going back to the y-axis going this way. So let's change this in the x axis to 0 and in the y to one. Well, it's going the wrong way. So let's try this as negative one here. There we go. That puts it over on the other side. And I'll just hold the Shift key, click and drag and lets find a place where it's just almost there we go, something like that. So I've got negative 0.01. Now there are five doors here, So let's increase the count to five. And now the problem is, I guess what I need to do is add these pieces in here. We've got a cooler for drinks and an ice machine. We really need to add those in before we know exactly how wide these should be. But what I can do for now is I can tab into edit mode and select this face over here. And if I drag this in or out, you can see I can adjust the width of all of them, keeping that one in place. So no matter what we put over here, I can very easily change the width of the doors to match the opening that we have. So in the next video, but let's do, is let's work on creating this cooler and the ice machine.
26. 026 Adding the Kitchen Cabinets and Drawers: To block in these items over here, it looks like we're going to need a new reference image. So I'll come back over to my reference images and let me switch back to thumbnails here so we can see them. And I think that was that one that showed the end of the counter. There's this one, but I think maybe let's go with this one here. This is 2784. And yes, so we've got basically this cooler or fridge type thing here and then an ice machine over here. Alright, so with this image, I think that'll work pretty well. And all I wanna do is just block it and liked the refrigerator over here, just get some temporary items in here so that we can see how wide the cabinets need to be. Alright, so I'll just bring a cube over here. And let's get this in and get it about the right size. I'll go back to the top view and wireframe and we don't really have an image of it here, but think this might just help me get it in place here. And maybe it looks like that ice machine is a little bit smaller than the little fridge there. So I'll put this right about here. And while I'm here, I'll just duplicate this and move it. And let's scale it up just a bit like this. And it looks like it sticks out some. So let's push it out about like that. And there we go. Now, we need to do some work adjusting here. Oh, I switched over to the material preview. Let's go back here and there we go. Alright, so let's move this up. I'll go ahead and scale it in the z some. And I think there's kind of a smaller area on the bottom like a the event or something down here that I can take this base. And let's just extrude it and hit the ascii to scale N. And then let's extrude it down again like that. So there's just kind of an indentation there. And I think that's the same thing on the other one as well. Let's just move this up. Get it in place. Let's grab this face down here just like we did before. And let's pull it down and I just want to create another piece like this. I'll just hit E S scaling just a tad and then hit E again and bring that down. Kind of like that. Okay, so let's just say that that's kind of how big these pieces are. It looks to me like maybe this one is just a little bit wider. Let me do that. There we go. Okay. So now we can take this cabinet once again and grab that interior face on this side. And now we can just move it back and forth until we get the cabinets about the right size, maybe about like that. Okay. And then of course we need the drawers. We can't forget those. I've made the cabinets as tall as this, but we need to bring the top down to get the drawers in. Let me switch once again to that image with the drawers here. Here it is 2771. So there's the drawers. It looks like we've got 123 and this kind of long panel where the sink is and we're going to have to to decide where the sink is, I guess to be able to put that in as well. But let's get the drawers in first. I'll go ahead and select this face on the top right there. And then let's bring it down and get it. So yeah, let's get it about like this, I think. And then what we can do is just take this and duplicated and bring it up. So shift d and z and I'll bring this up. Now let's scale in the z like this and get this about where we want it. And then I'll just remove that array modifier here. Let's just hit the x and remove that so we don't need all those. And then let's grab this face here and bring it up like this. And then we can duplicate this over to get the other drawers. So let's just take this and duplicate here, move it in the y and bring that over just a little bit about like that. And then of course here what we can do is just duplicate this and bring it here into the metal and let's stretch it out a bit. Actually, what I'll do is I'll bring it over to one side and I'll move it just to this edge. And then let's tap into edit mode and grab that face there. And let's move it over to here. About like this. There we go. And then let's just take this and duplicate it and move it over here. Okay, so there we have the drawers and the appliances here. Now let's think about the sink. If we zoom in to the sink, we can see it's just really a hole cut out of or from the countertop. And we can just place a cube inside here with the top deleted to create the sink. Let's go back to the top view here and let's see if we can see the sink where it is here. Yes. So there's the sink there. It may not be exactly where we want it to be for our purposes, but we can go ahead and place the edge loops in here. So if we select the countertop here and tap into edit mode, we can press the R key and insert two edge loops here. I'll grab this edge loop and move it to here. And then let's insert two edge loops here as well. And maybe I'll scale these out in the x axis. About like this, something like that. And then let's grab this one and it looks like I can move this forward a bit like that. Okay, let's take a look now. So know our cabinets and everything aren't quite the same as the drawing and that's fine. And what we can do is just take these edges now and move them over so they kinda center underneath this panel. Okay, now that we've done that, let's take this face here and we'll delete it. And also let's go ahead and delete this face right here. We don't need that one. And then what we can do is select this edge and Alt Shift click this edge. Now we can take these two edges right here and bridge those edge loops. And that'll connect it up to create this part right here, control ie bridge edge loops. And there we go. So now that's been closed off there. And then what we can do is we could take this loop of faces, bring the cursor to it with shift S2. And then let's create a new cube right here, a little big. And I'll take away the top face. And then let's bring it down. Kind of put it in place here so it looks like we don't need it quite that deep. That's a very deep well sync there. Let's kind of bring that in some. And if we move that up into here, we can bring these into match the opening. So let's press S and X and bring that in S NY and bring that out about like that. Okay, so now what we can do is create the bevels that are giving us those nice curves along here. So what let's do is, first of all take this countertop and let's press control a and apply the rotation and scale. And we'll tab into edit mode and we're probably going to have to do some beveling along the outside edges here, we're getting kind of a false sense of a beveled curve with the particular viewport shading I've got on here, so we may have to deal with that. But for now, let's just take these edges here, inside here, and inside here. And let's press Control B and bring these out like this. And I'll scroll the mouse wheel and add a few edges. There we go. And then inside here it looks as if actually this piece maybe a little bit too thick. It it looks like that front panels intersecting with it and also our doors in here. So let me grab that back base and move those forward just a bit. There we go. Now let's grab the inside of the sink. Let's, let's press control a and apply the rotation and scale. And then let's come in here and let's select all of the edges that we think we want to have a little bit of a bevel on. I'm gonna do both the vertical and the horizontal edges here. So let's press Control B. Pull this out, some like that. So I'm going to come up here and turn off that cavity. I think that's giving us a false sense of our edges here. I'll go ahead and smooth the sink. Analysts smooth the countertop just to see how that does. Oh, we're gonna need some work on that. Let's go over to the auto smooth. Turn that on. That helps a lot. Alright, so there is our sink and our cabinets and drawers. Well, let's do in the next video is work on bringing some of these handles over to this side. As well as maybe we could use this handle over here for the handle on that, that ice machine that's kind of curved like this as well.
27. 027 Creating the Kitchen Handles: For the handles on our cabinets here, we can of course come over and just grab one of these and duplicate it and move it over. Let's just do that. I'll duplicate this. Let's spin it around the z-axis with Rs 80. And then let's begin putting them in place. So I'll just bring this one over here. Let's go to the top view and wireframe, see if that helps any. Yeah, we can begin placing things right along in here, I think. And then let's do this one here. This is we can put a drawer, pull there, and one down here as well. And then let's select them. And this one. And then let's go back to our solid view and let's just pull this down until they're kind of in place here. Yeah, let's just put them in this center like that. And then let's grab one and spin it around again. Shift D like this, and then spin it in the x-axis, RX 9-0. And let's put this in place. And it looks like it's fairly high up yet also looks like we may need to pull the bottom faces down a bit as well. So bring that down like that. And we go. And let's put two here, right here. And then these two can go over here like this. And then we just need one for this other cabinet right over here. Let's say we put it about like that. Yeah, there we go. Alright, so we have those in place. Now. The handle for the ice machine. Here, we can take a look at it here. It's really kind of like the handles that we created for the cabinets over there. So I think we can just duplicate it and then scale it up. And let's do that. And that's the nice thing about things like this is once you get a few things created, you find that you can just kind of duplicate and reuse. So let's press shift d and y, and I'll just bring this out like that. And then if we separate this out with the P key on press P and separate by selection. And now if we tap back into object mode, this is its own object. Let's move the object origin back to the geometry. Go up here to set origin, origin to geometry. And now let's move it over and put it on the ice machine here. And then let's see if we need to make it any bigger than we already have it. Well, it looks like yeah, and we may want to make it a little bit bigger. So it's kind of near the edge. And I like this and yeah, I think we're going to want to make it a little bit bigger. Let's just press S and scaled up sum. And that looks pretty good actually, if we wanted to make it any thicker, one of the ways to do that if we tap into edit mode and select everything with the a key, we can come over here to the shrink fattened tool. The shortcut key is alt S. And instead of scaling over the entire thing in every direction, what we can do is press Alt S. And then move the mouse and you can see it kind of gets a little bit fatter and a little bit thinner. It's kind of doing an, in an odd way. I think maybe what we could do is apply our scale. And it might do a little bit better job of expanding it. So let's do that. Let's press control a, and I'll apply the rotation and the scale. And now let's tap back into edit mode and press Alt S. And now let's try it again. And yeah, it's like it's doing a little bit better so we can make it a little bit bad or something like that. Maybe. I'm maybe too much. But I just wanted to show you that particular tool. Let me go back and press Alt S and take it down just a little bit more. There we go. Yeah. Okay. Who actually that's still a little bit big, isn't it? Let's bring it down like that. And then maybe I'll go back and scale that up just a bit. There we go. Or more fatten it just a bit. Yeah. Okay. There we go. So now we've got the handles there. Let's also think about any beveling we need to do for this countertop. The cameras you can see has just a tiny little bit of a devil there on that counter along the edge. Let me go back to another image. Let's take a look at it here. It's very tiny, but I feel like it's a little bit more than we have over here with these cabinets. I feel like the edges are sharp enough here to leave them on beveled. But these over here with this countertop, if you'd like, we need just a little bit more. So what I'll do is come back to the counter here and I think we applied the scale didn't. We'll hit the Enter key and yet we applied the rotation and the scale earlier. So let's now go to Edit mode and let's begin selecting the edges that we want to bevel. I think the ones I want to do are these along the outside here like this. Let's go ahead and extend these down to here. And over like this. Probably this one here. Just any, any outside edge. This one, this one. Let's go ahead and get these as well. Oops, this one on the outside, there we go. Now we could probably go ahead and get that one there as well. Alright, so now let's do this. Let's go ahead and press Control B. And I'm going to hold the Shift key and pull out just a little bit. Now we don't need a whole lot, so I don't think we need that many edges. I'm going to scroll the mouse wheel and just maybe add one edge. Let's try that. Add one more edge. That like that. Let's take a look. Yeah, yeah, that helps. I think. There we go. Now we need them on the inside here as well. So let's select this edge ALT shift all the way around here and we're, we aren't picking up these ones on the corners. So let's go back and pick those up right in here. And then on the inside as well. Same thing. Alright, now that we've got those, let's do our devil once again Control B and I'll pull out just a little bit like this. Yeah, I think that looks pretty good, actually. Ok.
28. 028 Fixing Smoothing Errors: Now one thing you have to watch out for when creating an object like this are smoothing errors. And from here this looks pretty good. But if we tumble around down here, you can see, look at this. It's got these things that kind of look like creases. And if we tap into edit mode, you can see we've got this long polygon here ending with this n gon, this multi-sided polygon. It isn't a three sided polygon and try it isn't a four-sided polygon, a quad. It's an N gone more than four sides here. And that can lead to problems if you've got something like this long polygon leading up to it. So we could, we could tumble around here and then we could maybe click and drag on the auto smooth here and see what we could come up with. And it turns out that it just stays there. There isn't anything we can do. We can go all the way down and take the smoothing completely off. But as soon as we give it any smoothing at all, it comes back. So how do we fix something like this? Well, oftentimes you've gotta just add a few edges here and there, maybe even redistribute the geometry to smooth that out again. So I think if we tab into edit mode and take a look at this, if the problem is that we're coming into this area with a long polygon and ending that polygon with multiple angles. In other words, this long polygon currently is an end gun, right? It's got more than four sides because if this area here, what if we made this a four-sided polygon, so it didn't extend all the way to this area. Let's give that a try to do that. We can't really just insert edge loops. If I tried to say press Control R and hover over any of these areas in here. I can't insert an edge loop into these because there are more than four sides and we can only insert edge loops into four sided polygons. So what we're going to have to do is cut them in, kind of draw them in ourselves. I'm gonna go to vertex mode and the tool we can use is the knife tool. To get to the knife tool, you just press the K key. So oppress k. And then I'll just come over here and hover over a point. Click, and then hover over another point and click. And then I'll hit the Enter key. And that draws a new edge or cuts it in with the knife tool. I'll press k again and click here, click here, and hit Enter, Kay, and snap to that point, and click and snap to that point and hit enter. And just do this all the way around like this. There we go. So now you can see this face, this long polygon is now a quad. So let's tap back into object mode and see how we've done. Well. We've cleaned up this edge pretty well. There isn't that indentation there. There's still a little bit of a problem going on in here. You can see at the corners. So let's see what we can do with that. For this, once again, you've got a polygon terminating in multiple sides. And I think adding another edge loop through here might be beneficial. So if we press control are though, we can see that we can only insert the edge loops through these four sided polygons. We can't really get him all the way around. Now. We could add one here and here. Oops, here, there we go. And here and here. And then use the knife tool to connect these up. But there's another way that we can do this. If we say go to edge mode and select this whole edge, it's already selected actually. But if it isn't, you can always press Alt and click and select that whole edge. Now to add one more edge here, we can use our Bevel tool. So to do that, let's just press Control B and pull out. And there we go. Now you can scroll the mouse wheel and add a lot more edges, but I don't think we need to do that. We just need to add one more edge right in here. So then I'll click. And there we go. Now if we tap back into object mode, it's looking quite a bit cleaner now there still may be a tad bit of an issue here on the corner. And that's something that we might be able to come over here and click and drag. And sure enough, I think with the auto smooth tool over here, we can clean that up a bit. There we go. Yeah, I think that looks a lot better. So sometimes depending on the structure of your polygons, you may need to go in and reorganize or add an edge here or there, just to clean up any smoothing errors on the object. Alright, well, we're getting to the point where I think we can begin working on the furniture of our co-working space here. Now granted, here in the kitchen would there's a lot we can do with creating the faucet for the sink here, we'll probably want to create this coffee maker. But I think there's some other pieces of furniture I'd like to begin with first. So in the next part of the course, we'll begin working on that.
29. 029 Organizing the Scene: Well, I feel like we should do a little bit of clean up before we begin on the furniture. The outliner looks pretty clean here, but that's deceptive. If we go down into here and into the cabinet handles seem collection, we see that there's a lot of things that aren't cabinet handles down here, so we need to do a little bit of rearranging here. One of the great things about blender to 0.8 now is that you can do a lot of the organization here in the 3D view. So like for this kitchen countertop, we can see over here that the object is named cube 00 for and that really isn't very helpful. So if we right-click on the object, we can go to Rename active objects or press F2, and we can rename the object right here. So we'll call this countertop. There we go. So now that's been changed. We can also move it to a scene collection by right-clicking and going to move to collection here and picking a collection that we want it to go in. However, we can also create a new collection. And in fact, if we go into this collection counters, we can create yet another collection here. So let's say, let's call this kitchen counter. And we'll click OK. And that creates a kitchen counter seen collection in this counters collection. And it put the countertop in it. That's pretty handy. We can now take these objects here, say just all of these. Actually, I'm going to join these two objects together, the handle and the ice machine with control j. So it's just one object. And while we're here, let's go ahead and rename it. Let's press F2 and let's call it ice machine. And we go and we can select this and hit F2 and call it cooler. Let's just do that. And this over here, we could call this kitchen cabinets, F2 kitchen cabinets. And then we could take all of these things. The appliance is here, the cabinets and we could put those in that new kitchen counter collection. We can press M counters, kitchen counter. And there they go. Now they're down in here. Now for these handles, we could take these and we could all at once or create a new scene collection and put them in it. So let's press M underneath counters. Let's click on new collection. Let's call this drawer pulls. And let's click OK. And there we go. So now we've got a collection called drawer pulls and all of those items put in that let's also take these drawers here and let's put them somewhere. Let's press M counters and we'll just put this in kitchen counter. And also I guess we should maybe do a similar thing for this kitchen island. We've got the two objects here out on their own under counters, but we've got all of these handles. If we wanted to find them in the outliner, we could do the same thing that we do here in the 3D View. Pressing that NUM pad period key. If we hover over the outline or we can press NUM pad period key and it will find that object right there so we can see where it is. It's under cabinet handles and counters, so they're pretty much in a good place, I think here. But let's create another collection with the cabinet doors and the island. And let's press M under counters. Let's create a new collection called kitchen island. And let's put those in there. There we go. So now we have all of those organized. Well, one thing I didn't do is put the sync anywhere. Let's do that. Let's press M and put that in kitchen counter. Yeah, I think that's a little bit neater now if we twirl that up, it really doesn't look a whole lot different than it did. But within that counters seen collection that really clean that up and organize it a bit. So in the next video, let's begin working on the furniture. And I think what Let's do is work on those in tables. Something that's relatively simple that we can begin with. And put it here in the center of the room just to get a sense of their size and proportion. So in the next video, let's begin working on these.
30. 030 Modeling the End Tables: To create these tables, I've brought up image 2775, and let's take a look at it a little bit closer here. Kinda zoom in here and see what we can see. I think I have another image that's actually a little bit better. Let's, let's go back and see. I think I've just taken an image of just one of these integrals or excuse me, the two of them, here they are. So let's take a look at these. This is a 2791. So let's zoom in here and take a look. So a couple of things here I see is that first of all, these corners, here are your normal corners. But then also the interior of these is a little different. Look at how it angles in. This isn't a square, it's actually a cylinder. And it looks like it's maybe five-sided. But I'm not sure that we wanna create a cylinder for this. I think we might want to begin with a cube and then bevel this edge on the interior so that we can extrude this center piece on the floor. So let's take a look at how we might create this. I'll press Control Spacebar to go back to here. And let's go ahead and hide everything. I'm just gonna click and drag on all the i's here and hide everything so we can just concentrate on what we're working on. I'll move the cursor back to the center of the grid with shift S1. And let's go ahead and create a cube. And I think this is what's going to be a vertical leg here. I'm going to zoom or reduced the size of this a bit and maybe scale this up. I'm looking at these four grid squares right here thinking maybe I'll try and make, at least for now the tabletop about this. So I want to maybe get something like this. And then what let's do is let's bring this up to the grid. And to do that, remember, we can just take this Z and copy it into this x0 and then divide by two, and that'll pop it up to the top of the grid. Now that we've done that, let's go over here to the top view and let's take a look at this. I think I'd like to scale it back out just so it's in line with some of these squares so I can see it just a little bit better. I'm going to hit the S key and just scale this out. So it's kind of in line with the squares. Because I think what I wanna do is bevel the edge until it meets, till it aligns with these points right here. So I'll tab into edit mode. And the one key for vertex mode. And what Let's do is what's border select these two points. And before I do anything, I better apply the scale. Recall that this particular tool really is affected by the scale of the object, and we want this to be uniform scale. So let's press control a and apply the scale. There we go, all ones and now its tab back into edit mode. And with this edge selected here. Like this. I'm going to press Control B and Bevel this and take it down about to there. You can see I've got these points intersecting right there. And that gives me a 45-degree angle so that when we extrude these, it'll go toward the opposite corner. Alright, so let's try that. Let's now take this and let's move it. Let's move it over here. Let's say something like this. I don't know if that's I don't think that's quite right. Let's move it out to here. Yeah, let me press this seven key again and let's move it out to here for now. Let's see if this will work. So with this in place, let's now create the other corners. What we can do is move this origin into the center of the grid and then mirror both along the x-axis and the y-axis. So let's move that origin object, set origin, origin to 3D cursor. Now let's come over here to the modifiers panel, and let's click add modifier and mirror. And there we go. Now it's mirroring in the x-axis. And then if we click here, we can also mirror in the y axis there. Okay, so we've got something resembling our table. It seems to me that this may be a little bit tall. It's now that we've got these in place, let's see what we think here. We can, we can raise and lower this when we're completely done with the table as well. But I'm just trying to get it close here. That's all. Now that we've got this, let's go ahead and insert some edge loops so we can extrude both the top around this wood panel and the bottom cross beam. So let's, with this one here, let's press Control R and scroll the mouse wheel and click two times and then press S and Z and scale these up til we get him about the right width. Let's go about like that. Now what we can do is we can come down here and we can select this face right here. And if we go back to that top view, now we can extrude and watch this e. And now they're all coming toward the center here. That's what we want to zoom in a bit and we can delete this face right here. And I'm going to bring these on in now once I do that though, I selected this edge, you can see my move Gizmo is in the global orientation. It's aligned to the global x and y axis. I can come up here and change it to local mode, but that doesn't do much good. We can change it to normal, and that then switches it to be in-line with those edges. So now we can just take this and drag him in until they overlap about like that. And we go. So now we've got that piece. Now, these parts up here, the top crossbars. We can select this face here. And once again, we can extrude it toward the other corner. So if we hit II and pull out, we can go like that. Now let's zoom in and let's delete this face here so we don't have any internal faces. And then we can select this edge and we can pull this in. Now, we overlapped the bottom, but here we can clip these together. If we come over here and choose clipping, and then drag these towards each other. Now they're connected. Now I can't move them apart once they've been clipped together, and that's fine, that's good. Now let's come over here and select this face over here. I'll grab that, go back to the top view it e and pull these in. And we go now we can select or delete this face here, select this edge around here, and clip these or snap those together so we can't move them apart. And there we go. So now we've got the basic frame of that table. With this done, we can come back and maybe select these top pieces here and just get a better sense of how tall this should be. I'm gonna change this back to global orientation. And we can move this up or down. And kind of find the right height for that. Maybe about like that. Let's try that. Okay. Now that we've got this, let's create that top. That would panel that fits in here. I'll just press shift a and create a new cube. And let's press S and Z and scale this down quite a bit like this, and then pull it up and maybe a little bit narrower or something like that. Now, let's go to the top view and let's scale this in. I'm gonna press S, Shift Z to turn off the z-axis because I just want to scale it in, in the X and the Y. I'm just gonna make it just a little bit smaller than that opening there. And then what I'm gonna do is grab this edge right here, all the way around all these edges. This one, this one, this one. And then what Let's do is what's used the Bevel tool to round it out a bit so it kinda fits in here. Before I do that, once again, I should apply the scale. Let's do that. Control a, apply the scale. Now let's go back to edit mode, press Control B. And let's bring this in about that. And I'm going to scroll the mouse wheel and add a couple of edges to this, something like this. And there we go. Let's try that. Now I'm going to take this. I'm just gonna drop it down in there with it sticking out just a little bit. Okay, and then let's go ahead and grab this edge up on top. And let's bevel this just slightly. We don't need quite so many edges. I don't think. Something like that. And we go, all right, now let's go about smoothing it. We can come up here and go to shade smooth. And then look at this. We've got one of those creases again. Once again, we've got a large polygon going into multiple sides here. This though is a fairly easy fix. What we can do is we can actually select this face here and we can just inset it. We can press the I key and just inset it a little bit. We can't go too far else we get something like this. That if we go and get a little bit something like that, that pretty much cleans it up. And then we could come over here and turn on auto smooth. And let's go ahead and combine it with this piece here. Control j. Turn on auto smooth again. And now let's do is let's bring everything back and see how it looks to me. It looks like it's still a little bit too tall. I could be wrong. Let's go back to that other image here like this. Let's take a look. Well, not too bad. I just feel like it's just a tiny bit too tall. Let me go back to wireframe and let's just select all of this here. And I'll bring all this down just a bit like this. Let's try that. Yeah, that looks pretty good. Okay, so now what Let's do is bring everything back here. And of course are in table is too big. But what we can do is now just scale it down. We can take it over here and see how big it is next to the counter. And by the counter it feels a little too small, so maybe I'll bring it up a bit like that. Bring it back. We could duplicate it and see how we're doing here. Yeah, so there we go. We've got our in tables in I think for the next piece, let's maybe work on this couch and see how that looks.
31. 031 Modeling the Sofa: Well, I guess since I've cleaned up the outline or a bit, I should go ahead and clean this up as well. I've left these hanging out here as cubes without being named properly or put in a collection. So let's select one of these and I'll just hit F2. And let's call this in table 01. And this one here will call in table 02. And then let's select both of these, and let's press the M key and let's create a new collection. We'll call it furniture. And we'll put these init. So now we've got that new collection with our objects in that collection. Okay, so now let's think about how to create this sofa. I've got a couple of other images we can use. I'm gonna go ahead and click on the scene collection at the top here. And so anything we create will go into there. And then I'm just going to drag over all those icons and hide everything. Now let's see what we can find in terms of a reference images. I've got, well here I've got this image here of the couch. I think that'll be helpful. And let's split this again. Let's click here and drag, and let's put another one over here. I'll open up the, I've got one from behind here, kind of a three-quarter view from behind. And then maybe down here below. Let's do a third one as well. Click here and drag down. And let's change this to an image editor. And openness up. Go to the reference images folder and let's see if we can find something a little bit more in front. So well, I think this one here and let's take a look at this. Yes, so this gives us kind of a front view. I think down below here it, it doesn't really have legs. It just kind of has this dark gray square or platform underneath here and it kinda curves on the sides are on the corners here. So I think we need to keep that in mind as well. Alright, so here's three views of the sofa. I think these will help. So let's go ahead and begin by creating a cube. Let's just create a cube. I'll go to the front view here with the NUM pad one key. And let's scale this in the z-axis. And what I'm gonna do is just try and work on one of these cushions right here, the bottom cushion, maybe it's about like this. Let's say let's maybe put it about like that. So what I'm gonna do is just kinda block this and just put it together with basic shapes. Get a sense of the size and the scale of it, the proportions, and then begin to add some details. Alright, so if this is a one of these cushions here, I think maybe it's a little bit narrower. Let's now do one of the back cushions. Let's do that. Shift DY and I'm just going to move it back here and scaled in the y. And maybe something like this. And it looks like it. Is even with the bottom of this hello here. Ok, so let's maybe grab this face and bring it up to get that back cushion like that. And then I'll take this and duplicated again and move it in the x-axis. And let's scale it in the x and see if we can get one of these in pieces here. Maybe something like that, and select this face and pull it up. Now about to hear. Feel like this is, this should be a little bit wider now that we have this in here. But before we do anything else, what I wanna do is maybe select all of these and join them together, control j. Now I'm gonna move this cursor or move the origin of the object into that 3D cursor. Object, set origin, origin to 3D cursor. And now we can use the mirror modifier to put the other side in there so we can get a better sense of the proportions of it. There we go. Oh, I didn't add this one. Let me select this shifts, select the cushions there and control j, and that'll add that into that group or into that object. Okay, so now we can get a little bit better sense of what we've got here. So if I take this face and move it in just a bit, maybe like this. And I will press all Z to go into X-ray and I'll border select these and maybe move these now Tibet. So just having that other side there kinda helps in figuring out the proportions. I'll also turn on the edit cage on the other side. So when we tap into edit mode, we can see the polygons on the other side. Alright, lets try this. So let's say we've got that fairly well blocked out. I think the only thing I need here is maybe to take this face and pull it back, even with the back of these cushions here. And then let's go ahead and put that base on down here. We tap back into object mode. I'll just go to the front view here. Let me go to wireframe. And then let's shift a. Let's create another cube and then bring it down. Scale it down in the z, and put it down here as well. I'll just scale out in the x and it looks like it hard to tell, but it looks like it goes about to the middle of these in pieces here. And then we can move it back. Maybe something like this. Let's try that. Alright, so we have the basic outlines, kinda the proportions of this. I think I'll also take this and add it to this group controlled j. So we have it all in one group now are all in one object. Now we can begin maybe using our Bevel tool to give it some of these curved, rounded edges. Let's first of all, at the end key and take a look at our scale here our scale is off, so let's press control a and apply the scale. Then let's tab into edit mode and let's begin selecting edges that we think we want to bevel. So I think just about everything all around here. I think I'm going to wait to bevel the back edges, they look a little bit tighter than everything else. So I think I'll wait to do that. But pretty much everything else I think we can select here. I need to grab this edge right here. I'll press Control B and pull out a bit. Bring those in. Yeah, there we go. Okay, and then what I should do is grab a couple of these faces and pull them out, but I need more edges in here to do that. Let me best control are and create two edge loops here. And control are and create two edge loops in here. And then I can take this face, let's say, and just kinda pull it up just a bit. Give us a little bit of a cushion type area, maybe something out here like this. Let's add a few edge loops in here. And maybe a couple in here. Let's say maybe pulled these up like this. And maybe I'll grab this and this and this and kinda pull these out a bit, just a little bit. We should add a few to this. Maybe I'll add two to here. And we could add maybe to here. And then I'll just take these and kind of pull this up just a bit. This maybe pulled these out just a bit like this. We could probably add a couple of edge loops up here and grab these and pull these up a bit like this. Maybe I'll do the whole line of bases here, something like that. So we're just kind of bulging amount just a bit. So they kind of look like pillows. Alright, so now let's do, is, let's go ahead and smooth it and see how we're doing. I'll go over here to object shade smooth. And let's come down here to our object data panel and turn on auto smooth. And let's click and drag up. Maybe do around, I don't know, 60 or so. Yeah, we're getting there. Alright, let's work on the edges on the back here. Let's select these edges all the way around here and all the way around here like that. And let's just give these a little bit of a bevel, not quite as much as the others. Like that. We've got a bit of an issue here with that smoothing. And that's because I inserted edge loops after I beveled. And you can see the edge loops weren't able to go through this face because it was an n gone. So we can always take our knife tool if we want it and just press k and click and drag through here, and enter and K, and click and drag through here and enter. And that'll help clean that up quite a bit. We have one back here. Yeah, I'm not too wild about these back here. What we could do is we could just grab these once again hit the icky and this just a bit. And that helps clean that up. The last thing I wanna do is give these edges a little bevel as well. But as I'm looking at this, I can see some Z fighting happening here. And I think the problem is, is that I added this full object to the mirrored couch without splitting it in half. And so it's mirroring on itself, which is causing this Z fighting. So what let's do real quick is let's take the mirror modifier off of here. I can just come over here and turn it off like this. Then what Let's do is go into here and let's split this. Let's create an edge loop down the center and hit enter two times. And then I'll go to face mode with X-ray and hit the B key and border, select all of this and delete this. Now we've got it just in half, right? What we can do now is turn the mirror modifier back on. And there we go. Now if we tab into edit mode, we don't see that Z fighting anymore because it's been split in half and mirrored over properly. Alright, so let's select these two edges. It control B, and let's bevel these out like that. Now that we have that pretty much in place, let's bring everything else back by clicking and dragging on all of these. And we need to spin it around and the z-axis, r, z 180. And let's bring it over here. Scale it down quite a bit. And let's see how we're doing here. Yeah. So all right, we've got our couch in here. In the next video. Maybe I kind of would like to work on some of these stools here. Let's create one of these tools and then duplicate them over here. For the kitchen island.
32. 032 Beginning the Stools: Before we move on, let's go ahead and clean this up a bit. Let's just call this sofa and drag it into the furniture collection there. Okay, now let's go ahead and join these back together. And let's take a look at creating one of these stools. Now I think I only have one reference image for this, but I think that should be enough for us. Here we go. So I'll press control space and here we go. Now, the interesting thing about this though, there are a couple of interesting things actually, and to me they're kind of fun. One thing is this nice smooth curve we have here. How did we get that? And then also the legs here are actually turned in 45 degrees. So the outside of them, kind of like the end tables, faces out at a 45-degree angle. Whereas I guess on the end tables the inside based in at a 45 degree angle, but this is like turned and then it connects, I think, over to the other side. This is something that creates an X pattern underneath the chair here. And then lastly, this little tube around here that connects all the legs together. So I think there are a couple of interesting pieces to this. Let's, let's give it a try. First of all, I think I want to create this top part, get that in, get the basic size n, and then we'll work on the legs. So let's select the scene collection up on top. Let's click here and hide everything. And I think I'll go to the side view here. I'll press the three key on the NUM pad. And to get this curve, I'm going to use a path. And then once we've created the path, when, once we've created this side edge, we can extrude it across to get the width of the seat. So let's begin by creating a curve and a path. Actually I'm gonna go over here. Here we go to the front view. We can see it better this way. Alright, so I'm gonna pull this up. And if we tap into edit mode, we can choose any one of these points that we want to move around. I'm just gonna take this one and almost start moving it up. And this is going to be this back part, right back here. And maybe this over here will kind of be that front part here that curves down. So R curve isn't quite in the right shape yet. What we need to do is add more of these points. To do that, we can always just select two and right-click and choose sub-divide and, and that will add a point between those two. We can select these two here and right-click and sub-divide there as well. If we tap back into object mode, we can see we're getting a little bit more of that curve now. Maybe I'll take this and move this up a bit. And from here it's just a matter of adding points, moving them around and getting them basically in the right shape. So I'm gonna take these two and right-click and subdivide and then just select this and move it toward that curve. And the closer we have points to a curve, the closer these points are, the tighter that curve will be. So I'll add one in here. Let's say like this. Move that up. And so we're getting like a tighter curve there. I can maybe grab this and move it down like that. Yeah, so I think we're getting something like this. Feel like these are still not quite right back here. Let's try this. In addition, we could maybe, well, how flat is this? It's kinda hard to tell. There might be a little bit of a curve in there like that, something like that. Okay, and then maybe I'll bring this up. Maybe we can take these and pull these out just a bit like that. So we're getting there. And b, I'll bring this forward some I feel like I need one more point right in here, right between these two that add one right there. Let's see how that helps. Yeah, c, So now this can help that back part kind of curve in just a bit like that. Yeah. Okay. Alright. So if we tumble around, there's the basic shape of our chair seat. From here, what we need to do is convert this to a mesh and then extrude it across to get the width. However, if we take a look at this now, if you recall, when we created the closet handles, we could go into wireframe and see how many edges there are work because we had a tube. But here if we go into wireframe, we don't see any difference. But what we can do is look at all of these little edges, these little black lines. All of those are going to correspond to edges once we convert this to a mesh. So that's quite a lot. We need to reduce that a bit. So let's go over here to that path panel again. And this resolution preview you, let's bring this down and you can see as we bring it down to one, that really reduces it. But I think that's going to be too much. Let's bring it up. Bring it up to three. Let's see how that looks. Yeah, we're still getting a fairly nice curve with that. So let's go with three. And then what we need to do is convert it to a mesh. Now we can go up here to object, convert to, or we can just come out here and right-click and choose Convert to mesh. And there we go. Now we don't see much change, but we tap into edit mode and hit the one key there, all the vertices. So that's what we need to be able to extrude it out. So let's just hit the a key and select everything. And then let's hit e and y and extrude this out like that. So how, why do we think we need that? It looks like it's fairly wide, something like that. I think. Let's give that a try. Now that we have the basic shape of that, we need to add thickness to this. And instead of extruding to get thickness, I think what lists do is use yet another modifier down here in our modifiers panel called solidify will go to add modifier and solidify. And if we click this, you can see it added just a little bit of thickness there. We click on thickness and drag. We can extend this out quite a bit. Let's click on even thickness, so it'll try and keep it even all the way along the object. And well, that's a little bit too much, isn't it? Let's bring it back. That looks pretty good, actually, Something like that. Yeah, let's go with that. Let's click Apply. Alright, now if we tab into edit mode, we can see that geometry now has been expanded. And then let's smooth it as well. Let's do that. Let's come over here to object and shade smooth. And we've got some issues there. So let's come down here to our object data panel and click on auto smooth. And I think just right there that, that looks pretty good. Let's just go with that. I'm going to go to the front view and kind of bring that up to about where we think it might be. It's kinda hard to tell here, but maybe something like that. And then in the next video, what Let's do is work on creating the legs of our stool as well.
33. 033 Continuing the Stools: Now that we have the c, Let's go ahead and work on the legs. What I'd like to do is maybe go to this front orthographic, which is the side of the chair here. And I want to create a couple of cubes for the legs beginning down here. And I'm not going to immediately turn them 45 degrees. I'm going to get the whole thing modeled here from the back to the front on the other corner. And then I'll turn it 45 degrees once we have that all modeled. So let's see what we can do. I think I'll go to wireframe and let's press shift day and let's create a cube. And I will scale this down quite a bit. And let's move it up to the top or to the ground plane here with our z field trick here. Dividing by two. I'll put this up, put this over here, and I'll duplicate it and move it in the x and move it over here. So we kind of have something like this. Now, since this is going diagonally from front to back, it's going to be longer than it would going front to back, if that makes any sense. Uh, it's it's a longer distance from one corner to the other diagonally than it is straight from front to back. So what I wanna do is take these two objects and join them together, control j. And let's tap into edit mode and go to face mode. And I'll select this face and this face. And I just want to bring him straight up like this. Now, it looks to me like the bottoms down here are a little bit smaller than the ones on top. So I'm going to select these two faces and I want to scale them in if I hit the S key, recall that's what happens. So I want to come up here to individual origins now, also there is a shortcut key for that menu. You can press the period key on the keyboard, not the one on the NUM pad, but on the keyboard underneath the L key. And that brings up that same menu in a little pie menu here. So we can choose individual origins or press the two key. And now if we hit the S key, we can scale those in just a bit so they're a little bit smaller than the ones on the top. Alright, now what let's do is let's insert some edge loops so we can connect these all. Press Control R and hit the Enter key twice to make sure that is in the center and same over here. And what I really wanted, it was just them at the same location, whether they're in the center or not. Now if I just drag these straight up, look what happens, it would deform the shape of those. So I'm gonna hit G2 times to slide those up, get G2 times and see how those slide up without deforming the shape of the leg. Ok, so now if we bring these up to here and maybe go back to face mode, I'll select those two faces and let's press Control E and bridge edge loops. And now I can connect those two. Ok, so now that we have this, this is what we have right here. What I wanna do is adjust this just a bit before I try and put it in place. I think I'm going to need it to be a little bit bigger, a little bit longer from front to back. So let me just border select these and maybe pull this out. And pull this out just a bit like that. And then I think I'd like to take these and maybe pull these out just a bit and pull these out just a bit kind of angle amount. I feel like they're kind of angled maybe. And then once I have this, I also want to take these edges here. And let's bevel these because we've got a curved edge right here underneath the seat. So let's bevel these. I'm going to tab back into object mode and apply the scale, control a scale. And then let's go back to edit mode, and let's press Control B and bring these in. Scroll the mouse wheel to add a few edges and something like that. Okay, so now we've got what we hope is one of these pieces here. The true test is going to be when we actually turn it and see if we have it correct. So what I'm gonna do is maybe take this piece right here and let's bring it into the center. It's kind of hard to tell where the center of this is. I'm gonna go to objects set origin and origin to geometry. There we go. I'm going to bring this forward until that origin is kinda on the x axis there. It doesn't have to be exactly perfect. But now I just want to take this piece and turn it 45 degrees, but I want to do it at that center point. So let's move that origin to the 3D cursor. Here we go. Now let's press RZ 45, and let's see how we did go back to solid mode and take a look here. First thing that I notice, it just appears too small, right? Just doesn't appear tall enough. We're going to need to deal with that. But I think what I'll do first is maybe take this and the size of it this way looks pretty good. So I think what I'm gonna do is just duplicate this. And then I think I need to turn it 90 degrees. If that was 45, then going back the other way should be 90 or negative 90. So RZ negative 9-0. And there we go. Now we've got that. Ok, so now what Let's do is take all of this. I'm going to select this one, this one, and the chair seat and join it all together and control j. And then let's now tap into edit mode and let's try and adjust these sorts of little more the right height, a border. Select these, and let's bring them up a bit. Let's see how this looks. So little better. Let's take the legs. I'll go to base mode and press the L key. And let's take the legs and let's scale them. I think I'd like to scale them up a bit from this 3D cursor. So we can once again change this to 3D cursor, but also press the period key 3D cursor. And now let's scale this up just a bit like this. I'm going to bring this up a bit like that. And then I'll select this with the L key and let's bring this up as well. I can take this back to median point. Bringing this up. Yeah, I think we're getting there. Okay. So now what Let's do is create that tube around the bottom here. Maybe that's what we could call a foot rest or something down there. And once again, we're gonna use the path tool. Well, if not the path to a, we will use a curve. I think we're going to use a circular curve. But let's work on that in the next video.
34. 034 Finishing the Stools: To create this foot rest, let's, as I said, begin with a circle. Let's press shift a and go to curve. And then let's go to nerves circle. And there we go. Now, if we tap into edit mode, you can see we've, we've got eight points with which we can edit this circle. And I think we're gonna need more than this. So what I'm gonna do is just press the a key and we can right-click and choose sub-divide. Or I just wanted to mention you can come up here to segments and choose sub-divide as well. But we can choose subdivide and that will add a point between each of the selected points. Let's bring it up and put it in place or a kind of where we think it's going to be. I think it's going to be about this high I think. And then I'll scale it out just a little bit. Let just begins to intersect with those your legs. And then what we can do is begin placing these a little bit more where we want them. So like this one, I think what I'll do is grab the little blue plane, which means I'm only moving in the y and the x axis. I'm turning off the z-axis and I'm just gonna move this back like that. And let's select these three points and do the same over here. So I'm going to just try and get them in place here. More like that. Now, as I move these, these center points are kind of distorting it. So let's delete those. Let's just select those four points and hit X and delete vertices. Now those will stay straight between the corners. These corners are still too curvy, so I'm going to grab one of these and kind of move it in. Grab one of these, move it in. So these are a little bit sharper now. They're intersecting with the leg now. So let's pull this out like this. And I'm just going to go through each one of these and kinda push these in to make these a little bit sharper. Now, uh, let's do is go ahead and create a tube out of this. Just like we've done before. We can come over here to this curves panel, the object data properties. And we can come over here to the depth field under Bevel and click and drag, and that will make a tube out of that. So let's bring it down quite a bit. I'll hold the Shift key down. Let's do that. Now we can do a little more adjusting in edit mode if we want, we can grab these, these four points or excuse me, three points, I should say. And we can begin placing these where we want them. If they're a little off, you can go through and adjust them now. That looks pretty good there. Alright, so once again, we've got to convert this to a mesh. And we can see by all the black lines here that we're going to have a lot of geometry. We get the Z key now we can see the actual edges. But let's go back up to this resolution. Preview you and let's reduce the polygon count quite a bit. Here. It looks like if we go below five, we get some blocking us around the corner. So I think this is probably pretty good. Let's now convert this right-click convert to mesh. And if we tap into edit mode there we can see our polygons. Let's selected and the chair and press control j and get those all joined together. Now let's take this object origin and move it down to the 3D cursors so we can scale it easily. Set origin, origin to 3D cursor. And then all let's give this a name. Let's call it stool. I'll give it a suffix of 0.001 so that when blender duplicates it, it'll just go to zeros are two, et cetera. And also let's come in here and do a little bit of smoothing, a little bit of beveling. Well, first of all, let's go ahead and smooth this. I'll go up to object and shade smooth. And that helps a bit. Now let's tab into edit mode. Let's grab these edges down here. And let's bevel these cars. I think it looks like there's a curve there as well. So let's just press control be in bevel these a bit, maybe like that. Okay, and then also let's get those outside edges here and here and here. And it looks like these and these. So I'm just gonna go through and select all of these edges all the way around these legs here. Okay, I think I have all of those edges slighted. Ok, there's one here and let's get that one. Ok. Now lets do is tab into edit mode. Let's take a look at the scale. I think we're good, they're all ones. So let's go back to edit mode and press Control B. And let's add a bevel here. We probably don't need too many edges here, but maybe something like this. And there we go. And then what, let's do this, let's put this in place. So let's go back to here and bring everything back. This of course is huge and that's a little too big. Let's bring it over to the kitchen island here and let's scale it down quite a bit. And if we go back to one of our images in the reference images that kinda has him at the counter. We can see they're just a little bit lower and it looks like actually the legs flare out quite a bit more than I have here. But I think that's okay for now. Let's go ahead and go with that. I kind of liked the look of it, but it isn't exactly like these. That one angle gave me a skewed view of it, I guess. But if we put this here and let's go ahead and duplicate these, I'll press Shift DUI. And let's how many do we have here? Five. Let's put five in. And there we go. Now, I kind of like things that are a little bit unorganized because as people we don't put things in exactly the same place, you know, all lined up perfectly the way we do in 3D. So I'd like to take these and press R and Z and turn them just a bit. Just just so they're they're not quite perfect. I like it feels more like a human place when they're just not quite perfect. You know, something like that. There we go. Alright, let's take a look at it. I'm going to press shift tilting. And let's drop to the floor and let's walk around here. So how does that look? Actually, that doesn't look too bad. Yeah, I think we're coming along here. As I said, if I had it to do over, I would make the legs a little wider than you certainly can do that by just spreading them out more when you're creating the single first leg. But generally speaking, I think that looks pretty good. So in the next video, what let's do is let's work on some other furniture here. Maybe let's work on one of these chairs right here. So that's coming up next.
35. 035 Modeling the First Chair: Well, just like before to create this chair, we're gonna need some better reference images. So let's go ahead and take a look at that. Here's one, this is pretty good. This is 2789. Let's open that up. And also let's get another window in here as well. Let's click here and bring this down, and we'll switch to an image editor. And let's open up the reference images. And I guess this is the one that I took from the back. Yeah, that looks pretty good. So let's work with these two for now. I also think that my, my outline or is still kind of a mess. I just want to clean these up. Let's just select, let's just select these objects here. And let's hit em and we'll create a new collection. We'll call it stools and click OK. And now we've got our collection here called stools. Let's take that and drag it into furniture. So we have that there. There we go. So that's just keeping it clean as we go. And now that we have that in there, we can just click and drag all of these. And that makes it easy to hide all of that. Oh, let me hide that as well. Right there. There we go. Okay. For the chair, I think what I'm gonna do is begin with the bottom of the chair and then extrude up to get the back. This is a fairly complex object in terms of just the shape and angles. And I've found that a lot of times, if you have a complex object like this, it's really easier to begin with a two-dimensional plane and get that plane in the proper shape and then give it thickness. After that, you can be pretty difficult to get this kind of shape when you're working in three-dimensions, it's easier, I think, when it's in two dimensions and then pull it out into three dimensions. Alright, so let's, let's press shift a and let's create a plane. And the first thing I'm gonna do is split it in half. Let's tap into edit mode. And let me spin back around over here. So the x-axis is going to the right, and that's the positive X. So we're looking at this now from the front with the x going to the right. Let's press Control R and hover over this. And let's add an edge loop right down the center here. I'm just going to hit enter there. Once we do that, we can take the face on one side and let's delete it, delete faces. And now we can measure it over so that as we're working, anything we do on one side happens on the other. Let's come over to the modifiers, panel modifier, and let's choose mirror. And while we're here, let's go ahead and turn on clipping because we want those center points, that center line to stay together. And in addition, I'm going to turn on edit cage here so that we can see the polygons on the mirrored side as well. So I'll turn that on. Ok, so now. If this is the front of our chair right up here, it looks like it goes back, it kind of angles in. So if we tab into edit mode and go to vertex mode, I can take these and kinda pull them in like that and you can see how 11 side moves from the other side does. So I think we're gonna need more resolution in here. We're going to need to subdivide this. So let's hit the a key to select everything and then right-click and choose sub-divide. Now, once we do that, we can come down here to this sub-divide panel and just increased the number of cuts. And maybe I'll increase it to about there. I've got three cuts here. Alright, so now that we have that, what we're going to need to do is Extrude. Alright, we're going to need to get the arms while these are kind of arms or just kind of angled up and the back. So to get the sides first, I think I wanna do that. I want to just select some edges on the side here. And let's hit the three key and go to the side view. And if we hit e And I'm going to click and then I'm going to drag up in the z-axis here is that side panel. Now we need to turn it, of course. So what let's do, Let's turn it at a particular point. I'm going to select this point and move the 3D cursor to it, shift us to, I'll then change to 3D cursor. So up here, remember we can choose 3D cursor or we can just hit the period key and choose 3D cursor from here. Alright, so now that we've done that, let's select all of these points. And what we can do is we can turn them at that 3D cursor now. So if, so, if I hit r, you can see I can turn it like this. So what I'm gonna do is turn it a bit like this. And then I'm going to extend it in the Y, S and Y, and then it'll extend back like that. Let's now hit the Z key and move down like this. And it looks like I want to bring this back, I want to bring this point back like this. And I'll bring this one back a bit as well because it's going to want to angle back like that so I can take this May be here and pull it back. Let me hit the period key and go back to median point. And then let's bring that back like this. Well, we're not bringing all of those back now are we? Let's alt click that whole line, go back to the side view, will select that or excuse me, de-select that and pull that back about like that. You might want to do a bit of point pulling here. In fact, this is going to take quite a lot of point polling. Once we get everything in place, we're not going to be able just to extrude it and have everything be just right the first time. We're going to have to be pulling points as we go. Kind of like this. I feel like this is too narrow, too close in. We need to just pull that out. Alright, so now that we have this in place, what Let's do is begin extruding the back. So you can kinda see what I'm doing. I'm just getting the basic shapes with a two-dimensional plane. And then we'll add the thickness. I feel like this whole area here. Let me select these points back here. We'd like this whole area needs to come back. And in fact, look at what we've got here. We've got points on either side of the center line and that's not good, we don't want that. So what we can do, let's go ahead and select that whole center line. I'll press Alton click. And now I'm going to move these into the center and hopefully they're going to clip, since we have clipping on, these should clip together and seal up. So let's give it a trial. Drag and they go together and then I'll release. Now if I try and move them again, I can't. Now they're sealed up, so that's what we want. So for the back, what we need to do is select this whole row. I've, I've just pressed alt and click and selected that whole back row. And now let's begin extruding this up. So that kind of angles back, right, as it goes up. So let's try and get that as we go. I'll hit E and let's bring this up. But I'm also going to turn it all, get r And turn it like this. And maybe bring it in, in the y axis with x and y. This. Okay, so now let's do it again. Let's hit II and bring this up. I'm going to turn it again with the R key. And it begins to come out again like this. So I'm just going to bring it out like that just a bit bad. Now let's come to the front and see how it looks. It also flares out as it goes up. So we need to probably bring these out as well. And I'll maybe bring these now. So here's that point pulling I was talking about, so we're not gonna get it right the first time and that's fine. You can go in and just pull points around to your heart's content until you get it just the way you want it. Now let's go back to the side view and continue extruding up. But what we can do is see both the front and the side view and the top all at once we can go to our quad view. And you can get to the quad view by pressing Control Alt Q. And there you go. So now you've got one view here that can be a perspective view. And then you've got a side view, front view, and a top view. So this can be helpful here as we begin extruding up toward the top of the chair. So let's press Alt and click that edge again. And let's begin moving this up. So let's hit II and pull up like that. Once again, I think we're going to need to pull forward like this. Kinda like that. We're gonna need to expand it out, some flare it out just a bit like that. And I think these can begin coming out as well too. Alright, let's keep going. I'll press Alt and click that edge so we can extrude that whole edge up once again. This time I'm going to leave this here. It looks like it kinda comes back in on the side, but we do need to expand it out a bit. What we can do if we want, we can select a point in the middle here and bring that cursor to it, shift S2. And once again, we can move the point from which we will scale or rotate to the 3D cursor by pressing the period key, go into 3D cursor. Now if we select that whole row up top, we can press S and X and scale that out from the center. Tried to do that before because we're mirroring it would only scale it out based on one side. Since we've moved the cursor to the center now it's gonna do it throughout the whole width of the chair. I can select this edge and let's press S and X and maybe scale that out a bit so we can just begin adjusting this a little more if we want. That's looking pretty good. I think. Let's take it up. One more Extrusion here. I'll press Alt and click. We can press E and bring this up like so. And now let's expand this out again. Since the cursor is still in the center, we can press S and X and bring that out just a little bit more. Maybe take this one out a little bit more. So as you go, as you extrude and as you create the object, you're going to need to adjust and tweak as you go. And I suggest you do that to tweak as you go. Because if you don't do any tweaking or adjusting until the very end and then you've got a lot of work to do. And sometimes you can't even make the adjustments that you need to once everything's in. So I'm just going to take this now and press S and X and expand these out just a bit because it looks like the front of the seed is about as wide as the widest part of the back. So we want to probably spread these out just a bit. And that's what I mean, you're gonna tweak as you go. All right, so we've got the basic outline of the chair here. Let me press control all q to come out of that quad view, we can do a little more adjusting, of course. But I think in the next video, what Let's do is add a subdivision surface modifier to it and see if we can get some of this roundness, this curvy nature of the chair before we add any thickness.
36. 036 Continuing the Chair: As I look at this, it it appears to be too narrow. I feel like this part in the middle should be wider. Now I could select everything and press S and X and widen it out a bit. And when I get it to about where I feel it should be, this area up here seems to be too wide. So what I can do is I can use proportional editing tool. And to turn that on, you just come up here and click on this button. Now, the shortcut is the o key. So if I hit o on the keyboard, you can see it turns it on. Now what I'd like to do is just expanded this area while smoothly transitioning it to the other parts. So I'm gonna go to face mode and click and select this row of faces. And now if I scale out in the x, I'll press S and X. You can see that there's this fall off area around that point. Actually, let me hit escape and let's move this down into this area here just so it's easier to see, we could use it up here, but let me just press Shift S and cursor to selected. And now I'll select this row of faces. And now if we press S and X, we can see that area of influence. So if I pull out on this now you can see the more I expand that area of influence with the scroll button on the mouse, the more it smoothly transitions into the other part. So if it's at this point, it'll look like this. And then I can scroll the mouse wheel and expand that area of influence. So let's try that. Let's see what we can do here. I'm going to press S and X and I'm going to pull out. And it looks about like That's pretty good. Right in there. I may have to do some polling around the top and the bottom, but something like that. I think it looks pretty good. Let's try that. Now. There are a couple of things that can be adjusted here. Like say this edge, I could pull out a bit. And once again, I can use that proportional editing tool. Let's change to median point. I'll hit the period key and change from 3D cursor to median point. And then let's press G and X, and I'll scroll down some. And if we pull out just a bit, now we can kind of adjust that line just a bit. Something like that. Maybe I'll hit G and X with this and pull out. So once again, you can do a bit of point pulling and tweaking as you, as you go here. But the proportional editing tool just gives you one more way to adjust things. So it's kinda nice. Alright, I think that looks a little bit better. Let's go ahead and turn off the proportional editing tool by hitting the o key. And now in addition to our mirror modifier, let's go ahead and add a subdivision surface modifier. So I'll come back over here to the modifiers panel and click add modifier and click subdivision surface. And what that does is it begins to kind of round out the corners. You can see here's the cage. Of our actual polygons here. And then you can see it's kind of rounding out any of the edges. Now if we want to collapse our cage to what the subdivision surfaces doing, we can come over here and turn on edit cage here as well. And now it conforms to that curved shape. So yeah, I think that's looking pretty good with all of this. Now we can begin to select some of this and pull these out a bit. Maybe bring this up a bit, something like this so you can go through and just begin tweaking now. Various points that you think need just to be in a slightly different place here. Maybe I'll pull these out just a bit like that. So you can see we're getting the basic shape of it now. And as I said, it's just easier to do when you're just doing it in two dimensions. So once you have it the way you want it, once you have it kind of generally in the right shape like this, then you can begin to add thickness. Now before I do I see that I'd like to maybe pull this back like this just a bit. Let's try that. Okay, I think that looks pretty good. So to add thickness to this, we're going to have to add yet another modifier to the modifiers stack. Now one thing about the modifiers tag that we need to keep in mind is that the order in which these modifiers are in the stack makes a difference, can change the look of the object and what the modifiers are actually doing. So if we add a solidify modifier to this, let's see what happens. I'll come over here, click add, modifier and solidify. And there we go. And not much happened. But let's click down here in the thickness field and see if we can add a bit of thickness. We can bring it up or we can take it down. I think I'm going to take it down like this. Let's try that. And that looks pretty good. That looks like the general thickness of this. And I'm going to click on even thickness to try and get the thickness even all the way around. And then let's apply this so we can begin working with the geometry all the way around. Currently, the geometry is only on the top part. So if we wanted to work with geometry on the bottom of the chair, we're going to need to apply the slidify modifier. So let's give that a try. If we click Apply, that's what happened and that's not bad. So now that we've got that in place, Let's start working on these details like this indentation and the cushion on the seat here. What I wanna do first of all is let's go to the top view with the seven key. And I just want to give this a bit of a curve up front. I'm gonna go back to my proportional editing tool with the o key and press a G and Y and on pull this Ford. And that's a little too pointy. So I'm gonna scroll the mouse wheel and let's bring this out so it's a little more curved. Something kind of like this. Yeah, let's do that. And then I'm going to turn it off and bring it back just a little bit like that. So we have just a bit of a rounded front there. It looks like I could bring these out as well just a little bit. Maybe these. So once again, some point pulling, you may just need to grab some points or some edges for some faces and just begin moving them to where you want them to be. All right, so this cushion here, let's see if we can get that. I'm gonna go back to face mode and let's select the faces of the seat here. I'm just going to press the C key and then click and drag and select the faces down in here, I think. Let's try this. Now. We'll just do is just Extrude. I'll hit E and I'll pull up. And so there's the beginning of our cushion now. It doesn't look too bad, but once again, there's gonna be some things we need to do. I feel like it needs to be closer out to the arms and the back. So let's begin taking these, say, these edges and let's begin moving them out toward the arms like this. And we may want to take the edges of the arms and begin moving them in as well. So we could maybe try selecting these and kind of moving these in like that. We could maybe take these edges here and kind of angle them back a little bit at kind of slopes back from the front. So if we grab these edges here, we can take them in and we can move them straight back like this. Or we can use the G key, pressing the G k2 times to slide it along the existing edges. So let's hit G2 times and slide that back. And then let's select this edge and do the same thing. Let's hit G2 times and slide that back. So that kind of angles that bag just a bit. Now, in addition, we need to have the back kind of push out some at it, it kind of bellows out just a bit here at the lower back area. So what let's do is let's take some edges in here, and let's use that proportional editing tool once again, let's pull these out. I'll hit the O key, and let's press g and y. And I'm going to bring this out and adds a little bit too much. Let's scroll in. So we've just bringing that edge up just a bit. And once again, let's do the same thing here. Kind of bring that out some. And we need to do that up in here as well. So let's grab some of these and bring these two with that proportional editing tool on. So we're just trying to get it so it has a little bit more cushion to it. Alright, I think we're getting there. We tap into object mode. This is what we have. I think we're gonna need to pull these edges out sum. And we're going to have to think about how we want to make this indentation right here. So we'll work on those things in the next video.
37. 037 More Work on the Chair: To get that indentation on the back here, I think I'm going to need to insert a new edge loop. I don't think we can get it in here with the edges that we have. So I think what I'll do is just press control are and insert an edge loop right here. And that actually gives us a little bit more of an angle, kind of like here. So that is actually a happy accident there. That's nice. Now, well it's do is keep that edge here and let's begin pulling some of these edges out and maybe moving them up a bit. Actually, I'll turn off the proportional editing tool with the o key. And let's begin moving some of these edges around. See how this works. I'll grab these edges down here and pull these forward a bit again. And let's grab these and pull these forward. And you can see what I'm doing. I'm just kind of keeping that edge there and pulling everything else forward just to see if we can kind of get a hint of that indentation there. I'll tap back into object mode, and here's what we have so far. So that's not bad. But I think what we can do is maybe take these here and let's pull these up right here. I'll just kinda bring that up. And let's grab these, bring these out and bring him down a bit. Alright, let's see how that looks. Yeah, I think we're getting there. That's kind of giving a hint that there's kind of an indentation there. That's what we want. Something like that. And also we should smooth this just so we can see it a little bit better. Let's do that. I'll come up here and go to object shade smooth. And there we go and look at this. Now we've got a problem. Do you remember how I said that the order of the modifiers in the modifier stack makes a difference. And you remember when I applied the solidify modifier, it was on the bottom. It is preferable when you apply a modifier to do it from the top. Because modifiers really work kind of from the top down. So what is happening here? Why is this happening? Well, if I come over here and let's turn off the mirror modifier for just a minute, right here. Take a look at this. We've got internal faces. And internal faces like this when mirroring and object is going to be a bad thing. And what happened is that because of the order of the modifiers in the modifier stack, it applied the thickness after the mirror. And that's how we got these faces here. So one thing we can do now is we can delete these faces and then reapply the mirror. So let's go into base mode and let's just select all of these internal faces here, all the way up here, all the way up here like this. And let's delete these. And now let's turn on the mirror modifier again. And there we go. Now it's clean. In addition, let's take a look at what happens when we change the border of the modifiers We have here currently, if I take this up, you can see a slight change. It's doing the subdivisions first and then doing the mirroring. So let's just, let's just test this real quick. Let's just bring this up like this. And when we do that, you can see how that's affecting the connection between the two sides. Let's change the order of the modifiers here. And now look how much smoother that is because it's applying the mirror and then the subdivision surface. So let me press Control Z and take that back to there and there we go. Now let's turn this back on. And we can move this up now to here. With this. Now I think I just need to do a little bit of point polling in here and some of these edges could come out as well. So I think I'll do that, just kinda clean this up a bit. And there we go. I think that's getting better Also, I'd like to grab one of these points in here and just curve this up a bit. So if I hit the proportional editing tool again with the oaky and pull this up in the z, I'll hit g and Z0 and pull that up. And then I'll scroll the mouse wheel and expand that out a bit just so it curves up just a bit comma capello. And we go. And then I feel like I need to bring some of this in here too. So let's take some of these edges and bring them forward just a bit. But let me turn off that proportional editing tool here. And I'm just going to bring these forward just a bit like this. Something like that. Just want them to kind of move a little bit closer to the pillow. And then I can take maybe these points here and begin moving these back just a little bit. I don't want to overlap too much. Looks like I've got some overlap happening there. So once again, just a little bit of point pulling can actually make quite a bit of a difference once you're at this stage. All right, so let's see if there's anything back here we can do. Yeah, it looks like I could maybe take some of these points here. Turn on the proportional editing tool and press G and Y and kind of bring these back a bit. Kind of like that. Maybe let's see how that works. Yeah, that help smooth that out a bit. Let's go ahead and begin work on the legs. Now, if we take a look at this, it looks like there are four legs coming out of a central cylinder now we can't see that fourth leg there, but I think that's what it is. So let's begin with a cylinder and work from that. I'll go back to the front view with the one key on the NUM pad. And I'll bring this up to about where I think it might be something like that, maybe, maybe a little bit lower about there. And then I'll move the cursor back to the center of the grid with shift S1. Then let's press shift a and create a new cylinder here. Now, since there are only four legs here, I'm going to create this cylinder with eight sides. I'll select every other face to extrude the legs out. So let's give it eight sides here. And then I'll scale it way down until it's about the right width. Hard to know, of course. And let's get it in the right place. I don't think this is quite right. Let's move it back to where we think it should be. And then let's tap into edit mode, grab this base here. Once again, I'll turn off the proportional editing tool. Let's grab this face and let's bring it down like this to about here. It looks like the legs kinda hover above the ground about like this maybe. And then let's insert an edge loop with control are, and let's bring it down about like this. I'm trying to look at the width of the legs right about there. Now, let's select every other face here, all the way around like this. And then what we're gonna wanna do is extrude them out in their individual directions. So we're going to want to use this independent origin or individual origins here. When we do our extruding, let's go to the top view and hit the Z key for wireframe. And with those faces selected, let's now press E and extrude them out. So let's go here. Let's press E and pull out with the mouse. And each one of them is going to extrude out on their own. How far should we go? Well, how about like, let's try about like this. Let's try that. And then what let's also do is scale in the z. So let's press S and Z and we can scale each one of these down a bit. So they're a little bit smaller, narrower at the end. Then they are up here at the cylinder. And then let's press the three key to go to the side view and we'll just take these and drag them down toward the ground. Like that. I think there's just a little bit of a foot underneath these. Let's see. Yeah. A little bit of something. I think I'll just put a, a cylinder under there. And another thing that we could do is we could narrow these up just a bit so they aren't quite as thick as it is from the cylinder base there. So what we could do if we just tried to scale in the x or the y currently, if we hit say, S and why they would kinda turn, you see how they're turning and we don't want that. So we need to scale in each of their individual axes entity that we can come up here to the global or the transform orientations menu. And we can change from global to normal. And now you can see how that transform gizmo has changed. Now, if we scale in the x axis, let say S and x. Now there are going to scale individually right there. So now we can make them a little bit thinner. And there we go. And also, why don't we take one of these edges here like this. And let's take each one like this. I'm gonna go through and select each one of these. And we go, and I'll go back to global. But now what I'm gonna do is use that G key, press the G k2 times to slide that edge back because it looks like they're kind of angled back here. So I'll hit G2 times and we'll angle it back like that. There we go. Alright, so I think we're beginning to get the legs now. I think in the next video, what Let's do is work on adding the feet, beveling a few of these edges. And then we'll also talk about the unique issues of trying to combine two objects that have differing modifiers on them over here in the modifier stack. So we'll work on that next.
38. 038 Finishing the Chair: All right. Let's add the feet to the chair. As I said, I think I just want to use some cylinders here. Nothing fancy. I'll just create a cylinder and instead of eight sides, let's give it, let's just give it 12. And let's scale it in the z. And let's just scaled all the way down like this. And let's place it underneath one of these and see how it looks. Let me go to the top view with wireframe here and let's just get G and drag this over. Now it looks like it's a little big. Let's scale it down some let me, So it's about like this. Let's try that. I'll go to the front view. And let's just move this up and give it a little more thickness right here. So that'll be one of the feet on the chair there. We're never gonna get that close to it. So to see anything other than just the hint of that. So I'll take that now. And unless just go to wireframe and let's just duplicate that with shift t and then move that over here, like that. And let's hit shift t and move it over here and over here as well. Now, the next thing I wanna do is add a little bit of beveling to this. It looks like I got two of the edges, but I didn't get these edges in terms of just moving them back. Let me do that real quick. Grab this edge and hit g twice and kind of move it back just a smidge. And this 12, it looks like I failed to grab this. Here we go. Let's see how that works. Yeah, I think that'll be okay. And then for our beveled edges, let's first check our scale. I'll hit the Enter key. And over here are scalars uniform, but it isn't applied. So let's go ahead and apply the scale, control a and scale. And then let's tap back into edit mode and go to edge mode. And let's just select these edges right around here. The ones on top, and then the ones around this polygon right here. And let's just try beveling these and see if we can get some curves on here that make it feel a little bit more realistic. And once we have all these selected list, just press Control B. And then I'm going to pull the mouse out just a bit, scroll the mouse wheel till we get just some nice curves on here. Maybe something like that. Let's try that. Let's go ahead and smooth this. I'll select this object, shade smooth. And we can come down here to our object data properties and turn on auto Smooth. Now let's take the feet that we have down here. And let's add these to the legs object. I'll select all of those and then select the legs and press control j to join those all together into one object. And then lastly, what we need to do is join. Legs here with the chair up here. But the problem is, let me go to the modifiers panel. For this object we have no modifiers at all, and for this object we have to. So what happens if you try and join two objects that have differing modifiers? Well, let's see, let's, let's find out. Let's take this object and let's shift select this object, and then let's press Ctrl J. And there we go. So now we've got extra legs. So what's happened is since I selected the chair last and it already had both a subdivision surface and a mirror modifier on it. It added those modifiers to what we added to the chair. So that's not right. Let's press Control Z. Now let's do it the other way around. Let's select the chair, shifts, select the legs and less press Control J. And there's what happened. So since the legs didn't have any modifiers on it, when we added the chair or the seat part, it took all the modifiers off. So really neither one is acceptable as I think we're going to have to find a compromise. And I think the best way to do it is to go ahead and apply the modifiers for the seat and then join it with the legs after that. Now, it looks like in the last video, I think I had the mirror above the subdivisions and then I moved it again. So let's actually, let's move this up. And do we like the look of that? Or if I move it back down, do we like the look of that? I kind of liked the look of that a little bit better. Let's go ahead and leave that as is anyways, so I will twirl this down and currently our viewport subdivisions is at one. So if we hit the Z key, we can see that that's what the resolution will look like once we apply the modifier. If we increase this up to two, that's what it would look like and that's OK. A little bit too much, I think So let's take that back down to one. Let's hit apply. And there we go. Okay, so now let's also come down here to boil this down, we want to apply the mirror modifier and we want to ensure that clipping is turned on. So let's go ahead and click apply here. Okay? Now that we have no modifiers on that object, we can now select either one of these in any order and press control j. And that will join those two objects together as one. Now, we can of course, come over here and play with the smoothing a bit if we wanted, we could turn that on and, and click and drag, and drag this up here like this. So we get a smoother look on this, something like that. Alright, so now that we've got that all taken care of, what let's do is let's take this back into the scene and see if we can place it in our co-working space. I think I'll take this whole thing and move it up until it's kind of just over the center of the grid. And then I'm gonna move that origin to the 3D cursor here. Go to object set origin, origin to 3D cursor. Now it's going to be easier to move in scale with that point on the ground plane. Alright, let's bring it back first. I better give it a name, a proper name. Let's call it share. And then let's bring everything else back that can drag on all these. And here we are. Okay, so let's bring it, let's turn it 90 degrees in the z-axis, r, Z. And I'm going to hold the control key down and turn until I get 90 degrees up in the top left-hand corner. And now let's scale it down S and bring it down like that. Alright, let's see how we're doing here. It looks like that's a little too small. Let me bring it up just a bit like this. Let's see. And, you know, I should move these things into the center of the couch like that. And then is that about right? That looks pretty good actually. So let's take that then. And let's press shift D and X and move it this way. Now let's turn it in the z-axis, 180 degrees, our Z1A 80. And there we go. So in the next video, I think what I'd like to do is work on that table that's over here. Now that we've done the legs on the chairs, I think the table is going to be a similar thing. Let's see if we can find. I'm pretty sure I took an image of the table underneath. Here we go. Let's take a look at this Control Spacebar and bring it up like this. Yes, so if we create the table, these legs here are very similar to the ones we just created underneath the chair. So in the next video, let's begin working on that.
39. 039 Beginning the Table: To create the table here, I think I'll just joined this window together there, so we just have one window and then, well, actually I guess we need another one, don't we? I think let's let let's go ahead and grab this window and move it over. And we'll bring in another reference image right here. But let's go to image open and our reference images. And what I think I want is just an image of it in the room as a whole here let's take a look at this control space. And so I just wanted to get a general sense of how big this is. And generally speaking, it looks like it's about, if not quite as wide as the sofa here. And it's pushed over near the edge of this counter. I guess. I just wanted to keep a sense of how big it is in the room once we get to that point as well. So let's press Control Spacebar to reduce the size of that. And before we begin, let's organize these chairs here. We've got them out here and their own collection. So what let's do is select these two. Press the M key and within furniture, let's create a new collection. Let's call it chairs. Let's call it chair 0-1, cuz they're gonna be more chairs to come. And so of course now we have that collection here under the furniture collection. Alright, that's good. Let's go ahead and just click and drag all of these and hide everything. And to begin with, I'll just create a cube for this tabletop. Let's do that or press shift a mesh cube. Let's bring this up some and maybe I'll press S and Z and let's get it about the right height or about the right width, I should say. And we're going to be adjusting this as we go, of course. So let's get it about like this, S and X to scale it out like that. And maybe something like that. So to begin with, let's just go with that. We really don't know exactly what we want out of this quite yet until we get the other parts in. And the other parts of course, are the legs here. So let's think about this. I think first of all, let's begin with a cylinder and then create the legs in a similar way as we did with the previous chair. And then we'll create this cross piece here. Alright, so let's go ahead and create a cylinder shift a. And this cylinder, let's have it be instead of and 82. And I don't think I want to eight sides like we did for the chair. I think I want it with a little bit more resolution. Let's do 16. Let's try that. And I'll scale it down and let's try and get it in place here. I'll scale it in the z with S and Z. And let's scale it down until we get it about the thickness that we think it should be. Let's go ahead and do that and then move it over and put it over here. Now if you like, this is too low, so yeah, we're gonna need to be adjusting this as we go. Let's go with that for now. I'm going to press all Z to take a look through this, to turn on X-ray. And tab into edit mode and select this face here because we don't need that and I'll delete it. Alright, and then let's come down here and I'll go to wireframe and let's tap into edit mode and go to vertex mode with the one key on the keyboard. And I'll hit the B key and border select. And let's bring this down to about where we think it should be, where the legs come out of it. Let's go with right about here. And then I'll add an edge loop to get these legs extruded out. We're going to need faces down here. So let's press control are and place this right about there. And then, alright, let me go to the side view here. And here's these two side faces. I mean, we could come out with these faces here and extrude the legs out from here. But I feel like they need to come out a little bit farther. Let's, let's try. Instead of these, let's try these. Let's just see if this is going to be the proper distance. So what I've done is just selected two faces for faces apart. All right, so we've got four empty spaces and then two here and two here. So let's try and extrude those the way we did the chair, I'll go to the top view with NUM pad seven, hit the Z key for wireframe. And now from here, let's make sure we've got individual origins selected. And if we do, we can hit a0 and then pull out like this. And that'll bring those legs out like that. So I'm going to bring them out to about right here. Alright. Now let's take these and pull them down toward the ground. Let's do that. Let's take this and move him down like this. And then let's also make them a little bit smaller. So they seemed to be shorter here then they are back at the base. So let's press S and Z and bring these down like that. Alright, let's see how this works. I will bring these down a little bit further. And we're going to put little cylinders on here. It looks like right there. Alright, so let's go back to solid mode. Let's now create that center bar. Let's come in here and tap into edit mode. And maybe if we just selected this face and this face, let's try that. Let's extrude this out in the x axis. So E and X, I'll pull this out like this. And we go, let's flatten IT S x 0. And let's delete these faces. X, delete faces, okay? So now we've got that. Well, it's do is create the other side using the mirror modifier. So I'll come over here to the modifiers panel. And what we need to do is move that object origin into the center of the grid. Because if we hit the mirror modifier now if we added this now you can see it's just going to mirror around that point. So that's not going to work. Well, we need to do is move this origin to the center point, going to object, set origin, origin to 3D cursor. And there we go. Now let's turn on clipping. And if we tap into edit mode, we can grab these edges right here, alt click and drag him into the center and they should clip, oh, drag a man. And now that they've connected, if we try and pull them out again, they won't, they're sealed up. Ok. So let's also turn on edit cage over here so we can see the polygons on the other side. And now Alice do is add some of those feet on the bottom. Let's use a cylinder. Lets press shift a mesh cylinder. And I'll keep 16 signs here. That's fine. Let's scale this down. Press S and Z and scale it down a little bit further, Something like that. Now just go to that top view with NUM pad seven, if the G key and move it over to one of these legs here. And let's scale it down. Maybe I'll put it about like this. Write on that center line there. And let's go to the front view. Move this up a bit. It looks like I could make it a little bit bigger and scale it in the z, some like that. And maybe I need to bring these down a little bit more or let's try that. I'll grab this one. And let me go over here and grab this one. And then let's try and bring this down a little bit more like that. Alright? And then if we select this, let's take this and select this top face here. Let's instead it with the I key, like that. And then we'll extrude it straight up into the leg there. Already go, something like that. Now let's take this and take it over to the other side. Shift d y will bring it up here and put it in place, about like that. Okay. Now what we can do is add these feet to the mirrored object of the leg. So if we take this foot and this foot and then select the legs, we can press control j. And when it adds it to the object, it'll also mirror them over there. Alright, so we're getting there, we've got kind of the beginnings of the table. You'll like this table now has a little bit too thick for the size of the legs. Let's press S and Z And I'll just kill that down just a bit. Alright, I think what we need to do now is create that hole in the top of the table here. And that's for the electrical cords to go through when you're setup there with your computers or laptops. And to me, that kind of black thing there for the cords really says a business environment, you know, that to me says that this is a co-working space because you don't really see these kinds of things on people's tables at home. So in the next video, let's work on creating that, as well as adding some bevels to the edges of the table top and the legs.
40. 040 Finishing the Table and Rug: To create the little panel in the center of the table, I think what I'm gonna do is just use a boolean modifier again and then use that cutter as the little panel. So what I'm gonna do is press shift a and create a cube. And let's scale it down and kind of put it in place here. Maybe it needs to be about that big. Looks like it's a little bit longer than it is wide, so I'll kinda bring it out like that. And also, I think I'll add a little bit of a bevel on the edges of this. I can't really see it here, but let's go ahead and add a bevel. Before I do though, I want to make sure that the scale has been applied. So I'll press control a and apply the scale. And let's tap into edit mode and select these edges all along here. I just want a little bit of a bevel like this and I'll scroll the mouse wheel about like that. That's all I want is just a little bit of a curve. Alright, so now that we've done that, let's select that table and let's add a Boolean modifier to it. And let's select the eye dropper and click on the Cube here. Now, I think that'll be just fine, but recall that we can take that cube and come over here to the object properties. And right down here we can change from textured to wire just so we can see what it's done. And that looks fine. That's, that's about all I wanted. So let's just switch back to textured. And I'll go back to my modifiers panel, select that table. And let's just click apply. And there we go. Now we could take this cube. I'll scale it in just a little bit. And let's scale it in the z, x and z, and let's make it pretty thin. I think this is just a plastic panel. So I'll press S and Z and make it pretty thin like that. And then let's just drop it down into that hole. Once again. That may be a little bit too small. Scale it up just a little bit like that. And there we go. Yes. So we just have a little panel inside there. That's all we needed. Now that we've got that, let's think about beveling these edges. You can see there's a bit of a curve on the table top. And let's go ahead and get that. I'll select the table top. And once again, our scale is non-uniform, so let's press control a and apply the scale tab into edit mode. And I'm just gonna go around and select these edges all the way around on the side here. Even the vertical edges as well, because I want a little bit of a bevel on those two. And we go. And then let's press Control B. I'll hold the Shift key down and drag out just a little bit like that. Yeah, that's pretty good. Now down here, let's do the same thing we did before with the legs of the chair. I'll just select this collection of edges right around in here like this. And also this area on this side right over here. And the other side has been selected because we still have the mirror modifier on it. So let's press Control B. Pull out just a bit. Oh, and look how flat the bevel is. And of course we know that that is because we haven't applied our scale. It's tab back into object mode. Sure enough. Let's press control a and apply that scale. Now let's come back. Press Control B, and look how much better that looks. Let's scroll the mouse wheel in that like that. And we go. Okay, that's nice. And then also let's do the crossbar along the bottom here. Let's select these edges and this, and this over here. And then let's press Control B and pull out just a smidge to get that. There we go. Yeah, I think that helps. I think that's kinda nice. So before we try and add these objects together or join them together, of course, we should go ahead and apply that mirror modifier. Let's do that with clipping on. Let's click apply. And there we go. Now we can select the tabletop and this little panel in here. Let's press Control j and where we are. And then let's go ahead and just add some smoothing to it to see how it looks. So it's good to object and shade smooth. Well that's not perfect. Let's go down here to our object data properties and turn on auto smooth, and that helps quite a bit. I think our corners are doing pretty well here. Yeah, that looks pretty good. Alright, so now I think let's bring it into the scene, but before that, let's bring this object origin down to the center of the grid so we can scale it and move it around a little easier. I'll go to object set origin, origin to 3D cursor. Now let's bring everything back. Ok, let me change the name here. I'll call it table. Now let's bring everything back and let's try and put it in place. I've lost the counters here. Look at that. Let's throw the counters down and sure enough, these are still hidden away. And I lost my stools to, let's throw those data. Here we go. There we go. Alright, so we've got those in there. Let's move this over and see if we can get it in place. And let me take a look at this one image here so we can kind of get a sense of where it's supposed to be. It's too big. So let's scale it down a bit. And let's move it over. And I feel like it needs to be this way some closer to those stools, which means everything else should be closer to those stools as well. So let's do that. Let's take all of these and we'll move them this way. And as I said, this is just what happens. You begin putting more and more things in and you realize, oh, that isn't quite correct. So you readjust and you readjust and you readjust. I think I want to look at it from over from. Another angle here. If I look at this one, this 2775, let's take a look here. So the edge of the couch going to press Control Spacebar. The edge of the couch appears to be kind of in line with this front desk here. And then the carpet, the rug for this area seems to come out even just a little bit farther than that. So let's line that couch up first. Let's do that. So this thing looks like it should come all the way over to this line here like this, right? In line with that with that desk. Which means all of these can come over closer to it. And we go, which means this will have a lot more room to have the chairs around it when we get to that point. Yeah. So I think that'll provide a little more room over here. There we go. And in addition, we could go ahead and add that rug if we wanted. It's a rug that's glued down to the floor. You can see it's got this rim on it here. It's actually kind of a part of the floor. So what we can do is go ahead and create a cube here. And I'll bring it up and scale it down quite a bit. Let's press S and Z, scale it down so it's pretty thin. And I'm going to drop it back down here into the floor about like that, maybe something like that. And then let's take a look at it from the top and wireframe. And let's expand it out so it's kind of in the proper place here so we can get a sense of where these pieces of furniture should be or, or if they're in the proper place. So I'll hit the one key here and let's border select this and move it over. So I get just almost comes up to the stools. Move that over here. This back here comes out to about the end of this wall. I do know that. So kind of in-line with this. These points come out just beyond the couch now, right? Just like that. And these points over here come to just about the edge of that counter right in here. They're all right. Let's take a look at that. Yeah, so that's the extent of our rug there. I think what we need to do now is add that trim around it. And to do that, what I'll do is I'll go ahead and just alt click between two of these bases to select that whole thing all the way around. And then let's extrude and scale out. So I'll go back to wireframe, and let's press E and I'll hit the Enter key. And now let's scale on the y SY. And let's bring this out just a bit like this. And then let's scale in the x S, x, and I'll bring this out about like that. So we kind of have that trim on it. Now it lets do is just grab this edge all the way around like that. And let's just scale it in. I'll hit S and I'm just going to scale it in just a little bit like that. And let me bring this closer here. Yes. So it's about like that and then let's bevel this all the way around. So before we do that, let's go back to object mode and press control a and apply the scale. Now with this still selected list press Control B and bring this in like this. And asked about like that, I guess. So it kind of angles out like that. And then let's go ahead and see if we can smooth it too. I'll go to object, shade smooth. And let's turn on auto smooth. And yeah, I think that'll be just fine. So what we're going to see when we actually texture this is we're going to have this interior face right here, be the carpet. And then out here will have this little trim on it. So hopefully that'll give the impression that we've got a rug there in this area. Now one thing we should do is make sure that all of the feet are on top of the rug. Weave kind of buried all the feet in the rug. And I will, I want to pull all these up so they're sitting on top of the rug here. So with all of these selected, I'll just maybe zoom into one of the chairs and let's press g and Z0 and pull up, kinda sit right on top here like that. Let's take a look at this. Yeah, something like that. So they're sitting up on top of that rug. Alright, well, with the table created, I think now we probably should go ahead and create one of these chairs and duplicate it and put them around the table. So that's coming up next.
41. 041 Beginning the Second Chair: All right, before we begin on the next object, let's do our normal cleanup here we've got our table label. That's good. Let's change this to rug. And let's go ahead and put the table and the rug in the furniture collection. I'm not sure if a RUG IS furniture, but we're going to put it there anyway. All right, so now to create one of these chairs, I'm gonna go to image and open here. And I think I've got two images of this chair. Yeah, here's one. And let's take a look at this. I'll press Control Spacebar again and let's take a look. So it's a curved seat here, just like on the last or excuse me, on the stool. We can probably once again create a path and then extrude it over to create the shape of the seat. We've got this cushion here and we've got this cutout to let's go take a look at the backside of the chair. I'm going to create a new window here. And let's go to image open and let's get that front side or excuse me, the backside right here. And here we go. Let's press Control Spacebar and take a look at it. Now in the back it's got these thicker curved parts here along the side. And those are going to be interesting. I think we can use the extrude tool to deal with these, but we're going to have to do a good deal of point polling or moving edges or vertices around to get this kind of a shape. So I think it's kind of a fun challenge here, so let's give it a try. So I get these two images in place here in the image editor's right here, so we can just keep an eye on things as we're modelling. First of all, I guess what Let's do is begin with a path. Let's begin with that seat back combination there with a curve. So I'll press the Shift a and let's go to curve and path. Here we go. Now, if we tab into edit mode, we can see it here. I'll begin by going to the front view, and I will grab one of the points and just bring it up. This is the beginning of the back. So we can bring it up like that. From here, we can maybe take one of these points and move it back. That it looks like we're going to need a point between these two a. So I'll right-click and choose sub-divide. And that adds a point there between those two selected ones. And I'll just hit g and move this down like this just so we can get that curve or at least the beginning of it here. Now, it looks like it curves down a bit here. So let's take this point and move it forward and then bring this one down like this. Alright, let's tap back into object mode and see how we're doing. Ok, we're getting there. But I think between these two, we need a point. So I'll subdivide that. And let's grab this point and move it forward. So that tightens up that curve just a little bit more, something like that. We probably need another point in here, so I'll subdivide that and maybe bring that one up like this. So we're beginning to get that curve just a little bit tighter there. That's good. Now for the back, it looks like it's got kind of a curve in here. So we're going to need another point right in here between these two. Let's grab this point now and pull it forward some. Alright, we're getting there. I think I'd like to select all of these here and pull him back just a bit. And there we go. So that looks like it's kind of the basic shape of what we want. Is it tall enough though? I feel like it may need to be a little bit taller. So we could grab these points and just pull them straight up. Let's try that. And maybe, I don't know, I'll grab these and move these forward a bit. So you may need to play with it a bit until you get the shape that you're after. But once you do, what you're gonna wanna do is convert it to a mesh, an edge so that we can extruded over to create the whole width of the seat there. Now if we tap into edit mode, you can see again all these little edges here that are going to correspond to edges and polygons in the converted mesh. And that's an awful lot right there. So let's reduce the resolution with this resolution preview, you will take this down till it seems to be a reasonable balance between lower polygon and keeping them at curve in tact. Let's take a look at this. I'll go back to that front view with the NUM pad one key and tab into object mode. And that looks just a little too blocky. So let's bring it up to two. Better. How about three? I kind of like that a little bit better. So we've still got a few edges here, but it's certainly quite a bit reduced from what it was. So let's go with this. I think this looks pretty good. So what we can do is convert this. We can right-click and go to convert to mesh. And there we go. Now if we tap into it and hit the one key for vertex mode, you can see all of the vertices and the edges there. Alright, so now let's go ahead and hit the a key to select everything. And let's press E to extrude and the Wai Qi to extrude in the y axis and just pull it out to about how wide we want it. We may not know quite yet exactly how wide we want it, but I think something like this is probably pretty good. Now we have the basic shape of the seat and the back. I'd like to move it back into the center of the grid. So what let's do is first take this object origins, set origin to the origin of the geometry. Let's just move that back into the center now. And then what we can do is hit the end key and we can 0 the location out and it will take that origin and put it back in the center of the grid. I'm just gonna click and drag down on these fields. And then when I press 0, it puts 0 in all of them and I'll hit the Enter key. And there we go. Now we're back into the center. Alright, so now let's see how tall this should be. I'll go to the right orthographic view with the NumPy had three key and let's pull it up and kinda get it about how tall we think it may be. So now that we have this, we need to do a couple things. We need to give it thickness, but also we need to cut out this center hole here at the back of the chair. So I feel like we should do any cutting like that and before we add the thickness, so let's come in here and take a look at it. And of course, to cut that whole out, we're gonna need to add some edges. So let's press Control R And I'll add three edges here. I'll just click and click again. And then let's scale these out in the Y, S, Y. And I'll bring these out just a little bit so we get about the right width of that cut-out like that. Now let's go in and go to face mode. And let's see how high we want to take this now we could cut these out here. And maybe these Should we go up this high? Yeah, I think I will. I think I'll go up that high and I may need to actually bring the top up a bit, but Let's do that. Let's give it a try. I'm gonna hit X and delete faces. And so there we go for that hole in the back of the chair there. And as I said before, I may just take these faces here and moved them up a bit. I will just take them straight up and see what that does for it. Alright, so now should we begin thinking about giving it some thickness? I think so except I'm seeing one last thing I should probably do before we give it a little bit of thickness and that's this right down here. Like it'd be easier to deal with this before we add a solidify modifier. So let's come in here, select this. And I think what I wanna do is just select these edges and extrude them out just a bit and bring it down a hair. So I'll hit Ey and Ex, and extrude out. And maybe one more Bx. And I'm going to bring this out and I'm going to bring it down, just a hair like that. So we have this kind of little flap there. And we may need to bring it out at a later time when we add thickness to this part. But at least for now, I think that's probably going to be pretty good. That'll at least give us the geometry there that we can pull out if we need to. So I think that's a good beginning for the shape of the chair. In the next video, let's add thickness and work on these thicker parts here, as well as this Bactrim here.
42. 042 Continuing the Chair: To add thickness to this, we once again use that solidify modifier. I'll go to add modifier and solidify right here. I'll turn on even thickness and let's click and drag in the thickness field and pull that out just a bit. I think that looks pretty good right there. And from here what Let's do is go ahead and apply it. Because I think what I wanna do is then delete half and mirror it over to the other side so that when we begin to extrude these things here and add edge loops for this ram up top that whatever we do on one side will be mirrored over to the other side. So let's go ahead and apply this here. And now that that's done, if we tab into edit mode, we can see the polygons there. Now it looks like this particular piece right here was a little bit too thick. So let's go ahead and grab that and maybe move it up. Move it out a bit. Kind of get that piece a little bit more the way we want it. Sometimes that happens. I'll just pull it out a little bit more like that. There we go. Now let's split it in half. And when we added those three edge loops, we had one right down the middle here. So we should be able to select one side here and delete it, and then add a mirror modifier here and mirror that over to the other side. Now, currently we're marrying in the x-axis, but of course we need to mirror in the y. So let's change this. There we go. And let's also turn on clipping. Okay, let's take a look at it. I think that worked pretty well. Now let's work on these curved parts right here. And I think the way to do that, let me come over here and turn on the edit cage on the other side here. I think the way to do that is to select a few of these faces here and extrude these out. So I'm just gonna go through and select these. And of course the other side is being selected as well. And I'll maybe come down about like this. Let's try this. And from here I'm just going to extrude them out. So I'm just going to hit II and pull out a bit like this. Now, these need to be transitioned a little bit better into the back of the chair. And also down here as well, it's kind of a smooth transition. So what we can do is just select some of these edges and just begin pulling them around until we can kind of get a smooth transition into this curved part here. That's all I wanna do in this is what I mean by we were going to have to do some point pulling here for the chair. We can get it to be pretty close, but ultimately we're going to have to just grab some points, grab some edges, and move them around. Same over here. We should probably just take these and begin moving these in as well. Something like this. So that kinda transitions into the back of the chair a little bit better. Now let's also add some edge loops for the rim around the top here, let's tap into edit mode and I'll press control are. And let's add an edge loop right along here. And then let's add an edge loop up on the top right here. There we go. Now what we can do is select these faces along here and begin extruding these out. We just need to pull them out just a little bit. I'll hit II and pull them out just a bit like this. And then we want to transition these edges in a little bit better, right? We want to maybe take this edge and hit G2 times to slide it back like this. And I'm gonna take this one and move it back and kind of move it in like this. So we kinda transition this area just a little bit better, right? So we have this kind of an edge flowing into that thicker curved part there. And then I think I want just a little bit of a bevel on each of the corners. But when we take a look at that, we've got these edges right here that are gonna kinda get in the way. So I'm going to take that edge and hit G2 times and slide it over. So we have room for a bevel, and I'll select this edge here. Of course, we need to apply the scale so this tab into object mode and hit the Enter key and it looks like our scale is just fine, so that's good. Let's go ahead and go back to edit mode. And I'll press Control B and pull out a bit and then scroll the mouse wheel. So we get kind of a curve here on either side. And we go. And also up top looks like we've got a smaller curve right up top. So let's go take a look at that similar situation. We've got a couple of edges that we could maybe slide over a bit. I'll select this edge and this edge and hit the G key two times and slide. And this one as well. I just want to give it a little bit more room for the bevel. I don't want to do too much here. And in fact, while I'm here, it looks like when we extrude it out, I pulled out. Well, I pulled straight out, didn't I? So there's kind of an indentation appear. I just want to fix this, bring that up just a bit. And once again, that's the pulling points, pulling edges that needs to be done sometimes. So I'll grab this edge and Control B. And let's pull this out. Oh, about like this. There we go. Alright, so we've got those rounded corners. We've got the thicker curves on the back here. Let's go ahead and smooth it and see how it looks with some smoothing. I'll come up here to object, shade smooth, and we get a little bit of artifacts there. Let's go over to our object data properties. Turn on auto smooth, and that really cleans it up pretty well. Yeah, like that. Now we need to deal with the cushion here. And for the cushion, I think what I'm gonna do is maybe select some faces here on the seat, duplicate them. And then from those duplicated faces at a solidify modifier to give it some thickness. So let's let's come down here and I think what I'd like to do is go to face mode and I need to select Quite a few faces here. So I'm gonna hit the C key to turn on that circle select tool. We can also come over here. Let me hit escape here and then select this. We could also select this and select the circle select tool here. So either way. But I'm gonna just click and drag and paint my selection like this. I'll come back to the Move tool here. And this looks pretty good. I think this is what we want. However, I'm not so sure about these faces down here. Let's leave those out of the equation for now. And if we need to pull it down, so I think we can, but, but let's go with this for now. I also have these selected back here. That's probably not a good idea. Let's de-select those. There we go. So now we've got these faces selected for the cushion here. Let's go ahead and duplicate this shift dy and Enter. And now let's split this off into its own object. We can press the P key and then choose separate by selection. And there we go. Now if we tap back into object mode and just select this piece right here, note let me click again. There it is. We just select that piece. Now and I think I'll do is go ahead and take this edge here and move it down all Extrude one more time and move it down just a little bit. So I'll hit II and click and I'll bring it out in the eggs, and I'll bring it down in the z. Just want it to be about like this, maybe up a little more. In a little more about there. Yeah. Okay. Now that we've got this, let's add that solidify modifier to it to give it some thickness. Over here to the modifiers panel. Now we have a mirror modifier on it. I don't think we need that mirror modifier on it anymore. Let's go ahead and click apply. We've got clipping enabled. Click Apply. And now let's add that solidify right here. Let's click even thickness, and let's click and drag in the thickness field. Now it goes down in the positive. We need to bring it back up into the negative like this. And I'm gonna make it a little bit thicker than it actually is. Because what we're also going to do is we're going to add a subdivision surface modifier to it, and that will bring it back down a bit. But we need that subdivision surface modifier to give it this kind of cushioning, rounded look. So with this brought up like that, I think that's probably good. Let's go ahead and click Apply here. And this is what the mesh looks like now. Now, uh, let's do is add a subdivision surface modifier. I'll come over here, add subdivision surface. And there we go. Now you can see how it's beginning to curve those edges just a bit. We can also take the viewport up to two and that gives us a little bit more of a cushion type appearance. So yeah, I think that's going to work pretty well for the cushion of the chair. Alright, well, in the next video, what let's do is let's begin working on the arms of the chair, as well as this center post and the legs.
43. 043 Modeling the Chair Arms: Well now let's work on the arms of the chair. I think these look kinda fun. What it is I think is just basically a path, this tube right here going from one side to the other underneath the chair. We can do with just a path. And then these little arm pads here, I think those can be done in a similar way to the way we did the seat cushion. So let's give this a trial. It's first of all, work on that tube underneath the chair. Let's go to on the right orthographic view with NUM pad three to look at the front, yours may be different, but this is, this is the view that I need from the front here. And for this, let's just create a curve. So shift a curve and path. Here we go. Now let's pull this up and we can see that it's turned the wrong way. So what I'm gonna do is just press RZ 9-0 and turn it 90 degrees. And then let's bring it up. Put it right under here. And then what Let's do is begin extruding it out. So it turns up along the side of the chair here. Once again, I'd like to mirror this. So what I do on one side happens on the other. So let's tab into edit mode, and I'll just select these two points over here. And let's delete these. I'll just hit X and delete vertices, and there we go. So now we have just half of it there. And let me go to a wireframe so we can see that. Now we'll, Let's do is mirrored over. So I'll tap back into object mode and let's come over here to the modifiers panel. Go to add modifier in here. Let's go to mirror. And when we do that, it mirrors over properly in the right direction, but that's the y-axis. I'll get that. So we're going in the y axis, but over here it says X. If I've turned on the y, then it's not going anywhere. It's just mirroring back on itself. So why is that? Why is the x working with the why? Well, because we just rotated the object. That's all if we hit the end keeping and see we rotated the object in the z-axis 90 degrees. So that's why we're off. Let's go ahead and press control a and apply the rotation. And now we can't see it, but if we switch to the why, now it's mirroring properly. Alright, so with that taken care of, let's go back to that view where we're viewing it from the front. And let's tap into edit mode and select this point right here. And then let's begin extruding out and up around the chair. So I'll hit E and Y and let's pull out to about right here. And then I'll hit e and z and pull out to about right here. So I have these three points right here defining that curve. You can see that curve right there. And of course we can take these points and move them in and out. However we need to depending on what we want from that curve. But for now I think that's okay. If we tumble around, we can see that it's going to go straight up. And I think I wanted to lean forward. You can see how it's kind of tilted forward like that. And also I think this should go back a little bit further here. To get that angle, let's go back to that quad view. Let's press Control Alt Q to go to our quad view. And now we can see front side and top. We can tumble around over here for our perspective view. Let me zoom in here, and let's zoom in here. And now we tap back into edit mode. We can take this point and we can kinda lean it forward just a bit here in the side view. Now, granted, this says Front orthographic because my chair is turned 90 degrees in the global axis, but that's fine. We just need to be able to see these views here. From here, what I'll do is I'll hit II and extrude again. And I'll pull up about two where we think that Handel would be, maybe right about there. Alright, let's tap back into object mode and I'll press Control Alt Q. Let's go back to solid mode and see how we're doing here. Yeah, I think that looks pretty good. Let's now convert it to a tube. Let's come over here to our path panel or our object data properties panel right here. And let's scroll down and click and drag on the depth field. I'll hold that Shift key down as well. And I'll drag out until we get it about the right width, something like that. Alright, we've got that. We need to create that arm rest. To do that, I'm going to tab back into edit mode. And with this point selected, I'll press Shift S and cursor to select it to move that cursor to that point. And for this thing, I think what I'm gonna do is begin with a cube. Now, you might think, well, let's begin with a cylinder and give that a try. But I don't think that's going to work. I think we're going to have an easier time if we begin with a cube and use our subdivision surface modifier to then begin extruding and pulling out. Since this is really more of a almost an organic form, very curved. I think that subdivision surface modifier will help with the cursor here, let's press shift a and go to Mesh cube. And let's scale it down a bit. And let's go to our side view and I'll go to wireframe. And let's scale it down a bit more and let's turn it and get it right in here as if it's going to fit onto this tube right there. And then from here, let's go to our subdivision surface modifier right here. And there we go. Now we've got kind of a blob that we can work with here. If I tab into edit mode, you can see the edit Cage still there. Let's collapse that edit cage down to the sub-divided surface by clicking on Edit cage right here. There we go. Now, let's go to face mode and select this face. Let's go back to solid mode now. And let's begin pulling this out. I'm gonna go to my local transformation right here. And that changes my move gizmo to go in line with that face and I'm going to pull that out. And then I'm going to add an edge loop was press Control R and add an edge loop right here. And you can see what that does. That kind of tightens up that edge down here by the tubes. And it's going to bring that down about like this. Alright, and then this face, I can maybe scale out some and bring up a bit. And now what Let's do is take these faces, actually it's just one face here. Let's take this and extrude it back. So let me go back to our side view here. I'm gonna change back now to my global transformation. Oh, and remember you can always press the comma key to get to this pie menu of those same items so I can change from local to global here. Okay, so now that we've changed that back to global, we can see the x-axis here. Let's press E and X to extrude in the x axis. Now you can kinda see what I'm doing here and we're going to get that more organic form with this. Now let's take that face and press S and Z and scale it in the z and kinda flatten it up some. And there we go. So we're just beginning to get this kind of organic shape for that arm rest. Now maybe we can take this edge right here. And let's pull it up, hit the G key and kinda pull it up like this. And I think I need another edge down here to hold this form around the tube. So let's press Control R and add an edge right there. And see we can kind of adjust that edge right there. We go. See how we're doing here. Actually that's pretty good, just the way it is. This is what I like to do for these kind of forums is really work with as low poly subdivision surfaces. I can just pull out the forms and then we can always add more resolution by increasing this viewport subdivisions right here, right? We can always increase that to get it a little smoother. And that's looking pretty good. Lets go ahead and smooth it now to let's go to object. Shade smooth down here. There we go. Yeah, that's looking a little bit better. We could take this edge here maybe and hit r And turn it a bit to kinda even at out some. We could also take this face down here. If I hit the three key and select that bottom face, we could go back and we could begin pulling it down a bit. And you could scale it out, sum or scale it in. So whatever you need to do to kind of get it to fit around that tube there. But I think that's looking pretty good. That's kinda what I'm after. Now, this here is a little bit flatter. You can see it's got kind of a flatter end here. You could always come in here and press Control R and add an edge loop right down the center. And that will flatten this area up back here. But it will also flatten it up, up here. So it's whatever you think you want. I'm going to move this cursor down. Let's take a cursor to world origin so we can see it a little bit better. So back here I think it's looking more like this. But up front I think it's kind of flattened it a bit. It isn't quite as rounded here. So it's really up to you what you want. You could of course, take this point and move it forward a bit and a round that out a bit. Or you could just not have that edge there at all and have it be a little bit more rounded up front so I could press Control Z and remove all of this, remove that edge, something like that so you can have it more rounded there. So it really depends on what you want. I kind of like it like this with it more rounded on the front and a little point here in the back. And I think that's fine. Alright, so let's go ahead and take this. Let's move that origin to the center of the grid. And then let's measure it over. Let's come over here and add a mirror modifier right here. And well, we're way over here, but that's because I think we can take this and change it to y. And there we go. Alright, so we've got the arm rests on the chair. So in the next video, let's work on the legs and the canisters.
44. 044 Creating the Legs of the Chair: Before we start on the legs, let's think about this for a minute. It looks to me like we've got five legs here. And if we kinda zoom in, there's a space between each of the legs. And what I'm thinking is we could create a cylinder that's 15 faces, that has 15 faces, make each leg to faces. And then I have one face in between. So two times five is ten and then one in between each is 15. So I think let's begin with a cylinder that's 15 sides. We'll create this center column, and then we'll duplicate that to begin this part right down here with the legs coming out. Let's give this a try. I'll press shift a and let's create a cylinder. Let's change the number of sides here from 32 to 15. I don't think I'll need the top face here. Let's go ahead and delete that. And then I will scale it down and scale it in the z with S and Z, maybe down a little bit more. So I'm just trying to get it about the right size, whatever we think it's going to be here that's still looks a little too big. I'll scale it down. Yeah, let's go with that. And I think I'll place it right up in here like this. So it's right in front of this bar. There's probably more going on down here that we're not seeing connecting all this together. But I don't think we need it because I don't think anyone's ever gonna be crawling around on their hands and knees. In our environment here. Let's think about how big this is going to be. It looks like the whole thing is a little too tall and we hit the a key and bring this down some. Now let's just select this and grab that face there. And it looks like this goes down below where the legs are that down pretty close to the ground. Like that. Okay. Now what I'd like to do is just duplicate this. I'm gonna hit the a key and select the whole thing. I'm going to press shift D and Enter. And I'm going to scale it up just a little bit like this. I'll go ahead and get rid of this face here. And then I need to split this out from the rest of the mesh. So what I should probably do is just hit the L key, deselect that. And this one is still unselected under here. So let's press S and Z and scale this down like this. And maybe bring it down like that. So let's give this a try. Now I want to split this out from that other object. So to do that, we can separate it with the P ki and then separate by selection. And there we go. Now if we tap back into object mode and select just that object, we can tab into edit mode there. And let's take a look down here. It looks like there's a little bit of an area below here, below where the legs come out. So maybe we should press Control R and add an edge loop right in here. Let's do that. Now. It looks to me like theirs. Space here before the legs extrude out. So we need to get that. I'll go ahead and just select everything here. And let's just extrude and then scale out. So I'll hit II and enter. And then I'm going to press Shift Z to turn off the z-axis and then I'm going to scale out just a bit like this. So it looks like it comes out some like that. Right? And then we should begin selecting the pair of faces for each of the legs that were going to extrude out. So two faces and one m between, Alright, go around like this. So there we go. So now we've got those faces selected from which we're going to extrude the legs here. Let's go to our top view with the seven key. Let's hit the Z key and go to wireframe. And now from here, we want to extrude these out, but we should make sure that we've got our pivot point in the right place. We want individual origins, just like we did the last time. Alright, so now that we've got all that, let's press E and let's push these out like this and it looks like they go out just beyond the seat. Maybe. I'm gonna take it out about like this right there. Okay. Now let's make this a little smaller. It looks as if they get smaller as they go out. So let's press S and Z and shrink this down a bit like that. And also let's drag these down toward the ground like that. And I'd like to make them a little bit narrower. And if you recall how we did that, we changed our transform orientation to normal. And then let's scale out. Let's scale now in the y-axis here, let's try this. Let's go S, y, and scale in each individual one so they're a little bit narrower here. There we go. Okay, I'm going to go back to global and let's take a look at it. Yeah, I think that's pretty good. I feel like this is a little bit too high though. Let me select this area up here, these parts. And let's pull this down, some kind of like this. And we go, well, we're kind of coming through the top here. Let's select that, grab that edge. Let me go and let's just bring this down into here. We don't want that poking through the top. Okay. So now we've got the legs pretty much in place. I feel like this areas a little too thick right now, so I may just select it and press S and Z and kinda scale these n sum. And then bring that whole thing down again like that. There we go. Yeah, I think that's pretty good. Ok, so now what we need to do is think about creating these wheels are the characters on the chair. There's more to do, of course, with smoothing and beveling these edges. But I think before we do any of that, let's go ahead and work on these wheels, and we'll do that in the next video.
45. 045 Working on the Wheels of the Chair: Alright, let's take a look at these wheels now. I think I'm just going to grab these and turn the visibility off in the outliner. And let's just begin fresh with a cylinder. I think for these wheels, it looks like it's two parts. It looks like it's the main part that terms and then this kind of curved part that fits over it. And then it fits up into the leg of the chair. So let's see, we can do with this. I'll press shift a and let's create a cylinder. And we've still got our 15 sides here. I'm just gonna take this down to 12. And I will also turn this. Let's turn it in the y axis. Let's press RY 9-0 and turn it. So we're working on this part right here. I think when I want to do is use that subdivision surface modifier because these are some fairly curved edges here. So what let's do is come over to the modifiers panel and let's click on add modifier and add a subdivision surface modifier. Now, that of course looks terrible. But I think we can work with this. What I'm gonna do first of all is a tab into edit mode. And let's press Control R and add, well, let's add two edge loops here. And that begins to get us a little bit closer, right? Let's also select this face over here and this face over here. And let's press the icky and inset this. I'll press I an inset these two like this, and then click. And now we've got something that looks like that. So that's looking a little bit better, a little bit closer to what we're after here. Let's now come over to object and go to shade smooth. And we could always increase the viewport here to smooth those corners out. Let's see if that's too much. Let me hit Z and look at wireframe. And that's pretty dense. I don't know. We'll see if we're going to keep it like that. We may have to bring this back to one and play with the smoothing over here, instead of having such a high poly count. But for now, let's go ahead and go with that. I'm going to tab back into edit mode. And let's select some of these faces along here. And what I wanna do is just duplicate them to get that curved part right up here. It's gonna select maybe these right here. Let's try that. I'll press shift D and enter. And then I think I'll just hit the S key and scale them up a bit, pull them up. So there we go. Now let's separate it into its own object. I'll hit the peaky and choose selection. And there we go. So that's the beginnings of this piece up here. I'll select it and let's use our solidify modifier to give it a little bit of thickness. I'll come over here and go to add modifier, solidify. And let's choose even thickness and click on the thickness here and will kind of bring it down toward the cylinder there like that. Alright, I think we're looking pretty good there. What we can do is add a couple of edges down the center here, like that. And maybe add an edge along here. And over here as well. And that kind of tightens up these edges at the end. And we go and let's see how that looks. Okay, I think that's looking pretty good. We could probably bring this in some way. Scale this and I don't think it needs to be quite that wide. Now that we've got that piece about the way we want it here, let's go ahead and apply the solidify modifier. Let me take it up to the top of the stack and see what it looks like. If we do that, we probably need to increase that thickness again, kind of like that. So now let's go ahead and apply that solidify modifier. Now that it's on the top of the stack, let's click apply. And there we go. Now what we wanna do is select some faces up here to extrude up into the leg of a chair. So let's take this and tab into edit mode. And I bet we could grab these faces here. Go ahead and grab these and these. And let's extrude these up. I'll hit a0 and then press the Enter key. And then I'm just going to drag straight up in the z axis like this. And let's flatten it in the z-axis with S is z and 0. And we go, and then let's go ahead and delete these faces. Were not going to need these. There we go. So now we've got this opening right here. And this is what we want to have go up and into the leg of the chair. However, I feel like it's a little bit squared. I'd like it more rounded as it goes up. And blender has a group of tools or group of modelling tools called loop tools that we can use to change this from a square to a circle. So let's take a look at that. You can find the loop tools if you come over here to edit and preferences. And here in the add-on section, what we wanna do is type in OOP, and here we have loop tools. Now, to enable this tool, we just have to add a checkmark there. And now if we close this out like this and come over to our side panel, I'll press the Enter key. If we come down here, we can see we've got a new tab right here called Edit. We've got the old ones, item Tool view, and I've got my screencast to show what keys I'm pressing. Down here is a new tab called Edit. And within that tab is Loop tool. So let's twirl this down. And now we've got quite a few different tools in here. We've got a bridge tool, a circle, a curve of flatten. But the one we want to use is this circle tool. And currently all the settings should probably be about right? Whereas all we've gotta do is just click this circle button. And if we do that, look at what we get a circle. So that's pretty cool. I'll hit the S key and let's scale that down a bit. Maybe move it back. Oh, I'll bring it down a bit like that. And now let's go ahead and extrude up from here, I'll hit II and enter and I'll just drag up in the z axis like that. Actually, maybe I'll leave this down here like that. And let's do one more easy and I'll bring it up like that. There we go. I just did that to hold that edge right there so it wouldn't just angle up like a funnel. Alright, so let's take a look at that. Yeah, I think that's all I really wanted was just a little bit to go up into the legs of the chair. Alright, so now we got to think about combining these together. And when we do, we need to take a look at the modifier. So this one has a subdivision surface modifier on it. And this one does also, but their view ports are at two and that may be a little bit too much in terms of the resolution. So let's bring that viewport subdivision level down to one. And let's do the same here. Let's bring this down to one that reduces the poly count a bit. Now let's also think about if we need to deal with the smoothing on this, it doesn't look too bad really. Let's come over here and turn on auto smooth. And let's drag up. And yeah, I think that cleans that up pretty well. Well, we've still got some artifacts here, but I don't think it'll be a bad thing. So small and the scene, I mean, we could also take this face here and inset it again on either side and try and clean that up. But honestly, I don't think this will be a problem for this one. I think what I'd like to do is go ahead and turn on auto smooth as well. And let's drag up Trans smoothed this a bit. And I think also I might add an edge right in here to kind of tighten up these corners right there. Let's try that. That's not too bad. Okay? Now Alice do is apply those modifier. So I'll click Apply here, and I'll click Apply here. And then let's join them together. Select this and press Ctrl J. And then well as dU is tab into edit mode. And let's select this edge right here and move the cursor to it. Shift S two. And then let's move the origin of this object to the cursor. Object set origin, origin to 3D cursor. Alright, so now that's ready to take back into the scene and place on our chair. So we'll do that as well as beveling any edges, working on smoothing and combining the whole chair back together. In the next video.
46. 046 Finishing the Second Chair: All right, it's time to put all this back together. Now let's take a look at what we have here. Let's bring these back. Looks like this one and this one here. There we go. So that's all of our chair so far. Let's go ahead and place the caster or the wheel where it needs to be, and then we'll see about finishing it up. So let's go to the front view here. And I'll scale this down. Pretty small. Let's take a look at kinda how it looks. Now it feels when we look at the whole thing. So I'll hit g and move it down here. Let's see if that's about right. Yeah, I think that may be about the right size, maybe a tad bigger. Alright, so let's put that in place here. I'll, I'll take it out to one of these here. And if I place it there, it looks like we need to move the whole thing up. So to select everything else, I can invert the selection. Since this is selected, I could go to select and invert or I could press control. I, So with that one thing selected, I'll press control I. And now it deselects that one thing and selects everything else in the scene. And I can just drag it up and put that in place. Now, I'll select this. I can just press control i again and move that into place like that. I'll go to the top view wireframe. Lets take a look here. Now we need to move it over and maybe move it right about in here like that. And then let's spin it around. I'll hit are and kind of spin it around like that. So it's kind of on the inside. Let's take a look at how that went. All the way in. Wow, there's still a little bit here. I could move this over like this. Yeah, we may need to reduce the size of that cylinder just to fit it into these legs here. So we could go into wireframe and tab into edit mode, and we could take these faces right in here, I'll hit the border select. And then we could expand the selection with control plus and maybe move down like that. And let's scale it in just a smidge. There we go. Let's try that. There we go. That gets it in there. Alright, let's see how that looks. I think that looks okay. Let's go ahead and place these on the other legs back to the you and wireframe. And let's just press shift D and move this over here. Try and get it in place. Right there. And I'll hit r and spin it a bit so it isn't just exactly like the other one. And shift D and move that over here. And I'll go through all five of these and kind of put them in place and spin them around a bit. Now let's take a look at it. How would we do are we inside all of the legs? Do we have any overlap or anything sticking out? I think we're pretty good here. Yeah. Alright. So we've got. Wheels on. Now let's deal with the legs here again. Let's take this. We'll go ahead and smooth it. And for these, I think I'd like to add a few bevels to these before we smooth this. So let's first of all, before we do any beveling, let's hit the Enter key and take a look at our scale and it is non-uniform. So let's press control a and apply the scale. Now it's come back in and go to edge mode, and I'm going to press Alt and click an edge here. It doesn't really extend on, but I'll go ahead and press alt Shift Click to see if I can get these to continue on around. We really want these top edge is up here, I think. And we also want these down here. I think we also should have these around that front part of the leg as well, so I better go back and get those. So I'll go through all of these and select all of these edges on the top and on, around this top cylinder as well. All right, that's all the edges here. Now let's go ahead and press Control B and Bevel these in just a bit like this, maybe scroll the mouse wheel. I'll hold shifts so it moves a little slower. And there we go. Let's try that. Yeah, I think that'll work. And now let's try our smoothing. Let's go up to Object shade smooth. That helps, but let's go over here to our object data properties turn on auto smooth. And I'm going to drag this up just a bit. See how that works. Yeah, we're getting some artifacts in here. Oh, it's because I didn't choose that edge properly. So I need to undo and go back and grab that edge. I forgot to get an edge. Make sure I got all the rest. Yeah, it looks like I got all the rest. I just missed that one. So let's undo all the way back and then select that one. Now let's go back and try again. I'll smooth it again, shade smooth. Turn on auto smooth, and let's drag this up till it cleans it up a bit. Here we go. Alright, so I think we've got the basic pieces in now. I didn't create this little piece right down here. But honestly this is going to be underneath the table and I don't know that that's really going to be quite necessary, so I'm not going to worry about it right now. Let's go ahead and get this all combined together and get it in the scene and see how it looks. So first of all, let's think about this piece right here. I'm gonna go to the modifiers panel and we've got a subdivision surface modifier on it with a subdivision level of two. If I hit the Z key and go to wireframe, that is pretty dense right there. I think there's just too many polygons for what I wanna do here. So I'll reduce that viewport subdivision level to one. And then what let's do is let's go back to our object data properties in this auto smooth and see what we can do this. I'll drag this up, see if we can yeah, it looks like we can get rid of that sharp edge there. If we come up over 90 degrees right there, actually we can do it under 90 at 88. Let's do that. Yeah, I see that looks pretty good without it being such high resolution. Alright, let's go back to that modifiers panel, and let's go ahead and click apply there. This one has a mirror modifier, so we need to apply this one. It has clipping turned on, so let's go ahead and click Apply. All right, this part has a mirror on it and it is also still a path, so we need to deal with that. If we tap into edit mode, we can see it here. So let's take a look at it in wireframe. And once again, this is way too many polygons as well. So let's go back to our path panel or our object data properties here, and let's use this resolution. You click and drag it all the way down there. And that's too much of course, but let's ease it up. Let's go up to 23 for yeah, let's go with four. I think that's probably pretty good right there. So let's select this object and let's right-click and choose Convert to mesh. And here we go. So now you can see that's how many polygons we have for that. Believe it's already been smoothed. So let's come over here to our auto smooth and take a look at this. Let's click and drag. Yeah, I think that looks pretty good. Anywhere between 3090 seems to clean that up pretty well. Okay, so now what about this? We go back to our modifiers panel. This has both a mirror modifier and a subdivision surface on it. So if we tab into edit mode, that's our subdivision surfaces. Okay? We've got a viewport level of two. If we hit the Z key and take a look at it, that's actually not bad, even at two. Let's take it down to one and see what happens. Ok. We have fewer, but does that mean it's going to look like that? Let's make sure we've smoothed it. And let's take a look at our auto smooth here. If we click and drag up, can we do anymore with that? That's about all we can do. So I'm not really pleased with that. So I think we will have to use that subdivision level of two for this instead of just one. So and that's okay. Sometimes it has to be done. I'd just like to make sure that that's the way it has to be. Rather than having the opportunity to lower that down and get a lower poly count. So let's go ahead and go with that. I'll click Apply here. And for the mirror, let's go ahead and click apply as well. Now we don't need the clipping on because they're not connected, they're not touching each other. So clipping isn't required here. So let's click apply, and there we go. Now. We should have everything here now without a modifier and that's what I want. That's what I want before I try and combine any of this. Good, so, okay, let's select one of these objects. And then I'm going to hit the a key to select all the rest. And then let's press control j. And there we go. Now, we had different smoothing levels in our object data properties here. So now we're going to have to increase this again and see what we can get. We can find some sort of happy medium in here and I think we can, that doesn't look good. But if we drop it down just below 90, we've got the cushion looking pretty good. And everything else looking pretty good as well. Good. Ok. So we have our chair there. Now, uh, let's do is take this cursor back to the center of the grid, Shift S one. And we'll select our object and take that origin to the 3D cursor. Set origin 3D cursor. Now let's bring everything back in our scene and see if we can put it in place. I'll click and drag on everything. And let's shrink it down and see what we can do. I'll hit S and down. And it looks like if we take a look at this view that has the table in it, let's comeback here, image open and let's look at this one here. So it looks like the arms are just below the bottom of the table. And let's try and put that in. Bad, I'll bring this over. Move this over here. And let's just shrink it down to just below the table there. That maybe back up a little more like that. Let's see how that looks. That actually looks pretty good. Let's see. Within the context of the scene, how does that look? Does that look? It actually looks pretty good. Let me take it down just a little bit more. I'm gonna shrink it down just a hair more. Alright, let's see how that looks in the sea. And I'm gonna go to the top view here. And what I'll do is just press shift d and x and move that over here. I'll spin it around. Just hit the archi in Spirit. And in the image, it looks like we've got two chairs on one side and three on the other. I think I'll just put two on each side. So shift D. Let's put one right here and one right here. And once again, I'm just going to turn them just a bit to make it look like people have used them and they aren't just aligned perfectly in a 3D animation program. You know what I mean? Let's collect that. Alright, and let's take a look. Yeah, I think that looks pretty good. I'd like to maybe move this over just a bit, move these over a hair and give it a little more breathing room on the carpet here. Let's try this. It's going to grab all of these pieces here. Just kind of slide it over a bit. There we go. Okay. We have our table and chairs in our main workspace here. I think from here what we should do is work on the furniture in the offices as well. Really, I think there's only maybe a table and a chair and one or two other things that we can then duplicate around the various offices. But in the next video, let's start working on that.
47. 047 Batch Renaming Multiple Objects: Before we move on, we should probably go ahead and clean up the outliner again, it's time to do a little bit of housekeeping. I feel like now that I'm looking at this, I feel like these chairs and table, this whole thing is just slightly big. So I'm going to press the S key and hold the Shift key and just scale them down just a tiny little bit. You know, like it needs to be a little bit smaller. And then what I'd like to do is take all of these chairs and bring them up. So they're sitting on the rug as well. Let me do that. So now that I've got all of those selected, I'm just going to grab that z-axis and move them up to about right there. Okay. Now we should do is rename or objects here. It began with a nerves path. The chair did. And so that's what we have them all named. Of course we can select one and right-click and choose Rename here. But that'll only rename one of them. And there are six of them here. And of course, I don't like a lot of busy work. So I always want to know is there a way to change the name for all of them all at once? And of course, since it's blender, there is, yes. The way to do it is you can see here that the shortcut to rename an object is f2. But if we select all of these objects, all the chairs and press Control F2, Control F2. Now we get our batch rename window here. And in here, we can select our preferences and the way we want to rename things. So we can search for a particular item and rename it with the find and replace. And we can change the case of names. And of course we can set a name, so let's choose setName. And what you can do is you can add a suffix or prefix to the names. So if I said I wanted the suffix of this to be called chair, the names would be changed to nerves path 0.01. chair. And we could also add a prefix as well, but if we choose nu, Now we can call this, let's call this chair 0-2. And then if we click OK. You can see all of them have been renamed and any duplicate gets a 001002003, it, et cetera. So that's really nice if you have multiple objects and you've forgotten to rename the first one and then duplicated the rest out. You can go back and rename them all at once. That's pretty slick. Alright, so now let's go ahead and add these to a collection. Let's press M. And in the furniture collection, let's create a new collection and call it chairs 02. And there we go. So now within our furniture collection here, we've got our chair 01 and our chair 0 to here. Now we also have these tables. We could select these and press M and create a new collection in here, call it in tables. And we go. And also this table is going to be one of a few. We're going to have this table here in the main co-working area and then we'll have two conference rooms, right? So we ought to create a collection for tables here. So with this selected, let's go ahead and press em again. New collection. And we'll call this Tables. Alright, so there we have that. And then we've got the rug and the sofa. I think these are pretty much independent of everything else, so that's fine. Alright, so we have our outliner fairly cleaned up here. Now let's think about creating one of the tables in these outer offices. I've got an image here. Let's go to image open and NR reference images. I've got a image of the table here. So here's this table and this, well, I guess I should call it a desk is just gonna be duplicated around within the offices. So Let's go ahead and take a look at this. To begin, I'll go ahead and hide everything here. And let's just press shift a and create a cube and then press S and Z and scale it down. So it's pretty then, and then we'll press S and Y and we'll maybe scale it out to about like that. There we go. So we've got kind of the beginning of our desk here. Let's go to the right orthographic view, at least that's what gets me to this view right here. And let's create a new cubelets, press shift a and create a cube. And this is going to be the legs. So what I'm gonna do is I'm going to pull this up right about here. And then I'm going to scale this in, in the y axis, x and y. And just scale it in a hotel that's about the right thickness, something like that. Maybe a little bit dinner. And then I can bring it over here, put it on one side. So we've got the beginnings of that leg. Now what Let's do is just use our inset tool to create the width of the legs. So before I do anything, of course, let's check our scale. And of course, since I just scaled it in, it's going to be non-uniform. So let's press control a and apply the scale. Now if we tab into edit mode and select these two faces here, I'll go ahead and go to an orthographic view to look at it. Now we can press the icky and push these in just a little bit, and that's gonna be the width of our legs for the desk there. So something about like that. And there we go. Now, well, let's do it. Just hit X and delete those faces. And then we can take these edges here and shift click these edges here. And now we can bridge those edge loops. Recall to do that, we just go to the edges menu with control ie and choose bridge edge loops. And there we go. So now we've got that basic leg of the desk. We can now from here just duplicated shift DAY, move it over and put it in place. Okay. So that's our quick way to make one of those desks. I think I may want to put a bevel on the legs here. Let's do that. We've still got uniform scale, I think. For the legs, yeah, there's still good. So let's just tab into edit mode here. And let's grab these edges. And actually I'm just going to duplicate the leg again once I get this done, instead of doing it for that one as well, it looks like we've got a rounded edge here on this edge right here as well. So I'll go ahead and grab these down here. Alright, so now that we've got that, let's go ahead and press Control B. And I'll pull out just a bit, scroll the mouse wheel, and there we go. Alright, so I'll get rid of this one. And let's bring this one back over again. And there we go. Alright, now that we've got this done, let's go ahead and combine this together, these two objects with control j. And I'll move that cursor or that origin down to the 3D cursor. Objects set origin and origin to 3D cursor. Now it's bringing everything back and put it in place. I guess I should give this a name. Oh, I didn't do this when here, let's do this. Take that shift, select that control j, and there we go. Alright, so this is office desk. Let's do that. And now let's bring everything back. Let's click and drag on all the i icons. Let's scale it down. I would imagine it's probably going to be about the same height as our table here, maybe a little bit lower, and thing like that. And then let's just grab it and slide it back into one of these offices. Just see how it looks in here. I feel like this part of the desk is a little bit too narrow. I feel like I want to take this and bring it out just a little bit like this. Take a look at the other side. Yeah, I guess I should do it here too. Okay. Alright. So there we've got our office desk. I don't think I'm going to do too much more with it because ultimately we're just going to be duplicating it around the office. If I go to this view here, let's take a look at this. You can see that it's got one here and here and here there. They've got him over here in this office. So they're really just kinda placed all around in the offices to be used by anyone who happens to be renting the office for that week, month, or whatever. So I'm not going to worry about duplicating these around quite yet. I think probably the best thing to do is to go ahead and begin working on one of these office chairs. And these two will be duplicated around the offices. So in the next video, we'll begin working on one of these chairs.
48. 048 Beginning the Third Chair: To work on this office chair, we're going to need a new reference image. So I've got a couple of images. Here's one that's 2799. Let's open that up and let's take a look at it. Control Spacebar. And this is a little bit more complex than the other one. I think I'd want to begin with the seat once again and then work on the arms beginning under here and going up. And then the back of the chair is going to be an interesting challenge because I think this mesh that we see here that we can see through is going to have to be done with a texture. So we're going to need a polygon plane here with enough resolution that we can bend it and mold it to the right shape. But ultimately, I think it's going to have to be a texture that's gonna give us this see-through mesh kind of effect. Then we're going to need to build the frame around it in the back as well as this piece here. And of course, the legs and the characters we've already done a couple of times already. So that's not going to be too difficult, but it's going to provide some new challenges. So let's give it a try. Let's grab this corner and bring it in here for another window and I think I've got one from the backside, yes. So here let's take a look at this. This image shows, I think, a little bit better the back frame that we're going to have to create. And it's kind of difficult to tell what all this is down here. Not sure that we're going to be able to do that because I'm not really sure exactly what it is. But we can at least get this frame. I think that'll go a long way to selling it within these offices. So let's go back here to width control space and let's hide everything. I'll just click and drag on all these icons. And let's begin with the seat cushion. So for that, I think we can just begin with a cube. Let's do that. And here I will press S and Z and go ahead and scale it down a bit. We should probably split it in half because what we want done on one side should happen on the other. So I'll press Control R and hit the Enter key to times to ensure that it goes right down the center. And let's go to wireframe and face mode and hit the B key to border select this side. And if Dx and delete faces. Now what we can do is add a mirror modifier. Let's do that over here in the modifiers panel add modifier mirror, and will turn on clipping and our edit cage here. Okay, so if we tab into edit mode now, we should be able to take this and increase the resolution by subdividing it. So let's right-click and choose subdivide. And let's increase the number of cuts. How about like this? This looks pretty good. Let's try this. All right, and now what I'll do with that mirror modifier, let's go ahead and add a subdivision services modifier as well, right here. And if we tap into edit mode, we can see the original mesh surrounding the sub-divided. Let's go ahead and click this to collapse the mesh to the edit cage. So we just see that. Now we can do is we could begin pulling some points around and getting the shape of this a little closer to what we have here. So it looks like we've got kind of a dip in the center here so we could turn on our proportional editing tool with the o key and then press g and z and we could begin moving this up and down. Let me maybe go like this so we get just a little bit of a dip there in the middle of the Chair. Also, it kind of looks like these sides go up just a bit right here. Let's maybe do that. I'm going to turn the proportional editing tool off now with the o key and just pull these up just a bit. It looks like maybe back here. We could select these faces here and pull them in a bit. I'll turn the proportional editing tool back on and let's hit G and X and pull these in a bit. Maybe expanded out just a bit like that. And maybe I feel like we could grab one of these points and less press g and Z0 and maybe bring these up just a bit like this. So it's really whatever you think however you want to shape that seat. But we can get just a general shape of it with the subdivision still at one here. And also I feel like we should probably pull this front part out just a bit. Maybe if I take this, press G and Y, and let's bring this out just a little bit like this. Something like that. Yeah. Okay. So now that we've got that seat generally in the right shape, Let's think about the arms now. I think since these are kind of rectangular here, instead of a tube, let's begin with a cube and then begin extruding out. So I'm going to take this and move it up. Let's see how high, just about how high it should be. Let's just go with that for now. Of course, we're gonna continue adjusting this as we go. But let's go ahead and press shift a and bring in a cube. And I'll scale this in and bring it up. And let's go ahead and split it in half. Tab into edit mode, control are, and hit the Enter key to times there. And then let's grab these faces on this side right here. Delete those, and then let's mirror this over as well. Add modifier mirror and turn on clipping and our edit cage. Ok, so now that we've done that, we can begin scaling this to what we need. So I think I'm gonna bring it down in the z-axis about it like that, and bringing it in, in the y-axis about like that. And then let's bring this up here, an object mode. And then in edit mode, let's go ahead and grab that face there. And let's bring this out to about right onto here. Now, the proportional editing tool is on, and let me turn this off. I'll just hit the O key. And then now I'll drag this over again out to here. And then what we need to do is turn it up. So it goes up along the side of the seat here. Now, before we did this with a path, we created the path and then we kind of expanded a tube around that path. What we can do here is we can just use the mouse cursor as a way to extrude that curve on up this side of the cushion. So what I mean by that is over here, under the extrude Region button, we've got this little menu arrow here. And if we click and hold, you can see we've got a couple of different ways of extruding, but here at the bottom of the list is extrude to cursor. Now, there are a couple things I want to show you here. First of all, recall that we've scaled this quite a bit, so we have non-uniform scale. If I hit the Enter key, well, we'll have to tab back into object mode, but you can see that here. Let's go back to edit mode. Now, if I click the mouse here, watch this, see how it turns with the mouse and extrudes up to where the cursor is. And that's great, but look at how oddly it's shaped. It isn't keeping the same width as it turns up. And that's because once again, we haven't applied the scale. So let me undo this Control Z and we go and now its tab back into object mode and press control a and apply that scale. And there we go, Uniform Scale. Now we tap back into edit mode. And now here in this front orthographic view, I'm going to click here, here, here, and here. And now we've got a pretty nice curve along that path that I clicked. Once again, applying that scale really allowed that to be a uniform size as we use that tool. So yet again, applying the scale can really help in using a lot of the tools here in Blender. Alright, so we've got this now turned up a bit. Let me scale on the Y. It looks like it's a little too wide. There we go. Now what Let's do is kind of lean it forward. I think it's just, it's leans forward just a bit here. So let's go to the side view and back to edit mode. I'm gonna come over here and click on the Move gizmo. And let's just kind of move it this way. And I'll go to mode and alt click this edge and let's kind of move this forward. I'll do the same thing with this one. So just kind of get it in line here just a little bit better. And now I want to extrude this one up. So we get this piece here. Now, it looks like we've got another piece over the one we've just extruded. So we're going to have to create that as well. But for now, let's just hit II and pull this up and move it over so it's kind of in line with these others. And then we're going to need to create this piece here. So in the next video, what Let's do is work on creating this piece. And the arm rest here on the chair.
49. 049 Creating the Arm Rests and Back: So for these pieces, I think I'm just going to duplicate some faces off of this. So let's just take this face and let's move it up. Oh, about two here lets say. And what I'm gonna do is grab these faces right around here. I'll Alt click between those two faces and let's duplicate it. Shift D. And now let's split it out as its own object with the P key again. And then we tap back into object mode and D select and select this one piece right here. I'll double-click it, and there it is. And we need to now expand this out just a bit. And to do that, I'm going to first of all take off the mirror modifier so I can move this object orient into the center of that object. Let's do that. Origin to geometry. And now if I take this and scale it out just a bit, Well, I think maybe I'll scale it out in the x and the y. Let's do that. So let's press S, Shift Z to turn off the z-axis and I'll just scale it out like this. So it's just a little bit bigger than the original piece. And let's get it in place here and there we go. So now we can begin working on this little flare out. It's almost like a funnel at kind of flares out. Maybe I'll take this piece here and let's grab that face and move it back down. And I'll move it back down, something like this just to get it out of the way there. Alright? And now we take this, and let's grab this edge right here. And let's extrude this out now. Do I have it in about the right place? Kind of seems like it that I think will be pretty good. Let's move it down right about there, let's say. And then I will hit E And I'll pull these up. And I'm going to expand them out just a bit. Something like this. Alright, so now let's flatten it in the z as z 0, just to make sure. And from here I think what we can do is create this piece, the arm rest now, and I think that'll be a different objects. So what let's do is with this selected list, press shift us to and bring that cursor to that point. And then let's just create a cube, shift a mesh cube, and let's scale it down and scaled in the z, so it's pretty flat. And let's get it in place here. Maybe. I'll bring it up about to here, let's say. And let's scale it in the y just a bit. There we go. So now what I'm gonna do, I've gotta just a little bit bigger than we have it here. So once I add the subdivision surface modifier and it collapses down a bit, maybe it'll be about the right size. Let's see. I'll add the subdivision surface modifier to it. I'll turn on the edit cage here. And then let's tap into edit mode. And I think if I add, let's try two edges here. I think that helps. Let's try and add most try to hear as well. Alright, and let's also try adding one along in here. So something like this, maybe. And now let's go down in the z just a bit. Yeah, so we're getting there something like that. Perhaps this backend is a little bit narrower. Maybe let's take a look. If we select these faces back here, we could maybe grab these and scale them in the X axis, S and x, o. It looks like we've got individual origins still on. So let's change to median point. And now let's press S and X and scale and yes, so now we've got just a little bit narrower in the back than we have on the front. I think that's pretty good. Lets go ahead and place it there. Now also, I should probably select this edge down here and scale in because we don't want there to be an opening there on the bottom. So let's press E and S and just scale in. So that closes off their, Alright, let's go ahead and mirror these over. I need to move that cursor into the center of the grid again. So let's press Shift S1, and then I'll move the origin of this object to the 3D cursor. And let's add a mirror modifier just to see how it looks. Okay? And let's do the same thing with this one just to see how it looks. Before we move on. I'll go ahead and a mirror here. Alright, I think we're doing pretty well. Perhaps this can be a little bit longer if I tab into edit mode and select everything and press S, and why maybe we can pull that out just a bit. There we go. Okay. Now I'm not going to deal with smoothing, beveling and all that, right yet I really want to get all of the pieces in and rough out the chair with all of the objects in to get the scale and proportion pretty close before I begin refining and smoothing each object. Alright, so what let's do now is let's bring in a polygon plane. And let's start to at least get this shape back of the chair. Alright, so let's press shift a and go to Mesh plane. And what I'll do is just pull this back. Let's turn it in the x. I'll press R and X and I'll hold that control key down. And let's spin it 90 degrees. And let's move it up and kind of put it in place and see about how big it needs to be. So it looks like it comes down pretty close to the middle of that seat in the back. And then let's scale it in the x I think it comes in or it's not quite that wide. And then if we tap into edit mode and grab this edge here, I think it goes up a little higher. And does it flare out at the top? No, I guess not. So let's give it a little bit more width here like that. Alright, so generally that's about the right size. Of course, once again, we're gonna continue to tweak it as we go. But let's add some geometry to this. Let's select that one plane and let's right-click, and let's choose sub-divide. Now we can come down here and begin adding the number of cuts that we want. And I want to be sure, no matter how many cuts I add that we have an edge right down the center because I'm going to delete 1.5 and add a mirror modifier to it. So let's say, let's go to here, I've got five cuts. So I think that should be enough to at least get us to the point where we can kind of mold this to the proper shape. Now that that's done, let's go ahead and grab one side here. I'll go to wireframe and I'll go to the front view. And let's just grab one side here. Let's delete these. And let's add a mirror modifier here. And let's turn on clipping and the edit cage here. Alright, so now that we've got this in place, we can begin using the proportional editing tool to pull this around and get it in the shape that we want. So it looks to me, if we tap into edit mode, I'm going to go to vertex mode and turn on the proportional editing tool with the o key. And it looks to me like these corners down here on the bottom kind of come up a bit. So let's press g and z. And let's pull this up and then scroll the mouse wheel out of bed and just see if we can kind of get these corners to come up the way I, the way I think I see them there. And we go something like that. And then up on top or at least the top part, it looks like the top part may lean back while that center part kinda pulls forward. So let's try that. Let's grab this edge here. And then let's press G and Y. And let's pull this forward SEM and kinda scroll out a bit and see if we can get a bend in that, that we kind of like, that's not bad there. Let's do it again here. Maybe something like that. And then we try again appeared G and why? Maybe pull that back just a bit like that? Let's try that. Once again, at this stage we're just roughing in the shapes trying to get the general proportion and scale correct. So in the next video, we'll continue with this and begin working on that frame. In the back of the mesh fabric.
50. 050 Modelng the Back Frame and Legs: To create the frame of the back of the chair, I think what I'm gonna do is just grab faces from this polygon plane. Now that we've got it in the general shape that we want it, let's go into base mode here. And I'll press the C key to go to the circle select tool. And I'll click and drag. And let's select kind of the frame area around that on the outside of the polygon plane here. And then let's press shift D and enter. And I'm just going to pull this out a little bit. Ok, I've got that proportional editing tool along. Let's hit the O key to turn that off. And I'm just gonna bring that out just ever so slightly. There we go. Now I'm going to hit the P key to separate it out into its own object. Go back to object mode and select that frame. Now, let's tap back into edit mode and let's begin reshaping this because this edge or these edges right here need to come up quite a bit higher, right? So let's hit G2 times. And let's slide this up into here like that. And let's do that same thing over here. I'll select these edges right here. And let's hit G2 times and slide these back over here like this. And let's work on this here too. So down here, let's hit G2 times and pull this down just a little. We don't need a whole lot because it's fairly thick down here. In fact, I guess we could take this and move it down just a bit. G twice. There we go. So this bottom of the frame is a little thicker than all the rest. All right, so now that we've got that, what we could do is use our solidify modifier to pull that out into 3-dimensions. So I'll go ahead and add modifier, solidify. And let's click even thickness. And I'm going to hold the Shift key down and click and drag and the thickness field. And let's pull this out just a bit. Maybe something like this. Alright, so now we have that frame. Let's also try and get these shapes here. You can see that shape right here from the front and then there's a smaller back support behind it. So let's use that plane again, and let's tap into edit mode. And let's see what we can find in here. We could probably select faces like this to get this basic shape here. Let's try that. Once again, shift D And I'll hit enter and let's pull this out like this. Okay, so we've got that basic shape. Let's begin getting this a little bit closer to what we want. So maybe if we bring this up, we can bring these edges in. So just pulling around until we get it about the way we want it. Alright? And for this though, I should, I didn't do that. I should go ahead and split this out as its own objects. So I'll hit the L key to select a point and that'll select that whole part of that object. And then let's press P and separate that by selection as well. Alright, so now we've got this as its own object. And we could put that in here, I guess, or bring it down a bit. And there we go, kind of behind that, right? And then we need another one as well. So I'll select that and let's press shift D and pull that out as well. I'm going to shrink it down quite a bit. And I'll begin pulling these points around to get it smaller. Like this. And it looks like we could select these points and bring them down quite a bit. Maybe bringing these out so we can kind of play with it to get it about the right size, something like that. Let's say. Now this one should go in here. But I think we're gonna need to expand the thickness of the frame out here as well. So let's go ahead and apply this solidify modifier so I can pull that part out at the base of the frame. This area that's a little bit thicker. Let's go ahead and apply this. Recall that we wanted, tend to apply our modifiers from the top if we can, i'm gonna go ahead and bring this up to the top and then click apply. And there we go. Now it's tab back into edit mode. And that, and that gives us the polygons that we can work with now. So I'll switch to edge mode and just bring this one out just a bit like this. And maybe bring this out just a bit like that. Now that gives us a little bit more room for these guys. You can move these around as needed. Alright, so we have those pieces blocked out. Now, once again, I'm waiting to do any detail work until we're all done putting all the pieces in. So the next thing we could do, I guess, is create that cylinder that the legs come out of. Now, once again, we've got five legs. So if we used two faces for each leg and one in between that comes out to 15 sides on our cylinder. So let's go ahead and try that. Shift a mesh cylinder. Let's change this from 32 to 15. And you can also adjust the radius and height here I can click and drag and pull that in quite a bit, so it's a little bit closer to what we want, something like that. And then I could press S and scale it down. And let's try and put it in place here. It goes down a little bit lower than the leg. So let's move it down here like that. And then what I'm gonna do is tab into edit mode and I'm going to create two edges here, control are, and scroll the mouse wheel. And I'm going to bring them down about like this. And I'll grab this one here and bring this one down in it. Just I'm just kind of getting the height of the legs at the base there. That's kind of all I wanna do. Maybe something like this. Alright? And then from this, I'm going to duplicate these faces out into their own objects. So I'll click between two of the faces to select them all. Shift D. And there we go. Now with this still selected, I can press Alt S to fatten it up a bit. Alt S, bringing that out. There we go. Something like that. And now let's split it off. Press the P key and separate by selection. Let's select that object and then tab into edit mode. And we really need to extrude this out to give it a little bit of thickness First I think let's try that. Let's press E and S, And then let's turn off the z-axis, shift Z and pull this out some. There we go. Now we can go through and select R two basis for each of the legs and two over here. And from this we should be able to extrude this out. So let's go to that top view, go to wireframe, let's be sure and switch to individual origins. And then we want to extrude them out. It looks like we went to extrude them out slightly beyond the seat cushion. So let's hit E And we'll just push them out like this. And maybe about like that. There we go. Let's now scale them in the z-axis, S and Z. Here we go. Let's also bring them down in the z-axis. I'll just take this and bring him down like that. And then let's also make them a little bit narrower. Let's switch our transform orientation to normal. And then let's try scaling in the x. Let's try that ESX. There we go. That makes him just a little bit narrower. Alright, let's take a look at what we have. So we've got the basic pieces roughed out. I think in the next video, what Let's do is work on the wheels. And then we'll begin refining each of the objects and begin combining them together. So that's coming up next.
51. 051 Adjusting Proportions of the Chair: Now that we have the chair roughed in, let's go ahead and begin adding a few more details and trying to get the proportions a little bit better here, I feel like that this is a little thin compared to how wide these are. So maybe I should go ahead and work on that while we still have the mirror modifiers on here. So let's go ahead and grab this object here. And I think I just want to expand it out. I'm just going to press S and X and kind of pull that out a bit. Now if we go to say this object here, we could tap into edit mode and hit the a key and pull this out. And of course, since the mirror modifier is still on it, we can bring the other side comes along. And let's go ahead and tap back into object mode and select this, go into edit mode, select that, and let's bring this out as well. So I'm just going to move everything out just a bit while we have the mirror modifiers on here, which just makes things a little easier. So let's grab this too. I'll tab into edit mode and let's press Alt Z to go to that x-ray mode. And I'll just grab some points here. And let's pull these out now and fit it in. It looks like I'm not in global transformation, so let's change that up here to global, and then let's move that out just a bit. And then let's take a look at this here. So let's select this polygon plane. That's the mesh material for our chair. And lets expand this out as well as and x. And I'll just pull this out to about right here. And we could do that same thing with this. Let's give this a try. I will go to the front view and press S and X and expand this out as a well till we get it about the same size as that polygon plane, about like that. Now, it looks as if we've got a plane or a face interior here or inside this object, let's, let's take a look at that. So I'll hit the three key. And sure enough, we've got an interior face and we certainly do not want that. So let's get rid of that. And I bet we have one up here. Yep. Sure do. So let's get rid of that. Always be on the lookout for those. Alright, let's take a look at it now. I'll press all Z and go back. Alright, I think there's pretty good. Let's continue and work on refining some of our objects. I think I do need to extrude this down and kind of extended down underneath so it connects with everything. So let's take a look at that. I'll probably want to take this edge and move it out a bit just to have that curve a little bit more. And then we could grab this face here, incentives mirrored the other side is selected as well. And let's just extrude this down. I'll hit E, and let's pull this down. And then I'll press R. And let's insert an edge loop in here. And then let's just take this face here and maybe I'll pull it in just a bit. And then I'm going to press E and enter. And then I want to bring it forward and the global axis. So I'll just grab that and bring it forward until we kind of intersect with these here. There we go. I just want something that kind of connects all these together. Once again, we're not gonna be crawling under Neith here to see if this is correct. I think this will be just fine. All right, so we've got that. The next thing we should do is probably put the wheels on this. Now we've already created wheels before. I think we can just go in and grab one and duplicated and bring it here and use it. So what I'll do is come into the furniture collection and let's turn this on so we can see that. And then I'll just grab one of these chairs here, tab into edit mode. And let's come down and just press the L key here and the L key there. And now let's press shift d y. And I'll just bring this out like that. Now let's press the P key and separate it by selection. And then if we just select this one piece, one object, and let's move the origin to the geometry here. And then what we can do is bring this piece out of the furniture collection so we could press M and move it to the main scene collection. And there we go. And now it's out here with the rest of the chair. So now let's hide this furniture collection again. And there we go. Now, let's do a little bit of work to try and get this in place. I'm going to scale it up quite a bit. And then let's invert our selection. I'll press control I. And then let's move this up a bit and see what we can do here. Maybe scaled up a bit more. And let's try and put it in place and see how it looks. Alright, so let's go to the top view and wireframe. And let's try and bring this over and put it in place, maybe right in here and just see how it looks. I'm going to put it right about there. And we go. And now let's take a look. Okay, that's not too bad. How does it look in terms of overall size compared to the rest of the chair? Not bad. Actually going like it could be a little bit bigger. Let's scale it up a little bit more. Bring it up to sit on the ground plane. Put it in place here. Now it's kind of bulging out a little bit too much. So maybe we could decrease the size of the cylinder coming up. But let's press control. I invert the selection and move this whole thing up. So GZ and move it up a bit. And we go. All right, how does that look? Yeah, I think that looks pretty good in terms of the size of the wheels compared to the rest of the chair. So let's go with that. Now we need to adjust this cylinder so it'll fit well into the leg of the chair. So once again, what I'll do is select this face loop with alt click and then press control plus on the NUM pad to expand the selection like that. And then let's scale this in. I'll hit S and scale that in quite a bit. Alright, so there we go, there, we've got that in there. Let's now tab into edit mode. And what I'll do is move that cursor to this center point right here. I'll select that edge and press Shift S2 and move that cursor there. And then let's move the object origin to the 3D cursor. Now as we place it around, we can spin it at that axis. A little easier. Alright, so let's grab this and lets duplicate it and move it around to the other legs. Alright, like this. Try and get that in there and maybe spin it around like this. So they're not all exactly the same. And I'll just go through and place this on all the others.
52. 052 Finishing the Third Chair: Okay. We have them all on. Let's take a look at them. Did I get them placed OK. Yeah, I think so. Looks like there's one here that's maybe a little bit too far forward. I'll grab that blue plane here and just pull it in just a bit. Alright, so now that we've got those in place, let's go ahead and begin applying the mirror modifiers and getting everything joined together. Before I do that, let's add a few bevels to this. Let me press control a and apply the scale. And let's grab this edge here, o and these edges down here. And I just want to add a bit of, of a curve to these kind of like this. And let's get the edges on the inside as well. Right in here. And now because we have that mirror modifier on there, it should apply to the other side as well. So let's press control. Be pulled these out, scroll the mouse wheel, and there we go. That looks pretty good. Looks like I could bring this in a bit. Let's grab this edge, bring that into hair. Maybe this edge here as well, and bring this in like that. And then let's add a bevel down here. Let's do the same thing down here. And we'd go. Where else do we need a pebble? Well, how about this piece right here? We can't really bevel it as a plane. If you try and just grab a point and hit Control B, there's, there's no effect there, so we can't do that. But what we can do is grab this edge all the way around like this down here. And we could extrude back just a little bit, and let's do that. Let's hit E and then I'm going to click. And then I want to bring this back in the y-axis just a little bit, just so we have an edge here to work with. So we can take this and these of course down here. But let me grab that one right there. There we go. And we could bevel these to match this here. So let's press the Tab key to go back to object mode and apply the scale. So control a, apply the scale, and then let's press Control B and pull out and try and get it to match that. There we go. Okay, so we've got that. Maybe I think this needs a little bit of a bevel here. So let's press control a and apply the scale. Select these edges along here. The edge down at the bottom and over here. And let's go ahead and press Control B. Double these just a bit. Okay. And I don't think we need that, but down here I feel like we need these. So let's apply the scale. And then let's come in here. And let's select all of these along the top edges like this. And then let's go in and select these edges as well in here. All the way around. Alright, with these selected, let's go ahead and press Control B. Pull out just a bit and get those beveled as well. Lets also bevel these here. Once again, I'm going to add a solidify modifier to these Applying the scale, solidify. So we have just a little bit of thickness there. I'm going to bring that to the top of the modifiers stack and click Apply. Same thing here. Apply the scale at a solidify, bring it to the top and apply. Now we can do is come in here and grab these edges here. And even in here I think. And give these a bit of a bevel like that. And do the same thing with these. Alright, let's go ahead and combine everything together so we need to go through and began applying all the modifiers. All right, let's get these all done. Here's one. So this one has a subdivision surface and a mirror. So we'll go ahead and apply the mirror and then the subdivision surface. This one, we'll apply the mirror. This one also has a subdivision and a mirror down here. I think we're good on all of these. Okay, so now let's do, oh, we've got a mirror here. Let's go ahead and apply that. And we've got clipping on all of those. Let's go ahead and select one of these objects. Get the a key to select everything and press control j. Now let's smooth it. And then let's come over here to our auto smooth. And let's see what we can do to kinda smooth everything up here. Yeah, that looks pretty good. And it's a little bit of an artifact back here. I don't know if we can clean that up any here. Let's try. But does that add no, that looks pretty good. So I've got it around 78. Alright, let's move that cursor to the center of the grid, shift S1. And let's select the object and move the object origin to the 3D cursor. Here we go. Let's give it a name. Let's call it a chair, O3. And let's bring everything back and see if we can put it in our scene. I'm going to bring it over here by this table. And it looks like the arms of the chair kind of match the height of the table. So I'll spin it in the z-axis 90 degrees. And let's scale it down and get it about the same height as that desk. Let me move it over here. And I'll scale it down till it's about the right height, thing like that. And move it back. And there we go. Let's see how it looks. Yeah. I think that'll work pretty well. Alright, in the next video, I think what lists do is begin duplicating these around the offices and see how they look. And also we'll begin thinking about our conference rooms.
53. 053 Populating the Offices: Well, now's a good time to do a little bit more clean up. We should really create collections here for the chair and the office desk before we begin duplicating them around so that when they duplicate that go in the proper collection. So let's just select that chair and oppressed the M key. And let's within the furniture collection, let's create a new collection. And we'll call it chairs 03. And that put that in there. And then if we select that office desk, we can do the same thing. New collection, and we'll just call it office desk. Alright, so we have those cleaned up. Now in looking at the reference images of the conference rooms, I'm really thinking that I don't need to create new chairs for these. Let's, let's take a look. If we open this up and let's go to the reference image that has the conference room in it. Here we go, this 2806. Let's open this up and press Control Spacebar. Now, this is a whole new kind of chair. But quite frankly, we've done three chairs and a struggle and all of the processes, all of the tools that we've used for all of those can be used for this as well. So if you would like to create this chair, I highly encourage you to do it. However, just for time's sake, I'm going to skip this and just use the chairs we've created around the other table for the conference rooms as well. So what let's do is go back and I'll just select the table and chairs here. And let's just move these or duplicate them into the conference room. Now I think the table in the conference room is slightly longer than a table out here. And I say that just because we've got three chairs here relatively comfortably, it looks like there's a good bit of space between them. Whereas here, I think putting three chairs would be a little bit tight. So what let's do is let's go over to that conference room. Let's duplicate this over to this conference room over here. I'll press shift D and just move that new table over here. And then what I'd like to do is expand this to make it a little bit longer. If I just scaled this in the x-axis, just hit S and x, it would scale it out in the x, but it would also scale out the legs, the feet, and the bevels on the ends of the tables. And I don't want to change the size of all of those. I want to move each side out the same amount without scaling the legs and the bevels out as well. So how do we do that? Well, one way we can do that is if you tab into edit mode and go to vertex mode, let's just press the B key and border select this side. And now we can move that side over in a specified distance. So if I click on the X axis and then hold the control key down. Now if you look up in the top left-hand corner, as I move this, it snaps into tenth of a meter increments. So maybe I want to just move it out, say 0.2 meters. And then let's select the other side border, select these and do the same thing here. Click on the X axis, hold the control key. And let's move these out 0.2 meters as well. Alright, so now we've got a table where everything is still the proper size in terms of the legs and the bevels. It's just a little longer. Alright, so let's go grab those chairs now let's go back to the top view and come over here and grab these chairs. And we go and let's duplicate these and bring those over here like this. And now let's kind of arrange these chairs the way we'd want them. So maybe I'm just going to pull them out a little bit. So the so the arms of the chairs are just outside the table here. And I'll move these to one side like this here. And let's go with here. And then I'll just duplicate one of these. Put it here and rotate it just slightly. Here we go. Now the tables and chairs are gonna be hovering above the ground plane just a bit since we raise them up to sit on this carpet, I'm going to leave them there for just a bit because we're also gonna put a carpet in here and I'm not sure if that's going to be just a little bit higher than the floor here as well. So I'll leave that until we deal with the carpet. But also we've got another conference room over here. So let's go ahead and grab these again. I'll just select all of these. And let's duplicate this and move it over here. Shift dy. And let's put that right here. In addition, I think I'm also gonna put them right out here too. So let's just grab these. I think this area out here is kind of a employee break room maybe. So let's duplicate this. Move it out here and this time I'll spin it this way now, look at what's happening. Everything's turning on its own, which means of course we've got this individual origins zone. So if we change it to median point, now we should be able to hit the archi and turn them like this. And you can hold the control key down to snap it to five degree increments if you like. But I'll just put that right over here, something like that. Now we've got the furniture for our conference rooms. Let's think about the furniture for the offices now and for this is just going to be duplicating and placing these two objects right here. And since we've already got them in their respective collections, they should just duplicate and continue to be in those groups in those collections. So how do we wanna do this? How do we want to arrange our office desks and chairs? Well, let's go into a reference image and just take a look. Maybe let's take a look in here and see what we can see. It looks like they're kind of different configurations. You can see some over here and you can see tables and chairs in here. So it's just a matter of kind of duplicating them around, I think, and just and just putting them in relatively random places. So let's see what we can do here. I'll grab this, let's go to the top view, and I'll also go to wireframe here just so we can see them a little better. So let's just say. This one's like this. And then we could put one over here and turn it. And maybe there's one right here. And as I've mentioned, I'm not going to be real strict on making sure everything is inline, inline and exactly 90 degrees here or a 180 degrees there. I will do some of that, but I also like to give it just a little bit of randomness as well. Just so it looks like people have used it, have been in there. Alright, so we've got those two. Let's take this one and just duplicate it and I'm going to turn it and move it like this. Maybe this one's here and this one is over here. This can be of course, totally up to you, however you want to arrange the office is is perfectly good. I'm not exactly an interior designer, so don't go by the way. I put them in. You can do it however you want. I'm gonna put this one right here. And I'll just move this one right here. And here we go. Alright, let's do the same thing down here. I'll spin this around R18 0 for a 180 and then I'll just move this right here, maybe the bit. And I'll duplicate this and move it in the next, put it right there, and we go, okay, so we've got those rooms. Let's go back to solid mode and just see how that looks. Is that okay before I begin duplicating to all the other offices, i'm going to press shift tilde d and then hit the Tab key and dropped down. And let's just wander around and take a look. Does this look reasonable? You know? Yeah, I think it does. I don't think that's too bad. Yeah, I think that's OK. And then our conference room. Yeah. Ok. I think we're on the right track. So I'll hit the Escape key to come out of that. And then let's, let's keep going here. I'll grab this office chair and desk combination here. I'll just duplicate. And this one I'll move over here. Maybe this one I'll move over here. Like this. Same thing over here. And maybe I'll put this one oh, I don't know. Maybe I'll put this went against the wall here, something like this. And then maybe another one over on the other wall. To that. You know, we go. Yeah, so I think this is working out pretty well. What I'm gonna do is just continue placing the desks and chairs throughout these offices and also over here. And then in the next video, what I'd like to do is begin working on the some of the appliances and various items here in the kitchen. We need a faucet and a refrigerator, and maybe a coffee maker. So in the next video, we'll begin working on those.
54. 054 Beginning the Refrigerator: All right. I've gone ahead and duplicated the office desk and chair all the way around the environment here so we can see them all in here. I made this one over here, a little training room as if someone can sit up here and do some sort of training. I don't know, but you can do it however you want. I've also grabbed one of these and one of these and put them over in these small rooms as if it's a phone call rooms, you know, so that you can be an isolation while you're talking on the phone. But I think now that we've done all of this, what I'd like to do is begin work on the refrigerator here on a few of the appliances in the kitchen. And to do that, let's go ahead and look for some new reference images. So I come over here to image and open and let's go to our reference images folder. And I've got an image here. And let's take a look at this. Let's press control space bar. And now this kind of fool me. Initially, I thought these doors had an indentation underneath the handles. It turns out that's just a reflection of the handles. So we don't have to worry about that. But it does look to me like the doors have a slight curve to them, slightly rounded out. Let's take another look at this from a different angle. I'm going to click here and create a new window. And let's bring in another reference image. We may only have that one up at the top. Yeah, I think this is the only one I've got. This is 2771. So it's pretty far away, but we can zoom in pretty close. So let's press Control Spacebar and take a look at this. So as I said, it kind of looks like the doors curve out just a bit. And then we've also got these handles here. And I think maybe I'll add these small blocks up on top. I don't think I need to add these down here. I don't think we'll ever see those. Let's press Control Spacebar to go back and allright. So what I'm gonna do is just basically work with this cube as it is. I'm just going to take this face here and pull it back some. And then we'll add the doors onto the front of this. Now, it looks like the freezer door down here is just slightly below the counter. So I'll press Control R and add an edge loop and just bring it down. I don't know, I'm gonna bring it down to about right here, let's say. And then what I'll do is with this face here. Now, I'll select this and I'll bring the cursor to it shifted us to. And now from here, I want to begin to create that door. And instead of a cube, what I'm gonna do is actually begin with a cylinder. And to make my life a little easier, I'll hide everything else except the refrigerator. And to do that, we'd been hiding them over here in the outliner, but here I'm going to go ahead and press Shift H, and that'll hide everything except what's selected. Now let's go ahead and create a cylinder. I'll press shift a and mesh cylinder and I'll keep 32 sides here and I'll remove any cap fills. I'll change that to nothing. And let's go to wireframe. And I'll go to the Front of the refrigerator with the NUM pad three key. I'm just going to scale this down in the z until it's about fitting where it needs to fit. I just added that edge there just so we can see where the door is supposed to be. There we go, something like that. And then I'm going to scale this in the x-axis, S and X, kinda flatten it some and then I want to bring it out. And what I'm trying to do is kinda test how much of a curve I want on this door. So I'm thinking maybe something like this. Let's see. Pull that out about like that. Maybe we can just have a little bit of a curve out like that or is that still too much? Let me press S and X and kind of bring this in a little bit more. Move this back. Something like that, maybe. Yeah, I think that might work OK, So from here what I'll do is just select the faces that we want to keep these here. I want to keep these for the door and I wanna delete everything else. So I'll press control i to invert the selection and then x and delete faces. Now we've got the beginnings of that door, okay, from here what I'll do is select these edges. And let's go ahead and extrude this up for this little piece right here. Let's do that. I'll go back to the side of the refrigerator and just hit e and z and pull that up just a bit about like that I think. And then what I wanna do is add some thickness to this. I want to add a bit of thickness just enough for this up here. And then I'm going to extrude the rest back. So let's tap back into object mode and then I'll press control a and apply the scale. Now let's come over here to the modifiers panel and let's add a solidify modifier. Choose even thickness. And I'll click in the thickness field and expand this out. Well, it really doesn't need to be expanded much more than an RDD is. Alright, so let's go with that. I'll hit apply here. And then well, it's do is tap back into edit mode and select these faces in here on the back, the ones that we just created in here. Now let's extrude this E x, pull it back, and let's also flatten it. And I think let's press Sx and 0. And then we can just bring this back like this. We may want to instead it in just a bit. Let's try that. I'll hit I and inset. And then I'll hit E x and pull it back a bit like that just to give it a little bit of a indentation there. And then I think I'm also going to flatten this area right back in here. Let's do that. I'll press sx 0, and then I'll bring this back just a bit like this. And we go just to flatten out up. Alright, so there we've got a basic door for the top. Now, for the bottom, I think I'm just going to duplicate this and take it down and then I'll lop off that top edge there. So let's try that. I'm going to press shift d and z and pull this down. And now I'll go back to wireframe and let's see if we can press S and Z and scale it down a bit like this. And maybe it'll go about in here. Let's try that. Yeah, let's try that. So then we're just going to bring it out a bit. And what let's do is let's remove this top part. I don't need this for the freezer door down here. Alright, now that I've got that all selected, let's go ahead and hit X and delete these faces. And then let's click this edge all the way around. And let's fill the faces here now. Recall we can't just hit F, but that makes just one big N gun here. I'll press Control Z. What I'd like to do sometimes if we're at all going to see it, I guess we really aren't going to see this too much, but you can also come over here and choose Fill, and that will fill it with triangles. Or you can choose grid fill and that we'll try and fill it with quads or four-sided polygon. So let's just use Grid fill there. Yeah, that worked out pretty well. Alright, so let's take this piece now and take it back to here. Okay, so we've got that freezer door and the refrigerator door. The thing is, is this refrigerator door is actually two doors. We need to split it, so it at least looks like you could open it. I'm never going to open the doors here for this particular scene. So it doesn't really matter if I don't have hinges on it or anything. But what I can do is select this edge right here and then bevel it and delete the faces in-between. So let's try that. I'm first going to apply the scale just in case, you know, we go and then I'll press Control B and slowly pull this out. We've got just a little bit of space between there like that. Ok, now these faces here, I'm just going to delete c. It goes all the way around. So i'll just delete these. And now what we can do is since really no one's ever going to see those inside, we can just fill those with the F key. So I'll press Alt and click that edge and hit F. And then I'll press Alt and click here and hit F as well. So now those are filled inside there. Okay, so we've got the beginnings of the refrigerator. In the next video, we'll go ahead and work on the handles and the little pieces up on top.
55. 055 Finishing the Refrigerator: Okay, now let's take a look at the handles. And I think we can really do a similar thing that we did with the front of the doors. Using a cylinder, getting it in the right shape and size, and then using the slidify modifier. So let's give that a try. I'm going to press shift a and create a new cylinder here. Let's turn it in the x axis, RX 9-0. And I'll also scale it in the y with x and y. And let's get it quite a bit narrower here. And then let's press S and X, and let's scale in. Move this out here. And then let's begin scaling it down and seeing if we can get it. So it looks at least similar to what we're seeing here in the reference images. And that right there doesn't look too bad. Actually. Think we might be able to flatten it just a bit. And maybe scale in the z, x and z. And let's take a look at that. Yeah, okay, so let's now scale it in the y and get it about the right width for just one handle. And let's move it over to the side here. It may need to be a little bit thinner. That's fine. We can do that. But from here now, let's just select the faces we want to keep. Let's do that. I'm going to come in and just select these. And yeah, I'll go ahead and get these as well. And then let's press control i x delete faces. Now if we grab this edge and this edge, I think I want to just pull it out just a little bit more and straighten it up just a bit. And then what I'm gonna do is extrude those two and scale them into z. So e, S, Z and pull them up. And now I want to pull them back out like that. But let's do is give it a little bit of thickness. So I'm going to select it here in object mode first and then press control a and apply the scale. And then let's come back over to the modifiers panel and add a solidify modifier. Now let's choose even thickness and I'll click in the thickness field and add some thickness to it. Kind of looks like it's maybe about like that. And then what let's do is let's grab this and duplicate it and move it over to the other side. So I'll press shift d y, move that over just a bit. We've got that there. Now what I'd like to do is combine the two. And then I'm going to use the door itself as a Boolean, as a Boolean cutter to cut these parts so they don't insert into the door. So let's select these two. Oh, I need to apply to solidify for both of the handles. So I'll go ahead and apply this one. And I'll apply this one. Now let's select these two and press control j. Now they're all one object. Now we can do is apply a Boolean modifier and have the door B, the cutter. And there we go. Let's now take one of them and move them down to the freezer door on the bottom. So what I'll do is I'll just hover over this and press the CTRL key, and then I'll press shift d and z and move this down. Let's split this out with the peaky and separate by selection. And then if we tap back into object mode, grab that, move the origin back to the geometry here. Now let's spend it in the x axis, RX 9-0. And now let's shrink this down a bit. So it'll fit on this door. Let's move it down. And then what I'll do is I'll go ahead and just press the S key and scale it down a bit like this. Now it's probably wants to be as wide as the other one, so I'll scale it back in the Z. Oh, I see. The problem is, is that we're not in the center, are we? So let's go ahead and go to the front here, and let's center this up. We better do that. There we go. Now I've pushed it back a bit, but what we need to do is maybe scaled in the X. So I'll press S and X. And as I scaled it's going to bend it just a bit. And you can see that there. And then I can push it back in just a smidge like that. Okay, so now what we can do is do our Boolean trick. Once again, I'll select this. Oh, we've still got the boolean on it. So what I'll do is I'll remove that object and then take this eyedropper and select this object here. Now I can go ahead and apply this. And I guess these up here I need to apply as well. So I'll do that. There we go. Okay, now lets do is add that top piece right up here. Let's do that. I'll select this, select this face and move the cursor to it with shift S2. And let's just create a new cube. Shift a cube. I don't need that. Face on the bottom here, so let's delete that. And then I'll scale it way down and bring it down into here. Let's move it over here. And then I could take this and duplicate it. Why don't we do that? And I'll just move it forward and let's shrink it down quite a bit. I'll scale it in the x, scaled in the y two. And I just want to put it right over here on the door, right in here, just to add something up there. And then I can take each of these and let's duplicated and just move it over. I'm just trying to build a few very simple small pieces just to give it a little bit of interest here. Alright, so now that we've got that, let's go ahead and begin adding a few bevels to this. I think what I'll do is join all the objects together to do that. But before I do, it looks to me like these are just a little bit too wide. Maybe I'll set the origin to the geometry and then scale in the y here like this. And then I'll also scale on the y down here. Excuse me, the z. I'll do that here. Now I'll go ahead and combine all the objects together. I'll select one and then hit the a key and then press control j. From here. Let's go ahead and smooth everything shade smooth. Let's come over here to our auto smooth and turn that on. And then let's come in and begin doing a bit of beveling. You can see here that these edges have curves on them. So let's, let's begin adding edges in here. And all the way around here. Let's do that. Alright, I've selected a few edges here. Let's go ahead and press Control B. And I'll bevel the edges here, scroll the mouse wheel. Let's add a couple of edges here. Let me bring that back down about like this, I think. Yeah. And then let's do that on the door handles as well. So let's grab these edges and these behind here. And let's do that up here. Control B. Add those. And yeah, I think that looks pretty good. That's really all we need. It's not really the focus of the scene. So once we add a metallic material to that, I think it'll be just fine. So let's bring everything back now with Alt H. And it looks like, look what I've done here. I've actually created the refrigerator in the wrong direction. Well, that's not a problem. Let's go ahead and just press S z 180. And that term turns it around there. And then we can bring it back and put it in place. Maybe something like this. And I can always press Alt Z to go to x-ray and then grab these faces back here and pull him back if I want toward the wall, maybe something like that. And there we go. We've got a refrigerator. So if we press Shift TLD and the Tab key, we can drop down and walk around and see how it looks. Yeah, I think that'll be just fine. Good. Alright, so in the next video, what let's do is let's begin working on the faucet for the sink.
56. 056 Extrude Along a Path: Now before we begin on the faucet, we should probably clean up our refrigerator here. I'm not really sure where it went, but what we can do is we can hover over the outline or impressed the period key on the NUM pad. And it will then highlight where that object is. We need to give it a new name. I'll call it refrigerator. And I'd also like to move it into a new collection called kitchen appliances. Let's try that with this selected I'll press M and nu and we'll call this kitchen appliances. Okay? Now if we go back up here and twirl this down, now we can see here's our kitchen appliances, and if we troll that, there's the refrigerator. Okay. Now, for the faucet, I think we're going to need some new reference images. Let's go to image and open. And I've got an image here. Let's take a look at this control space. And yes, so this is really just very tubular. We'll, we'll, we'll be able to just to use a cylinder for this. I'm not going to worry about this thing. This is a hot water spout. If you would like to create that the tools and processes will use for this can be used for the hot water spout as well. But just once again, for time's sake, I'm just going to create the water faucet here. Now I'd like a different view of it. We can't really see all of it here. I think actually this view may give us the best angle on it. Yeah, let's take a look at it here. There we go. So let's press control space again and zoom in and take a look at this. Yes. So it's really just a cylinder and then extruded in, scaled in, and then we'll extrude this up as well. So I think we can use a couple of tools that we haven't used before. We'll use the Boolean tool as a merge tool to combine these two objects here, this cylinder and this cylinder. And then we'll also use blenders extrude along a path for this. So let's give that a trial press Control Spacebar. And let's get this in the frame there. Now for all this, I think we can just hide all of this. Let's do that. Let's just hide all of that there. Let's move the cursor back to the origin of the grid with shift S1. And then let's go ahead and create a cylinder. I think I'll begin with a cylinder, 12 sides. So let's change 32 to 12 here. And I don't need a cat built, so I'll change this to nothing. And then let's go to the side view here with NumPy three, and I'll bring this up to sit on the grid here. And then what let's do is let's begin with this little ridge right down here at the very bottom, right there. Let's begin with that and then we'll extrude up. Alright, so I'll tab into edit mode and alt, click that edge and bring that whole thing down. And then what I'll do is I'll get it right about here. And then I'm just going to hit e and z and extrude up. And then I'll hit S and scale in just a little bit like that. And we go. Now let's continue with this piece right here. I'll just hit e and z and pull up like that. Let's get it about the right height. I'm just kind of eyeballing it here and maybe something about like that. And then we go and then it looks like it has another little ridge or something here. We should go ahead and add something like that. What I'll do is I'll press E and S and then scale out a bit. And then I'll just pull this up like that. And then I'll sit e and z. And then I'll hit E and S. And then we'll pull this up a bit as well, something like this. Now I should probably scale that in a little bit more. So this right here is now going to be the diameter of the spout that goes on up and curves over. However, we're going to be able to adjust this as we need to. So the exact size of this isn't really important at this point in time. But I think we've got a good beginning to adhere. Well, let's do now is begin extruding this up. And we could, just like we've done before, we could begin extruding up. And if you recall, we had that extrude to curser here. We could go ahead and click and click and kind of create our own curve like this and down like this doesn't really work too well, especially with my shaky hand. Let me undo this. But another way to do this is to use the path tool to extrude up along a path. Now, the problem with blenders extrude along path is that you can't just extrude an edge from a polygon along a path, you can only extrude another curve along that path curve. So we're kind of at an impasse here. How do we do that? What we can do is we can duplicate this edge, pull it off, separated into another object, and then convert it from a polygon to a curve. Just like before we were able to convert from a curve to a polygon and we can also go the other way. So let me go back to the Move tool here, and I'm just gonna press shift D and click, and then I'm just gonna move this up. And there is a little curve out of polygons, will then convert this into a mesh. So first of all, we need to split it out as its own object with the P key, and then click on selection. Alright, so we tap back into object mode and just select that one circle there. And then we can go up to Object, convert to, and convert to a curve from a mesh. So let's do that. Click that. Now you can see the curve or path tool came up. We can tab into edit mode and you can see those points there along the curve. Alright, so we've created our curve. I'm going to move the origin up into this circle now. So let's go to object and then set origin and origin to geometry. There we go. So now that we have that, let's create a path for this spout part that goes up and over and down like that. So let's go ahead and create a path. I'll press shift a curve path. Let's bring it up. It's pointing toward us now, but let's spin it in the y axis so we can see it. I'll press RY 9-0. There it is. We can see it there. And then what let's do is let's tab into edit mode and we can grab one of these points. And we can begin pulling this up and extruding to get this piece right here. So I'll pull it up to about one, kinda hard to know, maybe about right here, let's say. And then I'll extrude it easy and pull up a bit. And then let's extrude it this way, e y. Now we are getting that curve. Recall that you'd need those three points there to get any curve. And then let's extrude it forward with EY. Pull it out to about right here, let's say. And then E y out a little further. And then pulled down like that. And then I'll take it down just a little bit farther, e and z and pull it down to there, let's say. Alright, so now that we have our path, what we wanna do is we want to extrude that tube out from this path based on this circle. So with this path selected, Let's come down here to the bevel section and we want to click on this little eyedropper here, and then click on our circle right here. And there we go. Now we've extruded that circle along that path. And we can take this circle here and we can scale it in and out like this to make this bigger or smaller. So if we want our path to be o, if we want that tube to be about like that, we can do that. We can also tap back into edit mode here with this path. And if we want to change the curve on the tube now we can move these back and forth and change the angle of the curve if we want to get it just the way we like, something like that, maybe when we go. Also recall we need to adjust that resolution up here, that resolution preview you because if we hit the Z key and wireframe, we can see we've got a lot of polygons there and we just don't need that many. So let's take this down like this. And that's a little too much. Maybe. Let's go back to solid mode and let's take a look. Maybe fours, Pretty good. Maybe go to five. Let's see how that looks. That looks pretty good. Let's see how that's not too bad. We've got a lot of polygons in here. We might be able to get away with four. We've got a little bit of a wrinkle here, but that's not too bad. This is really going to be seen from quite far away. I'm not too worried about that. I might select that circle again and adjust the thickness of this one more time. I'll just hit the S key and scale out. Just a little bit like that. Yeah, I think that's going to work. Alright, so what let's do now is take this and convert it back to a polygon so we can connect it up to this piece. I'll go up to Object, convert to a mesh from the curve. And let me go. And if we tap into edit mode, we can see the polygons there. Now I can grab that circle. We don't need that anymore and let's just delete it. And what we can do is we can grab these faces here. Alt click between two of them, delete them. Let's take this and add it to this with control j. And then let me bring this down. It looks to me like we need to bring that out just a bit. So I'll scale that out just a bit like that. And in fact, what I think I'll do is bring this down to about right there, and then delete all of these faces here. And now we can take this edge and this edge and bridge those edge loops. And keep in mind, we created that cylinder with a 12-sided circle that was duplicated from this 12-sided cylinder here. So this should all fit without a problem. So press Control E and bridge edge loops. And there we go. Now we're gonna get some smoothing errors here what we can do is you go over to object, shade smooth, come over here to auto smooth and play with this a bit. And there we go. So we're beginning to get that a little bit better. Alright, so we're on our way to creating the kitchen faucet here. In the next video, we'll work on merging is cylinder here for this and creating the handle, as well as putting it all back in the scene again.
57. 057 Finishing the Faucet: Now it looks like the cylinder down here, maybe a little bit too short for the size of the spout here. I may need to grab these points and pull them up. But in order to do that, I should probably remove some of these edges and it probably wouldn't be a bad idea to go ahead and remove these just to reduce the poly count. So let's go ahead and do that real quick. I'll just select all of these with Alt Shift Click and will just dissolve these by pressing X and choosing dissolve edges. There we go. So now if I go back to the side view, I can go to wireframe and border select these and just pull these up or down depending on what you need. So maybe I'll just bring it up about like this. Let's try that. And in addition, I should probably go ahead and just grab these up here. We don't need all of these edges along here. There's really no point in it. Let's go ahead and dissolve those. Okay? Yeah, that looks pretty good. Now let's work on adding this cylinder right here to the faucet. As I mentioned, to do that, we're going to use the Boolean modifier. But before we do, I'm going to add a few edge loops in here. Just because sometimes when connecting a piece in this way, it's sometimes good to have just a bit more geometry in there. Alright, and then what I'll do is I'll go ahead and create a new cylinder right here. And I'll make it 12 sides just like we had before. And I'll also remove the cap fill as well one more time. Okay, so now that we have this, let's move it forward. I'll spin it in the x axis, RX 9-0. I'll move it up and let's put it in place. So it looks like maybe it's up a little bit beyond halfway. Maybe I'll put it right in here. So let's bring it in and let's have it intersect with this. And I'll also scale it down. So it kinda fits in there with a relatively nice curve here. If I go too far out, you can see it kinda has a point there. So I'll just scaled in just enough to get us a little bit of a curve there. Okay, so with that, what I'll do is I'll come over to the modifiers panel, add modifier, boolean. And then let's use the eyedropper to select the other object. Now, currently we have difference. We can use union and combine the two together. Now we're getting some strange artifacts there and I'll show you what that is in just a moment. But what we can do now is click apply. And there we go. Now this strange artifact is the original object, the original faucet. So if I double-click it and that there it is, I can move it aside. And there it is. That's the old one. Now, we can take this one and smooth it again. And then we can come in here and add auto smooth and pull this up once again to smooth that out a bit. But there we go. Now we've got this piece fused to this, right? So if we select this and go to wireframe, we can see that there we are. There's our merged objects right there. Alright? Okay, so let's go and begin extruding this out right here. To get this part in here. Oh, and of course, this over here, we can just delete that. Let's just hit X and delete that. Okay, so now Let's work on this right here. I'll select that with this edge selected. We can now extrude this part out. Let's go ahead and do that. I'll bring it out to where this kind of indentation is right there. Let's just bring it out to that point. And then we can hit E and S and bring that in. Ie. And why bring that out just a bit? Then we can hit E and S and scale that back out to get us. So about the right size, I think let's go to the front view here and wireframe. Let's just make sure it's pretty much the same size. There we go. And now we can continue on to the end here, E, y out to about here. And then let's bring this in E and S and bring that in like this. And then we'll hit EY and bring that out to their, Okay, so we've got this part now. Now I just want to create a cylinder for this and I'm just going to push it right onto there and not worry about attaching it because no one will ever really see behind there to see whether it's actually attached or not. So I'm going to tab into edit mode and selected these edges right here and move that cursor to that with shift us to. And then let's create a new cylinder right here. I'll go ahead and add a cap fill to it. I'll choose a triangle fan. And let's scale down. And then scale up in the z like that. And then maybe we could bring it up like this. Let's try that. And we could maybe scale it out a bit and bring it up. About like that. Maybe maybe a little bit bigger about that. Yeah, let's go with that. And then I'll move the pivot point of the object to the 3D cursor here. Let's just change it to 3D cursor like that. And then let's just turn it. It's kind of at an angle here. I'll just press R and Y and turn it a bit like that. Okay, now let's add some bevels to this to get it to look a little bit more realistic, let's add a few on the here. I'll press control a and apply the scale. And let's grab this edge and this edge. Control B and pull that out a bit. Something like that. And these as well. So I'm just going to select this. Oh, we should apply the scale. And I'll just select these and let's just go through all of these right here and create bevels there. Yeah, that looks pretty good. Okay, also up here, let's take a look up here. And we should probably close this off. If we select this edge right here and press E and S and scale in, oh, look, I need to move that pivot point back to the median points. Let me undo this, change our pivot 0.2 median. Now we can select this, press E and S, bring that in. And then we could press E and Z and bring that up a bit. Now if you wanted to close it off just in case I don't think we'd ever be looking up into the faucet, but we can merge all these together. We can press E and S and scale them in. And then to merge, we can press Alt em and choose to merge at the center. And that will just collapse those up. There we go. And let's put a bevel on this as well. Control B and pull that out a bit. There we go. Okay, so we've got all the pieces and let's select everything with the a key and press control j to join all the objects together. And then let's make sure that smoothing has been applied. And we can adjust the angle here. And yeah, there we go. That looks pretty good. Now let's move our 3D cursor back to the center of the grid, shift us one. And then let's move the object origin to the 3D cursor by coming over here to object set origin 3D cursor. Alright. Now let's take it back in. I'm going to change the name here. I'll call it a faucet. And let's bring everything else back. And let's try and put it in place. I'll bring it over here. Let's scale it down quite a bit. I'll press are in Z and hold the Control key and turn it 90 degrees like this. And then let's bring it up, put it on the counter, and we'll scale it down. A good bet. Like this. Put it right on the counter there. And let's get it in the center. Like that. There we go. Yeah. So there we go that we've got a faucet on our sink. Let's put it in our kitchen appliances collection. I'll press M and select kitchen appliances. And there we go. We now we've got a faucet on our sink. In the next video, let's begin working on the coffee maker.
58. 058 Beginning the Coffee Machine: All right, well let's take a look at that coffee maker. We've got an image of it over here. Yeah, here we go in this image. So there's kind of a three-quarter view of that. Let's take a look at it Control Spacebar. And so it looks like it's basically a cube here. And then it's got this front piece on it. And then this silver piece on top of that. And then it's got this black piece, this silver piece. I'm not gonna do the little cup holders here, but maybe then this tray here. Alright, let's take a look at another view here. I'll go to image open. And here we go, we've got a closer shot of it. So yeah, I'm just I'm not going to do these little cup holders. They actually flip up and you put your cup here. So I think that's really all we'll need for this piece down here. What I'm gonna do is just put a polygon plane in there and then see if I can find a texture that will work with that. Instead of trying to model all these little holes and slots here, I think that'll just be way too many polygons for such a small part in the scene. So I think I'll, we'll need is these main parts here. Okay, well, let's see what we can do. I think I'm gonna go ahead and hide everything. Let's do that. Click and drag all of this. The cursor is in the center of the grid. And one of the things I'm gonna do here is I'm going to create this in multiple objects. It's a little trick I like because it allows you to add extra edge loops to one part of the object without having them extend over into the other parts. And I'll show you what I mean is we get there. Alright, let's press shift a good a mesh cube. And I'm going to go to the front view with NUM pad one. And then what I'm gonna do is just bring this up onto that grid plane right there. And then let's tap into edit mode and grab a face up here and we'll just pull it up till it's about the right height. I'm thinking maybe about like that. And it almost looks like it goes back a little bit farther like that. Something like that. We may have to once again do a little bit of adjusting as we go. But now that I have this, what I'm gonna do is I'll bring this back now to this line right here. Maybe something like that. And what I'm gonna do is duplicate this face, split it out into its own object to create the next piece right here, this lighter gray part right there. So what I'll do is I'll press shift D and enter. And then I'm just going to take this and hold that Shift key down and pull that polygon plane out just a little bit, kind of give it that little crease or that little edge separation between the two objects there. Then I'm going to split this out with the P ki and split. By selection. Now let's tap back into object mode and select this new object here. And then what we can do is go back into edit mode, select that face, and looks like it comes out about this much right here. So let's press E and why? And I'm just going to pull out about like this. Alright, so now you see here it's got a little extrusion going out. So if I add an edge loop here, it won't go through the other object. And that's gonna be beneficial as we work on this silver part on the front, I think. All right. So I'll move it down to about right here. Then what lets us do is take this face right here and extrude that out just a little e and y. And I'll pull that out some like that. And there we go. Now we need something for this up here. So let's once again duplicate this one, face, shift D, enter, pull it out. Just a smidge, split it off with a peaky. And now we've got a new object that we can work with to create this piece here. So what I'll do is tap back into edit mode and let's press E. And just a bit. I'm thinking about like that. Alright, so now we've got those three pieces. This one, this one, and that one. And each time we just duplicated a piece off of the original object. Now it looks to me like it's not tall enough. I'm gonna go ahead and select all of these objects and hit the tab key. And this new feature of being able to go into edit mode on multiple objects comes in handy here. So I'll just grab this and move it up a bit. Maybe something like that. And then let's go back to object mode, and I'll just select this one. I'll grab this and just pull it up a little bit because I feel like it needs to be just a little bit higher. Right? Okay. Now that we've got that, let's pull that out just a bit. It looks like it's just got kind of an angle to it here. So if I take two edge loops here and then press S and X and pull them out a bit like that. And then grab this face here and just pull it straight out. I can get that kind of bend there. Okay? Now we've got this piece right down in here. It kind of angles up writing here. So let's see, we can get that. I think what we could do is add two more edge loops here and then press S and X and bring these out about like that. Now if we grab this face here and just pull it up, let's take a look. Well, it looks like it needs to be in a little bit further. So let me undo that and go back to these, and let's do this. Let's pull these out just a little bit more and then we'll add two more edges in here. Let's do that. Like this, S and X and I'm gonna pull these out. And now these are the ones that are going to define this face here. And we'll just pull that up. Okay, so now that we have that, we need this black part right here, it's a another piece, another object. So once again, what Let's do is come in and select a few bases here. I'll select this one, this one, this one, this one, and this one. Here we go. Now let's duplicate, hit Enter. And then let's grab this and pull it down just a little bit. And then we'll press P and split it out. Now we've got this piece on its own. Let's tab back into edit mode and grab all of these faces once again. And we go. And let's extrude these down. I'll hit e and z, and let's pull this down like this. And what Let's do is kind of bring it down about here. Let's go with that. Now it looks like we need to take this one and this one and extrude them out just a bit. So let's press ESX and scale them out. And then let's grab these edges right in here. And let's pull those in. Paul and then like that, and there we go. So it's just kinda conforms to that bend on the part above it there. Now we want this guy right here and it looks like it's flat on top, but it's got a little angle down that follows that black piece. So if we then grabbed, say, these here and extruded these offers, excuse me, duplicated these off with shifty and enter, and then grab this and pull it down just a little bit like that. Now let's split it out with the peaky selected an object mode and go back to edit mode. Now we could take this piece right here, and we could get e and z and pull it down just a bit. And then we could flatten IT S z 0. And there we go. Alright, I think I need to pull the back of all of these clear to this object right here. So let me grab this real quick and tab into edit mode and I'll just try and select. I'm going to turn off my move tool for a moment and select all of these back in here. Spin around and grabbed these. Now, bring back that move tool and just bring these all the way back to about here. And the same with this. Let's just take this, grab all of these faces here, and bring these straight back. There we go. Alright, I think we're coming along. We've got many of the parts in, in the next video. I think what lists do is work on this tray. And also this screen here on the front of the coffee maker.
59. 059 Finishing the Coffee Machine: All right. Continuing the coffee machine. I think maybe I'll bring this front part out just a bit. It looks like we could bring that out from that black part just a bit. I'll grab these faces and just pull it out about like that. And we may put a bevel on those edges here pretty soon as well. But let's think about this tray down here where the coffee mug is. I think what I'll do is select this object right here. And let's tap into edit mode and I'll grab a piece off of this. So I'll bring an edge down about like this, about the height of that tray, let's say maybe something like this. And then I'll grab this face and let's break this off from the rest shift D. And I'll bring it out just a little bit. And now let's split it with the P ki and grab that object. Now we go back. Let's select that face and let's extrude this out with e and y, kind of bring that out like this. And then I think I'll take these edges right here and right here. And let's bevel these. I'll make sure that our scale is applied control a and apply the scale and Control B. Let's bring these out. Scroll the mouse, we'll maybe something like this. Alright? And it looks like it comes out just a little bit more. Maybe if we created two edges here, scaled out in the x and then pulled this one, phase out just a little bit like that. Something like that. And then let's extrude this down or use the inset tool. I guess we gotta just grab this and we can use the inset tool with the icky and bring that in about like that. And now let's extrude it down E and pull it down. We don't wanna go too far, maybe something like that. All right. Now, we've got this back part and I'm not really sure that that's supposed to be there. If we look at it here, I don't really see a back edge to that. It just kind of goes straight into this other piece. So how do we get this out of here? Well, an easy way to do that would be to go to the side view and let's go to wireframe. And if we tap into edit mode, we could border select these faces back here, right there, and just delete those. And then once we've done that, let's go to vertex mode. Go back to that side view, and let's border select these and then press SY 0. And that will straighten all those up or make them inline with each other. And then we can just take this and bring it straight back like that. And there we go. I feel like it's a little too tall. Let's go ahead and move that origin into the geometry. And scaled in the z, maybe something like this. And bring it down a bit. And then what we can do is grab this face in here like this. And I'm just going to duplicate this and bring it up for that grid there where the coffee cup is sitting. I'm thinking maybe we can put a texture on that, as I said before. So let's just press shift d and z and bring that up to about here. Let's just put that there. Alright, so now we've got that tray piece on. The last piece of the puzzle I think we need is this screen. And then we can begin going through and beveling edges and smoothing, et cetera. So let's take a look at the screen. It looks like it's kind of pushed out just a bit from the metal part. So let's see what we can do with this and see what we have in terms of edges that we've already created. Well, we could use these internal edges hearing here. We could use those two edges as the sides of the screen. And then we could use that screen to duplicate and expand out to get that frame around it. Let's give this a try. So first of all, let me do the top edge of the screen and I'm not doing the frame, just the screen here. So let's bring this up now. It isn't gonna be a problem in this instance, but you can see how the closer I get to the bottom edge, the more angled it is and the and the closer I get to the top edge, the more straight it is. We can fix that angled goodness, if we wanted to buy at this point in the process, pressing E, And then we can press the F key. And you see how we can toggle between the top edge and conforming to the bottom edge. So I'm just hitting the F key here. Alright, so now let's bring this up and put it in place maybe right about here. And then I'll press Control R and click. And now I'll hit the E key again so I can toggle between the bottom edge and hit the F key and the top edge. So we can just toggle between those two. Alright, I'll bring this up and I'll drop this right about here. Alright, now that we've got that, we can grab this. And it's kinda hard to tell if it's recessed in just a bit from the metal area, but I think it is. Let's go ahead and press E. And I'll push back just a bit like this. So we'll get that screen right there. And then let's duplicate this and bring it out to begin the frame. So I'll press shift d y and let's bring it out here. And now let's split this off p separate by selection. And now this object is what we're going to build the frame out of. So I'll go to the front view and let's go to wireframe. And now I can scale this out. Oh, let's first move the object origin into the geometry. There we go. And now scale this up. And we'll go out to about oh, about like this I think. And then let's bring this in just a bit. So this'll be the frame here. Now if we tap into edit mode and select this one face, we can inset this by pressing I and insert it in. And this'll be the inside part of that frame. Let me press S and Z and bring this up a bit. And we go, well, I better bring it inside there, shouldn't. I'll bring it inside that frame right there. And we go, and then I'll delete this x and delete faces. Now, we go back. There's our frame. Right there. We can grab the edges all the way around here and extrude these back. So EY and pull them back. Now we can take this whole thing and kind of move it back in like this. And there we go. So there's our frame and our screen. The last thing I think I'll do is put some feet on here. You can see that this is kind of hovering above the kitchen counter here. And I think that's because it's got some rubber feet on it and I want to add those as well. So let's select everything and go to that side view. And I'll bring this up off of the counter space right there. And then let's add a few cylinders. The feet and what the cursor in the center of the grid. Let's go ahead and create a new cylinder, shift a mesh cylinder. Let's give this 12 sides and let's take away the cap till so there isn't anything on the top and bottom. And then I'm gonna move it out and let's just scale it down quite a bit. And I think what I'm gonna do is take the bottom of this, take this edge right down here, and just shrink it down a bit like that. Now, if we shrink this down and put it over here, like this, and here we go. I'll shrink it down just a bit more. And we can put it right here. And then we can put one in the back shift d y and bring that over here. And then let's also go to the top view and wireframe. And let's put these in place over on one side like that, and then shift dx and we'll pull him over to the other side like that. And there we go. So now we've just got little feet on the bottom that'll kinda keep it up off the counter there. Alright, now that we've got all that in place, let's go through and try and bevel of few edges, do some smoothing, things like that. So in terms of beveled edges, I think maybe this front panels a good candidate. Let's give that a try. I'll press shift a and apply the scale, and then I'll just press Alt and click. And let's select the edge all the way around the front like this. And then let's press Control B. And let's pull these out just a bit. And I accidentally clicked so we can go into that bevel Settings window and we can increase the number of segments here as well. And we'd go something like that. And we ought to do these here. I think I'm gonna try and bevel the outsides right along here. Let's do that. And I'm not going to worry too much about the others. Just right in here. Right in here. And it looks like there's a bit of a bevel on the inside. Let me go ahead and get those as well. Oh, let me apply the scale. And then let's press Control B and bring these out as well like that. Try that. Yeah, there we go. And what about down here? Do we need anything down here? Well, it looks like the bottom edge of this piece needs a bit of something. And maybe even over here as well. So let's apply the scale for this. And then we'll grab these edges along here. And that one there. Oh, I'll grab that. Yeah, there we go. Control be bring those out a bit. And oh, we had said we may want to do something here. Well, it's kinda hard to know exactly what to do here, but let's just grab these. See how that's going to look. Yeah, I think that'll be fine. And down here well, we could bevel the top two edges along here, I guess. Let's try that. We go. Okay, so now that we have all of that, let's select one piece and then hit the a key to select everything, and let's join it all together with control j. Then let's move this object origin into the center of the grid to that 3D cursor. And we go, and let's go ahead and smooth it. Let's see what we can get with this shade smooth, kinda ugly. Auto smooth. So what we have here, yeah, actually, just 30 degrees isn't too bad. And then let's take it in and put it in our scene and see how it looks. So let's go ahead and bring everything back. I'm going to press Control asked just to save the scene and let's call this coffee maker. Bring everything back. Now let's bring this over here. Let's turn it 90 degrees are Zhi Control and turn it 90 degrees here. Let's scale it down. Put it up on the counter, see outlooks. And I'll put those feet right there on the counter like bat. Let's slide it back so that tray is just hanging over the edge there. So it looks like we're going to have to come down a bit of debt like that, push it back out. Yeah, that's not too bad. Let me like it needs to be a little bit smaller than that. And I'll kind of put it right there. See how that looks. Yeah, I think that'll work. Okay. Alright, so we have our coffee maker. I think from here what let's do is let's begin working on the ceilings here, the various parts of the ceiling. There's a drop ceiling and also all the lights, the hanging lights and recessed lights up into the ceiling panels. So we'll begin working on that coming up next.
60. 060 Creating the Drop Ceilings: Before we move on to the drop ceilings, let's take care of the coffee maker here. We should move that into the kitchen appliances. I'll just take it and drag it in. And then let's join these two windows here. And let's find a reference image that gives us some sense of what these drop ceilings look like. How about this one? This is 2785. I'll press Control Spacebar. And let's take a look. So we've got this main or larger drop ceiling here and it looks like it pretty much conforms to the size of the rug on the floor. And then there's a smaller drop ceiling over here that pretty much conforms to the size of the kitchen counter. So let's just create some cubes and put in there and see what we can do with that. I'll press Control Spacebar. And first thing was do, let's actually create that higher ceiling. So there's a ceiling, the actual ceiling is up higher than the drop ceiling up in here. So let's go ahead and create that. To do that, I think the easiest thing to do is just to take this floor object and duplicate it and use it for the ceiling. So let's go to the front view with NUM pad one. I'll press the Z key and wireframe and let's just move this up. Let's just press shift d and z and move this up here. I'll press S and z to make it a little bit thinner. And I'm using objects here that have thickness to them for the floor, for the ceiling, for the walls. Sometimes if you just use a flat polygon plane, you can find that you get light leaks and shadows sometimes aren't rendered correctly. So I think it's good to use objects with thickness for the floor, the ceiling, and the walls. Let's give this object a name. I'll just press F2 to bring up the object name field and let's just call this ceiling. And then to create those drop ceilings, what Let's do is just duplicate this again and scale it down. I'll press shift D and S And we'll just scale this down quite a bit. And this'll be the beginning of those drop ceilings. I'll take this ceiling object here and let's hide it. I'll just come over here to the walls, floors ceiling group. Here it is. So let's just hide that. This object right here is our new drop ceiling. I'll just call this drop ceiling 01 because we will have another one there. And let's go to the top view and let's put this in place now, I don't really need this floor diagram here, so let's turn off the reference objects here. And I guess we could also take these cutter objects into there as well. Let's just drag those in there, just kind of cleaning up as I go here. All right, so let's select that drop ceiling again. And let's move this over. And that's not bad there in the x-axis, but let's scale it in the y with x and y and kind of bring this in a bit. Yeah, so I'm just gonna have it be just a little bit bigger than the carpet there. And also let's tumble around and see how Thick. This should be maybe a little bit thicker in the z-axis here. And let's do this. Alright, and then let's also go over and let's bring it down. So it's just above those door frames here. Maybe right around in here. Okay, so now that we have that one, let's go ahead and create the other one here for the kitchen island lists. Press shift d and x and move this over. Scale it in the x. And maybe it should go about like this. Let's try that. And then it looks to me like it kind of comes in a bit like it isn't as wide as that first drop ceilings. So let's tab into edit mode and go to face mode and grab that base and just move that in a bit like that. Let's take a look at what we've done. Yeah, I think that's pretty good. Let's work with that now. I'll go ahead and apply the scale for this one, control a ply the scale there. Same thing here. Now that we have the general size in place. And then let's think about these ceiling tiles. Now. It looks like the ceiling tiles themselves are just above the little crossbars there. So I think what we need to do is create the crossbar and then extrude them down just a bit. To do that, let's select these two, and I'm going to move them out of their scene collection here. I'm going to press M and move them to the main scene collection. And that brings them out here. And then I'm just gonna take this and drag and hide all of those. Okay, so now we've got these isolated. Let's begin working on the cross bars here. So if I select this one and go to the top view, Let's tap into edit mode, and then let's begin adding some edge loops to get these squares here. So it looks to me like how many do we have across your lawn? Let me press Control Spacebar. Let's take a look. Looks like we've got 369 squares across it. Kind of looks like that one over here is a little bit smaller, but I think we're going to make them all the same size. So let's just see if we can get nine of them going this way. Let's press Control R. And I will scroll the mouse wheel until I get, Let's say eight cuts here. I've got eight cuts, which comes out to be nine segments. So let's press Enter twice there. And then let's go the other way and see if we can get these to be fairly square. So we've got six cuts there. 78 cuts there. Yeah, I think I'm going to go with seven here. Let's do that. So you can see down at the very bottom left-hand corner, I'm scrolling the mouse wheel and I've got seven cuts there, which gives us eight segments. So I think I'm gonna go with that. I'm going to hit Enter twice. There we go. So now we've got all of those. Let's then go through and select all of these edges here. So we've got them going both ways like that. Now let's use our Bevel tool to add those crossbars. Let's press Control B. And I'm going to hold the Shift key down and pull out like that. And then I'm going to press Control R and add edges all the way around the outside as well. Because it looks like we've got those crossbars on the outside edges as well. Alright, so let's go through here. You get one right here. And then over here as well. Okay, so we've got those, let's do the same thing over here. Try and match them up. I'm going to grab this face and move it down just a little bit so it lines up with that edge right there. And then what did I do? Eight here. So maybe seven I think would work here. And then let's go this way. You have three is a little too much. Let's go with two cuts here. Okay, now let's grab these edges here. And let's do the same thing. Control be, hold that Shift key down and just bring those out just a bit like that. Try and match it up with the other one. Alright, now let's add our edges up here, over here, on this side. And then down here as well. Alright. Now that we've got that done, what we need to do is extrude those crossbars down just a bit. So the way I'm going to do that I think, is, Let's begin with this one again. And what I'm gonna do is tab into edit mode and select everything. I'm just going to hit the a key. Now if we go to wireframe and the one key, and if I go to base mode, what I can do is I can border select and then hold the Shift key down. And now I can de-select everything but what's on the very bottom right there. Alright, so I've got all of these selected now. Now what I wanna do is de-select all the tiles. So I just go through all of this with the Shift key pressed and click on all the tiles. Kinda takes awhile. But it's really probably the quickest way to go through and choose just the cross bars here on the bottom. Alright, last row. There we go. Okay, so now what I'm gonna do is go back to this front view. And I'm just going to extrude this down just a little bit. So t0 x0 and I'm going to pull down just a bit like that. And there we go. Okay, so we've got those crossbars pulled down just a bit. Now let's do that same thing over here. I'll tab into edit mode, hit the a key. Let's go to the front view and wireframe, and let's hit B and hold the Shift key down and de-select all of those. Now we can go through and deselect each one of these tiles. And then let's go to this side, the right orthographic view with the three key on the NUM pad. And then I'll just extrude down to about where the other one is. So let's hit e and z and pull down about like this. There we go. All right, we've got the ceiling tiles pretty much in place in the next video, what Let's do is work on some of these hanging lights. And also we're going to need to deal with these vents as well in the ceiling tiles up here. So that's coming up next.
61. 061 Modeling the Kitchen Hanging Lights: Well, I've renamed this object drop ceilings 0-2. And let's go ahead and put these in the wall or ceiling seen collection and we'll just bring everything else back. And there they are. Now what we should do is create the three lights that are over the kitchen island here. For that. I think I'll actually create them with everything here. It'll kinda give me a sense of what the scale and proportion is as I'm creating it. It's always up to you, of course, how you want to do that. I like to isolate objects quite a bit as you've seen. But for this, I'm going to try and create it with the other objects in here just to get a sense of scale, I'm going to tab into edit mode and I think I'm going to begin it around in here. It looks like the center of the counter is right around in here. So what I'll do is I'll bring that cursor with shift S2 to this selected face. And then I will press shift a mesh cylinder. And I don't think I need 32 sides have out 16. I'll change the Cat Fill to nothing. And then I'll scale it down and we'll begin putting this in place here. Let me see if I have another image of this that's a little bit closer up. Yeah, here's one. Well, yeah, here we go. So we can kind of see what this top looks like. So what I'll do is I'll scale and the Z, s And Z and bring this down quite a bit. And I'm just gonna begin with this very top. I think there's a little bit of an edge there, right there, a little bit of a ram at the very top. So I'll just select that edge and kind of bring it up. And then maybe I'll just hit E and S and scaling just a tiny bit. Okay, and now what I'll do is hit e and z and pull down to about here. So I'm working on this part right here. Looks like that. Angles in just a bit. Maybe like that. And then I'll hit e and z and bring it down like this. It S And scale in to about here. Yeah, something like that. And now I'll take this and kind of bring it in just a little bit more. Ok. Now let's take a look at this. It looks like there's a little bit of an indentation before that Chrome piece. It's hard to see, but I'll just put one in there. Let's hit E and S and bring that in just a bit. And then e and z and bring that down. And then I'll scale it in with the S key. And from here I'll hit E, S in scale in just a bit there. Okay, so now we've got that top part. Let's extrude it down now with e z, bring down all the way down to, I don't know about right here. And then let's take a look at this. Now, for this, it's got this chrome part on and again, I'll hit E and S and kind of bring that out just a little bit. And then E, z. And let's scale this out. About like And then I'll hit ES and pull that out just a bit. And then, and I'm working on this angled part right here now. So I'm going to scale this out. Let's see how that looks about like that. And now let's extrude down again with e and z. And maybe I'll bring that out just a little bit as well. And it looks like we could add extra edge loops in here and kinda pull these out just a little bit. And even one in here, it looks like just scale that up just a little bit like that. Give it kind of a curve there. So we might as well put one up here as well, S and pull that out a bit. Yeah, let's give that a try. Okay, now we need the inside of it. Let's select this edge. And I want to hit E and S and pull in because we want an inside this. So if we see up in it, we don't see through the polygons. These are the back of the polygons and they're gonna be invisible if we look through there. So we need to add some thickness to it. I'll hit e and z again and pull up. And I think I'm going to go to wireframe and scale in just a bit like this. And then I'll hit easy and pull up here and just scale in here like this. So we go inside of there. And then I want to close that off inside. So let's go back inside here. And I will extrude and scale with the S key in a bit. And then I want to collapse these all. So I'll use the merge tool with alt em and choose to merge at the center. And we go so that closes that off. Now, I think this edge right here should probably have a bit of a bevel on it. So let's apply the scale control a and scale. And then I'll grab this edge right here and let's press Control B, pull out a bit and off we go too far. You can see the inside likewise, I can always bring that in some, but let's bevel that like this. Maybe I'll go in and just grab this edge and scale it in just a bit like that so we don't get any overlap there. And then up here, I think I could probably get a bevel on this edge right here. Let's do that. Control be bringing that out a bit. Alright. Now, it looks to me like what I have done is made this part too small, right? You can kinda see how that's just a bit too small. So let's come back in and select this part right here and scale it up a bit. So I'm gonna go to wireframe and I'll go to vertex mode. And let's just press the B key. And now let's come back to salad mode, and let's try and scale this up a bit so we can kind of get a sense of how big it should be. Maybe I could bring it up like that, bring it like this. Just wanna kinda get a sense of how big it should be in the room. Here. Let's open up a reference image. How about this one? Twenty seven, eighty five. We can kind of get a sense of what we're supposed to have here. Yes. So I think maybe something about like this. Yeah, let's try that. Okay. And then what Let's do is just take this and we'll move it over so it's closer to the center of the counter. Let's also smooth it a bit. Let's come up here to object shade smooth. And let's come over to auto smooth here and turn that on. The inside has a little bit of faceting there. We could always take that up a bit. See how that works. Yeah, that's not bad. Yeah. So there we go. If that's our first light, let's go to the top view then and wireframe. And now we could duplicate this. Let me move this forward a bit here, and then let's press Shift DY and move that over to year, let's say. And then shift DY and move that over to here. So let's see how that looks. Yeah, that doesn't look too bad, I think. Alright. In the next video, what Let's do is work on these, these lights over here will create them and then place them throughout the scene as well.
62. 062 Creating the Large Hanging Lights: Before we work on these other lights here, let's just take these, the ones we just created and let's select them all and press Control F2 and bring up the batch Rename field. And let's change this to setName and nu. And we'll call these Kitchen hanging lights. Let's do that. And there they are, right there. Now let's put them in their own collection. M new collection. And we could call these kitchen lights maybe to do that. Or we go. Now that we've got that cleaned up, let's take a look at a reference images for these other lights. If I go to my reference images, let's, let's take a look at this image here, this 2775, right here. Yeah, that's a pretty good picture of that. Let's take a look at it. So these things right here, I think for these I'll hide everything and isolated just to create it on its own. And then we'll bring it back in and try and put it in place. So let's go back and I'll just frame that up right there. Let's then hide everything. Just click and drag. I'll move this 3D cursor back to the center of the grid with shift S1. And how should we began? Well, I think this time I'll begin at the bottom of the light here and work my way up. So let's press shift a and create a cylinder. The one we did before had 16 sides. So let's do that. That seemed to work pretty well. And I'll take away the Cat Fill. Let's go to the front view with NUM pad one. And I'll bring this up, set it on the grid and thing like that. And here we go. Let's now go through the same process here. I'll take that edge and move it all the way down. And it looks like there's a bit of a rim here at the bottom. So let's first get that. I'll just kinda begin like this and I'll go to wireframe as well. So from here, let's press E S and bring that in just a bit. And then easy and bring that up. And let's do that again. Let's do this a couple of times. I might scale this in just a bit with the S key and then press E and Z and bring this up again, scale with the S, e, z. So I'm just kind of bringing it up and scaling and a bit to try and get that basic shape. Easy. S. So something like that. Let's take a look. We've got these two little pieces with the wire between. So let's bring this down quite a bit. Maybe I'll do one more like this. Bring that down like that. And then let's go ahead and get this little piece. Easy. We'll bring it up. And we can then bring this in a bit, AES scaled N. And then this goes straight up, up. It looks like I needed to bring that in a little bit more. Let's undo this. Let me tumble around. Yeah, let's bring that in about like that, something like that. And there we go. Now let's press E to bring that up. And then bring that out at about the same as the one on the bottom. This up. And then let's get this piece up here. What I'll do with this is just press E and Z and bring this up and then scale it out. And we'll just kind of get an approximation of that little dome there. Something like this. And then from here, let's just take that straight up, like that. Alright, let's take a look at it. See if our proportions are about right. We can always select any part of it and make it bigger or smaller, but well, I feel like this part may be a bit too small. So let's tap into edit mode and I will grab everything beginning up right here, just below that little piece that sticks out there on top. And then let's just scale this out of bed. I'm going to scale it out. Bring it down some like this. Let's take a look at that. Yeah, I feel like that's a little bit better. Okay. So now Alice do is go back to solid mode. And I think we may need to add a couple of edges here in the center or between these extrusions. It seems a little flat. So I'm going to insert an edge loop here and just scale this out just a bit just to get those curves or feel like we need those curves in there. Yeah, let's do that. And maybe one up here to do this. Okay, I think that helped. And then let's come over here to object and shade smooth. And then let's turn on our auto smooth and see what we get. That's actually not bad. We still need to do the interior here. So let's go ahead and tumble around here, select that again and go into edit mode. I will select this edge. And let's take a look at it in wireframe. I'll press E, S and scale in Tibet. Now let's extrude up here. I'll scale in and I just want to take this up and create an interior for this so we don't accidentally see up and threw it. Scale that down. And this one up here, so e and z. And I'll scale this down. And then what let's do, once again, let's go inside here. And let's merge these together. So I'll just press ES, scale that in a bit and then ALT M or the merge tool and merge at center. And there we go. Let's move the origin of the object up to here so we can place it easier. I'll select this edge and press Shift S2 to move the cursor there. And then let's go to object set origin, origin to 3D cursor. Ok. Let's call this, I'll call this large hanging light. We go and let's try and put it in place. Now it looks like there's one over here by the kitchen and then another one here. And I think they go all the way around this large drop ceiling here. So let's do that. Let's bring everything back. I don't need the reference objects, so I'll hide that. But let's now take this, scale it down. And let's try and put it over here. I think I need to bring back that ceiling so we know where it goes. Let's twirl down that scene collection and bring back the ceiling here. Okay. Now let's bring this over and let's put this right up here on the ceiling itself right here. And I like that. Now, I think they go just near the bottom of the drop ceilings kind of inline with that. So if that's the case, then let's just scale this down until we get it about like that. I think that's pretty good. Let's scale it down a little bit more. Okay, so now we have that. Let's begin putting them in place. Now when I go to wireframe and go to the top view with NUM pad seven. And let's begin moving these around and putting them in place. So let's say there's one over here by the kitchen, right here. And then there's one maybe kind of in the middle of the drop ceiling here. And then we could put one over here like that. And I think it goes all the way down the hallway. Let's take a look at another reference image here, this 2788. Yeah, you can see them going all the way down the hallway there. So lets do that. I'll put a couple over here like this. Let's move these like that. And then I'll put this one right here. And then these two, I bet we could take these two like this. And we could move these over here. So duplicate and the y axis and move these over here like bad. And we go. All right, so let's grab this one here. And then let's create them all the way down this hallway. Shift dy and y here. And then all the way back here as well. I'll move this one. I'll move this one about right here in the middle there. And then dear and I'll just put one back here as well. There we go. Okay. Let's take a look. Let's, let's walk around here. I'm gonna press Shift tilde. And then the Tab key and the WASD keys will allow me to walk around here. Let's just go over here and take a look at them and see what we think. Thank that kinda works. Alright, so now we've got our hanging lights here. Let me hit the Escape key to go out of there. And then we need to clean up all of these things here. We need to, we need to put them in their own seen collection. So let's just select all of them here. And let's press M, New Collection and we'll call these large hanging lights. And we go. All right. We have those in place. I think the next order of business is to work on the things that are recessed up into the drop ceiling. So these canister lights that are up in there and also these vents. Let's do that. Let's work on one of these vents in the next video and then we'll duplicate it and place it around on the drop ceilings.
63. 063 Modeling the Air Vents: To create the air Vance, I think the first thing I wanna do is just isolate the drop ceilings here. And maybe I'll go ahead and grab the lights here that we created because we'll need to know where they are as to which of the tiles we put the vents n. So let's select those things and then let's press Shift H to hide everything except those selected objects. All right, now Let's take a look at this. It looks like it's three tiles in and three tiles over for the back of the larger drop ceiling here. So let's tab and edit mode. And let's go, well, Let's go 123123. Let's maybe drop it here. Let's say. Now that's a little bit too far in because I'm going to want others out here, even though this is three and I'm going to put a two in here like this. Alright, so now what Let's do is use this face right here to begin to create the air vent. And I feel like I've got a better reference image for those air vents somewhere. I think maybe here let's take a look at this. Yeah. This is a pretty good picture of it. So we've got these nested pieces here. We've got that piece on the bottom and then this and an F and an F. So I think what Let's do is use this face right here to begin this top piece in here. So what we can do is we can actually just split this off using the peaky and create a new object without duplicating or, or pulling it off the object where it is. So what let's do is just with this select, let's hit the peaky and choose to separate by selection. And if we tap into object mode and then select that, now that is its own object, Let's move the origin to this object. This object set origin, origin to geometry. And you can see there it is. Now it's hard to tell that there's a hole here, but if we go up into here, you can see there is one there. Alright, so let's undo this. I'm just going to bring it back. And now let's tap into edit mode actually, no, let's apply the scale first control a and apply the scale. Now, let's tap into edit mode, and we'll select that face. And let's just inset this with the I key, like this. And then let's extruded up E and pull that up a bit. Now let's scale it in like this. And we could probably pull it down a bit like that. Alright, so there we've got the basic shape of this. What I'd like to do is create a hole in here and we can do that with a Boolean pretty easily. So let's press Shift S2 to move the cursor to that point, and then go back to object mode and press shift a mesh cylinder. And I've got 32 sides here. Let's just do 16. That should be fine. I'll keep the fill type, that's good. The end gun. And for this, let's type in 0.1.2 and that'll shrink it down pretty good. There we go. Maybe I'll scale it back up just a bit like that. Now let's create that hole using this as a cutter. So I'll select this, go to our modifiers panel, add modifier, and let's go to Boolean. Now let's grab the little eyedropper. Click on the cylinder, and then let's click apply. There we go. Now we should be able to take this, move it out of the way and we have a hole there. Now, once again, it's hard to tell. We can kind of tumble around up here and take a look down. And you can see there's a hole there. Alright, so let's delete this object. We don't need that anymore. Then what I'll do is take this edge right here and just extrude it up just a little bit. Alt Shift click there and I'll just hit e and z and pull that up just so we have some bit of thickness there. Okay, so now that we've got that, let's begin duplicating these down. So I'll press Shift and Enter. And I'm going to bring this down just a little bit like this. And then let's scale it in, hit the S key and scale that in a bit about like that. And then let's try that again. Shift d, z and I'll bring it down a little more. Scale that in about like that. Okay? And then I think we need one more right here, this piece right here. Let's press shift d and z and bring that down. Scale it n, about like this. And here we go and see how that looks. Yeah, that may be I may have pulled them down a little bit too much each time. So let me bring that back back up to here and maybe write in there. Try that. Yeah, I think that's a little bit better. Okay, now it's got this little piece right inside here. Let's work on that. I'm just going to select this one and I'm going to delete these. I'm going to press Alton click between two of those faces. And then I'm going to expand the selection with control plus on the NUM pad. Now I'm just going to hit X and delete faces. And now if I select this edge right here, I can just press the F key and it'll fill that face. Now it's got a little kind of a point going out right here. And one of the ways you can make something like that and very easily is with POC faces. So if you come up here to the face menu, you can see poke faces right here. If we click that, it'll create triangles in there like an X. And then what we can do is just take this one vertex and just pull it down like that. There we go. So we've just made that little bit really quickly, which is kinda nice. Okay? Now from here I think what I wanna do is give each of these a little bit of thickness because if we ever see it from this side, this is the back of the polygons and we don't want to see the back of the polygons there. So what I'm gonna do is just combine all of these right here. We're just going to press Control J. And then what I'll do is with these selected, I'll go ahead and add a solidify modifier like this. Even thickness. Maybe bring this down just a bit like that. So we have a little bit of a thickness there for each of those. And there we go. Now let's go ahead and apply the solidify modifier. And then with the still selected, I'll shift select this part. And we'll press control j to join that all together into one object as well. Alright, so there is our event. That's looking pretty good. So what let's do now is just take this and duplicate it into another place. I'm going to bring it over, maybe over to right here. Let's try that. I'm going to select this face right here and delete it. And then I want to take this and press Shift DY and move it over here. I'll go to the top view and wireframe just to make sure I have it right in line with the opening here, like that. And we go, Okay, we've got two of the event's done. Well, let's decide where else we want to put on my think, maybe let's put them right here. Let's do that. How about in these two right here? So three from the other end. Let's delete these faces. Select these two. And let's go to the top view again with NUM pad seven and wireframe. And then let's duplicate and at the x key and move them over to here. Alright, so let's get these in GX. And I'll move these right about here. Okay? So we got those in there. Now. Let's move them over to this drop ceiling now. I think I just want to put them right along this side right here. So I will remove, let's remove this face and this face here, x delete basis. So now what I'm gonna do is I'm just going to take one of these. And I went to duplicate it and move it in the x-axis to here, go to the top view and wireframe. And now I've gotta do a little bit of adjusting here. It's not quite the same size as the other tiles and that's okay. It's not going to be real noticeable here. I'm going to move it in like that, scale it in a bit. And maybe like that, let's take a look how that looks. Yeah, I think that'll work and so we can take this one and move it right over here. Shift DY. And once again, let's go to the top view and wireframe and put this where it needs to be right in there. Okay. Alright, I think we have our vents and let's bring everything else back with Alt H. And let's take a look at it. I'll, I'll press Shift tilde d and the Tab key. Press the W key and just kinda walk around and let's take a look at how these look. Yeah, actually that's not too bad. I think that'll work. Alright, so we have our air vents in. In the next video, let's start working on those canister lights that are recessed up into the drop ceilings.
64. 064 Placing the Cannister Lights: Now let's work on the canister lights that are up in this drop ceiling. We don't have them in the small drop ceiling over here, only the larger one. And also there's an overhang over here in the kitchen. Let's take a look at that. I'm going to open up a different reference image here. So let's take a look at this one. And yeah, you can see it right over here, this this overhang right here, over the kitchen counter. So we need to create that as well so we can put the canister lights up in there. You can see here that we don't have any on this drop ceiling, but we do have on here. So Let's now think about how we can do this. First of all, let's go through and hide everything we don't need. We need this drop ceiling and we also need the air vents. And it looks to me like I haven't renamed the air vents. Let's go find where those ended up. Are they in here? Yeah, they're right here. So let's take all of these. Well, there's the drop ceiling, here's the air vents. Let's rename these and put them in their own container, their own seen collection, to rename all of them at once again, let's press Control F2. Let's choose new or setName and then new here. And let's call this air vent. There we go. Now let's put them all in their own seen collection. I'll press M nu and we'll call this air vents. Ok, so we have those in place. So what we really need is the drop ceiling and the air vents. So I'm just going to hide everything and I'll bring back the air vents and the drop ceiling 01. I have to turn on that scene collection for that to come through. There we go. Okay. So how are we going to put the canister lights in here? I think what let's do is let's create that canister and then we'll take it up and put it in here and get it the proper size. So let me press Shift S1 to bring the cursor to the center of the grid. And then I'll press shift a and let's create a cylinder. Lets give it 16 sides. Let's do that. We don't need the face on the bottom here. So let's get rid of that. And then I'll scale it down a bit and let's zoom into it. I'll go to the front view with NUM pad one and let's bring it up to sit on the grid here. And I'm just gonna create a little rim for this. If we take a look at the image, you can see there's just a little bit of a rim around each of those canisters. So let's tab into edit mode and alt click this edge right here and bring it straight down like this. And then we'll press E and S and scale out. And then let's press E and Z and pull back up like that. So we just have a little lip around the canister there. Alright, let's go ahead and smooth it. And then let's come over here and turn on auto smooth. And that looks just fine. Okay, so let's move that origin to the 3D cursor. So we have it there. And let's take it up and put it in place. I think. I think I'd like to put it in this row here, so let's do that. Let's go to the top view and wireframe. And I think in this row here, right along here, maybe we'll put one right here, right in the center there. And we'll put it looks like we've got three across and then three along the length of it. So maybe we'll put one here, here and here. And then also going back like that. Alright, so let's get this in place. Let me go back to solid view and hit the period key and I will tumble around and we need to bring it up. Don't wait, let's do that. Up into here. And maybe like this, bring it right down to here. And we go, alright, I think that's going to work pretty well. Now let's go ahead and put them in everywhere else we need them. So let's go back to wireframe. And I think I want to put one over here like this. And then shift d and y and put one right in here. Okay? And now let's grab all of these and let's do this again. Let's press shift d x, maybe put them back here. And shift DX. And let's put these back here. There we go. Okay, so now we have all of those. What we can do now is use our Boolean modifier to cut a hole in here, because currently we just have this covering over it. We need to cut that away so we can see up into that canister. So to do that, first of all, I need to make all of these one object I need to go through and select all of these and just make this all the same object with control J. So let's grab all of these and controlled J, and let's give it a name. Right now. It's just called cylinder. So let's call this call it canister cutter. I'll just call it canister cutter for now, just so we know what it is. Now let's go back and let's select that drop ceiling and NR modifiers panel. Let's choose Boolean. Now let's make sure that we're using the difference operation. And then let's just grab the eyedropper and select that canister cutter. And there we go. Now, let's come over here and click Apply. And what does that do for us? Well, it didn't look like it did anything. However, Let's de-select everything and then select that, that drop ceiling again. And if we tap into edit mode, now look at this. Each one of these inside here is it's own base. So we can grab all of these and we can delete them. Let's do that. X delete faces. Now, you would think that were done. However, look at the problem here. We've got this Z fighting going on. And that's because we not only have the canister in there, but if we take this and we move it down, we can see we also have. The interior duplicated as part of the drop ceiling object as well. So we're getting a bit of Z fighting in there. I'll press Control Z to bring that back. So what we can do now is just get rid of those in mass. We can select this and go to wireframe. And I'll go to the front view. And what we can do is tab into edit mode, go to face mode, and then we can just select these faces ride on the top here. And if I do that, you can see they're selected all the way across because we're doing this in wireframe. So let's do that again. Let's come over here, IT B and select these. And then come over here and hit B and select these. Now that we've got all of those selected, we can just expand our selection. Let's press control plus. And now we've got all of those selected. So what we can do now, let me come up in here. There we go. Well we can do now is just delete them. Let's hit X and delete faces. And there they go. Alright, so now if we tap back into object mode, we don't see that Z fighting. We just have our canisters in there with a hole in the ceiling. All right. Let's now do the same thing over above the kitchen counter here. We need to bring this back. So let's come over here and bring the walls back right here. And you can begin to see the benefits here of staying organized, of grouping things in a logical way and naming all your objects. Because as you go along, you're going to need to come back to things and you're going to need to know where they are. All right, so let's come over here and select this wall. And I think, yeah, we've got an edge going along the top of those doors, which is about the same height as the drop ceiling. So let's just take this and let's delete this. I'll hit X and delete faces. And then let's grab these two bases here. And let's just extrude these down to inline with this wall here. So I'll hit E and Y. And let's just bring this right down here at the period key to zoom in and let's just line it up right here. And there we go. Now what I wanna do is de-select these vertices over here. Let's hit the one key to go to vertex mode. And I'll hit the B key and hold the Shift key down. And let's drag select those to deselect them. Now that we have just these two selected, let's pull them out like this. And we can see we've got an interior face here that we don't need. So let's just get rid of this. Get rid of that. And then we can come back and merge these points together. We can select this and this ALT em at last. And we can merge this point to this point. All m merge at last. Okay, we've got that connected, but we don't have it sealed yet. Because take a look at this. We've got these points and so this edge isn't sealed together. A press Control Z to undo that. What I'd like to do is just extend this edge on around down here in connected here. So that, that edge will be sealed up because we don't want any accidental light leaks happening through there. Alright, so let's press Control R. And let's bring our edge down here. And I'm just gonna put it right there so that we can select these two points easily. This one and this one. Alt em at last. Down here. I want to select this one and this one. Same thing. And there we go. So now we have those connected together. Alright? Now that we've done that, let's grab one of these canisters here. I'll tab into edit mode, and let's just hover over one of these and press the CTRL key. And then I'm going to press shift dy dx and move this over here. With this still selected, I'm going to split it out with the peaky and separate by selection. And I'll just tap back into object mode and select justice object. Let's move that origin back into the geometry. And now let's move it over here and put it in place. And I'll go back to the top view and wireframe. And let's bring this over here. Maybe something about right here. And let me go see if it's in the right place here. Now, we need to pull it down some. There we go. And once again, we have the same problem, so we will deal with it in the same way as we did the drop ceiling. Let's get these in place here with shift D and why? It's like I need to bring this down, just a pet like that. Okay, let's select all of these. Press Control J. Now let's select the walls. And then we can use our Boolean modifier once again, with add modifier Boolean. Make sure we're using the difference operation. I'm going to select the eyedropper and hover over this object right here. And we go now hit apply. And if we just select the wall now, tab into edit mode, and I can select these faces here and delete them. Now we can actually come up into here and just select these faces right? Appear since they're all together, this is a little easier to do. And we can press control plus x and delete faces. So there we go. Now we've got those canisters in place.
65. 065 Modeling the Conference Room Glass: Well, since the last video, I've gone ahead and cleaned up the canister lights here. I created a collection and put those in here. Now what I'd like to do is work on the windows and door of the conference room. Let's see if we can find a reference image here. I think I have one right here, this 2785. Let's open that up and let's take a look at it. So here we have the windows and doors on the conference room. We've got for glass panels and adore. We've got a handle on the inside and the outside. And then we've got these metal trim pieces at the top and at the bottom, as well as the trim pieces on the door. Now we're not going to work on the material at this point in time. What I wanna do is just get all the windows in, get him into a collection or two, and then hide them again because we're really not going to be able to deal with them until we start doing the materials and the lighting. But we can at least model the window panes and the doors and get those in place. So let's do that. What I'll do first of all is just create a cube over here. I'm going to select a chair and hit the period key just so I center up over here in this area. I just want to be able to tumble around this area here. And I'm going to leave everything in just so I can see how I'm doing. So I'll move the cursor to that selection with shift S2. And then let's press shift a mesh cube. And here we go. Now I'm gonna move this generally into place. Let's scale it in the y with x and y and I'll bring it in. So it's pretty narrow, something like that. Let's move it back. And I'm going to begin back here and then use the array modifier to make sure I've got five evenly spaced panels here. Let's zoom into this with the period key and I'll move it out to about here. And how are we doing in terms of centering it on that wall? Well, we gotta move it out just a bit like this. And let's go to that top view and wireframe to make sure we can get it right in the center here. And I'll move it over right against this wall right here. Alright. Now I think let's take it down to the ground. Oh, well, this is a little piece that's sticking out of the wall, isn't it? Let me go back and pull it out to that right there. We probably want it right there. Let's do that. Okay. So let's go back and put it on the ground. I think we've got it pretty much there. And let's now grab this face right up here. Take it up to the top of the door frame here. And we go and we're going to have metal trim pieces there, so it doesn't have to be perfect. And let's move this back to about right here. Okay? So now that we have that and I'll move the origin to the center of the geometry here. I'll apply the scale with control a scale. And then let's come over here to the modifiers panel, and let's create an array modifier. Now, it's going in the wrong direction. It should be going in the negative x. So let's come over here and type in negative one here. I'd like to give it a little bit of space between each one. So let's maybe put it at negative 1.01 and see how that works. Yeah, that gives us just a little bit of a space there. In fact, we might be able to get a little bit. The closer, let's try negative 1.005. Let's try that. Yeah, that gets them nice and close without connecting them together. So let's do that. Now. Let's give it five in the count. We've got two here, so let's increase this to five, since that's how many we have here. And then we need to adjust this beginning one, adjust the original To get it to all fit. So if I tab into edit mode, I've still got that face selected. So let's just grab that face there and pull it back until we get this about where we want it. Let me bring up, I'm going to hold that shift key down. And let's bring it right back to here. Whenever we go. Yeah, that gives us five evenly spaced panels there. That's good. Now, the next thing we could do is create that Handel, let's cheat just a bit. It's not really cheating, it's just reusing your pieces from other objects and that's fine. Let's grab this piece right here with the L key. But you know, before I do, it looks like we've got a whole lot of edges in here. Let's just go through and alt click quite a few of these edges here. And then I'm just going to dissolve them because we don't need all of those edges. I'll press X and dissolve edges. There we go. Alright, now what let us do is just hit Bell and shift D and buy and pull that out. Let's hit P and choose to separate by selection. And there we go. So now we go back to object mode and just select that object. We can move our origin to the geometry and we go and let's move it over here into place. So I think what I wanna do, let's take a look at where it is. It looks like it's about even with this handle on this door. So let's grab this and take it over here. And let's move it up and put it in place so it's about at the right location. And you hit the period key. Again, I feel like it's too small, it's scaled up a bit. Let's press our Z and I'm going to hold the control key down and let's spin it 90 degrees. There we go. Now let's come over here and put it in place on this door right in here. Something like that. And then I'm gonna move it into that door. And then let's create the other one on the inside. So let's duplicate this shift D and enter. And then I'm going to mirror it along the y-axis and two mirror we press control m, so control M and Y and then enter. We go. Now if I press all z, I can see through it. And we can bring this over and connected up with that one there. Feel like they need to come out more. Maybe I'll bring them out like this. So let's see how this works. When we put that transparent material on there will have to see how that works. I may have to close off the holes on the inside. But now Alice do is create those metal trim pieces at the top and at the bottom. So to do that, and once again, I could press Shift a, create another cube. And let's bring that cube over. Let's bring it up here. I'm going to scale in the y, x, and y. So it's pretty narrow n, let's bring it back out like this. I will grab this face down here. Let's bring that up. And it looks like it's about like this maybe. And we can always just grab this face and take it back to the wall back here. And I think this face just needs to go to the door right here. Let's see how we're doing on the other side. Yeah, that's not bad. I'm just gonna move this over like this. And then let's do that on the bottom. Let's just take this same piece, shift D Z and bring it down here like that. And then let's grab that same piece. Once again, I'm going to move the origin to the geometry. Let's duplicated shift D, Enter. I'll scale it in the Z sc. Let's scale it in the, why make it a little bit thinner? Sy. Then what let's do is let's make it quite a bit shorter with scaling in the x axis. And we'll bring that over here and put it on the top of the door here. And use this face here to bring this right about here. Oh, it looks like we need to take that trim piece all the way over. Now, don't waste, so let's go ahead and just take that all the way over. Let's do that over there. And then grab this and move it down like a bat. Yeah, that looks a little bit better. Every go. So down here, however, I don't think we needed to go all the way because someone would trip over that, so we don't want that. Let's press shift d and z and bring this down to the bottom down here like that. And we go, okay. Now we have the door and windows on the conference room there. Let's go ahead and put this in it's own collection here. I'm going to take all of these pieces and let's get them in their own collections so we can select them easily. I'll grab this here. And let's just press the M key and go to New Collection. And we'll call this conference room windows. And we go. So now we have the mall in here. But for now what I'd like to do is take them and duplicate them and move them over here. So let's go ahead and do that with all those still selected less press shift D and move them over here. Let's zoom in and place them where we think they should be right along here. And then we're going to need to move everything over. So what I should do is go back to solid view here. And let's select that window object with the array modifier still on it. We'll tab into edit mode and we'll grab this one face again. And let's just move everything over until we get to the end here. Like that. Now we can take these pieces here and move these over to about right here. And move this to the side. You need to do the same thing here. Alright. There we go. We've got our conference room, doors and windows in place. We've got them in a collection so we can easily hide them. What let's do in the next video is begin placing the windows for the offices all through here. And once again, we'll put them all in their own collections so we can hide them until we get to the point where we can apply that transparent material.
66. 066 Adding the Glass for the Offices: Let's now put in the windows for the offices and also the glass for the doorways. If we just selected one and move the cursor to it with shift S2, I think we could then just create a cube like this and scale it and size it and put it in place. And then we could just duplicate it all around the office. So let's do that. Let me scale this down quite a bit. So it's thinner than this internal rim of the window frames there. Let's scale it down. So it's about like this. And I'm using objects with thickness for the glass instead of just a polygon plane. Because you get a bit more realistic refractions through the glass when you have a little bit of thickness to it. So I'll take this and I'll move it. Let's let's move it over here. Well, I can do it over here, I guess let's do that. Let's put it in place over here. And then what we can do is begin stretching it around in edit mode. So if I take this in edit mode, this face up here and just drag it up. We can bring it up into here. And we can take this face here and bring it over into this frame right over here. Just a bit of an overlap I think is all we need. And then the face down here, we can drag this down like that. Alright, let's take a look. Okay, I think that's going to work. Now we can just take this and duplicate it all the way around. Let's make sure our ceiling is hidden. Yes, let's go to the top view and wireframe. And if we take a look at it, we can see it's overlapping that ridge in the center of the window and that's good. And we also have an overlapping over here. So that's really all we need to do is duplicate it and move it around to the rest of these front windows. Now, we're going to have to adjust the size a bit of course, but let's go ahead and press shift d and y and move this down to here. And we'll zoom in and we need to do it back here outside of the door. We need to bring this right into here. I'll press Gy and move that right into here. And then over here, looks like we need to tap into edit mode, go to face mode, select that one base there and just drag it up. Right here. Here we go. So this is all we're going to be doing is just going through and placing these throughout the scene. Let me see where they are. They're here. Let's now create a collection to hold all of these. And as we create new ones, as we duplicate new ones, it'll all go into that collection. So let's select these two here, press M and new collection, and let's call this office windows. There we go. So now everything that we create or duplicate offer these will go into that particular collection. Alright, so I'm just going to grab another one here and duplicate it and hit the y key and move this down here. Let's do the same thing with this. Go to wireframe and move this one into play. So it looks like it's already pretty much there, that's good. And then we just need to tap into edit mode, grab this face and move it down here like that. And okay, yep, and we'll just keep going. Alright. I think I've got all the windows in now for the offices. Let's work on the doors. Same thing really. We can just take this and duplicate it. Let's move it over in the x axis and we can just scale it in and really do the same thing that we just did. I'll press S and Z and scale in the Z here. And let's get this one in place. It looks like we need to move it back a little bit. Of course. Let's try and center this one up. There we go. I think that's good. Now let's just grab these faces up here and pull that up. And let's see how we're doing down here. Yeah, that looks like it's overlapping. They're pretty well. Okay. Now we can take this and begin just duplicating it for all the other doors. Shift DX, and let's move it right over here. And I'll go ahead and do all the doors as well. And I'll duplicate this and move it over to here. And I think we just have one more now. Right over here, let's get this one in place. Shift D and X, and put this one right in here. There we go. So now let's take a look at it, and let's go back over here and there we go. So now we've got all the glass panels for the doors and the windows in place. And if we take a look at this, they're all in this collection here. Now, I guess we could call this office windows and doors. Let's go ahead and do that. And doors, glass, I'll just put that in there so we know what that is in the future. Alright. And then we need the glass between the offices right in here. So if we take just one of our panels here and duplicate this and move it out. And I'll spin it in the z-axis, r, z 90. Now let's move this over and get it in place. The top of the window should be pretty good because that's really about the same height as the doors and everything else. But we need to get it right in that little rem right there. Let's try that. Makes sure we're kind of in-between there. Let's move this over to the side. And then we'll grab the face down here. I'm going to press all Z so we can see through everything. And then I'm just going to grab that face there. And then all z again. And I'm going to bring this up to about right here. And then this side, of course, we need to bring over all the way over here. Now that we have those in, we can begin duplicating these around as well. So I'll go to that top view and wireframe again. And let's just duplicate this and move it over here and get it in place. I think I'll set the origin to the center of the geometry here. And we'd go, and then I can press g, x and move this around in here to where it needs to be. And we go let's take a look. Look at that. Yeah, I think that's going to work. So now I need to go through and duplicate all of these for all of the windows in between the offices. And let's get one last one here, duplicated and let me centre it up with the period key and then zoom in and try and get it right in place right here. Okay, let's take a look now. Go back to solid view and now we have our doors and windows in all the offices. All of those objects are here in the office windows and doors collection. And so as we begin to put our materials on these objects, as we begin to UV map them and texture them. Having them over here organized in the outline or is going to help speed things up quite a bit. So speaking of UV mapping, in the next video and in the next section of the course, we're going to begin UV mapping are objects so that we can begin texturing them in substance painter. So that's coming up next.
67. 067 UV Mapping the Office Desks: In this next part of the course, we're going to work on UV mapping. And we need to UV map are objects so that we can texture them. So what is UV mapping? Well, it's really the process of taking a three-dimensional model and laying it out flat in two dimensions. It's kind of like when you cut the corners of a cereal box and then you lay it out flat on a counter. You can then draw on it pain it pastes things to it. But then when you're all done, you can fold the box backup, tape up the corners. And once again, you have a three-dimensional object, a three-dimensional box that you can put on the counter again. And that's kind of what UV mapping is. We're gonna take the polygons of a three-dimensional object and lay it out flat. So that when we apply the textures in substance painter, those textured can lay down flat and they'll stay positioned where they're supposed to be as they get put back into a three-dimensional object. So it can be kind of hard to talk about. Let's go ahead and do one and you can see what I mean. First of all, let's hide these windows here. In fact, what I think I'm gonna do is turn the collections off completely here, here. And we can turn off the reference objects as well. And when you do that, the objects won't come back when you unhide things. So if I select an object and press Shift H to hide everything except a selected object, and then press Alt H to bring everything back. These collections will not be brought back because they've been disabled. So I thought we'd start with a pretty simple object, maybe one of these tables over here in the offices. And what we're gonna do is create the UV mapped for this one object. And then we can select all the other tables and apply that UV mapped to them as well. Alright, so with this one selected, what I'm gonna do is hide everything else with Shift H. And then I'll go over here to the UV Editing tab. When we do that, this object switches to edit modes, so I'll hit the a key to select it and the period key to zoom in. Now you can see we already have a UV map. This is the two dimensional representation of the polygons. However, they don't really coincide with the shapes and proportions of these polygons in the 3D view. Every 3D object that we create comes with a UV map already on it, already built in. But once we begin changing things modeling, et cetera, those UVA's don't change along with our modeling. So now we have to go and redo that UV map. Now there are quite a few ways that we can UV map our object. With all of these selected. I can press the UK key, and that will bring up the UV mapping menu. Now, we're going to use unwrapped and we're going to use smart UV project. Everything else is nice to have, and every once in a while they come in handy. But generally speaking, smart UV project and unwrap is what you're going to use, will begin with smart UV projected to little easier. And then we'll go to using unwrapped for subsequent objects. Now, just like so many tools in Blender, we need to make sure that our scale is applied. So I'll press the end key here in object mode. And we can see here that our scale is not applied. Actually. Let's go ahead and use that smart UV project, see what happens, and then come back and apply our scale and compare the results of those. Let's do that. So in edit mode with everything selected here, what I'm going to do is press u and choose smart UV project. Now when I do that, this panel comes up and this angle limit can be useful. But generally speaking, you probably wanted around 66, which is the default. It goes up to 89 degrees and down to one degree. But generally speaking, this is usually fine. So I'm just gonna click OK. And this is what we have. Now. It doesn't look too bad if I hover over here and hit the a key, you can see that the polygons here have been laid out flat. However, if I come up here and choose the islands selection mode right here and click on an island. This right here is actually part of the table. Here. Let me switch over to UV sink selection right here. And then whatever we select over here will also be selected in a 3D view. So now if I select this right here, whereas that, well, that's right here. Now, if I select this one right here, you can see that it's the exact same size as this. And that's not really what we want. We want our UV islands over here to be the same size proportionally as our 3D model over here. So that's where applying the scale comes in if we tab back into object mode and at the end key. Now let's press control a and apply the scale. And there we go. Now we've got all 1's. Alright, so let's compare the two here. Let's tab back into edit mode. Get the a key to select everything, and then press you and will try smart UV project again, and click OK. Now it's looking a little bit better. This is this top face here, and this is this face here. So they are now proportionally the proper size in relation to what's in our 3D view. So that's what we want. Alright, now, we should probably test this. And when we test this, we want to see two things. We want to see. Do we have any stretching in our UV map? In other words, once we apply a texture, will the texture be stretched? And two, we wanna see if we have any unsightly seems any seams that are between the different UV islands. So if I come over here, these UV islands say right here, on either side, they're going to be seems. Let's see where this is over here. Here it is. So if we take a look at this one, there will be a seam on either side of this face, right here and over here. So wherever an island is split, there's going to be a scene. So we need to make sure that those seams aren't detracting from the look of our texture. So to do that, we need to apply a test texture to see if it's stretched and to see if there's a problem with the seams. So to do that, we first need to create a material and then we'll create a texture to apply to that material. So over here in the materials panel right here, we need to create a new material with this selected. We'll click New. And I'll call this test pattern. So it's a test pattern material. Now let us do is add a texture to this. So here in the base color, I'm going to click on this little circle and we're going to add an image texture. Now let's create a new one here. And in this new image panel, what lives do was let's call this texture at test pattern as well. And we will create a UV grid test pattern right here. Okay, so now let's click okay, and nothing happens. The problem is, is we need to change our views. So if we come over here and change to viewport shading, there we go. Now we can see our test texture. And what we want to see here in our test texture is that all the squares are uniform in size. They are square, they aren't stretched out into rectangles. And we wanna make sure that our seams are okay, that we're not seeing any radically strange seems. In other words, there isn't a seam going right down the center of the top of the table or anything like that. Let me just tab into edit mode and let's select one of these faces right here. Let me go to select, I'll select this face which is the top one. Actually, we can go to edge mode here. And if I select this edge, well, I better turn off uv sink here before I do this because you can see the other edge along with it is getting selected. So I'm going to turn off uv sink here. Now let's select this face right here. We can select this edge. And if I hit g and move it, and you can see I'm stretching those checker patterns as I move this around. So we do not want anything like this. That's what we do not want. We want to make sure that all of our squares on our Checker pattern actually square. Alright, so that looks good. Let's now apply this to all the other tables. Let's go back to the layout view. I'll bring everything back with Alt H. We could probably hide that ceiling high. Let me select a ceiling and hit H. Okay, so now, which one is it? Well, what we can do is go back to our viewport shading here. And there it is, it's right there. So that's the one we want to then apply to everything else. So what I'm gonna do is, first of all, select all of those tables that are gonna be under furniture, right? And here's our office desks collection. So let's right-click and choose, select on objects and that selects all of those. Now I want to select this one last. So if I shift select it once, there we go. Now it's de-selected it. I'll shift select it one more time, and that selects it again. Now it's the last one in the group to be selected. Alright, so what I'm gonna do is I'm gonna do two things. I'm going to transfer the material from this table to all the others. And then I'm going to transfer the UV map from the table to all the others. So first the material. To do that you can come up here to object, then go to make links. And here we can link the material to the last object selected. Also, we can link the UV maps as well. So first of all, we're gonna do the materials also keep in mind the shortcut key is control l. So what we can do is press Control L and choose materials. And that adds the material with the test pattern. But because they haven't been UV mapped yet, the texture is stretched and that's one of the problems that we want to keep away from right now. Well, it's do is press Control L again, transfer the UV maps. And when we do that, now the texture pattern is correct. Alright, so that is how we're going to UV map. All of our objects will do one, and then we'll transfer the UV maps to all the others that are in our collections. Once again, that's why we're keeping our collection so organized. Alright, we'll do another one in the next video.
68. 068 UV Mapping the Stools: Alright, which object should we do next? Let me switch back to solid view. How about those stools here? Let's grab one of these stools right here. And let's UV map this and then transfer the UV map over to the other ones. Let's first of all isolate this one. Let's press Shift H to hide everything. And then what Let's do is go over to our UV Editing screen layout. Now this one is switched to edit modes. Let's at the a key and that period key and zoom in. Alright, so now we've got this. We have our UV map over here that's come from that original plane or cube that we created. Because here let me just quick show you. If I press Shift S1 and take that cursor back to the center of the grid and I'll switch over to the solid viewport shading. I'll press shift a. Let's create a cube and let's tab into edit mode. This is the default UV map that comes with a cube. So if I delete this again, let's do that and then come back here, you can see that outline of that original UV map. So as we've done our editing here, as we've done the modelling, that UV map hasn't kept up with the way the object looks now. So before we do anything, let's switch over to our viewport shading and let's add that material onto this object here in the materials panel. Let's just pull this menu down and we'll add that existing test pattern material. So we'll click on that. And there we have it. So we've got a lot of stretching. This up here is so stretch we don't even see the checker pattern anymore, so we can't use this. Let's first of all try smart UV project and see how it goes. You can see the Checker pattern texture over here. I don't think I want that because it's hard to see the UV map. So what I'm gonna do is just come over here and click X, and that will remove that from that view. It doesn't take it off of the material here. It's still here, but I want to view it over here without that pattern. All right, so let's now with all of this chair selected, let's press you and will choose smart UV project and say OK. And there we have it. So that doesn't look too bad. Now if we tap back into object mode, there are a couple of problems here. We can see this seam right here very clearly, and we can see a seam right here very clearly as well. And that's probably not what we want. Those are pretty obvious seems now the ones down here on the legs may not be too bad. There on the legs. They're further down and they're going to be pretty much a single color. So usually if you just got a single color on an object, seems may not be a problem. So smart UV project may work for these here. Down here, these look a little bit stretched. I may want to redo this down here. And of course I want to redo this because of this very visible seam here. So how do we do that? Well, we use the other method of UV mapping that we talked about in the previous video. If we tap back into edit mode and hit you, you can see we have this unwrap. Now. This is different than smart UV project in that smart UV project creates its own seems based on the angle in that panel we've seen before. So if I click Smart UV project, this angle limit from one to 89, I'm going to hit escape to get out of that. Whereas the unwrap method here uses seems that we assign that we tell blender, This is where I want you to put your scene. So what I'm gonna do is hover over this part of the stool and hit the L key. And then I'm gonna hide everything else. I'm gonna press Shift H once again to hide everything else except that TOP seat. Now what I wanna do is switch to edge mode with the two key. And I'm going to hold the Alt key down and click and select that whole edge there. And also Alt Shift and click this edge, this edge right here, and this one over here. So I've selected all those edges and now I want to tell blender, that's where I want you to put the seams when you do the UV unwrapping. So I can open up the edge menu here. Or I can press control ie to open up that same one. And here you can see Mark seen. So if I click that, now you've got this red seem marked where I had the edges selected. Alright, so that's where it's going to break this apart. I'll hit the a key again and you can see the UV map here. Now let's press you and unwrap. And this is how it looks. That looks a whole lot better. However, we can see some little warping up here. To fix that. We can come down to this unwrap panel. And we can change the unwrap method from angle based to conformal. And there we go. That cleans it up quite a bit. Alright, so now that we have that done, let's bring the rest of it back. I'll press Alt H and that'll bring the rest of this object back. And all of our UVA's are kind of overlapping now and that's not what we want. None of the movies should be overlapping, but we're gonna go ahead and UV map the whole thing first and then deal with the overlapping problem. Alright, so let's deal with this piece right down here. I'm going to hover over it and press the CTRL key. And then I'm going to press Shift H to hide everything else. And down here let's do a similar thing. I'm going to create an edge all the way around, a bottom edge here. I'm gonna press Alt and click here. And I'm gonna create an edge all the way there. So let's press Control E And Mark scene. Now let's see how this works. I'm going to hit a and U and unwrap. And it's going to break that object open at that seem as if we've cut it with a pair of scissors and it's going to open it up flat over here in the UV editor. So you Unwrap, and there it is. Now, that doesn't look too bad. However, if we tap back into object mode in take a look at it, some of these are a little warped, So I think we might be able to do a little bit better than that. Let's tap back into edit mode. And what I'm gonna do is select a couple of edges here on the corner where the legs are kind of hiding the seam there. Alright, so let's grab an edge over here. And as I do this, we'll look at what happens. Once again, I get that clipping here and we can fix that. That's just a viewport problem by pressing the end key coming over here to view and reducing the clip start. So let's reduce that to say 0.01 and see how that works. Yeah, yeah, that helps quite a bit. Okay, so let's close that panel. Press Alt, and click that. Let's press Control E And Mark seam. And then let's go around and do this to the other corners as well. Alt, Control E, Mark seem. And this one is well, Mark seem. Okay, so now we've got all of these seems marked for our object. Let's hit a u and unwrap. And there we go. That looks a little bit better. If we go back to our solid mode. Actually, let's go to viewport shading here, you can see it's cleaned up that checker pattern quite a bit by splitting those out there. Yeah, I think that'll work just fine. Alright, so let's press Alt H to bring everything else back. And now let's work on the legs. Let's just hover over this and press L and L, And then let's press Shift H. And for these, these are complex enough that I don't think smart UV project is too bad of a solution here. Let's try it. I'm going to press you and smart UV project. And click OK. And there we go. Yeah, I think that'll be just fine. Okay. Alt H to bring everything else back. And now you can see there's a bit of a problem. We've got a whole lot of overlapping. And in addition, look at the size of our Checker pattern. The checker pattern on the legs is bigger than the checker pattern on the seat. But down here they're very tiny and very small. And that's a problem. What that tells us is our UV islands over here in the UV editor aren't proportionally the same size as they are over here. And the 3d view, once we get all these proportionally scaled the same size as they are over here. All these checker patterns will also be the same size. But how do we do that? Well, Blender has some pretty cool tools to help us do this. The two that we're going to use are under this UV menu here and their average islands scale and pack islands. So these are pretty cool. I like these. So if you hit the a key and select everything over here and then come up to UV and choose this average islands scale. It will average the size of all the UV islands over here to match the 3D view, to match the 3D object. So let's click this. And sure enough, look at that. Now everything is proportionally the correct size and all of our checkers over here on our object are all properly sized. So that's good. Now we have yet another problem. If we're ever going to take this out to another program, to a game engine, to any other program including substance painter. It's a good idea to get all of our UV islands inside this square, inside what is called the 0 to one space, because this is like a graph. Whereas down here it's 00. Up here it's coordinate 11, or one comma one, right? So over here is 01, and over here is 10. And that's why it's called the 0 to one space. But we need to get everything inside of this square. And that's where this other tool comes in. Pack Islands. This is a really handy one. If you click this, they all get packed inside that square. Now, if you look down here, we've got this pack islands panel. The margin between each of these UVA islands is really small at this point in time. Look how close they are together. I'd like to expand those out to give him a little bit of breathing room. And to do that, we can increase this value here in the margin. So instead of 0.001.01 and hit enter, and you can see they've kind of moved apart and rearrange themselves within this UV space. Alright, let's go back to our layout view here. Let's bring everything else back with Alt H. And then what Let's do is add what we did to this stool to all the others. So I'm gonna click this tool, this, this, and this. Oh, let's change our view port here and we go. So I've selected these four here. Now I'm going to shift select this one. And then let's press Control L, transferred the material. You can see it here. Now let's press Control L, transfer the UV maps. And there we go. So you don't have to do the material each time. I'm just doing that so you can see the change when the UV maps are transferred. Alright, so there are the stools. In the next video, we'll begin on another one of our objects, maybe, maybe one of these chairs here. So that's coming up next.
69. 069 UV Mapping the Conference Room Chairs: Well, moving on. Let's go ahead and grab this chair and let's try and UV map this. I'll press Shift H. And then let's go over to the UV Editing tab right here. Like the a key to select everything in the period key to zoom in. And so here we go. Let's add that material, that test pattern material over here in the materials panel. Just pull this down and choose test pattern and then switch over to the viewport shading. So here we go. We can kinda see some checker pattern here. Other than that it's really stretched all over. Let's see what the smart UV project can do. I'll just hit the a key and you and choose smart UV project and okay, and there we go. Now how does that look? Can we get away with that? Well, look here, there's a seam right there that's pretty ugly. And there's kind of a one over here. I don't know if that's a seam or warping may be both. But since this is really going to be one of the main places you're going to see, as well as back here. And actually this looks pretty good. But I'm a little concerned about the seams here. So I think at the very least we should work on UV mapping the seat here, let's do that. Let's tap into edit mode and get the L key to select that seat and then press Shift H to hide everything. Alright, for this, I think I want to grab the edges along the bottom here. I'm going to alt click this, and then shift all click and on around here. And down here. Just put that seem down at the bottom where it isn't going to be very visible. So let's press Control E And Mark seam. And then we can just hit the a key, you and unwrap. Now I'm seeing a bit of warping here. We could try and change our unwrap method here from conformal to angle based. And that helps, that helps quite a bit actually. But I realize, I'm not sure if I applied the scale for this object. So let's tap back into object mode and hit the Enter key. And yeah, I didn't, the scale is uniform but it isn't ones. So I'm gonna go ahead and press control a and apply the scale. There we go. So because it's uniform, there probably isn't going to be too much of a difference, but let's go ahead and give it a try and see. I'll press you and unwrap. And yeah, there isn't a whole lot of difference there. Okay. So we have that seat UV mapped. I think that looks better than what we had before. In addition, we've got these things here. These look a little odd. There's seams and stretching happening for the arm rest. So tap back into edit mode and press Alt H to bring everything back. And then let's press L and L here. And now let's hide everything. Shift H. There we go. So now let's just see what happens if we take one of these. And let's try smart UV. Unwrap here again. And let's just try this. So when we do it individually, we get a better rap, I think. But we've still got some seams here. So there are a couple of things we can try. We can try and put a seam right down here at the very bottom and try and open it up like a pair of butterfly wings. You can try that. Let's see what happens if we do that. So I'm going to tumble around here. And first of all, I'm going to get rid of these faces down here. I don't believe we need these. I'll go to face mode and hit the C key, and I'll just circle select these here and then right-click to get out of the circle, select x and delete bases. And now if I select this edge right here, and then go all the way up and control-click this edge here that connects those two selections up. So we select that whole edge. Let's mark is seen here. And then let's come over here and do the same thing on the front. How about right up to here? Let's try this. So I'm going to put a seam right up here at the front. There already seems up here as well. I'm going to try this and just see if I get a better cleaner unwrap here. So let me press the L key here just for this one, just to test it. And I'll hit you and unwrap. That doesn't look too bad. We've got a seam right here. And we've got a seam right here. I'm wondering how this would look without a seam on the front. Let's try one more time. I'm going to take this edge control, click this, and so we select that all. And I'm going to remove this seem now with control II and clear this seam, right? So let's try this again. Let's hit L, u and unwrap. Well, we don't have that same that we have stretching here. See how small they are here and how big the squares are in front. Well, let's change from angle based to conformal. Helps a little. That might be OK because this is just going to be a uniform color on here. And even though we are getting a bit of stretching, at least we're not getting a seam. And if it's just a uniform black color, stretching may not matter. Yeah, let's give it a try. And sometimes you just have to do that. You just have to give it a try and see how the texture is going to lay down on the object. Let me go to the circle select tool again and select these and delete these out of here. And then I'll select this edge, control-click this edge, mark the scene. And then let's read UV map this. There we go. Alright, let's give it a try and see how it works. Alright, so we've got those three things. How about this right here? Let's take a look at the main back of the chair here I'll hit the L key Shift H. And here we are. For this, let's go ahead and test it with smart UV project. I'll press you. Smart UV and okay. You know what? I think that yeah, I think that looks pretty good. Let's just go with that. Yeah. Okay. The next thing we should do is how about this piece right here, that bar that connects the two arm rests here. I'll press Shift H. And for this we could hide a seam right in there. Middle here, let's alt click that edge and let's put a seam on that. And then this is going to be a pretty long tube. Let's go ahead and add an edge or add a seam right here around the center of it as well. Mark scene. And then I'll press a u and unwrap. Not too bad. Let's take a look at it. Let's try angle based and conformal. Not a whole lot of difference, but at least there is some there. I'm gonna go with angle based on that one, Alt H to bring everything back. Test this one here. Shift h. Well, let's just select it and do smart UV project and see what happens. Okay. However, these look a little stretched. So let's try this again. Let me hit Alt H and I want to select this edge back here. Mark seem, and I'm going to, I could delete this face. However, if I do that, then this object won't be the same as all the other chairs and then I wouldn't be able to transfer the map. So I'm going to leave that face there and just add a seam around there. Alright, let's hit the L key EU and unwrap this. Yeah, that looks quite a bit better. Okay. For the tires were just going to smart UV map all of these. I'm just going to select all of these with the L key just hover over each part with the cursor and then press l. And then I'm going to hit you and smart UV project. And okay, and that's fine. That'll be just fine. Alright, and then this one as well. Let's try that too. Smart UV project. Okay? Yeah. So I think that's going to be a little bit better than the way we had it. If we hit the a key, we can select everything. We can come over here to the UV map and get the a key to select all the UV islands. Now we need to apply this average island scale to make all of these UV islands proportionally the same size as everything over here. So notice that all the squares now are pretty much the same size. And now we need to pack it all in. So let's go to UV pack Islands. We've still got our margin at 0.01. That's good. So there we go. There's our UV map for the chair. Now we can go and transfer it to the other chairs. Let's go back to the layout and press Alt H. And let's go through and select all of these chairs here around the table. And then we'll also select the one we just did. And then let's press Control L and transfer the material. And then control l again and transfer the movies. And there we go. So there we've got our chairs will have to do the same thing over in that conference rooms. Or once again, we can just duplicate this whole thing and move it over there again. That's probably the easiest way to do it. So well, it's do is just grab this table. And in the next video, we'll go ahead and UV map this.
70. 070 Creating the UVs for the End Tables: So to work on this table, once again, I'll select it and press Shift H to isolate it. And then let's go over to the UV Editing tab. Let's hit the a key to select everything in the period key. And we could probably just use smart UV project and give this a try. But first, let's make sure that the scale has been applied. I'll press the Enter key and no, we've got non-uniform scale here, so I'll press control a and apply the scale. And now its tab back into edit mode. Let's apply that material to it. Over here in the materials panel. Let's pull this down and choose that test pattern. And we can see quite a bit of stretching here. So let's give smart UV projected try. Let's press you. Click that and okay, well, it's looking pretty good. There seemed to be some problems here. Looks like this. Right here is a little bit different size than the checkers on the top. You see how it's bigger here. Everything else looks okay. But I think we maybe want to spend a little bit of time trying to correct this. What we could do is we can de-select everything and then just hover over that table again, the L key. And also let's press the L key here. And let's just select this whole thing and try our smart UV project. Again. I'll hit you smart UV project. And okay, and now that's looking a little bit better. So sometimes as you can see, when you isolate a part of the object and use smart UV project, you can get a better result. So this looks better now along the side. Alright, let's, let's do that. Same thing with this down here. Let's press L And I'll press you smart UV project. And let's try that. And yeah, that looks better as well. So now we need to select everything with the a key and make sure that our UV islands aren't overlapping over here. So I'll press the, a key to select everything on this side in the UV editor. And then let's go to UVA average islands scale. That helps a bit. And then let's go to UV and pack islands. There we go. Now we can come down here and uncheck the rotate box in that we'll spin it around 90 degrees. And sometimes this uses the 0-1 space a little more efficiently. So you can always test this to see what you think. But I think that looks pretty good. Let's go ahead and tap back into object mode and go back to our layout tab. I'll press Alt age to bring everything else back. And yeah, that looks pretty good. Now, I'll wait to copy all of these over to the other two conference rooms because all I'm gonna do is just delete these and duplicate these and copy them over again. But let's work on this one right here. This little n table may provide us with some interesting issues here. Let's, let's try this when, once again, I'll press the Shift H, and then let's go over to the UV Editing. I'll hit a to select it and the period key to zoom in. And now. Take a look at this. We've got, when we select it, we only select one quarter of it here. If we go to our modifiers panel, we have a mirror modifier on here. So a couple of things are happening. We're mirroring in the x and y, which is mirroring this one part of the object to all four corners. But what it also does if I hit the L key for just that top part and hit g and move it around and look at what happens. As I move this around. You can see I also have that mirror modifier going in the x and y for this top panel as well. I'm hit the escape key here. So that's a problem. We don't want to do that. But if I turn this off, I'll just click here to hide it. I lose it for that corner as well. So how do we do that? Well, I think what we're going to need to do is just split this out temporarily into its own object. Say this part here, remove the modifier, then apply the modifier for this, and then join it all back together. So UV napping is actually a pretty good time to go through and clean up the model. Sometimes as I'm going through a C And I'm 3D modelling pretty quickly and don't really think about the cleanup and the organization that needs to happen. And UV mapping is a good time to slow down. Take a look at each object and clean it up if need be. So with this top piece selected, I'll press the P key and separate by selection. Now if I tab back into object mode and select that one object, I can remove the mirror Modifier from here. There we go. Now if I come down here and select this object, I can click apply. I'll make sure clipping is on and then click Apply here. Okay, so now what we have to do is select everything that's part of the table here and press Ctrl J to join it altogether. Now let's make sure if we press the Enter key that we have uniform scale. We do, but it isn't all ones. I'll go ahead and press control a and apply the scale. Now if we tap back into edit mode, we can go ahead and apply our test pattern and take a look at it. So quite a bit of stretching, quite a bit of warping. Let's give this a try with the smart UV project. I'll hit the a key. Smart UV project. Looks pretty good really. I don't see too many problems, but I think I'd like to try it with just using the smart UV project with one part at a time. Let's try this. Well, now we're getting some strange stretching on this. We've got our scale applied. But when using smart UV project on just this one item we're getting some stretching. So I think what I'm gonna do is press Shift H. And I'm going to just select an edge right down here. Press Control E. And let's try it with just the unwrap method here. I'll hit a and u and unwrap. Now that's looking better, but we've still got a bit of warping over here. Let's try instead of angle baseless, try conformal. Yeah, that looks pretty good. So now we've got a nice uniform pattern for the checkers there. Let's press Alt H and bring this back. And while we're here, let's just select this and let's try smart UV project again on this as well. See what we get. And okay, yeah, that looks pretty good actually. So if we select everything, take care of our overlapping over here by first of all, average islands scale. And then pack Island doesn't look too bad. Let's click on rotate. We don't get a whole lot of change there. That's fine. Alright, I think that's good. Let's go ahead and go with that. Now. We're not going to be able to transfer the UAVs to these other ones because we've made changes to this, right? But we can duplicate this and replace the others with this particular one that's already been UV mapped. So if we go back to Layout, and what I'm gonna do is bring back those end tables and see if we can find those in furniture here. Here's the end tables right here. If I open this up, I can make visible the other in tables, so there's one there and then I put, I'm duplicates over here in those phone rooms. So what we can do is we can take this one and we can move the cursor to it, shift us to. Now. I'll delete this one here. And then let's take this one that we've UV mapped duplicated with shift D, And then I'll snap it to that cursor. So shift s And selection to cursor or eight. So I can press Shift S eight. And there we go. Let's do that again. I'll come over here, move the cursor shift S2, delete this, duplicate, one of these, Hit Enter shift S8. Let's do it again. Shift S2. Delete, select one, duplicate, shift S8, And there we go. So now we've replaced those fairly quickly with just using the cursor and snapping. Alright, let's press Alt H and we'll select that ceiling and hide it. And here we go. Now we've got our little tables, UV mapped and ready to go. Alright, in the next video, let's work on one of these chairs here.
71. 071 Working on the Chair and Sofa: For this chair, let's go through the same process again. Let's press Shift H, and we'll go over to UV Editing. Let's hit the a key in the period key to zoom in. Now, this May 1 not work if we just do a smart UV project, once again, has got these more organic curved shapes. And smart UV project doesn't usually do a great job with those. Let's hit the end key and make sure our scale is applied. Control a, apply the scale. And then let's just go ahead and press U and smart UV project and see what happens. Well, it looks okay, but let's see where it put this seems. Let's bring in that test pattern. And I'll tab into object mode. And yeah, it, it's putting seems right here. That's not quite what I'd want. And it's putting seems right along here as well. Yeah, we'll look at that. It's got that seem right there, so I don't think I want to do that. Let's go back into edit mode and let's just select this part with the L key, press Shift H, And let's isolate it. I think probably an easy way to do this is just assume that there's gonna be a seam all the way around here as if a seam on the fabric like the two pieces of fabric that make up the front and the back were sewn together right here, right along that edge. Let's just, let's just do that. Control II and Mark scene. And then if we select it all and press U and unwrap, I think that's probably pretty good. Yeah, we don't get any seams back here. We do get them along that edge, but I think that's reasonable. I think that's a logical place to put them. Okay, so let's press Alt H. And if I select this one piece here with the L key and then press control i to invert the selection control I, I'll select everything else. Let's go ahead and try smart UV project on this. Yeah, I think that'll be just fine. So let's select everything. Come over here, select everything with the a key, select the UV menu and then average islands scale. And then let's pack it into the 0 to one space pack islands. And there we go. Yeah, I think that'll work just fine. So if we take this and go back to the layout view, ALT H. And now what we'll do is select this chair shifts like the one we just did. Let's press Control L and transfer to the material. Then Control L and transfer UV maps. And there we go. Okay, how about this couch here, let's try this shift h and over to UV Editing again. And let's frame it up with the period key. And this one, let's see how we're doing well, we need to apply the scale. Let's do that. And why don't we just give this a try with the smart UV project. And see if maybe we get lucky. I'll add the material here. And let's see. Well, it's not too bad, but I'm not liking this seam right here, right in the front. And we've got seams over here as well. So it's not quite the way I'd want it to be. So let's go ahead and modify it just a bit. Now, if I recall, we've got yes, we've got a mirror modifier on this. So what let's do for this is let's take this mirror modifier off and let's do the UV mapping. And then once we're done with the UV map, will apply the mirror modifier again and see what happens. So let's give this a try. I'll take the mirror modifier off. Let's tap into edit mode and let's just begin with this one right here. Shift H. The problem I'm seeing is that seem right up front. I don't want that. So maybe if we began well, let's begin with some edges down here. I don't think I want this. I just want the edge all the way around the bottom. Right along here. There we go. I'm just going to make that a seam right here. And then what let's do is let's create a seam right back to here like this. And let's do that same thing over here. So what I'm doing is just trying to ensure that we don't have a seam right up here in front that's going to be so visible. I'll go ahead and add seems to this back here, like this. Now let's give this a try. You and unwrap. And how did we do? Yes. So that allows that texture to flow smoothly across this edge. I think that's going to be important. And I'd like it to do the same thing over here. I'd like that texture to flow smoothly over this as well. So let's press Alt H to bring that back if the L key to select it. And let's press Shift H to hide everything else. So once again, let's take these edges here. I'm just going to take this edge and this edge and lets mark a seam. I'll do the same thing over here. Just select these. And Marcus seem there. Now let's grab what's on the bottom here. Let's do that. And also in the back it looks like we could extend this all the way to this bank, the panel. Why don't we do that? That seems like it'd be a good idea to get this all the way back to here. And then let's alt click this and get this whole thing all the way around here. Like this. Control II and Mark seen. So if I hit the Z key and go to a wireframe, you can kinda see what I did. I've blocked out these pieces on the sides and the back and left this clean, left the front without a seam. So hopefully the texture will flow smoothly over that. So let's hit the Z key and goto material preview. And we go and then let's hit the a key you and unwrap. And we do hear. Yeah, so now that flows smoothly over that. For the arm of the sofa, I think I wanted to flow smoothly this way over this. I don't think I mind too much if there's a seam right up front, that seems like that might happen, but I want it to flow smoothly all the way across here. So let's press Alt H, select that with the L key, shift h. And then I think maybe I can just select this edge here. Let's try that. Marcus seem there. Let's go in the back and do a similar thing. Maybe we should just select this one right here. Let's do that. Mark that seam. And then I want to select this edge from here all the way to the front. So if I select one right here, one edge right there at that point, and then Control click to here. It will extend that selection all the way across Mark seem there and let's do that on the other side, I'll select this edge and then Control click this edge. And that selects everything in between. Alright. Now hopefully we'll have that texture transitioning smoothly over that arm of the sofa. So let's hit a u and unwrap. Let's take a look. Yeah, I think that's the kind of thing I want that smooth transition. This seam here, I don't think is going to be a problem. I think that would be I think that's how it would be in real life. So let's go down here and press Alt H. And this one down here is probably just fine as it is. But while we're here, let's just go ahead and press U and smart UV project and get that cleaned up there. Okay, so now we have all of that done. Let's select it all. Select All of our UV islands, average islands, scale, pack islands. And there we go. Now, watch what happens when we take this and we add a mirror modifier to it. Keep an eye on the UV map. So let's come over here, add modifier mirror. And there we go. So far, nothing has happened to the UV map. We've got a tab into object mode to apply this mirror. Let's turn on the clipping here and then click Apply. Now let's tap into edit mode and see what's changed. Nothing. So what's happened here? Where did all that new geometry go? Well, what it did is it actually put it right over all the existing UV islands. So if I select this UV island here and hit G, There's the other one, there's the one we mirrored over. I'll press Control Z to undo that. So whatever texture we put over this is going to be exactly the same on one side as it is on the other side. The good thing is, is this is just going to be a uniform texture or a plane beige fabric texture. So you're not going to be able to tell that it's been mirrored over that one side is exactly the same as the other. Alright, so let's tap back into object mode. Let's go over to our layout and let's bring everything back. Alt H. There we go. All right. It looks like we've got yeah, we have another chair in the offices here. We could in the next video and work on this one.
72. 072 Chair, Lights, and Drop Ceiling: All right. With our chair selected, let's go ahead and press Shift H to hide everything. Let's go over to our UV Editing Tab. There it is there. Let's select everything and hit the period key. And let's make sure that our scale is applied. Let's press control a and apply the scale. Now I'll go ahead and just see how it looks with smart UV project. Let's take a look. Alright, that looks OK. Let's come over here to the material and add this test pattern. Yeah, we're seeing some problems here. Look, there's some warping here on this piece. There's some seems here that I don't think I wanna seem right there. So to me the main problem look like the seat and this back right here. Everything else doesn't look too bad. We might want to redo the movies for this back here, but everything else looks OK. Well, let's give this a try. Let's see. Let's, first of all, let's take this and recall that this was just a plane and then the sides were extruded here. So I bet we could even just try using the unwrap even without any seems if we hit you and then just went to unwrap, There we go. That doesn't look too bad because the edges are small enough that when it tries to lay them out flat, it doesn't introduce too much warping at all. So I think that looks fine. Let's take a look at the seat Now let's press the L key and let's isolate this with Shift H. And let's try and reconfigure our seams here. These don't quite work for me. So let's come down here and let's select this edge right here. And then Control click here. And I'm going to select all the way around. So what I'll do is I'll then shift click here, then Control click here to extend that selection. And then shift click, Control, click, shift, click, control-click. And that'll get that whole square of edges there on the bottom. So let's press Control E And Mark seem and we go. Now I think I'll take these here. And Mark seems here. Select and control click here. And let's get some seams in the back as well. How about these back here? Let's do that. Shift click, Control, click. There we go. And let's mark these back here. So now we've got all of that selected. Let's hit a u and unwrap. And yeah, I think that'll work a little bit better. Having one seam right here on each of these corners seems to make a little more sense to me. And to have the texture flow smoothly along the front, I think is important. Alright, so what we could do now actually, if I press Alt H, we can bring everything back. If we select this that we just did and that, that we just UV mapped, let's now press control i to invert the selection unless try everything else. Now. I'll hit you and smart UV project here. Alright, that actually might be a little bit better. Let's try that. So I'll select everything now and then come over here and hit a to select all the UV islands. And then of course we need to go to UV average island scale and then pack islands. Yeah, I think that'll probably work just fine. I don't see any really glaring problems there. That looks pretty good. Now, uh, let's do is let's come back to the layout and let's press Alt H to bring everything back. Once again, I'll select that ceiling and hide it with the H key. So let's try something else. How about let's begin working on some of the light fixtures and things like that. Let's select this one here. And let's press Shift H. And now let's go over to our UV Editing at the a key, the period key, and that zooms at n. Alright, so let's apply the scale. And then let's also add the material is see how it looks and it so stretched, We can't even see the checker pattern. Ok, well, let's select everything in edit mode and let's hit you and smart UV project and see what we get. Alright, well, this is interesting. It's produced several seems around this main part of the light fixture n. I kind of want to reduce the number of seams here at. It feels too, too many. We may need to have just one seam and open it up from that. But having these multiple seams is just a little too much for me and there's one up here. So yeah, let's try and fix this. The first thing let's do is grab an edge right down here. Let's just select this edge and Marcus scene there. And also let's grab this edge right up here. I'll click here and Marcus scene there. Now let's select one of these edges here, and then a corresponding edge right down here. Control click to select that whole thing and mark that scene. Okay, so hopefully that will just give us one scene for all this instead of the multiple ones we have on there. Now, let's also come up into here inside the light and select an edge. And then let's control. Click here. Control, ie, mark, seem, and oh, it looks like there's a little bit more. I think I need to zoom in here. Yeah, let's add this one edge as well. It looks like it goes all the way up into their, alright. And then this part up here, let's, let's put a seam right up here, troll e. Then let's add one. Well, we might as well go in line with this edge. Right up to here, I think. Yeah. And let's mark that seem. So. This cylindrical piece will be split off here and here. And then it will be opened up at this seam here. Ok. And do we need anything up here? Do we need anything to break this open that might just work the way it is. Alright, so let's try it. Let's hit a, and then we'll hit you and unwrap. Okay, but let's come over here to the unwrap panel and let's try angle based. Yeah, I think that's a little bit better there. Let's try that. So now we've got a prominent seem there, but we only have one. And that was my concern is that having more than one scene could be distracting there. We also just have one seen up in here. So I think that's a better way to do it than before. So let's go ahead and go with that. I will come back to the layout panel. And let's find this over in the outline, or let's hover over here and press the period key in there it is. So what we can do is bring back all of this. Let's do that. Let's bring back all of this and all of this. There they all are. Let's go ahead and hit a to select everything. I will shift click this to de-selected and then shift click it again, so it's the last one selected. And then let's press Control L, transfer the materials, control l again and transfer the UV maps. So there we go. Now I've got all of those UV mapped. Let's press Alt H to bring everything back. I'll hide the ceiling again with the H key. And I guess, well, let's work on these right here real quick. Let's do these Shift H to hide everything. So this is just the drop ceilings without the events or the canister lights here. That's just these individual pieces. So let's go over to our UV Editing tab up. Let me hit the a key and then the period key. So let's make sure that both of these have the scale applied. I'll take a look at this one. Yeah, this one's got all 1s and this one's got all ones as well. Okay, that's good. So let's just select one of them. Press you and smart UV project. And then we go, that doesn't look too bad really. Let's add a test pattern. Yeah, I think that'll be just fine. Let's do the same thing over here. And that test pattern, that doesn't look too bad the way it is, but oh, yeah, it's still in that original cube patterns. So let's redo that. Lets click Smart UV project and do that. Yeah, that'll be a little bit better. Okay. I'm going to bring everything back. I'll to H hide the ceiling and there we go. So that's what we have so far. I think in the next video, let's go ahead and work on the other lights over in the kitchen area. And maybe we can also work on these events as well.
73. 073 Kitchen Lights and Cannister Lights: for the lamps over the kitchen counter here. Let's just select one and press shift H and then I'll tab into edit mode. And really, let's do the same thing that we did for that other lamp. Let's apply the texture at the A key you and smart UV Project and see how it goes. Um, a similar problem with multiple seems around this here. You can see how it's splitting it up here. We could try and adjust the angle limit to tell it to change where it's putting the seams, but I don't think that's going to really do a whole lot. It's still gonna break thes up into multiple you ve islands, really, no matter what we dio. So let's go through and create our own seems again in the same way we did with the last one . So I'll just grab this seem here, actually, let me hit the Z key and go to solid view. It's sometimes easier for me to see if we do that. Control E and Mark seem no press salt and click this edge and that'll select everything all the way on up. No press control. De and Mark seem there what's at an edge right year to split out that cylinder here. And Ah, well, come on up to the top and do a similar thing up here. Let's select this edge. Zoom in with period key and Mark seem there. Um I don't know that we need this seem right here. It just kind of extended up when I selected the other parts. Let me just press control e and clear scene for that. There we go. Um, yeah, I think that's about it. Let's press a and you and unwrapped this. That's it. Z and go to material preview. And how did we dio? Well, not too bad. I think that's probably pretty good. That one seam is just fine. Let's go with that. This press ault h to bring everything back. I'll select these two here. Shift Click that control l transfer the material control l and transfer the UV maps. There we go. All right, so we have those Now, let's, um, take a look at the air vents here. Let's Ah, pull this down and I'll hover over the outline. Er and press the period key on the num pad. And there we have our events here. Let's right click on the collection and choose select objects. And now we can press shift H to isolate those now these air, all separate objects as well, so we can just do one and then transfer the maps to the others. So I'll hit the n key to see how our scale is doing. Looks like it's non uniform. So let's press control a and apply the scale. And then let's tab into edit mode. Select everything will press you and smart UV project. There we go. Let's go ahead and add the material here. Yeah, that looks pretty good. Let's go with that. That's fine. Um, I'll select them all shifts like this and then again control l materials control L UV maps . And there we go. All right, so we've got those as well. Let's press all age to bring everything back. And let's now think about Well, how about those canister lights? As long as we're in here and doing this, it looks like now this what I did for these is I made all of these all one object, and that's not a terrible thing. But when we're UV mapping it sometimes better to have them all is individual objects. Let me also select this Ah, canister lights, kitchen object as well and then press shift h And here we go. Now the issue we have here when it's all one object, let me just show you. If we If we get the tab key to go to object mode and select everything, let me make sure that our scale is applied its uniform but not applied. So let's switch that to one's. There we go. And then if I tap into edit mode for all of these, you can see that each of one is laid out over the other. So if I, um, if I select this one here and hit G, you can see that they're laid out one on top of the other. But if we select them all and hit you and smart UV project, we get this. So it's not terrible, but it doesn't really use that 0 to 1 space very efficiently. If we split these up into their own objects, then once again, we can use the whole 0 to 1 space for each individual one, which gives us more texture resolution for each UV map. So let me press control Z and I'll go back to here. So I think the solution to this is to split them up into their own objects. Do one transfer the U. V s, and then we can join them all back together. And when we do, they'll be one on top of the other the way we have him here, but in a cleaner, more appropriate UV layout. So with all of these selected in edit mode, what I'm gonna do is press the peaky. And instead of separate by selection, I'm gonna separate by loose parts. So what that will do is that will take every loose part, every individual item and split it out into its own object. You can see all those over here from the tab back into object mode and just select one now and zoom in. And now let's just UV map, this one, and then transfer the map to all the others. Well, tab into edit mode. Let's go ahead and apply that test pattern and it doesn't look too bad, but you can see this extra rim here is very smeared. We can't even see the checker pattern on this. So let's go ahead and just select everything. Press you and smart UV project again. Now we've got some stretching here. You can see how these air kind of ovals. What we can do is come over here to this smart UV project panel and weaken Turn off stretch to UV bounds. And that doesn't try and stretch all the U. V s to fill the entire UV space. So that gets them a little more proportional to the three D object itself. All right, so now that we've done that, it's tab back into object mode. I'm gonna go to the top view here and just border select all of these at the Beaky and Border. Select all of these because I don't want to select these at this point in time. Then I'm gonna shift. Click this. Do that again. So it's the last one selected this press control l materials control. L transfer UV maps. Okay, so there we've got those done. We've got one strange one over here. Let's go take a look at this guy. He didn't come out very good now, did he? So let's ah, tab back into edit mode. Select everything press you and Smart UV project. And there we go. Now that looks a little better, and sometimes that happens. You just need to go back and clean it up, and that's fine. Alright, let's try these over here. Let's do the same thing Tab into edit mode. Select them all at the peaky and separate them by loose parts. Here we are. Tab back into object modes, like just one of them. And let's try this here. Let's go ahead and select everything. I'll put that test pattern on it. It's press you and smart UV project a little bit stretched here. Oh, let's Ah, make sure we're Yeah, let's see if, um, applying the scale can help with that. Maybe not. But let's try you and smart UV project. OK, there we go. That helped. Okay, Now what let's do is take this and select these two and then this one control l materials control l transfer UV maps and this one too. Sometimes that happens. Let's just select it. You smart UV project. And there we go. Now we can do is hit the Beaky, select them all and press controlled J and oh, we need a an active objects. So let's ah, de select one and re selected. Now we compress control J. And there we go. That joins them all back to one object. Same thing here. Let's select these three control J. And there we go. So now we have our canister lights back into just two objects. All right, so now we can bring everything else back old age and there we go. I guess what we can do in the next video is begin working on some of these kitchen items, so that's coming up next.
74. 074 UV Mapping the Kitchen: we could begin with any object here in the kitchen. But let's go ahead and select the refrigerator Endless press shift H and isolate that. We'll zoom in with period key and let's see for this. Let's go ahead and press control and apply the scale. And I think, Let's just try Smart UV project here. I think if we hit the A key impress you and smart UV project. Let's see what happens now. I want to turn off this stretch to UV bounds. Let's do that and click. OK, all right. I think that looks pretty good. Let's assign our test pattern material over here and let's take a look at it. I think that's just fine. I don't see any, um, glaring. Seems right down the middle of the doors or anything. I think that will be just fine. All right, let's press Ault H and let's move on. How about this coffee maker Shift age. Zoom in and let's go through the same process. Control a. Apply the scale. And for this, let's just, um, once again select everything. You smart UV project. Make sure you ve bounds is turned off, okay? And let's take a look at it with the pattern on. I think that's okay. That looks pretty good. I don't see any. Once again, I don't see any major. Seems going through parts that are gonna be really visible in the scene. So that's good. Let's press Ault H And, uh, what? We could grab this faucet here. Let's do that. Shift h and once again, control A and apply the scale. Let's tap into edit mode and let's just give it a try with smart UV project. See how that works. Give us our test pattern here. Now, we've gotta seem here and here. So we've got a couple of seems on this. I'd kind of like Teoh limit that area to just one scene. Let's do that. I will. Ah, select. Say this edge right here And press control E and Marcus scene and all select. Say this edge right here. Let's do that. And then from here all the way down to hear control, click there. Let's create a scene there. So was pressed Control. E and Mark seem there and then I'm gonna press the l key Now it selects everything, but I can constrain that selection by coming down here to the select linked panel and choose to delimit the selection by seems so I can click this and now it just stays within that area of this tube here because we've already you ve mapped these other parts. Why don't we keep those in place and just do this? So I'll press you and unwrap and there we go. That's pretty good. We tap back into object mode. We can see here. We do have a seem going along here, but that's the only seem. I think everything else looks pretty good. So what? Let's do now. If we're OK with that, let's hit the a key. Dissect everything. Let's come over to the UV editor in Press A as well. And now we can use the average island scale and a pack islands right here. That looks pretty good. So let's go ahead and tab in object mode again. Press Ault H and let's work on something else here. How about this? Um counter? Let's let's work on this counter. If I select this counter impresses shift H, here we go with press control A and apply the scale. Let's select this. I'm gonna go ahead and put the material on it now just to see how it looks. And it's very stretch. So let's select everything with the A key you and I'll choose Smart UV project Once again. There we go. I think that looks good. All right, let's press all th and for this. Here, let me hit the Z key and go back to solid mode right here for this right here. If I recall, this is still an array. Let's go over and take a look at the modifiers panel. And sure enough, we've still got the array modifier on this. You can see it here. We just have this one with the array, so let's apply this. I'll just click. Apply here and now let's press shift H and isolated. Let's go through the process of applying the scale and I'll come down here and apply the material right here. We need to, of course, press Z and go to Material Preview. And then let's tap into edit mode, select everything and use our smart UV project again. That does a pretty good job. Must press Ault H and, um Let's grab one of these handles and we can then transfer the UV maps to the others, but we'll just grab one press shift h and zoom in here and then I'll press control a and apply the scale We can then apply the material, get a to select everything you and smart UV project again. And there we go. I think that will be OK. Let's press all h. And now let's select these other handles right along here. And then we'll select this one that's already been UV mapped right here. Press control L and Material or the M Key. And we can press control l and transfer UV maps or the T key. There we go. So it's control l m control lt, if you wanna do it that way. And in fact, we could come over here and select all of these handles as well. I'll just crab all of these on this side and then grab one of these here. Control l m control L t. And there we go. All right. We could do the same kind of thing for this. Let's Ah, grab this and just apply that scale tab into edit mode. I'll go ahead and apply this material, and then let's press you and Smart UV project. And there we go. All right, let's go back. Do the same Here. We can apply the scale. Use smart UV project. Put on material on to make sure. Yep, that looks good. What about the sink here? Let's Graham that Let's press control a and apply the scale tab into edit mode and smart UV project and put our material on. There we go. All right. Um, the counter top. Of course, we should do that. Let's apply the scale. I liked everything smart UV project and let's apply that material. Here we go. Now. This down here, I think, is also Honore. If I recall, let's go over to the modifier. And sure enough, there it is. So let's apply the array there. And then let's also select these pieces. And there we go. And then I'm gonna press shift H to isolate all of these. We could probably take all of these and join them into all one object control J. Make sure the scale is applied to have into edit mode and use our smart UV project. Now let's come over here and apply that material. There we go. All right. Let's see how it looks. Yeah, We've got just about everything in our kitchen. Done. Oh, why don't we grab these doors here, too? While we're here, let's select these two and press shift H. Now, we could combine these two doors together, but if you are interested in keeping them separate so they can open weaken do that to that isn't a problem. Weaken. Just apply the scale and do our smart UV project there. And select this one as well. Smart UV project. And there we go. We could then apply the material to each of these, and there we go. All right. What let's do in the next video is begin working on the walls and the floors and the ceiling, as well as the doors and the window frames in the offices.
75. 075 Finishing the UV Mapping: all right, we're nearing the end of the UV mapping process here. Let's continue by grabbing that rug. Let me go to the solid view. Let's grab that rug, object here and isolate it and then put our material on it over here. Oh, let's go to our material preview again and then, Oh, let's make sure that our scale is applied with control. A. Now let's just use that smart UV project again. And there we go Now it's still pretty stretched here on this sides. Let's take a look at why that would be Oh, well, it's because I didn't choose the whole thing. Let's go ahead and select that impress you and smart UV project. And there we go. That looks a little better. All right, so all H bring everything back and let's Ah, let's try one of these doors here. Let's grab a door and let's UV map this. I'll press shift. H less press control A and apply the scale again. And, of course, let's just try are smart UV project and see how that works. Well, I had the test pattern and yeah, I think that's gonna be just fine. Yep. Let's go with that. So now what let's do is press Ault H and I will hide that ceiling once again. And then let's grab that door that we just did. Here. It is right over here and let's hit the period key in the outline, er, to find that object. And now we can select everything within this collection by right clicking and choosing select objects. Now we've got all of those selected. Let's zoom in and de select the door and then re select it just to make sure that it's the last one selected. And then let's press control. L m control L T. And there we go. Now we've got that. Next What do we want to do now? Well, how about the walls? Let's just, ah, select the walls here and let's press control a and apply the scale. And then let's tab into edit mode. Let's go ahead and add that test pattern. It's really smeared all way around, but we can hopefully fix that by pressing you and smart UV project. And there we go. Yep, that'll be just fine. We're just gonna put a very uniform material or texture on that. So I think that will be just fine. While we're here, we could go ahead and do the floor. Let's do that. Control a in scale. What's tab into edit mode and use smart UV project again. There we go. Um, it looks like I haven't applied the UV map here from this chair to all the other chairs. I guess we can do that. Let's come over here to the outline and hit the period key, and now we can see that this collection is the one it's in. So let's right. Click and choose select objects. And then let's de select that one. We have already UV mapped. Let's shift. Click that one more time. There we go. To de select it. I'll select it again. So it's the last one. Control l m control L t. There we go now. I do still need to copy and move over the table in the chairs. I will do that, but let's see if there's anything else we need to deal with in this main room here. I guess the things that need to be done now are these window frames, as well as a couple of the door frames and the problem with these? Is there really all different sizes? They are slightly different. There's There's a few that are the same. Like, um, maybe these two windows here and these windows along here, but everything else is pretty much gonna have to be done individually. UV mapped individually one by one. So that's gonna be a little tedious, but not too bad compared to just everything we've already done. But what let's do is let's grab this one here, and let's UV map it a press control a and apply the scale. Oh, assigned the material to it. And then let's use smart UV project for this. There we go. Now, we should be able to grab all of these windows here cause they're all the same. We just duplicated these for each of the walls, so I should be able to grab all of these and then the one we just did control l m control l t. And transfer those UV maps there. All right. What other ones were similar? Well, these over here, we could do this one. Let's ah, apply the scale some in the material smart UV project, and then we should be able to take. Well, this when I guess, is the only one we can really do in terms of transferring. So let's just press control. L m control lt. And then we're gonna have to do everything else pretty much individually. So let's apply the scale for this. You and smart UV project. Apply that material. There we go. All right, Um, so all of these, I'm afraid we're just gonna have to do one by one, so I'll do a few, but then I'll just do the rest before the next video, because all it is is just applying the scale smart UV project and applying that material. And that's it. That's all this is. That's all these were going to be for each one of these. So it's not really exciting to watch, and honestly, it's not really exciting to do either. But sometimes you just got to do it. And it's certainly easier to use smart UV project than to actually go through and try. And Mark seems for this. That would be very, very time consuming. So this is still a good compromise. So I'm gonna continue to do these, and in the next part of the course we will begin text. Oring are objects within the scene. We're gonna use substance painter for this. And we're gonna talk about what we need to do to prepare the models, to go into substance painter so that we can apply our textures as efficiently as possible and then bring them back here into blender. So that's coming up next.
76. 076 Exporting to Substance Painter: all right, We are now to the part of the project where we can begin texture in our models to do this. As I've said before, we're going to take the individual objects into substance painter, and we're gonna create the textures there. We're gonna use physical based rendering PBR texture ing to create the textures. And then we're going to export the textures out of substance painter and bring them back here into blender. We're gonna be exporting for each object, a color map, a metallic map, a roughness map and a normal map. And we will then assign these textures to the blender materials. So the first thing we need to do for each object is to get this test pattern off of it. So let's begin with something pretty simple. Let's begin with one of these little end tables. I'll press shift H to hide everything. And then let's come over here to the materials panel right here. And let's just click the minus button to remove that material. And then let's click New and let's just call this in table. All right, so there is the material for that object, and we're gonna have to do this for each one, I'll switch over to the solid view here and now. What we need to do is somehow differentiate the different parts of the model that have a different material on it. So if we come over to our image editor and click open and I'm gonna go to my reference images and let's find that image of these in tables here so we can see from this image that basically for this object there two materials one for the tabletop and one for the legs on important thing to do when sending something to substance painter is to really think about how maney texture maps you want to get out of it. And, as I said, we're gonna want four texture maps for each of the objects. But what substance painter does is it uses the materials from blender to create a texture set, so if we just have one material, it will create one texture set, which will output four textures. If we have to materials, it will create two texture sets, which will then export eight or four for each texture set. If we had 10 materials, it would output 40 textures, and that's just way too much. That's just way too many to have to deal with. So what we want to do is keep our materials to a minimum. And instead of using the materials to tell substance painter where the different types of materials were supposed to be, we're going to use vertex paint. So here in blender, you can switch to Vertex paint by coming over here to this, pull down and switch to vertex paint. But first, what I'm gonna do is I'm gonna tab into edit mode, and then I'm gonna come over here and pull this down and switch to Vertex paint. And the reason why I did that is the tab key doesn't exactly switch between object mode and edit mode. It switches between the last two modes you used and, of course, edit an object mode were the only two we used up to this point. So now if I hit the tab key, I can switch between vertex paint and edit, and that's what we want. Now, I also want to turn on this little face selection masking as well. So I turn that on and then what I'm gonna do is come over and go to this active tool tab right here. And if we do that, the active tool is, of course, the Vertex paint tool. And so we get the Vertex paint settings over here. Now I've got the brush for draw. That's fine. We aren't really gonna use a brush for this, so we could probably just bring that down like that. Now we could change the blend mode to add Let's do that. And my strength is 100 or 1.0. Now, here in the color picker, we're going to assign various vertex colors to the different parts of the model that have different materials on them. So, as I said, this has a wood material and a metal material. So we need to put two different Vertex colors onto this to make sure we can come back to the proper colors when we need to. We can come over here to the color palette right here and create a new color palette, and so we can add colors to this palette here, just like a painter's palette to be ableto go back to the appropriate colors, and it really doesn't matter what color we use. It's This is all just a random selection of colors as long as they're different colors for each material. All right, so I'm gonna begin with just a green. I'll just click and drag and create a green right here, and I'll add it to my palette here. And maybe I'll also use a blue will just drag over here, create a blue. Add this to the palate as well. All right, So first of all, what I want to do is just choose that tabletop. Now, I can hover over this and press the l key just like I could An edit mode. If I too, have into edit mode, you can see here I can hover over this pushed the l key. And that selects that. Now, when we tab again back into Vertex paint, you can see it's been selected because we can't see the wire frame on it. If I press Ault A you can see the edges again or I can hover over this and press the l key . And that selects it. Right? So now we want to apply. Say this green to that table top. The way to do that is we can come over to paint and choose set Vertex colors or shift K right there. So on press shift K And there we go. There's a vertex color for the tabletop. Let's press ault a and then hover over the legs and press the L key and now switched to my blue endless press shift K. And there we go. Now we have our Vertex colors in place. This is the information that substance painter is going to use to differentiate between one material and another. Okay, so let's tap back into edit mode. Let's go over to object mode And there we have it. There is our first object ready to go into substance painter. I'm impressed. Control ass just to save the scene. And then what let's do is let's export this out so I will select it and we're gonna export it as an fbx file. So I go to file export Fbx, and here in the export panel, I'm going to just choose mesh for my object type. And I'll also choose selected objects only. So we only export this in table and not the entire scene all at once. Well, then browse to the folder. I want to put it in. And currently here in my scene folder. I don't have anything for exports, So I'm gonna create a new in All right click choose new folder and I'll call this exports. Here we go. So we'll put it in exports and export Fbx. And there it goes. All right. In the next video will import this object into substance painter.
77. 077 Importing in Substance Painter: Well, in my excitement to get this object exported out of lender, I forgot to give it a name. So I'm gonna go back to file export FB X, make sure I choose mesh and selected objects, and then I'll go to my exports folder. And here is that file I forgot to name. So I'm just going to give this one a new name. I'm gonna call it in table and let's just hit enter and send that off again. Okay, Now, let's go over to substance Painter. What I've done is I've just opened up thesis UBS Stints, launcher. Through this, you can open up substance painter, Designer, alchemist. We're only gonna be using substance, painter and substance source now, substance source is a library of PBR textures, materials that you have access to if you subscribe to substance painter or any or all of the substance products. If you do not have substance painter and you want to follow along, you can get a 30 day trial version of it. But you won't have access to the library. That is substance source. And I'm gonna be pulling quite a few materials out of here. So just to let you know. Not all of the materials that I use will be available to you If you're just using the trial version. If you're just using the trial version, that's great. But you may have toe substitute a couple of the provided materials for the ones I'll be pulling out a substance source. All right, so let's open up substance painter here. And once sepsis Painter opens, What we need to do is bring in that in table object that FB X. So I'm gonna come up here and go to file and new, and here in the new project panel, we're going to select the file we want to bring in. I'll click select here, and then I'll open this in table FB X right here. Now, you do have a template here. You can choose between quite a few pre made templates, and these dictate a lot of settings that are used when you export your textures out. But frankly, we're going to set our textures to be used in blender so we don't need any of these. At this point in time, you can set the document resolution here, but once again, as you're exporting it out. You can set the resolution there as well. I think 2048 is just fine for what we're gonna do now. One new thing they have in substance painter is this auto unwrap. It actually has an automated system to create a UV map of your object. It's still currently in beta, and honestly, it's not great. The, um, way it unwraps objects isn't really suitable for complex ones. It would be good for, say, the desk in the office that we created, or maybe even this end table. But since we've already gone through the process of UV mapping are objects in blender? We won't be using this. However, In a later video, I will go over how to use this, and we'll talk about its current limitations. All right, so that's really all we need to do for this panel. Let's just click, OK? And there is our in table Now. The navigation here is a little bit different than blender. Here in substance, Painter used the altar key to do just about everything. So you press Ault and left mouse click to tumble all to middle mouse button to pan and ault , right mouse button to zoom. They can also scroll the mouse wheel to zoom as well. So Ault and left click to tumble around. And so there we can see our object. We can come up here and change from three D, only 23 D and two D, and you can see the UV map here. I'll go back to three D here, but the first thing we need to do when we bring any object into substance painter is to bake are textures and from those baked textures. Substance painter uses all that information to apply all the materials that were going to use. So if I come over here to the texture set settings by, click here and I scroll down. Here is the bake mesh of maps. And here is where all the texture maps are going to go. These air all empty slots where the normal map, the I D map, the ambient occlusion map, etcetera are all going to go once we bake are textures. So to do that, let's just click bake mesh maps. And now here, once again, let's change this output size to 2048. This will just dictate how we're viewing it here once again when we export our final textures weaken set the output size there as well. Another thing we should do is probably set the anti alias ing, and that is right down here. We can change it from none to any of these. A sample rate of two by two will be just fine without slowing down our computer here. And the last thing we should do is come over to the I. D. Tab right here and change this color source from material color to Vertex color. Recall that we created those vertex paint colors in blender so that substance painter would know how to differentiate one material from another. And we'll see how we use that here in just a moment. So with those three things done, the output size, the anti alias ing and the I d. We can now bake our map. So I'm just gonna click bake in table mesh maps. Here we go. As it does this, you can see the UV map underneath here with the checkerboard pattern. That's substance painters own checkerboard pattern that it's using. So now that we've baked all those texture maps, we can click OK and you can see them over here now, populated in those slots. All right, so I'll go ahead and scroll back up. Go to the properties panel. Now. Remember how I said that materials and blender translate to texture sets here in substance painter. Here we are. Here. Here is the list of texture sets and for every texture scent, we're gonna have a collection of texture maps, output for us to take into blender. So to reduce the number of texture maps we need to deal with once we go into blender, we wanted toe Havas. Few materials here as few texture sets as possible here in substance painter. All right, so now let's do is begin adding materials to this layers panel. We get a blank layer here for free, but we can just go ahead and delete that. So the first thing let's do is let's create that metal texture on the legs of this table. Let's come down here to the materials panel right here and in the search field, all type metal, and this is what we get. What I'll use for this, I think. Is this steel painted right here? If I click on this and drag it into the layers panel and drop it. Look at what happens. I get it over all of that. So what we need to do is be able to break out or separate. Are different parts of the model using those vertex colors To do that, I'm gonna create groups or folders. So I'm gonna come over here to this folder icon, click, add folder. I'll give this a name or color legs, and I'll take this steel painted material and dragged into that group into that folder. Now, what I want to do is take this folder right. Click it and choose add mask with color selection. Now, once I do that here in the properties tab, I get this pick color. If I click this now, we can see the Vertex colors that we created in blender so we can come over here with the eyedropper, choose the blue, and it limits that material to just that area so you can see the power of creating those vertex colors and blender and then bringing them in here to substance painter. All right, let's do it one more time. Let's, um I'm gonna select this folder, create a new one. Call it. Ah, tabletop. And this time, let's find a wood material. W 00 d. And how about this right here, This cedar white? Yeah. Let's try that. I'm gonna take this, drag it into that folder and drop it, and it puts it on everything. So once again, we come back to that folder and right click, add mask with color selection, pick color, and choose that green. And there we go. Now, we need to do a bit of adjusting here. Play with the settings for our tabletop. And also, I want toe work on the color of the legs there. I think they should be more black, so we'll work on that in the next video. But first, I want to save this project. Let's press control as to save. And in our project folder here, let's create a new folder. And let's call it, um, s P projects right here and in here. I'm gonna change the name to end table so we know what that is. So for each of our objects, we're gonna create a substance painter, project a new file and save it in that folder. All right, so we'll continue working on the settings coming up next
78. 078 Exporting Textures Out of Substance Painter: Okay, so now let's take a look at adjusting some of these setting so it looks a little bit more like a reference image. I think what I'm gonna do first is change the grain of the tabletop. First of all, it's just too big. I'm gonna select this the actual wood texture within this group, and I'm gonna change the scale of the UV. So currently it's at one. If I click and drag on this, I can make this smaller and smaller until we get a wood grain that's a little bit more like what we want now. In addition, it's awfully rough and jagged, and I'd like to turn that off. I wanted to be just very smooth. So under the Properties tab, we've got our material section here, and these are the different texture maps that are being used currently for that material. If we turn off the height map here, you see that smooth that out quite a bit. And that's really more like what I want. Although when we get in the light here, we can see a little bit more of the texture. And perhaps if we turned off the normal map, we'd get it a little bit smoother. Let's try that. Let's turn this off and, yeah, we get it a little bit smoother. I think that's about right. So that's looking pretty good. I think for the top now for the legs. Let's come over here and open up this folder and select the material within the folder. And now we have access to this color here and currently it's a little bit too blue for me. If I hold down the shift key and then right, click and drag, I can move the lighting set up or rotate that HDR image within this scene so I can get a sense of how it looks in different lighting scenarios. So for me, this is just a little bit too blue. So let's come over here and click on this paint color, and I'm just gonna bring this Ryan over here toward the black so it's a little bit more black. I don't want it to be all the way black. I wanted just to be a little more black that waas about like that. Yeah, so let's go with that. And also I think if I hold that shift key and right click and drag. I think it's a little bit too shiny. So what I'm gonna do is come over here to this paint roughness and just increase that just a little bit. So we don't get quite as much of a shine off of that. Yeah, I think that's about what I want from that. So now that we have this done, we need to export these textures. So to export our textures, we just need to go to file export textures right here. Now, we have quite a few templates here. You can choose from all kinds of, um, output templates here, but we're out putting to blender, so it doesn't have ah template for blender at this point in time, but we can create one of our own in the output templates tab, we can create our own template for blender. But how should we do that? Well, what we can do is just find one that's close and then copy it and adjusted. So for us, I think for Blender, this PBR metallic roughness would probably be the best choice. So I'll click that. And this is what we get. We get a base color roughness metallic, normal height and a missive. Now, if we go back to blender, let me just go back to Blender a real quick here. And let's go over to the materials panel right here. And this right here is a basic material in blender. This is it's standard principle be SDF material. We scroll up here, we can see that we've got a base color, a metallic, a roughness, input normal and a mission. And we don't have a height map here. So what we can do? Let's go back to substance Painter. What we can do is remove the height and use everything else. So let's go ahead and copy this. I'll come up here to this little icon here to copy a preset. Let's do that. There it is, down here. Let's right click and choose rename and let's call this blender PBR. There we go. So now with this selected this blender PBR selected, let's remove the height right here. The next thing we need to do is think about our normal map Now. Any animation program like blender can handle normal maps in one of two ways. One is with direct X, which we have here with this green icon and the other is with open G L and blender happens to use open GL. So we're gonna need to replace our direct X with the open G L. We can do that by just clicking and dragging and dropping this right here on that tab. And we want to choose the RGB channels. There we go. So now we've switched our normal map template from Direct X to open Geo. The next thing is, I found that changing this setting right here from 16 bits to managing the normal map with eight bits plus dithering really does the best in blender. I found it really works pretty well, but what is dithering? Well, it's a process of actually introducing some noise into the image to try and reduce artifacts like banding in the image. So it's actually introducing a little bit of noise in there to try and keep out distracting patterns, if that makes any sense. So I think now we're all set. We are rarely going to muse this in missive texture set, but we're gonna leave it here in case we need it when we need it. It'll be here if we don't have a missive map in our set up over here. It'll just leave that out automatically, so that shouldn't be a problem. All right, so what I'm gonna do now it just close this window so it can reset. I'm gonna go to file and export textures. We can come in here to our output template and choose that blender PBR right there. So our template chooses the PNG file format. We can take a look at that. Over here. You can see we've got PNG files being output it, and that's fine. We can leave this on that based on output template, the size we can choose. Or we can have it default to whatever the texture set sizes that we set up the beginning of the process here. But we can choose anything, so I'll just choose 2048 again. We can choose a location for our textures. I've got a in table folder created within my textures folder. So we'll just use that and then we'll just click export. And that will export our textures. Here. You can see them. They're all done. It didn't export that in missive texture because we weren't using one But we can go over here now to the island. Put directory, Click here and there they all are. So now let's go back into blender and apply each of these textures to our material.
79. 079 Finishing the End Table and Beginning the Chair: all right back here in Blender. Let's go ahead and bring in those textures and see how it looks. What I'll do is go over to the shading tab right here and our table is selected. I'll hit the period key and what we're seeing bank here is an HDR image. You can see it here on the sphere, and it's really just ah, spherical image that's providing light and reflections so that we can see how our materials , how are textures are going to look in the scene. I'm not a big fan of the, um, blurred background here. If we come up here and pull this down, we can play with the Blur here, and you can actually see the image that's being used to provide the lighting and the reflections. I'll click here and let's take that blur. Backed about halfway, you can increase the strength of the exposure. We'll take that back to one. You can turn the HDR image here, just like we were doing in substance Painter. Put that back to zero, but I like to take the image out. I think it's kind of distracting as I'm working. So what I like to do is just take this world opacity and take it all the way down to zero. And that just gives me that basic grave background which I think is less intrusive. You certainly do not have to do that. That's just a a preference of mine. So what we need to do now is find our textures over here in the folders and what we'll do is hook them up to our material. Here, let me I grab this and just move this up some. If I hit the a key, that will select everything down here. And then I hit G and I can move this around a bit. And what we're gonna do is bring in our textures and plug them into the base color socket, the metallic, the roughness and also the normal. So let's begin doing that. Let's first ah, find our files here. So in my textures folder, I've got that in table folder and let me change this from thumbnails to vertical list here so we can see it a little better. So the 1st 1 in the list here is the base color. Let's just grab this. I'm gonna click on this icon right here and drag it straight in. And now we can connect this yellow color socket to this yellow socket here, just click and drag and drop it there and there. We've got the color on there. I'll go ahead and twirl this up right here to make that a little smaller. The next one on the list is the metallic right here. So let's highlight the metallic and grab that icon and drag it down. Now, the rest of these textures, other than the base color, are all non color images. If we go back to the thumbnails, we can see that the base color has color in it. But everything else is either black and white or this RGB. So what we need to do is change our color space here from SRG. Be to non color right here. Then we can hook this up from our yellow color socket to the metallic right here and there we go. Now let's twirled that up. The next in the list is the roughness channel right here. So let's grab the roughness map, dragged that in change to non color, and then we can take this and drag it over to here. There we go. All right. And then, lastly, we've got this. Ah, normal channel right here. So let's grab the normal map. Bring it over into here. And let's also change this to non color. However, we've got a yellow socket here and a blue socket here. We were able to put the yellow socket into the gray, but yellow to blue isn't quite right. So put let's do is let's find the normal map node that we can channel this through. To do that, you can press, shift a tow, add a new node in its under vector. And here it is, normal map. Or you can just click on search and type in normal and then choose normal map. So either way, all right, so now we've got this. I'm gonna drag the color into here and the normal to here and there we go. So now we've got our normal map on here. You can kind of see a little bit of that normal map here in the little bumps and ridges on the metal material. So that is working just fine. Let's go back to our layout tab here, and I'm gonna click here to turn on the view port shading There we go. And then I'll also just select that and press ault age and then we'll bring back everything else. So now what we can dio is select the other one here and just delete it. And then we can grab this press shift d x and move that over and put it in place. So maybe something about like that There we go now, since the texture is the same thing, the exact same thing from one to the other, just a little trick. What I'm gonna do is press rz 180 and spin it around. And now it doesn't look quite as similar from one to the other. And there we go. So now what let's do is let's work on one of these chairs. Let's just export this out and, ah, take it into substance pain or once again. So this chair has the test pattern material on it. But we should do is get rid of this and add a chair. Yet we could just call this chair one. So let's remove the material from the object. Over here in the materials panel, let's create a new material. Let's call it Ah, chair 01 Here we go. Okay. The next thing we need to do is create our Vertex colors for the different parts, the different materials that we're going to need. Selous Press Shift H two Isolated will hit the period key to zoom in. And now let's work on creating are different Vertex colors. Let's take a look at a reference image for this. Here in the Reference Images folder, I'll switch to, uh, thumbnails and let's see what we confined here. Um, it looks like here's a good image, but let's go with this when it can see the different parts here, let's open that up. No press control space bar. And so it looks like it's just too materials. It looks like Thea Feet and the legs air all one material and then the fabric on the chair itself. All right, so it's press control space again. Let's just do, um to Vertex colors. With this selected, I'll tab into edit mode and let's ah, just select the bottom part here. Let's hit the Elke for the legs and the L key for each of the feet. Let me go back to solid view here. There we go. And this here. So this is all going to be one vertex color. I'll go up here, go to edit, protects paint. I'll turn on the paint mask right here. Let's go to our active tool right here. And ah, well, we could just choose the green and press shift K. There we go. All right, Now we need is the other one. We can invert the selection by pressing control I and let's choose that blue and shift K. There we go. Okay, let's go back to object mode. We can save our scene with control s and now it's export it out. Let's go to file Export Fbx. Let's choose mesh selected objects and let's put it in the proper place. I'll put it here in my exports folder and I'll call it share 01 Here we go. Okay, so in the next video will bring it in to substance Painter
80. 080 Texturing the Chair: now here in substance painter. Let's go ahead and bring that in will go to file new and will choose. Select. I'll come over here to my exports folder. Here's that chair 01 and let's click open. Now I've got my document resolution at 2048. That's fine. There really isn't any more. We need to do here, So let's click. OK, and now here is our chair. What we can do is, of course, bake are textures. Let's come over here to texture set settings and let's scroll down and click on bake mesh maps, and I'll go ahead and have this at 2048 as well. Let's scroll down here and choose our anti alias ing at two times two, we'll come over here to the I D and make sure we've switched over to Vertex Color. And then we just click bake mesh maps. And there it goes, all right, and when we're all done with this, we can begin creating are groups that will split out the different materials from the Vertex colors. So now that that's done, let's click OK, I'll go ahead and remove this layer. Let's create a new group Let's call this legs. There we go. Now we need a metal like a black metal. Don't Lee. So about, um, well, we've got this steel painted again. We could use that again. I think that's what we used the last time. Let's give it a try. I'll click this and drag it into the group. It, of course, will once again place it over everything. Let's select the group and right click will choose Add mask with color selection. And then if we go back over to our properties tab right here, we can choose pick color, and then we can choose that green Vertex color. And that puts it just on that area. All right, let's do this again. Let's create a group. I'll select this group. And so when I create the new and it'll pop up on top, we'll call this ah, fabric. And I don't think I have really anything in here that I'd want to use. Let's see, I may have to go back to ah, substance source. I don't think that's quite right. Um, no. What about this here? Yeah, I think that might work. I had downloaded this for something else. Some time ago. But this is off of, ah, substance source. So yeah, let's try this. Let's try this. I'm gonna click here and drag and drop into that group and, well, that looks terrible. Let's Ah, right click and pick with color selection here and select that. Now let's go back and just select that one material within that folder. And let's click and drag on this scale and really bring it down quite a bit. Yeah, that's beginning to be a little bit more like I was hoping something like this. Now I feel like we may need to rotated just a bit. You see how it's kind of at an angle? So if I click on rotate, maybe I can bring it back or Ford boo. I kind of like that diagonal right there. That's kind of that's kind of nice. I like that. Um, let's work on the material for the legs real quick. I'll select that steel painted, and I think I want to make it once again a little bit less blue and a little bit less shiny . So let's scroll down. I moved the color into the black, not completely black, because there isn't really anything in the real world that is completely black. So I don't like to pull that all the way down into the kroner there to make it totally black. It just doesn't seem quite real to me. Um, so I'll go right about there and then paint roughness. I'll bring this up some so it isn't quite so shiny. And in fact, I may also I see some pattern here right in there may scroll up and increase this pattern just a little bit. So it repeats a little bit more frequently like that. Yeah, I think that's probably OK. I'll hit the F key to frame it up, and there we go. So let's give this a try. All we need to do now is export our textures. Let's go up to file export textures. Let's choose our template here. We'll go down to Blender PBR. We'll just let it pull the file type from the template and the size from the texture set. Let's make sure we're taking it to the proper place. I'll go ahead and open that Texas folder. Let's right, click and create a new folder, and I'll call this chair 01 Select folder and export. And there we go. We can open that output directory just to make sure it's there. There it is. Now let's go back to Blender and assign these to the material back in Blender. Let's go ahead and select this and we'll go to the shading tab with the period key to zoom in. And now let's work on assigning those materials. I'll hit the G key and move these over a bit. Let's go back up and go into our chair folder, and here we go. We can begin bringing these in again, so let me, Ah, bring in the base color. Select that and connect that up. We'll bring in the metallic change to non color metallic. We'll grab the roughness map. Bring that in. Look that up to the roughness. We better change that to non color. And then that normal map. We can press shift a search normal. There's our normal map. Will connect these up normal to normal. Oh, let's make this non color as well. There we go now. If we go back to the layout and let's choose our view port shading. There it is. It's a different material of course than we have on here, but I think it's kind of of that same vein. Ah, let's press all to H to bring everything back. And now what we can do is just take this chair and weaken. Delete this and then take this chair. Press shift, E X, move it over here and we can spend it around with our Z 180 And there we go. Now we've got two chairs in. We can also take this and move it over. Remember that we've got them in that other little room. Let me press the H key to hide the ceiling and you can see them over here. Of course, we can take these two and then select one of these. There we go. And then we can press control l and link the materials. And there we go. Now we've got those chairs in there. All right, So what else should we do? What should we do next? Um, let's do something with a few more materials on it this time. How about this coffee machine? Let's take a look at this. This has a fume or materials on it. So in the next video, let's begin assigning the vertex colors so we can take this into substance painter
81. 081 Preparing the Coffee Machine for Export: Now I'm thinking about how we should texture this coffee machine. I realize there may be a few issues that we need to deal with first. Before we take it into substance painter. We need to think about a couple of things. So let's go over to the U V editing tab here. I'll first press shift H to hide everything and then let's go to UV editing. I'll select everything with the A key and hit the period key. Now, if we look at this UV map, it seems to me that things are very close together here, the things air right on top of each other. And that could be a problem with all of these different, smaller parts. When substance painter lays down its colors on the UV map, it usually needs a little bit mawr room around the U. V s than this. So I think what I should do is probably repack this and then increase the margins between the UV island. So let's hit the a key here and go to U V's and let's then go to pack islands. So if I click that they move apart just a little bit because I've got this margin said at 0.1 Usually it's 0.1 and that's our default, and that's a little bit too close. So let's go ahead and go back to 0.1 and that spreads these out just a little bit. Now, the second thing we need to think about is this panel right here. Let me hit the three key and go to face mode. This panel right here, we're gonna wanna apply a texture. Apply an image. If I go back to my layout view, you can see here. We've got this screen image on here. I've taken a picture of a screen like that. Let me, um, go to image open and ah, I've got it in my images folder, I've created an images folder that just has these two images. I think I like this one that doesn't have so many colors in it. I kind of reduced the saturation here just a bit, So if we take a look at this, let's press control space bar. So this is the image that I want to put on that screen. And to do that, or at least to make our lives easier I should say it like that because there are lots of different ways to do this. But I think to make our lives easier Let me go back to that coffee machine here. Here it is. There we go to make our lives easier. I think we need to split out this face, this UV island from this material that will be the coffee maker. So let me show you what I mean Here. First of all, let's get rid of this UV test pattern. Currently, of course, we've got in our materials panel this test patterns. Go ahead and get rid of that. And let's create a new material and call it coffee maker or machine. However, we want toe title that that's fine. So now we've got that material and within that material, we've got all of these faces assigned to that one material. However, what I like to do is take this one face right here, created a new material and assign it to that. Now that new material, of course, will be a new texture set in substance painter. And I think that's what will make our life a lot easier as we try and apply that image texture. So let's go ahead and create a new material. Let's call this, um, coffee machine screen. Let me add an e here. And then what I want to do is click on a sign right here. While that faces selected, I'll click a sign and there we go. So if we de select that and with that material selected, if I choose select, you can see it will choose that face. Okay, so now that we've done that, let's re UV map this so that it's using as much of the 0 to 1 space here as we can. So what I'll do is I'll just press you and unwrap and there we go. So we've got this material here, and if we choose select, you can see all of the polygons or all of the UV islands. I should say, here in the UV map, we de select this so like that and choose Select. Now we can see what UV maps are associated with that material. So that's gonna help us once again when we go into substance painter. All right, now, let's go back to the layout panel here and let's assign our Vertex colors. I'll go ahead and tab into edit mode. Let's go back to solid mode here, and I'll hit the L Key to select the front panel here. Now it also select this face here, Weaken de, select that we can go to face mode and shift. Click that to de select it. And that's fine, because that's going to be part of the other material. Let's now come over here to Vertex paint, Turn on paint mask and we can come over here and let's just choose this green and pressed shift K and that assigns that color to the selected area there. All right, let's press all day to de select that. And now what about this back part? Let's hover over this and press the l key to select this whole back part of the coffee machine. Let's select that blue and once again, shift K. All right, Bolt a to de select. And, um, let me go back to edit mode and just take a look at this. What else do we need to do? Um, it looks to me like this whole piece is all one piece, so yeah, that's the way we built it. So let's give this a vertex color, and I think we also need it to be the same color for that bottom panel. So let's hover over this and press spell now, as we talked about before. That grid is gonna be its own texture, so we'll give it its own Vertex color. But now let's tab back into or excuse me, go up here in select Vertex paint. And now let's create a new color. I'll move this around to here, let's say Plus, to add it to our color palette and let's press shift K Tau, Add that, There we go, this piece up here Should that be the same? I think that should probably be the same kind of plastic. Is this here? So let's just select this as well and assign that same for text color. There we go. Um, this is its own material, So let's create a new color. Let's world this down to here. Add it to our palate. Let's hover over this with the l key shift K. There we go. Um, it looks like our panel here, or that frame is its own kind of material. It looks a little different than what we have down here. It looks more like a rubber to me. I could be completely wrong about this, but let's go ahead and give it its own material. I'll hover over it and press the L Key. Let's give it a new color. Let's spin that around. Orange added to the palate shift K. And there we go. What else? Oh, we've got feet down here. Perhaps perhaps we can make these the same color or the same material as that frame kind of , Ah, black rubber. So let's let's just select these as well. I will have rowed over each of these and press the L Key. And then let's best shift K. And that'll give those the same material there. The screen we don't need to worry about because it's going to be its own material. And there's only gonna be one texture that we need to apply so we can bake textures based on material for this rather than Vertex colors. And I'll show you what I mean when we get there. But let's also do this one down here. Let's ah do its own color. Let's swing this around to the yellow, get the plus toe added to the color palette that's hover over this and press L and then shift K. Okay, so I think we now have all the parts with a vertex color assigned all parts that is, that are a part of this coffee machine material. All right, so let's ah, go back to object mode here. Let's make sure this is selected. We'll go and save my scene again and let's go to file Export Fbx. Let's choose mess and selected objects and then in our Exports folder, let's give this a name. Let's call it Ah, coffee machine and export that fbx All right in the next video will loaded into substance painter and begin our texture.
82. 082 Texturing the Coffee Machine: and now here in substance painter. Let's go to file New will go to select and let's select our coffee. Must seen Miss tell that Click Open will go with 2048 let's click. OK, now, here's the coffee machine, Um, and notice up. Here we have two texture sets, the coffee machine and the coffee machine screen, and we will, of course, have to apply textures to each of these materials in blender. And that's why try and have his few materials coming into substance painter as possible so that we don't have to spend a lot of time dragging and connecting textures up to multiple materials. But for this instance, I think it's a good thing to do so let's begin by adding some materials or textures, too. Our coffee machine here in the coffee machine material. Let's first of all, come over here to the texture set settings. We'll scroll down and we'll click on bake mesh maps. I'll change the output size to 2048. I'll scroll down and change the anti alias ing to two by two. And of course, we want to use our vertex color for the coffee machine. Notice that we have a texture set pulled down here because we have multiple detector sets over here. But for this particular one, we want vertex color. Now we have a bake all texture sets or bake coffee machine mesh maps. And that's what we want to do here. We just wanna work with one material or one texture set at a time. So I click here and there it goes. All right, let's click. OK, we have all of our baked maps over here. Now, if we go over to the coffee machine screen here, you can see there are no baked mesh maps for that. We do need to go ahead and take thes as well. Ah, click Bake. And for this we'd really don't need 2048. We could probably do with 5 12 Let's just go with 5 12 Once again, I will use that to buy two anti alias ing. But when we go over the i D. I want to keep it material color because we only have that one material. We have no vertex paint on the screen, so we're gonna use our material color. All right, so let's click. Bake coffee Machine screen right here and now That's done OK, so we have both texture sets with our baked texture maps. That's good. Now let's go ahead and delete this layer that we have. And let's begin thinking about what we want to do here. Let's begin with this front panel. Let's do that. I'm gonna create a group. Let's call this Ah, well, front panel. And, um, I'm gonna type in metal cause it's kind of ah, metal color. And I think we've got this iron shiny and it has some striations in it. So let's give this a try. I'm gonna click this, drag it up to here. Yeah, you can see those. Ah, lines or striations in there. We'll turn that with the rotation. But for now, let's right. Click on our group. Choose add mask with color selection back here in the Properties tab will choose pick color , and we'll grab that green right there. Okay, now let's grab the iron shiny material and in the rotation. Let's trying 90 degrees. Yep, that's the way we want it, all right, But it's a little too strong, I think lets us scroll down here and see if something under the finish will allow us to reduce that. I think this brushing intensity. Let's pull that down. Yeah, that's about all I want that I don't want a whole lot just a little bit. There we go. Okay, so that looks pretty good. Let's now select that group. Create another one and let's work on the back of the machine. Let's do that for that. I think what I'll do is use that steel painted and then change the color again. But let's drag that up to here. Drop it onto there. Let's right click add mask with color selection and pick that blue. All right now, I'll me shift right click to move that light around. I think I want to make those bumps a little bit smaller, so I'll select the steel painted. And if I scroll back up in the Properties tab here, I can increase the scale of the U. V s. That makes those quite a bit smaller like that. Let's change the color. I want toe. Bring it over into the gray. There we go. And, um, what else I feel like? Maybe that's too shiny. Let's Ah, increased the paint roughness here. Let's bring that up so it isn't quite so shiny. There we go. Think that's a little bit better. Okay, What next? In fact, you know what? Maybe let's ah, bring the shiny nous of the front panel down a bit by increasing the roughness as well. Or click and drag here, drag that happily shift right click and move the light. Bring it up just a little bit more. Kind of like that. Let's say Alright, let's try that. How about this black part here? Let's begin doing that. I will select group create a new one. Let's call this. Ah, let's just call this black plastic because that's really what it is. And for that I will grab a plastic material. Here's a plastic glossy weaken, then reduce the glossies. But if we drag this up into here and drop it now, let's add the color selection. Pick that color there. Now let's work on this. So we want to take it to pretty close to black, right? But not all the way. I'm not a ban of that Jet black. Something like this. Let's reduce the shiny nous by increasing the rough ness. Let's do that. There we go see what else we can do here. Um, it looks pretty good. I think I maybe you want it just a little bit darker. Let's take that down just a little bit. Yeah. So it's a little darker than the back panel like that. All right. Ah, we need this piece right here. Let's do that. That's kind of a chrome, isn't it? Let's see if we can find a chrome. Um, not sure I have one in here. We can go find one in our substance source. If I go back to that substance launcher here, I can choose substance source and ah, weaken, type in chrome. Let's just do that chrome. And here we go. We've got a chrome here. We've got a plated clean. Let's try this clean. Let's try that. I'm gonna click here and it will send it straight into my substance painter project. And then we go back. Now if I type in chrome Well, here's here we go. Here it is that plated clean. Let's try that drag. Read into here and let's pick the color right there. And there we go. So that may be a little bit too shiny. Let's take that. And let's increase the roughness just a bit. Not a lot. Just a little bit. I think that's pretty good. All right. So, um oh, the material around this I had said that might be a rubber material. Let's give that a try. Uh, let's call it rubber frame. Let's see what I have in here. Oh, yeah, we can try this. There's a plastic fine plastics. Well, let's try this one right here. I'll drag that up and right click. Pick the color selection. Let so it's this frame right here. Okay, Let's Ah, zoom in a bit and take a look. That's a little bit too bumpy. So let's grab that material. Let's increase the scale in the UV. Looks something about like that. Yeah, that's actually not bad. Me? Move the light a bit. Yeah, I kind of like that, actually, Um and it's It should also be down here on the beat because we made that the same vertex color. Okay. And, um, for this thing right down here, we need some sort of Ah mesh for that. Let's go take a look at that in, um, substance source. So I'll go back to that substance source in the launcher window and let's type in mesh and ah, well, this might not be bad. That's Ah, that right there that black may not be bad. Is there anything else in here that we think might work for us? These air? A little bit too elaborate, I think. Um, yeah. I think that one up at the top might do it. Let's let's grab this metal mesh ob long to go back here. Take away that search term right here. And what did we call it? Ob along. Here we go. Let's take a look at that. Yeah, that's it. So let's create a folder. First. We'll call this grid. I'll take this and drag it in. Wow, the here we kill. Ah, let's right click choose, add mask with color selection and grab that. Now. There are a couple things we need to do with this. Let's first select it. Ah, let's decrease the size by increasing the scale. Let's turn it 90 degrees right here. There we go. Let's also make it black. Let's see if we have select and apply a preset let's see plastic grid. That's kind of what we want right. Let's do that. Oh, yeah. Ah, but it's turned again. So let's go back up. We need to take that back down to zero. Let's do that. There we go. Hey, that's not bad. Yeah, I kind of like that. All right, So we have all our materials on for the coffee machine material. The next thing we need to do is work on adding our texture for the coffee machine screen. Right. We've got our whole layer stack for this that we can use. Just like we've used the lair stack over here for this texture set. So in the next video, we will bring in our texture and we'll add it to our screen.
83. 083 Adding an Image Texture in Substance Painter: so, to add a texture to that screen, let's go over to the screen texture set, and our layer stack is empty. So let's go ahead and add a fill their right here and in this Phil there, we're gonna put our texture. I'm gonna come back over here to the shelf and right up here we've got this little icon. If you hover over, it's called Import Resource is. So let's click on that. And what I want to do is add a resource. All click add resource is, and now I can browse to the folder with the texture in it. Here we go, on my images folder. I'll grab this coffee screen image, P and G, and then let's just click open and then we have to define what it is. So we've got the image here. We need to tell substance painter that it's a texture right here, and also we need to tell what we want to do with it going forward. Do we want to add it permanently to the shelf? Do we want to add it just to this session, or do we want to add it to our current project every time we open this particular project, and I think that's what I want to do. I want to just click that so it comes back every time I happen to open this project. All right, so let's click Import here and here it is highlighted. Now notice. Substance painter has added a search field. Four textures. If we come over to our textures here on the shelf, you can see it's in here is Well, all right. So what do we do with this? We don't drag it straight over here onto the fill there. We actually drag it down here on the base color of that fill their So within the properties tab down here, we just click this dragon and drop it right on the base color here. All right, so there we have it. Now there's a problem. Let's take a look at it. It is upside down s so we need to deal with that. Let's come over here to the rotation and type in 180 and that takes care of that. Now, we also need to adjust it with the offset. We've got X and y here, so maybe I'll drag the why down just a bit like this. And there we go Now we've got it in our screen and that's that's pretty much what I wanted . The only problem I see here is that in the image we've got a lot of these reflections, reflections of the lights and of the surroundings. And since we have that, I don't want reflections on the material itself, right? You can see that's kind of shiny. So what let's do is let's turn off a couple of these here. First of all, we don't need the height. We don't need the normal. And frankly, I don't think we need the metallic. Let's go ahead and turn that off as well. It's the roughness that's gonna turn off or reduce that shining. So let's just click and drag and drag this up. I think I want it pretty much all the way. So the Onley shiny nous that we're getting is what's actually in the image. All right, so I think that is pretty good. That's what I want for that screen right there. All right, so now that we have are two materials with the various paint layers on them, what let's do is go ahead and now export our textures out. Let's go back to the coffee machine, Texture said here. Make sure we have everything we want. I'm just going to spin around, make sure we have all our materials on here. I think we do. All right. So now come over here to file export textures, and we want to change to our blender PBR, the one that we created. The file type is fine based on our output template thesis, eyes of the texture. I believe I want this to be 2048. I believe that's what we chose up front. But I'll go ahead. Just make sure. Let's tell it where to go up here to the Output Directory I'll go into by Textures folder. Let's create a new folder in here and let's call this coffee machine. Now you can see over here we have our different texture sets. We can choose this to see what's going to be exported. You can see in the coffee machine screen. We've got the same thing. What I'm gonna do is just export one at a time, all right? I'm just gonna turn this off and let's export just the coffee machine texture maps. First, I'll come over here and click export. And there it goes. So there we have them in our folder here. Now, what I'm also gonna do is just create a folder in here and call this ah, screen. And then when we go back, what I'm gonna do is re direct where this is going. I'll turn this on, turn that off and let's redirect where this is going and go into screen right there now for the coffee machine screen. I believe what I'm gonna do is change this to 5 12 which is what I believe we did before. But I'm just gonna ensure that that's what it's gonna be. Now let's also go back into that coffee machine screen, weaken, turn off things we don't need. So the in missive won't come through because we never had that. Even in our list. Over here, we don't really need a normal map or a metallic weaken. Just go with the base color and the roughness. So now let's go over and click Export. There it goes, and there's our to texture maps. Now let's open up that output directory. And there they are. If we go back one. There's the textures for the coffee machine proper. All right, now, let's go into blender and see if we can hook these up here in Blender. I'll go over to the shading tab right here. I'll click period key to zoom in tow. Frame that up. You grab all of these and move them to one side. Let's go back up in the directory structure and find our coffee machine. Here it is. So what we can do is bring in our base color. Let's click that drag that one in. Oh, and look at what I did. So let's go back over here to the materials right now, and currently I have my screen material selected, but I've been bringing in a texture from the coffee machine as a whole. So that's not correct. Let's grab this and hit the X key and delete it. Now let's switch back to the coffee machine. Now. What we can do is grab this and bring this in and add that to their now that looks a little better, so we have to be sure we've selected the appropriate material before we begin bringing in our textures. Let me grab this non color metallic and I'll grab this non color and to the roughness socket right there. And then let's grab the normal well, press shift a search normal. Choose normal map. Drop that there. Color. Oh, let me switch this toe Non color. Normal to normal. And there we go. Okay, so now what we need to do is switch over to this material here. There we go, and let's bring in our screen. So let's open up that screen, go to the base color. Drag that in, drop that here. And then let's grab the roughness texture map and let's hook that up as well. Change it to non color right there. Okay, now let's go back to the layout tab. Switch to our view port shading, and let's bring everything back. Let's press Ault h. And there we go. There's our coffee machine. Yeah, that looks pretty good. So I think you're probably seeing a pattern here of how to, ah, prepare a blender object for export to substance painter, using both vertex paint and materials, if need be. How to bring the object into substance painter. Apply textures based on those Vertex colors or material i d. And then bring them back. So in the next few videos, I'll just do a few more of these objects. Really, it's just lather, rinse, Repeat. But there are a couple of other little techniques and tools that we might be able to cover along the way, so in the next video will continue on other objects to get the text during done.
84. 084 Creating the Vertex Colors for Hanging Lights: We've talked several times about the in missive, texture map in substance painter and how we're using it in the Blender PBR template. But it hasn't really been used when we've been exporting, Let's go ahead and take a look at an example of how we would use that to do that. I think we want a light fixture with any missive bulb in it. So let's choose one of these hanging over the kitchen counter here and I'll press Shift H to hide everything. And now what let's do is let's go over to our UV editing screen layout and let's select that with the A key and frame it up with the period key. And here, in this view, we can see the material. So I'm gonna do is get rid of this test pattern and create a new material. Just click the minus new and let's just call this hanging light. Okay, so now we have that on our object. What I also want to do is create a bulb object that we can put on a missive texture on, so I'm gonna tab into edit mode, and I'm gonna select a point and a press shift s too to move the cursor there. And then, actually, while I have it in edit mode, I'll go ahead and create the object like this so it automatically becomes part of the current object. I'll press shift a and let's create a UV sphere. There we go. So I'll hit s and scale that down quite a bit like that. I'll turn on my move gizmo, and let's bring this down into the light. Maybe about like that. All right, so there is our new bulb object with this selected let me go up to object and shades smooth Just so we have that smooth this well. And if we tap into edit mode and select everything, you can see that this bulb object this fear has its own UV map. However, when we select everything it overlaps and overlapping U V s. When we take him into substance painter, it's going to cause horrible artifacts. So we don't want that we really never want our U. V s to be overlapping within the same material we had overlapping U V s in the coffee machine, but we separated them out. We assigned those overlapping U. V s two different materials. So for our purposes here, let's come over into the UV editor and hover over this and press the L key. I'm currently in the face select mode here. So then I'll just hit the S key and scale it down and move it over into a corner where it isn't going to be overlapping anything. Right? So we avoid that problem of overlapping You've es within the same material. Let me just go back real quick and take a look. That coffee machine, Let's press Ault h bring everything back. Let's like that coffee machine shift h. And if I tab into edit mode and hit the a key, you can see that this face right here, this one let's see if I can get it without No, I can't really get it without selecting something over it. Let me ah, hit the three key And here's that face. But it's part of its own material. We've taken this face and we've assigned it to this material to a separate material. This one, however, right, if we hit select that includes all of these. If we select everything yes, there are overlapping U V s. And that could be a problem if we were dealing with once again all of our faces of the object assigned to the same material rather than split up between multiple materials. All right, so just wanted to to make that point. All h, let's come back over here. Select this shift, H period. Okay, so now that we've taken our U. V s and made sure they do not overlap, let's work on assigning our vertex colors to this. I'm gonna go back to the layout view here and let's begin working on our Vertex colors. I've brought this image or these two images in just so we can kind of see what we're dealing with. It looks like we can use the same material, the same vertex color for the main part of the light here, the stem or longer part here and also up the very top of the base. And then we have these two areas that are kind of chrome you can see here and here. So I think that's what I'll do is just use to vertex colors for these two parts, and then a white color should be in here, so I'll use 1/3 Vertex color inside and then 1/4 1 for the bulb object itself. All right, so let's select the object. I'll go in to edit mode and let's begin. Let's begin with, um, the inside here. I'll hit the L Key to select this, and because we've got seems selected for our select linked here, it only select up to that seem. If I shift, click that to turn it off. It selects the whole thing. So I'll click here again, and that selects just to that scene. Now. I don't know that I want the white part to go to the rim. Here, let me see if I can press control minus, and that will decrease the selection so that it does not include that rim there. All right, so now let's go over to our Vertex paint. Let's turn on the paint mask. You can see that that's selected here. Let's go up to our active tool tab. I'll scroll down and let's begin here at the beginning. It's like the green and press shift K. Now we don't see anything, and that's because we need to switch here from material preview to solid view right there. All right. Let's go back to our edit view. Let's press l to select this part, and we've got a couple of issues here. One, we do want it to extend on into here, but we don't want to extend up into here. So I'm gonna press control minus a couple of times. Bring that down. And also, it looks like I'm gonna need to expand the so impressed all shift and click between two bases and all shift click here as well. So that's gonna be our black materials. So we need a new vertex color for this. Protects paint. Ah, it's like the blue Shift K. And we should also do that up here. So let's while we're here on that blue, let's select this. I'll hit the l key and ah, well, let's go ahead and add that protects paint shift K. Okay, let's go back to edit. And I'm gonna all to click between these two faces and then press control plus and expand this selection on down to Yeah, here on press control, plus one more time. There we go. So now let's go back to our Vertex paint shift K. There we go. So we've got all the blue done or what's going to be a black material. All right, let's work on the chrome here. All click between two of the faces and thes as well. All right, Now that we've got that, let's go back to Vertex Paint and we're gonna want this pink here. Shift K. There we go. And let's go up and get this up here. We'll go back to edit, click, and let's also grab these years. Well, okay, so let's go to Vertex Paint shift K. All right, that took care of that. Uh, I'm gonna turn off paint mask for just a moment so we can see those colors a little better . Yeah, so that's what we want. Now we need the bulb. So let's go back to edit. And, well, I think we can just hover over this and press the Elke. There we go. That'll work. Let's go to the red color shift, K. And there we go. All right, let's go turn off our paint mask just so we can make sure we have everything. I think that's good. So now what we need to do is export this out. I'll go back to object mode with this selected Let's go to file Export and FB X now in here , we want to export just the mesh. Just the selected object. Let's put it in our exports folder. I'll call this hanging light and there it goes. Okay, so in the next video, let's open up substance, painter and begin texture in this.
85. 085 Creating and Applying an Emissive Texture: here in substance painter. Let's now bring in that hanging light and we can work on applying an a missive texture map to that light bulb. So let's come up here and go to file new Let's Click Select and let's choose that hanging light Fbx I'll click OK, and there it is. OK, so now let's come over here to the texture set settings and let's scroll down and click on bake mesh maps. Here I'll go ahead and choose 2048 again. I'll choose to buy two for the anti alias ing and in the I D. Let's make sure and change it to Vertex Color. Now we click big hanging light. There it goes. Okay, now that we've got our mesh maps baked, let's now come back and begin applying our materials so I'll get rid of this layer for now . And let's create a new group. Let's call this ah, light main. So this is going to be that black material. Let's go to metal. All search for metal in here and I think I want that steel painted again. That's really been a good go to material, so let's drag that up into the group. Let's right. Click on the group and choose Add mask with color selection. And let's choose that blue color. All right, so that splits that up. That's good. Um, that's not bad as it is, but let's go and select this. And, ah, let's change the color. I'm gonna drag this color over to the black, bring it right down. Maybe about right in here, and that looks kind of good. I think I'd like to reduce the scale here on the UV. And when I say reduce the scale, I guess I should say, increase the scale on the UV. So those are a little bit smaller, but I also don't want them quite as big. I think I'll scroll down here and under the technical parameters, we've got this height range. I can take this down, Shasta little bit, but isn't quite. It's prominent. Yeah, that's pretty subtle, but that's that's kind of what I want. All right, Let's Ah. Now look at these little chrome pieces. I'll create a new group right over here, and let's call it chrome. I will search for chrome in here, and we've got this, um, chrome plane or excuse me plated clean that we downloaded earlier. Let's go and use that. I'll drag that over here and then right click. Add mask with color selection. And let's pick that color right there. Ah, I think that's pretty good. I'd like the color to be a little bit lighter. Let's do that. It's not bad. Okay, um, the inside. We want that to be white. It is kind of white now, but we actually need to apply a material to it. Let's select that and create another group. And let's call this light inside. I think for this that steel or ah, painted steel again steel painted again. I think. Let's do that. And then let's isolated to just that vertex color that green. And also let's change the color toe white. I'll just drag this over and just all the way up, and I don't think I want a height map on this summer. Turn off height, and also I think I wanna increase the scale on the U. V s like this pretty high. There we go. All right, so now that we've got all of those in, let's think about the in missive texture for the bulb. Let's now select this group and I'm gonna create its own group here. I'll call this job and let's now I think that shiny plastic would probably be good for this . Let's find that there it is. This plastic glossy. I'm gonna take this and drag it into here and let's isolate it to just that vertex color right there. Let's change this to a white right here. Now what we need to do is let me select that again. Here we go. Now we need to do is add une missive channel here to the material itself. We've got color metal, rough, normal and height. We need to add one more. We need to add that in missive channel. So to do that, we need to come back over here to our texture set settings. Knowing you scroll up here to this channels area and notice. Here we have the same texture channels that we had here in the properties panel. Right. So what we need to do is just click on this little plus right here and add and a missive texture right there or channel I should say now that that's here. If we go back to the properties. There it is right there. And if we click on that, we turn it on. But we still need to adjust the actual in missive color, and that's done with the value here. So if we take it all the way over to the gray scale and adjust this value, you can see we can turn that in missive quality on and off with the value. So I don't think we need it quite that bright I might bring it down to about right. I didn't hear. I think something like that. There we go. All right, so now we've got the materials. Four are light and the e missive texture on that bulb. Now let's do is let's go ahead and export this out first. I should probably save the file a press control s and here in our substance painter projects. Let's go ahead and call this hanging light. There we go. And now let's export out our textures on Go to export textures. Um, let's change our template to blender. PBR right here will browse to where we want it to go. I'll put it in my textures folder will give it a new folder in here and call it hanging light. There we go. Now, if we look at this here, we can see that we've got the the missive texture map in there. You can see over here in the list of exports. It's here. So what let's do now is let's go ahead and click Export. And there it goes. And there's that in missive texture there that's been added to the rest. Let's click on the open output directory button and we can see right here. There's are in missive texture. All right, let's go hook it up in blender here in Blender. I'll go over to the shading tab. That's it. The period key. We've got our materials selected here. Let's now go up in the hierarchy to find are hanging light folder and let's start bringing these in. I'll bring into the base color right there. The next one in the list is the metallic. Bring that in. Let's change it to non color. Next one is the roughness. Let's grab that. Bring that in also non color. We've got ah Thean Missive channel. Here. Let's grab that texture. Switch it to non color, bring that in right there and Then let's grab the normal map. Bring that in non color as well. Shift a search. Normal. There's the normal map. Let's drop that there and connect them up like that. Now, if we tumble around here, you can see we've got that glowing a missive light in there. If we unhook it and see There it is. We took it back. There it is. All right, so let's go put it in our scene. Let's go back to the layout view. Turn on the material preview Ault H to bring everything back. And what I'd like to do is just duplicate this because we've added a new object to each of these. So all I want to do is just press shift D and why, and move it over about to hear, select that other one. And let's delete that that grab this one shifty. Why? Let's move it over into here about like that. Let's select the other one and delete it. And there we go. So now we've got are hanging lights with the in missive texture map on it, and what we'll do when we actually get to the lighting of the scene as well. Add little spotlights or point lights in here to illuminate the scene, but will also have that glowing bulb to give a sense that that's where the light is actually coming from.
86. 086 A Brief Discussion of the Direction of Normals: the next subject I'd like to work on is this chair, and I think it's gonna provide a couple of issues that we haven't dealt with before. I'm gonna come in here and just grab this chair. I'll hit the period key and move into here and with this selected all press shift H and hide everything else. Now, there are a couple of things. One is this, um, semi transparent mesh on the back of the chair. How are we going to create a mess that we can kind of see through? The other is, Look at what I've done down here. I forgot to mirror this piece over to the other side, and I think that's gonna provide, um, an interesting issue as well. So I want to deal with both of these. They're actually related in a way. First of all, I think before I do anything like, um, adding vertex colors, what I'm gonna do is mirror this piece over and to do that. I think what I'll do is let me go back to salad mode here, and I'm just gonna grab this edge right here, and I'm gonna move it back. All right, so I want a mirror, This piece over to the other side. I want to duplicate it and merit. Now, before we were using the mirror modifier, right? And if I added a mirror modified to this, it would mirror the entire thing. And that would cause problems as well. So we don't want to do that. What I need to do is create or find a point around which it can be mirrored. So what I'm to do is just select these faces around this tube and press shift us to and move the cursor there. Then what I'm gonna do is change from median point to three D cursor up here. Remember that we can also hit the period key to do the same thing. Then what I'll do is hover over this and press the L key. And you can see there's our pivot point. So now, to mirror a knob jet without the modifier, we can, of course, press control em. So what I'm gonna do is press shift d enter to duplicate press control em, and then I'm gonna press the X key to mirror in the X axis and then hit Enter. All right, so that's been mirrored over. Now I'll select these two edges here and here, press control E and bridge edge loops. And then I can remove these edges so I'll just like this edge in this edge right here. Press X and dissolve edges. So there we go. Now that's been recreated, but it's a little bit off here. It looks like this right here. Let me just grab this in this and I'll just move this back just a little bit like that. But now that that's been done, there's going to be an issue, and I want to just point that out before we go any further. When we take this chair into substance painter, we're going to see that this part back here behind the seat of the chair is going to be invisible. And that's because it's just a single plane, and we are at the back looking through the back side of the polygons because polygons have a front and a back. And when you take them into a program like substance painter or into a game engine, you're only going to be able to see the texture, the surface of the polygon from the front from the back. It's going to be invisible. You're just gonna be able to see right through it. Now, you would think that would be a good thing, since we want to see through this, In a sense, it is. But that's not really what we're looking for here. We're gonna use a texture with an Alfa Channel. But my point is, let me tap back into edit mode again, and I'm gonna bring this menu down right here and all the way down. You can see these buttons called normals, and if we turn this on, I can see there is a lot of blue lines coming out of a lot of polygons. Here, let me reduce the size of these. It's currently at 0.1. Let me take it down. 2.1 Okay, Now look at the difference between these polygons here that we have the normals which indicate the front of the polygon coming out right down here. We have these coming out, but take a look at what happened over here. They're not coming out over here. In fact, if we get all Z, you can see they're actually going in. So we're seeing the back of the polygons here. And what that means is, when we take this into substance painter, this half of this piece will be invisible. Just, like appear. Look at this. The front of the seat, the normals air coming out this way. But in the back, you can see they're not so anywhere. Where the normals are not facing out is actually going to be invisible. Well, we don't mind it for this, but what about this thing down here? What about this part? How do we flip the normals out? So they're going in the right direction. Well, what we can do is weaken once again, press the l key to select all those faces. And we can come up here to mesh normals, and we can re calculate the normals. So they're facing toward the outside. So we click here, and now those normals are facing out. That's what we want. All right, so let's ah, come back to this menu. Turn this off. There we go. Now let's work on our Vertex colors. So what I'm gonna do is go to object mode and then go to Vertex paint and then weaken tab back and forth between edit and Vertex paint. All right, so let's work on, um this here, let me turn on paint mask. Let's ah, hover over the seat and press the L key will go up to our active tool tab here and let me go to the green and we'll produce shift k and we go, um, let's do the back of the chair here, press salt A I'll hover over this press the l key. Let's go to that blue shift K. And it looks like we've got pretty much the same color on most of the rest. This looks like a different type of material than this, but pretty much everything else is all that black plastic. So think I'm just gonna go through and hover over and select all of this with the l key. Ah, select this and this and then down here. Probably want to go through and get all of the wheels here and this one. And then let's ah, go over to this color press shift K. There we go. Oh, and guess one more color here. Let's hit the l key here and here. And let's do the red for this one all right. I think we've got that taken care of. Yeah, that looks pretty good. Now let's go back to object mode and let's export this out. Let me go back and change this toe median point and ah, let's go to file Export Fbx. Choose the mesh object type selected objects only. We'll open up our exports folder here and we will call this share, too. And there it goes. So now let's go over to substance Painter and I'll bring it in here. Go to file new select Let's choose chair too. Okay, And there it is. So now you can see kind of what I mean here the front of this part of the chair Weaken, See? But if we spin around its invisible And that's because, as I said, we're seeing the back of the polygons. Let's go ahead and bake our textures. Big mesh maps Will ah choose 2048 for this once again, two by two anti alias ing and will choose Vertex color and bake. All right, now that we've got that baked out in the next video, we'll work on creating the materials and see if we can get that see through mesh on the back of the chair.
87. 087 Using an Opacity Channel in Substance Painter: All right. Well, let's begin with that mesh back of the chair. I'll go ahead and delete this and let's create a new group. We'll call this Ah, chair mesh, I guess. Let's do that now. Of course, if we'd spin around, we can't see it because that's the back of the polygons. And usually that's a problem. But when we're gonna add something like this with an Alfa Channel, that should be okay. Let's give it a try. I'm gonna first go to substance source to grab a material for us. Let's do that. So here I am in the substance launcher and I'm gonna choose substance source. Now I think there's a material that I've seen. I'm gonna type in net and right here, this car synthetic net. I think this had probably worked pretty well and noticed from the images. It's got an Alfa Channel. You can see through the holes, and that's that's what we want. Let's go ahead and download this to substance painter. And if we come back in here Ah, I don't see it. So let's type in net. And here I think this is it. Yeah. Car, synthetic net and notice. Here we can't see through it. Let's Ah, drag this over and drop it here and then I will isolate it by color selection right here on that blue. Let's select the material and increase the scale. So it's pretty small like that. I think something like that. And if we spend around, we still can't see our material. We can only see directly through that. But the main issue here is we can't see through the holes. It's blacked out here. So how do we fix that? Well, remember of when we were dealing with the light bulb? We added a new missive channel for this. We need to add a new opacity channel to be able to see this, to be able to use that Alfa Channel in the material. So with this still selected, let's come back over to our texture set settings and here in channels. Let's go ahead and click on the plus and we'll choose opacity. And there we go. Now that hasn't really done much for us yet, and that's really due to how we're viewing this. Currently in substance painter in early virgins of substance painter. There was another tab here, and we can find that by going upto window and views this shader settings. I'm gonna click on that and you can drag this down and the docket here if you want. But in here is a setting that will allow us to view an Alfa Channel within our view port here. And what's difficult about this? Sometimes you is you'll scrolled through here and try and find it. But right up here, this thing that looks like a header is actually a button. So if we click this notice, we've got PBR metal rough currently and that's right over here, I believe. Let me hover over this. Yeah, this is the default. So you can always go back to this if you want, but the one we want currently is this one right here, This PBR metal rough with Alfa blending. Now, if you click on that look at what happens. Let me close this. Now we can see through our mesh right, and we can see it from the back too, which is pretty cool. So now that we've got this set up, let me do a couple of mawr changes here. First of all, I'm gonna take that scale down quite a bit again. Um, if we scroll down here, we can do we can adjust net thickness. I'm just going to take this up all the way, and yeah, I think that looks pretty good there. That's kind of what we want. All right, So let's go ahead and do the rest of the chair. Now I'll grab this group. Open that up. Let's call this. Ah, seat. That's right. Click color selection. And I'll pick that green of the seat And let's find a fabric here. Um, about this diamond woven wool. Let's try this. Dragged that up. Drop that in here. And there we go. Yeah, I think that'll work. It's just a little too big. Let's Ah, scroll up here and increase the scale quite a bit. Something like that. There we go. And what about that black plastic? Let's get that. I will call this group Black Plastic and let's see what we have here. So if we go back to a plastic, um, we've got a plastic diamond, plastic, fine plastic, grainy plastic, skin green, thin. I'm gonna try this plastic Fine. Right here. Let's take this and dragon on. Let's isolated to that pinkish color there. It looks like we're going to need to increase the scale quite a bit. Let's do that. Something like that. Okay, um, and do I want that color quite that dark? Let me see where it is. I'm gonna pull it out just a little bit like that. And then let's grab these things. Let's make thes more of, ah, rubber material. I mean, they're kind of, Ah, a soft vinyl. But I think we have a rubber material. That would probably work. Let's try that. I'm gonna use this one right here, see how that works. And I will isolate it once again based on the color selection. And ah, actually doesn't look too bad. Just right out of the gate. Yeah. So let's go with that for our chair. It looks like I forgot to add a vertex color to the very bottom of the chair. So when I selected this with the l key, maybe I had seem selected, and it didn't select down here, so that's okay. I don't think we're gonna be seeing down there too much, but ah, let's go ahead and export this out. So let's go to file and export our textures. We'll put it in the proper place. Here, in our textures folder, I will create a new folder. Call it share, too. And in that folder, let's save it. Let's used the blender. PBR template. The file type and size should be fine. Now, notice if we take a look at this here and let me point out, too, that I never change the material in blender to the chair created a new material for the chair. So our, um, texture set is called test pattern instead of chair. What we can do is we can come up here and call this chair to and just for the purposes of exporting this out, we can now go to export textures, and it will have chair to in it. So I'll be sure and create a new material once we get back into blender. But what I wanted to point out here was that we don't have a no opacity channel here in our output template in that blender. PBR, if we go over here, choose blender PBR. We've got the missive. Normal metal, rough and base color. Do we need an opacity texture map? Now that we've used one to take it into blender. Well, if you come over here to our possible input maps, you can see opacity here. But it already has a color next to it, which means it's being used and it's being used right here in the base color. As an Alfa Channel, you can see here it says capacity. So for this particular output set up, we already have our opacity channel built in to the base color texture map, so we don't need to add anything else to this group of output maps. All right, so let's go back to our settings here. Everything should be good and we'll click export. And there it goes. No. Once again, we do not have a pass ity map because it's here in the base color. So let's go back to blender and hook these up
88. 088 Using an Alpha Channel in Blender: all right, back in Blender. Let's go ahead and bring in those textures. I'll go over to the shading tab and at the period key to zoom in. Now notice that we still got the test pattern on here, so let's get rid of that. I'll click the minus button here, creating new material. And let's call this share. Well, you know what? I've been calling it chair, too, but look at the name of the actual model. It's chair three. So just to keep things in line, I'll call this material chair three. So we know which one it goes to in the future. Here, let me go back up and here's our chair to folder. But that's OK. Well, get this straightened up. Let's begin bringing these in now. I'll bring this in. Hook up the base color. Here we go, and then I'll bring in the metallic and hook this up. Change that to non color. Let's bring in the roughness. Me. Grab that again. There we go. Bring that into here. Non color and the normal map. Grab that non color shift a search. Many use the normal map and let's hook this up. Now we still need to deal with our Alfa Channel right now. There's a couple of things we need to do in here in blender. So the first thing is in our material in our chair material, we need to scroll all the way down here and change this from blend mode opaque to Alfa hashed. And when we do that, not much happens. So there's still more we need to do. Let me bring this up. All right. So what we need to do is we need to somehow activate this Alfa Channel. You can see it here in the base color. We need to use this Alfa Channel going into our material output. And we need to tell blender that that Alfa Channel needs to be used as a transparency. So we already have this principle be sdf shader. We also need to bring in a transparency Shader. So I'll press shift a and go into Shader here and right here we have a transparent be sdf shader. Let's bring that in and drop it here. Now both this shader and this Shader have to go out to our material output. So we need to mix these two together. I'll press shift A And in Shader again, We've got a mix Shader here. So if I drop that right on that line right there, it will go ahead and hook itself up. Okay, so we've got our principal be SDF. Let's move this to the bottom socket here and connect this transparent up right here. Now look at what we have. It actually doesn't look too bad. That looks ok. However, look at the rest of the chair. It too is kind of transparent. And we can take this down toe all the way. Transparent. So it's just gone or turned the opacity all the way up here in that factor. Slider weaken. Just click and drag here, so we don't want it to be like a ghost, right? But this factor socket right here, we now know adjust the transparency. So if we select that Alfa socket here and have it dictate what the transparency is going to be right there Now we've got our chair opaque and the mesh transparent in the proper places . So there we go. Now we've got our transparency through that Alfa Channel applied to the back of the chair. So let me zoom out just a bit so you can see this node set up again. Once again, we've got both a principle be sdf, shader and a transparent going into the mix Shader and going out to our material output were then using that Alfa Channel to control the factor socket here as to what is going to be transparent and what isn't. All right, let's go back to the layout tab. I'll click here for the material preview and then we can press ault age to bring everything back. Now One of the problems that we have here is that I'm sure Yep, all of the other chairs are missing this side of the arms as well. So we can if we wanted, we could select all the chairs and press shift and select this one. And then we could press control l and apply the material to that. But the problem is, we still are missing part of the arm of the chair. So what I will need to do is actually delete all of these chairs and read Duplicate this to all the rest of the offices, which is kind of a pain, I admit. But I won't do that here on a video. I will do that before the next video. So the chairs are in furniture here. And if I look, I conf find my share threes here. What I could do is right. Click on this group and select everything. Here, Let me select the one I want to keep. That's this. Ah, chair 03005 If I select the collection and right click, choose select objects now it chooses everything I can control. Click this chair 3005 to de select it. And then I can just come in here and it x and delete and that will delete all those chairs . Now I'm gonna have to go through and duplicated. I'll hit the H key to hide the ceiling. But here's the chair I will need to go through and duplicate in place each one of these, which is gonna be kind of a pain. This is why you try and avoid these kind of things before you duplicated all your objects. But I will go through and duplicate all of these and put them back in all of the offices. And then in the next video what I'd like to do is work on the rug, and this will allow us to talk about yet another tool in substance painter that can help a lot win text Oring in this way with Vertex colors, so that's coming up next.
89. 089 Adjusting Mask Tolerances in Substance Painter: All right, let's work on the rug here. So I'll press shift H to hide everything else and ah, let's. First of all, make sure we give it a new material. I will Ah, call this rug and let's add our Vertex color. So from object mode here, let's go to Vertex paint. Let's turn on paint mask. Let's tab into edit mode and just select this face right here. Let me hit the three Key and select that face right there. Now if we tap back into Vertex mode, let's go over to our colors. I'll grab that green and press shift K No, we can't see it again because we're not in salad mode. So let's go back over here. There it is. Now it's invert the selection. Control I and let's add that blue here, Shift K. All right, so that really should be about what we want. All right, let's go back to object mode and let's go ahead and come up to file and export and fbx. We'll choose mesh and selected objects only. Let's go to our exports folder and we'll just call it rug and there we go. Okay, let's go back to substance painter here in substance painter will go to file new select. We'll choose the rug 2048. Once again, I think is okay, Let's open it up and here we go. All right, so let's bake the texture, Texture set settings big. We'll give it 2048 two by two for the anti alias ing, and we do have Vertex colors. Let's choose that and bake. Okay, we're done with that. Let's go back to a properties. Let's delete that layer, create a new group. We will call this, Um, let's call this trim because this is gonna be the trim around the rug, and I think that's kind of a rubber material. So maybe this rubber vulcanized now kind of like this plastic skin green thin. Let's drop that in. Let's isolate it right click mask with color selection. And let's choose that blue here. Okay, we do need to adjust this scale. I think that's like the material increase the scale. Um, I also don't know that it needs to be that shiny. Let's scroll down and increase the roughness just a bit. And OK, so now let's do the actual rug. Part new group um, I'll call this. Ah, rug. Let's see what we have in here. So I have anything that I would want to use? No, that looks kind of like what we used on the chair. But this Let's try this. I'm gonna take this and drag it over. Drop it in the rug. Well, it's mask with color selection, and there we go now a couple of things. First of all, I think that this is the longer side. But we needed to go this way in the reference image when we go back to blender here. Ah, in the layout, you can see Here's an image. Let me press control space. Barnes him in. So it looks like the grain or the pattern goes parallel with the counter here. And I believe in mine. Let me press. Ah, ult h hide the ceiling again. Yeah, in mine. Um, the longer end goes this way. So I think we want to go this way with the grain or the pattern like this. So Ah, what I need to do is turn it 90 degrees. So if I select the carpet, scroll up and rotation, I'll put in 90 degrees. Yeah, something like that. This is just too big, You know, that's just gonna be too big. Let's increase the scale to decrease the size of the pattern. I'm thinking something like this. Yeah, let's try 12. I'm gonna try 12 like that. And in doing that, you can see one of the issues I wanted to talk about when using Vertex colors. Oftentimes we will put one texture right up next to the other texture on the same object. A lot of what we've been doing with, like, the coffee machine and the chairs. The, um, different materials are often on different parts of the model. So there isn't that direct seam between two textures, whereas here, this is all one model, and we've got to textures right up close to it. Now, we could have created this in two parts. We could have split this center part out and then maybe scale it out just a bit. So it overlapped under the trim here, and then we wouldn't have had this problem. So that's one way to do it. You can keep in mind as your modeling and blender that you wanna have separate parts of your object When they're going to be different textures. However, if you have something like this, one way that you can deal with it is within the actual color selection layer. So if I select that, we've got some tools here that we can use and it's this tolerance. So we're currently in the color selection for the rug here that I can click and drag this up until we get to a point where it clips right up next to that trim and kind of cleans that up quite a bit. All right, that looks pretty good. There's still one little part here, but generally speaking, that looks pretty good. Now. If we back that off, let me take that back down to about 0.1. That's what it usually is. Let's try the other color selection for the actual trim. We click and drag this bring this up that closes that off there and gets rid of that corner . So what we could do is clip that corner right there, see that, and then go back to the color selection here and increase the tolerance for that. So we're kind of combining the two to clean that up. So that's just another tool in substance painter that you have that you can adjust the tolerance between two adjoining textures. All right, so now that we have that, let's go ahead and export it out. I'll go to file export texture. Let's put it in the proper place. Here's our textures folder. I'll make a new folder in here Rug. Let's a like that. We want to choose our blender, PBR Here it is. I'm just gonna ensure that I've got 2048 analysts export this out. There we go. OK, here is the folder with our textures. Now let's go back to blender. All right, here in Blender. I'm gonna go ahead and move over to my shading. I'll hit the period key, Endless press shift H to hide everything. And then now that we're here, let's go up in the hierarchy to the rug folder. Let's start bringing these in. Connect the color. Let's go back to the metallic. Let me grab that again. Here we go. Ah, non color metallic. The roughness map. Look that up non color. And of course, the normal Right here that is well known. Color shift day vector normal map color normal and There we go. Okay, let's go back to the layout tab. Go to material Preview. Ault H And there we have our textures applied to the rug.
90. 090 Sampling Colors in Substance Painter: Let's no work on one of these chairs around the table on press shift H and isolated. And let's come down here to our materials panel and let's give it a new material. I'll just call this. Ah, well, this one would be chair, too, wouldn't it? So we'll call it chair, too. We need to add our Vertex colors, so I'll go from object mode to Vertex paint, and we should be able to tap between them. All right, so I'll choose that green and let's turn on paint mask here so it looks like we've got, um, a couple different materials here. Let's begin with the seat. I'll just press the L Key and select that ad that green color Let's now select this year and will add that blue shift K. It looks like these are different materials, so I'll put another Vertex color on that and this arm of the chair here. Let's go ahead and add a color to that. Let's shift K there now. What is this here? It looks like it's a metal that's slightly different from this metal, although I think I could probably just go ahead and make it the same Let's do that. I'll just select this whole piece and press shift K so that will just be the same. And then the post here and the wheels, I think, could be the same just to reduce the amount of different textures were putting on this. I'll select this and go through and press L over each of these wheels. There we go. And let's give this that orange, I guess. Let's do that shift K. There we go. All right, so let's turn off the paint mask for a moment. We've got 12345 different materials on this. I think that's probably good. All right, let's export it out. Object mode File Export fbx. Choose mesh and selected objects. We'll open up the exports folder and we'll call this chair we already had shared to before . But this is the actual cheer, too. Call it zero to riel. Oh, my naming conventions got a little thrown off their All right. Let's go over to substance painter. Now let's go to file and new. Here in substance painter, Click Select. There's the rial chair, too. We'll bring that in now. What let's do is bake are textures our texture sets. Settings are up here now. I reset the you I by going to window reset user interface here simply because I was getting a log warning about the user interface. And I don't know if that's just for this particular version of substance painter, but you can always just take thes and move them around like this and put them anyway you wanted. This is the way I had it. So, as I said, I just reset it because I was getting that error. All right, let's go to texture set settings down here. Bake mesh. Once again, I'll put it at 2048 two by two and Vertex Color Okay, and that is complete. Let's now begin adding our groups. Let's do the seat of the chair here. I wonder what I have. Do I have anything else that might work for this? I think this is the one I used for the previous chair. Let's go over to substance source and see if there's anything we confined there. I'll go over to substance source right here and under fabric. Let's take a look here. I think this one this one here looks interesting to me or even this one. I'm gonna go with this when this cotton multi filaments spotted and see how that works. So I will download that to substance. Painter and weaken. Probably search for cotton up. Here it is, right here. OK, good. So let's take this. Drag it up into here and let's isolated with the color selection. I'll go back over here to properties pick color. So like that. Now let's select this and increase that scale once again. Yeah, that's kind of nice. I think that'll work. Okay. And let's, um, do some plastic here. Let's ah, create a new group and we'll call this plastic. And I think this will be that tan part right here. So let's come up to plastic and I will use this plastic glossy, but we're gonna have to reduce that or increase the roughness quite a bit. So let's mask this with color selection. We will come down here and increase the roughness and then will also change the color. Here. I'll press shift and right click and move that light around. That's still a little too shiny, isn't it? Let's bring that down some, and let's bring this over to here like that. Here we go. Let's try that. Now we need a metal. Let's do this. I will search for metal down here and we have, Ah, steel painted metal. That's been a pretty good go to material here. Let's mask it with color selection and we'll choose that read right there. There we go. Let's now. Ah, change some properties of that. It looks like that actually looks pretty good as is. I just really need to change the color. I'm gonna choose the eyedropper here and hold and then come over here and click here. I don't want it to be exactly the same, but at least that's a good way to begin with the base color. I wanted to be a little bit darker than that. Let me bring this down. Some, maybe something like that. You know, we can use that. I drop her on actual photographs as well. Let me bring an image of this chair in. All right, I've brought an image in just to be able to select thes color. So if I click here and click and hold on the eyedropper, I can come over here and just select this color. Gonna move it around and see what I think. Maybe something right about there. So something like that, it's a little bit darker in here, so maybe I'll bring it up some like that. There we go. And also, I could Ah, let's go back to that back of the chair here and I'll select that. And let's try. And I dropped this color here, Click and hold something like this to try that. Yeah, that's pretty good. All right. Um, what about thes arm rests. Let's, um I think that's kind of a rubber soft material. Let's, um, add a group up here will call this. Ah, arm rest. We'll search for a rubber. I'm gonna grab this. Ah, vulcanized raw. And I want toe mask that we'll put that there. Now, let's change that color. I will click here, click and hold on the eyedropper and move that right into here. Something like this. Yeah. Let's go with that about like that. I feel like it could be a little bit different. Like the metal maybe should be a little bit lighter. Let's try this. Bring it up just a little bit like that. And also I think I want to increase the scale. You can see the patterns here, so I will go up to here and increase the UV scale just a bit. It's kind of like that. All right, now we need the black plastic. Let's work on that black plastic. I will grab that plastic again that we had earlier dragged that up into here. Let's isolate it there. And then let's select that again. Let's change the color and increase the roughness here. There we go. Something like that. Maybe. All right. I feel like the, um back once again is not quite right. I'm gonna change the plastic, the plastic here if I move this up. Yes. So I feel like I wanted just to be a little bit lighter like this. Yeah. Okay, I think that's pretty good. Let's go ahead and go with that and export our textures out. I'll go to file export textures. We'll put it in the textures folder. Let's call this share to Riel, the rial chair, too. And let's choose that PBR template. And there we go. Let's hit export
91. 091 Exporting Multiple Objects as a Single FBX new: I've brought the textures in and applied it to the chair material. And then I've used control l to select all the other chairs and link the material from the 1st 1 So now I'd like to actually work on something a little bit different over here in the kitchen. We've got a collection of items that we could take into substance painter all at once, so we could take this entire area here the cabinets, Thea appliances, the sink and the faucet, as well as all of the, um, handles here. I could select all of these. Let's get all of these selected and then let's hide everything else so I'll press shift H. And now we can take all of these objects in in a single fbx file and texture them as a unit in substance painter. So let's give this a try. I'll first go through and replace the materials. So for this ah, granite countertop, let's go into the materials property and let's get rid of that test pattern. What's created new material and let's call this Ah, but like colored granite countertop and then for this year, I think what we should do is give it its own material. But I think I'd like toe have this bottom part thes two bottom parts. I think I'd like to have them be a different color than the main stainless steel part. So for this, I'll get rid of the material and then let's create a new one and this looks like it's the ice machine. Let me put that in here. Now, Within this material, we probably need to add some Vertex colors. So let me go back into solid mode. Let's change to Vertex paint here, and I think what I'd like to do is just select all tab into edit mode here. Just selected this area down here. So this and this area and this should be one vertex color, and then everything else can be that stainless steel. So let's let's select that tab into Vertex paint, Turn on the paint mask and up here. Let's use that green shift K. And then what I'll do is just press control I and let's use that blue gear shift K there. All right, so we've got that. Let's now go back to object mode. Um, this one here, I feel like it needs a different color down here as well. So I'm gonna do basically the same thing here. But this is for the cooler. So let's give this a new material. We will call this cooler, and for this I'll switch to Vertex paint. Let's tap into edit mode. Let's select this and this as well. Go back to Vertex Pain. Turn on our paint mask and let's give it a color. I'll do the green again. Then let's press control. I like the blue and add that as well. Okay, so we've got those, too, with their respective materials and Vertex paint. Um, let's go over here to the sink. Let's just select the sink. Let's give it its own material. Call this sink and let's also remove the test pattern from that faucet and we'll call that faucet. Um, also, I realized that, um, if we take a look at the normals of this, I think we're going to see a problem with me tab into edit mode and let's come up here and pull this menu down like we've done before. And let's turn on normals and look at what we have here. Let me press all dizzy and sure enough. We can see the normals are facing inside on this tube here, so we need to fix that. Let's come up here to mesh normals and recalculate outside. And there we go. Now everything's basing out, and that's what we want. All right, so we've got our material for that. Let's ah, do a material for the kitchen cabinets. Let's get rid of that. The test material and call this cabinets. Now, each of these, I'll go back to the material preview. Each of these handles is its own object. And if I give it all the same material, if I give all of these the same material there, UV maps will be overlapping. However, recall that these air exact duplicates so the U. V s will be in the exact same place, so you won't see a problem here with the U. V's overlapping. Let me just go over here real quick and will ah, select this one right? And then if we select this one here, it's the exact same UV map. So there shouldn't be a problem giving all of these the same material. So I'm gonna select one, get rid of the test pattern, call this handle or handles, I guess. And then I'll select all of these and then shift. Select this one control l and let's put that same material on all of them. Now let's take a look at the refrigerator. Let's get rid of the test pattern and call this one refrigerator, and then we need to add some vertex colors to this as well, because we've got multiple materials here. We've got that, Ah, stainless steel door and handles. We've got this gray part on the back, and then if we zoom way in, it looks like these little pieces are a different material. And also that trim inside the door seems to be a different material is well, so I think four different Vertex colors here. I will go to Vertex paint and tab into object mode. Oh, let's turn off the normals here. Let's select this part right on the back tab into Vertex paint. Turn on paint mask and let's give it a color here with shift K. Ah, let's just Well, we're still here in Vertex paint. I'll hover over these and press the L Key and let's get these taken care of. There we go um it looks like I'm gonna have to tap back into edit mode to get this trim here. Right in here. Let me select all of this in here, cause this is its own material, I believe year and looks like we got that. They're okay. So let's go back to Vertex paint, select a new color and shift cave with that. Then what let's do is, um Well, if I press gun control Z to re select that, what I could do is press control I and then press shift l to de select these other parts. Let's try that shift. L shift l. And here is Well shift L There we go. So now we've got I think everything de selected. Now we can give the doors its own color as well. So let's use the red shift, K. And there we go. Let's turn off the paint mask real quick and take a look. Yeah, we've got those four colors there. That's good. Okay, so let's go back to object mode now. Should I take a look at this sink? Let me just take a look at this sink in terms of the direction of the normals as well. Let's take a look. I'm gonna go here and turn on face normals, and that's a problem. Yep, it looks like they are facing the wrong direction. So let's flip those isco mesh normals and let's just flip here. If we re calculate on the outside, they will still be pointing the same way that they are. We want to flip them or we could say, Re calculate on the inside. Let's try that, Do that They're And yeah, I think that points them in the proper direction. OK, so there we go. We've got the normals pointing in the right direction. Our materials and Vertex paint done. Let's now export this out. I'll hit the a key to select everything here. Let's go to file export. Fbx will choose mesh and selected objects. We'll go to our exports folder and will call this kitchen counter. All right, let's hit export and away it goes
92. 092 Texturing the Kitchen Countertop: Let's bring in those kitchen counters. Let's go to file New and let's choose, select. And here we go kitchen counter and open. I'm gonna keep it at 2048. We may export the different texture sets at different resolutions. But for now, this is fine. I'm gonna click, OK, and here we go. So here is all of our objects and noticed that all of the materials have been split out into individual texture sets and we can bake all of these texture sets all at the same time . So let's go over to our texture set. Settings must scroll down here to bake mesh maps. And if we click that, I'm gonna go ahead and change this to 2048 and I will turn on the anti a leasing two by two . And over here in the I d notice weakened choose, bake all texture sets. I currently have the cabinets Tector set selected, so you can see we can also just bake that one texture set. But if we're going to do all of them, we can go through here in the I DS. Now, since we have multiple texture sets and choose how we wanna handle the color source for each of these, so recall that the refrigerator has for text colors on it. So I want to choose Vertex color for that. Also, the, um, ice machine has vertex colors, and the core has vertex colors, right? But everything else is using material color because we only have a material on that object and no Vertex colors. All right, so let's now go ahead and bake all the texture sets from this. So I'll click Baycol and there it goes, so it's gonna go through each one. It's going through the cabinets, and then it will go through the handles and it'll go through each of the texture sets, baking out all of these mesh maps, so it's gonna take a little while, all right. It is all done on click. OK, and now we've got all the mesh maps for each one of these texture sets. And because we've done this all at once, I just want to show you that each object is interacting with the other. So if I choose this ah faucet texture set and let's hide this notice that it saw this as an object on the kitchen counter. So it created an ambient occlusion map on the counter based on the faucet being there. So all of these objects air interacting with each other in terms of the Ambien inclusion and the other mesh maps that have been baked. All right, so what should we do first? Um, I think How about lets work on the granite countertop? Let's select that texture set and let's go over to the Layers panel here. And since it's only one material, we don't have any Vertex colors on this. It's going to delete that and let's find a granite countertop that we like. I'm gonna go to substance source for this right here and let's type in granite and here we go here, we got some granite countertops and let's scroll down. I kind of like this. This black pearl granite. That's kind of nice. Let's download this or click here downloaded to Substance Painter and then let's go take a look at it here. Looks like here it is. Yeah, that looks nice. I'll just click this and drag it in. Let's see how it looks. There we go. Well, I think it's a little bit big. We ought to, Ah, come down here in the properties panel and increase the scale. Let's do that quite a bit. I think now we're beginning to see the repeats if we go too far like that. So maybe something like this that's not bad. Feel like it. Maybe a little bit too shiny. Let's come down here and adjust the roughness. I'll click here and drag that up a bit. Yeah, so it isn't quite so shiny. There we go. I think that's pretty good. All right. What next? Well, we could do the Ah, stainless steel of the sink and the chrome of the faucet. Let's Ah, choose the faucet. Let's delete that layer. Let's find some chrome here. Do we have? Yeah, I think I had this chrome here. I think. Let's try this. I'll drag this over. Drop it on. It's a little bit too dark. Let's Ah, come over here to the color and I'm just gonna bring it up just a little bit like this. All right. Now let's take a look at the sink. Let's choose the sink. Texture set. Where is that? Here it is. Let's get rid of this layer. Um, and let's type in metal because I think I've got a metal. What was that? It was that iron shiny. I believe that was kind of a nice stainless steel type material. Let's try that. I'm gonna drag that over here. Drop it there. Yeah, I kind of like that. Actually, we could turn that grain if we wanted to. Just to see if it looked any better at 90 degrees, we could turn it with 90 degrees here. I don't know. It does that. Ah, look any better? No, that's not bad. I'll go ahead and go with that while we're here. While we're using that iron shiny, Let's go ahead and work on the appliances as well. So for the ice machine. Now, this does have Vertex color. So let's create a group and I'll call this base and I'll also create another one and call this main. So this is the main part of it. It's gonna have that stainless steel. So let's put that on in here. And then let's right click, color selection, pick, color and slick, that blue. There we go. Yeah, that's kind of nice. I kind of like that. It's going that way. That's that's that's kind of nice, although, Well, let's try it the other way. I'll select the iron shiny and type in 90 degrees. Here, let's try that. Well, that's not bad either, so I don't really know. I'm gonna scroll down and under finish. Let's bring that brushing intensity down a bit like that. And then let's, um, select this part and we want kind of Ah, plastic. What's this here? Now I want a plastic something like this, I think. Let's ah, drank that over there. Now, this is interesting. Notice how the color is only going down here because we've assigned to the color of the stainless steel to the top. But it's the other maps here that are coming through. If we go up here, you can see we've got normal here. If we turn that off, you can see it goes away. So you have to be careful of what you put above and below things. But what I'm gonna do is just once again isolate this with the color selection and just put that down there. There we go. All right. Um, let's select that plastic. And I want that scale to go up quite a bit bad. There we go. Yeah, so I think that's pretty good. Let's do that one more time with this. Ah, would we call it the Cooler? Let's do that. So if I select the cooler texture set here, let's basically do the same thing. Let's create a main and a base. Take that plastic fine and drop it on the base. Let's isolate that with the color that green done there. I will tumble around and let's see if we can. Now let's reduce the size of that quite a bit. I'll select the plastic and will increase the scale like that. There we go. Okay. And then up top for the stainless steel. Let's go back and grab that iron shiny here. I believe that's the one. Let's then a mask with color selection and there we go. So for this one, I think I'm gonna leave the grain going that way just to kind of differentiated a bit. I will, however, take that and under finish, Let's take down the brushing intensity quite a bit like that. There we go. All right, we are coming along here. We've got our countertop and a couple of the appliances. What I'll do in the next video is finish up the rest of the objects here
93. 093 Exporting Textures for Multiple Objects: The next thing let's work on in this collection of objects is the cabinets. Here. Let's click on the cabinets in the texture sets. I'll remove that layer, and I think I want to go to substance source again. And let's go down there is at the bottom, down here under collections. There's an office spaces section right here, and I believe if I type in linoleum, here we go. We've got quite a few choices here. I think I just want this plain white linoleum for those cabinets. So let's give this a try. Amount of downloaded to substance painter. All right, there it goes, and let's go back to substance Painter and let's see if I can find it in here. L I N Oh, there it is linoleum. So I think I just need to drag this right into here, and that's about it. Now the colors a bit off. Let me take it really up to almost pure white. Something like that. Yeah, I think that's what I want there. Also, I think I'd like to change the color a little bit of one of these appliances. Let me click on the cooler, and if I go to the iron shining. I'd like to make this just a little bit different than the other one. You know, maybe about like that just so they don't look exactly alike. All right, um, let's work on that handles. I'll Ah, go over here and select the handles. Texture set. Let's delete that layer. And, um, let's go back to searching for metal. And I've got a couple of things in here that we could try. I like this iron pure. That looks kind of nice. Let's drag that over there and drop that on. Yeah, I think that, um, that's pretty much dead on what I was hoping for. So let's go with that. That's good. Now let's come over here to the refrigerator. Let's select that texture set and delete the layer. Let's first work on the back part of the fridge. Here I will create a new group. Let's call this Ah, back, and I'm going to find that painted here it is steel painted. I do. I do like that one. Let's ah, a mask with color selection here and choose that color. And then what let's do is change the color. Here. It's more of a brown or brown grey, I guess. Let's let's take it down into the brown here, into that area. But then move it over toward the gray Like that? Yeah, let's try that all. Move the lights a bit and I think that's what I want. But it needs to be a little bit smaller texture there. So it's scroll up. And with the scale, just increase that scale just a bit. And then I think I'd like to reduce the amount of scale. Let's see down here in the technical parameters, that height range. Let's bring that down just a bit. Yeah, but isn't quite so noticeable. There we go. Yeah, there's still just a bit there, but not a whole lot. Yeah, I like that. Okay, Now the front is just gonna be that iron shining again. So let's just create a new group. We'll call this doors. And where is that? Here it is. Let's drag that up. A mask with color selection and selective that color there. Now, which way is the grain going on? This? I really want to grain to be going up and down. Let me, uh, scroll up in the properties and change this the rotation to 90 degrees because I really would like that to go up and down, and then I'd like to be not quite as prominent. So let's come down here into the finish and reduce that brushing intensity about like that . Yeah, I feel like, um, I might want to play with the roughness on this. In fact, I think I'm gonna bring it down. Think I wanted to be? If I bring it all the way down, it's like a mirror, and I don't want that. But I do want it to be fairly reflective. Maybe something like that. Yeah, Just a little bit more reflective than I had it. And then we've got a couple of other things up here. Let's call this. Let's call these hinges. I don't think they are, but that's kind of descriptive. Let's ah, use some plastic on this, so I'm gonna use this plastic glossy again, dragged that onto here and then mask with the color there, and then we wanted to be more of a gray. So I'm gonna come down here and move it to gray and also move it down a bit like this and then, um, the interior here. There's like a rubber interior. Let's get this. That's Thea the the door trim. So I just call this trim and let's find a rubber material. Ah, what about this one? No. Let's go with this here. What about this? It's possible I'm gonna go with this here. So let's right. Click and mask with color selection and choose that color right in there. And then I want to make it quite a bit lighter, so I'll just come in here, move that up like that. Let's try that. I feel like that, Um, metal here is a little bit too bright. Let's ah, and it may be because of the reflection. Let's just see if I can grab this and bring that value down a bit. Yeah, something like that. I think. Yeah, that's a little bit better. Okay, I think we have all of our objects textured. Now let's work on exporting all of these out. So to do that, let's go over to file export textures. And here you can see we've got all of the different texture sets. Now what let's do first of all is be sure and come in here. And ah, I'm gonna go to my proper folder. I'm gonna open up textures in here. So this is where we want to go. Ultimately let me click Select folder there. But we will be changing that. I just wanted to get it in place there. We want the blender PVR. So if we just exported all of these out, they would all be at the same texture, size or resolution based on the texture set that we chose initially and they would all go into the same folder. We could do that. We could export them all and then arrange our textures into their individual folders at that point where we can do him one in the time and export them into individual folders from here. So if we were going to do that, let's say we could de select all of these. Let's say go to our textures folder, create a folder here and call this cabinet, and we could export out to here. Now we can change the texture size here. Let's say we want to make it 10 24 and we can export those out to that folder. Now we can come back and we can choose. Um, let's say the refrigerator. Maybe we want that one at 2048. We need to come in here and create a new folder and call it a refrigerator. There we go. And then we can export this out. We can export that to that particular folder. So in this way, we could go through and create our individual folders and have our individual textures. In addition, if we wanted to, we could select all of these. Let me de select the cabinets and the refrigerator, and then we could export all of these out, as is now. I don't want to do that because I don't think I need the granite countertop to be the same size as the handles. The handles, I think, can be pretty small. The granite countertop is taking up more of this space in the scene, so I think it needs to be 2048. But you can do that either way. I'm just gonna go ahead and let's ah, export the granite countertop out. I will go into textures and let's call this granite countertop, and then we can export this out. The handles. I feel like those only need to be about 5 12 So let's ah, create a folder for those we call these Cabinet handles and let's export thes. I think the same goes for the faucet. It only needs to be about 5 12 So let's export that to our faucet folder here that we're going to create. There we go. We can export that. Now we could do is we could say, the cooler, the ice machine, the sink can all be exported out at, say, 10 24. And now we could do is we go back up to our textures, drop them all in that textures folder and then organize them after that. So let's click Export, and now they're all going to go out like that. Now we can go to our output directory and we can see them here. So what we can do is also we can come in here and choose new folder and call this cooler, and we can take all of the cooler textures and just dragged them into that folder there, in the same way we can create an ice machine. We can drag these in dear, and then we can create a folder called sink and put all these in a swell. So it's just how you want to do it. How you want to organize your files, how you want to export them. If you wanna do it individually per folder. If you want to do it by, say, texture size, however, it works for your particular project. I just wanted you to know that you've got some options here as you export your textures.
94. 094 Applying the Textures to the Kitchen Objects: Now let's begin putting our textures on the materials here in Blender. I'm in the shading tab now and let's work on the granite countertops. So let's go over here into the counter top folder and I'll just begin bringing in each of these textures, the base color, the metallic just like we've done before. There we go. And the roughness map here, non color. Look that up and let's grab the normal non color shift A. And this time I'll go to search type in normal. And there it is, normal map, and we can hook that up. There we go. So now we've gotten that in there. That looks okay. Yeah, I think that's gonna work. Let's now work on what else have about the faucet on? Zoom into here and let's go up in the hierarchy. Find our faucet. Let's do the same here. So this is really just the process, the same process that we've done before. We're gonna go through and attach all of these textures to each individual material. And of course, this is kind of why I said you should reduce the number of materials that you have at least as much as you can, because ultimately you're gonna have to sit here and drag all of these in, and that can get a little tedious. And it's also the same in a game engine. In that, um, you're gonna need to create materials in the game engine, and then you'll need to drag on each of the textures. Let's try the sink. I'll go into the sink folder and let's grab this based color. And so much of metal textures are all about what's being reflected. So, um, once we get all of the other materials in and and all the lighting in the metals will look a little bit better, I think currently we've just got an HDR image here, this one here that we're reflecting. It's like a woodland scene. Once we get everything in the scene and it's reflecting the actual scene, it will look a little more convincing. All right, there we go. Let's see how the refrigerator looks. Let's take a look at that. I'll open that up and let's bring in all the textures for the refrigerator. Here's the metallic non color look that up and the roughness map wants do that. We go and also the normal map. What's to that shift? A vector. Normal map and hook this up very ago. Yeah, that's going to be interesting, actually, once we get everything in a scene because this is such a big surface reflecting what's around it. We're really gonna have to get everything else in the scene for it to reflect that. And we'll be talking about that in the lighting portion of the course. All right, let's some try this guy. The ice machine. I'll grab these and the metallic on color here. Let's bring in the roughness map, change it to non color and hook that up. And the normal non color shift day Victor. Normal map. And let's hook this one up a swell. Let's not do this one here. What is that? The cooler. Let's go into here and grab these. Look up the base color and all the others, just like we have before and down here too. The normal socket. All right, we've got that. What else do we need to do? Well, how about the cabinets? Let's do that. Um oh. I haven't re named that. I should probably do that. Let's come over here to the outline. Er, get the period key. And here it is. Cube 0 11 Let's Ah, change that to kitchen cabinets. Here we go. And that helps. Now let's come over here and go to the Cabinets folder. Here it is. Let's bring the exam. There's probably not gonna be much of a change here because this is just a plain white type of texture. And I think the last thing would be our handles here. So let's ah, go up in the hierarchy and find that handles Here they are Cabinet handles. Let's grab these and add the normal map non color and connect that up and we go. And of course, they all changed because we've got all of them with the same material. They all have that same material. So there we go. We've got our appliances and everything, all textured. Let's go back to the layout view and I'll press Ault h bring everything back. Let's go over to the material preview. I will also hide the ceiling. Let's do that. Let's go in and take a look at this. There we go. We've got our kitchen set up. I think. What let's do in the next video is begin working on the ceiling tiles and events up here, and we also need to work on these couple of other pieces of furniture and also the kitchen island here, so those are all coming up next.
95. 095 Selection Tricks When Appying Vertex Colors: I think I'd like to work on these ceiling tiles or the drop ceiling objects. Here, let me go to this solid view. So maybe we can see these a little bit better included. With this, I think we should go ahead and grab the air vents and the canister lights. Let's do that. Grab these and the other canister lights. Well, I'll leave those there for now. Let's just grab these ceiling tiles. So I'm gonna press shift H. And now what let's do is create our materials and any Vertex colors that we need. I think for the event, we just need a single material. So get rid of this and just call this event and then I'll select all these others and we'll put the same material on all of these. Control L and materials. Okay, so we got that. Let's do the drop ceiling here will call this drop ceiling large, and we can call this one. Drop ceiling small. There we go. Canister lights. Let's do that. Get rid of that. Call it canister lights. All right. I think the only thing will need Vertex colors on are the actual drop ceilings. Everything else can be a single material. So for this, let's now switch over to Vertex paint and then I'll tab into edit mode here now. Well, it looks like I've still got the normals turned on. Let me turn those off year. There we go. Now how we're going to select all of the trim here, all of the framing here. And then all of just the tiles separate from all the rest here. Well, I think we can do that with our UV editor. Sometimes it's easier to select things in two dimensions than it is here in three dimensions. So let's give that a try. Let's go over to the U V editing tab and let me hit the A key in the period key. So here we are. I think what I can do now is come over here and turn this on right here. This UV sink selection because noticed that if I don't have anything selected here, I can't see anything in the UV editor. But if we turn this on even when things aren't selected, we can still see the UV islands here. I'm gonna turn this to solid view. It's a little bit easier to see, There we go now for the frames here. What let's do if we come in here? These are the frames right here. And if I go to face mode, I can then hover over one and press the L Key, and that selects everything there. I think I'd also like to Ault shift. Click this right here all the way around as well. And there we go. So I think that's what we want for the frame. Let's give this of Vertex color. I will tab back into Vertex paint. She was paint mask. Let's go over here and I will twirl down the color palette. Select a color impress shift K. All right, so that gives us the frames with a Vertex color. All right, so now it's tab back into edit mode. Let's think about how to do these faces. Well, what we could do is we could invert the selection control I now that gets us all of these. But now what we can do is just go to the side view right here. It's easy for wire frame and let's just with the Beaky shift click and drag everything down to the tiles right, like that. So now that gives us all of these right z solid. Now all of these air selected. Let's give these of Vertex color. I'll tab into Vertex paint and let's choose Blue Shift K. And there we go. So now we've got the green and the blue. That's good. What let's do now is pretty much the same thing, but in reverse. So let's ah, select the frames with the L key. There we go. Let's hit control I And then let me press control space part to make this bigger. Now that the Z key and then let's de select just the bottom part somewhere press shift and click with the border Select Tool de Select all of those. Now let's see how we did here. Yep. So we got all of those de selected. Now we can press control space bar to go back. Let's switch to Vertex paint and in here Let's give it 1/3 color right here. Me, Turn on paint, mask, shift K And there we go. We turn off paint mask. You can see we've got the blue, the green and the pink. Yeah, so that's what we want. All right, let me go back to lay out, and we don't need any Vertex colors for the canister, lights or the events. But let's do the same thing over here real quick. I'll go over to the U V editing screen layout. Let's hover over the frame right here. Hit the L key. There we go. Back over to Vertex paint. Turn on paint mask. Let's begin with the green. Here we go. Now let's go back to edit mode. Let's get these taken care of. So let's press control I and let's de select with Beaky. Hold shift and I'm just gonna go right down to about here to de select those. And let's see if we got everything. Oh, we need to de select that rim around their meat. Do that. There we go. Now we've just got the tile. So let's do vertex paint. Choose Blue Shift K and there we go. Now let's get everything else I wanna press control I and let's de select everything down here like this to make sure we got it. Yep, we got it. And so let's go to Vertex. Paint one more color and shift K. Here we go. All right, Let's turn off the paint masks, see if we got everything. Ah, Looks like we didn't get that that line of faces right there. So let me just go back to edit mode. Well, just select that. And what color was that? What color should that be? That should be green. So let's choose green shift K. There we go. There we go. Okay, Now that we've got that, we can go ahead and export these out. So once again, for multiple objects, we can use a single FB X. So we select everything. Click file export, Fbx mesh, selected objects. And let's put it in our exports. I can always come back over here and change these two thumbnails if we want. But let's call this drop ceilings and there we go. So in the next video, let's go and apply our textures in substance Painter
96. 096 Copy and Paste Layers in Substance Painter: Let's go ahead and bring in our drop ceiling. I'll find it here. Here we go. Drop ceilings. FB X 2040 eight's fine. Let's tumble around and here we go. Now let's bake are textures to come over here to the texture sets and let's scroll down and click bake mesh maps. Let's change this to um 2048 for now and to alias ing two by two and for the I D. Now the event can be material color, right? The drop ceiling large needs to be vertex color. The canister lights can be material and the drop ceiling small needs to be vertex color as well. All right, so let's click Baycol texture sets and there it goes. All right, so those air all done. Now one thing I need to point out here is look at the canister lights. We've got them flip so we can see the outside. But we can't see the inside where we need to see them, and that's OK for now we can throw on the material here, but then when we get back to blender, we're going to need to flip those normals Alright, So I've gone ahead and downloaded a tile texture here from substance source. So let's go over to the drop ceiling. Let's remove this layer and let's create a new group. We'll call this tiles and let's just dragged us in and see how this looks and it doesn't look too great. But let's first of all mask with color selection. And then let's select the material. And let's increase the scale quite a bit. Something like that. Now let's see. It's not looking too good, and I think one of the reasons why is because we're viewing it at 2048 it's such a large thing. We really need to view it at four k to do that with our drop ceiling large selected, we can come over to our texture, set, settings, weaken, scroll up, and we can choose how we're going to view this. So even though we chose 2048 at the beginning, we can choose to view it even bigger here. Let's try 40 96 All right, so now it's looking a little more detail. That's kind of nice. So let's go back to our layers, and maybe I don't need to pull it up quite so high. Now let's try something like this. Yeah, let's do that. Now Let's Ah, work on the frames here. I mean, create a new group, Call it frames. And for this I think I'd like to use that steel painted again, always going back to that. But it's a good one. So let's mask with color selection and let's choose this green right here. Why don't we go? I will take it up pretty much toe white, pretty close there and ah, let's also increase the scale for that as well. Something like that. The next thing will need on the drop ceiling is this top part. So let's do that. I'll just call this top. And for this I think I'd like a painted material. It's go to substance source here, and let's go to paint right here and let's see if we can find some sort of painted wall material. How about just a ah, glossy paint? Let's do that. So our will download this and let's then type in paint down here. Here we go, glossy paint. Let's give this a try. I'm gonna pop that into here. Well, it's isolated. Mask it with the color selection. And then let's also increased this scale quite a bit. So it's not so textured. And then also I want to increase the paint roughness just a bit like that, something like that. All right, so there we've got the drop ceiling. Now what I also want to do is do all that with this as well. And what we can do now is, since we've put all the same colors on this object as we did on this one, we could just go through and copy and paste our groups into the drop ceiling small. So if we took all of these, let's just see. Let's just grab all of these and right click copy. Let's go over to the drop ceiling small and let's paste check it out. It went ahead and added all those same materials. Now, one thing we may need to do is adjust the scale for this one because this one we're viewing , I think, in 2048 which I think is just fine. I think if we exported this is 2048. It'd be fine because it's smaller but weaken. Choose the ceiling tile material and adjust the scale so it matches the other one a little more closely. Maybe something like this. There we go. All right, so we've got our ceiling tiles done. Let's now take a look at the events. Ah, the events, I think could be that steel painted. And all we have to do is just drag right on there. And there we go, because we don't have any Vertex colors there. Let's change the color to an almost white here. And I'll also increase the scale quite a bit because, yeah, you can see the patterns there. I want to increase that quite a bit like that. There we go. And now the canister lights. We could probably do pretty much the same thing there. In fact, we may be able to copy this. Let's try that. Let's just right click copy. Go over to the canister lights and right, click and paste. Now for this, it's difficult to see because the, um, polygons air flipped. But I think what I'm gonna do is increase the scale just a little bit A swell Here. There we go. All right. So what let's do now is let's export this and take it into blender. We can go to file export textures. So for the drop ceiling large, let's do this one first. I think what we need to do is put it in the right place in our Textures folder. We'll give it a folder here. Drop ceiling large, and we will choose that blender PBR. And for the texture size. Let's go with 40 96. All right, so I'm gonna export this out first. All right, we've got that one. Now, let's do the drop ceiling small. And we want to take this one down to 2048. We want to give it its own folder here. And let's export this out. Now let's go back and for the events. Um, I think we could probably export thes out at 10. 24. Let's do that. Events and export. And for the canister lights. Um, they're pretty small. They're all on one UV map, though. Well, let's go ahead and go with 10 24 and see how that works. I will create a new folder for those and let's export thes. All right, let's head over to blender
97. 097 Using the Node Wrangler Add on in Blender: Now we've seen how tedious it can be to drag new textures into the nodes window. So I just wanted to introduce something that can make your life a little easier. And it's called Node Wrangler. It's an add on here in Blender. And if we go to edit and preferences, we can go to add ons and weaken search for node Wrangler. So I'll come up here and just type in node. And here it is. So if we turn this own and this comes with blender, if we turn this own and I want to twirl this down here, we can see that it's gonna be found in the toolbar of the note editor here. Or you can press shift W All right, so now that this is enabled, let's go ahead and close this window. And if we hit the n key here in the note editor weaken, See this node Wrangler tabs that we click on that? So there's a lot of tools here, but the one I really want to point out to you is this ad principled set up. So with this drop ceiling, small material selected, we just need to come over here and click on the principle Be SDF shader, and then we come over here and click add principles set up. It's going to take all of the textures we select and apply them to the selected Shader. So let's click here we'll go into our textures folder will choose that drop ceiling small, and here we can just hit the a key and now we click principal texture set up and there we go. Look at what it did. It took all of those textures and set them up just the way we have before with the SRG. Be here non color, non color and our normal map. Now it's also given us a texture, coordinate node and a vector notes so we can scale and rotate and move our textures if need be. You really don't need to do that, since we've actually applied them to the UV map itself in substance painter. But you've got to admit, this is, ah, pretty slick little set up so well. Let's try it again. Let's ah, choose that drop ceiling. Large material. Let's select our principal be SDF Shader was click add Principled. Let's go back up and let's find the drop ceiling. Large folder. That's it. The a key and principled texture set up. And there we go. All right, let's Ah, try it again. Let's click on one of our air vents here. I will select just the B sdf shader. And this time, if you hover over here, you can see the shortcut is shift control T. So we press shift control T and let's find that air Vent folder at the A key. And there we go. Pretty slick, huh? Now let's do the canister lights. I'm gonna de select everything and just select that GSDF shader control shift t go back up to canister lights at the a key. And there we go. Right now we do need to flip the textures or the normals, I should say for the canister lights, Let's do that. Let's tab into edit mode and select everything. And then let's go to mesh, normals and flip. There we go. So we've got those flipped now. All right, let's go back to our layout tab and let's bring everything else back all to H Ah, I will hide that ceiling again And let's go to our material preview and let's take a look at it. See what we think. There we go. So, yeah, I think that will work pretty good. That'll give us a nice texture to that. Yeah, there we go. All right. So I think what we should do now is let's work on the floors and the walls, and that'll be about it for our text. Oring I'll go through and do on my own with camera turned off all the other objects. And I really think all these other objects use just the tools and techniques we've already gone through. It's just once again lather, rinse, repeat. But I think there's a couple of things we can still learn in doing at least the floors before we move on to the lighting. So in the next video, we'll work on the floors and try and get those done before we move on to the next part of the course.
98. 098 Preparing the Floors for Texturing: for the floor. I think I'd like to different materials. I'd like a wood texture for the main area and then kind of a gray carpet in each of the offices. Now, I could go through and create those offices one by one. But I think what I'm gonna do is use just a couple different objects. So Well, let's do first is I'm gonna go to the top view and go to wire frame, and then I want to hide most everything. Like the kitchen counters, the furniture, appliances, lights. Um, all of these things I'm gonna hide. I'm gonna hide that. Ah, drop ceiling here and here so that we just have basically the walls and the floor. And what I want to do is I'm gonna tab into edit mode, and I want to bring this in just to where the walls are right in here. I'm gonna bring it right to here, and I'm gonna bring this one right in to right into here in the center of this wall and the same thing down here. I'm just gonna take this actually in, drag it right up to here into that wall and right in the middle of it right like that. Okay, so then what I'm gonna do is extrude out the hallway here. But before I do that, I want to take this and duplicate it. So let's just take this and shifty X. I'm gonna move this over here, and I also want to move this into here. I'm gonna press shift e and move this over into here. Okay? So now I need to do these for the carpets. Um, I want to move this into the middle of this wall. Move this in the middle of this wall. I want to move this one up into here. And this one. I want to move right over here. So all of these offices here will have carpet on it from this object here like this. And then, um, this object here, we need to do a similar thing. So I want to take this face and move it to the edge of this right here. I want to take this one and move this out here. Um, this I think we need to move. But I realized that this right here is Ah, hallway with that wood floor. So I need two of these. So I will tap back into object motor, Let me move that orange back the geometry. And I want to duplicate this and bring this down like this. So, yes. So we have this right here and I'll tab into edit mode and bring this into the center. Let's bring this one down all the way down year, and then I'm gonna begin adding edge loops and extruding out. So for this, I wanna press control are and add an edge loop here, and then I'm gonna get B and drag this all the way over. Let me just used the x axis to drag this all the way over here. Um, it looks like I should probably pull this down a little bit more like this, and we go, and the overlap to the outside is fine. I don't worry about that because we aren't going to see that outside. All right, so there we go. So we've got that area for all the carpets in here. Now, the carpets up here, we should take this and press control are and put an edge loop there. And then I'd like Teoh extrude this all the way down to here and then at an edge loop right year. And now we should be able to extrude this straight down in the Y axis to here. Put that in the middle of the wall right there. Okay, so we've got those areas of carpet here and here right now. We need to extrude some for the wood areas. Control are. And I want to bring this into here. Let's grab this and extrude it that we go. And now this Syria down here, I'm gonna need Teoh Add a new edge loop in here. So control are there it is. And I'd like to bring it. Yeah, straight down like this, I'll grab these two faces and hit e and let's pull these all the way down here. And I think I'd like to grab these two edges. Just this one. You can see that there and shift. Click the other one there and then bring that out just a bit. And I'm gonna grab or create an edge right there. And then let's take this face it e and pull that out. All right, Now, we just need to create an edge loop here and extend this one like this. So this edge e and I'll bring this all the way down to here will be like this, and control are. And let's bring one right here and extrude this out like that. Okay, so now we have the floors for both the wood and the carpet in two different objects. I will hide the walls here so we can see it as well as Thea door door frames and window frames. So there we go. There are two objects. We've got Thea carpet here, here and here. So let's make that all one object. All press control J. And I'll press control A and apply the scale. And then we've got the wood here. Let's ah, press control A and apply the scale there. Now let's go. UV map them. So here in the U. V editing screen layout, let's ah, select the wood area here oppress you and smart UV project. And let's put an island margin of 0.1 here. Click. OK, there we go. Now it's select this other one for the carpet. I'll tap into edit mode. Let's select everything you smart UV project and island margin is still at 0.1 So let's click. OK, and there we go. All right, so let's give these to objects and name. I'll hit the period key over in the outline, er and we'll call this Ah, floor would. And this one is going to be floor carpet. Now let's give these two some materials, so I'll choose the Wood. We'll take away the test pattern and we'll call this floor would. And let's choose the other one and we'll call this floor carpet. All right. With that done, let's liked everything. Go to file export and Fbx will choose mesh and selected objects here in our exports folder . I'll just call this floors, all right, And then the next video, Let's put the textures on it.
99. 099 Texturing the Floors: here in substance pain or I'll go to file new. And for this I want to choose 40 96. Since these objects are so big in the scene. So I'll click Select Let's choose the floors Fbx and OK and here we go. Let's bake are textures bake mesh maps. We'll choose 40 96 and our anti alias ing now for both the floor and the wood. We want material, so that's good. Let's choose Baycol textures and there it goes. All right, those air done. Now let's start working on each of the textures. I'll begin with the carpet here, remove this layer and then, um, I think I've got a carpet carpet gray. Let's take a look at this. Yeah, let's just go with this. This looks good. So it's Ah, little big. Let's go into our UV scale and let's increase this quite a bit. Kind of hard to know. Let's get in a little closer here. If we were in the room here, maybe I'll just take it up to 25. Let's try that. Yeah, that looks pretty good. And then let's take a look at the wood. Um, I will search for that, and we want kind of, ah, darker wood. This one's not bad parquet. What's this? Would walnut? Well, that looks kind of good. Let's try that. Going to get rid of this layer here, drag that on and couple problems first. It's too big, and secondly, it's turned in the wrong direction. If I recall, the wood grain is going this way in the offices. So let me, ah, turn it 90 degrees like this. And then let's try and bring that would green down quite a bit or make it quite a bit smaller. Yeah, that's pretty good. It's hard to find something that won't be easily repeated. That won't seem like it's a repeating pattern. I think that looks pretty good. Let's give this a try. I'm at 7.2. Maybe I'll try eight. Well, let's take it back to seven. 7.5 7.5. Let's try that. Okay, so now that we've got those, let's export these out file export. I'll put them in a folder called Floors. Let's just ah, create one folder for this and we'll call it floors and I'll select that folder. Let's use the blender PBR right here Let's make sure that our texture sizes 40 96 and then let's just export this out. All right now that those air done, let's go back to Blender Now let's go into our shading tab here in Blender and let's begin adding our materials. But let's do it with our node Wrangler. Add on. So I'll select that be SDF shader, Press control, shift T and in our textures, Let's find our floors and for the wood. Oh, let me, Ah, change it to horizontal here so we can see. Here's the wood. I'll select all of these and there we go. Now let's work on the carpet just like that. Just select the B SDF Shader Control shift T and let's select the carpet. There we go. All right, let's see how it looks. I'll go back to the layout. Tam. I want to take a look here. Yeah, that looks pretty good. Let's go and bring everything back. Let's zoom in and see what we think. So I think it may be a little bit too big. I think that texture may just be a little bit too big for the floors there. I feel like it should be a bit smaller. Let's take a look at the carpet here. I don't mind the carpet. I think that's OK, but the wood grain needs to be a little bit smaller. So I think what I'm gonna do is go back to Substance Painter and in here let's just select the wood floor and for the scale. Let's take it up to a list. Take it up to 12 see how that works. And then I will go to file export and just diesel ect the carpet. And then when we export this out, it will just over right the wood textures. And then if we go back into blender and over to our shading tab, weaken, reload the images for this shader. So I'll come right down here and click reload images. And if we go back to the layout tab, we can see that the grain is a bit smaller now. So there we go. Well, as I said, I think I'm gonna go through and finish off the text Oring here in the scene. I would encourage you to do the same using all the techniques and tools that we've used so far throughout the course. Then in the next section, what let's do is begin working on the lighting, will bring in some lights, will talk about the E V render engine and will render out a few images of the scene, so that's coming up.
100. 100 Adding Lights to the Scene: Well, since the last video, I've gone ahead and added textures to the rest of the objects. In addition, I've outed a couple of new things like this white panel on the little reception desk over here. I've added these doors here, zoom into one of these here. And basically all these are are just duplicates of thes doors here. I've also added kind of an area out here. We already had this part sticking out. I've just duplicated parts of the wall and put it here and duplicated a part of the carpet and put it there. Just so if we're ever looking out this way, we kind of see this area out here as if it's kind of a hallway. I've also added sphere objects to the canister lights right up in here. Me select this and zoom in here. So I've just added spheres. I put them in each of the canisters and what I did is I actually gave them a blender material so big over to the materials panel here, and I've given it a new material and all I did I didn't take it into substance pain or anything. I just came down here to the emission, and I just drag this up. So it was down here. I just drag it up like this toe. Add a little brightness to those here in Blender. All right, so so I think that's about all I've done so far. What I'd like to do now is bring in some lights to illuminate the scene when we come over here to the Render preview. So currently it's just like this is just kind of adult gray because we don't have any lights in here. And in fact, what's going on? Why were getting any light at all is because over here in the world properties the color of the background is this medium grey. If we click here and drag all the way down, you can see there's no light in there at all. The only thing we're getting is this gray background that's giving it just a little bit of light. All right, so if we go back here, let's add a few lights, and the first thing I think I'd like to do is to add some spotlights to all that hanging lights in here. So let's begin with this one here. What I can do is with this light selected. I'll just press shift us to to snap the cursor there. And then I'll press shift a and go to light and spot. And there we go. Now I'm gonna pull this down so it's just below where the bulb is here. I don't want it to go up into the bowl, because if we go into the bulb, we're going to get some artifacts. But if I come down here below just like that, that should be good. Now let me go over here to the Render preview, and we can't really see much happening on the floor, and that's because it isn't very strong. So let's go over here to the light properties and ah, for power. Let's let's take this up, Teoh. Let's try 200 for now. So there we can see the actual spotlight illuminating the floor. I think that's a little bit too narrow of an angle, and I feel like that edges a little bit too harsh. So the blend over here is what we can use to deal with the edge. If I drag this of you can see how it kind of gives it a nice fall off a nice kind of gradual fall off there and then I can take the size and it's currently at 45 degrees and I could take this up. I think I want to drag it out like that's not all the way, but pretty far. So it's pretty wide giving some good coverage here. So maybe something like this and we go all right. So now we need to get thes into the other lights as well. Let's give it a name. Let's call this hanging light spot like that and we ought to create a new group for this. So I'm gonna press m, come down here to new collection and call this lights. There we go. So now we have our object, our spotlight in this new collection. Now let's go to the top view and let's go toe wire frame and let's move this around and put it under each of the other hanging lights. I'm gonna press shift D and X and move this over here, kind of get that right in the center there and, ah, let's select this one then and move this one over and we'll just go through and add these to each of the hanging lights. All right, we've got those in. Let's go back to the material preview. No, Excuse me. Let's go back to the rendered view. Here we go. And let's go in here and see what it looks like. I'll select an object and just hit the period key and zoom in. So here's what we've got so far we're getting there. But, um, we're gonna need more lights. Of course. So the next thing I think I'd like to do is start working on the canister, lights and weaken. Just duplicate one of these if we want and begin with that. So let's press shift, E X. I'm just gonna move it over here some, and then I'll go back the top view and wire frame, and I'll put it in one of these canisters right here like this. And then I think we're gonna have to move this down. Let me ah, go to solid view and zoom in. How are we doing here? Well, actually, we're gonna need to go up, aren't way. So let's take this up into here, but not quite into the light. And I think for this. I don't want it quite so wide. Maybe let's ah, bring this down. Some like this. Let's do that. Maybe to 60. And then what I'll do is hit the period key, and this one is gonna be a canister spot. There we go. And then I'll begin duplicating and putting them in the canisters as well. So to go back to the top view and wire frame and once again duplicate and move and put each of these just underneath the canister lights. Then I'll select each one of these thes three. And let's move these over Shifty X and I'll move these two here. Shifty X, and I'll move these two year, and then we need one more or a couple more over it here in the kitchen. Let's press Ah, shifty and move that over to here like this. And then what I'll do. Let's take a look at how tall this is. Now, this one. Yeah, we are gonna need to pull that down a bit, so let's do that. Let's pull that down and this 1 may need to come out more again. So let me ah, take this size and bring that out again, and this one will call Ah, kitchen canister. There we go. Now let's go back to the top and duplicate Thies to get these in here and here. All right, well, let's take a look. Now. I'll come over here to the rendered view and we're getting there, but to me it looks like everything's just not bright enough. So one thing we can do come over here to the Lights group and we can right click and choose select objects. Now, if we press Ault and click and drag in the power field here under the light tab, we can affect all of them. So if I all to click and drag, we can drag all these up. Let's go up to 400 see what happened. See if that's just way too much. Here we go. Let's try that. So actually, that's not too bad. However, I feel like the canister lights out here should be a little bit broader a little bit wider , So what I'll do is oh, come over here to the canister spots. Click that and then let's all to click the size and bring those out some, like that kind of spread the light around just a little bit more now. One thing I've been doing is I have been viewing this in the E V render, and what I'd like to do is first of all, work with cycles. So let's go over to the render properties and let's switch the render engine from E V two cycles and let's see what happens. Cycles by its very nature is slower, quite a bit slower than TV. However, it looks better. It is a much more realistic renderers. So in choosing between these two, you really have to kind of figure out what you want greater speed or greater realism. And for me, at least for this scene, there is so much glass that I think it's going to be beneficial to use The cycles render engine simply because cycles does glass quite a bit better than TV does. But it still takes a while. Well, the cycles preview is all done, but we've still got a lot of grain in here. Noticed that under the render properties we've got Vieux Port at 32 render it 1 28 So this 32 is what's happening here in the view port. And if I hit F 12 or come up here to render and render image, it would use 128 samples. Now, I've chosen GPU compute here under the device simply because it's a little bit quicker than a CPU. Now, you can come over here to edit and preferences to choose what you want to use. So currently, I don't have a great graphics card in this particular computer, but I'm gonna use it for GPU rendering simply because it's quicker than the CPU. So I'm gonna go ahead and choose both of these, and hopefully that'll help things move a little quicker. All right, so close that. And let's see if it goes a little quicker here. Yeah, it seems to be moving a little bit faster. All right, so we've got the basic lighting set up in. We're gonna do a lot of tweaking from here, but this is a good place to begin. And now that the lights air in weaken begin working on the material for the glass
101. 101 Adding a Glass Material: I forgot to mention in the last video that I had put on a new texture for the floor. You probably already noticed that, but I felt that this, um, kind of parquet floor looked a little bit better than what I had previously. I just took the floor, would object back into substance painter, put a new texture on it and then exported the textures out again. And when you export the textures out in the same place, they just rewrite over what you had before and then in the shading tab. Well, I've got to do is just come down here and click reload images, and it will reload the new textures. So I forgot to mention that also, it looks like I forgot to add some spotlights underneath these hanging lights as well. So I'm gonna select this light and hit the period key on the num pad to zoom in. Um, I think what I'll do for this is just select the light, grab this point right here, and move that cursor to it. With shift s two. There it is. And then all grab this light duplicate with shift D on. Enter and then I'll press shift s and snapped the selection to the cursor. There we go. So now we have one there. Ah, that's probably going to be too broad and too bright. Let's Ah, switch over to our rendered view to take a look. Now, of course, we do have cycles turned on, and we don't have to leave cycles on when previewing, even though we're going to render it out in cycles. Eventually, we can always come over here and just switch TV just to make things move a little quicker. So for this, I've got it spread out quite a bit. Maybe I'll go to the light properties and bring the size down some and also maybe bring the power down. I'll take this back down to 200 so it isn't quite so bright. Right? So with this selected, I'll go back to the top view and wire frame, and I will copy it and put it in the other lights as well. Right here. Back to my rendered view. Yeah, let's go with that. So, once again, E V gives us an approximation of what we're going to see in cycles. But when we actually work on the materials for the glass. I think it would be best to be in cycles, so I'm gonna go back over here and change it back two cycles. So to set up the material for the glass, let's go to the materials panel and will create a new material and we'll call it glass. Now, we're gonna want some reflectivity in here, So I'm gonna bring up the metallic in here, maybe take the roughness down as well, Just a bit. And then also, if we scroll down here, I need to increase the transmission. So I'm gonna click here and drag all the way over toe one. And I think we're gonna have some trouble viewing this. If we don't put a light behind there to illuminate the objects, that's behind it. So what I'm gonna do is I'll just take this corner right here and drag down on to create a new window. So now we can kind of move around more easily here while this is previewing. So I'm gonna come up here and instead of trying to put canister lights in for each of the office is I'm just gonna put a big area light in for each one of these. So I'll press shift a and go to light and area. And here we go. Take this and I'll move it over here and you can see an area light is just a big square. That gives us a nice diffuse light coming off a larger object. So I'm gonna hit the S key and scale this up a bit kind of center it in the scene. I also need toe come around and have you move this up a bit. Maybe you have to about here. Let's try that. And then let's also increase the power of it. So for now, try 400 again. Let's try that. Well, that brighten things up a bit, but we still can't really see through it. Let's select the material or select the glass and go back to the material. And let's take the roughness down all the way. Let's do that. And sure enough, now we can see through the glass. Not only can we see through the glass, but we've got reflections of this scene out here in the glass as well. And that's one thing that's really nice about cycles is you get this automatically with Eva . You've got a fake it here in cycles. It just happens as it does in the real world. I think I also want a little bit of a tent to the window. So I'm gonna come up here to the base color and move it just a little bit into the green blue. Not lot, because a little goes a long way with color on glass. So just a little bit. All right. I think that's looking pretty good. If I tumble around here, let's take a look. Yeah, that looks pretty good. I think I don't know about how bright the light is in there. That may need to be adjusted in comparison to the rest of the scene. But while we're here, let's go ahead and put the glass material on all the others. So with this selected, I'm gonna go over to the outline and press the period key on the num pat. And that will tell me which one this is. It's that cube 28. You can also see it over here. Now let's just right. Click on that collection and choose select objects. Now go back to that 28 control click it to de selected and then control Click it again to select it. So it's the last thing we've selected. And then I'm gonna press control l and Material, and that puts it on all the others. Now I want to go through and put these area lights in all the other offices as well. Let me hit the period key in the outline er and find it. There it is. It's right here. Let's call this, um, office light, but we go and get the period key again. There it is. Now what I'll do is expand this one view. I'm gonna hover over that view port here and press control space bar so we can just see this. And now I'll take this and duplicated and move it to all the other offices. We're gonna have to do a little bit of scaling for each one. But let's just, ah, take this and scaled in the X about like this and then, Ah, let's take this one shifty ex and move it over here. And so I'm just gonna go through and put a nary a light in each one of these offices. And as we've done before we can go through globally or selecting all of them and adjust the power. But for now, let's just get him all in. Okay? I've put them all in the office is now. Let's go back out. Press control, face bar and let's see how that looks. Yeah, I think that's looking all right. Now let's take a look at what happens if we go back to the E V renderers. I'll just change from cycles to E. V and look at that so you can see that the two different renderers managed glass in completely different ways. They're very similar in a lot of ways. In fact, they're more similar than the old blender. Internal renderers was two cycles, however, when it comes to glass, big difference. All right, so now in the next video will add a camera to the scene, and we'll do a couple of renders and see how it looks
102. 102 Rendering with Cycles: to render the scene out. I think I'd like to render it from a different angle, maybe. And what? Turn it Maybe something like this. Let me join these two areas together, right? Click and join areas. There we go. I think I'd like it something like this and like that. But to do that, we first need to add a camera. If you recall from the very earliest videos, we deleted the camera out of the scene while we were working. Let's go ahead and add that back. I'm gonna click on the scene collection there and then press shift A and camera. Here we go. And there it is. Over here. Now you can move the camera anyway you want, you can grab it just like any other object and move it around and you can get the R key and rotate it so you can move it however you like. But I think one of the easiest ways to move a camera in blender is to get your scene kind of set up the way you want it. Let's say, Ah, I kind of wanted something like this and then to move the camera to match this view. You can press control all 20 on the NUM pad, and it will pop into that view. Now it's a little bit narrow. In other words, if we go over here to the camera properties panel, I've got the cameras selected. You can see that the focal length is 50 millimeters, so I'm gonna change that to 35 millimeters. Let's say kind of widen the view out just a bit Now. If I zoom in or zoom out, it'll zoom through the view of the camera. And if I tumble, if I tumble around like this or moving anyway, it'll bring me out of that camera view. So to get back to that camera view, you compress the zero key. If this isn't the exact camera view you want, the way I like to move the camera is if you press the end key and come over here to the View tab, you can turn on this lock camera to view. So if you check that and I'll close that panel there now, if I tumble around and zoom in or out, it's through the camera. The camera is staying connected to the View port. Let's say I, um Oh, let's say I get it about like this. How about like this? If you want to make the outside of the frame a little darker, you can come over to the View port display under the camera properties and here this passage, part two. I'm sure that's a horrible pronunciation of that. But this particular setting will allow you to make the opacity a little bit greater around the frame there if you want. You can do that just to view that a little better if you want. Think maybe I'll bring this down some and over. I don't know something like this. I'm kind of wanting a view from here. For now, let's see how this works. Now let's go over to the output panel here and currently I've got my resolution at 1920 by 10 80 which is the standard HD resolution, it's at 100%. You can, of course, pull this down right here and choose other presets. You can choose several different kinds of four K HD etcetera, but I think the default is just fine. So now, once again to render you can come up here to render and render image, or you can just press F 12 and once you do, the render will begin and we'll see how long this will take. Well, on my computer, the render took three minutes and 12 seconds, so that's just mine. Your mileage may vary, but it really depends on the computer how quickly you can render a scene and this is OK. But I think there's some things we need to deal with. First of all, I think the lights in the offices are too bright, and I think the light out here is too dark and there's a lot of green. If we zoom in, you can see there's just a lot of graininess in the image, So we've got some things to work on. Let's first of all work on the lights out here in the main area. I'm gonna close this window here and let's go select those canister lights again. I'm gonna twirl this down under the lights collection and let's choose thes canister spots right here and back in the lights property Gonna press Ault and click on the size and let's bring this up toe. Oh, I don't know. About 120 or so. Let's just try that. So that will hopefully give us a little bit more light in that area now for the offices I want toe go down and select the office lights all of these area lights and let's select all of those. And let's see if we can take the power for these down toe. Let's try 100. I'm just gonna ault and click and drag down to around 100 let's see how that works. Alright, So first I'm gonna save the scene with control s and then I'm gonna hit F 12 and try it again. Yeah, I think that looks a little bit better. It's brighter out here and not quite as bright in the offices. No, If I wanted to save this image out to my hard drive, I can always just go up to image save as give it a name and I'll just call this Ah, test 01 and save it to the hard drive. But as we said, we've got a lot of noise in this image and they're really two different ways to clean this up. One is just to increase the number of samples so if we close this and go back to the render properties weaken, Just increase the number of samples here in the render setting. Now, at 128 samples, it took just over three minutes. If we increase this, it could take 6 12 Who knows how long it could take before we get an actual clean image? So another way to do this is to use blenders, new D noise node. And in the next video, we'll take a look at using that.
103. 103 Using the Denoise Node: before I do anything, before I move the view I'm gonna press the end key and uncheck this so that now when I tumble around, the camera stays in place. Now you may have noticed that I've got the ceiling hidden away And you may be wondering, How are we seeing the ceiling when we do Orender? Well, let me show you what I've done here. So if we go to the walls floor in sealing, I've hidden the ceiling here. But this only hides an object in the view port, not in the render. If we come up here to this little filter, we can pull this down and we can add different ways that we can filter are objects in collection And one way to do that is to filter by the render. So if I turn this on now, we've got this extra icon here for the render. If I wanted to turn the sealing off both in the view port and in the render, I would disable that here as well. So you have a little more control. The mawr filters you add on like for this one here, this is select ability. So if I um, didn't want to be able to select. Say this. Ah, drop ceiling here. Let's say I didn't want toe accidentally select this and move it around. I could turn off the select ability right here and now. No matter how much I click on it, I can't selected. I'm selecting everything else underneath it. All right, so I'll turn that back on and I'll turn this off again right here. So that's how I'm having the ceiling hidden yet. Still having it appear in the render. All right, let's work on Denoix Zing. A rendered image trying to clean it up some. What I'm gonna do is create a new window. I'll just grab this and move this down here and maybe I'll hit the zero key up here to view from the camera right here and down here. I'm gonna change this to a composite editor. So right here, or a composite her right there. Now I want to use nodes so I'll check that. But I also want to see the backdrop so I'll click this now. We don't see a backdrop yet because we have to render an image to be able to see that. But What I'm gonna do is I'm gonna move this composite over and the render layers note over a swell. So the composite er nodes are really very much like texture and material nodes in the shader editor, but they're affecting the overall image of the render. So to add a Dean Oise filter to this, we can press shift a go to filter and D noise right here. Now, if we look at this, we can see it's got an image socket, which is good. We can put that into there, but then it's also got a normal and albedo and we don't have those here to get those here to be able to use. We need to come over to the layers property panel right here, and we need to turn this on Denoix zing data. Once we turned that on, look at everything we get over here. So now what we can do is we can take the image here down to here the Denoix zing normal down to here, and the Denoix zing Albay dough down to here. Now, In addition, I'd also like to be able to see it here, as I said, So I'm gonna press shift A and I'm gonna go to output and create a viewer right here. Now what let's do is take this image and drop it into there and now all of a sudden we can see our image. So what's the difference Here, let me Ah, grab this and move this down. If we take this right here and drop it right there, that's the render as it waas. Now I need to also say Let me press the end key to close that if you want to zoom in or out or move that backdrop image, What you can do is press the wiki to zoom out. You compress all T V to zoom in, and you can press ault and use the middle mouse button to move or pan back and forth. So I'm gonna press the wiki and zoom out just a bit here like this. Okay, so this is the way our image looks as is just without doing any Denoix zing at all. But we can take the image from here and drag it right onto the viewer and you can see how it cleans it up. But you can also see how, what it's doing is it's basically blurring the edges just a bit, so you can see there's a bit of a blur to it. So just like everything else, it's a trade off. How much time do you want to spend, rendering the image as opposed to how much of a blurring effect you want on the edges from the D noise filter? I mean it. It doesn't look too bad. Let's take this image and drag it over to our composite Or so the renderers can work here. Now it's press F 12 again and take a look. All right, the renders finished, and it looks pretty good. Now. A couple of words of warning for this one is that the DEA noise filter currently only works with the cycles render engine. Also, it really shouldn't be used for animation is really more for a still frame. Or if you want a preview on animation and then render it out at higher quality without the D noise filter, and to get more detail with the Denoix zing node, you can increase the samples, but you won't have to increase them as much as you would if you weren't using it So to get the same level of Denoix Zing that we have here, you'd probably have to increase the samples 234 times what it is. Let's take a look at that. Let's go back to Blender and I'm gonna go over to the render panel and let's increase the render samples from 1 28 to 56. Let's do that and let's see how long it's going to take. Currently, this render took two minutes and 56 seconds, so now that we've doubled, the sampling rate will probably double the time. But it will still look better than it would have without the Denoix zing. So let's give it a try. I'll go back to Blender all press F 12 and here we go. All right, the render is done. And, yeah, it took almost twice as long or actually just a little bit more than twice a long, just over six minutes. And I really do think that the detail is quite a bit better. But once again, to get this level of Denoix Zing, we would have had to put the sampling rate even higher than this. So if we go back to Blender here. Let's now take the image here and drop it into the viewer. So that's what we got. Press Ault and Middle Mouse button to move around here in the backdrop. So that's what we got, which is better than the grain or the noise that we had at 1 28 But then when we placed the D noise in, we get a Nimitz with a little more detail, and this particular de noise note is actually adaptive, so it only gives you the amount of Denoix zing that you need, depending on the quality of the render. But it still gives a very nice image and allows you to increase the quality, reduce the noise of the image without increasing the render times astronomically.
104. 104 Rendering with Eevee: Well, now that we've tried the cycles render engine, let's not try the same render with e e v render engine. So what I'll do here in the render properties it I'll switch from cycles to evey notice. We lose all of our Denoix zing sockets here in the render layers node, We don't need this d noise here at all anymore because it just isn't going toe toe work. So I will hit X and delete that I'll delete the viewer as well. Now we need to hook these backup because no matter what render engine we use, we have to be able to go to the composite here. So I'm gonna go from image to image here. If we didn't hook that up, Orender would just be black. There wouldn't be anything there. So let's go ahead and hook that I will then join the areas here and here we go. So now with all that change, let's just go up here to the render a preview right here. Click that and see how it looks. All right, here we go. It doesn't look too bad. It's just that the windows we can't see through them at all and we're not getting any reflections on them either. So if we wanted to render with evey, how would we get these windows to be one transparent and to have reflections? Well, let's go over that now let's first of all, in the renders properties here, I'm gonna turn on ambient occlusion, which gives us a little bit of a contact shadow between objects. I can turn on bloom here, which takes thes bright areas and kind of blooms them out. We can reduce that by coming in here and turning down the intensity so we can bring that down quite a bit. Maybe I'll just type in 0.1 for that. Well, too much. How about 0.1? There we go. That's that's a little better now. It's also turn on screen space reflections That's gonna help, and within here, let's turn on refraction. Then we still can't see through there. Let's go into the material of the glass itself. I'll click on one of the glass objects and let's go into the materials down here at the bottom of the material. There's this new panel here that isn't in cycles. In this settings panel, we can come over and turn on screen space re fractions here and there we go. Now we can see through them a lot better. However, we're getting this strange kind of double image here. If we go back to the Render properties here, we can see that in our screen space Reflections We've got a thickness of point to, I think also under the screen space re fractions here. If we set this depth at point to as well, that really clears that up here in the offices. Okay, so we've got our screen space re fractions turned on. We've got our screen space. Reflections turned on our thickness on each at 0.2, and we've also turned on re fractions here, and that allows us to see through the glass. And that's good. But at this point in time, we don't have any reflections. We can't see the table or anything in this area reflected in the glass. So if you recall, I said that reflections and TV are just a fake and they really are there. Just you've got to kind of fake it to make it look realistic, whereas cycles it's an actual ray tracing render that tries to reproduce the attributes of light in the real world. Here on TV, it's all about speed. It's the speed in which it's rendering. That's important. That is its priority. So you've got to kind of do a couple of extra things to get things like Reflections toe happen. All right, So with this glass selected, I'm going Teoh, move the origin to the center of the geometry and then I'm gonna move the cursor to their shift s too. And now what we want to do is create a reflection plane. I'm gonna press shift A and down here under the lights is light probe. And under this, you can choose reflection Plane and that allows us to simulate reflections on a piece of glass. So I'll click this and let me zoom in. I'll hit the period key. You can see it's this flat plane that has an arrow sticking up out of it. So what I'm gonna do is I'm impress our why 90 and turn it so the arrow is facing out in the direction we want to see the reflections. I will take this and maybe scale it up a press s and y and scale it. So it covers the glass on the door and then also s and Z. So it covers the windows vertically as well. Okay, We can't see much here, but if we take it and we pull it out just a little bit look at that. You see how all of a sudden the reflections happen? There they are. But you can pull it out just a bit, and the farther you pull it out, the more they go away, you push it in, and then you push it in too far and they go away again. So there's this kind of happy medium between there, right about there. So now you can see the table. You can see the walls that may press zero. To go back to the render view, you can begin to see all the reflections in there, and then all we need to do is take this and begin to duplicate it and put it on these other windows within the frame of our camera. So I'm gonna pass shift, do you? Why? And move this over. And then ah s why? And scale that down a bit. Then we go and then I think I want him want reflections over here as well. So let's press Ah, shifty X and rz 90 up. That's turning the wrong way. Let's go. Um rz negative 90 There we go. And then I'll bring this back and let's put it in here. We need to get it at just the right place. So we see the reflections. Let me move it back. There we go. See how they just pop in there. Here we go to move this over snx, and I'm gonna scale that down a bit. Get those in there and maybe we need one more shifty X and I'll move this over here. And let's put this one in places well S and X to scale that out. And there we go. All right, So let's hit zero. Go back to our camera view and yes, so now we can see the reflections in the windows. The quality of the reflections is not as good as in cycles, but I think it still looks pretty good. And once again, it's a trade off. How much time do you want to spend in the rendering process? As opposed to how much realism do you want? So let's go ahead and render this out and see how long it takes. Now, if we come over here to the sampling under the render properties, we can see that currently the render samples for this is that 64 The View port is at 16. So let's see how it looks. At 64 samples, I'll hit F 12 and here we go. And so the render is done, and this render with evey Onley took about 10 seconds. You can see right up here. That's quite a difference. Um, so it's really gonna be up to you What you want to use these two renderers for? I think TV is a wonderful renderers for animation. You can render a lot of frames relatively quickly, but once again, cycles has a more realistic way of dealing with the paths of light and reflections. So there you go. What you going to choose? I think it's probably depends on your project. You could make a different decision for each project. It's totally up to you. But the great thing about blender is you have these options. You can choose the method of rendering that is right for you and the project that you're working on
105. 105 Conclusion: Well, thank you for joining me is we've created this scene using blender and substance painter. The combination of these two tools is a powerful pipeline for creating environments for animation, architectural, visualisation and games. And I hope this course has helped to introduce you to the fundamental tools and techniques of each of the programs. I look forward to seeing the environments and scenes that you create with these tools. And I hope you continue to learn and make the world's and stories that you have in your head all the best to you keep creating. And I hope to see you again soon. Thanks.
106. 106 Bonus Lecture: Reflection Cubmaps in Eevee: Let's not take a look at another kind of light probe in Blender. I'm gonna tumble around and let's go over to the kitchen area because we don't want to do is work on the reflections of the refrigerator and, ah, the coffee maker and maybe even the ah, the faucet here. So, first of all, what? Let's do, let's bring the camera over to this view. No press control ald zero and that will bring the camera here. Well, then hit the n key and go to view and blocked camera to view. And now we can arrange this. Maybe I'd like the view to be a little bit wider angle. So I'm gonna scroll or twirl these up and go down to the camera here and in the camera properties. I'm gonna change the focal length from 35 to 30. Let's try that. Yeah, something like that. All right, So here's our frame. I'll turn this off now and close that panel. Let's go over to the rendered view here and see how it looks. All right, so we can see some reflections in here, but not not, not a lot. I mean, it's kind of we get a little bit on the floor and a little bit up here from one of the the lights, but not much, really. So currently, screen space reflections is on right here. And that's what's helping us with the windows. Let's turn that off for now. And when we turn that off, we get really no reflections at all. So what we can do if we press shift? A. We've got this Reflection Cube map, and that's what we're going to use. I'm gonna select the refrigerator here, and then I'm gonna press The shift s to to move the cursor there and then shift a and light probe reflection cube map. What we can do now is go ahead and bake the indirect lighting. So if we scroll down here indirect lighting here and we choose bake cube map, let's try this. Hey, that's quite a difference, huh? Look at that. So now we get some pretty nice reflections from this. That's not too bad. Now, what we can do is we can isolate it more for just that object. We can change the size. So if I come over here to the Cube map data Properties, I can change the size from sphere to box, and there it is. Now let's go to the top view and wire frame, and let's scale this in until it fits a little bit better. I'll bring that in like this and then bring it in and the why here about like that. There we go, and then we can also bring it down. So it's the proper size here in the Z axis as well, or at least a little bit closer where we go. All right, so let's go back to our camera view and the rendered view. So there's our cube map for the refrigerator. Now let's Ah, create one for the coffee machine as well. Weaken. Go through the same process we compress. Shift a tube map, change it to a sphere and bring it down quite a bit now. Oh, I've still got my cursor over here. I should have moved the cursor to the coffee machine. But that's okay. Let's try this. We can bring it up and get it the right size. All right, I'll hit zero and go back to the rendered view. But we need to make this a little bit taller. Don't Lee. Let me do that. Okay, There we go. Now, let's bake this. I'll come over to hear the cube map. All right, so now we've got a reflection. Steer. Let's go ahead and render it and see how it looks. I'll hit F 12. Yeah, that looks pretty good. So we're getting some reflections from the environment, from the lights and from other objects here. We could do the same thing with this faucet over here. Let's hit, escape. Select the faucet. You can see how it's kind of Ah, dull material here. We can move the cursor to here, create a light probe cube map, and then I'm gonna move it up into here and scale it down quite a bit. So it's just around that faucet, and then we can come over here and bake when there you go. So we can see quite a bit more reflections in there. Let's go back to our camera with zero key it f 12 and see what we think. Yeah, there we go. Now I want to point out notice what's happened over here are windows are not transparent anymore. So what we can do is come over back to the render properties in turn on screen space reflections. But when we do that are reflections on the metal. Here aren't as crisp artist clean, right? So if we hit F 12 and take a look at this, this is what we get. Still, not bad, but not as clean as it was without screen space reflections. So once again, a trade off, you're always kind of balancing what's important and what you want out of the render and prioritizing one over the other. So that's how you use the reflection cube maps.
107. 107 Bonus Lecture: Auto UV Unwrap in Substance Painter: earlier in the course, I mentioned that substance painter can do UV mapping. It's a beta feature, but we might as well go through it and take a look at how it works. I'm gonna go to file and new and select, and I'm gonna bring in an object that we've already done. Let's use this desk, object Here I'll click open And then in this panel, we can choose to auto unwrapped right here. We if we turn this on and go into our options panel, we can choose to re compute all which I think we need to do for this object because it already has a UV map on it. But if it was only partially you vihd, we could choose generate only missing data here for thes two. But I think we want re compute for all of these. And then let's click. OK, here and then. Okay, here and here it is, but how do we tell how it's done? Well, we can come over here to this pole down and choose three D and two D. And the two D is the UV map. So it looks a little wonky here, right? It looks a little twisted and uneven. Let's go ahead and bake the textures and see how it does. I'll come over here to the texture sets and click on Bake. Let's do 2048 um, anti alias. Sing it to buy to our I D should be Vertex color, cause this did have protects color on it and I'll click Bake here. There it goes. All right, so it's all done. Let's click. OK, let's go back to the layers and let's go ahead and create a new folder here. I'll call this top. Let's take, um oh, I don't know some wood and drop it in there. Let's mask with color Selection will choose that green and there we go. So it's not exactly what we'd want, is it? We could, ah, increase the scale, and we could try and rotate it and get it the way we want it. Maybe something like this I don't know. It's still kind of clue GY, though, uh, let's ah, go back to three D. Only here, let me choose that. So you can see that it's not exactly doing what we'd want here on the sides. The UV map has really come out kind of angled, and that's really not what we want for something like this. But let's go ahead and finish it up real quick. I'll add a new folder, call this legs. I'll grab that painted metal again. Here we go. Steal tainted and drop these on the legs here. All right, so there we go. That's just a basic bit of text. Oring. We can take a look at it again here, and we did So now when we export this out, we can't just export the textures. We also need to export the model because the U. V s now are specific to this particular model. So let's first of all, export our textures in the normal way. Come over here, Teoh Textures, and I'll create a new folder on Call This desk. You vihd here hoping that up. Select the folder. Let's now. Ah, like blender PVR. We wanted 2048 right? And let's export this. All right now we need to export the model. Let's go back up here to file export mesh, and here we can just click export. I'll give it a name. I'll call this desk you vihd as well and I'll put it in the same folder where I put my textures. There we go. All right, So now let's go back to Blender here in Blender. Let's now bring that fbx file in. I will select the main collection. So it goes into that. I'll come up here to file import fbx and let's go to that folder into the textures into that folder. There's our FB X and import. Now look at where it went. It went right over here in the exact same place as the one we exported out originally, which is really nice, actually. So I'm just gonna move this forward just a bit like this. Now, let's apply our textures to this. Go into the shading tab. I'll hit the period key. Here's our desk. I'm gonna give this a new material. Take this off, add a new material, call this desk you vihd, and I'll select the principle be SDF, shader and principled set up and let's go in here and find those textures. Here they are and texture set up and there it is. So all the textures have been brought back onto this object. It has a new UV map If we go over to the U. V editing screen, lay out, we can see the UV map that came from substance painter. Um, it's a bit of a mess compared to ours, but it still works okay for this particular object now, it won't work really well for anything more complex. Like if you tried to do one of these chairs or anything else in the scene, it isn't going to do real well, but it is a beta version. It has a lot of promise. I'm certainly going to keep an eye on it as it continues to evolve.
 Darrin Lile, Blender Foundation Certified Instructor