Transcripts
1. Introduction: You get excited watching smooth SAS explainer videos and wonder how
they even do that? Hi, I'm Valerie, and after creating several
successful courses, I'm super excited
to announce that my most advanced course
yet is finally ready. And this time, you will
learn how to create premium SAS explainer
video from scratch. After watching over 200
premium SAS explainers, I took on the challenge to build the most complete
course for creating SAS explainer videos
from understanding the script and building storyboards to
preparing Figma file syncing with voice overs and animating clean dynamic demos. It's not about flashy effects, but real techniques and
workflows used by professionals. You are going to create a full 62nd SAS explainer
video that look professional, feel smooth, and truly
represent industry standards. This is not a beginner course, and it includes 24
in depth lessons. Don't worry. You'll be completely engaged
from the first second, the detailed explanations,
real examples, personal guidance, mid lessons
questions, and, of course, the animations
themselves will keep you inspired and focused throughout
the whole experience. By the end of the scurse, you will have the
confidence to take on any project, and even better, you will walk away with a
high quality final project you can proudly show as an example to your
future clients. So if you are ready to take your motion design skills to
the next level, go ahead, join the course today, and
let's start learning how to create SAS explainer
video like a Pro.
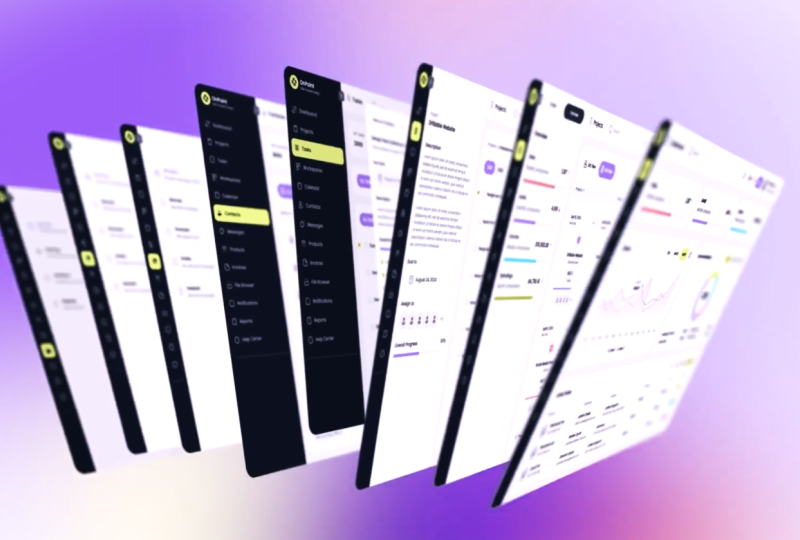
2. Course Welcome and Project Files Setup: Hey, there, and
welcome to the course. In this video, I want
to walk you through some important notes before
you jump into the lessons. First of all, please
don't forget about the main course
folder where you'll find all the assets we'll
use in the lessons. Another very important
note to mention is that from lesson
two to Lesson six, you don't have to follow along. These lessons are
more about explaining some initial steps
before animation, mostly about preparing
all the design files before the animation phase. In these lessons,
I'm going to show you how to transfer
the designs from Figma to Illustrator and
prepare them for animation. So if you decide to do
it together with me, please save your Illustrator
files in the AI folder. When we start
animating the project, I strongly insist that you
use my prepared files, which you can find
inside this folder. So no matter if you saved your own files or
not, in any case, we'll all use my files inside
the screens for AE folder. When we start animating,
please save your after effects project file
inside the AE folder, which you can find
in the main folder of the course you
downloaded from me. And once we finish the project and start the rendering process, you will save your files
inside the final folder, which you'll also find in
the main course folder. And the last thing I
want to mention is that all the links for the
things I'll mention during the course can be found in
the PDF file named inks. With that being said,
let's get started.
3. Figma Setup and Importing the Design: There. So first, let's begin by creating a
new account on Figma. Or if you already have
an account, just log in. In case you don't have one, you can create it pretty easily by signing in with
your Gmail account. Now, you might see different
things than I have here, and that's because
I already have a few projects imported to show you something
in a minute. For now, let's click on the profile name and download the desktop version of Figma. There's no major difference
between the two. I just prefer to use the
app instead of the browser. The installation process
is pretty straightforward. So once you're
done, open the app, and let's now log in to the account using
the browser version. All right. So once we're ready, let's go over the
basic functions you need to know as a motion
designer working with Figma. First, we can change the theme. We have three main options. In the settings, there's
nothing we really need to know. So let's move on. Now, I want you to go to the templates
and tools section. Here you can find
a lot of useful assets to use in your projects. Maybe in your case, you're
seeing different stuff than mine, but that
doesn't matter. What matters is that
you can find designs here that you can use in
your After Effects projects. Later in the course,
we will learn the most simple
and free method to import these designs
into After Effects. You can filter to see
only the free assets, and if you need
specific UI designs, you can use the search bar
to find something you like. I'm sure you'll be
surprised to discover some pretty high quality designs here that are totally free. Just make sure to check
in the descriptions which designs can be used for marketing purposes and
which ones are just for learning purposes. All right. I'll bring everything back to
normal, and let's move on. If you click here, you will see the team projects
you are working on. Soon, we will cover
this section in depth. In drafts, you will see the files you imported
from outside. In all projects, you will see the projects you are
actually working on. And in trash, you will see
all the deleted files, okay? So now, if we go back to drafts, we can see that if we want
to create a new design, we can click here and do that. But in our case,
we will not create a design from
scratch, of course. As motion designers,
we usually get a Figma link to the
design from the client, or we receive a Figma
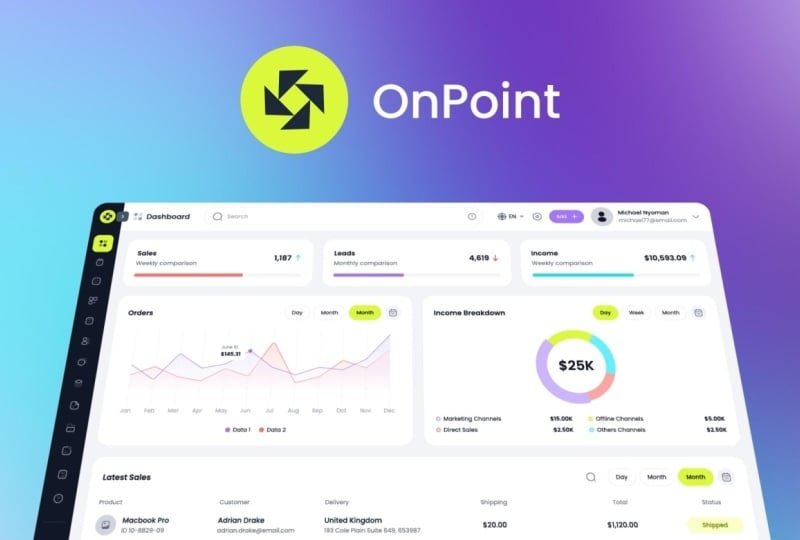
file of the design. In our case, I found a super cool Figma design of a SAS platform on the
Invoto elements website. This is the name of the
designer. So shout out to him. There are a lot of
different panels here. Making it a perfect example of a complex SAS project
for us to practice on. We will use it in the course as if a
client sent it to us. So now let's go back to Figma and import this
design so we can use it. To do this, first, let's click on the plus icon
next to the drafts section, and then select Import. Now click Import from
computer and find the FIGMAFle in our assets folder that you
downloaded for me. Finally, enter the CRM website, Kit folder, select the
FIGMAFle and hit Open. Now, wait a few seconds until the design is uploaded
to the drafts section. Great. So importing a Figma file is one way to get the
design from the client, but there is another
way via Figma link. If a client shares
their Figma design with you using your email, you will see a notification
here in the bell icon. In any case, whether
you click on the notification or like now, import the Figma file, just click on it to
open it. All right. So now let's investigate
this FIGMa design. This design is very complex, but it is super organized. By exploring it, we will now see the most common actions
you need to do as a motion designer
when preparing to use the designs
in After Effects. So the first thing you want
to do as a motion designer is to make sure that you are not working on
the sharable project. This means you don't
want to interfere with the design team
of this project. If you receive the design
using a sharable Figma link, then you would see here
other profiles that might be the client's design team
working on this project. In that case, the first
thing I would do, whether I got the file
using a sharable link or just the Figma file is
duplicate this project. That way, I have the original untouched and won't interfere with the design team
that created it. For this, let's close the project and duplicate
it in the draft section. Right click and
select Duplicate. Now, to make sure I know it's the design
I will be working on, I'll add my name to
the project name. And so that only I can
mess with this project, I will move it to my
personal team projects, which I will find in the
All projects section. Now we can go to our projects and open the duplicated design. Awesome. Now, you won't see any other profiles next to your profile in the
top right corner. Great. So let's start
exploring this Figma project. As you may understand,
every Figma project may look different from another, like After Effects projects, all look different depending
on who designed them. My goal here is for you to get familiar with the
basic Figma layout, so you can navigate through the Figma projects you
receive from a client. And this design is a great example because as
I already said, it's super complex and includes a lot of
design elements inside. So first of all, in every Figma project, there will be a pages section
and a layers section. Basically, what we as
motion designers should care about is the
left panel of Figma. Don't be intimidated
by the right side. This is not an area we
need to touch or change. The layers section will change according to the page we select. For now, we have the
cover page selected, and therefore we are seeing the layers for this
specific page. If you're working
with a good client, you will usually get all
the design guidelines inside the Figma file. So try to search for them
first when you open the file. Don't have them, feel
free to ask for a PDF or another file with the company's guidelines
if they have one. Okay, so now, as I said earlier, the layers section changes. According to the project we are selecting under
the pages section. As you can see, each time I select a
different page design, I get a different
layer structure. This is how FIGMA works. Another thing you need
to know is that you can move the line separating the pages in the layers sections. As you can see, we have a lot of other pages
inside this SIGMA file. Most of the time,
you will find here all the assets the
design team use to create their SAS platform panels and all the UI designs
of the platform. So in case you can't find the
actual SASUIPanel designs, either ask the client
under which page it is, or just search for a page
referring to the design. Like in this example,
we can see it if we click on the website
design page. So let's click it and adjust the panel so we can see all
the layers of this page. You can move the line, or you can just click on the page name to
collapse this section. Now, we can see all
the UI panel designs of the client's SAS platform. As I already said, it's a very complex project
with many UI panels, and not all the time, will you have this
kind of big project. But it's a good chance for us to practice on this
type of project, so you can be ready for any Figma file later
in your journey. It's a well organized project, and if you open the
layers of a panel, you will see its sub layers that create that specific panel. That's how a good Figma design
file should be structured. But you should know that no matter how structured
the project is, sometimes you can find
small issues in the design. Let me go back to my dashboard
and show you what I mean. For now, don't do anything. Just watch and listen. I will go to drafts and enter another UI kit I downloaded
from the Internet. It could easily be a design
I got from a client. So here, the structure of the
design is a bit different. In pages, there is a dark
version of a platform design. But most importantly, if
I zoom into this panel, we can see that there is
a small mistake here. In that case, I just double click on the layers until
I get to the right one, similar to how we do
it in Illustrator. Then I can move it, and
now I see that there are two objects I can
delete after that. I'll bring this shape back
to its original position. Great. Now, I want to show you another example of a
Figma design project. What I want you to see in this
one is that sometimes you can get a design with different panel sizes,
like you can see here. And moreover, there are
situations where you will have a dark and a bright
design next to each other. I'm showing you all
of this, so you'll be familiar with the different
Figma project structures. All right. Now I'll go
back to our design, and let's get to work together. First, I want you to
get used to zooming in and out and moving
across the design. Hold control or command on Mac, and scroll the mouse wheel
to zoom in to move around, similar to Adobe software, hold the space bar
and drag the screen. As you can see, we have a
lot of panel designs here, and we are not going to use
all of them, of course. We'll use only the ones that
are relevant to our project. What I want you to notice is that even in this very
organized design, we can still find some
small design problems. Pay attention to this area
where we see the arrow. Here, it looks fine. But if we go to another panel design, we can clearly see that
this layer is not in the right place in
the layer stack. Since this mistake repeats in a lot of the panels, we
won't correct it here. We will fix it later in the process of importing
it into After Effects. But before that, we
need to know exactly which panels from the
design we will use. That's what we're going
to do in the next lesson. It's going to be a good
one. So see you there.
4. Read the Script and Plan the Storyboard: Come back. In this lesson, I want you not to do anything, just watch and learn. Now, after opening
the design infigma, we need to start understanding which panels we should use in
our after effects projects. And this should be
your next concern when working on a
complex SAS video. The best resource for that
will always be the script. It can be a script
that we get from a client or a script
we create ourselves. In any case, the script is the number one source to
investigate next. In our case, let's
imagine that we got the script from the client. This point in my process
of creating a SAS video, I usually start creating
the storyboard. In most cases, it's a
bit simpler to create than a storyboard for a
regular explainer video. That's because in a lot of
the scenes in SAS videos, we need to show big
title animations and the animation of the
UI panels of the software. In my opinion, that's
easier than coming up with complex visual
concepts like we often need for explainer videos. First, let's understand the main structure of almost
every script. Whether it's for a SAS or
a regular explainer video. This will help you in
the storyboard creation. Usually, we will have four
main parts in the script, the presentation of the problem, the introduction of the company, how the company solves the
problem, the call to action. These are the main parts of
the script, and from here, sometimes we can add additional
subparts between them. For example, between the
first and second parts, we can add additional points that show how the
problem can ruin more specific areas in the audience's life,
usually three points. And between the third
and fourth parts, we can add additional benefits, also usually three, about how the company can make the life of the audience better. Alright. So now that we've got this, let's take a look at our script, and I'll show you how I
created the storyboard. First things first, you need to understand that in order to
create good storyboards, you need to generate visual
ideas for the script text. And to do that, you
must watch a lot of examples and similar videos to the one you need to create. I will attach a link
to a playlist with some cool Sas explainer videos so you can start somewhere. Throughout the course, I
will show you how I use these videos to generate ideas for many of the
scenes in our project. I always say that the best
idea generation method is to watch a lot of
references online, not only when you're
working on projects, but also in your free time. You need to understand that if you want to take your
career seriously, you need to start thinking
like a motion designer. And when you watch a lot
of motion design videos, you slowly start to
memorize scenes and animations that you can
later use in your projects. That way, when you read your next script or
create one for yourself, you can already start imagining what scenes will fit
visually with the script. There are unlimited ways to
present a script visually, and this process can change either by you or by your client. This is why creating a
storyboard is so important. It gives both you and the client a clear idea
of what to expect, and it saves you a lot of time by avoiding
unnecessary revisions. Note that sometimes we slightly change the ideas during
the animation phase, but not too drastically. So if you feel that in
the animation phase, you want to change
something that doesn't sit perfectly with your
initial storyboard idea, just make sure
that the change is barely noticeable and
not too complicated. Alright. So now I'll walk you through my process of generating visual ideas for this script. For the opening text,
presenting the main problem, I want to start with a
simple text animation because I saw that a lot of other videos start like
that, and it's totally fine. To spice the scene
up a little bit, I decided to play around
with the word multiple and emphasize its
meaning visually by giving it an unorganized
and messy feeling, creating a chaotic animation for the characters of this word. Finishing with a cursor object helps the viewer follow
into the next scene. Then for the next paragraph, continuing to present the
outcome of the main problem, I want to show a lot of
tasks and messages in the scene before the
cursor moves down, maybe into a dark sea, where we have a website
style search form, indicating that the character is starting to search
for help online. Next up, after
presenting the problems, it's time for the
introduction of the SAS platform that will
help improve the situation. As I saw in almost
every reference video, this is the moment for
a nice logo animation, followed by the main panel
of the SAS platform. Whenever you want to
present a UI panel, it's a great idea
to consult with the client and ask what
they prefer to show. This applies to every scene where UI panels are presented. In this script, we also
have a funny aspect that says it's so simple
that even a cat can do it. So I decided to present a meme of a funny
cat in this scene. At this point, we
start presenting the solutions for
the main problem. In SAS videos, this is usually shown by demonstrating a
workflow of the platform. It can be presented
in three main methods using vector based graphics, which is what we'll
use in this course. We can scale them and still
get a premium result, but we must have the
original design files. Using screen recordings, this doesn't require
original design files, but instead records
the actual platform. It can save a lot of time, but the quality of the
footage is very limited. Using representative graphics, instead of showing
the actual design, we create something that
reflects the original idea. This is especially helpful for clients who don't yet
have a final version of their UI or who want
to focus only on a specific feature of
their SAS platform. Back to the script. At this point, after
seeing a cool reference, I decided that before jumping
into a specific panel, I want to present everything at once in a dynamic three D look. Then I made sure with the client which screens
they wanted me to show, and I noted the names of
the panels for myself, so I could easily find them in the Figma design before importing them into
after effects. Then we have a question
in the script. I noticed that this
pattern repeats itself, so I decided that the
question would be presented in the same
visual and motion style. And once again, I made sure
to use relevant UI panel. Next, the process
is pretty much the same as for the previous scene. But this time, I
wanted to present the relevant UI panel in
a more interesting way. After seeing a cool example of a very similar UI
design reference, I decided to present it the
same way as in the reference. For the next paragraph,
the process is the same. I just want to mention
that at this point, while creating the storyboard, I'm noting to myself which UI
panels should be relevant. And I already know in my
mind, that in this scene, I can add some Zoom in animations to specific
parts of a UI panel. But if you feel that your client doesn't fully trust
your process, then I suggest adding these extra frames to
the storyboard, as well. That way, no questions will be left unanswered about
how the scene will look. Now, at this point, where we have the
file sharing part, you may notice that there is no text accompanying this scene, and that's another important point you should know
how to deal with. To decide when to add
text and when not to, it's best to consult
with the client. Sometimes they want
certain phrases shown and other times
they're less important. So make sure to align this
part with the client. Just ask them which phrases from the script they want to be
presented in the video. All right. So now
for the final part, I decided to finish the video with the same text
animation we started with. That's because the
word struggling also fits the
unorganized letters, animation we did for
the word multiple. Then we need to
finish with a call to action scene,
where in most cases, we will present the logo and the company's website or any other call to action
the client requests. For example, it could
be Met us in LA. Click Below to join the
waitlist, et cetera. So with that, we have
finished the lesson, and we are ready to finally
learn how to import the Figma designs
into after effects. We'll do that in
the next lesson. It's going to be a great
one. See you there.
5. Importing UI Panels from Figma to After Effects: I back. In this lesson, we will learn how to
import the UI panels from Figma to after effects. There are five main ways
that I know to do this job. You can see them all
now on the screen. We can either do it
using extensions or we can do it using the
native Figma functions. The difference is that
by using extensions, the transfer happens
straight from Figma to after effects. When using native
Figma functions, we first need to
import the design into Illustrator and then bring
it into after effects. Let's start with the
extensions list. I'm not going to go in
depth with every method because I don't want this
course to be over 50 hours. Instead, I'll attach links to the best tutorials
for each extension, either in the assets folder or below the video in
the description. First one is AEUX. It's a free extension,
but it creates a lot of issues during
the importing process, especially with text layers, effects, and position
values in the design. Next is Convertify. You can use it with a monthly
subscription, but you must also have Adobe XD installed
on your computer. Then we have overlord, which is currently
the best option, according to many
motion designers. It's a paid extension, and it's the fastest
direct way to import Figma layers into after effects without going
through Illustrator, which we'll cover in
the next methods. Just know that even
with overlord, there are still some issues
that need to be adjusted after importing the Figma
layers into after effects. It's not 100% perfect. Since the majority
of my students are beginner motion
designers without a lot of funds to invest
in paid extensions, I decided in this course to use the native Figma
function method. The first option is using
the export function. I know there's a
lot more to cover about this function, but again, I want us to get started with animation and not waste too
much time exploring FIGMa. The goal of this course is not to learn every
Figma function, but to learn only the
functions we need as motion designers
in order to create a great SAS explainer video. By the end of this course, I want you to feel
confident enough to take a FIGMa file from a client and even without
knowing Figma in depth, still be able to create a
great SAS explainer video. All right. So now let's talk
about the final method. In this course, we
will use this method, which is simply copying
the Figma layers as an SVG format and pasting
them into Illustrator. There we can split the
layers and organize the design to fit our
needs in after effects. So now I want you to grab the mouse and finally
start working with me. The first thing we need to do is open Adobe Illustrator. So
let's do that real quick. Now, we need to create a new
file. So let's click here. For the document type, I usually go for the
web templates, and here we can
choose the large one which has full HD
resolution dimensions. Next, we need to think
of a name for this file. And that's very important
because we want to remember which UI panel it is. So we can start the name
with panel or screen one. Then add a suffix with the name of the panel we are working on. In this case, according
to our storyboard, the first panel that needs to
be shown is the dashboard. Soon, we will choose
which one specifically. For now, let's write
dashboard here in the name. Then we can leave all the
setup as it is and hit Create. And now, before moving on, I want us to set up
the same panel layout. So let's go to Window, Workspace and set it
to Essentials Classic. In case you've moved around some panels in this
layout in the past, make sure to reset the layout. Now, let's improve
it a little by dragging the layers tab to
the right open area here. It'll be much more convenient
for us when we start working with all the
layers in just a minute. Great. So now we are
ready to go back to Figma and import our
first panel or screen. In this course, I'll
call them screens. As I already mentioned earlier, we need to pick one of the
dashboard screen designs. To know which screen to use, you can ask the client
what they prefer. Of course, this decision
can also be made earlier in the process while
creating the storyboard. All right, so let's
say we want this one. As you can see, when I click
on the name of this design, InfigmaT is called a frame. It's like an artboard
and Illustrator. When I click that, I can
see it's selected in the layers tab on the left
under the dashboard section. You can open the layers and all the sub layers to see
how complex this design is. In our case, we want all the layers related
to this frame. So we can either select
all the layers manually, or just click on the
name of the frame. Then right click, go to Copy
Paste Says and choose SVG. SVG is a vector based format
that can easily be opened in Illustrator because
Illustrator is a vector based software. Okay. So now let's go back to Illustrator
and simply press Control or Command on Mac plus V to paste
the copied design. Simple as that. One thing
you need to know about this method is that if your Figma design has
effects like blur, drop shadow, or other
complex overlays, they won't appear
in Illustrator. In that case, you
can either recreate the effects in Illustrator or, in my opinion, the
better choice, recreate them later
in after effects. Also note that all
the text layers are no longer editable text. They are now shapes. All these issues also apply to most of the paid extensions. I said, no matter
what method you use, you will always need to adjust some small things along the way. Maybe in the future, there
will be better ways. All right, back to the design. In cases where the design is bigger or smaller than
your Illustrator canvas, I suggest that while
the design is grouped, make sure that constrained
proportions is activated and then scale the size of it
manually from here. That way, your design will scale proportionally
and fit properly. In our case, it fits the canvas perfectly so we
are ready to move on to separating the layers. So first, we need to release the clipping mask so we
can ungroup the layers. Then click somewhere outside to unselect the design
and reselect it, or just right click
and ungroup it. Our goal is to have all
the layers ungrouped, so we can decide which sections need to stay grouped
and which do not. Next, we need to separate all the ungrouped layers
into individual layers. For this, while the
main layer is selected, open the layers menu and select release to
layers sequence. Now we can see all the
layers of this design. Don't be intimidated by
the number of layers. It won't stay like
that. Next, we need to move them all
out from the main layer. To do this, select
the first sub layer, scroll down, hold shift,
and select the last one. Now, drag them all out
of the main layer. This will allow us to prepare
the design for animation. After that, we can delete
the empty layer below. I know it's an empty
layer because there is no arrow icon next to
it on the side. Great. Our next step is to prepare
the layers for animation. What I mean by that is
making sure we group layers that don't need to remain separated because we
won't animate them. And how do we know what we
will animate and whatnot? That's why we created
the storyboard. For example, in this scene, we don't need to animate
any of the layers. But in case a client asks us or we decide that we want to animate some of
the parts here, let's go over the design
and start organizing it while planning what we might
animate later if needed. Okay, so at this point, I first make sure to lock
the background layer so I can easily select the
other layers in the design. Now, I'll try to select the
objects that I think should be grouped because I'm
sure I won't animate them. As you can see,
some other layers are also being selected. These are shapes being
used as clipping masks. Let's select one.
And here we can see that it's under
our background layer. We can either turn it off, lock it, or delete it because
we don't need it here. Alright. So now let's start
grouping the objects. We're sure we will not animate, starting with the upper
area, in this case. I know that in the storyboard,
I have a search bar scene, so I'll make sure not to
group the objects that create the search bar together with the rest
of the upper area. So let's select all
the objects here, making sure not to
select the search bar and then group
them together. Now, this group is on one layer, and it moved up in
the layers list. Let's turn it off for now. Next, we can group this area here because I know I
won't animate it and there won't be any need for
changes in this area in either the design
or the animation. Let's group them using the shortcut Ctrl
or Command on Mac plus G. We can find
this group layer here. You can place it below the
first group layer if you want. And let's turn it off for now, so we can focus on
the search bar. For the search bar, I'm
planning to animate the magnifying glass
icon and to manipulate the word search later
in the animation. So I'll make sure not to
group them altogether. To make this easier, let's turn off the white search layer. I see it's built
from two layers, one for the white fill, and
one for the gray stroke. We'll deal with
that in a second. For now, let's group all the shapes that create the
magnifying glass icon. As you can see,
these shapes are on separate layers,
which is unnecessary. We can have them on one layer. So select them and group
them using the shortcut. Next, let's check if the search word is
on one layer. It is. That means we can
leave it as it is. Then let's see what's going on with the exclamation mark icon. All the shapes are
on separate layers, and we don't want that. So let's group
them all together. Alright, so with this, we're done with the upper area. Now let's deal with
the area below it. But before that, we
can now bring back all the turned off
layers and bring them closer to each other
in the layers panel. But to be honest, we
don't have to do it now. Since later, after we finish grouping all
the necessary layers, we will organize the layers
panel anyway, right? And now let's get
back to grouping the layers in the UI section
under the search bar. Again, in this case, we need to think
about whether we want to animate something
here or not. Maybe we'll need to animate
the line here or the numbers. This is pretty much
the logic behind preparing the design
for animation. And even if you use paid extensions and skip
the Illustrator step, you'll still need to adjust some layers and pre comps
inside after effects. But the good news is that it's very unlikely
you'll receive such a complex design where you'll need to animate
this many panels. We're doing it in the course
because I want you to repeat these actions so
you can get used to them as quickly as possible. And don't worry if you
think you need to prepare all the Figma panels for
this course in Illustrator. The main folder of the course, you can find all the
Illustrator files already prepared for animation. I just want you to practice
this one time with me. Then you can use my ready files. All right, back to the lesson. Here, I decided that I
want all the layers to be separated because I might
animate them in the future. But I do want to make sure
that the objects that create the arrow icon
are on one layer. For this, let's lock
the white box so we can select the arrow shapes
and group them together. Let's do the same for
the rest of the boxes. Great. Once that's done, let's move on to the next part. First, let's lock the
white shape so we can select the
objects here easily. Now let's select the calendar
icon, and as you can see, it's spread across
a lot of layers, so it would be better if we
group it into one layer. Next, let's make
sure the buttons in their text are also
grouped one by one. For this word, we can leave it since it's already
grouped into one layer. Awesome. Now, let's
deal with this part. As you can see, all these
layers are grouped right now, but I think it's a
good idea to separate this small box because we might
animate it in the future. So first, let's release the
clipping mask of this group, then click elsewhere to
Unselect and ungroup. Great. Next, we
can try selecting the shape of the clipping
mask and deleting it. At this point, we can
zoom in and make sure the layers here are
separated the way we want. For example, I see that
this box is grouped, but I might need to
animate the numbers here, which means I need the objects
inside to be separated. This time, let's spread
the grouped layers here without ungrouping the
stack and see what happens. Sometimes we can make
these small mistakes. So I want you to know what
to expect when this happens. So while the layer containing
this group is selected, let's open the menu and click on Release to Layers Sequence. Now let's move all the
layers out of the main one. And as you can see,
it seems that we only get the small purple
dot out of the group. The rest of the stack
is still grouped. In that case, since I only need the number layer
to be separated, I can double click this
stack until I reach it, then press ControlX to cut it. Next, I'll click
the small white box to see where it is
in the layers panel, create a new layer
above this one, and press Control
Shift V to paste it in the same place.
All right. Moving on. Now, let's see
what we have here. I think we can leave
the graph as it is, but for the month names below, I think it's better
to group them together since I don't think
I'll animate this part. And let's also group the red dot with its text and do the same with the
blue one. Awesome. Now we can move
to the next part. Let's see what we have
here in the Pie area. I see that we have some
clipping masks here. We'll deal with
them in a second. First, let's select the
white box and lock it. So we can select the rest of the objects in this
part more easily. Now, let's start grouping the obvious parts like
the calendar icon shapes, the buttons, and their texts. We can also zoom in
here and group the dots and their text together because I don't think we will
animate these parts. Let's select the numbers
here and watch them in the Layers panel to make sure the USD icon and the number
are already grouped. Great. We can now move on
to deal with the Pi. I see that the number here is on a separate layer,
which is good. But when I select the
Pie, I see that it's grouped and has some
weird shape behind it. Let's right click here to
see if it's a clipping mask. As we can see, it's
not a clipping mask. Let's select it and
try to move it around. I see that it's just
a white rectangle. We don't need it in the
file, so let's delete it. Great. Now for the Pie. I see that all its parts
are on separate layers, which is useful if you plan to animate it in after effects. But in our case,
I won't do that. So let's select them all. Hold shift, click on
the number to select it and group only the
Pie layers together. You can always check by turning the new grouped layer on and off to confirm that you grouped the right objects. Looks great. Now, we can move on to deal
with the button part here. First, I'll lock
the white box so I can select the rest
of the shapes easily. Now, let's group the
calendar icon shapes, the buttons in the magnifying
glass icon shapes. Finally, let's select
the bottom part to see what's happening here. I see that all the layers are
already grouped together. In my case, I don't want to animate any of the layers here. So I'll leave it as it is. But in case you need to
animate something here, for example, the buttons,
you would need to handle this part differently. Alright. Let's move on
now to the last part, which is the left panel here. If you zoom in on
the icons area, you can see that
every icon's shape is placed on a separate layer, which in our case, is
completely unnecessary. According to the
storyboard and script, we don't have any part in the video where we need to animate something
in this left panel, which is the main menu
of this SAS platform. So in that case, let's
select the entire area here, including the small
arrow and the gray box, and then group them
all together. Awesome. Now we have it on
one layer only. And now we've reached
the final part of preparing this
file for animation, which is deleting the remaining empty
layers we have here. You can clearly identify an empty layer by the
fact that there's no small arrow beside it
pointing to the layer. So let's start selecting all the empty layers and deleting them from
the layer's panel. In some cases, I hold
control or command on Mac to select the
empty layers one by one. In situations where we
have an empty layer directly after a non empty one, it's better to select the
whole range of layers, and while holding
control or command, unselect the non empty ones. You might find this
method more convenient. Unfortunately, I haven't
found a shortcut or function that selects
all empty layers at once. So if you try to find one using AI or by searching online, please make sure it actually works and then share it
with the rest of us. Alright, it looks like we
deleted all the empty layers. We can now unlock the
locked ones if we want. But most importantly,
let's take a look at the overall frame and see
if we need any adjustments. I see that we don't
see the panel name here, which is Dashboard. It might not be in the correct
order in the layer stack. So let's find it and place
it in the right spot. Great. Everything
looks good now, and we are ready
to save the file. If you want to follow me and prepare all the designs
throughout the course, enter the AI folder and
save your file there. But just so you know, you
can skip this process, and when we start animating
in after effects, you can use my already
prepared Illustrator files, which you can find
inside the folder called screens for AE. In my case, I'll act
as if I'm doing it for the first time and
save this file here. We just need to make sure that the name is correct
and that we're saving it as in Adobe Illustrator
file. Then we can click Save. We can leave all
the options as they are and just hit Okay. And with this, we have finished
preparing this UI design. Now I'm going to
prepare the rest of the UI panels for animation. As I already told you, you
don't have to do this with me because you'll already have the ready Illustrator files, but I do want you to
watch the lessons because in each preparation
process for each panel, we can learn something
that could also happen to you during
this process. Alright. So now we will
continue preparing the Figma files for animation
using Adobe Illustrator. According to our script, the
next panel we need to use is one of the panels under
the project section. So let's say after
confirming with the client, we know this is the screen
we need to use in the video. As we did with the
previous screen, we can either select
all the layers manually or just select the whole frame
by clicking on its name. Now, to copy it to Illustrator, we need to right click,
go to Copy Paste As. And here's a quick
question for you. What format do we
need to copy it as? Since we want to
have the objects in this design saved
as vector files, we need to copy it
as an SVG format. Now we can go back
to Illustrator. And if you're following
the lesson with me, we need to create
a new document. We can select the recent file we used and just change
its name to match the correct UI panel or
screen we're working on. I'll call this one
screen two Projects. Once we have the new canvas, we can now press Control
or Command on Mac V to paste the Figma design. All right, the first
thing we need to do is release the clipping mask. Next, let's unselect the group, then select it again so we can right click and ungroup it. After that, while this
main layer is selected, open the menu and choose
release to layers. This will separate the layers. Finally, let's select
the first layer inside this group, scroll down, hold shift, and select
the last one so we can move them all out of the
main layer. Alright. So now we see the shape that
was used as a clipping mask. How do I know this is the shape? I can click on the small circle on the right side of this layer, and the shape will be selected. When I move it, I see
that it's actually just an empty shape.
So let's delete it. Now we're ready
to start grouping the rest of the layers according to our needs and after effects. First, we can select the main gray background and lock it, so we can select the rest
of the layers more easily. Let's start with the upper area. I'll select this
part right here, making sure to avoid selecting the left panel with
the numbers in the two buttons in the upper area because that's not part of
the header section. Now I'll press Control
G to group them. Great. Now let's move on to
the left menu we have here. Since I know that I don't
want to animate this part, I'll select all the
layers and objects in this section and
group them together. Awesome. For
convenience, we can lock the grouped layers so we can continue selecting the rest of the objects and
shapes more easily. Let's now move on to
the left main menu. We can select all
the shapes here, making sure to include
the small arrow and the gray rectangle behind it, and group them all together. Great. Now let's move on to the main part
of this UI screen. When I'm not sure what's
going on in a section, I move some shapes
and layers around to understand which
sections are grouped and which are just
separate layers. To start, I'll
find the white box and lock it so I can continue with this section more easily. Now, as you can see, the entire section
with the small boxes and icons is grouped together. So let's start by
dealing with the layers. The first thing I'll do is right click on this
section and make sure to release any clipping
mask if there is one. After that, I'll
click elsewhere, then right click on this
group to ungroup it. Next, I'll make sure
this layer is selected, then release all the
layers to separate layers. Finally, I'll move all the separated sub layers
out of the main layer. Now I see that the
shape used for the clipping mask remains here, and I don't need
it in my design. So I'll select it and delete it. Before we move on, I want
to mention, once again, why it's so important
to constantly look at different references and
examples of similar videos. Since I already studied
a lot of examples, when I looked at this UI panel, I immediately remembered seeing a very similar design in one of the reference videos
that gave me the idea to animate this section in the same way I saw
in the reference. So now in Illustrator, while
preparing this design, I know I need to group each of the small sections
here as its own group. That way, in After Effects, it will be much easier
for me to animate them as I envisioned
from the reference. So now let's select
each small section and group all the shapes, text, and layers related
to it into one group. Let's do this for all
the small sections here. Awesome. Now we can move on to the bottom part with
the page numbers. Since I know I don't want to animate this part in any way, I'll select all the shapes and layers here and group
them all together. Great. Now, I can move on to the upper
part of this section. We can group all the
shapes in this area. We can also group the text and the button boxes
for each button. And finally, we can select this long section below
and group it all together. Now we're ready to start
deleting the empty layers. If you want, you can lock
the non empty layers so they stand out more clearly while you delete the empty ones. While doing this, I
noticed that there is a layer that looks like
it has nothing inside it, but it's clearly not empty, in that case, to better
understand what's going on here, I'll isolate this layer by holding Alt and clicking
once on its icon. This will turn off
all the other layers and leave only this one visible. All right, so I see
that it's some kind of line that has no
purpose in the design. If I'm not sure, I can
turn all the layers back on to check if it's
important for the design. But if I'm certain that I don't need it, let's
just delete it. Now, we are completely
ready to start selecting the empty layers
and deleting them this time. Let's use the second method with the non empty layers
while holding control. A quick note if after selecting all the relevant
layers and clicking Delete, you get a warning message, that usually means
you accidentally included a layer
that isn't empty. In that case, I suggest
not deleting yet, go back over your selection, carefully check again and deselect the layer that
contains design elements. Awesome. Now we have only the relevant layers
left in the file. We can unlock them all
and save the file. Once again, make
sure the name is correct and that you're saving
it as an Illustrator file. Then click Save. With that, we finish this lesson, and we're ready to move
on to the next one. See you there.
6. Preparing the Projects UI Panel in Illustrator: I'm back. Now, let's
continue preparing the next UI panel
from our storyboard. According to the
sequence, the next one is the project's UI panel. So let's go back to the Figma file and copy the frame we need. Back in Illustrator, let's
create a new document. I'll make sure to
give this new file the correct name and hit Create. Now, let's paste the design. As you may notice, this
design is slightly taller than our previous ones,
but that's totally fine. It doesn't interfere
with our work. The process will be
pretty much the same. I'll first release
the clipping mask, then ungroup the design. After that, I'll separate all the layers into
individual layers. Then I'll get all the layers
out from the main layer, and after that, I'll lock
the background layer. And delete the shape that was
used for the clipping mask. Now, as you can see, there's a small layer
organization mistake here, which actually also appears
in the original Figma design. For us in Illustrator,
it's not such a big deal. All we need to do is select all the layers and
shapes in this section, including the arrow and the small gray square,
and group them together. Later, we'll place this group in the correct spot in
the layer stack. For now, let's keep focusing on grouping
the next sections. Once that's done, let's
group the header area. Next, let's deal with the main
section in this UI design. First, I'll select the white
box and lock it so I can easily select the layers and shapes I want to group
inside this section. Now, I'll start grouping all the relevant
shapes and texts. After that, I'll group
all the buttons here into one group since I don't
need each button separated. I don't think I'll animate them individually in after effects. Finally, let's also
group this area here. And now let's talk
about this part. According to our storyboard, we need to present some kind
of demo software flow here. I think I'll create an
animation for the checkbox. That is, I want to animate
a cursor that will activate this green
checkmark icon. In that case, I'll first delete one of the
checkmark icons. Then I'll make sure all the
UI panels here look the same, and I'll separate the remaining checkmark and the green box into their own layers so I
can animate them separately. I see that the V black icon, and the small green box are already separated each
on a separate layer. So the last thing I'll do is just color the green
stroke here in gray. Once that's done,
I'll start grouping each section here one by one. Each task should be
on its own layer. Just make sure not to include the checkmark and the
green box in those groups. Of course, if you need to
add people's pictures later, then you shouldn't group
everything together. You'd keep the Avatar icon on a separate
layer. Don't worry. We'll practice that in
the following lessons. For now, let's finish grouping every task
box we have here. Great. Once we're
done with that, we're ready to start deleting the empty layers in
the layers panel. I'll speed this process
up a little bit for now. All right. So once we're done deleting
all the empty layers, we can move the layer with
the left menu a bit higher in the layer stack so we can see all the design
details properly. Great. Now, everything
looks perfect. With that, we can go
ahead and save the file. Make sure the name is
correct, then hit Save. Awesome. Now let's go back to Figma and prepare
the next UI screen. According to our
storyboard, in this part, we also need to create
a small demo animation where we see a pop up panel appear in the center
of the screen. So I'll go to Figma and find the frame I need to
copy to Illustrator. Let's say that after
confirming with the client, we know this is
the page we need. As usual, I'll copy this
frame in SVG format, and then in Illustrator,
I'll create a new document and give
it the proper name. Now, when I paste
the design from Figma into my new canvas, the first thing I do is
release the clipping mask. I don't mind having
a large shape here. I can deal with it later. What's more important
for me to show you is that it's
very difficult to separate the pop up UI
from the main panel. Even if I ungroup the design, it's still tricky to select just the pop up layers because I might accidentally grab unnecessary shapes or
layers sitting behind it. So let's delete
everything for a moment, and I'll show you the
right way to do it. When we have a pop up on
top of the mainframe, it's better to first
select only the pop up infigma either by clicking directly on it or
by selecting it in the Layers panel on the left. Then copy just this part
to Illustrator first. Once we paste it in Illustrator, we can move it aside for now. Now, back in Figma, let's hide the pop
up and then copy the main frame separately
into Illustrator. In Illustrator,
create a new layer and paste the copied
frame onto it. Make sure to align it to
the center of the canvas. This way, we can easily prepare the main UI panel and then later we'll organize
the pop up section. Alright, while this
main layer is selected, open the menu and choose
release to layers. Finally, let's select
the first layer inside this group and select the last one so we can move them all out of the main layer. Alright, as you can see, there's a dark rectangle
behind the pop up. I won't delete the shape
because in after effects, I can animate it
with a simple fade in when the pop up appears. To make it easier to find later, I'll rename this
layer to shadow. Awesome. Now let's move on and adjust the large
shape we have here. Awesome. Let's lock the background layer
before moving on. Now, as always, the
first step is to delete the shape that was
used as a clipping mask. After that, we're ready
to start grouping the rest of the layers according to our needs and after effects. In this part, I don't plan
to animate the numbers. So I'll simply select each section and group
it all together. After that, we can group all
of these sections as one. Now, let's deal with the
final section in this design. First, I'll lock the white
box in the background. Then just like we did
in the previous design, let's make sure all the
task panels look the same, and that the V icon
and the green box are separated onto their own layers in case we need to
animate them later. Awesome. Now, for this area, we can group
everything together. And for the three buttons here, I'll also group
them into one group since I don't plan to animate
them in after effects. Great. Now, let's select
each task section and group it individually so that each task sits on its
own separate layer. Awesome. Now we can begin
deleting the empty layers before moving on to work
on the pop up panel. Once that's done, let's
turn the shadow layer back on and lock all the
layers we already organized. Now we can move all the
pop up panel shapes and layers into the center of the canvas and make sure they sit
above the shadow layer. Don't forget the pop up
design isn't grouped yet. So if you try to
align it directly to the center, it won't work. To fix this, first select all the pop up
shapes and group them. Now you can align
the entire group to the center of the canvas. Once the pop up is
aligned perfectly, you can ungroup it again and
start separating the layers. And if you see an error message during
the step, don't worry. It usually means
you accidentally selected a locked layer. Just double check your selection
and repeat the process. All right. So now we can
start working on this design. First, you can
select a few layers and drag them slightly to the sides just to
understand what you have here and how
everything is built, for example, I don't want this field box to
be without a fill. So I'll add a white
fill to this shape because I know I'll be animating it later in After Effects. Now, let's select the white
background of this pop up and lock it so we can freely select the rest of the
shapes and layers. Now, we're ready to start
grouping the relevant parts. I'll keep the text inside this field box on
a separate layer since I plan to animate it
later in after effects. The upload icon,
on the other hand, can be grouped
together as one unit. Next, for the small
task sections. I'll prepare them for
checkbox animations. To do that, I'll group the V icon with the green
box for all the tasks. Later in after effects, I'll use these grouped layers to create the
checkbox animation. For the progress bar, I'll
leave it grouped as it is, because I don't
plan to animate it. The numbers here can be
grouped together as well. Now, let's deal with the
upper section of this pop up. We'll group the date
section, the avatar section, the exit icon, the three dots, and the button at the top. The text below is already grouped, so we
don't need to touch it. That means we've now finished grouping all the relevant
sections in this pop up. The next step is to delete the empty layers to
clean everything up. With that done, we finished
preparing this panel. For now, go ahead and save the project now
before moving on. In the next step, we'll deal
with another tricky design, and this one is
going to be super interesting, so stick around. All right. Now, let's go back to Figma and
copy the next frame. We need to prepare
for animation. According to our storyboard, this is the part where we
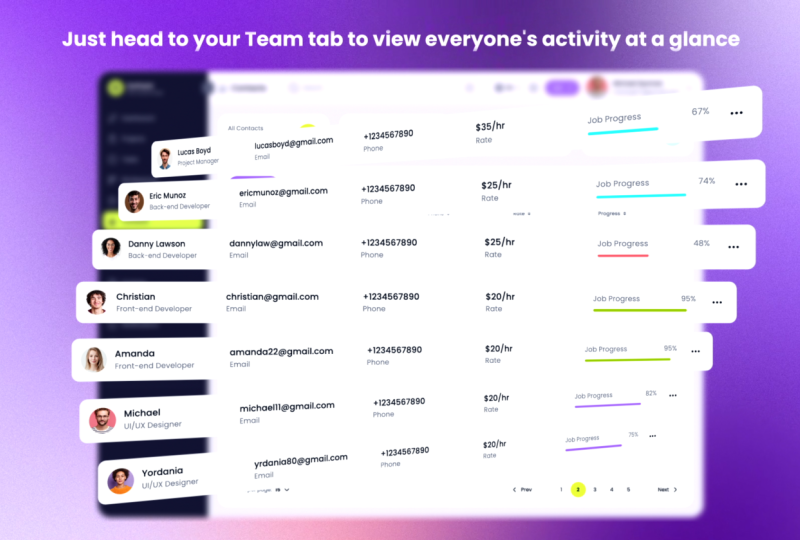
show the contacts UI panels. In this case, we'll prepare
the design in a way that allows us to later add real
human avatar pictures. So if you're following along, let's find the
correct Figma frame and copy it into Illustrator. Here's the contact section. Let's say that after
confirming with the client, we know this is the frame
we need to animate. As usual, let's copy
it as SVG format, then go back to Illustrator
and create a new document, make sure to name it correctly, and then paste the
copied design. I see that this
design is slightly taller than the previous ones,
but that's totally fine. It won't interfere
with our workflow. We'll continue with the same process of
separating the layers. So first, let's release the clipping mask and
then ungroup the design. Now, since we've decided
that in this part, we'll replace the
Avatar icons with real human pictures
later in the animation, we'll keep that in mind while grouping and organizing
this UI panel. For now, just continue with the same process of
separating the layers. And while you're
doing that, I want to remind you of
something important. Maybe right now, this process feels overwhelming or
too time consuming. But remember, you'll
probably never need to prepare such a large number
of UI panels in one project. I'm doing it here on purpose so that you can
practice with me, and later in the
animation stage, we'll have a variety
of different UI panel examples to work with. Okay, back to the lesson. So now we get to the
interesting section. First, let's lock the
white box of this section. We can group this part and the two buttons we have
here on the left side. Now let's move on to the
avatar section here below. I noticed that the whole
section is grouped. So the first thing I will do is start to ungroup it all and separate all the layers
inside this group so I can decide what should
be grouped and whatnot. Okay, so now let's try to
group all this section. As you can see, we have
something interfering, and it's the shape that was
used for a clipping mask, so let's select it
and delete it from the design because
we don't need it. So now let's select the whole section and
group it all together. Now let's move on to all
the Avatar UI boxes below. Since we want to
add real pictures instead of the avatar icons, let's make sure we are not
selecting the shapes that create the Avatar icon here
and group this section. Next, we can turn off the layer
we just created so we can easily select all
the shapes that create the Avatar
icon and group it. We will use this shape
later in after effects as a mask for the human pictures we will add in this section. You can place this layer now above the previous
one if you want. But most importantly,
let's keep repeating this process for the rest of the avatar UI panels
we have here. We can first finish grouping all the main boxes and the
shapes relative to each box. Now, instead of dealing
with the Avatar icons, let's skip this part for now because it will be a
little bit difficult to find the layers we need to turn off to see the
Avatar icon shapes. So before we do it, let's finish grouping all
the rest of the parts. And after deleting
the empty layers, we can easily find the avatar shapes and
group them as we need. So now let's group the
page numbers section in one group and then group the
button on the left, as well. Now, let's start deleting
the empty layers so we can navigate the layers panel
a bit more conveniently. We can do it using the
reverse selection method. Great. So now we can find the box layers
in the layer's panel, and we can turn them
all off so we can select the Avatar icon
shapes much more easily. Now, let's start grouping
them one by one. Once that's done, let's place each avatar layer above
its relative section. Finally, we can delete the remaining empty
layers and after that, save the file on the computer. And with that, we have
finished this lesson, and we're ready to move
on to the next one where we will deal with another
tricky figma frame. It's going to be amazing.
I'll see you in the next one. And before starting to
watch the next lesson, don't forget to take
a ten minute break to refresh before we continue.
See you in the next one.
7. Structuring Complex UI Panels for Animation: I'm back. So in this lesson, we're going to work on a
part where we want to show another demo animation
of the software. But this time, the animation
is a bit more complex. According to the storyboard, we need to work on a scene where we see the
messages section. So first, let's go to Figma and find this frame here in
the project. Here it is. In our case, we need to
show an animation of the messaging list that transforms into a
personal messaging chat. Is the conversation section. At this point, try to understand the flow of the UI
panels as much as you can. Look at the different
sections inside both of the designs and see what will be the best way to
organize the layers. This will give you the idea of what layers you should leave as separate layers and what layers you should
group together. With this idea in mind, let's
begin with the first frame, which is the messages section. Let's copy it as SVG from Figma, and then an Illustrator,
create a new document. Let's give this new
document a name. Now, let's paste the figma
design here. All right. So now, as usual, let's get all the layers out from
the grouped design. Now, we can delete the shape that was used for the
clipping mask and lock the main gray background layer here so we can
select the rest of the shapes and layers easily. We can already delete the
empty layer and the layer that contained the shape that was used for the
clipping mask. Great. So now let's start grouping
each section in this design, starting with the left menu. Now we can group
this whole section here with all the
different tabs, including, of course,
the white box behind. M next, let's group the shapes
and the layers of the header up here. And now let's start dealing with the main section in this design, which is the messaging list. So first things first, let's
lock the white box so I can select the rest of
the objects here easily. Now, let's group
this part, and then let's group the
purple button here. So now let's think again about what objects here need to
be grouped and whatnot. Let's go back to
the Figma design and try to see
what's going on in the next UI panel that needs to come in this demo flow
from what I understand, we need to create an animation of clicking on one
of the contacts, and then a private
conversation panel of this specific
person should appear. All right? Back to Illustrator. I'll first start by
making sure that I have only one red star here. In case I want to
create an animation of the red star appearing for the other
contacts in the list. Next, let's see what's going on here with the box
behind the contact. I see that the box is not
filled with any color. And since I already know
that in after effects, I will animate this box, changing shape, I think it's better to fill all
the boxes with white. So let's select
them one by one and make sure to change the
fill color to white. Now we can easily
select them all together and lock them
in the layers panel. We need to lock them so we can select the rest
of the shapes here. Without these boxes interfering, you can easily understand
which layer is selected by looking at the small square on the right side of the layer. This is how you know that
this is your selected layer. We're not grouping everything
that is relevant for each box and each contact, because as we already
saw and understood, we need to create a demo
animation of this section. And in that animation, the box design will change. That means every
object that belongs to each contact will either disappear or change
its position. Therefore, we need most of the shapes and layers
here to remain separated because we're going to animate them in after
effects. All right. So now we're ready to group
the objects in each section. And before moving on, let's take another
look at the Figma design so we
understand if we need any icon here to remain
on separate layers. From what I see
here, I understand that this part with the three
icons on the right side needs to disappear when the transition to the
next UI panel happens. Therefore, in Illustrator,
we can actually group all three icons
together on one layer. Of course, if you want to create a disappearing animation for each one of the
icons separately, you should leave each
icon on its own layer. But in our case, we
don't need to do that. I prefer to make them
all disappear at once. Once we're done with
that, let's move on and think about the next
section in the design. Let's consider the
Avatar icon here. Do we want to leave the
Avatar icon separated from the green or red dot beside it? Let's go to the Figma
design and think about it. I see here that the avatar
section doesn't really change, which means I can actually
group the shapes that create the avatar icon and the dot
beside it into one group, so they're on one layer. Of course, in case you want to add a picture of a real human, you should leave the Avatar icon separated from the
dot so you can then use the Avatar icon as a mask for the picture
you add in after effects. In our case, I don't want
to add pictures here, so let's group all
this section together. Let's do the same
for the rest of the avatar sections
in the design. All right. So with that, I think we've finished grouping all the necessary layers
and objects in the design, and we're now ready
to start deleting the empty layers in
the layers panel. I'll speed up this
process for now. No I noticed that during the process, I deleted the red
star by mistake. So in that case, I'll copy
one of the gray stars, create a new layer, and paste the gray star here in
the correct position. Here's a quick tip to align the object in case you don't
want to create a new guide. I'm bringing the canvas to the
left where the second star touches the gray area of
Illustrator's left panel, and that's how I
know where the first gray star should be placed. For the color, I'll leave
it gray and then create a color change animation to red in after effects
if I need that. All right. And with that, we have finished
preparing this design. Can now save this file before moving on to deal
with the next screen. We have two more to
go, so stay focused. The next two will be quicker. Alright. So now we're
going to move on to the next UI panel that we need
to prepare for animation. Let's go back to Figma and
select the relevant frame, which is the
conversation section. Let's copy it as is. Now, let's go back
to Illustrator and create a new document. Let's give this document
an appropriate name. We can call it messages too, because it still belongs to the messaging
section in which we will create a demo flow of the messaging system
of this SAS platform. Let's now paste the design we copied from Figma and
start working on it. As always, first, let's
release the clipping mask. Then we need to
ungroup the design. After that, let's spread all the layers from this design and move them out
of the main layer. We can already lock the
gray background layer, and before moving on, delete
the two layers below it. One is an empty layer,
and the other is a layer that contains the shape used for
the clipping mask. Now, let's start
grouping the sections, beginning with the side menu, which hasn't changed from
the previous screen. Next, let's group the main
menu here on the left side. Then let's group
the header section. And now let's start dealing with the main dissection
in this UI panel. We can start by locating
the white box and then let's group the different
sections inside this panel. All right. And now let's move on to deal with
the main section here, which is the contacts boxes. Let's think about what shapes should be grouped
and what should not. Since most of the parts
of this demo flow were already separated
in the previous design, we can actually group all the shapes or layers
that we know for sure we will not animate
or use in after effects. For example, since
we will create a morphing shape animation
for each box of each contact, in this design, we can group the Avatar icon inside
the box together, just to use it as
a reference later. Will not animate
it again because we already have it prepared
in the previous design. So now I'll select the box and the avatar objects and
group them all together. Let's do it for the
rest of the design. Now, for the rest of the
objects inside the boxes, I want to leave every object separated because we do need to create some kind
of animation for them later in after effects. Alright. Now, let's
deal with this area. We can group the date button. Now, let's zoom in and think about what we
need to do here. In the meantime,
don't do it with me. I want to explain
something real quick. First of all, in
case you want to animate each main icon
or shape separately, you can group the avatar
shapes into one group, then group the text message
shapes into another group, and finally leave the time
text on a separate layer. Of course, we would
need to repeat this for each message
in this section. But in my case, I want to create an intro animation for the entire message
section at once, so I'll undo my actions. And
now you can do it with me. In our case, I will group
all these shapes together, so we will have one layer
for each message section. By now, I hope you understand
that the grouping process completely depends on how you are planning to animate
your UI panels. Alright. Let's keep doing this for the next four
message sections. Now, let's stop here and think about what we want to do
with the last two messages. I'm saying this
because I think it can be a good idea to create a demo animation of the
messaging between two contacts. I'll make sure to keep
each shape here on a separate layer
because I might want to create some more interesting
animations for this part. I'll group the avatar
shapes into one layer, then I'll leave the
text in the text box on separate layers because I might change the text later in
the animation process. I'll also leave the time
on a separate layer. The same goes for
the last message. And here, I'm sure that I will create a typing text animation. So I'll keep the text
on a separate layer. Now, let's check the
rounded box behind it. I see that this rounded
box doesn't have a fill, so I'll add a white fill,
since I know I'll animate the shape in after effects. Once that's done,
let's move on to the next three objects and
group them one by one. So every object will
be on its own layer. Great. So with that, we have finished
preparing this design and we're ready to start
deleting the empty layers. All right. Everything looks good. Now let's save this file. With that, we have
finished this UI design, and we're ready to move
on to the next one, where we will prepare
the final UI panel or UI screen for this project. Great. So now let's prepare the final UI panel
for this project. Let's go to Figma and find it so we can copy it
into Illustrator. According to the
storyboard, in this part, we need to show a
short demo flow of the software where we showcase the file
browser screen and demonstrate the process of
uploading a new document. As you can see, we have the main panel
and a small pop up. Just like we did last time
we had this situation. Let's first copy only
the pop up layers, and after that, we'll come
back and copy the main screen. That way, it will
be much easier. To prepare this design
in Illustrator. We can find the main group of this design in the Figma layers. Let's right click on
it and copy it as SVG. Now, let's go to Illustrator
and create a new document. We'll call it screen eight
file browser. Great. Now let's paste the design here. And for now, just
move it to the side. Next, let's create a new layer and then go back to Figma
to copy the main screen. We can turn off the
pop up for now and then copy the
entire Figma frame. Back in Illustrator, let's paste it on the new
layer we created and start the process of separating all the layers before
we begin grouping them. Now, since we have a
shadow layer here, just like in the
previous design, I'll find this
layer in the stack and rename it to shadow, so we can easily find it later. All right, we can turn
this layer off for now, then lock the main
gray background layer, and finally delete
the two layers below it since we
don't need them. Great. So now let's start
grouping the sections here, beginning with the left menu. While I was trying to select the small gray
rounded rectangle, I noticed there's a line
here that we don't really need for the animation phase
later in after effects. Therefore, I'll select
it and delete it from the design. All right. So let's move on and
group this menu section. We can now place
the left main menu of the software above
the newly created layer, so the small arrow
will sit above the second menu item. All right. Now, let's move on to
the header section. But before grouping
the entire section, let's pause for a second and go back to Figma to understand
it a bit better. Since we want to create
a popping animation when adding a new file
in this UI panel, I think it's better to leave the head purple button
outside of the group. This will be the
button we'll use to create a click animation, and after that, the pop up panel for uploading a new
file will appear. With that in mind, let's
go back to Illustrator and first group all the shapes and layers that belong to
this purple button. Once grouped, turn off this
layer for now so we can easily select the
rest of the header objects and group
them all together. Great. Now we can place
the purple button above the newly created header
group and then move on to work on the main
section of this UI panel. Since I know for sure
that I'll want to create an intro animation for each document box
inside this section, I'll start by ungrouping the section and separating
all the layers. This way, I can decide which shapes and layers
should be grouped together in a way that fits the animation
process. All right. So after separating the layers, I noticed there's a shape that was used as
a clipping mask. I'll locate it and delete it, so I can easily select the rest of the
layers and objects. Once that's done, I'll select the entire section and
group it properly. Great. Now, let's start working on the document boxes
section below. When I'm not sure what's
happening in the structure, I usually move objects
around a bit to see which layers are already
grouped and which are not. For example, in this case, I see that the gray stroke is separated from the
white box fill. In our case, we don't need
them to be separated. In fact, I also
think we don't need every single object of each
document box separated. So I can group each
section into one layer. But since I know, I'll be
creating a demo flow animation of uploading a new
PNG or JPEG vile, I'll make sure to
keep the objects in the PNG document box
section separated. That way, I'll have
more flexibility in case I want to do
something special with this one or even duplicate it and replace
the names later. So let's keep that in
mind. But for now, let's start grouping each document box section one by one. As we said earlier, we'll leave the PNG document box
section ungrouped for now and move on to
grouping the remaining ones. Alright. I'm sure
I won't need to create any special animation
for the page numbers. So in this case, we can simply select the entire
section and group it together. Awesome. Now, let's go back and deal with the ungrouped
PNG document section. To make it a bit easier, we can start by grouping
the gray stroke in the white fill box together
and then lock this layer so we can safely select all
the remaining objects that form the PNG document
icon and group them as well. Great. Now let's move
to the right side and check if there are any other objects we can group
into one layer. Here we can group
the entire section with the Avatar icons. As for the text layers,
they're already properly grouped on separate layers, so we don't need to touch those. We can keep them just
the way they are. Great. So with that, we've finished
preparing the screen. And now we can move on to delete all the empty layers
from the Layers panel. Awesome. Next, let's
turn all the layers back on and lock them so we can start working
on the pop up panel. Don't forget to group
the pop up itself in case you want to quickly align it to the
center of the canvas. All right. Let's begin by
separating the layers. In case you get this
message, don't worry. It probably means
you didn't select the relevant layer before
splitting the layers. To fix this, undo
the action first. Then ungroup the layer again, click to unselect it, reselect it, and finally
split the layers once more. So we can clearly decide which shapes should be
grouped in this section. From what I see, we can
group the dotted stroke together with the purple
rectangle behind it. And in case we want to create an animation for
this element later, we can always use the
native stroke properties inside after effects. Great. Now, let's do the same with all the shapes that
make up the folder icon. To make selection easier, let's zoom out, find the white rectangle of
this pop up and lock it. That way, we can safely
select all the small shapes which are currently on separate layers and group them together. Next, I see that each line of text is already
on a separate layer, so we'll leave them as they are. Now let's look at the X icon
and the upload file text. In this case, we can group them together with the
white rectangle. So let's unlock the rectangle, select all of these layers,
and group them into one. Awesome. With that, we've finished preparing all the sections
of this UI panel. Now we can delete the remaining
empty layers in the panel and finally save the project before moving on to
the next lesson. In that lesson, we'll review all the prepared
designs and make a few improvements before importing them into
after effects. It's going to be amazing,
so see you there.
8. Refining the Design with Rounded Corners: Come back. In this lesson, we will improve the look of
the designs a little bit. For example, we can start
by rounding the corners of all the UI panels we have for all the screens we prepared
for after effects. And since we have a lot of shapes that
are grouped together, it's better to use the
direct selection tool to select the corners so
we can round them. So let's select this area, and then hold shift and scale
the corners around us to, let's say, 20 pixels for now. Let's now do it for all the
corners in this design. We can select this area, then
move to the next corner, hold shift, and select
the area as well. After that, let's
go up and while holding Shift again,
select this area, too. Now, let's set the roundness for all the selected corners to 20 I think it looks a bit better with the
rounded corners. So now, after we are
satisfied with the new look, let's not forget to press Control or Command
S to save the file. Great. And now let's move on to the next screen
and do the same. So I'll select all the
four corners here, and then let's set the roundness
to 20 or maybe try 30. I think 30 looks better. So
let's leave it like this. Let's save the new update now. And before moving along, let's go back to
the first screen and adjust the corners
to 30, as well. I want to show you this
process because it can be a little bit tricky to corners value for
areas where we have one shape with the rounded
corner, it's pretty easy. All we need to do is just
click on the shape using the direct selection tool and then click on the corner
we want to change, and then update
the corner value. We can do the same for
this corner as well. Let's do the same for the
bottom right corner, too. And now, here's the tricky part. In areas where we have more
than one shape together, like in this part, we
have the white shape of the header and the gray
shape of the background. We need to make sure we update both of the corners
of both shapes. A common mistake that can happen is when you select the
shapes and then click on a corner point without
realizing that you clicked and selected the corner of only the first shape in line. In that case, only the corner of the white rectangle of
the header changes. So in those cases, using the direct selection tool, select both shapes without
clicking on the corner dot. Instead, go straight to
adjusting the corner value. And, of course, after
updating all the corners, let's not forget to save
the file. All right. So now let's go to the third screen and adjust
the corner roundness there. But Let's save the file now and move on to
the next screen. And now, before moving
on to the next screen, I also want to hide
all the logo icons at the bottom part
of the main menu. Since this whole
area is grouped, let's use the selection
tool and double click on one of the layers
here until we can select it. I'm not sure what's
happening in this area, so I will find the shadow
layer and turn it off for now. I see that I can now select the rest of the
shapes and logos. So let's do that. To make
this selection easier, let's select the entire area, including the blue layer behind, and then hold Shift and click on the blue layer
to deselect it. And now, instead
of deleting them, let's turn them off
in the layers panel. For this, we can open the layer group and turn
off the selected layers. We can recognize
the selected layers by the pink square
icons beside them. All right. That looks okay. And now we can exit the
group by clicking somewhere outside the design to
unselect the selected layers. And before moving on
to the next screen, let's not forget
to save the file. I'll speed this process up
because it's pretty much the same as what we did on
the previous screen. All right. So once we're
done adjusting the design, we can move on to the
next step where we'll finally start importing the
designs into after effects. We have some additional assets
here in Illustrator that we will use in the
animation phase for sure. For example, we know that we have a scene where we need to create a logo animation so we
can get it ready right now. We can also create the color
palette for this project, so we can follow it throughout
the animation process. So let's get to work and
prepare these two real quick. Of course, you don't need to
do it because you already have the color palette and the logo files and
the assets folder. It's super important
for me to show this process so that when you work on your
explainer video, you will follow my process. And of course, we could
prepare these files later after we've already
started the animation, but I prefer to get them
ready as soon as possible. So first, let's start with
preparing the color palette. For this, we can actually check in the FIGMa
project that the client shared with us if there are any design guides or
assets of their company. A lot of the time, when
you get a Figma project, you'll also get
these design assets. In our case, we can find the colors here in
the pages section. Now, let's select the
layers we need to copy to Illustrator and then
copy them as SVG format. Just as we did for
the UI panels. Now, let's go back to Illustrator and create
a new document. We can use the recent
file template and just make sure not to
forget to name this file. Let's call it one point Colors. Now we can paste the figma layers and start preparing them. First, I'll scale
down this group until it fits my document. Next, I'll make sure the
layers are grouped so I can then align this entire group to the center
of the document. Finally, I'll just
make sure to name this layer colors because it will be much easier to find it later in after
effects that way. Once done, let's save this file and move on
to preparing the logo. For the logo, we can actually find it in
one of the screens. As you can see, we have a full
logo here in screen five. So let's double
click on the logo and copy the relevant
shapes we have here. Now let's create a new document, the same size and just
call it one point logo. Then let's paste
it here, group it, and scale, and align it
without problems. All right. And now, since we know that we will create a logo animation, let's prepare this design
for after effects. That is, we will
spread the layers. But first, just so we can
see what we're doing, let's create a new layer and draw a rectangle with
the size of the canvas. And now fill it with a different color so we can clearly see what
we're working on. Place this layer below the logo. And if you want, choose a
more contrasting color, so the logo stands out better. Finally, let's lock this layer and start preparing the logo. All right. So first, I will ungroup the layers, then select the text
of the logo and align it to the center of
the canvas vertically. Just to be sure, I will
also group the icon, so I can align it vertically
to the canvas as well, making sure everything
is well aligned. Once everything is
perfectly in line, we can start ungrouping the shapes and separating
them into layers. Here, we need to release
the compound path. Now, let's fix the weird
fill issue here real quick. First, make sure you select all the problematic
layers and then use the Shape Builder
tool to fix it. Hover over the problematic area, hold down Alt or Option on Mac, and click on that area
to delete the fill. Great. So now let's start
spreading all the letters into separate layers so
we can animate them in after effects individually. Once that's done,
let's name our layers, so it's easier to
navigate through them later in after effects
during the animation phase. All right. And now
let's save this file. And with that,
finish the lesson. Now that we have
everything prepared for animation in terms of
vector design elements, we're ready to
finally open after effects and start importing
everything we prepared. We'll do that in
the next lesson. It's going to be awesome,
so see you there.
9. Importing the Designs into After Effects: Come back. In this lesson, we will import the designs
into after effects and prepare the project for
animation and after effects. Before we do that, I want
to take the color palette, and the logo files from the AI folder and paste them
into the assets folder. In my opinion,
these are more like general assets that
we will use in the project rather than specific AI files prepared
for after effects. All right, back
to the AI folder. In case you didn't follow
along with me preparing the Figma designs in
Illustrator, don't worry. You can find all
these designs in their finished and
polished state inside the screens
for AE folder, which you will see if you open the assets folder inside the main course folder
you downloaded from me. Alright. With that done, let's now open Adobe
After Effects together. I will use the Beta
version because this is the most updated version of After effects that I could get while recording this course. And I want to use
the latest version since there are some
very cool updates in it, including the offset keyframes and layers function
that we will, of course, practice together. In case you are using an older
version of After effects, below the 2025
version, don't worry. I will also mention
how to do the things we're doing in the
newest version in your version as well. Okay. So once we
open after effects, let's first make sure
that we're all on the same page regarding
the panel layout. Let's go to Window and make sure we selected
the default layout. In case your default layout
looks a bit different, reset it because you probably changed the panel positions
at some point in the past. If you have a small screen, you might find this
layout a bit more comfortable because you can see all the tabs on the
right section here, clearly, like the Effects
tab and the properties tab. But if you want the focus
to be on the timeline, you can grab the timeline
panel and drag it down here. When you see a gray
line, release the panel, and now this panel
will be bigger, it's up to you do whatever
feels best in your case. And of course, in case
you don't see some of the important panels
like the text panels, you can go to Window
and add them from here. For example, let's add the paragraph tab in the
character tab. All right. So now, once we're
done with the layout, let's make sure we are also on the same page regarding
the system preferences. So let's go to Edit
preferences and first go to AutoSave and set the auto saving from 20 minutes to 5 minutes. We want after effects to save
our project automatically in shorter increments because
in these kinds of projects, the system can crash suddenly. So we want to be sure
that every 5 minutes after effects automatically
saves our project. Now let's go to
General and make sure to check the checkbox that
centers the anchor point. This way, the anchor point of any shape we create will
be automatically centered. Once that's done,
let's now go to Media and disk cache and
make sure the folder where all the temporary cache is saved while using after effects is located on a hard disk in your computer that has
a lot of free space. So click on Choose folder
and make sure that the disk and the folder you're saving the cache in has
plenty of free space. Otherwise, after effects
can work slowly. For the minimum disk cache size, you can leave it at 46 GB. All right. And now let's move on to the next setting
we want to adjust, which is memory and performance. In this case, it very much
depends on your computer. If you see that your installed
RAM is lower than mine, you will probably see
different numbers here. What's most important
is to lower the RAM reserved for
other applications. So the RAM available
for after effects will be larger. Great. So with that, we have finished adjusting all the necessary
system preferences, and now we are ready
to start working. If you notice a little icon in the upper right area of my after effects that
you don't have, it's because I'm using
the Beta version, so don't worry about
it. All right. So now let's start working. First, let's create
our first composition. We can call it master comp, and let's make sure
we're working in full HD resolution with
30 frames per second. And now for the
duration, in case you're not sure what to write here, I want to give
you a quick tip. First, I want you to
go to the website. You can find the link
in the description of this lesson or in the Links document inside the assets folder you
downloaded from me. Okay, so what we want to do is find the script that we
got from the client, or maybe we created
it ourselves. Then select all the
text and copy it. Now, all we need to do is go back to this website
and paste the text. It will automatically
count the words. And as you can see down here, it shows the time
it should take to read the text at an
average reading speed. What I love to do is
check how long it will take in the fast mode
and in the slow mode. And this gives me
the minimum and maximum time duration
for the project. So now, back in after effects, I know that this
project will not take more than 2 minutes for sure. Great. So with that done, let's go to the
Advanced tab and set all the values exactly
as I set them. Then let's go to
three D renderer and make sure we're
using classic three D. One final setting adjustment
I want to do before we start the project is to lower the
bit depth of this project. Higher bit depth means more color shades and
smoother gradients. For example, choosing a higher bit depth
improves image quality, but requires more processing
power and memory, which can significantly slow down previews in
rendering times. We can enter the setting through file project settings
and then go to color. Here it is under
the color settings. We can also access it
quickly by clicking on the icon down here in
the project panel. Let's set the bit
depth for now to eight bits per channel so we
can get a faster workflow. Later, before rendering the
project when we're finished, we can scale this up to
get better color quality, but for now, set it to eight. Great. So now let's press Control or Command S
to save this project, so the autosave function
will be activated. And, of course, so
we can manually save the project whenever we
want during the process. Enter the main folder that
you downloaded for me, go to the AE folder and save the project you are
now creating inside here. In your case, you'll probably
see another file here, which is the file
I've been working on with the finished animation. You can ignore it and just save the project we're
doing right now. Alright. And now
let's start importing all the Illustrator
screen designs we prepared earlier
into after effects. A very important rule that
I have when working on complex and multi
scene projects is to keep my after effects
project super organized. With that in mind, let's
keep working and see how we can apply this
rule in this course. So now, I want you to
go to the main folder you downloaded from me
and enter the AI folder. I insist that you
use the AI files. I prepared for this course and not the files that
you saved yourself. Please enter the screens for AE folder and use the
files inside this folder, not the ones you just saved. The reason for that is I want to keep a consistent
flow throughout the lessons without you stopping in case you missed something
in the preparation process. As I said earlier,
I will present all the mistakes that can happen along the way
during the lessons. In those cases, you just
need to listen and watch. But for now, please use the finalized AI files that I prepared inside the screens
for AE folder. All right. So the first thing I want us
to do is import all the AI files into after effects as they are without separating
the layers. That way, we can use these screens later
as reference layers. Now, let's create a
new folder inside the project panel and
call it screen Designs. Drag all the files inside this folder to keep
our project organized. Great. Now we can save the
project and start importing the designs with all the layers separated as we prepared
them in Illustrator. For this, we need to
import them one by one. Let's start with
the first screen. Now, we need to choose
to import it as a composition because we want all the layers that
are inside this file. And then under
footage dimensions, we need to choose layer size. Here's the difference between layer size and document size
in case you don't know. Document size.
Every layer will be the full size of the original
Illustrator artboard. Even if the actual
content is small, this can make alignment
harder intact. Layer size, each
layer's boundaries are based only on the
content inside that layer. This makes it easier to scale, animate, and align individual
elements precisely. Great. So let's click Okay, and see that now we have a new composition
of the screen and a new folder with
all the layers from this Illustrator
file. All right. So now let's repeat this
process and import the rest of the Illustrator files into
our after effects project. A very important
point I want you to take from this course
is that working on complex projects is not always a clear and
clean process. During the workflow,
you will always find some mistake you made earlier
or something you missed. I will try to show you this throughout the course and make the course as realistic as
possible because in real life, we don't work like robots. We make mistakes, and it's important to know how
to deal with them. Alright, so once that's done, to keep the project
panel organized, I love to click here on type. So every asset I have is sorted in a more
visually organized way. Now, to keep our project
panel organized, let's create another folder
that we'll call precomps. We will store in this folder all the precomps we create
during the project. The precomps we already have here from the screen designs, let's select the
precomps folder, create another folder inside
it, and call it screens. Then drag all the precomps of the screen designs
into this folder. To keep our project
even more organized, let's make sure no
folder is selected and then create a new folder
called screen Designs. Inside this folder, drag all the folders that contain the screen layers
of each design. Awesome. The project panel
looks much better right now. We can also add AI to
the name of this folder. So we know these are
Illustrator layers. AI stands for Adobe Illustrator. This way, we can easily differentiate this folder
from the one where we'll later store flattened
Illustrator screen designs. Oh, and I just noticed I had a grammar mistake here,
so I corrected it. And now we're ready to
continue with the lesson. At this point, we can save
the project once again. Another small thing
that I love to do is color my master comp
in a different color, so I can easily find it
later when I need to render the final project or navigate through
the project panel, we will have a lot more
assets here later, so this helps and
speaking about assets, let's go to the assets folder and bring in some of the files
we'll use in this project. Of course, eventually, we'll use all the assets we have here. But for now, we don't need
to import everything. We can start with the assets
that we'll use very soon, for example, the color
palette and the logo file. So let's start with the logo. We can already place the
newly created preComp inside the precomps folder, but not inside the
screen's preComps folder. As for the folder
with the layers, we'll find a place for it later. Alright, now let's bring
in the color palette. Since we don't need it
as separate layers, this Illustrator file doesn't include separated layers anyway. We can import it as footage, which means it will come in as a flattened
Illustrator file. I see that I have some weird
white box at the bottom. They were probably imported
from Figma when I copied from Figma as an SVG format
into Illustrator. In your case, you'll
get my finalized file, so you won't see this issue. For me, fixing
this is very easy. All I need to do is open the color palette
in Illustrator, select the white shapes,
and delete them. Then I'll press GRLS to save
the file because I changed the location of this file
the last time I saved it, I'll need to find it again. It's now in the assets folder, so I'll select it and save it
over the previous version. Back in after effects, the color palette will
automatically update. Great. Now everything
looks okay. Let's create another
folder called assets and drag all the folders
with Illustrator layers, and the rest of the
assets we'll use in this project
inside this folder, including, of course,
the color palette. Now we have everything
perfectly organized. Let's save the project, and
we're ready to move on to the next step where we'll finally start working
on the project. This is going to be super
fun. So let's do it. Alright, now let's create another asset that we'll
definitely use in this project. An animated gradient background. We can use it in
some of the scenes or maybe even all of them
throughout this project. Of course, you could
download ready made animated backgrounds
from stock websites, but I want to show you
the most useful way to create a custom animated
gradient background directly inside After Effects and also how to use it
smartly in the project. You'll see exactly what
I mean in just a minute. The first step is to
create a new sphere. To do this, long press the rectangle tool and
select the Ellipse tool. Make sure the fill is set to white and the stroke
is turned off. Now create a proportional circle by holding shift while drawing. To keep us all on the same page, set the size of
this shape to 500. If you're using an older
version of after effects, you can find this property under the layer's properties.
Here it is. Now, let's select this layer and switch back to
the selection tool, so we can move it to the side. Next, duplicate the circle
and move it over here. Let's do it once again so
we have three in total. Now, select all three spheres
and duplicate them again. Move the duplicates
up in the layer stack and roughly align everything
toward the center, just so you know
the exact amount of spheres isn't important. You can create as
many as you like. What I want to focus on is the main technique
behind this setup. Now we need to start
coloring our spheres. For this, let's open the
Assets folder and bring in the color palette
file to the scene. Once it's in, lock this
layer so it doesn't move around and then start applying colors to the spheres. Once you've finished, duplicate another sphere, place it somewhere in between
and change its color. Let's repeat this process again
to build up our gradient. Great. And now that we have
all our spheres ready, we can turn off the color
palette layer and start making this setup more
interesting by adjusting the scale and position
of each sphere. Try to make the corner spheres slightly bigger than the rest. The goal here is to
have the corners of the frame filled
with larger spheres, while also keeping
the overall look randomized as much as possible. Awesome. Now, we can start the animation
phase of this gradient. To do this, let's open the
position property for one of the spheres and add a very
simple wiggle expression. Hold Alt or Option on Mac and click on the
position stopwatch. In the expression
box, type wiggle. Inside the parentheses, we
need to add two values. Let's write two for
the first value, which controls the
speed of the wiggle. How many times per second
the motion will occur. For the second value,
let's type 30 for now. This controls the
amount of movement in pixels in every direction. Now, let's solo this layer so we can clearly see
what's happening. As you can see, with
these settings, the sphere basically stays close to its original position. What we want is for
the spheres to travel across a wider area so the
gradient keeps changing. To achieve that, let's
increase the second value. Try setting it to 100 and
you'll see the difference. It's looking better, but now the movement feels
a little too fast. In that case, let's slow it down by changing the
first number to one. This way, the sphere
will move more slowly, but still cover a wide distance. I'm making these adjustments
here so that if you've never used the wiggle
expression before, you can clearly
understand how it works. By experimenting with
these values right now, you'll get a much
clearer idea of how to control both the speed and the range of the
motion. All right. So once we're happy
with the animation, we can right click on
the position property of one sphere and choose
copy expression only. Then select the rest
of the layers and press Control V or Command V on Mac to
paste the expression. Since this is a
wiggle expression, it will make each
sphere move randomly. But here's the thing.
If all the spheres use the exact same
wiggle values, the animation won't
feel truly random. To fix that, let's select
every other sphere. Now press the E
key twice to open the expression box and then tweak the second value in
the wiggle expression. Instead of 100, let's set it
to 150 for these spheres. That way, some will travel
further than others, giving us a much more
natural randomized look. Great. Now it already
looks better, but let me show you
a little secret trick that not many people know. This will make your
animated gradient look even more dynamic. First, create a new null object, then parent all the
spheres to this null. Be careful not to
confuse the parent and link pick whip
with the track mat. Pick Whip. They look similar, but for this step, we need the
parent and link pick whip. Next, let's animate the
rotation of the null object. Instead of adding
manual keyframes, we'll use another simple
but powerful expression. Open up the rotation
property of the null, hold Alt Option and
click the stopwatch, in the expression box type. Time asterisk 100. This means the null will rotate
100 degrees every second. That's a bit too fast
for our project, but I wanted to show
you how it works. Let's slow it down by changing
it to T asterisk ten. Now, the entire group
of spheres rotates smoothly while each individual sphere still wiggles
independently. This combination makes
the gradient feel alive. Now let's turn this into
an actual gradient look. For that, create a
new adjustment layer. Then go to the
effects and presets panel and search
for Fast Box Blur. Drag it onto the
adjustment layer and increase the blur radius. Let's set it to 100 for now. Scrub through the
timeline and watch how the overlapping
colored spheres blend into a beautiful
shifting gradient. This is a great opportunity
to adjust the scale and position of the
spheres in the scene. What I like to do here is
scrub through the timeline, check how the animation looks at different
points in time, and then fine tune the scale and position of
individual spheres. Right now, as you
probably noticed, we don't have any solid
background in the scene, which makes the gradient
look incomplete. To fix that. Let's create a new white solid and place it
below all the layers. Next, turn on the
color palette layer and search for the fill effect. Apply it to the solid
and choose one of the brighter or darker colors, whichever works best for you. This will give us
a background color to blend with our
animated spheres. Personally, I'll go with
a bright purple color, which I think looks really nice. Looking at the setup
now, I noticed that the sphere in the upper left
area feels a bit too dark, so I'll change it to
a brighter color. Let's preview again and see how everything
looks together. At this stage, if you're not satisfied with
the look of your gradient, try moving some spheres around. For example, I feel this
area is too bright, so I'll drag the Beige
sphere down a little. You can keep tweaking
the positions until you get a
balanced overall look. Another useful
adjustment is to open up the wiggle expressions on
the position properties. If you notice that
certain spheres are moving too much
or too little, just modify their wiggle values. That way, you'll have
full control over how dynamic or subtle the
motion of your gradient feels. The key idea here is that
this setup is flexible. You can keep refining
colors, scale, positions, and wiggle settings until you achieve the animated gradient
look you're happy with. Once I'm happy with
the general setup, I think we can
improve the look of the gradient even more by
increasing the blur radius. This will blend the colors
together more softly. And in my opinion, the
result looks much nicer. Now that I've shown you all
the different steps you can take to refine
your gradients, I'll spend a few
moments recoloring the spheres until I find
a look I really like. In my case, I want the
gradient to lean more toward a purple tone rather
than a yellowish one. So I'll adjust the sphere
colors accordingly. Alright, now I'm satisfied
with the result. Before moving on, let's copy the effects name and paste it
onto the adjustment layer. So we'll always remember what this adjustment
layer is used for. At this stage, since we're done with the gradient and
we like how it looks, we definitely don't want
to leave all these layers sitting inside the master comp. Let's precompose all of them
into a single pre comp. We'll call it
gradient background. Make sure both options
are checked in the dialogue box and hit Okay. Now, in the Project panel, drag the newly
created precomp into the preComps folder to
keep everything organized. I'll also change its label color back to the default sandstorm. It appeared blue
earlier because it was created inside the master comp, which I had colored blue. Alright. Now I want to show you something very
important when working on complex projects. One of the main concerns
in projects like this is making sure after
effects run smoothly, both when previewing
and when rendering. In our case, if you use
the original pre comp of this animated gradient background throughout
the project, it will be very heavy
on after effects, slowing down previews
and final renders. Instead, what we need to do is render this animation once, and then you use the
rendered version of the gradient wherever
it's needed in the project. Let me show you exactly
how to do that. First, let's enter the pre
comp of this animation. Next, we'll set
the color settings in our project to maximum. At this point, I don't
want you to do anything. Watch and listen. I want to show you two
different high quality formats that you can use for rendering. The first one is
extremely heavy, so I don't recommend
actually using it, but I'll show it to
you so you understand the difference
between the formats. Don't worry, I'll
let you know when it's time to go back and follow along with me as we
render the second format. So let's say you know
that this background absolutely needs to be rendered at the highest possible quality. In that case, we'd go
to the output module, choose QuickTime as the format, then inside format options
under Video Codec, select either animation or one of the Apple
ProRes resolutions. For now, let's go
with animation. Now, I'll choose a location to save this render and
hit the render button. All right. The render is done. As you can see, it
took almost 5 minutes. On your computer, it may be more or less depending
on your hardware. But here's the
important takeaway. Instead of using the
original pre comp of this gradient animation, we now use the rendered file. After Effex handles footage much more efficiently than
a heavy precomp, so both previews and final
renders will be much faster. However, as I mentioned, this format is very heavy. If you don't have a lot of
free space on your computer, you should render it instead as a high quality MP four file
rather than a MOV file. This way, you'll still
get great quality, but with a much
lighter file size. So now let's do that together. You can go back to After
Effects and follow along with me as we render
the second lighter format. So once again, let's open
the original precomp. This time, we'll change
the color depth to 16 bit. Now press Control or Command plus M to send
it to the Render Q. Inside the output module, choose h.264 as the format. That's an MP four file. In format options, you'll
see the target bit rate, which is set to 15 megabits
per second by default. You can increase this to
something higher like 35 or 45 for better quality, or if you prefer, just pick one of the
ready made templates that already sets the
bit rate for you. I'll choose to render this
into my assets folder, but you should render
it to the separate folder I asked you to create earlier
for your own files. Finally, hit the render button. Once the render is finished, I'll delete the old MOV
file and then import the new MP four version of the animated gradient
background into our project. You can either use the
file you just rendered or the one I've included
in the Assets folder. Great. Now, as you can see, the MP four file is
much lighter in size, but the quality is still perfect for the rest
of the project. If I drop it into the timeline, it looks identical to
the original pre comp. The only difference
is that now after effects can handle it
much more efficiently, which will make
previewing and rendering the final project
faster and smoother. And with that, we
finish this lesson. Let's save the project one
more time before moving on. In the next lesson, we'll create the video board before
starting the actual animation. You'll see why
having a video board ready is so important. It's going to save us
a ton of time and make the animation process much easier. It's going
to be amazing. So I'll see you in the
next one. And before starting to watch
the next lesson, don't forget to take
a ten minute break to refresh before we continue. See you in the next one.
10. Creating the Videoboard for Scene Timing: Come back, we can now bring back the color settings to eight BPC. We will switch it back
to 16 when we finish this animation and need to
render the final version. In the meantime, in this lesson, we're going to create
the video board, which is a very important
step in creating any multi scene
video or animation. Together with the voiceover, it will help us determine how long each scene should last, which will be very helpful
in the animation phase, so we know how many seconds
each scene should last. And to do that, let's find the storyboard that
I prepared earlier for the project because we
will use the frames of the storyboard to
create the video board. Since we want all
the layers, we can select composition
retain layer size, and then we can choose to match layer styles into footage. Which doesn't really matter
because we don't have any layer styles in these
layers from Photoshop. Alright, we can place
the folder with the layers inside
the assets folder. And now let's enter the pre comp we get from importing
the storyboard. For now, we can turn off all the layers here except
the background layer, and we can lock it so it won't interfere
with the process. Great. Now let's import the voiceover to the
project as well. Whether you get a
voiceover from the client or generate it yourself,
it doesn't matter. What matters most is to have
any voiceover you can use when creating the
video board and starting the animation
of the actual project, even if it's just
a simple voiceover created with AI or
recorded by yourself. It is very important to create
an initial voiceover so you know approximately where each scene needs
to start and end. So now I will show you how to
do it completely for free. The website I usually use, whether for an initial voiceover or a final one that I will actually use in the project
is called vi dot IO. You can sign up very quickly
using your Gmail account. I'm going to log in because I already signed up with
my Gmail account. At the time I'm
recording this course, this platform allows
you to create a few minutes of
Voiceover for free. Maybe by the time
you see this lesson, they will have changed
their free package, and it's no longer
free, but in any case, that shouldn't be a
problem because I'm sure it's super easy to find free tools that can generate two or 3 minutes of
voiceover at no cost. I strongly insist
that you create a voiceover before
starting the animation. It will save you a lot of revisions and headaches
in the long run. Alright. So once we are
logged into the website, it is pretty easy to use. I'll click here to
create a new project. Next, I'll choose the
size of my screen. In my case, I will use
the full HD resolution. Then for the background
color, I will choose green, and that's because I will also create captions in this video. When the background is green,
it will be much easier in after effects to remove it using one of
the keying effects. All right. So now to
create the voiceover, I will go to the audio section and select the text
to speech feature. Next, I will go
to the script and copy all the texts
that I have here. Then I'll paste it
into the text box. And as you can see,
there is a limit to how much text I
can use at one time. The next step is to choose the right voice
for my voiceover. At this part, I will
speed things up. All I'm doing is
just playing and testing to find what will be the best choice for my video. All right. So after
testing all of the voices, I finally picked the
one I liked the most. Now I'll select it
and click Generate. This process might
take a few minutes. All right. So the
voiceover is ready. I'll just change the
name of this project, and now I can listen
to what I've got. Managing a large team across multiple projects isn't easy. Too many tasks,
too many messages. And before you know it, you're drowning in chaos,
looking for help. Met One point. The platform that makes project
management so simple. Even your cat could do it. With One Point, you get a crystal clear overview of everything your
team is working on. All your projects, all your
tasks, all in one place. As you may notice, sometimes we hear long pauses or
no pauses at all. In this situation, I will
adjust my text a little bit. By changing the punctuation
marks in the text, the AI will slightly change
the version of the voiceover. Managing a large team across multiple projects isn't easy. Too many tasks,
too many messages. And before you know it, you're drowning in chaos,
looking for help. Met one point. The platform that makes project
management so simple. Alright, this sounds
better. But I decided to change the voice
over to another artist. Managing a large team
across multiple projects. In that case, all I
need to do is find the artist that I want
and click Regenerate. Great. So once I'm happy
with the voiceover, the next thing I will do is add captions of the
voiceover in the video. I do this because it
helps me later in after effects to understand what the scene is talking about, even if I don't
hear the voiceover. It's just a small thing that I love to do when I work on
projects with voiceovers. It's okay if you don't fully understand what
I'm talking about. Once we actually start working
on it in a few minutes, everything will become
much clearer for you. Here on the left side, I can adjust the text if I
find some mistakes. All right. So once I'm
good with the captions, I will scale the
font size down and recheck everything once
again before downloading it. Okay, so I'm ready
to download it. For this, I'll click on
Download and make sure the quality is set to HD and that burned
subtitles is checked. Now I'll click on Export
Video and wait a few minutes. Once that's done,
I will click on the Download icon and
choose to download it as an MP four file because
I want to see the captions. If you don't want captions
in your voiceover, you can download it
as an MP three file and use it in your
project. All right? Let's drag the voiceover
into our project. Now let's bring the MP for file into our timeline and start
creating the video board. The first thing we need to do is remove the green screen so we can see the captions and the
layers of the video board. For this, let's go to the Effects panel and search
for the key light effect. Now, all we need to do is select the eyedropper of
the screen color and click on the
green color here. Awesome. So now let's start
creating the video board. The first thing I
love to do when creating the video board is to offset all the frames
from the storyboard, one after the other
in the timeline. To do that quickly, let's
select all the layers. And now let's go to frame ten and crop the
layers to this point. Now, to offset all
the layers at once, it's important that we
start the selection from the first layer we want to be at the start of the timeline. In our case, it's
layer number one. So select it, hold Shift, and then select the last layer. Now, right click, go to Keyframe Assistant and
select sequence layers, and then just click Okay. As you can see, all our layers are now offset one
after the other, starting from the first
layer that we selected. Now, sometimes the first
offset is not what you need because the duration
of each layer is either too short or too long. In our case, ten frames for
each layer is too short, so let's undo what we did and repeat this process once again, but this time, set the duration of each layer to 1 second long. Now, we can start working on adjusting each layer
according to the script. And since we can see
the captions below, we don't even need
to hear the script. We can just follow
the text to know which frames should be shown at each specific point in time. That's why I love to add
captions to my voiceovers. In the final rendering,
I can just turn off the layer of the captions
so I won't see them, but I will still
hear the voiceover. Later, you'll understand
exactly what I mean. Now let's focus on adjusting the layer durations
according to the voiceover. So according to the voiceover, I understand that at
this point in time, the first scene should end and the second
one should begin. This means we need to
adjust the frames that describe the first scene
up to this point in time. Now, we can select all the frames that create the first scene and
shorten their duration. After that, we can use the sequence layers function
once again so they will be offset one after the other without us needing to
move them manually. As you may understand, we will need to use this
function many times when creating storyboards or any other animation
we are working on. Now, I want to teach
you something important for becoming a more
advanced motion designer, creating custom shortcuts for actions that don't
already have shortcuts. For example, we don't have a
shortcut for this function. So I'll show you how we can create a custom shortcut for it. By using this opportunity. I want to teach you the process of creating a new shortcut. You don't have to do
it for this function. You can create one
for any function you want, and I'll show you how. First, go to Edit and click
on keyboard shortcuts. Here you can see
that we are using the default after effects
preset of shortcuts. Once we create a shortcut, it will show that you are
using a custom one instead. Next, make sure the
language is set to English. Now, all we need to do is type the action into
the search bar. In our case, we can
write sequence. And if we scroll down, we'll see the sequence layers function
under the animation section. To create a shortcut,
just click here beside the name under the shortcut menu and
choose the keys you want. We can start the shortcut with
Control or Command on Mac. Now we can see all
the available keys we can use colored in gray. What's in purple means it's already in use and
we cannot use it. To open more available keys, we can add another key to our
new shortcut combination. For example, we can use the shift key together
with the control key. Now, as you can see, we have a lot more
available keys to use. I love to use the number keys because they are
easier to remember. As you can see, number one is already taken, so
let's use number two. Once that's done, let's start selecting the frames
of the first scene, starting from layer one and then use our newly
created shortcut, which is Control Shift two. And there it is. The
shortcut is working. So now we can work with the
captions of the voiceover and understand where to finish the last frame that belongs
to the first scene. Okay. So the second
scene starts here. So we can now bring layer
seven to this point in time. Now let's see what we
have in the next layer. If we read the captions,
we will see that layer number eight shouldn't start right after layer seven. According to the
captions, this scene should start from
this point in time. A bit after the seventh second, that means the scene represented
in layer seven should last up until the point in
time when layer eight starts. Let's see what we've got so far. Managing a large team across multiple projects isn't easy. Too many tasks,
too many messages, and before you know it,
you're drowning in a. Looks like we got
everything right. Basically, when using this
method with the captions, we don't have room for mistakes. Everything is super clear. Let's move on and try to
practice it once again. Let's now select all
the layers after layer eight and move them
later in the timeline. Then we can see where the next scene should start and end. And before you know it, you're drowning in chaos,
looking for help. Met so as you may understand, according to the voiceover,
when we hear meet one point, we need to present the logo. That means we need to start
layer ten a bit earlier. Now, let's see what we need
to do before this happens. At this point in time, we see, according to the captions
of the voiceover, that it's a scene
where we need to present the searching
for help scene. So let's expand the
beginning of layer nine. So it starts from
here. Finally, we can expand layer eight to
end at this point. Great. So now let's keep
going to the next scenes. Okay, so here is the
moment in the Voiceover, talking about the platform. In our storyboard, it's the layer where we see the dashboard of the
platform for the first time. That means we need to start layer number 11 from
this point in time. Let's move all these
layers to the right for now and expand the previous
scene to this point in time. Now, we can bring layer
11 to start from here. Great. So now I see that according to the
captions of the voiceover, the cat scene should start
at this point in time. So I will now try to place the cat scene starting from
somewhere around here. That means we can expand the previous scene
up until this point. Okay, I hope you're starting to understand the idea of
creating a video board along with the voiceover and
how it makes the process easier when we have captions
along the way to guide us. Okay, so now let's keep
going and continue to adjust the layers of the storyboard according to the timing of the voiceover. In cases where things
get a bit complicated and we can't fit the
layers to the voiceover, what I love to do is find
a scene where I have a text animation and align
it with the captions. As you can see, we
have a scene with a text animation that
says, N the full picture. So I will now ignore
everything else and just keep watching the captions
to find where this sentence starts
in the voiceover. As you can see, it
starts somewhere around here at second 22 or 23. So now I'll go back and select all the layers
starting from layer 17 and drag them to start
from that point in time, which was the end
of the 22nd second. Now, all I need to do
is adjust the timing according to the captions
so it fits perfectly. Great. Now, we can
bring layer 16 here to the right and layer 14 here to the left and see what's
going on in between. I know that at the
moment in the voiceover, when we hear a crystal
clear overview, we need to already present
the project's UI screen. So we can start this layer from here and drag
it to the right. Now let's see where we
need to end the scene. I know that my next frame
is showing the task scene. So now I'll read the
captions and see where this part starts
in the voiceover. It starts here, so that means layer 16 needs to start here. And that means layer
15 needs to end here. Great. So now we can
continue to the next scenes, and from now it will be super easy because we have a lot of scenes with text animations. That makes it easy to match the voiceover to these scenes while we are reading
the captions. For example, to see where the
question scene should end, all we need to do is check
in the voiceover captions, where the next
scene text begins. As you can see here in the
captions of the voiceover, we no longer see the question. That means we can layer 17 at
this point in time for now. Now, let's move
all the layers to the right and see where
the next scene begins. Pay attention only to the
captions of the voiceover. As you can see, we see the
text every project includes. That means that at
this point in time, we can start the next scene and the question scene exactly here. Now, let's bring layer
18 to start from here. Great. And now, to know
where this scene should end, all we need to do is see where the next question text scene begins according to the
voiceover captions. So now, focus on the captions only until you see the moment where the
question is starting. Here it is at second 37. So now let's select all the layers from the
layer named layer 19, which is presenting the
question scene and then move them all to
start from second 37. Now to see where the
question scene should end, keep focusing only on the captions of the
voiceover to see where the voiceover
finishes saying falling behind. Here it is. So expand the frame from the storyboard of the question scene up until this
point in time. Great. With that done, we can now select the rest of the layers and start them from the end of
the previous one. As you can see, it
matches the captions of the voiceover and the text that needs to be shown in the
scene at this moment. Awesome. So now we can go back to the
previous scene before the question and
expand the frame to the point in time where the
question scene begins. Great. So now I see, according to my storyboards frame that the next scene is
a question scene. That means I will now avoid everything else
and only focus on the captions of the voiceover to see where the voiceover
says this question. Here it is at second 42. So now all we need to do
is bring all the layers from layer 21 to start
from the 42 second mark. After that, we can extend layer 20 to end at
that point in time. So now to see where the
question scene ends, pay attention to the captions
of the storyboard to see where we no longer see
the question. Here it is. So let's move all the rest
of the layers to start from here and then end layer
21 at this point in time. Awesome. Let's keep working. I see that the next scene is perfectly aligned
with the voiceover. Since the text I see
that needs to be presented in the scene matches
the voiceover captions. Now I keep focusing only on the voiceover captions and see what the next scene
is talking about. In this case, we are talking
about the messaging system. In our case, the beginning
of the scene is okay. But now we need to find
where this scene ends. For this, let's focus on what the next scene should be
according to the storyboard. As you can see, we
now see a scene with the file browser UI screen in which a person
can share files. With that in mind, we
now need to go back and focus only on the
voiceover captions and see where the voiceover
starts talking about this part. Here it is. As you can see, the
voiceover says sharing, which means the
file browser scene should start from here. So let's now bring the layers to start from
this point in time. Great. And now let's go back to deal with
the previous part. According to the
storyboard frame, I see that it shows a scene
about quick reminder, and I clearly see the captions not talking
about this part. So let's focus on the
voiceover captions to see where the voiceover starts talking about the
quick reminder part. Here it is at second 50. So let's bring the
storyboard frame of this scene to
start from here. Great. So now we can expand layer 23 to end
where layer 22 begins, and then expand layer 22 to
end where layer 23 begins. So now, according
to the storyboard, I see that the next scene
is presenting a question. So now I'll focus on the
captions of the voiceover and see where the voiceover
starts talking about it. Here it is. It's starting somewhere around the
first minute mark. That means that we now need
to select the layers starting from the question scene and bring them all to start
from the 1 minute mark. With that done, we can now expand layer 24 to end
at that point in time. Okay. So now let's
check the final scene. The storyboard frames
and the captions of the voiceover seem
to match perfectly, so we don't need to
do anything here. The only thing we can do is in the last storyboard frame at the point in time where
the voiceover ends. Alright. So when we're
finished with the timing, we can now shorten
the work area to the end of the voiceover and check that
everything is matching. The storyboard frames
with the voiceover. So let's take a look
at what we've got. Managing a large team across multiple projects isn't easy. Too many tasks,
too many messages, and before you know it, you're drowning in chaos, looking for help. Met One Point. The platform that makes
project management so simple, even your cat could do it. With One Point, you get a crystal clear overview of everything your
team is working on, all your projects,
all your tasks, all in one place. Need the full picture. Every project includes
detailed tasks, sub tasks, and real
time progress tracking, so nothing slips
through the cracks. Want to see who's
falling behind, head to your team tab to view everyone's
activity at a glance. Need to follow up with someone. Jump into the built in
messaging system where all your conversations
are organized by contact. Send a quick reminder or
share an update instantly. And yes, sharing
files is effortless. Upload any document, and your entire team will have
access to it right away. So why keep struggling? Go to one point.com and make your workday
easier, starting today. Managing a large team Great. Everything looks perfect. And we are now
ready to move on to the next lesson where we will start animating
the first scene. It's going to be super
fun. So see you there.
11. The Correct Animation Workflow: Come back. Before we start
animating the scenes, it's important for me to explain to you the correct workflow. It's pretty simple
to understand. First, I want you to work macro. That means I want you to
first finish animating the scenes without going too
much into design details. The most important part is
to first finish creating a good animation that fits
perfectly with the voiceover. This is the most important part. Only when you have that
for all the scenes, you can start working micro. That is, go into each scene and add additional design
assets and start coloring and designing
the scenes and adding special effects like
blurs, glows and shadows. This method not only makes your project run faster
and more importantly, prepares it to fit the
animation to the voiceover, but it also saves you a lot
of time in the long run by avoiding adjusting the
design 1 million times. So remember, split your
workflow into two parts. First, work macro on the
most important things and only then start working Micro on adjusting the design details. Keep this in mind throughout the course and pay attention
to how we will go to animate the next scene before finalizing the design
of the previous one. Alright? So we will start this lesson by creating and
animating the first scene. The first thing we
need to do before animating any scene that includes voiceover is to see what should be the
duration of this scene. In our case, after
creating the video board, we can clearly see
when the scene starts and when it should end
before the next one begins. As you can see, the
first scene ends here, so it means we need
the animation of the scene to last
at most 4 seconds. Knowing what the duration
of a scene is can prevent a lot of timing
adjustments in the near future. That's one of the
important benefits of having a video board. All right. To begin, let's first bring the
Voiceover MP four file into the Assets folder. And now let's press Control or Command N to
create a new composition. Let's name this comp scene one. There are a lot of ways
to animate this scene. And this time, I want to give you a quick tip for animating scenes where we have a moving to the side motion, like we
do in the first scene. When I deal with these
kinds of scenes, I love to create a
wide composition, and after that, animate the
comp to the sides if needed. I covered this technique in
my course transition Mastery, in which we learned
a bunch of ways and techniques for
different types of transitions and
explainer videos. Alright, so to have
a wide composition, we can multiply
the width by two. Next, for the duration, we can leave it at
2 minutes for now. Great. So now we have a wide composition
in which we can enter the entire text we need
to animate in the scene. So let's open the script
and copy the relevant text. Back and After Effects,
select the text tool, click once to open a text
line and paste the text. Now, let's adjust the text to fit the company's
design guidelines. In our case, the main font
of the company is pop ins. In case you're not sure, you
can always ask the client to confirm and send you the relevant font so you can
install it on your device. In our case, it's a free font that you can
download from Google Fonts. You can also find the
font in my assets. If you don't have this font
installed on your device, please save the project, close it and install the font. Only after that, reopen the
project and keep working. All right, back to the project. I will find the font. Now I'll
reset my text properties. Let's set the font
size to 100 for now. Next, make sure the
paragraph is centered, and then you can align the layer to the
center of the comp. Great. So now we can start
animating the scene. But before that, let's delete the dot we have in the text. In animation videos,
it's not common to use dots in text
animation scenes. Awesome. So now we can go to the video board and recheck what needs to happen
in the scene. My approach for
this animation will be dividing the text
into several parts and animating them
one after the other without worrying about timing
between them at first. After creating the
animation for each part, we will move the layers and the keyframes to
adjust the timing. Okay, let's go back to
the scene and start preparing it for
animation. All right. So the first thing we can
do is use this layer as a reference layer
because we need to have a few different text
type animations. And it's a good idea to see where each word
should be placed. We can duplicate this layer
now and lock the reference. Let's bring the opacity
here back to 100. Great. So now, since we have to create different types of animations for the text, let's start splitting the text into a few separate
layers for each part. To begin doing that, first, let's duplicate our text layer. Now let's make sure
that on this layer, we only see the first
part of the text. Let's select the
text from the word multiple up until the end of the sentence and
delete this part. Once that's done before moving to splitting
the text again, let's now bring our
first text part to the correct position. In this case, we need to
move this layer to the left. This will be the
part where we use text animators to
animate this text. For the rest of
the text, we will animate almost each
word separately. With that in mind, let's select this text layer and make sure to delete the first
part of the text, including the word multiple. Since we will animate this
word separately later. Okay. So now we can isolate this text
layer to focus on it. Now, let's duplicate this layer. And this time, make sure
that on this layer, we have only the word projects. Great. And then let's
isolate this layer and make sure to have here
only the text isn't easy. Awesome. So now let's
bring back all the layers and organize the position of our new text parts according
to the reference layer. All right, at this point, we can select all the layers and center their anchor points. For this, hold down Control or command and click twice
on the AnchorPoint tool. Great. So now let's deal with the most complicated part
of this text animation, which is the word multiple. Let's select this
layer, duplicate it, place it in the right place, and change the text to multiple. Great. And now let's
tag this layer in a different color so we can differentiate between
the layers more easily. Now, let's start dealing
with this animation first since it's the more
complex part of this scene. To better focus on this layer, let's isolate it and shy all the other layers besides
the reference layer. We can isolate it as well
to have a clear vision of where the final animation of
this word should end. Okay. So now we need to split all the characters of this
word into separate layers. There is a paid tool for this in case you want to make this
process a bit faster. I'll leave a link for
it in the description. But in my case, I don't do these kinds of
animations too often. So I don't need
this tool. I'm fine with doing it manually. So let's duplicate this
layer seven times. So in total, we will
have eight layers, each layer for one
character of this word. Now let's make sure each
layer has only one character of this word. Awesome. And now, using the
selection tool, let's place all the layers
in the correct position. Great. So with that done, we can start
animating the layers. First, let's select them all and then go to
the second one. When I don't know what the duration of the
animation should be, I usually create a
1 second animation. After that, I adjust the
duration and timing if needed. Okay, so now let's
press P and create a keyframe for the
position property for all the layers at
this point in time, since we know that at the
end of their animation, they need to be located here. Next, let's go 15
frames earlier in time and start spreading
the layers randomly. With that done, let's
go to the beginning of the animation and place the layers where we
want them to start. In our case, let's make
them pop from the center. So let's bring them all to approximately
the same location. Awesome. So once we're done with
the position animation, let's move on and
animate the rotation. First, we know that at the end, they should all look
as they are right now and in the middle
of this animation, we'll start rotating
each character randomly. Finally, at the beginning
of this animation, we can copy the last keyframes
and paste them here. Okay, it's starting to get
a bit more interesting. So now let's make it even more interesting by adding
a scale animation. At the end, the scale should
be as it is right now. In the middle of the animation, let's set the scale
to, let's say, 150. And at the beginning, since we want to create a
pop up animation, let's set the scale to
zero for all the layers. Great. And now let's make sure no layer is
selected and press you to see all the keyframes we created and start
improving the motion. First, let's select
them and convert all the keyframes to
Easy Ease keyframes. Then let's go to the
graph editor and make sure we are using
the speed graph. Now, let's zoom in a little
bit so we can see what we're doing and start adjusting
the speed of the animation. That is adjusting the velocity. I want the animation
to start fast. So let's select all
the middle keyframes and move their
handles to the left. Now I want the layers to
hover a bit in the air. That is, I want the animation in the middle to be a bit slower. So let's move these
handles to the right. Now the motion here
will be slower. Great. So with that done, let's exit the graph editor and keep improving
the animation. At this point, what
I love to do is create a slight delay
between the layers. It's always a good idea
when you have a bunch of layers that do pretty
much the same animation. Okay, so let's start by selecting all the layers
after the first one and offset them by let's
say two frames. Now, hold controller command, click on the second
layer to unselected and move this 12 frames. Let's do it for the
rest of the layers. As you can see, it looks better. But now I'll undo
my actions and show you how you can delay
the layers much quicker. You can also do it
if you are using the most updated after
effects version. That's the reason I'm
using the Beta version. When I recorded this course, this function was only
available in the Beta version. Okay, so to do it, we first need to start selecting the layers from the layer we want the delay to start with. In our case, the first layer we need to select is the letter M. Then we can hold Shift
and select the last layer. Now, hold Ctrl Alt or
command an option on Mac. And as you can see, the cursor changes to the new
delay feature icon. That means we can
now drag the layers to the right and get
a proportional delay. You can zoom in and place the time indicator at frame one, then drag the layers so the second layer will
be placed here. This is how you can know that the delay is exactly one frame. Of course, you can do
whatever delay you want. But for this lesson, follow
along with what I'm doing. All right, so the delay
looks pretty cool, and now we can improve
the animation even more by adding additional
pop up motion. To do that, let's create
a new null object. Now let's stay somewhere
after the animation ends. You can see where
that is by checking the last key frame
of the last layer. In our case, it's
somewhere around here. Then bring the null to
the center of the word, and after that, select all the layers and
parent them to the null. So now, using this null, we can add a secondary
scale animation to all the layers we have here. Let's create a keyframe with the current value
at the beginning. After that, let's go to some point in the middle
of the animation and scale the null to
let's say, 120. Let's check that
it's not too much. Okay, it looks fine. Now let's go to a
point in time where the animation almost ends
and set the scale to 80. And finally, let's go
a few frames after the animation is
completely finished and bring the scale back to 100. This will create a cool
popping animation. We can now easy ease the key frames and
see how that looks. At this point, I love to watch the animation a few times
and see what I can adjust. In my opinion, we can bring the final keyframe a bit earlier to have
a snappier motion. And we can also bring the
first keyframe to start at, let's say, frame ten. Yes, I think it looks much
better this way. Great. So now we can continue animating the next text parts
of the scene. Before moving on,
we can tag the null with the same color as
the multiple text layers. That way, we'll know all
these layers belong to the same text part. All right. And now let's animate the
first part of the text. It's going to be much easier
because we'll animate it using text animators. In case you don't
know what this is, I highly suggest you
watch my course, text and motion in
which I cover the world of text animation
in After Effects. Alright. To begin, let's open the text properties and
add a new animator. Let's start by adding the position property
to our text animator. Now let's go to our newly created animator
and open the range selector. We can also open
the Advanced menu, which we'll use in a second. Great. So now let's begin
setting up our animator. Here is the position property we just added from the list. The first thing we
need to do is set up the changing point
for this animator. In our case, I want the text
to enter from the bottom. Therefore, my
changing point will be somewhere around here, we can set it to 90. Next, for the shape
of our animator, let's make sure to
set it to ramp up, since we want the animation
to begin from left to right. After this, let's
make the animator move each word rather
than each character. With this, we've finished
setting up the animator. And now, to control this setup, we'll animate the
offset property. This changes the text from the changing point
of our animator to the original
form. Of the text. That means when the
offset is at -100, it will bring the text
to the changing point we set for the position
property of our animator. And when it's at 100, the text will be at
its original form. Okay. So now, make sure
you're at the beginning of the animation and create a keyframe for the
offset at -100. Next, go to second one and
set the offset to 100. Great. And now, when using
text animators, we don't easy ease the keyframes to
control their velocity. We can do it directly from here. A good setup for nice
easing is setting E's high to 20 and Es low to 80. Let's see how that
looks. Looks nice. To finish this animation, let's stand at the
point in time, where the animation
is fully completed and create a new
mask for this layer. That way, we won't see the text at the beginning
of the animation. In case we can still see some parts of the
text at the beginning, we can change the changing
point in our animator. We just need to adjust the position property
we have here. That looks better. Great. So now we can move on to the next text
part in this scene. We can animate the word project in the same animation style
we used for the first part. For this, let's just copy the animator and paste it
onto the relevant text layer. We can bring this
layer up here to keep the chronological order
of the text. All right. And now let's just
press CtrolF to paste the animator. Looks nice. Before moving on, let's stand here where the animation
is fully completed and create a mask for this
layer as well to get the same intro as the
previous text. Awesome. So now let's deal
with the last part of the text in the scene. To make it a bit
more interesting, let's split this text
into two separate layers, one word on each layer, and create a cool popping
animation for both. Then we can offset these layers and get some nice results. Before animating them, let's
center their anchor points. All right. And now let's
select them both and press S to open the
scale property. Now let's create the
first keyframe for both. When the scale is set to zero. Next, let's go to frame 15
and set the scale to 100. And finally, let's move the
last keyframes to frame 20. Now, let's stand
in the middle at frame ten and scale
them up a little bit. Let's set the scale to 120. Great. And now let's easy
ease the keyframes and then go to the graph editor and adjust the handles so the
animation starts fast, slows down in the middle and
gains speed toward the end. Great. And now at this point, after finishing
animating the text, before moving on, it's a
good idea to work with the voiceover and check if the
timing fits the narration. Let's go to the
video board and copy the voiceover layer from
there. Back in the scene. Let's paste it here and
see what we've got so far. We can turn off this layer
to hide the captions. We don't need to
see them right now. Let's focus on hearing the voiceover and watching
the animation. Managing a large team across multiple managing a large
team across multiple. Alright. So after
hearing it a few times, I see that the word multiple should start at
this point in time. So let's select all
the layers related to this text animation part and move them to
start from here. At this point, I'm
hearing the voice over again and trying to
adjust it even more. Came across multiple projects. I cross multiple projects. From what I understand,
our animation of this part lasts for too
long. Let's speed this up. For this, let's open all the keyframes we've got
for this text animation part, and now make sure we are
selecting all of them. Don't miss the keyframes below in case you're working
on a small screen. Okay. So now, let's say
the animation starts at 1 second and 15 frames and ends at 2 seconds
and 20 frames. Let's stand here and
hold down Alt or Option on Mac and drag the last keyframe we have
to this point in time. Before seeing what we've got, let's make sure to adjust the length of the
layers from the start. It happened because we
dragged the keyframes to the left while shortening the duration
of this animation. Now let's see it a few times. Across multiple projects. Cross multiple projects. All right. So once that's done, let's deal with the first part. Aging a large team across. From what I hear, I think we can slow this animation
down a little bit. So let's bring the
last key frame of our text animator to
1 second and ten frames. Managing a large team
across multiple. That's better. We can start
the second part even earlier. Great. And now let's
deal with the next word. Team across multiple
projects. Multiple project. I think we can start it from
2 seconds and five frames. Projects. Maybe a bit earlier. Well, projects SiplePjects? Is it. That's better. Okay. So now let's deal with the last text part while making sure we create a slight delay
for the last two words. Jex isn't easy. Isn't easy. Managing a large team across multiple projects isn't
easy. Too many texts. Alright. I hope that while
working on the scene, you get an idea of how to
create main text based scenes. We first animate each part, then adjust the timing
according to the voiceover. This step by step method
will make your life easier rather than starting to work on the timing
from the beginning. Alright, everything looks great. And now we can delete
the voice over layer and start working on the transition
for the next scene. In our case, what starts the transition is the
exclamation mark, which needs to appear and disappear while revealing the main cursor object
we have in the project. All right. So first, let's
create the exclamation mark. Make sure to use the right font for the size, you
can leave it at 100. Next, let's bring it to the correct position and tag this layer in
a different color. Now, let's start animating it. First of all, we know that
this layer should enter the scene at
approximately this point in time, so let's move it here. And now we will animate it using the scale and
rotation properties. Create a keyframe for
scale and rotation. Now, press to see all the keyframes and make sure the scale is set
to zero at this point. Then let's move forward and
set the scale to 100 for now. Now let's rotate the layer 180 degrees so it
will be upside down. Next, in the middle
of the animation, let's scale the layer up to get a nice popping
animation. Awesome. And finally, since we need to create a transition from
this layer to the cursor, we can set the last scale, keyframe to zero, so
it will disappear. Then we'll start the sphere
animation right from here. For now, let's easy ease
the rotation keyframes and make sure the motion starts slow and gain speed
towards the end. After that, for the
scale keyframes, we can make the
animation start fast, slow down in the middle, and then speed up again at the end. I think it looks great. Now, we are ready to work on the
last part of the scene, which is creating the
sphere animation. That sphere will be our cursor
throughout this project. So first, let's select
the shape tool. Make sure no layer is selected, and then create a proportional sphere while holding Shift. Let's set the size to 60. And now before moving on, I
want to give you a small tip. When you have a project
that includes some kind of cursor or sphere animation
as the main object, I highly suggest you precompose it and keep it inside a precomp. The reason for this is that
when it's inside the precomp, it will be much easier to adjust the design of this object or create a unique
animation for it if needed. It will also be much
easier in case you want to add other layers to
fit a specific look. You'll understand this
better in the course, since this is exactly
what we are going to do, we'll use our animated
background layer to color this object. For now, let's go back to the scene and start
animating this layer. First, let's bring it
to start from here. Now, let's place it in the
right place in the scene. We need to position
it in the same place. We can already
collapse this pre comp to get it in full quality. Later we'll talk in depth
about the collapse function. But now let's
animate this layer. We can start it a bit after the exclamation mark animation. Where the exclamation
mark is disappearing, we can use the scale to create a 1 second long
pop out animation. Now, let's open the
position property and create a nice
popping animation. So the focus of
the viewer goes to this part before transitioning
to the next scene. We can make this layer jump up before falling
down at the end. Great. Now let's make sure the scale animation
happens quickly because we want it
to appear right before the exclamation
mark disappears. And now let's focus on easing
the position key frames. I'm showing you this process
rather than telling you the final velocity settings because this is the
realistic workflow. Sometimes we don't know what easing will fit the animation, so we adjust along the way and try to understand
what looks best. Okay, so now I think we
need to move the sphere. When you already have position
keyframes on your layer, don't forget to stand on one
of the key frames first. Only then, while all position
keyframes are selected, move the sphere to where
you need it to be. It's super basic stuff, but I want to make
sure you don't make unnecessary mistakes
during the course. Alright? I think the
position is good, but I feel that the
scale animation needs to start a bit faster. Let's see how that
looks. That's better. But the final part still
feels a bit too slow. Also, as you may remember, according to the storyboard
and the voiceover, this scene should
end at second four, and right now we're at
almost the sixth second. So let's open the
exclamation mark key frames and speed
up the animation. Let's make it last
for 20 frames. Let's do the same for the cursor animation and
then adjust the timing. The timing looks okay, but I think we can
push the sphere a bit higher before it falls down. At this point, I usually watch the animation a few times
and make final adjustments, but make sure not to get
stuck too long on one part. Our goal is to first make sure the animation looks good
and fits the voiceover. We want to move on to the next scenes and finish them all. After we have everything ready, we can take the time to fine tune those
finishing touches. Alright, so once I'm
happy with the animation, and I know it matches
the correct duration, according to the
storyboard and script, we can crop the unnecessary
duration of this comp. Right now, the
duration is 2 minutes, but the scene actually ends
around the fifth second. What I usually like
to do is keep one extra second before
trimming the comp. So let's stand at second six and shorten the work
area to this point. Great. Now let's go back to the master comp and bring the first scene
into the timeline. At this stage, we need to add additional animation
to this precomp so it matches what's
happening in the scene. I prefer doing it this way because I don't
want to convert the layers inside the precomp to three D and animate
them with a camera. We can do that, and we will, in some scenes,
but in many cases, we can create great motion
in design without going three D. That's because three D scenes render much
slower than two D ones, and avoiding them when possible will speed up our workflow. Alright. With that in
mind, let's keep working. First, we need to align this
pre comp to the left so we can start with the
beginning of the text inside. When we need to create
a side panning motion, of course, we use the position
property to animate it. I usually match the start of the position animation with the beginning of the
scenes animation, then move to the point
when the scene animation ends and slide the comp
over to the other side. In this case, we need to
align it to the right. That gives us a solid
starting point. After that, we can easy ease the keyframes
and preview it. For now, the animation doesn't perfectly match what's
happening in the scene. To fix this, we can work on the velocity of the
position animation and adjust when it speeds up. Our main goal here is to
reach the point where the word multiple appears. That happens at this
moment in time. So we'll tweak the
graph handles so the motion acceleratees
at the right moment, making sure that
word comes into view exactly when needed.
For now, it looks good. But I noticed that the
exclamation mark in the sphere are
starting too late. Let's go back into the scene and shift this part a bit earlier. I'm watching the word
easy and trying to find the moment when it almost
finishes its animation. That feels like
the perfect timing to start the final part. Let's now go back to the master comp and
see how that looks now. That looks better now. Great. Next, we can make
this animation more interesting by adding
a scale animation when the word multiple pops out. It happens somewhere between
the first and second second. So let's create the
first keyframe here, then move to the end of
the pop out animation and add another keyframe
at that point in time. Now, in the middle of this animation,
let's adjust the scale. At first, let's try scaling
the pre comp down to 80. Now, let's adjust the
velocity, so it starts fast, slows down, and then gains
speed again toward the end. Let's see how that looks. It's nice, but I think
it will look even better if we scale
up instead of down. Because of this scaling,
we'll also need to nudge the scene a little bit to the
left at that same moment. As you may have noticed,
this creates a new keyframe. Let's see how it plays now. At this point, I want the
position to slow down slightly. To do that, let's select
all the keyframes and press F nine to apply
default Easy Ease. This will give us
a short pause in motion at this exact point. Now, we can open the graph editor and fine
tune the velocity at the beginning of the
position animation to add a bit more
interesting motion. Once again, I'm showing you the raw process of
creating good motion. Don't think that pro
motion designers create a perfect animation
on their first try. It's not true. We
all add keyframes, adjust them, and experiment until we find something
that feels right. That's the natural and
healthy animation process. Alright, everything looks great. To finish, I think we can end the position
animation a bit earlier, since we already shifted the final part forward
a few minutes ago. Let's bring the last keyframe to second four and check it. Okay, that looks perfect. Before moving on to
animate the next scene, let's collapse this pre comp to confirm it won't interfere with the animation we just made. Nothing changes here
because we're only using simple two D layers without any effects or three D cameras. But later in the
course, we'll run into scenes where collapsing the pre comp does
make a difference, and we'll go deeper into
that in those lessons. And with that, we've
finished this lesson. We're now ready to move on to the next one where we'll start
working on the next scene. It's going to be super fun,
so I'll see you there.
12. Creating Scene 2 – Bouncy Sphere Animation: Come back. In this lesson, we will create the second scene. So let's go to the video
board and see what exactly needs to happen and how long this
scene should last. Remember, we don't
want to create a scene that is too
short or too long. It will cause a problem in
the long run because we will need to adjust the keyframes and the timing in case
we didn't get it right. Alright? So in this scene, we need to present a lot
of messages and tasks. And to make this
scene interesting, we need to create some cool,
bouncy sphere animation. Now, I want you to understand to know what should be the
duration of the scene. To calculate it, we need to see at what second
the scene starts. In our case, it's
somewhere around second four and 15 frames. Now we need to see where the scene ends in our video board. It's around second seven. So that means the duration
of the scene we need to animate should last
approximately 3 seconds. All I did was calculate how many seconds there
are from second four to second seven,
it's 3 seconds. So this scene should
last for 3 seconds. Since we have a very
precise video board that fits perfectly
with the voiceover, we don't even need to
hear the voiceover and count what the duration
of the scene should be. With that in mind, let's
start creating the scene. First, we need to create
a new composition. Let's call it scene two. Make sure to adjust the
dimensions, and after that, make sure it's 30
frames per second, and the duration is 2 minutes. Once we finish the animation, we will adjust the
duration, of course. Great. So now we first need to design the scene and create those message
bubbles and task boxes. Of course, we could
prepare everything in Illustrator and import it
with the rest of the designs. But in my courses, I always
try to teach you how to design scenes directly
in after effects. For me, it's much easier to design scenes and after effects, and it saves me a lot of time. Moreover, that way, I have
much more flexibility, and I can do any customization
and adjustments in real time without messing
with outside files. With that said, let's start designing the first
message bubble, and let me show you how
to do that real quick. First, we need to have
some text as a message. In case you don't know what to write or the client
didn't tell you, you can go to GPT and ask it to write a few messages.
That's exactly what I did. I explained what I'm working on and asked it to generate
the messages for me. I saved this text as a PDF file that you can
find in my assets folder. It's called Random Messages. All right, so let's open the
PDF and copy this message. Back to After Effects,
let's paste it. Now, let's adjust the
textyle and the size. Make sure the paragraph is
centered and finally align this layer to the center
of the comp. Great. And now let's create the
message bubble to do that in a way so the message bubble size will adjust automatically
to our text. Let's search for the
two D textbox effect. Now, to use it, we need
to double click on it. But if the layer is
selected, it won't work. So make sure no
layer is selected and only then double
click the effect. Okay. And now we need
to make sure the box is using our text
layer as its source. Let's move the box
below the text layer. And now we can change
the design of the box. To do it quickly, you
can hold Alt or option and click on the
stroke a few times until you get to the
no stroke option. Now let's make the fill white. Let's change the
text color to black. And now, as you can see,
we can add more text, and the textbox will be adjusted
accordingly. All right. And now let's design
the text box, so it will look like
a message bubble. We can set the padding to 70. Next, we can round the corners. Let's set it to 120. Great. So now since we know we will need more of
these bubbles in the scene, it will be a good idea to
precompose these layers. Let's call two message one. Number two is representing the number of the scene
this message appears in. Great. So now, before moving on and
duplicating this comp, let's enter it and
adjust the dimensions. We don't need this
comp to be that big. Make sure the preview is checked and adjust the
width and the height. Great. That's perfect. Now, let's head over
to the project panel and duplicate this pre comp, so we can make changes inside the duplicate without
affecting the first one. Let's open the PDF and
copy another message. I will go with this one. In case your text moved too
much to the right, that means your text paragraph wasn't aligned to the center. All right. So now
let's go back to the scene and bring
the new pre comp here. Awesome. We can leave
it as it is for now. Now let's start designing the task box that we can
see in the video board. In my case, I will also add a message along with
the checkbox icon. And to do that quickly,
we actually can duplicate the last message box we created and adjust
the design inside. Let's change the
name to task one. Great. Now let's enter the pre comp and adjust
the text and the design. For the tasks, I also use GPT to generate some random tasks that can be relevant
to my project. So now, go to my
Assets folder and open a PDF file named Random
Tasks. Let's copy this one. Back in After Effects, let's replace the current text
with the task text. Great. And now let's adjust
the design of the textbox. We can lower the roundness
to, let's say, 35. And we can also add a gray
stroke to this design, so it will be different
from the message bubble. And now we need to
open the padding menu and make sure we have some space on the left side
to add the checkbox icon. We need to make the
space here bigger. Let's scale the width of
this comp a little bit. Great. So now let's set
the padding left to 70. Looks great. Next,
let's use one of the checkbox icons we have
in our screen designs. I think it was in
the task screen. So let's enter it and copy the green check box and the
gray stroke of the checkbox, because we might add a
checking box animation once the cursor lands on this message when we create
the bouncing animation. Let's start with the
gray stroke layer, copy it and then go to our task precomp
and paste it here. Align it to the
center of the comp vertically and place it on
the left side of the box. Let's adjust the scale
to fit the design. 350 looks good. Let's collapse this layer to
get it in a high quality. I'll move it to the
left a little bit. Okay. Looks good. Now, let's bring the
green checkbox icon. All right. That looks perfect. Let's now create
another task precomp. For this, let's duplicate this pre comp in
the project panel. Now, enter the new
precomp and change the task. Let's copy this one. Great. Next, let's adjust
the position of the icons. So now, to make it look different from
the message designs, let's make the
text here in bold. Let's do the same
for the first task. We can adjust the icons
position a little bit. Okay, next, I think
it will be better if we color the stroke in black. Yes, that looks better. Let's do the same for
the first task, as well. Alright. With that done, we can close all these precomps and go back to the scene comp. Let's bring both of the
task precomps here and find a nice scale and place for all
the elements we have here. We can first scale the
precomps down a little bit. Let's set the scale
to 60 for now. We can already collapse
these precomps. And now let's find a nice position for the messages and the
tasks we have here. At this point, I'm
just trying to come up with a visually
balanced composition. So I'm using the
safe action grid to make sure everything
is perfectly balanced. I think we can
scale the precomps down even more. Let's try 50. I'm trying to place
the elements, so I will have
enough space to add the bouncy sphere animation that needs to at the end, go
in between the elements. All right. I think I'm
good with the composition. I'll press the apostrophe
key to turn off the grid. And now let's bring the cursor object precomp to the scene
and start animating it. Alright. So first, we can
already collapse this precomp. And if you feel that your
computer is struggling, you can lower the
preview quality. It happens because of the collapsed messages
and tasks precomps. It's hard for after effects to present complex expression
based precomps, like the text boxes
we have inside those four precoms in case
you didn't realize it, the two D box effect
we are using to automatically adjust
to the text is set up with complex
expressions in the back end. That's one of the reasons why
I say that sometimes adding too many expressions
to the project can really slow
down your workflow. Alright, back to the project. Let's start the animation of the cursor from
somewhere around here. Now press P and create the first position keyframe at the beginning
of the timeline. Now, I don't know how much time all this animation needs to be. So, as always, let's
set key frames every 1 second. Later,
we will adjust it. Alright? So now bring
the cursor down here, so it will touch
the task precomp. To see what we are doing better, we can color the default precomp background color to
some gray color. Okay, now let's move 1 second
and bring the cursor here. Next, go 1 second forward and place it to touch the
first message precomp. Now, let's keep this process until we have the cursor
out of the scene. Great. The next thing I love to do when creating
bouncy animations is to curve the position path at the points where the object
needs to hover in the air. So using the convert
vertex tool, click once on each point
we have in this path. Great. Now let's go back
to the selection tool and adjust the handles of the points to get a much better curve. We can activate a curve here as well and adjust the handle
to get a straight path. Great, Let's see what we've got. It looks weird for
now, but that's okay. Let's see what we need to
do to make it move better. First, let's easy ease all the keyframes and
see how that looks. As you can see, now we have some pauses in between
the keyframes. That's better, but we
still have some work to do to really make
that bouncy motion. For that, we need to go to
the speed graph and first, make sure the points
where the cursor touches the precomps
happen very fast. That means we need to move
this handle to the right. Let's see how that
looks. Looks better, but now we also want the cursor to bounce back super fast. That means we need to start
the incoming animation of the second keyframe
super fast, as well. And now, as you can see,
we get that bouncy motion. But as you may
notice, we still have some weird pauses when the
cursor hovers in the air. Don't worry about that. We'll
deal with it in a second. For now, let's keep making all the touch points bouncy
by adjusting the handles. Okay, that looks nice. Now, let's deal with
the pause moments. First, you need to
understand that it's happening because at
this point in time, the speed is zero, as you can see in the
small yellow box. At this point, the
speed of the motion is 81. Here it's 223. Here it's over 1,000.
You get the idea. So now what we need to
do is make sure that the motion at this
point, is not zero. To do that, we can bring
the outgoing motion up, and we'll need to match
the incoming motion to the exact same speed. But there's a way to control
both of them at once. For this, we first need to
select them both and then press Control Shift K or
Command Shift K on Mac. This way, we will open the
keyframe velocity panel. We can also open this panel
outside the graph editor. To do this, select the keyframe, hold Alt or Option on Mac,
and double click on it. Or you can right click and
select Keyframe Velocity. Alright. So now let's go
back to the graph editor. And once the relevant
keyframe is selected, press control shift K or
Command Shift K on Mac. And now, all we need to do is check the
continuous option. This will connect the incoming and outgoing
motion for this keyframe, which will now make
it possible for us to control both the incoming
and outgoing motion at once. I suggest adjusting the speed, not by dragging the handle, but by moving it directly by clicking on
the point like this. So now you can check
your animation and adjust the
speed accordingly. That looks better. Now,
let's do the same for the second part where the
cursor is hovering in the air. All right. I think it looks
great. So now let's exit the graph editor and
speed up the entire animation. Let's make it last for 3
seconds and 15 frames. To do this, select
all the keyframes, hold Alt or option, and drag the last
one to the time indicator position. Let's
see how that looks. Now let's move on and make the scene look a bit more
interesting by adding a micro animation to the message and task precomps when the cursor bounces on them. Let's ignore the
timing for now and first create the
micro animation. For this, we will use the position and
rotation properties. First, let's start
with the position. Let's make this animation
last for ten frames. In the middle, bring the
precomp down a little bit. Let's see how that looks. Okay, now let's add a
slight rotation animation. Let's easy ease the
keyframes and check the motion. Looks cool. Now, let's find
the perfect timing for this micro motion to start. It should be right when the
cursor lands on this pre com. That looks great. Now let's do the same for the task precom. This time, we'll rotate it
in the opposite direction. Now, let's time this
animation with the cursor. Great. And now before moving on, let's tag the cursor in yellow. And let's do the same in
the first scene, as well. Alright. So with that, we have finished
the main animation that needs to happen
in this scene. For now, I will not
continue messing with this comp in terms of design or bringing additional
elements into the scene. As I explained earlier, we will deal with the
final touches later. For now, there are more
important things to do, for example, checking if it
fits the voice over timing. So to check this, let's first shorten the duration
of this scene. We can end it at second four. Now let's go back
to the master comp and work on the transition from the first scene to the second scene we just
finished animating. My goal here is to achieve a
nice match cut transition. For this, we first need to find the point in time
where the cursor in the first scene is about to exit the screen and then immediately
start the second scene. Here is the point in time where we can end the first scene. Now, let's bring the second
scene to start from here and finally crop the first scene so it ends exactly at
this point in time. Now, let's check this part a few times to see
if it feels right. We need to make sure both comps are not overlapping one
on top of the other. I think it looks
great, but I have a problem with the cursor in the second scene hovering too slowly in the air
after the first bounce. So let's enter the
scene and adjust the motion speed at
this point in time. Great. That looks
much better now. And with that, we've
finished the lesson, and we're ready
to move on to the next one where we'll start creating the next scene
and so much more. It's going to be a fun
one. So see you there. And before starting to
watch the next lesson, don't forget to take
a ten minute break to refresh before we continue.
See you in the next one.
13. Building Scene 3 – Search Bar Animation: Come back. Let's start this lesson by working
on the next scene. The first thing that
we need to do before doing that is to go
to the video board and check what we
need to create in the scene and how it should
be designed and animated. Moreover, we, of course, need to check what should be the
duration of the scene. As you can see, it should begin from somewhere
around the seventh second, and it should end at somewhere
around the 11th second. This means that the
duration of the scene should be less than
4 seconds in total. With that in mind, let's create a new composition
for this scene. We can call this scene three and make sure that all the
settings are correct. For the background,
we can change it back to black. All right. And now the first
and main object that needs to be in the scene
is the search bar. If you remember, when we
prepared the dashboard UI panel, we made sure to leave this
object as a separate layer, so now we can open
up the dashboard pre comp and copy the
relevant layers from here. To make it a little bit faster, let's just select all the area here with the objects
of the search bar, then hold Shift and click on the irrelevant layers
to unselect them. Let's make sure we've
selected the relevant layers. Now let's copy the
selected layers. Then go to our new composition
and paste them here. Great. So now let's
see what we have here. As you can see, after
pasting the layers, they are not organized in the right order
in the layers panel. In case you don't know,
in after effects, the selection plays an
important role in this part. The first layer that
you select will appear in the upper part
of the Layers panel. That's how we
selected the layers from the dashboard precomp, and that's why we see this
result here right now. To fix this quickly,
we can select the bottom layer because this is the layer we
want to be above. Then hold Shift and
select the upper layer. Now press Control or
Command X to cut them and then press Control V to
paste them back here. It's a quick trick to
reorganize your layers quickly without doing it manually
one by one. All right. And now let's start
adjusting the scene. First, we can get rid of this icon because we
don't need it here. Next, let's make
sure our objects are aligned perfectly in
the center of the comp. For this, we can open up the safe action grid
and then select all the layers and
align them perfectly in the center. Looks great. Next, we can also delete the
search layer because we will create a button in the right area with a search text inside
in a few minutes. Let's keep checking if we missed something
here because I see that we have three layers
in the layers panel, but I see only two
objects in the scene. At this point, we can
turn layers on and off to understand
what's happening. As you can see, I
have a stroke layer that is a part of
the search box. In our case, I don't
really need it, so we can delete it
right now. All right. And now, before we start
animating the scene, let's scale the objects
we have here real quick. For this, it will
be a good idea to parent the search
icon to the main box, then we can align
it to the center of the comp to make sure
it's perfectly centered. Now we can scale the box layer, and the icon will scale with
it together. Looks good. So now we can already collapse
the layers to have them in the best quality and continue
designing this scene. Since we know that
we will add here a sentence that
says, I need help. Let's select the text
tool and write it down here because we
will soon animate it. I'll change the color
of the text to white, so I can see what I'm doing and let's set the weight to regular. Alright. That looks good. Now, let's bring
the text back to black and place it
inside the search box. We can scale the font
size down a little bit. 35 looks good. Great. So now we're ready to start
animating the scene. The first thing
we can animate is the typewriting
animation for the text. And to do it, we will
use a built in effect we can find in the effects
and presets panel. You can type typewriter in
the search box and then use the blinking cursor
typewriter console effect. To use it, make sure the
text layer is selected, and then double
click on the effect to apply it to the
selected text layer. Okay. So now, as you can see, the text starts animating from its center, which is
not what we wanted. We need the text to start the typewriter animation
from the left, and it's happening because
the text paragraph was aligned to the center. In this case, let's
adjust the paragraph to the left and adjust
the layer's position. And now the animation
will look as it should. Now let's press on the layer. And as you can see here, we see the two keyframes that
create the type animation. The keyframe is starting
from this point in time because when we
applied this effect, we were standing on
this point in time. So, in case before you
applied the effect, you weren't at the
beginning of the animation, move the keyframes to start from the beginning
of the timeline. Alright. So now let's make
this animation last 1 second. As you can see, we have this nice
typewriting animation and a small blinking
cursor beside it that continues to
blink endlessly. You can play around
with the different properties of this
effect, if you want. But in my case, I will leave
it as it is, and move on. Alright. So now I don't want the text to just start
appearing in the animation. I want to create a bit more realistic look to
the search box. And for this, I want to
have the search text that we deleted earlier. Let
me show you what I mean. Let's go back to the
dashboard, pre comp, and copy the search
layer from there, and then paste it in our scene. Place this layer in the correct position and
adjust the scale of it to 150 because this is the scale value we set for the other layers
in this scene. Now let's place this layer below the text layer and parent
it to the white search box. Let's zoom in a little bit
so we can see what we're doing and place the text
there to the left a bit. Now let's start the text layer 1 second after the
beginning of the timeline. Great. And now let's crop the search layer to
end at second one. Let's make sure to crop
this frame, as well. And now, if we
preview what we have, it will look more like a realistic search box that we all know exists
on the Internet. At this point, you
can, of course, change the text or
adjust it if you want. It will not affect the
typewriting animation. Alright. And now
let's move on and create the search
button that needs to be on the right side
of the search box. And there is a very easy
and fast way to make. Let me just close
all the layers in the folder in the project
panel before we move on. Okay, so now to
create the button, we can duplicate the
message we created earlier. Let's now change the name
to three button one. The number three represents the scene where this
button should appear. Now, let's enter
this precomp and first change the text to search. After that, let's
set the text to bold and adjust the width
of the composition. 450 looks okay. Now let's find the
correct color that the button box should
be filled with. For this, let's go to the dashboard precomp and
open up the character tab. Now let's use the
eyedropper to sample the purple color of the
button in the header area. Next, let's open the color box and copy the tag of this color. And now let's go back
to our button pre comp, then select the button layer, open the fill for this layer, and paste the tag we copied. Finally, let's change
the text color to white. Let's save the project
before moving on. All right. And now I want us to create a click animation
for this button. Of course, we can create a simple scale animation for this outside
in the main scene, but I want to teach you how
with a very simple technique, you can create a much more
interesting click animation that is used in a lot of
SAS explainer videos. The first thing I want
to note before we start the click
animation is for you to understand that since we're using the two D textbox effect, we cannot scale the
button layer because it's connected via expressions to the text layer we
have in this comp. Therefore, we will create the scaling animation
for the text layer, and the button box behind it will be animated accordingly. If you ask why we are not
creating a regular shape for the button instead of using
the two D text box effect, it's because we know that
later in the project, we will have another button
with different text. For example, we will have
a button with the text ad, and it will be much easier using the two D box effect because the box will
automatically adjust to the text. All right. With that in mind, let's start creating
the click animation. So first, let's
begin by creating a scale animation for the text. Create the first keyframe with the current value at the
beginning of the timeline. Now let's move on 15 frames or maybe 20 frames forward and create another keyframe
with the current value. Then in the middle
of this animation, let's scale down the layer. We can set it to 70. Now, let's easy ease all the keyframes and Using the graph editor, move
the handles to the left. So we will have a snappy motion. I think it's too slow.
Let's exit the graph editor and make it last for 15
frames instead of 20 frames. So select all the keyframes and while holding Alter option, drag the last key
frame to frame 15. And now, let's make this click animation much more interesting. For this, first, let's
select the Ellipse tool. Now let's turn off the stroke. Hold Alt or option and click
the stroke color to toggle between the different
stroke options until you get to the option
of the turned off stroke. For the fill color, let's
choose white this time. Now, create a
symmetrical sphere. Let's set the size to 350. And finally, align
it to the center of the comp and change the name
of this layer to sweep. Soon, you will understand what this layer
will be used for. And now let's start
animating this layer. First, we will use
the scale property. At the beginning
of the animation, set the scale to zero and
create the first keyframe. Next, move 15 frames forward and set the scale to a higher
number, something like 110. Now, go back to the beginning of the timeline and press T to
open the opacity property. Create the first keyframe
with the value of 100%. Next, go to frame 15 and
set the value to zero. As you can see, we are already getting
an interesting look. All right. Let's move on. Now, let's easy ease the keyframes and add
the snappy motion to it, as we did for the scale
animation of the text, and see how that will look. I think the opacity
disappears too fast. We can slow this
animation down a little bit by selecting
the key frames of the opacity and pressing F nine to reset the easing
of this animation. I think we can slow
it down even more by dragging the last two
keyframes to frame 20. All right. And now let's open up the track mat function
and make this layer, use the Alpha channel
of the button layer. That means the sphere will be visible only within the
shape of the button. Let's turn back on the shape layer because we
do need to see the button. All right. And now,
as you can see, together with the scaling
animation of the text, we have a very interesting
click animation. I think the sweep is too
bright in the beginning. To fix this, let's open up the keyframes on the layer
and change the value of the first opacity
keyframe to let's say, 80% instead of 100. That looks much better.
Alright. And now we can save the project and move on to adding
this button to our scene. Let's scale this pre comp down. We can set the scale to 40, collapse the precomp,
and place it here on the right
side. All right. So once that's done,
we now need to time the clicking animation with the animation
happening in the scene. That means the
click should start after the typing animation ends. But as you may understand, we can't just move this
precomp to start from here, because that way
we won't see it in the beginning of the animation. Instead, let's stand
on the correct second, then enter the button precomp, press you to reveal all the keyframes and move them to start from
this point in time. Back in the main
scene, we now have the click animation
starting right on time. We can adjust this later in case we change
something in the scene. But for now, let's
leave it as it is. We can also scale down
the font size to 30. I think it looks a bit
better. All right. So now let's save the
project and go back to the video board
to see if we need to add something
else in this scene. As you can see,
we need to create the cursor animation that falls down into
some kind of ocean. For now, the Dark Ocean is just a design asset that is not essential to
the flow of the scene. What's more important
is to create the cursor animation
because it needs to be synchronized with the main animation
happening in this scene, which is all the
search box animation that we created earlier. This is the way of
thinking I want you to have while working
on complex projects. As I already mentioned a couple
of times in this course, I want you to always finish animating the important
elements first, rather than dealing with
design assets that don't play a big role in the timing
of the main animation. Alright. So with that said, let's go back to
our scene and add the cursor object
pre comp to it. We can already collapse
this pre comp, and let's begin creating the
animation it needs to do. We need to create some kind of animation of the
cursor falling down, going below the search bar, and finishing by
clicking on the button. We can do it from the right
side or from the left side. I prefer doing it
from the left side. So let's begin the animation of the cursor from
somewhere around here. At the beginning
of the animation, create the first
position keyframe. Now let's move 1 second, zoom out a bit and bring the cursor down here
on the left side. Again, let's move forward
another second and bring the sphere
somewhere around here below the search box. We can bring this point to here later. We will
curve this path. For now, we can place the cursor at this point in
time somewhere around here. Then let's move another second forward and bring the cursor
somewhere around the button, or we can place
it on the button. At this point, I
don't really know how my animation is going to look exactly, and that's
perfectly fine. But what I do know is that I will curve the
position path now. And therefore, I'm
trying to create the path in a way that
after the curving, I will get a nice
motion for the cursor. If you don't have enough
experience in after effects, this will probably seem
very weird to you. But as you gain experience
working with paths, whether position paths or paths created using
the Pen tool, you will understand
how to structure them so that with the
help of the handles, you will get the path
that fits your scene. So let's start curving the path. For this, we can use the
convert vertex tool, or we can use the shortcut. Hold control and alt and
click on the point once. Now we get the curve handles
that we can adjust in a way so the cursor
will move down, repeat this process for
the rest of the points of this position path until
we get a nice curvy path. Okay, so now when we have
the animation of the cursor, I see that it will
take the cursor 3 seconds to reach the button. That means that all the
animation happening before it is happening too
fast, so let's adjust it. First, we can make the
typing animation last a bit longer from second
one to second three. Next, let's enter the
button pre comp and move all the keyframes to
start at this point in time. All right. I think
it's good for now. So let's keep working.
First, we can tag the cursor pre comp in yellow as we did for the
previous three comps. That way, we can easily distinguish it from the
rest of the layers. And now, from this
point in time, let's create a click
animation for the cursor. In this situation, we can just
create a scale animation, making the cursor scale to zero. Let's make this animation last for ten frames and
see how that looks. Okay, I think it
looks nice for now, but I think we can easy ease the typing animation so it
won't start in a linear way. Let's easy ease these keyframes. And now the animation
will get a nice, easy start and finish. Nice. That looks better. We can place the
button prec below the text layer to have a
more organized timeline. And now let's press P on the cursor object and start adjusting the position
animation that we created. While we're doing that, you
need to understand that, by adjusting the position
animation we might need to adjust the rest of the
animation in the scene. Let's select all the keyframes and first Easy Ease them all. Now, let's make this sphere
enter the scene fast. This way, we will get a
nice continuous motion from the previous scene in a
nice match cut transition. At this point, I'm
good with the cursor stopping because it will
bring the focus to the text. And now, at this point, I'm just checking the
animation and trying to think if the timing is good, in my opinion, the
text should end the type animation a bit faster. At this point, I'm always
watching the animation a few times until I get
something that feels right. So at this point, we can move some key frames around and
make the timing a bit better. An important thing
to remember is when you adjust some key frames, you always need
to make sure that you also adjust the rest
of the keyframes that relate to this animation
accordingly to the new timing. In our case, I need to move the scale animation
to start from here, and then I need to enter the
button animation and make sure the clicking animation
also fits the timing outside. Okay, I think it looks
a bit better now. And before moving on, I
would adjust the handle of this keyframe so the
cursor will start moving slowly and then
gain speed toward the end. Great. So once we're done with the main animation that needs to happen
in this scene, we can move on to start working on the transition
to the next one. In this case, I want to create a scaling animation
for the search box. So after the click, it will
cover the entire frame. This, we can convert the white search box
layer into a shape layer. Right click, go to create and select Create Shapes
from vector layer. This will allow us to
change the shape of this design object as if we created it using the
shape or Pen tool. And since the original layer was created inside Illustrator, we might have some
properties inside the newly created shape
layer that we don't need. So at this point, feel free to investigate how this
layer is built and delete the unnecessary
properties such as groups or merge paths. With that done, let's
start working on the outtro animation
of the scene so we can have a nice
transition to the next one. First, we need to find
the point in time when we want to start
the Otro animation. In our case, we can start
it from second four, a few frames after the
clicking animation happens. And since we are now
animating the shape layer, let's open up the layer
properties and create the first keyframe for
the path of this shape. Next, let's move 1
second forward and then double click on the shape
to select all the points. Scale this shape while
holding Shift and control or command on Mac
to scale it proportionally. Let's scale it until
the entire frame is covered with the
white shape. All right. So for now, the animation is not looking very exciting,
so let's improve it. First, let's easy
ease the key frames. Now, let's make this
animation start slowly by adjusting the handle in the
graph editor to the right. I think it looks
much better now. With that done? Let's save the project before
moving on. Okay. So now let's go back to our master comp and insert the new scene
into the timeline. As you notice, we didn't
completely finish the atro animation
of the third scene. And that's because,
as I already said, it's very important
to first check that the voiceover and the animation we created are synchronized. Before creating too many scenes and animating too many layers, let's make sure to bring
the voiceover into the master Comp
timeline and watch the entire animation to check
if it fits the voiceover. It's better to catch mistakes and fix them now before we have too many scenes that will be affected by early mistakes
we might have made. With that in mind, let's
see what we've got. Managing a large team across multiple projects isn't easy. Too many tasks,
too many messages, and before you know
it, you're drowning in chaos looking for
help. Met One Point. The platform that
makes project manager you may notice the third scene is not synchronized
with the voiceover. So let's focus on fixing that. First, let's deal
with the transition between the second
and the third scene. As you can see, the cursor
in the second scene is already out of frame
at this point in time. And since we want to create a match cut transition
to the third scene, it's a good idea to
cut this pre comp right when the cursor
goes out of frame. Make sure to zoom in and delete the last frame as
well. All right. So now let's bring the
third scene to start from this exact point in time and watch the animation once again. Let's listen to the voiceover
when the third scene begins and try to understand what we
need to adjust inside. Before you know it,
you're drowning in chaos looking for help. Met one point. The platform
that makes product Alright. So the first thing I notice
is that all the animation needs to happen a bit
quicker because as we hear, the next scene already needs to start at this point in time. So let's enter scene
three and first, make the typing animation faster. Let's end
it at second two. Next, let's adjust all the animation happening
with the cursor. That means we also need to adjust the clicking
animation inside. And don't forget to adjust the outtro animation
of the scene. That is the key frames
of the white shape box. All right? Now, let's go back to the master comp and see
this part once again. For help. Met one point. The plat Ling for help. Met I think we
still need to make this animation a bit faster
and in the scene earlier. So let's enter the precomp and adjust the key
frames once again. I'm showing you this
process because I want you to get used to first making sure that the
first few scenes in your project are synchronized
with the voiceover, so you can practice timing the
animation according to it. It's very important
to do this in the early stages before moving on to animate
the rest of the scenes. I think we can also make
this part smoother by making this keyframe a
continuous one and speeding up the motion that happens at
this point in time. The bottom line is, I don't want the pause
to happen here. Okay, I think it looks better. Let's now go back
to the master comp and watch this part once again. And before you know it, you're drowning in chaos,
looking for help. Met one point. Drowning in
chaos, looking for help. Met one point. Met
one point. For help. Alright, I think, at
this point in time, the Otro animation already
needs to start happening. So let's enter the
scene and this time, move just the last key frames of this animation to second
two and 15 frames. And, of course,
don't forget about the clicking animation
inside the button precomp, right? I think that
will work great. And now we can move
on to continue working on the Otro
animation of this scene. First, let's crop the cursor object precomp right when
it finishes its animation. Next, let's create a simple opacity
animation for the button, so it disappears right after
the clicking animation. I think that looks
nice. Let's do the same for the
magnifying glass icon. We can crop both
of these layers at this point in time so the
timeline stays clean. Now, before moving on, I'll bring the search layer here on top to keep my
timeline organized. Alright, so now let's deal with the text layer
we have here. Let's begin its
Otro animation from second two and 15
frames as well. But this time, to make it
a bit more interesting, let's convert this layer to
a three D layer and create an outtro animation
where the text flies toward the camera
and out of the frame. So first, create a keyframe for the position property
at this point in time. Next, move 1 second
forward in time. You can use the time
menu here if you don't want to drag the
time indicator manually. Now, move the Z position value until this layer goes
completely out of frame. I think this animation
looks very cool, and I want to apply
the same type of animation to the button and the magnifying glass
icon, as well. So let's first delete the opacity keyframes
on these layers, making sure we start
by deleting from the last keyframe so the remaining one keeps
the value at 100%. Then remove the rest
of the keyframes, as well. All right. Now let's create the
same outtro animation on the position property
for both of these layers. To show you this
process because this is the realistic workflow of
motion design projects. Sometimes we create animations
that seem okay at first, but later we realize a different
animation looks better. That means you'll often
understand what works best only after testing it
directly in after effects. And I'm telling you this
because I want you to get used to situations where you don't know exactly what to do. Instead of guessing, start
trying different animations. Thinking about it in your head
won't give you the answer. Actually testing different
approaches will. All right. So after converting these layers to three D and creating the
position animation, you can see that the button layer looks like
it's not moving. This happens because we
collapse this precomp. And as I mentioned
in previous lessons, now is a good time to
talk a bit in depth about the collapse transformations
function in after effects. When we collapse a
layer or a precomp, after effects shows us the original information
of that layer. For example, when collapsing
an Illustrator layer, after effects uses the
original vector data, so we see the layer in
full vector quality without losing resolution. When collapsing a precomp, after effects presents
the original information from inside that precomp. In our case, since the layers inside the precomp are
not three D layers, after effects still
sees them as two D. That's why the button doesn't behave like a three
D object here. If we uncollapse the precomp, then after effects ignores
the inside information and treats the precomp as a single three D
layer in the scene. But since we do want to keep the highest quality
for this button, we'll keep the
precomp collapsed. To fix the issue, all we need
to do is enter the precomp and convert all the layers
inside it to three D as well. Now, even with the
precomp collapsed, after effects will use the
three D information from inside, and the issue is solved. Alright, now, with that fixed, let's adjust the animation
and timing of the Outro. I think this animation can start at second
two and 20 frame. It's always a good idea to add a little delay between the animations of
different layers. In this case, the white
search box can start first, and then about
five frames later. The rest of the layers follow. Great. Now we can trim this
pre comp to end at second four and go back
to the master comp to see how everything
works together. Managing a large team across multiple projects isn't easy. Too many tasks,
too many messages, and before you know
it, you're drowning in chaos looking for
help. Met one point. Alright, I think
everything looks great. With that, we've finished this lesson and are ready
to move on to the next one. It's going to be a good
one. See you there.
14. Building Scene 4 – Logo Animation: Come back. In this lesson, we'll start working
on the next scene. So as usual, the first
thing we need to do is to check what should be the
duration of this scene. As you can see, the scene
should start from second 11, and it ends at second
17 and 15 frames. That means that the
duration of this scene should last not more
than 7 seconds. With that in mind, let's create a new composition
and start working on it. We can call this
comps scene four. Let's adjust the dimensions. Okay. And now we can start working on the
first part of this scene, which is the logo
animation of the company. For this, let's open
the precomps folder in the project panel and drag the logo precomp
into our timeline. Great. And now let's enter the precomp and think of a
way to animate this logo. Most of the time, in
this kind of project, the logo animation doesn't
need to be very complicated. Therefore, try to
watch the logo and think of the simplest way
that you can animate it. In our case, I think it
can be great to create some rotation animation
for the dark icons of the logo popping out from
the green sphere behind it. And for the text of the logo, we can animate it in
the very common way used in this kind of project, which is creating a
reveal stroke animation. And now I want to remind you of something we talked about
in the earlier lessons. I want to remind
you of my process of thinking when I have a logo animation to create or any other animation
task I need to animate. When I'm looking at my
screen, I divide it into several animation parts. In this case, I'm splitting the scene into three main parts. The triangle icons animation, the green sphere animation,
and the text animation. After that, I decide
which part of the animation to start
working on first. And to be honest, this
is not very important. What's most important
is that I first create the animation
for each part and only then start to time
the three parts together in my timeline. This way of thinking
is especially good when we have to create a demo animation for UI
panels of SAS software. With that in mind,
let's keep working, and this idea will slowly become clearer for you
during the process. First, we can begin
with the simplest part, which is animating
the triangles. For convenience, we can turn off all the other layers we
have here in the timeline, so we can focus only
on the triangle icons. And as I always love to do, let's tag these layers in some other color to
distinguish this part of the animation from the rest of the parts
that we'll have here in the near future. Alright. And now let's
start animating it. To begin, we can go to
second one and create the first keyframe for the position property
for all these layers. And that's because we know
that this is the position they all need to be at the
end of the animation. Now we can go to
the beginning of the timeline and create
keyframes at this point in time, then zoom in and adjust the position so we can have them popping out
from the center. Great. With that done, let's stand in the middle
of the animation at frame 15 and make the icons open up even more before reaching
the final position. And because I want them all
to move the same distance, instead of moving them manually, we can use the X position axis as a calculator and add
to the current value, let's say, 200 pixels. For the upper
triangle, instead of adding 200 pixels to the X axis, we need to lower the
Y axis by 200 pixels. Let's do the same for the
rest of the triangle icons. If you're not sure, you can play around with the values
and understand if you need to raise the
value by 200 or lower the value by 200 to get the
look that we're going for. Great. So now we
have the beginning of the popping rotation animation that we're
trying to create. Next, let's create a
rotation animation. For this, let's create
a new null layer. Place it above the triangles and center the anchor
point of the null. Then place it in the center
of the triangle icons. Next, let's stand at
the point in time where the animation already ended and the triangles are placed
in their final position, and then parent all
the icons to the null, tag them all in orange, and change the name to null icons. Now let's go to the beginning of the animation and make the
null rotate one full rotation during the popping
animation. Awesome. And now let's use
the null and add a secondary popping animation
using the scale property. Create the first keyframe here, another keyframe at second one. And in the middle
of the animation, let's scale the null
to, let's say, 120. Let's zoom out a
little bit to see how that looks. I think
it's too much. Let's set the scale to 110. Great. With that done, let's start working on
improving the motion. First, let's open up all
the keyframes we created for this animation part
and easy ease them all. That let's see how that looks. I think we can improve the
animation by adjusting the keyframes and creating
a bit more snappy motion. But instead of doing it
using the graph editor, I want to remind you that
when you have a bunch of keyframes for the same
value on a bunch of layers, you can select
them all and enter the keyframe velocity
panel to adjust the velocity using the
influence percentage for the incoming and
outgoing animation. Let's set it to 75% for both. In the graph editor, it
will look like we dragged the handles a little bit to the left and a little
bit to the right. I think it looks
great. Now, let's move on to improving the
rest of the keyframes. In my opinion, we can leave the rotation
as it is for now. Let's focus on the
scale key frames. Let's begin by adjusting
the velocity to 75% as we did for the position of the icons
and see how that looks. That looks nice, but I want
the icons to hover for a bit longer when
they're all opened up. Therefore, I'll reset
the scale keyframes by pressing F nine or F and F
nine, if you're using Mac, and I'll adjust the velocity
using the graph editor, so the animation starts fast, slows down for a longer
period in the middle, and then speeds up
again towards the end. I think it looks much
better this way. With that done, I think
it's a good idea to offset the icon
animation slightly. But before that, let's
use a simple trick to make the popping animation look a bit more interesting. For that, let's zoom in on the last scale key frame of the null object and move
it five frames forward. Instead, at this point in time, let's make the null scale
down to, let's say, 85%. As you can see,
this simple trick adds a nice touch to the motion. Great. And now let's move on to animating
the green sphere. First, we can tag it
in a green color to separate it visually from
the previous animation part. Now, let's create a nice scale
popping animation for it. Alright, after creating
the popping animation, I'm now trying to
time this animation to start a bit after the
triangle's icon animation. As I said, it's always a good idea to offset
the layers a little bit. At this point, I'm
trying to place it at different points in time and
see how the animation feels. I can also change
the velocity to 85 instead of 75 to get
even snappier motion. I think it looks much
better this way. All right. So with that done, let's
move on to animating the next part of
the logo animation, which is the letters
of the logo. As I said earlier,
we'll animate it in a common style for
this kind of project, which is a stroke
reveal animation. We practice this technique in
the logo animation course, where we created
five different types of premium logo animations. So if you want to
learn other ways you can animate logos in
your bigger projects, I highly suggest you watch
that course. All right? Back to the project, we
will reveal these letters using a stroke effect and
to use the stroke effect, we first need to create
a mask on this layer. The mask should follow
the form of the letter. The way you start
creating the stroke will affect the revealing
animation in the future. I want the reveal to start from the upper part and then
go to the left side. Therefore, I will start
creating my mask in that way. So make sure the
layer is selected, and let's start creating
the first point here. The next point will be here, and before releasing the click, let's drag the mouse down
to make this area curvy. You can hold shift
while doing that. Let's keep doing that until
we get to the upper area. In this area, we
don't need to drag the mouse. Just click once. The most important thing is to make sure not to close the path. If you close the path, it
will be a little bit more difficult to create the
reveal animation. All right. So with that done,
let's search for the stroke effect and
add it to the layer. First things first, make
sure all masks is checked. Next, for the paint style, choose reveal original image. After that, increase
the brush size until you see the entire letter. Then make sure the brush
hardness is set to 100%. And now to animate it, we
will use the end property. At the beginning
of the animation, let's create the first
keyframe with a value of 0%. Next, let's go 1 second forward
and set the end to 100%. We can turn off the rest of the layers so we
can focus on it. As you can see, the beginning of the reveal is looking
a little bit weird because a big chunk
of the letter is being revealed
right at the start. To make it look a
little bit more subtle, we can animate the
brush size as well. At the beginning
of the animation, set the brush size to zero, at the end of the
animation, set it to the number we chose
earlier, which is 20. Now we will get a nicer
reveal animation. Next, let's easy ease all the keyframes and
using the graph editor, make the animation
start quickly and slow down towards the end.
Let's see how that looks. I think it looks good, and
the great news is that we don't need to repeat this
process for all the layers. We can just copy the effect and paste it on
the rest of the letters. But we do need to
create the masks for each letter so the
effect works properly. So let's keep creating the mask for each letter we have in
the scene for the letter N. I want the reveal animation
to start from the upper area. So I'll start creating
the mask from this point and then create
the second point down here. Now, instead of continuing the mask for the
rest of the letter, it's better to start a new mask for this part of the letter. Great. With that done, let's move on to
the next letter. This time, I want the reveal animation to start
from the bottom part, so the first point I'll create for the mask will be down here. Then I'll go up and
finish the mask according to the
form of the letter. Let's keep doing that for
the rest of the letters. For the dot of the letter I, we can skip it for now
because we will create a scale animation to reveal it along with the rest of
the letters. All right. And now for the second
letter N we have here, we can copy the two masks
we already created for the first one and paste them onto this one
to save some time. All right, so once
we've finished creating the masks
for all the letters, let's go back to
the first letter and copy the stroke
effect from it. Then let's select the
rest of the letters. Make sure we're at
the beginning of the timeline and
paste the effect. Great. So now we have all the letters animated
and we can move on. Let's collapse all the
Illustrator layers we have here. And now let's make the reveal of the letters a little
bit more interesting because they're too
static right now. We can add some position
animation to them, since we know that
the end position for these letters needs
to be where they are. Right now, we'll go to
second one and create a keyframe for the position
with the current value. Now, let's go to
the beginning of the animation and bring all
the letters to the left. I think that's enough for now. Great. So before moving on, I noticed that I
forgot to create a reveal animation for
the dot of the letter I. So let's do it real
quick right now. Let's stand at second one. Then open up the scale
property of this layer. Now, let's create a keyframe
here with the current value, then go back to the beginning of the animation and
set the scale to zero. To finish, let's easy ease the keyframes and create
the same velocity we use for the revealing
stroke animation for the rest of the
letters. All right. With that done, let's bring
back the position property of this layer so we can see all the position properties
for all the letters. Then let's easy ease all the keyframes and adjust the velocity to
fit the reveal animation. Let's see how that
looks together. I think the motion is
good. Now let's improve the animation by offsetting
the letter layers. Let's make the letter
T be the first in line to enter the scene. I'll do it using
the new feature. Los nice. Let's leave
it as it is for now and find the right timing for this animation
part to start. Let's bring all
the letter layers to frame five and
see how that looks. I think it looks okay,
but in my opinion, we can improve the intro
animation for the letters even more by adding a scaling
animation to all of them. To make it easier, let's
stand at frame five. And while all layers
are selected, press the left bracket key to bring all the layers
to this point in time. Now, let's lock this
layer because we already have a scale
animation All right. So now let's select the
rest of the layers, press S and create the first key frame with a
higher value for all of them. Maybe 120. Let's try 150. That's too much. I think 135 should look
better. All right. Now let's move 1 second forward. That is second one
and five frames and bring the scale back to 100. Now, the animation should look a little bit
more interesting. So let's unlock the layer. And then select all the
layers once again to create a nice delay The offset
can be a bit bigger. In my opinion, this looks
good, and with that, we have finished
animating the logo, and we are ready to move on. But before that, we can delete the background
layer we have here. So now let's go back to
the scene four comp and try to add an additional
touch to the logo animation. First, let's collapse
this pre comp and then open the scale
property to create an additional scale animation
to enhance the logo. Intro. Let's zoom in on the timeline
a little bit and create the first keyframe for the scale property
of the pre comp with a lower value. I
think 70 should work. After that, let's move
1 second forward and create a keyframe with
the value of 100. And finally, let's
stand in the middle of this animation and set the
scale to a higher value. We can set it to 110. Now, let's easy ease
the keyframes and set the velocity to, let's say, 85%. Let's see how everything looks together. I think
it looks great. All right. So now
let's go back to the storyboard and see what
else we need to animate next. As you can see, we're
finally getting to animate our first UI panel
in the project. So let's go back to the
scene and find the comp of this UI panel or UI screen in our Screens folder inside
the preComps folder. In our case, we need to
use the dashboard screen. Let's drag it into the
scene and start working on this animation
part. All right. So first of all, we can turn off the logo precomp for now, so we can focus
only on the screen. According to our storyboard, we know this screen needs to be presented at a slight angle. And as you can probably guess, we can achieve this
angle by converting this precomp to a three D layer. Now let's open up the
rotation property and adjust the rotation axis until we get the angle
that we're looking for. Since we may want to zoom in on different areas
inside this UI panel, it's a good idea to collapse this precomp to keep it
in the highest quality. But as you can see,
once we do that, the precomp appears in
its original two D angle. So here's a question for you.
How can we fix this issue? To fix this, we need
to enter the precomp and convert all the layers
inside it into three D layers. First, we can select
all the layers, collapse them to
keep their quality, and then convert them
all into three D layers. Once that's done,
we can go back to the main scene and see that everything works
perfectly fine. Great. So now let's enter
the dashboard precomp and continue preparing this entire
UI screen for animation. The first thing we should
focus on now is to precompose the layers that belong to each
section of this UI screen. To begin, we can lock the layers that we know
for sure we won't touch. Let's start by locking the
main gray background layer. Next, let's lock the main
menu on the left side. Great. Now we can start precomposing the layers
of each section, beginning with the header area. So let's select
all the layers of this area and precompose them. Since we use the
precompose function, while selecting one
of the precomps inside the Screens folder, the new precomp
will automatically be placed inside this folder. I'm pointing this out because it helps keep the project
panel organized. Later, when we search
for this precomp and see it inside the Screens folder,
you'll know why it's there. All right, back to the precomp. Now we
need to give it a name. To keep things organized, let's start the name with S
one, representing screen one. Then let's add header. Np next, after precomposing
the relevant layers, we need to collapse the precomp and convert it to
a three D layer. Finally, we need to make sure the anchor point is perfectly
centered for this precomp. To do that, we can hold down Control or Command on Mac and double click the
anchor point tool while the precomp is selected. And now before moving on, we can lock this precomp. Great. So now let's deal
with the next section, which is the three
boxes below the header. Let's say we want to create some animation for each
of these three sections. In that case, it's
a good idea to precompose the layers that belong to each
section individually. For naming, once again,
we'll start with S one, and then we can add
something like panel one. Once that's done, we collapse the precomp and convert
it into a three D layer. Finally, we need to make
sure the anchor point is perfectly centered for
this precomp. Great, great. Let's keep doing this for
the rest of the sections. Another trick to make the
selection process easier is to temporarily turn off the
newly created precomps. Of course, you don't have to follow these steps
in this exact order. You can first precompose
all the relevant layers and only after that adjust the anchor points for each one. You don't necessarily need to do it immediately
after precomposing. Alright, so now that all the layers have
been precomposed, I can convert all the
precomps to three D layers, collapse them, and then adjust the anchor point for
each 11 after the other. Once that's done, we'll have a very organized setup for animating each section
of this UI screen. This way, you can easily
enter any precomp and animate the objects inside it separately from the
rest of the layers. This is the right way to
handle complex UI panels with many different sections and lots of layers belonging
to each section. In our case, I'm not sure we'll animate every single
section of this screen. I might leave that for you as homework at the
end of the course. I don't want to
spend too much time animating small sections. I'd rather focus on more important concepts that are relevant to
projects like this. Okay, so before we
wrap up this lesson, let's make sure our project
panel is clean and organized. As you can see, we're
already creating a lot of new pre
comps and assets, and we'll have even more
in the upcoming lessons. That's totally
normal. This happens in real world projects too. That's why it's so important
to keep everything clean and organized so you can easily navigate
through your project. As I mentioned earlier, the
precomps we created inside the screen were automatically placed in the Screens folder, since one of the precomps
inside that folder was selected when we
precomposed those layers. But I don't want the
section precomps to be inside the Screens folder. So I'll select the
precomps folder and create a new folder
inside it called panels, then I'll move all the
section precomps we create in this project
into that folder. Already, it looks much better. The precomps that are
not section precomps, we can place them directly inside the main precomps folder. Let's also drag the video
board precomp there. And for the master comp in
the main scene precomps, we'll keep them outside so
they're easy to access. Alright, now, everything is nicely organized. Let's
save the project. And with that, we
finish this lesson. Save your project one more time before moving
on to the next one, where we'll continue
working on the scene. It's going to be
awesome. See you there.
15. Continuing Scene 4 – Logo and Dashboard Transition: Come back. In this lesson, we'll continue working
on scene four. Let's close all the pre comps that we are not
going to use first. We can also close the
dashboard pre comp because we won't animate
anything here. All right. And now we can turn back on the logo animation and start working on the
intro of this scene. First, I'll go back to
the video board to remind myself what the duration
should be for this scene. I see that it should
start at around second 11 and end somewhere around
second 15 and 20 frames. That means that I
have 4 seconds and 20 frames to present
the logo animation and the dashboard
screen before moving to the next part where we see the cat and the
splitting screens scene. So with that in mind, let's go back to the scene four comp and first move the dashboard pre comp somewhere around here. And now, up until that point, let's animate the logo
pre comp to scale down and go up so we can have some space
to enter the dashboard. First, let's start with
the scale animation. So let's say after the
intro of the logo, we will go 1 second forward, and then the logo will
scale down to let's say 80 or maybe 75%. And now let's go
to second number one and create a
position animation. I'll create the
first keyframe here. We can press to see all the
keyframes that we have here. Then I'll go to second two and bring the logo somewhere
up in the frame. Great. So now let's select the new keyframes we
created and easy ease them. Now let's go to the speed
graph Editor and first adjust the previous scale
keyframe velocity as it was. The velocity at
that point changed because we easy
ease the keyframe. So when we do that,
it's important to check the velocity across all
the animation. All right. So now let's make this motion, start slow and gain
speed toward the end. Let's see how that looks. That looks okay for now. Let's keep working
on the next part, which is creating the
intro animation for the dashboard precomp that can start also from second one. So first, let's bring
it here and now open the rotation
property to bring the X rotation back to zero. And now, since I know that later I want to add some
depth of field for this part, I will create a new
camera in the scene. We can use the one node camera. And for the lens
size, let's choose 35 MM because it will
give us the Alright. And now let's open the
camera options and make sure the depth of field
is turned off for now. We don't want to work
when it's turned on because it can slow
down the computer. As I mentioned
earlier, only after we finish animating the
essential animation, we will start adding the final touches to our project, right? Now before moving on, let's tag the logo precomp
in some other color. And now let's start working on the intro animation
for the dashboard. So first, we can start with
animating the position. And since we know that
the precomp should be placed right here at
the end of the anim, we can go to second two and create the first keyframe here. Next, let's go back
to second one and drag the pre comp down
out of the frame. At this point in time, we can
also bring it a bit closer to the camera to get a bit
more interesting motion. All right, so once we are done with animating
the position, let's now add a
rotation animation. First, let's try to see
what the rotation should be at the end of the
intro animation. Let's set the X axis
to -25 for now. Before moving on with
the rotation animation, I think we can
bring the dashboard down at the last keyframe. And now I see that
the logos too big. So let's open the key frames
of the logo precomp and adjust the scale and
the position if needed. So now we have a lot more
space for the dashboard, and with that, we can go
back to animating it. At this point in time, I want the dashboard to be placed
somewhere around here. And now for the rotation, I want it to start
entering the scene when the X rotation is -90. So I'll create a keyframe at
second one with this value. Next, I'll go to second two
and set the value to -25. Great. So now we can
start working on improving the
animation and trying to see how the motion
will look if we adjust the velocity of the position and rotation
animation in a way, so it will start
slow, gain speed, and then slow down
toward the end. Let's see how that
looks altogether. I think the animation
is too quick. So let's go to second three
and bring the last key frames of the logo and the dashboard pre comps to this point in time. Let's see that once again. Alright. I think it looks much
better, but in my opinion, the velocity of both pre comps at the end should be
exactly the same. So let's select all
the last keyframes and press F nine to
reset the easing. And now let's go to
the graph editor and make the motion start slow. Gain speed in the middle and
slow down toward the end. Let's not forget about the previous scale key
frame of the logo precomp. I'll say it again. This is a realistic process
of animation. We always try to see
how the animation will look with different
velocities and different timing until
we get something that we like. Great. So with that done,
let's go back to the video board and see
what we need to do next. As you can see, we
need to prepare this scene for the
intro of the cat. So with that in
mind, let's go back to the scene and
continue working on it. First, let's start by creating the outtro animation
for the logo. Let's stand at second four and bring the logo up
out of the frame. Once we're done with
that, let's go to the graph editor and adjust the velocity to get a
bit smoother motion. Yes, I think it looks nice. And now we can keep
working on adjusting the position of the
dashboard pre comp. So once again, let's make
sure we're standing at second four and first set the X
rotation value to zero. After that, adjust
the position value. At this point, we can
use the safe action grid to see that we're moving the
pre comp to the right place. Let's make sure the screen is perfectly centered in the frame. As you can see, it's
centered vertically, perfectly, but horizontally,
it is not centered. This can happen to
us all the time. We sometimes forget about aligning the objects
in the scene, but it's no problem
at all to fix. All we need to do is
make sure we're standing exactly on one of the position keyframes for this precomp. Then click on the position value to select all the keyframes and adjust the position
values until we get the precomp centered
exactly in the middle. If you do this when
you're not placed on one of the
position keyframes, you will create an
unnecessary keyframe. All right. So now I think
everything looks okay. We can press you on the dashboard pre comp
to see the keyframes in a more convenient way and adjust the velocity
of this motion to fit the logo pre comp motion. Pay attention to
the rotation graph. As you can see, I missed
adjusting its velocity, so I'll make sure to select
the rotation property and adjust the velocity to fit my motion. Let's
see how that looks. I think the dashboard
at the end of the animation is too
close to the camera, so I'll stand at the
last keyframe and adjust the position
axis of this precomp. Yes, I think it
looks a bit better. Now, let's go back
to the video board and remind ourselves
what to do next. Alright. So now we need to start the intro
animation of the cat. And before we do that, let's
go back to our scene and save the project to save all the progress that
we did until now. Once we're done with that,
to find the funny gift, open the assets
folder you downloaded for me, and you
will see it there. And before dragging
it into the project, I want to show you where
I got this gift from. There is a website called
Giffi where you can download any kind of funny memes and gifts that you can
use in your projects. I will leave the link
for this website in the PDF file called inks that you can find
in My Assets folder. So all I did was search
for CAT in the search box, and then I started
thinking about what gift would fit
best for my project. I decided to go with this
one, so I clicked it. Then I noticed that this specific GIF was not
playing in a loop. And to my surprise, when I looked at the similar
gifts under it, I found the same
one, but playing in a perfect loop
back and forward. So I clicked it and downloaded it to my
computer. All right. So now let's drag this
Jif into our project. And now to have this
GIF inside a precomp, let's drag it to
the precomp icon down here in the project panel. That way, a new precomp with this layer will be
automatically created. Great. And now let's press Control or Command K to enter this comps settings
and adjust its size. As you can see, the preComp size is created automatically according to the
size of the layer. Let's scale the width and
the height to 500. Awesome. And now let's scale the layer
to fit the new comp size. Great. Next, let's make this
footage look a bit better. First, we can apply
the hue sash, saturation effect and
scale the saturation. After that, we can
add the curves effect and make the footage
a bit more contrast. And now, since we scaled the
layer, it lost some quality. To make sure we're getting
the best quality here, we can activate the quality
and sampling function. Great. So now, once that's done, let's deal with the
duration of this GF. As you can see, for now, the original duration is 2
seconds and five frames. So first, we need to expand
the duration of the comp. Let's make it last
for 10 seconds. Great. But now, as you can see, our Jif ends at 2
seconds and five frames. In our case, we need it
to last a bit longer. There's a quick way to extend the duration of a looped
video in After Effects. For this, first, let's select this layer in
the project panel. Once done, right, click on it and go to
Interpret Footage. Then click on Main. And now, since we
have a looped video, we can make the loop
play more than once. Let's set it to
ten. Great. And now all we need to do is
extend the layer. And as you can see, the
video keeps playing, let's extend the
layer to the end of the timeline. Awesome. With that done, let's
go back to our scene, and before bringing
this pre comp into it, let's adjust the name. Let's call it Cat gift. Let's also move the gift
to the Assets folder. Alright, now, bring the
pre comp into the scene, and let's keep working on it. First, let's find a
nice position for it. According to the video board, it should be somewhere
around here. Next, let's add
rounded corners for this pre comp so it will
fit our overall scene look. To do that, enter the precomp and now make
sure no layer is selected. Then select the rectangle
tool and double click on it. This will create a rectangle that perfectly
fits the com size. Next, make sure this shape has a fill and the
stroke is turned off. Then let's round its corners. Now let's change the name
of this layer to mask, and now we will
make the GIF layer, use the Alpha channel
of this shape. That will make the
gift visible only within the boundaries
of the shape. That way we can get nice
rounded corners for the gift, which we can later
adjust if needed. I prefer this method
rather than creating a mask on the gif layer
which cannot be customized. Alright. And now,
before moving on, let's adjust the
saturation a bit because it's too
strong, in my opinion. I'll also adjust
the curves a bit. Alright. And now
we need to create an intro animation
for this gift. But before doing it, I want to go back
to the video board and check how long
this part should last. So it starts at second
15 and 20 frames, and it ends at second
17 and 15 frames. That means that this
whole part needs to last no more than 2 seconds. So let's go back to the
cat gift and create a simple intro animation
using the scale property. And to make it look a
bit more interesting, we can also create
a scale animation for the mask. Great. So once we have the intro, let's go 1 second forward and create an Otro animation for it. We can copy the intro
animation keyframes, paste them here, and then
reverse the keyframes. Now, let's easy
ease the keyframes. And in the graph editor,
make the intro happen fast and the outtro start slow. Let's see how that looks. Alright. So once we have the
intro and Outro animation, as you may remember,
this whole part should last no more
than 2 seconds. So let's stand at this
point in time and bring the last two key frames
to start from here. And before we do that, I just noticed by looking
at the time box that the frame rate of this pre comp is not
30 frames per second. This happened because we
created this pre comp using the automatic method
by dragging the asset into the pre comp icon
in the project panel. The pre comp is
created according to the information of
the file you dragged in. It's important to
know that, so I decided to show
you this process. Let's fix that real quick. Enter the comp settings and
set the frame rate to 30. Alright? So once that's done, let's start the outtro animation from second one and 15 frames. It passes the two
second duration that we planned, but it's okay. We can see if it fits the
overall timing of the scene, and in case it feels too
long, we can adjust it later. For now, let's tag
this pre comp with a different color and find the right point in
time for it to start. At this point, I'm just placing
the pre comp at a spot in time I think will be best and then watching the
overall animation. If it doesn't feel right, I'll drag it to another
point in time. In our case, I think we can start this pre comp
from second four. Alright? I think that's a good point in time for
this precomp to start, but as you can see,
the overall look of the scene feels a bit static. To improve it, we can
create a slight zoom in or zoom out for the camera
using the position property. So let's go to the beginning of the animation and create
the first keyframe there. Next, let's go to a point in time where the animation
will definitely be finished and create a
gentle Zoom out animation. Let's see how that
all looks together. As you can see, it adds a bit more motion to
the overall look. In case the zoom out
is barely noticeable, you can adjust the last keyframe to make the camera
move further backward. Let's watch this
animation once again. I think it looks much
better, but in my opinion, we can start the gift animation a bit earlier in
time, let's say, from second three,
because I remember that this entire scene should
last no more than 5 seconds. All right. So with that done, we can save the project
and move on to see how this scene will
look together with the rest of the scenes
in the Master Comp. So let's go back
to the Master Comp and bring scene four
into the timeline. At this point, we just need
to find the best point in time for this scene to start. I'm carefully watching
what's happening in the previous scene and trying to start the next
one accordingly. After finding a
nice point in time, it's a good idea to watch the animation and see if
the transition works well. In my opinion, it looks good, so now I'll make sure to watch
the animation once again. But this time, while
listening to the voiceover, to see if everything is
synchronized perfectly. This is very important
to do before moving on to animating the next
scene. Looking for help. Met One Point. The platform that makes project
management so simple, even your cat could
do it with one point. Alright. So after watching the animation with
the Voiceover, I noticed that scene number four should start a bit earlier. Let's start this pre comp
from second 11 and watch it again while listening to
the Voiceover. Eat one point. The platform that makes
project management so simple, even your cat could do it. With one point, Met one point. The platform that makes P. Yes, I think we should
leave it like this. That means that at
this point in time, scene three should already end. So let's enter this pre comp and first open all the key
frames we have here. Now, let's start shortening the last animation
part by a few frames. Select all the key frames and move them ten
frames backward. We can also bring these other key frames
a few frames backward. But for now, let's
leave it as it is, and see how the animation looks after adjusting the
first animation part. It looks nice. Before moving on, let's not forget to adjust the click animation to start
from this point in time. Alright. And now let's make
the outtro animation a bit faster by bringing the last key frames a
few frames backward. Let's bring them to
the 1 second mark. Great. And now, after
adjusting the animation, it's always a good idea to rewatch the motion and
see if it feels right. We need to make sure it's
not too fast or too slow. I think the motion is
okay. Now let's go back to the master comp and see the animation again
with the voiceover. Looking for help. Met one point. Looking for help. Met one point. The platform no Awesome. So once we've got the timing
fitting the voiceover, we can now enter scene four and add a background
layer to it. Let's use the gradient
background animation that we created
for this project. You can find it under the assets folder in
the project panel. Now, let's create a nice
intro for this background. My favorite way to create an intro animation for
a background layer is by creating an ellipse mask and animating it. Let me
show you what I mean. First, make sure the layer is selected and then choose
the Ellipse tool. Double click on the
Ellipse tool to create an ellipse mask for this layer. Now let's double
click on the mask and adjust it to look
more proportional. Hold controller command
while doing that. Thanks to the safe action grid, I can see where to
adjust the shape of the mask to get
the rounded look. Great. So once that's done, let's open the mask
properties and animate the mask
expansion property. As you can see, it creates an interesting
shape for the mask. I really like the look of
the ellipse form. All right. So let's set the expansion value until we no longer
see the layer. Don't set it higher than needed. Now create the first keyframe at the beginning
of the animation. After that, move 1 second
forward and adjust the value until we see the
entire background layer. And once again, don't push
the value more than needed. All right. So now let's
ease the keyframes and make this animation start fast right from the beginning.
Let's see how that looks. That looks great.
Now, the final thing we can do here is create a small offset between the background intro
animation and the rest of the animation parts
in this scene. Let's start the other
precomps from frame ten. Maybe frame five and see how it will look with
the five frame delay first. I think it looks nice. Now let's go back to the master comp and watch it together with the voiceover. Meet one point. The platform that makes
project management so simple I noticed that the
CAT precomp should actually start somewhere
around the 15 second mark. So let's move the playhead to
15 seconds and ten frames, enter scene four and make
a few small adjustments. First, let's bring
the Cat precomp to start from this
point in time. Great. Now, let's make the dashboard animation a bit slower here. If it starts from second
three and five frames, let's finish it at second
five and five frames, which will be exactly 2
seconds long animation. Let's rewatch the
animation and make sure it doesn't feel too
slow. I think it's okay. Now, let's go back to the master comp and
watch it again with the voiceover to confirm everything is perfectly
synchronized. Meet one point. The plot. Form that makes
progenigement so simple. Even your cat do
it. With one point, Do it with one point. Awesome. I think
everything works great. Now, we can move on to
creating the Otro animation, which needs to happen
at around second 17. For now, let's turn off
the voiceover so it won't distract us while
reviewing the Otro animation. We'll work on that
in the next lesson. It's gonna be awesome.
So see you there. And before starting to
watch the next lesson, don't forget to take
a ten minute break to refresh before we continue.
See you in the next one.
16. Creating Scene 5 – Splitting Screens Animation: I'm back. Let's
begin this lesson by going to the video
board to check, what is the next scene
we need to animate. The next scene is the part where we see all the UI screens, and it starts at second
17 and 15 frames. Now let's see where it ends. It ends at second
19 and 15 frames. That means this animation
should last for 2 seconds. A quick reminder
that the idea for this splitting screens
composition I got from watching a great reference
video on YouTube, it's a reminder of how
great it is to see a lot of other projects
to get inspiration. Alright, back to the lesson. Another thing that
we can learn from the video board is that after the splitting
screens animation, we need to enter the
project's screen. And with that in mind,
let's go back to our scene and keep animating in this timeline rather
than creating a new pre comp for
obvious reasons. Since we need to continue
the animation while still seeing the
dashboard screen for the split animation part, it's better to keep working on this timeline and not
create a new scene. And before moving on, let's organize our
timeline here. First, we can crop the logo pre comp to the point where we no longer
see it in the scene. After that, we can do the
same for the cat pre comp. So let's find the
point in time where this animation already ended and crop this layer
to that point. Finally, let's bring
the pre comp up here to have a more chronological
layout in our timeline. Now, let's stand at the point in time from where
we think it's going to be good timing to start transitioning to the
next animation part, which is presenting
all the UI screens. We can start it
from second seven. With that done, let's open the precomps folder
and the Screens folder inside it to find the project's UI screen that needs to be presented
in the next scene. And now let's bring
it to our timeline. And think of a way to
organize the screen with the rest of the screens for
the split screen scene. And before doing that, let's also open the
camera position and bring the last keyframe
to this point in time because from
this point in time, we will create a transition
for the next animation part. All right. And now let's bring the projects pre comp
to the timeline. Next, let's convert
this layer to a three D layer and find the place for it
in our three D space. To see what we're doing better, let's change the view
to a custom view so we can see the three
D space more clearly. As you can see, the
project pre comp is now located in front of the dashboard, which
is not what we need. We want it to be behind. And since we know that later, we will add all the
rest of the screens. It will be a good idea to
keep the space between each screen equal to do that. First, let's see
the position value of the dashboard precomp. Now, let's set this exact
value for the project precomp, so it will be aligned with
the dashboard position. And now let's use
the value box as a calculator and decide what should be the distance of the project screen from
the dashboard screen. Let's try to move it 250 pixels. I think the distance is okay. And now let's move on to bring the rest of the
screens to the scene. And now I want to share
my thoughts with you. I know that the rest
of the screens in this scene need to be presented
for a very short time. I also know that if I bring all the pre comps of the
screens into the timeline, after effects will have a hard
time previewing the scene. With that in mind,
I think it will be a good idea rather than
using the pre comps of the screens to use
the AI files of the designs of
these screens that we imported at the
beginning of the project. For after effects, it is much easier to render an
Illustrator file. Than a precomp with a bunch
of Illustrator files inside. I didn't do that for the
project screen because I know that this screen
should be animated in my next animation part. Therefore, I brought
the pre comp of the screen and not its
flattened Illustrator layer. Alright. So with that in mind, let's keep working, and what I just explained will be
much clearer for you now. So let's bring the
next screen to the timeline and
adjust its position. First, we convert it
to a three D layer. Then let's use the last
screen's Z axis position value and add 250 pixels to it. This way, we will
place this screen 250 pixels after the
previous screen. Okay. Now let's move
on to the next one. To make this process
a bit faster, instead of dragging
the next screen to the timeline and
then adjusting it, we can duplicate the last
screen from the timeline, select the bottom one, and adjust its Z axis
position value. After that, while this layer
is selected in the timeline, we can go to the project panel, select the next screen,
hold Alt or option, and drag it on top of
the selected screen in the timeline to replace it. Great. And now let's repeat this process for
the rest of the screens. All right. And now
we can bring back the view to the active camera and keep working on the scene. The next thing we
can do is bring all the new screens
in the timeline to start from second seven, since this is the
point in time when this animation part will start, then we can bring all the
screens above the dashboard pre comp to keep our timeline
organized. All right. And now let's prepare the
project screen for animation. What I mean by that is
we need to make sure this precomp will work properly in case we
want to collapse it. As you can see, after
collapsing the precomp, we see the precomp differently. And it's because we've
got a camera here that is now watching inside
the precomp and doesn't interact with
the layers inside the precomp since they
are all two D layers. So to fix that, all we need to do is enter the precomp and collapse all the layers and convert them to three D layers. This way, the camera in the
main scene will see them. With that done, let's go
back to the scene and convert the rest of the screens into three D layers as well. We can also collapse them. Great. And now let's start working on the
split screens animation. The first thing we can do is
create a new null object. Then let's convert it
to a three D layer, place it above all the screens and rename it to null screens. After that, we need to place this null in the middle
of all the screens. For convenience, we can
use the custom view, or for an even better view, we can choose the top view. Since we have eight screens, we should place the null
somewhere around here so we can have four screens before it and four screens after it. And to know exactly where
to place it in between, we can use the Z position
axis of the screen before it. Let's copy this value from the screen and paste
it to the null. Then change the nulls Z
position axis accordingly. If the distance between
the screens is 250 pixels, that means we need
to move the null by half of this number. So let's add 125 pixels to
the current nulls Z axis. Great. And once that's done, we need to parent all the
screen layers to the null. But before that, let's split the dashboard precomp so
we can have this precomp separately for the
first animation part of the scene and a
separate one for the animation part we are
working on right now. Awesome. And now let's parent all the screens to
the null. All right. And now let's go
back to the active camera view and
animate the scene. We can start the null from here. Okay. And now let's open
the rotation property and find the right axis
for us to animate. In our case, we will
animate the y axis. Let's create the
first keyframe here, then move 1 second forward
and rotate it -69 degrees. Before we move on, we can
open the keyframes for this precomp and delete all
the previous keyframes. We do that because
we will create a completely different rotation
and position animation for this precomp to
achieve the curvy look we are aiming for when the
split animation begins. With that said, let's open
the rotation property for all the screens and see
what axis we need to animate. It's the X axis. So let's create a
keyframe for all of the layers with
the current value. At this point in
time, we can press you to see just the keyframes. After that, let's move to
second one and start adjusting the X axis for each screen layer to get a proportional
curvy look. Let's rotate the dashboard
screen to 25 degrees. And for the last screen,
that is the file browser, let's do the opposite.
Set it to -25. For the screen before it, we
can set the rotation to -20. For the one before it, we
can set the rotation to -15. For the next one minus ten. As you may notice, I'm rotating the layers by five degrees to make the curve
look proportional. All right. And now for
the first four screens, we can set this one to five. The next one we will set to ten. And for the final one, we
can set the rotation to 15. That looks nice, and
we are almost there. Now to make it look
better, we can create a position
animation as well. So let's select all the
screens and press P. Now, create a keyframe at the
beginning of the animation. Next, let's move 1 second and start adjusting the position of each screen to get
that nice curvy look. At this point, since there are screens that are a bit
bigger than the others, I'm just trying to
move each layer intuitively until I get
something that I like. Alright, I think it
looks okay for now. Let's move on to
create the animation of the project's screen
popping out of this list, since this is the
screen that needs to be shown in the next scene. So in a moment, we will move 1 second
forward and adjust the project's screen pre
comp, position, and rotation. But before doing that, let's make the rest of the screens
go out of the frame. And we can do that
using the null layer. So let's stand at second
eight, then press P, create a keyframe here after
that move to second nine and bring the null down out of the frame until no screen
is visible in the frame. Great. And now let's
make sure we are splitting the projects
pre comp at second eight, since we want it not to
be affected by the null. We need to animate this
part separately so we can enter the next animation
part much more conveniently. Let's make sure it's not
parented to the null. Great. And now we
can easily animate this layer without worrying
about the nulls motion. And before animating it,
let's make sure to delete the first keyframes
and only keep the last ones so the precom will stay at its
current position. With that done, we can now go to second nine and
animate this layer. First lot, let's
make sure to set the X rotation axis to zero. After that, let's adjust the Y rotation axis until we get the UI
screen facing the camera. Great. Once finishing
adjusting the rotation, let's start dealing
with the position. Let's press you twice so we
can see all the key frames. Now, let's open the
action safe grid and start adjusting
the position. We can place it in the
center of the comp for now. Don't worry about the
collision that happens here. We will deal with
it in a minute. For now, let's focus on finding a nice position
for this UI screen. If you're not sure how
the scene should look, it's a good idea to come back to the video board and
recheck the scene. I see that we need to add a
text layer here, as well. It's important because
now I know that I need to leave some space for a
text layer in the scene. Let's also use this
opportunity to check how long the project's UI screen part animation
should be presented. It starts at 19 seconds and 15 frames and ends at
the 24 second mark. That means we have a little
bit more than 5 seconds to present this animation part. All right. So with that in mind, let's go back to the
scene and keep working. So now, from this point in time, we have 5 seconds to present
this UI screen part. We will bring the pre comp to a position similar
to the reference I told you about when we talked about the
storyboard creation. Alright, back to the lesson. Let's go 1 second forward and then open up all the
rotation properties. Now, let's try to
play around with the different axes until we
get something that we like. In our case, I see
that we also need to animate the Z rotation axis. Therefore, first thing first, let's create a keyframe
at second nine, and then go to second ten
and change the value. Alright. I think the
angle is perfect. Now, let's bring the
position and make sure to move the precomp
closer to the camera. At this point, I'm
just trying to achieve a nice angle and make sure
the composition is balanced. So I'm playing around
with all the properties I animated until I
get a nice result, making sure I have enough
space for the text layer that needs to be in this
animation part. Mm. Et's see how that looks. I think it looks
great. Let's select the pre comp and press you
to see just the keyframes. All right. And now let's open the script and
copy the relevant text. Let's check that in
the video board. In our case, we need only this part of
the script for now. So let's copy it and
paste it in the scene. Let's now adjust the text. Let's go with a bold
version of the font. Next, let's change
the color to white. And for the font
size, set it to 40. Finally, let's make
sure the paragraph is aligned to the
center and then align it horizontally to the
center of the comp. And I think we can place it
somewhere around here, right? And now let's bring
the text above the null layer and bring it
to start from second nine. We can adjust the
position a bit. Later, we will animate all the
text layers in our scenes. For now, let's focus
on continuing to animate the rest of the
essential animation parts. As you may remember, the
animation part presenting the project's UI screen
should last for 5 seconds. That means we need now to
create the uplifting animation for each section
in this UI screen. As we saw this animation is used a lot in this
kind of project. So let's learn how to do that. But before that, I just
noticed that I missed adding a position keyframe to the messages to screen layer. Alright, now let's start creating the
uplifting animation. Let's find the timing for
this animation to start. We should start it
from second ten. Now let's enter the
projects pre comp. Here in this timeline, we see that the animation will start from second three. Great. So first, let's begin by
locking the gray BG layer. So we can select the rest
of the layers easily. We can also lock the
left menu layer. And now let's figure out which
layers we need to animate. In our case, these are the
layers of the project boxes. So let's select them all and tag them with a different color. We can turn them on and off to make sure the
selection is correct. Great. Now, let's
tag them in orange. Now, let's open the
position for all of them and create a keyframe
at this point in time. Next, let's move 1 second forward and create another
keyframe here as well. Then let's go to the middle
of the animation and adjust the Z axis position
to bring them up. We can go back to the scene to see how that looks with
the angle we created. I think it's too much. Let's bring them all
down a little bit. Let's check that one more time. Yes, I think it looks better. Now let's go back to the
precomp and adjust the motion. Let's make the animation start fast, slow
down in the middle, and gain speed toward
the end. Great. And now let's create a gentle
offset between the layers. I'm selecting each
layer to make sure they are all organized
chronologically, one after the other. Yes, it looks like the order in the layer panel is correct. So now let's decide that the upper left box will
start the animation first. That means we will
select the rest of the keyframes and move them, let's say, two frames forward. We can do it manually while holding Alt or option and
using the right arrow. Or we can do it using
the new feature. I'll undo my action and zoom
in a bit to show you how. If you want to use
the new feature, then you need to
remember that the order of your selection will
affect the offset direction. Let's move two frames forward. So if I start selecting
from the upper layer, then hold Control and Alt to
activate the new feature. The offset will begin
from the upper layer. In our case, we want it to
begin with the lower layer. Therefore, I'll start the
selection from the lower layer. Now, I'm making sure that the key frames of the
layer named layer 353 are reaching the time
indicators position. That will indicate
that the offset is two frames distance. I think we can make
the offset bigger. Great. And now,
before moving on, let's go back to the scene
to see how that looks. It looks okay, but I think this entire animation
part is too fast and lasts for
too short of a time. Knowing the fact that this part should last four or 5 seconds, I'm sure we need to make
this animation a bit slower. So let's go back to the screen precomp and
slow down the animation. Let's focus on the key
frames of the bottom layer. For now, this animation
lasts for 1 second. It starts at second three
and ends at second four. That also applies to
the rest of the layers. Their animations all
last for 1 second. So now let's go to second five. Then select all the
keyframes and now hold Alt or option and drag the last
keyframe to increase the distance between the
keyframes proportionally. While doing that, pay
attention to when the last keyframe of
the bottom layer, reaches the five second mark. It will indicate
that its animation now lasts for 2 seconds, and as you may
already understand, it applies to the rest
of the layers, too. That's how we slow
down the animation for all the layers from 1
second to 2 seconds long. With that done, let's go back to the scene and see
how that looks. And most importantly, see that now the animation ends
at the right point in time. The animation ends
at around second 12, which is great because we
now have a couple of seconds left to create the transition for the next animation part. For the next animation
part, we need to create a cursor click animation on
one of the project boxes, which after that will bring us to the second
Project's UI screen. So let's start working
on that part right now. So first, let's enter the second project screen and try to understand
what needs to happen. As you can see here, we
are currently inside a project that is
called dribble website. So that means we need to create a click animation for this project box in the
first project screen. Once we understand the flow, we can go to the second
project screen and start thinking of a way to create
an intro animation for it. In our case, we will
focus on creating some kind of animation
for these task sections. But as you can see, I just noticed that these
boxes have no fill. So before starting to animate, let me fix that real quick. In your case, since you are
using my finalized files, you have all the
sections already fixed. I just wanted to show
you that sometimes we miss something in Illustrator,
and it's totally fine. So to fix this, all I need to do is to find that design
in Illustrator, select these boxes and make sure to add a white
fill to them. I'll speed up this
process for now. Once done, I'm not
forgetting to save the file. Then I can go back to
After Effects and wait a few seconds until
the changes are updated here. All right. And now I'll save my project here in
after effects as well, and we can keep working. So at this point, we
already know what we need to do for the
rest of the scene. But before we start creating
a complex animation, it's a good idea to go back
to the master comp and see the animation we
created together with hearing the voiceover to
see from what point in time we should start creating
the demo flow animation. That makes project
management so simple, even your cat could do it. With one point, you get
a crystal crystal clear, um of everything your team is working on all your project. Okay, as you get a crystal clear overview of everything your team is
working on all your product. I think we can start
it from second 22. That means that the
uplifting animation of the project boxes should
already end here. So let's enter the scene and then enter the
projects pre comp to shorten this animation part to the time indicators location, which in this
timeline, means that this animation should end
at around second four. So basically, our first duration of this
animation was perfect. I wanted to show
you this situation because sometimes we feel that our animation should
look a certain way. But what's most
important is to make the animation fit the voiceover, rather than just making
it look as we feel. This is why it's so important to always go back to
the master comp and recheck the project after every animation part
you finish creating. With one point, you get
a crystal clear overview of everything your team is
working on all your Alright. So now the animation
syncs with the voiceover, and we are ready
to start working on the demo flow animation. That should start somewhere
around second 22. Let's enter the scene
and start this animation from the point in time where all the boxes have already landed. Place the time indicator here. And now let's start creating the click motion on
the first project box. Since we know that we
will need a few frames for the click
animation to happen, let's make sure this precomp stays still for a
couple of frames. To do that, we need to
create key frames for all the animated properties
with the current value. Now, let's make this precomp
stay for ten frames. I think that should be enough time for the clicking animation. So if we are at frame 12, let's move to frame 22, which makes ten frames in total. Finally, let's create
another set of keyframes for all the
animated properties with the current value. This part will be our place to create the click animation. In case you want to
adjust the angle or position of the precomp
before the demo flow starts, don't forget to update
the last keyframes accordingly to keep
that pause moment. Let's practice it right now. We can change the angle by
playing around with the values of the animated
properties a little bit until we create a
more interesting angle. Alright. So now
once that's done, you can just delete
these keyframes and copy paste the new
ones here instead. All right. And now from
this point in time, let's enter the project's
precomp and find the first project box to create a click animation
for it. Here it is. Open the scale property and create a keyframe with
the current value. Then move ten frames forward and create
the same keyframe. Now let's stand in the middle of this animation and
scale down the layer. Let's try our 80. Great. And now let's easy ease the keyframes and
see how that looks. Let's try to make this
motion a bit more snappy. That's better. Great. Now,
let's go back to the scene. And from the point in time where the click animation ends, let's change the angle of this pre comp to
a different angle that will look best
for the next UI screen that needs to be presented
after the click animation. Let's say the changing angle animation will
last for 1 second. So let's use this time box
and change the seconds to 12. This way, the time
indicator will jump forward exactly 1 second. Great. At this point, let's adjust all
the properties we animated to get a
nice front angle. Using the safe action grid, it's easy to align the
precomp to the center. Alright, I think it looks good. Now we know that when we
present the next screen, we also need to change the text we have
here in the scene. So let's split the text layer from the beginning
of the transition, then open the script to
copy the relevant text. Let's double click
on the text layer and paste the new text. Great. So now we've
prepared our transition. And before moving
on, let's check if it syncs perfectly
with the voiceover. We can also confirm
that it sinks by checking that the text is
changing at the right timing. Preview of everything
your team is working on, all your projects, all your tasks, all
All in one place. Alright, I think
everything looks great. And now we're ready
to go back to the scene and start working on creating the intro animation for the second
project's UI screen. The transformation
needs to start happening right after
the click animation. In this case, we'll create the intro animation of the next screen inside
the project's pre comp. First create an outtro animation for all the sections
in this screen, and after that, we'll create an intro animation
for the next screen. Then we'll time these
two animation parts together to create a
smooth transition. And finally, we'll have
that demo flow animation for this UI screen. We'll continue with that
in the next lesson. It's going to be amazing.
So see you there.
17. Creating the Outro Animation for the Projects Screen: Come back. We will
start this lesson by working on the Otro animation
for the project's screen. That needs to start happening right after the click animation. So we'll stand here and start thinking of a way to
get all the layers out so we can start bringing the layers of the
next screen. Alright. So with that in mind, let's start creating
an outtro animation for the main section
in this UI screen. To make it in the
most convenient way, we can use the white
box of this section. Let me show you what
I mean. First, let's color it in a different color
so we can find it quickly. Next, we can select all the
objects and layers that relate to this section and parent them to the
main white box. Once done, we can create an outtro animation
for this layer only. Then we can move on to creating an outtro animation for
the rest of the sections. With that said, let's open the position for the
main white box of this section and create a simple outtro animation
for it to the right side. Let's make this animation
end at second five. Next, let's go to the point
where this animation starts and create an outtro animation for the big menu on the left. We can move this out of the
frame to the left side. Great. And now let's create an outtro animation
for the header. Before doing that,
I noticed that the header is not looking good. I would love to
have it start from the left side and not be
cropped as it is now. This is how I got the
design from Figma. But here in after effects, I will change it to
fit my animation. In your case, you don't see it because you are using my
finalized Illustrator files. So you already have
this issue fixed. To fix it, I just went
to this design in Illustrator and adjusted
the shape to the left side. Once done, I saved
the project so I could get the updated
version and after effects. Lastly, I updated the position of the layer that was
messed up because of the design change I did in
Illustrator. All right. And now, once I got that fixed, after checking how the
next screen should look, I understood that the header
section is not changing, so I don't need to create
an tro animation for it. So now before entering
the next layers, let's make sure to get
these layers visible only within the boundaries of the main gray box
for this screen. I think it will look
better rather than just leaving the layers going
out as they are right now. Let's start dealing
with the menu first. We need to do is
make this layer, use the Alpha of the gray box. So drag the pick whip of the track mat function of the menu layer to
the gray box layer, which is the last layer
in our layers panel. Finally, turn this
layer back on. Awesome. Now, let's do the same for the white box
of the main section. Great. And now let's
repeat this process. For the rest of the layers,
we want to be masked out. For some reason, when I
tried to do this process for a bunch of layers, at
once, it didn't work. So if that happens
to you, don't worry. Just make sure you
do it one by one. As you can see now,
that's working. We can also do it for
two layers at once. All right. Once we're
done with that, let's go back to the scene
and see how that looks. As you can see, since we have an animation of some of
the layers going up, we don't see them
because they are now masked by the main
gray background layer. When you're in the
situation, all you need to do is enter
the pre comp with the masked layers and
find the point in time where the going up
animation has ended completely. We can stay at this
point in time, which is where the
outtro animation is starting, and
from this point, we can select all the layers we don't want to be masked in the previous animation
part and split them. Now we can place the
duplicated layer up here. Finally, we need to select
the layers we don't need, masked and deactivate the
track Mat function for them. So now we get these project
boxes not masked by any layer at the
point in time where they are popping out. And then we have them masked for the outtro animation part. That's how you deal with
these kinds of situations. All right. And now we can enter the next screen and try to understand what layers and objects should be presented
after the click animation. We need to make sure to
enter these two sections. Let's start with the big
menu on the left side. First, we need to copy it. Then let's go back to the first project screen and stand at the point in time where we need the new layers to
enter the scene. In our case, it's
from the beginning of the Otro animation. All right. So now let's paste
the copied menu here and place it
above all the layers. Now we can bring this layer to start from this
point in time. And now let's make sure
this layer is masked. We can place it
below the header. Okay, so now make it use the Alpha of the gray
box to mask this layer. Great. And now we
can start creating an intro animation
for this menu. We can create a keyframe here
because we know that this is the position it needs
to be in after the intro. Now we can go to
the beginning of our animation and move
this layer to the left. Once done, we can delay the intro animation from the outtro animation
of the previous menu. All right. And now
let's go back to the second projects screen and copy the rest of the layers. Let's select these four layers, copy them and paste them into
the first projects precomp. Let's bring them to start from this point
in time, as well. This is the point
where the intro of the second project's
screen will start. Great. Let's again go
to the second screen, and this time copy
the white box. Now, click this layer and paste the white box so it will
be above the selected one. With that done, let's create an intro animation
for this new section. We will create a
different intro for the rest of the layers that need to appear in the section. But all these layers we
can animate together. Let's tag the white box and parent these
four layers to it. Before animating it, let's make sure to place this
section in the right place. As you can understand, we should bring it
down a little bit. So select the white box layer and lower it a bit. All right. And now open the
position of this layer. We can open the position
of the new menu as well to see where it ends. So at the end of the
intro animation, we will create a keyframe with the current position value. And at the beginning,
let's decide that this section will enter the
screen from the bottom part. You can check how
that looks with the outtro animation of
the previous section. I think it looks
great, and we can save the project and move on. Now let's create an
intro animation for the rest of the layers that
need to be in this section. So let's select all
task lists here. Back in the first
projects pre comp, let's make sure to select this layer so the pasted layers
will be above it. Great. Let's now tag them in orange and bring them
to start from here. Great. Now let's zoom
a bit and bring them down to fit the original
design of this section. You can check how
that should look in the second projects, precomp. Alright. And now let's start creating an intro for
all these layers. At the end of the intro,
they should be placed here. And in the beginning,
let's bring them down. We can place them
somewhere around here. And now, to make this a
bit more interesting, let's make them start at
the second five mark. I want to create a slight delay for these layers from the
rest of the sections. Alright, for now, it looks
okay. Let's move on. At this point, I don't mind that the white box bottom part
is out of the screen. I love how it looks,
but I do want to mask the tasks layers so they can be visible only within the boundaries
of the white box. For this, first,
make sure you know, which is the white box
layer. It's this one. Now we need to select
the task layers and make them use the Alpha channel
of the white box layer. Finally, don't forget to turn the white box layer back on. Do it for the rest
of the tasks layers. All right. With that done, it can be a good
idea to go back to the master comp and see
if everything looks okay. As you can see, we're getting a very weird
looking thing going on. So let's go back to our
projects pre comp and fix that. Since this whole scene
is in three D space, we need to make sure that all the new layers inside this pre comp are
also three D layers. So now, when we check
the main scene or see this animation part in the master comp, everything
will look great. So now it's a good time to save all the progress and watch the animation with the voiceover to see if the timing is okay. Your cat could do
it. With one point, you get a crystal
clear overview of everything your team is
working on all your projects, all your tasks,
all in one place. Need the full asks, all in one place. Alright. So now I understand
that at this point in time, this entire demo flow animation should end at the
second 27 Mark. That means I have
a few seconds to create the rest of the
animation of this demo flow. Now, let's enter
the scene pre comp. In this timeline, the
demo animation flow should end at the
second 16 mark. Telling you this, so
you understand that the time codes may be
different in each pre comp, and that's because the pre
comp we are working on in the timeline starts at second
11 in the master comp. And inside this pre comp, we started animating from
the second zero mark. Therefore, we see a
different time code here. Our finishing point
in the timeline inside this pre comp
is the 16 second mark, not the 27 second mark, as in the previous comp
where the scene for pre comp is located and
starting from the second 11. Then when we enter the
project's precomp, the finishing time code
will be different again. Here it's at the
second nine mark. That's because the animation here starts from the
second zero mark, and not from the
second seven mark, as the project's precomp
starts in scene four precomp. So don't think that
you're making a mistake. I in the master comp, the timing shows something different from
inside your scene precomp, trust the position of
the time indicator. That's why it's important to
place the time indicator at the correct point in
time in the master comp and then don't move it when
you enter the precomps. This is very important
to understand, especially in these
kinds of projects, since creating demo flow animations can be
structured from more than one pre comp that doesn't start from
the same point in time. All right, back to the project. Now let's zoom out, and
while keeping in mind that the animation should end at the second nine mark
in this timeline, let's start working on the next animation part in
this demo flow. This time, let's
stand at the point in time where the
intro of the tasks layers ends and bring the green checkbox icon so we can start creating
the checkbox animation. As you can see, we've got two layers creating
the checkbox design. Therefore, make sure you
select them both and then paste them in the
first projects precomp. Let's now bring it to start from here and color it in green. And now we need to time
the intro animation of the checkbox together
with the layers. We can start the
checkbox animation right after the intro
of the task layers. So let's stand here for now. And now, since I know
that I'll need to have a couple of the
checkboxes in the scene, I'll prefer to precompose these two layers and create
the animation inside, so I can easily
duplicate the precomp and spread it across this
entire animation part. We can call it task
done or checkbox. Let's just make sure to get the new precomp out of
the screen's folder. It appears here because when
we created this precomp, one of the precomps inside
this folder was selected. All right. And now let's tag
it in green and enter it. And now before we
start animating, let's adjust the precomp start time code to
start from zero. It's not on zero because when
we precomposed the layers, we were at the second
five mark. All right. And now since the
icons are too small, let's scale these layers. We can set the scale
to 300, great. And now let's place it in
the center of the comp. We can use the align tool, make sure to set the
alignment to composition. I think we can set
the scale to 500. That's better. Finally,
let's collapse the layers. Awesome. And now
before animating it, let's convert the layers
to three D layers. Since we know they need to be presented in a three D scene, and then let's adjust the comp size to fit
the layers in the comp, leave some free space
so we can create some nice popping animation. All right. And now let's go to the beginning
of the timeline and create a ten frame
duration popping animation for the two layers. I think we can make it
scale more in the middle of the animation. Looks better. Now we can delay the V icon by three frames to make it
a bit more interesting. I think it's too much. Let's
bring it one frame backward. Let's see how that looks now. Great. I think it looks awesome. And now we can go
back to the scene and time this animation with
the rest of the scene. First, we can
collapse the precomp and convert it to
a three D layer. Now, let's stand at the point where the animation ended and adjust the size of the precomp
to fit the task checkbox. We can set the scale to 30. And now let's move it
to the right place. Let's press Cutrel
or Command Shift H to hide the layer guides so
we can see what we are doing. Great. And now let's time this
animation with the scene. We can start the checkbox
animation from here. Great. And now let's save the
project before moving on. We can now close all the
not relevant precoms and start adjusting the motion in each
animation part of this demo flow animation. As you may notice, until now, we didn't easy ease
any of the keyframes. When working on long scenes that include a few
animation parts, it's better to focus first on creating the initial
animation and making sure the timing is good rather than finalizing each keyframe we create for the
layers in the scene. Keep this method in mind when you're working in after effects. Now, let's go back to
the main scene and start adjusting all the key frames we
created there first. Make sure no layer
is selected and press you to see all the
keyframes we have here. Now, let's start working on
the first animation part, which is when the split
animation starts. Let's first deal with the main
motion that happens here, which is the
rotation of the null that rotates all the screens. Let's make sure to
adjust the velocity for the rotation
keyframes to 75%. In the graph editor,
it looks like this. Let's now watch the animation a few times and see
how that feels. I think we can make the velocity 85% to get a bit
more snappy motion. Alright, I think
it looks better. Now, let's deal with
the going down motion. I want this layer to start going up fast and slow
down toward the end. As you can see, this creates a collision of the project's screen with the
screen behind it. So let's select the first
movement of the projects screen pre comp and make sure it starts slow and gain
speed towards the end, the opposite of the going
down motion of the null. This will create a
better velocity sync between the two animations. Now we can make the
project's screen move faster in the
middle of the animation, if we want, by adjusting
the outgoing velocity. While I'm doing it,
I'm making sure to check the timing so the
comps won't collide. Great. So I see that adjusting the velocity in that way.
Can fit the animation. So at this point,
we can actually select all the key frames
of the project screen and easy ease them all and then create the same velocity
for the entire animation. Before moving on, let's check that we don't have
that collision happening. Alright, I think
everything looks great. And we can now move on to deal with the next animation part, which is the animation of
the rest of the screens. First, let's select
all the keyframes, ease them, and then
in the graph editor, make sure to have a velocity similar to what we created
for the null animation, which in our case, the influence
percentage should be around 85% for both incoming
and outgoing velocity. Let's see how everything
looks together. The going down motion looks a little bit weird, in my opinion. So let's adjust the velocity of this animation similar to how we did for the
rest of the animation. I love how the motion
feels right now, but as you can see, we got the collision issue once again. So in that case, we can just stay here in the
middle of the animation of the project's pre comp and make sure to move the layer
on its Z position axis. My goal is to bring this layer a bit further from the
layer behind it. We can also bring
it up a little bit. And now let's zoom in and check if we've got that
collision happening again. All right. I see that
everything looks okay, and we're now ready to move on. At this point, let's enter the project's
screen pre comp and open up all the keyframes on all the layers to see
what we can adjust here. So, in this case,
we already dealt with the animation of
the project boxes, but we can delete the
previous keyframes on the second part of the
layers of the task boxes. All right. And now let's go back and forth
on the timeline to see if everything still looks okay after deleting
these keyframes. We should not get any problems, but it's still worth
checking. All right. And now let's deal with the keyframes that we
haven't adjusted yet. We can begin by easing the
keyframes of this layer. To see what layers
we're selecting, let's bring back the layer
guides by using Alright. And now let's easy ease these keyframes and then
set the velocity to 85%. That looks nice, but I think the outtro animation
of this section is happening too quickly. So let's make it last a bit longer to make the
animation slower. In our case, we can
stand at second five and five frames and
bring the last keyframe. The motion still feels
super fast, in my opinion. So let's make this animation
last for exactly 1 second. So if the animation starts
at 4 seconds and 22 frames, let's go to 5 seconds and 22 frames and bring the
last keyframe here. Let's see how that looks now. I can barely see
something because the other layers are
already entering the scene. In that case, let's isolate only the white box layer
to focus on its motion. Alright. I think it
looks much better now. With that done, let's adjust the intro animation
duration for all the layers that should enter the scene after the first animation part. Since we made the
outtro animation of the previous section
last 1 second, that means we also need to make the intro animation of the
new section last 1 second. So let's stand, again, at second five and 22 frames and bring the last keyframe
of this layer here. Next, we need to do the same for the rest of the animations. For these two layers,
they both start at second four and 25 frames, which means we need to go to second five and 25 frames and move the last
keyframes here. Let's also make the intro of the tasks list
last for 1 second. And, of course,
let's not forget to start the checkbox animation
from here as well. Great. Once that's done, let's start easing
the keyframes. Beginning with the position keyframes for these
three layers, set the velocity to 85%. That looks nice. Now, let's do the same for the tasks layers. Perfect. Since we know
this whole animation part should end around second nine, we can see we have plenty of
time to reach that point. So let's make a nice offset between the task layers to
fill up the free space. Don't add too much delay between the layers
because we still need a few seconds for the
green checkbox animation. With that said, let's
bring this precomp to start once the last task
layer finishes its animation. Okay, now let's duplicate
this precomp and place the new checkbox
under the second task. To make it more interesting, let's start this one at
second seven. All right. Once we've adjusted
the keyframes, let's go back to the
master comp and preview the animation with the
voiceover to make sure everything sinks
perfectly. At could do it. With one point, you get a crystal clear overview of everything your
team is working on. All your projects,
all your tasks. All. With one point, you get a crystal clear overview of everything your
team is working on, all your projects,
all your tasks, all in one place. Need the full picture. I see that the next scene
should start here. So to avoid having
a static frame, let's go back into
the scene and add another green checkbox
animation for the third task, just to fill the empty space. Make sure it has the same
delay as the second checkbox. Great. Now that we've finished creating the
most complex part, which is the demo
flow animation, we can go back to
the scene and add some interesting
camera movements to match the demo
flow animation. But instead of animating
the camera itself, let's animate the
project's screen precomp because I don't want to interfere with the
existing camera animation. And I also want to show you
an easier way to create camera like movements without actually animating the camera. With that said,
let's get started. First, since the precomp
already has keyframes, we'll create a new null object and parent the precomp to it. That way, we'll have a
clean layer to work with. So, create a new null object and bring it below
the camera layer. Let's start this null at the 12 second mark and rename
it to null screen two. Move. Since it will control the motion of the precomp
named scene two projects. Now, convert the null to a three D layer and place it in the same position as the
project screen precomp. You can copy the values from
the precomp to the null. If you switch to
Custom View one, you'll see the null is placed exactly where the precomp is. Perfect. Now we can parent
the precomp to the null. Before doing that, let's
move these two layers up here and close
the camera layer. Great. Now, parent
the second part of the projects
precomp to the null. With that done, we can now control this precomp
using the null without interfering
with the key frames already on the precomp. All right. Let's create
an interesting angle. First, create a keyframe for the X rotation at second
12 and 22 frames. Then move 1 second
forward and rotate the precomp to
around 25 degrees. Next, go back to the
beginning of this animation. Press P to reveal the position property and create a keyframe with
the current value. Move 1 second forward and bring the null closer
to the camera. Once that's done, easy ease the keyframes and
adjust the velocity in the graph editor to around 85% for both incoming
and outgoing motion. Great. Now, let's
see how that looks. I think it looks great,
but in my opinion, we should start this
motion a bit sooner. Let's say from second
12 and ten frames. Let's open the key frames
of the precomp and time the null animation to start from the middle of the
precomp animation. Alright, I think we're good now. But as you may have noticed, we can see the next
section at the bottom. Let's enter the
precomp and fix that. First, open the key frames of the main white box and stand
at the first keyframe. Only then bring the
layer down a bit more. Now, go back to the scene and
check. That looks better. I think we can also delay the checkboxes
animation slightly. Later we'll add a cursor
animation to this scene. And I'd like to have a
few free frames to create either an intro animation for the cursor or possibly a Zoom in animation on the
task with the checkbox. With that said, let's
enter the precomp and move the three checkbox precomps to start from second
seven and ten frames. Perfect. Now, let's go back to the scene and at that
exact point in time, bring the null even closer to the camera so we can see the
first three tasks up close. We can also play around with the rotation to get a
more interesting angle. Just don't forget
about the text above. Try not to bring
the UI screen too far into that area. Great. Now let's adjust the velocity to around 85% for this
animation as well. When you do that, make sure
you adjust both properties. In this case, I
miss the rotation. So I'll easy ease
the key frames again to reset the easing and
then adjust it properly. Once that's done, let's
see what we've got. Uh, looks great. To add some
gentle motion to the scene, we can stand a little
after the scene, should end and bring the camera slightly
closer to the UI screen. That's a great
example of why it's better to use a null object for complex angles instead of struggling with
the camera directly. You can always keep the
camera for simpler movements. I think we can bring it even closer. Let's watch again. Alright, I think it looks great. Now let's go back
to the master comp and preview it with
the voiceover. Managing a large team across multiple projects isn't easy. Too many tasks asks, too many. Before you know it,
you're groaning in cost looking for Met one point. Point. The platform that makes project management so simple
even your cat could do it. With one point, you
get a Crist Yes. Everything projects. All your tasks all in one place. The full picture? Perfect. It looks like
everything is synced. So let's find the
point in time to start the outtro animation
for the entire scene. From the voice over, it sounds like this should start
around second 27. Let's stand here,
then enter the scene, and I'll show you how to create a simple outtro animation that transitions perfectly into the next scene with a match cut. First, we need to adjust the camera's last
keyframe so it ends here. Now, move 1 second forward
and push the camera backward. Et's scale the panel
for convenience. Now, go to the beginning of the Outro and open the
nulls keyframes, as well. Create keyframes with the current values
for both properties, since we don't want them to
change until this point. Then move 1 second
forward and adjust the null so the UI screen
aligns nicely to the center. We can push the camera even
farther back and bring it up slightly. Great. We're almost there. Since we
moved the camera backward. We can now see some of the
previous animation layers. To fix that, all we need
to do is find the point in the timeline where we're 100% sure those layers
are no longer needed. In this case, it's when our first null
finishes its animation. We can also trim this null
to the end of its animation. That's the perfect spot to crop the rest of the screens that
were parented to this null. So select them all and press
Alt right bracket to crop. Awesome. With that done, let's go back to our
outtro animation. At this point, we can start
adjusting the motion. First, select the
null object and press U to make sure we
didn't miss any key frames. Great. Now, select all
the keyframes and press F nine or F and F nine
if you're on a Mac. Next, open the speed
graph editor and adjust the velocity
closer to 95%. We're doing this
because we want to create that match
cut transition. And for it to work, the motion needs to reach a very fast peak. Now, stand at the point in the graph where the
motion is at its fastest. Then go back to the master comp and crop the precomp
to this exact point. This way, the next scene we'll create we seamlessly
continue the motion. More on that in the next lesson. For now, let's go back to the scene and adjust
its duration. Don't crop it too close to
the end of the outtro motion. Instead, move 1 second forward and trim the
timeline to that point. Great. Once that's done, enter the screen pre comp. Just to double check, we
didn't miss anything. Everything looks
good here, and we don't need to trim
this timeline. So let's move on. Now we can clean
things up a bit, close the unnecessary precoms, then go back to the master comp to prepare for animating
the next scene. Before we wrap up,
let's also organize the project by
moving the task done precomp into the
precomps folder. Do the same with the
Cat Jeff precomp. Once that's done,
save the project. And with that, we've
finished this lesson. And the next one we'll complete the match cut transition and start building the next
demo flow animation. It's going to be a good
one. So see you there.
18. Building the Title Animation Template: Come back. Let's begin
the lesson by going to the videoboard and checking what is the next
thing we need to do. As you can see, now we need to create
the Title animation. This title animation is going to appear in
the next scenes throughout the project every
time with a different text. As you can see, we
have it also here. All the questions in the script will be presented
in a similar way. In the last part, this title animation
is going to be like our first title animation in
the opening of this video. Alright, so now
after we know that we will have a couple of
the same title animations, we can structure it in a way, so it'll be easy for us to duplicate it and just
change the text. With that in mind, let's create a new composition for the
first title animation. Let's call it Main Title one. Make sure to change
the resolution to full HD and check that the
rest of the settings are okay. Great. So now let's
select the text tool and go to the script to copy the text for the first
title animation. In our case, it's this
question. Back to the project. Let's paste the
text and adjust it. First, make sure to
center the paragraph. And now let's see what
size can work well here. I think 150 is great. Next, choose the bold
weight for the font, and then let's align the layer
to the center of the com. Finally, we can center
the anchor point. For this, hold
controller command and double click the
AnchorPoint tool. Great. And now let's
switch back to the selection tool and make this composition a little
bit more interesting. First, we can bring in the gradient background
animation we created at the beginning
of the project. And now I want to show
you some basic tricks you can do to make the gradient look a bit different from the rest of
the scenes in this project. It can be a good
idea because we can decide that the background
for the title animations will look a bit different from the rest of the project to make it a bit more interesting. Right. So the first trick
I love to do when I have gradient animations is to
add the invert effect. Now, I can switch the channels here to get some interesting
variations for the gradient. All right. For now, let's say we go with luminance. If we zoom in, we can see the pixels which make the
gradient look low quality. To fix this, we can add
the Fast booxplur effect. And then make sure to set the blur radius to
some high number. I think 20 is
enough in our case. Next, to improve the look, we can also add the hue and
saturation effect and crank up the master saturation to some higher number to get an interesting
look for the gradient. As you can see, it creates nice contrast parts
in the gradient. And now, if you want to change
the color of the gradient, you can play around with
the master hue property. But if you want to have complete control of the new colors, you can add the toner effect. Now let's delete
the invert effect so we can see what
we can do with the toner effect with our
original colors. All right. So first, to have control of
more tones in our gradient, we can change the
tones to Penton. Now we have five color
types that we can control. So now we can bring
the color palette to the comp and start adjusting the different
tones we now have. Let's say I want this
gradient to look more purple, so I'll start picking
the purple colors. I'm showing you these tricks because I want you
to know that you can have complete control of the colors of your
gradient background, whether you render
it yourself or download some gradient
animation from the Internet. Sometimes we love the
motion of the gradient, but we don't have them in the precise colors that need
to fit our client's palette. So now you know how you can adjust any gradient to fit
your project needs. All right. So with that explained,
let's delete the toner effect and keep adjusting our gradient
background a bit more. If you still can see the pixels, you can scale the blur radius. And also know that the
order of the effects can also affect the
look of the gradient. As you can see, having
the blur effect under the hue effect makes the gradient look a bit better. Okay, so now when we are good with the look
of the title comp, we can start animating it. There are endless ways to do it, but I want to show how you can make your project look good, even with a very
simple animation. First, let's open the scale
for both of the layers. Now let's set the scale to 200. We can set the text layer to 400 to get a bit more
interesting motion. Now, create a keyframe at the
beginning of the timeline. Next, let's go 1 second forward and bring the scale
back to 100 for both. The text looks too big. Let's set the scale to 90. Next, let's easy ease
the keyframes and set the velocity for
both to around 95%. The goal is to create
a super snappy motion. Let's see how that
looks. All right. That looks good for now. So now we created the intro
for the title. Let's now create the Outro. But before that, let's
go to the videoboard and check for how long this
animation should last. It starts at second
27 and 15 frames, and now let's see
where it ends at second 29 and ten frames. That means we have a little over 2 seconds for this animation. So now back to the title comp. Let's create a short pause for the animation so the
viewer can read the text. Let's make the pause
last ten frames. So now let's create a keyframe
with the same values here. Then let's move 1 second forward and copy the
first keyframes here. Now, we need to make sure the motion is similar
to the intro. As you can see, it's not. So let's easy ease the
outtro keyframes to reset the velocity and
then adjust it to be 95%. Let's see how that
looks. I think there is not enough
time to read the text. Let's make the pause last
for five more frames. This will be the
point where we will end the animation to get a nice match cut transition that can fit almost every
scene. All right. And now let's add
a small detail to the animation to
bring the focus of the viewer to the important
word in this text. In my case, I want to add a nice stroke animation
below the word. Let me show you what
I mean. First, make sure no layers are selected. Then select the Pen tool. Now, make sure to
turn off the fill color and turn on
the stroke color. For the color of the
stroke, let's bring the color palette to the
comp and decide to use some bright color
so it will be in high contrast with
the background so we can see it clearly. Alright. Now, let's delete
the color palette and create a line under the word full for the stroke width.
We can leave it on 20. Now let's create an
additional point in the path and bring it up. Then let's curve it and adjust the handles to get a
nice rounded line. Let's bring it down
a little bit. Great. Now let's change the name to stroke and start animating it. And we will do it using
the trim path effect. For now, let's stand at second one and create a
keyframes for the end property. If you want your stroke to
move from the other direction, you can open the
stroke properties and change the path direction. All right. I'll bring
it back to how it was. And now let's animate it. At this point in time, set
the end property to zero. Now let's move to the end of
the pause moment and bring the end value to 100. Great. And now let's stand five
frames after the beginning of the animation and create a keyframe for the start
property with the value of zero. Next, stand five frames
after the end of the animation and set
the start value to 100. Now, we have a nice
stroke animation. Let's make the stroke
visible for a bit longer, and we can do it by playing around with the
velocity of the two animation. First, let's select
the end keyframes and make this
animation start fast. After that, let's make the
start keyframes start slow. This way, we adjusted the timing between
these two animations to make the stroke be visible for a few frames more
before it disappears. Great. So now, once we've done with the initial animation of
the title animation, let's add an additional
gentle zoom out motion to the scene so it
won't look static. Let me show you how
to do it quickly. First, let's create
a new adjustment layer above all the layers. Next, let's add the
transform effect to it. Now, let's go to the beginning
of the timeline and set the scale to 120 and
create a keyframe here. Now, let's go to a point
in time where we are sure the animation
should already end. In our case, we can stand at the three second mark and
now set the scale to 100. So now if you check
the animation, you will see that we get a nice, gentle zoom out motion, and the animation feels better because even
in the pause moment, the scene is moving. Alright? So with that done, we have finished creating
the title animation. We can activate the quality and sampling feature to get the most quality for
the gradient MP. For file we have here. Let's now go to second four and trim the comp to
this point in time. Let's go back to
the master comp and bring the title precomp here. And now to get a cool
match cut transition, let's crop the title
precomp from the point in time where the intro
animation is super fast. To know where it is, for sure, we can enter the precomp
and find the point in time where the animation of one of
the layers is at top speed. In our case, it's
here at frame 15. We can move one frame
backward and then go back to the master comp and trim the precomp to this
point in time. Now, if you watch the animation between the last
scene and the title, you will see that
we have a super cool match cut transition. Great. So now let's crop
this pre cont from the end, also at the point in time
where the outtros at peak speed to get a cut
transition to the next scene. Awesome. So with that done, we are now ready to start
working on the next scene. Before you do that,
I suggest you save the project to secure the progress
you've made so far. All right. And now
let's go back to the videoboard and see what is the next scene that
we need to create. Okay, so now, as you can see, we need to work on the
task's main UI screen. From what we see
in the storyboard, we can clearly see that
we will need to create a short demo flow animation. I'm talking about creating an intro animation for
the pop up we see here. To understand that
better, let's open this UI screen precomp and
see what we have there. Okay, so here we can see the pop up presenting the
sub tasks for the main task, which in this case, is
designing the new dashboard. I know it because
I can see it in the title of this pop up. Great. So with that in mind, let's
create a new comp for the new scene in
which we will create this demo flow animation. Let's call this pre
comp scene five. Make sure the settings
are correct and hit Okay. Great. So here is the
new scene pre comp. And now let's drag the tasks UI screen pre comp into the timeline of
the new scene comp. Later, we will add here the text and the cursor animation. But for now, let's focus on creating the demo
flow animation. The first thing
that we can do is select all the layers
here and collapse them. I'm not planning to animate
the scene in a three D space, so I won't convert the
layers to three D layers. Okay. And now let's select all the layers related to the pop up design and precompose. Since we have this shadow layer, it's easier to understand
what layers to select, starting from this one and all the rest of
the layers above. You can turn off and on the selected layer to make
sure you got it right. All right. And now let's
precompose them all. We can call this precomp
screen for pop up. Great. So now let's collapse
the precomp and make sure the anchor point is in
the center. Awesome. And now let's turn off the pop up in the shadow layer as well, and start preparing the rest
of the design for animation. At this point, we
need to understand what layers we should
precompose and whatnot. And, of course, it all depends on what animation
we want to create here. In our case, the most important thing to know is that we need to create a click animation
for this task, since the pop up we have in
the design relates to it. But before doing that, I will make sure the task
boxes have a white fill. I forgot to do it in the preparation phase
in Illustrator. But it's totally fine.
As I already said, this can happen to all of us. And it's important
for me to show you a realistic workflow. In your case, you don't
need to do anything because you already have my
finalized Illustrator files. So I will speed this
process up a little bit, because all I'm doing
is just finding the relevant layers and making sure to set a fill
color to white. Great. And now, after
saving the file, I'll go back to the project
and wait until it's updated. Awesome. So once I got
everything updated, I'll save the
project, and you can continue to follow along. Let's go back to
the videoboard and check for how many seconds
the scene should last. It will help us to
understand where to finish the scene and how long the animation part and
it should last. So the scene starts at
second 29 and 15 frames, and it ends at second
38 and 28 frames. This means we have a
bit over 7 seconds to present all the animations
happening here. So with that in mind,
we can now collapse the pre comp and start working on the intro
of this screen. I prefer to finish
the intro first, so I know for sure
where to start the demo flow animation that needs to come after the intro. It's better than first
creating the demo flow and then adjusting the keyframes
after creating the intro. Great. So since we
have a fast Zoom in animation happening in the outtro of the
title animation, we can create a fast
Zoom in animation for the intro of this scene
to get a cool match cut. Transition. So let's create a scale animation
for this pre comp, starting from a scale of 50. And then after 1 second,
don't set the scale to 100 because we need some space for the text, we can set it to 80. Great. With that in mind, let's also create a
position animation as well. I want the screen
to be down here. We can use the safe action
grid to make sure we're not moving it too
much down. All right? Now let's adjust the velocity, so we will have
this motion super fast in the middle
of the animation. This will be the point we
will start this precomp. Let's now go to the Master Comp and bring the new scene here. Now, let's enter the scene and stand at the fastest point. Finally, let's go back to the Master Comp and crop this pre comp to
this point in time. And now all we need to do is place the scene to
start right after the title animation and check how everything
looks together. Awesome. I think the match
cut works perfectly. Now we can enter
the scene and start animating the demo
flow animation, starting right after the intro. Let's enter the tasks pre
comp and start working. Alright, so the thing
we can do here is create a nice popping
out animation for all the tasks in
the main section here. So starting from
this point in time, we will create a keyframe
for the scale property with the current value as always
to have everything organized. Let's tag these layers
in a different color. Next, let's move 1 second and create another
keyframe here. Then in the middle of this animation, let's
scale them all up. 120 looks good. Great. And now before
adjusting the keyframes, let's first finish animating and timing the entire animation. So now, after the
popping out animation, I want to add a
checkbox animation for a few of the first tasks. And since I have a ready checkbox animation
in a separate precomp, we can now delete these
layers from here. Later, we will add
the checkbox pre comp we have prepared earlier. For now, let's create the click animation
for the third task. But instead of
animating this layer, we will use a null object. And it's because the anchor point on this layer is centered, and I don't want to change
it or mess around with the keyframes I already have on this layer. Let me
show you what I mean. So now let's create a new null object and create a small setup for
the click animation. Bring the null to
be in the area from which you want the click
animation to be triggered. We can change the name to the name of the layer that
will be parented to it. In our case, it's the
layer with the number 100, so we can call it null 100. Once done, let's parent the
relevant layer to the null. And now from second
two, that is, after the popping out animation, let's create a scale down
animation for the null. Let's make it last
for 15 frames. Alright. So now, once we
got the click animation, we can trim this layer to start and end according
to the keyframes. Later, we can move this
null backward or forward in time in case we want the click animation to happen at a different
point in time. Alright. So with that done, let's keep working on
the next animation part, which is the intro of
the sub task pop up. First, after the
click animation, the shadow layer should appear. So let's bring it here.
And now let's create a 1 second long fade in animation using the
opacity property. If the animation starts at
second two and 15 frames, it should end at second
three and 15 frames. Okay. And now, to make this
a bit more interesting, let's also add a
nice blur animation. For this, first, let's create
a new adjustment layer. Let's place it above
the shadow layer and move it to start from
where the shadow starts. Next, we need to make
this adjustment layer visible only within
the boundaries of the main shape of this UI
screen because we don't want assets outside this
area to be blurry. We need only the screen
area to be blurry. So to do it, we can simply
make the adjustment layer, use the Alpha of the main box. Don't forget to turn back on the box layer that way we
masked the adjustment layer. Okay. So now let's add the fast box blur effect to the adjustment layer and create an animation for
the blur radius. If we turn on the
transparent background, we will see that the
blur is covering only the UI screen boundaries,
which is what we want it. That means that in case we add some new assets behind
the adjustment layer, it will only blur
the parts behind the boundaries of
the UI screen shape. Alright. I'll delete the shape and let's animate the blur. First, we can change the name of the adjustment layer to blur. Now, let's set the
blur radius to zero at this point in time
and create a keyframes. Next, let's move 1 second forward and set the blur to
a higher number. Maybe ten. I think that's too
much. Let's try five. Yes, that's better. Great. So now once we've done that, let's bring the pop up
precomp here and create a simple popping out animation for it using the scale property. Great. I think it looks nice, and we can now move on. After the popping out animation, we need to add a
checkbox animation inside the pop up precomp. Since we already have a
ready animated precomp prepared for it, we can
do that in a minute. For now, let's
focus on improving the motion for the
keyframes we created here. But before we do that,
I just noticed that the adjustment layer doesn't reach the bottom part
of this section. To fix this problem, quickly, we can use the Alpha channel of the main box of this
UI screen to mask it. Great. So now we don't see the bottom part of the
white box of this section, and we can move on to
improving the motion. First, let's begin
with the task layers. Let's make them pop quickly from the beginning of the animation. I noticed that I
missed the first task, which is the bottom layer
here in the layers panel. Let me adjust the
motion here real quick. It's a good example
to always make sure you're getting all the
keyframes you wanted to adjust. Alright. With that done, I'm happy with the motion, and now to make it look
a bit more interesting, I'll create a one frame offset between the keyframes
to create a nice delay. Let's see how that
looks. I think we can make the delay bigger. Let's say, two frames offset. For this, I'll stand two frames after the
first task, keyframes, and then make sure
the second task starts to move from that point, this time, I'll use the
new offset feature. So I'll make sure not to select the keyframes
from the upper layer. I'll select them from
the bottom layer because I want the offset to be in the direction
to the right. Alright. I think it looks great. Now let's adjust the
intro for the next part, according to the task
layers animation. With that done, let's now start adjusting the next animation
part we have here, starting with the
click animation. Now let's adjust the shadow
and the blur animation. Let's make it start quickly. Now let's deal with
the pop up animation. We can set the
velocity of the scale keyframes to 85% and
see how that looks. I think it looks great, and we can move on to the
next animation part, which starts right after
the pop up animation. So let's stand here
and enter the precomp to add the checkbox animation
that needs to be here. First thing first, let's zoom in so we can see what
we're doing better. And now instead of animating each of the check boxes here, we'll use our ready animation
that we prepared earlier. So let's find it in the precomps folder and
drag it to the timeline. Now let's collapse the
precomp and scale it down. We can set the scale to 20. Now, let's place this precomp
beside the fourth sub task. I think we can
scale it up a bit. Let's see how that looks. Let's set the scale to 25. Great. So now let's find the right point in time for
this animation to start. This needs to happen right
after the pop up animation. So let's stand here and
enter the pop up precomp. Now, move the checkbox
animation to start from here. Awesome. And now
let's duplicate it and start the new
115 frames after. We can now tag the
pre comps in green and finally bring the new
one for the sixth sub task. I don't think we need to
create more than that, since we already almost reached the duration
limit we need for it. With that in mind, let's go to the master comp and see the
animation while hearing the voiceover to check
if everything is synced perfectly before creating
an Otro for the scene. Sure. Every project
includes detailed tasks, sub tasks, and real
time progress tracking, so nothing slips
through the cracks. Want to see who Alright,
I think it looks great. And now we can start to think about the outtro of this scene, which needs to happen somewhere around
the 37 second mark. When we go back to the scene, we can see that we
still have plenty of time until
reaching that point. Right now, the animation we
created feels a bit boring. So let's use this
opportunity to add some nice zoom in and zoom out movements to make the
scene feel more dynamic. I also want to shift the
popping out animation we created for the task boxes a little later in the timeline, since we have a lot of free
space until the scene ends. Alright. So with that said, let's stand at the
two second mark in the scene timeline and bring the popping out animation of the task layers
to start from here. I see that I missed creating a delay between the first
and the two bottom layers, so I'll move the bottom layer keyframes, one frame forward. All right. Now let's select all the task layers
keyframes and start this animation part from
the two second mark. Great. And now let's select the next animation part and adjust the timing accordingly. On second thought, let's start this animation part 1
second later because I want to leave some
free space for a Zoom in animation or a cursor
animation at this time. Once done, let's go back to the scene,
stand at second two, and start adjusting the scale
and position properties until we get something
that looks good. My goal here is to
create a nice Zoom in animation where the task list
section will appear closer. The focus of the viewer should be on that area at
this point in time. I'm just experimenting
with different values for scale and
repositioning the precomp, so the task list sits
more in the center. We can turn on the
action safe grid to make sure we have a
balanced composition. I think it looks nice, but the starting position of the precomp can be adjusted a bit. Let's move it slightly
upward so we create a bigger difference between the first and second positions. Don't worry about the text that should be in the upper area. We can place that text
at the bottom instead. Now, let's stand at the
second keyframe and adjust the precomp size and position again to make the Zoom in
animation more noticeable. Let's also make sure
the task list section is perfectly aligned
to the center. Use the action safe grid
guides to check the alignment. At this point in the timeline, the task boxes should be centered exactly
according to the guides. A quick reminder, this should be your main workflow when you work on these kinds of projects. First, create the
essential animation, then improve the motion. After that, check the animation
sync with the voiceover. And finally, add
camera style movements in the scene to make
it more interesting. Alright, now let's go back to the master
comp and find a scene with a text layer inside so we can copy it and reuse it here. Paste the text layer
into the timeline and bring it in from the
beginning of the animation. Place this layer below the UI screen
somewhere around here. Finally, let's go
to the script and copy the text that needs
to appear in this scene. We'll copy the first part
of the sentence first. Let's now find the perfect
place for the text. Great. Now, let's
create a nice angle for the UI screen during the part where the pop
up UI panel appears. We can start changing the
angle from the moment the task list animation finishes
and see how that looks. First, create keyframes
for both properties, scale and position with their current values
because we don't want the UI screen to
move before this point. That gives us a pause moment. Let's make this pause shorter, for example, place the keyframes
at the four second mark. Once that's done, let's decide where the angle
change should end. It can finish just before
the click animation. So let's move to that
time point and adjust the scale and position
keyframes of the precomp. Place it so we still
have some space to add the second part of
the text afterward. We can now split the
text layer at this point in time and copy the second part of the text from the script. Back in the project, let's paste the text into the new text
layer and move it upward. Great. Now let's expand
this layer and find a good point in time to create another changing
angle animation. This time, we'll create
a Zoom in animation on the subtask area inside
the pop up UI panel. To do that, we'll keep
staging in sync with the animation happening
inside the UI screen precomp. Up until this moment, we can
keep a pause in the scene. So let's create keyframes with the current values
for both properties. Then move 1 second
forward and create a Zoom in animation by adjusting the scale and
position properties. All right. I think
it looks good. Now we can improve the motion for all the keyframes
we have here. We'll do this using the keyframes velocity
panel. A quick reminder. You can't adjust
different properties together using the
velocity panel. So first, do it for
the position property and then repeat the process
for the scale property. Let's set both to 85% velocity.
Let's see what we've got. Looks great, but I think
the checkbox animation inside the pop up should start a bit
later in the timeline. Let's start it right after
the Zoom in animation ends. So stand here, then enter the pop up precomp and move the two precomps to
this point in time. Awesome. With that done, let's go back to the master comp and check the animation
against the voiceover. Pay attention to how the VO indicates where this
scene should end. Picture. Every project includes
Includes detailed tasks, subtasks and real time
progress tracking. So nothing slips through
the cracks. Want to? Everything looks great. Now
we can start working on the outtro animation for this scene because at
this point in time, the next scene should
already begin. First, let's enter the scene. Before moving on, let's expand
the text layer real quick. Now let's find a good point in time to start the
outtro animation. I think we can start it at
7 seconds and 20 frames. So let's create keyframes
at that point in time. Then move 1 second forward. In the timeline and create a simple outtro animation where the pre comp moves
downward, out of the frame. Next, go into the
graph editor and set the velocity to 95% to make
the motion a bit snappier. I want it this way
because I'm preparing for a match cut transition
into the next scene. On second thought, I
think we should leave a slightly longer pause before
the UI screen moves out. In my opinion, the Otro starts too soon after the
checkbox animation. Let's shift the outtro animation
to start at 8 seconds. Great. Now let's find the fastest point in the Otro motion and in
the master comp crop, the pre comp at
this point in time. Now let's re enter
the scene and trim the timeline 1 second after
the atro animation finishes. I don't like to end scenes
right on the final motion. I always prefer
to leave 1 second of spare time in case I need
to make adjustments later. Alright, with that done, we can move on to
the next scene, which in our case, is
another title animation. To do it quickly, let's
duplicate the title animation we already have in the timeline and place it right
after the last scene. The good thing is
that it's already trimmed to fit the
match cut transition. But if we enter this precomp
and change the text, it will also update the text in the first title animation, since it's the same precomp, and that's not what
we want to fix this. We need to duplicate the pre
comp in the project panel. Then we'll replace
the old pre comp in the timeline with
this new one. Great. Now enter the new title precomp and change
the text inside. As you can see, the text is
longer than the first one. To fix that, let's
reduce the font size. Around 100 looks good. Once done, don't forget to add the stroke under the
important word in the text. In my case, I'll place it here. Great. Now replace
the old pre comp in the timeline
with this new one. This way, we keep
the cropping from the previous title animation
but with new text inside. And just like that, we have another perfect match
cut transition. Now we're ready to move on to the next lesson and start
building the next scene. But before that, let's
fix one last detail. If you haven't
noticed, we don't have the checkbox icons that need
to be in the main task list. They don't need to be animated. So let's enter the
pop up pre comp and copy the checkbox
icon layer from there. Now, go back to the tasks UI screen pre comp and
paste the layer in. Before pasting, make sure
to be at the point in time where all the layers are
in their static state. In our case, that's at the
beginning of the animation. All right, now place the icon inside the first
task in the list. Once done, duplicate it and
place it in the second task. Perfect. Now, since the tasks themselves have a
popping out animation, we want the checkboxes
to move with them. So make sure to
parent each checkbox to its corresponding task layer. Preview the animation
to make sure it works. If a checkbox doesn't
move correctly, you probably parented
it to the wrong layer, simply re parent it
to the correct one. Do the same for the
second checkbox icon. Alright, with that done, we've finished this lesson. You can now save the project and close all the pre comps
to keep things clean. Leave only the videoboard
and the master comp open. And now we're ready to move
on to the next lesson. See you there. And before starting to watch
the next lesson, don't forget to take
a ten minute break to refresh before we continue.
See you in the next one.
19. Animating the Contacts UI Screen in 3D: Come back. In this lesson, we will start working on
the contacts UI screen. So first things first, let's see what the duration
of the scene should be. It starts at second
38 and 28 frames, and it ends at second
42 and 18 frames. That means we have
approximately 4 seconds and a few frames to
animate the scene. With that in mind,
let's now create a new comp and
call it scene six. Make sure the settings
are correct and hit. Okay. Great. And now let's bring the contacts UI screen
into the new scene. I want to animate the scene,
similar to this reference. That means that we will for sure need to use the three D space. With that in mind, let's
enter the pre comp and first select all the
layers here and collapse them, and right after that, convert all of them to three D layers. Great. And now let's start preparing this UI
screen for animation. What I mean by that is we can precompose the layers
related to each section. It will be much easier
for us in the long run. So first, we can lock the layers that we know for sure
we won't precompose. Now, let's select all the layers of the main section
and precompose them. Pay attention that I'm not
selecting the contact boxes. That's because I want
them to remain outside, so I can animate
them without messing with layers that
won't be animated. Great. And now let's also select these three layers
that belong to the main section and
cut them from here, then paste them
inside the precomp. Great. Now let's go back to the main scene and precompose the layers of the upper section. Now, let's deal with
the contacts action. Since there are a
couple of layers that belong to each contact box, we need to select all
the layers related to that contact box
and precompose it. Let's call it screen
five contact one. We can copy the name and
then keep precomposing the rest of the contact sections and paste the name
for the precomp. Just don't forget to
adjust the number. Let's do it for the
rest of the contacts. Awesome. With that done, let's turn back on
all the precomps, collapse them, and convert
them all to three D layers. Finally, let's center the
anchor point for all of them. You can click on a precomp to make sure the anchor
point is centered. Alright. Everything looks great, and we can now save the
project before moving on. Let's also use this opportunity to organize our project panel. Let's open the Screens
folder and drag out all the precomps we created for this scene in
the previous one. Inside the Screens folder, only the main UI screen
pre cooms should remain. Nothing else. For all
the other pre coms, we can drag them inside
the main precomps folder. Great. And now we are ready
to start animating the scene. The first thing we
can do is create an intro animation
for this scene. Since we're dealing
with three D layers, we can create a new 35
MM camera in the scene and use it to create a nice Zoom in animation for the intro. At the beginning
of the animation, I will move the camera backward. That's enough. Now, let's move 1 second forward and bring the camera
closer to the UI screen. Note that we need to save some
space in the upper area of the frame to add the text that
needs to be in this scene. For convenience, we can open the title safe action grid and play around with the
position values. Alright, I think it looks good. Now, let's stand at
second one and start creating the popping
out animation for the contacts precomps. First, we need to open
the position property and create the first
keyframe here. Next, let's move 1 second forward and create the same
keyframe here as well. After that, let's
stand at the middle of the animation and bring all the precomps
closer to the camera. Make sure not to set
the value manually at once for all of the precomps, because it will
adjust the rest of the position axes as well,
which is not what we want. Therefore, make sure
you're adjusting the value by
dragging the Z axis. Let's now move the
precomps to the left. So when they pop out, they will be placed in the
center of the comp. Keep adjusting the position
values until they are a bit closer to the camera and well centered horizontally
in the frame. All right. I think
it looks good. Let's stand at the beginning of this animation and now open the rotation property to create a nice rotation effect
during the animation. In our case, we will use
the Y rotation axis. So first, let's create
the first keyframe with the value of zero
at this point in time. Then let's move to second two and create the same
keyframe here. Now let's stand in the
middle of the animation and start adjusting the rotation
for each of the precomps. At this point, I'm
just trying to rotate each precomp while keeping a similar rotation
change across them all. That means we can
set the rotation for the upper precomp to 30. For the next one, set it to 20. The next one will be
ten. The following one, we can leave at zero. The next one will be minus ten. After that -20, and
the final one -30. The rotation looks good,
but as you can see, the bottom precomp is cropped in the bottom part of the comp. So while standing at the
middle of the animation, let's adjust the position for all the precomps and move
them up a little bit. Awesome. So now, once we've created the
initial animation, we can select all the
keyframes and easy ease them, then adjust their motion
in the graph editor. I want the motion
to start quick, then slow down in the middle and gain speed toward the end. Let's see how that
looks. All right. I think it looks great.
But in my opinion, the animation is
too fast for now. So let's go back
to the timeline. Stand at second three, then
select all the keyframes, hold down Alt or option, and drag them from
the last keyframe to the time indicator
position. All right. So now the speed is great, and we can create a
nice offset between the precomps to make it look
a bit more interesting. This time, I will
use the new after effects feature for
offsetting keyframes. So first, let's scale this panel so we can
see all the keyframes. Now, make sure you are selecting the keyframes from the layer that you want the
offset to start from. In our case, I want the first upper precomp to
start the motion first. That's why I will select
all the keyframes from the bottom layer in the layers
panel in the composition. It is the upper first precomp,
so don't get confused. Alright. And now I
will move, let's say, two frames after the
first keyframes and then hold Alt and control and move the keyframes until
I see the next precomp keyframes reaching
the time indicator position. Let's see how that looks. Alright, I think it looks great. And now, after this
animation part ends, we can stand at this
point in time and create the atro animation
for this scene. So let's create
the first keyframe for the camera position here, then move 1 second forward. That means we need to stay at second four and
ten or 12 frames. Now we can bring the
camera backward manually, or we can just copy the first position camera keyframe
and paste it here. Awesome. And now let's set the velocity for
this animation to 95% so we can create a
nice match cut transition. Okay, I think
everything looks nice. The only thing we
need to add here is a text layer that should be
presented in this scene. For this, let's enter one of
our scenes where we already have a text layer and copy it from there so we can paste
it into our new scene. Let's now enter scene six and
paste the text layer here. Expand this layer
and start it from the beginning of the timeline. After that, we can go to
the video board to see what the text should
be in this scene. Alright, here's the text. So now let's go to the script
and copy the relevant text. Great. So now, once
we have that done, let's add a secondary
camera movement to the scene so it won't look as
static as it is right now. For this, let's enter the
contacts precomp and create a new null object that we will use for creating the
secondary camera motion. First, we need to convert
it to a three DD layer. Now, let's make sure
the null object is placed in the
center of the comp, bring it up until it aligns with the safe action
grid center point. All right. And now let's
parent the camera to our null and change the null's name to
null camera. Great. So now let's go to the
beginning of the timeline and create a first position
keyframe for the null. Now let's stand at
the point in time where the short
scene already ended, which in our case,
is second five. Now let's adjust
the Z position axis for the null to make it move a bit closer
to the UI screen. Let's set it to 600 and
see how that looks. I think it's too close.
So let's stand at the last keyframe and
change it to 400. We can still see
the bottom contact cropped in the lower
area of the frame. To fix that, we can time the secondary camera motion to the animation of the
contact precomps. That means we can
stand at the middle of their popping out animation and adjust the secondary camera animation at this point in time. We can bring the null
up a little bit. Let's see how that looks.
Alright, I think it looks nice, but we might cover the text in the main scene after
creating this animation. So let's go back
to the main scene comp and see what we have here. Yes, as I thought, we're covering the text,
which is not what we want. So let's try to fix that. First, we can bring the text up a little bit and see
how that looks now. I see that the UI screen is almost touching the
text, but for now, let's leave it as it is, because
the most important thing is that we can see
the text clearly. So now before getting too
deep into the details, let's first check
that the animation we created is syncing
with a voiceover, which for now is the
more important thing to deal with before
adjusting the fine look. So let's go back to the master comp and bring the new scene into the timeline. Now let's make sure the match cut transition works properly. For this, we need to enter the scene and then the
UI screen precomp. Now we need to stand
at the point in time where the intro animation
is at top speed, which is at frame 15
in this timeline. Now we can go back to
the master comp and crop the pre comp to the time
indicators position. Great. And now let's do the same
for the outtro animation. Let's find the
point in time when the outtro animation
is the fastest. Let's stand here with
the time indicator. Now let's go back to the
master comp and crop the pre comp to the time
indicators position. Awesome. With that done, let's now focus on watching
the animation while hearing the voiceover to see if we got everything
synced perfectly. Behind, just head to your team tab to view everyone's
activity at a glance. Need to fall Alright. I think the Otro animation
needs to happen later. It should be at
this point in time. So let's stand here, then extend the pre comp to the
time indicators position. After that, let's reach
the Otro animation and make sure it starts from
this point in time. We can make the
outtro animation, start from second four exactly just to keep a more
organized timeline. A few frames won't affect the precision of
the sinking too much. Great. So now let's find the new fastest
point in time for the outtro animation, which
is somewhere around here. Now, go back to the
master comp and adjust the scene
duration accordingly. Awesome. And with that done, we can now enter the scene
and finish it at second six, which is 1 second after the
outtro animation ends. Great. So now, once we have
the sinking right, we can spend a few minutes
adjusting the scene look, especially at the
point in time where the UI screen is almost
covering the text. So first, let's enter
the contact screen pre comp and adjust the secondary camera
motion we have here. We can start by adjusting
the last keyframe. Let's set it to 300, so the camera will be a bit
further from the screen. The most important thing is
that you know what to adjust in case you have a similar situation in your
future projects. I'll just bring
the final original camera position keyframe
to second five. So we'll have a full 1
second outtro animation. Now, it will be much easier to stand at the middle
of the animation, which is at 4 seconds
and 15 frames. Then let's go back to the master comp and make sure we got the pre comp at the
correct point. Awesome. So now we've finished animating the contacts
screen scene. And now let's go back to the video board and see
what we need to do next. As you can see, we have
another title animation that needs to start
after the contact scene. So let's go back to
the master comp and repeat the same process we
did in the previous lesson. First duplicate one of the title animation pre
comps in the timeline, and then duplicate it in
the project panel to change the text without affecting
the previous one. I'll speed up this process, and you can follow along. And to finish, of course, we'll replace between the two. Let's see how that looks. Alright, and with that, we
have finished this lesson. Now we're ready to move on
to the next one where we'll start creating the most
complex scene in this project. It's going to be
super interesting, so I'll see you in the next one.
20. Creating the Complex Demo Flow Animation: I'm back. In this lesson, we will start working
on the most complex demo flow animation we
have in the project. We will need to present the
main messages screen morphing into the private
conversation section. I will teach you one of
the best methods to deal with these kinds of
situations where we have a lot of layers that
need to be morphing into other layers. So let's begin. First thing first,
as we usually do, we need to start by
checking what will be the duration of the scene. In this case, the scene
starts at second 44, and it ends at second 50. That means that
in total, we have approximately 6 seconds to animate the entire
demo flow animation. With that in mind, let's go back to the master
comp and close all the relevant
precomps we have in the composition panel. Great. And now, the first
thing we need to do before animating
the scene is to deeply understand
what we need to do in the demo flow animation. That means we need
to ask ourselves a few important questions. Like what layers
in each UI screen should appear or disappear? What layers can be morphed and what layers should
get out of the frame, what layers need to be presented on both of the
screens and whatnot. To answer all these questions, it's better to open up both of the UI screens and
start investigating. In our case, most
of the action will be in the main section
of the messages screen. We need to morph the chat boxes in the list to be presented in their second design form as shown in the second
messages scene. We can also see
that the left menu and the header don't change. We should keep that in mind. Our main focus will be
here in the main section. So now, once we understand what we need
to do more or less, we can start by creating a
new composition that we can call scene seven and start preparing it
for the animation. Inside that comp, we will try to combine both of the UI screens that we need to create
the demo flow animation, which are messages and
messages to precomps. Let's start by
creating a new comp. Before moving on, let's quickly drag the new comp
out of this folder. And now let's bring the first UI screen into the timeline. Great. With that done, I want to teach you
the main process of thinking when you need to create a transition
for a bunch of layers in between two scenes. Let's enter the precomp
and start working, and I'll explain it to
you slowly step by step. The first thing you need to check is whether
this scene will be animated in a three
D space or not, because if it is, it's
better to convert all the layers to three D
layers now before moving on. In our case, we won't animate
it in a three D space, so let's keep them
as two D layers. After that, we can move
on to the next step, which is precomposing
the layers. Since we've got a huge
amount of layers here, we need to think about
what layers we can precompose together to
have a cleaner timeline. Our case, as we
already saw earlier, we know that the left menu in the header won't change
for both of the screens. That means we can select them in the first message is pre comp and precompose them together. Here are the layers we
can precompose first. But before that,
let's not forget to collapse all the
layers at this point, so we don't need to do it later after we have them in
separate precomps, it will take more
time, so we can save time by collapsing
all the layers now. All right. So now let's select the layers we
can precompose already, including the main gray
box of this UI screen. We can call it screen
six panel one. Let's find the newly created
precomp in the project panel and make sure it's outside
and not inside some folder. We want to reach it
quickly for now. Alright. And now let's collapse the precomp in the timeline and bring it below
all the layers. Now we can lock it and before moving on,
save the project. Awesome. And now let's
see if we need to precompose another stack
of layers together or not. For this, we can find the Illustrator file of
the next UI screen from the assets folder of
this UI screen and double click on it to open it in the secondary preview panel. This way, we can
now check both of the screens and start thinking and planning the
demo flow animation. As you can understand, the
demo flow animation in this scene needs to show the click animation
on one of the chats, and then right after
it, we need to present the conversation
panel that will show the chat of this contact. But now you're probably thinking how we will create
this transition. Have so many layers
inside both of the comps. From what do we
even need to start? To answer all these doubts, you need to start thinking in
a very simplified mindset. You need to split all
the design assets here into different
animation parts, similar to what we already
did in the course. In this case, since we
have a lot of layers, let's start thinking of what the separation
can look like. For example, I will first focus on the first
messages screen and find one design asset that needs to be changed
for the second screen. In this case, let's start
with the star icons. This can be the animation part that we will
deal with first. At this point, we don't
need to worry about the timing and duration
of each animation part. We also don't need to
worry about making sure it will sync
with the voiceover. For now, we are just focusing on creating the demo
flow animation. It means we now need to
create an outtro and an intro animation
for all of the layers we have on both UI screens
we are dealing with. All right. So now I'm just
looking at the first and the second screen to understand what transition animation I can do for this animation part. In the first screen, they appear on the left
side of the box, and in the second screen, they
appear on the right side. So to make my life easier, I can create a simple
outtro animation, using the scale property to make the stars in the first
screen disappear, and I can create an
intro for the stars in the second screen using
the scale property as well. So for now, don't worry
about anything else. Let's focus on this part alone. So let's close the second
preview and start by selecting all the star icon layers we
have in the scene. Great. And now, so they're all placed in the same area
in the layer stack. Let's move one of them
up in the layers panel. Once done, we can now tag
them in a different color. Great. And now we can
zoom in on the timeline and start creating
the outtro animation from the beginning
of the timeline. Let's open the
scale property and decide that the animation
will last 1 second. Later we can adjust all the animation parts we
create to fit the voice over. For now, let's focus on creating those animation parts for
the demo flow animation. Okay. And now, to make this animation a
bit more interesting, let's set the stars
to be a bit bigger in the middle of the animation
to get that bouncy motion. Great. So now, once we're done creating the
outtro for the stars, let's select them all and bring them above all the layers. We will place each
animation part above the previous one to get a
clean and organized timeline. Soon, you'll see what I mean. Awesome. Now we can check
the animation one more time. I think we should scale them more in the middle
of the animation. They're super small,
so I want the viewer to notice them before
they disappear. I think we can set
the scale to 200. Yes, that looks better. Awesome. So now we finished with the
first animation part, and we are ready to decide
what should be our next one. For this, you can
always go back to see the second UI screen and
understand better what to do. We can maybe deal
with the text here, or we can decide to deal with all the icons here
on the right side. In any case, to make it
easier to select the layers, let's select the white box
of this section and lock it. Now let's go and select all
the icons on the right side. As you can see, we also selected the small white
boxes of each chat. So let's hold Shift
and unselect them. Great. And now let's bring all the selected layers above all the layers
in the Layers panel. Next, let's tag them
in a different color. Alright. And now let's make sure no layer is selected and hit to close all the
previous layers. With that done, let's create
an Otro animation for all the icons we
just tagged from the second one right after
the Otro of the stars. Let's use the scale property
this time, as well. Alright. I think it looks okay, and we can move on
to the next part. Let's now deal with
the text in the scene. As you can see, the name of
the contact is not changing. It's just changing
position slightly. But the other text
layers we have here are changing completely. With that in mind, let's create an outtro animation for all the text layers,
except the names. We will deal with those later. It's better to finish with the simplest animation
parts and after that, start thinking about
the more complex ones. All right. With that said, let's go back to the project
and select all this area. Now, let's unselect
the white boxes. Great. Next, let's bring all
the layers up in the layers, panel and tag them in
a different color. And now let's create
an Otro animation for the All from second three
right after the icons Outro. This time, let's use opacity to create a fade out
animation for the Outro. Awesome. And now let's
close all the layers, save the project, and move on
to the next animation part. To keep the timeline organized, let's start the next
animation part at second three right after
the fading text animation. And this time, let's
focus on creating the morphing animation
for the chat boxes. We need to make them
all look like they do in the next UI screen. Let me show you
the best approach to deal with these kinds of
situations where you want to create a morph animation
for the UI panels instead of just creating outtro
and intro animations using scale or opacity. All right. So the first
thing we can do is create a new shape layer
that we will use instead of the box's
Illustrator layers. It's better because we
will have a lot of freedom to change the form
of this shape later. So let's make sure no
layer is selected. Zoom in a little
bit, then select the rectangle tool and create a new shape exactly the
size of the white box. Let's now open up
the shape properties and uncheck constrained
proportions, so we can adjust the width
and height separately. Great. And now let's round the corners so it matches the
original design. Awesome. Next, let's add a thin gray stroke
to this shape. To get the exact
color, we can check it in the original
design in Illustrator. So let's find this UI
screen. Here it is. We can use the direct
selection tool to select the relevant shape. Now, we can copy the
stroke color code. Back in After
Effects, let's paste this code into the stroke
color of our shape. Finally, let's adjust
the stroke width. I think setting it to
two looks perfect. Great. With that done, let's now cut this layer from this precomp and paste it into the first
messages UI screen. Now we need to
start animating it. For convenience, let's
lower the opacity so we can see where it
should be placed throughout the animation. Let's place it here for now. Now let's move the playhead to second four because
we'll soon create a keyframe there for the shape to look as it does right now. At second three, it should look like it does
in this UI screen. Longer and thinner. Awesome. Now we can start creating
the morphing animation. We can either animate the size property or convert
the shape to a bezier path, which will give us more
freedom to change its form. But before we do that,
let's first make the shape look exactly
like it should in the current UI screen before it morphs into its form
in the next screen. So let's place this
layer exactly in the middle of the long
white box we have here. To make sure it's
perfectly aligned, let's open the rulers, select the long
shape, and create a new guide at its
anchor point position. This way, we know exactly where our new shape
should be placed. E. Once that's done, we can remove the guide
and close the rulers. All right. So now let's use the size property
for the morph animation. First, create a keyframe with the current values because
at this point in time, the shape should look
just as it does now. Then let's go back to second
three and adjust the size of the shape to fit
the dimensions of the long box we have
in this UI screen. With that done, we can now
bring the opacity back to 100% and move on with adjusting the
morphing animation. Next, we need to tweak its position for the moment
when the shape changes form into how it should
look in the next UI screen. To see where exactly
it needs to be placed, let's use the
Illustrator layer of the second message's UI
screen as a reference. So let's bring that
into the timeline and lower its opacity to compare how the next screen should look against
the current one. As you can see,
the second screen is a bit taller
than the first one. Let's not worry
about that for now and focus only on positioning
the shape correctly. To avoid confusion
with all the layers, let's bring the opacity of the next screen
reference layer back to 100% and create guides that match the placement
of the chat boxes. This way, we won't
need to toggle the reference layer on and off to check if
everything is aligned. Once that's done, we can delete the reference layer and lock the guides so they don't
interfere with our workflow. Great. Now let's turn off
all the layers that are not relevant to
this animation part so we can focus on the
boxes more clearly. I want you to understand
that we are not going to animate the
original box layers. Instead, we'll duplicate
the shape we created, but we'll still keep
the box layers in the scene as reference points. So for now, let's select them all and place them
together in one area. Next, we can tag them
in a different color. For now, let's turn
off all the boxes, except the first one
in the scene so we can focus on its
morphing animation. Before that, let's organize the assets inside
the contact boxes. We can tag them in a
different color as well. Wait, I noticed that
there's a layer sitting in between
here in the stack. Let's isolate it
to see what it is. I see it's a star icon from
the first animation part. For some reason, we forgot to move it with
the rest of the stars. To fix this, let's select
all the assets inside the contact boxes and move
them below the star layer. Good. Now we can turn them off and continue working
on the boxes animation. First, let's go to
the point in time where our shape has
already changed its form. Here we'll use the position property to adjust
its placement. Let's create the first
position keyframes now. Then let's move it
to second three because at the start of
the morphing animation, the shape should be here. At second four, we
need to move it into the area we marked
earlier with guides. Alright, that looks
good for now. Before moving on,
let's also place the wide box layer with the rest and tag it
with the same color. Now, let's turn off all layers except the shape we created. Now, let's duplicate this shape. To know where to place it, we'll turn back on all the long box layers tagged in purple. Let's lower their opacity to about 30% and then lock them, so they serve as a reference. Now, let's go back to
our new duplicate shape. Stand at the first
position keyframes, select the property
so both keyframes are active and adjust
the shapes location to match the reference box. Perfect. Now, let's move to the second keyframes
and adjust it again to match the guides
for the next screen. Awesome. Now we have the morphing animation
for the first two boxes. Let's repeat this process
for the rest of the boxes. Duplicate the layer, stand at the keyframes, adjust
both positions. Then tweak the final one. Once again, duplicate the
layer, stand at the keyframes. Adjust both positions. Then tweak the final one. Let's repeat this process
for the rest of the boxes. Now, as you can
see, at some point, we no longer have a guide that indicates another box
should be placed. That's because in
the next UI screen, there are only six chat boxes, not nine, like in the first one. So for these extra boxes, let's move them down
out of the frame. We can stack them neatly
above one another. O. Awesome. With that,
we've finished preparing the first part of the chatbox
morphing animation. Now, let's select all
the long box layers we used as references. Instead of deleting them, let's just turn them off and activate the shi function so they don't clutter
the timeline. Perfect. Now, we can turn all the layers back on and
disable the guides we created. Let's also move all the
new box layers below the rest of the elements
to keep things organized. Great. Now let's move on to the next animation part
related to the chat boxes. First, open the second
message Illustrator layer so we can understand which
layers to animate next. At this point, we can start dealing with the Avatar icons. Great. Now, close
the preview and select all the Avatar
icon layers in the scene. Now move them together in the layers panel and tag
them with a new color. Let's decide that these avatar
animations should start at the same time as the box morphing animation
at second three. Move the playhead
to second three, press P, and create a keyframe for all the
avatar layers position. Then move forward 1 second
and adjust their positions. To know exactly where
they should go, we'll use the Illustrator layer of the next screen
as a reference. Let's bring it in and
lower its opacity. Now, let's lock the
reference layer and select all the Avatar icons. Next, move them into
their correct positions. Now, hold Control
or Command on Mac and click on this
layer to unselect it, then bring the
rest of the layers down to match the design. Repeat this process for the rest of the
chat box sections. Don't feel overwhelmed
by this process. In real projects, you usually won't deal with this many
layers and sections. I'm using this
complex setup here in the course so you can
practice as much as possible. What's most important is
that you learn how to approach complex
scenes step by step, splitting the scene into animation parts and focusing
on each part one at a time. Give you a solid
starting point when working on complex
demo flow animations. All right. Now, for
these last three layers, let's place them according
to their relevant box. Perfect. With that done, we can move on to
animating the name layers. As usual, let's select all the name layers and tag
them with a different color. Now, zoom in a bit, move the time indicator
to second three, the point where this
animation part should start and create a position
keyframe for all of them. Move 1 second forward and adjust their
position one by one, just like we did with
the Avatar icons. Great. Now, that's done. Let's deal with the rest of the design objects in this section. Let's start with
this purple button. At second three, we'll animate
its position from where it is now to where it needs to be in the second
messages screen. Tag it in a different
color for clarity. Open the position property, create a keyframe
at second three, then move 1 second forward
and bring it down a bit. Perfect. Next, let's handle
this other design object. It's already present
in the first screen, so all we need to do is
animate its position as well. Tag it in red to stay organized. Again, create a position
keyframes at second three, then move forward and adjust
its placement. All right. So now we've finished adjusting all the design
objects that remain consistent between the
first and second screens. Next, we'll deal with
the new design objects that only appear in
the second screen. Example, we need to add the text messages inside each chat box. I've already prepared a
few text lines we can use. Before moving on,
let's lock and isolate the reference layer so we know exactly where
to place the text. Now let's create the
first text message. Go to the assets folder you
downloaded from me and open the PDF file called
Random Messages two. Copy the First
message. All right. Back in After Effects,
paste it here. But instead of keeping it
as a single text line, let's delete that layer
and create a text box. This way, adjusting multi line messages
will be much easier. Great. Now, open
the text properties and adjust the font settings. First, reset the leading. For font size,
let's set it to 14. Next, move it into place. Now, before animating it, let's duplicate this
text box for the rest of the chat box sections so we can easily replace
the text later. Now replace each duplicated text with the messages
from the PDF file. By the way, I generated all
these messages with Chat GPT. I explained that I'm working on a SAS explainer video
for a CRM company, and it created random chat
messages for us to use in this demo. Cool. All right. With that done, let's save the project
before moving on. Now, move the playhead to second four and align all text
layers to start from here. For the intro animation, let's use the opacity
property to create a simple fade in effect
for all of them. All right. And now
let's change the color of all the text layers to black. Great. And now let's bring back all the layers to be
visible and move on. I see that the position
of my text layers is not aligned with the name, so I'll select them all and move them to the
right a little bit. Okay, that looks better. Let's now open the design of the second message design
and see what we can do next. I just noticed that
the text color is actually not black.
It's a dark gray. Let's quickly adjust it. Select all text layers. Then with the
eyedropper tool sample, the dark gray color from the
Avatar icons in the design. Yes, that matches the
original style perfectly. Now, let's preview it with
the rest of the animation. A quick reminder. You don't need to worry too much
about timing yet. For now, we're just finishing
the initial animation. Later, we'll refine
the timing to match the overall scene
duration and voiceover. Now let's move on to the
next design objects. To see what comes next, turn the reference
layer back on and check the right hand
area of the chat boxes. Here we can start animating the star icons with a
nice intro animation. So with that said, let's turn
off the reference layer, then go to the main pre comp of the second messages UI screen and copy all the star
icons we have there. Now, head back to the first
messages screen where our demo flow animation is
happening and paste them here. Make sure to paste
the layers above all the other layers
in this timeline. Next, tag them in a different
color for organization. Let's bring them to start
at second five and use the scale property to create a nice popping intro
animation for the stars. Great. Now, at second six, let's animate the
next design object. The time icons, select them all, copy them, and paste
them into our scene. Set their starting
point at second six. This time, let's use opacity for a smooth fade in animation. Don't forget to tag
these layers with a different color then save
the project before moving on. After checking the playback, I think it looks
better if the time icons appear together
with the star icons. So let's move them
back to second five. Awesome. Now, let's return to the second messages
screen and see what's next. After finishing the
demo flow animation for the left menu in the
contacts chat sections, we can now deal with
the main chat section. Let's begin with some
simple design objects. Select these four
layers, copy them, and paste them into our scene,
starting at second five. Tag them in a new color. For their intro animation, let's use the scale property. To add variety for
the text layer, we'll instead use a fade
in animation with opacity. Perfect. Now let's scale
up the other three layers. Once that's done, let's move on. Back in the second screen,
copy the next three layers, start them at second
five as well. For these two layers, let's animate with
opacity fade in. And for the third, use
a scale up animation. Notice how I'm not copying everything at once from
the second screen. Instead, I'm dealing with
each section one by one. This is the best approach for complex demo flow animations. It keeps everything
structured and manageable. Now that we've finished
the easiest parts, let's move on to
the final section. The conversation area. We'll
split it into two parts, the upper message bubbles and the last two message bubbles. The last two require a
slightly more complex intro since I planned a custom
conversation there. For now, select all the
layers of the upper bubbles, copy them, and paste them in the main timeline at second six. Great. Now, tag them in green. Next, go back to the
second screen and copy the layers for the
last two message bubbles. Paste them into the timeline, also starting at second six. Zoom in and check the
layer order carefully. It's important that
everything is stacked correctly, adjust as needed. Great. Now, for their intro, let's animate them sliding in from the bottom of the frame. But first, make sure to parent all the bubble elements to
their avatar icon layer. Perfect. Now, do the same
for the second bubble. Great. Now, tag each part in a different color
to stay organized. Now, since we want
the scene to look like the final UI
state after the intro, let's stand at second seven and create position
keyframes for the two Avatar icons in all their related
message bubble layers. Then go back to second six
and drag all of these layers downward so they animate
in from outside the frame. We'll leave it
like this for now. Meanwhile, let's also prepare the final animation
part of the scene, the search box layers
at the bottom, copy them, paste them
into the timeline, and start them at second seven. For their intro, we'll
use the same technique, sliding them in from the
bottom of the frame. Perfect. At this point, we've built the
initial animation for all the UI sections. Now, let's check everything
against the reference. Great. Now, cut the reference
layer from its place, paste it above all the
layers for easy access, tag it in a different
color, and turn it on. As you can see, we need
to adjust the size of the main UI screen to perfectly match the
original design. To do that, let's open the
rulers and create guidelines. First, one to indicate
the overall screen size. And then two more
to mark the top and bottom of the main
conversation section. Close the rulers. And now let's start adjusting
the most important part, the conversation section itself. First things first, let's locate the layer of
the white box in this section inside the
layers panel. Here it is. Now, the best way to
adjust its size is to convert this
Illustrator layer to a shape with a busier path. This will allow us to animate the path of the shape directly. Once that's done,
we can turn off the original layer and shy it so it won't clutter
the layers panel. Let's also tag the new shape in a different
color for clarity. Before animating, let's
open the shape layer and check if there are any
unnecessary properties inside. I can see a few
irrelevant paths here. So first, let's
delete this group, then also delete the
merge paths property. Great. Now open the path and create a keyframes at the
beginning of the timeline. Later we'll time this animation properly with the
rest of the scene. For now, let's move 1 second forward and select the
bottom part of the path. Then drag it down to alge with the guideline
we created earlier. Perfect. Now, let's do the same for the upper
part of the path. With that done, we now need to adjust the size of
the main UI screen. To save some time, instead
of resizing everything, we'll decide to keep only the main conversation
section visible. The rest of the UI
sections can fade out. This not only saves
us time but also draws the viewers attention to the most important
part of the scene. You'll see what I
mean in a moment. So let's go to the start
of the timeline and create a simple
fade out animation for the panel one pre comp. Now, that's complete. Let's turn the reference layer back on to check if we
missed anything. I noticed we still have one
more step before moving on, creating a color
change animation for the stroke of the chat box. Let's turn off the
reference layer again and for convenience, also
turn off the guides. Now, hover over the shape
layers in the timeline. Watch the preview
panel carefully. When you hover over
a shape layer, you'll see its layer
guides appear in blue. By the way, they're blue because this layer is tagged in blue. Here's the correct shape layer. Let's select it and press
U to reveal the keyframes. Stand at the beginning
of the animation, open the stroke properties
from the layers menu, and create a keyframes
for the stroke color. At this point, leave
the color as it is. Now press you again, so we
only see the keyframes. Move to second four and change the stroke
color to purple. We can sample the
purple directly from the button icon to keep
consistency with the design. Perfect. With that done? Let's save the project. That wraps up this lesson. In the next one, we'll continue working on this complex
demo flow animation. It's going to get even
more interesting. So see you in the next lesson.
21. Timing Adjustments and Click Interaction Animation: Come back. We will start this lesson by adjusting the
timing of the animation. And since we will create
an intro animation for the scene before the demo
flow animation begins, we can move all the animated
layers 2 seconds forward. That way we will have some time for the intro animation for the scene. All right. And now let's select
all the layers of the first UI screen
and extend them so we can see them at the
beginning of the timeline. Great. Now, let's open this pre comp keyframes and move them to start
from second two, as well. Since from this point in time, the click animation
needs to happen, and we will transition to
the next UI screen. Okay. And now let's create
that click animation. As you may remember,
we need to do it for this contact chat box. And now to create
the click animation. Let's create a new null
object in the scene. Make sure it's above
this shape layer. Let's copy the name of this
shape layer and paste it to the null so we
know what shape layer it is going to be
responsible for. We can tag the null in blue. So we know it belongs to this
animation part. All right. And now let's make sure
the anchor point of the null is placed in the
center of this avatar icon. And after that, let's
parent the relevant shape layer to the null. Now, we will create
a click animation by animating the
scale of the null. At this point in time, the click animation
should already end. So let's create the
first keyframe here. Now let's move ten frames backward and create a
keyframe here as well. Finally, let's
stand in the middle of the animation and
scale down the null. I think we can set
it to 70, right? And now, as you can see, we also need the rest of the design objects of this chat box to
scale down, as well. Therefore, let's select all
the relevant layers and decide to parent them whether to the null or to
the shape layer. Let's go with the shape layer. Let's check that out.
I noticed that I missed parenting
the avatar icon. So let's find it real quick and parent it to the
shape layer as well. All right. So with that, we finished creating
the click animation, and we can now trim the null so it will
fit the animation. We don't need this layer to be at the end
of the timeline. Awesome. And with that done, we can now move on
to the next step, which is adjusting the motion. That is, we will easy
ease all the keyframes we created so far and try to make the motion look
a bit more interesting. First, let's scale
the timeline panel so we can see as many
layers as we can. Now let's start with adjusting
the click animation. First, let's easy ease the
keyframes and then let's make the motion start quickly at the beginning and slow
down toward the end. I think we can make this type of motion for the rest
of the animation. In my opinion, it
looks good. All right. Once that's done, let's make sure no layer is
selected and press T to open the opacity keyframes
we created in the scene, we will adjust each
property at a time. For now, let's deal with
all the opacity keyframes. So make sure you
select them all, and then let's
easy ease them and make the motion as for
the click animation. Awesome. That looks good. Now, let's press U to close
all the layers and then press S to deal with
the scale keyframes. Let's make sure we select all the keyframes we
have in the timeline. Now let's ease them and adjust the motion in the graph editor. Work. While watching the animation, I noticed that one of
the star icon layers is tagged in the wrong color. So I'll make sure
to find this layer and I'll tag it in
the right color. This one needs to be
tagged in pink. All right. With that done, let's now close all the layers and open up
the position keyframes. Let's select all the
position keyframes we have here and
adjust the motion. Awesome. Now, once we finish
adjusting all the keyframes, let's close all the
layers and then press you to see all the keyframes for all the properties
we animated, just in case we missed adjusting some property in the process. It's always a good idea to double check yourself before you move on to the next step. As you can see, we have
the size animation that we created for the
shape layers down here. So let's adjust these
keyframes, as well. To see just the size keyframes, we can select only
the shape layers and then type size in the search
bar in the Layers panel. Great. So now let's select all the path keyframes and adjust the motion as for
the rest of the scene. Since we uncheck the constrained proportion for the size values, we need to adjust the two
values one by one. Great. Next, we can adjust
the color keyframes. But before that, I just
noticed that I missed adjusting the size keyframes of this layer. So let
me do it real quick. Okay, so now let's adjust the color keyframes.
Awesome with that done. We can now save the project, and we can also close the search bar before
moving on to the next step. Let's take a look at
all the keyframes one last time to see
if we miss something. I see that I missed the path keyframes
of this shape layer. If you did that as
well, let's adjust the animation here quickly. It's important for me
to show you when you have a lot of layers
and keyframes, it's a good idea
to check yourself a few times before moving on. Alright, so now we completely finished
adjusting all the keyframes, and we are now ready to see how everything
looks together. So let's adjust the
layer panel size and see all the animation we created from the
beginning of this scene. I noticed that the avatar icon of the second chat box
is moving very weird. So let's focus on that part and try to fix this
small problem. First things first,
let's zoom in and try to understand when
exactly the problem starts. This is happening in the
click animation part. So let's find where our click animation
is in the timeline. In our case, what triggers the click animation is the null. That means that the avatar icon is probably not
parented to the null. Maybe it's parented
to another layer. I think we parented it to the white shape
layer, in this case. It's very important to stand
at the point in time before the click animation is
happening and only then find the avatar icon layer
and parent it to the null. Let's see what we've got.
Okay, that looks good. Let's now also parent the
rest of the design objects related to the chat box to the null instead of
to the shape layer. Awesome. So now,
everything looks perfect, and we can save the
project before moving on. In the next step, it
will be a good idea to start working on the timing of the morphing
animation that is happening in this
demo flow animation. We can turn off
this pre comp for now to focus on the
demo flow animation. For now, we've been focusing on creating the initial animation. Then we improve the motion, and now we can adjust the
timing of the layers. Some of the sections can start earlier and some of
them a bit later. To understand what
to do, I usually go back and forward in
the timeline to see what animation parts in the demo flow can be adjusted
to improve the transition. For example, I think
the text layers can disappear a bit
earlier in the timeline. We can start the
fade out animation from the point in time where the rest of the icons
start shrinking down. So let's do it right now. For this, we first need to open all the keyframes
of all the layers. Now, let's find a point in time where the text
animation should end. I think it can end
right before the shape layers morphing animation
or maybe even earlier. For now, let's stand here
and find the text layers. Here they are. It's
all the layers with the opacity animation. So let's select all the opacity keyframes on these layers and move them earlier
in the timeline. We can move them all to start from the
point in time where the icon's Otro animation
starts here at second three. Great. And now let's check this animation and see
what we can adjust next. From what I feel, I think
we can start the outtro of the icons in the
text even earlier. Let's start this
entire animation part from second two and 15 frames, which is in the middle of the Otro animation of the stars. So select all these
keyframes and move them to start from second
two and 15 frames. Let's see how that looks. I think it looks much better. With that done, let's continue
checking the animation and see what animation part
we can adjust next. In this case, I
think we can start the morphing animation of the shapes right
after the Otro of the icons and the
text animation part, which is at second
three and 15 frames. So now let's select all the keyframes for
the next animation part, which is the avatar
icons, the names, and the shape keyframes
and move them to second three and 15 frames.
Let's see how that looks. Great. In my opinion,
it looks nice. Now, let's find the
point in time where we can start the intro animation of the layers of the
second UI screen. In this case, we can start
it from second four, which is in the middle of
the morphing animation. So let's stand here
and then scroll up in the timeline and select all the layers of the
second UI screen. Finally, let's bring them
to start from second four. Let's now see how that looks. Awesome. We can now move on to adjust the next
animation part. This time, we can focus on all the layers
that need to enter the scene after the text layers
of the second UI screen. I think we can stand in the
middle of the text animation, which is from second
four and 15 frames. So let's select all
of these layers and bring them to
start from here. Let's now see how that looks. Looks nice. Let's now move on to check the
next animation part. This time, let's focus on the main conversation
section layers. In my opinion, they all need
to start earlier as well. I think we can start
this animation part from second four and
15 frames as well. Okay, I think it looks better. Let's now bring the
last animation part to start from second four and
15 frames as well for now. Let's check this part a few
times to see how that feels. In my opinion, we can start
the last animation part of the entire conversation section together with the text
layers from second four. So let's select all the
second UI screen layers except for the text layers and then bring them
all to second four. I'm showing you this process
so you understand that we never know for sure
the perfect timing. We should always check the
animation and see if there is a good flow in the motion. In this case, I'm happy
with the results. So let's now move on to make this animation look a
little bit more interesting, and we can do that by creating a slight delay for the layers
of the last animation part. That is the
conversation section. I would love to see
how it will look if we start the intro from the
first bubble to the last one, one after the other. So
let's do it right now. First, to have an
organized timeline, I will change the order of
the chat bubble layers. We don't have to do that, but I prefer to have the layers
organized in this way. So the upper message bubble will be below in the layers panel. The second chat bubble will
be above it and so on. All right. So once I have
all the layers organized, I can select all of
them except this one, since it will enter
the scene first, then start creating an
offset of one frame. Don't forget that
these four layers belong to one message bubble, so make sure to move
them as one unit. The same for the
last message bubble. Let's leave the last
animation part here for now. I first want to see
how that looks. Let's see it a few times
to see how that feels. I think the offset is great, but I noticed that
the main white box of this section is
growing too late. That means we missed
adjusting its timing. So let's do that real quick. First, we need to find
that layer. Here it is. Now, we need to start the path animation from
the point in time where the chat boxes start morphing to fit the design of the
second UI screen. In our case, it's from
second three and 15 frames. Let's see
how that looks. Great. And now we can go back to the last animation
part where we see the intro of the
search box layers and create a nice
offset there as well. To begin, we can select
all the layers related to this animation part
and open their keyframes. Once that's done,
let's now decide which layers should
enter the scene first. I want these two
layers to start first, so I'll bring them here
in the layer stack. For the button, I want
it to enter last. So I'll bring it here
above all the layers. Next, for the inks icon, I think it should enter the
scene before the Smiley icon. Alright. So now let's
start creating the offset. I want these two to
enter at the same time. Then I want the
Link icon to enter the scene followed by the rest.
Let's see what we've got. H I think we can start this animation part A bit after the
message bubbles part. Let's start this
animation part from second four and 15 frames. Great. So now let's start working on the
next animation part, which is the chatting animation
I plan to create here. And then we will work
on the outtro of this entire scene that should happen after a click
animation on the Send button. And instead of
animating this layer, we can use the
button pre comp we created earlier in which we already have the click
animation ready. So first, let's find the
relevant precomp. Here it is. Inside the precomps folder. In case you want to
find it quickly, you can use the search
bar to find it. That's one of the benefits
of labeling your precomps. All right. So now, once we found the precomp, we need to duplicate it
from the project panel. Now we need to adjust the name according to the number of
the scene we are working on. In this case, it is scene seven. Great. And now select the button layer from
the timeline and drag the new precomp on it while holding Alt or Option
to replace it. With that done, let's now adjust the scale of the precomp
to fit the design. Let's set the scale to 30. Now, let's collapse
the precomp and find the right point in time where we want the
click animation to happen. Since we need to create
the chatting animation before the click animation, we should leave ourselves a few free seconds for
it, and for now, start the click animation
from, let's say, second eight. So let's enter the
button precomp and move the keyframes
to this point in time. Awesome. And now let's change the text here to send
before moving on. Once done, let's go back to
the screen scene and save the project to secure all
the processes done so far. Great. And now let's
start working on the chatting animation that can start from second
seven for now. First, we need to add a
typing text animation here. For this, we can use the typing text animation we created at the beginning
of the project. Here it is. Let's
copy this text layer. Now let's go back to the scene and paste it above
all the layers. Let's now use the
left bracket key to bring this layer to the
time indicator position. All right? We can also open the keyframes and delete the
position keyframes on it. Great. Next, let's stand at the point in time where
the animation is finished and adjust the position and the location of this text layer. Okay. That looks good enough. Now, let's stand
at the beginning of this animation and crop the type your chat layer to
this point in time. Awesome. So now we've got a nice intro for the typing
message animation. Once that's done,
we can now adjust the message according to what we want the conversation
to be about. In this case. Since
the previous message was asking for a UI design, let's make our message say, I will send you a link
with a good reference. Later, we will also
change the text inside the two last message bubbles to fit the topic of
the conversation. So now this message
will be sent, and then we need to have a
few frames for the cursor to fly to the button location
and then click on it. We can start the click
animation from here. Let's enter the button, pre comp and adjust the
keyframes timing. Awesome. So now at the point in time where the
click animation will start, the text can disappear
and then reappear inside a bubble in the
conversation section above. That means that from
this point in time, we need to create a
green message bubble with the last message
we just created. For this, first thing, first, let's select all the
layers related to the last green message bubble
and then duplicate them. Let's place the new layers here above so we have
them in one stack. Next, let's precompose
these layers. We can call this screen
five bubble one. Awesome. Now, let's
place this precomp below the button and enter it to
adjust the text inside. First, let's delete
all the keyframes we have on all the layers here. Now, press S on the last layer
and scale it a little bit. The layers are too small
for me to work with. We can set the scale to 300. After that, let's open the safe action grid and position the layers in
the center of the frame. Great. Now we need
this bubble to show the text we created
a typing animation for in the screen scene. So let's go back
and double click the text layer we have
here to copy the text. Back to the precomp.
Let's create a new text layer
and paste the text. Now let's scale the font to, let's say, 42 and create
the message bubble for it. I don't want you to
follow along with me for now because I have
two ways to do it. I will show you the first way, but we will use the second way. So when we start the second way, I'll let you know when
to get back to action. For now, I just want you
to see how you can create a customized message bubble using the two D textbox we
already used in the course. To start, I'll add
the text box to the scene and make sure it affects the text
layer I have here. Next, I'll adjust
the colors and place it below the text layer
so we can see the text. Up until now, these are
things we already did. But now I want to show
you what properties you need to adjust
in order to get that unusual shape we have
in the original design. Pay attention to the corners of the green message bubble
in the original design. They are not all
equally rounded. So in case in your
future projects, you need to create
a unique shape. You can open the rounded corners menu and play around with the properties inside the
enable per corner menu. As you can see, I'm trying
to check and uncheck the different checkboxes here until I get the right
setup combination. In this case, unchecking only
the rounded lower right. Was the correct setup.
Then all I need to do is decide what should
be the roundness amount. All right, so now I'll delete
the textbox I created, and we will do it together
using the second method, which is simpler to create,
but less automated. In this case, I'm good with it. I will use the
original layer and convert it to a shape
with a Bezier path. We can now shy the
original layer. Alright. And now let's open the new shape layer and delete the irrelevant
properties inside, like the group we have
here and the merge paths. Once done, let's place the
text in the right position. And then using the Pen tool, select one of the
points of the path. Now we can switch back
to the selection tool and select all the
points on the left side. Then let's drag
them until we get the path to fit the
length of the text. We can delete this layer
showing the original text. Alright. And now let's select
all the layers we have here and place them in
the center of the frame. That looks nice, but I
think we can now open the composition
settings and adjust the size of the comp to fit
the message bubble size. Let's set the height to 300, and then the width
to, let's say, 1,000. With that done, let's now go
back to the screen comp and create an intro animation for the new message
bubble precomp. First, let's bring this pre comp to start from second eight. Now let's adjust the size of the pre comp to fit
the overall design. All right. That
looks good enough. The intro animation of this message bubble will
start from second eight. We can bring this precomp
above all the layers. And now before starting to create the intro for
this message bubble, let's replace this
message bubble with a new one that has a
different message inside. We need the conversation to
look a bit more realistic. To do it, let's first find our newly created
message bubble in the project panel and then
duplicate it from here. But before that, we can drag this precomp out from
the screens folder. It doesn't need to
be here. All right. And now let's
duplicate the precomp. Now we can copy the
last message layers for reference and then enter
the new message bubble, pre comp, and paste them here. Let's first delete the
animation we have on them, then place them beside our
message bubble design. And now we need to
adjust the design of it to look as in the reference. First, we can flip the
message bubble horizontally. Then let's move it to the left. Now, let's move the avatar
icon to the left side as well. But before that, let's
unparent the layers, parented to it so we can move it without moving
the rest of the layers. W all right. Once that's done, let's adjust the
color of the bubble. We can sample the color
from the reference layer. Great. Now we can delete
all the reference layers. We can now bring the
time to the left side. Finally, let's move all the layers to the
center of the frame. Awesome. So now we can center the anchor point
of the message bubble, and then let's change the text
we have here. Let's write. I don't have any
ideas. Now, let's adjust the path of the shape so the bubble will
fit the text length. Okay, let's move the layers
to the center one last time. Great. So now let's go
back to the screen precomp and replace the
message bubble we have here with the new
one we created. And since we want to save the intro animation of
this message bubble, we can replace the
Avatar icon layer since it has the position
animation on it, and the rest of the layers
are parented to it. So now drag the new
message bubble precomp on it while holding Alt
or Option on Mac. Now let's adjust the size. And after that, let's
adjust its position. First thing first,
let's open the position keyframes
on this layer. Now we must stay on
one of the keyframes, then select all the
position keyframes and only then adjust
the position. I think the position looks good, but we can
turn off the time. We will create an
intro animation for it maybe in the future. For now, let's stick to the
original design. All right. So now, with that done, we have finished preparing all the setup for the
conversation animation section, and now we are ready
to animate it. As you may understand,
our new green message needs to enter the
section from the bottom, which means all the message
bubbles need to go up. This will be our first
thing to deal with. So for now, let's bring the last message bubble forward
in the timeline. Soon, we will find the
perfect timing for it. For now, let's focus on
moving all the messages up, and we can do it
using a null object. First, let's create a new
null object in the scene. We can change the
name to null bubbles. Next, let's tag it in green. And now let's place it in a convenient order for
us in the layer stack. What I mean by that
is we should place it above all the layers that
will be parented to it. We don't need to parent the last green message bubble to it. But we do need to parent the last gray message
bubble to the null. Therefore, let's
find the precomp of this message bubble and
place the null above it. We can change the color of
this precomp to C foam. Now, let's place the null somewhere
in between the message bubbles and then start parenting all the
message bubbles to it. Once done, let's bring the null
to start from second eight and animate its
position to go up. I just noticed that I missed parenting this message bubble. So let me undo my action, and let's parent it to the null. Alright? So now move
the null up so we will have enough space
in the bottom area to enter the new message
bubble we created. Let's bring this new bubble to start from second nine for now. Soon, we will create a nice
intro animation for it. In the meantime, we can
tag it in green. Okay. And now, at this point in time, we should not see the
time of this message. So let's enter the precomp
and turn it off for now. Back to the animation.
We do need to see the time appear for
the previous message, and we can create a nice fade in animation for it
from second eight. So let's stand here and
then enter this precomp. Now, let's create a fade in
animation for the time layer. Let's make this animation
last for 1 second. Okay. That looks good. Now we can go back to the
main animation and create an intro animation for
the last message bubble. We can bring this precomp
to start from second eight. Now, let's press Y to switch to the anchor point tool and move the anchor point of this precomp to the right bottom corner. Hold control or
command on Mac while doing so to snap it
exactly in the corner. With that done, let's
now start animating it. We can first create
a scale animation. And since we know
that the precomp should look as it does right
now at this point in time, we will create a keyframe here. Next, let's also add a
rotation animation to it. For the same reason,
we will create a rotation key
frame here as well. Now let's move back 1 second and scale down the precomp while rotating it a This way, we will get a nice rotation
popping animation. Let's now easy ease the nulls keyframes and make it start
moving fast in the beginning. Once done, let's adjust the animation of the bubble
pre comp accordingly. But before that, let's make
it a bit more interesting by making it scale in the
middle of the animation. This way, the popping
effect will be more noticeable. All right. And now let's select all the keyframes
and easy ease them. Then let's go to
the graph editor and make the motion move in a snappy way by adjusting the velocity influence
to around 80%. I think it looks nice. Now we can go back to the timeline. Before moving on, let's
start the last bubble pre comp from second nine,
exactly. Awesome. So with that done,
we have created a nice demo flow animation
of a chatting conversation. At this point, we can save the project and keep
moving to the next step. At this point, we can also make sure all our layers
and pre comps in the timeline are
collapsed so we will get the scene in
the best quality. Great. So Now I'll save
the project once again. And let's go to the beginning
of the timeline and see the entire animation
we created so far. I noticed that in the left bottom area of the avatar boxes, we have some layers that
don't belong there. I'm talking about
this one. Maybe it's a layer that we forgot to
delete in the previous steps. Let's find this layer
in the layer stack and try to understand
what it is. I see now, it is a text
layer that belonged to the last gray message bubble
from the original design. We replaced these layers
with a precomp that includes our customized layers inside. That means we don't need
this layer here anymore. The same goes for this layer. It's the time layer from
the original design. We don't need that either, since we already have it
included in the precomp. That's why I always check the animation after
every step I do. And I suggest you do the same. When dealing with
a lot of layers, it's always a good idea
to check ourselves. Even if we are 100% sure we
did everything perfectly. It's better for you to find the relevant issue rather
than the client finding. Alright. So now, with
all that being said, let's check this animation
together in the master comp. We will come back
to this pre comp later to add the final touches. For now, it's
important to check how it looks together
with the voiceover. Jump into the built
in messaging system where all your conversations
are organized by contact. Send a quick reminder or
share an update instantly. And yes, sharing
files is instantly. And yes, sharing f instantly. And yes, sharing f. And
yes, sharing. And yes. Alright. So I think
we are good with the sinking of the demo flow animation with
the voiceover. We might adjust it
slightly later if needed. But for now, I want to
keep animating the scene. We need to create an
intro Otro for the scene. And we also need to create
some camera movements to bring the viewers focus to the relevant sections
in the UI screen. We will also need to add
the text that needs to be presented during the
demo flow animation. Only after this will
we start working on the next demo flow animation that we can see here
in the videoboard. For now, let's focus on creating the camera movements and adding the text lines from
the script to the scene. But first things first, let's
not forget to turn back on the main panel
precomp we have in the first UI screen of
this demo flow animation. And with that done, we can
now go to the main scene comp and start planning what the
camera movements should be. First, let's collapse this
precomp so we can see all the collapse layers inside in high
quality here as well. And now before
animating this precomp to get some nice
camera movements, let's first add the text
that needs to be the scene. For this, we can go to the
videoboard and see that. As you can see, this long scene includes a very long text. In our case, we can split
the text into a few parts, each shown according to what's happening in the
demo flow animation. With that said, let's go
to the script and copy the first part of
the text that needs to be shown in the scene. Now, let's go back to the
project and paste the text. I just noticed that
we should first copy a text layer from another
scene with text inside it. This way, it will
be easier to paste the new text in the new scene. Let's enter scene six and copy
the text layer from here. Now let's go to scene seven
and paste this layer here. And now let's go to the script once again and copy the text. Great. Now let's go
back to the project. Double click on
the text layer and paste the copied text
from the script. Alright. And now, let's split this text layer at the point in time
where we get to the second part of the demo animation
because here we will add the second part of the main text of this
scene from the script. So let's go back to
the script and copy the second part of the main
text, back to the project. Let's now paste the text
and expand this layer. Great. So now we have the
text for the first part of the demo flow animation
and for the second part. And now let's stand at the
point in time where the third and the final part of the demo animation
is happening, which is at second eight, and split the text layer
at this point. Then let's go to
the script and copy the last text part we
have in this scene. Back to the project.
Let's paste the text. And I will delete the dot
at the end of the text. All right, so now we can
extend this layer a little bit and save the project before moving on
to the next step. Our next step will be
creating the intro animation for this scene and also
creating the camera movements. To begin, let's first find the right scale and
the correct position for the UI screen pre comp to be at the beginning
of the animation. You can use the safe
action grid to make sure you're placing the precomp in the center of the frame. Alright? So I think we are good now with the scale and the
position of the precomp. So now let's stand
at second one and create a keyframe for
the scale property here. Now, let's go to the
beginning of the timeline and scale up the precomp, so we will have a nice zoom
out animation for the intro. Okay. And now let's open the position property and create a keyframe with
the current value. Let's bring this
keyframe to the end of the intro animation
since we want the precomp to be placed
at this position. And now for the first position in the beginning of the intro, we should adjust the position of the precomp to be a
little more centered. So at this point in
time, we can move the precomp a little
bit to the right. Okay. So with that done, we have created a
nice intro animation. Next, let's watch
what's happening in the demo flow animation
and try to understand what angles we could
create to better fit what's shown in the UI screen during the demo flow animation. We also need to think
about the timing when we should start
changing the angles. For example, in this case,
I don't want the angle to change until the second part of the demo, animation starts. So that means that until second two, nothing should change. Therefore, I will create
keyframes here with the current values for the position in the
scale properties. And now we can go
to second three and change the scale and the position of the pre comp according to what's
happening in the animation. At this point, the main panel of the UI screen disappears, and we are seeing only
the conversation section. Therefore, at this
point in time, let's move this pre comp to the left so we can see it in
the center of the frame. Now, let's also try to scale this precomp at this point in time and see how that looks. So for now, what we are doing is following the
demo flow animation and trying to scale and position the precomp to create better
angles for the scene. Later, we might
change the angles and the timing, but for now, let's keep focusing on creating the initial keyframes to
have something to work with. I'm mentioning this
to remind you that the animation process is not
a straightforward process. We always create the
initial keyframes and then adjust everything to
make the scene look better. So when you don't know
exactly what to do, I suggest you just
start with something simple, as we are doing now. Following what's happening
in the demo animation and creating simple scale and
position keyframes. All right. So now I see that the
second animation part of the demo flow animation is about to end at
around second five. So let's stand here and create keyframes for the position and the scale properties with the current values
because we don't need the precomp to change
up until this point. Next, let's go to second
six and scale and position, the precomp to fit the third animation part of
the demo flow animation, which is the chat
conversation we created in the bottom
part of the UI screen. Therefore, we can scale this precomp and
bring it up to get the viewers attention to the right section
in the UI screen. I'm constantly
watching the guides of the Safe Action grid to make sure I'm placing
the pre comp in the center. I'm also trying
different scale values to see what will look the best. Don't worry about the
text that we need to see in this animation part,
because as you can see, we have plenty of room in the
bottom part of the screen to present the text that needs
to be shown at this part. All right. I'm good
with this angle. And I want to remind you
that you don't need to worry about the different
irrelevant layers we see here. We can fix all of this
later without problems. For now, let's just focus
on the camera movements and the outtro animation that needs to happen
in the next step. So as you can see, the final part of the demo flow animation
ends at second nine. That means that from
this point in time, we can start the Otro animation. So let's stand here and create keyframes for the position
and the scale properties with the current values
because we don't want the precomp to move until
this point in time. Let's go to second ten and scale down the precomp and
move it to the center. This way, we will get a
nice Zoom out animation for the outtro and it will fit perfectly with the match
cut transition that we will create from this scene
to the next one. Okay, so with that done, let's now start
adjusting the keyframes. This time, let's do it using the keyframes velocity panel. We can start by selecting the
position keyframes first, then press Catrol Shift K
and set the velocity to 85%. Let's do the same for
the scale animation. And now, since we
want to create a nice match cut for the
intro and the outtro, let's set the velocity
at these parts to 95% to get a bit
snappier motion. I'll select the intro keyframes and adjust the handles manually. Let's do the same for the Outro. Awesome. And now let's exit
the graph editor and start this scene from
the point in time where the motion
is at top speed. In this case, it's at frame 15.
22. Building Scene 8 – Drag and Drop Demo Animation: Come back. In this lesson, we will start working
on the next scene. But before that, let's
organize our project panel. Let's place these
three pre comps into the pre comp folder. All right. And now let's create a new pre comp
for the new scene. We can call it scene eight. Make sure it's full HD and the rest of the
settings are correct. Let's now close all
the pre comps we have here. All right. And now let's enter the videoboard and see
what we need to do. In this scene, we will create a drag and drop demo
flow animation. Let's start by understanding what should be the
duration of the scene. It should start at
around second 53, and it should end at around
1 minute and 1 second. That means we've got
around 8 seconds. Awesome. So with that in mind, let's find the
relevant UI screen we will animate in this scene. Great. So here it is. Let's now go to
the new scene comp and drag the browser
UI screen into it. And now I want to take a slightly different
approach from the animation workflow
we did up until now. Up until now, we first animated the initial animation
for each part, then created the
intro and Outro, then created the
camera movements, and then adjusted the animation. This time, I want us to work not in this step
by step approach. This time, I want
to guide you with an approach where we work
on all the steps together. I want you to experience both
approaches so you can get a good understanding of
what works best for you. And moreover, so you understand
that sometimes it's even better to work on all the
steps simultaneously. Okay. So with that said, instead of starting with the first part of
the animation flow, let's start working on
the intro of this scene. For this, let's go back to the master comp and see the
outtro of the last scene. We've got a nice
Zoom out animation. My goal is to create a
cool match cut transition. Therefore, let's
create the same motion for the intro of the new
scene as in the last one. Then we can time the motion to get that smooth match
cut transition. With that in mind,
let's go back to the new scene and start
creating the intro. First, we can collapse
this precomp. Next, let's zoom in on
the timeline and use the position and scale
properties to create a 1 second long
zoom out animation. Since we want the
precomp to look and be placed where
it is right now, after the intro animation, we need to create a keyframe for the relevant properties
at the 1 second mark. Then we need to go to the
beginning of the timeline and adjust the scale and position to get a
nice zoom out motion. Let's open the safe action grid to see the center of the frame. Now, let's find a nice position for the precomp at
this point in time. I don't want to position
the scene according to the pop up panel because at this point in time,
we don't see it. We will see later
in the animation. So let's enter the precomp and turn off the pop
up layers for now. Alright, back to the main scene. Let's keep adjusting
the precomp. I'm trying to place the precomp, so the file list boxes will be perfectly centered in the frame. Alright? I think that's Alright. I think that's good enough. Now, let's adjust the keyframes velocity to get a
nice snappy motion. That means we can move
the handles so we see the influence around 95%. I think the motion looks great, but maybe we can
adjust the position of the precomp at the
beginning of the timeline. It will be a bit
more interesting if the Zoom out animation begins with the name
of the UI screen. I'll stand at the first
position keyframes and only then adjust
the position of the precomp at this point in
time. Let's place it here. Let's check how that looks now. I think it looks better for now. So what we did now is
we focused a lot of our time on adjusting
the intro animation. But is it good to do
that? I want to show you this kind of workflow so you can answer
this question for yourself. Later in the lesson, you
will be able to answer it. Because during the animation, we might change this
intro animation that we spent so much time
perfecting right now. Maybe spending this time at this point of the process
wasn't a good choice. More on that later, for now let's keep
working. All right. So now let's enter
the browser UI screen pre comp and start preparing it for the
demo flow animation. First, we can turn back on the pop up layers and then tag
them in a different color. Next, we can collapse
all the layers we have here to get them at
the highest resolution. Once that's done,
let's start creating the first animation part for
the demo flow animation. We can now turn off
the pop up layers, and then let's also tag the shadow layer in
a different color. And now let's try to understand what should be our
first animation part. In our case, we need to create
an animation where we add an additional file to the file list in the main
section of this UI screen. And before all this happens, we need to create a drag
and drop animation. The drag and drop
animation will happen after the pop up panel
enters the scene. That means we also need
to create some kind of click animation to trigger the
intro of the pop up panel. In our case, we can
trigger this by creating a click animation for the ad button we have here
in the header section. Great. So now we have an idea of the different animation parts
we need to create here. With that in mind, I understand that the first thing
I can do now is precompose the pop up
panel layers in a precomp. That way, it will be much
easier for me to create an intro animation for it and time it with the
rest of the layers. Moreover, it will be much
more convenient to create micro animations inside
the pop up UI panel. Move the new pre comp out of the screen's folder
before moving on great. And now we can start working on the first animation
part of this demo flow, which is the click animation on the Add button and the
intro of the pop up panel. Since we know that
the intro animation of the scene ends at second one, that means this
animation part must start from second one.
And not before it. That means we can
move the pop up and the shadow layer to
start from second two. And from second
one to second two, we will create a click animation on the ad button in
the header section. So now, instead of first
creating the click animation, let's keep working
with our new approach of not keeping the
step by step workflow. Instead of focusing on the
click animation first, we will focus on the
camera movement. In our case, instead
of animating a camera, we'll just keep adjusting the position and
scale animation. With that in mind, let's now stand at second two and position the UI screen pre comp in a way so we can see the
button a bit better. We need the viewers attention
to focus on that area. Okay, so now at
this point in time, after the Zoom and animation, we can create the click
animation for the button. The click animation will
last for ten frames. So let's stand here and
then enter the precomp to move the pop up panel timing to start from this
point in time, which is second two
and ten frames. Once that's done, let's
go back to second two and create the
click animation. Let's first select the
button layer and place it above all the first
animation part layers. And now instead of
animating this layer, we can use the button
animation precomp we used earlier in the project. Once found, let's duplicate this precomp and adjust
the name to fit our scene. Now, hold Alt or
Option on Mac and drag it onto the button layer in the timeline to replace it
with the button precomp. After that, let's
adjust the size of the precomp to fit the
design of the UI screen. Next, let's enter the button
precomp and adjust the text. Awesome. Now, we need
to make sure we are standing at the correct point in time for the click
animation to happen. Then we can enter the
button precomp and drag the keyframes to
this point in time. Alright. So now we have
the click animation ready, and we're set to move
on to the pop up panel. We need the pop up
to enter the scene right after the click animation. Let's start it from second
two and five frames. For the intro animation, let's use the scale
property to create a nice popping out
effect for this precomp. Let's make this animation
last for 1 second. Great. Once we've got the
pop up animation done, we can now create an animation
for the shadow layer. For this, we can use the blurry shadow animation we created in one of
the previous scenes. To find which scene it was in, I'll use the project
panel search bar. The shadow for screen
eight is not what we need, since it's the layer we
see now in our scene. What we need to check is the
shadow from screen four. All right, click on it and
choose reveal in composition. That way, After Effects will open the comp with
this layer inside. Here we have that
layer already enemy. So now we can select the blur and shadow layer from here and copy and paste
it into our new scene. Let's paste it above the
shadow layer we currently have and then press the left bracket key
to align it here. We can now delete the
old shadow layer. Great. Now, let's make sure
the new layers we brought in fit the design of our
UI screen in this scene. As you can see, the two
layers were placed in the same position they had in the scene they were copied from. That means we need to
adjust them a little bit. So let's do that quickly. Okay, so now let's tag these two layers
in purple and open their keyframes to check
that the animation fits the pop up panel intro. Let's see how that looks. I think we can start this
animation part a bit later. Let's drag these three layers to start at second two
and ten frames. Alright, that looks
good for now. Before moving on
to the next step, let's save the project to secure the progress
we've made so far. Great. Now, instead of jumping straight into
the next animation part, let's stick to our new
approach and take some time to finalize and adjust
this animation part. We can start by adjusting the motion of the
pop up animation. Let's set the velocity to
85% and see how that looks. I think it's okay. Now, let's
go back to the main scene and adjust the camera
angle at the point in time where the pop up
panel is appearing. That camera angle change
should happen at second three. So let's stand here and adjust the position and scale properties
of the screen precomp. For now, let's copy the previous values before the Zoom and animation
and paste them here. Now, our next camera movement
should be to the left side, since we need to create the
drag and drop animation. That means we will
move to the left, and the cursor will
bring a file from the right side and drop it
into the pop up panel section. With that in mind, we
can make the scene look more interesting
by zooming in a bit more on the pop up panel also because we want the viewer to pay attention to it at
this point in time. So let's play around with the scale and position values until we get a nice
look for the scene. My goal is to make the pop up panel located in
the center of the frame. Alright. I think it looks nice, and now we should move on to prepare the next
camera movement. Time. Since we want to add
a drag and drop animation, we need to move the precomp
to the left so we have space to grab the file and drop it inside the pop up panel. Let's decide that this
animation will take 2 seconds to complete.
Why? 2 seconds? Because there will
be a lot going on in this part
of the animation, and I don't want it to
feel too quick. Alright? So let's stand at second five and move the
precomp to the left. So we have free space
on the right side. This way, we will create the illusion that the camera
moves to the right where the file is located before we
take it with the cursor and drag and drop it inside
the pop a panel. Now, let's go 1 second forward
in time and copy and paste the previous position
keyframe here because we want the pre comp to return to its previous position. That means that at
this point in time, we will have already dragged the file inside
the pop up panel. To make the animation a
little more interesting, we can create a micro animation
inside the pop up panel. My goal is to
create some kind of micro animation that will show the pop up panel reacting
to the dropped file. Soon, you'll see what I mean. For now, let's stand
at this point in time and enter the
browser precomp. And from this exact
point in time, we will create that
micro animation inside the pop up precomp. So first, let's enter it. Here we can create a
popping out animation for the folder
icon that we have. We can also create a nice rotating animation for the dotted
stroke we have here, but more on that later. For now, let's focus
on the folder icon. First, let's create
a keyframe for the scale property at this point in time with the current value. Next, let's decide that this
popping out animation will last ten frames and create another keyframe here
with the same value. Now let's go to the
middle of this animation and scale up the layer.
We can set it to 200. Let's see how that looks. I think we can scale
it a bit more. Let's try 300. Great.
That's better. Now, let's adjust the
velocity of the keyframes to 85% to get a bit more
interesting motion. Let's see how that looks now. In my opinion, it's super fast. So let's make this animation
last exactly 1 second. That means if it starts at
3 seconds and 20 frames, it needs to end at 4
seconds and 20 frames. Let's preview it again. Now, I think it looks too slow. So let's make this
animation last until 4 seconds and ten frames
and check it once more. Awesome. I think we got
it right this time. Now, to make the popping out animation look a
bit more interesting, let's stand at the beginning
of this animation and place the anchor point at the bottom center
area of the layer. This will make the folder icon
pop up in a more dynamic. In my opinion. Moreover, now the folder icon doesn't collide
with the text below it. With that done, let's move on to the next micro animation
we can create here. This time, let's make the
dotted stroke rotate. The easiest way to do this is by recreating the
rectangle from scratch. So let's select the
rectangle tool, make sure no layer is selected, and create a new rectangle with approximately the same size as the original
rectangle in the design. For the color,
let's switch it to a regular fill color and
for now, set it to gray. Now, create the rectangle
and adjust its size. For that, let's use
the size property. First, I'll uncheck
constrained proportions, and then adjust the
values separately. We can also move the shape manually until it fits
the original design. Awesome. Now, let's adjust
the rounded corners of the shape to make it look closer to the original design. Great. With that done, let's now deal with the stroke that needs to be on this layer. For the color, we can
sample the purple we see in the stroke or in
the folder icon. For the stroke weight,
we can set it to two. Next, we need to make sure this stroke looks like
the original design. That means we need it to
appear as a dotted stroke. For this, open the stroke menu inside the layer and add dashes. To rotate the stroke, we'll use the offset property. But before that, let's adjust the dash value
to match the design. We can set it to five. Let's now check if it looks similar to the
original design. Yes, I think it looks great. For now, let's leave this
layer turned off so we can sample the gray color from the original design to color
the fill of our new shape. Alright. The design looks good, and now we're ready
to animate it. As I said earlier, we'll use the offset property for this. But instead of manually creating keyframes
for the rotation, let's use a simple time
expression to make it rotate endlessly
without keyframes. For this, hold Alt
or Option on Mac, and click on the stopwatch
of the offset property. Now, inside the expression
box type T asterisk -100. With that done, the stroke
now rotates endlessly to the right without us
creating keyframes manually. In case it feels too quick, you can lower the value
inside the expression. Let's set it to -50 and
see how that looks. Awesome. I think it
looks very good. With that done, we can now turn off the original
rectangle layer. And after that, we can shi this layer in the timeline
since we no longer need it. Finally, let's place our new shape layer
above the last layer. Alright. And now, once we've finished the micro animation
inside the pop up panel, we can make this animation look even more
interesting by adding an additional micro animation for the pop up panel
outside in the scene com. Let me show you what
I mean. First, let's stand at the point in time
where this animation begins. Now, let's go back
to the browser prec. Once here, we can create an additional scale animation
for the pop up precomp, starting from this
point in time. So create the first
keyframe here. Now, we need to sync
this animation with the animation happening
inside the pop up precomp. If you're not sure
where it ends, you can enter the
precomp and stand at the point in time where
the animation there finishes. Then go back to the
browser precomp, create another keyframes
at this time point, and then stand in the middle of this animation to scale
down the pop up precomp. We can now adjust
the velocity to 85 to match the motion
inside the pop up precomp. And with this, we created a pretty cool reaction animation
for the pop up UI panel. This will look much
cooler once we add the drag and drop animation. But for now, let's focus on starting the
next animation part. When we need to show
the main file list with the new file that was
drag and drop, for this, we need to create an
outtro animation for the pop up precomp that happens right after
the scaling animation. Let's stand at
second seven and 20 frames and set the scale to
zero at this point in time. We can then go to the graph
editor and adjust the motion, so it starts slow and
speeds up toward the end. After that, let's also create an outtro animation for the blur in the shadow we have here. We need to sync
this animation to the outtro animation
of the pop up precom. To do it quickly, we can
stand at this point in time, copy the first keyframes of both layers and paste them here. Then right click, go to keyframes Assistant and
choose reverse keyframes. Let's preview this animation a few times to see how it feels. Awesome. I think it
looks very good. Now we're ready to start
animating the next part, where we add another file
to the list to finish our demo flow animation
for this scene. Since I already knew I wanted to create this
kind of animation. When building the
storyboard in Illustrator, while preparing this UI
screen for animation, I made sure to have one file box design in the
list separated into layers. This way, we can now find
these layers in the timeline, select them all,
and duplicate them. Because I knew the file added here in the
drag and drop part would be a new JPEG or PNG file. I made sure the
design layers for this PNG file were
separated as well. So let's select all
the layers related to this file box and press Ctrl
plus D to duplicate them. Now let's move them up so
they sit in one stack. Once done, let's precompose
all these layers and call this pre comp screen
eight panel two. Great. Now we'll
use this precomp as the new file box that appears in the file list after the
drag and drop animation. But first, we need to adjust the design
inside this precomp. Let's use the region
of interest to crop the size of this comp since
it's too big right now. Once that's done,
now let's select all the elements inside and parent them to the
white box layer. This way, we can select
the white box layer, align it to the
center of the comp, and make sure everything is
perfectly centered. Okay. And now let's create
a new text layer with a different file name. To have a nice and continuous flow from the previous scene, we can name this file
reference dot JPEG. This works because in
the previous scene, the conversation was
about sending a reference for the task that
was being discussed. After adjusting the
text size and position, we can turn off the
original text layer. We'll leave the rest
of the information as it is, and move on. Now, let's go back
to the browser, UI, a screen, collapse
our new pre comp, and find a good place
for it in the list. Let's zoom in and
make sure the spacing between file boxes is consistent with the
rest of the list. With that done,
let's start creating the going down animation for all the file
boxes in the list. But before we do
that, let's deal with the PNG file box where all elements are
on separate layers. Let's make sure to select all the related
objects for this file and parent them
to the main white box of this file design. Great. Now let's tag all
these layers in orange, so we know they belong
to one section. Then we can select all the
layers related to this file, except the white box layer
and shi them in the timeline. This way, it'll be
much easier to create the go down animation for
the file boxes in the list. And to avoid any interference, let's lock the blur
and shadow layers. Well. All right,
then, now let's start selecting all the
file box layers. For this file, make
sure not to select one of its elements that
are on a separate layer. Instead, select the
white box of this file. Now, once all five
layers are selected, let's find the right point in time to start this animation. In our case, it can
start right after the pop up funnel finishes
its intro animation, which is at second
seven and 20 frames. So while standing here, let's create the first
keyframes for the position. Now let's move 1 second forward. The timeline and bring all
the selected layers down. We need to make sure that our new pre comp is placed exactly where
the first file box is. Therefore, before
dragging the layers down, let's press Control or
Command R to open up the rulers and then create a guide so we know how much we need to drag
the layers down. We can now turn off the rulers and start dragging
the layers down. Great. And now let's easy ease the keyframes and adjust the
motion in the graph editor. Let's make the motion start quick and slow down
toward the end. Let's see how that looks. All right. I think it
looks okay for now. We no longer need the
guide we created, so let's remove it from
the frame. All right. And now let's deal
with the upper area in the list section
because we need to hide the new file
box in this area. For this, we can find the
white gradient we created in the previous scene and then copy it from there and paste
it in our new scene. So let's open scene seven and then enter the
messages preComp. Now let's find that white
gradient shape layer we created here and copy it. Back to the new scene
before pasting the layer, let's first deal with the order of the file list we have here. What I mean by that
is, I want to place the new file pre comp we created in the right
place in the layer stack. Maybe we need to place it here. No. So according to
the layer order, this is the area of the bottom
file box in the design. That means we need to move the pre comp to be
before the file layer, which is the first file in
the list in the design. In our case, we need
to place it here. That way, as you can see, when I'm selecting each layer, we have a chronological order. I'm doing this because it will
be a bit easier for me to know where to place the
white gradient layer. In our case, the white
gradient should be above all the file box layers because we needed to hide
the top file box. So I'll select this layer to paste the white
gradient above it. Let's now bring this
layer to the beginning of the timeline and then adjust its design to fit
our list section. First thing, first,
I'll bring it to the center of
the list section, and then I will adjust
the width of this shape. Let's remain a little bit in the preview and adjust the position a bit
more. All right. So now the white gradient
is hiding the top file box, but it is also
hiding another layer that does not need to be hidden. Let me show you what I
mean. If we now turn off the white gradient and then also turn off the first
file box in the list, we will see that there is a
section here with some text. This small section
needs to be seen. Therefore, we need
to find this layer in the layers panel
and then move it above the white gradient
shape layer. Great. And now we can turn
back on all the layers. And as you can see, we now have only the right area hidden. With that done, we
can now go back and forward in the timeline and
see how this section looks. I think it looks
great. So now we need to do the same for the
bottom part of this section. Our goal now is to hide the bottom file box
because as you can see, it collides with the page
numbers design elements. So first, we can duplicate the white gradient shape layer and then drag it down
to the right place. Then we can right click on the layer and flip
it vertically. Now let's see how
that looks during the animation and try to
adjust its position if needed. In my case, I need to lower the layer down a
little bit more. Awesome. Now
everything looks okay, and we're ready to move
on to the next step. In the next step, I want
the going down motion of the file boxes to have a
slight delay in the animation. I want the first file box in the list to
start moving first, and then the rest of the
file boxes move accordingly. That means we now need to delay all the keyframes we created for the position property
for these layers. In this case, to
get a nice delay, let's create a two frame
offset between the keyframes. To create the delay, I will use the new After
Effects offset feature. And since I want
the first file box in the list to move first, I will start selecting
the keyframes from the bottom layer because this is the first layer in the
section. All right. So now I will hold down Alt and control or
option in command on Mac and then drag
the keyframes to the right until I see that the second layer is reaching
the time indicator position. Let's see how that looks. Awesome. I think it looks great. And now let's save the
project before we move on. Alright. So now let's go back to the master comp and see
what we need to do next. After the part in the demo flow animation where we drag and drop a new file and then see
this file added to the list, we should now zoom out
a little bit to see the entire UI screen with
the updated file list, and that Zoom out animation
should start at second seven. From second six
until Second seven, we don't want any changes in the camera movements
because this will be the moment when the Dragon
drop file animation happens. So now at second seven
we need to create position and scale keyframes
with the current values. Only then let's move to second eight and create the
Zoom out animation. For this, we can copy the second keyframes
on the screen and paste them at second eight. This way, we now have the UI screen shown
fully in the frame. Now, since we created new keyframes and copied
and pasted other keyframes, we need to make
sure the motion is still consistent throughout
the entire animation. And as you can
see, we have parts where the motion
is not consistent. We need the velocity
of all the keyframes to be around 85%. But as you can see, in some
parts, this is not the case. I'm showing you this
because I want you to see that adjusting the velocity of the
keyframes before finishing the initial animation is
kind of like working twice. Throughout the
animation of the scene, we created keyframes and then adjusted them
right away every time. Here we finish the animation, and we still need to
adjust the keyframes. Therefore, I suggest first finishing creating the initial keyframes for the entire scene, leaving them as regular
linear keyframes. Only when you finish
the entire animation, should you start adjusting them. This is one of the disadvantages of working with the approach of animating each part without following a chronological order. So when you work on
your next project, make the right
choice of workflow and the approach you
are about to follow. Alright. With that said, let's go back to the project and start adjusting the camera
movement once again, but this time for all
the keyframes at once, because we do want
the motion to be consistent throughout
the entire animation. And we will do it using the
keyframes velocity panel. Since we can't adjust
different properties at once using the keyframes
velocity panel, we first need to select all the position keyframes
and adjust them. Let's set the velocity to 85%. Then let's do the same
for the scale keyframes. Once that's done,
let's not forget to adjust the first
keyframes of this animation, since this is the intro
animation of this scene. And because we want to have a nice match cut from
the previous scene, we should adjust the keyframes
velocity at this part to around 95% because we want the motion here
to be super fast, so the match cut transition
will work perfectly. So now let's go to the master comp and
bring the new scene to the timeline here and work on the transition from
the previous scene. But before that, I
noticed that we didn't trim the duration of
the previous scene. We just cropped it
from the master comp. With that said,
let's enter scene seven and trim the
workflow to second 11, which is 1 second after
the outtro animation. I prefer to have 1 second of
free space in case I need to do some small timing adjustments in the scenes. All right. So now let's bring
scene eight to the timeline and make sure the match cut
transition is working. For this, we need
to crop scene eight from the beginning
to the fastest point in time of the intro motion. Let's bring Scene eight
to start right after scene seven and see how
the transition looks. After watching the
animation a few times, I don't feel that the
matchcut is looking good. The main reason for this is the position of our
elements in the two scenes. In our case, it's the
UI screens in scene seven and the UI
screen in scene eight. Let's see what we can do to make this match cut transition
look a bit better. First, let's try to
change the initial scale and position of the UI
screen in scene eight. Let's try to scale it down a bit and place it
more in the center, so the motion will
feel more like a straight Zoom out animation rather than the zoom out
motion we have right now. Once done adjusting
the position, make sure the velocity
is not changed. Alright? Let's now go back to the master comp
and see how that looks. Okay, I think it
looks a bit better. Let's go back to scene
81 more time and try to scale down the pre comp in the beginning a bit more, and then change the next scale keyframes to a lower
number, maybe 80. Too small. Let's try 90. Let's go back to the
master comp once again and see that a few times
to feel how it looks. I still don't love how
the match cut looks. In this case, we can entirely change the motion
of the match cut from a Zoom out animation to a panning animation. Let
me show you what I mean. First, we need to deal with the Otro animation in scene seven. Once here, let's
stand at the end Otro keyframes and delete
the last position keyframes. Now let's make sure at
this point in time, the scale remains the same as in the beginning of the
outtro animation. For this, we can just copy the previous scale keyframes
and paste it here. Great. And now instead of
creating a Zoom out animation, let's drag the precomp
up out of the frame to get some nice pan
down camera motion. Let's not forget to check that the velocity remains
the same. All right. So now once that's done, let's go to scene
eight and here, make the UI screen, enter
the scene from the bottom. This will create a
pan up camera motion. But before doing that,
let's bring back the pre comp scale of the
intro animation to 90. So let's set the second scale keyframes to 90 and then do
the same for the first one. Now, we can bring
this precomp down. But before that,
let's make sure it's perfectly aligned to the
center of the frame. Using the align tool won't really place it in the
center of the frame, since according
to After Effects, it's already in the center
of the scene because it looks directly at
the position of the adjustment layer
inside that precomp. And it looks at it because
this precomp is collapsed, which means After
Effects is reading the inside information of the
layers within this precomp. With that said, we now need to use the guides of
the safe action grid and align this precomp to the center manually for
the intro animation. Alright? So let's move it to the right and then move
it down out of the frame. Let's make sure the
velocity hasn't changed, and now we can actually delete the first scale keyframes because it's the same as
the second one. All right. And now let's not
forget to also adjust the position of the pre comp for the second
position keyframes. We want the pre comp to be centered perfectly at this
point in time, as well. All right. So now, once we finish adjusting the outtro of the previous scene and the intro of this one, let's go back to the master comp and watch the transition once again to see if the match cut looks better with
the new changes. Uh, awesome. I think the new match cut
works perfectly fine. And we can now move on to animating the
next animation part. But before doing that, I just noticed that
we should pause the camera motion at
the point in time where the button click
animation is happening. I think we should pause
this moment and continue the camera motion only after the click
animation is finished. Therefore, let's
enter the precomp and first find the point in time where the click animation ends. It happens here at second
two and ten frames. So now, to create the pause, all we need to do is copy the previous keyframes
and paste them here. By doing that, there will be no change in the motion
during this period of time. Only after second
two and ten frames, will the camera motion continue. Since we want the camera
motion to last 1 second, let's stand at second three
and ten frames and bring the second camera
motion keyframes of this animation part here. Let's see how that looks.
I think it looks great. We can double check
that we didn't change the velocity at
this moment just in case. Alright. And now we can save the project before we start working on the final
animation part for this scene. Awesome. So now for the last animation part of this demo flow
animation in the scene, we need to create the
dragon drop animation. For this, I want you to
open the assets folder you downloaded from me and find the Illustrator file named JPEG. It's an illustration
of a JPEG file that I created using some design
I downloaded from FreePiC. So now let's drag this
file into our project. And since we don't
need this file to be with separate layers, we can bring it in as footage. Alright. And now let's bring it to the timeline
and start animating it. My goal is to create
an animation where we see this file on the
right side of the scene, and then with the cursor, we bring it to the pop up panel. Alright? First, let's
scale this layer to 150 because it's too small, in my opinion. We can
collapse it already. Okay. And now let's open the position property
and start animating it. To begin, let's
stand at the point in time where the UI screen
is on the left side. Now, let's make sure the layer is centered horizontally
in the scene. It's done, let's create
the first keyframe here. Then let's go back
to the point in time where the UI screen starts to move and drag this layer to the right
out of the frame. By syncing the motion of our
layer with the UI screen, we're creating a nice panning
camera motion illusion. Okay. And now let's stand
at the point in time where the UI screen panning motion ends and bring the file to
the center of the comp. For now, it looks
kind of boring, so let's make it look a
bit more interesting. We can start by
curving the path of the file motion using
the vertex tool. Click on this point once and then press V so you
can adjust the handle. Nice. Once that's done, let's make the file rotate
according to the path curve,
23. Creating the Final Title and Scene Outro: Come back. In this lesson, we will start working on the final scenes
for this project. We will start by creating
the title animation scene. To make it quicker, we can use the similar title animation we created in the
beginning of the video. We will duplicate it and
adjust the animation inside. And before we do all that, let's create an outtro animation
for the previous scene. Let's enter scene eight and
now move to Second nine. This time we can make
the UI screen exit the frame from the left side. Because the text animation
that will enter the scene after it will have a
left to right motion. Soon, you'll get what I mean. In the meantime. Make sure
to set the velocity of the last two keyframes
to around 95%. And after that, let's crop the timeline 1 second
after the tro animation. Great. And now let's
stand in the middle of the tro animation and in the master comp crop the
comp to this point in time. Awesome. So now, once
we're done with the scene, let's start creating the title animation for the next scene. For this, let's find the first title animation
pre comp we created. Here it is. It's the
first scene we created. Now, because we want to have the same animation
for our new pre comp, let's first duplicate
this pre comp from the layers panel and bring it
to the right point in time. Let's see how that looks. Okay. So why keep struggling? Struggling. So why keep
struggling? Go to one point. Great. And now we need
to make some changes in the title animation to fit the script and
the voiceover. Therefore, we won't make the changes inside
this pre comp. We now need to find
this pre comp in the project panel so we can
duplicate it from there. We want to duplicate it from the Project panel
because we want to have a completely new pre comp that we can make changes inside without affecting the first one. Once done, let's now hold
Alter option and drag the new pre comp onto the original one in the timeline
to switch between them. This way, we saved all the key frames that we created on the original precomp, but now we have a
completely new pre comp. That we can make changes inside without affecting the
original one. All right. So now, with that being said, let's start by changing
the text here. For this, let's open the script and copy
the relevant text. Back to the project, paste the text, and once that's done, let's delete the word
struggling because this word should be
animated differently. We will animate it like
the word multiple. And we will do that in a second. For now, let's change the exclamation mark we have
here to a question mark. Awesome. And now let's delete the non
relevant text layers. Finally, let's make sure
the mask we have on this text layer fits
the current text. For this, first, let's remove the current mask and
then create a new one. This way, it will fit
automatically to the current text. Great. And now the next
thing that we can do is adjust the position of the word that is split
into several layers, and we can do it
easily by moving the null object since all the
letters are parented to it. Let's place it somewhere
around here for now. Okay. And now let's adjust the letters so we can get the relevant word
for this scene. In this case, it needs
to be struggling. And since we know that the word struggling has more
letters than multiple, it will be a good
idea to unparent the letter layers
from the null for now because we will add additional letter
layers in a second, which we will adjust
in the animation. All right. So now let's
adjust the letters, double click on each
letter and change it accordingly. All right. And now duplicate the
last layer and move it one frame forward to
keep the offset animation. Then change it to
the relevant letter. Now, let's duplicate this layer and repeat the same process. This time, change the
letter to G. Awesome. And now, since we have
more letters in this word, we should adjust the position
animation for all of them. To do it without any issues, let's first bring all the layers to start from the exact
same point in time. Later we will offset
them once again. For now, let's make all the keyframes start from
the same point in time. Me, it will be much easier to adjust their position animation. All right. And now let's adjust the last position
keyframes for the new letters. For this, we must stand at the last keyframe first and only then adjust the position. If you are not able to stand
right on the keyframe, like in my case, don't worry. It's just a small
software glitch that happens after repositioning
keyframes a lot of times. In this case, just stand as close as you can to the keyframe and move the layer. As you can see, a new updated
keyframe was created, but it is not aligned
with the rest of the keyframes. Don't
worry about it. Just make sure you don't
have two position keyframes for the position at
this point in time. For now, let's create
a new guide and focus on aligning the new letters with the
rest of the text. Don't worry if the keyframe is not aligned with
the other keyframes. Then let's move the new
letter to the right to rearrange the position
of the rest of the letters. Basically, what we
are doing now is adjusting the last position
keyframes for the letters. Once done, let's place the null object in the
center of this word. Great. Now we can bring
the first text closer. And now let's stand
in the middle of the letters animation and adjust their position at
this point in time, as well. All right. Once we've done that, let's go over the
animation and check if everything is okay,
as you can see. During the reposition process of the last position keyframes I created, unnecessary
keyframes, if it happened to you as
well, then let's make sure we delete the old keyframes
while leaving the new ones. Great. So once we're
done with this, let's make sure no layers are selected and press
you to close them all. Now let's create
the one frame delay we had earlier for
this animation part. Awesome. So now we can stand at the point in time
where all the letters are in their final place and then select them all and
parent them to the null. And now we will also have
the secondary bounce motion that we created for the null. We can get rid of the guide now. And now let's deal with the
question mark animation. First, we can delay
this animation a little bit in the timeline. Since now the letters animation
lasts for a bit longer, we can start the question mark
animation from second two. Okay, the timing looks good, but now we need to move it to
be placed beside the text. For this, we can create
a new null object, just to use it as
a moving object for the two layers we have here. I'm doing it instead of
moving each layer one by one. Alright? I think we can place
it somewhere around here. Great. We got everything
positioned in place. And now before moving on, let's adjust the size of this comp using the
region of interest tool. You can open the
composition settings and set the dimensions
to rounded numbers. We don't have to do it,
but I prefer it that way. What's most important
is to make sure that the layers are aligned to
the center of the comp. As you can see in my case,
I got everything aligned. In case you don't have
that, you can use the null object method to parent all the layers to the null
and move it to adjust the position for all the
layers at once. All right. And now, before moving on, let's do one final adjustment. I see that the animation here starts from second
one in ten frames. Let's select all
the layers except the first text and bring this animation to
start from second one. Awesome. Now, I'm sure we
got everything done here. We might move the first text to the right a little
bit, and that's it. Now let's go back to the master comp and see what we've got, pay attention to the voiceover. Our goal is to make sure it syncs perfectly with
the text animation. So why keep struggling? Go to onepoint.com and
make your workday easier. So why keep struggling? Go to onepoint.com
and make your work. Why keep struggling? Go to one point. Keep
struggling. Go to one point. Alright. So after
watching it a few times, I see that we do need
to adjust the timing. But before doing
that, I will delete the last position key
frame I have here. This small movement is
irrelevant for this text. It was more relevant for the
previous text animation. Now let's move ten frames backward and start the scene
from this point in time. Awesome. So now that means we need to adjust the timing of the tro animation for
the previous scene. Therefore, while standing
at this point in time, let's enter scene
eight and make sure the animation already ends
at this point in time. To do that, we need to enter
the UI screen pre comp. And first thing first, make sure the outtro animation ends at
the time indicator position. So I'll select all
the key frames of the file layers and make sure the last
keyframe ends here. That means we now also need to readjust the timing of the
previous animation part. It needs to end at
this point in time. So let's stand
here and then move all the key frames of the
previous animation part to end here. Awesome. With that done, let's not forget about the micro animation happening
inside the pop up precomp. It needs to start from
this point in time. So let's enter the precomp and move the
keyframes here. Okay? So now since we
changed the timing of the final part of this
demo flow animation, that means we also
must adjust the timing of the camera movements
in the main scene. We need to sync the drag
and drop animation to the outtro animation of the pop up panel
inside this precomp. That means the drag and drop
animation should end at this point in time
where the pop up panel starts the outtro animation. So let's stand here and
then go to the main scene. And now, make sure we see all the key frames we have here. Now, select all the key
frames of the final part and bring them here so the UI screen is already in the
center of the frame. As you can see, this way, we got everything
synced perfectly, and that's how you readjust the timing of your
demo flow animations. There is nothing fancy
or complicated in that. All we need is a little bit
of focus and understanding of where each of
our animation parts begins and ends. Alright? So now before going back to the master comp and watching
the animation once again, I want to adjust the final
position of the file layer. I don't want it to hide
the objects behind it. I want to see the purple
folder animation. Awesome. So now, after adjusting the timing
inside this pre comp, let's stand at the middle
of the outtro animation. And while standing here, go
back to the master comp and crop scene eight pre comp
to this point in time, let's zoom in and make
sure we don't have an empty space between
scene eight and nine. Okay. And now let's
see how that looks. A way. So why keeps
Keep struggling? Hey. So why keep struggling? On second thought, I think we don't have to create a match cut
transition here. Let's extend the scene
eight pre comp to get a simple panning to
the left transition. I think it looks
better in this case. We can enter scene eight and see where the Otro
animation ends exactly, and then crop the pre comp to that point in time
in the master comp. The painting to the left
transition looks much better. We can start Scene
nine a bit earlier. Let's move it ten
frames backward and watch this part a few
times to see how that feels. So why keep struggling? Struggling. Go to one point.com. So why keep struggling? Go to onepoint.com. So why keep struggling? Go to onepoint.com and
make your Alright. I think it looks great.
And now I want to make sure that the word struggling will be placed in the
center of the frame. For this, we can first open
up the safe action grid. And now let's stand at the last position keyframe of this pre comp and adjust it. So the word will be
positioned in the center. Awesome. So now
we've got the letter G almost touching the ceiling of the frame at
this point in time. Let's enter the precomp and adjust the animation
of this letter. First, let's select this layer and press to see
all the keyframes. And now let's try to
stand in the middle of this animation and adjust
the position of this layer. Don't worry if you can't stand
exactly on the keyframes. Just adjust the position,
and then we will remove the irrelevant keyframe. Also, don't worry
if you can't place the new keyframe aligned exactly with the rest
of the keyframes. This will not be noticeable
in the animation. Awesome. So now, let's go
back to the master comp, and as you can see, everything
looks perfectly fine. With that done, we can now save the project to secure the
changes we made so far. Great. So now let's
continue to the next scene. To see what we need to do next, we can go to the video board. Okay, so now we need to create the final scene
for this project. This is the call to
action scene that is very common in these kinds
of explainer videos. Usually, in this
scene, we need to present the logo and some call to action animation like check out our website or
click the link below. Of course, it needs to be
synced with the voiceover. In our case, our
call to action is to promote the website and
tell the viewer to visit it. With that said, let's go back to the master comp and start
preparing the scene. But first, let's bring this Illustrator layer
into the Assets folder. Okay. And now let's
press Catrol or Command N to create a new comp.
We can call it scene ten. Let's make sure the duration is 2 minutes before
clicking Okay. Of course, later we will
adjust the duration. Awesome. So now let's begin
by designing the scene. We can start with bringing
the logo into the scene. For this, we can
search for the logo, pre comp we have in the project, and then bring it
to the timeline. Once done, let's now make sure the logo fits the scene and
scale it down a little bit. As you may understand,
we need to have some space for the call to action button that needs
to be below the logo. Awesome. And now we can move on to start creating the
call to action button. For this, we can use one of our button pre comps that we
created during the project. Let's duplicate the last button pre comp and then
adjust the name. CTA stands for call to action. Great. So now let's bring it to the scene and adjust the
design and the text inside. First thing first, let's change the text to the website name. Once done, let's enter the composition settings and adjust the width to
fit the button size. Okay. And now let's position the two precomps so we will have a nice and balanced composition. We can lower the button
and also lower the logo. Great. With that done, we can start
animating the scene. And the main animation
that needs to happen here is the intro of the sphere, which is our cursor
in the project, clicking on the button. For this, let's search
for the cursor precomp in the project panel and then drag this precomp
into the scene. And now for the animation, we can start the intro of the cursor from the
top area of the scene. Let's place it in the
center vertically. Okay, that's good enough. And now let's tag
this pre comp in yellow and start animating it. We will use the position
property for this. So let's create
the first keyframe at the beginning
of the timeline. And now let's move 1
second forward and bring the pre comp here to
the right side of the scene. Next, let's move 1
second forward and bring the precomp somewhere
in the area of the button. We can align it
vertically to the comp, and then let's zoom in and
place it a little lower. Awesome. And now let's create the click animation
for the cursor, which will also be the
outtro animation of it. For this, we will use
the scale property. So create a keyframe here. Then let's move 20 frames
and set the scale to zero. Great. So now, once we've done creating
the initial motion, we can start adjusting it. First, let's begin with adjusting the path
using the Vertex tool. We want to have a nice and
rounded motion for it. Great. Once we
adjusted the path, let's now deal with the motion. First, let's easy ease
the position key frames. And then in the graph editor, let's make the intro velocity, 95% because we want to create a match cut from
the previous scene. And now, at this point in time, let's make this
sphere slow down by moving the handle to the right. I don't want it to stop
completely at this point, so I'll make sure to
turn this keyframe into a continuous keyframe and then make sure the speed at this part is not zero.
Let's see how that looks. Great. Looks nice. Now let's deal with
the scale key frames. To grab the attention of
the viewer to this area, we can stand in the middle
of the scale animation and make the cursor a bit bigger so it grows before disappearing. As you can see, it brings more attention to the cursor
at this point in time. Okay. And now let's easy
ease the key frames. And this time, use
the graph editor to make the cursor grow fast, slow down in the middle, and
gain speed toward the end. Awesome. I think it looks great, and we can now go back
to the timeline and watch the animation we created so far to
see how it feels. Alright. I think the
animation looks very good. But in my opinion,
we don't need to have the logo animation
happening here. I want the logo to be
static in the scene. I want to use this
opportunity to show you how you can freeze your animated
precomps. It's very simple. First, we need to stay
at the point in time where the logo has already
finished the animation, then right click on the precomp, go to T and choose freeze frame. Great. Now I notice
that the logo doesn't seem exactly in
the center of the frame, so let's move it to the left
a little bit. That's better. Great. And now let's
deal with the timing of the clicking animation
inside the button precomp. For now, it's
happening too early. For this, let's stand
at the point in time where the cursor
makes the click animation, then enter the
button precomp and move the keyframes here.
Let's check how that looks. I think it can start
five frames earlier, so let's adjust the
timing real quick. Great. And now it
feels much better. That's why I always
suggest checking the animation a few times to
see how the motion feels. Okay, so now I see that all the animation
looks and feels great. We can collapse the cursor pre comp and move on
to the next step, which is adding the scene
to the master comp. First, we can stand
at second five and trim this timeline to
this point in time. Once done, let's go
to the master comp and bring the final
scene to the timeline. Great. And now let's start
working on the transition. First, we can enter the
final scene and see where the middle of the
intro animation is. Here it is. Let's stand at
this point in time and then in the master comp crop this pre comp to the
time indicator position. Now, let's bring this
pre comp to start right after the previous one and then adjust the end of the
previous pre comp. Since we want to create
a nice match cut, we can end the scene
at the point where the cursor is about
to exit the scene. Let's now bring the final scene here and see how that looks. We can crop a few frames
from the beginning of the final scene to get a
bit more continuous motion. Okay, that looks nice. And now let's add
some gentle Zoom in animation for the final scene so it won't feel too static. We can create the first
keyframe here. After that. Let's stand at a point in time, a bit after the animation
inside this precomp ends. That should be a bit
after this point in time. I think we should expand the duration of the
final comp a little bit. So let's do that real quick. Let's make it last
for 7 seconds. Now let's expand all
the layers here, and after that, go back
to the master comp and expand the pre comp. Great. So now we can stand at 1 minute and 8 seconds and scale the pre comp a little bit. Let's try 110. Now let's see what we've got. Looks nice, but I don't like how the cursor is touching
the logo in the final scene. So let's enter it and adjust
the cursor position path. Alright. I think it's okay. Let's now go back to the master comp and see how that looks with the
Zoom and animation. Looks great. And
now let's stand at the end of the animation
and press in to finish the workflow
area here and now see the entire project from the beginning with
the voiceover. Managing a large team across multiple projects isn't easy. Too many tasks,
too many messages, and before you know
it, you're drowning in chaos looking for
help. Met One Point. The platform that makes
project management so simple, even your cat could do it. With One Point, you get a crystal clear overview of everything your
team is working on, all your projects,
all your tasks, all in one place. Need the full picture. Every project includes
detailed tasks, sub tasks, and real
time progress tracking, so nothing slips
through the cracks. Want to see who's
falling behind, head to your team tab to view everyone's
activity at a glance. Need to follow up with someone. Jump into the built in
messaging system where all your conversations
are organized by contact. Send a quick reminder or
share an update instantly. And yes, sharing
files is effortless. Upload any document, and your entire team will have
access to it right away. So why keep struggling? Go to onepoint.com and make your workday easier,
starting today. Managing a large
team across Mul. Alright, that looks very good. And most importantly, the animation syncs
with the voiceover. Now, once we've got the two most important
things done right, we are ready to move
on to the next step, which is adding the cursor
animation in each scene. It's gonna be super fun, so
I'll see you in the next one.
24. Adding the Cursor Animation: Come back. In this lesson, we will start adding the cursor animation to the relevant scene. Note that we are starting
to add the cursor animation only after finishing
the entire animation and syncing it to the voiceover. And that's because now we
are sure the timing of the click animation in the project is synced
perfectly with the voiceover. We don't want to involve
the cursor animation during the initial animation
because it will complicate the timing
adjustments in the process. As you may remember, we adjusted some demo flow animation
keyframes many times, and imagine if we
would also need to adjust the cursor
animation as well. It would make the
process much slower. Therefore, I prefer to imagine the cursor animation during the initial animation
of the entire project, and only after I'm done and sure that the timing is great, I will add the cursor animation. All right. So with that said, let's start working on the
first cursor animation, which, as you may
already understand, needs to happen in scene four. In the second animation
part where we see the project's UI
screen for the first time. So let's enter this
precomp and then add the cursor precomp we have in the project to this timeline. Let's tag this pre comp in yellow and start creating
the cursor animation. And so we can see our cursor
a bit better in the scene. We can add a white stroke
to it, just for now. Later, we will design the
cursor however we want. For now, we need to focus on creating
the animation first. So I'll enter the and
select the shape layer. Now let's add a stroke
color and choose black. For the width, you
can leave it at two, and now we can clearly
see the cursor. Great. So now let's go back to the master comp
and start animating it. From my experience, I discovered the best
way to do that is using a very simple method.
Let me show you what I mean. All right. So first, I
don't focus on creating the intro or the
outtro for the cursor. The first thing I focus
on is the timing. The timing for the clicking animations we
have in the demo flow, for example, at
this point in time, we have the click animation
for the project box. We can enter this
pre comp and find the exact point in time
where it's happening. In this case, it's happening
at this point in time. So now, we can stand here and then go back
to the master comp. Then we need to place the cursor in the logical position and create a keyframes
for the position property at this point in time. After that, don't pay
attention to anything else in the scene other than where the second click
animation is happening. As you can see, in our case, it's happening at
this point in time. So what I'll do is bring
the cursor to the area where the click
animation is happening. Now, let's zoom in on
the timeline and keep adjusting the position
of the cursor according to the click
animations we have here. The next one is happening here. So let's bring the cursor here. Great. And now let's
move forward and see where the next click animation is happening and then
bring the cursor there. Awesome. So now I
see that there are no more click animations
in this scene, so I can start creating
the atro animation for the cursor. And for this, we can go 1
second after the last keyframe and bring the cursor out of
the frame, however we want. This time, let's drag
it to the left side. Great. For now, the animation probably
looks very weird to you, but trust me, soon,
everything will become clear. For now, try to focus
on my workflow. So first, we created
the initial position keyframes according to
the click animation. Now we can start adjusting
the position path to make the cursor move in a
more rounded and natural way. For this, let's select the Vertex tool and first
deal with this point. Click here once, and now
let's curve the path. Now, switch to the
selection tool. And now let's drag this
handle up a little bit. We can hold Alt or
option while doing so to make sure we move
only one handle without affecting
the second one. Alright. Let's now do the
same for the second handle. Okay, so now we've almost
finished adjusting the path. And before doing
that, let's create the intro animation
for the cursor. For this, you can move
1 second backward from the first position
keyframes and drag the cursor to the right to make it
enter the scene from the right side. Great. Now we can finish adjusting
the curve point in this path. Let's curve this point as well
so we can have the cursor enter the scene in a
bit more curvy motion. At this point, I
usually love to zoom in and check the animation of the cursor to see
if it syncs with the click animation
in the scene. I noticed that the
cursor should not be placed here at this point in time because this
is the point where it needs to bounce
on the task box. That means we need
to make the cursor be somewhere around it before reaching this point to make the illusion of
the touching motion. So let's move 1
second backward from the first touching keyframe and move the cursor
somewhere around here. Once that's done,
let's now go back to the Vertex tool and curve
the new point, as well. Let's adjust the handle
to get a bit more curvy. Motion. Awesome. And now for this point, we can make the motion smoother by adjusting
the first points handle, lower it down and drag it
to the left a bit more. Great. So now, as you can see, we've got a nice rounded
and curvy motion for the cursor animation. We can also curve the last
point and adjust the handle to get a bit more rounded motion for the outtro animation. Alright. So now, once we've done creating
the initial animation, let's create a click motion
for the cursor so we can sync it together with
the click animation that we created for the panels. Of course, we could create a scale animation at
every point in time. Where we have a UI panel, click animation, but it
would take a lot of time. And in case we needed to adjust the click
animation timing, it would take us forever to adjust the cursor
click animation. Therefore, I want to teach
you a very cool trick to sync your cursor clicks
to the panel clicks, so you won't need to
time the two manually. When I created this project, I knew that there was a
way to trigger animation inside a pre comp
using an expression, but I didn't know
exactly how that works, and I definitely didn't
know what the expression was or what property
to apply it on. In this case, I used
the power of AI to generate the expression for so now I want to teach
you how to do that. You might watch my
course AI for motion, in which we learned how to
use hat GPT to come up with very useful expressions just by describing what
we want to achieve. No need to have any experience with expressions or
understand coding. I highly suggest you watch
the AI for motion course in case you want to level
up your workflow and take real advantage
of AI in After Effects. So now I will use the same techniques from
that course to come up with a nice setup to automate my click animations
here. All right. So with that said, let's
get back to action. First thing first, before
jumping to Chat GPT, let's create the click
animation for the cursor. Let's stand at the
beginning of the timeline and create a scale
keyframe here. Now let's say this animation
will last ten frames. So create another keyframe here. Then let's stand
in the middle of the keyframes and
scale down the shape. Finally, let's easy
ease the keyframes and adjust the motion
in the graph editor so the motion will start fast. As you can see, this way, we created a nice click
animation for the cursor. Great. So now I want to trigger this animation
in my main scene. At the relevant points in time where I need
to sync it with the click animation
of the UI panels. But let's say we don't
know how to do it exactly. This is the perfect time
to spend a few minutes to see if we can do it
using an expression. The first thing I love to do is take a screenshot
of my scene while making sure the layers
and their names are clearly visible
in the screenshot. Then I like to point
at the layer that I will soon talk about
with Chat GPT. You don't have to
do it. All right. Next, let's copy this
screenshot and then go to Chat GPT and paste the
picture in a new chat. It works perfectly with the free Chat GPT
version as well. Okay. And now I just start
to describe my situation, beginning with mentioning
what software I use. I write with poor English
and lots of spelling and grammar mistakes just so you can understand that you don't
need perfect English. The main goal is to describe the situation and
explain your goal. It's very important to mention the correct names of your layers that you
are referring to. Alright. So once
we're done with that, we can press Enter and
let the AI do its thing. Now, before applying the
expression to the project, I love to read the explanation
that Chat GPT provides. In this case, I can copy
the expression and use it. But after reading the notes, I notice that the
expression it gave me needs to be adjusted inside. I see that to activate it, I need to adjust some values under the click
duration text line. Let's say I don't have
a clue what that means. I just want a simple
expression that will activate my cursor click animation that I created inside
the cursor pre comp. So in that case, before pasting the
current expression, I will try to explain
to Chat GPT that I want an expression that
works without me needing to make
adjustments in the code. So now we got a new expression. We can read the
explanation and apply it according to the guidance
steps that Chat GPT gave us. You can also find
this expression in the assets folder
you downloaded from me. So go and copy it in case the expression you
created doesn't work after you apply
it in the project. But first, I do want you
to use the expression you created now
before applying mine. Okay, so let's now go back to the project and
apply the expression. First, as Chat GPT suggested, we need to activate the time remap function for the pre com. Next, we need to
create an expression for the time remap property. Then let's just past the
expression. Awesome. With that done, let's
now see if it works. So first, let's stand
at the point in time where the first
click animation should be and then let's do the next
step Chat GPT suggested. At this point in time,
we need to create a new marker on the precomp, you can use the
shortcut to do that. Alright. So now, as you can see, the scale animation
we created inside the cursor precomp is now happening here without
us moving the keyframes. That means the expression
is working perfectly. So now we can start
creating new markers. At any point we want the
click animation to happen. But before that, we can
adjust the motion of the cursor animation
to make it move in a more natural way and not in a linear way as it
moves right now. We need the cursor to
pause for some frames at the point in time where the
click animation happens. Let me show you what
I mean. Let's open only the position
keyframes and then select them all and make
sure the velocity is set to let's say, 85%. By doing this, we
now have the motion completely slow down at the points in between
the keyframes. It's great because now
the cursor will be almost static at the moment of the cursor click animation. Okay. But now there are moments where we don't want the
cursor to be static. Like at this point in time, we want it to slowly keep moving. Let me show you how to
deal with these moments. First, we need to make sure to select the keyframes
of that specific moment. And then using the
keyframes velocity panel, make them continuous keyframes. Now we can zoom in and bring this keyframes
up a little bit, so the speed at this point
in time will not be zero. As you can see, now it doesn't stop and keeps moving slowly. Once that's done, let's now
deal with the moments where we have the touching
animation happening, like, at this point in time. To make the illusion of
the touching motion, we need to speed up the cursor motion at the touching moment. And we need to make it go back super fast to create
that bouncy motion. Let's see how that looks. Great. We got a nice
bouncy touch motion. But now, as you may understand, we need to create the bouncy touching motion for the
next keyframes, as well. Let's try to adjust
the velocity of the keyframes to see if
we can get it right. Let's drag this
handle to the right. I'm trying to make the cursor move super fast at
these two points. As you can see, no matter what I'm doing,
it doesn't feel right. The motion doesn't feel
a touching animation. So let me show you
what we need to do to make this look better. Let's now go back
to the timeline and first find the problematic
area we need to deal with. We are talking about the
animation happening here. Now let's bring
these four keyframes back to linear keyframes. Hold controller command and
click on one of them once. After that, let's
stand in the middle of these keyframes and create a keyframes with
the current value. Next, let's do the same in the
second touching animation. Finally, let's move
five frames forward and create a keyframe
also before the Outro. For now, you may not
understand why we did that, but soon everything
will be clear. For now, let's start
adjusting the motion. Select all the last part
keyframes and easy ease them. And now let's go to
the graph editor and start adjusting the motion. Remember, we want to create that bouncy touching animation. So let's make the
cursor move fast before the touch moment and
fast after the touch moment. Great. So now we want the cursor to hover in
the air for a few frames, and that's where our
new keyframes come in handy because we can
now make this moment last longer by moving the handle of this
keyframe to the right. We then need the cursor to have that bouncy touch
motion after that, so we can adjust the
velocity at this moment, as we did for the
previous touching moment. Awesome. So now let's do the same for the final
touching moment as well. Once done, let's
see how that looks. Great. As you can see, now we get a more noticeable
touching animation. And in my opinion, it
feels much better than the previous animation we
created in the beginning. Alright. So now I don't
want the cursor to completely stop before
exiting the scene. So I'll select this keyframe and make sure it's a
continuous keyframe, which will allow me to
bring this keyframes up. Now, the speed here
will not be at zero. I can also move the
handle to the left to make the cursor exit slowly and gain speed
towards the end. In case you love this motion, you can apply it to
the hovering moments in the touching animation parts. We can select the
hovering moments at once while holding Shift, and then use the
shortcut to open up the keyframes
velocity panel for both. Now, let's make these keyframes continuous keyframes and
make sure to bring them up. Alright, I love how that looks. Let's now exit the graph editor and see this animation part, together with the
rest of the scene. I think that looks
great. And with that, we are now ready to move on to the next scene where
there needs to be a cursor animation inside. So let's go to the master
comp and check it out. Alright, the next scene we
will work on is scene five. Before that, let's close all the open pre
comps we have here. Awesome. And now let's enter the scene and try to understand
what we need to do here. Okay, so I see that the cursor should enter the scene at
around this point in time, and we should create
a click animation to open the sub task
panel and then create another touching
animation for checking some of the subtasks
inside this panel. With that in mind, let's go to the previous scene where we created the cursor
animation and copy the cursor pre comp from there because we already have the expression applied
on this precomp. Okay, and now back to
our new current scene, let's paste the cursor
precomp and get rid of all the keyframes in the
markers we created here. Make sure not to delete
the time remap property. Then let's go to the beginning
of the timeline and press the left bracket key to start this precomp from
here. All right. And now let's start
animating it. The first thing we will
do is find the moment in time where the first click animation is
happening in the scene. It's happening somewhere
around here in case you're not sure where exactly
the click animation starts, you can enter the UI precomp and find when it's happening. In our case, it's
happening here. So while standing
here, let's go back to the main scene and
now bring the cursor here and mark this point by creating a first position keyframes at this point in time. Great. And now we can
either keep animating the next cursor animation or we can create
the intro for it. This time, let's create
the intro and then keep adjusting the animation to
fit the demo flow animation. Alright? So let's go 1 second backward in time and bring the cursor
out of the frame. Let's make it. Enter the
scene from the right side. Cool. So now we have
an intro animation, and we've got it placed where the click animation in the
demo flow is happening. Next, let's move 1 second forward and bring the
cursor somewhere around here because we now need a few frames for the pop up
panel to enter the scene. Awesome. And now let's find the next position
that the cursor should be. In this case, we
need to bring it to the area of the first sub
task at this point in time. So let's drag it
here. Next, let's see where the second sub task, checkbox animation is activated, and then bring the cursor
to be placed beside it. Awesome. So now, as we learned
in the previous scene, we can stand in the middle of the touching animation and move the sphere to the
left a little bit to get that hovering
in the air motion. Awesome. So once we've got all the touching
and clicking moments, we can move 1 second forward and get the
cursor out of the frame. Nice. So now we finished creating the initial
motion for the cursor, and our next step is
to start adjusting it. We can begin by curving
the relevant points, starting with the moments where the sphere should
hover in the air. Then we can round the
outtro in the intro points. Now, let's switch to the selection tool and start
adjusting the handles of the rounded points to get a nice curvy motion
for the cursor. All right. So once that's done, let's now find the
point in time where the click animation
is happening and add a new marker to trigger
the expression. Awesome. So now we finished all the initial
important steps, and we are ready to start
improving the motion. Let's select all the
keyframes and easy ease them. And now let's enter
the graph editor and adjust the velocity
of the motion. Our goal is to make the
cursor, at this point in time, slow down for a longer period of time since we have the click
animation happening here. This way, we get the cursor moving super
slow for more frames. Great. So now, at this point, I usually check the rest
of the animation in the scene and try to understand what should
be adjusted next. This case, I know
that I need to create that bouncy touching animation for the sub task
panel animation part. Therefore, let's
select this keyframe and drag the left
handle to the right, so the cursor is super fast
at the touching moment. Then to create the
bouncy motion, we need to make it fast
after the touching point, very similar to what we
did in the previous scene. Okay, now let's do the same for the second touching moment. Great. So now, after checking
this part a few times, let's say we decided to make the cursor stay in the scene for a bit longer period of time. I don't want it
to exit the scene right after the second
touching moment. For this, let's stand at the last keyframe and change the cursor position to be
placed somewhere around here. Let's adjust the
curve for this point. Great. And now
let's move 1 second forward in time and move the
cursor out of the scene. Awesome. And now,
before moving on, let's first see how the
animation we created looks. Alright. So I noticed that
at this point in time, the cursor fully stops,
and I don't love it. Let's fix this by
converting this keyframe to a continuous keyframe and speeding up the
motion at this point. Great. So now we got
a bit better motion. But I noticed that the first touching animation
doesn't feel right. And it's because we have a
huge amount of time between the keyframes before
the touching point and the keyframes of
the touching point. Therefore, we can find a
nice point in time before the touching point and move the cursor a bit to create
a new keyframe here. Make sure you still
have that rounded path. Alright. So now
after doing that, we can enter the
graph editor and have a bit more control over the animation and the velocity of the first touching moment. We can make the touch motion faster by dragging this
handle to the right. And now let's deal with
the in between keyframe. First, we need to make sure both the incoming and
the outgoing motion of this keyframes are connected so we can control them
both as one unit, and we can do that by converting this keyframe to a
continuous keyframe. Now we can decide what the speed needs to be at this
point in time. Let's see what we've
got. Looks great. Let's now deal with
the hovering motion in between the touching moments. I don't want the cursor to completely stop at this moment, so I'll make sure to speed up both the incoming
and outgoing motion for this keyframes
one unit as well. Awesome. That feels much better. So while doing all these steps, I tried to show you how
to play around with the keyframes when you need the motion to fit your imagination. This is the process of
real motion design. We also check the animation and adjust the keyframes until we get something
that we like. Then I'm checking the
motion once again. Every time I watch it,
I notice something new. This time, I don't love that
the animation stops here. It doesn't feel right. So I'll make sure to make this moment
more continuous motion. All right. So with
that being said, let's now watch the
entire scene from the beginning to the end
and see how that looks. Looks great, but
I think we can do a few final tweaks to
make it look better. I feel that the intro
motion is too fast. Let's bring the first
keyframes to start 1 second earlier to make
the intro last longer, which will make it look slower. Let's watch it once
again. I noticed that the bouncy motion is too hard at the
second touching moment. So let's enter the graph editor
and ease it a little bit. Alright, that looks
better. And since the final key frame of the touching animation ends at second seven and ten frames, let's start the Otro from second eight and ten frames just to make it
exactly 1 second. Alright, so with that, we have finished the scene, and we're ready to move
on to the next one. So let's go back
to the master comp and find the next
scene we need to deal with. All right. So I see we have two
scenes to work with. Scene seven and eight,
the cursor animations in these two scenes are a bit more simple than the previous ones. So
let's get started. We will start with scene seven. First thing first, let's enter the scene and bring
the cursor pre comp from the previous one Now, let's delete the position
keyframes we have on it, and then also delete
the marker we created. Let's stand at the beginning
of the timeline and press the left bracket key to start this pre comp from
here. All right. So now let's see
what we have here. I see that the first click
animation is happening here. So let's stand at this point in time and bring
the cursor to be placed somewhere around
the second contact box. Now, let's mark this point
with the position keyframes. Um, before moving on in
the demo flow animation, let's go to the beginning of the timeline and
drag the cursor to the right out of the frame to create the
intro animation for it. Great. Now we can move 1 second forward and bring
the cursor somewhere around here so it won't
interfere with the transition happening in the demo flow
animation. All right. And now let's see where
the next click is happening or if there is any touching moment
throughout the animation. As you can see,
the next click is happening after a
lot of seconds, which means we have a
lot of free time that the cursor needs
to do something. In these cases, I love to change the position of the
cursor every 1 second. I'm doing this just
to get a first idea of the cursor motion. Later, I will adjust
it if needed. So let's do it now. Let's stand at our
last keyframes and move 1 second forward
and bring the cursor down a little closer to its click moment that needs
to happen in the button area. Next, move 1 second again and bring it
somewhere around here. Let's keep doing that
until we reach the button. Since we have the
text here, I'll make sure the cursor does
not collide with it. All right. And now, after
reaching the button, we can move 1 second
and bring the cursor down out of the frame to create the outtro
animation for it. Awesome. So with that done, we can move to the next step. At this point, the
best thing to do is to adjust the path, and we can do it using
the Vertex tool. So let's first round all
the relevant points, and after that, using
the selection tool, adjust the handles to have
a nice and rounded path. So once that's done,
we can now create a marker at the point in time where the
click is happening. We have the first click here and we have another one
for the button. I'll adjust these
points real quick. Okay. So now let's create
a marker here as well. Great. So now let's select all the keyframes
and easy ease them. After that, we can start
adjusting the motion. This time, let's
set the velocity of all the keyframes to 85%
and see how that looks. Okay, I think it
looks nice for now, but in my opinion, the outtro animation
doesn't feel right. Let's cancel the curve of the last path point to make it exit in a straight path and
see how that will look. That's much better, but it's happening too fast,
in my opinion. So let's make sure
the outtro animation lasts for 2 seconds and not one. Yes, that's much better. Awesome. So now, once we're done with all
the initial animation, let's now try to do some
adjustments to make the cursor move in
a more flowy way. I don't love the pauses
happening in these areas. The first thing we can try
is to delete this keyframes. Then let's adjust the handles
of the points to create a nice and curvy
path. All right. That already looks a bit better. Now, let's select these
three keyframes where we got the pause moments and open the keyframes velocity panel to make them
continuous keyframes. Once done, let's go to
the graph editor and make sure the speed at these
moments is higher than zero. At this point, I'm just watching the animation and trying
to adjust the velocity of the keyframes to have a motion
that feels right for me. In my opinion, at this moment where the cursor is
hovering over the text, it's happening too quickly. So let's make sure this
animation lasts a bit longer. Let's watch the animation a few times and see what
else we can improve. I don't like the
pause happening here, so let's fix that real quick. Okay, that's better. But now I don't want
the cursor to move in a snappy way before
reaching the button. So I'll adjust the
handles in that way, so the speed between
these two keyframes will not be so fast. I'm showing you
this process so you can see my thinking process and how I deal with
the adjustments in the animation. Alright,
with that done. We almost finished the scene. The only thing that
is bothering me is that the cursor
touches the text. To fix this, we can lower
the text a little bit while making sure we are still in the safe action grid guidelines. Awesome. That looks better. We can now adjust the
path a little bit, so the cursor won't
be so close to the UI screen. Great. So I think we have finished working on the scene because
everything looks great. So let's save the project and move on to work
on the next one. Okay, so for the next scene, we can make the cursor enter
the scene from the top, so we will have a nice
continuous motion from the previous scene where the cursor exited the
scene from the bottom. All right. With that in mind, let's enter scene eight
and start working. First, let's bring the
cursor precomp here. We can copy it from one
of the previous scenes. Now, let's get rid of
the position keyframes and the markers we have on it. Don't forget to
bring the precomp to the beginning of the timeline once you finish. Alright. And now let's start
animating it. As usual, we will focus first on finding the first
click animation. It happens from
this point in time, we've got the click animation
of the ad button here. So let's bring the cursor here and create a
position keyframes. Alright. And now let's go to the beginning of the timeline and bring the
cursor up out of the scene. And since we have a lot of time until the click animation, we can stand at second one and bring the
cursor here so we can have a nice and
curvy Intro for it. Awesome. And now, since the next click or
touching animation is happening later
in the timeline, we can move 1 second after the last keyframes and move the cursor
somewhere around here. Next, we need to make the
illusion of the cursor grabbing the JPG file and dragging and dropping
it in the pop up panel. For this, first, we
need to make sure to sync the cursor animation
with the camera movements. In our case, it's the
position animation for the UI screen pre comp. We need to stand at the
point in time where the right panning camera motion ends and bring the cursor
to the file location. Great. With that done, don't worry about the
curvy motion of the file. We will do it later. For now, let's focus on syncing
the keyframes timing. So now, once we're
back to the center, let's position the cursor once again to the location
of the file. Great. And now let's move 1 second forward and
bring the cursor down a little bit
to stay here for a few frames before
exiting the scene. After that, we can move another second and get the
cursor out of the frame, let's say, from the left
side this time. All right. And now once we're done
with the initial animation, let's select the Vertex tool and start adjusting the path. Let's first click on this point. Great. And then for
the next point, I'll leave it as it is because a click animation
needs to happen here. Next, let's move forward and
click on the third point. Awesome. Let's move on. Let's now click here
to round this point. And for now, don't worry that it doesn't match the
file animation, and our illusion is not working. We will deal with
this in a second. For now, let's finish adjusting
the rest of the points. I'll click here on
the last point. And now let's grab the
selection tool and adjust the handle to get a nice
rounded motion at this moment. Next, let's go back
to the file animation dragging part and see
what we need to do here. First, let's make sure we're
standing in the middle of the dragging file
animation so we can get the idea of where the
cursor needs to be placed. And now we need to match
the cursor animation with the file animation. For this, all we need to do is click on this point and
select the right handle. Now when you move it, hold down Alter option to move it only without affecting
the left side. This way, we can curve this
path to fit the file motion. And to know how the curve
should look exactly, we need to see the curve
of the file layer path. So let's click on
it to see its path. Now, let's create a new guide to mark the most curvy
point of the path. Next, let's select
the cursor and adjust the handle in a way
so it will fit the guide. Great. And now to keep the
illusion more realistic, we also need to match
the velocity of the motion of the file to
the velocity of the cursor. And since the
velocity we set for the file animation is 85%, we should do the
same for the cursor, but we will do that in a minute. For now, let's keep focusing
on adjusting the path. I want to round the path here more to get a more curvy motion. Let's do the same
for this point. I also want to curve
the intro motion. All right. So now
with that done, we can start adjusting
the velocity. Let's select all the keyframes and set the velocity to 85%. All right. And now let's
see what we've got. Looks nice, but we do have
some small tweaks to do here. But first, let's add a marker
at the click moment to trigger the click animation
inside the cursor precomp. Awesome. And now let's
start adjusting the motion. So now, at this point, as we did already a few times in
the previous scenes, all I'm doing is
watching the animation a few times and adjusting
the animation in parts where I don't want to
have pauses in the motion. By this time, you
should already know how set to deal
with these moments. At this moment, I
want the cursor to start exiting the scene slowly, and I don't want it to
completely stop at this moment. Alright, let's now go
back to the timeline and see all the animation we created from the
beginning of the scene. It looks fine, but I
noticed that there is a pause moment at the point in time where the
cursor is about to hit the button. I'm talking
about this point. Let's get rid of this
pause real quick. It's better. Let's now
see the animation a few times and check if there are any other adjustments
we need to do. I think the cursor is moving too fast after the click animation. Let's ease this motion. That looks better.
Now, let's get rid of the pause moment we
have here in the moment where the cursor is about to grab the M Alright. That looks much better now. And with this, we have
finished this lesson. Let's save the project and
come back to the master comp. In the next lesson, we
will start working on the design aspect
of the project. We will start
adding backgrounds, coloring some objects
in the scenes, and so much more. It's
going to be a fun one. So see you there. And before starting to watch
the next lesson, don't forget to take
a ten minute break to refresh before we continue. See you in the next one. O.
25. Enhancing Visuals with Effects and Color: Come back. So now, once we're done creating
the animation, we can start adding some
nice visual touches and effects to improve
the video visually. Let's begin by coloring the cursor that appears in a lot of the scenes
in our project. As you can see, for now,
it looks pretty boring. So to begin, we can color it with some interesting colors. And for this, we will use the gradient background
animation we created at the beginning
of the project. Let me show you what
I mean. First, let's turn off the black stroke. Then let's find the gradient background file we
rendered and bring it to the timeline. Great. And now let's scale this
layer down, but not too much. We need it to cover the
sphere we have here. Awesome. So now,
once that's done, we can use the track
mat function to make the background layer use the
alpha mat of the sphere. This way, we will mask
the gradient background using the shape of the sphere. And now we have a
nice colored cursor that looks a lot better
than a static color. Awesome. With that done, let's go back to the master
comp and enter one of the scenes where we have
a cursor animation. Let's enter scene eight. Once we're inside, I want you to zoom in on the cursor
to see it up close. Great. And now let me show you an easy trick to add more
depth to the cursor. Let's right click on
the cursor pre comp, go to Layer Styles and select and add an
inner shadow effect. After that, before you
start adjusting the effect, it will be a good
idea to collapse this pre com to make sure you are working on the final
form of this precom. Okay. And now we can choose a nice bright color
for the inner shadow. Let's go with yellow for now. Then to make it blend better
with the cursor colors, we can set the blending
mode to screen. As you can see, that
looks a bit better. After that, we can bring the opacity to 100 and play
around with the angle. In this case, I want
this inner shadow to be fully visible on the cursor,
not just from one angle. For this, we can
set the distance to zero and then play around
with the size property. Great. As you can see, we now have a bit of a three
D look for our cursor, and now I don't want you
to do anything, listen. I'll let you know when
to come back to action. And that's because I want to show you how to properly create this effect for the rest of the scenes with a cursor
animation inside. All right. So the
obvious thing we can do is copy the
layer styles from this precomp and
start pasting them onto the rest of the cursor
precomps in the project. So with that said, after I'm happy with the
look of the effect, I will go back to the
master comp and find the next scene with the cursor animation to
paste the effect on it. I see that I have it
in the first scene, so I'll enter it, then select the cursor precomp
and paste the effect. After that, I'll go to the next scene and then enter
it to paste the effect in the cursor precomp
inside. Pretty simple. But what if I want to change
the look of this effect? In that case, I would need
to enter each precomp and do it manually for all the cursor
precomps in each scene. As you may understand, it
will take a lot of time. Especially if I
have more than two or three cursors to adjust. Therefore, I want to
teach you a better way to copy and paste your
effects when you need them to be in more than one
scene and when you want to control the effect for
them all from one layer. So I'll undo my action and go back to the
initial situation. Now, you can go back and follow
along with me. All right. So in that case, what I will do is first make sure to create the effect in the scene where the cursor precomp appears
first in the project. Soon, I'll explain why. For now, let's cut the effect from this
precomp and then go to the master comp to see where we see the cursor
for the first time. In our case, it's
in the first scene. So let's enter it and paste the effect on the cursor
precomp. All right. So now let's say we just
finished creating the effect, and we know that it
needs to appear in the next scenes in the project. So let's select the effect. And now instead of
using the regular copy, we can go to Edit
and use the copy with relative property
links function. Great. And now let's
go to scene eight, select the cursor precomp
and paste the effect. By using this function, we now have all the properties
of the effect parented to the properties of the
effect that is in our case, the cursor pre comp
from the first scene. That means that now if I
need to redesign the effect, I'll go to my first scene, adjust the properties
there, and they will be adjusted automatically
in the rest of the scenes. As you can see, the design
changed in the scene as well. Even if the values here
didn't seem to be changed, you can clearly see that this still works perfectly. Alright. So now let's bring the
design back to normal and then continue to paste the effect for the
rest of the scenes. Let's go to scene two
and paste it here. If you open the
effect properties, you will see them in red, and that means they
are all parented using expressions to the
effect in the first scene. So now if you need to redesign
the look of the effect, it's easy to remember to go to the first scene and
make the changes there. That's why I prefer to use
this unique copy function from the first scene in
which the layer with the effect appears
in the project. All right. So now, with that said, let's finish pasting the effect for
the rest of the scenes. We can move this precomp to the right to get the
chronological order. This way, I can see where I
already pasted the effect. Alright, so once
we're done with that, let's save the project to secure the progress
we made so far. Great. And with that, we have finished adjusting the
design of the cursor. And now let's use this
opportunity to improve the look of the Call to Action button we have in
the final scene. I'll show you how
using basic Effects, you can create a
pretty impressive look for your buttons or even entire UI screen precomps. First, let's go to the
Effects and Presets panel, search for the CC
Light sweep effect, and apply it to the
button preComp. Usually, this effect
is used to create a nice shiny sweep for
logos or text layers. But in our case,
we will use it to create a cool,
shiny edge effect. Let me show you what
I mean. First thing, let's align the effect to
the center of the button. Next, let's change the shape
of the effect to linear. After that, let's adjust the width to fit
the button shape. I think 70 looks good. Then for the smoothness, we can set it to, let's say ten. Next, for the color, try to
pick some bright colors. Let's go with a bright
yellow or orange color. All right. And now you can play around
with the edge intensity and edge thickness properties until you get the look you like. Once that's done, we can go to the beginning of the timeline
and animate the direction. But instead of
creating keyframes, we can use a simple expression to make it rotate automatically. So let's open the
expression box for this property and inside write
a simple time expression. T asterisk 100. Now, this property will be
animated automatically. Let's see how that looks. Looks great, but I prefer to see only the shiny edges without seeing any shine in
the center of the button. For this, we can set the sweep intensity
to zero. Great. After we are happy
with the results, we can now save the
project and move on to the next step to make this effect look a bit better, and for this, we can
use the glow effect. So let's find it
in the Effects tab and apply it to the precomp. Now, before moving on, I want to mention that the
order of the effects in the Effects panel will affect the look of the
object we are dealing with. With that in mind, let's bring the glow below the
sweep and adjust some properties to
make it look a bit shinier and at this point, the best way to get a nice
look is simply by changing some properties and values of the effect until we get
something that we like. And that's because the effect
look changes according to the color of the button
and the sweep effect values. There are no specific
values using the glow effect that
are going to fit all the colors and
all the designs. Therefore, I suggest you play
around with the properties and see what you love and what fits your project the most. Alright. So now, once we're
done with the button design, we can save the project and
move on to the next step. At this point, we can go
back to the master comp and start adding backgrounds for the scenes without any
backgrounds inside. We can begin with
the first scene. So let's enter it
and start working. First thing, first,
I see that we have a text layer we
use for reference that we can delete right now. Great. And now, before
adding the background, let's use this opportunity and organize our project panel. I see that there are
a few pre comps that we can move into the
precomps folder. Alright. Now, let's find the gradient background we created for the project
and add it to the scene. As you may already understand, this will not be a good idea
because the background layer is too small for
this large scene. If we see that in
the master comp, we can clearly see that
it doesn't look good. The good news is that we can
solve this issue by just scaling the layer to fit the
dimensions of the scene. And before we do that, I prefer to use the
background layer we have in the title animation scenes since there are a few effects
on it that make the gradients look a bit better
than the original layer. So let's first go back to the first scene and delete
the background layer here. After that, let's find
the first title animation and enter this pre comp to copy the background
layer from there. Once done, let's go back to the first scene and
paste the layer. Great. And now let's place
this layer below all the layers and align it to the center of the comp this way. The effect will look
better when we animate it. Now, we can scale this
precomp, but before that, let's delete all the
scale keyframes here. Next, let's scale this precomp until it covers
the entire scene. Don't be afraid to
scale it because we've got the fast Box blur
effect on this layer, which means the gradients will still look good,
even if we scale it. Awesome. And now we can play
around with the position of the background layer to see what color area looks
better for this scene. In my opinion, the
bottom part of the gradient background
looks very good, so I'll leave it like that. With that done, let's move
on to the next scene. Let's now enter scene two and paste the gradient
background here as well. And before moving on, I want
to make this scene look a bit darker since this scene is talking about some problems, like, a lot of messaging
and a lot of tasks. Therefore, it can be
a good idea to make this scene fit the text concept
by darkening the vibes. So now I'll show
you a few ways we can do it using simple Effects. For the first method,
I don't want you to do it with me since we
will not use it. We will use the second
one. So for now, just watch and listen. Soon, I'll let you know when to get back to action. All right. So for the first
method, we can use the invert effect and then
play around with the channels. As you can see, each
option here creates a very different
look that might look very good with the
colors of your gradient. You can combine this
effect with adjusting the master hue property of the hue and saturation effect and see if you can get
something that you like. Alright, I'll delete
the invert effect, and now let's get back
to work together. Sometimes we want to
have full control over the colors in our gradient. And for this, we can
use the tritone effect. So let's first apply it to
the layer and then go to the project panel and bring the color palette to the
scene to sample the colors. Great. So now you can have
more control over the colors. But if you want
even more control, you can switch the tone's
property to Penton. And this will give
you control of the full color wheel you
have in the gradient. We can now sample
the darker colors from the color palette or
even decide that we want the darker vibe
scene to be mainly with the purple colors we
have in the color palette. At this point, I'm
just trying to sample the purple colors and
see what will look best. You can also pick the
color you want manually. Like, I'm picking now
the white color for that specific color area and
the gradient background. Once we are good
with the results, we can now delete
the color palette, and then let's bring
the gradient background below all the layers.
That looks nice. But I think the scene
should feel a bit darker. For this, we can add
the curves effect and then play around with the RGB channels to make
the gradient look darker. As you can see, that
looks very nice. So now let's go to the master comp and see how that looks with
the previous scene. In my opinion, that looks great. And we can now move on to add this dark
gradient background to the next scene, as well. And for this, let's
go back to scene two and copy the gradient
background from here. Next, let's go to scene
three and paste it here. Let's now bring this layer below all the layers here.
I think it looks good. Great. And now let's go back to the master comp and see
what we should do next. We already have a nice
background for scene four, and I think we don't need
to change anything here. As you may notice, we're getting
some nice patterns here, according to the
gradient backgrounds we have in different types
of scenes in the project. For title scenes, we have the boosted hue
gradient background for the scenes
talking about issues. We have a dark
gradient background. For the UI screen scenes, we have the regular
gradient background. This is a good method to
follow for your next projects. To make it a bit
more interesting, you can split the script
into main parts and add a specific background for each part as we're doing right now. With that said,
let's keep up with our pattern and add a regular
background for scene five, since this is a scene with
a UI screen animation. For this, we can enter scene four and copy the gradient
background we have there. Back in scene five,
let's paste it here and place it
below all the layers. Great. And now, before we keep adding the relevant backgrounds
for the next scenes, let's use this opportunity to improve the look of
this scene here. Let me show you what I mean. Let's enter the tasks
pre comp first. What I don't like here is how the shadow looks when the
sub tasks panel pops up. The shadow looks dark gray, which in my opinion, doesn't fit the overall design
we have in the project. To fix this, all we need to do is add the fill effect to it and then choose
a different color. Let's go with white and see how that looks with
the rest of the scene. It looks okay, but it blends too much with
the subtask panel. Let's stand here and then sample the
purple color we have. As you can see, that
looks much better. So now let's copy the
effect and paste it in the other scene where
we have the shadow layer. I don't remember where it was. So let's go back to the
master comp and find it. Here it is in scene eight. Let's enter the scene, and
then the UI screen pre comp. Once here, let's select the shadow layer and paste
the effect. Awesome. So now, with that done, let's go back to the master
comp and keep checking the next scenes where we need to add a
gradient background. Okay, I see scenes six and seven are
missing a background. So first, let's go to scene five and copy the gradient
background from here. Then let's go to scene
seven and paste the layer. Now bring the layer
below all the layers, and let's see how that looks. Okay, that looks great. But I don't like the
dissolve animation of the main UI screen. So let's use this opportunity
to make it look better. First, let's enter the
messages pre comp and find the relevant layer. Here it is. It's the pre comp we have
here below all the layers. And now to improve the
dissolve animation, we can add some gentle blur animation
during the dissolve. For this, first, let's
open the keyframes on this layer and stand at the beginning of
the animation here. Then let's add the
fast box blur effect to it and create a keyframe for the blur radius with a value of zero at
this point in time. Next, let's move a bit
forward to the point where the layer is still visible and set the blur to a higher value. Alright. And now let's bring this keyframe to
the end of the animation. Then easy ease the keyframes
and see how that looks. Awesome. I think that
looks much better now. So let's go back to the
master comp and find the next scene where we need to add a gradient background. Alright. Next one
is scene eight. Let's enter it and add the
gradient background here. Other than that, I
don't think we need to do any adjustments here. Let's go back to the master comp and see how this looks
with the previous scene. I just noticed that the
background layer has the intro animation that we created for the scene
we copied it from. In this scene, we don't need that intro animation,
so let's delete it. Select the layer and press
to see the keyframes. Now, first delete the first
keyframes and then the second. This way, the mask
will stay how it looks after the second keyframes,
which is what we want. To be honest, we can delete
the mask completely, but let's leave it for now and then go back to the
rest of the scenes with this gradient
background layer to delete the intro
animation there, as well. This is the scene
where we do need the intro animation, so
let's leave it as it is. Here, everything looks okay. Here, also, everything
looks fine. The first scene also
looks okay. All right. So once that's done, let's go to scene nine and add a
gradient background. And since this scene looks
similar to the first scene, let's go to the first scene and copy the gradient
background we have there. Alright, back in scene nine, let's paste the layer here
and set the scale to 100. Then let's align it
to the center of the comp and bring it
below all the layers. Great. And now let's go back to the master comp and see how that looks with the
previous scene. As you can see, we've got a weird situation here with
the gradient backgrounds. I wanted to show
you this situation so you know how to deal with it. Scenes eight and nine are
basically one continuous scene. That's because we decided not to have a match cut
in between them. We've got a regular panning
to the left camera motion. Therefore, to fix this issue, all we need to do is delete
the background layers from both scenes and paste one in the master comp below
these two scenes. So now we can first enter scene nine and cut the background
layer from here. After that, let's go to scene eight and delete the
background layer from there. Once done, let's go to the master comp and paste
the background layer here. Next, let's stand at
the beginning of scene eight and bring the gradient background to start from here. Finally, let's place the layer below the two scenes
and see how that looks? Alright. That looks great. But I noticed that
this background is not looking good in
the final scene. That's happening because we have the glow effect on
the button precomp. Usually glow objects look
better on darker backgrounds. Therefore, in our case, it will be a good idea to
bring here our version of the dark
background we created for the second and third scenes. So let's do that right now. Let's go to the second scene and copy the
background from there. Back in the final
scene, let's paste the layer and bring it
below all the layers. As you can see, that
already looks much better. Let's expand the
background layer, and we can also close
these precomps. Great. And now let's go back to the master comp and
see how that looks. Okay, I think it looks awesome. And with that, we've finished adjusting the look
and design of the scenes. Let's now watch the animation from the beginning to see
if we missed something. Managing a large team across multiple projects isn't easy. Too many tasks,
too many messages, and before you know
it, you're drowning in chaos looking for
help. Meet One Point. The platform that makes
project management so simple, even your cat could do it. With one point, you get a crystal clear overview of everything your
team is working on, all your projects,
all your tasks, all in one place. Need the full picture. Every project includes
detailed tasks, sub tasks, and real
time progress tracking. So nothing slips
through the cracks, the cracks, the cracks. Oh. Want to see who's
falling behind? Just. To your team tap Everyone's activity
at a i at a glance. Yes, as usual, we
did miss something. In our case, we need to add a gradient background
in scene six. So let's do that real quick. Let's go to scene five to copy
the background from there. Great. And now let's find
scene six and enter it to paste the layer. Here it is. Let's now enter the scene and paste the gradient
background here. And let's go back to
the master comp to continue checking the animation. Need to follow up with someone. Jump into the built
in messaging system where all your conversations
are organized by contact. Send a quick reminder or
share an update instantly. And yes, sharing
files is effortless. At this moment, I noticed that the cursor is exiting
the scene too early. It's ruining the
match cut transition. So let's enter scene
seven and make the cursor stay a bit longer before
exiting the scene. First, let's open
the keyframes of the UI screen pre comp and the keyframes of the cursor so we can time them
between each other. The cursor starts exiting the scene from this
point in time, let's move to let's say, second nine and bring
the sphere here. Now, let's move 1 second forward and bring the
last keyframe here. Awesome. So now it matches
the outtro of the UI screen, and the last thing we
need to do is make sure the velocity is not changed for the
cursor animation. I see that it changed.
In this case, let's make sure to set the velocity of the cursor
outtro animation to 95% to get that
extreme snap y motion. Let's see how that looks. Alright. I think it should work. Let's now go back to the master comp and check
the transition. Or share an update instantly. And yes, sharing
files is effortless. Upload any document, and your entire team will have
access to it right away. So why keep struggling? Go to one point.com and make your workday
easier, starting today. Looks nice, but now I
notice that the cursor in the final scene is position too low when
it hits the button. I think we should bring it up a little bit at this moment. So let's enter the final scene and then open the keyframes
on the cursor pre comp. Now, let's stand at the
last position keyframes and adjust the cursor position at this point in time. Bring
it up a little bit. We can place it in the
center of the button. Let's see how that
looks. Awesome. I think it looks much better now. Great. And with this, we can now go back
to the master comp and save the project before
moving on to the next step. This time, I want us
to improve the look of the popping out panels in the project. Let me
show you what I mean. First, let's start dealing with the pop up panel in Scene eight. Once we're here, let's
find the pop up panel, pre comp and add a drop
shadow effect to it. Now, set the opacity to 100,
then the distance to five. Next, let's set the softness
to a higher number. I think 80 looks good. I think we should set the
distance to zero. Great. And now, to make this shadow blend
better with the design, we can sample the purple color, and if it looks too bright, we can enter the color panel and choose a slightly darker color. This is a nice trick
I always use to make my shadows look better
in projects. All right. And now, in case you've got a lot of panels that you need to apply this shadow to, you should copy
it using the copy with relative links function. In our case, let's copy
it the regular way, since we have only one
other pop up panel in the project to
apply this effect to. Let's copy the
effect and then go to the master comp
to find that scene. Here it is since scene five. Let's ender it and then enter the UI screen pre comp and
paste the effect. Looks great. Awesome. So with that, we have finished the first round of adding final touches
to the project, and we can go further and add additional final
touches that will make the project
look even better. And we can start by making
sure we've got all the scenes visible here in the master
comp at their best quality. To do this, we need to collapse the precomps we
have in the timeline. As you may remember, we already collapsed the first
scene pre comp. So now let's move on
to the second scene. And before collapsing
the precomp, we can enter the scene
first and check that the layers in the precomps
inside are collapsed as well. In this case, we've
got everything right. So let's go back to the
master comp and collapse the scene precomp. Great. And now let's move slowly
in the timeline to see that the collapse function
didn't change something in the animation or the
look of this scene. Everything looks great. And now let's move on to scene three. Let's watch the animation carefully to see if
there are any changes. Looks great. Let's now
move on to scene four. As you may notice, after
collapsing this precomp, we do see some slight changes, especially in the camera angle. This is happening because
inside this scene, we have a camera layer
that we don't have in the master comp outside
this scene, precomp. Once we collapse this precomp, After Effects is now acting
as if all the three D layers inside this comp were in
the master comp timeline. But it ignores the camera inside because now it uses
the default camera created automatically in After Effects when a scene
has three D layers. In our case, it's
the three D layers inside the scene three precomp. And since chronologically,
the master comp is the first in line precomp, After Effects uses the camera of the first comp in the order. In our case, the master comp and not the camera inside the
scene three pre comp. That's how After Effects works. So in these types of situations, when you have three D layers and cameras involved
in the project, it's better not to collapse
this specific precomp. It's totally fine. You will still get your scene
in the best quality. So with that said, let's
move on to the next precomp. Alright, we can definitely collapse the title
animation pre comps, since there are no three
D layer animations or cameras inside. Let's now move on to
deal with scene five. We can collapse this pre comp also without worrying
because there are no three D layers or
cameras in that scene. But we should enter the scene to check that all the precomps and layers inside
are collapsed, too. I see that we missed
collapsing the cursor. So let's do that real
quick and then go back to the master comp and check how this scene looks after
collapsing it. Um, Looks okay. We can now move on and collapse this
title Animation precomp. All right. And now let's move on to collapse
the next scene. In this case, even if we
have the three D layers, animation happening
in the scene, we still got everything right
without camera distortions. And that's because the
three D scene animation is not happening directly
inside this scene precomp. It's happening inside
the UI screen precomp. So if we collapse this precomp, we do see the camera distortion. And that's exactly for the same reasons I explained earlier. Now, scene five sees the three D layers inside
the UI screen precomp, but uses the default camera
of this scene timeline. It ignores the camera we have inside the UI screen precomp. Therefore, let's not
collapse this precomp here. Why if we collapse the scene five pre comp in the timeline,
nothing will happen. The Master comp
timeline doesn't see the camera that is inside
the UI screen timeline. I'll continue without
collapsing it. Let's move on. We can collapse this
title animation scene. All right? Let's move on to
deal with scene seven now. Let's stand at the
point in time where we can see the dissolve animation and then collapse this
pre comp to see if it makes any changes.
Everything looks fine. But before moving on, let's
enter the scene and make sure all the precomps and the
layers here are collapsed. Okay, let's now go back to the Master comp and
check the rest of the animation
carefully. Looks nice. Let's now deal with scene eight. Let's collapse it and watch the rest of the animation here carefully to see if any unnecessary changes
appear after collapsing it. Everything looks totally fine. We can now move on to
collapse the next scene. Let's collapse scene nine
and see how that looks. Looks okay, and we can now move on to collapse the final scene and
see how that looks. Awesome. Everything
looks totally fine. Now, once we're done, collapsing all the
relevant scenes, let's do some small changes and add some final details to
make the project look better. And we can begin with scaling the background inside
the final scene. I don't like the bright
color in the bottom part. So let's enter the scene and scale up the
background layer here. Let's try 120. I think it looks better now. Let's go to the master
comp and see how that looks. Looks very good. Let's save the project
before moving on. Okay, so now at this
point in the project, what I usually love to do is go over all the
scenes again one by one and think of things
I can add or improve. For example, here
in scene three, I think the background
doesn't look good. Let's enter this pre
comp and first try to rotate the
background 180 degrees, so the bright area
will be at the top. This way, we will get a more continuous look
from the previous scene. That was an example of a small adjustment we can do to make the animation
look a bit better. But there are also other things that are a bit more serious that we can do to make the
animation look better. For example, here in
the second scene, this entire sequence feels
very static, in my opinion. We can easily improve
this scene by adding a Zoom in or Zoom out animation. Let me show you what I mean. Let's stand at the beginning of this scene and open
the scale property. Now, create a keyframe here. Let's now open the
position and do the same. Now let's press you to see all the keyframes and move
to the point in time where the cursor touches the task box and then scale this
precomp and position it. So it looks like a
Zoom in animation. Great. Once that's done,
let's now create a Zoom out animation at the moment where the cursor
is hovering in the air. To know exactly
when that happens, we can enter the scene and
open the cursor keyframes. Now we can find the
hovering moment and while standing here, go back to the master comp
and adjust the scale and the position keyframes to get the Zoom out camera
movement illusion. Or maybe instead of zooming out, we can create another
Zoom in animation. Let's try that. We can
set the scale to 260. And now let's
position the pre comp so the cursor will be
centered horizontally. We can use the safe action grid for Okay, that
looks good enough. After that, let's enter
the scene again and stand at the next cursor keyframes where it touches
the message bubble. Now, let's go back to the master comp and create
a Zoom out animation. Awesome. Once done,
let's now go back to the scene to see the
next stop of the cursor. Let's stand at this
point in time, and then in the master comp, create another
Zoom in animation. Let's also bring the pre comp to the center
somewhere around here. Great. And now, at the last
position of the cursor, that is the outtro animation, we can bring back
the pre comp in the master comp to the
original position. Let's stand at the end of
the scene and then copy the first two keyframes
and paste them here. This way, we won't ruin the match cut transition
we have here. Great. So once we're done with the initial animation,
let's improve the motion. Let's select the
position keyframes and set the velocity to 85%. Let's do the same for the scale. Okay, now let's stand here and press B to
start the work area from this point in time and
then go to the end of the scene and press N to end
the work area at this point. This way, After Effects will
render the scene quicker. Let's also use this opportunity
to purge the project. The purge function clears cached memory and disk space to free up resources and
improve performance. Alright, now let's
see what we've got. I hope that you learn
from this process that you don't always need to use cameras in the scene to
create camera movements. You can do it by animating the pre comp in your master
comp, as we did here. Okay, I think it looks great. And now we can save
the project and bring everything back to
normal before moving on. Alright, now let's add some
gentle Zoom and animation to the next scene to make
it look less static. For this, all we need to do
is create a scale keyframes at the beginning of the
scene and then go to the end of this precomp
and set the scale, let's say, to 120. Let's now see how that looks. Looks great. And
now I want to add an additional small final touch to the scene to make it look
a bit more interesting. This time, I want to add
a nice motion blur to the layer that flies toward the camera at
the end of the scene. So let's enter the
scene and start activating the motion blur
on the layers we want. In case you don't see the motion blur function,
click here. All right. And now let's
start by activating the motion blur for
the text layer. Don't forget to check
the motion blur icon here as well to make it work. Then let's also activate it for the magnifying glass icon layer. Awesome. So now, when the
layers start gaining speed, we'll get that nice
motion blur effect. And now to activate this function on the
collapse button precomp, we need to make sure
all the layers inside this precomp have the motion
blur function activated. Only this way, After Effects, we'll present the motion blur
in the main scene precomp. As you can see, we now see the motion blur on
the button precomp. In case you want to adjust
your motion blur effect, you need to enter the composition
settings and then go to Advanced and then change the values under the
motion blur section. You can set the values as I did. Alright. So now when we go
back to the master comp, we won't see the motion blur we add it inside this precomp, and it's not because we
collapse this precomp. The collapse function
makes this timeline. Treat the layers inside
the precomp as if they are placed here in
the scene three timeline. So that's not why we
don't see the effect. We don't see it just because the motion blur function is not activated
for this timeline. So all we need to do is check
the motion blur icon here. With that done, we can now see the motion blur effect perfectly in this
timeline as well. An important thing to remember when activating motion blur in your scenes is that
it will significantly slow down your rendering times. So don't overuse
it. As you can see, even if I speed the video up, it takes a lot of time to
preview the animation. Okay, everything
looks pretty good. But I noticed that
the outtro animation of scene three happens too fast. To fix that, all we need to do is enter the
scene and first thing, open the keyframes of the
last three layers here. Now, let's stand at second
three and ten frames, select the last keyframes
of the three layers, and then move them to the
time indicators position. All right. And now let's go back to the master comp and
check how that looks. That was not a
critical issue to fix, but that's what feels
right for me to do. In my opinion, the animation
was too fast at that point, and now the tra will
last a few frames more. Alright. So now with that done, let's move on to the
project and this time, see what we can do for scene four to make it look a
bit more interesting. This time, I want us to create a cool depth of field
effect in this scene, since we have the animation
happening in three D space, and we have a camera insi
26. Final Touches, Music, and Text Animations: Back. So after we dealt
with the majority of the adjustments in the animation and the design of the scenes, it's time to make
the final push and add the remaining final
touches for this project, like animating the text
layers and the scenes, adding music, and
improving the look of some scenes using
additional design assets. In my opinion, it is
the most fun point in time where the
project is 95% done, and now we're having fun
making final touches. With that said, let's first start dealing with
all the text layers we have in the demo
flow animation scenes, starting with scene four. So let's enter the scene. And first thing first, find the text layer we
need to animate. Once we find it, let's
now save some time by copying the text animation we did for the text layer
in the first scene. As you can see, we have here a nice reveal text
animation we created, and we did that
using an animator, so let's open the layer and select this
animator to copy it. Great. Once that's done, let's now go back to scene four and paste it to the
text layer we have here. First, stand at the
beginning of this layer, and then paste the animator. This way, the animation
of this animator will start from the
beginning of the text layer. Alright. And now let's
open the animator and adjust the position
property value we have in the range selector. Let's set it to 80. Awesome.
And now let's stand somewhere after the animation and create a new mask
for this text layer. Nice. So now we have created the reveal text animation
for this text layer. Let's now open the
keyframes and make sure the animation
ends at second ten. And now we need to create an Outro animation for this text. To make it simple, let's
stand at second 11 and use the position property to get this layer out of the
frame from the top. Let's now ease the
keyframes and make the animation start moving slow and gain speed
toward the end. Awesome. And now we can deal with the second text
layer we have in the scene. For this, we can now
copy the animator we have on the first text layer and paste it on the second one. Next, let's stand here
and create a new mask. Once done, let's now find a
good point in time where we can create the outtro
animation for this text layer. I think we can start
it from second 16, and it's because the
camera outtro animation starts from here. We can match the outtro
animation of the text with it. So let's create the first position keyframes for the
second text layer here, and then go to second 17 and get it out of the
frame from the top. Finally, let's
adjust the motion. And now before moving on, let's see the animation we created. To make our life easier, let's isolate only the two text layers and
check the animation. Awesome. I think
that looks great, and now we can save the project and move on to deal
with the next scene, which is scene five. Let's bring scene five
here before scene six, and now stand at
the beginning of the text layer and
paste the animator. Next, let's stand after the animation is complete
and create a new mask. And now we need to
create an Outro. So if the text layer ends at
second four and ten frames, then I'll stand at second
three and ten frames and create the first
position keyframe here. Now, let's go to the end
of the layer and get this text layer out of the scene from the
bottom this time. Let's now adjust the motion
and see how that looks. I think this time the
motion should start fast. So let's adjust the
keyframes velocity. Awesome. That's better. And now let's deal with the second text
layer we have here. This time, since the
outtro animation of the scene happens
from second eight, let's start the
outtro animation of the second text layer from here as well to
match it together. Okay, that looks nice, and we are ready to
move on to scene six. Let's first past the animator. Now, let's stand here and use the shortcut control shift
in for creating the mask. I think the UI screen
is too close to the text. Let's try to fix that. For this, we need to enter
the contacts precomp, and now we can either adjust the null animation or we can
adjust the camera animation. Let's start with the camera. First, we need to stand at the key frame of the problematic
moment which is here. Now let's move the camera
backward a little bit. I think we can
move it even more. Let's also move it
down a little bit. Okay, so now, while
standing here, let's go back to
the main scene and start creating the
outtro animation for the text from
this point in time to match it with the outtro
animation of the camera. Finally, let's adjust the
motion and see how that looks. Great. So now let's save the project and
move on to scene seven. Here we can do something interesting for the
first text layer. Since the UI screen is
covering the entire frame, we can bring the
text layer below it in the layer
panel and that way, create a revealing animation for this text in the
beginning of the scene. As you can see, that looks
very nice. All right. And now let's create an outtro
animation for this text. We can create the first
position keyframe here, then go 1 second backward and create the same
keyframe here as well. Now we can go back to
the second keyframe and move the text out of
the frame from the top. Now, let's adjust the
motion and then move on to the next text layer. For this one, we do need to
create the intro animation we created for the rest of the text layers in the project. So let's do that real quick. All right. And now for the Otro, we don't need to
do anything since the UI screen is covering
this text layer. So all we need to do now is to deal with the last text layer. So first, let's create the reveal animation for the intro. Once done, let's now
create the Outro. That should start
from second nine. Let's extend the text layer before animating the
position for the Outro. Okay. And now let's create
the Otro animation for. Awesome. So now let's
move on to scene eight and see if there is any text layer we
need to animate here. As you can see, we don't
have any text layers here. So let's go to scene nine
to check if there are any there. Nothing here. Let's go to the
final scene to make sure there is no text
layer in there as well. Alright. So with that done, we finished creating the text
animation for the scenes, and we can save the project now to secure the
progress we made. And now, at this
point of the process, I usually love to
recheck my scenes and see if there are any additional
adjustments I can do, whether in the animation or
in the design of the scenes, for example, in scene five. I noticed the popping
out animation can last a bit longer. I want it to end right before the outtro of the text
layer is starting. It's because I'm
trying to make my scenes always look in motion. Try to create as few
static moments as you can. This is the secret for a good
motion design animation. With that said, let's
enter the tasks pre comp and now open all the
keyframes of the task boxes. Now, let's stand at second five. Then select all the keyframes. Next, hold down Alt or option and move the
last keyframes. Great. And now let's go back to the main scene and
see how that looks. Oops, that's the wrong scene. We need scene five. Okay, let's see how the animation looks now. In my opinion, after
this small change, the motion feels much better. With that being done,
let's now go to scene four and recheck what we
can improve or add here. In this scene, I would love to increase the depth of field
effect we created here. Let's stand at this keyframes
and scale the blur level to a higher number.
That's too much. To be honest, I don't
love how that looks. Let's bring it back to 300. Maybe let's try to increase
the blur level for the final animation part of this scene where
we see the tasks. Let's try 300 here as well. 300 looks better, but I
still think it's too much. Let's try 200. Yes,
200 looks perfect. I'm showing you
this process so you can also get used to making some final adjustments in your projects before
rendering the animation. I love to do that because there is always something we can do that can improve the
animation a little bit more. That's why the
final touches phase is my favorite one. All right. With that said, let's now
move on and this time, try to improve scene three. Let's see what we've got here. Alright. I think the first
thing I would love to do here is to make the typing
animation last a bit longer. Let's stand at second two and bring the
last keyframe here. Let's now use this opportunity
and go to scene seven, where we have another typing
text animation and make this animation last
longer here as well. Let's first open the
keyframes on this layer. And now let's stand
at second seven and ten frames and move the
last keyframe here. Awesome. And now,
once that's done, let's now go to scene two
and see what we can do there in order to improve the motion or the
design of that scene. Alright, so now, since the
main goal in this scene is to show the chaos of having a lot of messages and
tasks to deal with, it can be a good idea to add
additional task boxes and message bubbles to match the concept of this scene.
And we will do that soon. Before that, I
would love to make the background color of
this scene not dark. I want the dark one to
be for scene three, so it will look like
a kind of deep ocean. Since at that moment,
the voice over says, You're drowning in chaos. Okay, so with that said, let's first delete the curves in the toner effects from
the background layer. Great. And now let's add additional task boxes and
message bubbles to the scene. But instead of
duplicating them here, I want to show you
another method that might be a bit more useful
for us in this project. This way, you can
learn a new trick and apply it to your
projects if you want. All right. So
first, press Catrol or Command end to
create a new comp. Let's name it two BG. Because it's scene two and
then add BG at the end, since it will be a part of
the background of this scene. Now, make sure the
dimensions are okay and then set the
duration to 2 minutes. Alright. And now let's
go back to scene two and select the tasks and the messages pre
comps we have here. Now copy them and paste
them into our new comp. Next, press and delete all
the keyframes we have here, and now we will start
duplicating them to create that chaos feeling. But before that, we need
to make sure we will not place the new
duplicates in these areas. Where in the main scene, we have these four precomps positioned. For this, let's make sure
no layer is selected and create a rectangle to
mark the messages area. Then let's mark the
tasks area as well. Once done, we can now lower the opacity of the shape layer and lock it so it won't
interfere with us. By doing that, we now
know that these areas are where we should not
place the new duplicates we will create in a second. So first, we can
move the current precomps out of these areas, and then let's start duplicating them to create a chaotic scene. I'll speed this process
up a little bit. All right. So once we
are done with that, we can actually cancel the collapse function
for all the pre comps, since we are planning to use this comp as a part of
the background layer. We don't need to have them
all in super high quality. I'm doing this to make my
render time a bit faster. Okay. And now let's turn off the
guide layer we created here and then extend the layers to last to the end
of the timeline. Great. And now let's add
a new adjustment layer in the scene and add the fast box blur to it to
make this composition blurry. It will look better in
the main scene this way. Soon, you will get
what I mean by that. For now, let's go back to
the main scene comp and then bring the new
background precomp we just created
to this timeline. Place it above the
gradient background layer. I think we should
adjust the blur. For this, let's enter
the precomp and cut the fast box blur effect
from the adjustment layer. We can delete the
adjustment layer here. Now, let's go back
to the main scene and paste the effect
on the precomp. This way, it will be easier
for us to control the effect. I wanted to show you this so you know that sometimes
it's better to use an effect on the pre comp instead of using
adjustment layers. And that was a great
example for this situation. And now to make it blend
with the scene even more, we can choose a different
blending mode for this precomp. Instead of choosing the right
blending mode, manually, we can use the shortcut to toggle between the
different blending modes. Hold down shift and press
the plus or the minus key. All right. So after checking
all the blending modes, I think overlay looks
best in our case. And now, if we go back
to the master comp to see how that looks with the camera motion
we created here, for this scene, we will
get a super cool look. We got the chaos, but still the scene looks
very balanced and clean. Great. So now, once we've
done adjusting the visuals in the project and we have all the animation perfectly
synced with the voiceover, we can now move on
to the next step, which is adding music
to the project. For this, go to the assets
folder you downloaded for me. And here you can find the music
I found for this project. I found this track in the
YouTube audio library, which is open source. That means that 99% of
the tracks you will find there are free to use without copyright
and royalty issues. You can use them for
commercial purposes. When I search for
a track, I usually first filter the list
by the right mood. In this case, I think funky will fit the tempo
of my animation. Of course, it's a
good idea to pick three songs and give the
client the option to choose. When I search for
the right music, I'm trying to find a
track that has a kind of build up section
in the beginning. The music should start
with some kind of intro that will add more
interest to the animation. So at this point,
I'm just listening to all the tracks I
see on the first page, and after finding the right one, it's super important to check that it has
the YouTube icon. It means that it's free
to use for any purpose without us needing to add credits for the
creator of the song. Only then can you download it without worrying
about copyright claims? All right, back to the project. Let's now drag the track to our timeline and see
if it fits the vibes. But before that, let's go to the project panel and
organize it a little bit. We can place the track
in the Assets folder, and we can also
place this precomp into the preComs folder. Great. And now let's hear it. Managing a large team across multiple projects isn't easy. Too many tasks,
too many messages. And before you know it,
you're drowning in chaos. As you may have noticed, the
track volume is too high. Therefore, we need to adjust
it to fit the voice over. For this, press the key. Now we can see the audio levels. Let's set it to -25 and
hear it once again. Managing a large team across multiple projects isn't easy. Too many tasks,
too many messages, and before you know it, you're drowning in chaos
looking for help. Met one point. The platform that makes project
management so simple, even your cat could do it. With one point, you
get a crystal clap. Dash. Okay, that's better. But I think we can
set it to -20, so the track will be a
little bit higher in volume. Managing a large team across multiple projects isn't easy. Too many tasks,
too many messages, and before you know
it, you're drowning in chaos looking for
help. Met one point. The platform that makes
project management so simple, even your cat could do it. With one point, you get a
crystal clear overview of everything your team is
working on all your projects. G. Great. That's perfect. With that done, let's now close all the pre comps we have
here and right after that, go to the Project panel to
organize it before rendering. Organizing is super
important, not just for you, but also for a person that might work with you
on this project. Maybe you will work
with another freelancer or maybe you will work in a company with
another colleague. Either way, having a
well organized project will position you in a very
good professional light. With that said, let's open the precomp folder and
start organizing it first. Let's see what we have
in the screen folder. Everything looks good here. Let's see what we have
in the panels folder. Here, I would love to adjust
the names of the precoms. Instead of S one, let's
change it to screen one. And it's because I noticed that all the other panels
precomps start with the full name
of the screen. Great. And now let's do the same for the rest of
the precomps here. Once done, let's now go to the
precomps folder and select all the screen panels
and asset precomps we created to put into
the panels folder. This way, in the precoms folder, we have only the general
precomps we used in the project. You can go further and
create a new folder inside the pre cooms folder
for the main titles, but we don't have many of them, so I'll keep it as it is. Awesome. And now
let's open the assets folder and see if there is
anything we can organize here. Alright. I think everything
looks good here, and now we are ready
to render the project. And to get the best
quality in terms of colors for our
final render file, we can enter the project
settings from here and change the bit
depth to 16 or 32 bits. If you use glow effects
in the project, going with 32 bits can affect the look of these scenes,
so pay attention to it. Note that the more bits
per channel you choose, the slower your
render times will be, because After Effects
will now need to render a larger range of colors. Okay. Now let's activate the motion blur function
here in the main timeline. So we can get the motion blur, we activate it
inside the precom. And now let's do one last thing before rendering the project,
and it's purging it. This way, we will
lower the risk of unexpected software
errors during rendering. Great. With all that done, let's now make sure we are
selecting the master comp in the project panel and then go to composition and add this
timeline to the Render Queue. Here, let's choose to render it in 40 megabits per second, because it will give us a bit higher quality for
the final file. If you don't see it
here, just click on Output Module and then in
format, choose Ht 264. Next, go to Format Options and set the bitrate
settings as presented here. All right. And now let's choose
where to render the file. I will render it in
the finals folder. Don't forget to adjust
the name of the file. Let's call it SAS
Project Version 01. Awesome. And now
let's hit that render button and wait for
a couple of minutes. I'll speed this process up. And now let's watch the
animation a few times to get a clear vision if we need to adjust
or fix something. Managing a large team across multiple projects isn't easy. Managing a large team across multiple projects isn't easy. Too many tasks,
too many messages, and before you know
it, you're drowning in chaos looking for
help. Meet One Point. The platform that makes
project management so simple, even your cat could do it. With One Point, you get a crystal clear overview of everything your
team is working on, all your projects,
all your tasks, all in one place. Need the full picture. Every project includes
detailed tasks, sub tasks, and real
time progress tracking, so nothing slips
through the cracks. Want to see who's
falling behind, head to your team tab to view everyone's
activity at a glance. Need to follow up with someone. Jump into the built in
messaging system where all your conversations
are organized by contact. Send a quick reminder or
share an update instantly. And yes, sharing
files is effortless. Upload any document, and your entire team will have
access to it right away. So why keep struggling? Go to onepoint.com and make your workday easier,
starting today. Managing a large team across multiple projects isn't easy. Too many tasks,
too many messages, and before you know it, you're drowning in chaos
looking for help. Met One Point. The platform that makes project
management so simple, even your cat could do it. With One Point, you get a crystal clear overview of everything your
team is working on, all your projects,
all your tasks, all in one place. Need the full picture. Every project includes
detailed tasks, sub tasks, and real
time progress tracking, so nothing slips
through the cracks. Want to see who's
falling behind, head to your team tab to view everyone's
activity at a glance. Need to follow up with someone. Jump into the built
in messaging system where all your conversations
are organized by contact. Send a quick reminder or
share an update instantly. And yes, sharing
files is effortless. Upload any document, and your entire team will have
access to it right away. So WAS multiple
projects is All right. So after watching the
animation a few times, I do have one small
adjustment I want to do. In the final scene, the
cursor object intro animation is entering the scene
from the center, and I think it
doesn't look good. So let's enter the
scene and then adjust the position of the cursor at
the beginning of the scene. Make sure you are standing at the first position keyframes
and only then move it. Let's move it to
the right. In case you're not standing
exactly on the keyframes, you might create an additional keyframes like I did in my case. So now I'll delete
the first keyframe and place the new
one there instead. Let's see how that looks. Okay, I think it looks
a bit better now. Let's now go back
to the master comp and enter the third scene
because I also noticed that there is a moment when the cursor completely
stops that I didn't like. It happens here after
the intro animation. If we enter the graph editor, we will see that the speed at
this point in time is zero. So let's fix that real quick by converting this keyframe into a continuous keyframe
and then speeding up this moment. I think
it's better now. Let's see it with the
rest of the scene. Great. I think it
looks awesome now. Alright. So now, once we're
satisfied with motion, we can go and render the
master comp once again. But before doing
that, I want to use this opportunity
and show you how to add realistic Avatar profile
pictures in the project, since I didn't want
to waste time on this for all the scenes that need
an avatar profile picture, I made sure to have
at least one scene just to show you the
process behind it. You might remember that during the preparation process
in Illustrator, when we prepared scene six, I noted that in this
specific scene, I'll leave the Avatar
profile icons as separate layers because we will use them later in the project. So now that's exactly
what I want us to do. Now we will learn how to add real Avatar profile pictures
in the UI panel design. Let's open the assets
folder you downloaded for me and find the PSD
file name portraits. Now, I want to show
you how I love to prepare my avatars
for animation. First things first,
I head over to the freepick website because you can find a lot of useful
stuff here for free. Now in the search bar, I'll search for portraits. Then I'll make sure I see
only the free options. And now I'm checking
what options I see here. I will then choose
something that I like while making sure there are a lot of other options
similar to this one. It's important
because we want to have a consistent design,
look in our project. Alright? So, in this case, I love this picture.
So I'll click it. And then if you want, you can already prepare it for animation right
inside free pick. You can get rid
of the background or choose any other format. In my case, since I know that I will need
to have a lot of these I prefer to have them ready for
animation in one file. We can use Photoshop for
this, but more on that later. For now, I'm just continuing to download the rest
of the avatars. In this case, I need to have
seven of them in total. So now I will first create a
new folder in which I will save all of the avatars
I downloaded from here. I will speed this
process up for now. All right. So once I finish
downloading all the images, I'll now open Photoshop
and create a new document. We can use the art and
Illustration presets for this since there is a square format already
prepared for us. The advantage of having all the images in one file is that they will
all be the same size. That will make our life easier in After Effects when
we need to use them. Soon, you will see what I mean. Okay, so now I will bring
all the images inside. And then while all of
them are selected, I'll press Control or
Command T to scale them up. Once that's done, I will now check that they are all
positioned in the center. That's also one of the advantages of
bringing them all into one Photoshop file because if you have images with
different dimensions, you can adjust them all to have the same dimensions here in this file by scaling some of them or moving them from
left to right if needed. All right. So now, once I made sure that I have
all the images aligned, I can now delete the background layer and save this file in
my assets folder. I'll make sure I'm saving it as a PSD file and then hit Save. Great. So now let's go
back to our project. First, let's drag the PSD
file into the project panel. Now in Import kind, we will choose composition
retain layer sizes, since we need all the layers separated as in the original
Photoshop document. Here, it doesn't matter what
to choose since we didn't use any effects or layer styles in the original
Photoshop document. Okay, so now before
we start working, let's bring the new
folder that consists of all the images into
the assets folder. Now let's select the portraits pre comp that was automatically created once we inserted the PSD file and stop
working for a second, because I want to mention
something important. As you may have
noticed, when we import a PSD file to After Effects, we get a precomp
containing the images. And also a folder
containing the images. Now, I want to
explain what exactly happened when we chose to import the PSD file as a composition
with retain layer size. After Effects created
a precomp with the dimensions of
the square document we created in Photoshop. But the images
inside this precomp will be the size of their
original dimensions. That's what retain
layer size means. After Effects doesn't crop the images to the square format. Therefore, if you go
inside the precomp, you will notice
that all the images are not in a square format. They also appear that way in
the folder of the images. I wanted to show you this
so you can understand the real meaning behind
retain layer size. In our case, that doesn't
really matter because even if we get all the images not
cropped to a square format, we can still work
with them since they are all more or
less the same size. But in projects where you need them to be all the same size, you should import them
as just composition. Alright. With that
being learned, let's drag this pre comp to the precomps folder to
maintain a clean project, and then let's open
the portraits folder we just dragged to the Assets folder and start adding the images into
the UI panel design. As you can see,
it will be easier that way to pick
the avatar images. Okay. So now let's select all the contact precomps
in the timeline and double click on them
to open them all at once. Great. And now let's
start with contact one. First things first, we need
to find an image of a man, since the name we have
here is a man's name. Let's use this one. Drag
it to the timeline, and then scale it down
to fit the design. Now let's drag it to
the Avatar icon area. We can scale it down a bit more. Great. And now we
will use the shape of the Avatar icon layer as
a mask for the image, and we will do that using
the track Matt function. All we need to do is
make the image use the Alpha of the
Avatar icon layer. And now, since we know that this precomp is animated
in three D space, we also need to convert the image to a three
D layer as well. Awesome. So now we can
zoom in and further adjust the position and the
scale if needed. All right. And now to repeat
this process faster, let's copy the image
layer we have here, then go to the next contact
precomp and paste it here. Now, let's adjust the
position and then let's make this layer use the Avatar
icon layer as a mask. Then let's find another man image and switch between them. So while the image layer is
selected in the timeline, let's drag this image on top of it while holding Alt or option. Finally, let's
adjust the position and the scale if needed. Awesome. And now let's repeat this process for the
next contact pre comp. First, we need to paste the first copied image and then replace it
with the new one, as we did a few seconds ago. Okay, so let's repeat this process for the rest
of the contact precomps. I'll speed this
process up for now. Just make sure the image fits the Alright, so once we're done
that we can hold Controller Command W to
close the contact precomps. As you can see, we now have a cool scene with the real
Avatar profile pictures. And now you know how to do
that in your future projects. Let's now save the project to secure the progress
we've made so far. And with that done, we
have finished creating the entire SAS explainer video. We are now ready to
render the final version. So let's select the master comp and then send it to
the render queue. Let's keep the same
render settings and replace the old
file with the new one. Now, let's wait till
the render is finished. Once done, you will have a
very impressive project to showcase in your portfolio and share with your
future clients. With that said, you can now close Illustrator if it's open. We can also close the Figma file and the PDF files we
used for the project. I hope you enjoyed this one and learned a lot of
new interesting stuff. The main thing that
I would love you to remember from this course is that creating a
motion design piece is a step by step
creation process. Try to always move one step at a time and trust the process. Thanks a lot for watching.
I'll see you in the next one.
 Valeri Visuals, Adobe After Effects Instructor